-
Fallout 3 / NV / SFW
-
-
Уже зарегистрированы? Войти
-
Регистрация
- VK
- Youtube
- Discord
- Patreon
- Boosty
Новые статьи в базе знаний
Последние обновления файлов
Новое из галереи

Возможно, для многих это боян, но я узнал лишь недавно и смог существенно повысить производительность, играть стало в несколько раз приятнее — и хорошие настройки графики, и без подтормаживаний.
Подробную инструкцию на английском можно найти здесь — эта и последующие две страницы. Для тех, кому лень читать много текста, изложу самые существенные детали, которые реально помогли мне.
Во-первых, огромное количество FPS жрет вертикальная синхронизация, поэтому ее надо убить. Простым убиранием галочки в лаунчере она не убивается. Надежнее всего убить ее в настройках драйвера видеокарты, а также открыть Fallout.ini для F3 и Fallout_default.ini для FNV и убедиться в том, что в строке
iPresentInterval=0
справа действительно ноль.
Во-вторых, если в Нью-Вегасе уже в лаунчере выставлены все возможные разрешения, в том числе много вариантов widescreen, то для Fallout 3 обладателям широких мониторов (например, как у меня, с разрешением 1920х1080) нужно найти в Fallout.ini строки
iSize W=1280 iSize H=1024
и установить в них требуемое разрешение по ширине и высоте.
В-третьих, обладатели видеокарт с поддержкой шейдеров 3.0 (если у вас видяха новее, чем Nvidia GeForce 6600 или ATI X1000, то у нее должна быть такая поддержка) могут включить поддержку этих шейдеров игрой, установить единицу в строке
bAllow30Shaders=1
Однако это еще не все, для полной убежденности в том, что вы включили шейдеры 3.0, нужно проделать следующие дополнительные танцы с бубном: открываем файл RenderedInfo.txt, который находится в той же папке, что и Fallout.ini. Ищем у него в конце строку Shader Package, смотрим номер. Например, это 13. Идем в директорию с игрой, в папку data/Shaders, ищем шейдерный пакет номер 13. Находим — shaderpackage013.sdp. Переименовываем или архивируем его (или удаляем, но я бы не стал, мало ли что), например, меняем расширение на bak. После этого делаем копию пакета номер 19 — shaderpackage019.sdp — и переименовываем эту копию в «shaderpackage013.sdp». Все, танцы с бубном с шейдерами 3.0 закончены
![]()

В мануале по ссылке пишут, что это может повысить FPS особенно при включенном эффекте HDR.
В-четвертых, огромный простор для оптимизации заключен в параметрах многопотоковости. Это актуально особенно для владельцев многоядерных компьютеров.
Ищем в Fallout.ini (Fallout_default.ini для Нью-Вегаса) строки:
uInterior CellBuffer=3 uExterior CellBuffer=36
Данные дефолтные значения установлены в расчете на 1 Гб оперативки. Если у вас больше, эти параметры смело можно повышать. В мануале рекомендуется 16 и 102 соответственно. Если хотите больше, ставьте больше, но тогда учтите, что еще надо увеличить значение расположенной ниже переменной
iPreloadSizeLimit =262144000
262144000 — рекомендованное максимальное значение даже для компов, на которых больше 4 Гб оперативки.
Далее ищем и устанавливаем представленные ниже значения для следующих переменных:
bBackgroundLoadLipFiles=1 bLoadBackgroundFaceGen=1 bBackgroundCellLoads=1 bLoadHelmetsInBackground=1 iBackgroundLoadLoading=1 bBackgroundPathing=1 bBackgroundNavmeshUpdate=1 bCloneModelsInBackground=1 bUseThreadedBlood=1 bUseThreadedMorpher=1 bUseThreadedTempEffects=1 bUseThreadedParticleSystem=1 bUseThreadedAI=1 bUseMultiThreadedFaceGen=1 bUseMultiThreadedTrees=1 bMultiThreadAudio=0 iNumHavokThreads=5
Кроме того, владельцы многоядерных ПК могут добавить в секцию General файла Fallout.ini (Fallout_default.ini для Нью-Вегаса) следующую строку:
iNumHWThreads=2
Здесь значение справа — количество ядер вашего компьютера.
Спасибо за внимание.
Description
This guide will help you squeeze out more performance for FNV so you can enjoy a more stable, crash-free game.
A .7z file is included in the downloads. It includes performances files and INIs that are tweaked to MY LIKING (this means you have to adjust it)
My (old) PC Specs:
CPU — AMD-A4 APU (2.7GHz) [I don’t even have a dedicated CPU and GPU]
RAM — 4GB DDR3
GPU — Radeon HD 6450 (1GB Vram)
MONITOR — Samsung SyncMaster 2233 60hz (Increased refresh rate to 77) (1680×1050)
STORAGE — 1TB, HDD — 7200RPM
OS — Windows 10 Home 64-bit
Computer Optimization (works for other games)
I have developed software for computer optimization and I will make a video on it at some point.
WARNING! Use at your own risk. These tweaks can have some bad side effects so make sure to back up your PC! I have included the entire code of the program so you know it will not do anything malicious.
Download
I coded this tool for my personal use since I like to wipe my PC a lot and I do not want to go through the entire process of these tweaks every time.
Essentials
There are a few essential mods that you need. These mods increase performance and help fix problems that would otherwise cause an explosion.
lStewieAl’s Tweaks and Engine Fixes — Engine bugfixes, optional tweaks and new features
New Vegas Tick Fix — Same concept as NVSR, except Windows 10 friendly
Yukichigai Unofficial Patch (YUP) — Fixes a lot of bugs that could break quests or save files
Unofficial Patch NVSE Plus — Fixes bugs that were not fixed in YUP
JIP LN NVSE Plugin — Fixes bugs
4GB Patch — Makes the game allocate more RAM. Increases stability and prevents crashes
Combat Lag Fix (NVSE) — Improves FPS in combat
Aqua Performa Strip Performance — Removes water LOD in the strip for more performance
OneTweak but Really Updated — Updated version of OneTweak
Simple Total Fog Remover — Removes fog
Fog Based Object Culling — Dynamically adjusts draw distance in accordance with the fog to improve performance
Ultimate Edition ESM Fixes — Optimizes and cleans the ESMs
New Vegas Heap Replacer — Better heap for NV than the one in-game
FNV Mod Limit Fix — Removes the mod limit but can also increase performance when you have a lot of mods installed
FNV BSA Decompressor — Tweaks for official BSA files to help get rid of stutter
Mods
Here are some mods that COULD increase performance and or fix some issues.
Better Combat Performance
Motion Sickness Destroyer
Clean-Deluxe — Mark the records as Deleted rather than Initially Disabled. If a mod references an object that this mod deleted, your game will crash so careful using this
Better Casing Performance
Interior Fog Remover
No Blur Menus and UI
No More Ravens
No More Scan Lines on Pipboy
Lil Fixes
Littlepips Fixes and Rebalances — Adds some minor tweaks as well as improve performance
New Vegas Anti Lag — Removes bushes, dust, grass and shrubs (keeps tumbleweeds)
LightsOut — Removes lighting effects from the game resulting in a massive FPS boost but a flat looking game
FNV Texture Optimization Overhaul Reloaded — Optimizes FNV textures, I like to use this is a baseline. I get graphical glitches using this mod, might differ for you.
Fallout.ini
This will…
- Disable Grass
- Remove fog.
- Remove the Blur on-hit effect.
- Make water will look less detailed (hardly noticeable).
- Disable VSync.
- Changes your game language to ENGLISH.
…and more.
*Download link available in the FILES section
FalloutPrefs.ini
This will…
- Disable Depth-Of-Field
- Remove grass shaders
- Disable gamepad
- Disable mouse acceleration
- Reduce particles
- Remove some decals
- Disable HDR
- Make water look a bit worse for extra performance (not noticeable)
…and more
*Download link available in the FILES section
NVSE_config.ini
Prevents crashing due to not enough memory (optimizes allocation)
*Download link available in the FILES section
Suggestions
You made it at the end of the guide, you can find a CHANGELOG under each file in the «Files» section or you can see a more detailed one included with each file. After reading this guide is there anything I should add on to it? Just leave it in the comments and I will consider it. If you have any questions, be sure to ask. Finally, don’t forget to endorse if this mod helped you. THANK YOU
~123keelos
Introduction
Welcome!
Goal of this guide is to fix the abysmal performance in Fallout New Vegas by using more modern technologies and tweaks, and make you generally aware of its quirks and other potential issues.
The guide is mostly written with an assumption that you’ve completed Utilities sections from
Viva New Vegas
or Essentials from
The Best of Times,
but it’ll still cover mods contained within those guides.
While the guide is focused on this particular game, most stuff shown here is applicable to other games.
![]()
Why?
Let’s be honest here, the engine did not age well. The renderer is based on now 20 year old DirectX 9, which fails to fit-in with modern GPUs and Windows.
It’s extremely inefficient and CPU bound, has glaring issues with display modes, memory handling and overall stability.
As for Bethesda’s code — it also fails (horribly) to scale well with modern CPUs, something that you can see even in their latest titles.
To make things worse, Fallout New Vegas was compiled without compiler optimizations.
In short most performance issues can be summed with two words: CPU bottleneck.
Even with that fact in mind, there are some tweaks to be done on the GPU and presentation side of things that can help with the overall responsiveness of the game, despite not fixing the performance on its own.
Terminology
Things You Should Know
-
Vertical Synchronization (V-Sync) — technology allowing to keep display’s scanout and refresh in phase to eliminate screen tearing,
at the cost of higher latency.
(Latency lowers along with refresh rate) -
G-Sync | Freesync — Variable Refresh Rate (VRR) technologies developed by NVIDIA and AMD respectively.
They allow the display to adapt its refresh rate to the framerate, allowing to use V-Sync at arbitrary framerates and reduce its latency[1] . -
Multiplane Overlays (MPOs) — hardware scanout planes for the GPU. They allow for hardware image composition without any latency or performance penalty (for example displaying windows on top of each other), as well as
their hardware scaling and stretching.
MPOs are supported since Windows 8.1. Hardware capabilities vary between GPU manufacturers. -
Input Latency (lag) — time between input event (mouse click, keyboard press) and the event being displayed on the screen. The lower the latency, the more responsive the game feels.
There are multiple sources of latency, varying from GPU/ CPU usage, display mode, framerate count and many more — most of them are covered in this guide.
-
Yes, despite popular misinformation, VRR alone doesn’t get rid of tearing. It can minimize the rolling tear however, but that varies between displays, and such, it’s not a guaranteed feature.
Additionally, the latency reduction applies only at framerates below V-Sync window (display’s native refresh rate) — if framerate matches the native refresh rate, VRR engages V-Sync emulation.
Technicalities
More text inside. Explains the concept of presentation models and display modes. While not needed to use the guide, it’ll help you with understanding why things are the way they are.
![]()
- Presentation models:
-
Flip Model — presentation model first added in Windows 7 with D3D9Ex and upgraded in DXGI in Windows 8-10.
Allows «fullscreen-level» of performance and latency. Has native VRR support in Windowed Mode. Additionally, DXGI version supports tearing (V-Sync off) in Windowed Mode, HDR and has Multiplane Overlay (MPO) support.
DXGI variant is supported only in D3D10 and upwards[2], enforced only in D3D12, and exists only on Windows 8 and upwards.
D3D9Ex Flip Model is not feature matched and lacks any DXGI improvements.
More information here. -
BitBlt Model — older presentation model used by most applications.
While performing similarly to Flip Model in Fullscreen, in Windowed Mode it has worse performance and always-on V-Sync on top of already additional latency caused by additional copy operations due to being software composed.
The only presentation model for Windowed D3D9 (and lower), but still very common in D3D10 and D3D11 games.Vulkan and OpenGL[3] use BitBlt in Windowed Mode.
- Display modes:
-
Fullscreen Exclusive (FSE) — legacy method of displaying content where application takes complete ownership of the screen.
Has slow Alt-Tab due to display ownership transfer, can be problematic if games are badly coded and switch to odd resolutions or refresh rates by default. Can lose color profiles.
Despite that, it offers the best feature compatibility and perfomance for games that don’t use Flip Model. Deprecated by Fullscreen Optimizations and Windowed with Flip Model for DirectX games.
Supported by every graphics API other than D3D12 -
Fullscreen with Fullscreen Optimizations (Fullscreen Optimizations) — an update to FSE for DirectX added in Windows 10 1803.
Converts DirectX applications running in FSE mode into a pseudo borderless mode with Flip Model for faster Alt-Tab,
lower latency, better color profile handling, and support for Windowed overlays (Xbox Game Bar, volume and brightness sliders etc.).
Because of being a Windowed Mode under the hood, it can break e.g. brightness control in old games that modify system gamma instead of window’s.
Enabled by default for every application.
More information here. -
Windowed — method of displaying content in a window, always managed by DWM. Due to being a window, Alt-Tab is fast, and color profiles usually don’t have any problems.
If not using Flip Model, it has worse performance compared to Fullscreen Optimizations | FSE, lacks native VRR support, has increased input latency and uses always-on V-Sync
-
D3D10 and D3D11 supporting Flip Model doesn’t mean that game actually uses it (Unity and UE4 implemented Flip Model support around 2019 — 7 years after its release!).
Flip Model in Windowed Mode can be enabled in those games using Special K (D3D11 only) or Windows 11’s (22H2) Optimizations for Windowed Games (both D3D10 and D3D11) -
OpenGL can be displayed using D3D11 thanks to Special K, which enables Flip Model and all its benefits along with HDR.
Nvidia drivers can also interop Vulkan and OpenGL to DXGI with Flip Model since driver version 526, albeit as the time of writing, OpenGL interop degrades performance compared to Special K’s one,
while DXVK compatibility requires toggling a flag in Nvidia Profile Inspector — see here.
New Vegas Tick Fix
Stutter Remover
New Vegas Tick Fix is a mod by karut that fixes and improves game’s internal clocks and memory management, which dramatically reduces stutter. It also
allows for
playing above 60fps without breaking physics.
Additionally, it has some DirectX changes, which help with performance and greatly reduce memory usage.
Installation
-
If it’s not already installed, download NVTF from Nexus and install with your mod manager.
-
Double-click on NVTF in Mod Organizer, then open NVTF.ini in the INI Files tab, and set:
bModifyDirectXBehavior = 1
Enables NVTF’s DirectX changes.
It’s required for following settings to work:-
bToggleTripleBuffering = 1
Enables triple buffer V-Sync, which gets rid of problematic framerate halving on FPS drops/ instability caused by double buffer V-Sync.
This change has no effect if you don’t use V-Sync
The potential latency increase is eliminated by properly capping FPS, which is done later in the guide -
bUseDefaultPoolForTextures = 1
Enabled by default
Disables texture mirroring between VRAM and RAM, which decreases RAM usage. Allows to use high resolution textures.
It’s required if you play at resolutions higher than 1080p.This change breaks Alt-Tab functionality in Fullscreen Mode.[6]
To mitigate that either use DXVK, or Windowed Mode.
Or just don’t Alt-Tab.
-
-
D3D9 loses the graphics device if it loses the screen ownership (Alt-Tab, Sleep, etc.). To recover, it needs to either have a copy of textures in RAM, or be able to reconstruct the memory from ground up.
Fallout New Vegas, like most D3D9 games, use the first method. Thus by disabling this behavior, after Alt-Tabbing, game is in a limbo where it doesn’t know what to do.
DXVK fixes this by simply being in place of D3D9, while Windowed mode guarantees the game will never own the screen in the first place.
Graphics Drivers and Windows
Driver Updates
Not much to say here — for the best compatibility and performance, you must be using the newest driver for your graphics card.
You can check what GPU you have by opening Task Manager, and going to the Performance tab — the last GPU on the left pane is your main one.
If you don’t see any GPU there, that means your GPU is too old to use DXVK.
This step is mandatory if you want to use DXVK!
Select your graphics card to go the driver download page |
||
|---|---|---|
Windows Watermark
This part applies only to D3D9 with Fullscreen Optimizations and DXVK with DXGI, since D3D9 Windowed is already in the DWM composed mode, and DXVK uses FSE.
You can ignore this section if you have following GPUs:
- Nvidia 16 series and newer
- AMD Vega and newer (single display only)
- Intel CPUs 8th Gen and newer
Make sure your Windows is activated, otherwise the watermark will kick the game into the DWM composition, which leads to increased latency, worse performance and disables VRR.
If you don’t have a GPU with MPO (Multiplane Overlay) support, you can mitigate this by disabling Fullscreen Optimizations.
(Keep in mind that this trick won’t work on modern, D3D12 games, so it’s still recommended to just activate Windows)
How to check if your GPU supports MPOs:
- Type dxdiag into Windows search
- Click Save All Information and save the file.
- Open the DxDiag.txt file, press Ctrl+F and look for MPO MaxPlanes
- If the number is greater than 1, then your GPU has MPO support.
Having the watermark without MPOs will disable VRR and increase input latency and stuttering!
Virtualization
Windows 11 uses virtualization features to increase system and inter-process security. Unfortunately, this can come at a performance cost, especially on lower-end hardware.
I won’t be writing on how to disable them, because… Microsoft already made a tutorial about it.
This step is not mandatory, as when it comes to security, it’s up to you to decide. Just letting you know that this exists, and even Microsoft acknowledges the fact that it can degrade perfomance.
Game Mode
Windows 10 introduced a feature called Game Mode, which puts the system in a more gaming-friendly state.
Game Mode features:
- Enables AutoHDR for DXGI based games.
- Enables VRR optimizations for games using Flip Model [?].
- Disables Windows Update.
- Disables notifications.
- Disables file indexing, if «Respect Device Power Mode Settings» is enabled in Search settings.
- Sets Game Mode power mode (Requires Balanced power plan to be active).
- Enables CPU scheduling optimizations for Ryzen CPUs.
Game Mode is enabled by default. If you had it disabled for some reason, you can enable it here.
Display Mode Differences
Presentation Problems
Here’s a comparison of three display modes you can use in this game. Situation is problematic mainly due to Vulkan and D3D9 using old presentation models.
Flip Windowed
|
Fullscreen
|
BitBlt Windowed
|
|---|---|---|
|
|
|
|
Alt-Tab doesn’t work at all if NVTF’s pool change |
|
- Despite that disabled V-Sync unlocks the framerate, window itself is V-Synced, so you don’t get any benefits.
-
While AMD enables Freesync for Fullscreen Windowed BitBlt surfaces, Nvidia allows G-Sync to run with any window.
This is problematic because refresh rate can get synchronized to wrong windows, framerate may break on other displays and display stutters may occur.
Enabling it globally is a bad idea, because it disrupts normal desktop usage (e.g. screen can sync to sleeping windows).
It’s recommended to use Nvidia Profile Inspector to set G-Sync Application Mode to
«Fullscreen and Windowed» in Fallout — New Vegas profile. This makes Windowed G-Sync run only when the game is running.
Keep in mind that even with this method, this G-Sync implementation is still buggy — if you get any of the forementioned issues, disable it.
Never enable Windowed G-Sync globally!
DXVK
Translation Magic
DXVK is an open source Direct3D 9-11 to Vulkan translator project lead by Philip Rebohle (doitsujin) and Joshua Ashton. While created mainly for Linux, works
unofficially
on Windows.
In short, it allows you to run Fallout using the Vulkan API which has much lower draw call overhead than D3D9, which is one of the main performance limiting factors in this game.
If you use Linux, most of this is irrelevant, since Proton on Linux obviously uses DXVK already.
Things about DXVK you must acknowledge:
-
DXVK improves performance in mainly draw call (CPU) bound scenarios (e.g. draw distance), and usually doesn’t help much in GPU bound ones (e.g. resolution)
-
It is possible that DXVK won’t change anything for you, or even make things worse
-
-
DXVK 2.0 and higher require:
- A Vulkan 1.3 compatible driver
- A VK_EXT_robustness2 driver extension
Generally almost all modern (2015+) GPUs support them, but if you’d like to sanity check yours, use GPU-Z, and go to the Advanced tab -> Vulkan section.
Those functionalities are a part of your GPU driver, so make sure you have the latest available version.
Keep in mind that even with those conditions met, DXVK 2.0+ may not work correctly for you, due to its Linux-based nature. -
DXVK’s GPU compatibility varies between manufacturers
-
Nvidia GPU laptops must use the DXGI interop (see below).
Using it on desktops is not required, but highly recommended for the most optimal experience -
AMD GPUs are more prone to shader issues on Windows (situation is completely reversed on Linux)
AMD dGPU laptops lacking direct dGPU output can not use DXVK due to presentation issues. (Integrated graphics work fine.)
(Vulkan runs in a broken state, GPU is underutilized and can’t use proper fullscreen mode — on Nvidia this is resolved by using DXGI presentation, AMD lacks such feature). -
Intel GPUs from 6th Gen and newer can work provided you have newest drivers
installed.
DXVK is broken past the 1.10.1 version.
Don’t expect a big performance difference, if any, since the game will still be mostly GPU bound.Arc GPUs should work fine, but are untested.
-
-
Fallout New Vegas has some known shader issues or quirks. They are not guaranteed to happen (getting rarer with DXVK updates), but they can occur:
- Transparency multisampling uses dithering — (DXVK handles alpha to coverage differently than drivers)
- Broken water reflections (rare, most reports come from older AMD GPUs)
- Broken lights and artifacting (rare, most reports come from older AMD GPUs)
Due to DXVK’s nature it relies on shader cache, which is compiled during the first use of that shader.
Because of that you can experience increased short stutter at the beginning of your playthrough.
This is completely normal, and will not reoccur after compilation has finished.
DXVK-GPLAsync patch by Ph42oN and Sporif alleviates this problem thanks to making the compilation asynchronous
DXVK 2.0 and newer precompile shaders on launch, although at the time of writing, on Windows, this feature is Nvidia only. Ph42oN’s async patch uses both methods, so it’s safe to use on all GPU manufacturers.
HDR-Mod
HDR-Mod is a DXVK mod made by Lilium (aka EndlesslyFlowering) and me with the intention of adding HDR functionality to D3D9 games.
Effectively it does 2 major things:
-
Displays the game at bit depth higher than 8.
-
Upgrades render targets to 16 bit.
This allows for HDR output and eliminates color banding from the game.
DXVK doesn’t perform any HDR tone mapping, so you need to use Pumbo’s ReShade AutoHDR or Special K (Nvidia only) for that.
Known quirks and issues
-
Any images produced by the game that were meant to be in 8 bit (screenshots, save images) are distorted due to lack of color conversion.
This is purely visual and doesn’t affect gameplay.
HDR Save Image Patch and New Vegas Reloaded fix save images.
For screenshots it’s recommended to use Game Bar, Steam or your tone mapping utility.
Installation
-
Download the latest DXVK version from Nexus.
If you have a HDR display, you can select the HDR version.
-
Extract archive contents into your Fallout New Vegas root folder.
Enabling Flip Model (DXVK with DXGI)
At the time of writing, this feature is Nvidia only!
Nvidia resets those settings on driver updates! Make sure to reapply them after updating.
Thanks Nvidia!
Nvidia’s drivers have ability to interop Vulkan to DXGI allowing for Flip Model in Windowed mode, which has HDR and VRR support, and better latency.
Be wary that current implementation of the interop will degrade performance on PCs.
- Enable Windowed mode in FalloutCustom.ini.
- In Nvidia Control Panel, in 3D Settings, set Vulkan/OpenGL present method to Prefer layered on DXGI Swapchain
You can use global profile if you want to use Flip Model in all OpenGL and Vulkan titles. - Press Apply changes and exit.
- Download Nvidia Profile Inspector.
- Extract the archive and run the program.
- Enable «Show unknown settings from NVIDIA predefined profiles» in the top bar (penultimate button).
- Press Ctrl+F and paste OGL_DX_PRESENT_DEBUG.
- Select the setting and click on Show bit value editor on the top bar (last button).
-
In the first column, check bit #00 and #19.
These flags enable DXVK support and fix forced promotion to FSE in some games.
- Click Apply & Close
- Click Apply changes in the top right and exit.
- Install OneTweak to disable window borders.
[Display]
bFull Screen=0
It’s recommend to use Special K, since it configures the interop automatically and applies other compatiblity fixes.
It also resolves the settings issue mentioned above.
In case you don’t want to, or can’t use Special K, you can follow the steps below.
If you don’t see those options, then your driver is not up to date!
Recommended FPS Limiters and Their Configurations
(Not) Pushing the Limits
Limiting framerate is very important for overall stability.
First and foremost, if you are using a good limiter, you’ll be implementing correct framepacing, which is the most important think for the overall feel of fluidity.
More advanced limiters can also reduce latency or power consumption (it’s difficult to have both).
Always limit your framerate to an amount you can actually achieve, otherwise you won’t get any benefits!
Letting your GPU overwork itself has a big latency impact, so try to cap your framerate at such value, where your GPU doesn’t sit at constant 100% usage.
Running at smoother, lower framerate is always better than high, albeit laggy and stuttery one.
Recommended Setups
Recommended configurations based on selected display scenarios:
-
V-Sync
- Framerate must be capped slightly below refresh rate to reduce latency.
V-Sync on its own is NOT a limiter. Using it as one introduces a massive latency penalty.
This workaround applies only to RTSS and D3D9 Special K.
(Not needed if you use Special K + DXVK with DXGI)Driver limiters are not precise enough to pull this off without risking stutter.
-
G-Sync | Freesync
- V-Sync must be enabled, in order to fully get rid of tearing.
- Framerate must be capped below refresh rate, in order for VRR to not disengage and fallback to V-Sync, as this causes a very big increase in latency.
-
No V-Sync
- No special prerequisites.
So many options…
Limiters presented here are ordered by their precision, from best to acceptable. The better ones are smoother and can provide better latency reductions, but may have some compatibility issues.
Enter your refresh rate here for automatic calculation of FPS limits. You can find your exact refresh rate here.
Applied!
If you don’t use, or not have VRR, it’s best to limit your framerate to fractions of your refresh rate. (30 at 60hz, 72 at 144hz, etc.)
Click on the cards below to show the instructions for each limiter.
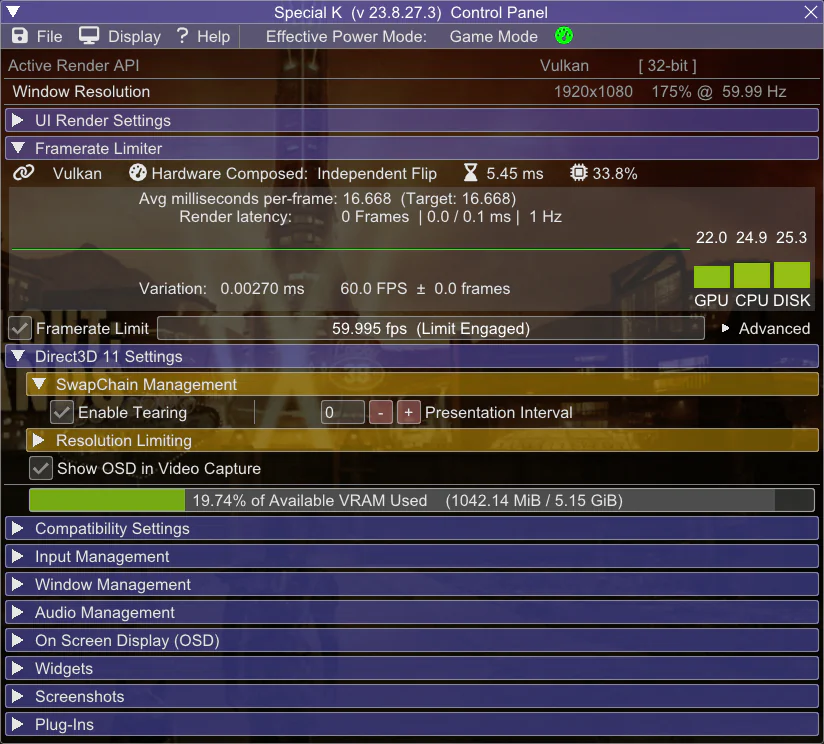
Special K
Special K is a mod by Kaldaien focused mainly on fixing performance in games and implementing HDR.
Its list of features is too long to write here, but the most important one used here is its incredibly versatile limiter and if using DXGI, HDR and (almost) lagless V-Sync.
![]()
Warning!
- Special K may conflict with Riva Tuner. If the game crashes or SK doesn’t show up in game, in RTSS settings, enable Use Microsoft Detours API hooking, or set injection delay to 30000
- Special K’s interface in D3D9 breaks water reflections when visible. Simply not having Special K’s interaface visible fixes the issue.
- Special K’s Vulkan support is currently limited to Nvidia GPUs.
Calculated values are not provided because Special K already does that automatically, and with higher precision.
Installation
-
Download the Special K Archive from the Stable section, then extract SpecialK32.dll
to your Fallout New Vegas root folder and rename it to dinput8.dll - Download the archive with preconfigured settings and extract its content to your root folder.
- Launch Fallout New Vegas and press Ctrl + Shift + Backspace to enter Special K Control Panel.
-
Enable the Framerate Limit by ticking the checkbox, then right click on the bar (not graph) next to it:
-
No V-Sync
In right click menu select your refresh rate
Click on Advanced and select the Latent Sync (VSYNC -Off-) modeOptional — Configuring Latent Sync to get rid of tears

It’s best to do this in-game!
If you use Fullscreen Mode without V-Sync or DXVK with DXGI and have stable framerate, in limiter’s right click menu select Latent Sync
In Latent Sync menu, select Visualize Tearlines and use Sync offset slider so the tearing is not visible.
Disable Visualize Tearlines when you decide you are satisfied with result.
It is possible that you won’t see tearing out of the box.Laptops with dedicated GPUs that do not have MUX switches for a direct dGPU<->Display connection can have problems with hiding the tearline.
While it may be impossible to hide it completely, latency benefits are still applicable.Some monitors have too small vertical blanking, so it’s possible to not fully hide the tearing without timing modifications —
if you wish to pursue this topic, create a custom resolution with increased Vertical Blanking in your driver or with
Custom Resolution UtilityIt’s best to first test the resolution in the driver settings, otherwise you may lock out your display
-
V-Sync
The subtraction is needed only for D3D9!
The preset included with the guide already optimizes V-Sync for DXGI, so you only need to select the limit.In right click menu select your refresh rate, then Ctrl-Click on the Framerate Limit bar and subtract 0.05
-
VRR + V-Sync
Included INI preset enables automatic VRR detection which takes care of everything.
…if you want to enter a custom value, Ctrl-Click on the bar. You can also drag your mouse on it.
-
No V-Sync
- Open the HDR menu at the top of Special K’s control panel menu and press the HDR Setup button.
- Select the scRGB HDR option from the HDR Calibration widget.
- Restart the game.
- For more information, see Special K Wiki.
If you use DXVK, on the first launch Special K will ask you to enable DXVK support/ Vulkan bridge. Click Yes and relaunch the game if needed.
Your configuration should look similar to this: (picture shows V-Sync configuration on DXVK + DXGI)
Nvidia Exclusive — HDR output
If you have a HDR compatible display and use HDR DXVK, you can use Special K to output in native HDR.
Keep in mind that it can decrease your performance a bit due to higher render bit depth.
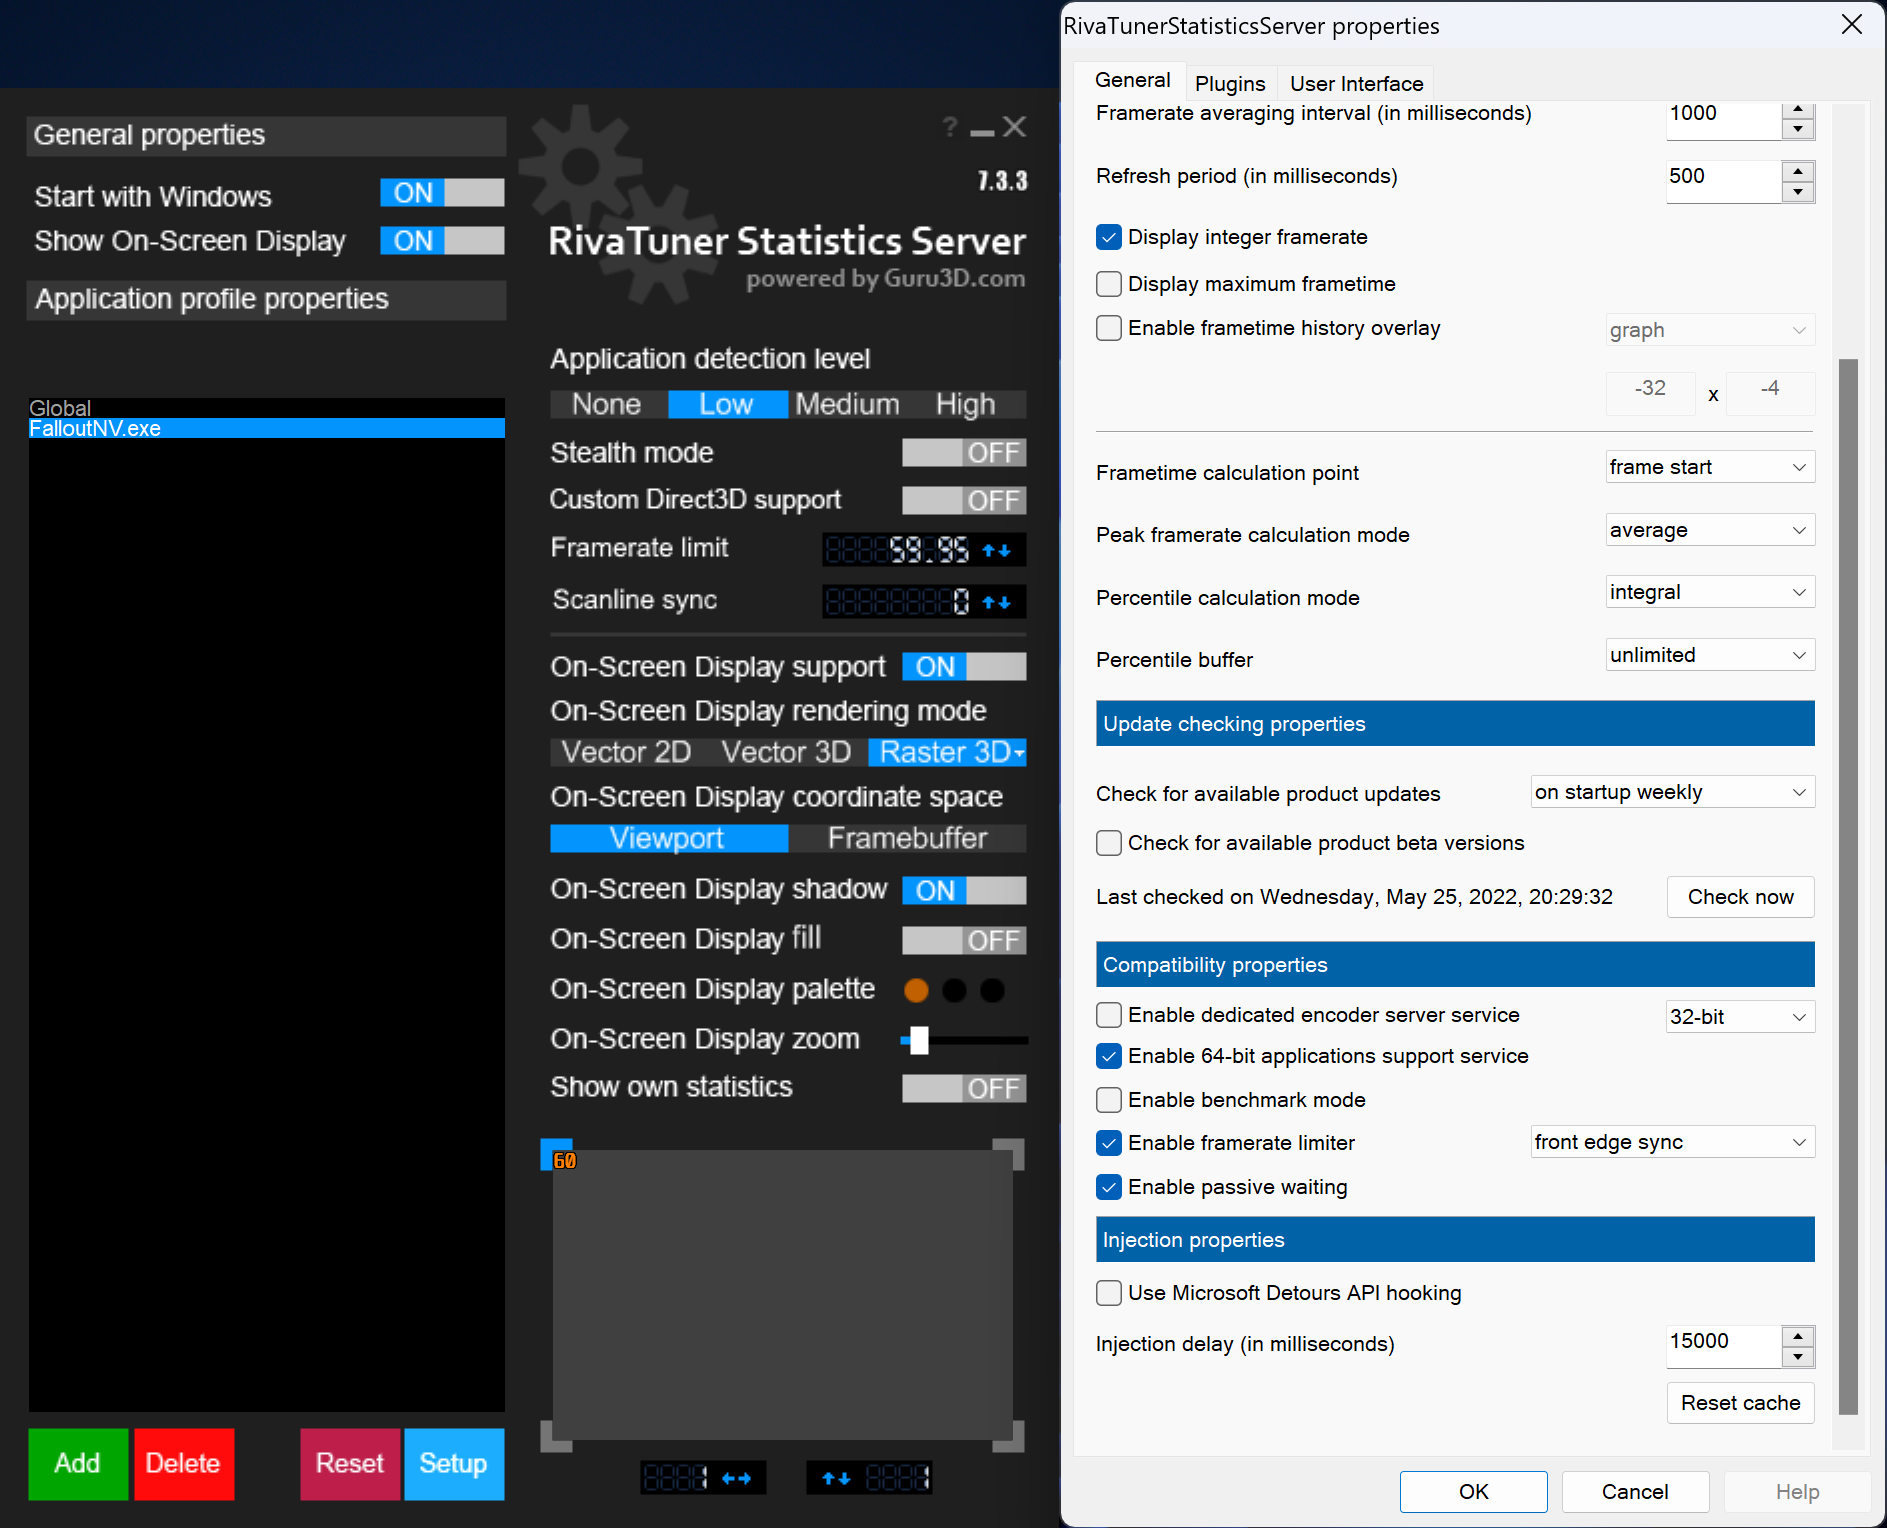
RivaTuner Statistics Server
Riva Tuner Statistic Server by Unwinder is probably the most famous FPS Limiter and OSD software, thanks to its performance, compatibility and power usage.
![]()
Installation
- Install and launch RTSS. Open your System Tray (the triangle pointing upwards on the taskbar) and click on the RTSS icon to open it
- Press green Add button and select FalloutNV.exe
- Set Application Detection Level to Low
-
Set Framerate Limit to:
-
No V-Sync
(RefreshRate)
-
V-Sync
(RefreshRate — 0.05)
-
VRR + V-Sync
(RefreshRate * (1 — RefreshRate * 0.00028))
…or lower
-
No V-Sync
-
Enter settings using Setup button and:
- Enable Passive Waiting
- Set framerate limiter to Front Edge Sync
- Enable Start with Windows or launch RTSS everytime before you play
Your configuration should look similar to this:
NVIDIA | AMD driver
The most basic limiters from this list, but definitely the easiest and fastest to set up!
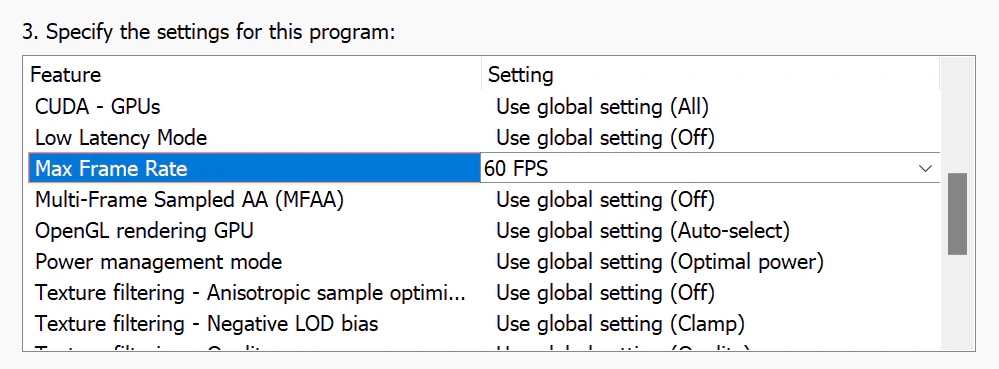
NVIDIA
Configuration
- Open NVIDIA Control Panel, go to Program Settings
- Select FalloutNV.exe. If it’s not present, add it manually
-
In settings, set Max Frame Rate to:
-
V-Sync | No V-Sync
(RefreshRate)
-
VRR + V-Sync
(RefreshRate * (1 — RefreshRate * 0.00028))
…or lower
-
V-Sync | No V-Sync
- Click Apply
Your configuration should look similar to this:
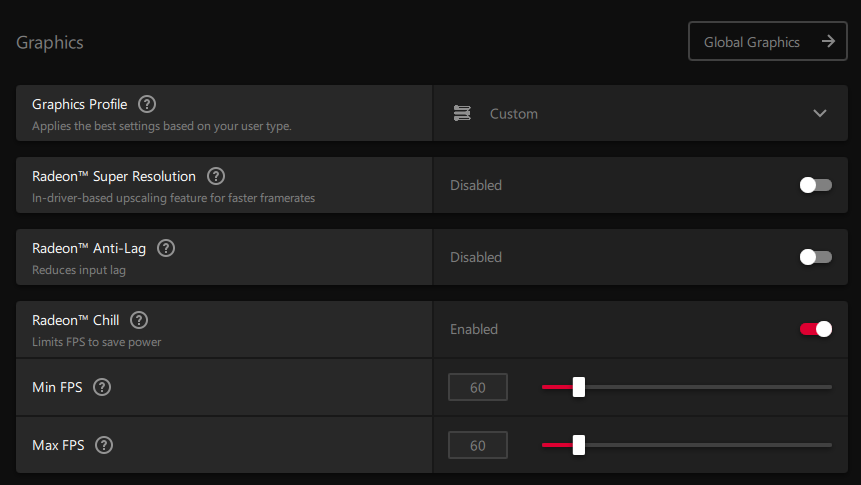
AMD
Configuration
- Open AMD Software: Adrenaline Edition, go to Gaming tab
- Select Fallout New Vegas or search for it in the bar. If not present, click on the three dots and add the executable manually.
-
In games’s menu, enable Radeon Chill™️ and set Max FPS to:
-
V-Sync | No V-Sync
(RefreshRate)
-
VRR + V-Sync
(RefreshRate * (1 — RefreshRate * 0.00028))
…or lower
-
V-Sync | No V-Sync
Your configuration should look similar to this:
Decompressing Records
zLag
Game by default uses zLib compression for most things, plugin records included. Unfortunately, zLib is very slow and CPU heavy (especially on modern SSDs), which sadly results in loading stutter, mainly in mods with lots of NPCs or new landscapes.
Luckily, you can very easily decompress any plugin using xEdit and a simple script.
It’s recommended to do it after you are done with installing all mods in your modlist.
The Process
- If you don’t have xEdit already set up, follow this guide.
- Press Ctrl+E in MO2 and select the xEdit executable.
- Add -IKnowIllBreakMyGameWithThis to the Arguments text box.
- Download the Decompress Records script from Nexus.
- From the downloaded archive, extract Decompress Records.pas into the Edit Scripts folder contained in the xEdit folder.
- Run xEdit, then load every plugin.
- Once the background loader finishes, press Ctrl+A then right-click and Apply script.
- Type Decompress Records, then apply.
It’s recommended to remove the argument line you added in step 3.
FAQ
Are these questions really frequent?
-
I can’t use DXVK, and I need to Alt-Tab — am I out of luck?
Yeah, all you can do is download OneTweak and use the legacy Windowed mode.
Also enable Windowed mode itself in FalloutCustom.ini (OneTweak itself doesn’t change display modes)[Display]
bFull Screen=0 -
Why does Special K show D3D11 instead of Vulkan when using DXVK with DXGI?
The DXGI interop uses D3D11 to display the game, and sometimes Special K can’t detect the presence of DXVK due to 3rd party programs.
It’s nothing to worry about, it’s purely a visual difference — Special K is running in D3D11 mode regardless of the name you see. -
Any way change brightness in Windowed Mode?
Use ReShade or Dynavision to change the gamma.
-
Do texture mods really have an impact on performance?
Not directly, no. As long as you don’t go over your VRAM budget and use NVTF’s memory pool patch you’ll be fine. If you run out of VRAM, you’ll either crash, or experience massive stutters.
What is guaranteed from higher resolution textures is increase in their load time. This can translate into longer stutter periods on cell loads. -
You talk about HDR. I thought FNV already had it?
HDR mentioned in game setting refers to HDR rendering, where game renders lighting passes in 16 bits, instead of 8. This leads to properly glowing lights thanks to the precision of using 65536 colors per channel instead of 256. (Glowing elements won’t be clamped anymore, and will glow instead.)
Due to the old age of the game, this data is later converted to 8 bit SDR (HDR in Windows was added in 2017!). Additionally, D3D9 obviously doesn’t support HDR output in the first place, hence the need for the DXGI interop. -
DXVK is breaking HDR after exiting the game!
Yes, unfortunately due to how FSE works, in addition to lack of native Windows support from DXVK, it doesn’t properly handle the HDR API.
If you have a Nvidia GPU, use DXVK with DXGI (You’ll get actual HDR too!). Otherwise, normal Windowed. -
Is dgVoodoo 2 a viable alternative to DXVK?
No. While it is true that you’d gain Windowed mode with Flip Model and HDR from it, in contrast to DXVK you are guaranteed to get lower perfomance due to the translation overhead.
If you can handle the performance loss, sure go ahead. -
Is it possible to use D3D9Ex in Fallout New Vegas?
Technically yes — Fallout New Vegas, oddly enough is the only Bethesda title with native D3D9Ex support. Does it work well? Not really.
While Special K’s D3D9Ex enforcement works far better that NVTF’s, it still suffers from CPU perfomance loss and increased GPU usage.
Finish
The End?
Congratulations! You’ve made it through! I hope this guide has helped you making Fallout New Vegas a smoother experience.
If you have any issues, questions, critiques or recommendations hit us up on Discord — wall_sogb and VishVadeva.
You can also find us on
ModdingLinked,
xNVSE,
Tale of Two Wastelands servers.
I recommend checking this guide from time to time — We’re not done yet.
If you found this guide helpful, share it with others or support me on Ko-Fi or Patreon
Things worth reading
Here are some links to stuff that I recommend checking out:
- Salamand3r’s Texture Guide — nice and easy to follow texture guide by Salamand3r that actually doesn’t break your game for a nice change of pace.
- PCGamingWiki — Great website, contains really helpful info about games, patches, fixes and other PC gaming related stuff.
- BlurBusters — Amazing website by Mark Rejhon focused on displays, latency and image quality. Really worth checking it out if you are a geek for these things.
Credits
This is the part where I’d like to thank people who have helped me in whatever way making this guide possible.
-
Whole xNVSE server for being a great community. Especially:
- VishVadeva — for testing and helping with benchmarks
- c6 — for fixing the some engine functions so my testing could be easier
- LOC (aka ItsMeJesusHChrist) — for making the awesome logo for the guide
- Nice try karut, but you are not getting credited
- Whole Special K server for also being a superb community with a lot of knowledgeable people. This guide would literally not exist without them.
- Glaceon575 — for helping with benchmarks and providing screenshots for AMD GPUs
-
You
