Время на прочтение
3 мин
Количество просмотров 339K
Роутеры лишаются своих родных прошивок по разным причинам. Желание добавить функционал, припаять USB порт или просто добавить стабильности в работу роутера.
В моём случае роутер на последней стабильной родной прошивке при 3 WiFi и 2 Ethernet потребителях подвисал 4 раза в неделю. Это не очень страшно, но и перезагружать его надоело. Хотелось стабильности. После поисков и чтения отзывов выбор пал на OpenWRT. В статье уже представлена пошаговая инструкция без ошибок, которые мне пришлось пройти.
Шаг 1, прошиваем на последнюю официальную прошивку
Первое, что стоит сделать, это обновиться и поставить последнюю родную прошивку.
Здесь вы можете найти последнюю прошивку для TL-WR741ND, для соответствующей версии оборудования.
- Переверните роутер и уточните версию железок в нём ориентируясь по наклейке на корпусе.
- Скачайте архив с последней прошивкой.
- Прошейте роутер прошивкой из архива обычным способом. Системные инструменты -> Резервная копия & Восстановление (System Tools -> Firmware Upgrade).
Шаг 2, скачиваем и устанавливаем OPENWRT
Далее необходимо выбрать версию прошивки OpenWRT.
Следует использовать именно тот файл, который согласуется с версией железа вашей модели. Не пренебрегайте этим правилом! Возможны два варианта файловой системы для загрузки: JFFS2 и SquashFS.
Прежде чем продолжить описание сборки, остановлюсь немного на том, как устроена корневая файловая система OpenWRT. Она представляет собой файловую систему mini_fo, которая прозрачно объединяет две другие файловые системы: неизменяемую SquashFS, смонтированную в /rom, и изменяемую JFFS2, смонтированную в /overlay. Все файлы, которые создаются или изменяются после установки прошивки, находятся в /overlay. При удалении файлов, изначально бывших в прошивке, mini_fo просто помечает их как удаленные, сами же файлы остаются в /rom и продолжают занимать место. Как SquashFS, так и JFFS2 используют сжатие, но SquashFS дает лучшую степень сжатия, поэтому помещение всех необходимых пакетов сразу в /rom дает прошивку меньшего размера. Исключение ненужных пакетов из прошивки также позволяет сэкономить столь драгоценное место на флешке.
alt
Слово factory в названии файла значит, что такой файл вы должны заливать на ваше устройство поверх заводской (родной) прошивки. файл со словом sysupgrade применим только для обновления OpenWRT, т.е. заливается после factory прошивки.
У нас стоит родная прошивка, значит нам нужно устанавливать прошивку с тегом factory.
Ниже представлена одна прошивка с разной аппаратной версией устройства, выбираем ту к которой принадлежит ваш роутер, для того что бы определить версию смотри Шаг 1:
- TL-WR741ND V1 Factory
- TL-WR741ND V2 Factory
- TL-WR741ND V4 Factory
Качаем factory прошивку и шьём обычным способом. Системные инструменты -> Резервная копия & Восстановление (System Tools -> Firmware Upgrade).
Шаг 3, входим в WEB интерфейс прошивки
После успешной прошивки мы получаем рабочий роутер с включенным web-интерфейсом. Поэтому заходим в настройки прошивки через браузер. Дальнейшие действия таковы:
Вводим в адресную строку адрес роутера 192.168.1.1
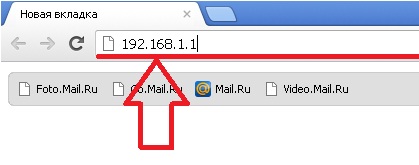
Нажимаем клавишу Enter и появляется web интерфейс роутера. Мы увидим то что нам предложили ввести Username и Password. В Username вводим root, поле Password оставляем пустым. Нажимаем Login.
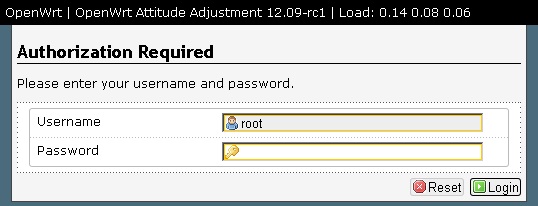
На этом прошивка закончилась, вы попали в web интерфейс прошивки Openwrt.
Шаг 4, настраиваем интернет соединение
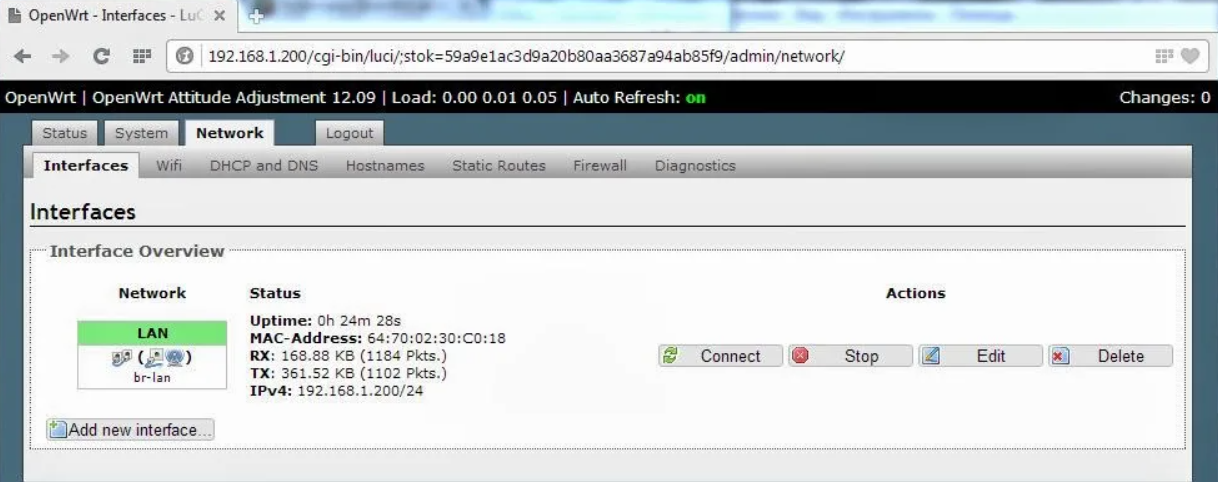
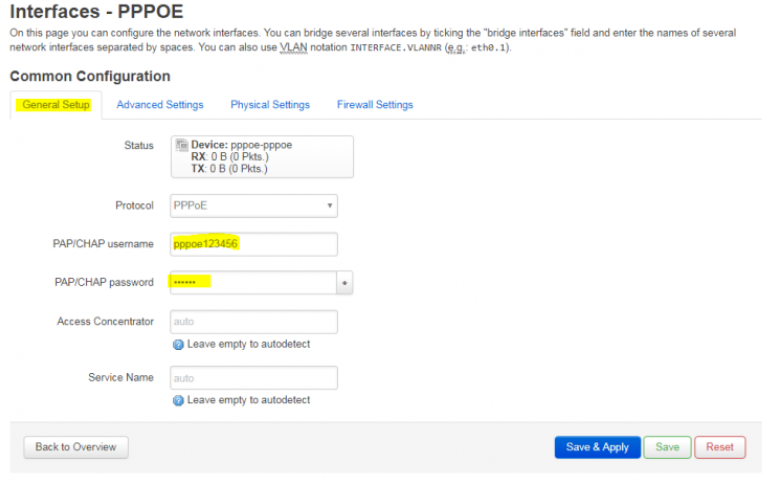
Нажимаем на Network -> Interfaces -> Wan -> Edit
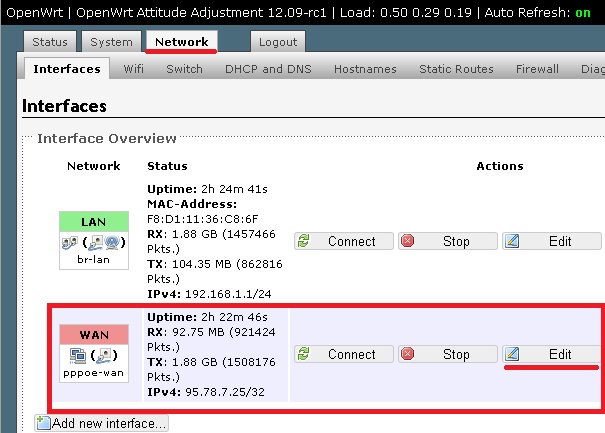
Выбираем нужный нам протокол, в моем случаи это PPPoE. Вводим логин от интернета в строку PAP/CHAP username, а пароль в PAP/CHAP password. Нажимаем Save & Apply.

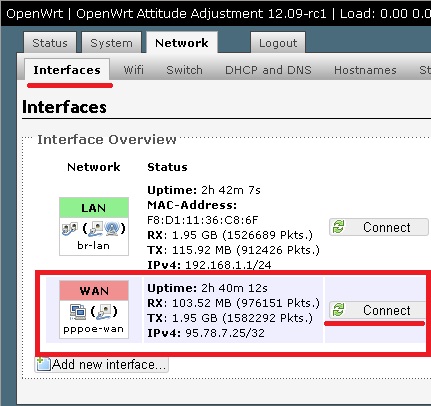
Возвращаемся обратно в Interfaces, нажимая на этот раздел, выбираем строку WAN и нажимаем connect. Интернет настроен.
Шаг 5, настраиваем Wi-Fi соединение
Настраивается оно почти так же как и интернет соединение так что расскажу кратко.
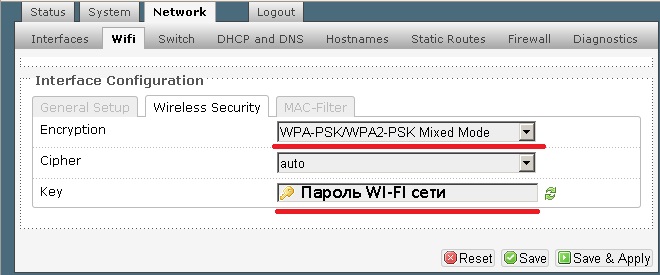
Заходим раздел Network -> Wifi -> edit(если есть) или Add(если нет созданной). В разделе General Setup меняем ESSID, это название вашей сети, потом заходим в Wireless Security. В строке Encryption выбираем WPA-PSK/WPA2-PSK Mixed Mode. В строке Key пишем пароль от wi-fi сети. Нажимаем Save & Apply.
Возвращаемся в раздел Wifi и нажимаем connect. Wi-fi настроен.
Шаг 6, русифицируем прошивку
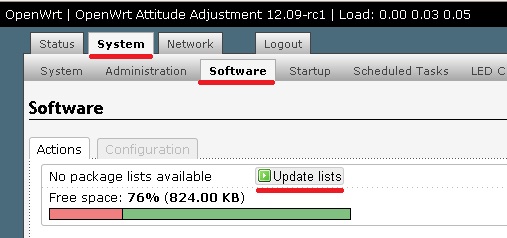
Для того чтобы русифицировать прошивку нам надо зайти в раздел System -> Software -> и нажать на кнопку Update List.
После этого нажимаем на Available Packages, выбираем раздел L. Находим файл с именем «luci-i18n-russian» нажимаем кнопку Install. На запрос согласны ли вы, нажимаете ок.

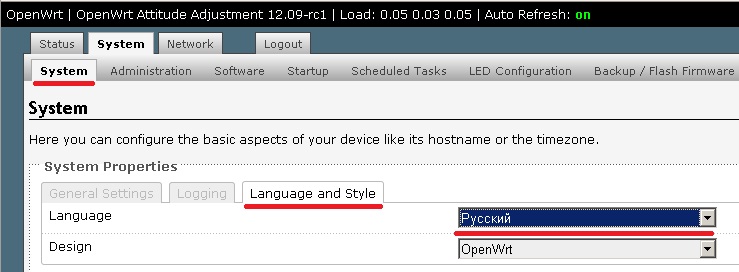
Языковой пакет скачали, теперь его нужно применить. Открываем раздел System -> Language and Style-> Language -> Русский. После этого нажимаем кнопку Save & Apply.
Обновляем страницу(нажимаем на клавиатуре F5) и видим русский интерфейс.
Шаг 7, устанавливаем пароль на маршрутизатор
Заходим в раздел Система -> Управление. Устанавливаем Пароль маршрутизатора. Нажимаем сохранить и применить.

Шаг 8, заключительный этап
Система -> Перезагрузка -> Выполнить перезагрузку.

Беспроводной маршрутизатор серии N 300Мбит/с
Основные технические характеристики:
Примечание: TL-WR841N идентичен данной модели, но оснащен несъемными антеннами.
Примечание: v5.4, v5.2 и т.п. аппаратно идентичны v5. v7, v8, v9 аналогично. Различие минорных версий отражает лишь версию в предустановленных прошивки и загрузчика.
| Версия/Модель | Версия OpenWrt | Скачать последнюю версию | Примечание |
|---|---|---|---|
| v1 | 10.03 и новее | 15.05.1 | Добавлена поддержка |
| v3 | 10.03 и новее | 15.05.1 | Отчет |
| v5 | 10.03 и новее | 15.05.1 | Отчет |
| v7 | 12.09 и новее | 15.05.1 | Полностью функционален |
| v8 (китайская версия) | Trunk r29631(измененная) | ? | Только 2МБ встроенной памяти, требуется аппаратная модификация |
| v8 (международная) | 12.09 и новее | 18.06.2 | DB120 — IPv6 баг |
| v9 | 14.07 и новее | 15.05.1 | |
| v10 | 15.05.1 | 15.05.1 | |
| v11 | образ от v10 или trunk | ? | При сравнении плат v10 и v11 различия только во флеш памяти. Можно использовать образы v10 c sysupgrade -F, игнорируя проверку версии. Так же по сравнению с v10, антенны имеют другую форму (как на Archer C7), и WAN LED теперь двухцветный, зеленый и оранжевый. Образ 15.05.1 r49389 работает из коробки. |
| Версия | v3 | v5 | v7 | v8 | v9 | v10 | v11 |
|---|---|---|---|---|---|---|---|
| Платформа: | AP81(ar71xx) | ||||||
| Архитектура: | MIPS | ||||||
| Производитель: | Atheros | ||||||
| Загрузчик: | U-Boot | ||||||
| Системный чип: | AR9130 | AR7240 rev 2 | AR7241-AH1A | AR9341 | QCA9533-AL3A | QCA9533-BL3A | QCA9533-AL3A |
| Частота CPU: | 400 МГц | 400 МГц | 400 МГц | 535 МГц | 550 МГц | 650 МГц | |
| BogoMIPS: | 265.42 | 266.24 | 265.42 | 266.64 | 366.18 | 432.53 | |
| Flash-чип: | ST 25P32V6P | Неизвестно | cFeon F32-100HIP/SPANSION FL032PIF | Spansion FL032PIF | Spansion FL032PIF | Winbond 25Q32FVS1G | Spansion FL032PIF |
| Объем Flash: | 4 Мб | ||||||
| Чип ОЗУ: | Hynix HY5DU561622FTP-5 | Неизвестно | Zentel A3S56D40FTP-G5 | ESMT M13S2561616A-5T | Winbond W9425G6JH-5 | Zentel A3S56D40GTP-50 | Zentel A3S56D40GTP-50L |
| Объем ОЗУ: | 32 Мб | ||||||
| Радиочип: | Atheros AR9100 Rev:7 | Atheros AR9280 Rev:2 | Atheros AR9287-BL1A 2.4GHz 802.11bgn | AR9341 | QCA9533-AL3A | QCA9533-BL3A | QCA9533-AL3A |
| Свитч: | Marvell 88E6060 | Встроенный AR7240 | Встроенный AR7241 | Встроенный AR9341 | Встроенный QCA9533-AL3A | Встроенный QCA9533-BL3A | Встроенный QCA9533-AL3A |
| Порт USB: | Неизвестно | Есть | Есть | В процессе | Отсутствует в SoC | ? | |
| Последовательный порт: | Есть | Есть | Есть Ещё | Есть | Надо убрать R26 | ? | |
| JTAG: | Есть | Неизвестно | Неизвестно | Есть | ? |
-
Войдите в веб-интерфейс маршрутизатора, перейдите в раздел System Tools — Firmware Upgrade и укажите образ дистрибутива как файл обновления.
-
По завершении прошивки маршрутизатор перезагрузится и будет доступен по адресу http://192.168.1.1
Для v8,v9,v10 все значительно проще
Внимание! Данный метод не рекомендуется к использованию если вы не понимаете о чем речь и никогда подобными вещами не занимались и учиться не хотите 
Требуется консольный кабель с ttl уровнями usb-ttl, например DKU-5, или RS-232-TTL преобразователь
и tftp сервер на вашем компьютере,
Почти полностью взято отсюда https://forum.openwrt.org/viewtopic.php?id=24203, спасибо dl3daz.
-
Подключите WAN портом к своей локальной сети или напрямую к компьютеру с tftp сервером.(для 8.2 попробуйте LAN1 порт)
-
Подключите консольный кабель как описано в секции “serial console” (английская вики) и делаем “tpl” трюк (включаем роутер и сразу пишем в консоли tpl, это нужно сделать буквально за полсекунды, иначе не получится), чтобы получить нормальный доступ в консоль.
-
Теперь прописываем IP адресы для роутера и TFTP сервера (здесь названы соответственно ROUTERIP and SERVERIP, конечно же должны совпадать с реальными IP адресами (мы же не фигней маемся). Пишем в консоли:
setenv ipaddr ROUTERIP
setenv serverip SERVERIP
printenv
Для примера, присвойте сетевой карте своего компьютера(TFTP сервера) статичный IP 192.168.1.100, если у вас есть другие сетевые карты, то рекомендую их выключить.
В консоли пишем:
setenv ipaddr 192.168.1.111
setenv serverip 192.168.1.100
192.168.1.111 ip роутера, 192.168.1.100 ip вашего TFTP сервера.
-
Дважды проверьте что ввели нужные адреса (printenv выводит на экран адреса) Проверяем, что ваш сервер находится на 69 порту(стандартный порт). Теперь загружаем прошивку через TFTP “tftpboot 0x80000000 имя_файла_прошивки.bin ”:
ar7240> tftpboot 0x80000000 openwrt-ar71xx-tl-wr841nd-v8-squashfs-factory.bin Using eth0 device TFTP from server 192.168.1.100; our IP address is 192.168.1.111 Filename 'openwrt-ar71xx-tl-wr841nd-v5-squashfs-factory.bin'. Load address: 0x80000000 Loading: checksum bad ################################################################# ################################################################# ################################################################# ################################################################# ################################################################# ################################################################# ################################################################# ################################################################# ################################################################# ################################################################# ################################################################# ###################################################### done Bytes transferred = 3932160 (3c0000 hex) -
Значение “3c0000” в последней строке (ваше число может отличаться). Теперь выполните следующие команды, меняйте 3c0000 на свое значение, которое вы получили из tftpboot
Для TL-WR841ND v3:
1. Чистим память:
 ar7100> erase 0xbf020000 +0x3c0000

First 0x2 last 0x3d sector size 0x10000
  61
Erased 60 sectors
2. Копируем содержимое RAM в память:
 ar7100> cp.b 0x80000000 0xbf020000 0x3c0000
Copy to Flash... write addr: bf020000
done
3. Перезагружаем
 ar7100> reset

Resetting...
4. Всё.
Для TL-WR841ND v5, v7, v8, v9:
1. Чистим память:
wasp> erase 0x9f020000 +0x3c0000
2. Копируем содержимое RAM в память:
wasp> cp.b 0x80000000 0x9f020000 0x3c0000
3. устанавливаем загрузчик
wasp> bootm 0x9f020000
## Booting image at 9f020000 ...
Uncompressing Kernel Image ... OK

Starting kernel ...
4. Всё.
U-Boot 1.1.4 (Apr 9 2009 - 12:29:57)
v8,v9,v10 без консольного кабеля
Как и большинство нынешних роутеров может быть восстановлен без консольного кабеля.
-
Пропишите на сетевой карте компьютера статичный ip
192.168.0.66 (у роутера он192.168.0.86) -
Закиньте factory OpenWrt образ в корень своего tftp сервера и назовите: для v8 mr3420v2_tp_recovery.bin ; для v9 wr841nv9_tp_recovery.bin ; для v10 wr841nv10_tp_recovery.bin
-
На выключенном роутере зажимаете reset, не отжимая его, включаете роутер, держите ресет пока не загорится светодиод lock(крайний правый) .
-
Ждем пока роутер перезагрузится.
подробнее
1. Скачайте оригинальный образ прошивки с сайта TP-Link(у версий 1 и 1.5 абсолютно идентичные последние прошивки), для версии 3.
2. Извлеките файл из архива и посмотрите содержит ли он в своем названии слово boot,
Данный способ подходит для моделей V1, V3, V5, V7, V8 и V9; так как бутлоадер у них одного размера.
Для примера возьмем файл со словом “boot” в названии wr841nv9_en_3_14_4_up_boot(131129).bin
Вырезаем первые 0x20200 (это 131,584 = 257*512) байт прошивки:
dd if=wr841nv9_en_3_14_4_up_boot(131129).bin of=tplink.bin skip=257 bs=512
Получаете файл tplink.bin, данную команду можно провести на компьютере с linux/unix или на самом роутере(предварительно закачав его туда с помощью web сервера или по протоколу scp)
Так же вы можете просто скачать уже модифицированные файлы без boot блока
3. Полученный файл переименуйте во что-то типа tplink.bin и можете прошить через web интерфейс, если же возможности нет, то можно через консоль, используйте протокол SCP (для windows winscp), если вы на линуксе то и сами все знаете, так же можно воспользоваться веб-сервером в локальной сети):
root@OpenWrt:~# cd /tmp
root@OpenWrt:/tmp# wget http://192.168.1.110/tplink.bin
root@OpenWrt:/tmp# mtd -r write ./tplink.bin firmware
Вы так же можете попробовать уже описанный способ установки по tftp(boot часть опять же придется вырезать)
См. также Back to original firmware
При загрузке устройства, когда начинает мигать индикатор SYS (под иконкой шестеренки), нажмите и удерживайте кнопку QSS около 5-10 сек. (индикатор начнет мигать чаще).
См. также OpenWrt Failsafe
![]() Изменение данной настройки в домах с большой плотностью wifi точек, может только ухудшить производительность вашего роутера вечером, когда соседские точки сильно загружены.
Изменение данной настройки в домах с большой плотностью wifi точек, может только ухудшить производительность вашего роутера вечером, когда соседские точки сильно загружены.
Суть в том, что по умолчанию в Openwrt соблюдаются законодательства разных стран и при присутствии других wifi роутеров, ваш роутер сбрасывает канал 40mhz до 20 mhz, дабы не загрязнять эфир и не ухудшать собственную производительность, хотя сообщает что умеет 300МБит/c и 40mhz, а так как у нас режим MIMO 2:2, то при 20mhz получаем 130 МБит/с по стандарту.
Как исправить:
Заходим по ssh(если вы еще не установили пароль, то по telnet) и вводим команды:
uci set wireless.radio0.htmode=HT40 /выставляем ширину канала 40mhz, можно и через веб интерфейс.
uci set wireless.radio0.noscan=1 /запрещаем роутеру сканировать окружение.
uci commit wireless /записываем наши команды в конфигурационный файл.
wifi /перезагружает wifi интерфейс с новыми настройками без перезагрузки роутера.
И получаем честные 300МБит/c
Редактируем файл /etc/config/wireless
-
Под config wifi-device ‘radio0’ добавляем
option noscan '1'
-
option ‘htmode’ выставляем значение HT40 (для билдов до BARRIER BREAKER(14.07) значение принимает HT40+ или HT40-)
option htmode 'HT40'
Проверьте, что eth0/eth1 не перепутаны!
Ядро операционной системы Linux часто становится базой для работы различных устройств вроде маршрутизаторов и навигаторов. Они имеют ограниченный функционал, зато гарантируют высокую стабильность работы оборудования, а также обеспечивают возможность установки сторонних приложений, помимо заводских утилит.
Относится это и к Openwrt – самой известной операционной системе для роутеров.
Требования к роутеру для установки Openwrt
Openwrt – это не простая прошивка, а целая операционная система для маршрутизаторов, созданная на базе Linux. Если вы решили перепрошить свой роутер и установить данную ОС, то проверьте, соответствует ли ваше устройство следующим требованиям:
- соответствие архитектурам, которые указаны на официальном сайте;
- минимум 4 Мб флеш-памяти (без возможности установить GUI (LuCI));
- от 32 Мб ОЗУ.
Перед тем как экспериментировать с сетевым устройством, рекомендуется усвоить – перепрошивка оборудования часто лишает пользователя заводской гарантии. Кроме того, вероятно, интерфейс новой оболочки будет несколько непривычным по сравнению с предыдущим, и это вызовет некоторые затруднения в настройке параметров.
Комьюнити теперь в Телеграм
Подпишитесь и будьте в курсе последних IT-новостей
Подписаться
Шаг 1: Подготовка и прошивка
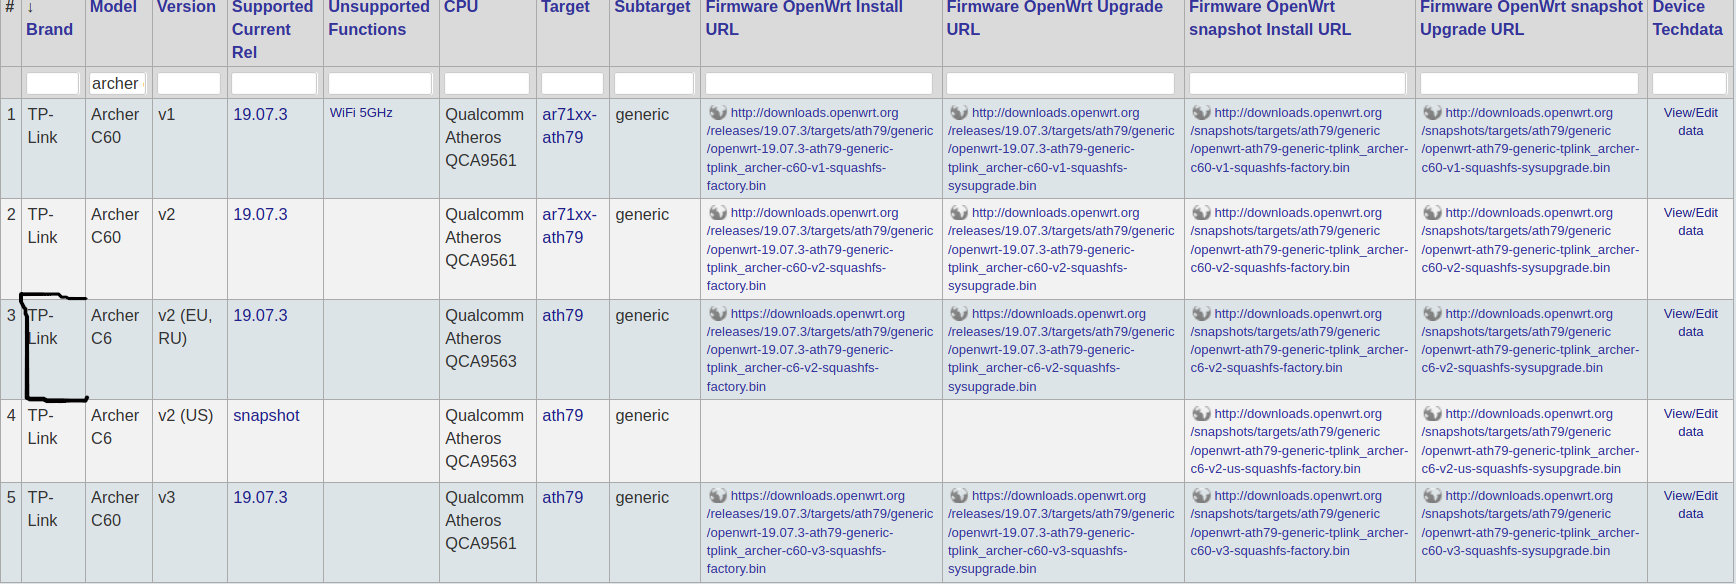
Рассмотрим процедуру прошивки на примере роутера TP-Link модели TL-WR740N. Перед запуском изменений нужно зайти в панель администратора (через браузер) и посмотреть текущую версию встроенного программного обеспечения. 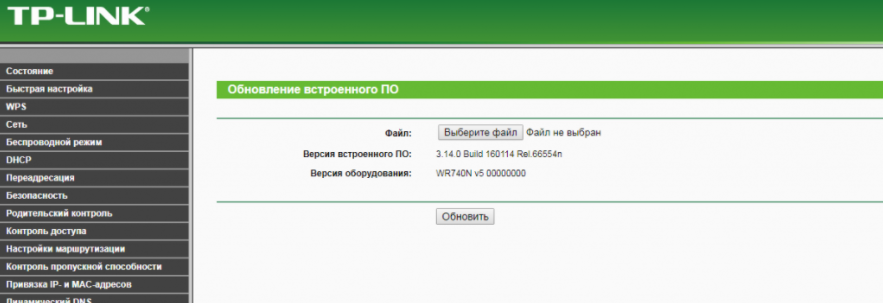 Следующий шаг – скачивание операционной системы Openwrt, она доступна по ссылке. В открывшейся таблице отображается перечень поддерживаемых роутеров и техническая информация о них. Пользователю достаточно найти прошивку, соответствующую текущей версии. В названии должна присутствовать приставка factory.
Если к названию прошивки добавлено слово Sysupgrade, это означает, что файл предназначен для обновления версии ранее установленной операционной системы. После скачивания требуется зайти обратно в панель администратора и нажать на кнопку «Обновить». Система предложит указать файл – здесь нужно выбрать архив с Openwrt.
Все, осталось дождаться завершения процесса прошивки. Важно на этом этапе обеспечить питание без аварийных отключений, чтобы не повредить программное обеспечение. Если это случится, оно перестанет запускаться, и аппарат останется только «выкинуть» или отнести по гарантии. Если все прошло корректно, после перезагрузки веб-интерфейс будет доступен по адресу http://192.168.1.1.
Шаг 2: Первоначальная настройка Openwrt
В перечень базовых настроек ПО входит изменение пароля администратора. Это исключит вход в панель посторонних лиц на удаленной основе в результате перехвата сигнала Wi-Fi. Плюс нужно включить интерфейс в режим «LAN», чтобы активировать поддержку протокола SSH.
Шаг 3: Настройка PPPOE
Теперь требуется настроить подключение к интернету. Если провайдер предлагает соединение по протоколу DHCP, этот шаг допускается пропустить, потому что роутер «по умолчанию» настроен на передачу данных через DHCP Client.
Если же речь идет о PPPOE, нужно провести следующую настройку:
- Перейти в подраздел Interfaces раздела Network.
- Кликнуть по пункту Add new interface.
- Задать имя интерфейса и указать протокол PPPoE.
- Выбрать режим WAN для пункта Cover the following interface.
После внесения перечисленных настроек нужно нажать на Submit, ввести переданные от провайдера логин-пароль и без сохранения настроек перейти в раздел Firewall Settings, где выбрать зону WAN. Теперь остается применить изменения и перезагрузить роутер. Если еще раз перейти в раздел Interfaces в Network, пользователь увидит, что PPPoE подключен, и можно выходить в интернет.
Шаг 4: Настройка Wi-Fi
Wi-Fi на Openwrt включается вручную. Сразу же после инсталляции операционной системы интерфейс обычно отключен. Выполняется процедура в подразделе Wireless раздела Network. Там нужно кликнуть по кнопку Edit и изменить несколько параметров:
- Mode – режим работы установить в значение Access Point (точка доступа).
- ESSID – имя сети Wi-Fi по свободному выбору пользователя.
Во вкладке Wireless Security нужно указать режим WPA2-PSK для пункта Encryption, а в строке Key ввести желаемый пароль для подключения к беспроводной сети. Остается кликнуть по кнопке Enable и попробовать подключение с любого устройства с модулем Wi-Fi.

What Is Openwrt ?
- OpenWrt (OPEN Wireless RouTer) is an open source project for embedded operating systems based on Linux, primarily used on embedded devices to route network traffic.
This Guide Will Work For All Supported Tp Link Routers
-
Fix For Invalid File Type Issue
-
Revert Back To Stock Firmware if something happens to your router or if your Openwrt installation fails
-
NOTE: If you do this, you do so entirely at your own risk.”
-
I am going to use Tp Link C6 Gigabit Router (EU Version 2.0)
-
Note : It will work for Tp Link A6 as both are the same
- For the US model, a network switch is needed to be connected between the router and the TFTPD server to force a 100Mbps FullDuplex connection
Things To Keep In Mind Before Installing Openwrt ::
- Do not connect the modem and the router until instructed
- If you power down the device while it is installing or upgrading, then you will break the firmware
Downloading Openwrt ::
- Check first to see if your router is supported, which you can do here . You can find your hardware version by following these steps
-
Now, once you find your router, download the corresponding firmware. I am going to download the stable version and copy it to the desktop. You can download the snapshot if you want
Note : Snapshot Firmware doesn’t have a GUI, so you will have to install the Luci package manually. I will show you how to install the normal stable version as I encountered a lot of problems with the snapshot version. If you want the snapshot firmware, the procedure is the same; simply download the snapshot rather than the regular version
-
The difference between Stable Build and Snapshot can be found here
-
So, I have downloaded the file from “Firmware Openwrt Upgrade URL Column”
-
Place this downloaded file on your desktop in a folder. Just name the folder openwrt. It is up to you
Installing Openwrt (Method A) ::
-
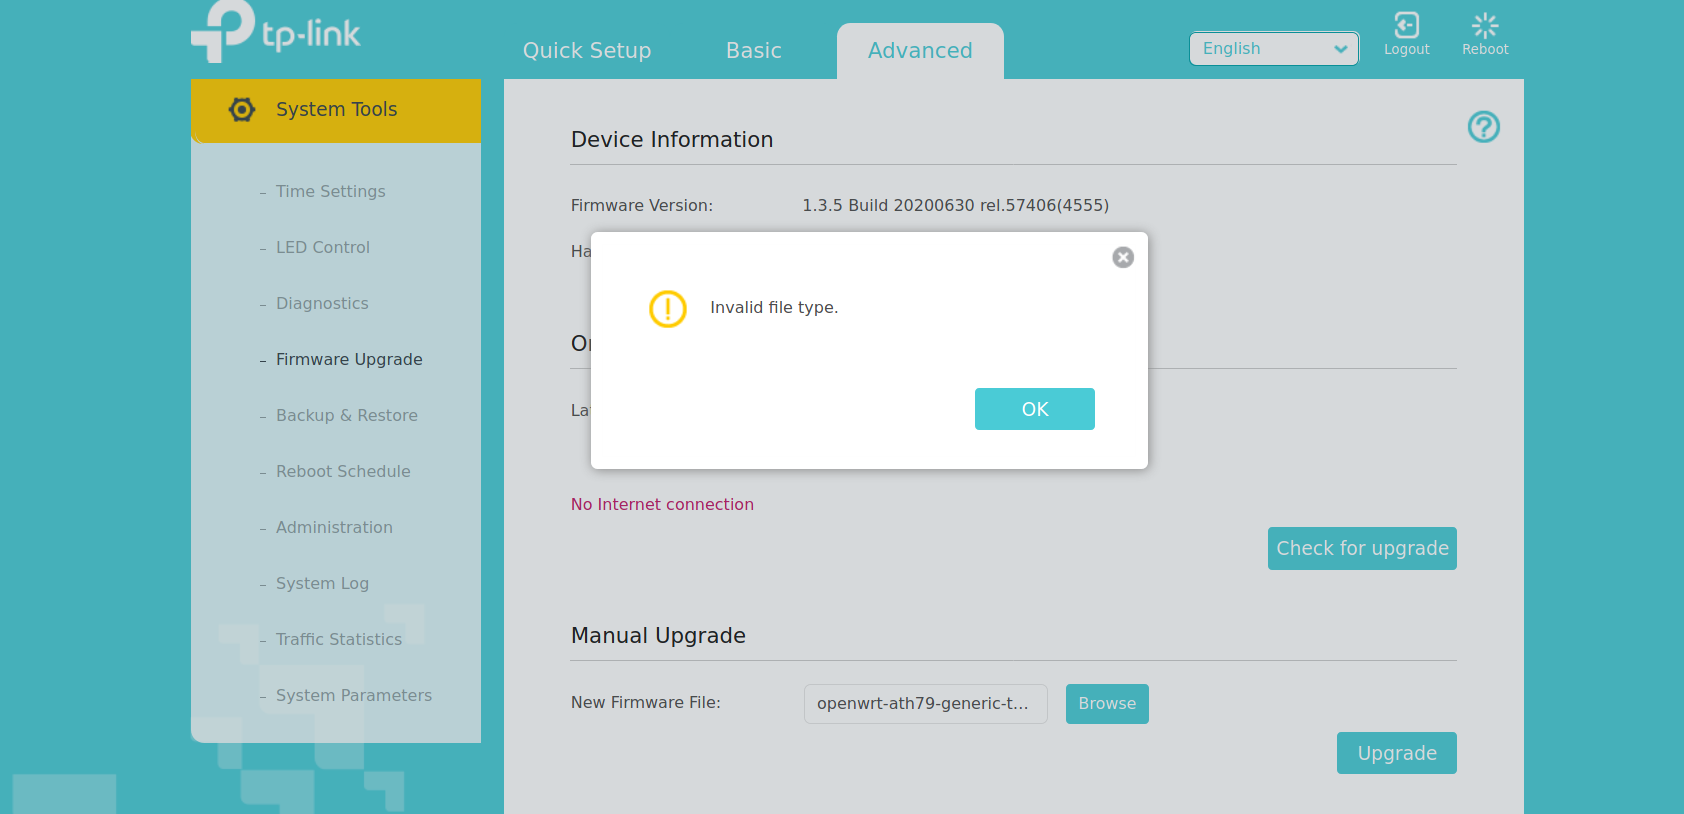
You cannot downgrade or install OpenWrt since the latest Tp-link-C6 Update, version 1.3.5 (Archer C6(EU)_V2_200630), which was released on July 14th, 2020, because it displays an invalid file type.If you are facing this issue, then refer to Method B
-
If your firmware version is below 1.3.5, then choose Method A. If you are still facing an invalid file type, then refer to Method B
-
So, after downloading the openwrt snapshot firmware, follow the following steps:
-
Go to 192.168.0.1 (or tplinkwifi.net). Enter the password
-
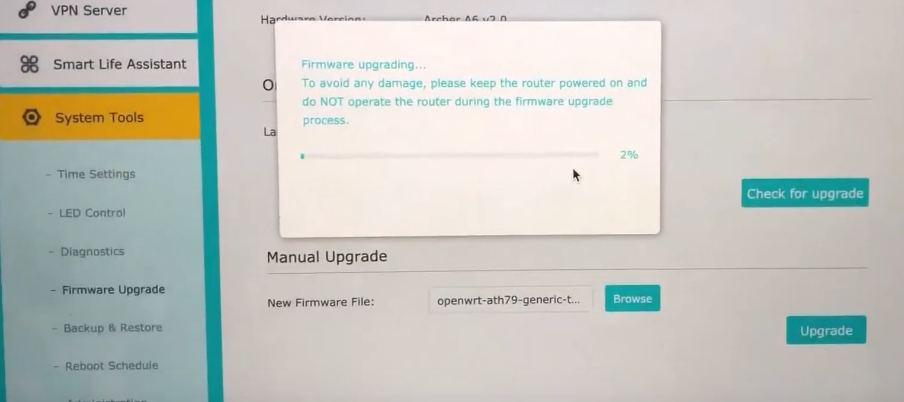
Then navigate to Advanced–> System Tools–> Firmware Upgrade–> Browse–> Desktop/openwrt-ath79-generic-tplink_archer-c6-v2-squashfs-factory.bin
-
After this, click on “Upgrade” and done. Now, skip to Setting Up Openwrt.
-
If You Get An Invalid File Type, Then Refer To Method B
-

Installing Openwrt Using Tftpd (Method B) ::
- If you are getting an invalid file type, then choose this method
-
This method can also be used if your router stops working, or if there is some problem while installing OpenWRT, or if you have bricked your firmware
-
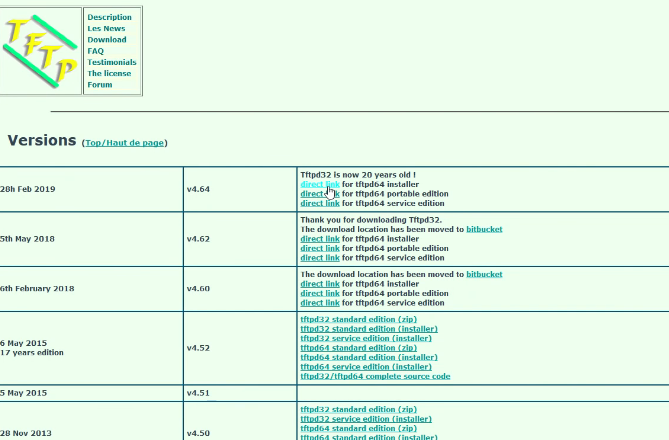
First download Tftpd from here, choose tftpd64 installer
-
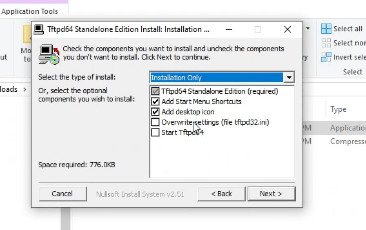
Click on the downloaded file and install it. Then just click next and next. Everything is pretty straightforward
-
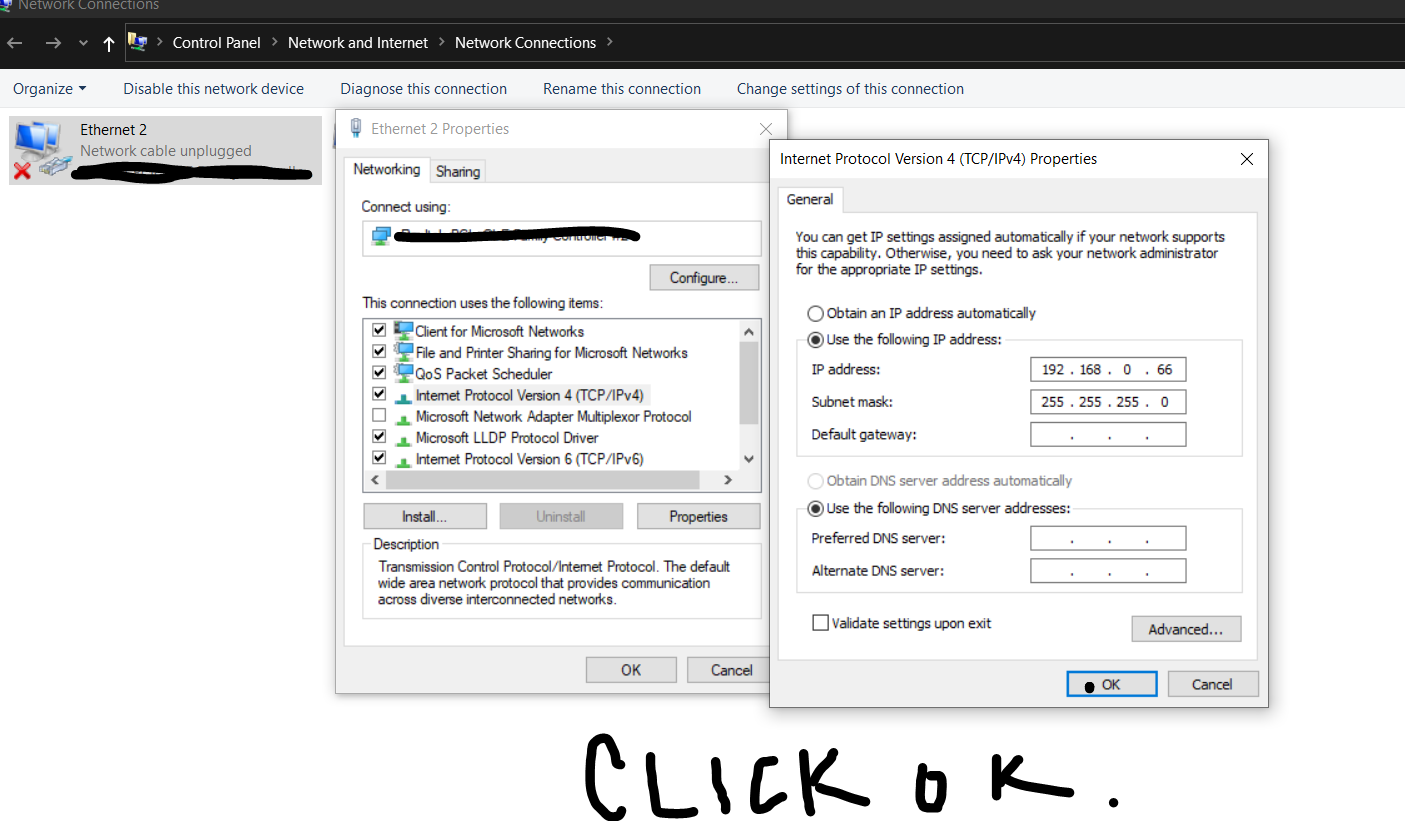
After This : Right Click Your Network Icon –> Open Network And Internet Settings –> Click Change Adapter Options under “Change Your Network Settings. —>Double Click Ethernet –> Double Click Internet Protocol Version (TCP/IPv4) –> Then Change from Obtain Ip Address Automatically to Use The Following Address
-
IP Address: Enter 192.168.0.66, then click Subnet Mask, which will change to 255.255.255.0 automatically, and then click OK. (You have to change this back to automatically later)
-
Now open Tftpd64 (Desktop). You can see the current directory. Change it to the directory where you have downloaded the firmware file. It would be better to just copy the firmware file to a folder on the desktop
-
Now after this, click on the Log Viewer Tab
-
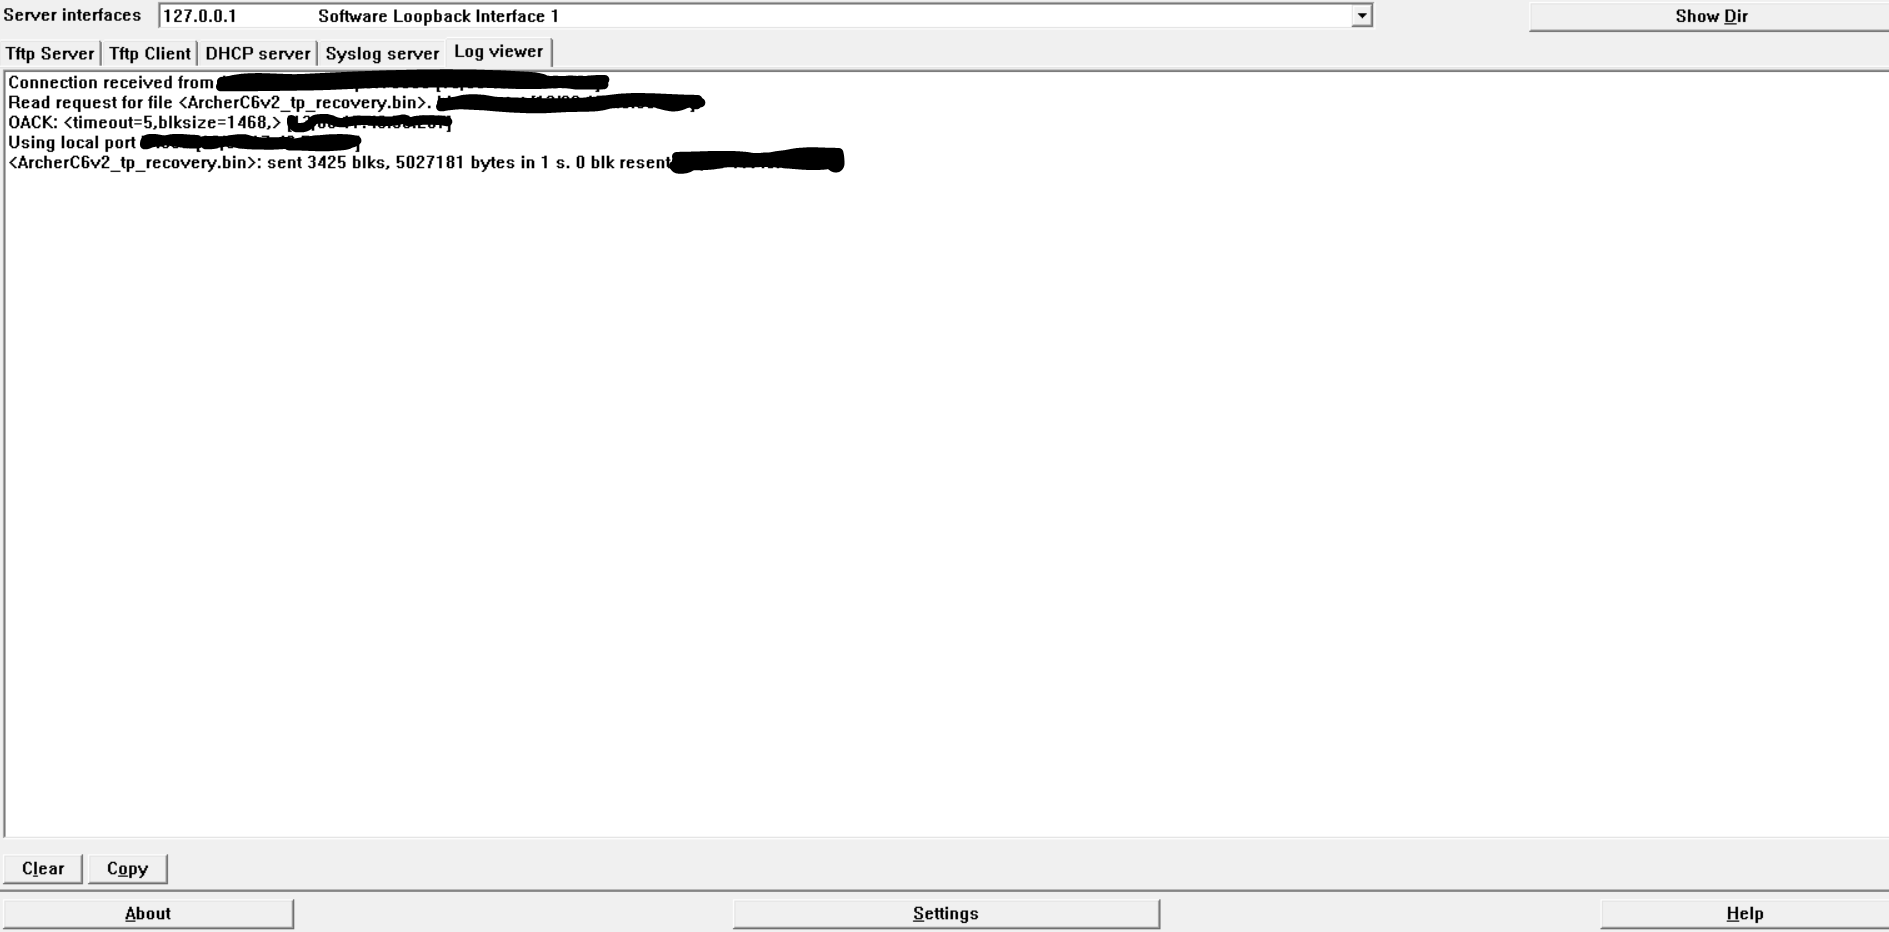
The Most Crucial Step : Power off the router, and then when you power it on, press the reset button simultaneously (power and reset at the same time), release the power button, but don’t release the reset button until you see the output as shown in the pic (for about 5-10 sec). You will see the log tab getting filled (right now it is looking for a particular file in the current directory)
-
In my case, it was looking for this file “ArcherC6v2_tp_recovery.bin” , rename the openwrt firmware file with this file name, and then power off the router again and power on again while simultaneously pressing the reset button Make sure that the current directory is the one in which the openWRT firmware is located with the new file name . It will copy that file automatically and will install OpenWrt. Once this is done, Openwrt will be installed on your router
-
If you have bricked your router or you want to downgrade your router, then just do this and rename the firmware that you want to replace it with. This is how you can downgrade or fix a broken firmware for a TP-Link router
-
Now change the IP address TCP/IPv4 from 192.168.0.66 to “automatically optain IP Address”
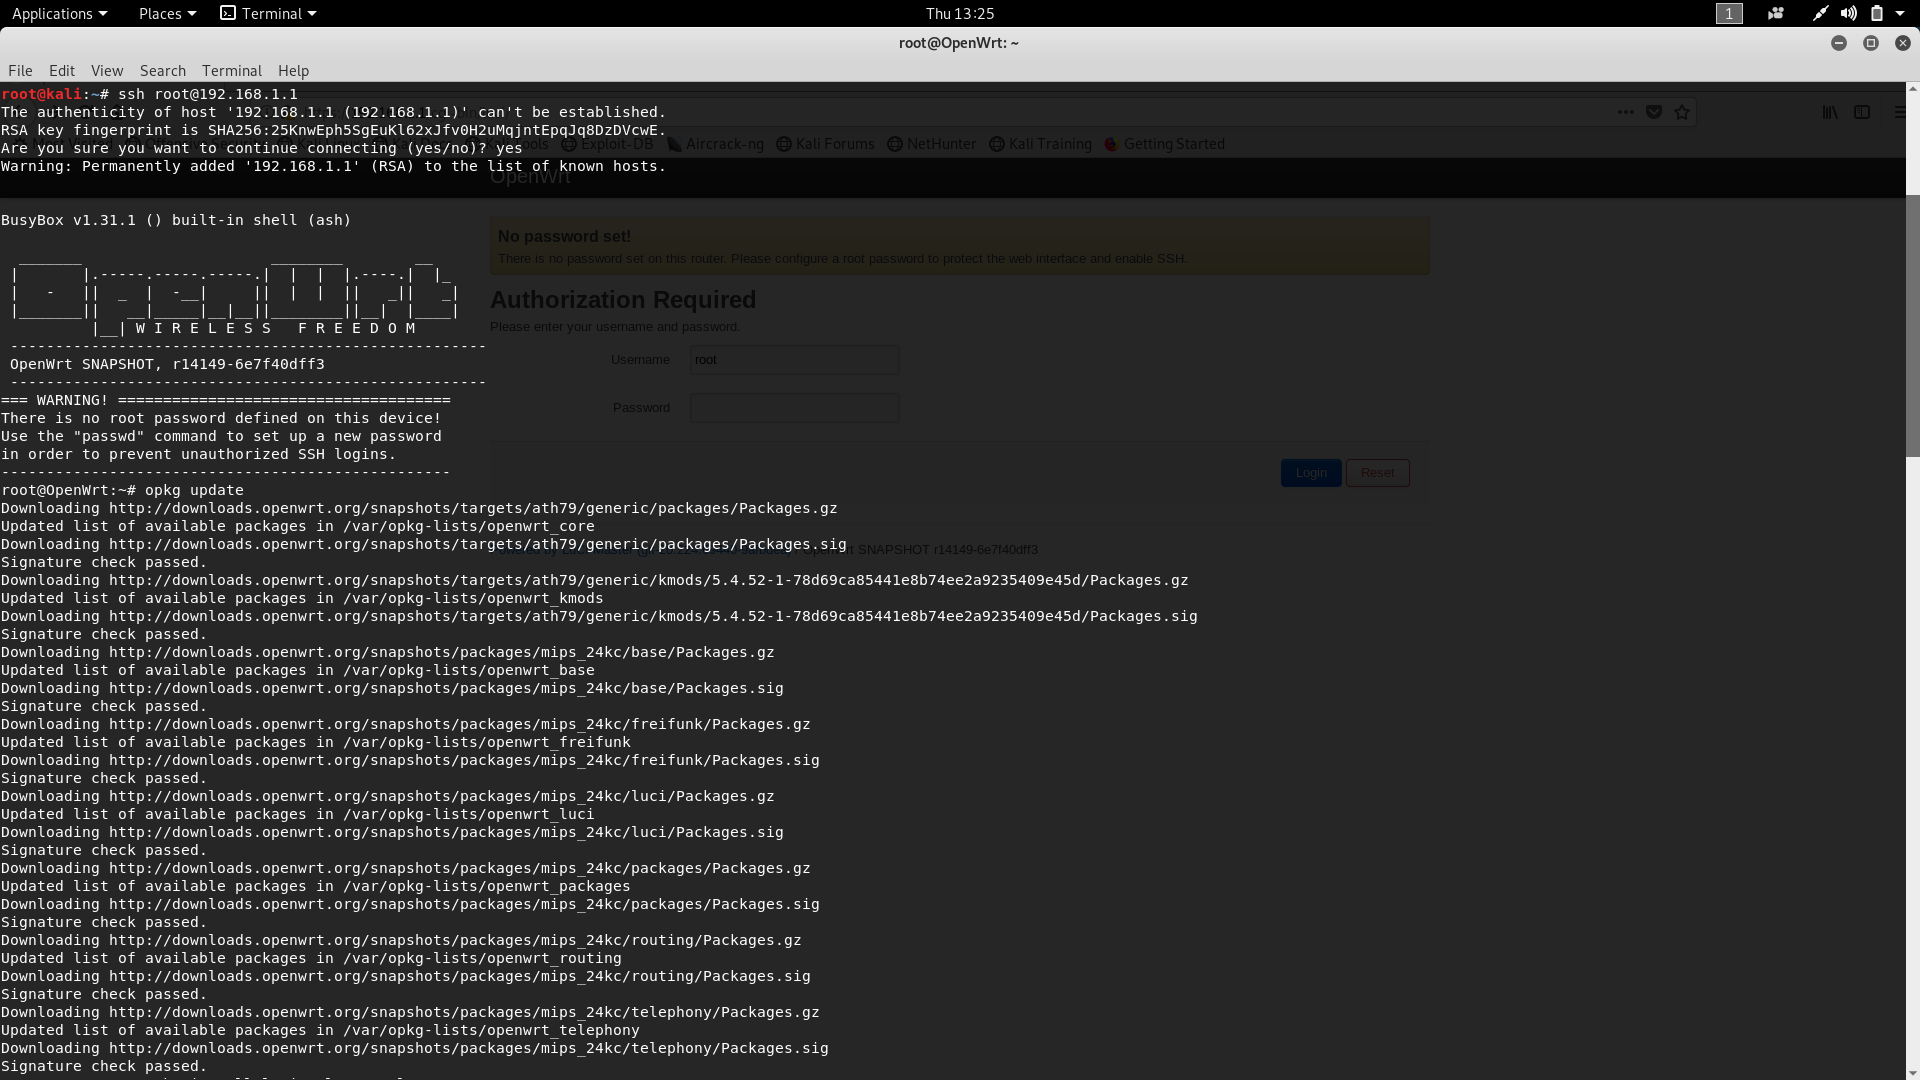
Setting Up Openwrt (Using ssh) ::
-
Open a terminal and then type:
-
After this, connect the router to the modem and plug the ethernet cable into the wan port
-
Once this is done, enter the following commands:
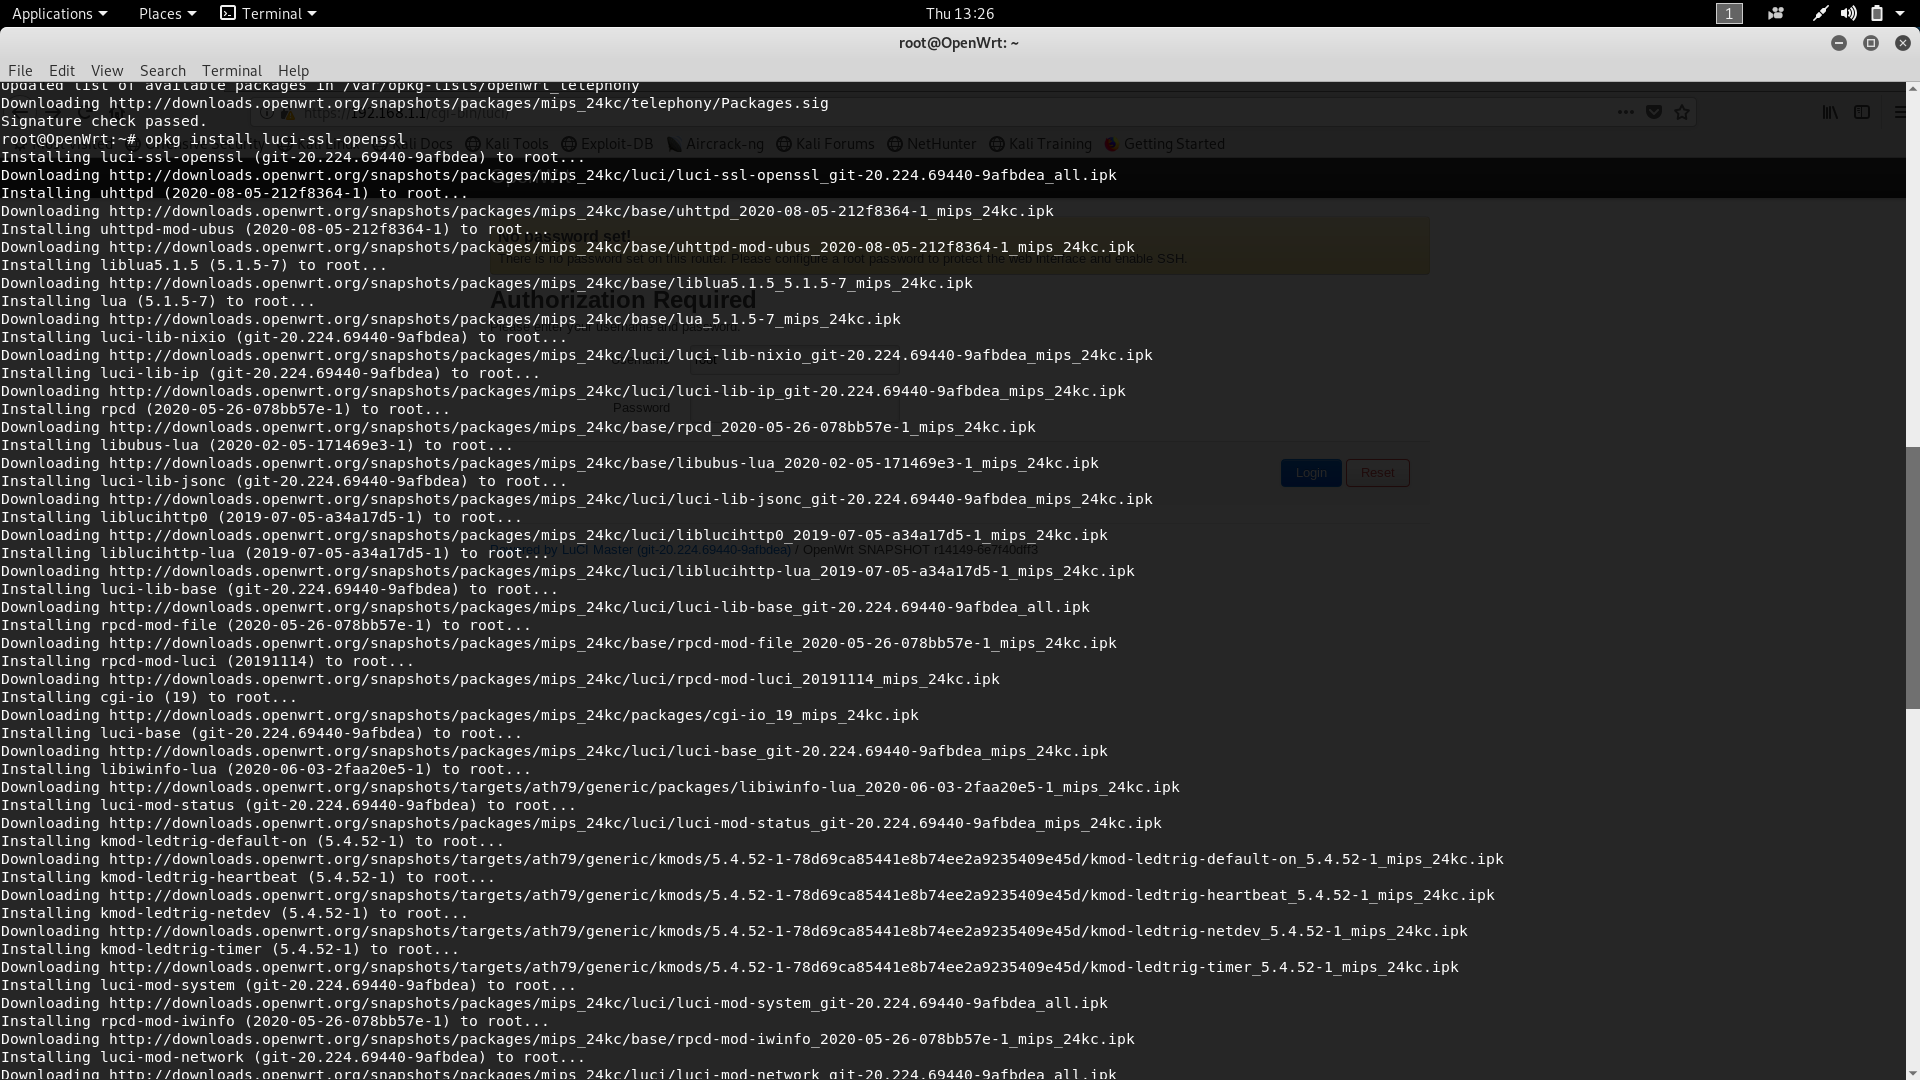
> ping google.com > opkg update > opkg install luci-ssl-nginx -
The following command is to download WPA3. (Optional, but strongly advised)
> opkg install --force-depends --force-maintainer --force-overwrite wpad-openssl > reboot -
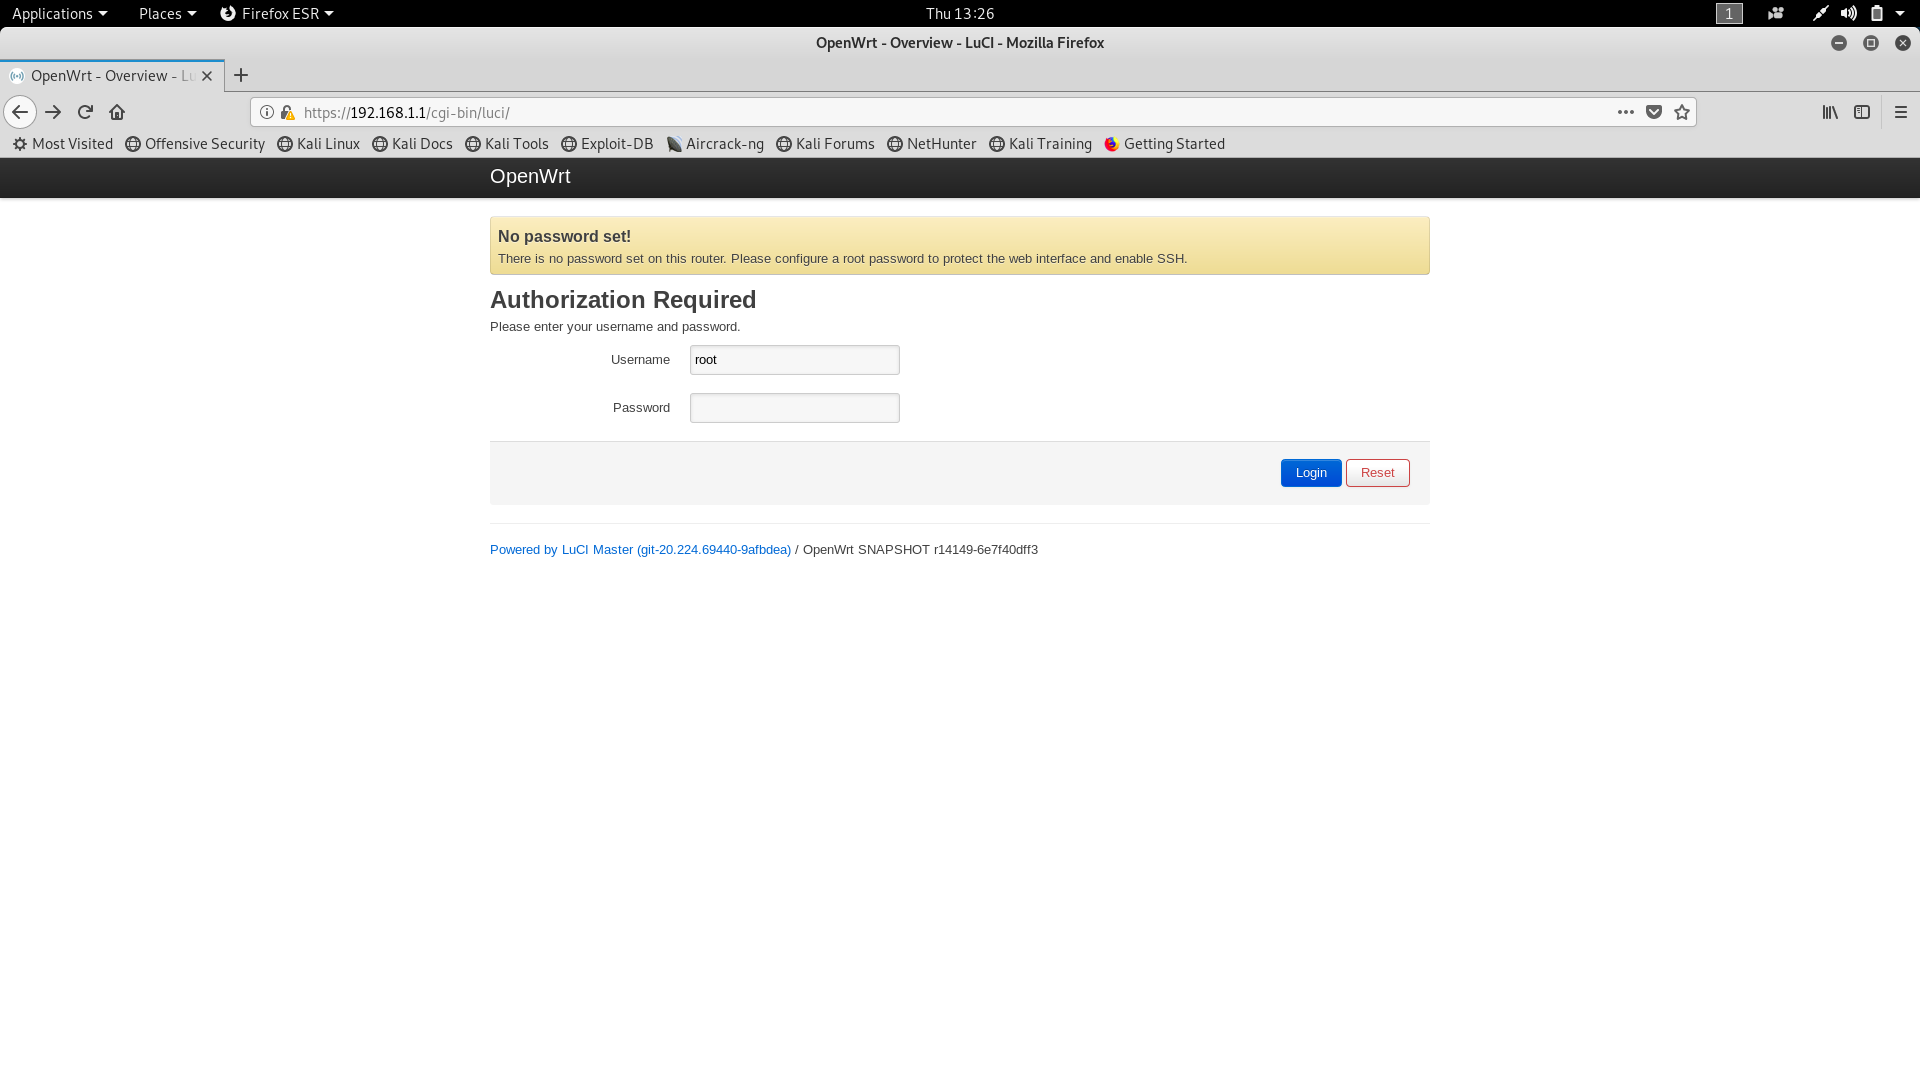
After all this is done, Open your browser and type openwrt.lan or https://192.168.1.1/cgi-bin/luci/ , It will show “connection not secure”. Add an exception and then the OpenWRT login page will come. By default, there is no password
-
After this, just configure your Openwrt
Setting up Openwrt (Using Putty) ::
-
The method is the same, with the same commands as above. I am not going to show you how to install putty
-
Once you have Putty up and running, repeat the same commands as above
How To Go Back To Stock Firmware ::
-
Download the oldest version. Like in my case, Archer A6(EU)_V2_200110 , 2020-02-17. Sometimes the newer versions don’t work for some reason, so always go with the oldest version and then update to the newest version
-
NOTE : If the above file doesn’t work, then download it from here. This is the oldest version available (1.0.1). If you click on the link, it will not work, so copy the link and paste it in the URL tab and press enter
-
Now download Tftpd from here and choose the TFTPD64 installer
-
Click on the downloaded file and install it. Then just click next and next. Everything is pretty straightforward.
-
After This : Right Click Your Network Icon –> Open Network And Internet Settings –> Under Change Your Network Settings Click On Change Adapter Options –> Double Click Ethernet –> Double Click Internet Protocol Version(TCP/IPv4) –> Then Change from Obtain Ip Address Automatically to Use The Following Address
-
IP ADDRESS : Enter 192.168.0.66 , Click On Subnet Mask , It will automatically change to 255.255.255.0 , then click okay . (You have to chnage this back to automatically later)
-
Now open Tftpd64 (Desktop). You can see the current directory. Change it to the directory where you have downloaded the stock firmware (unzip the firmware file and copy the bin file to the working directory). Better yet, just copy the firmware file to a folder on the desktop.
-
Now after this, click on the Log Viewer Tab.
-
The Most Crucial Step: Power Off The Router, And then when you power it on, press the reset button simultaneously (power and reset at the same time, release the power button, but don’t release the reset button until you see the output as shown in the pic) (for about 5-10 sec), you will see the log tab getting filled (right now it is looking for a particular file in the current directory).
-
In my case, it’s looking for this file “ArcherC6v2_tp_recovery.bin”, rename the stock firmware file with this file name and then power off the router again and then power on again while simultaneously pressing the reset button. Make sure that the current directory is the one in which the stock firmware is located with the new file name. It will copy that file automatically and will install the TP Link stock firmware again. Once this is done, wait for about 2-3 min.
-
NOTE : For some people, file transfer stops when trying to revert back to stock firmware . So, for those people, try using cat 5 or cat 5e cable (to force a 100Mbps full duplex connection). This does not happen with everyone, but if it does, then you can try this.
-
This is how you can install the stock firmware if any problem arises during Openwrt installation or if something else happens to your router during the upgradation of stock firmware. If you are still not able to go back to stock firmware, then pull a request.
FAQ ::
-
5Ghz Performance depends on a lot of factors . Please always use the stable Openwrt branch . Don’t go for the snapshot version.
-
In the wireless radio settings in Luci choose your country for signal strength accordingly.
-
Some people have complained about issues with 5Ghz performance, so if the other things don’t work for you, then you can always go back to stock firmware.
Read more about WPA3 here.
Contributing ::
Please check out the contributing.md guide on how you can actively participate in the development of this guide.
License 
This project is licensed under the GNU General Public License v3.0 — see the License.md file for more details.
OpenWrt Guide For Tp Link Routers ::
What Is Openwrt ?
- OpenWrt (OPEN Wireless RouTer) is an open source project for embedded operating systems based on Linux, primarily used on embedded devices to route network traffic.
This Guide Will Work For All Supported Tp Link Routers
- Fix For Invalid File Type Issue
-
Revert Back To Stock Firmware if something happens to your router or if your Openwrt installation fails
-
NOTE: If you do this, you do so entirely at your own risk.»
-
I am going to use Tp Link C6 Gigabit Router (EU Version 2.0)
-
Note : It will work for Tp Link A6 as both are the same
- For the US model, a network switch is needed to be connected between the router and the TFTPD server to force a 100Mbps FullDuplex connection
Things To Keep In Mind Before Installing Openwrt ::
- Do not connect the modem and the router until instructed
- If you power down the device while it is installing or upgrading, then you will break the firmware
Downloading Openwrt ::
- Check first to see if your router is supported, which you can do here . You can find your hardware version by following these steps

-
Now, once you find your router, download the corresponding firmware. I am going to download the stable version and copy it to the desktop. You can download the snapshot if you want
Note : Snapshot Firmware doesn’t have a GUI, so you will have to install the Luci package manually. I will show you how to install the normal stable version as I encountered a lot of problems with the snapshot version. If you want the snapshot firmware, the procedure is the same; simply download the snapshot rather than the regular version
- The difference between Stable Build and Snapshot can be found here
- So, I have downloaded the file from «Firmware Openwrt Upgrade URL Column»
- Place this downloaded file on your desktop in a folder. Just name the folder openwrt. It is up to you
Installing Openwrt (Method A) ::
- You cannot downgrade or install OpenWrt since the latest Tp-link-C6 Update, version 1.3.5 (Archer C6(EU)_V2_200630), which was released on July 14th, 2020, because it displays an invalid file type.If you are facing this issue, then refer to Method B
- If your firmware version is below 1.3.5, then choose Method A. If you are still facing an invalid file type, then refer to Method B
-
So, after downloading the openwrt snapshot firmware, follow the following steps:
- Go to 192.168.0.1 (or tplinkwifi.net). Enter the password
- Then navigate to Advanced—> System Tools—> Firmware Upgrade—> Browse—> Desktop/openwrt-ath79-generic-tplink_archer-c6-v2-squashfs-factory.bin
- After this, click on «Upgrade» and done. Now, skip to Setting Up Openwrt.
- If You Get An Invalid File Type, Then Refer To Method B


Installing Openwrt Using Tftpd (Method B) ::
- If you are getting an invalid file type, then choose this method

- This method can also be used if your router stops working, or if there is some problem while installing OpenWRT, or if you have bricked your firmware
- First download Tftpd from here, choose tftpd64 installer
- Click on the downloaded file and install it. Then just click next and next. Everything is pretty straightforward


- After This : Right Click Your Network Icon —> Open Network And Internet Settings —> Click Change Adapter Options under «Change Your Network Settings. —>Double Click Ethernet —> Double Click Internet Protocol Version (TCP/IPv4) —> Then Change from Obtain Ip Address Automatically to Use The Following Address
- IP Address: Enter 192.168.0.66, then click Subnet Mask, which will change to 255.255.255.0 automatically, and then click OK. (You have to change this back to automatically later)

- Now open Tftpd64 (Desktop). You can see the current directory. Change it to the directory where you have downloaded the firmware file. It would be better to just copy the firmware file to a folder on the desktop
- Now after this, click on the Log Viewer Tab
- The Most Crucial Step : Power off the router, and then when you power it on, press the reset button simultaneously (power and reset at the same time), release the power button, but don’t release the reset button until you see the output as shown in the pic (for about 5-10 sec). You will see the log tab getting filled (right now it is looking for a particular file in the current directory)
- In my case, it was looking for this file «ArcherC6v2_tp_recovery.bin» , rename the openwrt firmware file with this file name, and then power off the router again and power on again while simultaneously pressing the reset button Make sure that the current directory is the one in which the openWRT firmware is located with the new file name . It will copy that file automatically and will install OpenWrt. Once this is done, Openwrt will be installed on your router

- If you have bricked your router or you want to downgrade your router, then just do this and rename the firmware that you want to replace it with. This is how you can downgrade or fix a broken firmware for a TP-Link router
- Now change the IP address TCP/IPv4 from 192.168.0.66 to «automatically optain IP Address»
Setting Up Openwrt (Using ssh) ::
-
Open a terminal and then type:
-
After this, connect the router to the modem and plug the ethernet cable into the wan port
-
Once this is done, enter the following commands:
> ping google.com > opkg update > opkg install luci-ssl-nginx -
The following command is to download WPA3. (Optional, but strongly advised)
> opkg install --force-depends --force-maintainer --force-overwrite wpad-openssl > reboot -
After all this is done, Open your browser and type openwrt.lan or https://192.168.1.1/cgi-bin/luci/ , It will show «connection not secure». Add an exception and then the OpenWRT login page will come. By default, there is no password
-
After this, just configure your Openwrt


Setting up Openwrt (Using Putty) ::
- The method is the same, with the same commands as above. I am not going to show you how to install putty
- Once you have Putty up and running, repeat the same commands as above
How To Go Back To Stock Firmware ::
-
Download the oldest version. Like in my case, Archer A6(EU)_V2_200110 , 2020-02-17. Sometimes the newer versions don’t work for some reason, so always go with the oldest version and then update to the newest version
-
NOTE : If the above file doesn’t work, then download it from here. This is the oldest version available (1.0.1). If you click on the link, it will not work, so copy the link and paste it in the URL tab and press enter
-
Now download Tftpd from here and choose the TFTPD64 installer
- Click on the downloaded file and install it. Then just click next and next. Everything is pretty straightforward.
- After This : Right Click Your Network Icon —> Open Network And Internet Settings —> Under Change Your Network Settings Click On Change Adapter Options —> Double Click Ethernet —> Double Click Internet Protocol Version(TCP/IPv4) —> Then Change from Obtain Ip Address Automatically to Use The Following Address
- IP ADDRESS : Enter 192.168.0.66 , Click On Subnet Mask , It will automatically change to 255.255.255.0 , then click okay . (You have to chnage this back to automatically later)
- Now open Tftpd64 (Desktop). You can see the current directory. Change it to the directory where you have downloaded the stock firmware (unzip the firmware file and copy the bin file to the working directory). Better yet, just copy the firmware file to a folder on the desktop.
- Now after this, click on the Log Viewer Tab.
- The Most Crucial Step: Power Off The Router, And then when you power it on, press the reset button simultaneously (power and reset at the same time, release the power button, but don’t release the reset button until you see the output as shown in the pic) (for about 5-10 sec), you will see the log tab getting filled (right now it is looking for a particular file in the current directory).
- In my case, it’s looking for this file «ArcherC6v2_tp_recovery.bin», rename the stock firmware file with this file name and then power off the router again and then power on again while simultaneously pressing the reset button. Make sure that the current directory is the one in which the stock firmware is located with the new file name. It will copy that file automatically and will install the TP Link stock firmware again. Once this is done, wait for about 2-3 min.
- NOTE : For some people, file transfer stops when trying to revert back to stock firmware . So, for those people, try using cat 5 or cat 5e cable (to force a 100Mbps full duplex connection). This does not happen with everyone, but if it does, then you can try this.
- This is how you can install the stock firmware if any problem arises during Openwrt installation or if something else happens to your router during the upgradation of stock firmware. If you are still not able to go back to stock firmware, then pull a request.
FAQ ::
- 5Ghz Performance depends on a lot of factors . Please always use the stable Openwrt branch . Don’t go for the snapshot version.
- In the wireless radio settings in Luci choose your country for signal strength accordingly.
- Some people have complained about issues with 5Ghz performance, so if the other things don’t work for you, then you can always go back to stock firmware.
Read more about WPA3 here.
Contributing ::
Please check out the contributing.md guide on how you can actively participate in the development of this guide.
License
This project is licensed under the GNU General Public License v3.0 — see the License.md file for more details.