If supported by both devices, consider using WDS, Layer 2 GRE tunnels (“gretap”), or mesh networking.
Using relayd as instructed in this article isn’t guaranteed to work with all Openwrt compatible devices or wifi networks.
The most common problem is that the client router cannot pass the DHCP message between the main router and the client connected to the client router. Currently it seems to be the hardware/SOC limitation (related to MAC cloning?)
Instead of relayd it should be possible to use kmod-trelay, the only information about using it can be seen in its source code, if you used it successfully please add a section for it in this article.
In this article you will see how to configure your device to become a Wi-Fi extender/repeater/bridge.
In some cases, the wireless drivers used in OpenWrt do not support “Layer 2” bridging in client mode with a specific “upstream” wireless system. When this occurs, one approach is to route the traffic between LAN and the upstream wireless system. Broadcast traffic, such as DHCP and link-local discovery like mDNS are generally not routable.
When other options don’t work, the relayd package implements a bridge-like behavior for IPv4 (only), complete with DHCP and broadcast relaying. This configuration can be done through SSH (remote terminal) or through Luci GUI.

This image shows an example setup. LAN interface of the relayd device MUST be on a different subnet for relayd to work (since it is routing traffic, it expects 2 different subnets).
Since both ethernet ports and Access Point Wi-Fi network are on the same LAN interface, all clients connecting to the Ethernet ports and to the Access Point Wi-Fi network of the Wi-Fi extender device will be routed by relayd and will be connected to your main network.
The LAN interface subnet will be used only as a “management” interface, as devices connecting to the Wi-Fi repeater will be on the main network’s subnet instead. If the relayd device becomes unreachable, you will have to configure a PC with a static address in the same subnet as the LAN interface (eg. 192.168.2.10 for our example) to connect and be able to use LuCI GUI or SSH.
relayd package is of course needed, and luci-proto-relay is optional for the LuCI Web Interface.
Disconnect this router from your main network after successfully installing the above packages.
Alternatively, follow the steps described below to install the relayd packages over the new wwan wireless link.
Updated with new screenshots from OpenWrt 21.02.
To build a simple Wi-Fi repeater (a device that extends the same Wi-Fi network’s coverage) it’s a good choice to use the same Wi-Fi network name (SSID) as the one of your main router along with encryption, password, and so on. This ensure the wireless devices connected to your (wider) network will automatically stay connected to the best Wi-Fi network.
Alternatively, you can also choose to have a different SSID name/encryption/password.
Setting up a Wi-Fi network at this stage is not necessary if you just want a “Wifi bridge”. ie. a device designed to only connect ethernet devices to your existing Wi-Fi network.
For simplicity and best chance of success, the instructions below are only for setting up a Wifi bridge device. A computer with an ethernet connection is required.
LAN Interface
As shown in the above image, the LAN interface must be set in a different subnet than the Wi-Fi network you are connecting to.


When you finish all of the following steps, remember to reset your PC’s IP address back to the original address (or DHCP), otherwise you won’t have Internet access! (note: The router won’t route traffic from the 192.168.2.0/24 subnet)
Wi-Fi
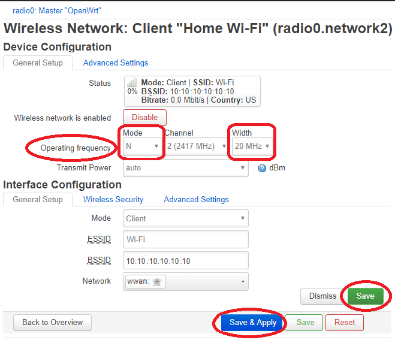
We will now set up the client Wi-Fi network, the configuration needed to connect to another Wi-Fi network.


You will land in the client Wi-Fi settings page. Edit as required.
The most important settings are on the Operating Frequency line.

Removing redundant WAN interface and firewall zones (Optional)
Although not absolutely necessary, it is recommended to delete the redundant WAN interfaces and firewall zones.


Click Save & Apply button.
Warning: These actions will also automatically remove any redundant firewall traffic and port forwarding rules.
Configure static IP address on wwan interface
It is recommended to assign a static IP address to newly created wwan interface. (eg. 192.168.1.30)
The main advantage is it will be possible to manage the router using this static IP address.
This static IP address will also be used later when creating the Relay interface.


Testing Connection
To verify the newly configured static IP address parameters are valid,

Installing relayd package


Creating Relay Interface
To add the relayd interface that will join/bridge the lan and wwan interfaces.


Reminder: Remove the static IP address from your computer. ie. change it back to DHCP client mode.
When the Wifi bridge is powered up, your computer should acquire DHCP IP address from your main router.
The Wifi bridge can be managed through its static wwan IP address (eg. 192.168.1.30)
This is the final result. Note how the client network has a ? instead of a IP address.
The wwan IP address is only visible in the Network Interfaces page.

Check Firewall zone settings
![]() The following part of the configuration should not be necessary (already default options or changed automatically), in case something isn’t working check this too.
The following part of the configuration should not be necessary (already default options or changed automatically), in case something isn’t working check this too.

—-

Before doing any actual configuration, the Wi-Fi interface must be enabled in order to scan for networks in the vicinity:
uci set wireless.@wifi-device[0].disabled="0"
uci commit wireless
wifi
Now we can list networks in range using iw dev wlan0 scan, substituting your actual wireless interface for wlan0 if different (ifconfig lists all available interfaces to find how your wlan is called)
iw dev wlan0 scan output example:
# iw dev wlan0 scan
BSS c8:d5:fe:c8:61:b0(on wlan0) -- associated
        TSF: 24324848870 usec (0d, 06:45:24)
        freq: 2412
        beacon interval: 100 TUs
        capability: ESS (0x0411)
        signal: -72.00 dBm
        last seen: 140 ms ago
        Information elements from Probe Response frame:
        SSID: Violetta
        RSN:     * Version: 1
                 * Group cipher: CCMP
                 * Pairwise ciphers: CCMP
                 * Authentication suites: PSK
                 * Capabilities: 1-PTKSA-RC 1-GTKSA-RC (0x0000)
BSS f8:35:dd:eb:20:f8(on wlan0)
        TSF: 24225790925 usec (0d, 06:43:45)
        freq: 2457
        beacon interval: 100 TUs
        capability: ESS (0x0431)
        signal: -90.00 dBm
        last seen: 1450 ms ago
        Information elements from Probe Response frame:
        SSID: GOinternet_EB20FB
        HT capabilities:
                Capabilities: 0x11ee
                        HT20/HT40
                        SM Power Save disabled
                        RX HT20 SGI
                        RX HT40 SGI
                        TX STBC
                        RX STBC 1-stream
                        Max AMSDU length: 3839 bytes
                        DSSS/CCK HT40
                Maximum RX AMPDU length 65535 bytes (exponent: 0x003)
                Minimum RX AMPDU time spacing: 4 usec (0x05)
                HT RX MCS rate indexes supported: 0-15, 32
                HT TX MCS rate indexes are undefined
        HT operation:
                 * primary channel: 10
                 * secondary channel offset: below
                 * STA channel width: any
        RSN:     * Version: 1
                 * Group cipher: TKIP
                 * Pairwise ciphers: TKIP CCMP
                 * Authentication suites: PSK
                 * Capabilities: 1-PTKSA-RC 1-GTKSA-RC (0x0000)
In the example, there are two networks, a Wi-Fi g one called Violetta and a Wi-Fi n one called GOinternet_EB20FB.
The device was configured to connect to the one called Violetta.
These are the uci values that were added or changed by the configuration procedure.
For SSID, BSSID, and encryption you must use the info you got from the Wi-Fi scan above.
For an explanation of why these values were changed, please read the luci tutorial above.
network.lan.ipaddr='192.168.2.1'
network.repeater_bridge=interface
network.repeater_bridge.proto='relay'
network.repeater_bridge.network='lan wwan'
network.wwan=interface
network.wwan.proto='dhcp'
firewall.@zone[0].network='lan repeater_bridge wwan'
dhcp.lan.ignore='1'
wireless.radio0.hwmode='11g'
wireless.radio0.country='00'
wireless.radio0.channel='1'
wireless.radio0.disabled='0'
wireless.@wifi-iface[0]=wifi-iface
wireless.@wifi-iface[0].device='radio0'
wireless.@wifi-iface[0].mode='ap'
wireless.@wifi-iface[0].encryption='none'
wireless.@wifi-iface[0].ssid='OpenWrt'
wireless.@wifi-iface[0].network='lan'
wireless.@wifi-iface[1]=wifi-iface
wireless.@wifi-iface[1].network='wwan'
wireless.@wifi-iface[1].ssid='Violetta'
wireless.@wifi-iface[1].encryption='psk2'
wireless.@wifi-iface[1].device='radio0'
wireless.@wifi-iface[1].mode='sta'
wireless.@wifi-iface[1].bssid='C8:D5:FE:C8:61:B0'
wireless.@wifi-iface[1].key='myWifiPasswordHere'
Please note that the Wi-Fi network generated by the device in this example (the one called OpenWrt) has no password nor encryption.
This was done because the focus of this article was getting the relay bridge up and running.
You will likely want to set up your device’s Wi-Fi network in a more secure way, as explained in the Wi-Fi setup page here.
If you find the OpenWrt device itself is only accessible from those computers directly connected to the W-LAN AP, not from the ones connected to the OpenWrt W-LAN client, when in the 192.168.1.0 subnet, Make sure the Local IPv4 address setting in the Relay bridge interface matches the ip address of the wireless uplink.
(The alternative is tedious: It is possible to access the OpenWrt box via its 192.168.2.1 address if you manually configure your computer to that subnet.)
Activate IPv6 support on your Internet box, this will get you a public IPv6 prefix. We will now activate IPv6 on our Wi-Fi extender to allow for Stateless Address Autoconfiguration (SLAAC) of your public IPv6 addresses and IPv6 traffic.
1. Go to Network / Interfaces and create a new interface. Name it WWAN6, using protocol DHCPv6, cover the WWAN interface. In the Common Configuration of the new interface, configure: Request IPv6 address: disabled. In the Firewall settings: check that the “lan / repeater bridge…” line is selected. Leave the other settings by default, especially, leave the “Custom delegated IPv6-prefix” field empty. On the Interfaces / overwiew page check that the WWAN interface gets a public IPv6 address.
2. Edit the LAN interface settings, DHCP server / IPv6 settings: check/modify the following settings: Router Advertisement Service: relay mode, DHCPv6 service: disabled, NDP-Proxy: relay mode.
3. Open a SSH session on your OpenWrt device. Issue the following commands:
uci set dhcp.wan.interface=wwan
uci set dhcp.wan.ra=relay
uci set dhcp.wan.ndp=relay
uci set dhcp.wan.master=1
uci commit
We suppose that you created a wwan interface when you joined to the other Wi-Fi network as suggested earlier in this guide; otherwise, change the dhcp.wan.interface=… line accordingly.
That’s it. Restart ophcpd (LuCI System/Starup page, or /etc/init.d/odhcpd restart) and your IPv6-network should begin to configure itself. Connected IPv6-enabled devices should get their public IPv6 addresses, derived from your public IPv6 prefix, and IPv6 traffic should go through your Wi-Fi extender.
Here are a list of some recently reported issues:
-
DHCP issue caused by Access Point. OWrt forum
-
Additional instruction for backdoor to router since once dhcp is disabled on LAN, the router become unreachable. This may occur if there are changes to the wireless access point. eg. wifi SSID, channel number or security passphrase has changed.
-
Connect a computer using ethernet cable to LAN port of the Wifi bridge.
-
Configure a static IP address on the computer. eg. if the Wifi bridge uses LAN IP address of 192.168.2.1 in above example, use static IP address: 192.168.2.10.
-
Access LuCI at 192.168.2.1 for above example.
-
Comment: This looks like the basic instructions for configuring a simple wireless client
This method basically puts a second Wi-Fi router in cascade on the first one; i.e. usually this means that the extender’s clients will be behind double NAT.
It’s like connecting with a cable the WAN port on the Wi-Fi extender to the LAN ports of the main router, the Wi-Fi extender creates a new network for itself and the devices connected to it, that can go on the Internet and reach devices in the LAN network of the main router. But in this case we are doing it with wireless networks instead.
prerequisites:
— router with two initial interfaces (LAN, WAN)
Setup with WebUI:
Now you’ve correctly bounded WWAN with WAN, and consequently WWAN with LAN.
исходные данные
основной роутер имеет ip 192.168.1.1, на роутере настроен выход в Интернет
канал wifi зафиксирован на основном роутере (в примере 13-канал)
роутер на LEDE/Openwrt имеет ip 192.168.1.1, подключен к ПК с помощью кабеля в разъем LAN
настройка роутера
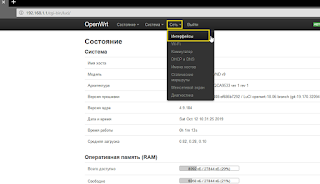
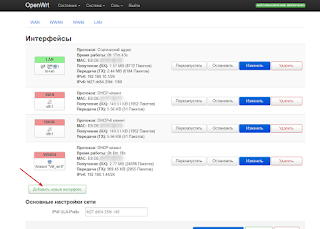
1. зайти в настройки роутера, перейти в «Сеть—Интерфейсы»
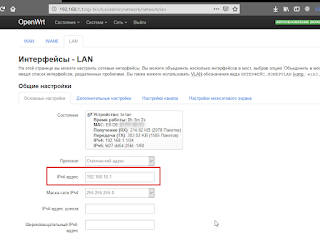
2. отредактировать интерфейс LAN

3. изменить ip адрес на 192.168.10.1, нажать «сохранить и применить»

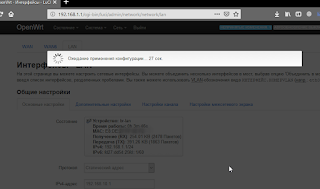
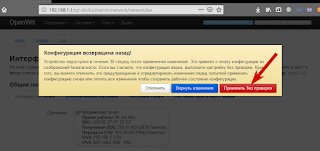
4. произойдет применение настроек, на некоторых версиях проошивок в течение 30 секунд нужно зайти по новому ip 192.168.10.1 (иначе произойдет откат настроек по изменению ip-адреса), если Вы не успели, то дождаться появления предупреждения и выбрать «Применить без проверки»
5. зайти в настройки роутера по новому адресу 192.168.10.1, перейти в «Сеть—Wi-Fi»
6. нажать «Изменить», чтобы отредактировать настройки точки доступа wifi

7. на странице настроек:
— включить wifi точку (если выключена, нажав кнопку «Включить», при включенной точке wifi кнопка будет «Отключить» — тогда ее не нужно нажимать)
— выбрать канал как у основного роутера (в примере 13 канал)
— настроить имя сети (ESSID), шифрование и пароль (можно задать такое же имя и пароль wifi как у основного роутера)
— проверить, что в поле «сеть» выбрано «lan»
— нажать «сохранить и применить»
8. на странице «Сеть—Wi-Fi» нажать «Поиск» для поиска точки wifi основного роутера
9. выбрать точку wifi основного роутера и нажать «Подключение к сети»

10. на следующей странице обязательно снять отметку (убрать «галочку») с «Заменить настройку беспроводного соединения», ввести пароль от точки wifi основного роутера, нажать «применить»
11. на следующей странице нажать «сохранить и применить»
12. если все данные указаны правильно, то на странице «Сеть—Wi-Fi» будет показан статус подключения к основному роутеру в качестве клиента wifi
на странице «Сеть—Интерфейсы» появится новое подключение WWAN, на котором будет получен ip-адрес от основного роутера, на данном этапе на роутере уже должен быть Интернет (необходимо проверить выход в Интернет, если выхода нет, значит где-то допущена ошибка или основной роутер не имеет выхода в Интернет)

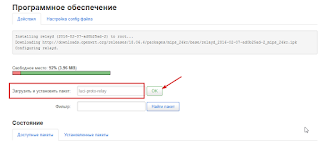
13. перейти в «Система—Программное обеспечение»
14. обновить списко пакетов для установки, нажав «Обновить списки», при удачном обновлении должны загрузиться списки пакетов

15. установить пакет «relayd», для этого в поле «Загрузить и установить пакет» ввести relayd и нажать «ОК»

при удачной загрузке и установке пакета отобразится соответствующая запись

16. аналогично установить пакет «luci-proto-relay», для этого в поле «Загрузить и установить пакет» ввести luci-proto-relay и нажать «ОК»
——————————————————
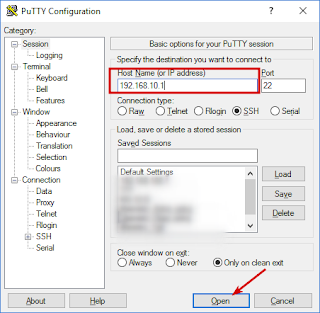
пакеты также можно установить через консоль SSH (если пакеты установлены через веб-интерфейс, то через SSH устанавливать не нужно), для этого:
1) подключиться к роутеру по SSH, например через Putty (ip 192.168.10.1, логин: root, пароль: пароль от роутера)
2) выполнить команду
opkg update
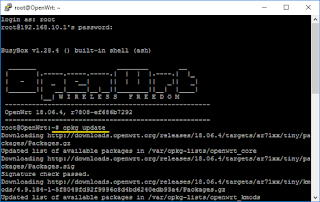
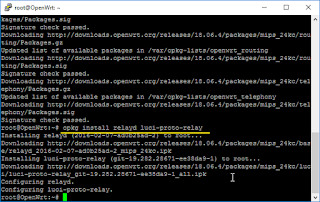
3) установить пакеты командой:
opkg install relayd luci-proto-relay
——————————————————
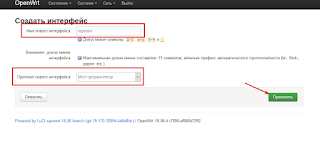
17. перейти в «Сеть—Интерфейсы», добавить новый интерфейс
18. указать имя интерфейса (произвольно, в примере имя «repeater»), выбрать протокол «Мост-ретраслятор»
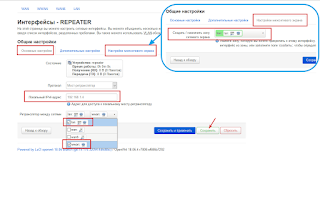
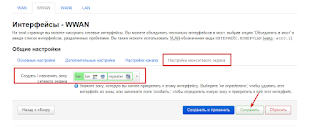
19. на следущей странице указать следующие настройки:
— «Локальный IPv4 адрес» — 192.168.1.4 (можно и другой из подсети основного роутера 192.168.1.х)
— «Ретраслятор между сетями» — выбрать «lan» и «wwan»
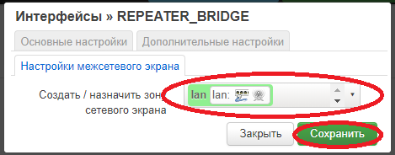
— на вкладке «Настройки межсетевого экрана» выбрать lan в поле «Создать/Назначить зону сетевого экрана» (зеленым цветом)
— нажать «сохранить» (НЕ «сохранить и применить»)
20. на странице «Сеть—Интерфейсы» отредактировать интерфейс WWAN
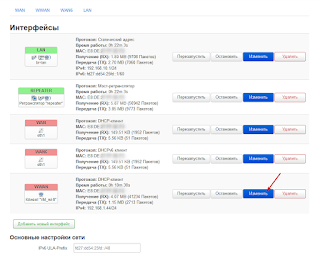
21. на вкладке «Настройки межсетевого экрана» выбрать lan в поле «Создать/Назначить зону сетевого экрана» (зеленым цветом), нажать «сохранить» (НЕ «сохранить и применить»)
22. на странице «Сеть—Интерфейсы» отредактировать интрефейс LAN
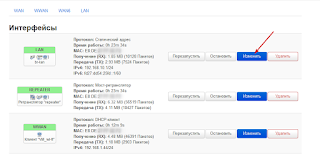
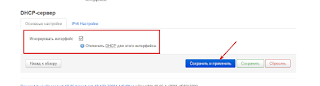
23. «IPv4 адрес» указать как в пункте 19, т.е. 192.168.1.4, ниже в настройках «DHCP-сервер» отключить DHCP, поставив отметку «игнорировать интерфейс», нажать «сохранить и применить»
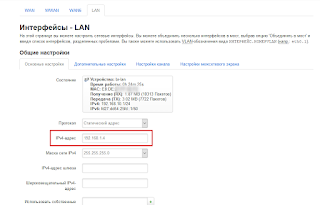
24. при необходимости перезагрузить роутер, после загрузки можно зайти в настройки роутера по адресу 192.168.1.4
клиенты подключенные к роутеру (репитеру) получают ip-адреса от основного роутера и находятся в одной подсети с клиентами подключенными как к репитеру, так и к основному роутеру, общие ресурсы в локальной сети будут доступны на всех клиентах.

Настройка роутера на LEDE/Openwrt в качестве репитера (веб-интерфейс на английском языке)
The OpenWrt lede repeater mode configuration with any other brand access point to increase signal up to 100%. follow the simple configuration steps to use OpenWRT OpenWrt Repeater Mode Configuration with Non-OpenWrt AP.
OpenWrt is an open source firmware under GUI license and free to use for personal and commercial use. Many leading wireless router Manufacturer Company use the source code of OpenWrt firmware to develop own firmware without extra effort to start from zero. You can use OpenWrt firmware for your wifi router to make it an extra feature and improve the performance of your WiFi network without paying single bucks. While going to upgrade your wifi router firmware with OpenWrt firmware, highly recommended checking the model number compatible with OpenWrt firmware. Force-fully flashing firmware can be permanently brick your WiFi routers.
- The Best Free WiFi Captive Portal Login Page
The OpenWRT firmware not only can be used as access point mode but also can be used to boost wifi signal in repeater mode. In this post, you will get a simple way to use your OpenWrt WiFi router as a repeater mode to boost the wireless signal up to 100% in the dark area. There are some points to know before going to start OpenWrt Repeater Mode Configuration to turn your OpenWRT router into wifi repeater mode. It is not necessary to use OpenWrt repeater mode with OpenWrt Access Point mode. It is not possible to test OpenWrt Repeater mode with every brand wifi router but as of now, we have tested OpenWrt Repeater mode with TP-Link wifi router, Netgear, D-Link, Digisol, Tenda, iBall, and many others.
Before the configuration of Repeater mode Default, the IP address must be changed to avoid IP conflict.
- How to Check Who is connected to My WiFi
OpenWRT Luci First time Login
OpenWrt firmware having default IP address 192.168.1.1 which is also used in most of the brand wifi router default IP. During the first login of OpenWrt change the default IP address to avoid any network glitch.
Go to your PC/Laptop LAN setting and turn into DHCP mode.
Now go to a web browser and type OpenWRT default IP address.
Default Username: root
Password: blank (no password)
- 3 Way to Factory Reset OpenWrt Router
Click Login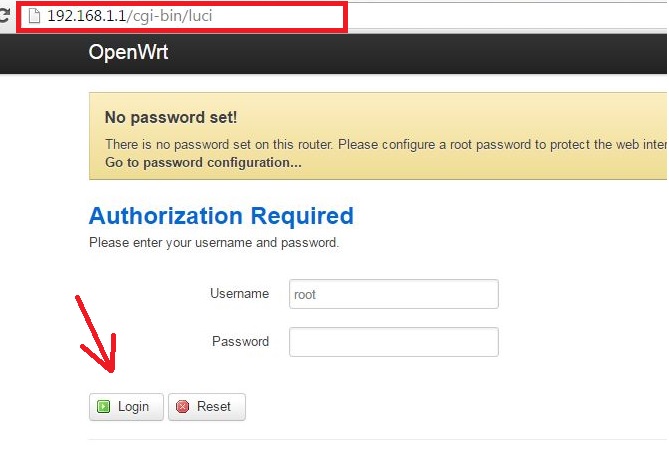
- How to login Mediacom Router to Manage Home Network
OpenWrt Router Recommended Set Password on the first Login
There is no password set on default mode in OpenWrt firmware
Click on “ No password set!” Notification in yellow color.
Set the login password to ensure your Wi-Fi router security from unauthorized access.
- 192.168.2.1 Login Digisol DG-HR3400 Broadband Router?
OpenWrt Lede Default IP Address Change
To change OpenWrt Default IP Address Go to Network- Interface
In LAN find the “Edit” button and press to enter in settings.
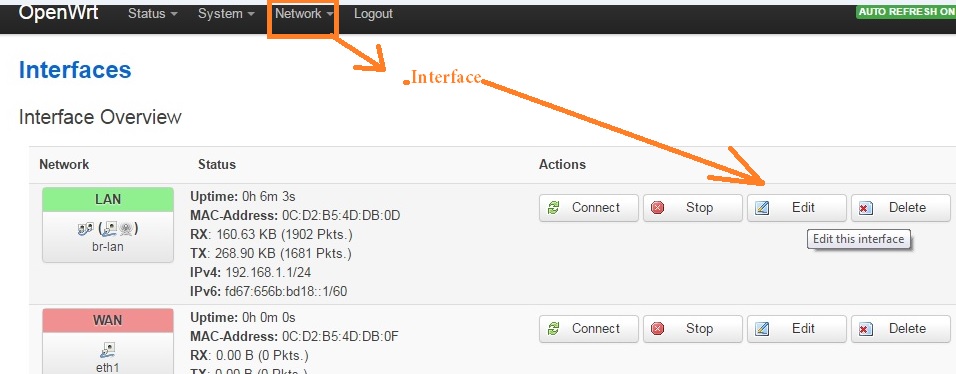
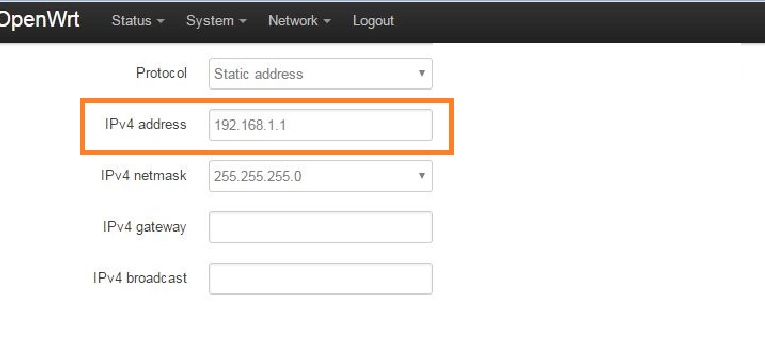
In the next page, you will get Network settings
IPv4 address– change the IP address in this box and re-open using the new IP address.
- How to upgrade WiFi router with OpenWRT Firmware
OpenWrt Lede Repeater Mode (Client+AP) Configuration
Before start process Repeater mode in OpenWrt keeps ready your main wifi router Wireless password to join OpenWrt Repeater device.
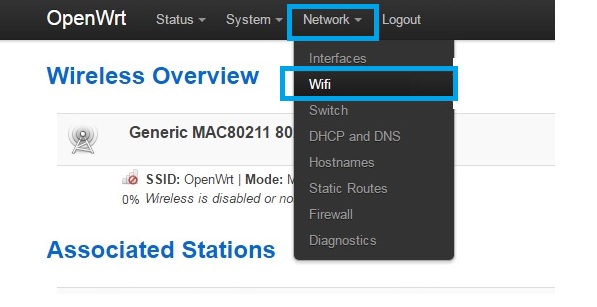
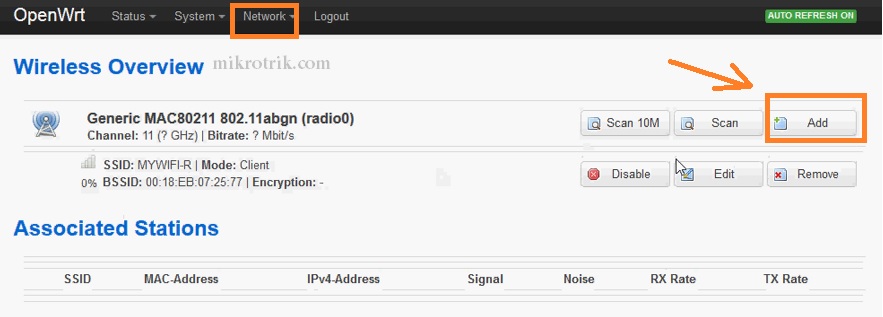
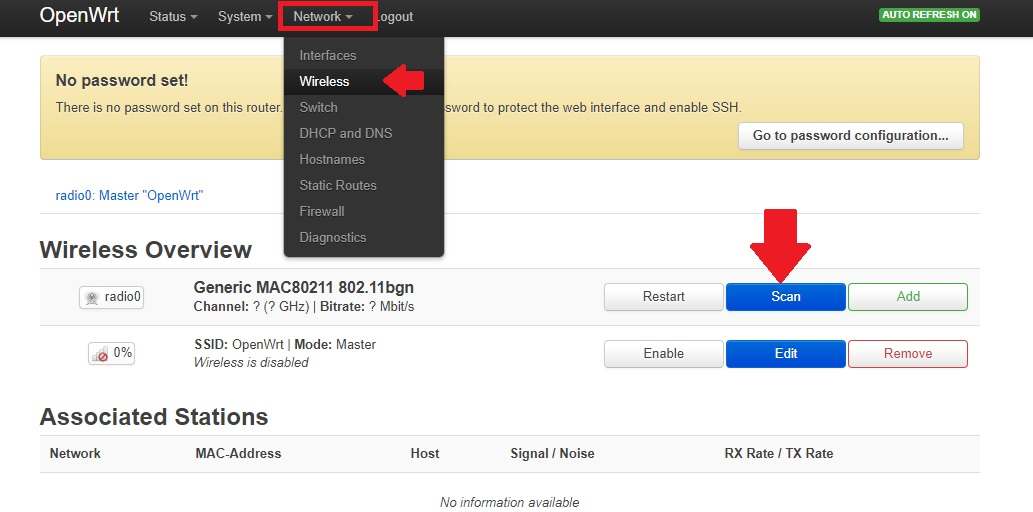
To enable OpenWrt, Repeater Go to Network option from the top menu.
Inside Network choose the WiFi option.
- Go to Network –> WiFi
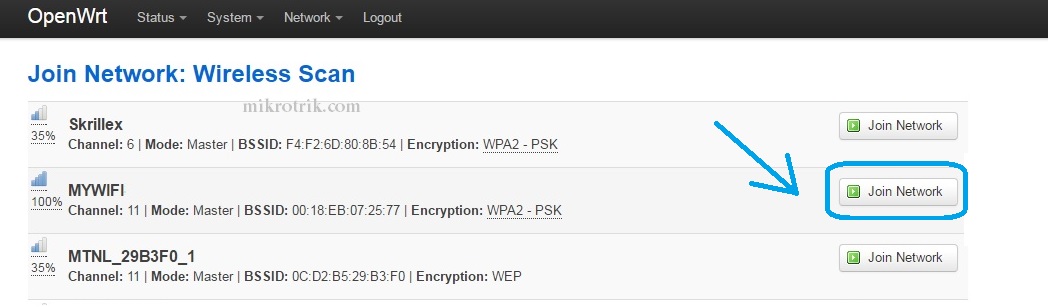
Click the Scan button as shown below image.

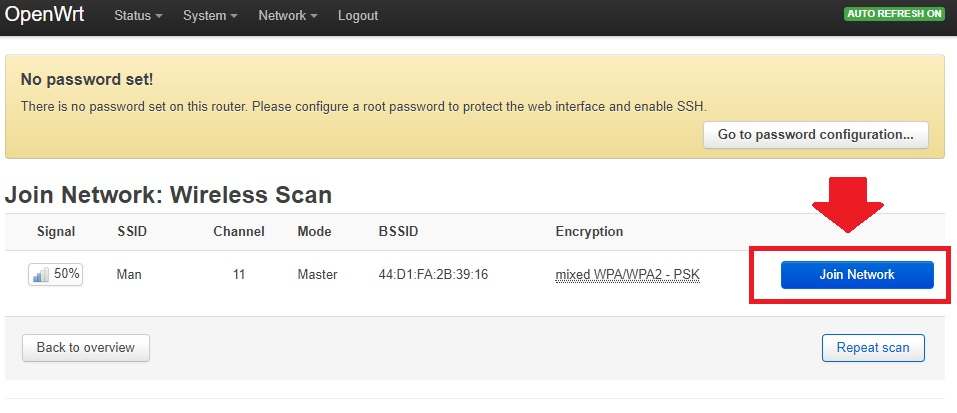
From Scanning, list finds your Main WiFi network SSID and click the Join Network button as shown below image.
Note:- Airmax must be disabled in the UBNT device to connect third-party repeater devices. And N-stream should disable in Mikrotik Device to able to connect Non-Mikrotik Devices.
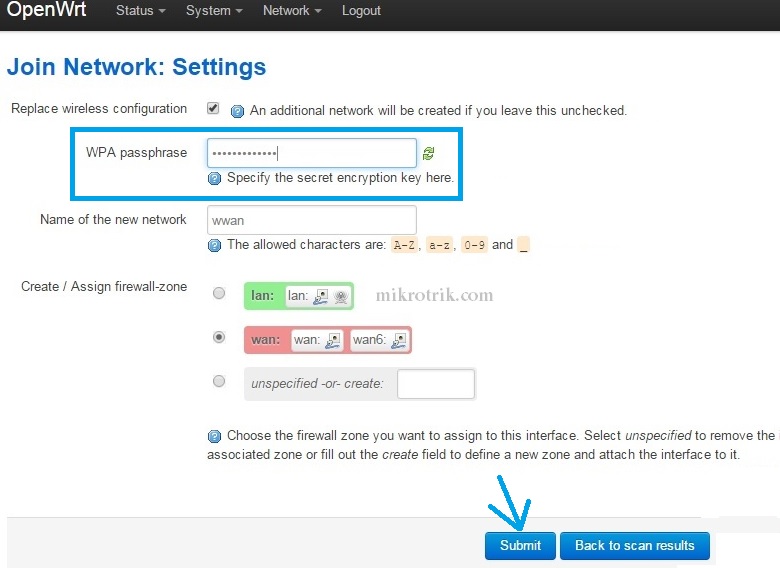
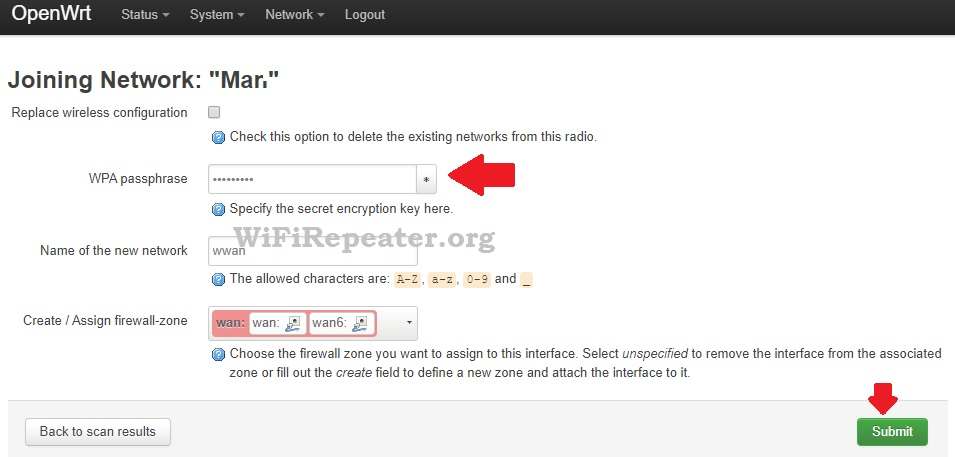
In this next step, you need to give the main wifi password to connect the repeater device.
WPA passphrase: type your Main WiFi Router Password in this box.
Name of the new Network: you can give any name in this box or leave as it is.
Create / Assign Firewall-Zone: WAN should be selected (default selection)
Press the Submit button below to proceed next steps.
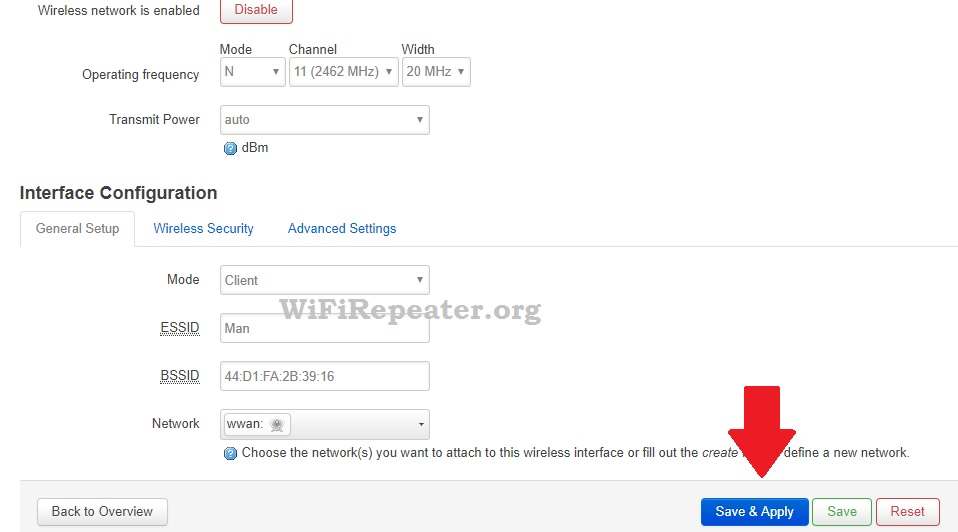
As the Repeater device uses Auto channel selection so it will lock with the AP channel so do not change Frequency.
Do not change any setting in this step.
Press Save & Apply
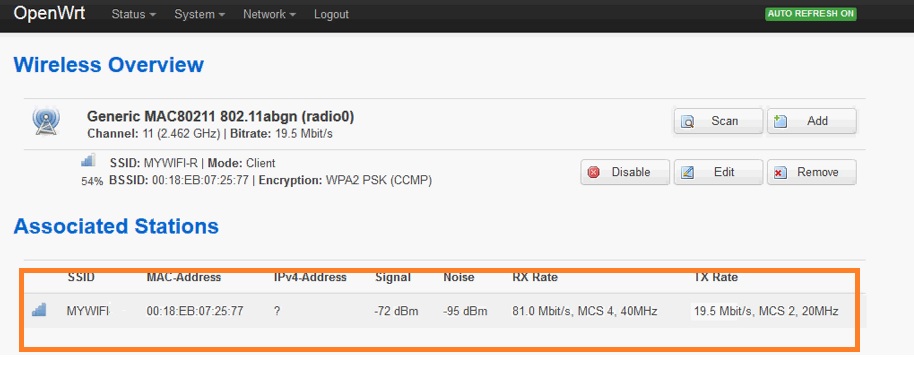
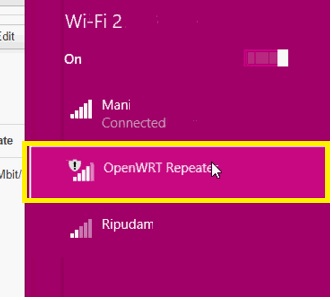
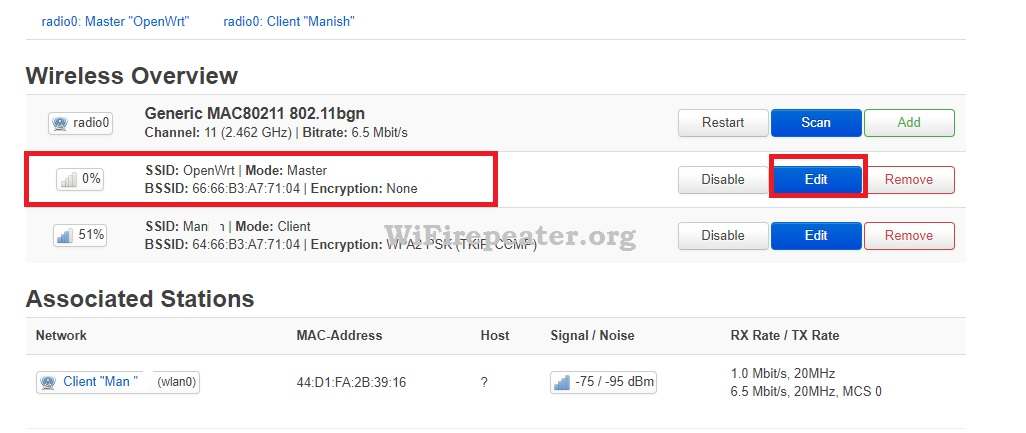
OpenWrt Repeater Connection Status
To confirm the connectivity of the Repeater device with your existing wifi router Go to Network tab.
Click on the WiFi tab.
You will get an AP name with signal status in your WiFi option to ensure your OpenWrt Repeater device successfully connected to AP.
Now Add OpenWrt Repeater Wi-Fi Name
To add Repeater SSID in OpenWrt Go to Network and WiFi option again.
Click the Add button to enter settings.
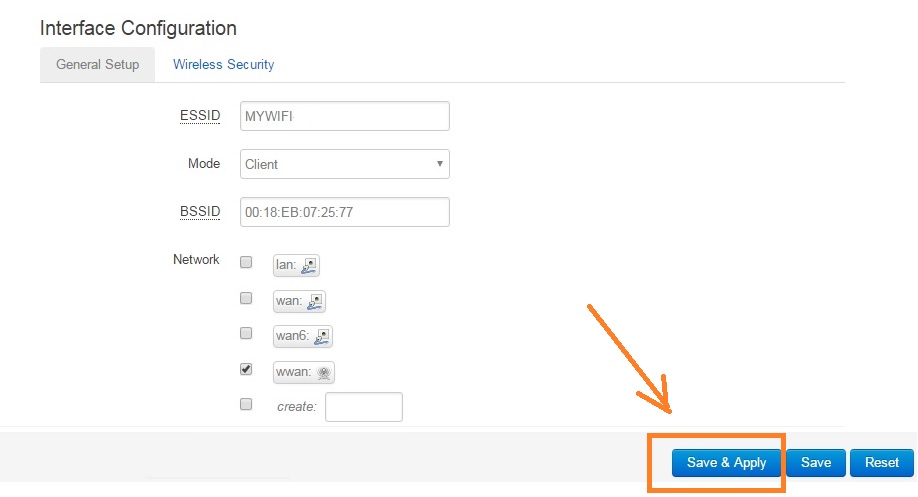
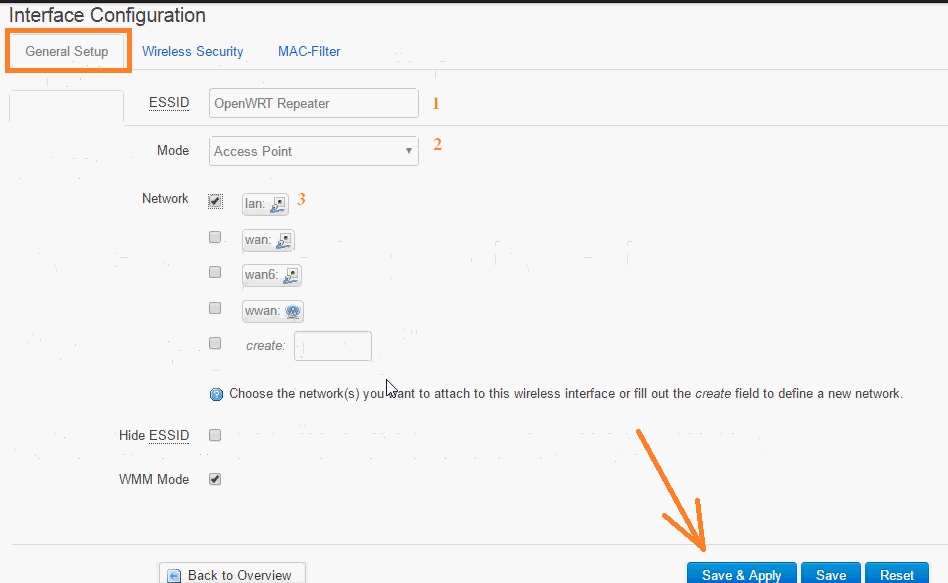
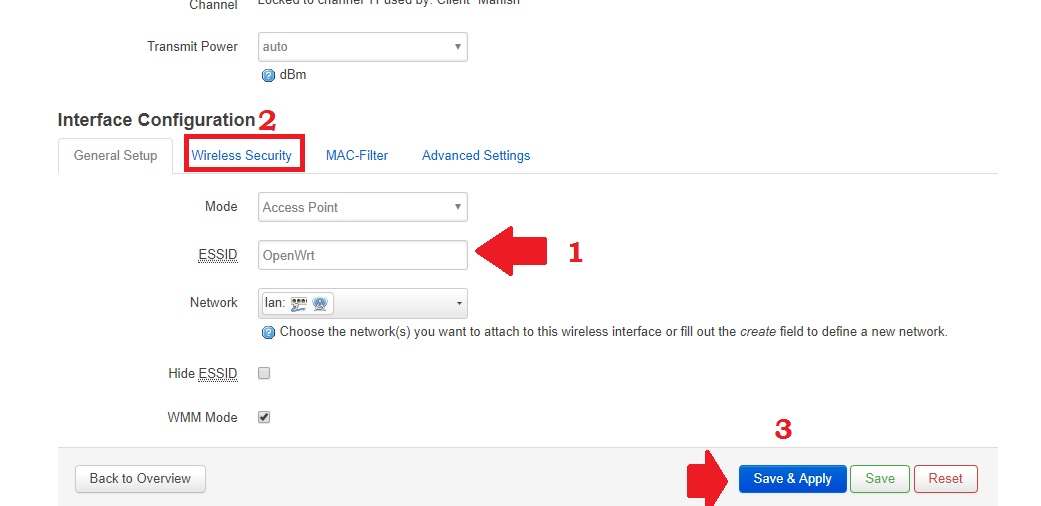
OpenWrt Repeater SSID and mode settings
Just down the page to the General Setup tab as shown below image.
- ESSID: OpenWRT Repeater ( type your repeater wifi name in this box)
- Mode: Access Point
- Network: Lan
Press Save & Apply button
OpenWrt Repeater WiFi password setting
You must set a wifi password in the repeater network to avoid unauthorized access to your WiFi networks.
Just Wireless Security tab next to General setup.
1: Encryption: WPA2PSK (recommended)
2: Cipher: keep it Auto
3: Key: type Repeater password in this box (this key will use to connect repeater device)

Press Save & Apply button
Placement of OpenWRT Repeater Device in Home
Always use the repeater location in a centralized position where the main AP device signal received at least 45% to get stronger repeater connectivity. Find the best location in which line-of-sight clear from Host AP and no object obstacle signal connectivity between repeater and AP. Never put Repeater device inside any drawer and any type of closed box to avoid the wireless signal issue.
Check Your Laptop/Mobile Wi-Fi signal for Repeater Status.
If you have desktop PC which does not have wifi then just connect the LAN cable to the repeater device and connect to the LAN port of your desktop or any other network device such as CCTV NVR, Network storage.
You can also use the OpenWrt Repeater device to connect NVR to the internet without laying physical cable from your Wi-Fi modem to the NVR device.
You have successfully configured OpenWrt as Repeater mode with any brand access point to boost your weak wifi signals. This user manual can use for OpenWrt any version such as OpenWrt attitude adjustment, OpenWrt Luci, OpenWRT chaos charmer, OpenWRT lede and any other release.
Related Post
- Block Website in OpenWRT WiFi Router
- How to Factory Reset D-Link WiFi Router
- TP-Link AC1350 Archer C60 Login 192.168.0.1 and setup
- Airtel ZeroTouch Broadband Login and Setup
У меня в последнее время как-то все с первого раза не получается! То ли я ввязываюсь куда-то не туда, то ли устройства попадают ко мне с какими-то ограничениями. Видимо, роутер TP-LINK TL-WR842ND V2 из этого разряда и без трудностей не обошлось, поэтому распишу как сделал и как надо, чтобы в будущем и вам полезно было и я сам не мучил себя вопросом — «Как же я это сделал?»
Для начала…
Чтобы много вопросов не возникало, я быстро распишу, как установить саму прошивку OpenWRT на примере роутера TP-LINK TL-WR842ND V2. Инструкция универсальна, так что у вас тоже должно получиться.

Итак, переходим на эту страницу, спускаемся к таблице и вводим данные о вашем роутере, нажимая ENTER.

В графе Supported Current Release увидим последнюю версию прошивки, которая доступна для вашего роутера. На момент написания этой статьи, для моего роутера это версия 19.07.2. Чтобы скачать прошивку, воспользуйтесь ссылкой в графе Firmware OpenWrt Install URL.
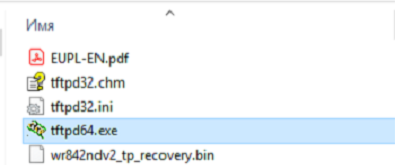
Теперь вам надо поместить в эту же папку ранее скачанную прошивку, но здесь есть один важный момент!
Прошивку необходимо правильно переименовать под вашу версию роутера.
Собственно, название прошивки должно быть следующего вида: МодельВерсия_tp_recovery.bin
То есть, если у меня роутер TP-LINK TL-WR842ND V2, то название прошивки у меня будет: wr842ndv2_tp_recovery.bin
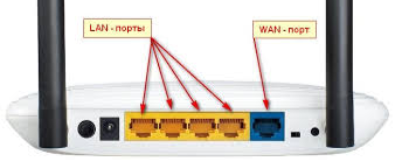
Отключаем на компьютере лишние Ethernet-кабели, а также Wi-Fi адаптер, чтобы ничего не мешало, и подключаемся к LAN порту роутера.
Далее подключаем компьютер к LAN порту роутера и меняем ip адрес сетевого адаптера компьютера на 192.168.0.66.
Для некоторых моделей роутеров ip адрес может быть 192.168.1.66
Все необходимые условия сделаны, давайте теперь прошиваться!
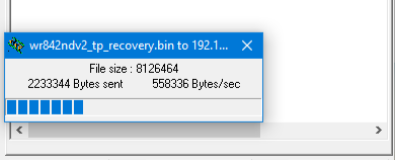
- Запускаем от имени администратора утилиту TFTP-сервер.
- Нажимаем и удерживаем кнопку WPS/Reset на роутере и не отпуская, включаем питание. В таком состоянии держим до той поры, пока не загорится светодиод с замком, примерно 5-10 секунд.

Если все было сделано правильно, то появится окно загрузки. Ожидаем пока процесс закончится, после чего ждем еще пару минут, пока сам роутер не перезагрузится.
При перезагрузке, в основном, загораются все светодиоды.
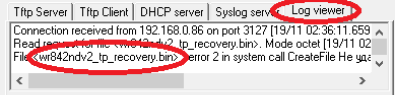
Если окно загрузки не появляется, то, возможно, вы неправильно изменили название прошивки. Во вкладке Log viewer можно посмотреть какое название прошивки запрашивает сам роутер.
Не забудьте вернуть настройки сетевого адаптера вашего компьютера в режим автоматического получения ip-адреса!
Настройка с помощью веб-интерфейса LuCI
Подключимся и настроим подсеть
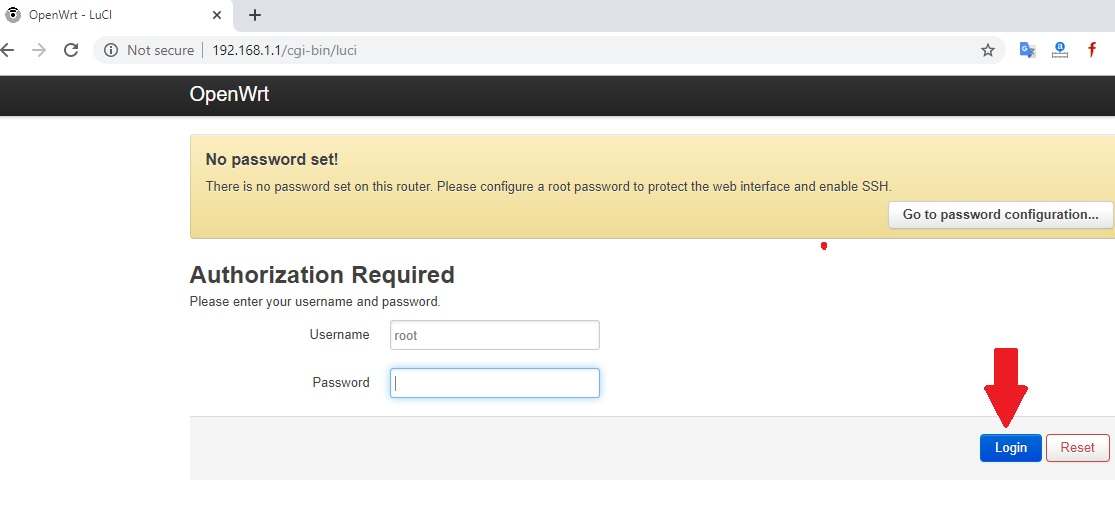
После, открываем браузер и переходим на страницу роутера по адресу 192.168.1.1, у некоторых это может быть 192.168.0.1. Думаю, сами разберетесь.
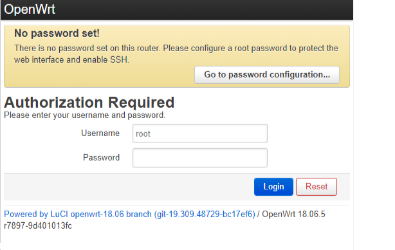
В итоге, откроется страница авторизации, где надо ввести логин и пароль. Так как это первый запуск, то вы увидите предупреждение о том, что на роутере не установлен пароль. Чтобы установить пароль, нажмите на кнопку «Go to password configuration«. Далее ничего сложного, поэтому переходим дальше к более важным настройкам.
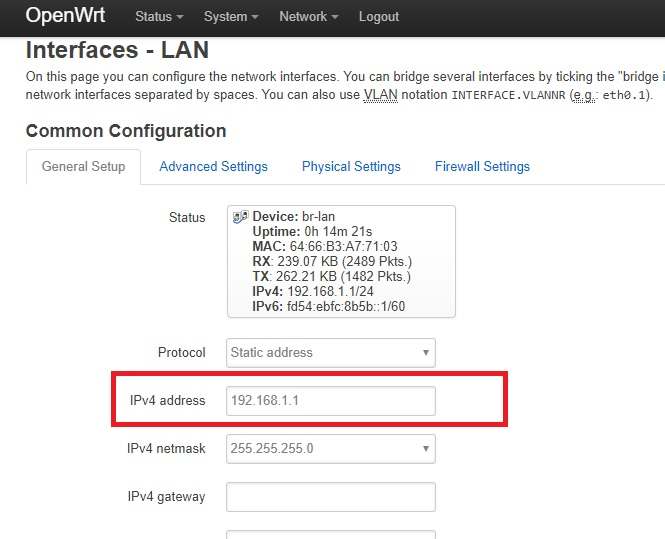
Назначим новый ip-адрес вашему роутеру, так как он должен работать в другой подсети от основного роутера. Это важно! У моего основного маршрутизатора 192.168.1.1, поэтому на второй я буду назначать 192.168.2.1.
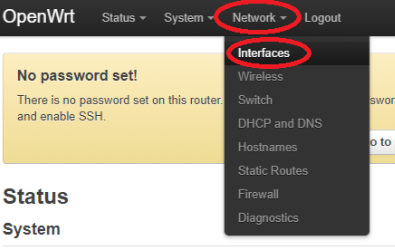
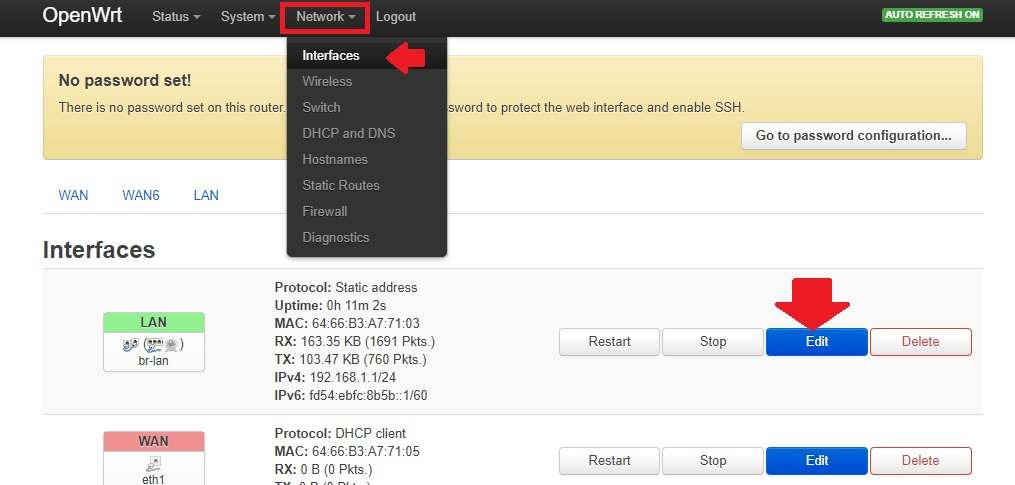
Нажимаем на Network и переходим в Interfaces.
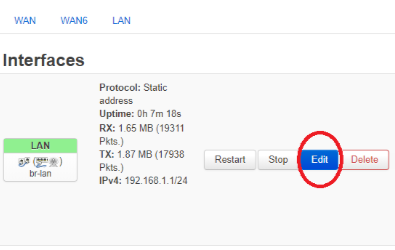
Находим интерфейс LAN и нажимаем на кнопку Edit.
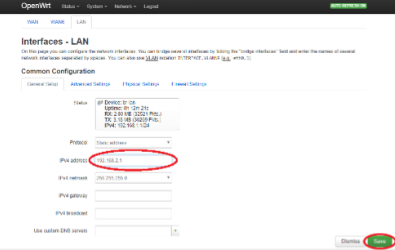
В поле IPv4 sddress: вводим новый ip-адрес и снизу нажимаем на кнопку Save. После, еще раз нажимаем на кнопку Save&Apply.
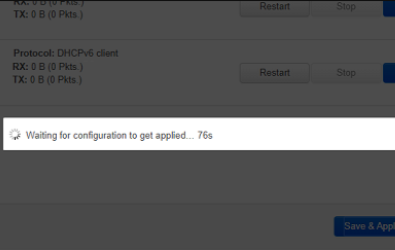
После того, как увидим следующее окошко с обратным отсчетом, предлагаю отключить и включить вручную LAN кабель роутера.
Ваш компьютер, возможно, не сразу определит новый ip-адрес роутера, поэтому и предлагается отключить и включить вручную LAN кабель роутера или лучше само питание. После этих действий, открываем новую вкладку браузера и переходим на установленный вами ip-адрес 192.168.2.1, пока обратный отсчет не закончился! Иначе роутер вернет старый ip-адрес.
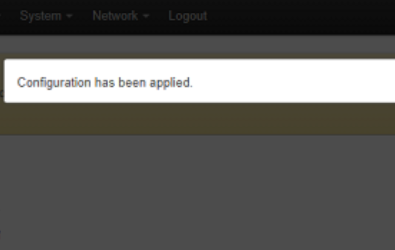
Если все прошло успешно, должно появиться такое предупреждение.
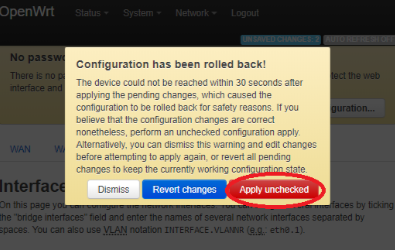
Иначе, увидим такое предупреждение, где нажимаем на кнопку Apply unchecked, для применения настроек.
Подключимся к интернету
Драйверы, используемые в OpenWRT, лишены поддержки мостового соединения в режиме клиента. Чтобы решить эту проблему, нужно установить дополнительные пакеты, но для этого нужен интернет на самом роутере.
Давайте подключимся по Wi-Fi к основному маршрутизатору, чтобы получить интернет.

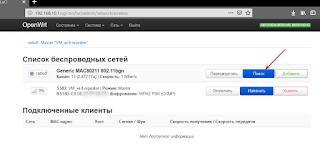
Нажимаем на Network и переходим в Wireless.
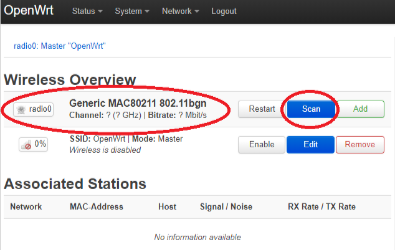
Находим интерфейс radio0 Generic… и нажимаем на кнопку Scan.

Выбираем сеть Wi-Fi вашего основного роутера, к которому надо подключиться и нажимаем на кнопку Join Network.
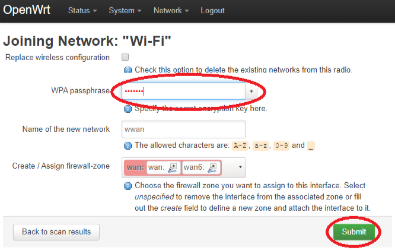
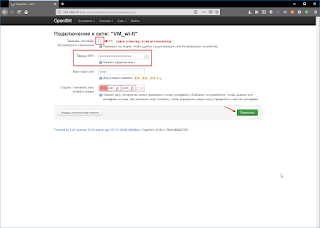
В поле WPA passphrase: вводим пароль от сети Wi-Fi основного роутера, а все остальное делаем как на скриншоте, после чего нажимаем на кнопку Sunbmit.
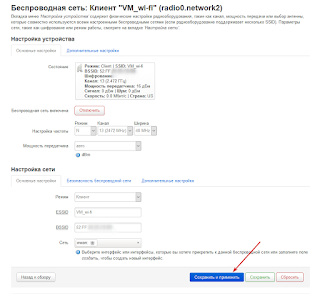
Перед вами откроется страница расширенных настроек Wi-Fi клиента, где вы можете настроить различные параметры по мере необходимости.
В пункте Operating frequency находятся важные параметры, такие как стандарт и ширина канала. Эти параметры должны быть выставлены как на основном маршрутизаторе.
Не забудьте применить настройки! Нажмите кнопку Save, а потом нажмите на Save&Apply.
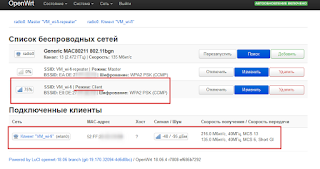
Если все настройки сделаны правильно, то внизу на открывшейся странице вы увидите статус подключения к основному роутеру в режиме «Client». Также, на вашем компьютере должен появиться интернет.

Установим дополнительные пакеты
Так как у нас уже есть интернет, то сейчас будем устанавливать необходимые пакеты, такие как luci-proto-relay и relayd, а заодно и установим пакеты русского языка.
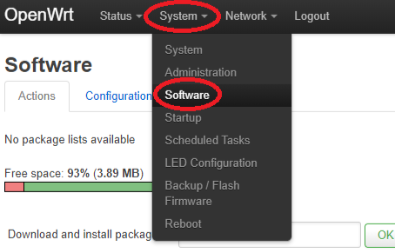
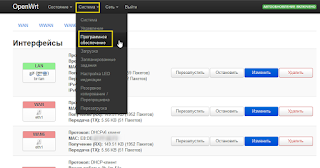
Нажимаем на System и переходим в Software.
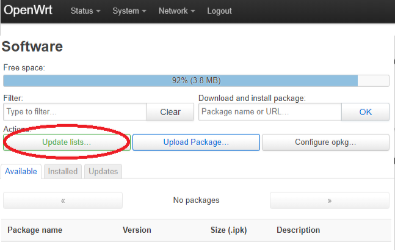
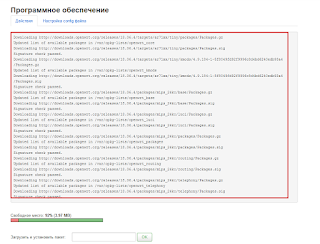
Находим и нажимаем на кнопку Update lists.

Ждем, пока не обновятся все пакеты, жмем кнопку Dismiss, после чего находим строку Download and install package:
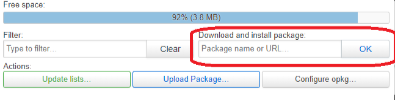
и устанавливаем по очереди ниже указные пакеты:
luci-proto-relay
relayd
luci-i18n-base-ru
luci-i18n-firewall-ru
В окошках нажимаем на кнопку Install и ждем пока не появится что-то подобное.

Ну вот и все, все пакеты установлены, обновляем страницу и интерфейс теперь на Русском языке, что еще для счастья надо.
Настраиваем раздачу Wi-Fi
Раз мы установили русский интерфейс, то дальше буду ориентировать вас в русском меню.
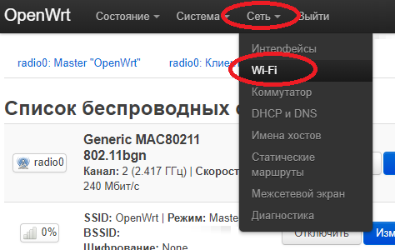
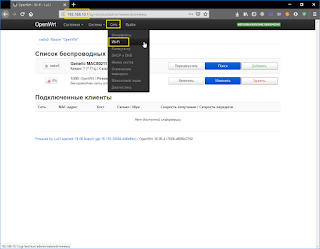
Нажимаем на Сеть и переходим в Wi-Fi.
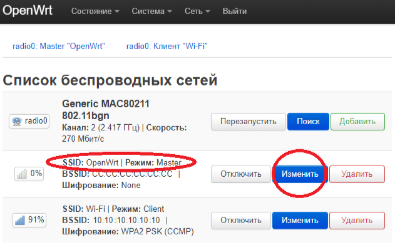
Находим интерфейс с SSID OpenWrt с режимом Master, после чего нажимаем на кнопку Изменить.
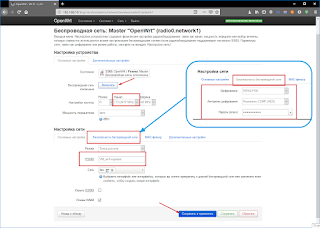
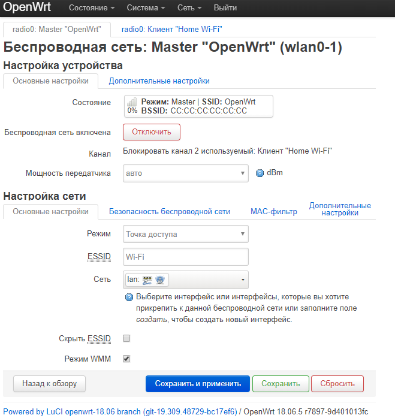
Теперь перед нами страница настроек Wi-Fi мастера. Здесь необходимо задать параметры, как у основного маршрутизатора.
Расскажу об основных настройках.
Мощность передатчика — лучше настроить так, чтобы при приближении к основному роутеру, устройство автоматически меняло сеть подключения.
Режим — должен стоять как «Точка доступа».
ESSID — видимое название WI-Fi сети (имя сети).
Шифрование — находится во вкладке Безопасность беспроводной сети, нужно для того, чтобы установить пароль на Wi-Fi сеть.
Сохраняем кнопкой Сохранить и нажимаем Сохранить и применить.
Настроим интерфейс повторителя
Теперь добавим и настроим интерфейс Relayd(Мост-ретранслятор), чтобы присоединить интерфейсы lan и wwan.
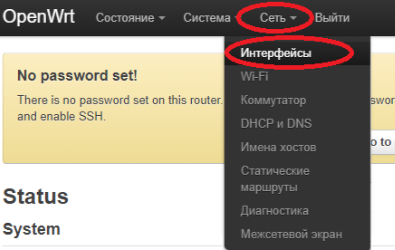
Нажимаем на Сеть и переходим в Интерфейсы.

Находим и нажимаем на кнопку Добавить новый интерфейс.

В разделе имя вводим Repeater_bridge, а протокол выбираем Мост-ретранслятор, после чего нажимаем на кнопку Создать интерфейс.
Откроется страница настроек нового интерфейса, где надо будет проделать некоторые настройки.
В разделе Основные настройки должно быть так:
-
Протокол должен быть Мост-ретранслятор.
-
Ставим галочку, чтобы загружалось при запуске.
-
Открываем список в пункте Ретранслятор между сетями и обозначаем в списке lan и wwan.
-
Локальный IPv4 — адрес здесь выставляем IP- адрес, который был ранее назначен на Wi-Fi-сеть.
Переходим на вкладку Настройки межсетевого экрана и выбираем lan. Нажимаем кнопку Сохранить, а после — Сохранить и применить.

Перезагружаем роутер самостоятельно, нажимаем на Сеть и переходим в Wi-Fi. Почему-то у меня отключился Master Wi-Fi, поэтому проверьте эту настройку и, если необходимо, включите и сохраните настройки с применением.
Настройка с помощью CLI
Пока времени не хватает, чтобы расписать как настроить тоже самое с помощью CLI, но как время появится, я обязательно это сделаю.
OpenWRT an open source router firmware to boost the performance a normal router by adding many extra useful features. WISP stands for Wireless internet service provider mode. In WISP mode router wireless work as a WAN port and wifi device work as a router. You can use OpenWRT wisp mode to share internet cable to multiple users without adding an additional wifi router.
WISP mode also can use to turn OpenWRT powered router into a wifi range extender to boost wifi signal. OpenWRT WISP repeater mode can configure with non-OpenWRT router also using the simple client mode. In WISP mode router not work as a bridge connection it works as a router so you can not access the device connected to the main router from the device connected to OpenWRT WISP mode. In this post, you will get a simple configuration step to setup the OpenWRT router as WISP repeater mode to work as a wifi booster.
- WiFi Repeater Vs Range Extender?
OpenWRT WISP mode Setup with non-OpenWRT AP
- Connect OpenWRT Router to PC/Laptop using LAN cable to access the OpenWRT configuration page in a web browser.
- Configure your Laptop/PC Lan IP address to access OpenWRT in default mode.
- Go to PC/Laptop LAN TCP/IPv4 Static IP address 192.168.1.254 to access open Wrt IP.
OpenWRT Default IP address: 192.168.1.1
Default username- root
Default password: NA
- LAN IP Address Configuration in Windows and Mac PC
Open a web browser such as Google Chrome, Firefox, and access OpenWRT default IP http://192.168.1.1.
Press the Login button to access the settings page.
- 192.168.0.1 Default admin username and password
Change OpenWRT Default IP Address
As most of the router comes with a default IP Address http://192.168.l.l so before setup OpenWRT router it is highly recommended to change LAN IP.
To change LAN IP Go to Network- Interfaces
Find the LAN interface (Green color).
Press the Edit button to enter in network settings.
Protocol: Static Address
IP Address: change this ip address to new IP address and press Save & Apply button.
Access OpenWRT with Change new IP address again and follow steps to configure as WISP repeater.
- How to turn wired IP Camera into Wireless camera
OpenWRT Configuration as WISP Repeater Mode
Now go to Network-Wireless
Press on the Scan button to search wifi network running nearby.
Wait to load all wifi names in the scan list.
See the SSID name of your host wiFi router on the list.
Press the Join network button to connect from OpenWRT.
Keep ready your Main WiFi password to allow OpenWRT device connection.
WPA Passphrase: type your main wifi password.
Press the submit button to proceed next steps.
In the next steps device will auto select wireless mode to client and Mac Address of host router.
Press Save & Apply button to confirm settings and wait.
The router will take a few seconds to save settings and revert back to the wireless page.
In the wireless page, you can check WISP connected status signal quality with main Wi-fi router.
Make sure your WISP router getting at least 50% of the signal from the host router.
- How to Fix WiFi Signal issue using Old WiFi Router
Setup WISP Repeater WiFI name and Password
Once the router connected to the host WiFi router using WISP mode now create the wifi name and password for repeater signals.
To add range extender wiFi name go to Network- Wireless
Find the Mode: Master in the interface list.
Press the Edit button to change the default WiFi SSID and set Key.
See the interface configuration settings on the page.
1: General setup:
ESSID: type the WiFi name for Repeater signals to use repeater existing wifi network.
2: Wireless Security: Press on the tab and set the WiFi security for the extended network name.
3: Press the Save and Apply button to confirm settings.
Once all settings save to go to Mobile WiFi and connect the Repeater name to confirm internetworking.
- 10.1.10.1 Admin login Username and Password
OpenWRT WISP Router Placement
The placement of the repeater device depends on the extended signal and wifi connectivity.
Always find a place where the WISP device can get at least a 50% WiFi signal of the main wireless router.
Follow the WiFi Repeater Placement guide to get proper signal and connectivity of the WiFi router.
Related Post
- How to Login BSNL Broadband WiFI Modem?
- iBall Baton 300M Repeater Mode configuration
- TP-Link CPE220 Outdoor CPE Range Extender Mode
- Tenda N300 Repeater Mode Configuration [N301]