OpenVPN is a free VPN (virtual private network) service that allows you to remotely access your Home network from anywhere with an open internet service. OpenVPN is a multiplatform service that works with both Android and iOS operating systems, allowing you to access devices and services in use through your router.
This article will take you through the steps needed to create and establish an OpenVPN connection with your TP-Link router.
*Note:
Verify router/modem has a public WAN IP address that is not bounded by ISP; if it’s a private IP address, that means the router/modem is behind a NAT, please open the ports for the router/modem on the NAT.
But for the CG-NAT ISP: Comporium and Direct link — radio service, provide the customer a private IP, that will cause you can’t use the OpenVPN and affect the NAT Type. You can contact the ISP and ask them to offer a Statis IP address.
Setting Up OpenVPN on a TP-Link Router
(This example uses the Archer C5400)
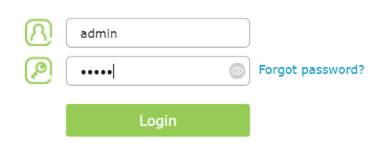
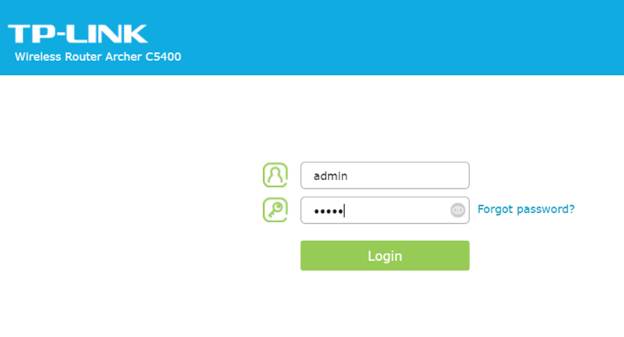
Step 1: Log into your router at tplinkwifi.net. The default username and password are admin.
Step 2: Click Advanced on the top navigation bar.

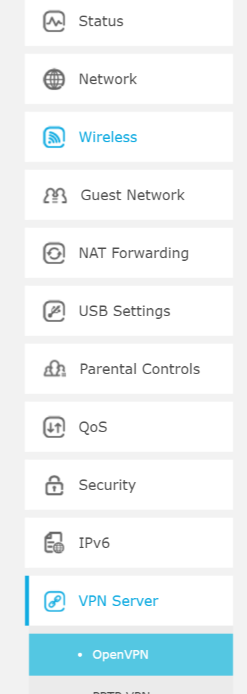
Step 3: Click VPN Server, then OpenVPN.
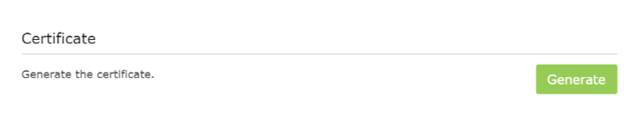
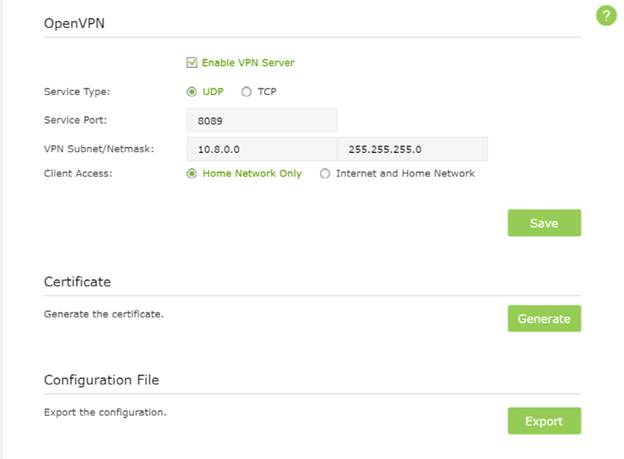
Step 4: Click Certificate to generate a certificate.
Note: This step must be completed before enabling OpenVPN.
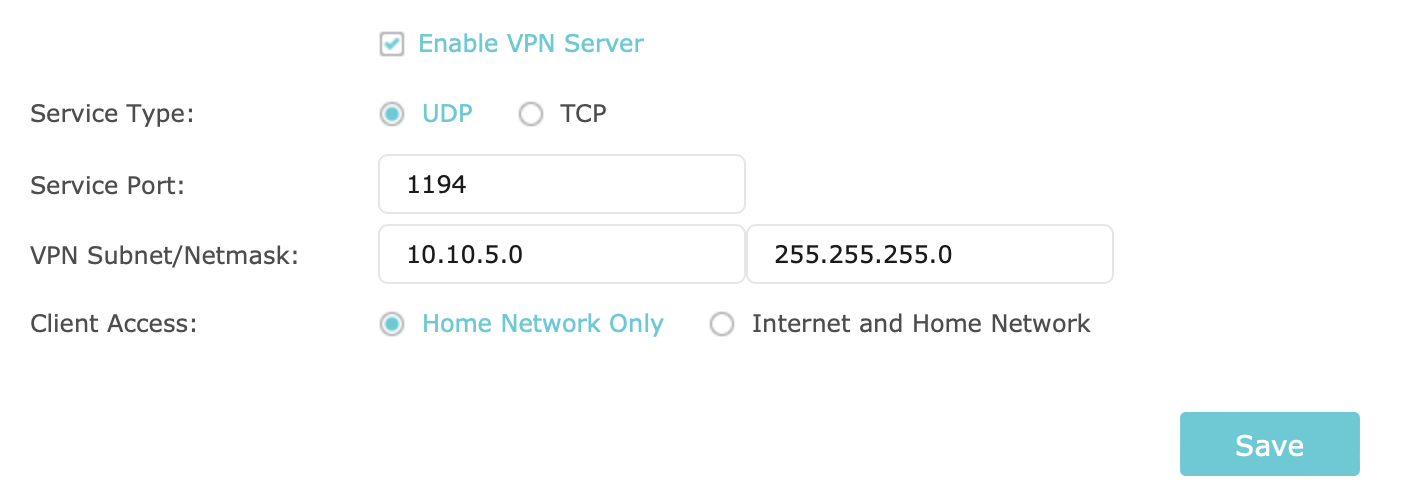
Step 5: Check the Enable VPN Server box, then fill in the following information as prompted. Click Save.
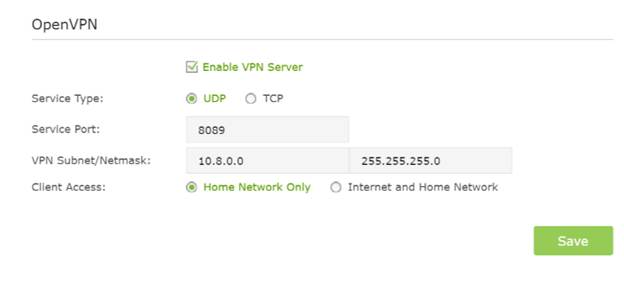
Note: What you select for Client Access will determine the content you are able to view over the VPN. Internet and Home Network will allow you to use your home internet service as well as access to your network shares. Home Network Only solely grants access to your network’s shared files and drives without home internet service accessibility.
Step 6: Click Export to download the configuration file to your computer.
Connecting OpenVPN (PC)
Step 1: Open your browser and navigate to https://openvpn.net/community-downloads/.


Step 2: Click Downloads, then click the link corresponding your Windows version.
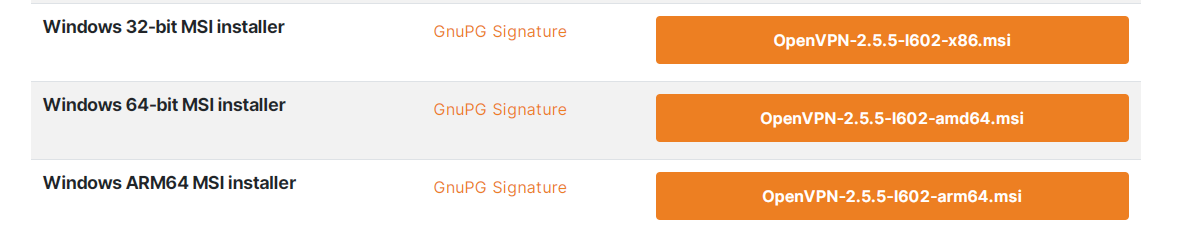
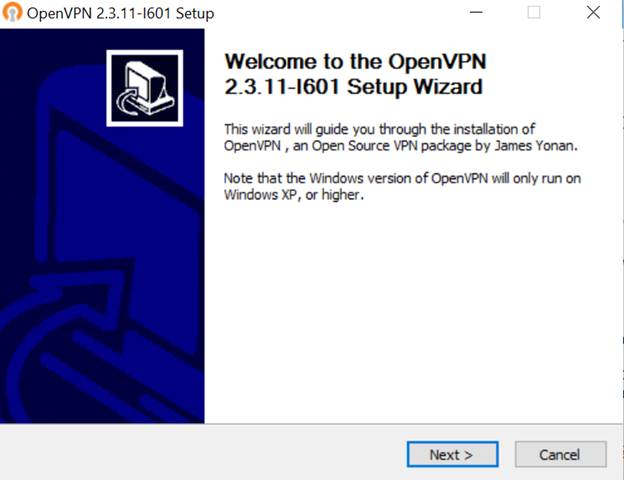
Step 3: Download and run the installer.
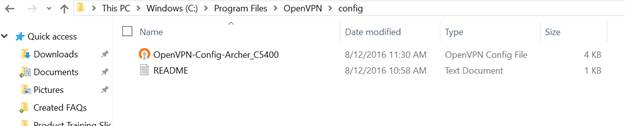
Step 4: Find the Certificate in your download folder and copy the file.

Note: The file name may differ for each router.
Step 5: Paste the config file into the config folder located in the OpenVPN directory.
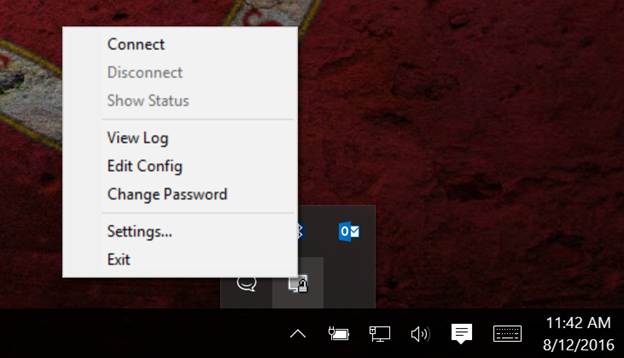
Step 6: Launch the program. A Quick launch icon will appear in your taskbar. Right-click the icon and select Connect.
Step 7: If connection is successful, you will see the following message.

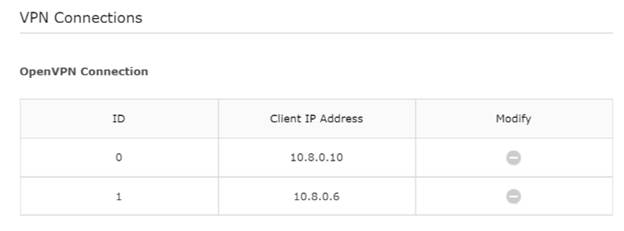
You are now connected to your home network via VPN. To verify, you can visit the VPN connections window in your router settings.

Был ли этот FAQ полезен?
Ваш отзыв поможет нам улучшить работу сайта.
Что вам не понравилось в этой статье?
- Недоволен продуктом
- Слишком сложно
- Неверный заголовок
- Не относится к моей проблеме
- Слишком туманное объяснение
- Другое
Как мы можем это улучшить?
Спасибо
Спасибо за обращение
Нажмите здесь, чтобы связаться с технической поддержкой TP-Link.
A lot of small businesses are using consumer grade routers and networking equipment these days. With good reason. If you only have a three to five person office and everyone connects via Wi-Fi, basically just to access internet services and one local file server, you really don’t need much else.
The best consumer grade routers I’ve worked with in recent years are the TP-Link Archer series. They are built for home use, but have some advanced features that lend themselves to today’s remote workplace.
One feature is their ability to be used as an OpenVPN server that you can connect to from the outside, letting you access your home servers, or company assets. It’s pretty easy to set up and the clients are super simple to deploy.
Setup OpenVPN Server with TP-Link Router
Before starting, please set up Dynamic DNS on your router. OpenVPN will not work without it. ‘
Note: I am using a TP-Link Archer A7 AC1750 as a reference. Your menus may be different depending on model and age of your router.
Step 1 – Log into the web interface for your router.
Step 2 – Click on the Advanced Tab and Scroll down until you see “VPN Server”. Select OpenVPN.
Step 3 – Check the “Enable VPN Server” checkbox. Everything can be left as default.
If you want the VPN client to only access your network and use its own internet select “Home Network Only”. If you want all traffic, including internet, to be sent through the VPN connection select “Internet and Home Network”.
Click Save

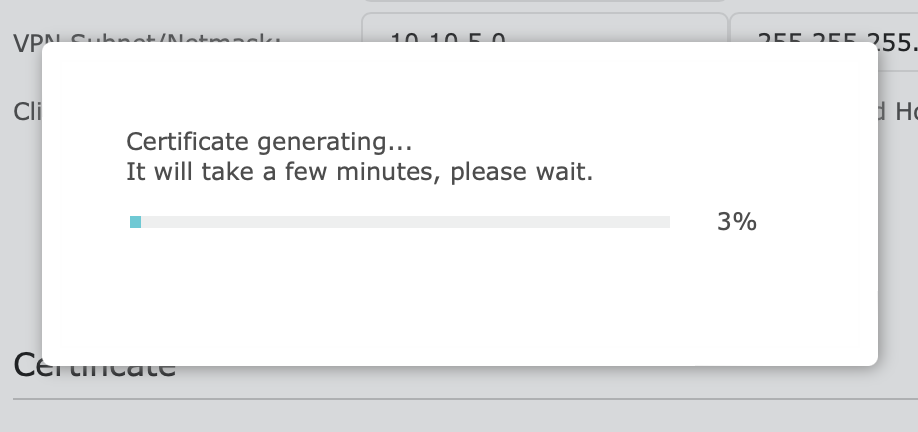
Step 4 – Click “Generate Certificate”. It will take a few minutes to generate a certificate. Wait until it is finished to move on.

Step 5 – Once the certificate is generated, click the “Export” under the “Export Configuration” Section.
Make sure you put the .OVPN file it downloads somewhere you remember. You’ll need it when you deploy a client.
Note: Once you’re done you’ll need to deploy the clients. I will post a detailed article on how to do that soon and link it here. The concept is pretty simple though. You need an OpenVPN compatible client for the operating system you’re working with. In most of those, you simply import a profile and select the OVPN file you downloaded from the router. It does all the work for you. Then you can connect
DevicesRoutersTP-Link
By September 8, 2023September 12th, 2023No Comments
TP-Link Archer WiFi routers are a great choice for home office and small business users alike. With impressive WiFi performance and full support for OpenVPN connections, setting up VPN for your home or office network has never been easier.
In this guide, we take you through the key technical specification of one of the most popular models, the TP-Link Archer A9 and show you how to configure an OpenVPN connection on your TP-Link Archer WiFi router and connect on Mac, iPhone and iPad.
Tech specs
Series: TP-Link Archer WiFi Routers
Model: A9 (AC1900)
Supported VPN protocols: OpenVPN, PPTP
Suitable for: Home Office users
WiFi capability: Dual-Band
WiFi speed: 5 GHz: 1300 Mbps (802.11ac), 2.4 GHz: 600 Mbps (802.11n)

Set up OpenVPN on a TP-Link Archer Router
Setting up an OpenVPN server on your TP-Link Archer router is simple and can be completed in three steps.
Step one: Generate OpenVPN certificate
To get started, log into the web interface of your TP-Link Archer router. Then, switch to the Advanced tab and go to VPN Server > OpenVPN. Here you will see your OpenVPN configuration options.
The first step is to generate the certificate for the OpenVPN server. Go to the section Certificate and click Generate:

Generate the OpenVPN certificate
After a few minutes, your certificate will be generated and you can enable the OpenVPN server.
Step two: Enable OpenVPN server
Check the box Enable VPN server and fill in the settings as shown in the screenshot, making sure to provide the subnet you are using for the VPN.
Click to save your settings:
Step three: Export your configuration
Finally, go to the section Configuration File, where you can export your OpenVPN connection with all your settings, ready to connect in the VPN client:

Step four (optional): Set up Dynamic DNS
If you don’t have a permanent, static IP address from your ISP (internet service provider), we recommend setting up Dynamic DNS (DDNS).
What is Dynamic DNS?
DDNS is a service that automatically updates DNS records whenever your dynamic IP address updates. For many (e.g. home or small business users), it’s a convenient alternative to registering for a fixed IP address, which can often be expensive.
Especially when setting up a VPN server, it’s a low-effort way to ensure your IP address will always be updated, meaning you don’t have to manually update the connection whenever your IP address changes – which can be anything from every few days to every few months. Learn more →
To configure DDNS on your TP-Link Archer, stay in the Advanced tab and go to Network > Dynamic DNS.
Here you will see the DDNS services supported by your router (e.g. NO-IP or DynDNS), you also have the opportunity to use TP-Link’s own Dynamic DNS service. If you already have an account, enter your login details in this view:
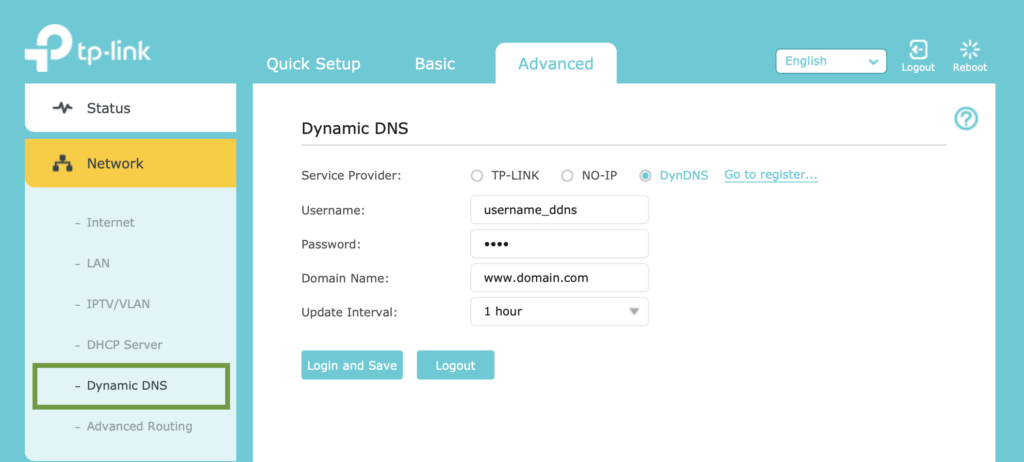
Log in with your DDNS credentials
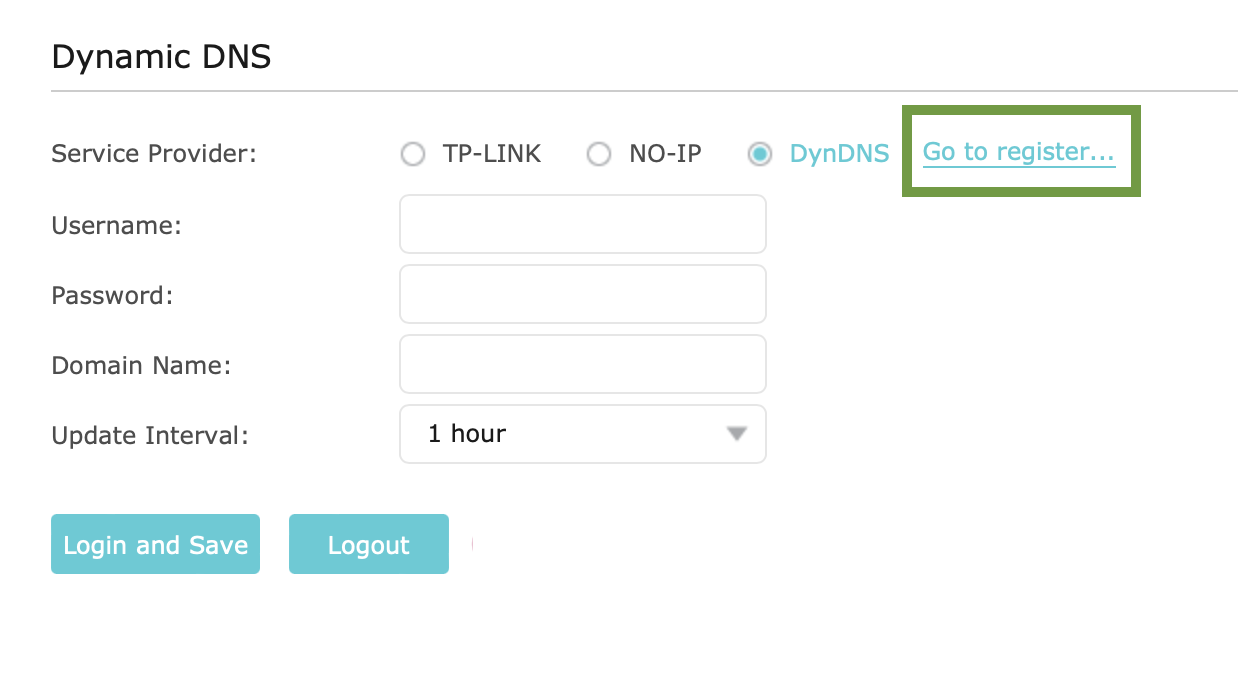
Alternatively, click the link to set up an account with one of the supported providers:
Once you have completed the VPN setup on your TP-Link Archer router, you can go ahead and get connected on your Mac, iPhone or iPad.
Connect to your TP-Link Archer Router on Mac, iPhone, iPad
In order to connect to your TP-Link via OpenVPN, you will need a VPN client. VPN Tracker is the best VPN client for Mac, iPhone and iPad and fully supports OpenVPN connections to TP-Link Archer devices – get connected in seconds.
Carry out the following steps:
- Open the VPN Tracker connection creator for TP-Link Archer
- Upload the OpenVPN configuration file you created on your device to import your connection settings
- Save your connection in your VPN Tracker account using secure end-to-end encryption for easy access on Mac, iPhone or iPad

Upload your .ovpn configuration file to import your connection settings
Your VPN Tracker benefits
- Secure remote access to your company network, home office, and Smart Home — all in one app
- Use your own VPN gateway
-
Ready-made profiles for 300+ VPN devices
- Configuration wizard for a smooth and fast setup
- For Mac, iPhone, iPad
- Discover all features
Rating: 5.0. From 1 vote.
Please wait…
About TP-Link
TP-Link is an international company that was established in 1996 to provide all kinds of networking accessories and devices. TP-Link is ranked #1 globally for providing reliable broadband and WLAN devices which are distributed across more than 120 countries worldwide.
What is OpenVPN?
OpenVPN is an advanced open source client/application developed by OpenVPN technologies as a highly secure tunneling protocol to help internet users establish an advanced and optimally encrypted connection through the internet. OpenVPN relies on military-grade 256-bit encryption that has the ability to pass through notorious firewalls and DPI investigations, such as those used by the governments of China and Russia. In addition, OpenVPN is compatible with all major platforms and operating systems, such as: Windows, Mac OS, Android, iOS and Linux. It can be used on a wide rage of devices, like: desktops, laptops, routers, gaming consoles, smartphones, tablets, etc. In this guide, we will help you configure OpenVPN on any TP-Link router.
I) Setting Up OpenVPN on TP-Link Router
Before connecting to OpenVPN from any TP-Link router, you need to first set up OpenVPN on your router. Follow these steps:
1- First, you need to log into your router by visiting tplinkwifi.net. You will be asked to insert your username and password. The default username and password for your router is “admin”.
2- From the navigation bar at the top, click on “Advanced”.
3- From the “Advanced” tab, you will find a panel on the left with several options. Click on “VPN”, and then click on “OpenVPN”.
4- To generate a certificate for your OpenVPN connection, click on “Certificate”. This is a very important step for your OpenVPN configuration to be completed successfully.
5- Check on the box next to “Enable VPN Server”, and then fill in the fields with the information shown in the image below.
As for the “Client Access” field, if you select “Home Network Only”, this means that you will only have access to the shared devices and files on your home network, but you will not be able to access your home internet service. On the other hand, if you select “Internet and Home Nework”, you will have access to your shared devices and files on your home network as well as access to your home internet service.
6- Click on “Export” in order to install the configuration file on your laptop/computer.
II) Connecting to OpenVPN
The following steps will help you connect to OpenVPN from any Android device on your TP-Link router.
1- Go to Google Play Store from your Android device, and then install “OpenVPN Connect” application.
2- After installing OpenVPN Connect, click to open the app.
3- You will find a menu in the form of 3 vertical dots located at the top right corner, click on it.
4- A drop down menu will be displayed, tap on “Import”.
5- Now, choose “Import Profile from SD Card”.
6- Save the file on your “Download” folder on your Android device.
7- Tap on your OpenVPN configuration file.
8- Tap on “Connect”.
9- Once your connection has been successfully set up, a pop-up message will be displayed confirming that.
10- Your home network is now successfully connected to OpenVPN. To make sure that your internet connection is routed through VPN, go to your router’s settings page and check the VPN connections.

Introduction
In this video I’ll be looking at how to setup the OpenVPN server on a TP-Link AX1500 router – also known as TP-Link Archer AX10.
This instructions will also work, at least, with the TP-Link AX1800 (TP-Link Archer AX20) and TP-Link AX3000 (TP-Link Archer AX50).
I’ll show you how to configure the OpenVPN server, edit the OpenVPN configuration file, open the OpenVPN port on the ISP router (generic instructions) and how to configure the OpenVPN client on a Windows machine.
This video is part of a series of videos I made about the TP-Link AX1500 router. The other videos are:
Upgrading my router – WiFi 6 TP-Link AX1500 (Archer AX10) WiFi 6 Router: https://youtu.be/QhNxfOTOa5c
Upgrading my laptop to WiFi 6 – Killer AX1650 + TP-Link AX1500 (Archer AX10) WiFi 6 Router: https://youtu.be/ScaaZTEd-F0
Download the OpenVPN Client:
https://openvpn.net/client-connect-vpn-for-windows/
TOC
00:00 – Intro
00:22 – Configure the OpenVPN server on the router
02:37 – Edit the OpenVPN config file
03:30 – Open the OpenVPN server port on the ISP router.
06:10 – Setup the OpenVPN client and test the connection
Setup the OpenVPN server on a TP-Link AX1500 (Video)
Useful links
Below you’ll find some links for the hardware used in this video and for some other WiFi 6 hardware, so that you can analyze yourself the existing alternatives.
A small disclaimer:
All the links below are affiliate links.This means that if you buy something using one of the links below, the channel will get a small commission from your purchase. This DOES NOT affect your final price! The price you see online is the final price you’re paying.
Hardware used in this video (my WiFi 6 setup)
Router – TP-Link AX1500: https://amzn.to/3a5CY4r
Wi-Fi Adapter – Killer AX1650 (currently unavailable on Amazon) – Link to official page: https://www.killernetworking.com/products/killer-ax1650/
As an alternative, you could use the Intel AX200NGW, which is basically the same adapter: https://amzn.to/2ERsc6h
Similar WiFi 6 routers
TP-Link WiFi 6 Router AX1800: https://amzn.to/2HTuJyx
ASUS RT-AX56U AX1800 WiFi 6 Router: https://amzn.to/37sOOo8
NETGEAR RAX15 – AX1800 Wifi 6 Router: https://amzn.to/30Fi8WL
If a bit more speed is needed:
TP-Link WiFi 6 AX3000: https://amzn.to/2XVeXZn
ASUS RT-AX3000: https://amzn.to/37t9pZ7
Mesh WiFi 6 Router
Netgear Nighthawk MK62
For those with a lot of interference or a house that’s hard to cover with a single router.
Router with one satellite: https://amzn.to/2YzmAE3
Router with two satellites: https://amzn.to/2MTC9kn
Add-on satellite: https://amzn.to/2AuRpS8
Wi-Fi 6 network adapters for your desktop computer:
TP-Link WiFi 6 AX3000 PCIe WiFi Card (1): https://amzn.to/31monxB
TP-Link WiFi 6 AX3000 PCIe WiFi Card (2): https://amzn.to/33uYH4E
Ubit AX WiFi 6 3000 Mbps AX200 PCIe: https://amzn.to/3a6gzEg
EDUP PCIe WiFi 6 Card AX 3000 Mbps: https://amzn.to/3icVFpS
Gigabyte GC-Wbax200 2×2 802.11Ax: https://amzn.to/2DHrLL9
MSI AX905C Dual Band WiFi 6 (802.11ax 2×2): https://amzn.to/2DCPD2N
I hope you enjoyed the video!
Don’t forget to like, subscribe and share!
See you soon!