Asus’s higher-end router models are some of the only consumer routers in the marketplace with built-in OpenVPN support. ASUSWRT (Asus’s custom router firmware) has native support for OpenVPN in both client and server mode.
This tutorial will show you how to configure your ASUS router to run as an OpenVPN client, which will set up a permanent VPN tunnel from the router.
This setup allows you to connect an unlimited number of devices to the same VPN connection.
This is perfect for devices that don’t have built-in VPN support such as:
- AppleTV
- FireTV
- Xbox (Xbox 360 & Xbox One)
- Playstation (PS3/PS4)
- Chromecast
- Roku
When you use our recommended Dual-Router VPN setup, it makes initiating a VPN connection as easy as switching wireless networks, allowing all of your computers and devices quick, secure access to VPN encryption.
ASUSWRT also supports the PPTP and L2TP VPN protocols, but OpenVPN is much more secure/flexible, and is definitely the recommended protocol.
RELATED: OpenVPN vs. L2TP/IPsec vs. PPTP
Supported Routers
This tutorial will work for any ASUS router that comes with ASUSWRT firmware. Here is the current list of supported routers:
- RT-N66U
- RT-AC56U
- RT-AC66U
- RT-AC68U
- RT-AC68P
- RT-AC87U
- RT-AC3200
- RT-AC88U
- RT-AC3100
- RT-AC5300
What you need for this tutorial:
- A router running ASUSWRT (list in the previous section)
- An active VPN subscription to a provider with ASUSWRT-compatible OpenVPN configs
- The OpenVPN configuration (.ovpn) and files from your VPN service
- The Certificate Authority .crt file from your provider (some providers embed the certificate in the .ovpn file. We’ll go into more detail in the step-by-step instructions).
Almost all VPN providers will make their .ovpn files for all servers easily downloadable from either their knowledgebase/tech support pages, or from inside your account panel. If you aren’t sure where to find them, just ask live chat or submit a support ticket.
Which VPNs are compatible with ASUSWRT?
Most (but not all) VPN providers are currently capable with ASUSWRT. The reason being, that ASUSWRT firmware doesn’t support any advanced VPN configuration options beyond importing an OpenVPN config (.ovpn) file. Some VPN providers config files require the ability to add custom instructions to the routers’ openVPN client.
Don’t worry, if your VPN provider doesn’t natively support ASUSWRT, you have 4 options:
- Ask them to create a custom .ovpn file for you (most VPNs will probably do it if they are able)
- Install ASUSWRT-MERLIN firmware on your router (which allows advanced OpenVPN configurations).
- Flash the Tomato-shibby or DD-WRT firmware on your router (advanced users).
- Edit the .ovpn file yourself to include the advanced configuration options
A non-exhaustive list of compatible VPNs
This list includes only VPNs that I have personally tested an confirmed to be working with ASUSWRT. If your VPN is not on the list, it may well still work with an ASUSWRT router. My best advice is to contact your provider for support if you’re having difficulties.
VPNs confirmed to work with ASUSWRT routers:
- Private Internet Access
- Proxy.sh (using iOS/Android configs. Not windows configs)
- Torguard (they provide custom ASUSWRT configs)
- IPVanish (requires manually importing CA file after uploading .ovpn)
- Hidemyass
- VPN.ac
If you’ve gotten other providers to work, please let me know in the comments and I’ll add them to the list. Thanks!
Video Tutorial
Here’s the video setup guide. You can also use the text walk-thru in the remainder of the article.
How to access ASUSWRT OpenVPN client settings:
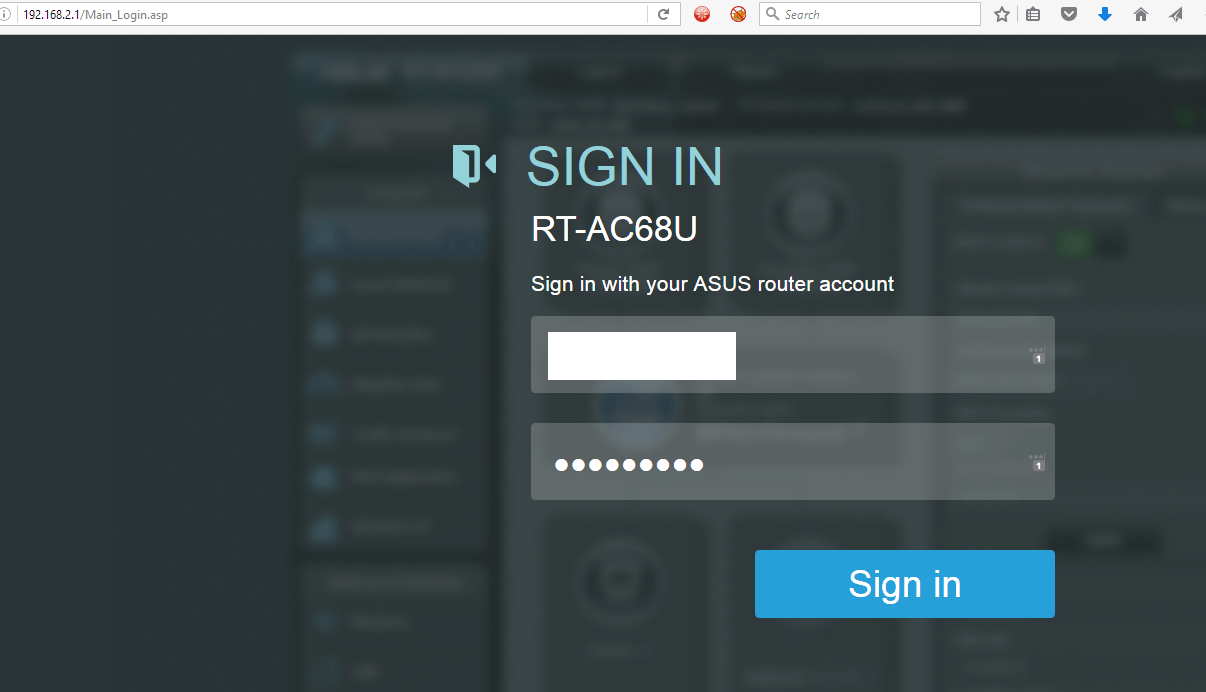
- Log in to your asus router control panel by typing the router IP address into your URL bar of your web browser. Since I’m using a dual-router setup, I changed my router to 192.168.2.1 but yours may be different. The default IP for Asus routers is 192.168.1.1
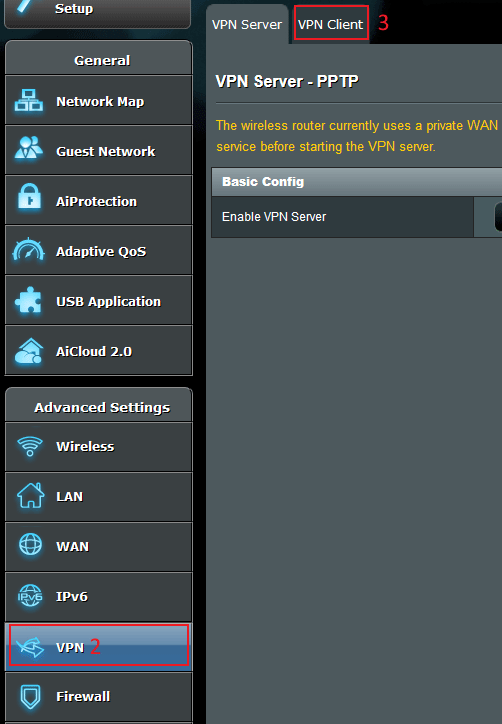
2. Under the advanced settings tab on the left side, go to ‘VPN’ (shown below)
3. Then click on the ‘VPN Client’ tab (shown below)
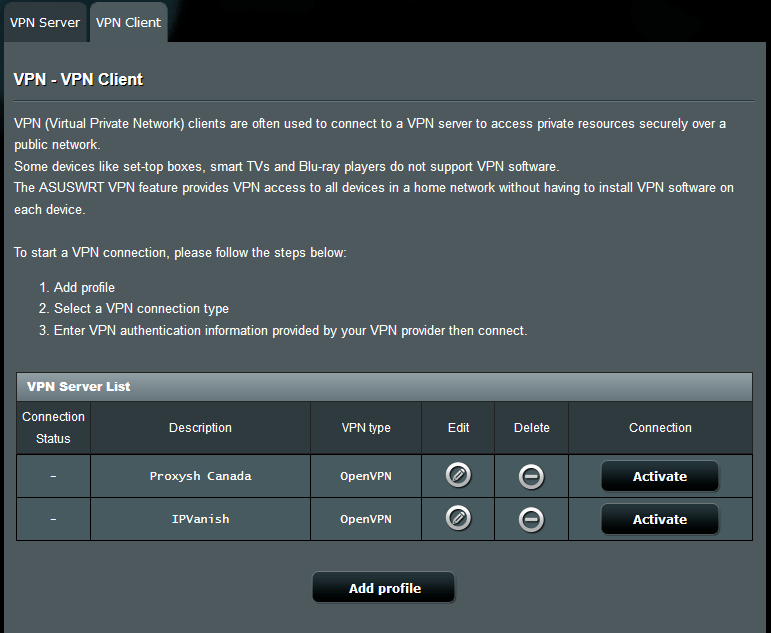
You should now be at the VPN Client screen, which should look something like the image below. You can click the ‘Add Profile’ button to create a new VPN connection.
Set up the OpenVPN connection
Now we’re ready to create a new OpenVPN profile for your router. You’ll need 3 pieces of information from your VPN provider:
- Your VPN Login/Password
- The .ovpn config file of the server location you want to use
- Your CA certificate file (some VPNs include the CA in your .ovpn file, others provide a separate .crt file)
Some info about .ovpn and CA certificates
Fortunately, ASUSWRT allows you to manually import the certificate file if your VPN provider doesn’t include it in your .ovpn files. When we setup the connection, ASUSWRT will actually warn you if the .ovpn file does not contain a CA, but we can also check in advance by opening your .ovpn file with a simple text editor like notepad.
If your .ovpn file does have a CA embedded, it will include something that looks like this:
<ca>
—–BEGIN CERTIFICATE—–
MIIDljCCAv+gAwIBAgIJANMiwLWxktowMA0GCSqGSIb3DQEBBQUAMIGPMQswCQYD
VQQGEwJSTzEMMAoGA1UECBMDQlVDMRIwEAYDVQQHEwlCdWNoYXJlc3QxDzANBgNV
BAoTBlZQTi5BQzEPMA0GA1UECxMGVlBOLkFDMQ8wDQYDVQQDEwZWUE4uQUMxDzAN
BgNVBCkTBlZQTi5BQzEaMBgGCSqGSIb3DQEJARYLaW5mb0B2cG4uYWMwHhcNMTIx
MTI2MTI0NDMzWhcNMjIxMTI0MTI0NDMzWjCBjzELMAkGA1UEBhMCUk8xDDAKBgNV
BAgTA0JVQzESMBAGA1UEBxMJQnVjaGFyZXN0MQ8wDQYDVQQKEwZWUE4uQUMxDzAN
BgNVBAsTBlZQTi5BQzEPMA0GA1UEAxMGVlBOLkFDMQ8wDQYDVQQpEwZWUE4uQUMx
GjAYBgkqhkiG9w0BCQEWC2luZm9AdnBuLmFjMIGfMA0GCSqGSIb3DQEBAQUAA4GN
qRI4JvSeZc4/ww==
—–END CERTIFICATE—–
</ca>
If not, it will be a much shorter config file (and won’t contain the ‘—-BEGIN CERTIFICATE—-‘ or ‘—-END CERTIFICATE—-‘ lines. Below is a full .ovpn file from IPVanish:
Step #1 – Create your OpenVPN profile
Click the ‘Add profile’ button to create a new VPN profile.

Select the ‘OpenVPN’ tab from the window that pops up.
Add a description of the profile. This will be the name that shows up in your list of available VPN connections. I like to use the following formula:
VPN name + server location
For this tutorial I’m using IPVanish’s Texas server so I’ll call it ‘IPVanish Texas’. Simple.
Also add your VPN username/password.
Step #2 – Import the .ovpn file
Click the ‘Browse…’ button to locate your .ovpn file.

Then find the directory where you saved it double click to open it in ASUSWRT.
Click ‘Upload’ to send the .ovpn file to your router.
You should now get a message saying ‘Upload Complete’. If it also says ‘Lack of certificate authority’ (meaning your .ovpn file doesn’t contain a certificate) then proceed to the next step to add one manually.
Step #3 – Add a CA client certificate (Optional)
This step is only required if your .ovpn file doesn’t contain a certificate already. You can either upload the .crt file to the router(provided by your VPN provider) or just copy and paste the certificate text (usually found in a how-to guide on your VPN’s website).
To import your CA file, follow these steps:
- Check the box ‘Import the CA file or edit the .ovpn file manually’
- Click ‘Browse…’ to locate your .crt file you downloaded from your provider
- Click ‘Upload’ to send it to the router.
So now our .crt file is successfully uploaded to the router. All that’s left to do is click ‘OK’ to save your profile. Now we can test the setup to make sure it’s working.
Step #4 – Test the VPN setup
Click the ‘Activate’ button to test your new VPN connection.
If the connection is successful, you’ll get a blue checkmark in the ‘Connection Status’ column like this:

Step #5 – Troubleshooting
If you get an ‘X’ instead of a checkmark, it means your settings are incorrect. Redo the setup and double-check that your username, password, and .crt file are all correct.
If all else fails, check your router’s log. Most .ovpn files will tell the router to log the VPN connection process to the primary router log for troubleshooting purposes. You can then share the log file with your VPN’s tech support team and they can help you troubleshoot the issue.
To access your router’s logs, go to: Advanced settings > System Log > general log
Wrapup and resources
Thanks for checking out this tutorial. Hopefully if you’ve made it this far, you’ve got yourself a fully functional VPN router.
Make sure to leave any questions or tips in the comment section, we go through and respond as often as possible.
Be well, and stay encrypted!
 В статье Настройка OpenVPN я описал общие принципы настройки OpenVPN сервера и клиента.
В этой статье опишу процесс настройки OpenVPN на конкретном примере, в данном случае роутер компании Asus RT-N10U
По умолчанию данный роутер OpenVPN не поддерживает. Но с помощью прошивки DD-WRT и расширения openVPN мы это исправим.
Для начала несколько ссылок:
База роутеров которые поддерживают прошивку:
http://www.dd-wrt.com/site/support/router-database
в строке поиска вводишь N10U, выбираешь роутер и качаешь прошивки:
Собственно прошивка для этого роутера:
http://www.dd-wrt.com/routerdb/de/download/Asus/RT-N10U/-/dd-wrt.v24-21061_NEWD-2_K2.6_mini_RT-N10U.trx/3909
Расширение Опен-ВПН
http://www.dd-wrt.com/routerdb/de/download/Asus/RT-N10U/-/dd-wrt.v24-21061_NEWD-2_K2.6_openvpn.bin/3906
Тут инструкция по установке на английском:
http://www.dd-wrt.com/wiki/index.php/Asus_RT-N10U
Огромное преимущество этого роутера в том, что его можно перепрошить прямо через админку, буквально в несколько шагов — красота.
UPD
Asus RT-N10U D1 + dd-wrt OpenVPN
Основные шаги:
-
- Сбросить настройки роутера (Clear NVRAM)
- Установить прошивку подходящую версию прошивки DD-WRT (файл с расширением .trx)
- Еще раз сбросить настройки роутера (Clear NVRAM)
- Установить необходимые расширения, в нашем случае OpenVpn (файл с расширением .bin)
- Еще раз сбросить настройки роутера (Clear NVRAM)
-
-
- Установка dd-wrt через web-консоль
-
-
- В браузере набрать адрес: http://192.168.1.1
- Сбросить настройки роутера: Advanced settings -> Administration -> Restore/Save/Upload Setting -> кнопка Restore
- Загрузить .trx файл: Advanced settings -> Administration -> Firmware upgrade
- Дождаться пока роутер перезагрузится. Питание не отключать, кнопок на роутере не нажимать, процесс длительный может занять от 3 до 15 минут.
- После того как роутер загрузится опять открываем в браузере: http://192.168.1.1
- Собственно вот она прошивка. Установите для администатора имя root и пароль на ваш выбор.
- Еще раз сбросим настройки, в DD-WRT web-консоли это можно сделать здесь так: Administration -> Factory Defaults -> yes -> Apply settings
- Теперь загрузим дополнение с OpenVPN(.bin): Advanced settings -> Administration -> Firmware upgrade
- И еще раз сбросим настройки DD-WRT: Administration -> Factory Defaults -> yes -> Apply settings
- Собственно всё. Осталось задать имя пользователя и пароль и можно переходить к настройке OpenVPN
Настройка OpenVPN на роутере с DD-WRT
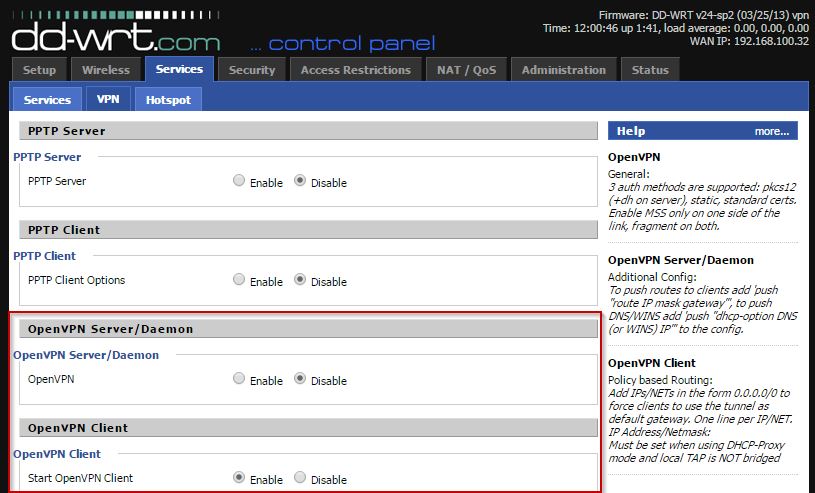
Если всё было сделано правильно, тогда в разделе Services ->VPN появятся OpenVPN Client, и OpenVPN Server.
Включаем клиента:
Start OpenVPN Client — Enable
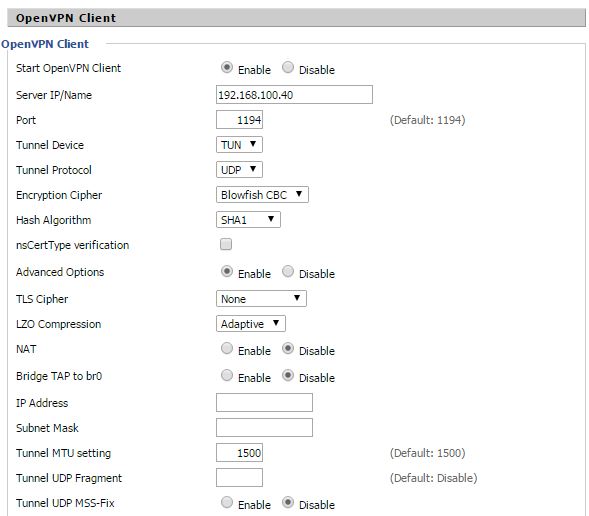
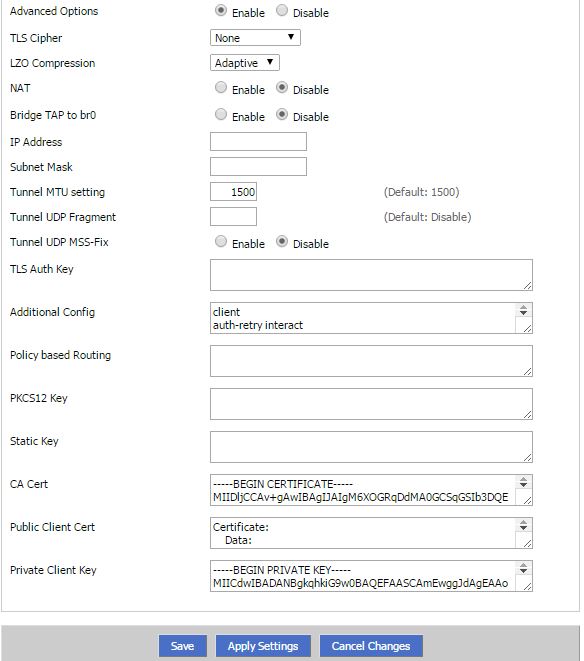
Server Ip/Name — тут вводим адрес или DNS имя сервера OpenVPN
Port — Номер порта по которому поднят сервер, по умолчания 1194
Tunnel Device — TUN либо TAP. TAP — это виртуальный адаптер локальной сети, TUN виртуальная IP соединение типа точка-точка (point-to-point). Выбираем в зависимости от того что у нас в настройках сервера.
Tunnel Protocol — TCP либо UDP, опять же должно соответствовать настройкам сервера.
Encryption Cipher — тип шифрования используемый на сервере
Hash Algorithm — алгоритм криптографического хеширования, должен соответствовать тому который применяется на сервере. В моем случа SHA-1
После применения всех настроек во вкладке Status \ OpenVPN можно посмотреть текущее состояние OpenVPN подключения. Если всё верно то в первом блоке будет что то типа этого:
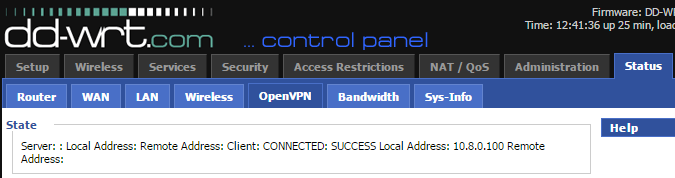
нас больше всего интересует CONNECTED: SUCCESS — значит подключение прошло успешно совершено. Local Address: XX.XX.XX.XX — сообщает о том какой адрес был присвоен устройству VPN Server’ом.
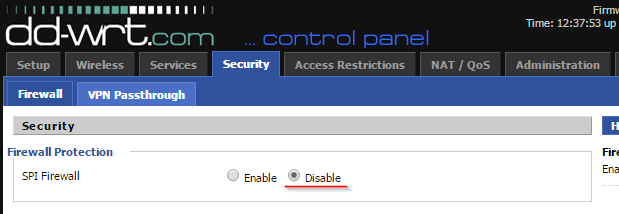
Если при это сервер не пингует новый адрес, то поможет следующий пункт:
Отключаем SPI фаервол
идем во вкладку Security\Firewall, и отключаем SPI Firewall, после этого сервер увидит и будет пинговать клиента.
Ошибки openVPN:
Authenticate/Decrypt packet error: packet HMAC authentiction failed
Вылечил изменением Hash Algorithm на SHA1.
TLS Error: Unroutable control packet received
Эта ошибка связана с синхронизацией времени на сервере и клиенте OpenVPN. Соответственно нужно убедится в том, что время синхронизированно.
Поменять дату и время на роутере с прошивкой dd-wrt в Administraton\Commands с помощью комманды вида:
date -s YYMMDDHHMM
date -s 1504021101
Thu Apr 2 11:01:00 UTC 2015
UPDATE:
Подключение dd-wrt роутера с openVPN через NAT
Итак есть роутер с openVPN который стучит на удаленный хост. Путь его пролегает через другой роутер с натом, где заблокировано все кроме доступа к хосту. Т.е. разрешены udp пакеты, и собственно всё. Результат — openVPN подключается но соединение не устанавливается.
Одна из возможных причин — ntpd. Если проанализировать сетевую активность роутера сразу после запуска можно обнаружить, что он очень активно стучится сразу по трем десяткам адресов. Потом лишние соединения выключается и роутер работает в нормальном режиме. Большая часть из них является обращением к известным серверам времени для синхронизации. Соответственно, роутер после перезагрузки сбрасывает значение на 1970й год, и пытается синхронизироваться. Если ему это не удается, на борту так и остается 1970, из-за чего openVPN не может установить правильное соединение.
Решение:
Разрешить доступ устройства кроме хоста еще и к серверу времени, либо прописать свой сервер, в базовых настройках
Setup\Basic Setup\Time Settings\ServerIP(name)
если прописать вместо айпи адреса — DNS имя, то так же нужно разрешить устройству доступ к dns.
Еще одна полезная статья по работе:
Настройка файрвола для работы openvpn сервера — команды из статьи подходят и для применения на dd-wrt роутерах.
UPD
О чем еще часто забывают — если машина с openvpn клиентом не является шлюзом для данной сети, то на шлюзе нужно добавить маршрут
route add -net 10.8.0.0 netmask 255.255.255.0 gw 192.168.11.2
[VPN] Как настроить VPN сервер на роутере Asus — OpenVPN
Введение
- Что такое VPN?
- Создание OpenVPN Сервера
- Экспорт настроек OpenVPN
- FAQ
Что такое VPN?
Виртуальная частная сеть: Виртуальные частные сети шифруют Ваше сетевое соединение, обеспечивая безопасную передачу важной информации и предотвращая ее кражу. Позволяет удаленным потребителям (VPN-клиентам) безопасно подключаться к VPN-серверам.
VPN имеет множество способов подключения, в этой статье информация о настройках OpenVPN сервера в маршрутизаторах Asus, для выполнения настроек, связанных с другими типами поддерживаемых серверов (PPTP VPN, IPSec VPN) настройки можно найти в следующих связанных часто задаваемых вопросах. Рекомендации могут быть выбраны в зависимости от типа VPN, поддерживаемого Вашим устройством.
Для настройки PPTP VPN сервера, пожалуйста,oбратитесь к https://www.asus.com/ru/support/FAQ/114892
Для настройки IPSec VPN сервера, пожалуйста, обратитесь к https://www.asus.com/support/FAQ/1044190
VPN-серверы, поддерживаемые беспроводными маршрутизаторами ASUS, различаются в зависимости от модели. Рекомендуется обратиться к руководству пользователя продукта или странице технических характеристик продукта, чтобы подтвердить, что Ваш маршрутизатор поддерживает данный функционал.
Пожалуйста следуйте следующим шагам для создания своего OpenVPN сервера:
Шаг 1. Пожалуйста, подключите свой компьютер или устройство к маршрутизатору, запустите веб-браузер и введите http://router.asus.com, чтобы войти на страницу входа в маршрутизатор.(Графический веб интерфейс, GUI)

Примечание: воспользуйтесь ссылкой, чтобы узнать больше о том, как войти в интерфейс.
Шаг 2. Введите свое имя пользователя и пароль для входа на страницу входа, а затем нажмите [Войти].
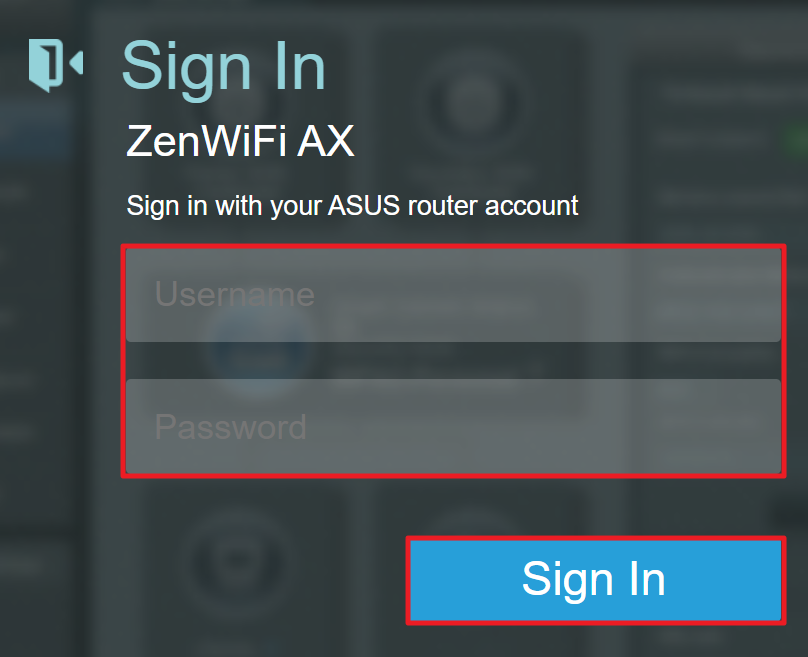
Примечание: Если Вы забыли Имя пользователя и пароль, пожалуйста, сбросьте настройки роутера по умолчанию. Пожалуйста, обратитесь к Как сбросить настройки роутера по умолчанию?
Шаг 3. Откройте настройки [VPN] > [VPN Server] > [OpenVPN], Включите OpenVPN сервер — положение [ON].
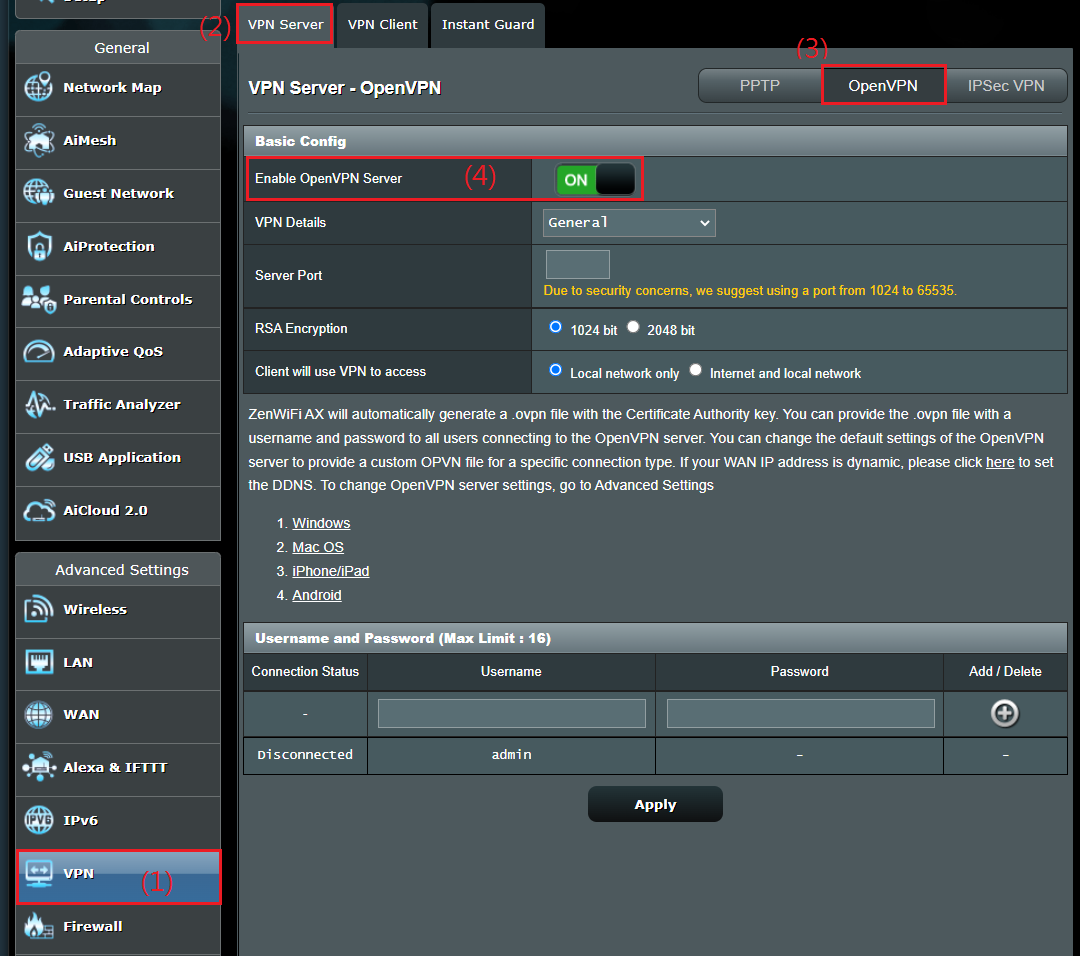
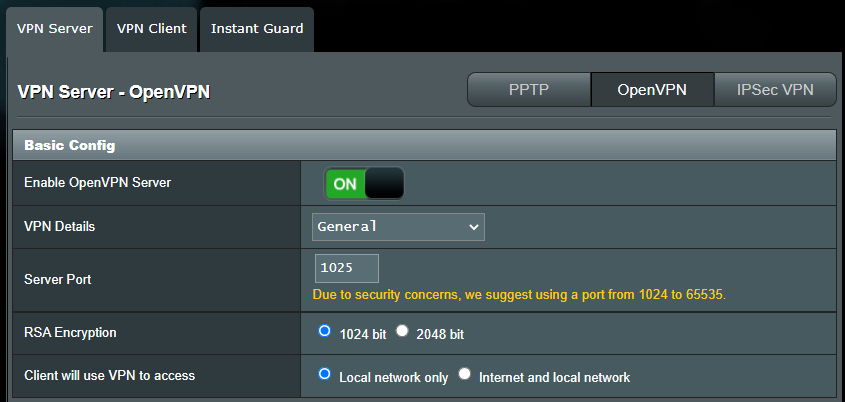
Шаг4. Основные настройки
a. Подробнее о VPN: По умолчанию как [Основные].
b. Порт сервера: Укажите порт соединения. Текущий порт по умолчанию 1194 определяется IANA номерами портов для OpenVPN.
c. RSA Encryption: По умолчанию как [1024 bit].
d. Клиент будет использовать VPN для доступа: По умолчанию [Только локальная сеть]. Когда VPN-клиент подключается к VPN-серверу, он может получить доступ только к локальной сети за VPN-сервером.
[Интернет и локальная сеть]: Когда клиент подключается к VPN-серверу, он может одновременно получить доступ к локальной сети за VPN-сервером, а также может получить доступ к Интернету через VPN-сервер.
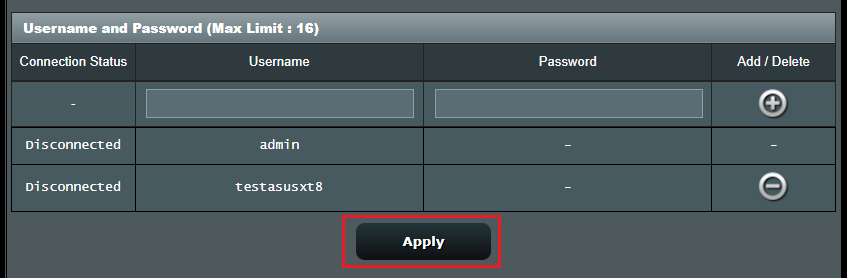
Шаг 5. Введите Ваши имя пользователя и пароль и щелкните по  кнопке чтобы создать новую учетную запись для Вашего сервера OpenVPN.
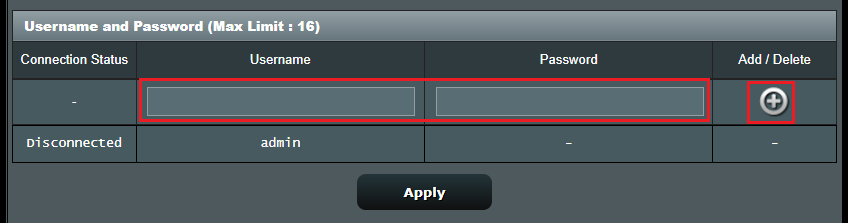
Шаг 6. Пароль будет автоматически скрыт, щелкните [Применить], чтобы сохранить настройки OpenVPN.
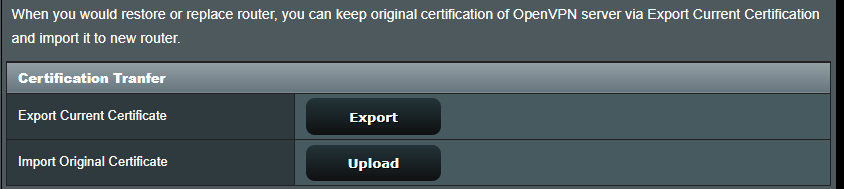
Экспорт файла настроек OpenVPN
Потребуется несколько минут, чтобы инициализировать настройки сервера OpenVPN и сгенерировать файл конфигурации openv. После этого, пожалуйста, нажмите кнопку [Экспорт], чтобы сохранить файл конфигурации ovpn с именем «client.ovpn».
Теперь Вы завершаете настройку OpenVPN на стороне сервера. Пожалуйста, перейдите на сторону клиента, чтобы установить клиентское соединение OpenVPN.
Для получения информации о настройках VPN-клиента ASUS Router, пожалуйста, обратитесь к
[VPN] Как настроить VPN клиент в роутерах ASUS (Web GUI)?

Вопросы-Ответы
1: Сколько клиентов может подключиться?
OPEN VPN может поддерживать более 10 клиентских подключений, но стабильность зависит от пропускной способности маршрутизатора.
2. Как сохранить файл настроек OpenVPN сервера?
Когда Вы хотите восстановить или заменить маршрутизатор, Вы можете сохранить исходную сертификацию сервера OpenVPN через Экспорт текущей сертификации и импортировать ее на новый маршрутизатор.
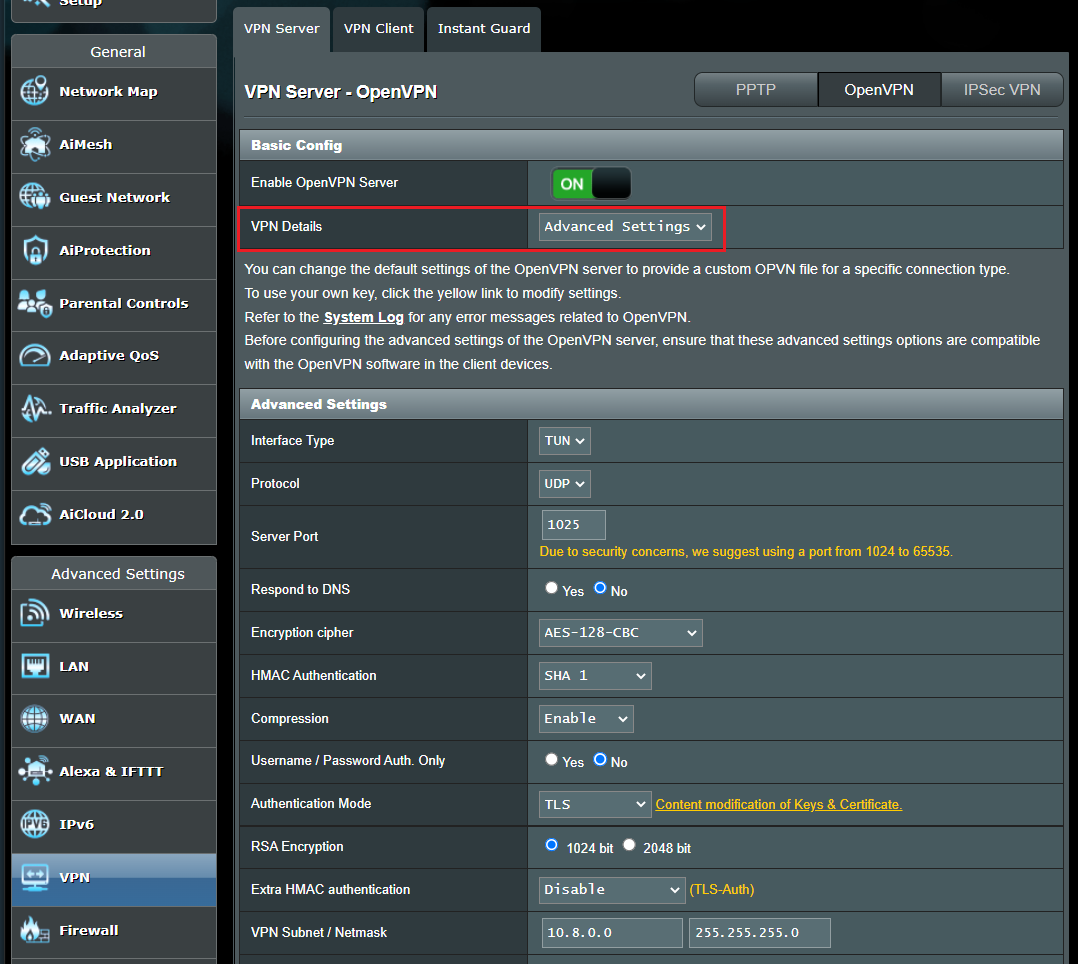
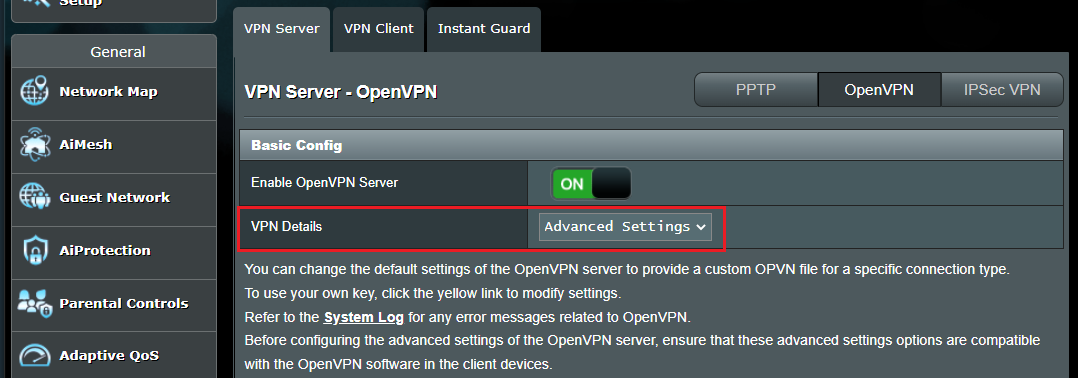
3. Где Дополнительные настройки OpenVPN?
Мы предоставляем более продвинутые настройки для OpenVPN. При необходимости, пожалуйста, перейдите к [VPN Details] >[Advanced Settings] для настройки.
4. Как изменить ключи и сертификат сервера OpenVPN?
Откройте страницу [VPN Details] >[Advanced Settings]
Щелкните по [Content modification of Keys & Certificate].

Измените содержимое и щелкните кнопку [Сохранить] для сохранения настроек.
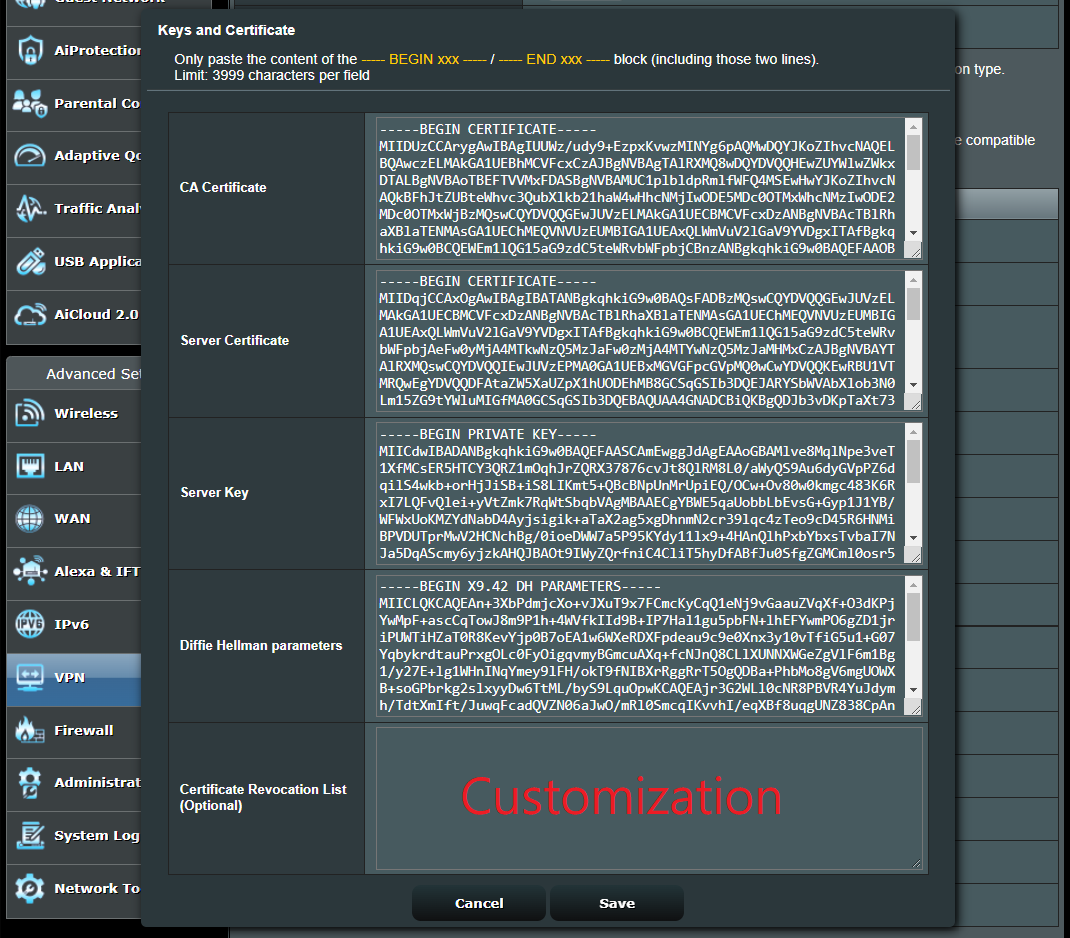
Нажмите кнопку [Применить] для сохранения настроек OpenVPN.
Как скачать (Утилиты / ПО)?
Вы можете загрузить последние версии драйверов, программного обеспечения, микропрограмм и руководств пользователя в Центре загрузок ASUS.
Узнать больше о Центре загрузок ASUS можно по ссылке.
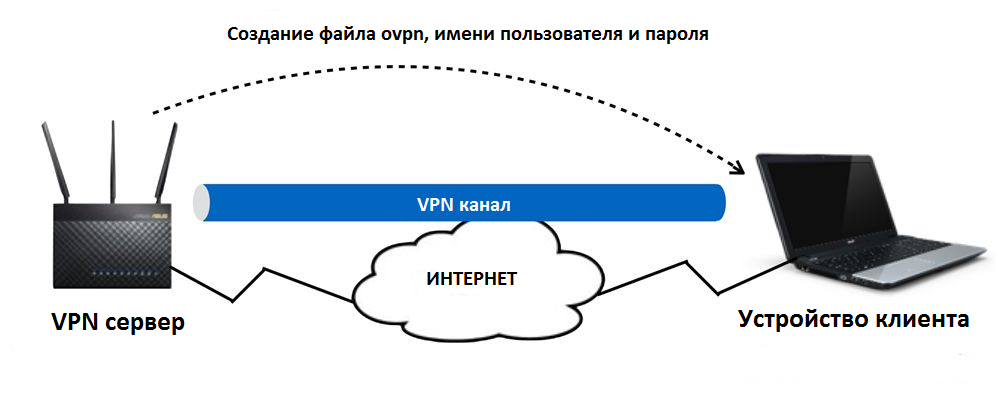
Большинство актуальных моделей роутеров ASUS среднего и топового ценовых сегментов поддерживают подключение к VPN. Вам потребуется файл конфигурации .ovpn, логин и пароль. Вы получите их в боте BlancVPN после выбора локации или в личном кабинете BlancVPN.
Настройка состоит из двух этапов – получение и редактирование файла конфигурации и загрузка его в настройки роутера Asus.
Настройка файла конфигурации
Настройка проводится через веб-интерфейс роутера. К нему можно подключиться, открыв в браузере на компьютере страницу по адресу 192.168.1.1 или router.asus.com. Также потребуется ввести логин и пароль от роутера.
Если вы не знаете логин и пароль роутера или изменили адрес веб-интерфейса и забыли его – сбросьте маршрутизатор до заводских настроек по инструкции, которая шла в комплекте с устройством.
Подключение к VPN
Настройка VPN производится в соответствующем пункте:
Чтобы отключиться от VPN, нажмите кнопку Deactivate («Отключиться») в строке профиля. Чтобы снова подключиться – нажмите Activate («Подключиться») в строке профиля.
Вы можете добавить несколько профилей, пользуясь этой инструкцией, однако активен может быть только один.
После подключения проверьте, изменился ли ваш IP-адрес. Для этого откройте наш сайт blancvpn.com и посмотрите на панель наверху страницы: там будет указан ваш новый IP-адрес и локация.

Если возникли сложности или что-то пошло не так – напишите нам в Telegram-бот https://t.me/FCK_RKN_bot, поможем!
Другие статьи по теме
Как настроить OpenVPN на роутере Keenetic
Как настроить OpenVPN на Android
Как настроить OpenVPN на iOS (iPhone, iPad)
Как настроить OpenVPN на macOS
Как настроить WireGuard на роутере Keenetic
![]()
Introduction
Many routers now come with an integrated OpenVPN server to provide secure remote access to both router storage and LAN devices. We haven’t been testing VPN performance in our reviews because, frankly, I dread messing with VPN. I usually get it working eventually, but typically burn a day in the trial-and-error process that is inevitably required.
So in the interest of saving you a day, I am doing a few articles that present both VPN performance test results and step-by-step setup instructions for getting a working OpenVPN tunnel between a Windows client and the router. This tunnel will support connection both to the router’s shared storage and to client devices on the router LAN.
Since ASUS was the first to integrate OpenVPN, I’ll start with them.
Setup
My test setup used Win 7 and Win 8.1 computers.
- Windows 7: Lenovo X220i (Intel Core i3-2310M @ 2.1 GHz, 2 GB RAM) running Win 7 Home Premium SP1 64 bit
- Windows 8.1: Acer AspireS7 (Intel Core i5-4200U @ 2.3 GHz, 8 GB RAM) running Win 8.1 64 bit
To eliminate internet connection variation, I used the test setup shown below. Note that the two computers are on different private subnets.

OpenVPN test setup
Steps
1) Check your shares
Before you start messing with VPN, you first need to check that your OS sharing permissions are properly set so that shares can be reached among LAN machines on both networks. This sometimes is tricky when mixing Win 7 and 8 devices.
I don’t use Windows Homegroups, don’t use password protected sharing and don’t use Guest accounts. So in Win 8, disabling password protected sharing (Network and Sharing Center > Advanced Sharing Settings > All Networks) and adding access for Everyone in the share’s security properties usually does the trick.
2) Configure your firewall
OS and anti-virus suite application firewalls are another thing that can mess you up. If you run one, you’ve probably already figured out the settings to not block file sharing traffic. Buf if you have any problems pinging a share across the VPN tunnel, temporarily disable the firewall to see if that’s the problem.
3) Install the OpenVPN client
ASUS provides links for downloading Windows, MacOS, iOS and Android OpenVPN clients on the VPN Server tab as shown below. Each link takes you to an ASUS FAQ page that includes a downlink link for the proper app and instructions for installing and configuring it.

ASUS VPN Server tab
- The Windows FAQ links to the OpenVPN downloads page that has only Windows clients.
- The MacOS FAQ links to the Tunnelblick installer for Mac OS X.
- The iPhone (iOS) FAQ tells you to search the App Store, which should turn up this OpenVPN Connect app.
- The Android FAQ tells you to search Google Play, which should turn up this OpenVPN Connect app.
This OpenVPN FAQ provides a pretty accurate description of the Windows installation process. Don’t bother to launch the app after you install it. It won’t do much until you install an OpenVPN config file.
4) Create User(s)
Create users on the VPN Server General settings page in the Username and Password section as shown below. Please use a stronger password than the one I used. Your connection security depends on it! Be sure to Apply the settings.

ASUS VPN Create user
5) Generate the OpenVPN config file
OpenVPN clients won’t do anything without a config file. You can find sample files in the «[program files path]\OpenVPN\sample-config folder on the system you installed the client on, where [program files path] is the path to the Program Files or Program Files (x86) folders for 64 bit and 32 bit apps, respectively.
The sample client.opvn and sample.ovpn files are well commented and useful for advanced users. But it’s much easier to click the Export button on the VPN Server page to generate and save a config that should get you up and running quickly.
Changing the selector on this page to Advanced Settings exposes the detailed settings used to configure the server and generate the client .opvn config file.

VPN Server Advanced Settings – Basic config
All the defaults work and will enable you to reach the router’s shared storage and shares on devices connected to the router LAN. They will not, however, allow network browsing from the remote client. So you’ll have to use \\ipaddress_of _device to reach shares and set up mapped drives for easy access.

VPN Server Advanced Settings – Basic config
If you simply must have network browsing, switching to TAP interface type will do it. But note this is a bridged connection and could cause problems.
Pay attention to the warning shown below that may appear on the VPN Server page. Most people will need to use a dynamic DNS service to reach their router due to the changing IP addresses issued by most ISPs. If you are going to use DDNS, set it up before you export the OpenVPN config file. Otherwise, the router’s WAN IP address will be used. In my case, the WAN IP was fine because I was testing on a private LAN.

VPN Server Advanced Settings – Basic config
If you make any changes to these settings, you need to Apply them first, then Export a new config file.
6) Install the config file
Find the client.opvn file generated by clicking the Export button in Step 5 and copy / move it to the «[program files path]\OpenVPN\config folder, where [program file path] is the path to the Program Files or Program Files (x86) folders for 64 bit and 32 bit apps, respectively. If your client needs to connect to more than one VPN server, you’ll need to generate a config file for each one and give them different names.
7) Start the OpenVPN client
Find the OpenVPN client shortcut created by the installer. Right click on it and select Run as administrator. At this point, this How to connect to a VPN Server with the Desktop Client FAQ screwed me up for awhile. I kept expecting to see the window below shown in the FAQ.

OpenVPN client window you won’t see
The ASUS FAQ provides a more accurate description of what to expect. The only thing you should see is the OpenVPN client icon in the System Notification Area (tray).
![]()
OpenVPN client running
 Connect
Right-clicking on the OpenVPN icon pops up the config(s), each of which expands into a submenu shown below. Select Connect.
![]()
OpenVPN client config selected
You’ll be prompted for the username and password you set up in the router.

OpenVPN client – user authentication
After you enter the credentials, the connection will complete…

OpenVPN client – connecting
…and when it’s done you’ll see a confirmation.

OpenVPN client – connected
9) Test the tunnel
We’ll use ping to check that everything is running ok. First, try pinging the OpenVPN router LAN IP address (the default is 192.168.1.1). It should respond. Next try to ping the IP address of a LAN machine. In my test case, the Win 8.1 LAN computer was at 192.168.1.149. The screenshot below shows that the OpenVPN configuration provided connection to LAN clients.

OpenVPN tunnel test passed
10) Use the tunnel
At this point, you are up and running! Remember that network browsing isn’t supported. So you must reach LAN devices by IP address, not hostnames. If you’re just accessing shared files, mapped drives are your friend.
Performance
I had three ASUS routers handy for testing. My go-to IxChariot performance test tool would not work through the OpenVPN tunnel. So I had to resort to drag-and-dropping a >1 GB Windows backup .bkf file for testing. Drag-and-drops were initiated from the remote (WAN side) machine to ensure that traffic flowed through the tunnel.
| Router | CPU | Firmware | Remote > Server | Server > Remote |
|---|---|---|---|---|
| ASUS RT-N66U | Broadcom BCM4706 single core, 600 MHz |
3.0.0.4.376_1071 | 1.6 | 1.6 |
| ASUS RT-AC68U | Broadcom BCM4708 dual core, 800 MHz |
3.0.0.4.376_1663 | 4.1 | 3.8 |
| ASUS RT-AC87U | Broadcom BCM4709 dual core, 1 GHz |
3.0.0.4.376_2769 | 5.5 | 5.0 |
Table 1: File copy throughput – OpenVPN tunnel (MBytes/sec)
There’s a big difference in stepping up from the single-core BCM4706 to the dual-core BCM4708. But not as large a jump between the 4708 and 4709.
Closing Thoughts
I hope the step-by-step saves you the hassles that I ran into in getting OpenVPN working on ASUS. If you find an error, please let me know so that I can correct it.
Next time, OpenVPN on NETGEAR.
Discuss this in the Forums