 Обновлено:
Опубликовано:
Тематические термины: OpenVPN, VPN, Windows, Linux, CentOS, Ubuntu
В данной инструкции подробно описан процесс настройки клиента OpenVPN на примере операционных систем Windows и Linux. Также, с ее помощью можно настроить скиента на Android.
Установка
Настройка
Пример конфигурационного файла
Ключи
Сертификаты
Запуск
Несколько конфигураций
Сертификаты внутри ovpn файла
Отзыв сертификата
Читайте также
Установка
Windows
Заходим на официальную страницу загрузки openvpn и скачиваем клиента для нужной Windows:

Запускаем скачанный файл и устанавливаем программу, нажимая «Далее».
Linux CentOS
Устанавливаем репозиторий EPEL:
yum install epel-release
Устанавливаем openvpn:
yum install openvpn
Linux Ubuntu
apt-get install openvpn
Android
Установка выполняется из Google Play. Набираем в поиске OpenVPN Connect — нажимаем установить и принимаем условия.
Настройка
После установки программы конфигурационный файл не создается автоматически и его нужно создать вручную.
В системах Windows создаем файл config.ovpn в папке %programfiles%\OpenVPN\config.
* имя файла может быть любым, расширение должно быть .ovpn.
Для создания конфигурационного файла в Linux выполняем команду:
vi /etc/openvpn/client.conf
* чтобы служба openvpn автоматически выполняла соединение, необходимо, чтобы конфигурационный файл назывался client.conf.
Пример конфигурационного файла
client
dev tun
proto udp
remote 192.168.0.15 443
resolv-retry infinite
nobind
persist-key
persist-tun
ca ca.crt
cert client.crt
key client.key
dh dh2048.pem
tls-client
tls-auth ta.key 1
float
keepalive 10 120
comp-lzo
verb 0
Параметры конфигурационного файла
| Параметр | Значения | Описание |
|---|---|---|
| client | Строка говорит о том, что конфигурационный файл описывает клиентское подключение (программа сама устанавливает соединение, а не ждет, как сервер). | |
| dev | tap или tun | Выбор виртуального сетевого драйвера. TUN — сетевой уровень модели OSI, оперирует IP-пакетами. TAP — эмулирует Ethernet устройство и работает на канальном уровне модели OSI, оперируя кадрами Ethernet. Настраивая OpenVPN клиента, в большинстве случаев, необходимо выбирать tun. TAP необходимо использовать для работы определенных сервисов, например DHCP. |
| dev-node | любая строка | Параметр используется в системах Windows в случаях, если имеется несколько сетевых интерфейсов. Значение этого параметра должно содержать название сетевого подключения, через который должен работать OpenVPN. |
| proto | udp или tcp | Указывает, какой протокол использовать для передачи данных. В большинстве случаев, лучше использовать UDP, так как данный протокол создает меньше нагрузки на сеть. |
| remote | VPN-сервер и порт | Задает сервер, к которому должен подключаться клиент, а также сетевой порт (по умолчанию 1194), на котором OpenVPN принимает запросы. Можно указать несколько строк. |
| remote-random | Если указано несколько строк remote, данный параметр говорит, что необходимо подключаться к удаленным серверам в случайном порядке. | |
| resolv-retry | количество секунд или infinite | Используется в тех случаях, когда в качестве сервера указано доменное имя. Параметр задает время в секундах для повторного переподключения, если не удалось узнать имя сервера. infinite — держать связь с сервером постоянно. |
| nobind | Клиент использует динамический порт для подключения. | |
| user | учетная запись | Задает определенного пользователя для работы клиента (только для UNIX-систем). |
| group | группа | Задает определенную группу для работы клиента (только для UNIX-систем). |
| persist-key | Не перечитывает ключи при перезагрузке сервиса OpenVPN. | |
| persist-tun | Не перечитывает параметры туннеля при перезагрузке сервиса OpenVPN. | |
| http-proxy | сервер прокси и порт | Использовать прокси-сервер для подключения. |
| http-proxy-retry | Переподключаться к прокси-серверу, если связь была разорвана. | |
| http-proxy-timeout | количество секунд | Время, через которое выполнять попытки переподключения к прокси-серверу. |
| mute-replay-warnings | Параметр стоит задавать при использовании беспроводного соединения. Он отключит дублирование предупреждений пакетов. | |
| ca | пут к сертификату | Корневой сертификат удостоверяющего центра. Генерируем на сервере. |
| cert | пут к сертификату | Открытый ключ клиента. Генерируем на сервере. |
| key | пут к сертификату | Закрытый ключ клиента. Генерируем на сервере. |
| dh | пут к сертификату | Ключ с алгоритмом Diffie-Hellman (Диффи-Хеллмана). |
| remote-cert-tls | сервер | Исключает возможность mitm атаки, включая верификацию сертификата сервера. |
| tls-client | Указание на то, что это клиент TLS. | |
| tls-auth | ta.key 1 | Дополнительный уровень аутентификации посредством ключа TLS. |
| float | Удаленный хост может менять IP-адрес в процессе соединения, при этом последнее не будет разорвано. | |
| keepalive | секунд1 секунд2 | Пинговать каждые секунд1 сервер и если в течение секунд2 не будут получены ответные пакеты, перезапустить подключение. |
| cipher | алгоритм | Указывает алгоритм шифрования. Примеры: AES-256-CBC, AES-128-CBC, BF-CBC, DES-EDE3-CBC. |
| comp-lzo | Использовать сжатие. | |
| verb | число от 0 до 9 | Уровень детализации лога. 0 отключает отладочную информацию. |
| mute | число | Указывает сколько лог-сообщений может отображаться для каждой категории события. |
| auth-user-pass | ничего или путь к файлу | Говорит клиенту, что необходима аутентификация. Если не указан путь к файлу, клиент выкинет окно для авторизации, иначе прочитает данные из файла. |
| ipchange | команда или путь к скрипту | Выполняет команду при смене IP. |
| connect-retry | секунд | Переподключиться к серверу через указанное количество секунд, если соединение было разорвано. |
| connect-retry-max | число | Сколько раз повторять соединение, если оно было разорвано. |
| shaper | байт | Задает максимальную скорость передачи данных для исходящего трафика. |
| tun-mtu | число | Задает MTU. |
| status | путь к файлу | Путь к фалу хранения статуса. |
| log | путь к файлу | Путь к лог-файлу. |
| askpass | путь к файлу | Путь к файлу с паролем для приватного ключа (private key password). |
Наиболее полный и актуальный список параметров для OpenVPN можно получить командой openvpn —help (в Linux и Windows).
Сертификаты
Клиентские сертификаты генерируются на стороне сервера. Процедура следующая.
Для Linux:
cd /etc/openvpn/easy-rsa
. ./vars
./build-key client
Для Windows:
cd %ProgramFiles%\OpenVPN\easy-rsa
vars.bat
build-key.bat client
* в выше приведенных примерах был сгенерирован клиентский сертификат client. Более подробно про создание сертификатов для клиентов читайте на страницах настройка openvpn на Windows и настройка openvpn на CentOS.
Сгенерированные ключи появятся в каталоге keys. Их необходимо скопировать на клиентский компьютер вместе с сертификатами сервера и разместить по каталогам, указанным в конфигурационном файле. В нашем примере они должны быть скопированы в ту же папку, в которой находится сам файл конфигурации.
В итоге мы получаем, примерно, следующее.
Для Windows:

Для Linux:
ls /etc/openvpn/client/
ca.crt client.crt client.key client.conf dh2048.pem ta.key
Запуск
Для проверки можно запустить клиента вручную. Но для повседневного использования стоит настроить автоматический запуск.
Вручную
На Windows:
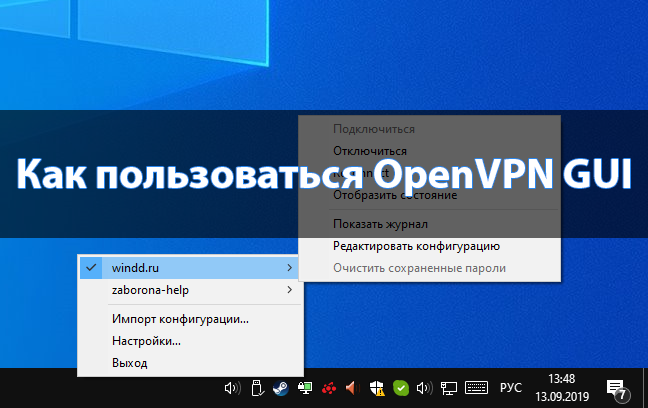
Запускаем OpenVPN GUI от имени администратора — в правом нижнем углу появится иконка программы:

Кликаем по ней правой кнопкой мыши и выбираем Подключиться:

На Linux:
Переходим в каталог с конфигурационным файлом:
cd /etc/openvpn
Вводим команду:
openvpn —config /etc/openvpn/client.conf
или:
systemctl start openvpn@client
* также служба может называться openvpn.
Автоматически
На Windows:
Выполняем 2 действия.
1. Наш конфигурационный файл с сертификатами переносим из каталога config в каталог config-auto:

* в старых версиях клиента каталога config-auto нет — тогда оставляем файлы в config.
2. Открываем службы и находим OpenVPNService. Переводим его в режим автозапуска:

На Linux:
Разрешаем автозапуск службы:
systemctl enable openvpn@client
или для старых версий.
CentOS / Red Hat / Fedora:
chkconfig openvpn on
Ubuntu / Debian:
update-rc.d openvpn defaults
Несколько конфигурационных файлов
Позволит держать несколько конфигураций для подключения к различным VPN-серверам. Между последними можно переключаться из клиентской программы.
Для Windows:
В каталоге config создаем для каждого сервера свою папку и помещаем в нее рабочие файлы (файл конфигурации, сертификаты и так далее). В каждой папке называем конфигурационные файлы ovpn своими именами (даже если файлы будут находиться в разных папках, но с одинаковыми именами, клиент OpenVPN будет воспринимать их как один конфиг).
Пример каталога config:

Пример файлов в одном из каталогов:

Теперь при подключении клиентом к можно выбрать конкретный VPN-сервер:

Для Linux:
Также как для Windows, создаем для каждого сервера свой каталог, куда скопируем рабочие файлы:
mkdir /etc/openvpn/server1
А в каталоге /etc/openvpn создаем для каждого подключения свой конфиг:
vi /etc/openvpn/client1.conf
* в конфигурационном файле все пути до файлов должны вести в соответствующий каталог (в нашем примере, /etc/openvpn/server1).
Запускаем OpenVPN:
openvpn —config /etc/openvpn/server1/client.conf
Для автоматического запуска мы уже ранее применяли команду:
systemctl enable openvpn@client
… где @client — указатель на использование конфигурационного файла client внутри папки openvpn (/etc/openvpn). Таким образом, если мы создали 2 файла client1.conf и client2.conf, команды для разрешения автозапуска бelen такие:
systemctl enable openvpn@client1
systemctl enable openvpn@client2
Сертификаты внутри конфигурационного файла
Ключи сертификатов можно хранить не в отдельных файлах, а внутри конфигурационного файла ovpn.
<ca>
——BEGIN CERTIFICATE——
…
——END CERTIFICATE——
</ca>
<tls-auth>
——BEGIN OpenVPN Static key V1——
…
——END OpenVPN Static key V1——
</tls-auth>
<cert>
——BEGIN CERTIFICATE——
…
——END CERTIFICATE——
</cert>
<key>
——BEGIN PRIVATE KEY——
…
——END PRIVATE KEY——
</key>
<dh>
——BEGIN DH PARAMETERS——
…
——END DH PARAMETERS——
</dh>
* key-direction 1 — необходим для tls-auth, в противном случае, работать не будет; ca — ключ центра сертификации (ca.crt); tls-auth — ta.key; cert — открытый сертификат клиента (clients.crt); key — закрытый сертификат клиента (clients.key); dh — сертификат, созданный на базе протокола Диффи Хеллмана.
Отзыв сертификата
Для Linux:
cd /etc/openvpn/easy-rsa
. ./vars
./revoke-full client
Для Windows:
cd %ProgramFiles%\OpenVPN\easy-rsa
vars.bat
revoke-full.bat client
* с помощью данных манипуляций мы отзываем сертификат client.
Читайте также
Настройка сервера OpenVPN на Windows
Установка и настройка OpenVPN на Linux CentOS 7
Настройка OpenVPN сервера с включением аутентификации через LDAP (Active Directory)
Настройка доступа к локальной сети клиентам OpenVPN в CentOS 7

The OpenVPN protocol is now by far the most popular option for consumer-facing VPN services today. If you’ve subscribed to any of the 100 most popular VPN services in the world, odds are you’ve already been using OpenVPN (whether you know it or not).
But what many people don’t realize is that you can use any OpenVPN-capable VPN provider without using their proprietary software. In fact, OpenVPN.net has their own client software that works with any OpenVPN server, or provider.
This guide will walk you through the (simple) process of setting up your own OpenVPN connections with the OpenVPN GUI client for windows.
Guide Sections:
- Why use the OpenVPN GUI instead of a custom VPN client (or why not)
- Setup
- Downloading & Installing the OpenVPN GUI Installer
- How to get the .OVPN config files from your VPN provider
- Copying the Config and Certificate Authority files to OpenVPN GUI
- Connecting to the VPN
- Troubleshooting
Why use the OpenVPN GUI?
Let me be clear… the OpenVPN GUI software is not faster, easier to use, or loaded with more features than the custom client your VPN provider probably offers you. In fact, the GUI (Graphical User Interface) doesn’t have any fancy features, bells, whistles, or gadgets. It does only one thing, create a secure VPN tunnel.
So why the heck would anybody choose to use it over a feature rich custom VPN client like VyprVPN’s?
Transparency, trust, and control. That’s it.
The downside of your VPN provider’s own custom software
Don’t get me wrong, I absolutely love many of the high-quality proprietary VPN clients out there. They add a number of features as an application layer on TOP of the OpenVPN protocol. This like kill-switches, WebRTC leak protection, smart server routing, and torrent-optimized connections wouldn’t be possible without proprietary software.
But there is one thing that (most) custom VPN client’s don’t have… Open-Source code.
They’re a black box, and honestly you don’t know what the heck they’re doing behind the scenes once you install the software. For example, a malicious VPN client could:
- Monitor all system processes and look for exploits
- Inject viruses, trojans, or malicious code into your computer
- Make your computer part of a botnet (this has already happened)
- Monitor all your web traffic or even access your laptop or smartphone’s webcam.
Now a reputable VPN’s software is probably doing none of these things. But it could, and you’d have NO idea.
So if you’re the careful type, it makes sense to use software with public (and exploit-free) source code so that trust isn’t an issue. Sure, you trade-off some functionality but if you’re the cautious type it may definitely be worth it.
Other reasons to try the OpenVPN GUI
- Simplicity: Since there’s no extra features or settings, there’s no real way to screw things up. You can have a VPN connection in 1 click, and that’s all that most people need. Things like DNS leaks can be solved at the device or router level.
- No Other Option: Not all VPN providers have their own software, especially smaller companies. It’s really expensive to develop a custom VPN client, and there’s always the risk of security flaws so why not let your subscribers use one that already exists.
- Robust Security: Because the code is audited and vetted, it’s MUCH less likely that a major security flaw will be found in the OpenVPN GUI compared to a 3rd-party VPN client. In fact, one study found that a huge percentage of Android VPN apps had major security flaws (or weren’t even encrypting data at all!)
It takes less than 5 minutes to complete the setup and create your first VPN connection. Make sure you have your VPN provider’s login details online so you can download the config files and connect to the VPN server. If you don’t have a VPN subscription yet, we recommend IPVanish or NordVPN.
Related: How to choose a VPN provider (in-depth guide)
Step #1: Download and Install the OpenVPN GUI
The GUI client is bundled as part of the entire OpenVPN package which includes TAP drivers as well as the OpenVPN server framework (which you won’t need to use).
Navigate to the OpenVPN download page:
Choose an installer type (Gzip, Tar, or Windows installer):

Unzip & Run the installer
Launch the installer and then click ‘Next’ to choose the installation options. You’ll want to make sure the TAP drivers and GUI are included in the install. You can also choose to associate all .ovpn files with the OpenVPN client.
Step #2: Download the .OVPN configuration files
You can’t run the GUI yet because it’ll just give an error message since you haven’t added any .ovpn config files. An .ovpn file basically a small text file that contains information about a specific VPN connection to a specific server. It contains information like:
- The IP address of the server
- What encryption cipher should be used
- What encryption strength should be used
- How to authenticate the data packets
- How to handle dropped connections
Download the .ovpn config files for your specific VPN
Each VPN provider has their own VPN config files. You’ll usually download them inside your account panel, or search your providers help documentation for a link. We’ll be using IPVanish for this example. As of publication, here are the links for the most popular VPNs.
| VPN Provider | Config File Link |
| ExpressVPN | download in account panel |
| IPVanish | OpenVPN download page |
| NordVPN | https://nordvpn.com/ovpn/ |
| Private Internet Access | https://www.privateinternetaccess.com/openvpn/openvpn.zip |
| VyprVPN | VyprVPN OpenVPN Configuration |
When in doubt try google:
“VPN Provider Name” + “ovpn”

What to download:
- The entire zip file with all configs (or…)
- The individual .ovpn configs for locations you want to use
- the CA (.crt) certificate file if your VPN uses one.
Step #3: Copy the .ovpn files to the OpenVPN directory
Once you’ve downloaded the configuration files, we have to copy them to the /config/ folder of the OpenVPN directory (where you installed OpenVPN).
Note: The OpenVPN GUI only supports a maximum of 50 config files, so only copy files for servers you actually plan to use. Some VPNs have literally thousands of different configs. So choose a few you want. The file names usually include the location (country or city) to make it easy to find the right ones. You’ll also need to choose whether you want to use TCP or UDP connections.
By default, the folder for OpenVPN is C:\Program Files\OpenVPN and you’ll want to locate the \config\ directory at that path and copy the files there.
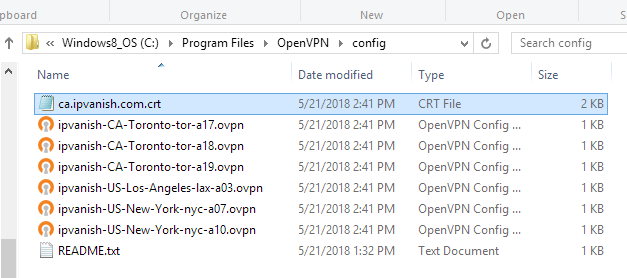
If the config package from your VPN also includes a .crt Certificate Authority file, you’ll want to copy that as well. If you don’t, you’ll get an error later when trying to connect. If your VPN doesn’t provide a CA .crt file, don’t worry. The certificate is embedded in the .ovpn file and you don’t need a separate one.
Step #4: Test your OpenVPN connection
1- Run the OpenVPN GUI from the start menu
2- Check the system try for the OpenVPN GUI icon (you may have to expand it)
![]()
3- Right-click the GUI icon to show the server selection menu
4- Choose a server from the list
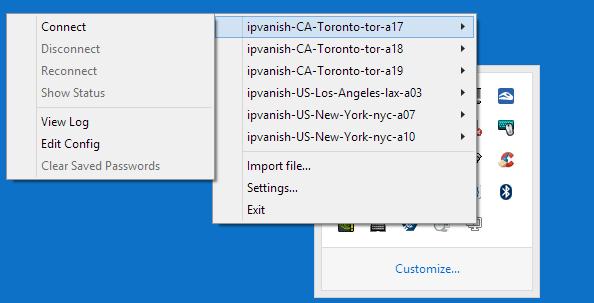
5 – Enter your username/password when prompted.
You can also choose to ‘Save the password’ for next time. You’ll have to do this once for each .ovpn file you added to the /config/ directory.
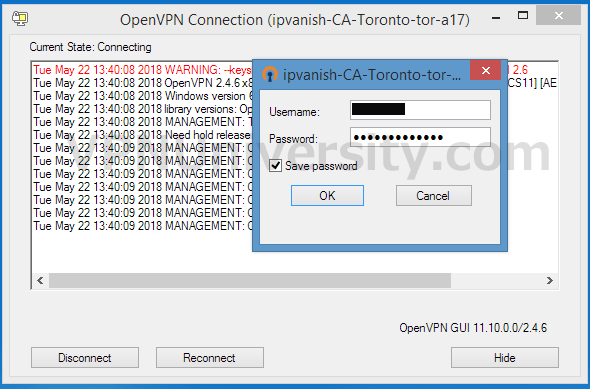
6- Check your connection status
Once you’re connected, the GUI icon in the system try should show green and display your newly-assigned VPN IP address. If everything is working as expected, you’re all set! If you’re having any issues, check out the troubleshooting section below.

Troubleshooting
There are several common errors you may encounter if you miss a step in the setup process. Don’t worry, we’ve got the fix for each of them.
No readable connection profiles (config files) found.

In order to connect to a server, you need to store the configuration (config) information in a .ovpn file and put it in the \config\ folder of the OpenVPN software. Your VPN service will provide these files to you.
Connecting to management interfaced failed
If you receive this error, you’ll be referred to the log file for more details. This can be found at \OpenVPN\log\
The most common cause is that your VPN provider doesn’t include the CA certificate authority text inside the OpenVPN config files and instead requires a separate .crt file to be placed in the config directory. Usually this file will be packaged with the .ovpn files in the zip archive. If not, contact support or check your provider’s documentation. Then simply copy the file into the \config\ folder.
Wrong credentials
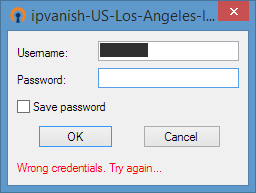
If you the ‘Wrong credentials’ error, it means you’ve mixed up (or mistyped) your Username or Password. Doublecheck your records (or do a password reset if you’ve forgotten it) and try again.
It is designed for DevOps 🧞♂️
If you are a DevOps engineer, you will love our development stack.

Pure Go
Ansible Semaphore is written in pure Go. Porting to any platform takes just a few minutes.
Docker
Docker used at every stage of Ansible Semaphore development. The result is a fully tested image on Docker Hubnorth_east.
MySQL, Postgres or BoltDB
You can opt for the database that aligns with your preferences, eliminating the necessity to uphold an additional database.
В последнее время популярности набирает клиент OpenVPN. После подключения к бесплатным VPN серверам в пользователей появляется возможность использования Интернета без ограничений. Все VPN программы и сервисы позволяют с лёгкостью открывать заблокированные сайты. OpenVPN является одним из самых безопасных VPN-протоколов, доступных на сегодняшний день.
Эта статья собственно и расскажет, как пользоваться OpenVPN GUI. Будем настраивать подключение OpenVPN на примере операционной системы Windows 10. Большинство поставщиков VPN-услуг и экспертов по безопасности действительно рекомендуют OpenVPN. Благодаря открытому исходному коду любой пользователь может его проверить или улучшить.
Как настроить OpenVPN на Windows 10
Как работает OpenVPN
Протокол OpenVPN отвечает за поддержание коммуникации между клиентом и сервером. Как правило, он используется для создания защищённого туннеля между VPN-клиентом и сервером.
Для шифрования и аутентификации OpenVPN использует библиотеку OpenSSL. Кроме того, для передачи данных OpenVPN могут использоваться протоколы UDP или TCP.
- TCP требует отклика от клиента, которому доставлен пакет данных, подтверждения доставки, и для этого ему необходимо установленное заранее соединение. Протокол TCP исключает потери данных, дублирование и перемешивание пакетов, задержки.
- UDP всё это допускает, и соединение для работы ему не требуется. Протокол UDP доставляет пакеты данных гораздо быстрее, потому лучше подходит для приложений, которые рассчитаны на широкую пропускную способность и быстрый обмен.
Как установить OpenVPN
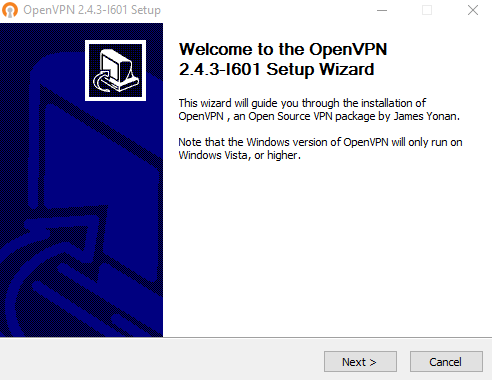
На официальном сайте производителя выберите версию программы для своей операционной системы. Существуют клиенты под все популярные операционные системы: Windows, Linux, MacOS, Android, iOS. Если же Вы загружали установщик с официального сайта, тогда проблем с установкой не возникнет. Запустите установочный файл и следуйте шагам мастера установки.
Как подключиться OpenVPN
Перед подключением нужно выбрать бесплатный VPN сервер, загрузив на компьютер файл конфигурации определённого сервера. Его стоит выбирать исходя из расположения, качества линии, пропускной способности и пинга.
Много разных сайтов содержат бесплатные сервера ретрансляции. Рекомендуем перейти на сайт vpngate.net и выбрать подходящий сервер загрузив файл конфигурации для OpenVPN.
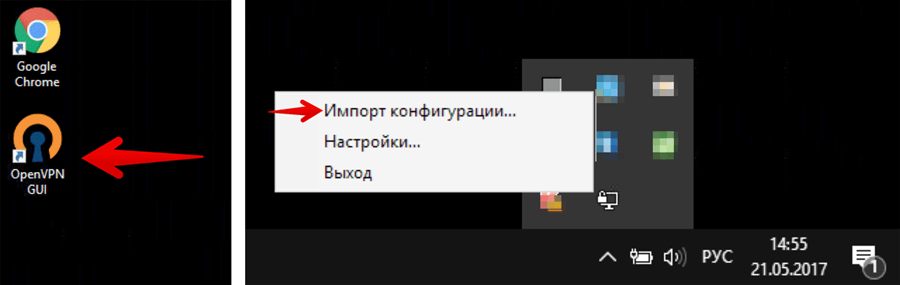
Теперь запустите программу OpenVPN GUI от имени администратора в Windows 10. В противоположном случае просто не удастся подключиться к выбранному серверу.
- На панели задач в контекстном меню OpenVPN выберите Импорт конфигурации… В открывшемся окне проводника укажите расположение ранее загруженной конфигурации.

- После импорта можно смело выбирать пункт Подключиться. При необходимости можно импортировать несколько конфигураций. В таком случае подключений будет два или три.


Рекомендуем импортировать несколько разных конфигураций, после чего перейти к их тестированию. Для тестирования можно воспользоваться сервисами проверки скорости Интернета на компьютере Windows 10.
Если же перейти в расположение: C:\ Пользователи\ Имя_пользователя\ OpenVPN\ config, то можно увидеть, и при необходимости удалить, папки с ранее добавленными конфигурациями.
После подключения к определённому серверу весь трафик пользователя будет проходить через VPN. Таким образом, можно будет играть в игры или посещать сайты, заблокированные в регионе. Скорость — далеко не его сильная сторона, но если у Вас скоростной Интернет, то скорость будет приемлемой. Как правило, скорость интернета падает из-за сильного уровня шифрования в OpenVPN.
Заключение
При необходимости для работы сами используем OpenVPN. На данный момент OpenVPN считается лучшим VPN-протоколом. На практике все наши высказывания подтверждаются. После первого использования, даже бесплатных серверов, сложно использовать другие VPN-клиенты. В принципе и без дополнительного программного обеспечения можно настроить VPN соединение на Windows 10.
(3 оценок, среднее: 4,33 из 5)
Администратор и основатель проекта Windd.pro. Интересуюсь всеми новыми технологиями. Знаю толк в правильной сборке ПК. Участник программы предварительной оценки Windows Insider Preview. Могу с лёгкостью подобрать комплектующие с учётом соотношения цены — качества. Мой Компьютер: AMD Ryzen 5 3600 | MSI B450 Gaming Plus MAX | ASUS STRIX RX580 8GB GAMING | V-COLOR 16GB Skywalker PRISM RGB (2х8GB).
Main Page > General Information > Configuration Examples > PC > Windows > OpenVPN client on Windows
Introduction
OpenVPN is an open-source software application that implements virtual private network (VPN) techniques for creating secure point-to-point or site-to-site connections in routed or bridged configurations and remote access facilities.
This article provides a guide on how to configure an OpenVPN Tunnel connection between an OpenVPN client on a Windows PC/Laptop and any OpenVPN server using TLS certificates as the authentication method. The examples in this article only apply to Windows 7 and later versions. For a Linux guide, click here.
Configuration overview and prerequisites
Before we begin, let’s overview the configuration that we are attempting to achieve and the prerequisites that make it possible.
Prerequisites:
- A PC or Laptop running on Windows 7 or a later version
- An active Internet connection
Configuration scheme:
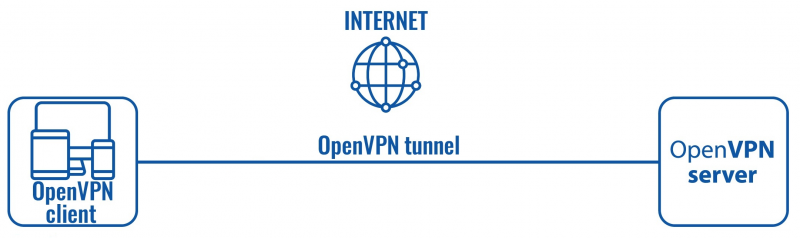
The scheme itself is very simple — an OpenVPN client connects to an OpenVPN server. The client is configured on a Windows 10 PC or Laptop, while the server is undefined in this example, i.e., we will be focusing mainly on the client configuration method, since the server could belong to any OpenVPN service provider.
OpenVPN client installation
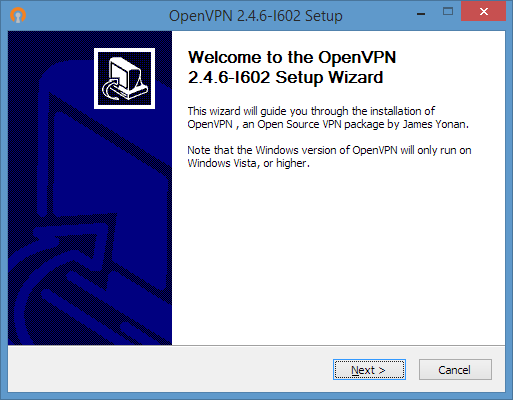
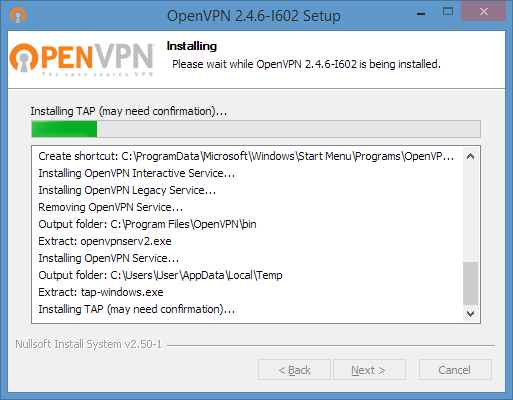
To create an OpenVPN client we’ll need to download and install the OpenVPN Windows application. You can find the download link for the newest OpenVPN version here. The file in question should be named something like this: openvpn-install-2.4.6-I602.exe (actual name depends on the current OpenVPN version). Download and run this file. For examples in this guide you can just use default settings in the installation, unless your own configuration requires otherwise.
OpenVPN client configuration
If you have familiarized yourself with the configuration scheme, installed the necessary software and have all of the devices in order, we can start configuring the OpenVPN client using instructions provided in this section.
The client configuration is stored in a single text file. You can either download an example file from the Internet or use our configuration file as a template, which you can download by clicking here. The file stores standard OpenVPN options, the values of which depend on the server type and user preferences, and authentication certificates or file paths to the certificates. Since we’ll be using TLS authentication for this example, we’ll need to generate TLS certificates for our configuration to work. The process on how to do that is described here in detail.
- When you have the certificates in order, you can start configuring the client. To do so, simply open the configuration file with any text editor. Enter the OpenVPN options relevant to your configuration. Then copy the contents of the certificates into that file. Below is an example of how the file looks like:
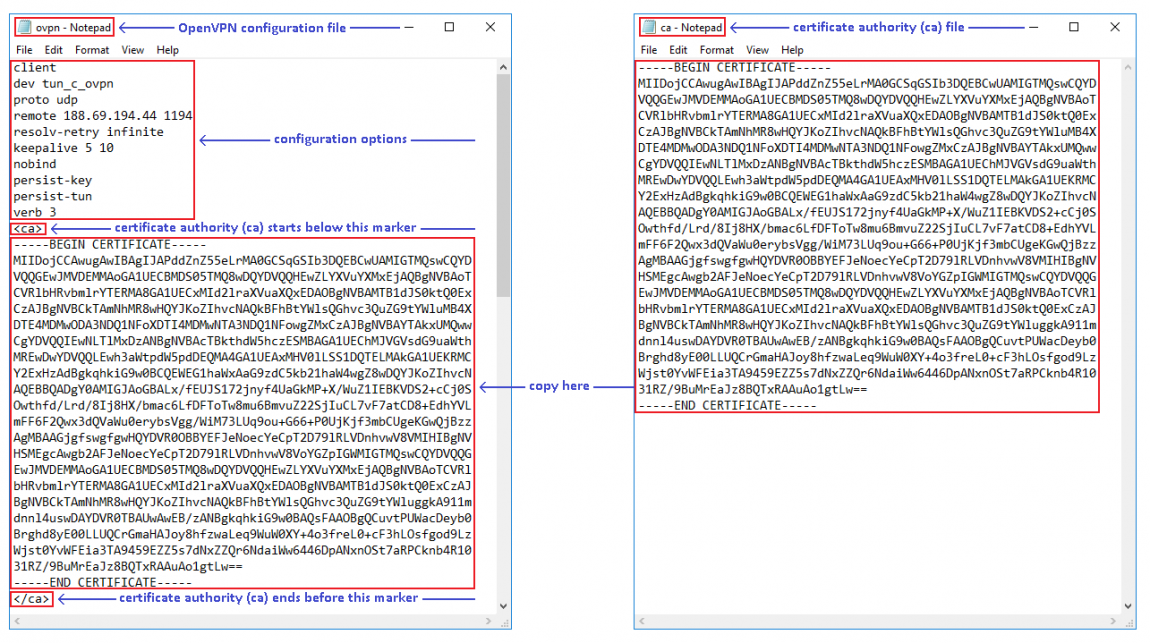
NOTE: don’t forget to copy the other certificates as well. The necessary markers are in place inside the example config file.

- At this point all you need to do is wait a few seconds for the connection to complete. After clicking «Connect» a status window for that client should appear. If the connection was successful, the status window should close itself automatically. To bring it up again, go to the OpenVPN GUI drop-down menu again and click «Show status» in your OpenVPN client’s menu. You should a «Initialization Sequence Complete» message in the log:

- Additional testing for the connection may be required depending on the server’s configuration and the overall intent of your OpenVPN connection. For instance, if you were supposed get access to server’s private network or other clients’ private networks, you can open the Windows «Command Prompt» and try pinging private IP addresses of the devices in the networks in question. Or if the server was intended to be used as a proxy, your computer’s Public IP address should be the same as the server’s. To check your public IP address, visit this website.
Different configurations
The configuration we discussed in earlier sections is very basic. Some options used in client configurations depend on the server’s configuration, some are only specific to the client. If you’re using a third party OpenVPN service, the configuration files (and necessary certificates) are almost always provided by that party, so if that is the case we suggest simply using their configuration file.
If you are configuring the server yourself you will also need to create the client config file yourself. You can use the one provided in this guide as a base, but keep in mind that you’ll have set the options specific to your own configuration yourself. OpenVPNs supports a lot of different options and can be customized almost endlessly. A complete list of OpenVPN options can be found in the OpenVPN manual (external link).
See also
- Other OpenVPN related articles from our wiki:
- How to generate TLS certificates (Windows)? — a guide on generating TLS certificates
- OpenVPN Manual section — OpenVPN section of the router’s manual
- OpenVPN configuration examples — basic OpenVPN configuration scenarios with detailed examples
- OpenVPN traffic split — a detailed example on how to configure different default gateways for devices in the router’s LAN
- OpenVPN client on Linux
- OpenVPN server on Windows
External links
- https://openvpn.net/index.php/open-source/downloads.html — OpenVPN client download.
- http://www.whatsmyip.org/ — a website where you can check your Public IP address
- https://community.openvpn.net/openvpn/wiki/Openvpn24ManPage — OpenVPN manual