Automatically connecting with a Mac client:
Step 1: Ensure you have the appropriate Connect Client downloaded on your device. From the Client UI for your Access Server, log in with your user credentials and choose the OpenVPN Connect download for your device:

Step 2: The VPN Administrator will need to enable auto-login for the profile in question. This is done in the Admin Web UI, by clicking on Allow Auto-login for the appropriate Username:

Step 3: Go to the Client UI and download an auto-login profile. You’ll find the link for that at the bottom of the UI. Open your Connect app and choose + to add it:

Step 4: Click on the OpenVPN icon on your device ribbon bar

Step 5: Select Settings > Reconnect on Reboot

Your VPN connection will now occur on start-up without requiring any additional steps on your part.
Automatically connecting with a Windows client
Step 1: Ensure you have the appropriate Connect Client downloaded on your device. From the Client UI for your Access Server, log in with your user credentials and choose the OpenVPN Connect download for your device:

Step 2: The VPN Administrator will need to enable auto-login for the profile in question. This is done in the Admin Web UI, by clicking on Allow Auto-login for the appropriate Username:
Step 3: Go to the Client UI and download an auto-login profile. You’ll find the link for that at the bottom of the UI. Open your Connect app and choose + to add it:
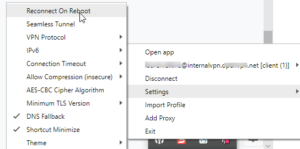
Step 4: Right-click on the icon in the taskbar:

Step 5: Choose Settings > Reconnect on Reboot:
Your VPN connection will now occur on start-up without requiring any additional steps on your part.
В этой статье мы рассмотрим, как настроить автоматическое подключение к OpenVPN серверу при входе пользователя в Windows с помощью ярлыка в автозапуске и с помощью службы Windows.
Автозапуск клиента OpenVPN при входе в Windows
Скопируйте ваш *.ovpn файл с настройками вашего VPN подключения в каталог C:\Users\YourUsernName\OpenVPN\config или в C:\Program Files\OpenVPN\config.
Теперь вам нужно открыть каталог автозапуска в Windows. Для этого нажмите сочетание клавиш Win+R и выполните команду shell:startup. Перед вами откроется папка в профиле текущего пользователя ((%APPDATA%\Microsoft\Windows\Start Menu\Programs\Startup). Windows при входе пользователя в систему автоматически запускает все программы из этой папки.
Если у вас используется клиент openvpn-gui.exe (OpenVPN 2.5), то для автоматического подключения с помощью указанного профиля из файла *.ovpn используется команда:
"C:\Program Files\OpenVPN\bin\openvpn-gui.exe" --connect your_vpn_connection.ovpn
Просто скопируйте ярлык OpenVPN GUI в каталог Startup и настройках ярлыка добавьте параметр --connect your_vpn_connection.ovpn.

Если вы хотите скрыть окно состояния клиента OpenVPN при подключении, добавьте в строку параметр --silent_connection 1.
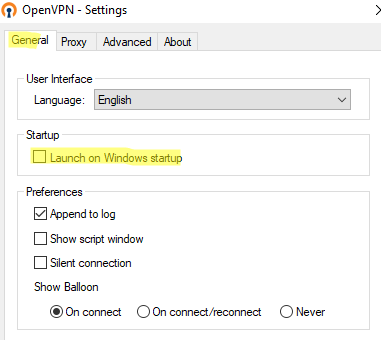
Теперь запустите клиент OpenVPN и отключите автоматический запуск при загрузке Windows (вкладка General -> Launch on Windows startup). Это позволит предотвратить конфликт с командой автозагрузки, которую мы создали ранее.

Теперь Windows будет автоматически устанавливать подключение с OpenVPN сервером при входе пользователя.
Если у вас используется клиент OpenVPNConnect.exe (3.3.x) от OpenVPN вместо комьюнити клиента, имейте в виду, что в нем пока нет опций командной строки для подключения к серверу с помощью настроенного профиля.
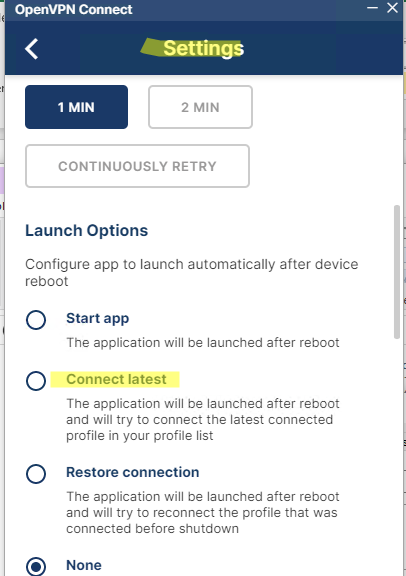
В настройках клиента OpenVPN Connect можно включить опцию Lauhch options -> Connect latest. В этом случае клиент будет автоматически подключаться с помощью последнего используемого ovpn профиля.

Эту же опцию можно включить из командной строки:
C:\Program Files\OpenVPN Connect\OpenVPNConnect.exe --set-setting launch-options:connect-latest
В этом примере мы показали, как настроить автоматическое OpenVPN подключение для одного пользователя Windows. Если вам нужно настроить автоподключение для всех пользователей, можно создать аналогичное задание в Task Scheduler или настроить службу OpenVPN.
Запуск клиента OpenVPN как службы Windows
Вы можете настроить автоматическое подключение с помощью службы OpenVPN Service, которая позволит автоматически поднимать VPN подключение до входа пользователя в Windows.
Если у вас используется клиент OpenVPN Connect 3.2+, вы можете запустить службу OpenVPN, которая будет автоматически подключаться к OpenVPN серверу после загрузки Windows.
- Откройте командную строку с правами администратора и перейдите в каталог:
cd "c:\Program Files\OpenVPN Connect" - Установите службуOVPNConnectorService:
ovpnconnector.exe install - Задайте полный путь к конфигурационному файлу OVPN, который нужно использовать для подключения:
ovpnconnector.exe set-config profile "C:\OpenVPN\client.ovpn"
- Укажите имя файла, куда нужно записыват логи VPN подключения:
ovpnconnector.exe set-config log "C:\OpenVPN\client.log"Логи OpenVPN также доступны в стандартном Event Viewer в разделе Windows Logs -> Applications -> включите фильтр по Event Source OVPNConnectorService.
- Запустите службу OpenVPN:
ovpnconnector.exe startПроверьте, что клиент успешно подключится в OpenVPN серверу. В логе должно появится сообщение:
Wed Feb  1 23:25:39 2023 Connected via TUN_WIN
Wed Feb  1 23:25:39 2023 EVENT: CONNECTED YourOpenVPNProfile via /UDPv4 on TUN_WIN/10.24.1.10/ gw=[10.24.1.9/]
И ваш виртуальный адаптер WinTUN получил IP адрес от сервера OpenVPN
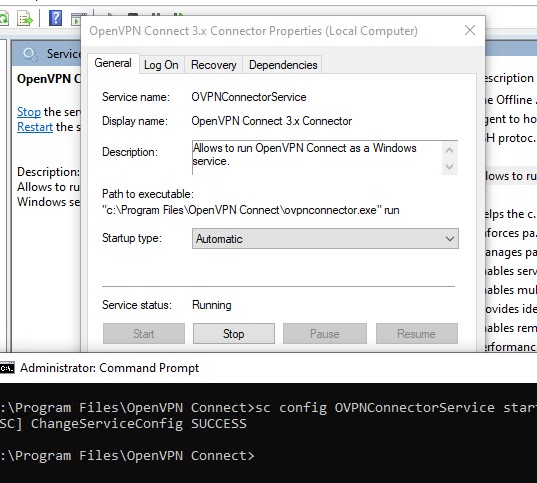
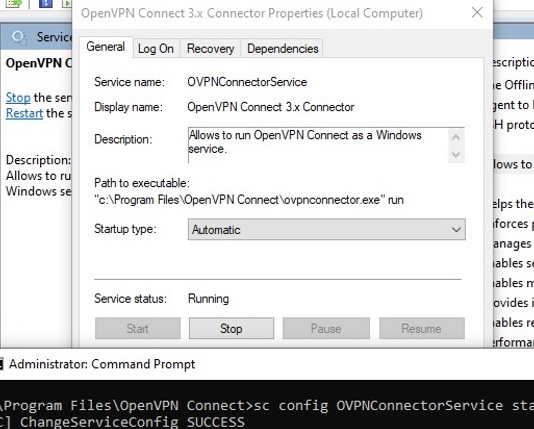
- Теперь настройте автоматический запуск для службы OVPNConnectorService из консоли управления services.msc или с помощью команды:
sc config OVPNConnectorService start=auto
- Теперь после перезагрузки Windows служба OpenVPN будет автоматически подключаться к серверу.

Если вы хотите отключить и удалить службу OVPNConnectorService, выполните команды:
ovpnconnector.exe stop
ovpnconnector.exe remove
Если у вас используется аутентификация OpenVPN ерез Active Directory, вы можете сохранить имя пользователя и пароль в текстовый файл и использовать его для автоматического подключения.
Создайте текстовый файл login.txt в каталоге C:\Program Files\OpenVPN\config.

И добавьте в конфигурационный файл ovpn строки:
auth-user-pass login.txt
auth-retry nointeract
auth-nocache
Если у вас используется клиент OpenVPN GUI, вы также можете настроить службу для автоматического подключения. Для этого:
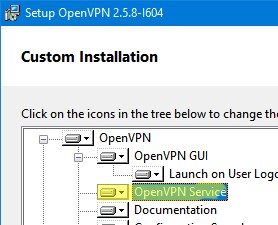
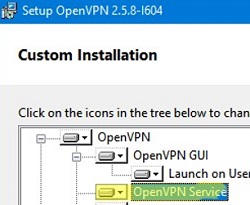
- При установке клиента обязательно выберите дополнительно службу OpenVPN Service

- Скопируйте ваши профили OpenVPN (файлы с расширением .ovpn) в каталог
"C:\Program Files\OpenVPN\config\" - Служба OpenVPN будет автоматически запускать VPN туннель для каждого конфигурационного ovpn файла из этого каталога)
Если на компьютере должны быть одновременно активны несколько OpenVPN подключений, убедитесь, что в Windows создано достаточное количество виртуальных сетевых адаптеров TUN/TAP. Иначе в логах появится ошибка All TAP-Windows adapters on this system are currently in use. Также рекомендуется привязать OpenVPN подключение к конкретному сетевому интерфейсу с помощью следующей строки в .ovpn:
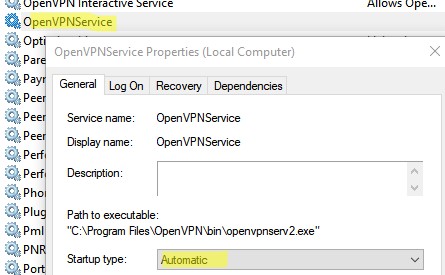
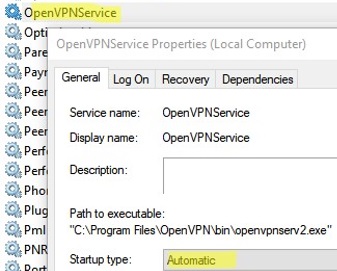
dev-node 'OpenVPN TAP-Windows2'(указывается имя сетевого адаптера в Window) - Проверьте что для службы OpenVPNService (
C:\Program Files\OpenVPN\bin\openvpnserv2.exe) настроен автоматический запуск.
В Linux вы можете подключиться к VPN серверу из командной строки или автоматически с помощью стандартного сервиса openvpn@client.service.
Данные демон автоматически создает VPN подключения для всех конфигурационных файлов .conf в каталоге /etc/openvpn (просто переименуйте ваши *.ovpn файлы в *.conf). И запустите сервис:
$ sudo systemctl enable openvpn@client.service
$ sudo systemctl start openvpn@client.service
In this article, we’ll look at how to automatically connect to an OpenVPN server when a user logs into Windows using a startup shortcut or using a Windows Service.
Autostart OpenVPN Client at Windows Startup
Copy your *.ovpn profile file with your VPN settings to C:\Users\YourUsernName\OpenVPN\config or to C:\Program Files\OpenVPN\config folder.
Now you need to open the Windows startup folder. To do this, press Win+R and run the shell:startup command. This will open the current user’s startup folder (%APPDATA%\Microsoft\Windows\Start Menu\Programs\Startup). Windows automatically runs all programs in this folder when the user logs on.
If you are using the openvpn-gui.exe client (OpenVPN 2.5), then the following command is used to automatically connect using the specified profile in the *.ovpn file:
"C:\Program Files\OpenVPN\bin\openvpn-gui.exe" --connect your_vpn_connection.ovpnJust copy the OpenVPN GUI shortcut to the Startup directory and add the --connect your_vpn_connection.ovpn parameter in the shortcut settings. Or create a new shortcut, specify the full path to the openvpn-gui.exe file, and add the --connect *.ovpn parameter.

If you want to hide the OpenVPN status window when connecting to the server, add the --silent_connection 1 option to the startup command.
Now run the OpenVPN client and disable automatic launch at Windows startup (General tab -> Launch on Windows startup). This will prevent a conflict with the auto-connect command we created earlier.
Now Windows will automatically establish a connection with the OpenVPN server when the user signs in.
If you are using the OpenVPNConnect.exe (3.3.x) client from OpenVPN instead of the community client, be aware that it doesn’t yet have command line options to connect to a VPN server using a configured profile file.
In the OpenVPN Connect client settings, you can enable the Connect latest option (under Launch options). In this case, the OpenVPN client will automatically connect using the last used ovpn profile.
Also, you can enable this option from the command prompt:
C:\Program Files\OpenVPN Connect\OpenVPNConnect.exe --set-setting launch-options:connect-latest
In this example, we have shown how to configure an automatic OpenVPN connection for a single Windows user. If you need to enable an automatic OpenVPN connection for all users, you can create a task in the Task Scheduler or enable the OpenVPN service.
Run the OpenVPN Client as a Windows Service to Connect Automatically
You can set up an automatic connection using the OpenVPN service, which will automatically establish the VPN connection before the user logs in to Windows. Using the OpenVPN Connect 3.2+ client, you can run the OpenVPN service that automatically connects to the OpenVPN server when Windows starts.
- Open a command prompt as an administrator and go to the directory:
cd "c:\Program Files\OpenVPN Connect" - Install the OVPNConnectorService:
ovpnconnector.exe install - Specify the full path to the OVPN configuration file to be used for the connection:
ovpnconnector.exe set-config profile "C:\OpenVPN\client.ovpn"
- Specify the file name where to write OpenVPN client connection logs:
ovpnconnector.exe set-config log "C:\OpenVPN\client.log"OpenVPN logs are also available in the Event Viewer under Windows Logs -> Applications. Enable the filter by the Event Source OVPNConnectorService.
- Start the OpenVPN service:
ovpnconnector.exe startCheck that the client successfully connects to the OpenVPN server. The following message should appear in the log:
Wed Feb  1 11:13:29 2023 Connected via TUN_WIN

Wed Feb  1 11:13:29 2023 EVENT: CONNECTED YourOpenVPNProfile via /UDPv4 on TUN_WIN/10.1.2.10/ gw=[10.1.2.8/]
And your WinTUN virtual adapter got an IP address from the OpenVPN server. - Now configure automatic startup for the OVPNConnectorService using the
services.mscconsole or with the command:sc config OVPNConnectorService start=auto
- The OpenVPN service will now automatically connect to the server after Windows is restarted.
If you want to disable and remove the OVPNConnectorService service, run the following commands:
ovpnconnector.exe stop
ovpnconnector.exe remove
If you are using OpenVPN authentication via Active Directory, you can save the username and password to a plain text file and use it to automatically connect.
Create a text file login.txt in the C:\Program Files\OpenVPN\config directory.

And add the following options to the ovpn configuration file:
auth-user-pass login.txt

auth-retry nointeract

auth-nocache
If you are using the OpenVPN GUI client, you can also configure the system service to connect automatically.
- Be sure to select the OpenVPN Service when installing the OpenVPN client;

- Copy your OpenVPN profiles (.ovpn files) to the directory “
C:\Program Files\OpenVPN\config\“ - The OpenVPN service will automatically start a VPN tunnel for each *.ovpn configuration file from this directory.
If you want more than one OpenVPN connection to be active on your computer at the same time, make sure that a sufficient number of TUN/TAP virtual network adapters have been created in Windows. Otherwise, the error All TAP-Windows adapters on this system are currently in use will appear in the logs. It is also recommended to bind an OpenVPN connection to a specific network interface using the following option in .ovpn:
dev-node 'OpenVPN TAP-Windows2'(specify your OpenVPN network adapter name in Windows). - Check that the OpenVPNService service (
C:\Program Files\OpenVPN\bin\openvpnserv2.exe) is configured to start automatically.
On Linux, you can connect to the VPN server from the command line or enable autoconnect using the openvpn@client.service daemon.
This daemon automatically establishes VPN connections for all .conf configuration files in the /etc/openvpn directory (just rename your *.ovpn files to *.conf). And enable the service:
$ sudo systemctl enable openvpn@client.service
$ sudo systemctl start openvpn@client.serviceСегодня хочу рассказать о том как быстро и просто настроить автоматическое подключение клиента OpenVPN 2.5 к серверу при запуске операционной системы Windows 10. Немного предыстории, в одной организации было реализовано подключение клиентов через OpenVPN. Но у большинства пользователей не знаю почему не хватало ума после запуска ОС запустить еще и OpenVPN. И каждое утро в чат сыпалась куча сообщений у нас ни чего не работает. Хотя всем пользователям все объяснялось и показывалось.
Конечно по хорошему необходимо было изначально настраивать автоматическое подключение к серверу OpenVPN, дабы не напрягать пользователей.
В общем опыта в этом не было, обратился с этим вопросом к поисковым системам. Ответов было много но все они не точные и не полные. Кто то писал про настройку службы, кто-то про создания задачи в планировщике. Прочитав несколько статей, я нашел один простой способ, которым хочу поделиться с вами.
Так же рекомендую прочитать интересные статьи на тему настройки OpenVPN.
Как узнать кто подключен к OpenVpn серверу
Как просматривать логи OpenVPN в Linux
Как настроить OpenVPN Client в Windows 10
Простой способ автоподключения OpenVPN
Для того чтобы клиент OpenVPN при загрузки Windows сам в автоматическом режиме поднимал соединение нужно в свойствах ярлыка в поле «Объект» добавить следующею запись.
—connect client.ovpn

client.ovpn это название вашего файла конфигурации который храниться в папке ovpn. Название может быть любое.

После чего проверяем, запускаем OpenVPN он должен сам подключиться к серверу.
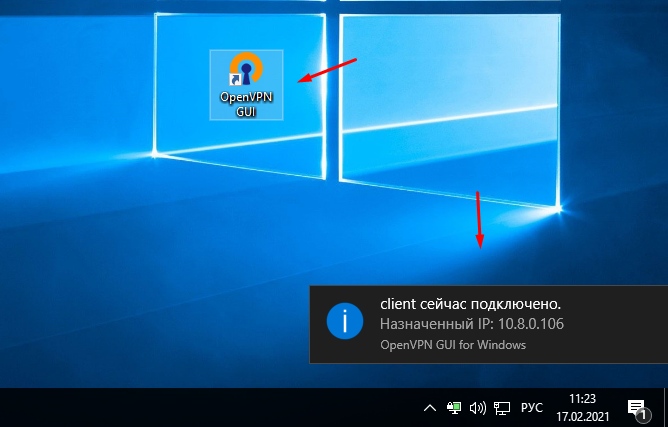
Остается только этот ярлык добавить в автозагрузку.
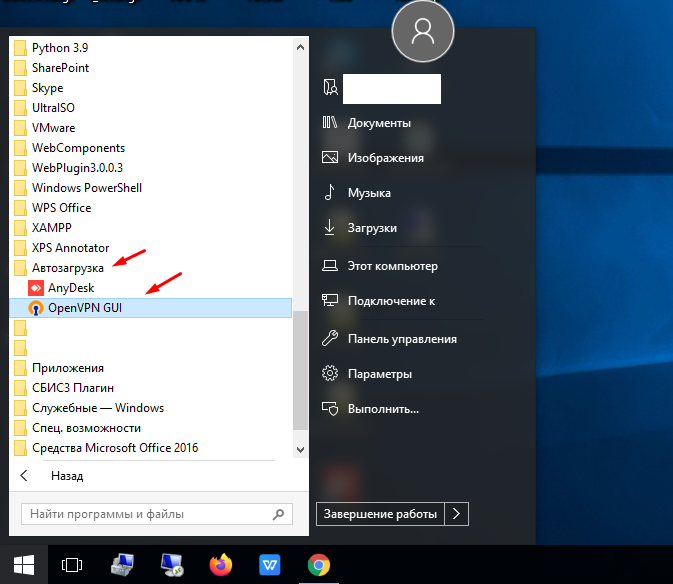
Если в вашей сборке Windows 10 в пуске нет папки «Автозагрузка» или вы просто не можете её найти, нажимаем клавиши Win+R и вводим команду «shell:startup».

В открывшиеся окно переносим измененный ярлык.

Все теперь OpenVPN после загрузки операционной системы будем автоматически подключаться к серверу и устанавливать соединение.
The best way is to use services:
- Install the OpenVPN service when you install the client;
- Place your OpenVPN profiles (with the extension .ovpn, not .conf as is common on Linux) in the config subdirectory of the OpenVPN installation directory, probably
C:\Program Files\OpenVPN\config. - Open the Services console (
services.msc); - Find OpenVPNService, right click on it, Properties, and change startup type from “Manual” to “Automatic”.
- Start the service, and OpenVPN will find and connect to the profiles in any .ovpn files. Keep in mind in most situations you need one TUN/TAP interface per connection file. In windows, I strongly advise to permanently associate an interface with their connection using the configuration files:
dev-node TAP_Servforces OpenVPN to bind the connection to the network interface named «Tap_Serv». Added after reading some comments: You need one interface per connection. In Linux this is trivial, but in windows it may be problematic. HAving two configurations that you can SEPARATEDLY test succesfully, doesn’t mean they’ll run together, as they may be competing for the same interface. OpenVPN is a ported program, and windows driver subsystem has allways been a pain in the a**.
You may want to investigate if there’s a way to elaborate a whitelist to force the service to connect only to specific files, and not all. I’ve had some issues in the past with people who needed to have a VPN server as a service plus several vpn client files in the same machine that only connect every now and then. In those situations, if I wanted OpenVPN GUI to show them a beautifull list of available connections, it meant that the service saw those files and was trying to connect to them automatically. In those cases, I decided not to use services at all:
If using a service is not an option, you can pass extra command line arguments to the OpenVPN GUI invocation to make it automatically connect on startup (as well as showing the tray icon as usual):
openvpn-gui.exe --connect myprofile.ovpn
To get that to run when you log in, place such a shortcut in the usual startup folder. (For all users, %ProgramData%\Microsoft\Windows\Start Menu\Programs\Startup; or for the current user only, %APPDATA%\Microsoft\Windows\Start Menu\Programs\Startup.)
I don’t know how to avoid the user to connect to the Internet before the VPN is set. The only way I can figure out if through Windows Firewall, and I’m not an expert on that subject. If you want to avoid a poweruser to be able to get to the Internet you need a firewall in your gateway to avoid so, or strong group policies to avoid privilege scalation.
For a normal user, you can configure the Windows client machine without a default gateway. Set a persistent static route to the VPN server on Windows clients using the following command (-P makes it persistent):
route -P add <target> mask <netmask> <gateway IP> metric <metric cost> if <interface>
Routes in Windows are stored under the following registry key:
HKEY_LOCAL_MACHINE\SYSTEM\CurrentControlSet\Services\Tcpip\Parameters\PersistentRoutes
At this point a disconnected client only has access to the VPN server. Then you can add the following lines in the VPN server configuration file to add routes on clients when they connect:
To configure the VPN server as the default gateway:
push "redirect-gateway def1 bypass-dhcp"
To add a specific route through the VPN Server:
push "route 192.168.1.0 255.255.255.0"
Sometimes route pushing doesn’t work on Windows. When this happens to me, I completly uninstall OpenVPN and its interfaces from Windows, restart the system and install the latest version of the software. Then, before establishing the first connection, I restart Windows. This has always solved the issues. However, Windows 10 Anniversary update (1607) is buggy with OpenVPN. There’s a link to a deeper discussion in OpenVPN forums:
Connection problems with Windows 10 anniversary update
Keep that in mind when you setup your Windows 10 OpenVPN clients.
If you’re a consultant looking to give advice to a client, please consider using some specific NATIVE Windows solutions, if your client’s budget allows for it. I won’t name any to avoid being flagged, but most known networking hardware companies offer solutions compatible with their devices that provide native drivers for any edge OS you may think of. Disclaimer: I don’t work for any of those companies. For my own dialy life I use OpenVPN, but to remotely connect to my company they’ve a commercial solution bundled on the computers: I never had a single connection issue, while OpenVPN is usually more delicate. Don’t take me wrong, I’ve delivered OpenVPN to production environments for clients with total success, but you need to be extra cautious (and put watchdog and recoverfy measures in place, or just train the user to «click reconnect» if something doesn’t work properly).