Introduction
This guide provides information for configuring OpenVPN Access Server to authenticate against Active Directory (AD) using the Remote Authentication Dial-in User Service (RADIUS) protocol.
Before you begin:
- Ensure you know the IP address of your OpenVPN Access Server. If you don’t know it, issue an ifconfig command in the terminal of your OpenVPN Access Server instance.
- Ensure you have Windows Server, Active Directory Domain Services, and Network Policy and Access Services roles installed.
- Be aware that using auto-login profiles doesn’t trigger RADIUS authentication and RADIUS accounting requests.
Sections:
- Windows Server Configuration
- Access Server Configuration
Windows Server Configuration
Begin by configuring your RADIUS server.
Add a new RADIUS client
- Open Server Manager on your Windows Server.
- Click Tools > Network Policy Server.
- Under NPS, expand RADIUS Clients and Servers, right-click RADIUS Clients and click New.
- Enter the information for your new RADIUS client:
- Friendly name: Enter a descriptive name such as “OpenVPN Access Server”.
- Address (IP or DNS): Enter the IP address of your Access Server.
- Shared Secret: Click the Generate radio button, then click Generate below.
- Click OK.
Add a Network Policy
- From the Network Policy Server window, expand Policies, right-click on Network Policies and click New.
- Enter the information for your new network policy:
- Policy name: Enter a descriptive name such as “OpenVPN Access Server Policy”.
- Type of network access server: Leave this unspecified.
- Click Next.
- In the Specify Conditions window, click Add…
- Click Windows Groups and click Add…
- Click Add Groups… to add new group memberships.
- Specify the group names you want to grant access; for example, we allow access to the group, “VPN Users.” You can add multiple groups.
- Click OK for the Select Group window and OK for the Windows Groups window.
- From the Specify Conditions window, click Add… to (optionally) also specify the IP address of the RADIUS client that forwards connection requests to the network policy server.
- Under RADIUS Client Properties, click Client IPv4 Address and click Add…
- Specify the IP address of your Access Server and click OK.
- From the Specify Conditions window, click Next.
- Leave the default permissions selected with Access granted and click Next.
- In the Configuration Authentication Methods window, under EAP Types click Add…
- Click Microsoft: Secured password (EAP-MSCHAP V2) and click OK.
- From the Configure Authentication Methods windows, click Next.
- Accept the default constraints and click Next.
- Accept the default settings for the network policy and click Next.
- Click Finish to complete the new network policy.
Note: We recommend including the Client IPv4 Address condition in your network policy, especially if you have other resources on your network besides your VPN server. Otherwise, it’s possible anyone listed in the group(s) added to the Windows Groups condition can access all your other network resources.
Ensure your policy is accessible
From the Network Policy Server window, ensure that your new policy is listed above any blocked policy. A blocked policy is denoted with a red X. If your new policy appears at the bottom of the blocked policies, your clients can’t authenticate against the server. To fix this:
- Right-click on the new policy.
- Click Move Up until your policy is above the blocked policies.
Access Server Configuration
Now you’re ready to configure your Access Server for RADIUS access.
- Sign in to your Admin Web UI.
- Click Authentication > RADIUS.
- If RADIUS is not enabled already, click Use RADIUS to set it as the default authentication method, or set Allow RADIUS authentication for assigned users and groups to allow RADIUS as an additional authentication method.
- Under RADIUS Authentication Method set MS-CHAP v2 to Yes.
- Enter your RADIUS settings:
- Hostname or IP Address: Enter your domain controller’s IP address.
- Shared Secret: Enter the long text string shared secret saved from earlier.
- Click Save Settings and Update Running Server.
Your Access Server should now authenticate users against your Active Directory users.
Note: Be aware that using auto-login profiles doesn’t trigger RADIUS authentication and RADIUS accounting requests. The first time a user signs in to download an auto-login connection profile, they can authenticate against the RADIUS server, but after that, auto-login connection profiles authenticate using only a certificate and bypass credential-based authentication of the RADIUS server.
If you want to protect your online privacy or encrypt your information on the web so that it does not fall into the hands of hackers; you should use a VPN. The main element of any VPN is the VPN protocol used by it. In this article, we will teach you how to install OpenVpn on Windows Server 2019. Most VPNs support several protocols such as IKEv2, L2TP, and SSTP, but the OpenVPN protocol is known as the most popular and best VPN protocol in the world. In this article, we will teach you How to Setup OpenVPN On Windows Server 2019. If you want to purchase your own RDP, you can check out the packages offered on the Eldernode website.
Table of Contents
What is OpenVPN?
Openvpn is currently the most popular and widely used protocol as a VPN. Unlike other IPSec-based tunneling protocols (such as L2tp), Openvpn relies on SSL / TLS for authentication and data encryption. This standard security technology is for making secure, remote connections from one place to another or from one point to another. The use of SSL to protect financial transactions, data transfers, emails, and other things is very popular.
OpenVPN is compatible with all major operating systems such as Windows, Android, iOS, Mac, and Linux. It is open source and supports up to 256-bit encryption.
Available OpenVPNs is as follows:
–> OpenVPN Community Edition: It is an open-source and free version and doesn’t have user limitations.
–> OpenVPN Access Server: It is based on the Community Edition but provides additional paid and proprietary features such as Easy Management Admin Portal, LDAP integration and etc.
–> OpenVPN-as-a-Service: It is a solution that eliminates the need for VPN server installation. You can connect to your hosted service with regions around the world simply by purchasing OpenVPN Cloud.
In this step from the Windows training tag, you will learn how to install OpenVPN on Windows Server 2019.
Prerequisites
– Access to port 1194 to connect to the same network
– Windows Server 2019
You can do this by allowing UDP traffic on port 1194 by adding a rule to your Firewall.
How to Install OpenVPN on Windows Server 2019
Go to the official OpenVPN Website to download the latest Windows 64-bit MSI installer for the OpenVPN Community edition:
After the download is completed, go to the downloaded file and double-click on it. Click on the icon next to desired features to choose them. Check the ”EasyRSA 2 Certificate Management Scripts” and click on Next:
Once the installation is completed, you should generate the certificates and keys to access the VPN. To do this, open the terminal by typing cmd on the Start menu and right-click on the Command Prompt icon. Choose ”Run as Administrator”:
Go to the following path:
C:\Program Files\OpenVPN\easy-rsaNow you can start configuring OpenVPN:
init-configIn this step, you need to open the vars.bat file in the text editor:
notepad vars.batEdit the subsequent lines by switching The ”US”, ”CA” etc with your business’s data:
set KEY_COUNTRY=US set KEY_PROVINCE=CA set KEY_CITY=SanFrancisco set KEY_ORG=OpenVPN set [email protected]–> KEY_CN and KEY_NAME: They will be unique for each build request and refer to the common name field and the name of the certificate.
–> KEY_OU: They refer to an ”Organizational Unit” and can be set to whatever if there isn’t a requirement for it.
–> PKCS11_values: They refer to settings used for Hardware Security Modules and Smart Cards if you use them.
Save the text editor file and exit it.
To apply the changes, enter the following command:
varsclean allBuilding Certificates and Keys
In order to create the Certificate Authority (CA) certificate and key, we need to run the following command:
build-caThis will prompt you to enter your country, state, and city. These options will also have default values, which appear within brackets:
Certificate Authority "OpenVPN-CA": Country Name (2 letter code) [US]: State or Province Name (full name) [CA]: Locality Name (eg, city) [SanFrancisco]: Organization Name (eg, company) [OpenVPN]: Organizational Unit Name (eg, section) []: Common Name (eg, your name or your server's hostname) []:OpenVPN-CA Email Address [[email protected]]:Using the following command, we initiate the server’s certificate and key:
build-key-server serverWhen prompted to sign the certificate and commit, enter ”y” and enter the ”Common Name” as a server.
Server Certificates and Keys
C:\Program Files\OpenVPN\easy-rsa>build-key-server.bat Generating a RSA private key ..............................................................................................................................................................................................................................................++++ ................................++++ writing new private key to 'keys\.key' ----- You are about to be asked to enter information that will be incorporated into your certificate request. What you are about to enter is what is called a Distinguished Name or a DN. There are quite a few fields but you can leave some blank For some fields there will be a default value, If you enter '.', the field will be left blank. ----- Country Name (2 letter code) [US]:US State or Province Name (full name) [MI]: Locality Name (eg, city) [Lansing]: Organization Name (eg, company) [OpenVPN]: Organizational Unit Name (eg, section) [changeme]: Common Name (eg, your name or your server's hostname) [changeme]:Server Name [changeme]: Email Address [[email protected]]: Please enter the following 'extra' attributes to be sent with your certificate request A challenge password []:XXXXXXXXXXXXXXXX An optional company name []: Using configuration from openssl-1.0.0.cnf Can't open keys/index.txt.attr for reading, No such file or directory 1832:error:02001002:system library:fopen:No such file or directory:crypto/bio/bss_file.c:74:fopen('keys/index.txt.attr','r') 1832:error:2006D080:BIO routines:BIO_new_file:no such file:crypto/bio/bss_file.c:81: Check that the request matches the signature Signature ok The Subject's Distinguished Name is as follows countryName :PRINTABLE:'US' stateOrProvinceName :PRINTABLE:'MI' localityName :PRINTABLE:'Lansing' organizationName :PRINTABLE:'OpenVPN' organizationalUnitName:PRINTABLE:'changeme' commonName :PRINTABLE:'Server' name :PRINTABLE:'changeme' emailAddress :IA5STRING:'[email protected]' Certificate is to be certified until Dec 24 19:01:08 2029 GMT (3650 days) Sign the certificate? [y/n]:y 1 out of 1 certificate requests certified, commit? [y/n]y Write out database with 1 new entries Data Base Updated C:\Program Files\OpenVPN\easy-rsa>Client Certificates and Keys
For each client that will be connecting to the server, you should choose a unique name to identify that user’s computer, such as ”Michael-PC” in the following example.
When prompted, enter the Common Name as the name you have chosen for the client’s cert/key. You will repeat this step for every client computer that is going to connect to the VPN.
C:\Program Files\OpenVPN\easy-rsa>build-key Michael-PC Generating a RSA private key .............................................................................................................................................................................++++ ..............................................................................++++ writing new private key to 'keys\Michael-PC.key' ----- You are about to be asked to enter information that will be incorporated into your certificate request. What you are about to enter is what is called a Distinguished Name or a DN. There are quite a few fields but you can leave some blank For some fields there will be a default value, If you enter '.', the field will be left blank. ----- Country Name (2 letter code) [US]: State or Province Name (full name) [MI]: Locality Name (eg, city) [Lansing]: Organization Name (eg, company) [OpenVPN]: Organizational Unit Name (eg, section) [changeme]: Common Name (eg, your name or your server's hostname) [changeme]:Michael-PC Name [changeme]: Michael Jordan Email Address [[email protected]]: Please enter the following 'extra' attributes to be sent with your certificate request A challenge password []:XXXXXXXXXXXXXXXX An optional company name []: Using configuration from openssl-1.0.0.cnf Check that the request matches the signature Signature ok The Subject's Distinguished Name is as follows countryName :PRINTABLE:'US' stateOrProvinceName :PRINTABLE:'MI' localityName :PRINTABLE:'Lansing' organizationName :PRINTABLE:'OpenVPN' organizationalUnitName:PRINTABLE:'changeme' commonName :PRINTABLE:'Michael-PC' name :PRINTABLE:'Michael Jordan' emailAddress :IA5STRING:'[email protected]' Certificate is to be certified until Dec 24 19:06:10 2029 GMT (3650 days) Sign the certificate? [y/n]:y 1 out of 1 certificate requests certified, commit? [y/n]y Write out database with 1 new entries Data Base Updated C:\Program Files\OpenVPN\easy-rsa>In this part, you need to generate the ”Diffie Hellman” parameters using thebuild-dh command. This step is necessary in order to set up the encryption model.
C:\Program Files\OpenVPN\easy-rsa>build-dh.bat Generating DH parameters, 2048 bit long safe prime, generator 2 This is going to take a long time .................................+......................................................................................................+.............................................................................................+..................................................................................+......................................................... .............................................................................+............................+..........+........+............................................+..............................................+....++*++*++*++* C:\Program Files\OpenVPN\easy-rsa>Generate a shared secret key (which is required when using tls-auth):
"C:\Program Files\OpenVPN\bin\openvpn.exe" --genkey --secret "C:\Program Files\OpenVPN\easy-rsa\keys\ta.key"Configuration Files
OpenVPN provides sample configuration data which can easily be found using the start menu.
Open the Start menu, and click on All Programs. Then select OpenVPN Sample Configuration Files from the OpenVPN options.
Server Config File
Copy the sample ”server configuration” file over to the easy-rsa folder. This command and its output are as follows:
copy "C:\Program Files\OpenVPN\sample-config\server.ovpn" "C:\Program Files\OpenVPN\easy-rsa\keys\server.ovpn" C:\Program Files\OpenVPN\easy-rsa>"C:\Program Files\OpenVPN\bin\openvpn.exe" --genkey --secret "C:\Program Files\OpenVPN\easy-rsa\keys\ta.key" C:\Program Files\OpenVPN\easy-rsa>copy "C:\Program Files\OpenVPN\sample-config\server.ovpn" "C:\Program Files\OpenVPN\easy-rsa\keys\server.ovpn" 1 file(s) copied. C:\Program Files\OpenVPN\easy-rsa>Now edit the server.ovpn file:
notepad "C:\Program Files\OpenVPN\easy-rsa\keys\server.ovpn"Locate the following lines within the file:
ca ca.crt cert server.crt key server.key dh dh2048.pemThen edit them as follows:
ca "C:\\Program Files\\OpenVPN\\config\\ca.crt" cert "C:\\Program Files\\OpenVPN\\config\\server.crt" key "C:\\Program Files\\OpenVPN\\config\\server.key" dh "C:\\Program Files\\OpenVPN\\config\\dh2048.pem"Finally, save and close the file.
Client Config Files
The client file modification is very similar to the server configuration changes.
Copy the sample server configuration file to the easy-rsa folder with the client’s Common Name as the file name.
Remember: Each client will need to have a unique filename.
copy "C:\Program Files\OpenVPN\sample-config\client.ovpn" "C:\Program Files\OpenVPN\easy-rsa\keys\Michael-PC.ovpn" C:\Program Files\OpenVPN\easy-rsa>copy "C:\Program Files\OpenVPN\sample-config\client.ovpn" "C:\Program Files\OpenVPN\easy-rsa\keys\Michael-PC.ovpn" 1 file(s) copied. C:\Program Files\OpenVPN\easy-rsa> Edit the client’s config file.
notepad "C:\Program Files\OpenVPN\easy-rsa\keys\Michael-PC.ovpn" Locate the following settings in the file and edit them as follows:
ca ca.crt cert client.crt key client.key to ca "C:\\Program Files\\OpenVPN\\config\\ca.crt" cert "C:\\Program Files\\OpenVPN\\config\\Michael-PC.crt" key "C:\\Program Files\\OpenVPN\\config\\Michael-PC.key" Next, we will edit the line “my-server-1“, replacing it with the server’s public IP Address or Domain Name.
remote my-server-1 1194 # The hostname/IP and port of the server. # You can have multiple remote entries # to load balance between the servers. remote my-server-1 69.16.236.167 ;remote my-server-2 1194 Save and close the file.
Copying the Client and Server Files to Their Pertinent Directories
Now you can copy these files from C:\Program Files\OpenVPN\easy-rsa\keys\ to C:\Program Files\OpenVPN\config\ on the server using the robocopy command:
- ca.crt
- ta.key
- dh2048.pem
- server.crt
- server.key
- server.ovpn
robocopy "C:\Program Files\OpenVPN\easy-rsa\keys\ " "C:\Program Files\OpenVPN\config\ " ca.crt ta.key dh2048.pem server.crt server.key server.ovpn C:\Program Files\OpenVPN\easy-rsa>robocopy "C:\Program Files\OpenVPN\easy-rsa\keys\ " "C:\Program Files\OpenVPN\config\ " ca.crt ta.key dh2048.pem server.crt server.key server.ovpn ------------------------------------------------------------------------------- ROBOCOPY :: Robust File Copy for Windows ------------------------------------------------------------------------------- Started : Friday, December 27, 2019 12:16:02 PM Source : C:\Program Files\OpenVPN\easy-rsa\keys\ Dest : C:\Program Files\OpenVPN\config\ Files : ca.crt ta.key dh2048.pem server.crt server.key server.ovpn Options : /DCOPY:DA /COPY:DAT /R:1000000 /W:30 ------------------------------------------------------------------------------ 4 C:\Program Files\OpenVPN\easy-rsa\keys\ 100% New File 2482 ca.crt 100% New File 432 dh2048.pem 100% New File 10901 server.ovpn 100% New File 657 ta.key ------------------------------------------------------------------------------ Total Copied Skipped Mismatch FAILED Extras Dirs : 1 0 1 0 0 0 Files : 4 4 0 0 0 0 Bytes : 14.1 k 14.1 k 0 0 0 0 Times : 0:00:00 0:00:00 0:00:00 0:00:00 Speed : 452250 Bytes/sec. Speed : 25.877 MegaBytes/min. Ended : Thursday, July 16, 2020 12:16:02 PM C:\Program Files\OpenVPN\easy-rsa> You can copy the following files from C:\Program Files\OpenVPN\easy-rsa\keys\ on the server to C:\Program Files\OpenVPN\config\ for each client that will be using the VPN (e.g., Michael-PC, in this example)
- ca.crt
- ta.key
- Michael-PC.crt
- Michael-PC.key
- Michael-PC.ovpn
Firewall Settings
If you have any connection difficulties, ensure you set up a rule on the server’s firewall allowing incoming UDP traffic on port 1194. (Win+R “wf.msc”)
Conclusion
We hope you would enjoy this tutorial, you can ask questions about this training in the comments section, or to solve other problems in the field of Eldernode training, refer to the Ask page section and raise your problem in it as soon as possible. In this article, we taught you how to install OpenVPN on Windows Server 2019.
Introduction
OpenVPN Access Server is a tool that provides secure access to private networks. With the support for all popular OSes and multiple authentication methods, it is a go-to VPN solution for many SMBs.
If you do not use more than two simultaneous connections, the Access Server is free of charge.
Follow this guide to learn how to set up OpenVPN Access Server and configure network settings.
Prerequisites
Take note of the following information:
- Data center name — e.g., CloudTest_DC
- Organization name — e.g., CloudOrgTest
- Site location — e.g., atlvpdc.phoenixnap.com
The details are available on the VMware Cloud Director landing page.
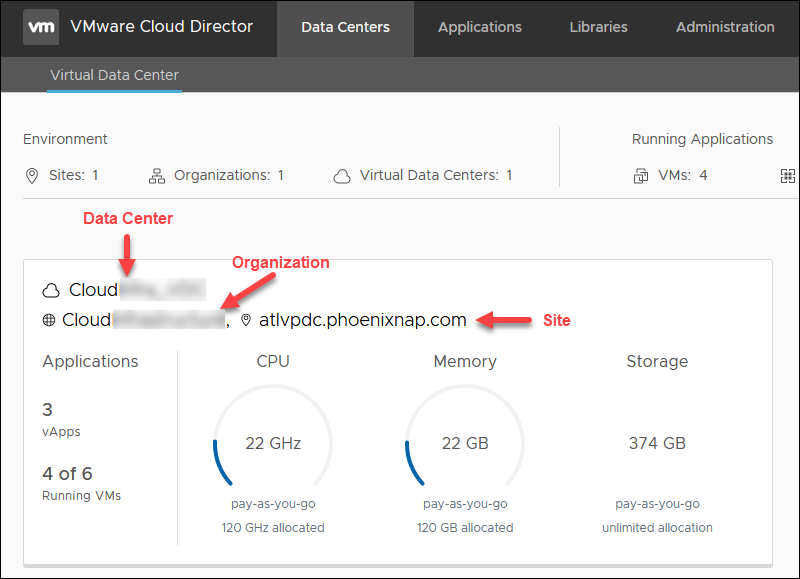
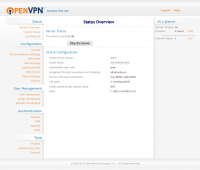
Organization Overview
On the Cloud Director landing page, select a data center. Below is the overview of the information you need for OpenVPN Access Server setup.
Note: All IPs in this guide are used as an example. Please use your own public IPs within the external network’s range. You can choose any private IP for the configuration.
- External network name. In the Data Centers tab, select Networking -> Edges and click the Edge name.
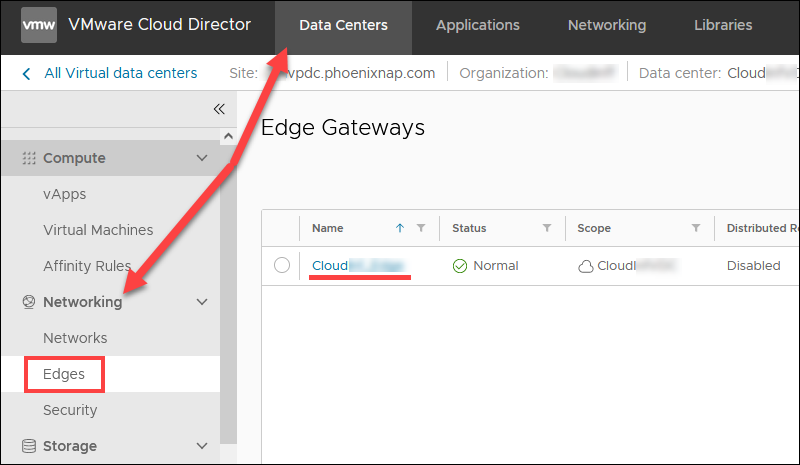
Choose Gateway Interfaces to view the external network name. The name includes your organization’s name.
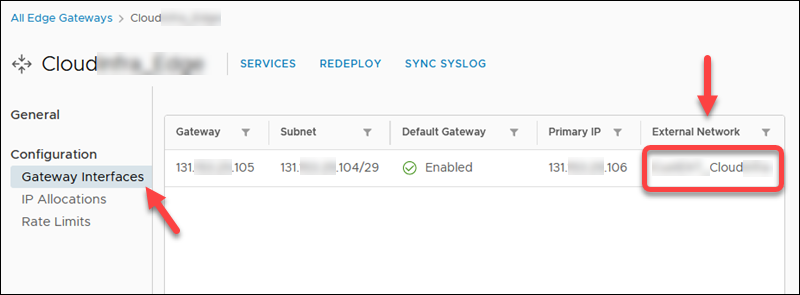
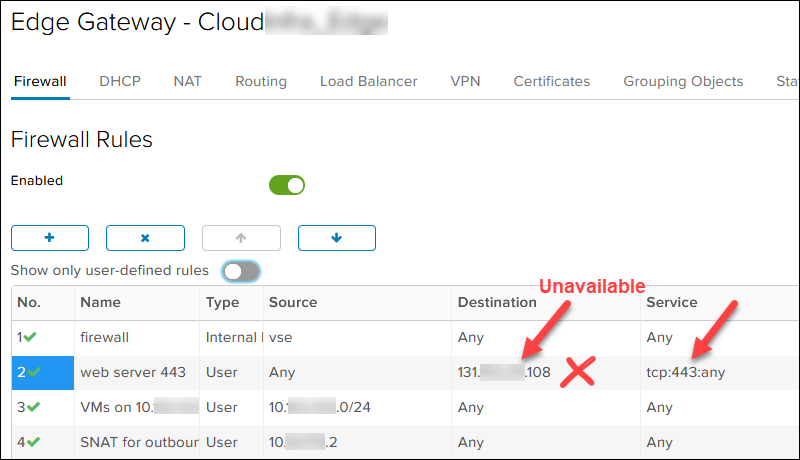
- First available public IP address. In the Data Centers tab, select Networking -> Edges. Click the Edge name and then IP Allocations to view the assigned public IP range.
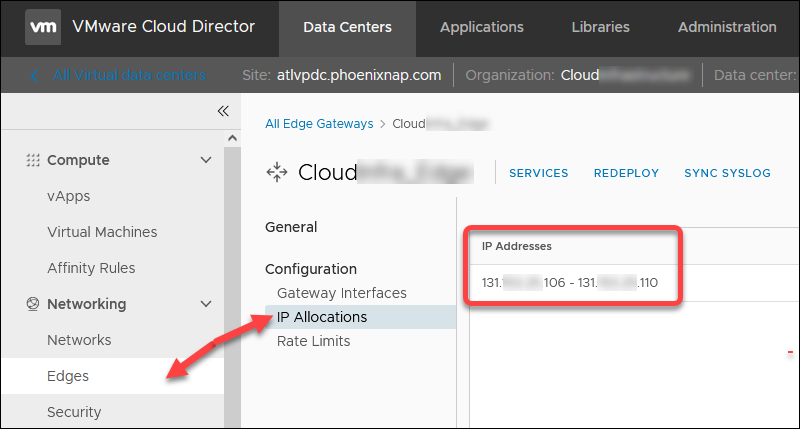
Then, click SERVICES and refer to the NAT and Firewall rules to determine which public IP from the range on TCP 443 port is unavailable. In our case, 131.xxx.xxx.108 is taken, so the first available public IP is 131.xxx.xxx.106.
- Document new DMZ network subnet for the new OpenVPN server. Choose any private IP. We picked /29 in case a second OpenVPN node is needed. For example:
- DMZ network: 10.xxx.xxx.1/29
- DMZ gateway: 10.xxx.xxx.1
- One OpenVPN Access Server IP: 10.xxx.xxx.2
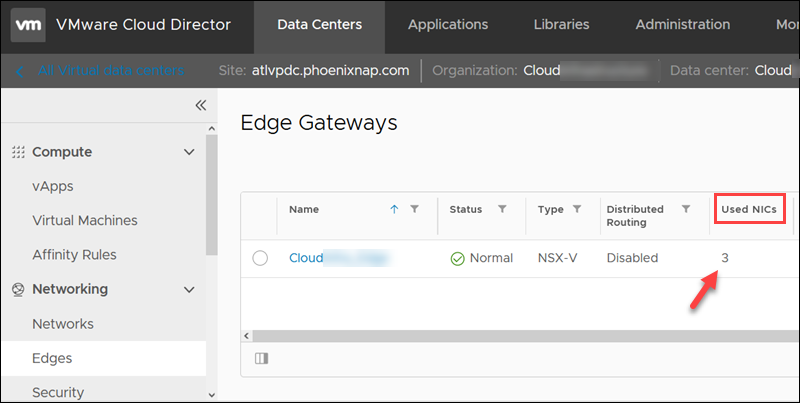
- The number of used NICs for the edge. If you have 10 NICs, the new DMZ network will be created as Isolated even if Routed is selected. The Used NICs number is in the list of your edges
- VM guest network, for example, 10.xxx.xxx.0/24.
Create OpenVPN Access Server Account
To create a free OpenVPN Access Server account:
1. Go to the OpenVPN Access Server page.
2. Click the Get Your Free Connections button.

3. Enter the Email and click Create Your Account.

4. Click the Confirm your email link when you receive the Email from OpenVPN.
5. Enter a password when the page loads.
6. Select Business Use (requires more information) or Personal Use and click Continue.
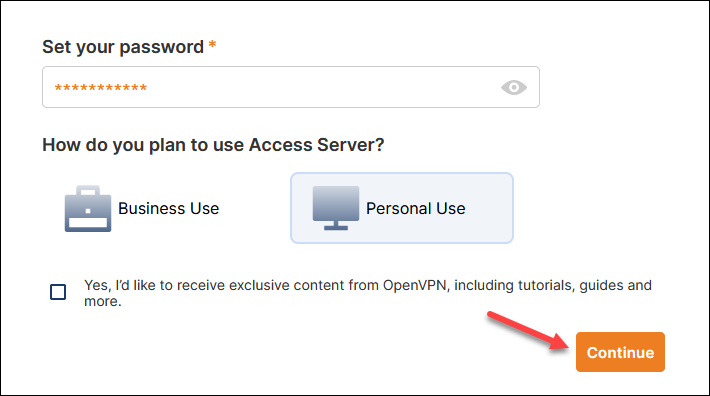
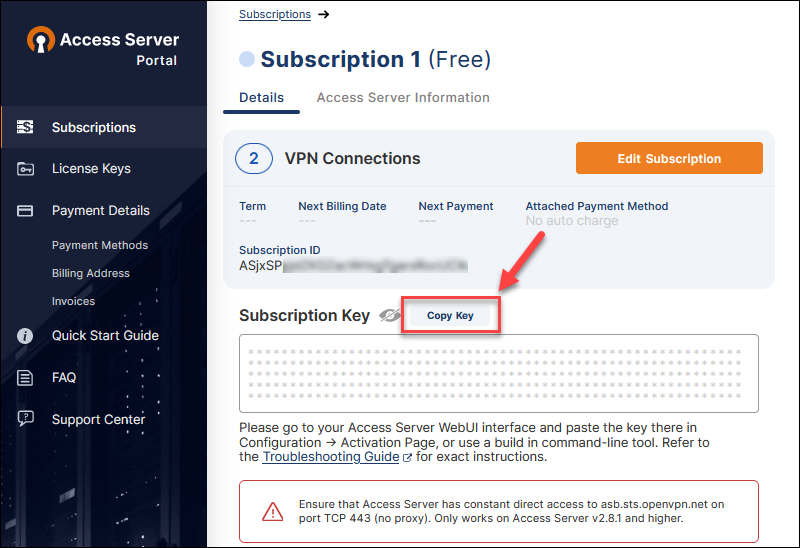
The Access Server Portal loads.
7. Click Create to create an activation key.

The subscription and key details page loads.
8. Click the Copy Key button and save the subscription key as you will need it later for the OpenVPN Access Server configuration.
Create DMZ Network for New OpenVPN Access Server
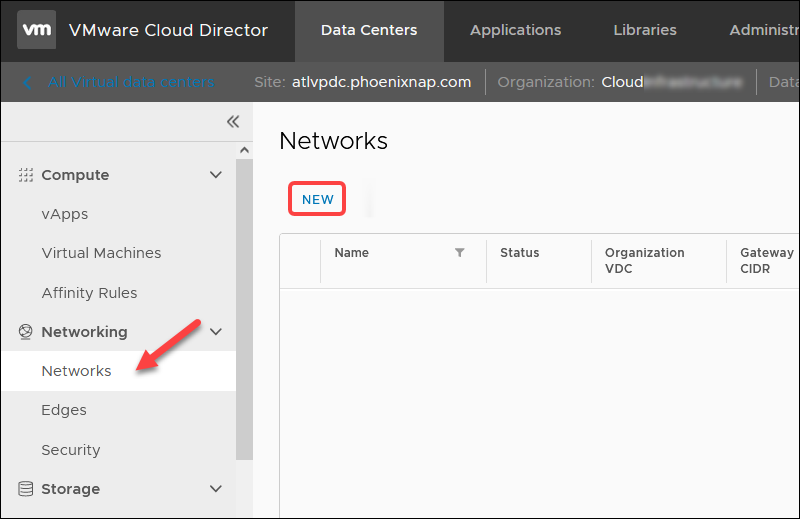
To create a new DMZ for the new OpenVPN Access Server network in VMware Cloud Director for your organization, navigate to Data Centers -> Networking — > Networks.
Click NEW to start the wizard.
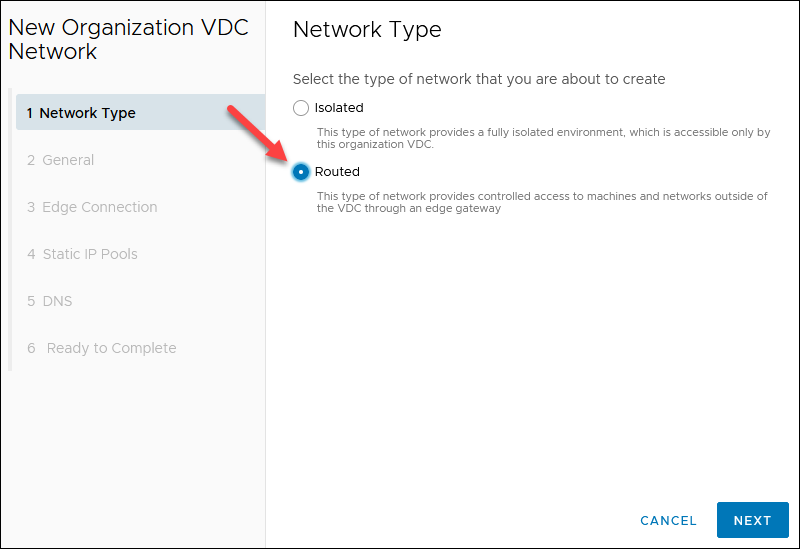
1. Select Routed for the network type step and click NEXT.
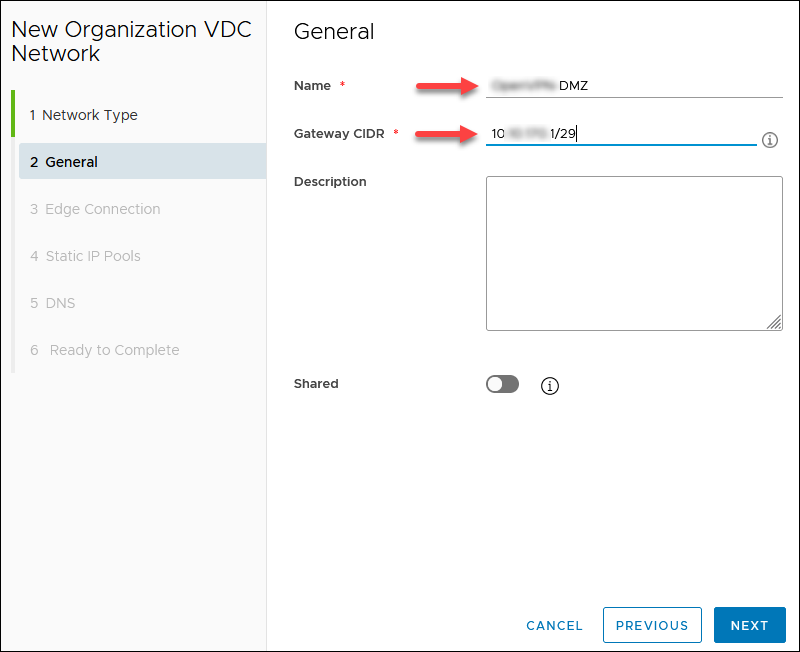
2. Enter a network Name and the Gateway CIDR you chose earlier, for example, 10.xxx.xxx.1/29. Other fields are optional. Click NEXT.
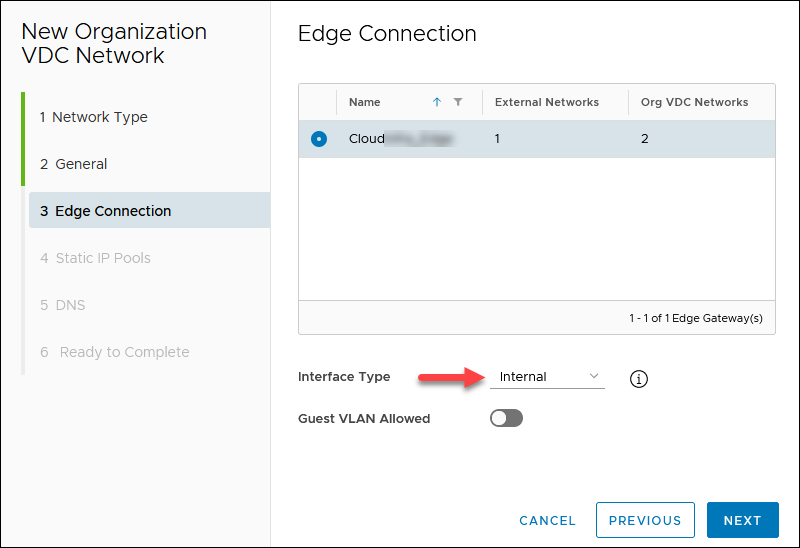
3. Chose Interface Type Internal for the selected edge with the Public IP and click NEXT. An example gateway is 10.xxx.xxx.1.
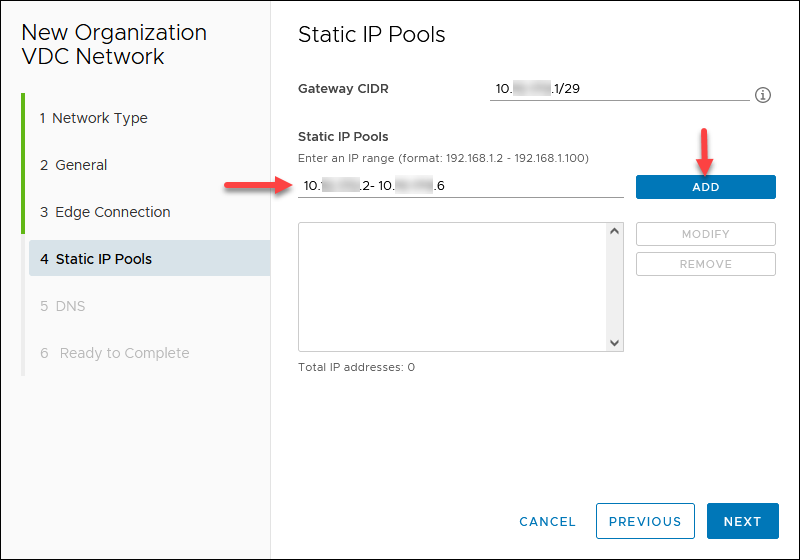
4. Add static IP pools defined by the gateway CIDR you designated earlier. For example, 10.xxx.xxx.2 — 10.xxx.xxx.6. Click NEXT.
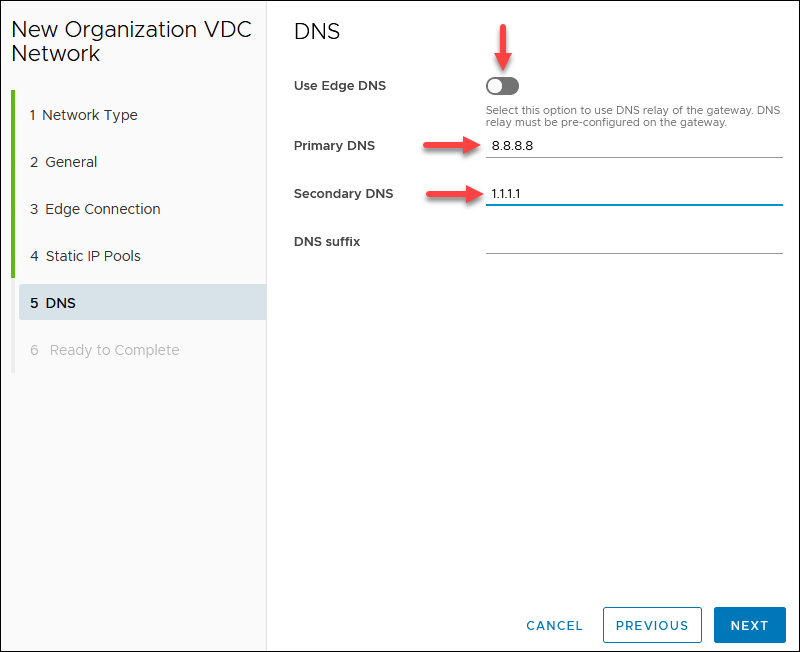
5. If your edge has a DNS, you can enable Use Edge DNS. Otherwise, specify a public DNS provider, for example, 8.8.8.8 (primary DNS) and 1.1.1.1 (secondary DNS). Click NEXT.
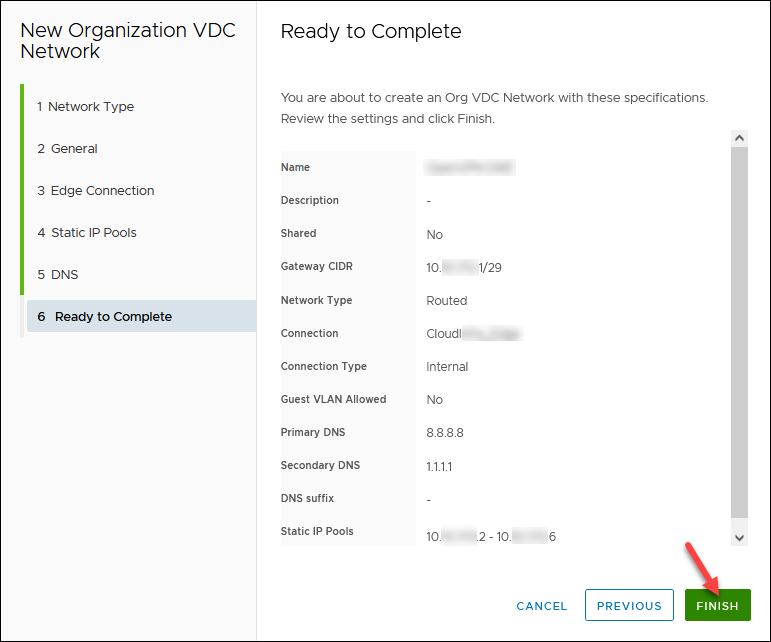
6. Review the network configuration and click FINISH when ready.
Create SNAT/DNAT Edge Rules
To create new rules, in the Data Centers tab:
1. Navigate to Networking -> Edges.
2. Select an Edge Gateway and click Services. Wait for the pop-up window to load to apply all new rules on the external network name recorded.
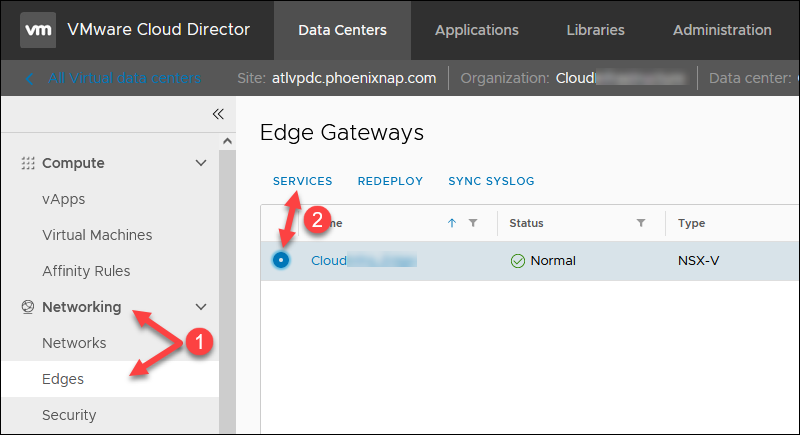
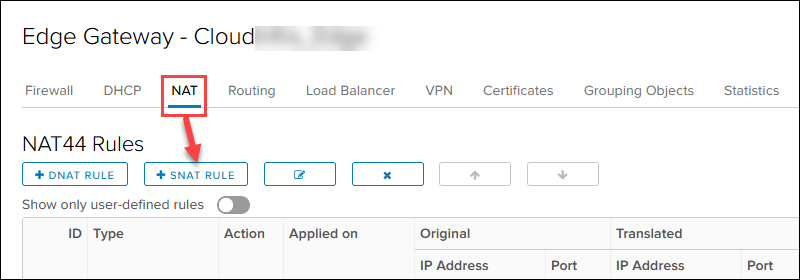
3. Click the NAT tab to start adding new rules. You can save the changes after every rule or when you add all of them.
Create SNAT Rule
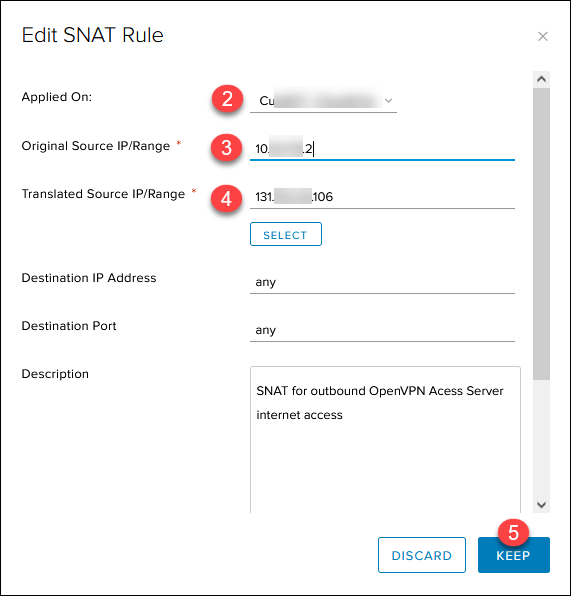
To create a SNAT rule for outbound internet access in the NAT section:
1. Click the + SNAT RULE button.
2. Select the external public network.
3. Add the OpenVPN Access Server IP 10.xxx.xxx.2 in the Original Source IP/Range for any port and protocol.
4. Add the previously noted first available public IP 131.xxx.xxx.106 in the Translated Source IP/Range for any port and protocol.
5. Add a relevant description and click KEEP.
The Save changes message appears on the main page. Save the progress now or when you add all rules.
Create DNAT Rules
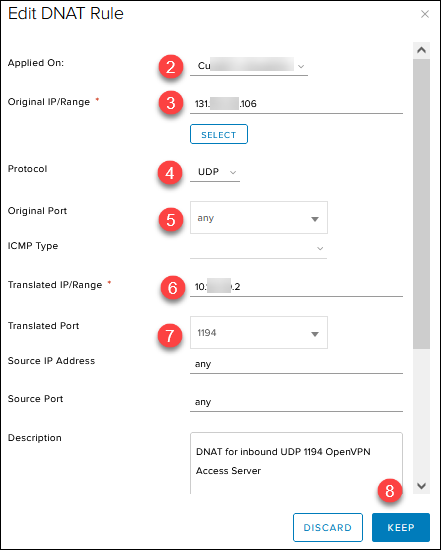
Create the DNAT inbound rules in the NAT section:
1. Click the + DNAT RULE button.
2. Select the external public network.
3. Add the public IP 131.xxx.xxx.106 in the Original Source IP/Range.
4. Select UDP in the Protocol drop-down list.
5. Choose Any in the Original Port drop-down list.
6. Add the OpenVPN Access Server IP 10.xxx.xxx.2 in the Translated Source IP/Range field for any source port and IP.
7. Enter 1194 in the Translated Port.
8. Add a relevant description and click KEEP.
Repeat the same steps for the second and third DNAT inbound rule, with these changes:
- Set Protocol to TCP, Translated Port to 443, and add a relevant description.
- Set Protocol to TCP, Translated Port to 943, and add a relevant description. (This one is a temporary rule for initial administration).
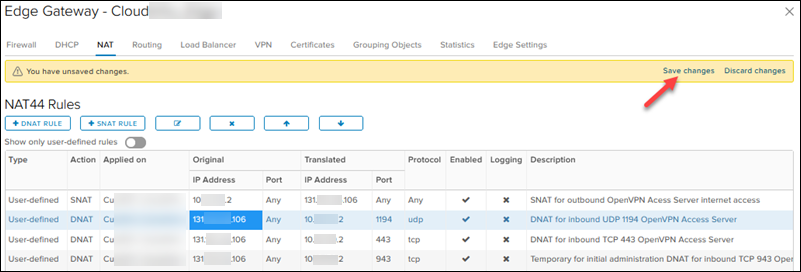
Remember to click Save changes when you finish adding all the rules or after every rule.
The rule list should look like this:
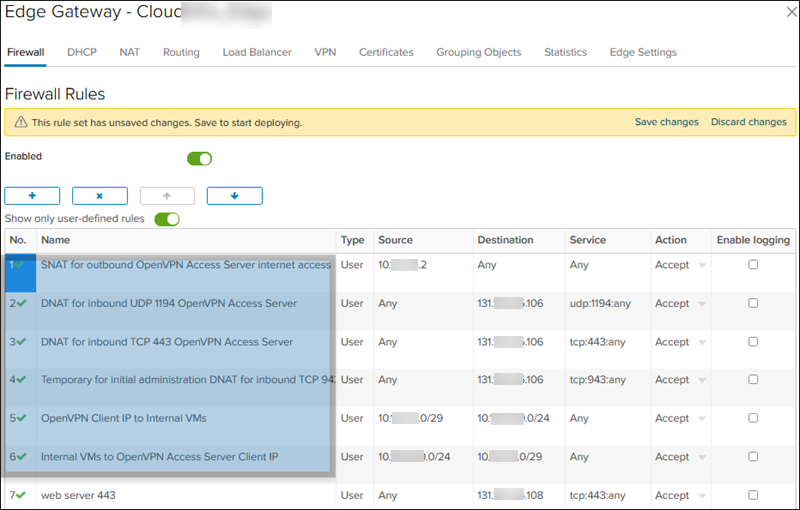
Create Firewall Edge Rules
The firewall rules in this section must be higher than deny rules.
To create a firewall rule in the Data Centers tab:
1. Navigate to Networking -> Edges.
2. Select an Edge Gateway and click Services. Wait for the pop-up window to load.
3. Click the Firewall tab and the + button to start adding new rules. You need six different rules listed in step 6 below. Save the changes after every rule or when you add all of them.
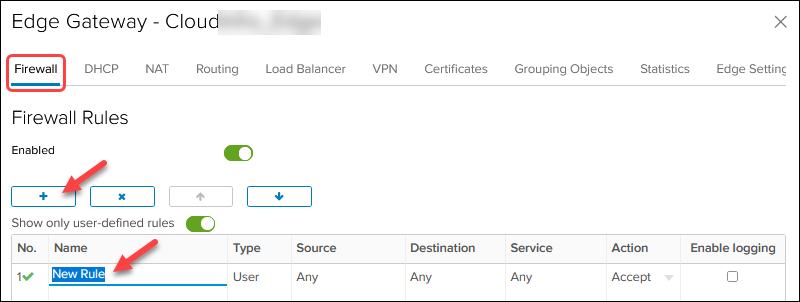
Edit the values in the columns for every firewall rule. Hover over a cell to see the available actions. For the names of firewall rules, use the description from the NAT rules.
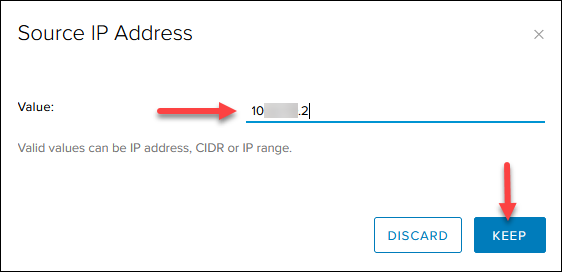
4. For Source and Destination, click the IP button to add an IP.
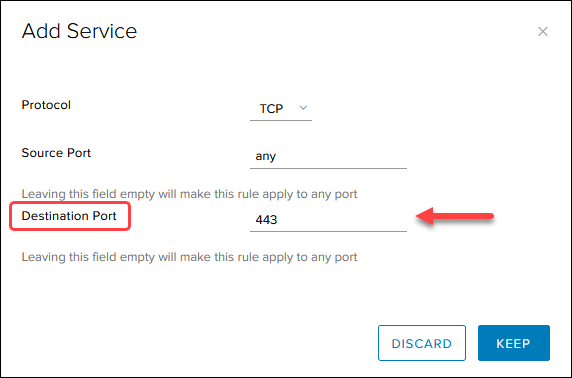
5. For Service, click the + button and add the protocol and the destination port as listed in the image in step 6. Leave the source port to any.
Note: The order of the source and destination port in the Add Service box does not correlate to how the firewall rule table displays them.
6. When you finish, the firewall rules table looks like this:
Create vApp with VM
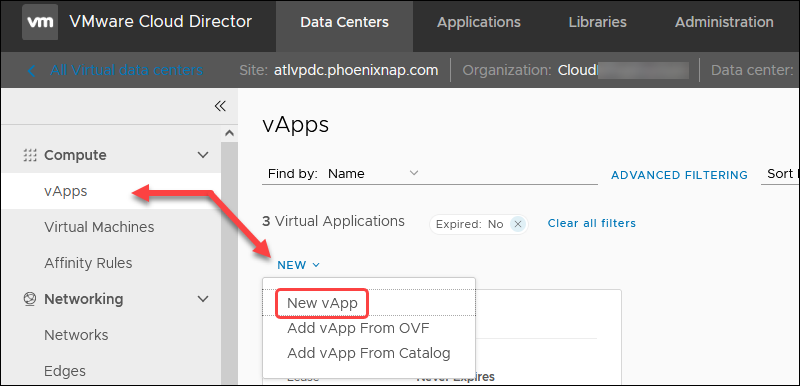
To create a vApp with a new VM in the Data Centers tab:
1. Navigate to Compute -> vApps -> NEW and select New vApp.
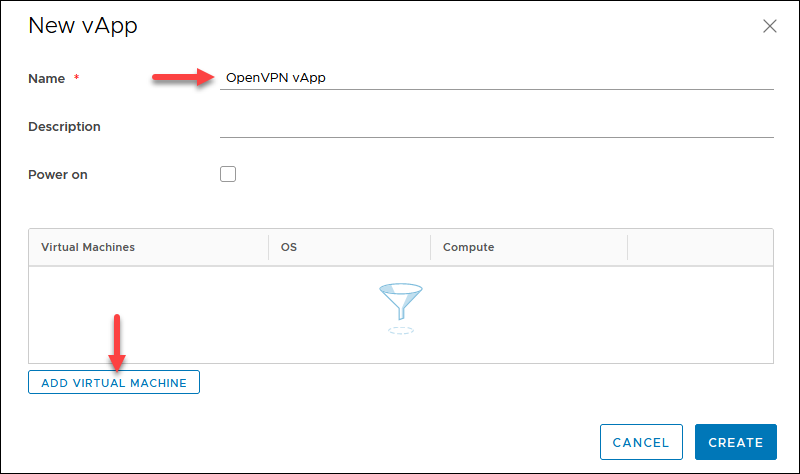
2. Enter a name for the vApp and click the ADD VIRTUAL MACHINE button
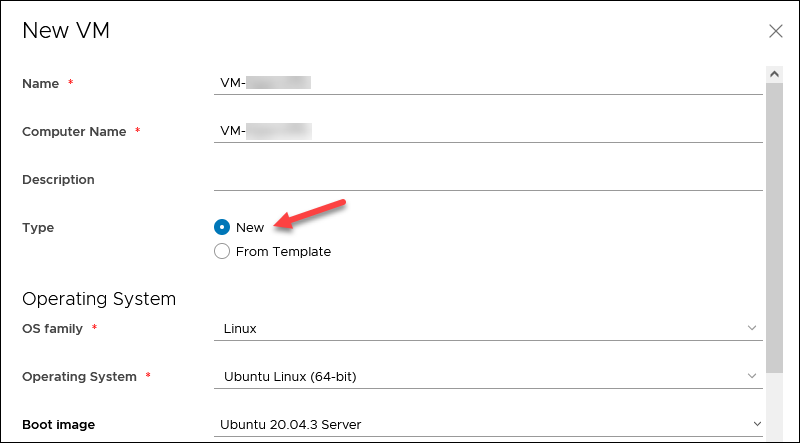
3. Enter a VM name without spaces.
4. Select Type -> New and specify the OS details:
- OS family: Linux
- Operating System: Ubuntu Linux (64-bit)
- Boot image: Ubuntu 20.04.3 Server.
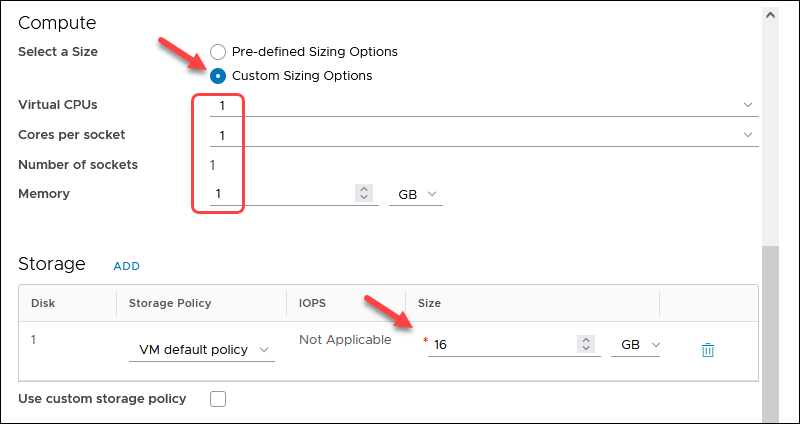
5. In the Compute section, select Custom Sizing Options and set all four values to 1.
6. Enter 16GB for the disk size in the Storage section.
5. In the Network section, choose:
- The previously created routed network.
- Network Adapter Type: VMXNET3
- IP Mode: Manual IP
- IP Address: OpenVPN Access Server IP 10.xxx.xxx.2
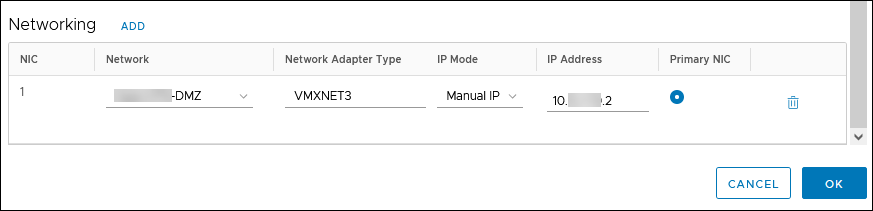
6. Click OK and then CREATE. The progress is shown on the vApps screen.
Configure VM
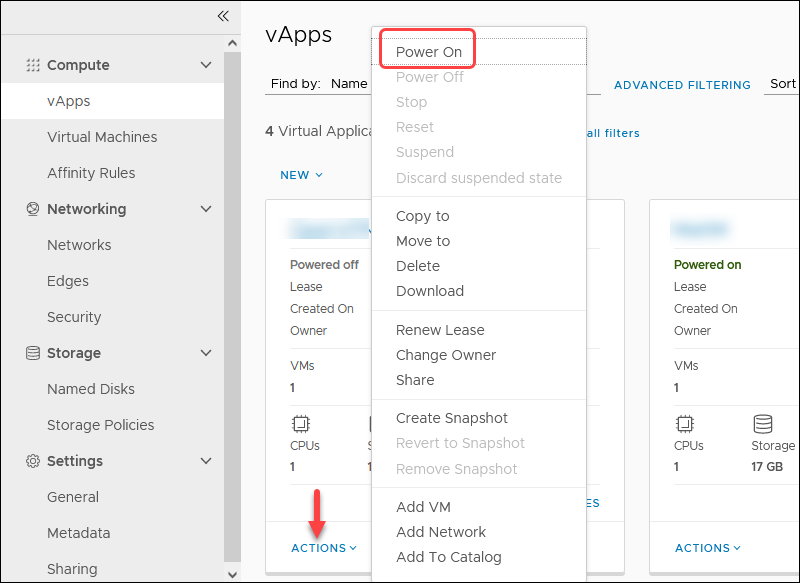
To complete the VM setup, power on the vApp to start the OpenVPN Access Server VM:
1. In the vApps screen, click the ACTIONS link and choose Power On.
2. Click VM Consoles and then VM Console to get access to the VM.
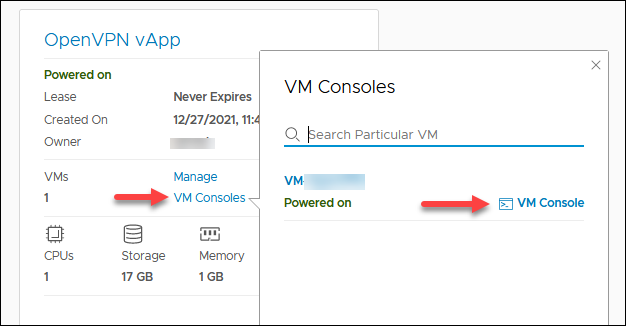
Wait for the VM to boot up.
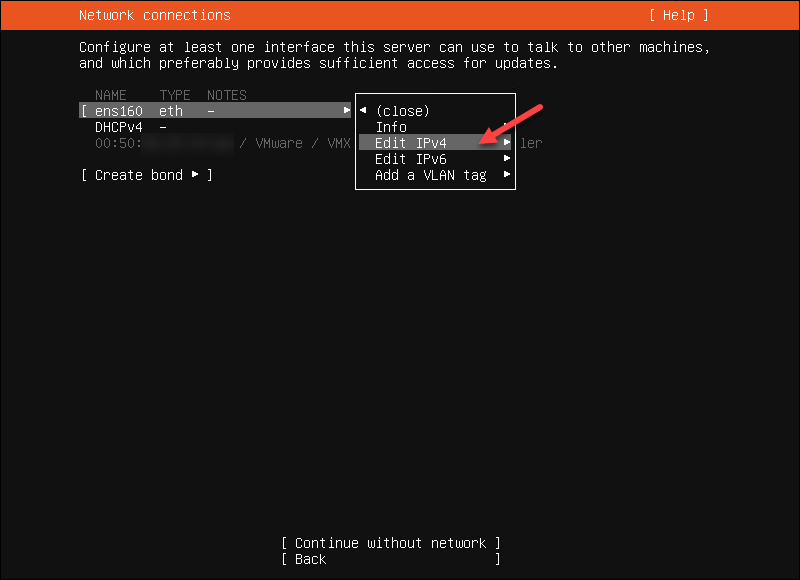
3. Highlight ens160 and choose Edit IPv4.
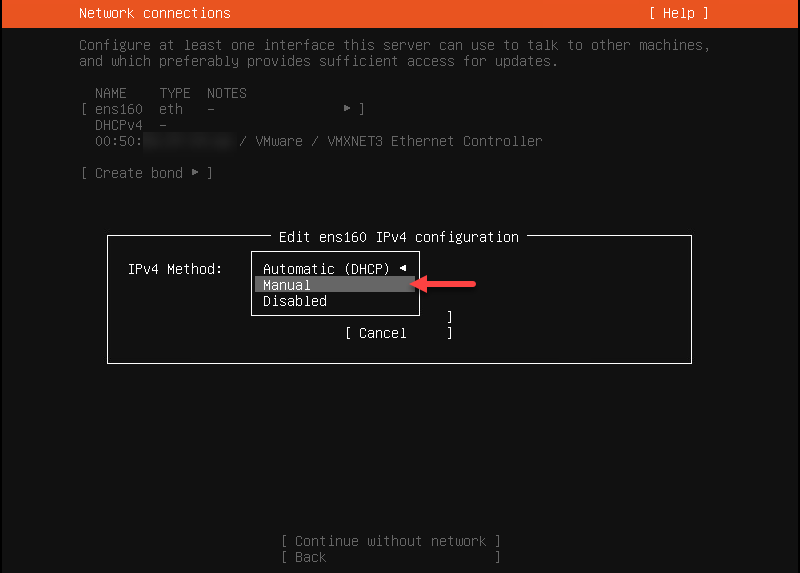
4. Choose Manual for the IPv4 Method. Confirm by selecting Done.
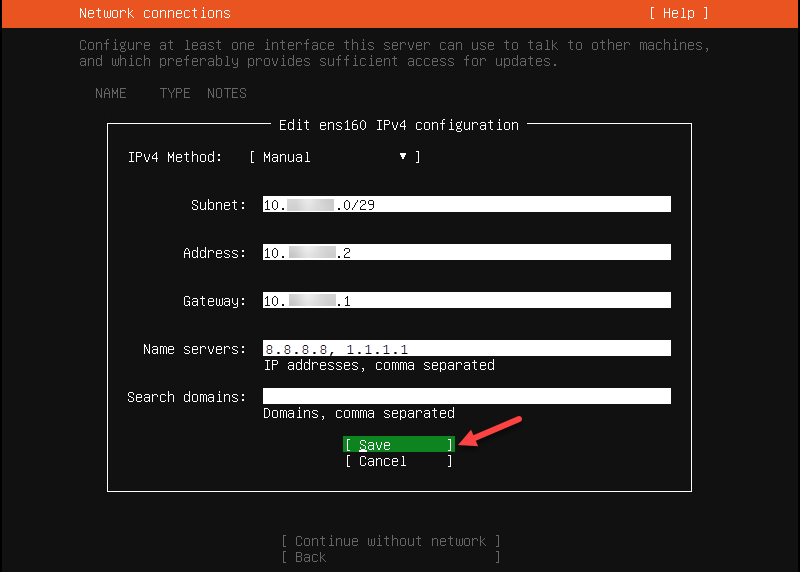
5. Enter the network settings you used previously and select Save.
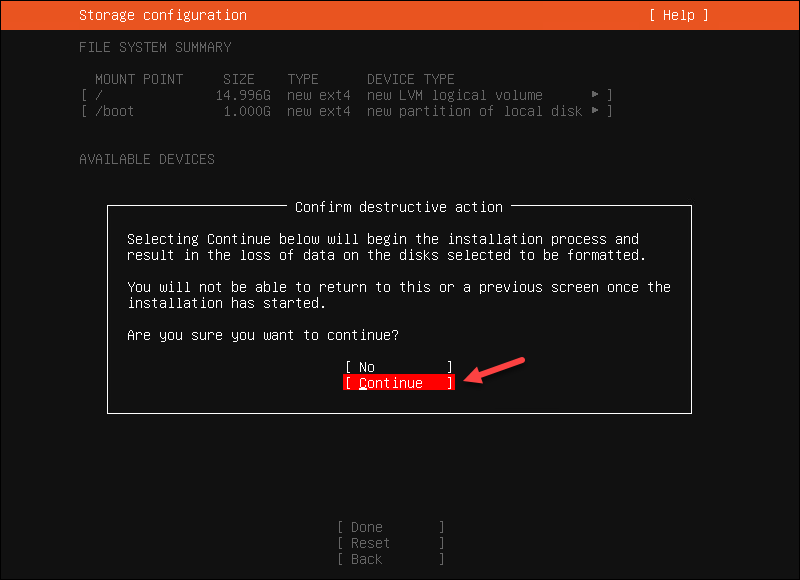
6. Select Done for the rest of the options and Continue to the storage configuration screen.
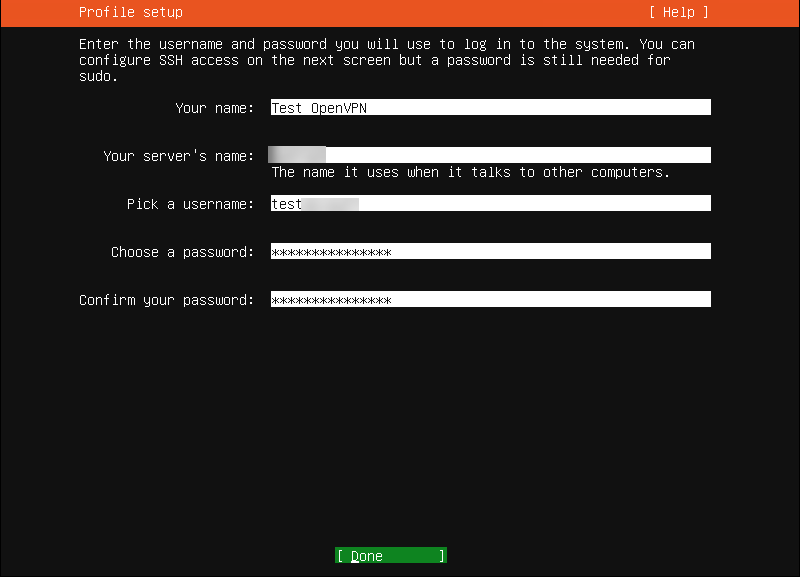
7. Complete the profile setup and save the account information securely. The username is stored in the sudoers file. Do not use «openvpn» as a username so that the OS and the OpenVPN Access Server application account can be separate.
Note: The server’s name will be reflected in the Web OpenVPN Access Server Subscription Portal.
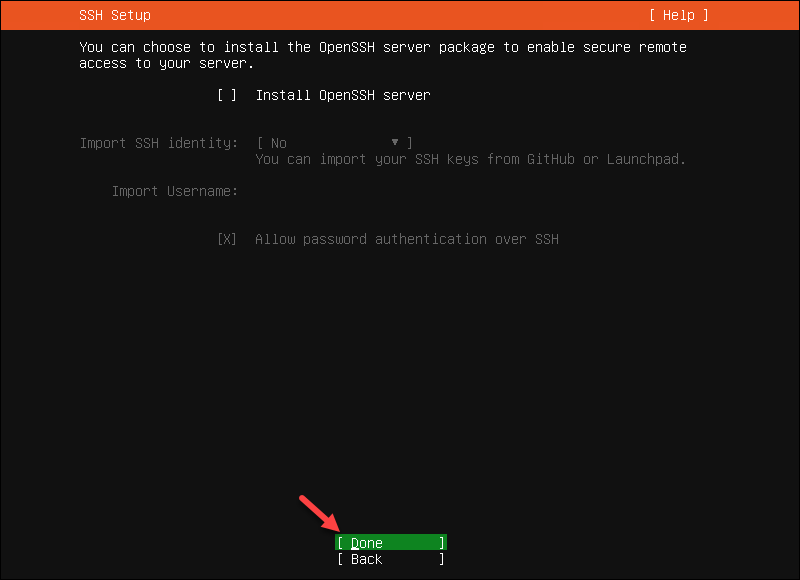
8. Skip the SSH Server installation. Select Done to continue.
9. Wait for the process to finish and select Reboot Now.
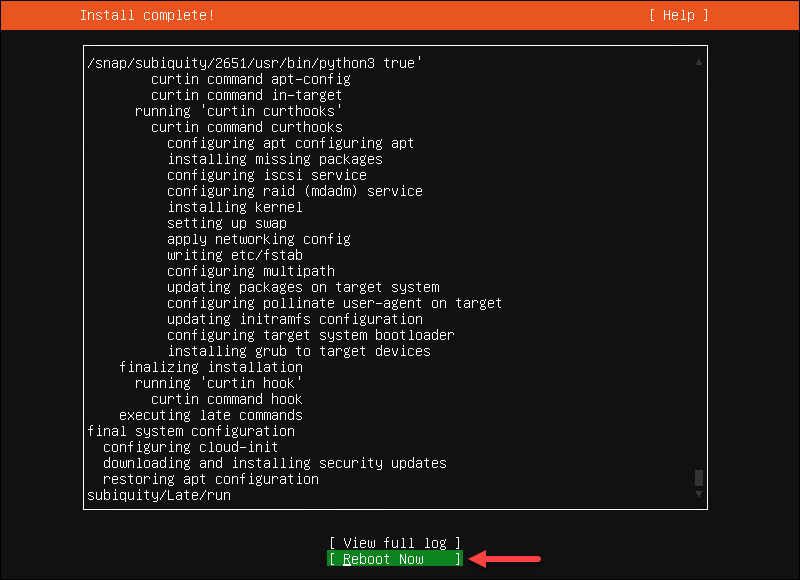
When done, the console shows the Failed unmounting /cdrom message.
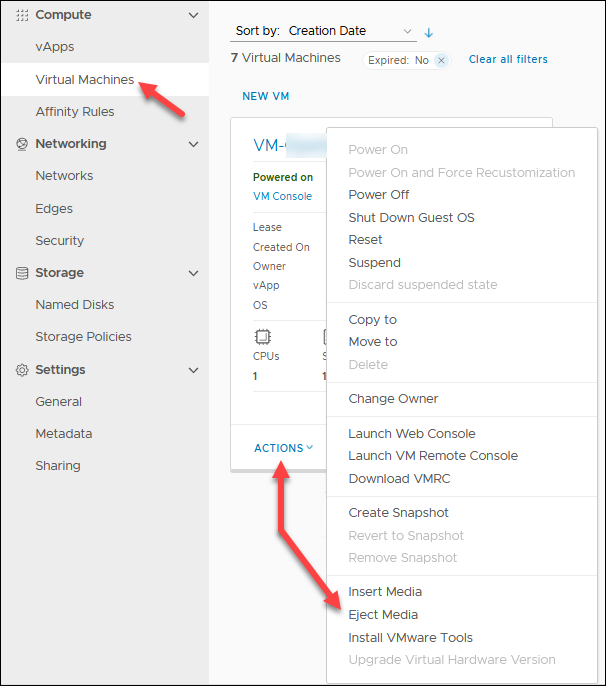
10. In the Cloud Director, locate the OpenVPN Access Server VM in the Compute -> Virtual Machines screen. Click ACTIONS and select Eject Media to remove the Ubuntu ISO from the VM.
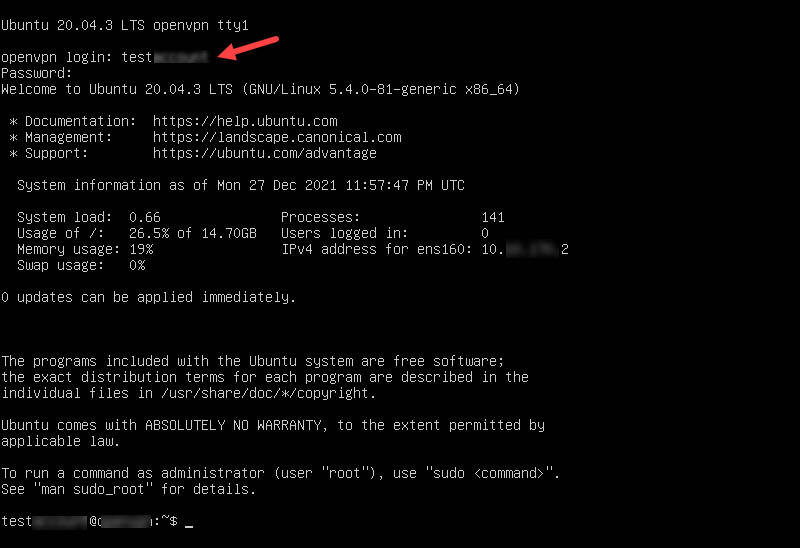
11. Return to the VM console and hit Enter to reboot the machine. The VM boots to the login screen.
12. Enter the username and password used during the profile creation.
Verify VM Network and Install Updates
Ping the edge gateway and a DNS server via the VM console to verify the connection.
ping 10.xxx.xxx.1
ping 1.1.1.1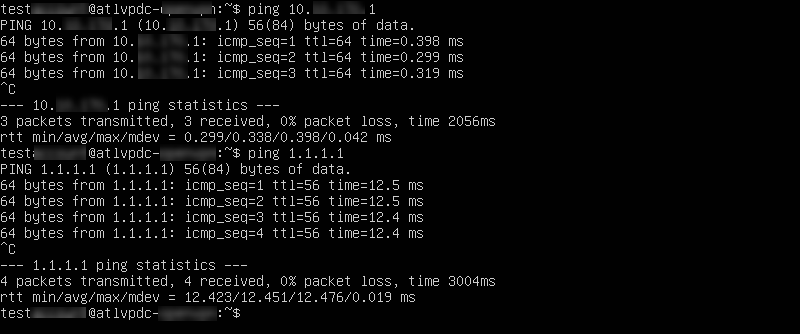
When you confirm the connection is working, update the system:
sudo su -
apt update -y && apt upgrade -y
To make changes in the network configuration, edit the netplan config file using a text editor:
nano /etc/netplan/00-installer-config.yaml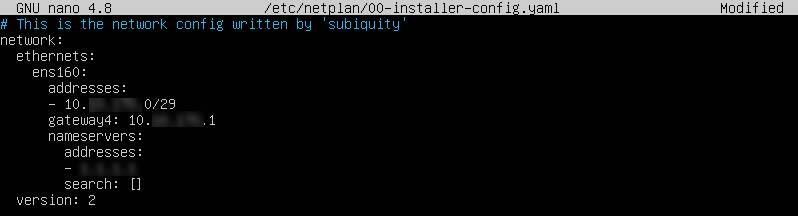
To install the OpenVPN Access Server:
1. Go to the OpenVPN Access Server packages page and click the Ubuntu icon.
2. Copy and paste the commands one by one in the VM console while logged in as root. If there are any errors, check for typing mistakes. The second command has capital O, not a zero.
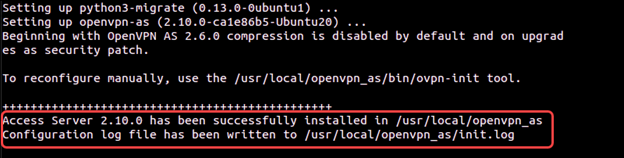
apt update && apt -y install ca-certificates wget net-tools gnupgwget -qO - https://as-repository.openvpn.net/as-repo-public.gpg | apt-key add -echo "deb http://as-repository.openvpn.net/as/debian focal main">/etc/apt/sources.list.d/openvpn-as-repo.listapt update && apt -y install openvpn-asWhen the update finishes, you see the confirmation message.
3. Save the OpenVPN Access Server password so you can use it later. The password can be changed via the OpenVPN Access Server UI.

Configure OpenVPN Access Server
To configure OpenVPN Access Server:
1. Go to the OpenVPN Access Server admin page using the public IP, for example:
https://131.xxx.xxx.106:943/admin2. Use the credentials you noted after the OpenVPN Access Server installation.
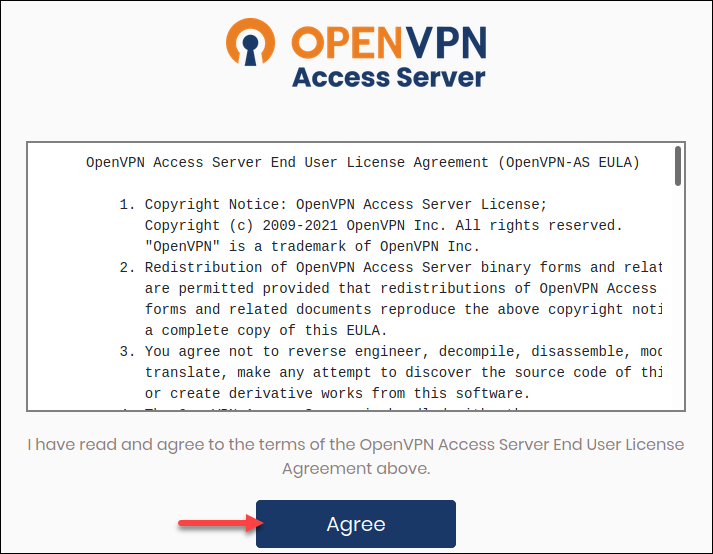
3. Click Agree if you agree to the terms and conditions.
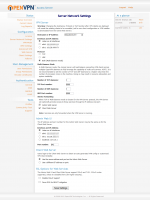
4. In Configuration -> Network Settings, change the hostname from the private IP address to the public IP.
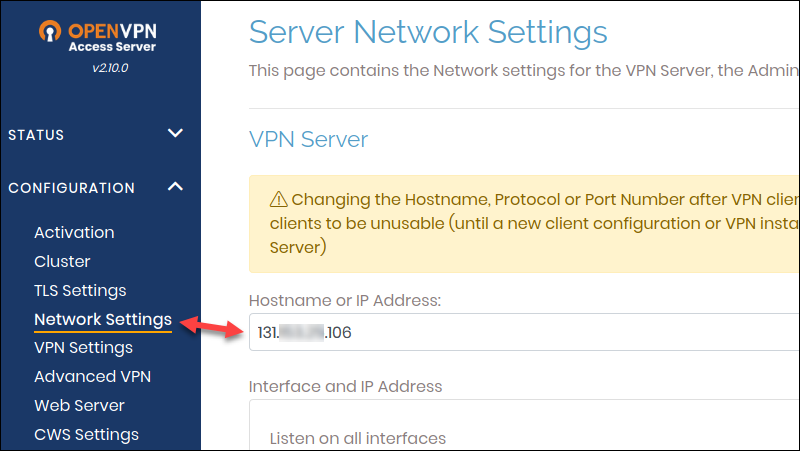
5. Scroll down and click Save Settings and Update Running Server.

6. Navigate to Activation, enter the subscription key from the OpenVPN Access Server portal, and click Activate.
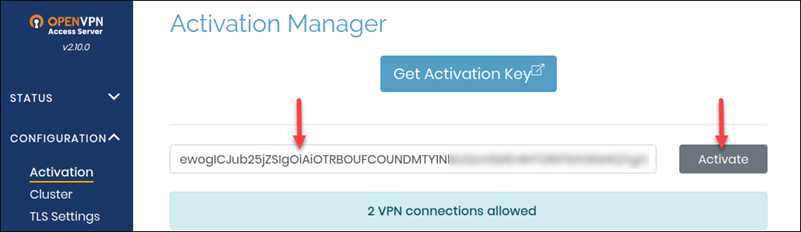
If successful, you receive the message «Subscription is active and operating normally.»

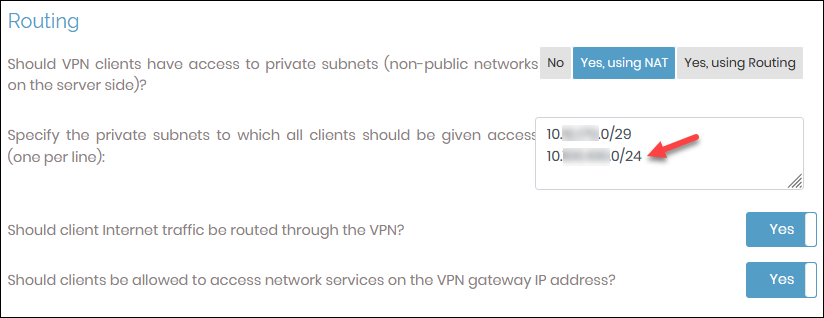
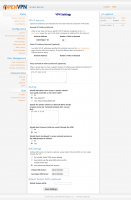
7. Navigate to Configuration — > VPN Settings, scroll to the Routing section and add the guest VM subnet you used previously.
8. Go to User Management -> User Permissions and create a new user account for the client VPN access. Click the More Settings icon to add a password.
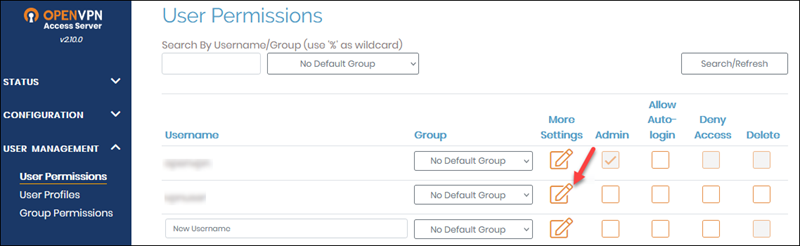
9. Click Save Settings and Update Running Server
On the client side, there are a few more steps:
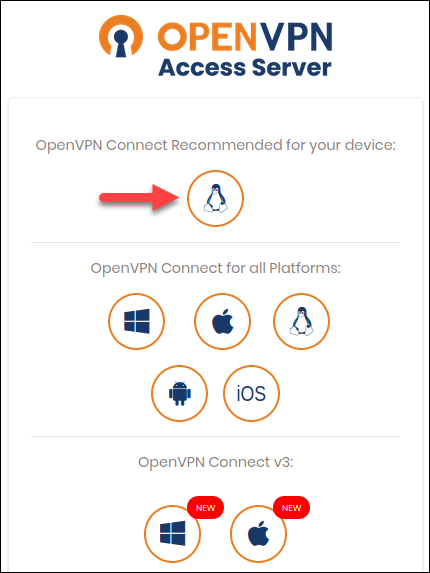
1. Log in to https://your_public_ip/ with the user you just created.
2. Install the recommended client for the OS you are using. Depending on the OS you choose, you either get a file to download or are redirected to the page to follow the installation instructions.
In Windows, if you get a Defender alert, accept to continue the installation. The profile is included with the installation.
If you already have the OpenVPN Access Server application installed and you are adding another connection, download the profile and import it.

3. Finally, launch the OpenVPN Access Server client and establish a connection.
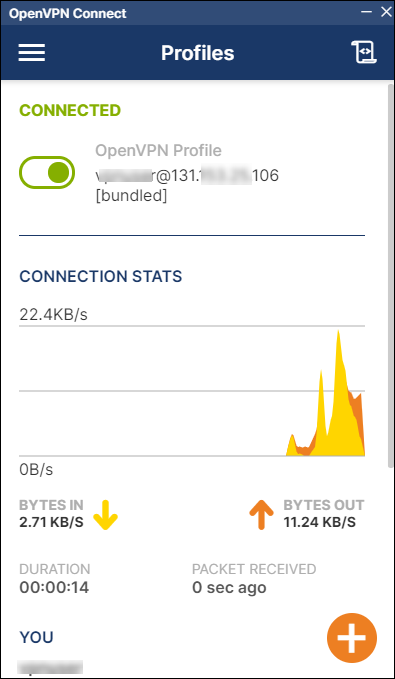
To test if the connection is working, RDP or SSH into your VM using the private IP.
Final Steps
Some firewall and DNAT rules are not necessary anymore. Log in to the Cloud Director and remove:
- TCP 943 firewall rule.
- TCP 943 DNAT rule.
To do so:
- Navigate to Networking -> Edges.
- Select an Edge Gateway and click Services.
- In the Firewall section, highlight the port 943 rule and click the X button to delete it.
- In the NAT tab, delete the DNAT TCP 943 rule. Highlight the row and click the X button.
Note: Once you remove the 943 firewall and NAT rules, the OpenVPN Access Server admin page will be accessible via https://your_public_ip/admin
Troubleshooting
If you can connect to your VMs with the SSL VPN Plus client and cannot when connected with the OpenVPN Connect application, please review the firewall rules you created and subnet added to the OpenVPN Admin page.
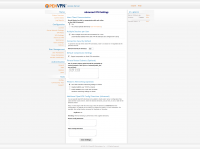
Additionally, try changing the following settings in the OpenVPN Access Server Admin page:
1. Go to the https://your_public_ip/admin page.
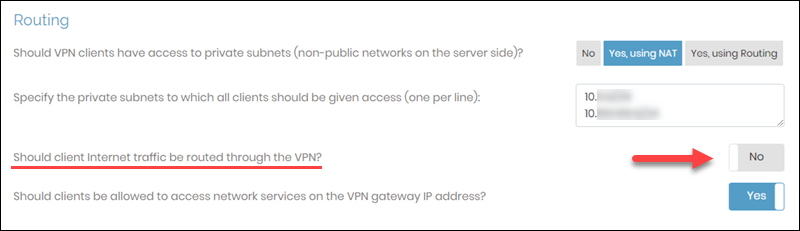
2. Navigate to Configuration -> VPN Settings.

3. In the Routing section, change “Should client Internet traffic be routed through the VPN?” to No.
Useful Links
For additional information on OpenVPN Access Server, consult the Open VPN documentation:
- Commercial VPN server Resources
- OpenVPN Access Server Support Center
If you need to do subnet calculations, use the subnet calculator.
Conclusion
By following the instructions in this guide, you should have a working OpenVPN Access Server installation with proper configuration.
The setup process is straightforward and simple if you complete all the steps in the tutorial.

OpenVPN Access Server
– полнофункциональное SSL VPN программное решение, включающее в себя непосредственно
OpenVPN
сервер, административный веб интерфейс и клиентские программы под различные платформы (Windows, Mac, Linux) для соединения с сервером. Базовая (бесплатная) лицензия рассчитана на двух клиентов, и этого вполне достаточно, если использовать OpenVPN AS в личных целях.
Установка и настройка OpenVPN AS гораздо проще стандартной установки OpenVPN, без каких-либо пользовательских интерфейсов (UI). Ещё одно преимущество OpenVPN AS в том, что пакет содержит в себе клиентские программы под Android и IOS. Таким образом вы без проблем сможете подключаться к серверу с планшетов и смартфонов.
И так, установка и базовая настройка.
Имеется VPS с 64-х битной Debian 7 и двумя сетевыми интерфейсами (локальный и смотрящий в Интернет). На стороне сервера должны быть включены NAT и TUN/TAP. О выборе хостинга для этих целей я уже писала в статье о настройках
VPN на базе PPTP
. Предлагаемый в ней провайдер предоставляет услуги по аренде VPS, где всё это включается в один клик самим клиентом, без необходимости ведения нудной переписки со службой поддержки.
Начнём. Предполагается, что всё необходимое у нас имеется и функционирует. Переходим на сайт OpenVPN и выбираем свою ОС. Как я уже сказала, у меня Debian 7, поэтому скачиваем на сервер пакет под эту ОС.
wget http://swupdate.openvpn.org/as/openvpn-as-2.0.7-Debian7.amd64.debУстанавливаем.
dpkg –i openvpn-as-2.0.7-Debian7.amd64.debВсё. OpenVPN AS теперь установлен и работает. Все сопутствующие настройки и правила iptables пропишутся автоматически. Изменения в iptables так же будут вноситься по мере настройки сервера через UI. Соответственно, если вы используете какую-то программу для управления фаерволом, то убедитесь в том, что она видит эти изменения и не перезапишет их при последующем обращении к ней.
Задаём пароль пользователя openvpn для доступа к нему.
passwd openvpnДля доступа к панели управления используем следующую ссылку: https://YourIpAddress:943/admin
Где «YourIpAddress» — внешний IP сервера. Используем в качестве логина openvpn и в качестве пароля то, что задали выше.
По умолчанию тут в общем всё уже работает. Можно внести некоторые изменения. Пример:
Вкладка Server Network Settings.
Тут можно указать тип соединения (TCP/UDP), если есть необходимость. По умолчанию включены оба. Можно выбрать какие интерфейсы будут слушаться. Для соединения, конечно же, необходим внешней. Но если вы подключены к сети, то доступа к консоли сервера, или другим ресурсам VPS у вас не будет. Дело в правилах iptables и при том, что внешне вроде как бы всё разрешено, фаервол не пропускает соединения с внешнего IP адреса сервера. Другими словами, если на этом сервере у вас что-то ещё, кроме OpenVPN, то пока вы подключены к OpenVPN, доступа к этим ресурсам у вас не будет. Если VPN сервер будет слушать все сетевые интерфейсы (включая eth1 – интерфейс локальной сети), то через консоль по ssh, или через файловый менеджер по sftp вы сможете соединиться с сервером через локальный адрес. То есть не ssh root@внешний_ip, а ssh root@локальный_ip. Если Admin UI так же будет доступен через локальный интерфейс, то доступ к нему так же будет возможен по локальному адресу, если у вас поднято VPN соединение. В общем, мне было лень искать причину, и я просто использую локальный IP для доступа к Admin UI, когда мне это нужно.
Вкладка VPN Settings.
Сетевой адрес – маска виртуальной подсети. Адреса из этого диапазона будут раздаваться клиентам. Можно указать статичный адрес. Это по умолчанию отключит возможность множественных подключений. Так же в этой вкладке настраивается NAT и условия соединения: Должен ли клиент выходить в Интернет через шлюз VPN? Должен ли весь трафик клиента идти через VPN? В самом низу можно указать DNS серверы: Будут ли использоваться DNS клиента? Будут ли использоваться DNS основного сервера клиентом? Так же можно назначить свои DNS.
Вкладка Advanced VPN Settings.
Могут ли клиенты VPN иметь доступ друг к другу? Если «да», то клиенты сети будут видеть друг друга. Например, в Windows во вкладке «Сеть» будут отображаться компьютеры других пользователей.
Множественные сессии. Если стоит галка, то под одним и тем же аккаунтом к сети могут присоединиться несколько устройств. Не будет работать, если клиенту назначен статичный IP. Ниже можно указать локальные подсети, доступные из VPN. Если не указывать ничего, то клиенты VPN не будут видеть друг друга не смотря на настройки выше.
VPN Mode Settings – настройки виртуальных сетевых интересов или моста для использования физического интерфейса. В моём случае NAT. По умолчанию оно же.
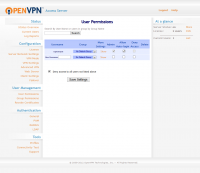
Во вкладке User Permission можно назначать права администратора и закрывать доступ к сети для определённых клиентов. А так же разрешить доступ без пароля. Имеется ввиду, что при соединении с VPN пароль не запрашивается. Это удобно для использования в роутерах и для настроек автоматического соединения, так как без сертификата сервер всё равно никого не пустит.
Не забываем нажимать кнопку «применить изменения» каждый раз после сохранения изменений в админ-панели.
Собственно, базовые настройки закончены.
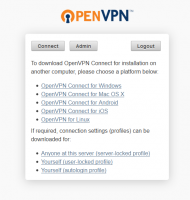
Далее в браузере открываем https://YourIpAddress:943, вводим свои данные и ниже выбираем «Login». Тут мы видим ссылки на различные клиенты. В случае с Windows, скачиваем соответствующий клиент и устанавливаем его. Для других платформ предоставлены ссылки, либо инструкции. Клиент для Windows загружается непосредственно из этого окна. Далее запускам клиент и выбираем адрес нашего сервера в его вкладке. Он там один. Соглашаемся, что доверяем самоподписанному сертификату и вводим пароль, если не включили ранее для себя доступ без пароля.
На этом всё. Все сертификаты на стороне сервера были созданы автоматически при установке OpenVPN AS, все клиентские сертификаты подгрузятся при соединении через клиент для Windows. Возможно потребуется перезагрузка Windows для принятия новых правил маршрутизации, по которым весь трафик должен идти через VPN.
Для Linux скачиваем файл по ссылке «Yourself (autologin profile)» (если пароль не требуется) и помещаем его в любую удобную директорию. Предположим, что файл скачался в /home/user/Downloads. Устанавливаем на ПК OpenVPN.
sudo apt-get install openvpnДля Debian/Ubuntu
yum install openvpnДля .rpm дистрибутивов (RedHat/Fedora/CentOS/OpenSUSE и т.д.)
Сервер не работает с OpenVPN ниже версии 2.1. Проверяем версию.
openvpn –versionЕсли всё хорошо, то настраиваем соединение.
cd ~/Downloads
sudo openvpn --config client.ovpn
Где «client.ovpn» — скаченный файл настроек.
По тому же принципу настраивается соединение на роутере. Но только на альтернативных прошивках. Показываю на примере прошивки Gargoyle.
К сожалению, на моём допотопном роутере не всё так гладко. С настойками по умолчанию Gargoyle не работает с tun серверами. Для этого скаченный файл помещаем в любую удобную директорию. Имеется ввиду, что раз вы используете альтернативную прошивку, то знаете, как попасть в сам роутер и уж тем более знаете, что там кастрированный Linux. Из-под Windows можно использовать программу
WinSCP
для того, чтоб положить файл в файловою систему роутера.

Предположим файл у нас в директории /etc/openvpn. Тогда:
cd /etc/openvpn
openvpn --config client.ovpn
Дожидаемся окончания. В моём случае (видимо из-за древнего роутера) окончания можно ждать до морковкиной загниви. Главное, что все основные процессы прошли без ошибок. Такие как настройка маршрутизации и непосредственно работа с tun. Далее переходим в настройки самого роутера и во вкладке OpenVPN выбираем ручную настройку. Если настройки и сертификаты не прописались сами при выполнении предыдущих команд. Все эти настройки и сами сертификаты есть в скаченном файле. Открываем его в текстовом редакторе и последовательно копируем информацию в соответствующие разделы.
В первом окне у нас настройки соединения. Они вписываются автоматически, исходя из настроек перед ним. Такие как IP, тип соединения и прочее. Для верности можно привести их к такому виду:
setenv FORWARD_COMPATIBLE 1
client
server-poll-timeout 4
nobind
remote SERVER_IP 8090 udp
dev tun
dev-type tun
ns-cert-type server
reneg-sec 604800
sndbuf 100000
rcvbuf 100000
comp-lzo no
verb 3
setenv PUSH_PEER_INFO
Где SERVER_IP – IP нашего сервера. То есть к тому, что там уже есть, я скопировала все не закомментированные настройки из скаченного файла.
Далее по порядку копируем данные сертификатов из файла в последующие окна. Названия секций на скриншоте.
Сохраняем, применяем, перезагружаем. Всё работает.
Теоретически, все эти пляски с бубном вокруг роутера не обязательны. Всё это должно было подгрузиться при выполнении команды openvpn —config client.ovpn на стороне роутера. Но не у всех оно срабатывает как надо.
На этом всё. Наш VPN сервер работает, а «чёрные списки» «неправильных» сайтов стран, загнанных их правительствами в «третий мир», хороши для украшения кабинетов чиновников этих самых стран. Пока в этих странах доступен Интернет как таковой. Северной Корее не повезло… Ну и вообще, в целом, хорошо иметь под рукой шифрованный канал, полностью тебе подконтрольный.
___
Tatyana K.
![]()
How to Setup OpenVPN on Windows server 2019
-
View Larger Image


Introduction
In this blog article we are going to discuss about How to setup OpenVPN on Windows Server 2019. A VPN is short form of virtual private network, which gives us a privacy, anonymity and security over public internet. A VPN service masks our ISP IP so your online actions are virtually untraceable. A VPN can also be used to connect computers to isolated remote computer networks that is usually inaccessible, by using the Internet or another intermediate network.
We can define OpenVPN as a full-featured SSL VPN. OpenVPN uses OSI layer 2 or 3 secure network extension using the industry standard SSL/TLS protocol. OpenVPN supports flexible client authentication methods based on certificates, smart cards and username/password credentials. OpenVPN is not a web application proxy and does not operate through a web browser. OpenVPN server process over a single TCP or UDP port. The default port number is 1194. OpenVPN 2.3 includes a large number of improvements, including full IPv6 support and PolarSSL support.
OpenVPN is also the name of the open source project started by our co-founder and which uses the GPL license. He developed the OpenVPN project that used to encrypt and secure point-to-point or site-to-site connection between two machines over the public Internet. In other word using OpenVPN we can create a secure Private network over public Internet and will have Remote access to internal services of your IT infrastructure.
Use Cases of OpenVPN
Secure Remote Access
Site-to-site , Users-to-Site or Users-to-Users connectivity to bring networks together
Protect screen sharing and remote desktop communications
Encrypt sensitive IoT communications
Secure Access to Cloud-Based Systems
OpenVPN available as Below.
- OpenVPN Community Edition, which is a free and open-source version
- OpenVPN Access Server (OpenVPN-AS), is based on the Community Edition, but provides additional paid and proprietary features like LDAP integration, Easy Management Admin Portal ,cluster option etc.
- OpenVPN-as-a-Service, solution eliminates the need for VPN server installation. By Purchasing OpenVPN Cloud we can simply connect to our hosted service with regions around the globe.
Apart from OpenVPN Community Edition, the other two OpenVPN editions has Economical licensing model that is based only on the number of simultaneous VPN connecting users or devices.
The OpenVPN Community Edition totally free to use and there is no user limitations. OpenVPN community edition server can be installed on Linux or Windows Based systems.
OpenVPN for Windows
It can be installed from the self-installing exe file which is called OpenVPN GUI. OpenVPN GUI is a graphical fronted for OpenVPN running on Windows. It creates an icon in the notification area from which you can control OpenVPN to start/stop your VPN tunnels, view the log and do other useful things.
OpenVPN Connect client
It is the OpenVPN client software packages installing on client PC. This client package used to connect to the OpenVPN server. OpenVPN Connect client supported on Windows, Linux, MacOS, IOS and Android.
Setting Up OpenVPN Server.
In this article will show you how to Setup up a OpenVPN Server ( Community Edition) On Windows Server 2019 to forward incoming traffic to the internet, then route the responses back to the client. This is a Users-to-Site Model.Which means settings up a OpenVPN Windows Server to tunnel clients internet traffic through OpenVPN server. Those clients that successfully connected to the OpenVPN server will have their ISP IP Address will show as servers Public IP address.Commonly, a VPN tunnel is used to privately access the internet, evading censorship or Geo location by shielding your computer’s web traffic when connecting through entrusted hotspots, or connections.
Section 1. Installing OpenVPN Server
Let’s get Started. Download the latest Windows 64-bit MSI installer for OpenVPN Community edition from official OpenVPN Website, under community section.
The OpenVPN executable should be installed on both server and client machines, since the single executable provides both client and server functions.
Once Downloaded double click the installer exe file. the following screen will appear, click “Customise” to start the installation.

Make sure to choose all features by clicking the icon next to each features and selecting it. Below are the two features which will not be installed by default and we need to select during install.
Openssl utilities , EasyRSA 3 Certificate Management scripts
OpenVPN service.
Click Install Now button.


The install will get completed and we will get below screen. Click Close.

We will get a warning message as ” No readable connection profiles ( config files ) found. Its fine , click OK.

This Completes the OpenVPN MSI Package install. After the install, if we go to Server “Network and Internet ” settings >> Under Ethernet >> Change adaptor options >> We can see a new network adaptor named OpenVPN TAP device created.

We can restart the OpenVPN service from Windows Start Menu -> Control Panel -> Administrative Tools -> Services.
As of OpenVPN version 2.5.0,While starting the OpenVPN wrapper service the OpenVPN will look for .ovpn configuration file under folder “C:\Program Files\OpenVPN\config-auto” to auto-start OpenVPN service when ever our Windows Server 2019 reboots.

Another option to start/stop OpenVPN service is Click on Windows hidden notification area from task bar , there we can see the OpenVPN icon, right click on it and you will see multiple options including Connect and Disconnect.
If you don’t see the OpenVPN icon in the Windows task bar notification area, double click the OpenVPN icon available in the desktop and that will make the OpenVPN icon available at the windows task bar notification area.
For better understanding refer below screenshot.

As I mentioned earlier As of OpenVPN version 2.5.0, when we start the OpenVPN service using the GUI component under windows task bar notification area, the OpenVPN will look for .ovpn configuration file under folder “C:\Program Files\OpenVPN\config”.
Now if you would like to add any OpenVPN features later you can use commands like below. Below example cmd command will install OpenVPN service feature on existing installed OpenVPN Server.

This Concludes the OpenVPN Package install on Windows 10 for Server and for the Client PC. Now lets move to the next section.
Section 2. Setup Master Certificate Authority (CA) and Generate Certificates and keys for OpenVPN Server and Clients.
OpenVPN uses public-key infrastructure (PKI) for certificate generation and Management. It is the technology behind digital certificates. There for, PKI is the technology that allows you to encrypt data, digitally sign documents, and authenticate yourself using certificates.
The PKI consists of:
- A separate certificate (also known as a public key) and private key for the server and each client, and
- A master Certificate Authority (CA) certificate and key which is used to sign each of the server and client certificates.
For PKI management, The latest version of OpenVPN packages provided easy-rsa 3, a set of scripts which is bundled with OpenVPN MSI.
The easy-rsa3 scripts folder location should be “C:\Program Files\OpenVPN\easy-rsa”. Also the Easy-RSA 3 runs POSIX shell code, so use on Windows has some additional requirements such as an OpenSSL installation, and a usable shell environment but Windows packages of EasyRSA 3.0.7+ include an OpenSSL binary and libraries that will be used by default. So basically we don’t need to perform the OpenSSL install separately in our Windows Install.
Additionally The Easy-RSA 3 Windows release includes a ready-to-use shell environment where we can run the commands that needed to issue SSL/TSL certificates. So lets proceed with the SSL/TLS certificate creation along with CA certificate using easy-rsa3 scripts.
First thing is go the folder “C:\Program Files\OpenVPN\easy-rsa” using Windows File explorer. Copy the file named “vars.example” to file named “vars“.
The “vars “ file contains built-in Easy-RSA configuration settings. The default settings are fine unless if we need any custom changes. Few configurable options given in below table.
| Variables | Default Value | Usage |
|---|---|---|
set_var EASYRSA |
C:\Program Files\OpenVPN\easy-rsa | Defines the folder location of easy-rsa scripts |
| set_var EASYRSA_OPENSSL | C:\Program Files\OpenVPN\bin\openssl.exe | Defines the OpenSSL binary path |
| set_var EASYRSA_PKI | C:\Program Files\OpenVPN\easy-rsa\pki | The folder location of SSL/TLS file exists after creation |
set_var EASYRSA_DN |
cn_only |
This is used to adjust what elements are included in the Subject field as the DN |
set_var EASYRSA_REQ_COUNTRY |
“US” | Our Organisation Country |
set_var EASYRSA_REQ_PROVINCE |
“California” | Our Organisation Province |
| set_var EASYRSA_REQ_CITY | “San Francisco” | Our Organisation City |
| set_var EASYRSA_REQ_ORG | “Copyleft Certificate Co” | Our Organisation Name |
| set_var EASYRSA_REQ_EMAIL | “me@example.net” | Our Organisation contact email |
| set_var EASYRSA_REQ_OU | “My Organizational Unit” | Our Organisation Unit name |
set_var EASYRSA_KEY_SIZE |
2048 |
Define the key pair size in bits |
set_var EASYRSA_ALGO |
rsa | The default crypt mode |
set_var EASYRSA_CA_EXPIRE |
3650 | The CA key expire days |
set_var EASYRSA_CERT_EXPIRE |
825 |
The Server certificate key expire days |
set_var EASYRSA_NS_SUPPORT |
“no” | Support deprecated Netscape extension |
| set_var EASYRSA_NS_COMMENT | “HAKASE-LABS CERTIFICATE AUTHORITY” | Defines NS comment |
| set_var EASYRSA_EXT_DIR |
"$EASYRSA/x509-types" |
Defines the x509 extension directory |
set_var EASYRSA_SSL_CONF |
"$EASYRSA/openssl-easyrsa.cnf" |
Defines the openssl config file location |
set_var EASYRSA_DIGEST |
"sha256" |
Defines the cryptographic digest to use |
So if you need to edit above default values, un-comment corresponding lines and make necessary changes. The “var” also have other configurable options but I only mentioned few important variables. So in our case we are fine with the default values and the default values will be used during certificate generation.
Now Open the windows command prompt and go the directory “C:\Program Files\OpenVPN\easy-rsa”. After that Launch EasyRSA shell. For that issue below commands.
Now we have entered the easy-rsa3 shell prompt and from there we will be able to issue easy-rsa3 scripts. Attached a screenshot for reference.

Now Initiate the Public Key Infrastructure PKI directory. For that issue below command in the EasyRSA Shell.
Below the screenshot for reference. From there we can see the PKI directory is set to “C:\Program Files\OpenVPN\easy-rsa\pki”

Now build the certificate authority (CA ) key using the command below. This CA root certificate file later will be used to sign other certificates and keys. The option “nopass” we used is to disable password locking the CA certificate.
The command will be asked to enter the common name. Here I entered my VPN server Hostname which is OPENVPNSERVER, and it is a common practice. Here we are free to use any name or values. Also the created the CA certificate will be saved to folder “C:\Program Files\OpenVPN\easy-rsa\pki” with file name as “ca.crt”. Refer below screenshot.

Now Build a server certificate and key using below command. Here Replace < SERVER >with your own server name. Also I used Option nopass for disabling password locking the key.
Attached a screenshot for your reference. The issued server certificate will be in the folder “C:\Program Files\OpenVPN\easy-rsa\pki\issued” with file name as SERVER.crt.

After that we can verify the issued server certificate using below openssl command in the EasyRSA shell itself. The Status Ok indicate that the certificate is fine.
Now Build a client certificate and key using below command. From that Replace < CLIENT > with your client name. Also used Option nopass for disabling password locking the key.
Attached a screenshot for your reference. The issued client certificate will also be saved to folder “C:\Program Files\OpenVPN\easy-rsa\pki\issued” with file name as “CLIENT.crt”.

After that we can verify the issued client certificate using below openssl command. The Ok indicate that the certificate is fine.
This Completed the CA certificate, Sever and Client Certificate Generation along with Key. These keys will be used to authenticate between OpenVPN server and with the Client.
Now Generate a shared-secret key that is used in addition to the standard RSA certificate/key. The file name is tls-auth.key.
Using this key we enable tls-auth directive Which adds an additional HMAC signature to all SSL/TLS handshake packets for integrity verification. Any UDP packet not bearing the correct HMAC signature can be dropped without further processing.
Enabling the tls-auth will protect us from
- DoS attacks or port flooding on the OpenVPN UDP port.
- Port scanning to determine which server UDP ports are in a listening state.
- Buffer overflow vulnerabilities in the SSL/TLS implementation.
- SSL/TLS handshake initiations from unauthorised machines.
So first Download Easy-TLS using the GitHub link https://github.com/TinCanTech/easy-tls. It is an Easy-RSA extension utility that we are using to generate tls-auth key.
Click the Download zip option which is available under code tab. Refer below screenshot.

After that unzip the easy-tls-master folder and copy the files named “easytls”and “easytls-openssl.cnf” file to “C:\Program Files\OpenVPN\easy-rsa” directory. Check below screenshot for reference.

Now go back to the EasyRSA shell prompt and issue below command. This will initialise the easy-tls script utility.
Now after that generate the tls-auth key using below command.
The command will generate the tls-auth key file named “tls-auth.key” under the folder “C:\Program Files\OpenVPN\easy-rsa\pki\easytls”. Refer below screenshot.

Now we need to Generate Diffie Hellman parameters.
Diffie Hellman parameters must be generated for the OpenVPN server.
These parameters define how OpenSSL performs the Diffie-Hellman (DH) key-exchange. Diffie–Hellman key exchange is a method of securely exchanging cryptographic keys over a public channel
Issue below command for generating Diffie Hellman parameters from the EasyRSA shell.
The command will create the DH file under folder “C:\Program Files\OpenVPN\easy-rsa\pki” with file name as “dh.pem”. Refer below screenshot.

This completes the generation of necessary SSL/TLS key files needed for OpenVPN service. We will be able to find the created files under below folders.
| Folder Path | Content |
|---|---|
| C:\Program Files\OpenVPN\easy-rsa\pki | CA file, DH file and other OpenSSL related files like config file |
| C:\Program Files\OpenVPN\easy-rsa\pki\private | Include the private key files of CA, Server and Client certificates |
| C:\Program Files\OpenVPN\easy-rsa\pki\easytls | Contains the tls-auth key |
| C:\Program Files\OpenVPN\easy-rsa\pki\issued | Contains issued Server and Client certificates |
Refer below screenshot.

Also below is the short explanation of the relevant files.
| Filename | Needed By | Purpose | Secret |
|---|---|---|---|
| ca.crt | server + all clients | Root CA certificate | No |
| ca.key | Server Only | Root CA key | YES |
| dh.pem | server only | Diffie Hellman parameters | No |
| SERVER.crt | server only | Server Certificate | No |
| SERVER.key | server only | Server Key | Yes |
| CLIENT.crt | Client only | Client Certificate | No |
| CLIENT.key | Client only | Client Key | Yes |
| tls-auth.key | server + all clients | Used for tls-auth directive | No |
Now its the time to copy Certificate files ca.crt, CLIENT.crt, CLIENT.key and tls-auth.key from OpenVPN server to the OpenVPN client PC. Make sure to copy secret files over a secure channel like SFTP.
Okay, this completes the creation of SSL/TLS certificates for the OpenVPN service. Now lets move to the next section.
SUPPOSE IF YOU WOULD LIKE TO USE YOUR OWN OPENSSL VERSION AND DON’T WISH TO USE EASY-RSA3 SCRIPTS, FOR GENERATING SSL/TLS CERTIFICATES THEN ONLY FOLLOW NEXT SECTIONS OTHERWISE MOVE TO SECTION 3
So lets see how we can generate SSL/TLS certificates using the openssl commands directly.
For that first make sure if the openssl toolkit installed in the server by issuing below version check command on windows cmd.
If it shows any error like openssl is not recognised as an internal or external command, we need to install the openssl toolkit first.
Section 2 a. Install and Setup openssl toolkit
Only follow this section if your server doesn’t have openssl toolkit available, otherwise skip this part and move on to next Section 2 b.
Open Windows Powershell and download the openssl package using below command.

Now perform the install by double-clicking on .exe file or from PowerShell issue below command.

A popup window will appear with message as Microsoft Visual C++ 2019 package is missing from the server. We need to install this package prior to proceed with the openssl package install .So click Yes for downloading the package.

Double click the downloaded Microsoft Visual C++ 2019 Redistributables msi installer. A another popup window will appear. Confirm the Licence Agreement and click Install.

We will get a success message after installation. Click close.

Now go back to the OpenSSL install wizard, Accept the Licence Agreement and Click Next.

Choose the Install directory and click Next, In our case, we are choosing the install directory as C:\OpenSSL-Win64

Select Folder for OpenSSL Application shortcut. Leave the default one as it is and click Next.

Choose the copy OpenSSL DLL files as The windows system directory, which is the default one and Click Next.

Click “Install ” to proceed with the install of OpenSSL on Windows Server 2019.

Give few minutes to complete the install, A progress bar like below will show the status of install.

Click Finish to Complete the OpenSSL install.

Now add OpenSSL install binary folder C:\OpenSSL-Win64\bin to the Windows environment PATH by issuing below two powershell commands.
Now export the OPENSSL_CONF as environment variable to server system variables section. Use below Powershell command.
The command output will look like below.

Now, we need to add the system variable OPENSSL_CONF permanently.
For that Press Windows + R keys together to open run window, Then type “sysdm.cpl” in the Run dialog box and hit Enter.
Go to “Advanced” tab and click on “Environment variables”. Click New under System Variables section.

Add values in the “variable name” as OPENSSL_CONF and “variable value” value box as C:\OpenSSL-Win64\bin\openssl.cfg . Click OK Two times and Apply and OK from System Properties window.
.

Section 2 b . Configure OpenSSL.
In this section, we configure OpenSSL installed in the server to build SSL/TLS certificated as per OpenVPN recommendation. For that,
- First go the folder C:\OpenSSL-Win64\bin and create folder named “demoCA” . This is the folder where we kept generated certificates and other related files.
- Now under the “demoCA” folder create another folder named “certs” . This is the folder where the issued certs are kept.
- Now under the “demoCA” folder itself, create another folder named “newcerts”. This is the default folder for new certs.
- Under folder “demoCA” create a file named “serial”. Make sure there is no file extension like .txt. Enter a value as “01” in the file. It holds the current serial number
- Lastly under folder “demoCA” create a empty file named “index.txt”
Refer below screenshot for getting an idea about file structure.

Now open the OpenSSL config file C:\OpenSSL-Win64\bin\openssl.cfg using any text editor.
Under [ CA_default ] section , set “dir” variable location as C:\\OpenSSL-Win64\\bin\\demoCA

To avoid a possible Man-in-the-Middle attack where an authorised client tries to connect to another client by impersonating the server, make sure to enforce some kind of server certificate verification by clients. For accomplishing this we are following below method.
Build our server certificates with specific key usage and extended key usage as per RFC3280.
Now as part of creating CERT with the extended key attributes, first verify under which section we need define extended key attributes. For that look under [ req ] section in file C:\OpenSSL-Win64\bin\openssl.cfg
Normally it should look like below. If its not, make the arrangement like below.

| [ req ]
default_bits = 2048 |
|---|
In the above section what we understood is all the x509 extension that are required should be specified in [ usr_cert ] section in C:\OpenSSL-Win64\bin\openssl.cfg
So find out the [ usr_cert ] section and make sure below values are defined.
| [ usr_cert ]
subjectKeyIdentifier = hash |
|---|
After adding the extensions to usr_cert , Now find out [ v3_req ] section and insert same Extensions to add to a certificate request. As this section will have the extension that the certificate request should have.
Below is the extensions we normally needed.
| extendedKeyUsage = serverAuth, clientAuth, codeSigning, emailProtection basicConstraints = critical, CA:true, pathlen:0 keyUsage = critical, digitalSignature, cRLSign, keyCertSign |
|---|
Now also make sure below extension key values added under [ v3_ca ] section too. From this section our CA certificate extension will be added. Below is the necessary values need to added or enabled.
| subjectKeyIdentifier=hash authorityKeyIdentifier=keyid:always,issuer basicConstraints = critical,CA:true |
|---|
Finally save the OpenSSL config file C:\OpenSSL-Win64\bin\openssl.cfg . Refer below screenshots so you will get an idea how the config file will look like.


This Completes the OpenSSL configuration according to OpenVPN recommendation. Now lets Proceed with the SSL/TLS Certificate creation.
Section 2 c. Generate SSL/TLS Certificates.
In this section we are creating CA, generate certificate & key for server and client. Sign those certificates using CA certificates. For all these tasks we use openssl commands.
Build a cert authority valid for ten years, starting now.
Open windows cmd , go to the directory C:\OpenSSL-Win64\bin\demoCA. Issue below command.
We will ask to input information’s that will be incorporated in to the certificate request. Below are fields and Answered I have used. You can enter values as per your requirement.
In the common name field, I entered my VPN server Hostname which is OPENVPNSERVER, and it is a common practice. Here we are free to use any name or values.
| Field | Value |
|---|---|
| Country Name | US |
| State or Province Name | CA |
| Locality Name | SanFrancisco |
| Organisation Name | OpenVPN |
| Organisation Unit Name | IT |
| Common Name | OPENVPNSERVER |
| Email Address | mail@openvpnserver.com |
Below is the captured screenshot of above issued command output.

After creating the CA certificate , we can check if the extensions are still properly added by issuing below command.
The captured output of above verify command will look like below. From the results we can see our added Extended Key usage parameters, validation details are with the generated SSL/TLS CA certificate.

Now Generate certificate & key for server
For that first issue below command for build a request for a server cert that will be valid for ten years.
Enter the needed information as we described earlier. Attached a screenshot for your reference. In the Common Name Field I have given the name as “Server” because the SSL/TLS certificate request are generating for the server.

Now we can confirm the generated server csr certificate has the Extended Key Usage values by using below command.
The output of above command will look like below. We will be able to see the Extended Key usage values from the result.

Now sign the server cert request with our ca, creating a cert/key pair.
For that issue below command.
We will be asked to confirm the signing of Certificate, type “Y” and also commit the changes by typing “Y”
Attached a screenshot for reference.

After signing the cert , we can check if the extensions are still properly added by issuing below command.
Also we can verify server certificate against the root CA certificate. An OK indicates that the chain of trust is intact.
The captured output of above verify command will look like below. From the results we can the Extended Key usage parameters are enabled with the generated SSL/TLS certificate.

Now Generate certificates & keys for 1 clients using below command.
Enter the Necessary information as we discussed earlier. Here the only change I made is changed the Common name to Client1 because I am generating this certificate for the VPN client named client1.
The command output will look like below.

Now sign the client cert request with our ca, creating a cert/key pair. Use below command.
We will be asked to confirm the Signing of Certificate and Commit the changes. Type “y” for both and Hit Enter.
Screenshot Attached for reference.

This Completed the CA certificate, Sever and Client Certificate Generation along with Key. These keys will be used to authenticate between OpenVPN server and with the Client.
Now we need to Generate Diffie Hellman parameters.
Diffie Hellman parameters must be generated for the OpenVPN server.
These parameters define how OpenSSL performs the Diffie-Hellman (DH) key-exchange. Diffie–Hellman key exchange is a method of securely exchanging cryptographic keys over a public channel
Issue below command for generating Diffie Hellman parameters.
The above command output will look like below.

Now Generate a shared-secret key that is used in addition to the standard RSA certificate/key. We named the file as ta.key.
Using this key we enable tls-auth directive Which adds an additional HMAC signature to all SSL/TLS handshake packets for integrity verification. Any UDP packet not bearing the correct HMAC signature can be dropped without further processing.
Enabling the tls-auth will protect us from
- DoS attacks or port flooding on the OpenVPN UDP port.
- Port scanning to determine which server UDP ports are in a listening state.
- Buffer overflow vulnerabilities in the SSL/TLS implementation.
- SSL/TLS handshake initiations from unauthorised machines.
Use below command.
Below is the captured output of above command.

Key Files
Now we will find our newly-generated keys and certificates in the “C:\OpenSSL-Win64\bin\demoCA” folder and its subdirectory “certs” folder.
Take a look at the attached screenshot for reference.

Here is an short explanation of the relevant files.
| Filename | Needed By | Purpose | Secret |
|---|---|---|---|
| ca.crt | server + all clients | Root CA certificate | No |
| ca.key | Server Only | Root CA key | YES |
| dh4096.pem | server only | Diffie Hellman parameters | NO |
| server.crt | server only | Server Certificate | NO |
| server.key | server only | Server Key | YES |
| client1.crt | client1 only | Client1 Certificate | NO |
| client1.key | client1 only | Client1 Key | YES |
| ta.key | server + all clients | Used for tls-auth directive | No |
Now its the time to copy Certificate files ca.crt, client1.crt, client1.key and ta.key from OpenVPN server to the OpenVPN client PC. Make sure to copy secret files over a secure channel.
Section 3 . Enable NAT On OpenVPN Server.
As I mentioned in the introduction section we are setting up our OpenVPN server , to route clients all IP traffic such as Web browsing and DNS lookups through VPN Server itself. For that we need to NAT the OpenVPN TUN/TAP Network interface to the public internet through OpenVPN server Public Interface that already have internet access.
Lets Get Started. First Open Server Manager. Click Add Roles And Features.

Click Next on the Add Roles and Feature install wizard.

Choose “Role based or feature based installation” and click Next.

Select Our Server from the “select server from the server pool” section and click Next.

Choose “Remote Access” role and click Next.

leave Features section as it is and Click Next.

Click next On Remote Access section.

From Role Services section, choose “Routing ” and “Direct Access and VPN”

A popup window will appear. Click Add features and Click Next.

Click Next on Web Server Role Section.

Leave the default selection as it is under IIS Role Service section and Click on Next.

Click Install button on Confirmation Section.

Wait for few minutes, we will get the message as installation got succeeded. Click Close.

Now From the Server Manager itself, Choose “Remote Access from Left side” >> Right click our Server Name from Right side >> Choose Remote Access Management.

Under Direct Access and VPN >> Click on “Run the Remote Access Setup Wizard”

A Popup Window will appear. In that Click “Deploy VPN only”

The Routing and Remote Access Management” Panel will open. From there Right click on our VPN Server Name and Choose ” Configure and Enable Routing And Remote Access”

Click Next on Routing and Remote Access Server Setup Wizard.

Choose “Network Address Translation (NAT) ” and click Next.

Select Our Public Network Interface where we have internet Access and Click Next.

Select our OpenVPN TUN/TAP interface that we attach to the internet and Click Next.

Click Finish and Complete the NAT setup wizard.

Now from the Route and Remote Access Management panel itself >> Expand Our Server name >> Expand IPV4 >> Select NAT >> From right side Right click our Public Interface name and choose Properties.

From Services And Ports tab >> Choose Remote Access.

A popup windows will appear, in the Private Address filed give our Public IP address and Click OK, After that click Apply and Ok.

Suppose your Server RDP Port is different, you need create a new rule and allow that Port instead of default remote desktop port 3389.
Okay, This Completes the Enabling of NAT on OpenVPN server. Lets move to Next section.
Section 4 . Create configuration files for server
In this section, we create the OpenVPN Server configuration file and Make Necessary changes in it.
First Open Windows Explorer and go the folder C:\Program Files\OpenVPN\sample-config and copy file named “server.ovpn” to C:\Program Files\OpenVPN\config.
Now open the config file using any Text editor and make changes to below values accordingly.
| ca “C:\\OpenSSL-Win64\\bin\\demoCA\\certs\\ca.crt”
cert “C:\\OpenSSL-Win64\\bin\\demoCA\\server.crt” key “C:\\OpenSSL-Win64\\bin\\demoCA\\certs\\server.key” dh “C:\\OpenSSL-Win64\\bin\\demoCA\\certs\\dh4096.pem” push “redirect-gateway def1 bypass-dhcp” push “dhcp-option DNS 208.67.222.222” push “dhcp-option DNS 208.67.220.220” tls-auth C:\\OpenSSL-Win64\\bin\\demoCA\\certs\\ta.key 0 data-ciphers AES-256-GCM |
|---|
In that first four values defines the location of ca, cert , key and Diffie hellman parameters certificate locations.
The Next three lines enforce the clients to redirect their all traffic through OpenVPN server once they successfully connected to OpenVPN server.
Using “tls-auth” parameter, we enable HMAC firewall. Its an extra layer of security used to prevent DDos attack.
The last one “data-ciphers AES-256-GCM” enables a cryptographic cipher.
Refer below screenshots and then you will get an idea about how these parameters looks in server.ovpn config file.


This Completes the OpenVPN config file Setup. Now open the UDP Port 1194 in the Windows firewall using below powershell command.
Now start the OpenVPN server service by click on Windows Show hidden icons section >> right click the OpenVPN icon >> Choose Connect.
The OpenVPN service will start automatically and you will see a green colour inside OpenVPN icon. This means that our OpenVPN service is running.
Another option to start the OpenVPN service is from the Windows services section, which we described in section 1.

Another Option to confirm the running of OpenVPN service is , take windows cmd and list all network interfaces. We will see now the OpenVPN TUN/TAP interface is assigned with private IP 10.8.0.1, which is the default private IP address range assigned to server and with clients as per the config settings.

Section 5 . Setup OpenVPN Client.
In this section we first install the OpenVPN MSI installer on Client PC like Windows 10. After that we will setup OpenVPN client config files.
Finally start the the OpenVPN connection and test it out.
Section 5 a . OpenVPN Client MSI Install
For OpenVPN MSI installation on Client PC, follow the same steps described on Section 1. The OpenVPN Community Edition MSI Installer can be used on both Server side and with the client side.
After the OpenVPN MSI installation. Open Windows Explorer and go the folder C:\Program Files\OpenVPN\sample-config and copy file named “client.ovpn” to C:\Program Files\OpenVPN\config.
After that rename the “client.ovpn” to “client1.ovpn” because we use this client config file for client1.
Move already downloaded ca.crt, client1.crt, client1.key and ta.key to folder C:\Program Files\OpenVPN\config.
Refer below screenshot for better understanding on file structure.

Section 5 b . Configure Client Config File.
Go to the folder “C:\Program Files\OpenVPN\config” and open client1.ovpn file using any text editor and define below parameters accordingly.
| remote 185.210.137.214 1194
ca “C:\\Program Files\\OpenVPN\\config\\ca.crt” cert “C:\\Program Files\\OpenVPN\\config\\client.crt” key “C:\\Program Files\\OpenVPN\\config\\client.key” remote-cert-tls server tls-auth “C:\\Program Files\\OpenVPN\\config\\ta.key” 1 cipher AES-256-GCM |
|---|
In that first value defines The hostname/IP and port of the OpenVPN server
The Next three ca, cert , key values defines the location of CA and client certificate locations.
Using “remote-cert-tls server” , the OpenVPN client will verify the server certificate extendedKeyUsage.
Using “tls-auth” parameter, we enable HMAC firewall. Its an extra layer of security used to prevent DDos attack.
The last one “cipher AES-256-GCM” enables a cryptographic cipher.
Below picture shows how these parameters looks in the client config file.


This Completes the Client Setup. Now test the VPN Connection from client side. Make sure to open UDP port 1194 in the client side windows firewall too.
Section 5 c . Testing the OpenVPN connection.
Under windows Hidden Notification area , right click on OpenVPN icon and Click Connect.

The OpenVPN connection will establish automatically. After the successful connection , try to ping to the private IP of OpenVPN server and make sure its reachable. Also test the internet connection of your client PC.

Also on a Successfully connected OpenVPN Client PC, if we lookup the what is my IP on web browser, we will see its our VPN Server IP. This means that all our web traffic is routing through OpenVPN server.

Conclusion.
We have successfully completed the OpenVPN setup On Windows server 2019 and successfully connected from a Windows 10 OpenVPN client PC. Also we have seen how to route all IP traffic from client side through OpenVPN server. I hope this article is informative. Leave your thoughts at the comment box.
Share This Story, Choose Your Platform!
Related Posts
14 Comments
-
 Dominique
November 18, 2021 at 9:11 am — ReplyThanks a lot for this page, Very helpfull to understand and configure an openvpn server and client ! And make IT WORKS !!
-
Иван Анатольевич
March 3, 2022 at 2:02 pm — ReplyOptions error: Unrecognized option or missing or extra parameter(s) in server.ovpn:192: push (2.5.3)
Use –help for more information.Help please
-
admin
March 13, 2022 at 4:47 am — ReplyCheck the mentioned line in openvpn config file. Could be some invalid character
-
-
Niltinho
April 3, 2022 at 6:16 pm — ReplyHi, thanks for the tutorial …. Do I need to create NAT for every type of traffic which by clients may be using? Is there a way to just assumes it will NAT by default?
-
admin
April 12, 2022 at 6:13 am — Replywe setup NAT for all type of traffic in this case
-
-
Nico
May 20, 2022 at 4:46 pm — ReplyTried to a VMWare émulator on Windows server 2019 and it doesn’t work for me :/
I had a lot of problem to install OpenSSL, I finally did it manualy not with Powershell or with the OpenVPN installator. And I think my problems comme from there.Anyways, may be it can’t work on a emulator ?
-
admin
May 28, 2022 at 10:00 am — Replyokay, I am not sure about VMware emulater network adaptor. Did you checked with VMware support team ?
-
Nico
May 29, 2022 at 7:22 pm — ReplyNo, but anyway it was just for test, its was not something important. I will ask them later.
Thanks for reply.
-
-
-
milad
August 7, 2022 at 8:42 am — ReplyI have 1 problem
you are install open ssl into “c:\program files\openssl” but config envoirment into “c:\openssl” its true?
i cant execute openssl commands! -
milad
August 7, 2022 at 11:39 am — ReplyLast problemes is solved , but when i want exexute req
i have this error :
req: Can’t open “certs\ca.key” for writing, No such file or directory -
kimbo slice
November 3, 2022 at 3:35 pm — ReplyThis milad guy really ought to pay attention to file paths, lol
-
Cupio
January 13, 2023 at 3:54 pm — ReplyHi my issue is :
I made this folder : C:\Program Files\OpenSSL-Win64\bin\demoCA\newcerts
and when I run this command :openssl ca -days 3650 -extensions usr_cert -cert certs\ca.crt -keyfile certs\ca.key -out client1.crt -infiles certs\client1.csr
My Error is :
Using configuration from C:\Program Files\OpenSSL-Win64\bin\openssl.cfg
ca: ./demoCA/newcerts is not a directory
./demoCA/newcerts: No errorbut I have that directory !
-
Antonio
January 16, 2023 at 2:49 pm — Reply -
BobH
February 3, 2023 at 6:32 am — ReplyUnable to start OpenVPN server – get “Options error: Unrecognized option or missing or extra parameter(s) in ..\config\server.ovpn:78: ca (2.6.0). Use –help for more information.
1) Unable to determine what :78 is – guessing line number, but there’s nothing but a blank line there. Tried guessing that it was counting non-blank lines (the sample config has every other line blank) and the nearest actual config line was dh “C:\\Program Files\\OpenVPN\\easy-rsa\\pki\\dh.pem”. Verified that dh.pem exists at that path and I did run ./easyrsa gen-dh from the easy-ras shell (date/time stamp on dh.pem confirms).2) Verified other edited config value that they point to correct locations, such as:
ca “C:\\Program Files\\OpenVPN\\easy-rsa\\pki\\ca.crt”
cert “C:\\Program Files\\OpenVPN\\easy-rsa\\pki\\issued\\ServerVPN.crt”
key “C:\\Program Files\\OpenVPN\\easy-rsa\\pki\\private\\ServerVPN.key” # This file should be kept secret
tls-auth “C:\\Program Files\\OpenVPN\\easy-rsa\\pki\\private\\ta.key” 0 # This file is secret


Page load link
Go to Top