In this guide, we have given step-by-step guides on how to create self-signed certificates using the OpenSSL utility. You can create self-signed certificates using commands or automate them using a shell script by following this guide.
Openssl is a handy utility to create self-signed certificates. You can use OpenSSL on all the operating systems such as Windows, MAC, and Linux flavors.
What is a Self Signed Certificate?
A self-signed certificate is an SSL/TSL certificate not signed by a public or private certificate authority. Instead, it is signed by the creator’s own personal or root CA certificate.
Here is what we do to request paid SSL/TLS certificate from a well-known Certificate Authority like Verisign or comodo.
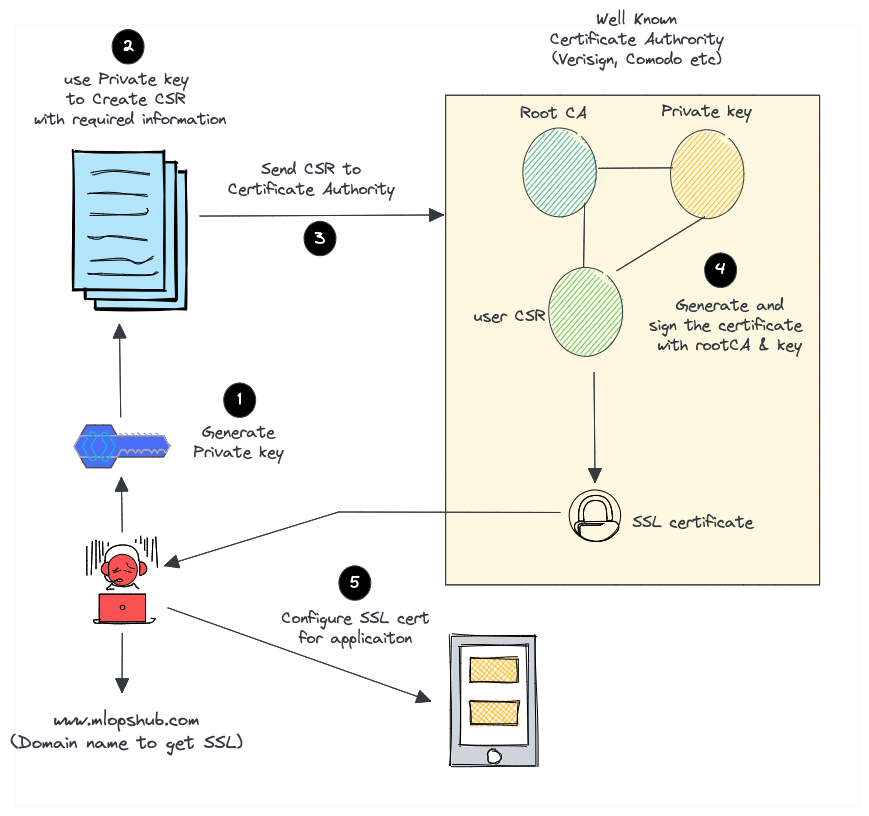
- Create a certificate signing request (CSR) with a private key. A CSR contains details about location, organization, and FQDN (Fully Qualified Domain Name).
- Send the CSR to the trusted CA authority.
- The CA authority will send you the SSL certificate signed by their root certificate authority and private key.
- You can then validate and use the SSL certificate with your applications.
But for a self-signed certificate, here is what we do.
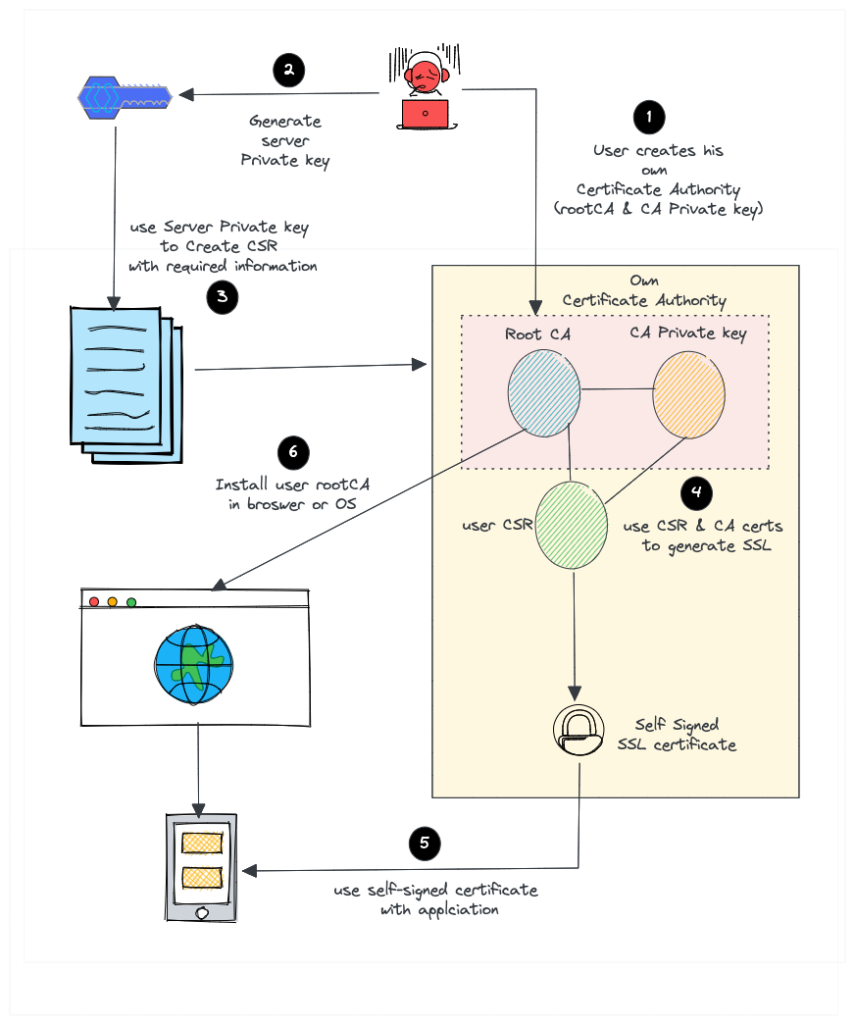
- Create our own root CA certificate & CA private key (We act as a CA on our own)
- Create a server private key to generate CSR
- Create an SSL certificate with CSR using our root CA and CA private key.
- Install the CA certificate in the browser or Operating system to avoid security warnings.
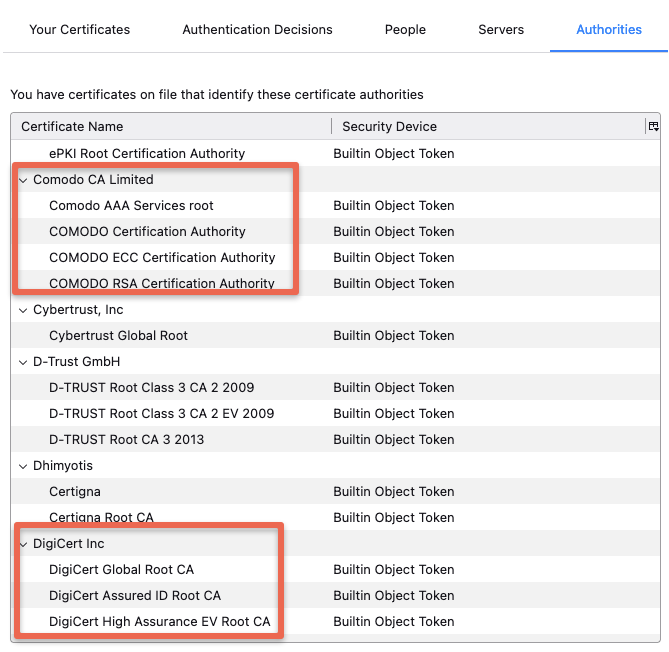
Most browsers & operating systems hold a copy of root CA certificates of all the trusted certified Certificated Authorities. That’s the reason the browsers won’t show any security messages when you visit standard websites that use SSL from a trusted and well-known commercial Certificate authority.
The following image shows the root CA present in the Firefox browser by default.
At the same time, if you use a self-signed certificate, your browser will throw a security warning. The reason is browsers only trust SSL from a trusted Certificate authority. For example,
Your connection is not private
Attackers might be trying to steal your information from demo.apps.mlopshub.com (for example, passwords, messages or credit cards)
But you can force browsers & operating systems to accept our own certificate authority. So you won’t see the security warning once you install the CA certificate and add it to the trusted list. You can also share the CA certificate with your development team to install in their browsers as well.
Also, you can use this CA to create more than one SSL certificate.
Create Certificate Authority
As discussed earlier, we need to create our own root CA certificate for browsers to trust the self-signed certificate. So let’s create the root CA certificate first.
Let’s create a directory named openssl to save all the generated keys & certificates.
mkdir openssl && cd opensslExecute the following openssl command to create the rootCA.keyand rootCA.crt. Replace demo.mlopshub.com with your domain name or IP address.
openssl req -x509 \
            -sha256 -days 356 \
            -nodes \
            -newkey rsa:2048 \
            -subj "/CN=demo.mlopshub.com/C=US/L=San Fransisco" \
            -keyout rootCA.key -out rootCA.crt
We will use the rootCA.keyand rootCA.crt to sign the SSL certificate.
Note: If you get the following error, comment RANDFILE = $ENV::HOME/.rnd line in /etc/ssl/openssl.cnf
Can't load /home/vagrant/.rnd into RNGFollow the steps given below to create the self-signed certificates. We will sign out certificates using our own root CA created in the previous step.
1. Create the Server Private Key
openssl genrsa -out server.key 20482. Create Certificate Signing Request Configuration
We will create a csr.conf file to have all the information to generate the CSR. Replace demo.mlopshub.com with your domain name or IP address.
cat > csr.conf <<EOF
[ req ]
default_bits = 2048
prompt = no
default_md = sha256
req_extensions = req_ext
distinguished_name = dn

[ dn ]
C = US
ST = California
L = San Fransisco
O = MLopsHub
OU = MlopsHub Dev
CN = demo.mlopshub.com

[ req_ext ]
subjectAltName = @alt_names

[ alt_names ]
DNS.1 = demo.mlopshub.com
DNS.2 = www.demo.mlopshub.com
IP.1 = 192.168.1.5
IP.2 = 192.168.1.6

EOF
3. Generate Certificate Signing Request (CSR) Using Server Private Key
Now we will generate server.csr using the following command.
openssl req -new -key server.key -out server.csr -config csr.confNow our folder should have three files. csr.conf, server.csr and server.key
4. Create a external file
Execute the following to create cert.conf for the SSL certificate. Replace demo.mlopshub.com with your domain name or IP address.
cat > cert.conf <<EOF

authorityKeyIdentifier=keyid,issuer
basicConstraints=CA:FALSE
keyUsage = digitalSignature, nonRepudiation, keyEncipherment, dataEncipherment
subjectAltName = @alt_names

[alt_names]
DNS.1 = demo.mlopshub.com

EOF
5. Generate SSL certificate With self signed CA
Now, execute the following command to generate the SSL certificate that is signed by the rootCA.crt and rootCA.key created as part of our own Certificate Authority.
openssl x509 -req \
    -in server.csr \
    -CA rootCA.crt -CAkey rootCA.key \
    -CAcreateserial -out server.crt \
    -days 365 \
    -sha256 -extfile cert.conf
The above command will generate server.crt that will be used with our server.key to enable SSL in applications.
For example, the following config shows the Nginx config using the server certificate and private key used for SSL configuration.
server {

listen   443;

ssl    on;
ssl_certificate    /etc/ssl/server.crt;
ssl_certificate_key    /etc/ssl/server.key;

server_name your.domain.com;
access_log /var/log/nginx/nginx.vhost.access.log;
error_log /var/log/nginx/nginx.vhost.error.log;
location / {
root   /home/www/public_html/your.domain.com/public/;
index  index.html;
}

}
Install Certificate Authority In Your Browser/OS
You need to install the rootCA.crt in your browser or operating system to avoid the security message that shows up in the browser when using self-signed certificates.
Installing self-signed CA certificates differs in Operating systems. For example, in MAC, you can add the certificate by double-clicking it and adding it to the keychain. Check the respective Operating system guide on installing the certificate.
- For MAC check this guide
- Adding certificate to chrome on Windows
Shell Script To Create Self-Signed Certificate
If you want to create self-signed certificates quite often, you can make use of the following shell script. You just need to execute the script with the domain name or IP that you want to add to the certificate.
Save the following shell script as ssl.sh
#! /bin/bash

if [ "$#" -ne 1 ]
then
  echo "Error: No domain name argument provided"
  echo "Usage: Provide a domain name as an argument"
  exit 1
fi

DOMAIN=$1

# Create root CA & Private key

openssl req -x509 \
            -sha256 -days 356 \
            -nodes \
            -newkey rsa:2048 \
            -subj "/CN=${DOMAIN}/C=US/L=San Fransisco" \
            -keyout rootCA.key -out rootCA.crt

# Generate Private key

openssl genrsa -out ${DOMAIN}.key 2048

# Create csf conf

cat > csr.conf <<EOF
[ req ]
default_bits = 2048
prompt = no
default_md = sha256
req_extensions = req_ext
distinguished_name = dn

[ dn ]
C = US
ST = California
L = San Fransisco
O = MLopsHub
OU = MlopsHub Dev
CN = ${DOMAIN}

[ req_ext ]
subjectAltName = @alt_names

[ alt_names ]
DNS.1 = ${DOMAIN}
DNS.2 = www.${DOMAIN}
IP.1 = 192.168.1.5
IP.2 = 192.168.1.6

EOF

# create CSR request using private key

openssl req -new -key ${DOMAIN}.key -out ${DOMAIN}.csr -config csr.conf

# Create a external config file for the certificate

cat > cert.conf <<EOF

authorityKeyIdentifier=keyid,issuer
basicConstraints=CA:FALSE
keyUsage = digitalSignature, nonRepudiation, keyEncipherment, dataEncipherment
subjectAltName = @alt_names

[alt_names]
DNS.1 = ${DOMAIN}

EOF

# Create SSl with self signed CA

openssl x509 -req \
    -in ${DOMAIN}.csr \
    -CA rootCA.crt -CAkey rootCA.key \
    -CAcreateserial -out ${DOMAIN}.crt \
    -days 365 \
    -sha256 -extfile cert.conf
Set the script executable permission by executing the following command.
chmod +x ssl.shExecute the script with the domain name or IP. For example,
./ssl.sh demo.mlopshub.comThe script will create all the certificates and keys we created using the individual commands. The SSL certificate and private keys get named with the domain name you pass as the script argument. For example, demo.mlopshub.com.key & demo.mlopshub.com.crt
What are the benefits of using a self-signed certificate?
There are several benefits of using a self-signed certificate:
- You don’t need to rely on a third party to sign your certificate.
- You can create and use your own certificate authority.
- You don’t have to pay for a certificate from a CA.
- You have more control over your certificates.
What are the drawbacks of using a self-signed certificate?
There are also several drawbacks of using a self-signed certificate:
- Your users will need to install the certificate in their browsers or applications.
- Your users will need to trust your certificate authority manually.
- They unsafe for public facing applications.
- None of the browsers or operating systems trust the self-signed certificates unless the user installs them.
- Prone to man-in-the-middle attacks.
In general, self-signed certificates are a good option for applications in which you need to prove your own identity. They’re also a good option for development and testing environments. However, they shouldn’t be used for production applications.
Self-Signed Certificates in Organizations
Many organizations use self-signed certificated for their internal applications that are not internet-facing. These certificates are generated using the organization’s internal PKI infrastructure.
DevOps teams and developers can request SSL certificates from the PKI infrastructure to be used in applications.
Self-Signed Certificate FAQ’s
How to create self-signed certificated on Windows?
You can create a self-signed certificate on windows using Openssl. The OpenSSL commands are the same for all operating systems. You can follow this guide to create a self-signed certificate on windows using this guide.
How do I get a self-signed certificate?
Self-signed certificate can be generated by you using tools like openSSL or CDSSL PKI toolkit.
Conclusion
In this guide, we have learned how to create self-signed SSL certificates using OpenSSL.
For production use cases, if you don’t want to spend money on SSL certificates, you can try out Letsencrypt.
Hope this self-signed SSL guide was helpful with the script to automate the certificate generation. Do let us know if you face any issues.
Also, SSL/TLS is one of the important topics in DevOps. You can check out the how to become a devops engineer blog to know more.
Use a command-line tool or third-party software
by Tashreef Shareef
Tashreef Shareef is a software developer turned tech writer. He discovered his interest in technology after reading a tech magazine accidentally. Now he writes about everything tech from… read more
Updated on
- The process of adding an SSL certificate to your website is pretty straightforward, and this guide will help.
- We also discuss the 3 most efficient ways to either purchase an SSL certificate, use an open-source SSL, or create your own.
- One of the best ways to generate a self-signed certificate in Windows 10 is to do so via a command line.

XINSTALL BY CLICKING THE DOWNLOAD
FILE
Adding an SSL certificate to your website is a straightforward process. You can either purchase a third-party SSL certificate and renew it on a yearly basis or use an open-source SSL certificate and create a corn job to renew it every month.
However, for development and testing, you can explore the possibility of creating a self-signed SSL certificate in Windows.
Creating a self-signed certificate is an excellent alternative to purchasing and renewing a yearly certification for testing purposes. You can make use of OpenSSL to generate a self-signed certificate for this purpose.
In this article, we explore how to create a self-signed certificate in Windows 10. The later part of the article also explores how to deploy the self-signed certificate to client machines.
Quick Tip:
Although you can save some money if you create a self-signed certificate, it may lead to a permanent block of your website for some users. This is caused by the certificate error message and in most cases cannot be undone.
Besides that, the process is time-consuming and really not worth your time which also has a certain cost. We strongly recommend using a 3rd party SSL service provider.
How we test, review and rate?
We have worked for the past 6 months on building a new review system on how we produce content. Using it, we have subsequently redone most of our articles to provide actual hands-on expertise on the guides we made.
For more details you can read how we test, review, and rate at WindowsReport.

GoDaddy SSL Certificates
GoDaddy is one of the best web hosting providers that also offers affordable SSL certificates.
How can I generate a self-signed certificate in Windows 10?
1. Use OpenSSL to create a self-signed certificate
1.1 Install OpenSSL

- Download the latest OpenSSL windows installer from a third-party source.
- Run the installer. OpenSSL requires Microsoft Visual C++ to run. The installer will prompt you to install Visual C++ if it is already not installed.
- Click Yes to install.
- Run the OpenSSL installer again and select the installation directory.
- Click Next.
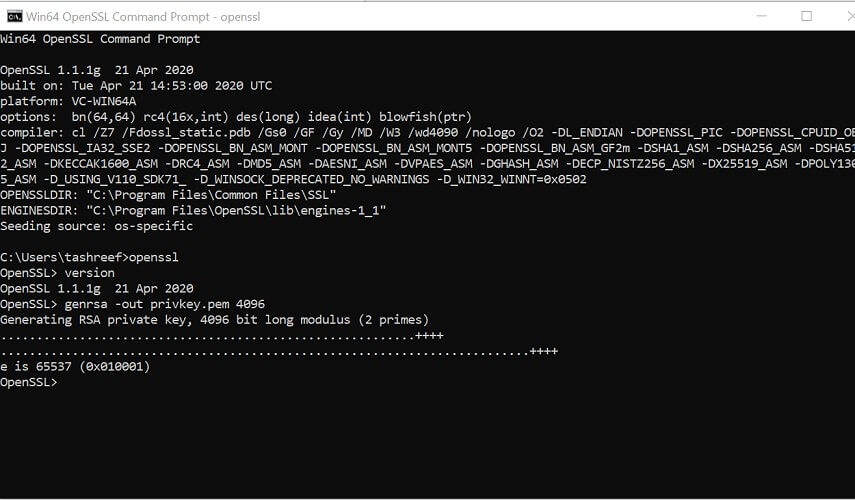
- Open a command prompt and type OpenSSL to get OpenSSL prompt.
1.2 Create a public/private key file pair
- Make sure you have OpenSSL installed.
- Open Command Prompt and create a new directory on your C drive:
C: >cd Test - Now go to the new directory:
C: Test> - Now you need to type the path of the OpenSSL install directory followed by the RSA key algorithm.
C: Test>c:opensslbinopenssl genrsa -out privkey.pem 4096 - Run the following command to split the generated file into separate private and public key files:
C: Test>c:opensslbinopenssl ssh-keygen -t rsa -b 4096 -f privkey.pem
Once you have the public/private key generated, follow the next set of steps to create a self-signed certificate file on a Windows system.
1.3 Generate a self-signed certificate
- Open a Command Prompt window.
- Go to the directory that you created earlier for the public/private key file.
C: Test> - Enter the path of the OpenSSL install directory, followed by the self-signed certificate algorithm:
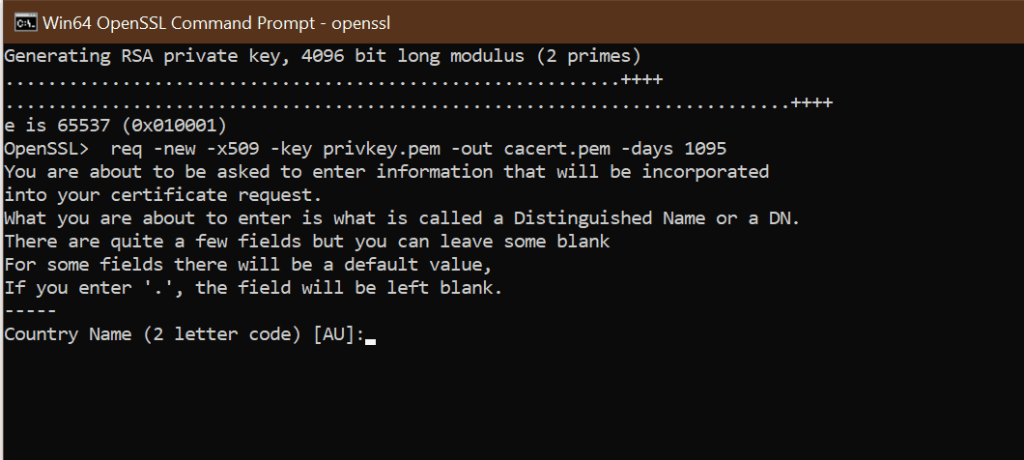
C: Test>c:opensslbinopenssl req -new -x509 -key privkey.pem -out cacert.pem -days 1095
- Follow the on-screen instruction.
- You need to enter information about your organization, region, and contact details to create a self-signed certificate.
If you would rather use PowerShell to create a self-signed certificate, follow the next set of steps instead.
2. Generate a Self-Signed Certificate on Windows using PowerShell
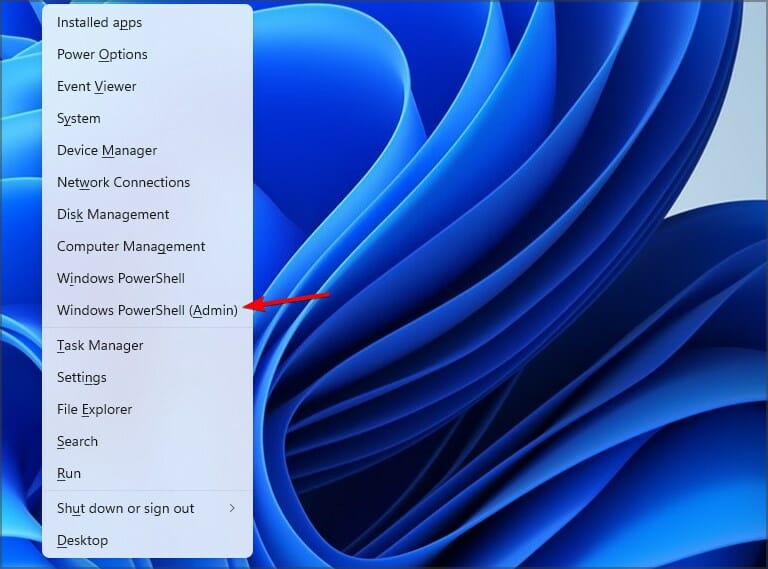
1. Press the Windows key, and type Powershell in the search box. Right-click on the PowerShell app and select Run as Administrator.
2. Run the New-SelfsignedCertificate command, as shown below:$cert = New-SelfSignedCertificate -certstorelocation cert:localmachinemy -dnsname testcert.windowsreport.com
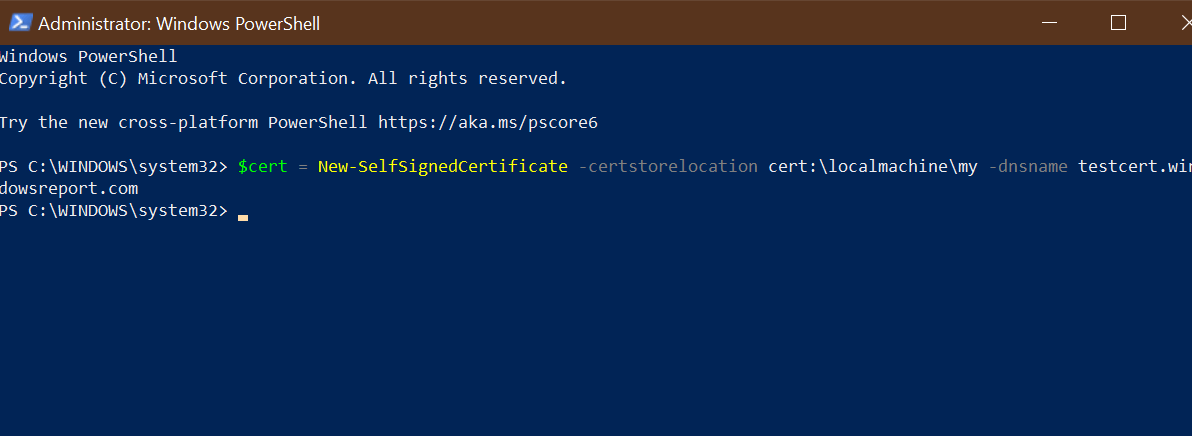
3. This will add the certificate to the locater store on your PC. Replace testcert.windowsreport.com with your domain name in the above command.
4. Next, create a password for your export file:$pwd = ConvertTo-SecureString -String ‘password!’ -Force -AsPlainText
5. Replace Password with your own password.
6. Enter the following command to export the self-signed certificate:$path = 'cert:localMachinemy' + $cert.thumbprint Export-PfxCertificate -cert $path -FilePath c:tempcert.pfx -Password $pwd
7. In the above command replace c:temp with the directory where you want to export the file.
8. You can import the exported file and deploy it for your project.
Another great option to generate a self-signed certificate on Windows 10 is to use a command-line tool such as Powershell.
With it, you don’t need to download any third-party software. You just need to input the appropriate command line in Powershell, and the tool will do the job for you.
How to add my self-signed certificate into the curls ca file on Windows 10?

- Once you have created a self-signed certificate and installed it, you may want cURL to trust the certificate as well.
- The later versions of cURL don’t include a trusted listed a .pem file. You can download the .pem file and type the following command in the php.ini file.
curl.cainfo = "C:xamppphpcacert.pem" - Once done, you need to get cURL to trust your self-signed certificate. To do this, open your server.crt file. The file is created when you created your self-signed certificate.
- Copy all the content of the server.crt file and then add it to the cacert.pem file.
Creating a self-signed certificate using OpenSSL can be done using the Command Prompt or PowerShell. Being able to create your self-signed certificate allows you to create a temporary certificate for in-development projects that require an SSL certificate.
We hope you managed to generate a self-signed certificate on your Windows 10 PC. Let us know in the comments section which method you prefer to use.
![]()
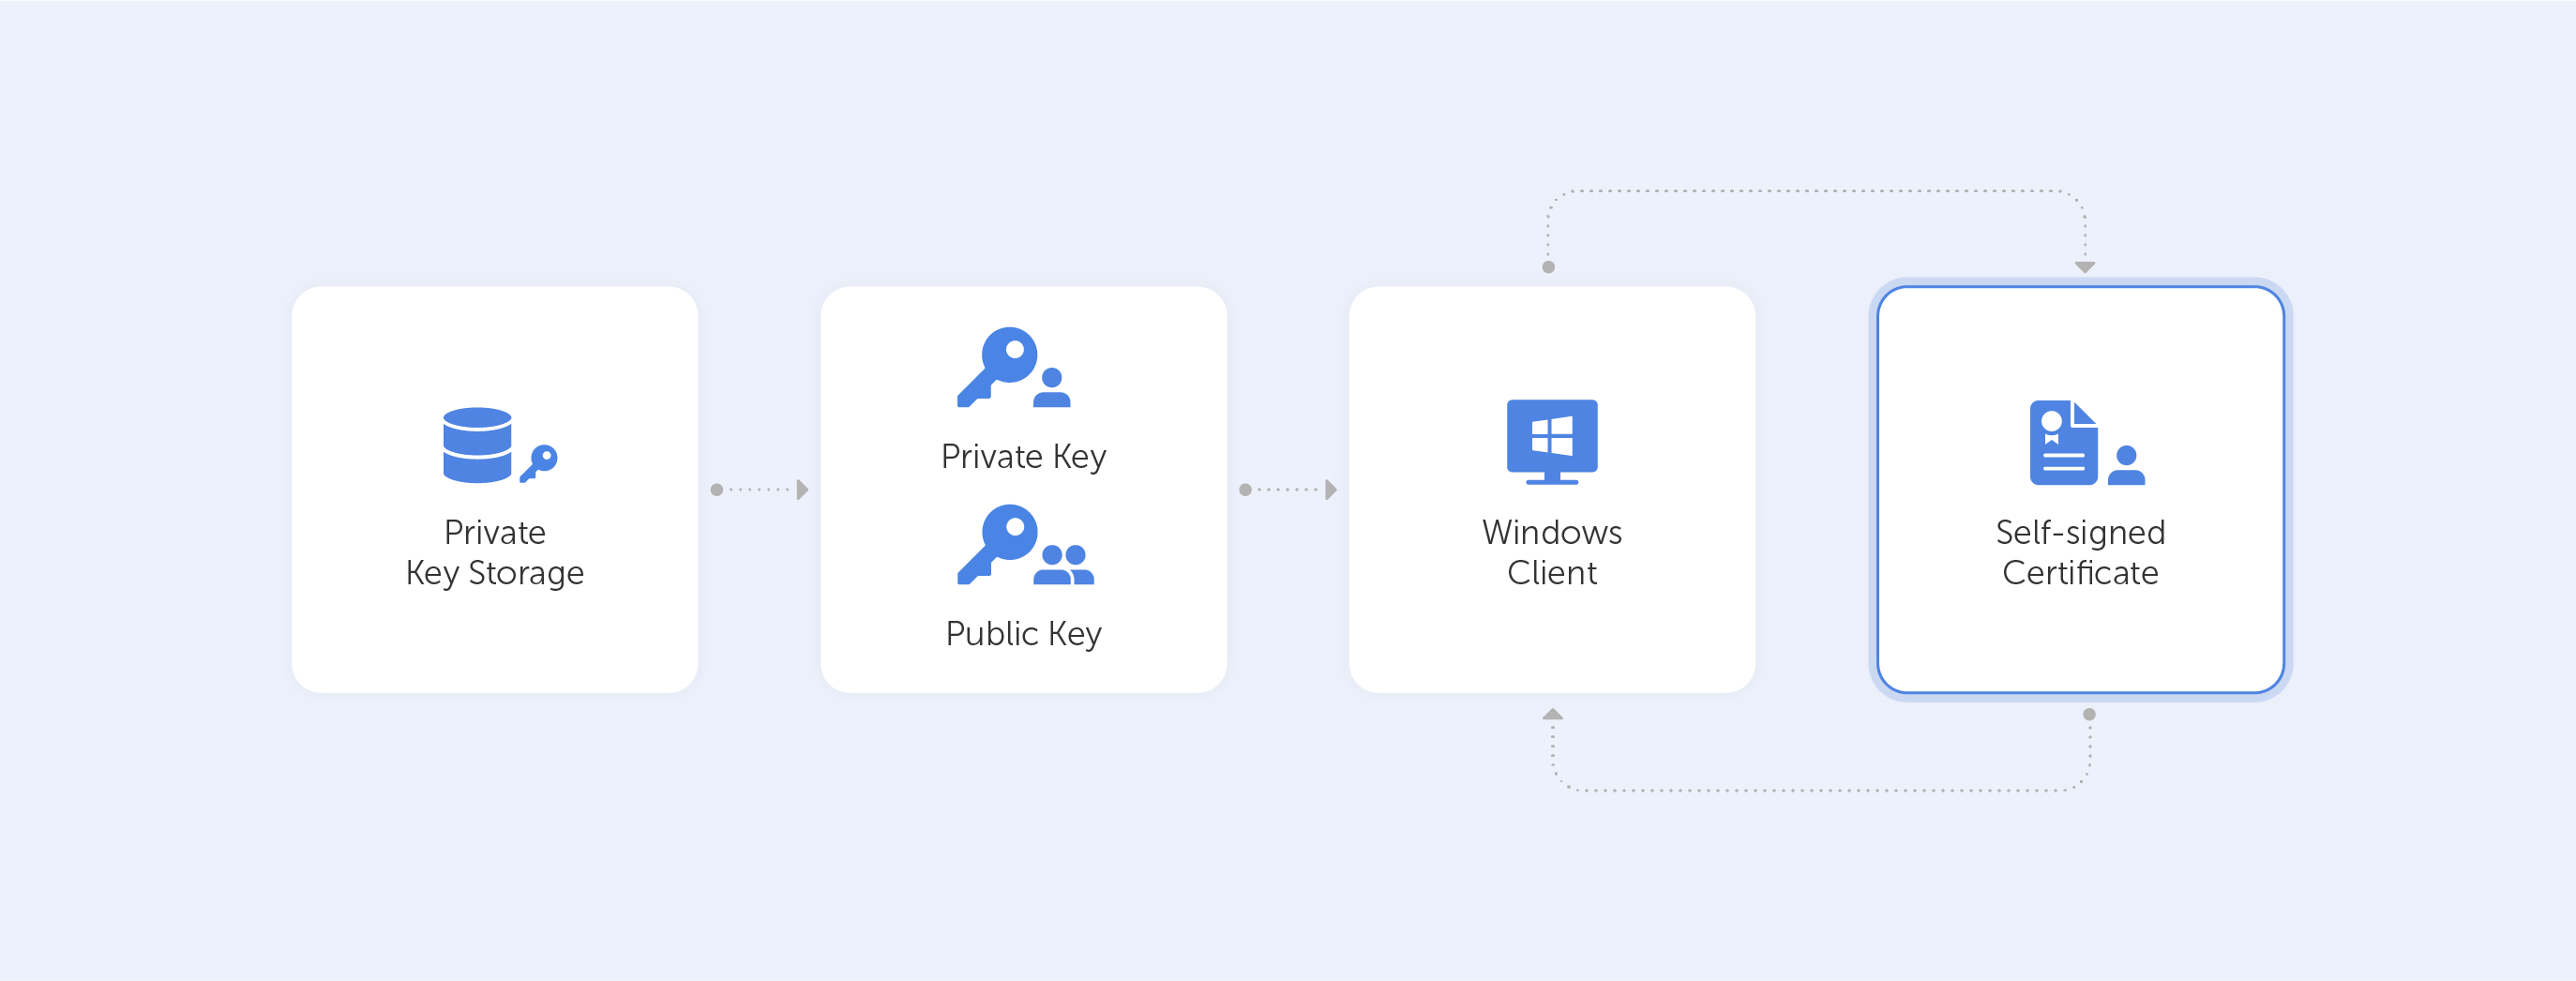
Self-signed certificates are widely used in testing environments and they are excellent alternatives to purchasing and renewing yearly certifications.
That is of course if you know how and, more importantly, when to use them. Remember, that A self-signed certificate is not signed by a publicly trusted Certificate Authority (CA). Self-signed certificates are considered different from traditional CA certificates that are signed and issued by a CA because self-signed certificates are created, issued, and signed by the company or developer who is responsible for the website or software associated with the certificate.
You are probably reading this article because for some reason, you need to create a self-signed certificate with Windows. So, we’ve tried to outline the easiest ways to do that. This article is up-to-date as of December 2021. By the way, we’re referring to Windows 10 for all the following tutorials. As far as we know, the processes for Windows 11 are identical.
So what are our options?
Using Let’s Encrypt.
These guys offer free CA certificates with various SAN and wildcard support. The certificate is only good for 90 days, but they do give an automated renewal method. This is a great alternative for a quick proof-of-concept. Other options would require more typing, for sure.
But this option works only if you want to generate a certificate for your website. The best way to start is by going to Getting Started, the instructions thereafter are very easy to follow.
Other one-click option:
We’ve reviewed different online services that allow you to easily generate self-signed certificates. We’ve sorted them from one-click to advanced, and the first one is:
Selfsignedcertificate.com
Just enter your domain name — and you are ready to go:
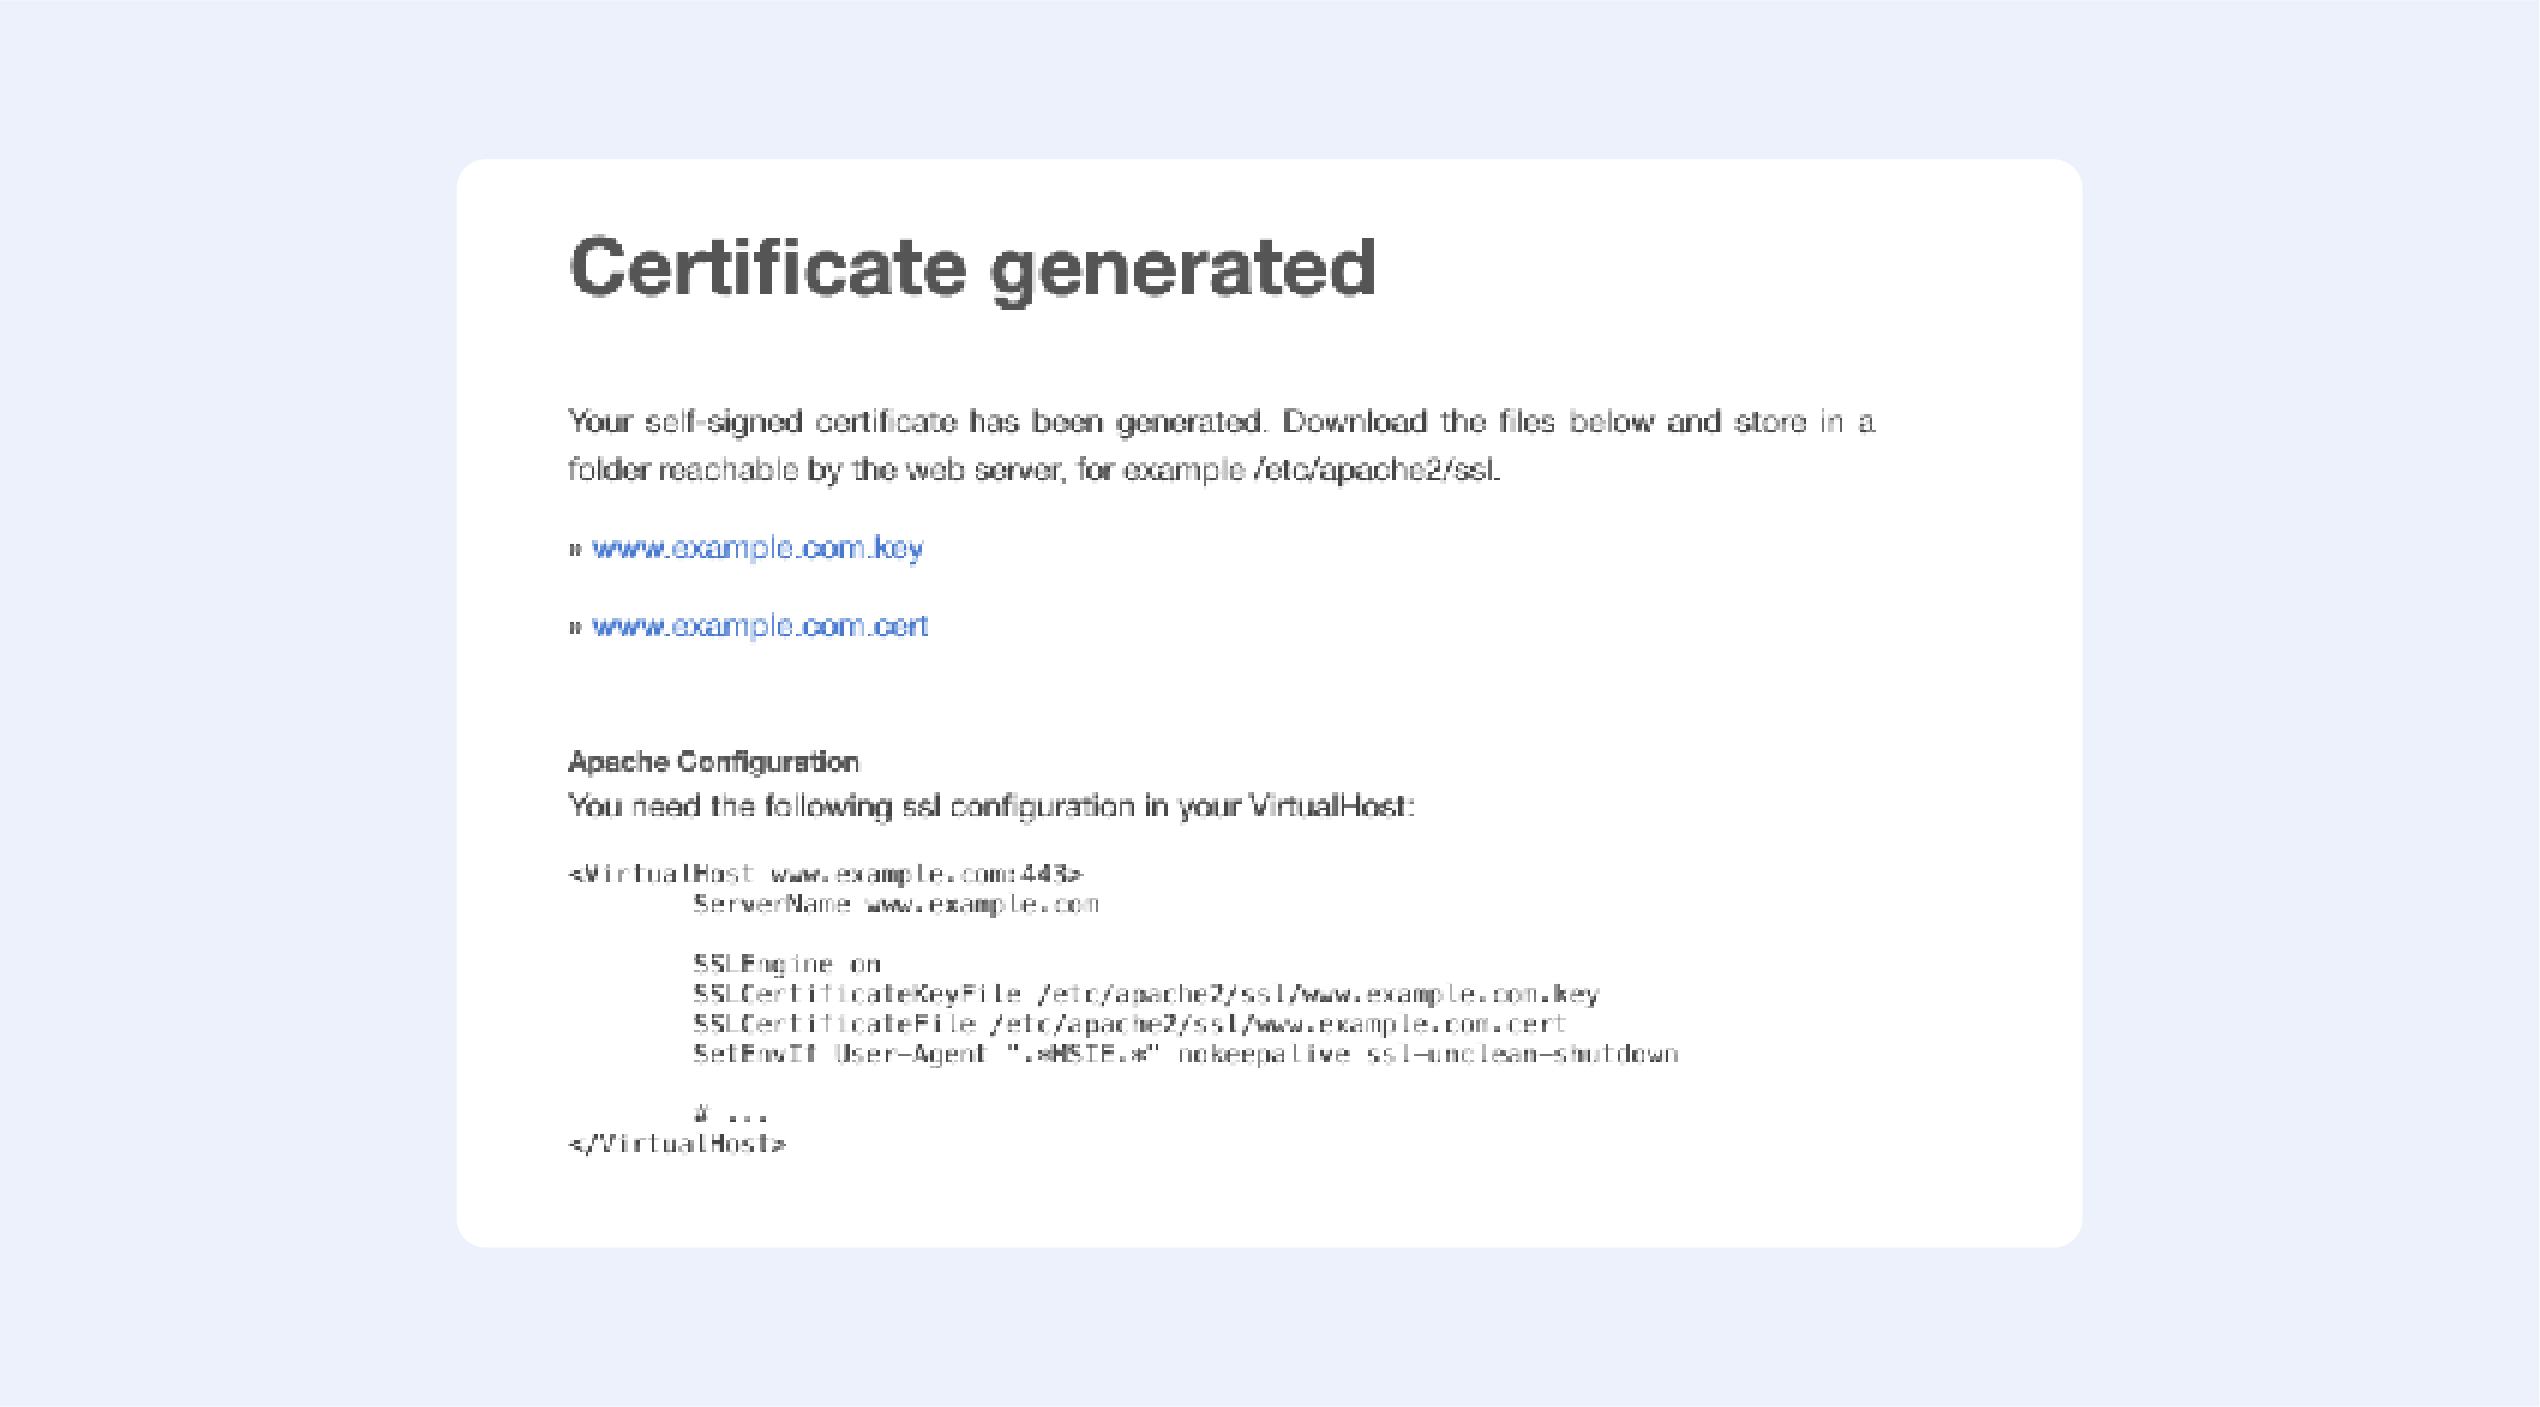
Getacert.com
Fill out the following fields:
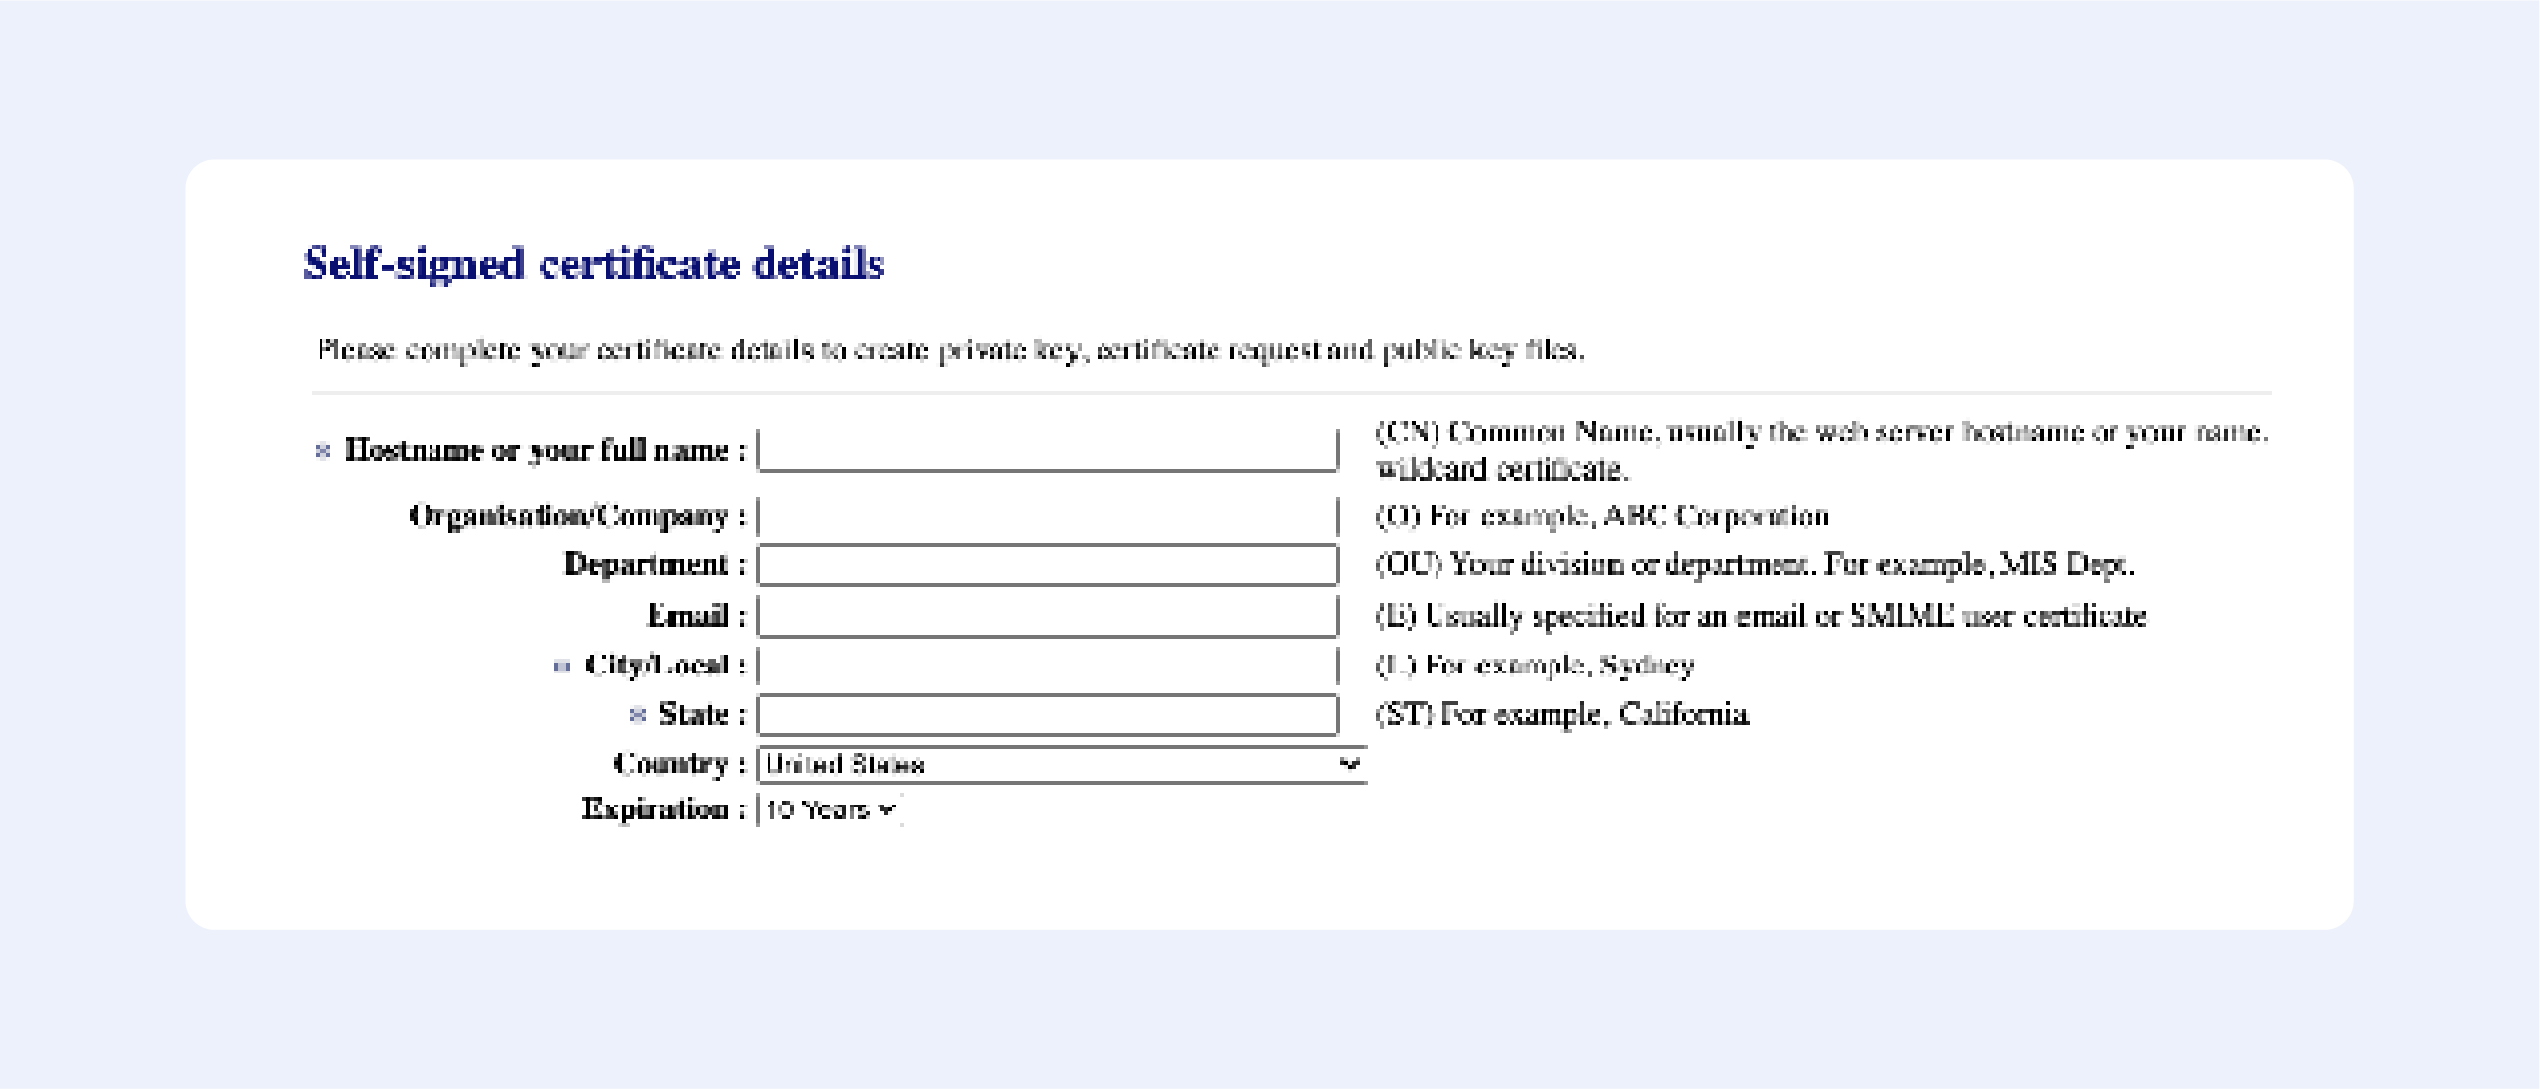
Press “Next”, then confirm your details, and get your certificate:
It’s that easy!
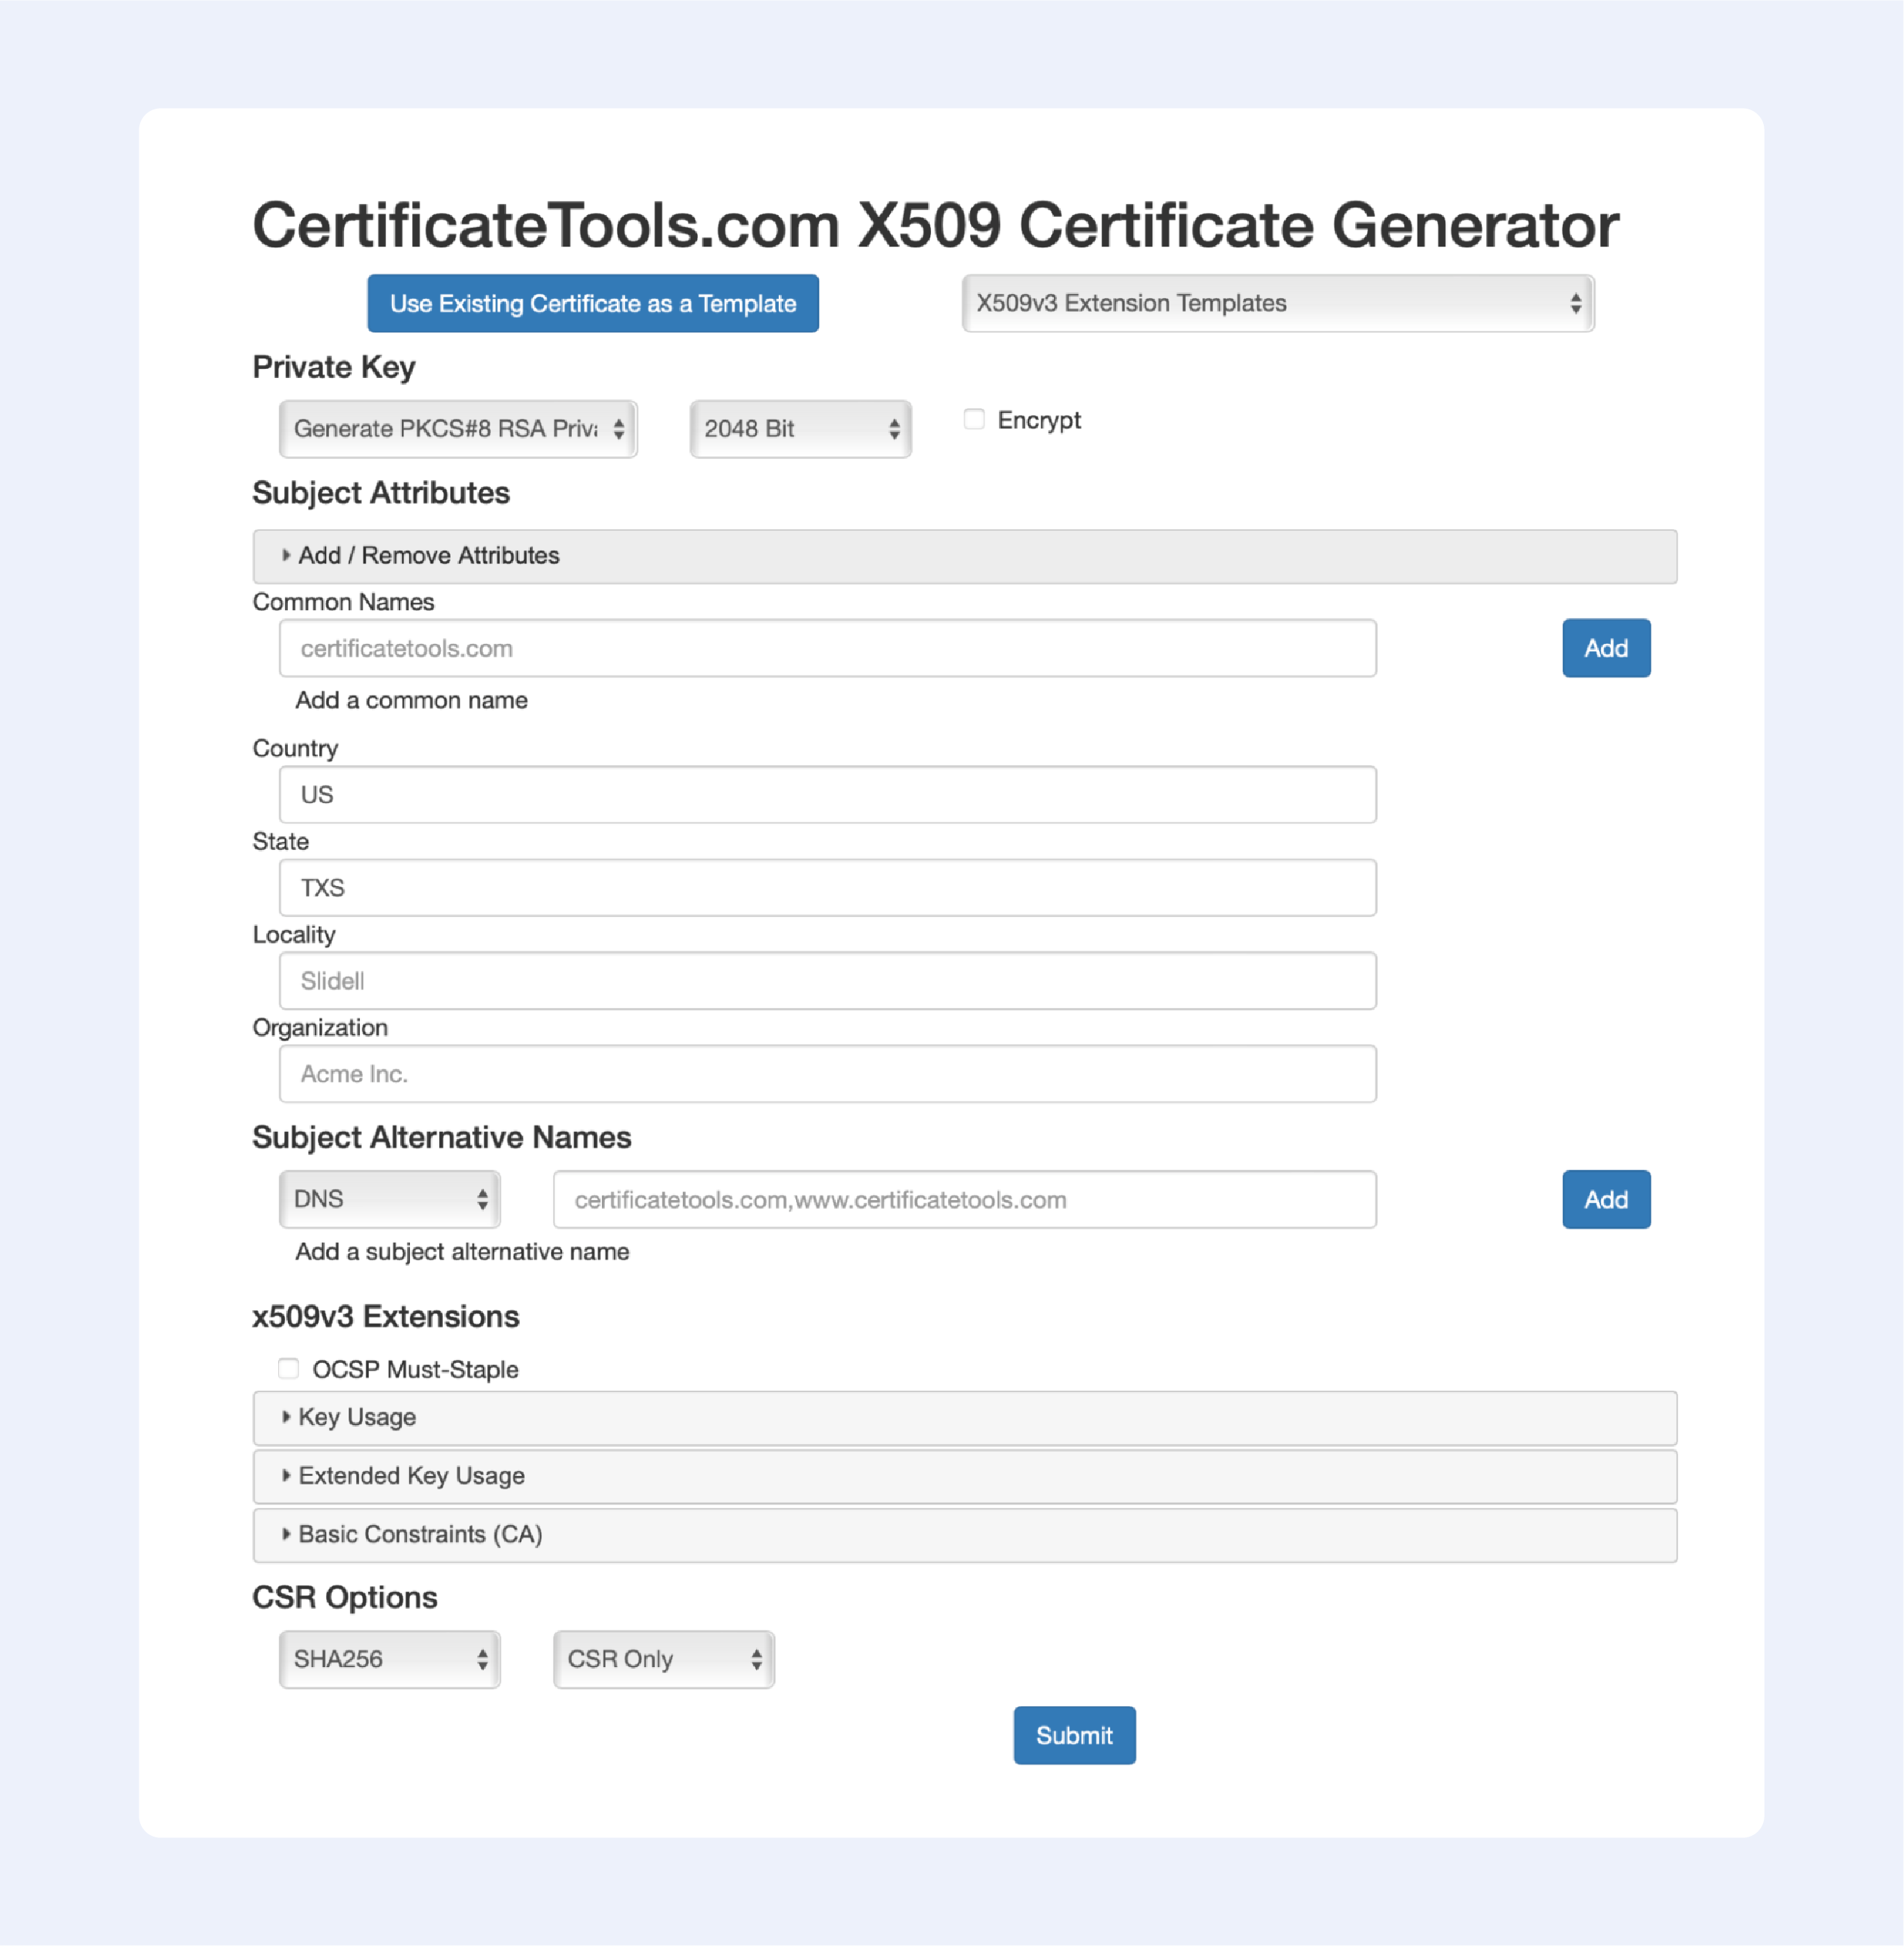
Сertificatetools.com
Among the online services that allow you to generate self-signed certificates, this one is the most advanced; just look at all available options to choose from:
Now let’s continue with offline solutions, that are a bit more advanced:
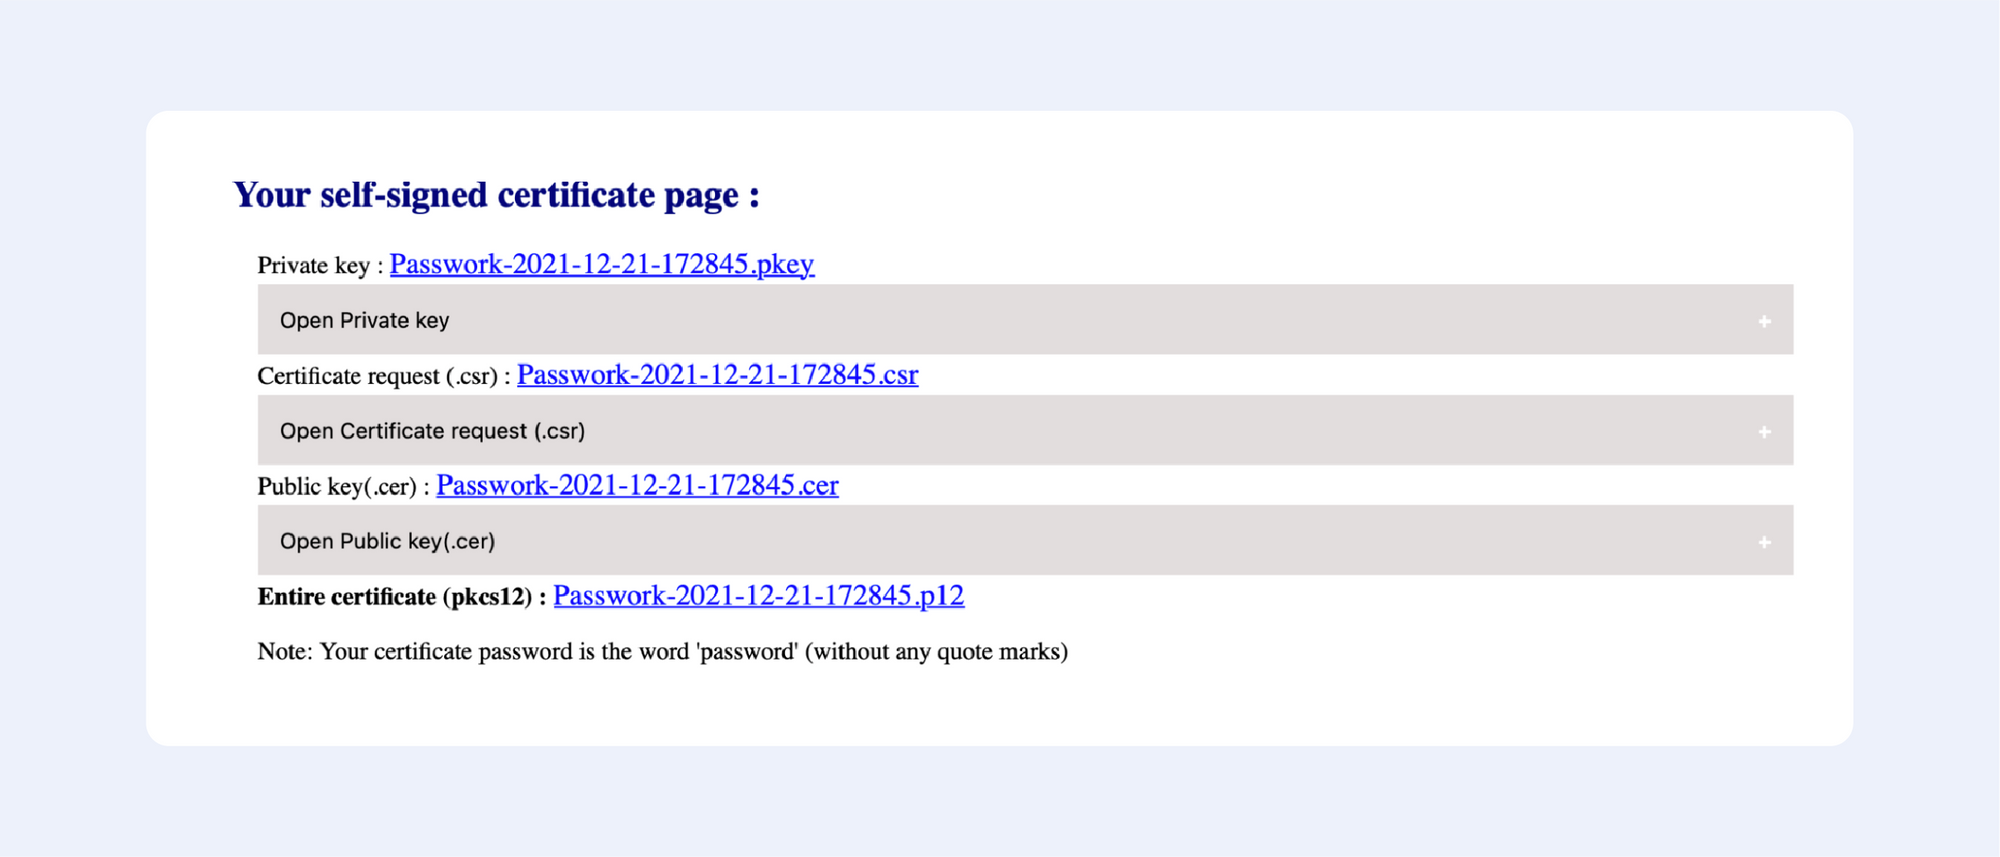
PowerShell 4.0
1. Press the Windows key, type Powershell. Right-click on PowerShell and select Run as Administrator.
2. Run the New-SelfsignedCertificate command, as shown below.
$cert = New-SelfSignedCertificate -certstorelocation
cert:localmachinemy -dnsname passwork.com
3. This will add the certificate to the locater store on your PC. Replace passwork.com with your domain name in the above command.
4. Next, create a password for your export file:
$pwd = ConvertTo-SecureString -String ‘password!’ -Force -AsPlainText5. Replace password with your own password.
6. Enter the following command to export the self-signed certificate:
$path = 'cert:localMachinemy' + $cert.thumbprint
Export-PfxCertificate -cert $path -FilePath
c:tempcert.pfx -Password $pwd
7. In the above command, replace c:temp with the directory where you want to export the file.
8. Import the exported file and deploy it for your project.
Use OpenSSL
1. Download the latest OpenSSL windows installer from a third-party source;
2. Run the installer. OpenSSL requires Microsoft Visual C++ to run. The installer will prompt you to install Visual C++ if it is already not installed;
3. Click Yes to install;
4. Run the OpenSSL installer again and select the installation directory;
5. Click Next;
6. Open Command Prompt and type OpenSSL to get an OpenSSL prompt.
The next step would be to generate a public/private key file pair.
1. Open Command Prompt and create a new directory on your C drive:
C: >cd Test2. Now go to the new directory:
C: Test>3. Now you need to type the path of the OpenSSL install directory followed by the RSA key algorithm:
C: Test>c:opensslbinopenssl genrsa -out privkey.pem 40964. Run the following command to split the generated file into separate private and public key files:
C: Test>c:opensslbinopenssl ssh-keygen -t rsa -b 4096 -f privkey.pemOnce you have the public/private key generated, follow the next set of steps to create a self-signed certificate file on Windows.
1. Go to the directory that you created earlier for the public/private key file:
C: Test>2. Enter the path of the OpenSSL install directory, followed by the self-signed certificate algorithm:
C: Test>c:opensslbinopenssl req -new -x509 -key privkey.pem -out cacert.pem -days 1093. Follow the on-screen instructions;
4. You need to enter information about your organization, region, and contact details to create a self-signed certificate.
We also have a detailed article on OpenSSL – it contains more in-depth instructions on generating self-signed certificates.
Using IIS
This is one of those hidden features that very few people know about.
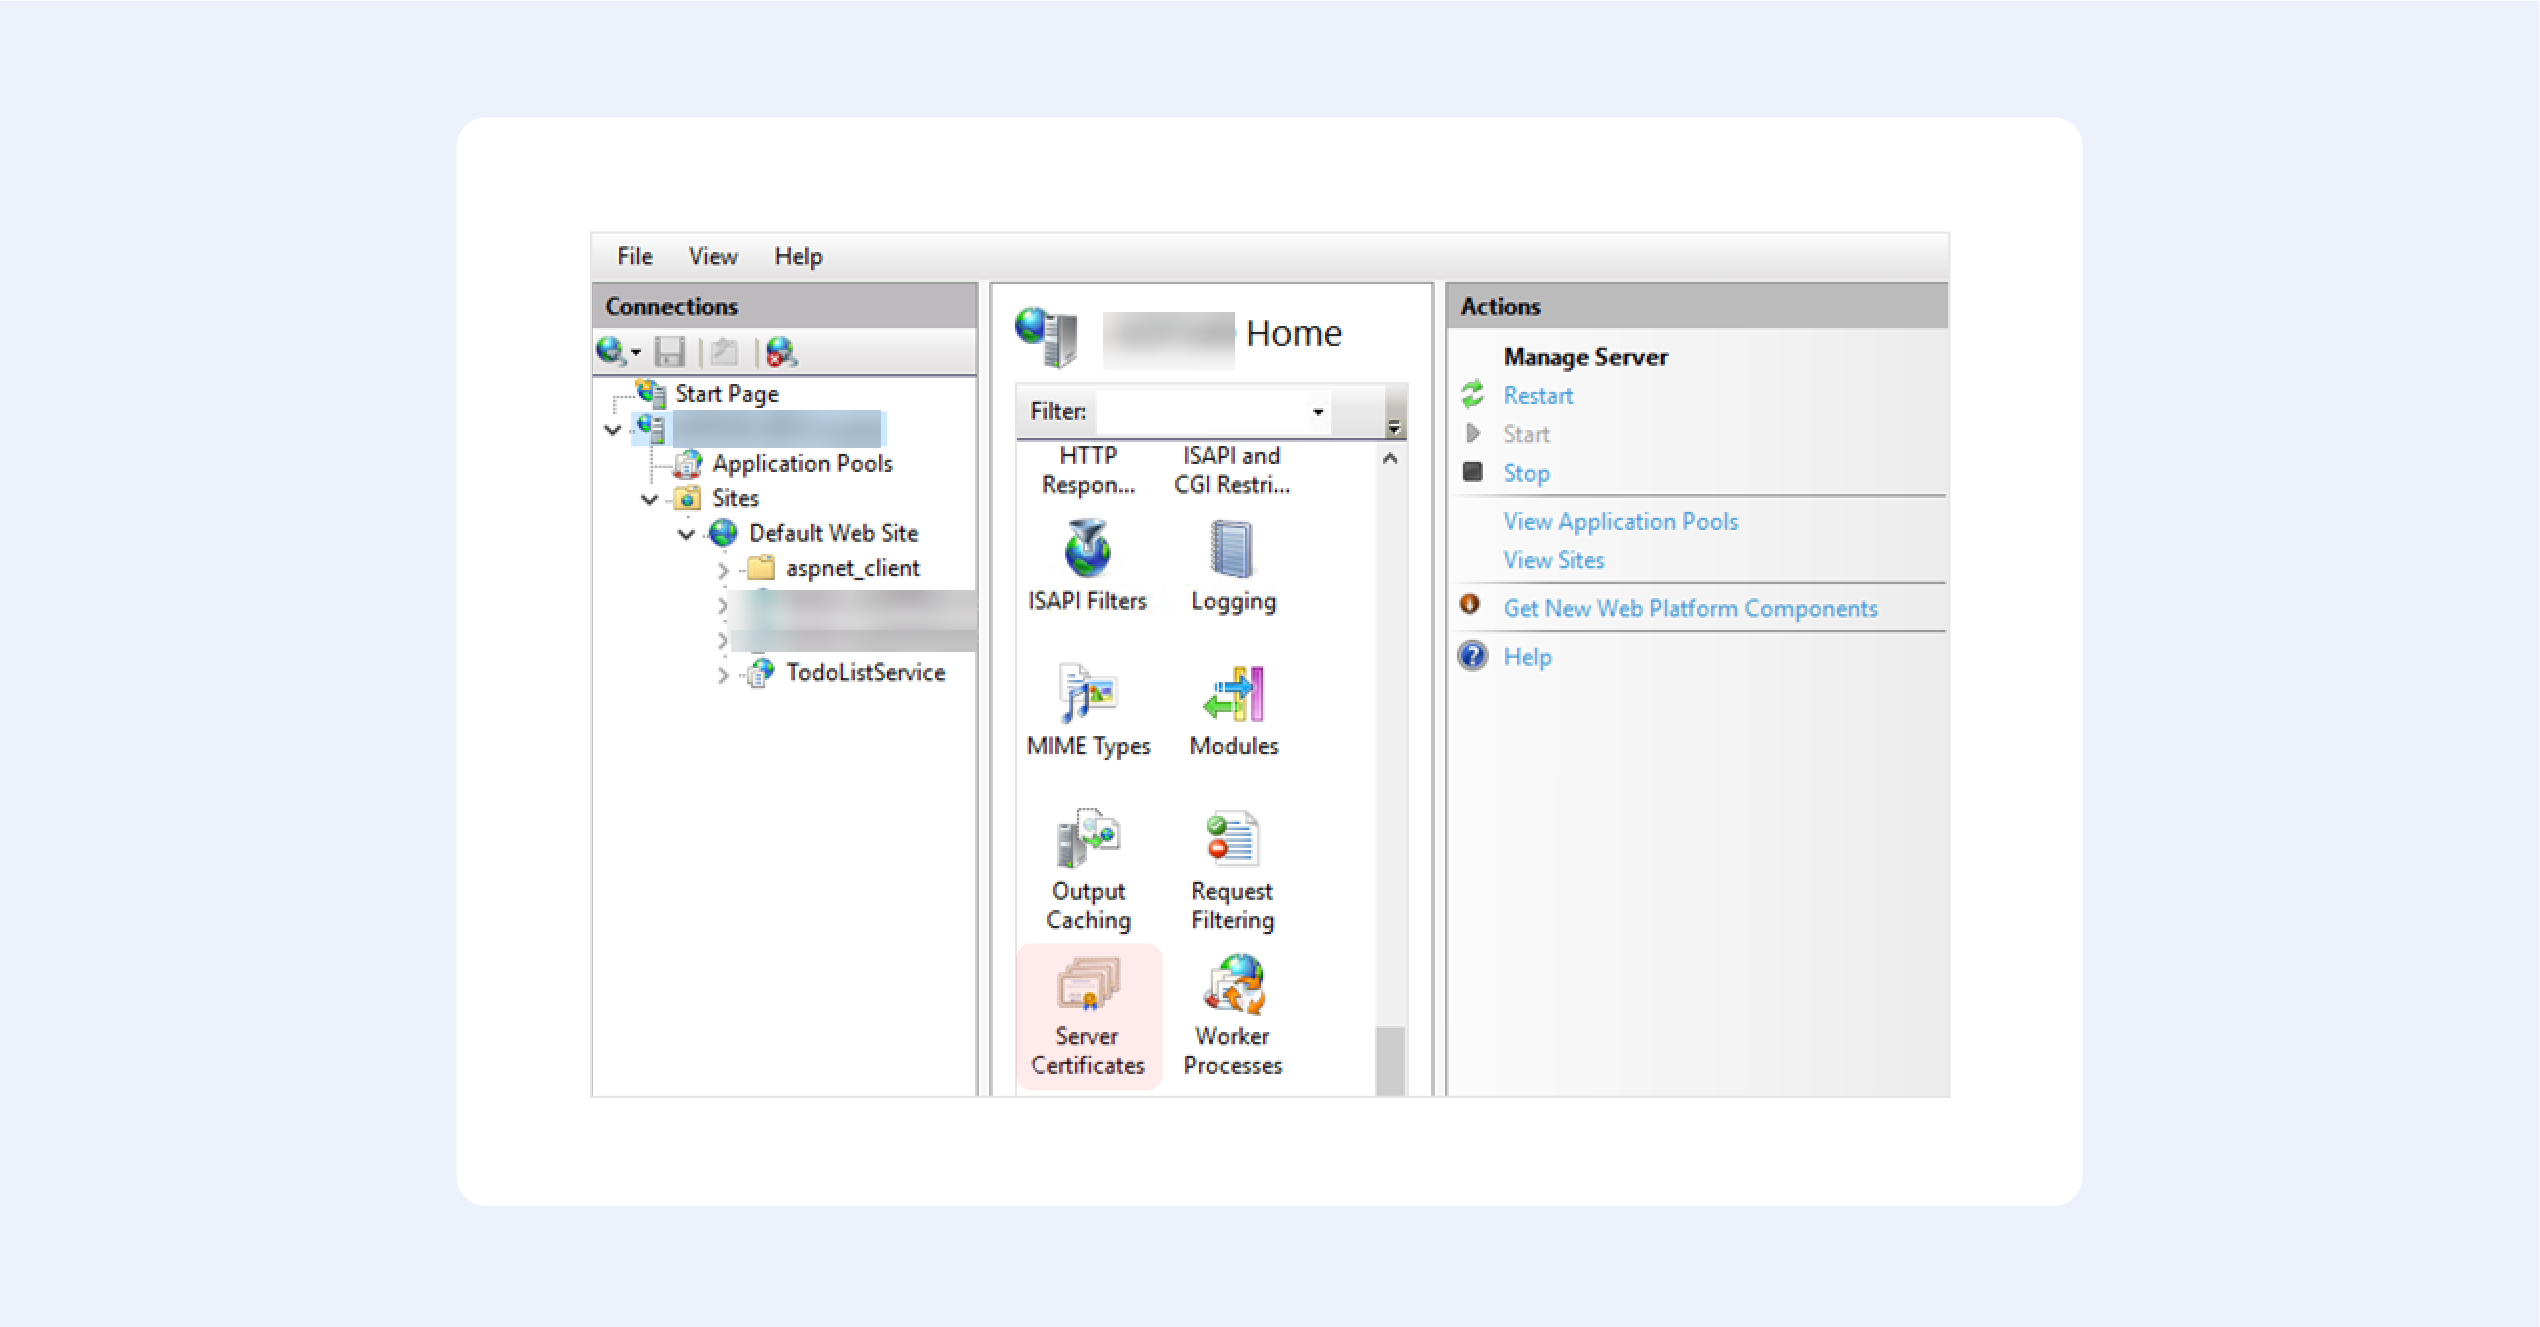
1. From the top-level in IIS Manager, select “Server Certificates”;
2. Then click the “Create” button on the right;
3. This will create a self-signed certificate, valid for a year with a private key. It will only work for “localhost”.
We hope this fruit bowl of options provides you with some choice in the matter. Creating your own self-signed certificate nowadays is trivial, but only until you begin to understand how they really work.
Our option of choice is, of course, OpenSSL — after all, it is an industry-standard.
In the IT world, securing your infrastructure applications and domains is crucial. And to achieve the ideal level of security, you need an SSL certificate. But how do you get an SSL certificate? One of the easiest and most cost-effective ways is to create self-signed certificates on your systems.
Self-signed certificates are public-key certificates that users can generate themselves rather than being issued by a certificate authority. And in this tutorial, you’ll learn how to generate a self-signed certificate on both Windows and Linux machines (for free).
Read on and start securing your apps and infrastructure!
Prerequisites
This tutorial will be a hands-on demonstration. If you’d like to follow along, be sure you have the following:
- A Windows 10+ device.
- An Ubuntu machine at least 14.04.4 LTS – This tutorial uses Ubuntu 20.04.4 LTS.
- Apache installed on Windows and Linux machines.
- OpenSSL installed on your Windows machine – This tutorial uses OpenSSL 3.0.3 Light (32-bit).
Generating a Self-Signed Certificates on Ubuntu
The easiest way to test the self-signed certificate is on a web server, and one of the most widely used web servers is Apache. So Let’s kick off this tutorial by configuring the Apache server already installed on the Ubuntu machine.
1. SSH into your Ubuntu VM using your favorite SSH client.
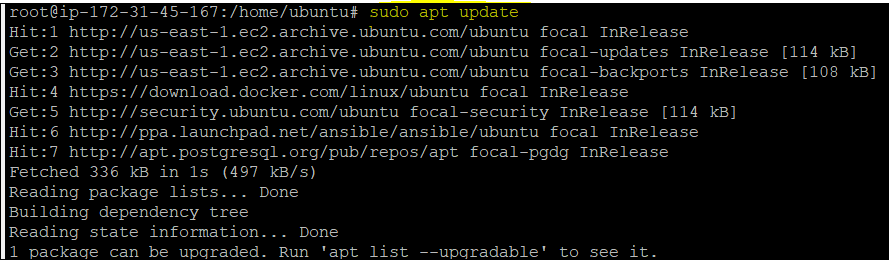
2. Run the apt update command below to ensure that Ubuntu has all the latest package sources.
3. Next, open your favorite web browser, navigate to <server-ip-address>:80, and you’ll see the Apache homepage opens only on the HTTP port (Not secure).

4. Now, run each command below to create a directory named ~/certificates and change to that directory where you’ll store certificates.
mkdir ~/certificates
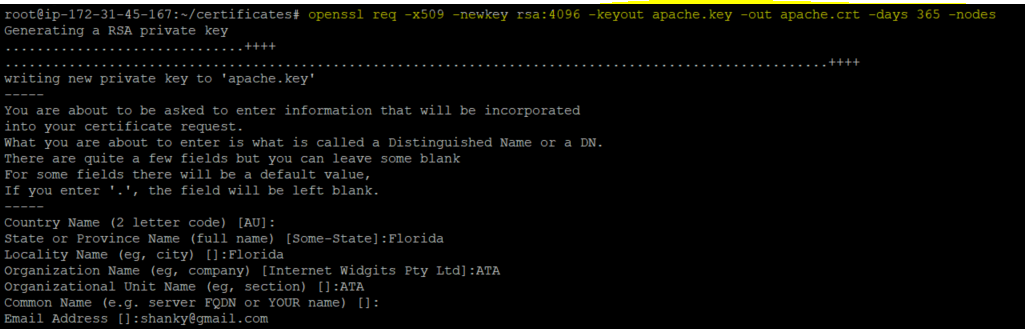
cd ~/certificates5. Next, run the following openssl command to generate a Certificate Signing Request (CSR ) and a private key.
openssl req -x509 -newkey rsa:4096 -keyout apache.key -out apache.crt -days 365 -nodesOnce you execute the command, enter the details, as shown below.
Securing the Apache Server with SSL Certificate in Ubuntu
After generating your certificates, you’ll have to configure the Apache server to use the certificates. But first, you need a dedicated directory to hold your certificate. You’ll enable the SSL module later and test if the certificates work in securing your Apache server.
1. Run the following commands to create a directory (/etc/apache2/ssl) and move the certificates from the ~/certificates/ directory to the /etc/apache2/ssl directory.
mkdir /etc/apache2/ssl
mv ~/certificates/* /etc/apache2/ssl/.
2. Open the default SSL Apache site configuration file (/etc/apache2/sites-available/default-ssl.conf) and add the below lines. Be sure to replace <my-server-name> with your server’s actual name.
In the below code, you specify the (certificate key and file) location where you previously copied your certificates.
ServerName <my-server-name>
SSLCertificateFile    /etc/apache2/ssl/apache.crt
SSLCertificateKeyFile /etc/apache2/ssl/apache.key
ProxyPreserveHost On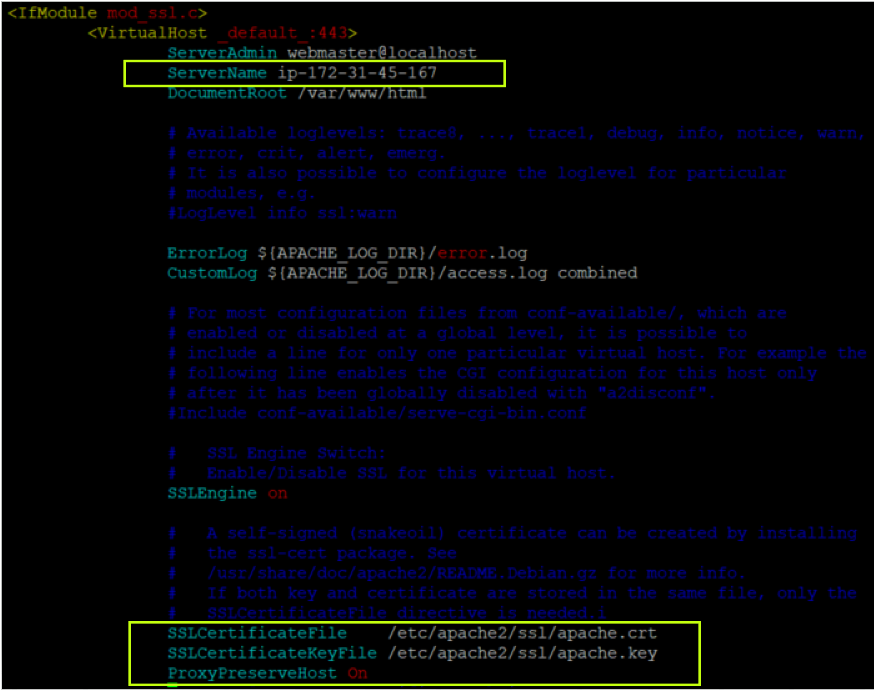
3. Now, run each command below to enable the SSL module, enable the site you modified (step four), and restart the Apache service.
# Enable the SSL module so that you can work with SSL connections.
sudo a2enmod ssl proxy proxy_http proxy_balancer
# Enable the site you modified (step four)
sudo a2ensite default-ssl.conf
# Restart the Apache service
sudo service apache2 restart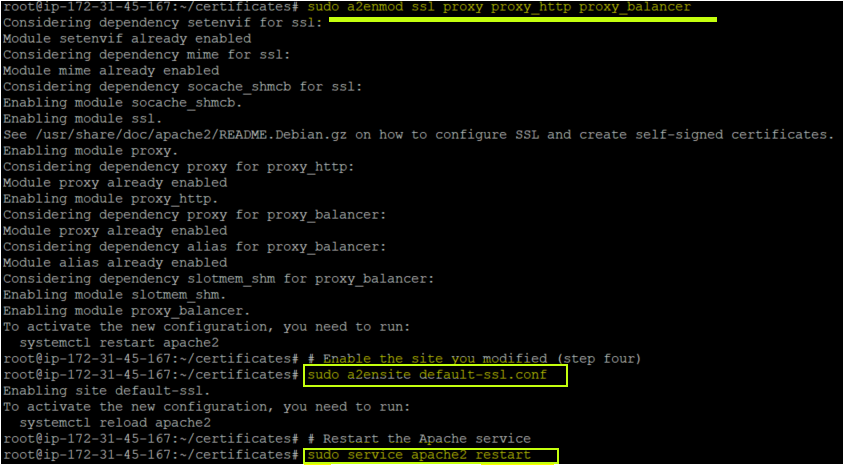
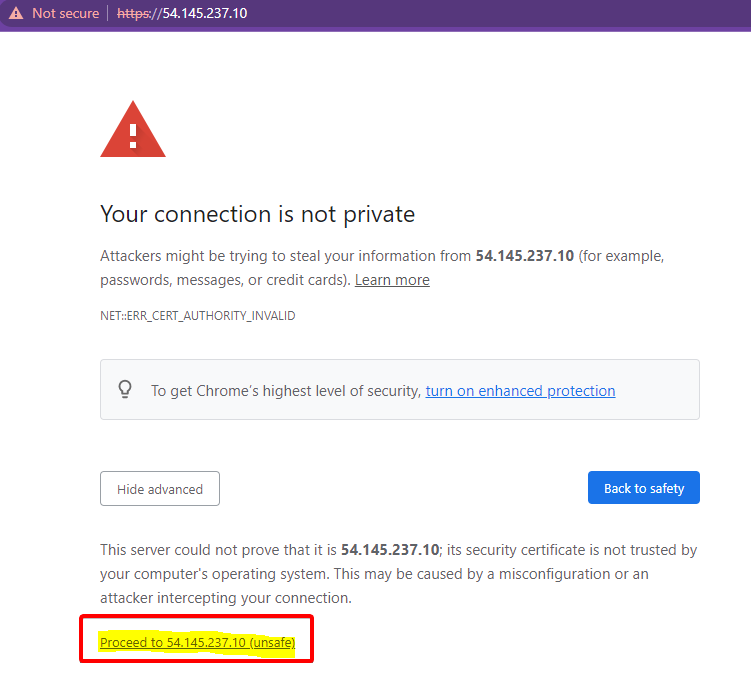
4. Finally, navigate to your Apache server again. But this time, using HTTPS, as shown below.
As you can see, Apache is successfully opening with SSL connections on an HTTPS port. Don’t worry if you see a warning symbol displaying the Not secure message. You’ll get that warning since you’re using a self-signed certificate (created by you) and not by the certificate authority.
Click on Proceed to <server-ip> (unsafe) to continue accessing the Apache server.
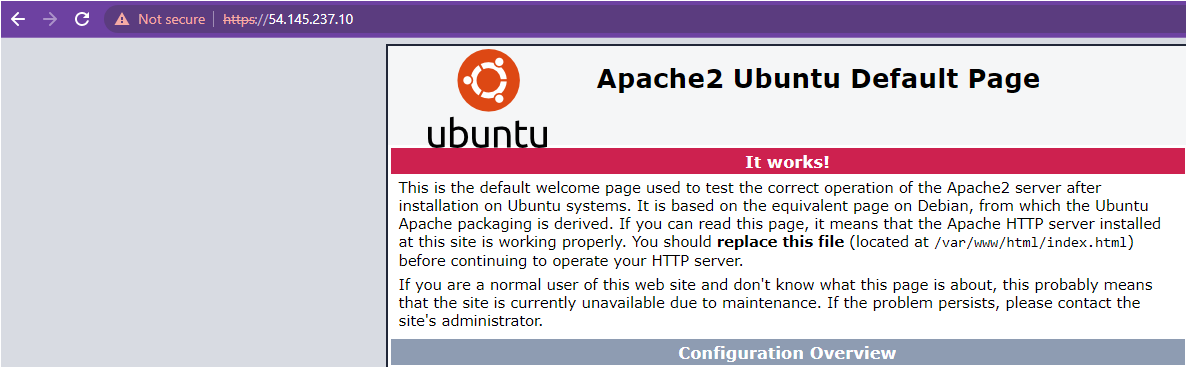
Do you see the same page as shown below? Congratulations! You’ve successfully secured the Apache server with your self-signed certificate.
Generating an SSL Certificate in Windows
Previously you secured an Apache server hosted on an Ubuntu machine using a self-signed certificate. In the same way, you can also secure the Apache server on a Windows OS.
To secure your Apache server on Windows:
1. Open the Apache configuration file (httpd.conf) at C:\Apache24\conf location and uncomment the below line.
The following line enables the SSL module on Windows machines and allows Apache to work with the HTTPS port.
LoadModule rewrite_module modules/mod_rewrite.so2. Next, open PowerShell as administrator, and run the following openssl command to generate a Certificate Signing Request (CSR ) and a private key.
openssl req -x509 -newkey rsa:4096 -keyout Apache.key -out Apache.crt -days 365 -nodesAfter running the command, enter the details for your certificate, as shown below.
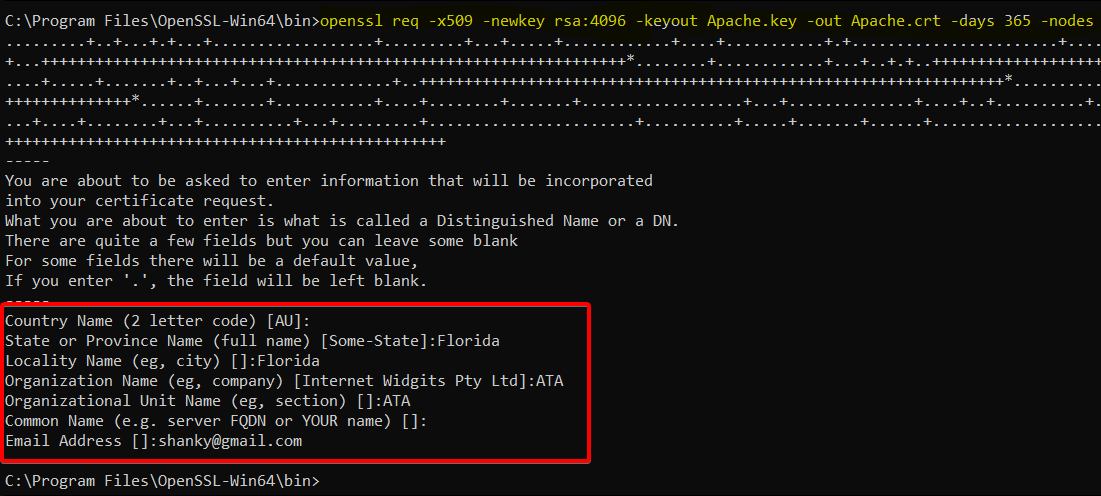
3. Navigate to the OpenSSL installation bin directory (C:\ProgramFiles\OpenSSL-Win64\bin) and verify the Apache certificate and key below.
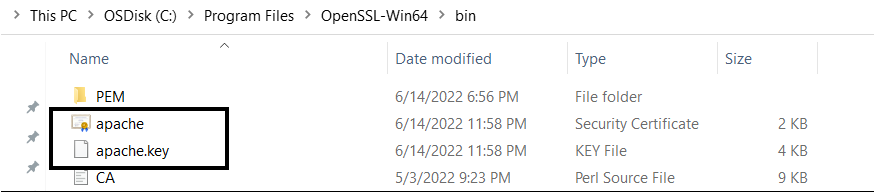
Configuring the Apache Server to Use SSL Certificates
You’ve just generated your certificate and key to secure the Apache server connection. But like with Ubuntu, you need a dedicated folder to hold your certificate and key and enable the SSL module.
1. Copy your SSL certificate file (apache.crt) and private key file (apache.key) to the C:\Apache24\conf folder.
2. Edit the Apache SSL configuration file (C:/Apache24/conf/httpd.conf), and add the following lines or uncomment if already present.
The below lines enable the SSL module and allow Apache to work on HTTPS Port.
LoadModule ssl_module modules/mod_ssl.so
Include conf/extra/httpd-ssl.conf
LoadModule socache_shmcb_module modules/mod_socache_shmcb.so
3. Now, edit the Apache SSL file (C:/Apache24/conf/extra/httpd-ssl.conf) and add the following lines. This file will be called by httpd.conf file internally as defined in the httpd.conf file (Include conf/extra/httpd-ssl.conf).
SSLCertificateFile "C:\Apache24\conf\apache.crt"
SSLCertificateKeyFile "C:\Apache24\conf\apache.key"
4. Run the following commands on PowerShell to navigate to the Apache installation bin folder, and start the Apache service.
# Change the working directory
cd C:\ProgramFiles\OpenSSL-Win64\bin
# Start the Apache service
./httpd.exe
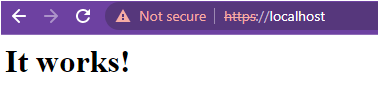
5. Finally, navigate to https://localhost to verify the Apache server.
You should see the same (It works!) message on the page, which confirms the Apache server is running with a self-signed certificate on a Windows machine.
Conclusion
In this tutorial, you learned how to configure an Apache web server on both Ubuntu and Windows operating systems and verify that you can access an Apache instance securely.
Now, how do you plan to up your game with Apache? Perhaps automate web deployments? Or create a Jenkins CI CD pipeline to improve your software development process?
Self-signed certificates raise a lot of questions. In this blog post, I’m going to answer those and teach you how to create self-signed certificate for Ubuntu, Nginx, and Windows.
What is a Self Signed SSL Certificate?
A self-signed certificate is essentially a certificate that is signed by the same entity that it certifies. There is no certificate authority (CA) involved, and it is signed with its own private key.
Pros:
- It’s relatively easy to create these certificates as no CA is involved.
- Self-signed certificates can be created for free using online tools like OpenSSL.
- They’re easier to customize.
Cons:
- Not trusted by other operating systems and applications
- They need to be renewed or replaced every year which can be a hassle
- They don’t provide the security that SSL certificates provide. For example, a third party could intercept the traffic on a self-signed website with its own self-signed certificate.
So why create a self-signed certificate?
A self-signed certificate is usually created during testing, just to ascertain how everything would run on an HTTPS environment. These certificates can’t work in production. No browsers will trust them since no certificate authority is involved. Moreover, they aren’t as secure.
Related read: Why is Google Crazy About SSL Certificate?
Create Self Signed Certificate: Windows
We’re going to generate a self-signed certificate using OpenSSL. Make sure you have the latest version of OpenSSL installed on your Windows. We’re going to create a private key, and a self-signed certificate valid for one year.
We’re going to create this certificate in c\:test folder.
- Open the command line prompt (cmd) in Windows.
- Go to the folder, type cd \test.
- Start OpenSSL: c:\OpenSSL-Win32\bin\openssl.exe
- Run the following command to generate a private key and a certificate:
req -x509 -sha256 -nodes -days 365 -newkey rsa:2048 -keyout privateKey.key -out certificate.crt5. You will then be asked to enter Distinguished Name (DN) information.
You are about to be asked to enter information that will be incorporated
into your certificate request.
What you are about to enter is what is called a Distinguished Name or a DN.
There are quite a few fields but you can leave some blank
For some fields there will be a default value,
If you enter '.', the field will be left blank.
-----
Country Name (2 letter code) [GB]:US
State or Province Name (full name): Tennesse
Locality Name (eg, city): Nashville
Organization Name (eg, company) [My Company Ltd]:https://Webscoot.com
Organizational Unit Name (eg, section) []:
Common Name (eg, your name or your server's hostname) []: Drake Danvers  (https://Webscoot.com)
Email Address []:[email protected]
You will now find your private key and certificate under \OpenSSL\bin\ directory
Create Self Signed Certificate for Nginx in Ubuntu
Note: The commands for Ubuntu and Mac OSX are the same, so you can just follow these if you’re operating on Mac. We’re going to create certificates using OpenSSL here as well. For Mac, OpenSSL comes pre-installed.
- First create a certificate configuration file
sudo nano localhost.conf[req]
default_bits = 2048
default_keyfile = localhost.key
distinguished_name = req_distinguished_name
req_extensions = req_ext
x509_extensions = v3_ca
[req_distinguished_name]
countryName = Country Name (2 letter code)
countryName_default = US
stateOrProvinceName = State or Province Name (full name)
stateOrProvinceName_default = New York
localityName = Locality Name (eg, city)
localityName_default = Nashville
organizationName = Organization Name (eg, company)
organizationName_default = localhost
organizationalUnitName = organizationalunit
organizationalUnitName_default = Development
commonName = Common Name (e.g. server FQDN or YOUR name)
commonName_default = localhost
commonName_max = 64
[req_ext]
subjectAltName = @alt_names
[v3_ca]
subjectAltName = @alt_names
[alt_names]
DNS.1 = localhost
DNS.2 = 127.0.0.1
2. Create a private key and certificate in OpenSSL using the following command.
sudo openssl req -x509 -nodes -days 365 -newkey rsa:2048 -keyout localhost.key -out localhost.crt -config localhost.confLet’s see what the command we’re issuing above actually does:
- Openssl: this is a command-line tool for TLS and SSL services. It secures communication and exchange of information between servers and client computers.
- -days 365: this means the certificate is going to be valid for a year.
- -x509: it’s just a type of a certificate that contains information about the owner like the version information, serial number of the certificate, distinguished name information.
- req: this means that it’s a certificate ‘request’ for an x509 certificate.
- New key: means that we’re going to create a new certificate.
- Keyout: this tells OpenSSL where to store our certificate
- rsa 2048: this simply tells OpenSSL to make an RSA key that is 2048 bits long. RSA basically means an RSA algorithm that constitutes of asymmetric keys i.e., public and private keys.
3. Copy the key pair to the certificates folder in Ubuntu
Copy the private key:
sudo cp localhost.crt /etc/ssl/certs/localhost.crtCopy the public key:
sudo cp localhost.key /etc/ssl/private/localhost.key4. To load they certificate key pair, update the Nginx configuration file
sudo nano /etc/nginx/sites-available/defaultsudo nano /etc/nginx/sites-available/default
server {
listen 80;
listen 443 ssl http2;
listen [::]:443 ssl http2;
server_name localhost;
ssl_certificate /etc/ssl/certs/localhost.crt;
ssl_certificate_key /etc/ssl/private/localhost.key;
ssl_protocols TLSv1.2 TLSv1.1 TLSv1;
root /var/www/html;
index index.html index.nginx-debian.html;
}Reload the Nginx configuration changes
sudo service nginx reload
5. Change chrome’s settings to show your site as secure
Self-signed certificates will have to be manually validated from your chrome’s CA root store, otherwise, the site will be shown as insecure.
To add the certificate to trusted root CA, follow this command:
certutil -d sql:$HOME/.pki/nssdb -A -t "P,," -n "localhost" -i localhost.crtLastly
Self-signed certificates are advised to be only created in a testing environment. They come at zero cost, so it makes sense to only use them when you want to test working in an HTTPS environment.
If we’ve missed out on anything, or you have any suggestions, do mention in the comments below. Or talk to our experts.
Interesting read: Flush DNS Cache: All you Need to Know

Divya loves writing and is passionate about marketing. When not trying to hone her skills, you’ll find her either reading or binging on TV shows.