В эпоху кибервойн единственная разумная позиция – быть параноиком, а это означает, помимо прочего, быть параноиком по поводу обновлений программного обеспечения.
Взять к примеру OpenSSL.
Эта криптографическая библиотека с открытым исходным кодом, которая реализует протоколы Transport Layer Security (TLS) и Secure Sockets Layer (SSL), разработана для «защиты связи по компьютерным сетям от перехвата», но угадайте, что?
С самого начала она была пронизана ошибками.
Это может быть неизбежно, в определенной степени – в конце концов, мы говорим о программном обеспечении.
Несмотря на то, что вы не можете ничего сделать с ошибками, которые еще предстоит идентифицировать, вы можете по крайней мере защитить свои системы от тех ошибок, которые уже исправлены и задокументированы.
Жаль, что официальный сайт OpenSSL предлагает только исходники для Linux.
Хотя дистрибутивы Linux обычно поставляются с OpenSSL, это не никак относится к Windows … или, скажем, «дистрибутивам Windows».
Если вы хотите запустить его, вам нужен бинарник под Windows, и если вы не хотите его собирать самостоятельно, вы должны найти другой вариант.
В этой статье я покажу,как можно настроить OpenSSL в Windows, не имея дело при этом дела со сборкой из исходников.
Содержание
- Шаг 1. Скачать бинарник
- Шаг 2. Запустите установщик
- Шаг 3. Запустите бинарный файл OpenSSL
Шаг 1. Скачать бинарник
Поиск бинарных файлов OpenSSL для Windows – непростая задача, но не отчаивайтесь.
Они существуют.
Чтобы загрузить нужный, перейдите по ссылке:
https://slproweb.com/products/Win32OpenSSL.html
Не дайте себя одурачить ни строкой Win32 в URL-адресе, ни навигацией, указывающей на казалось бы древнюю страницу загрузки еще с 2004 года.
Прокрутите страницу вниз до раздела «Download Win32 OpenSSL».
Теперь вам нужно выбрать правильный файл из этого списка.
Для каждой версии есть два основных типа: light и full.
Загрузите файл под названием «Win64 OpenSSL v1.1.0f» (или версию с более новой версией, как только она станет доступна), чтобы скачать фулл установщик.
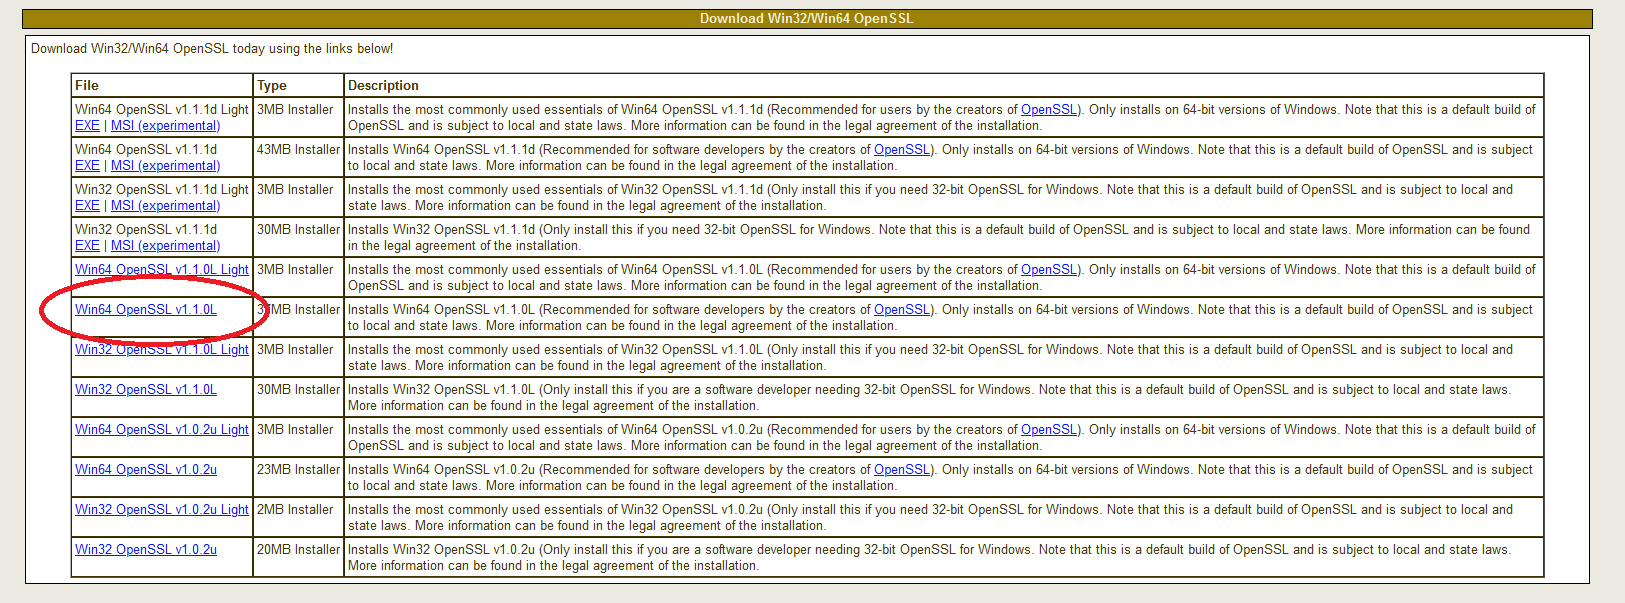
Текущая версия на момент написания этой статьи (OpenSSL 1.1.0h) сильно отличается от предыдущих версий.
Это совсем не одно и то же, поэтому обратите внимание на номера релизов!
Худшее, что вы можете сделать, – это использовать старую версию, в которой есть задокументированные ошибки.
Шаг 2. Запустите установщик
Мы рекомендуем установить OpenSSL вне вашей системной директории Windows.
Следуйте инструкциям по установке через GUI.
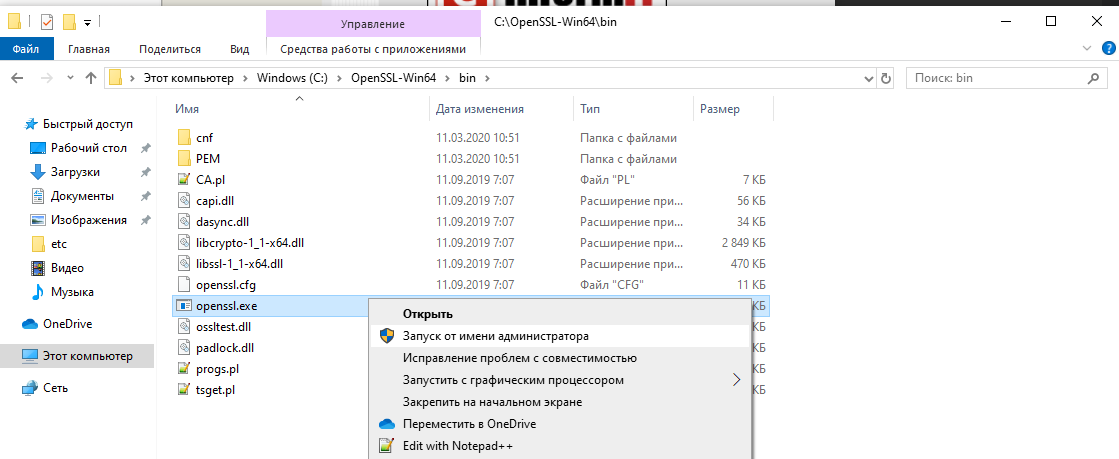
Шаг 3. Запустите бинарный файл OpenSSL
Чтобы начать работу с OpenSSL, вы можете просто щелкнуть по нему правой кнопкой мыши в проводнике Windows в месте его установки, например в моем случае:
C:\OpenSSL-Win64\bin\
затем выберите «Запуск от имени администратора».
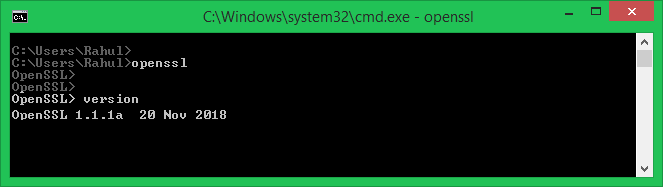
Откроется окно cmd с командной строкой OpenSSL:
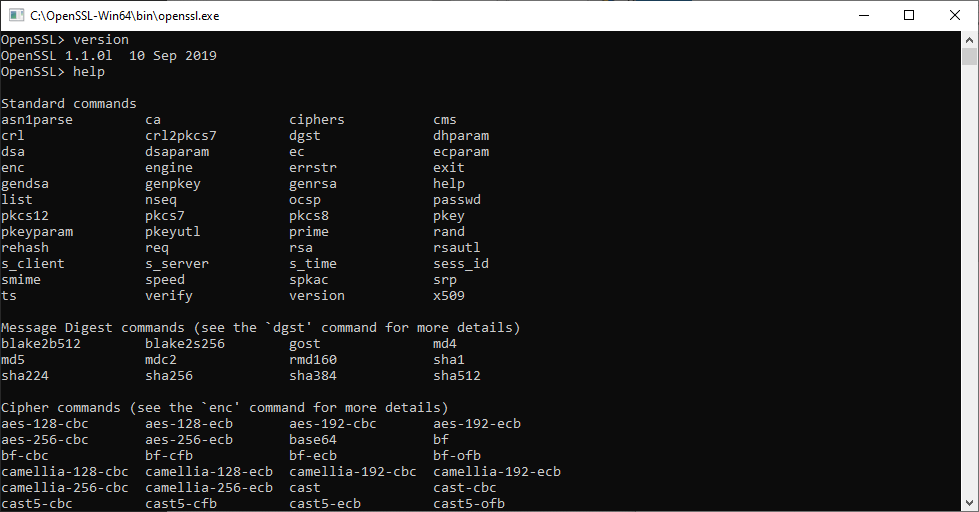
Теперь вы можете начать создавать ключи OpenSSL. (Кстати, пользователи утилиты удаленного доступа PuTTY могут экспортировать ключ OpenSSH из PuTTYgen.)
При использовании OpenSSL в Windows таким способом вы просто пропускаете команду openssl, которую видите в приглашении.
Например, чтобы создать пару ключей с помощью OpenSSL в Windows, вы можете ввести:
openssl req -newkey rsa:2048 -nodes -keyout key.pem -x509 -days 365 -out certificate.pem
и следуйте инструкциям на экране, как обычно.
Чтобы просмотреть сертификат:
openssl x509 -text -noout -in certificate.pem
Tutorial: OpenSSL provision on Windows 10 and Windows 11
OpenSSL was previously reserved for Linux operating systems or had to be compiled from the source code itself under Mac and Windows. With Win32/Win64 OpenSSL, the open source software library can also be run on 32-bit and 64-bit Windows OS (x86/i386) and can be integrated on Windows machines via installer.
OpenSSL is widely used and found by encryption in numerous application and secure connections, as well as for SSL/TLS connections HTTPS, including cryptography in SSH, OpenVPN and DNSSEC.
The Win32/Win64 OpenSSL installation project from Shining Light Productions (slproweb.com) carrying the ease of deployment of OpenSSL for Microsoft Windows. The installation consists of downloading and unpacking the binaries, which eliminates the need to compile source code.
Installation
This tutorial shows two methods to deploy OpenSSL on Windows 10 and Windows 11. The simple method right at the beginning, by running Windows Package Manager with hit the Windows-logo+R keys and enter cmd in the Run box then click OK, or press  and hit cmd then click the command prompt icon.
![]()
Click Start
and hit cmd

In the now opened command prompt ran the following command, if you are not authorized as administrator with the logged in user, you can select “Run as administrator”.
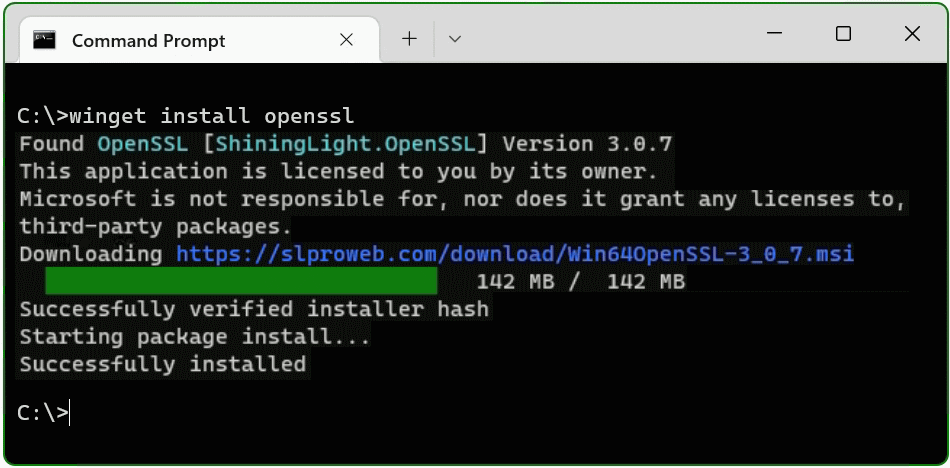
C:\> winget install opensslThe Windows package manager “winget” allows you to install applications and other packages by using the command line. If winget is started for the first time, you will be prompted to confirm the source agreement terms, by hit the Y key.
The OpenSSL package is now installed. The second method is to download and install the package.
Install Win64 OpenSSL package manually
The table (screenshot) on the slproweb.com website contains the versions for Win32 and Win64 OpenSSL as EXE and MSI installers.
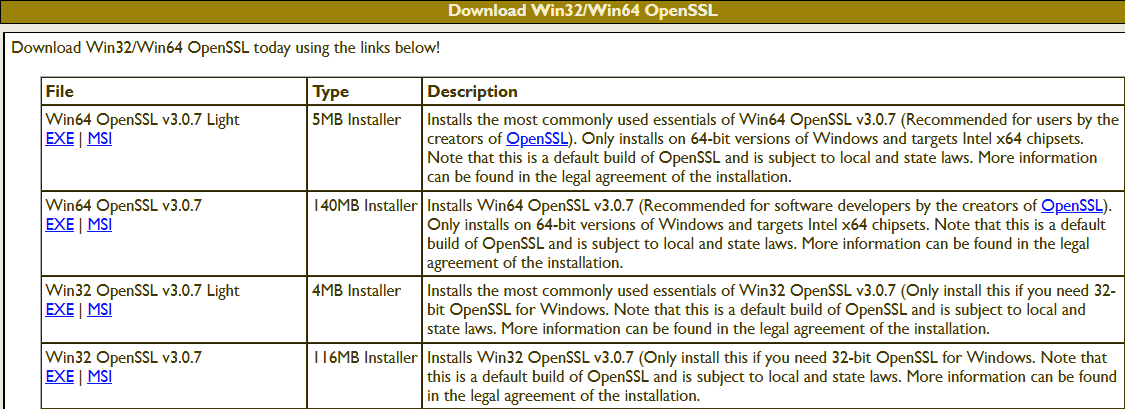
Recommended here is the latest version with the most commonly used essentials of Win64 OpenSSL v3.0.7, at the time of writing this article, it is Win64 OpenSSL v3.0.7 EXE Light, at the top of the first line.
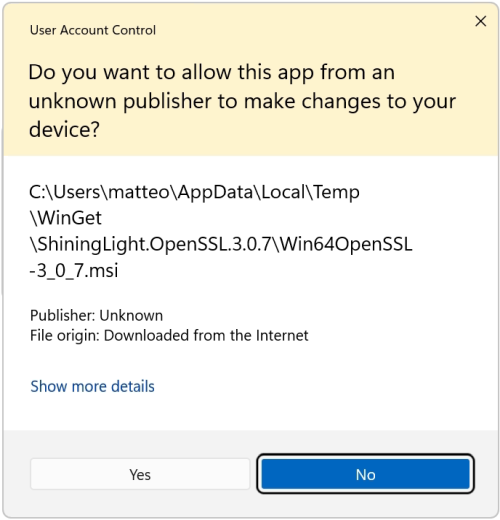
Double-click to execute the file Win64OpenSSL_Light-3_0_7.exe will the setup wizard appears. Confirm the Windows Account Control (UAC) with Yes to continue the installation.
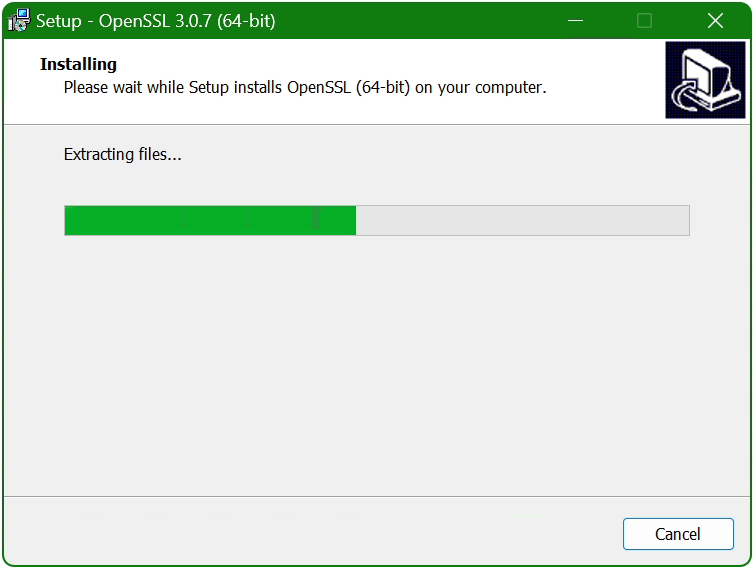
The setup wizard unpacks and copies the OpenSSL files.
Set up the OpenSSL environment
After the OpenSSL files are copied and installed, the search path and environment variable are now added to the operating system, with + R and paste SYSTEMPROPERTIESADVANCED and click OK.
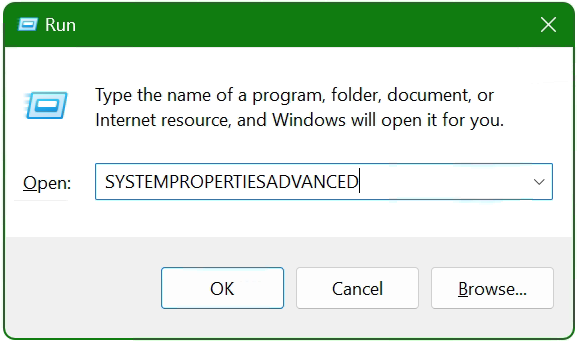
The System Properties window opens.
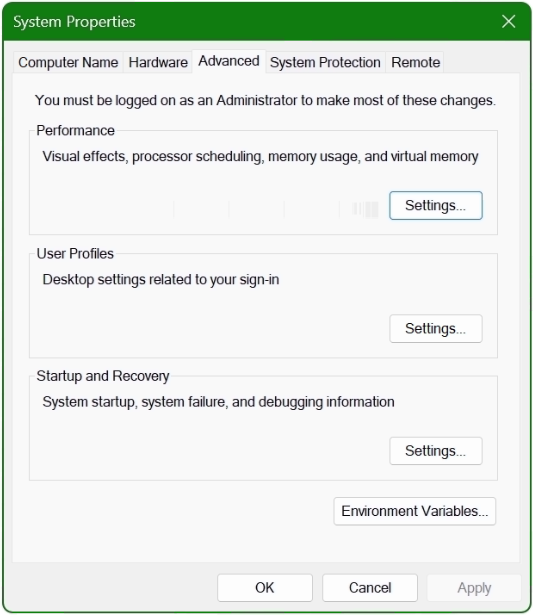
Click the Environment Variables button at the bottom.
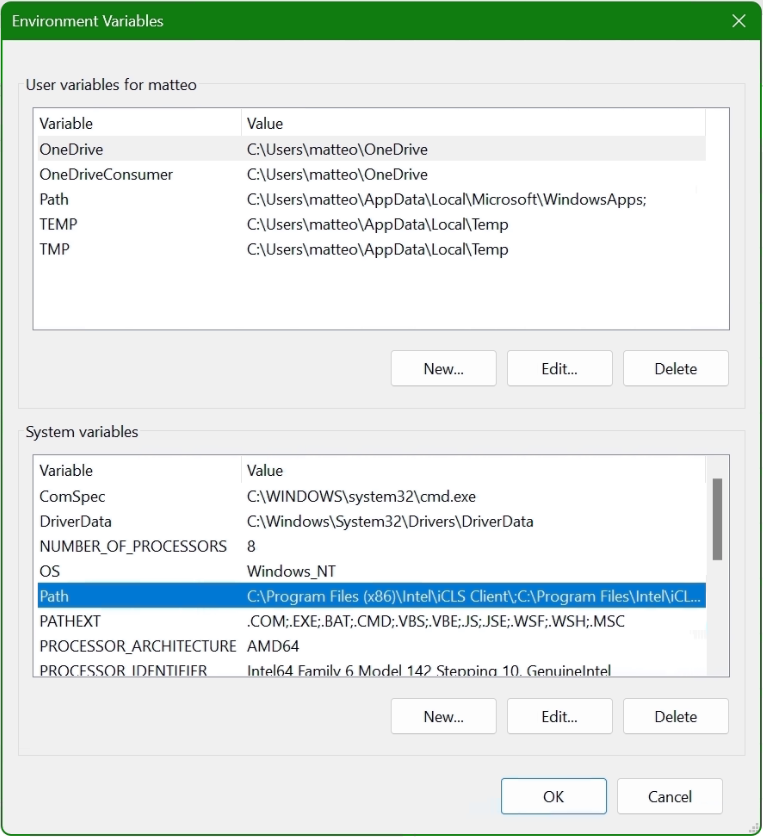
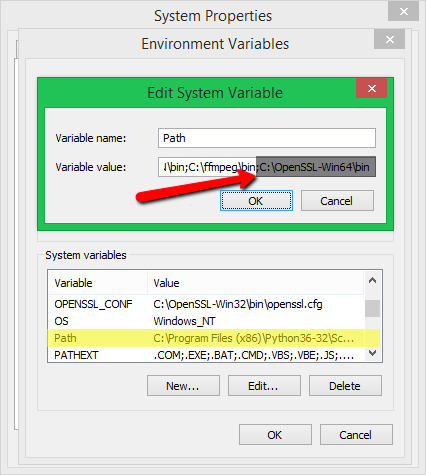
In the lower area System Variables, select the Path line with the mouse and click on the Edit button.
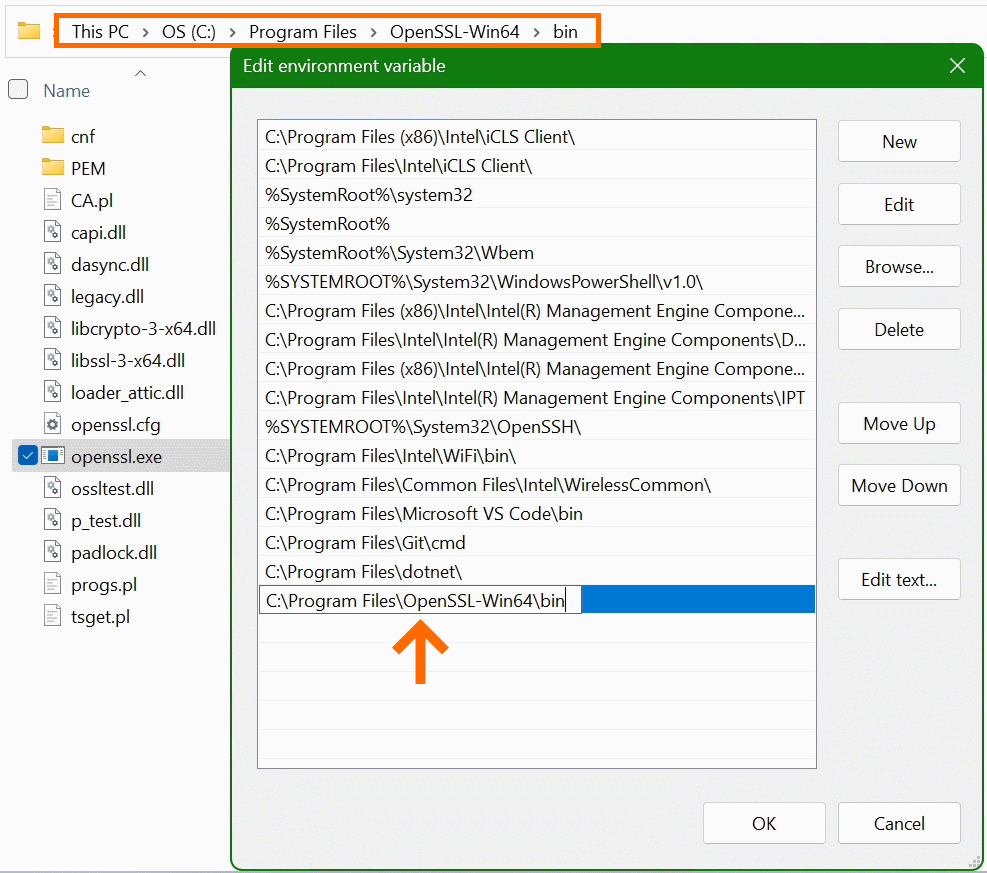
In the “Edit Environment Variables” window, click New to add the path to the OpenSSL-Win64\bin folder under Program files. The path in which the file openssl.exe is located can be found with Windows Explorer and copied to the clipboard, there is also the possibility to choose the path to the bin folder with the Browse button. Confirm the action with OK.
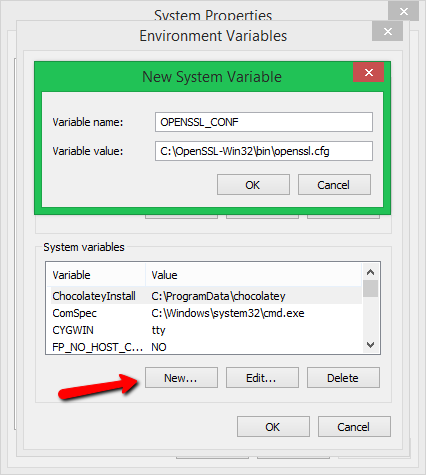
Now add another system variable with click New.
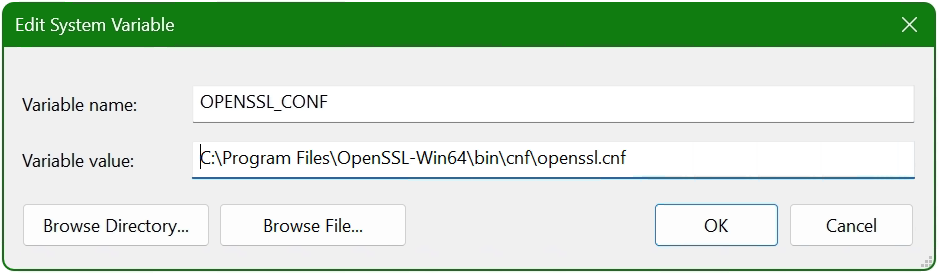
Enter OPENSSL_CONF in the Variable name field. In the next field insert the path to which the file openssl.cnf is located, here it is C:\Program Files\OpenSSL-Win64\bin\cnf\openssl.cnf
The installation is now complete and OpenSSL can be used. First of all, there is the opportunity to check the OpenSSL provisioned release.
C:\> openssl version -a
OpenSSL 3.0.7 1 Nov 2022 (Library: OpenSSL 3.0.7 1 Nov 2022)
built on: Tue Nov  1 16:04:12 2022 UTC
...
C:\> openssl version -d
OPENSSLDIR: "C:\Program Files\Common Files\SSL"
The OpenSSL Toolkit is a versatile utility with many options, but under Windows there is not the possibility of using the man page, as is known on Linux. However, the openssl help command provides context-sensitive help, such asopenssl help s_clientor useopenssl help x509oropenssl help reqto show just a few examples. Help is also offered on the documentation pages on the web, where manpages can also be found.
Useful OpenSSL Examples
A few of the most commonly used openssl command examples in the console are shown below, note that this is not a comprehensive collection of all possible applicable commands of this powerful open source toolkit.
openssl x509 -noout -text -in ca-cert.pemDisplaying and print the ca-cert.pem certificate file in plain text.
openssl req -text -noout -verify -in x509-check.csrView and verify the contents of CSR x509-check.csr in plain text.
openssl rsa -check -in rootCA.keyVerify key consistency of the rootCA.key file.
openssl x509 -noout -modulus -in ca-cert.pem | openssl md5Check md5 checksum of certificate ca-cert.pem file.
openssl crl2pkcs7 -nocrl -certfile servercert.pem -out c:\temp\servercert.p7bConvert certificate from pem to p7b format and write to temp folder.
openssl pkcs12 -export -in rootCA.pem -inkey rootCA.key -out c:\temp\rootCA.p12 -name "PKCS12 certificate"Convert certificate rootCA.pem to PKCS12 format as rootCA.p12 file.
openssl req -new -newkey rsa:2048 -sha256 -days 365 -nodes -x509 -keyout server.key -out server.crtGenerate SSL certificate and key on a single line, using SHA256 with RSA 2048 encryption, the certificate will be valid for 1 year.
openssl s_client -connect imap.gmail.com:993Check connection to imap.gmail.com service 993 to get more useful results like than as in telnet.
openssl s_client -crlf -connect smtp.gmail.com:587 -starttls smtpTry to connect service 587 on smtp.gmail.com using the starttls protocol, possibly to check a firewall policy for its effect.
openssl s_client -verify_quiet -brief www.ietf.org:443Check protocol version and ciphersuite, peer certificate and hash used.
openssl rand -base64 20Generate a random password in base64 using OpenSSL, can be used as a passphrase to hide private keys from spying eyes.
These were just a few examples, because openssl is a versatile toolkit that offers numerous application options.
Conclusion
The OpenSSL open-source library for cryptography is more important than ever and indispensable. Connections are encrypted and protected, so why shouldn’t the OpenSSL Toolkit be used on Windows? Creating and managing Digital X. 509 certificates, check algorithms for data encryption such as Chiper Suite, digital fingerprint, MD5 and SHA hash values can be checked, which was previously reserved only for Linux.
Sources Links:
slproweb.com Win32/Win64 OpenSSL Installation Project for Windows
openssl.org Cryptography and SSL/TLS Toolkit
OpenSSL is a small but powerful open-source, cross-platform utility which can be used in various digital PKI certificate activities. OpenSSL can be used to convert digital certificates from one to another format, export private keys from certificates, and build your own Certificate Authority. However, OpenSSL is included in basic packages in most of the popular Linux distributions. It is not required to install the OpenSSL on Linux. Well, the story is not similar in the case of the Windows platform. Don’t be disappointed since OpenSSL is a cross-platform utility that supports Windows, Linux, and Mac. You can install OpenSSL on the Windows platform with just a few clicks.
Why Should You Install OpenSSL On Windows?
First of all, OpenSSL is not for normal users. It is not mandatory to install OpenSSL on the Windows platform. As we said earlier, OpenSSL is a cryptographic SSL/TLS tool kit, which provides a wide range of solutions for those who work on Digital Certificates, SSL/TLS testing, application development or implementation, application testing, and security testing. There are a lot of things you can do using OpenSSL. Only a few of them are listed here:
- You can create your own Certificate Authority and issue certificates on your network.
- Convert digital certificates from one format to another.
- Export or Import private keys from the certificates.
- Validate the HTTPS connections to the destination website.
- Verify the certificate of the destination website.
- Run benchmark tests of your server and remote website.
- Extract information like issuer, subject, issued and expiring dates, and fingerprint from certificates.
- Create CSR.
- Decode CSR and Certificates to verify contents.
You can enjoy the features of OpenSSL if you have installed it on your Windows machine.
Let’s begin the procedure to install OpenSSL on the Windows platform.
How To Install OpenSSL On The Windows Platform?
The installation procedure is very simple and straightforward. You should download the OpenSSL installer, run it to install, and configure Environment variables.
Time needed: 10 minutes
How to Install OpenSSL on The Windows Platform?
- Download the OpenSSL installer
Download the OpenSSL installer from the official OpenSSL download link: https://slproweb.com/products/Win32OpenSSL.html

- Run the OpenSSL installer to install
Execute the downloaded installer file and install the OpenSSL on the Windows machine.
The installation procedure is quite simple and straight.
1. Accept license agreement.
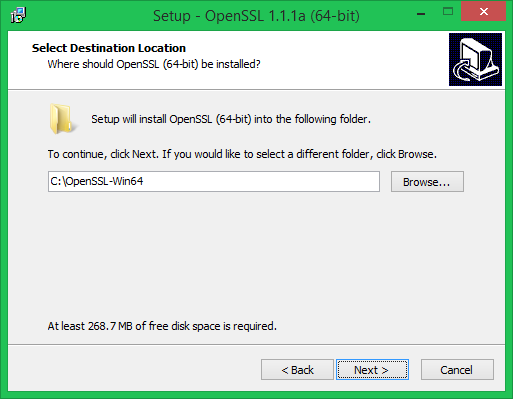
2. Specify the Installation location.
- Initiate installing OpenSSL
Set Start Menu location and the additional task then click on the Install button to initiate the OpenSSL installation.

- Installation in progress…….

- Complete the installation of OpenSSL.
The installation will take 5 to 10 seconds. Click Finish to complete the installation process.

- Set Environment variable
If you just want to set the environment varibles only for a login session, then run these commands.
>set OPENSSL_CONF=C:\Program Files\OpenSSL-Win64\bin\openssl.cfg
>set Path= C:\Program Files\OpenSSL-Win64\binIf you want to set the env variable for permanently, then add OPENSSL_CONF and Path env variable on System Properties.
Open Run using ‘Windows’ + ‘r’ then type ‘sysdm.cpl‘. Go to Advanced > Environment Variable.Set OPENSSL_CONF and Path variables.

- Run OpenSSL
Open the command prompt using ‘Windows’ + ‘r’ then type ‘cmd‘ to open command prompt.
Type openssl version command on CLI to ensure OpenSSL is installed and configured on your Windows machine. You should see the version information if OpenSSL is configured correctly.


Thats’s it. This is how you can install OpenSSL on the Windows platform. Simple itn’t it?
Thanks for reading the small tutorial. Please follow us on this blog to see more such tutorials and security updates.
Frequently Asked Questions:
1. What is OpenSSL?
OpenSSL is an open-source software library that provides cryptographic functionality and implements the Secure Sockets Layer (SSL) and Transport Layer Security (TLS) protocols. It is widely used to secure communications over computer networks and to create, manage, and verify digital certificates.
2. Why should I install OpenSSL on my Windows computer?
Installing OpenSSL on your Windows computer allows you to perform various cryptographic operations, such as generating public and private keys, creating Certificate Signing Requests (CSRs), and managing SSL/TLS certificates. It is particularly useful for developers, system administrators, and cybersecurity professionals.
3. Can I install OpenSSL on other operating systems besides Windows?
Yes, OpenSSL is available for various operating systems, including Linux, macOS, and BSD. The installation process may vary depending on the platform, but the overall concepts remain the same.
4. How do I download OpenSSL for Windows?
You can download precompiled OpenSSL binaries for Windows from a trusted third-party website, such as the Shining Light Productions’ Win32/Win64 OpenSSL Installer (https://slproweb.com/products/Win32OpenSSL.html). Make sure to download the appropriate version (32-bit or 64-bit) according to your Windows operating system.
5. How do I install OpenSSL on my Windows computer?
To install OpenSSL on your Windows computer, follow these steps:
1, Download the OpenSSL installer from a trusted source.
2. Run the installer and follow the installation wizard.
3. During installation, choose a directory where OpenSSL will be installed (e.g., C:\OpenSSL).
4. Once the installation is complete, add the OpenSSL directory to your system’s PATH environment variable.
5. Verify the installation by opening a Command Prompt and entering openssl version. You should see the OpenSSL version number displayed.
6. How do I update OpenSSL on my Windows computer?
To update OpenSSL on your Windows computer, download the latest version of the OpenSSL installer from a trusted source and run the installer. The new version will replace the existing installation. Make sure to update your system’s PATH environment variable if the installation directory has changed.
8. How do I generate a self-signed SSL certificate using OpenSSL on Windows?
To generate a self-signed SSL certificate using OpenSSL on Windows, follow these steps:
1. Open a Command Prompt.
2. Navigate to the OpenSSL directory (e.g., C:\OpenSSL\bin).
3. Enter the following command to generate a private key:
openssl genrsa -out private_key.pem 2048
4. Enter the following command to create a self-signed SSL certificate:
openssl req -new -x509 -key private_key.pem -out certificate.pem -days 365
5. Fill in the required information when prompted.
9. Can I use OpenSSL to connect to a remote server using SSL/TLS?
Yes, you can use the openssl s_client command to connect to a remote server using SSL/TLS. For example, to connect to a secure website, you can enter the following command in a Command Prompt:
openssl s_client -connect example.com:443
10. How do I get help with OpenSSL commands on Windows?
To get help with OpenSSL commands on Windows, you can use the openssl help command in a Command Prompt. This will display a list of available commands and their brief descriptions. For more detailed information on a specific command, you can type openssl <command> -help, replacing <command> with the desired command. Additionally, you can refer to the official OpenSSL documentation (https://www.openssl.org/docs/) or seek assistance from online forums and communities.

Arun KL
Hi All, I am Arun KL, an IT Security Professional. Founder of “thesecmaster.com”. Enthusiast, Security Blogger, Technical Writer, Editor, Author at TheSecMaster. To know more about me. Follow me on LinkedIn
Keeping your computer secure is a balancing act. On one hand, you need to keep your computer safe from viruses and hackers so that confidential information doesn’t get leaked. On the other hand, it’s also important that programs and apps are able to access information from users as needed so they can complete tasks efficiently. Keeping these two factors in mind is essential when installing software on your Windows OS.
Luckily for you, this article will explore how you can install OpenSSL on Windows. You see, OpenSSL helps developers and programmers create applications or software that have encrypted communication over the internet. In this article, you will learn what OpenSSL is and why it’s essential when creating a new app or program with security in mind. Additionally, we explore how to install OpenSSL on Windows using simple steps that even beginners can understand. Let’s get started!
This tutorial will help you to install OpenSSL on Windows operating systems.
Step 1 – Download OpenSSL Binary
You need to download the latest OpenSSL windows installer file. Click the below link to visit the OpenSSL download page:
http://slproweb.com/products/Win32OpenSSL.html
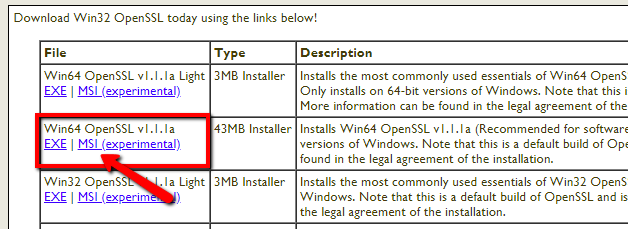
The above screenshot may be outdated but we recommend downloading the most recent version of OpenSSL.
Step 2 – Run OpenSSL Installer
Now run the OpenSSL installer on your system. The OpenSSL required Microsoft Visual C++ to be installed on your system. If your system doesn’t have Microsoft Visual C++ installed, the installer will show your message like:
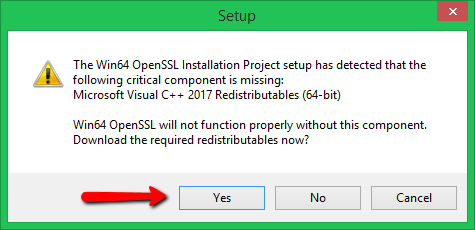
Click Yes to download and install required Microsoft Visual C++ package on your system.
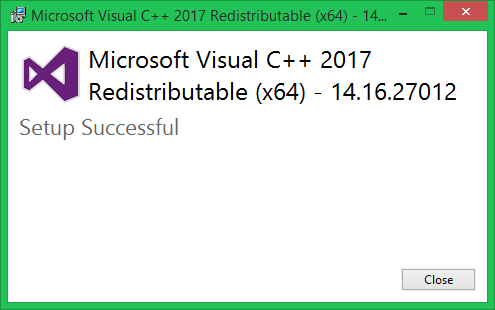
Then again run the OpenSSL installer and follow the wizard.
Step 3 – Setup Environment Variables
Now set the environment variables to function OpenSSL properly on your system. You are required to set OPENSSL_CONF and Path environment variables.
Use the following commands to set the environment for the current session only:
set OPENSSL_CONF=C:\OpenSSL-Win64\bin\openssl.cfgset Path=%Path%;C:\OpenSSL-Win64\bin
Set Variables Permanently – You can also set the OPENSSL_CONF and Path environment variables in the system permanently. To set the environment variable follow:
Press Windows + R keys together to open run window, Then type “sysdm.cpl” in the Run dialog box and hit Enter. Alternatively, you can open Command Prompt and type the same command to open System Properties
Go to “Advanced” tab and click on “Environment variables“.
Set OPENSSL_CONF Variable:
Set Path Variable:
Step 4 – Run OpenSSL Binary
Open a command prompt on your system and type openssl to open OpenSSL prompt. After that type version to get the installed OpenSSL version on your system.
Conclusion
This tutorial helped you for installing OpenSSL on the Windows system. As a best security practice, it is recommended to use the latest OpenSSL version on your system. You can find the latest version details from the www.openssl.org
OpenSSL is a widely-used tool for working with Secure Socket Layer (SSL) and Transport Layer Security (TLS) protocols. It is commonly used for creating and managing SSL/TLS certificates, which are used to secure network communications and establish the identity of websites and other online services. If you are a Windows user and need to use OpenSSL, you will need to install it on your computer before you can start using it.
Method 1: Install OpenSSL Using Binary Executables
Step 1: Download OpenSSL Binary Executables
- Go to the OpenSSL website and download the latest version of OpenSSL for Windows.
- Choose the appropriate version for your system (32-bit or 64-bit).
- Extract the downloaded file to a directory of your choice.
Step 2: Set Environment Variables
- Open the Start menu and search for «Environment Variables».
- Click on «Edit the system environment variables».
- Click on the «Environment Variables» button.
- Under «System Variables», click on «New».
- Enter «OPENSSL_CONF» as the variable name and the path to the OpenSSL configuration file (openssl.cnf) as the variable value.
Step 3: Test OpenSSL Installation
- Open the Command Prompt and type «openssl version» to check if OpenSSL is installed correctly.
- If installed correctly, the version number of OpenSSL will be displayed.
Step 4: Use OpenSSL
- OpenSSL can be used for a variety of purposes, such as generating SSL certificates, creating secure connections, and encrypting data.
- Here are some examples of how to use OpenSSL:
Generate a Private Key and Certificate Signing Request (CSR)
openssl req -newkey rsa:2048 -nodes -keyout example.key -out example.csrGenerate a Self-Signed SSL Certificate
openssl req -x509 -newkey rsa:2048 -nodes -keyout example.key -out example.crt -days 365Encrypt a File using AES-256
openssl enc -aes-256-cbc -in example.txt -out example.encDecrypt a File using AES-256
openssl enc -aes-256-cbc -d -in example.enc -out example.txtCreate a Secure Connection to a Server
openssl s_client -connect example.com:443Verify a Certificate Chain
openssl verify -CAfile example.crt example.pemMethod 2: Install OpenSSL from Source Code
Here are the steps to install OpenSSL from source code on Windows 10:
-
Download the latest OpenSSL source code from the official website.
-
Extract the downloaded file to a directory on your computer.
-
Open the Visual Studio command prompt as an administrator.
-
Navigate to the directory where you extracted the OpenSSL source code.
-
Run the following command to configure OpenSSL:
This command configures OpenSSL to build for 64-bit Windows using Visual Studio.
-
Run the following command to build OpenSSL:
This command builds OpenSSL using the configuration from the previous step.
-
Run the following command to install OpenSSL:
This command installs OpenSSL to the default directory.
-
Add the OpenSSL binaries directory to your system path.
setx /M PATH "%PATH%;C:\OpenSSL-Win64\bin"This command adds the OpenSSL binaries directory to your system path permanently.
-
Verify that OpenSSL is installed correctly by running the following command:
This command should output the version of OpenSSL that you installed.
That’s it! You have successfully installed OpenSSL from source code on Windows 10.
Method 3: Use a Package Manager
To install OpenSSL on Windows 10 using a package manager, you can follow the steps below:
- Install Chocolatey package manager by running the following command in an elevated PowerShell prompt:
Set-ExecutionPolicy Bypass -Scope Process -Force; iex ((New-Object System.Net.WebClient).DownloadString('https://chocolatey.org/install.ps1'))- Once Chocolatey is installed, run the following command to install OpenSSL:
choco install openssl.light- After installation, you can verify the OpenSSL version by running the following command:
This should output the OpenSSL version installed on your system.
That’s it! With just a few simple commands, you can install OpenSSL on your Windows 10 machine using a package manager.
Method 4: Use a Pre-built Package
OpenSSL is a widely-used open source tool that provides support for the SSL and TLS protocols. It is used to secure communications between servers and clients over a network. In this tutorial, we will learn how to install OpenSSL on Windows 10 using a pre-built package.
Step 1: Download the Pre-built Package
The first step is to download the pre-built package of OpenSSL for Windows. You can download it from the official website of OpenSSL (https://www.openssl.org/). Choose the version that is compatible with your operating system and architecture.
Step 2: Install OpenSSL
Once you have downloaded the pre-built package, extract it to a folder on your system. Then, open a command prompt with administrative privileges and navigate to the folder where you extracted the package.
Next, run the following command to install OpenSSL:
    > set OPENSSL_CONF=C:\OpenSSL-Win64\bin\openssl.cfg
    > set PATH=C:\OpenSSL-Win64\bin;%PATH%
This will set the environment variables required for OpenSSL to work properly.
Step 3: Verify the Installation
To verify that OpenSSL has been installed correctly, run the following command in the command prompt:
This should display the version of OpenSSL that you have installed on your system.
Step 4: Use OpenSSL
Now that OpenSSL has been installed on your system, you can use it to generate SSL certificates, sign certificates, and perform other tasks related to SSL and TLS protocols.
For example, to generate a self-signed SSL certificate, run the following command:
> openssl req -x509 -newkey rsa:4096 -keyout key.pem -out cert.pem -days 365This will generate a new RSA private key and a self-signed SSL certificate that is valid for 365 days. The private key will be saved in the file «key.pem», and the SSL certificate will be saved in the file «cert.pem».