В Windows 10 и Windows Server 2019 появился встроенный SSH клиент, который вы можете использовать для подключения к *Nix серверам, ESXi хостам и другим устройствам по защищенному протоколу, вместо Putty, MTPuTTY или других сторонних SSH клиентов. Встроенный SSH клиент Windows основан на порте OpenSSH и предустановлен в ОС, начиная с Windows 10 1809.
Содержание:
- Установка клиента OpenSSH в Windows 10
- Как использовать SSH клиенте в Windows 10?
- SCP: копирование файлов из/в Windows через SSH
Установка клиента OpenSSH в Windows 10
Клиент OpenSSH входит в состав Features on Demand Windows 10 (как и RSAT). Клиент SSH установлен по умолчанию в Windows Server 2019 и Windows 10 1809 и более новых билдах.
Проверьте, что SSH клиент установлен:
Get-WindowsCapability -Online | ? Name -like 'OpenSSH.Client*'
В нашем примере клиент OpenSSH установлен (статус: State: Installed).
Если SSH клиент отсутствует (State: Not Present), его можно установить:
- С помощью команды PowerShell:
Add-WindowsCapability -Online -Name OpenSSH.Client* - С помощью DISM:
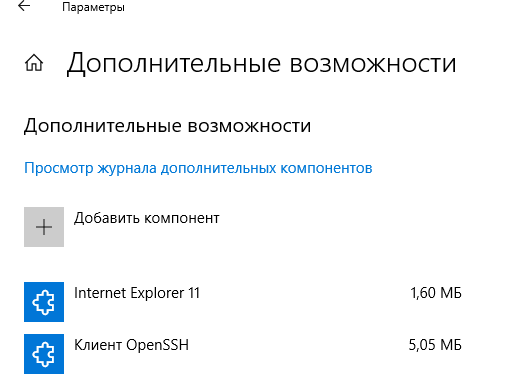
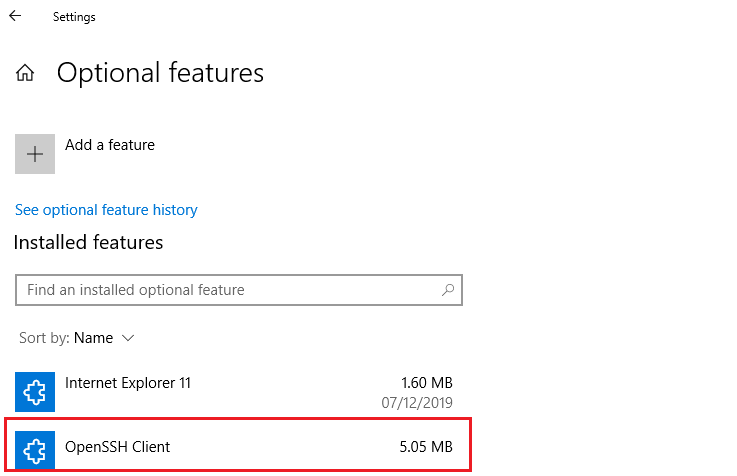
dism /Online /Add-Capability /CapabilityName:OpenSSH.Client~~~~0.0.1.0 - Через Параметры -> Приложения -> Дополнительные возможности -> Добавить компонент. Найдите в списке Клиент OpenSSH и нажмите кнопку Установить.
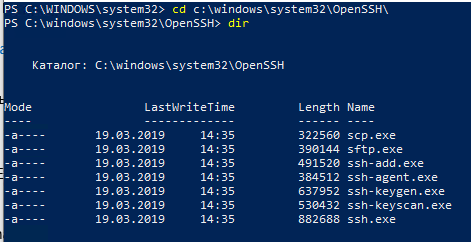
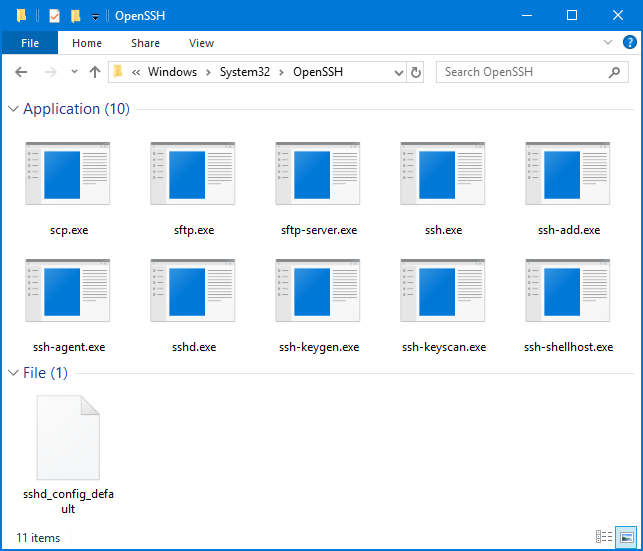
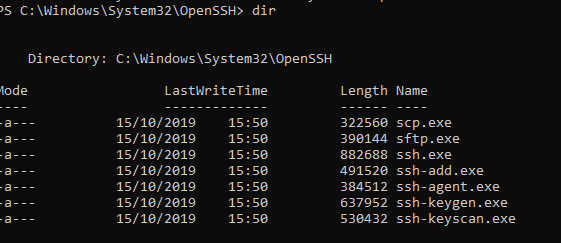
]Бинарные файлы OpenSSH находятся в каталоге c:\windows\system32\OpenSSH\.
- ssh.exe – это исполняемый файл клиента SSH;
- scp.exe – утилита для копирования файлов в SSH сессии;
- ssh-keygen.exe – утилита для генерации ключей аутентификации;
- ssh-agent.exe – используется для управления ключами;
- ssh-add.exe – добавление ключа в базу ssh-агента.
Вы можете установить OpenSSH и в предыдущих версиях Windows – просто скачайте и установите Win32-OpenSSH с GitHub (есть пример в статье “Настройка SSH FTP в Windows”).
Как использовать SSH клиенте в Windows 10?
Чтобы запустить SSH клиент, запустите командную строку
PowerShell
или
cmd.exe
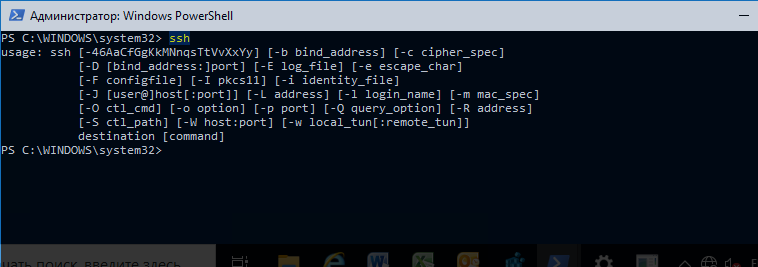
. Выведите доступные параметры и синтаксис утилиты ssh.exe, набрав команду:
ssh
usage: ssh [-46AaCfGgKkMNnqsTtVvXxYy] [-b bind_address] [-c cipher_spec]
[-D [bind_address:]port] [-E log_file] [-e escape_char]
[-F configfile] [-I pkcs11] [-i identity_file]
[-J [user@]host[:port]] [-L address] [-l login_name] [-m mac_spec]
[-O ctl_cmd] [-o option] [-p port] [-Q query_option] [-R address]
[-S ctl_path] [-W host:port] [-w local_tun[:remote_tun]]
destination [command]
Для подключения к удаленному серверу по SSH используется команда:
ssh username@host
Если SSH сервер запущен на нестандартном порту, отличном от TCP/22, можно указать номер порта:
ssh username@host -p port
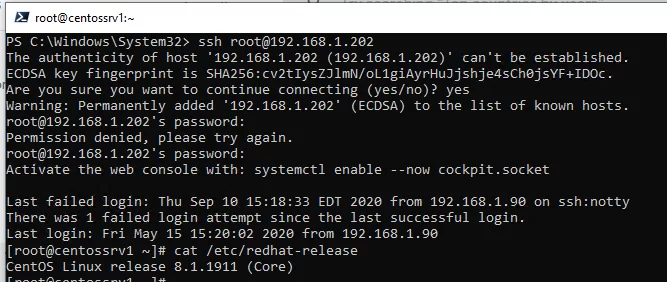
Например, чтобы подключиться к Linux хосту с IP адресом 192.168.1.202 под root, выполните:
ssh [email protected]
При первом подключении появится запрос на добавление ключа хоста в доверенные, наберите yes -> Enter (при этом отпечаток ключа хоста добавляется в файл C:\Users\username\.ssh\known_hosts).
Затем появится запрос пароля указанной учетной записи, укажите пароль root, после чего должна открытся консоль удаленного Linux сервера (в моем примере на удаленном сервере установлен CentOS 8).
С помощью SSH вы можете подключаться не только к *Nix подобным ОС, но и к Windows. В одной из предыдущих статей мы показали, как настроить OpenSSH сервер на Windows 10 и подключиться к нему с другого компьютера Windows с помощью SSH клиента.
Если вы используете SSH аутентификацию по RSA ключам (см. пример с настройкой SSH аутентификации по ключам в Windows), вы можете указать путь к файлу с закрытым ключом в клиенте SSH так:
ssh [email protected] -i "C:\Users\username\.ssh\id_rsa"
Также вы можете добавить ваш закрытый ключ в SSH-Agent. Сначала нужно включить службу ssh-agent и настроить ее автозапуск:
set-service ssh-agent StartupType ‘Automatic’
Start-Service ssh-agent
Добавим ваш закрытый ключ в базу ssh-agent:
ssh-add "C:\Users\username\.ssh\id_rsa"
Теперь вы можете подключиться к серверу по SSH без указания пути к RSA ключу, он будет использоваться автоматически. Пароль для подключения не запрашивается (если только вы не защитили ваш RSA ключ отдельным паролем):
ssh [email protected]
Еще несколько полезных аргументов SSH:
-
-C
– сжимать трафик между клиентом и сервером (полезно на медленных и нестабильных подключениях); -
-v
– вывод подробной информации обо всех действия клиента ssh; -
-R
/
-L
– можно использовать для проброса портов через SSH туннель.
SCP: копирование файлов из/в Windows через SSH
С помощью утилиты scp.exe, которая входит в состав пакета клиента SSH, вы можете скопировать файл с вашего компьютера на SSH сервер:
scp.exe "E:\ISO\CentOS-8.1.1911-x86_64.iso" [email protected]:/home
Можно рекурсивно скопировать все содержимое каталога:
scp -r E:\ISO\ [email protected]:/home
И наоборот, вы можете скопировать файл с удаленного сервера на ваш компьютер:
scp.exe [email protected]:/home/CentOS-8.1.1911-x86_64.iso e:\tmp
Если вы настроите аутентификацию по RSA ключам, то при копировании файлов не будет появляться запрос на ввод пароля для подключения к SSH серверу. Это удобно, когда вам нужно настроить автоматическое копирование файлов по расписанию.
Итак, теперь вы можете прямо из Windows 10 подключаться к SSH серверам, копировать файлы с помощью scp без установки сторонних приложений и утилит.
One of the biggest and most welcome changes to the Windows 10 1809 update and in Windows Server 2019 was the addition of the OpenSSH Client and OpenSSH Server features. It is now incredibly easy to SSH into a Windows Workstation/Server using native tools that are now builtin to the Operating System. In the past this was only possible by using complicated tools and odd workarounds in order to get an SSH-like implementation to work correctly. You can also use the SSH commands right from the Windows command line (CMD, PowerShell), without needing third-party tools or odd commands. This is a very nice change that Microsoft has added, since it is much easier to remotely manage a Windows through the Command Line instead of the GUI, and having the ability to use the same tools on both Windows and Linux is a big advantage.
Note: I have only tested this on Windows 10 Pro for Workstations (Version 1809 Build 17763.253) and on Windows Server 2019 Standard.
Table Of Contents
Installation
Installing the OpenSSH Client and OpenSSH Server options can be done through either the Settings app or through the Command Line.
GUI Installation
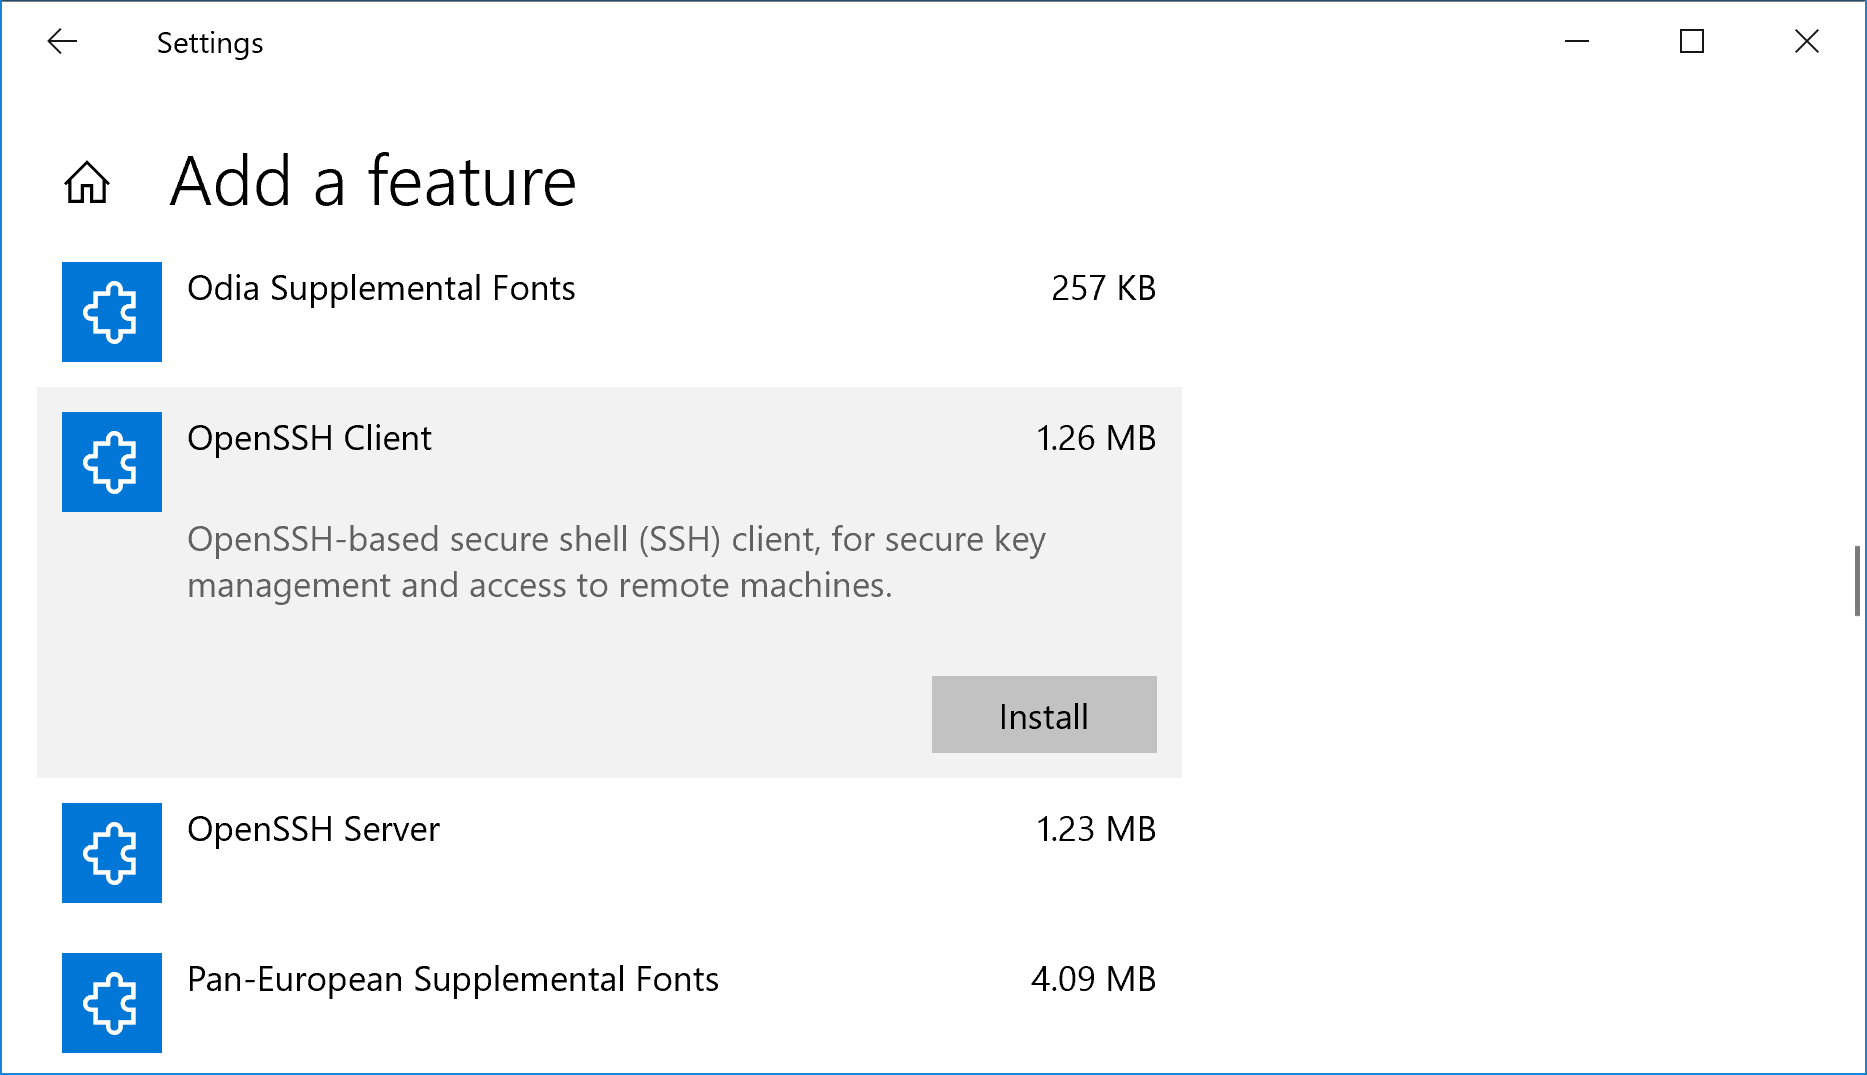
To install through the GUI, go to Settings -> Apps -> Apps & Features -> Manage optional features -> Add a feature. You should see the two options in the list of available features that can be installed:
- OpenSSH Client
- OpenSSH Server
Highlight each option and click the Install button to install the feature. If the options are missing, then you are not on the latest version/patch level of Windows 10 or Windows Server 2019. A restart should not be necessary after adding these features, but the newly installed services will need to be started and configured to automatically start at boot.
Command Line Installation
To install through the Command Line, open an elevated PowerShell console in order to proceed. To confirm that you are able to install the OpenSSH Client and OpenSSH Server features, run the following command:
Get-WindowsCapability -Online | findstr OpenSSH

Name  : OpenSSH.Client~~0.0.1.0
Name  : OpenSSH.Server~~0.0.1.0
If those two options are present, run the following two commands to install the features:
Add-WindowsCapability -Online -Name OpenSSH.Client~~~~0.0.1.0
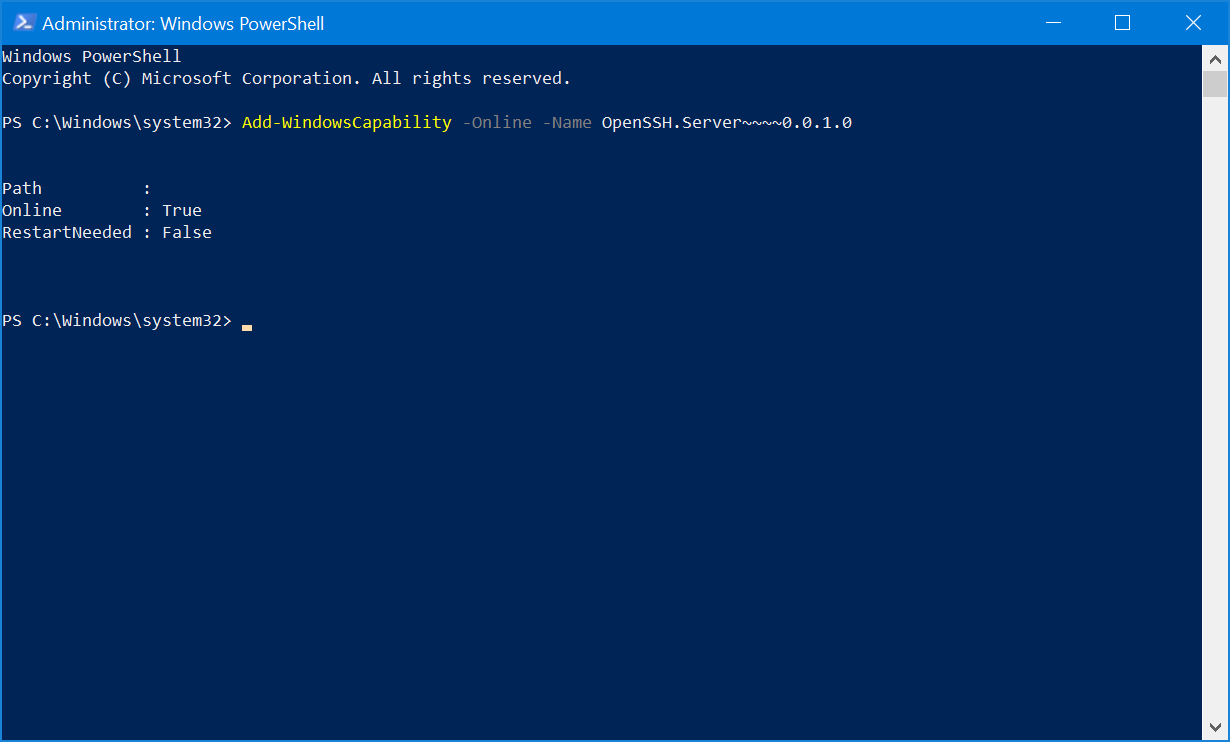
Add-WindowsCapability -Online -Name OpenSSH.Server~~~~0.0.1.0
Like installing through the Settings app, a restart should not be necessary after adding these features. The newly installed services will need to be started and configured to automatically start at boot.
Services Start
In order to start using OpenSSH Server, the associated services will need to be started first. This can be done through either the Services MMC console or through the Command Line.
Services MMC Console
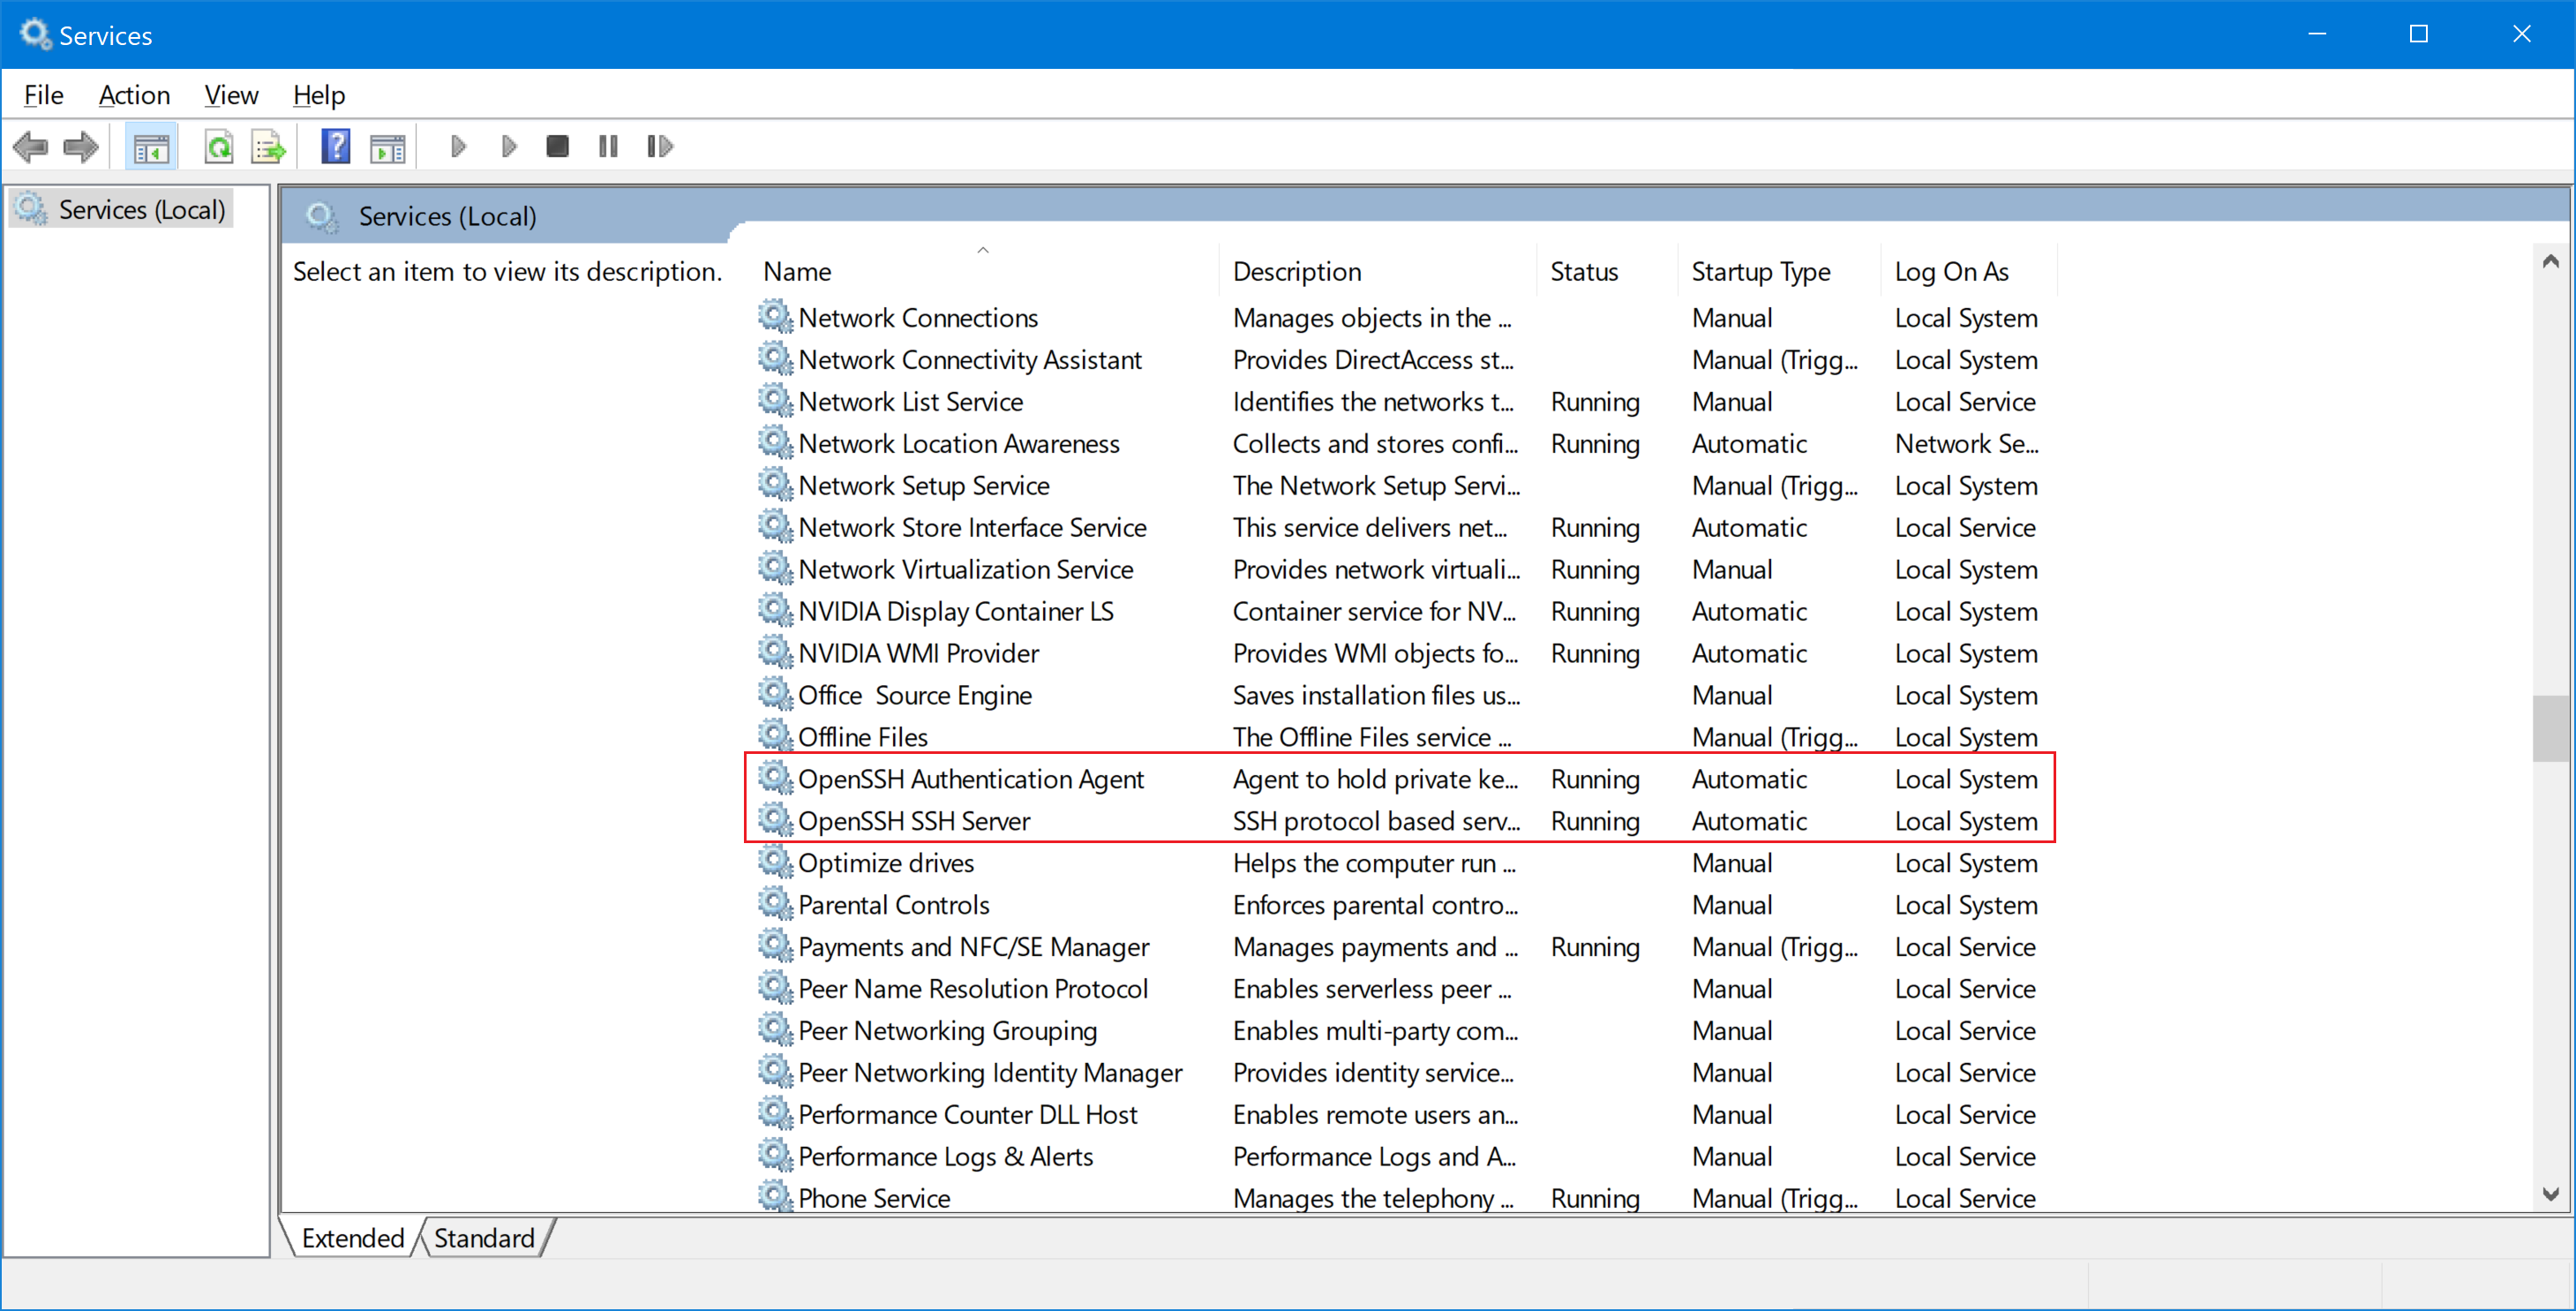
Open the Services MMC Console (Win + R, and type in services.mmc) and find the two Services that are related to OpenSSH Server:
- OpenSSH Authentication Agent
- OpenSSH Server
Right-click on each service and select Properties. Under Service Status, click the Start button to start the service. To configure the service to start automatically at boot, change the Startup Type drop-down menu to Automatic and click Apply.
Command Line Services
To start the OpenSSH Server services and enable them to run automatically, there are a few command that you will need to run. To do this, open an elevated PowerShell console and run the following commands to start the OpenSSH Server:
Start-Service sshd
Start-Service ssh-agent
To have these services start automatically at boot, there are two additional commands to run as well:
Set-Service sshd -StartupType Automatic
Set-Service ssh-agent -StartupType Automatic
After this has been completed, you should be able to connect to your Windows installation over SSH.
Using OpenSSH Client
The OpenSSH Client can be used exactly the same way as you would on any Linux/Unix host. It will work through the regular Command Line and in PowerShell:
PS C:\> ssh.exe
usage: ssh [-46AaCfGgKkMNnqsTtVvXxYy] [-B bind_interface]
           [-b bind_address] [-c cipher_spec] [-D [bind_address:]port]
           [-E log_file] [-e escape_char] [-F configfile] [-I pkcs11]
           [-i identity_file] [-J [user@]host[:port]] [-L address]
           [-l login_name] [-m mac_spec] [-O ctl_cmd] [-o option] [-p port]
           [-Q query_option] [-R address] [-S ctl_path] [-W host:port]
           [-w local_tun[:remote_tun]] destination [command]
Here is the same output from a Linux environment:
matthew@thinkpad / $ ssh
usage: ssh [-46AaCfGgKkMNnqsTtVvXxYy] [-b bind_address] [-c cipher_spec]
           [-D [bind_address:]port] [-E log_file] [-e escape_char]
           [-F configfile] [-I pkcs11] [-i identity_file]
           [-J [user@]host[:port]] [-L address] [-l login_name] [-m mac_spec]
           [-O ctl_cmd] [-o option] [-p port] [-Q query_option] [-R address]
           [-S ctl_path] [-W host:port] [-w local_tun[:remote_tun]]
           [user@]hostname [command]
I won’t go into the details on how to use any of these advanced options, there are very good tutorials on how to use the OpenSSH Client on other sites. The behaviour of OpenSSH Client on Windows should be almost exactly the same as on a Linux environment. So far I haven’t run into any issues with connectivity.
Connecting to OpenSSH Server
There is nothing special required to connect to a Windows host, it behaves exactly the same way as any other SSH host. There are a few different username formats that you can use:
user@windows-host (Local User Account)
user@domain.local@windows-host (Domain UPN)
domain\user@windows-host (Netbios)
One of the benefits is the ability to login with a Microsoft account if you are using that as your username. It is a bit unusual to see an e-mail address used this way, but I am glad that Microsoft made sure that this functionality worked correctly:
user@outlook.com@windows-host
There is nothing more to OpenSSH Server, you can manage your Windows host from the command line once you are logged in. If you want to do any further customization or need some basic troubleshooting, there is additional information below.
Change the Default Shell
By default when you login to a Windows installation with SSH, it defaults to the regular Command Prompt (cmd.exe). I prefer PowerShell for everyday usage, and it is easy to switch to PowerShell once you login, but you can change the default shell to save yourself some time if you are going to be using this feature often.
This is done through the Registry Editor, which will run with Administrator privileges. You need to navigate to the following key:
Computer\HKEY_LOCAL_MACHINE\SOFTWARE\OpenSSH
Create a new string called DefaultShell and give it the following value:
C:\Windows\System32\WindowsPowerShell\v1.0\powershell.exe
Restart the OpenSSH Server Service and the next time that you login with SSH, you should automatically go to PowerShell. I have tried making this work with Bash, but it doesn’t seem to be supported yet.
If you do want to use Bash, just type in bash.exe to switch to it.
Additional Settings
There are a few customizations that you can do to the OpenSSH Server service if needed. Since this is a port of the OpenSSH Server, the customization is done in a very similar way. To begin, the directory where all of the associated executable files are found is in the C:\Windows\System32\OpenSSH directory:
The other important directory for OpenSSH Server is the C:\ProgramData\ssh folder, which contains the configuration files and log files.
OpenSSH Server options, such as changing the login banner and locking down security options are done in the C:\ProgramData\ssh\sshd_config file.
Not all options can be used on a Windows host. For more information, you can refer to the official Wiki article on what options are supported:
https://github.com/PowerShell/Win32-OpenSSH/wiki/sshd_config
Troubleshooting
If you need to view the log file for OpenSSH Server, you need to make a quick change to the configuration file (C:\ProgramData\ssh\sshd_config) to enable logging:
# Logging
#SyslogFacility AUTH
#LogLevel INFO
Make the following change:
# Logging
SyslogFacility LOCAL0
LogLevel INFO
You will need to restart the OpenSSH Server service in order to apply the change. Once the change has been made, the log file (sshd.log) can be found in the C:\ProgramData\ssh\logs directory. When you are finished troubleshooting, you should revert this change to prevent unnecessary logging for the OpenSSH service.
Links
- SSH on Windows Server 2019
- Win32-OpenSSH
The built-in SSH client appeared in Windows 10 and Windows Server 2019. Ssh.exe can be used to securely connect to Linux/UNIX servers, VMWare ESXi hosts and other devices instead of Putty, MTPuTTY and other third-party SSH clients. The native Windows SSH client is based on the OpenSSH port and is preinstalled in Windows starting from Windows 10 build 1809.
Contents:
- How to Enable (Install) the OpenSSH Client on Windows 10?
- Using a Native SSH Client on Windows 10
- Using SCP.exe to Transfer Files to/from Windows Host Using SSH
How to Enable (Install) the OpenSSH Client on Windows 10?
The OpenSSH client is included in Windows 10 Features on Demand (like RSAT). The SSH client is installed by default on Windows Server 2019, Windows 10 1809 and newer builds.
Check that the SSH client is installed:
Get-WindowsCapability -Online | ? Name -like 'OpenSSH.Client*'
In our example, the OpenSSH client is installed (State: Installed).
If not (State: Not Present), you can install it using:
- The PowerShell command:
Add-WindowsCapability -Online -Name OpenSSH.Client* - With DISM:
dism /Online /Add-Capability /CapabilityName:OpenSSH.Server~~~~0.0.1.0 - Via Settings -> Apps -> Optional features -> Add a feature. Find OpenSSH client in the list and click Install.
OpenSSH binary files are located in c:\Windows\System32\OpenSSH\.
ssh.exe– the SSH client executable;scp.exe– tool for copying files in an SSH session;ssh-keygen.exe– tool to generate RSA SSH authentication keys;ssh-agent.exe– used to manage RSA keys;ssh-add.exe– adds a key to the SSH agent database.
You can install OpenSSH on previous Windows versions as well: just download and install the Win32-OpenSSH from GitHub (you can find an example in the article: Configuring SSH FTP on Windows).
Using a Native SSH Client on Windows 10
To start the SSH client, run the PowerShell or cmd.exe prompt. You can list the available options and syntax for ssh.exe:
ssh
usage: ssh [-46AaCfGgKkMNnqsTtVvXxYy] [-b bind_address] [-c cipher_spec]
[-D [bind_address:]port] [-E log_file] [-e escape_char]
[-F configfile] [-I pkcs11] [-i identity_file]
[-J [user@]host[:port]] [-L address] [-l login_name] [-m mac_spec]
[-O ctl_cmd] [-o option] [-p port] [-Q query_option] [-R address]
[-S ctl_path] [-W host:port] [-w local_tun[:remote_tun]]
destination [command]
In order to connect to a remote server using SSH, use the following command:
ssh username@host
If your SSH server is running on a port different from the standard TCP/22, specify the port number:
ssh username@host -p port
For example, to connect to a Linux host with the IP address 192.168.1.102 as root, run this command:
ssh [email protected]
At the first connection, you will see a request to add the host key to the trusted list. Type yes and press ENTER. Then the host key fingerprint is added to the C:\Users\username\.ssh\known_hosts file.
You will be prompted for a password. Specify your root password, and your remote Linux server’s console should open (in my example, CentOS is installed on the remote server).
Using SSH, you can connect both to *Nix OSs and Windows. In one of the previous articles, we showed how to configure an OpenSSH server in Windows 10 and connect to it from a Windows host using an SSH client.
If you use the SSH authentication with RSA keys (see an example on how to configure SSH authentication using keys in Windows), you can specify a path to the private key file in your SSH client as follows:
ssh [email protected] -i "C:\Users\username\.ssh\id_rsa"
You can also add a private key to SSH-Agent. First, enable the ssh-agent service and configure automatic startup for it.
set-service ssh-agent StartupType 'Automatic'
 Start-Service ssh-agent
Add your private key to the ssh-agent database:
ssh-add "C:\Users\username\.ssh\id_rsa"
Then you will be able to connect to your server over SSH without specifying the path to the RSA key. It will be used automatically. Now you can securely connect to your server without a password (if you have not protected your RSA key with a different password):
ssh [email protected]
Here are some more useful SSH arguments:
-C– used to compress traffic between client and server (it is useful in case of slow or unstable connections)-v– displays detailed information about all SSH client actions-R/-L– can be used to forward ports using an SSH tunnel
Using SCP.exe to Transfer Files to/from Windows Host Using SSH
Using the scp.exe tool (is a part of Windows 10 SSH client package), you can copy a file from your computer to the SSH server:
scp.exe "E:\ISO\CentOS-8.1.x86_64.iso" [email protected]:/home
You can copy all directory contents recursively:
scp -r E:\ISO\ [email protected]:/home
And vice versa, you can transfer a file from a remote server to your computer:
scp.exe [email protected]:/home/CentOS-8.1.x86_64.iso c:\iso
If you configure authentication using RSA keys, you won’t be prompted to enter your password to transfer files. This is useful if you want to configure automatic scheduled file copying.
Thus, you can connect to SSH servers directly from your Windows 10, copy files using scp without any other third-party apps or tools.
В этой статье мы расскажем, как работает SSH-клиент, как его установить, а также как подключиться к Ubuntu и Windows 10 по SSH. Но давайте сначала разберёмся, что такое SSH.
Что такое SSH
SSH (Secure Shell) — сетевой протокол прикладного уровня, который позволяет управлять операционной системой и выполнять функцию тунеллирования TCP-соединения. Работа SSH построена на взаимодействии 2-х компонентов: SSH-сервера и SSH-клиента. Подробнее читайте в статье Что такое SSH.
SSH-сервер по умолчанию прослушивает соединения на порту 22, а также требует аутентификации сторон. Есть несколько вариантов проверки соединения:
- по паролю. Используется чаще всего. При таком типе аутентификации между клиентом и сервером создаётся общий секретный ключ: он шифрует трафик;
- с помощью ключевой пары. Предварительно генерируется открытый и закрытый ключ. На устройстве, с которого нужно подключиться, хранится закрытый ключ, а на сервере — открытый. При подключении файлы не передаются, система только проверяет, что устройство имеет доступ не только к открытому, но и к закрытому ключу.
- по IP-адресу. При подключении система идентифицирует устройство по IP-адресу. Такой тип аутентификации небезопасен и используется редко.
OpenSSH (Open Secure Shell) — набор программ, который позволяет шифровать сеансы связи в сети. При таких сеансах используется протокол SSH.
OpenSSH включает в себя компоненты:
- ssh,
- scp,
- sftp,
- sshd,
- sftp-server,
- ssh-keygen,
- ssh-keysign,
- ssh-keyscan,
- ssh-agent,
- ssh-add.
Этот набор ПО может аутентифицировать пользователей с помощью таких встроенных механизмов как:
- публичные ключи,
- клавиатурный ввод: пароли и запрос-ответ,
- Kerberos/GSS-API.
Установка OpenSSH на Ubuntu 22.04
В качестве примера мы рассмотрим установку Ubuntu 22.04. Настройка SSH Ubuntu Server 20.04 версии проходит аналогично.
При первой установке Ubuntu подключение по SSH запрещено по умолчанию. Включить доступ по SSH можно, если установить OpenSSH.
Для этого:
-
1.
Откройте терминал с помощью комбинации клавиш Ctrl + Alt + T.
-
2.
Обновите репозиторий командой:
-
3.
Установите SSH с помощью команды:
-
4.
Установите OpenSSH:
sudo apt install openssh-server -
5.
Добавьте пакет SSH-сервера в автозагрузку:
sudo systemctl enable sshd -
6.
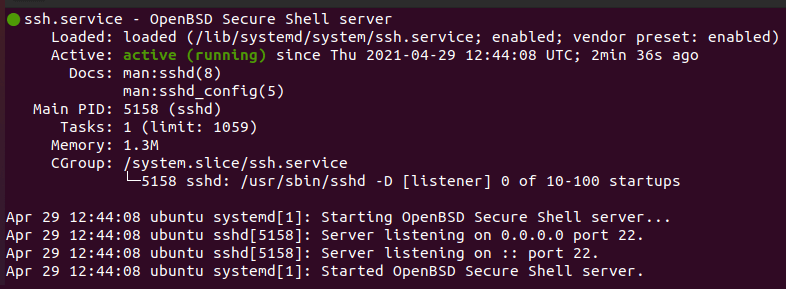
Проверьте работу SSH:
Если установка прошла корректно, в выводе вы увидите настройки по умолчанию:
Настройка SSH Linux
Готово, вы установили OpenSSH на Ubuntu.
Настройка OpenSSH на Ubuntu 22.04
По умолчанию SSH-соединение работает по порту 22. Из соображений безопасности порт лучше изменить. Для этого:
-
1.
Запустите терминал с помощью комбинации клавиш Ctrl + Alt + T.
-
2.
Откройте конфигурационный файл в текстовом редакторе:
sudo nano /etc/ssh/sshd_config -
3.
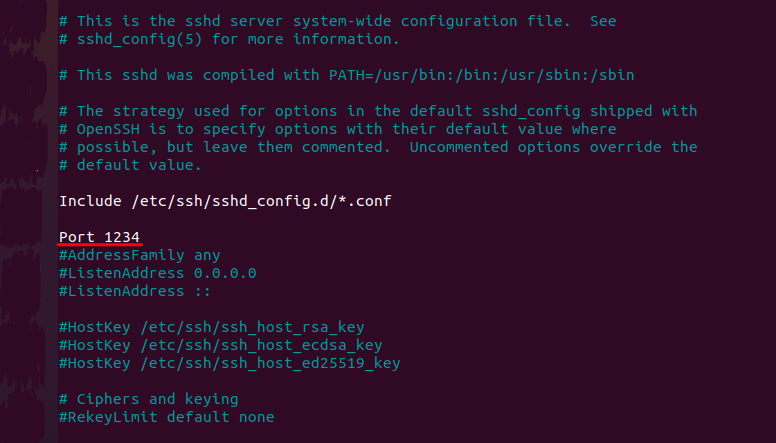
В sshd_config замените порт 22 на другое значение в диапазоне от 1 до 65 535. Важно, чтобы выбранный порт не был занят другой службой:
CentOS 8 настройка SSH -
4.
Чтобы изменения вступили в силу, перезапустите SSH-сервер:
Готово, вы настроили OpenSSH на Ubuntu 22.04. Теперь вы можете внести дополнительные настройки или в Ubuntu разрешить пользователю доступ по SSH.
Установка OpenSSH на Windows 10
-
1.
В меню «Пуск» нажмите Параметры:
-
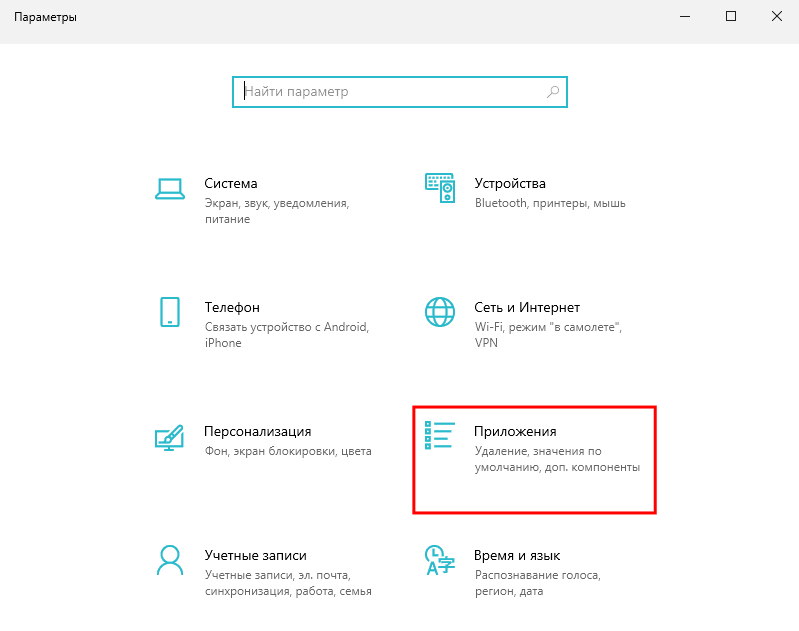
2.
Перейдите в раздел Приложения:
Настройка SSH -
3.
Выберите Приложения и возможности и нажмите Дополнительные компоненты:
-
4.
Проверьте, установлен ли компонент «Клиент OpenSSH». Для этого в поисковой строке наберите «OpenSSH». Если компонент уже установлен, переходите к шагу Настройка SSH на Windows 10.
Если компонент ещё не установлен, используйте PowerShell.
Что такое PowerShell
PowerShell — это утилита командной строки в ОС Windows. Она выпущена в составе Windows 7, Windows 8, Windows 8.1 и Windows 10 как неотъемлемая часть системы.
Управлять ОС через PowerShell можно при помощи командлетов — специальных команд. Командлеты работают аналогично с командами в терминале Linux.
Использование командлетов позволяет:
- работать с файловой системой и реестром Windows,
- изменять настройки операционной системы,
- управлять службами и процессами,
- устанавливать программы,
- управлять установленным ПО,
- встраивать исполняемые компоненты в программы,
- создавать сценарии, которые помогут автоматизировать администрирование.
-
5.
Перейдите в меню «Пуск». Правой кнопкой мыши кликните на Windows PowerShell и выберите Запуск от имени администратора:
-
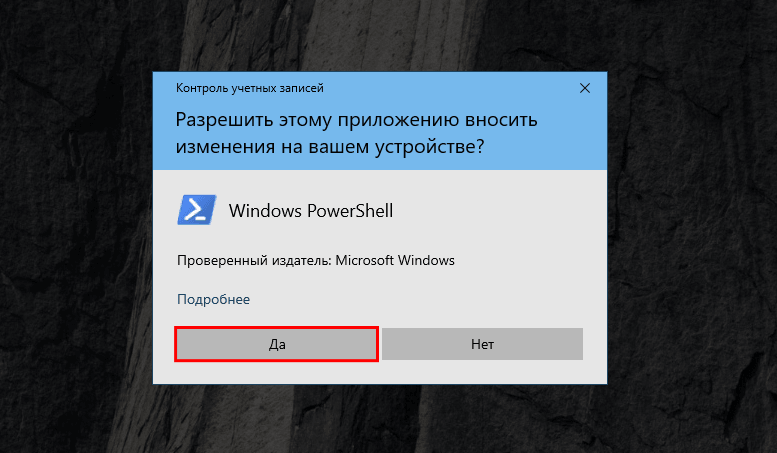
6.
Дайте согласие на запуск программы. Для этого нажмите Да:
-
7.
Введите командлет:
Get-WindowsCapability -Online | ? Name -like 'OpenSSH*'Вы увидите следующее сообщение:
-
8.
Установите OpenSSH с помощью командлета:
Add-WindowsCapability -Online -Name OpenSSH.Client~~~~0.0.1.0После установки вы увидите сообщение. Если для параметра «RestartNeeded» указан статус «True», перезагрузите компьютер.
Готово, вы установили OpenSSH на Windows.
Настройка Open SSH на Windows 10
-
1.
В меню «Пуск» и кликните на Windows PowerShell:
-
2.
Введите командлет:
В выводе отобразится справочная информация о командлетах:
-
3.
Если вам нужно подключиться к серверу по SSH, выполните командлет:
Где:
- username — имя пользователя SSH,
- host — имя удаленного сервера или его IP-адрес.
Например, так выглядит командлет для подключения к хостингу Рег.ру:
ssh u1234567@123.123.123.123
Готово, теперь вы можете как открыть доступ по SSH, так и внести дополнительные настройки на сервере.
Помогла ли вам статья?
Спасибо за оценку. Рады помочь 😊
👍
Если вы заядлый разработчик, вы, возможно, уже заметили, что Microsoft наконец-то добавила поддержку SSH-соединений в Windows 10 . Это интеграция OpenSSH в Windows 10, которая поставляется с выпуском Windows 10 Fall Creators Update. Теперь пользователи получают возможность отключить клиентское программное обеспечение SSH, например PuTTY , для подключения к локальному или серверу, расположенному в Интернете. Если вы новичок в этом, давайте сначала обсудим, что такое SSH или Secure Shell.
Что такое OpenSSH
SSH или Secure Shell – это не что иное, как общий протокол, подобный FTP или HTTP, который используется для отправки данных из источника в пункт назначения. Но здесь отправленные данные строго зашифрованы. OpenSSH очень популярен среди разработчиков, работающих на машинах Linux, поскольку он позволяет им получать доступ к удаленному серверу в сети и управлять им.
Прежде чем мы начнем, я хотел бы отметить, что эта функция доступна как бета-версия и может иногда показывать некоторые глюки.
Действия по включению OpenSSH в Windows 10
С функциями Windows:
Перейдите в «Настройки»> «Приложения»> «Приложения и функции» или перейдите по этому адресу:
мс-настройки: appsfeatures
Теперь нажмите Управление дополнительными функциями.
Выберите Добавить функцию. Это приведет вас к новой странице.

Прокрутите вниз до Клиент OpenSSH (бета) и Сервер OpenSSH (бета) .
Установите их оба и перезагрузите компьютер
Это загрузит и установит все компоненты по этому пути:
C: \ Windows \ System32 \ OpenSSH
Теперь вы можете использовать Powershell или командную строку (CMD), чтобы перейти к указанному пути, а затем начать работать с SSH, как в Linux.
С подсистемой Windows для Linux (WSL)
Прежде всего, откройте меню «Пуск» и введите Функции Windows , а затем выберите Включить и выключить функции Windows.

Установите флажок Подсистема Windows для Linux и нажмите ОК.
Перейдите в магазин Microsoft Store и найдите Ubuntu .

Установите это приложение.
Теперь выполните поиск Ubuntu в меню «Пуск» или в Cortana, чтобы запустить командную строку Linux Bash и использовать возможности SSH.
В настоящее время эта функция перенесена в Windows 10 с помощью Win32 Port самой Microsoft. В настоящее время доступно обновление для Windows 10 Fall Creators: 0.0.19.0 , но если вы зайдете в их репозиторий GitHub, вы обнаружите, что последняя версия – 0.0.24.0 , которая новее встроенного и, следовательно, будет гораздо более стабильным. Вы можете прочитать больше об установке через Powershell в их документации по GitHub, указанной выше.
Наконец, похоже, что Microsoft усиливает использование технологий с открытым исходным кодом, интегрируя их непосредственно в Windows 10 и улучшая их для разработчиков. Это делает утверждение Терри Майерсона (исполнительного вице-президента группы разработчиков Windows в Microsoft) верным, что
«Windows 10 – лучшая чертова девбокс на планете».
И мы не можем дождаться добавления более полезных функций, подобных этой, во встроенную Windows 10!

