- Можно ли установить Open Shell на Windows 11?
- Скачивание, установка Open Shell
- Русификация Open Shell
- Настройка программы Open Shell
Многие пользователи новой версии операционной системы Windows 11 остались недовольными стилем оформления меню «Пуск». Впрочем, недовольства начались еще с выходом Windows 8 с ее непривычными плитками разного размера, занимавшими, к тому же, большое пространство меню «Пуск». Положение дел решили исправить независимые от Microsoft разработчики, которые представили миру свой бесплатный программный продукт «Classic Shell» — утилиту, позволяющую заменить оригинальное меню «Пуск» Windows 8 и всех последующих версий (включая Win 11) классическим меню со времен Windows XP.
В настоящее время проект под названием «Classic Shell» закрыт — программа более не обновляется, но ее последняя версия до сих пор доступна для скачивания с официального сайта. Зато этот проект подхватили другие независимые разработчики. Программа была переименована в «Open Shell», но от этого не изменилась ни модель ее распространения (она также бесплатна и имеет открытый исходный код), ни предназначение. Именно ее мы и будем рассматривать здесь.
Можно ли установить Open Shell на Windows 11?
На репозитории GitHub, откуда и можно скачать установщик программы Open Shell, указано, что она предназначена для операционных систем Windows 7, 8, 8.1 и 10. Однако она прекрасно работает и в новой Windows 11 — мы бы не стали работать над этой статьей, если это было бы не так.
Также у некоторых могут возникнуть вопросы по поводу разрядности Open Shell — существует только 32-битная ее версия, в то время как Windows 11 — 64-битная (32-разрядной системы, скорее всего, не будет). Но и это не помеха.
Скачивание, установка Open Shell
Последнюю версию программы Open Shell вместе с русификатором можно скачать с нашего сайта. Установка утилиты проходит по обычному сценарию, но во избежание конфликтов рекомендуем отключить инсталляцию двух вспомогательных модулей Open Shell — «Classic Explorer» и «Classic IE». Это осуществляется в разделе «Custom Setup» установщика программы:
 1
1
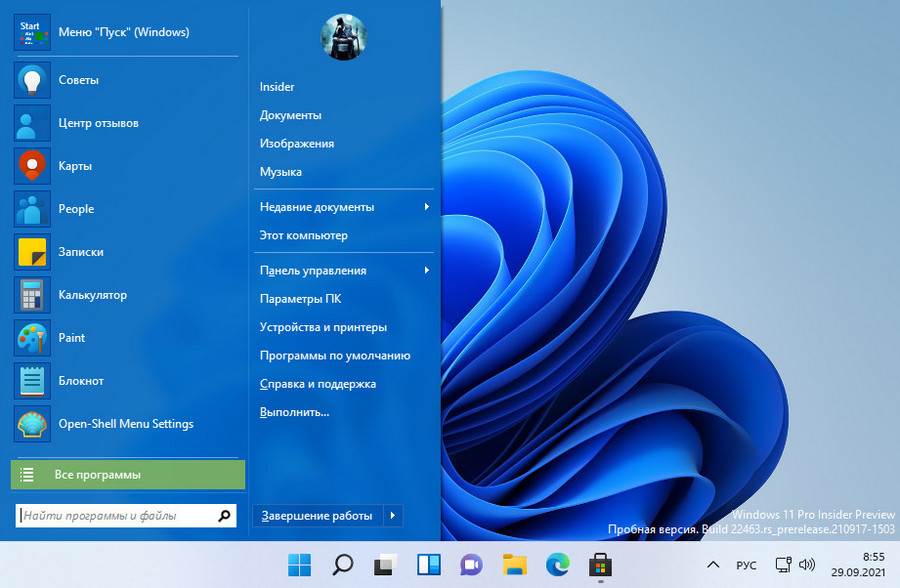
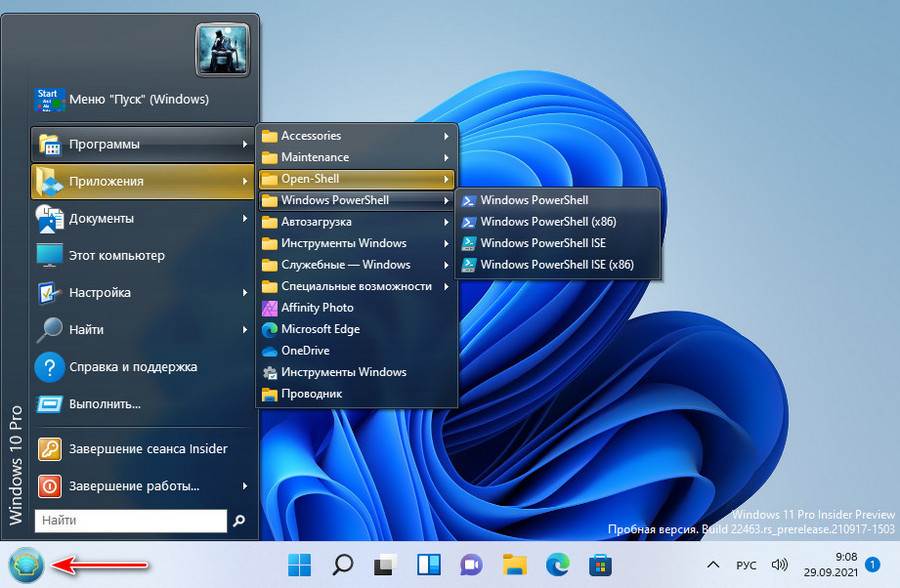
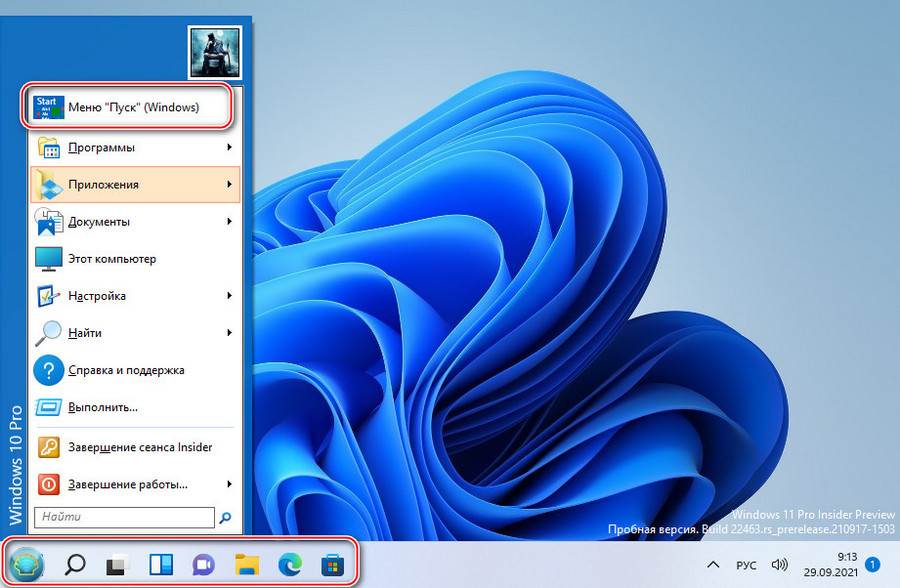
По завершению установки Open Shell автоматически начнет свою работу. Чтобы проверить — просто кликните по кнопке меню «Пуск» или нажмите клавишу «Win»:
Русификация Open Shell
Программа Open Shell поддерживает русский язык, но перевод неполный. Чтобы полностью русифицировать интерфейс, необходимо сначала установить русификатор, а затем активировать русский язык в настройках. Если утилита была скачано с нашего сайта в виде архива, то при его распаковке рядом с инсталлятором будет находиться файл «ru-RU.dll». Его нужно скопировать в папку установки Open Shell.
Инсталлятор почему-то не создает ярлыка на рабочем столе (по крайней мере, так было в нашем случае). Потому открываем папку установки утилиты вручную. По умолчанию — это «C:\Program Files\Open-Shell». Копируем/перемещаем русификатор «ru-RU.dll» в эту папку. Теперь нужно активировать русский язык в настройках.
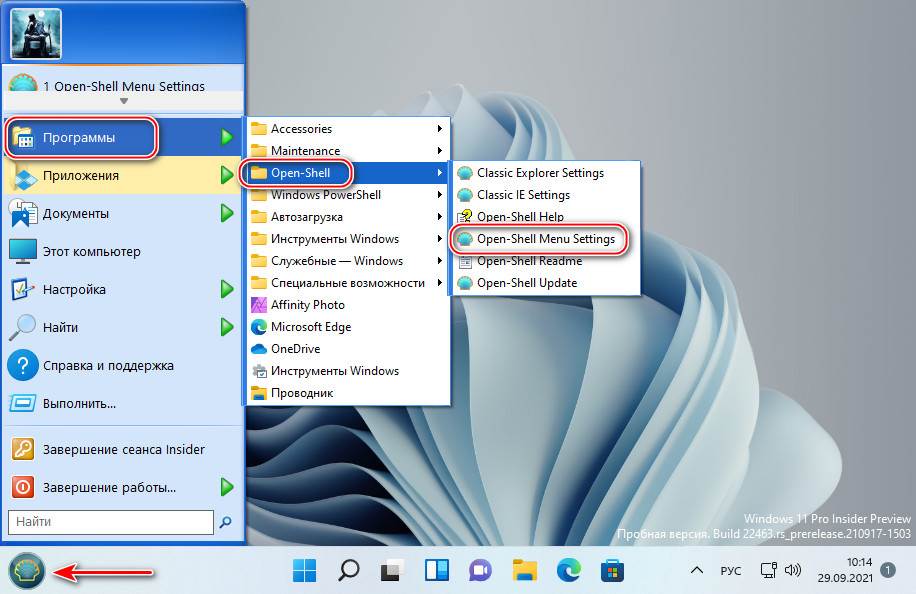
За настройку отвечает ярлык «Start Menu Settings» — запускаем его из папки установки программы:
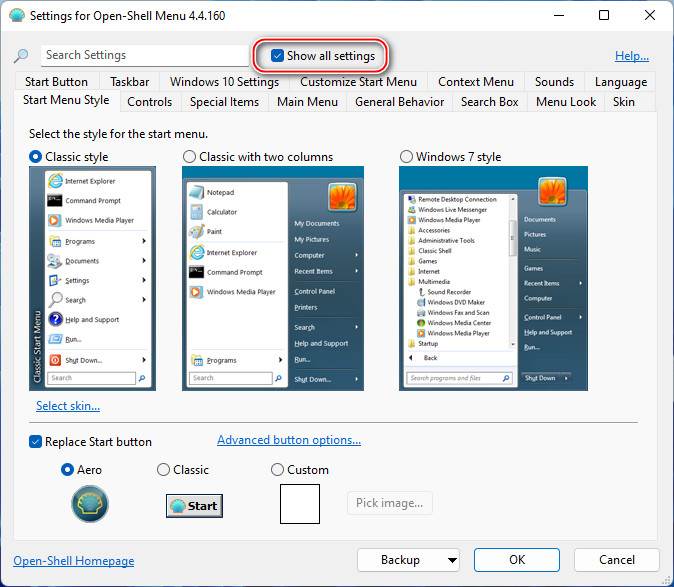
Чтобы активировать русский язык, сначала установите флажок напротив «Show all settings» в верхней части окна настроек, затем перейдите в отобразившуюся вкладку «Language»:
Найдите в списке доступных языков элемент «ru-RU — Русский (Россия)», выделите его и нажмите снизу кнопку «ОК». Это приведет к закрытию окна настроек.
![]()
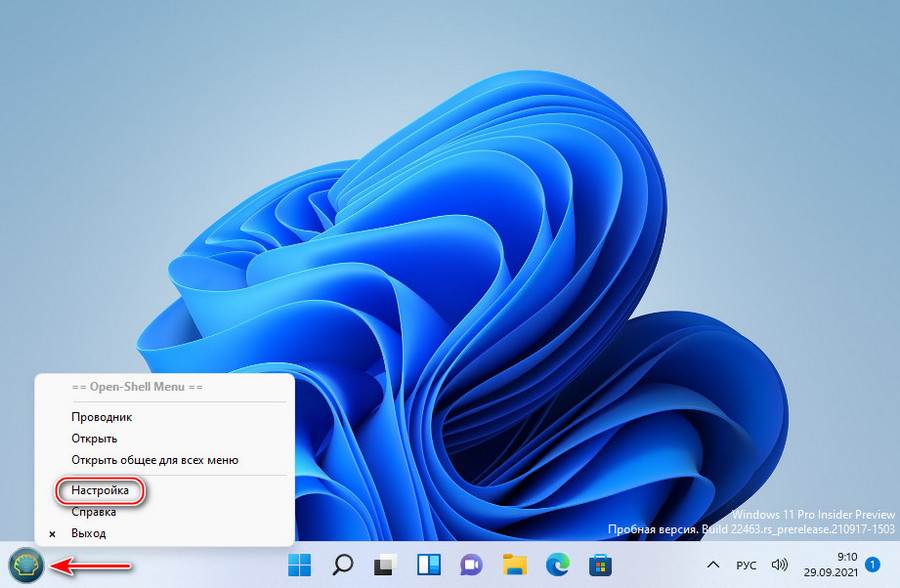
Чтобы изменения вступили в силу, потребуется перезапустить программу Open Shell. По умолчанию это делается путем нажатия правой кнопки мыши поверх значка «Пуск» и выбора пункта «Выход» с последующим повторным запуском приложения. Но это сработает только в случае, если заменить стандартный значок меню «Пуск» на один из тех, что предлагает программа:
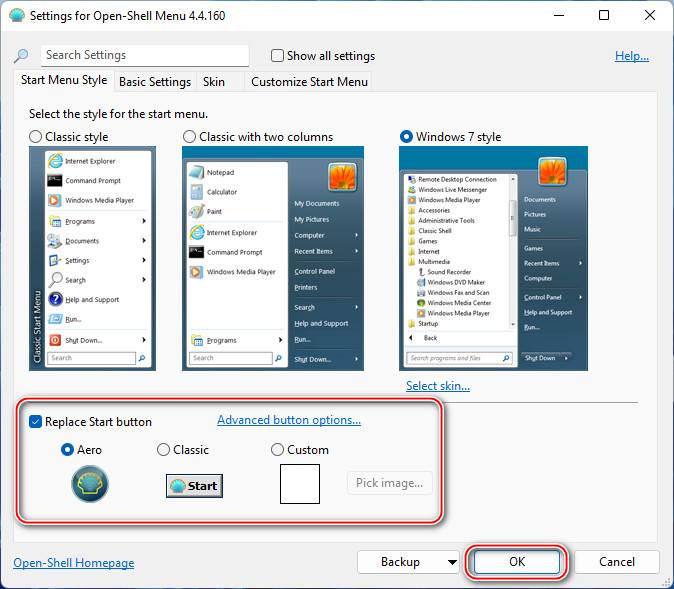
- Запустите ярлык настроек «Start Menu Settings», затем перейдите во вкладку «Start Menu Style».
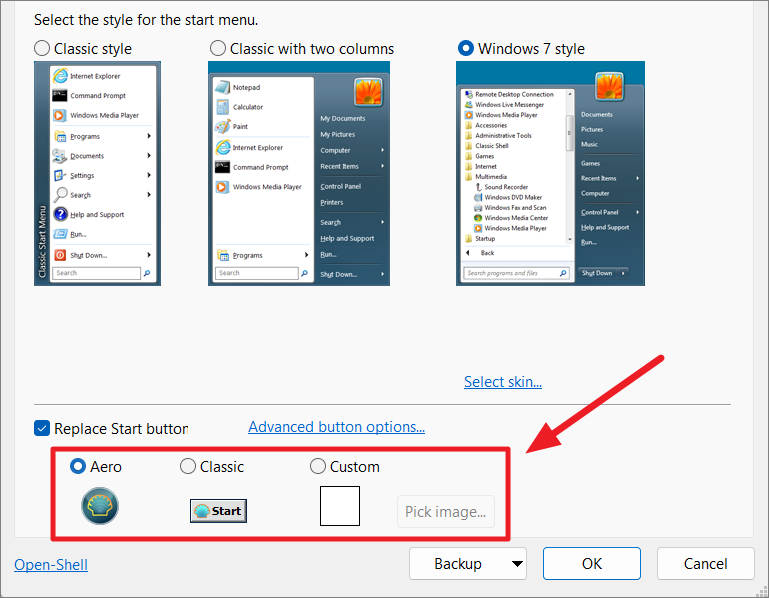
- Здесь же активируйте опцию «Replace Start button», выберите один их вариантов альтернативного значка для кнопки «Пуск» и нажмите «ОК».
- Теперь можно кликнуть правой кнопкой мыши по новому значку «Пуска», чтобы затем завершить работу программы выбором пункта «Выход».
![]()
- Вновь запустите ярлык «Replace Start button», чтобы проверить успешность русификации.
Настройка программы Open Shell
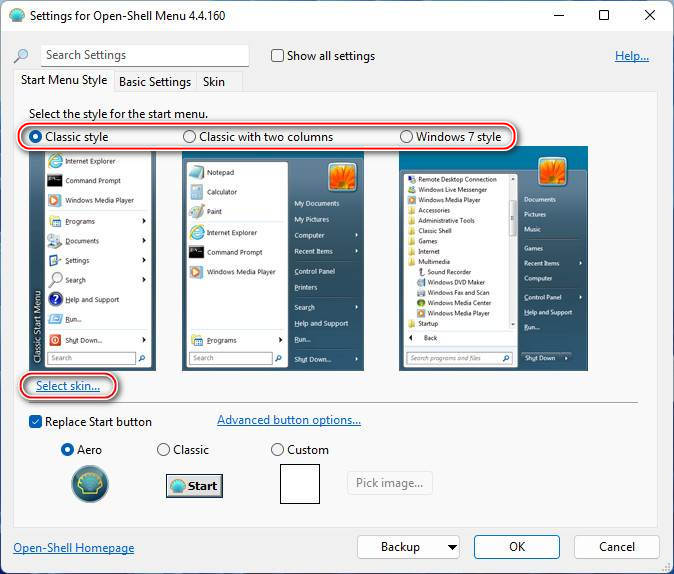
Простым пользователям вполне хватает то оформление меню «Пуска», что по умолчанию устанавливает программа Open Shell. Если нужно сменить стиль, откройте в настройках вкладку «Стиль меню Пуск» и выберите подходящий вариант оформления:
Во вкладке «Основные параметры» можно настроить поведение кнопки «Пуск» при клике по ней мышкой, клике с зажатой клавишей «Shift», нажатию клавиши «Win» и т.д. Open Shell не заменяет оригинальный «Пуск» Windows 11, а просто перехватывает нажатия клавиш и/или клики мышью, блокируя вывод «настоящего» меню свои собственным. Именно здесь можно настроить, когда Open Shell будет выводить свое, а когда системное меню «Пуск»:
Оформление заднего фона (обложки/заставки) меню «Пуск» можно дополнительно выполнить во вкладке «Обложка». Доступно несколько вариантов — от классического до Windows 8, выбираемого по умолчанию.
Все остальные настройки утилиты Open Shell связаны с функционалом и наполнением меню «Пуск». Мы не будем их рассматривать, но вы можете поэкспериментировать. Если что-то пойдет не так, настройки всегда можно сбросить (правда, придется повторно активировать и русский язык):

A collection of utilities bringing back classic features to Windows.
Originally Classic Shell by Ivo Beltchev


![]()


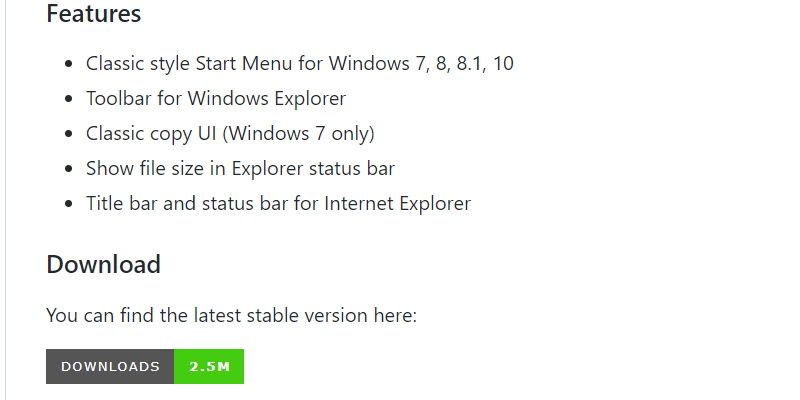
Features
- Classic style Start menu for Windows 7, 8, 8.1, 10, 11
- Toolbar for Windows Explorer
- Explorer status bar with file size and disk space
- Classic copy UI (Windows 7 only)
- Title bar and status bar for Internet Explorer
Download
You can find the latest stable version here:

You can find the latest nightly build here:

Get Help
- Report an issue
- Ask in Discussions
- Post in Gitter room
- Join our Discord
Temporary Translation/Language Solution
- Download language DLL
- Place it either in the Open-Shell’s install folder or in the
%ALLUSERSPROFILE%\Open-Shell\Languagesfolder.
For archival reasons, we have a mirror of www.classicshell.net here.
How To Skin a Start Menu
Classic Shell: Custom Start Buttons
Although Windows 11 has a fresh new design and features, many users are not happy with its User Interface due to its clunky layout and lack of customization options. Some of the UIs that greatly changed from the much-loved classic interfaces are the Start menu, taskbar, and File Manager.
Windows 11 did have a few registry settings in the older builds that can be modified to revert many of its designs and functions back to how they were in Windows 10. But, they have been removed from future builds of Windows 11. This is where Open Shell comes in.
The Open Shell is a free software that helps users customize the user interface of the Start menu, taskbar, file explorer, and more for your favorite Windows operating system. Open Shell itself is a replacement for the Classic Shell program which is no longer in development. Open Shell is the continuing development of the Original Shell program for Windows and its currently being developed by volunteer developers.
If you don’t like the new start menu and taskbar in Windows 11 and rather prefer the classic Start menu that appears from the left side of the screen, you can use the third-party tool ‘Open Shell’ to bring them back.
Download and Install Open Shell in Windows 11
With Open Shell, you can customize the Start menu and taskbar with multiple styles and skins, find programs, settings, files, and documents quickly, replace the new Start button with the classic and custom start buttons, add a custom toolbar and status bar to file explorer, and more. Let us see how to download and install Open Shell in Windows 11.
The Open Shell is open-source software that can be downloaded from the GitHub repository – Download Link.
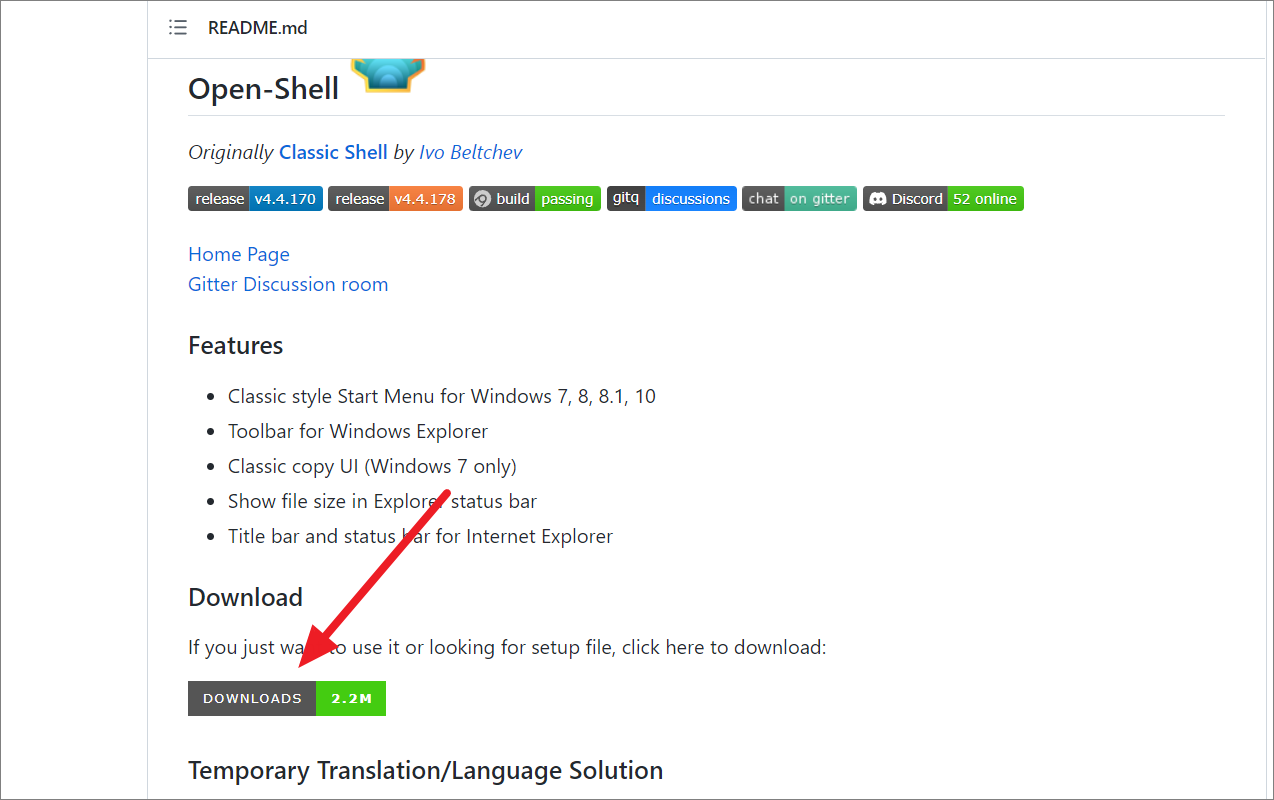
First, go to the Open-Shell GitHub page using the above link. Then, scroll down to the ‘Downloads’ section and click on the ‘Downloads’ button.
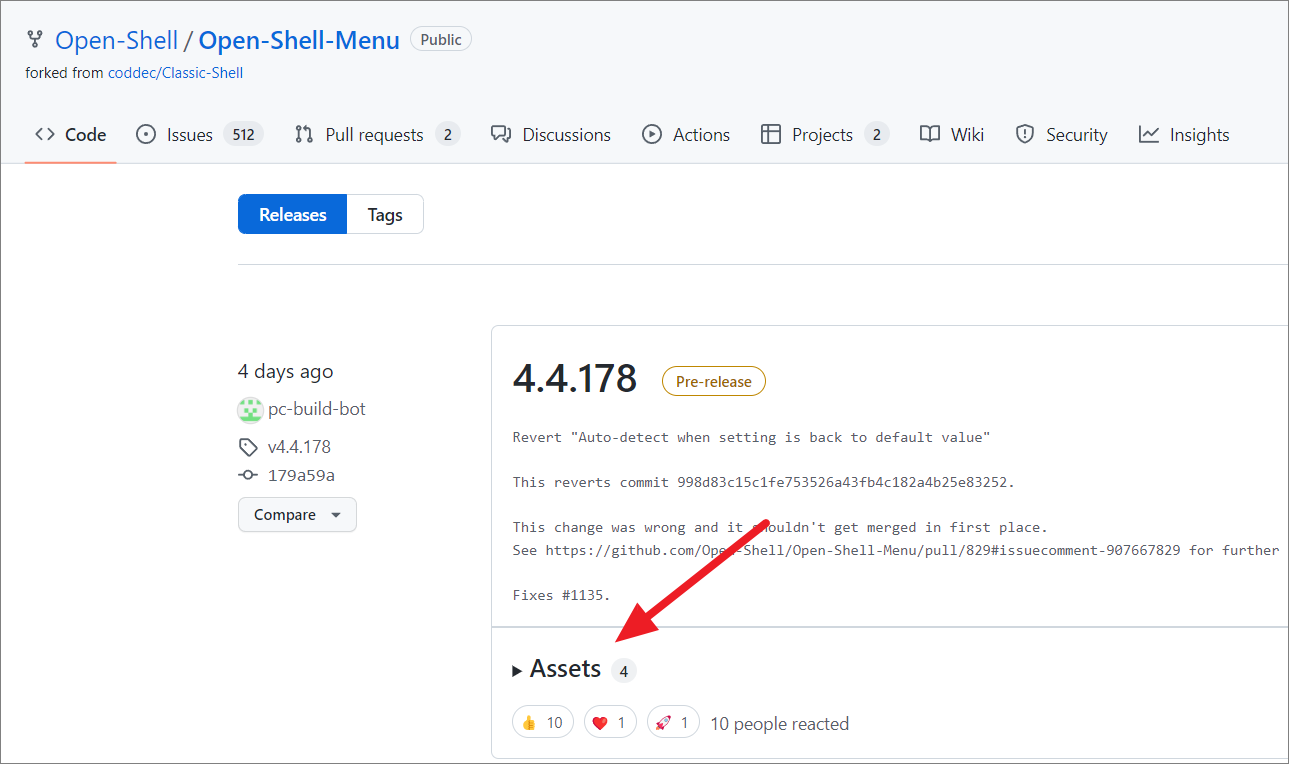
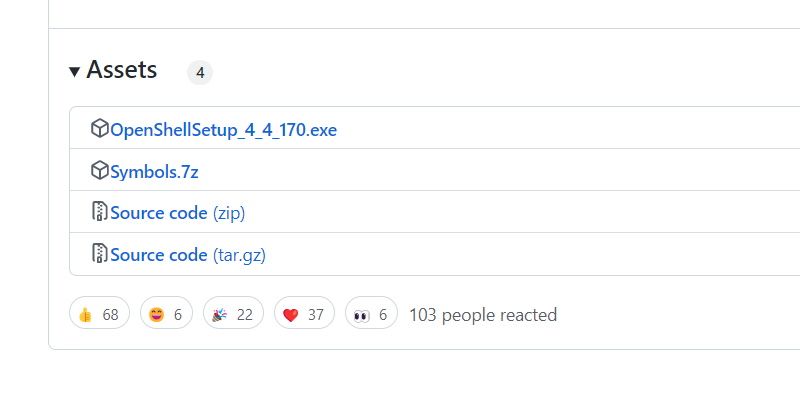
This will take you to the Releases page where you can find all the versions of the software that have been released so far. The latest version of the app will be at the top of the page. Move to the ‘Assets’ section of the latest version and click on it to reveal the download files.
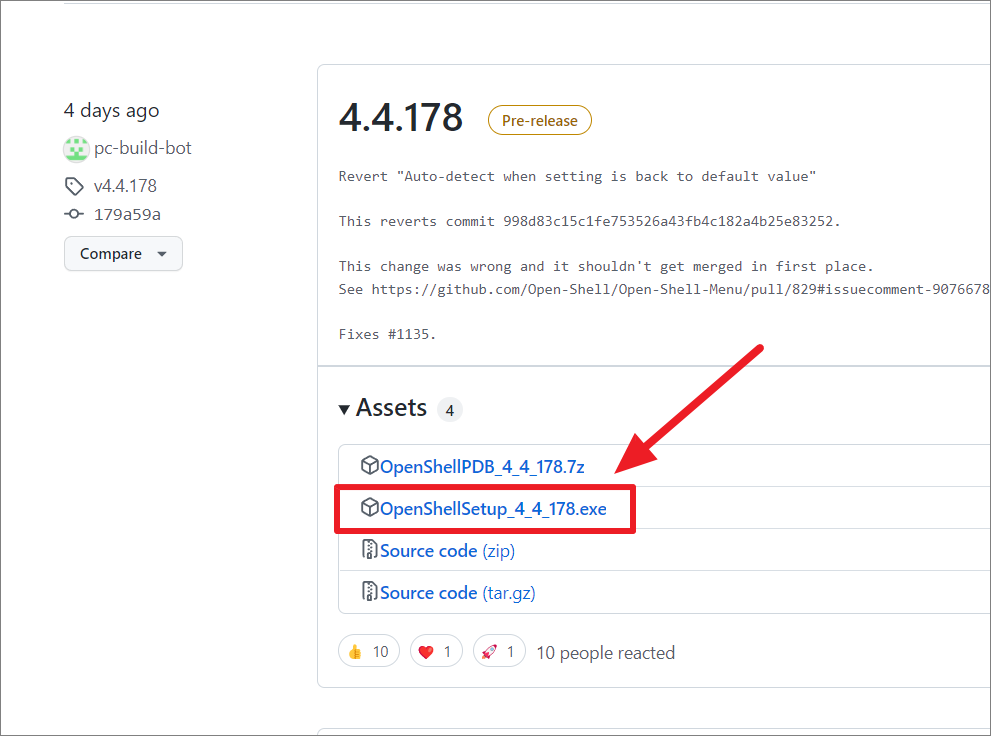
Now, click on the ‘OpenShellSetup_x_x_xxx.exe’ (setup link) to download the installer and save it on your PC. You can also download the installer in the archive file (.7z) and then extract it.
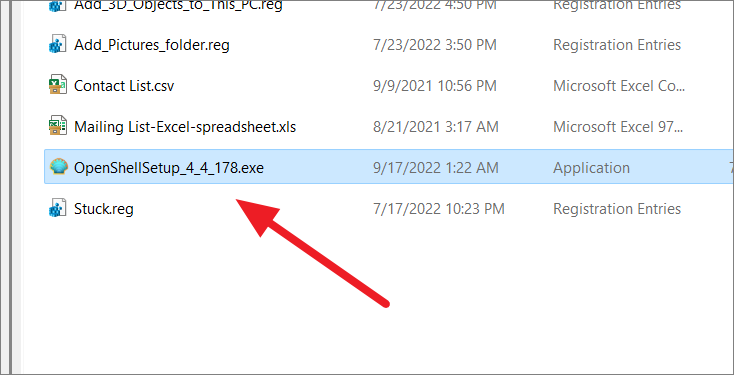
Once the installer is downloaded, double-click on the EXE file to begin the installation.
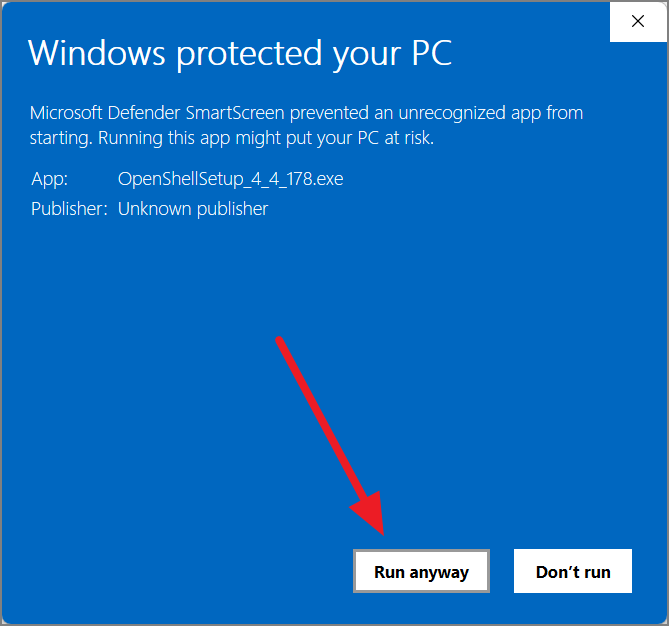
Windows Defender may show you a warning in a pop-up box that says ‘Windows Protected your PC’ with a ‘Don’t run’ button. Open Shell does not contain any malicious code and it’s safe to use, so you can ignore this warning. Click the ‘More info’ link instead.

Once you click the ‘More info’ option, another button will appear. Now, click ‘Run anyway’ to continue.
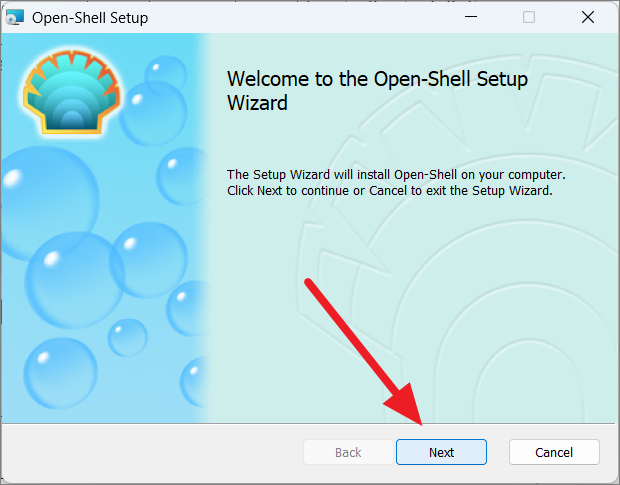
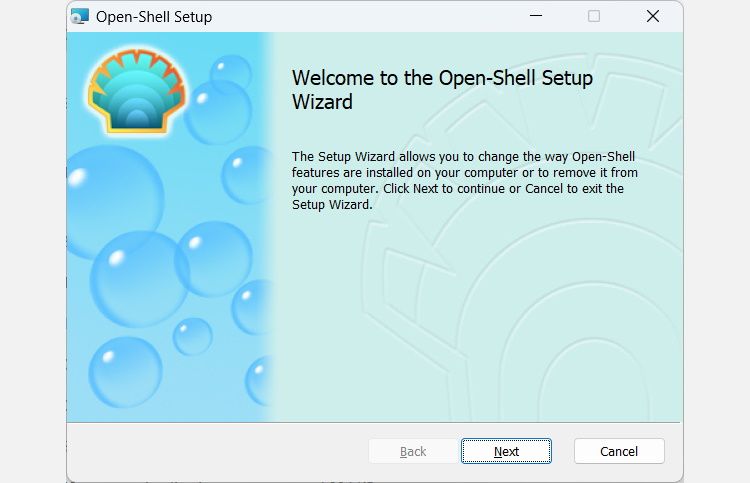
On the welcome screen of the wizard, click ‘Next’ to start the process.
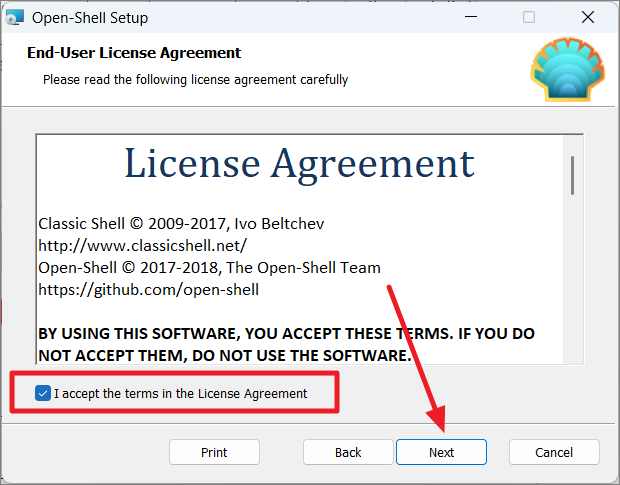
After that, check the ‘I accept the terms in the License Agreement’ option and click ‘Next’.
Next, tick the ‘Create a start menu folder’ option. If you wish to change the installation location of the app, you can do so with the ‘Browse…’ button. Then, click ‘Next’ to continue.

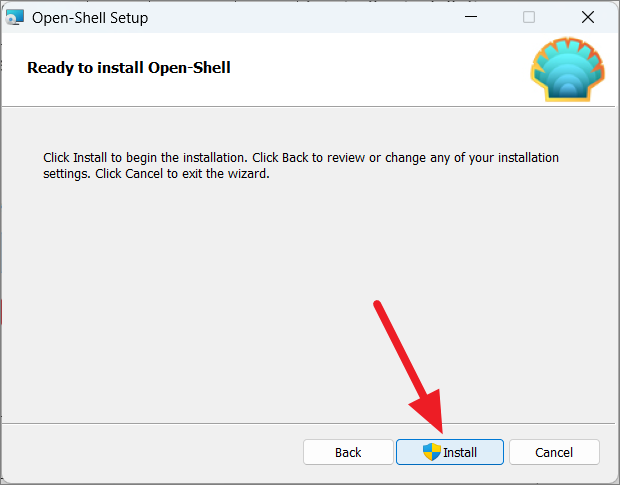
Now, click ‘Install’ to start the installation.
When the User Account Control dialog box pops up, click ‘Yes’ to allow. Finally, click ‘Finish’ to complete.

How to Use Open Shell to Customize Windows 11
Once Open Shell is installed, you can customize various settings such as the Start menu, Taskbar, Context menu, File explorer, and other elements of your system UI. If you are a fan of the old classic Windows 7, you can use Open Shell to make Windows 11 look more like Windows 7.
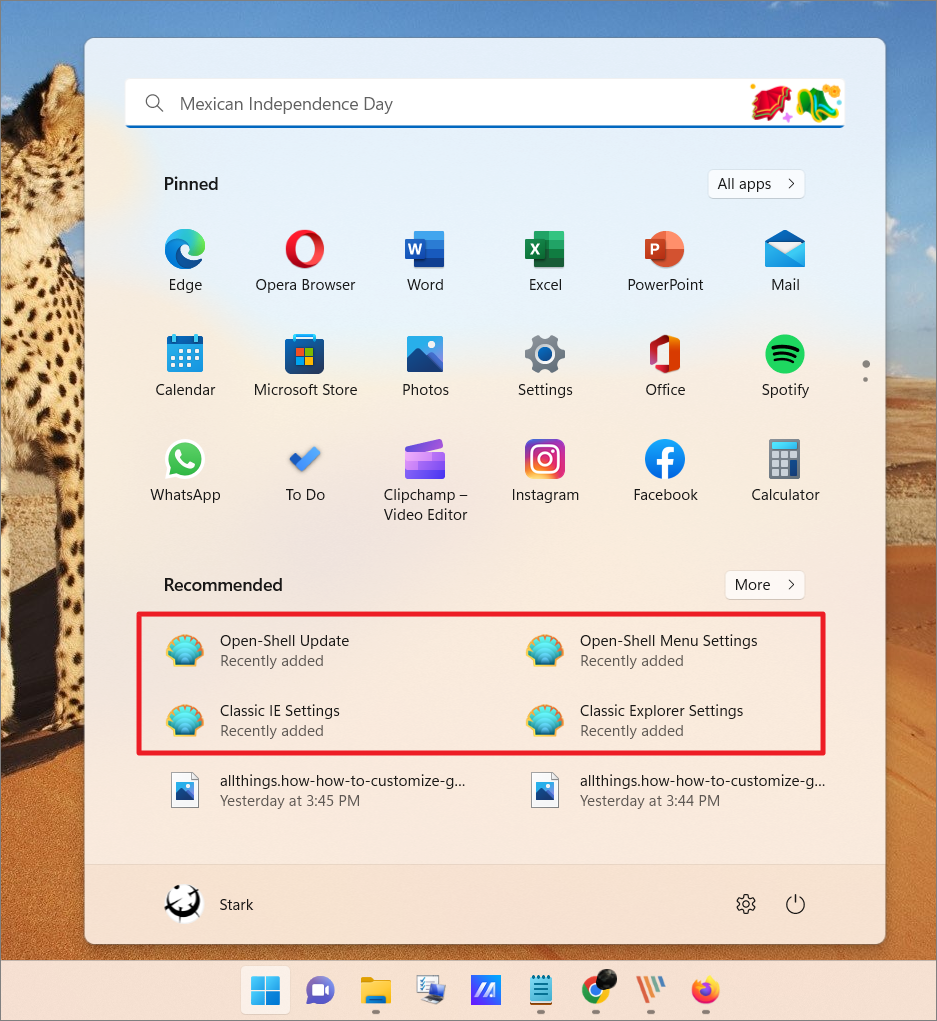
After installing Open Shell, if you open the start menu, you will see three settings apps – Open-Shell Menu Settings, Classic IE settings, Classic Explorer Settings, and an Open-Shell Update app.
Customize Start Menu in Windows 11
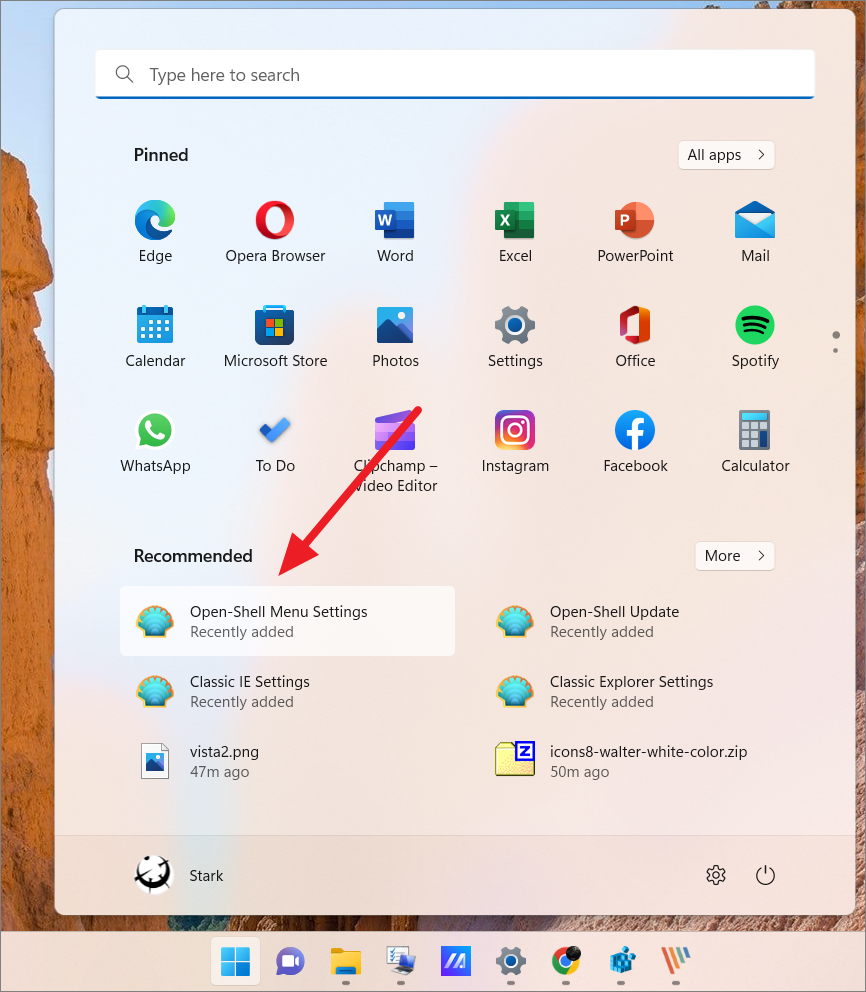
Open the Start menu by clicking the Windows icon or pressing the Windows key. If you recently installed the Open Shell app, click on the ‘Open-Shell Menu Settings’ app to open it.
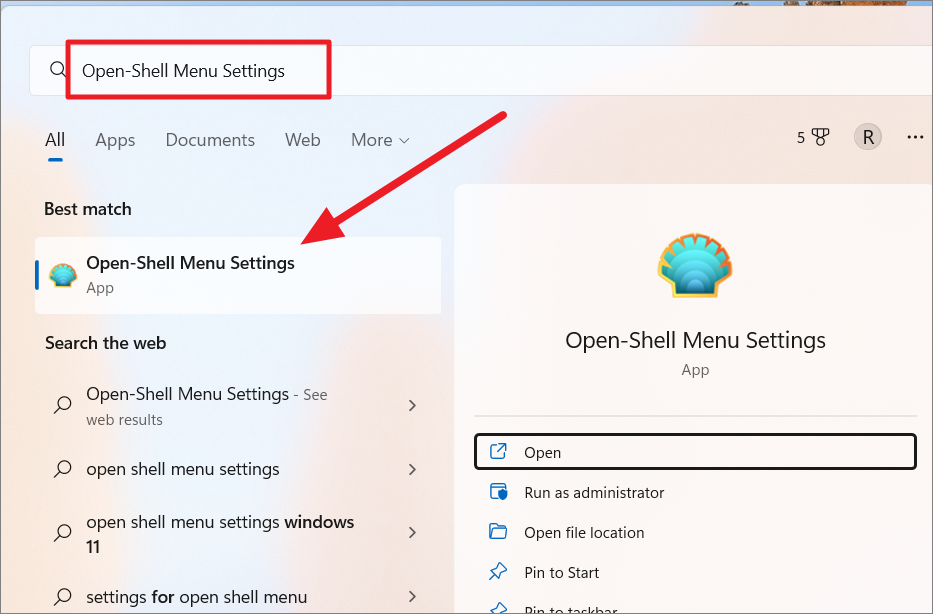
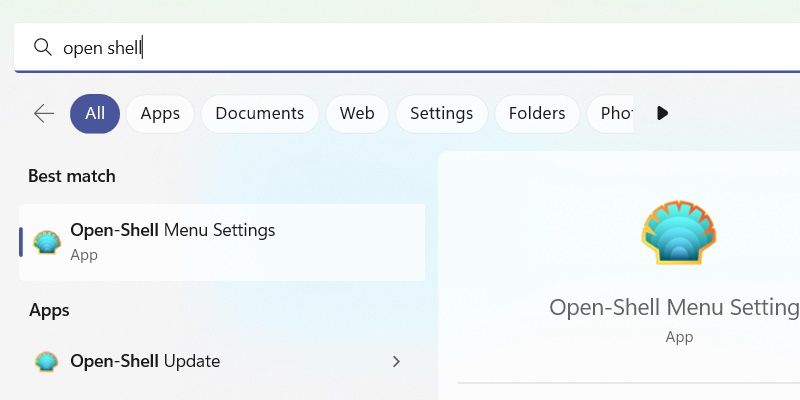
Alternatively, you can search for ‘Open-Shell Menu Settings’ in the Windows search and open it from the search results.
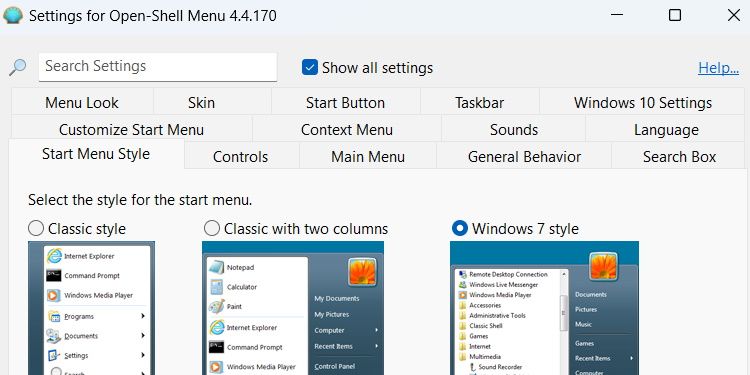
When the app opens, switch to the ‘Start Menu Style’ tab and choose one of the three classic Start menu styles – Classic style, Classic with two columns, and Windows 7 style. Each style has a different set of options to configure the Start menu.
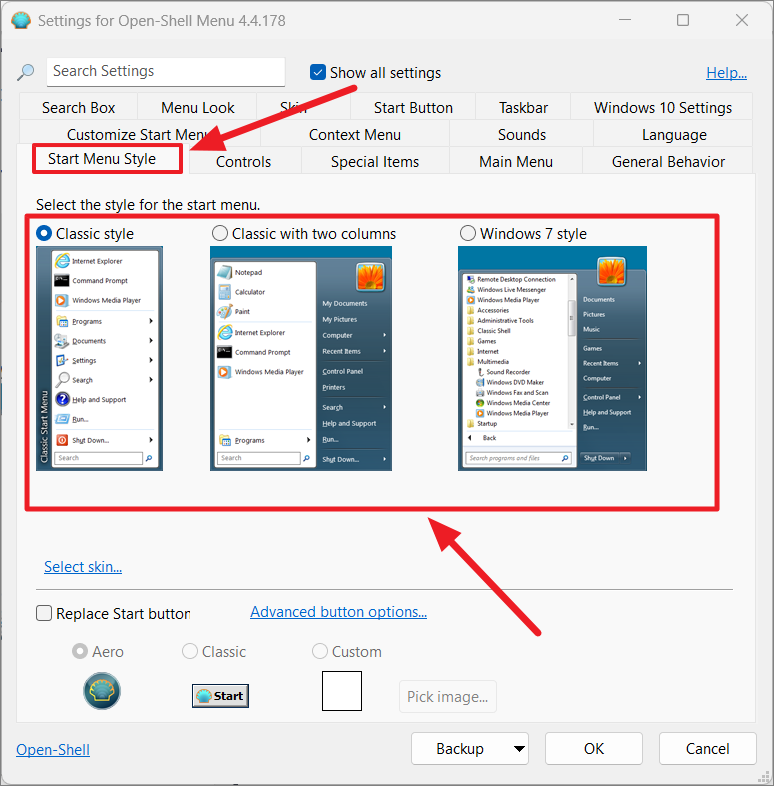
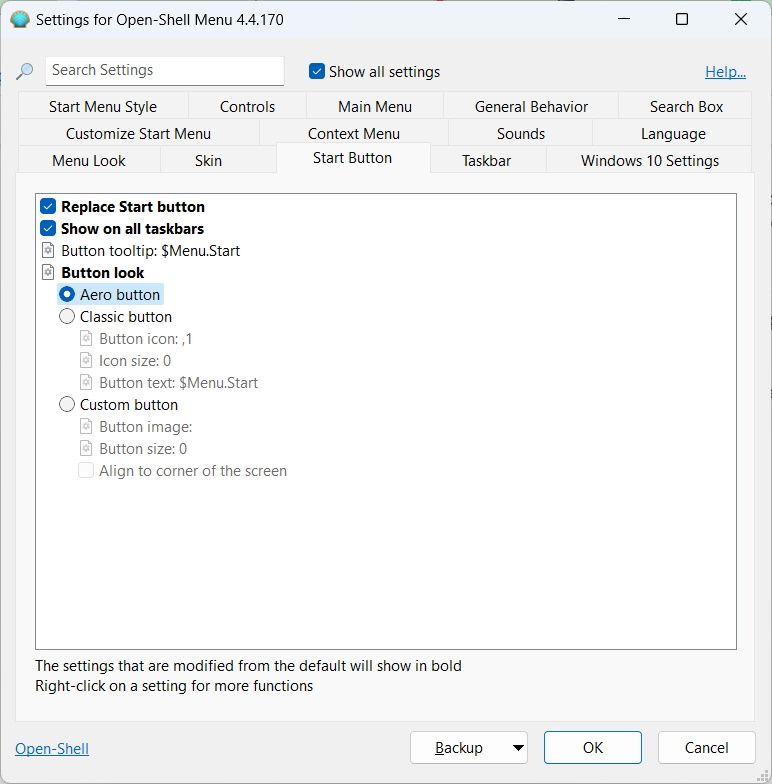
After choosing the start menu style, check the ‘Replace Start button’ box. Then, select one of the start menu icons. ‘Aero’ is the reliable Start menu button with the Open Shell icon. Then, click ‘OK’ to apply the settings.
Once you click ‘OK’, the new Start menu will appear in the left corner of the taskbar.
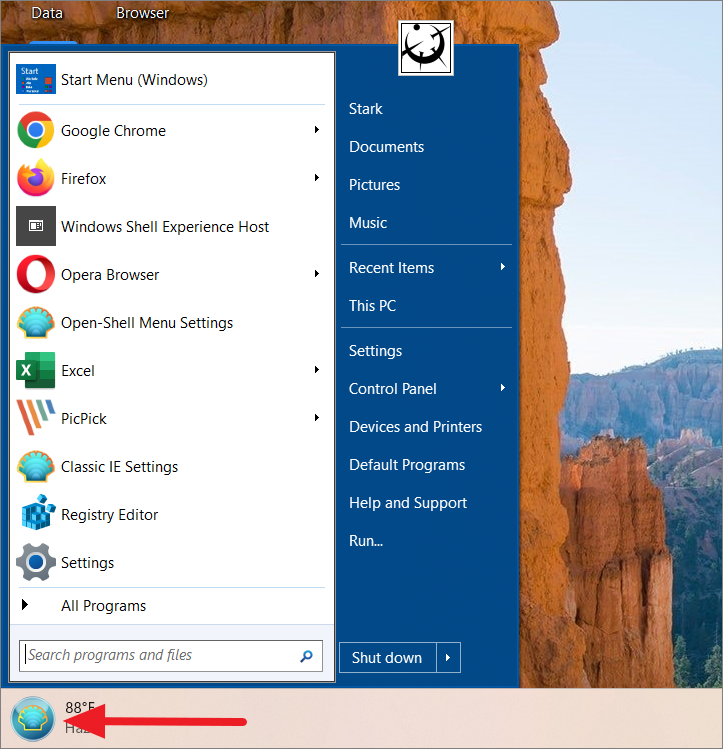
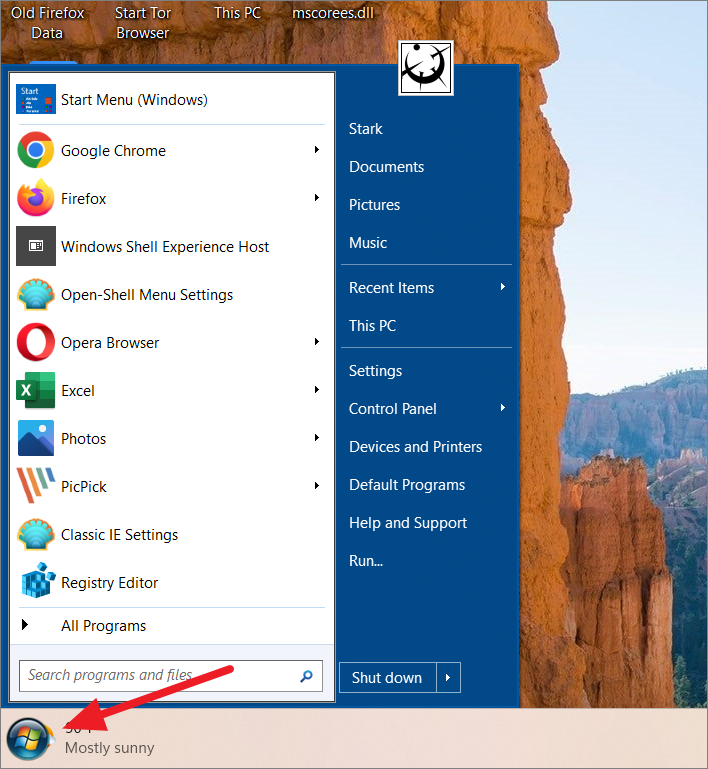
Classic Style:

Classic with two columns:
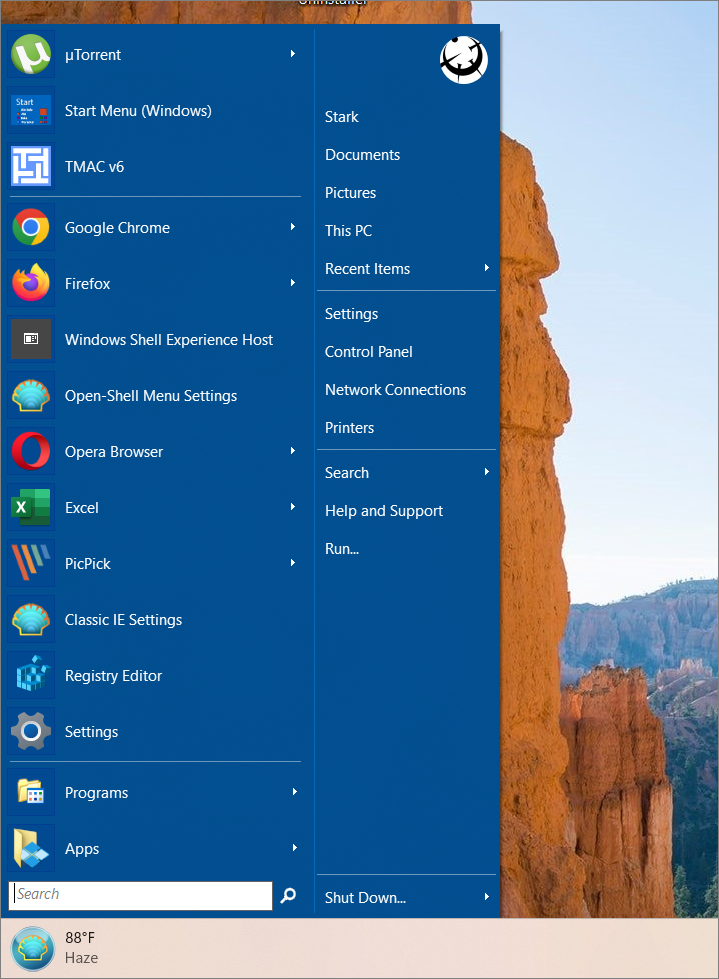
Windows 7 style:
With Open-Shell, you can also use a custom icon as the Start menu button. To do that, select the ‘Custom’ option under Replace Start button and click the ‘Pick image’ button.

Then, choose a logo or picture that you want to use as the start menu button and then, click ‘OK’. The image must be in .PNG or .BMP format and it must be small in size. You can download different types of Windows Start menu icons from the classic shell website for free.

This will apply the new start button to the taskbar.
To customize the Keys and Mouse functions, go to the ‘Control’ tab or ‘Basic settings’ and modify the below options.
- Change Start menu behavior for left click
- Change Start menu behavior for right-click
- Change Start menu behavior for middle-click
- Change Start menu behavior for keyboard shortcuts
- Change Start menu items
- Hide and unhide Start menu items
The settings that are changed from the default settings will be highlighted in bold.

Customize Start menu Skins
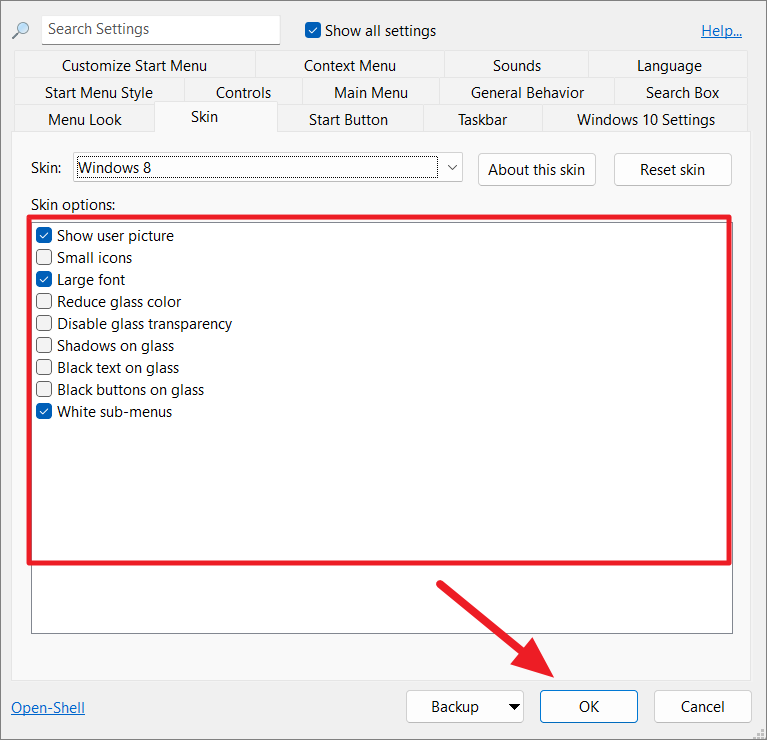
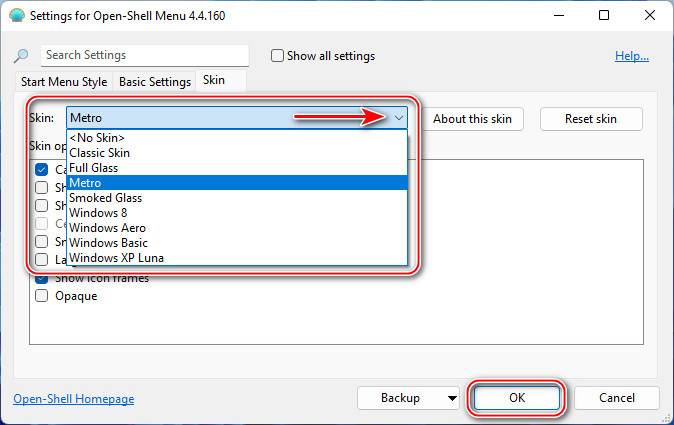
You can also change the Start menu skins to change their appearance. To do that, switch to the ‘Skins’ tab and choose a skin from the drop-down menu.

Once you select the skin, you will have a list of options below that can help further customize your start menu’s look. Simply, check or uncheck the options to change the settings.
For example, you can use the skin options to make the following changes:
- Show/hide user profile picture
- Enable Small icons in your Start menu
- Change main menu color and side menu color
- Change text colors for different columns
- Add image background to different columns of menus
- Change the opacity of the start menu
- Change Transparency level
- Reduce glass color etc.
After making changes to the options, click ‘OK’ to apply.
Customize Start Menu Items
You can also add or remove items from the Start menu, edit the menu items (including its command, link, icon, label, etc.), and create sub-menus.
Launch Open Shell and go to the ‘Customize Start Menu’ tab. As you can see, we have two columns of menu items – current menu items in the Start menu and the available commands that can be added to the Start menu.
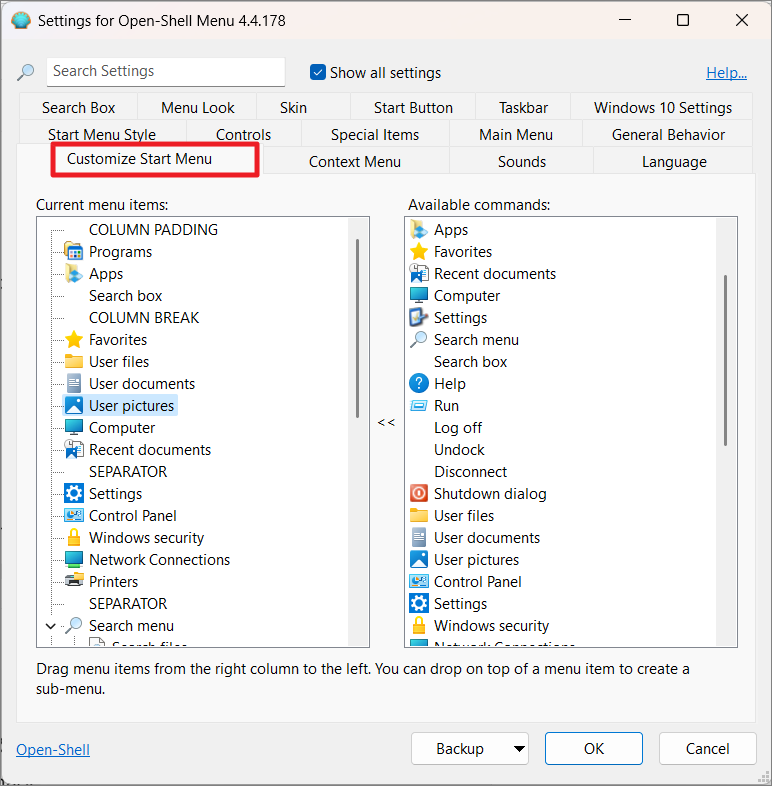
To add a command to the Start Menu, first, select where you want to insert the command under the current list and simply double-click or select an item in the ‘Available commands’ and press Enter.
In the below example, we want to insert ‘Control Panel’ below ‘Settings’.

To do that, find and select ‘Settings’ on the left and then find and select ‘Control Panel’ on the right. Then, double-click on it or select and press Enter. You could also drag an item from Available commands to your desired location on the current menu items.
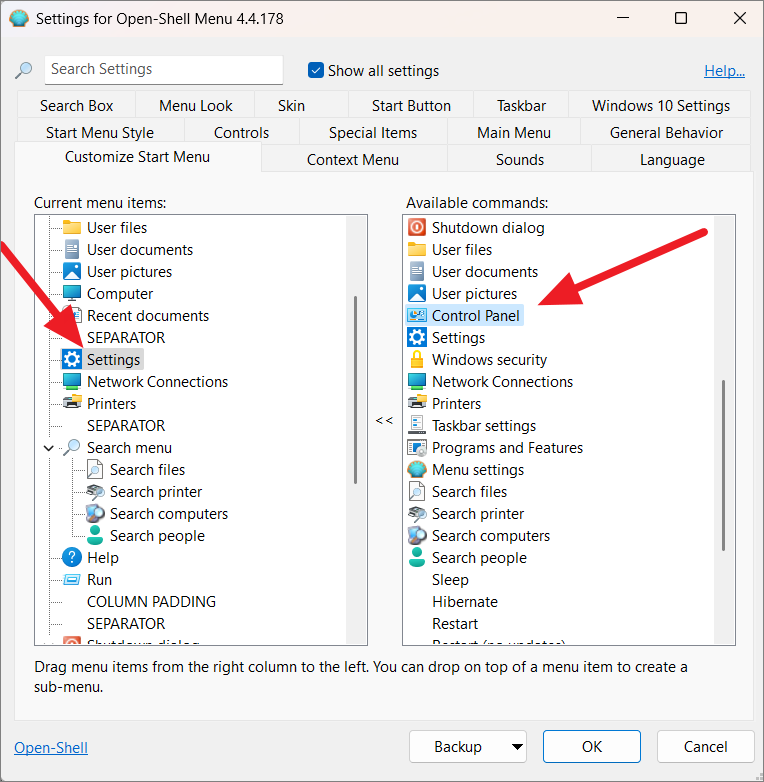
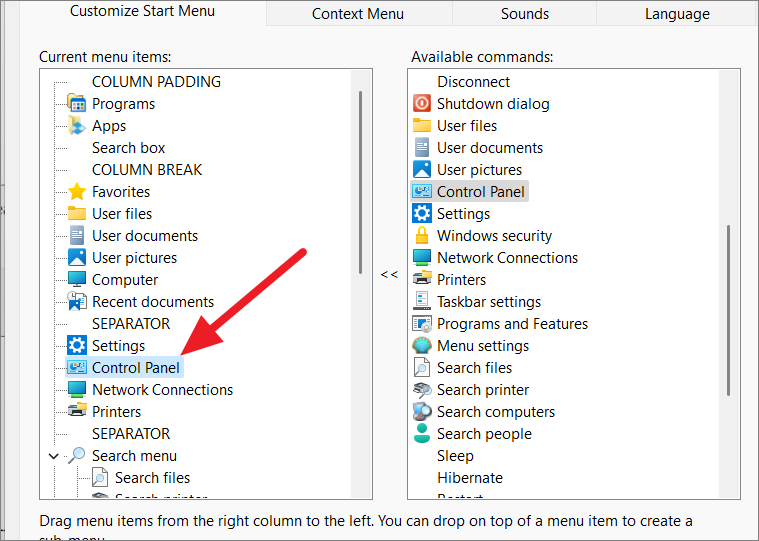
This will add the selected item to the current menu.
To edit a menu item, right-click on an item and select ‘Edit Item’ from the context menu. To remove a menu item, select ‘Delete Item’ from the context menu
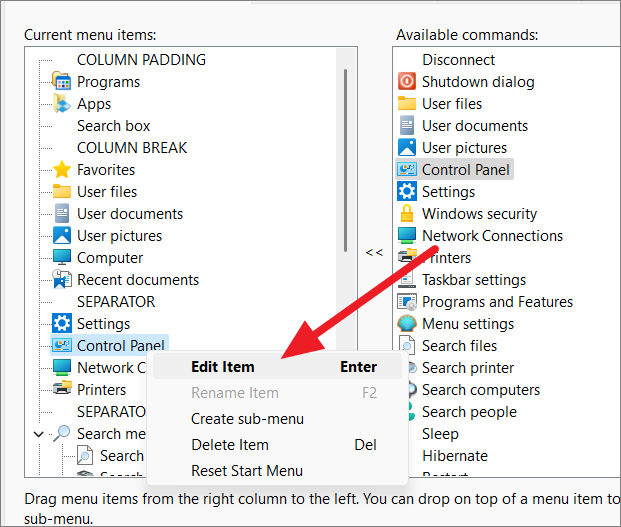
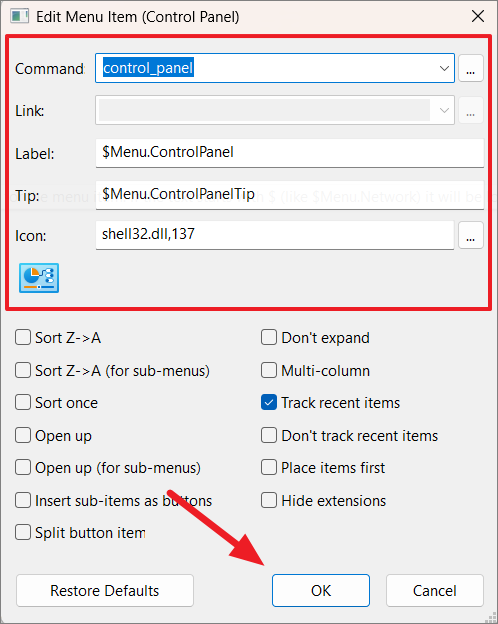
In the Edit Menu Item dialog box, you can make changes to menu items’ commands, links, labels, tips, and icons. In addition to that, you can organize and customize sub-menu items using the below options like sorting the sub-items (ascending or descending order), inserting sub-items as buttons, tracking recent items, hiding extensions, etc. In the end, click ‘OK’ to save the changes.
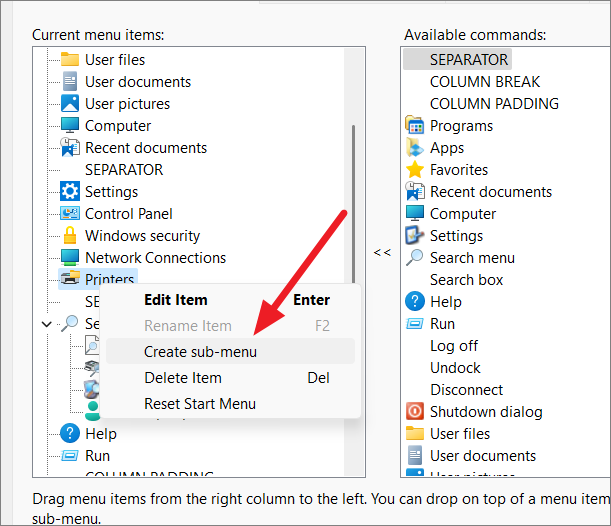
If you want to create a sub-menu under the main menu, right-click the item on the left and select ‘Create sub-menu’. And then drag an available item from the right to the empty submenu.
Customize Start Menu Sections
To customize the Start menu sections and menu items, go to the ‘Main Menu’ section in the Open Shell window.
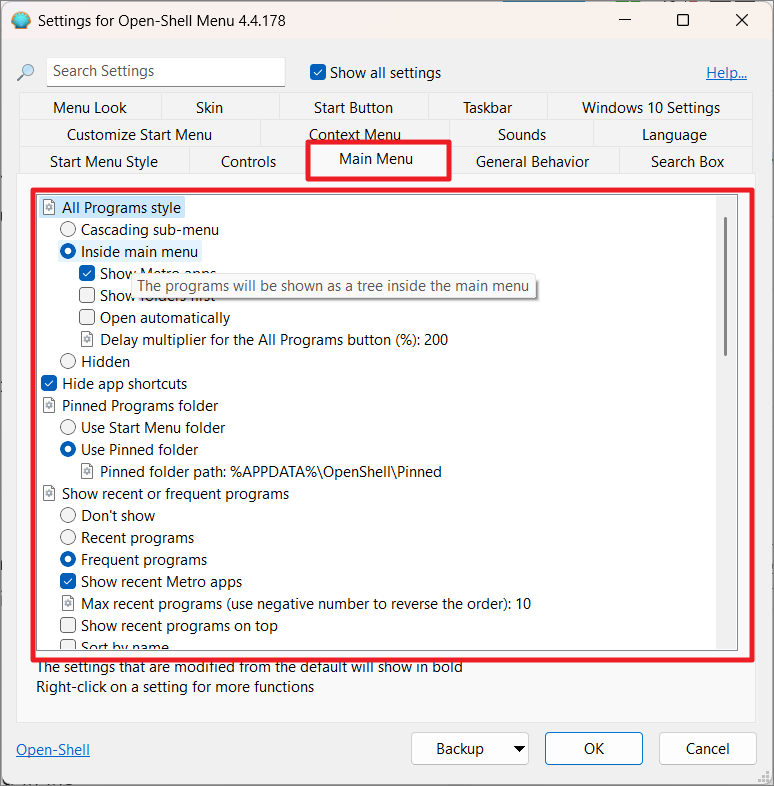
Here, we have the options to change the following options:
- Change All Programs style
- Hide/Show App Shortcuts
- Modify pinned programs folders
- Enable jumplists
- Customize the start menu pane sizes
- Sort main menu items
- Configure Shutdown commands.
Modify General Start Menu Behavior
This section lets you customize the Start menu behavior and other functionalities.
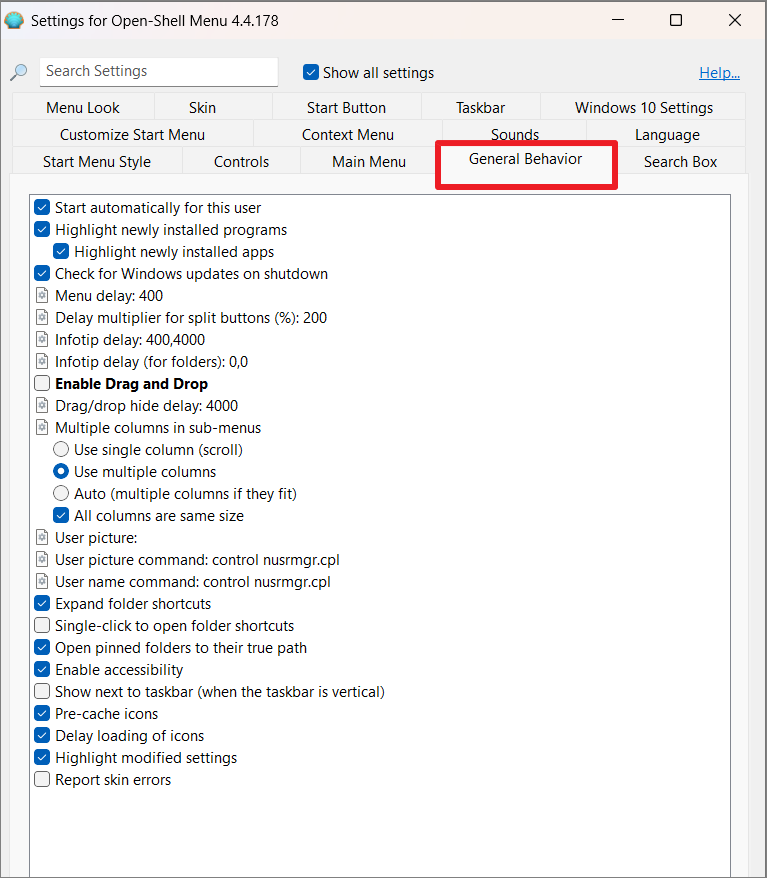
Here you can change the below settings:
- Enable Open-Shell to automatically start with Windows
- Check for Windows updates in the shutdown
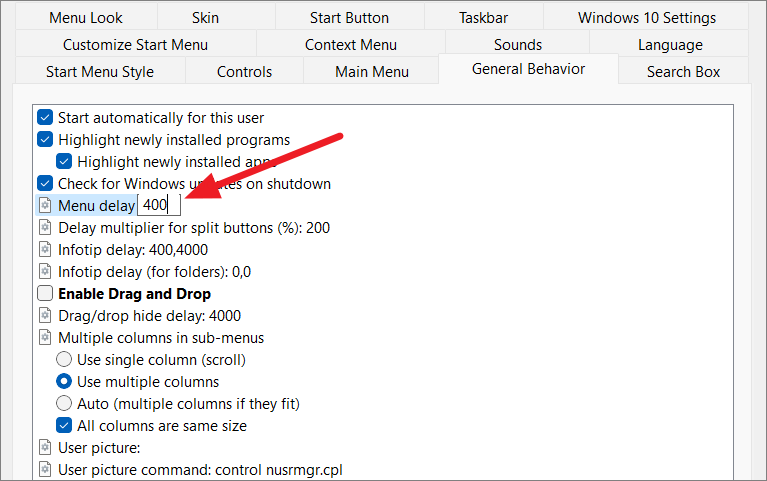
- Configure Time delays to show menu, info tips for apps and folders, and split buttons.
- Enable drag and drop items in the Start menu
- Use single, multiple columns, and auto columns to show items in sub-menus.
- Change User profile picture
- Configure shortcut folders
- Enable pre-cache icons, etc.
To change a time delay, select the option and edit the number beside it.
Customize Start Menu Appearance
In addition to skins, Open Shell provides you with a list of options that can change the way the start menu looks. First, switch to the ‘Menu Look’ tab and modify the settings as per your needs.
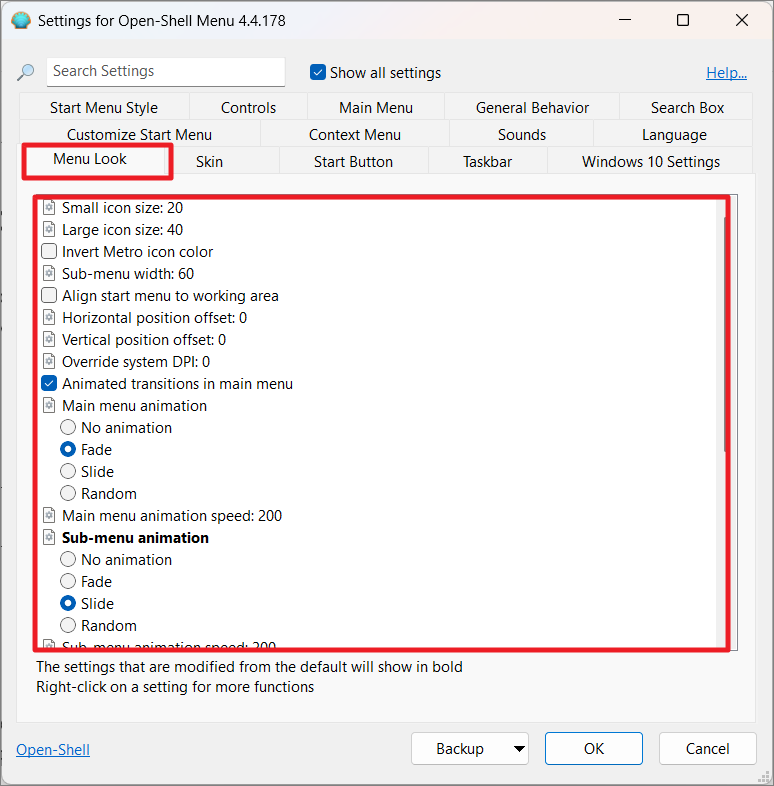
To change Start menu aesthetics, use these options:
- Change Small and large icon sizes
- Define Sub-menu width
- Modify Horizontal and Vertical position offset
- Change Main and Sub-menu animation
- Modify the Main menu and sub-menu animation duration (how they appear before they disappear).
- Change the duration of the fade animation for the selected item
- Modify the Start menu DPI value which controls the size of text, icons, and other graphical elements
- Configure Start menu shadow, glass behavior, and opacity.
- Customize Font smoothing
Customize the Context Menu of the Start Menu
Now, let us see how to customize Start Menu’s right-click menu. Go to the ‘Context Menu’ tab of Open-Shell and configure the below options:
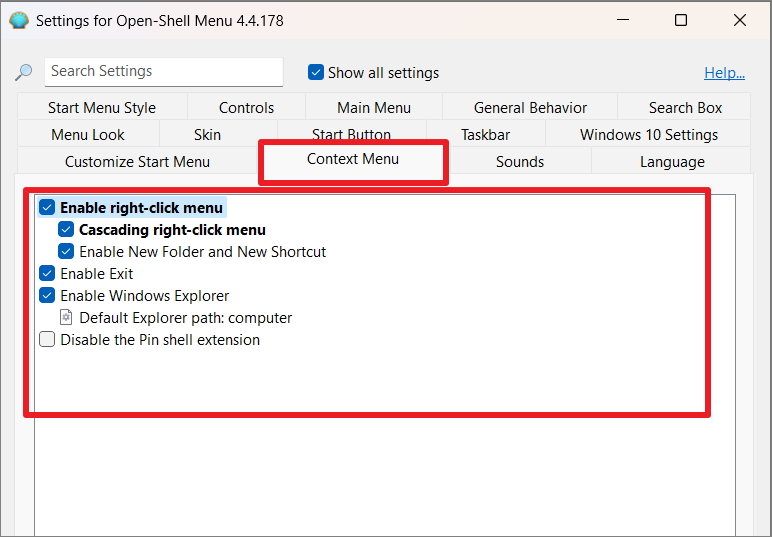
- Enable/Disable right-click menu (context menu)
- Toggle Cascading right-click menu to place additional settings in a sub-menu.
- Enable New Folder and New Shortcuts options to the right-click of the Start menu
- Enable the File Explorer option in the right-click menu. You can set a particular folder as the default path for the File Explorer command in the Start menu.
- Toggle ‘Pin to Start Menu (Open-Shell)’ in the Start menu.
Customize the Search box in Start Menu
All Start menus have a search box that lets you search your computer for apps, settings, files, etc. By default, the search box searches everywhere on your computer for contents. But, in the Search Box tab, we can configure where Windows can search on your device.
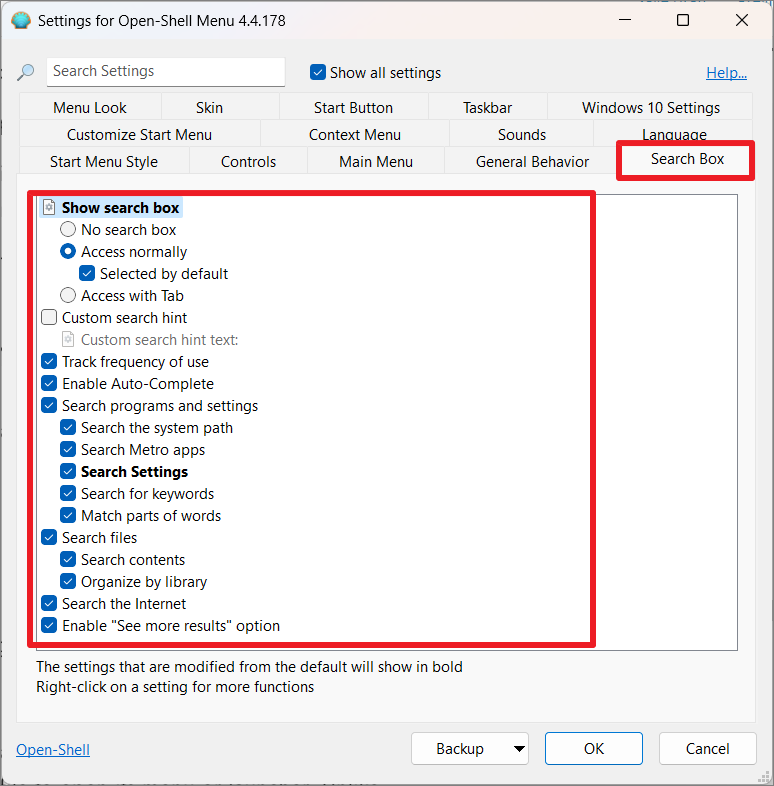
- Turn On or Off the Search box in the Start menu and choose how to access it.
- Set up search custom search hint
- Toggle usage tracking
- Enable or Disable Auto-Complete
- Configure Programs and Settings Search including index locations
- Toggle file search
- Enable or Disable Internet search
- Enable the ‘See more results’ option.
Customize the Taskbar in Windows 11
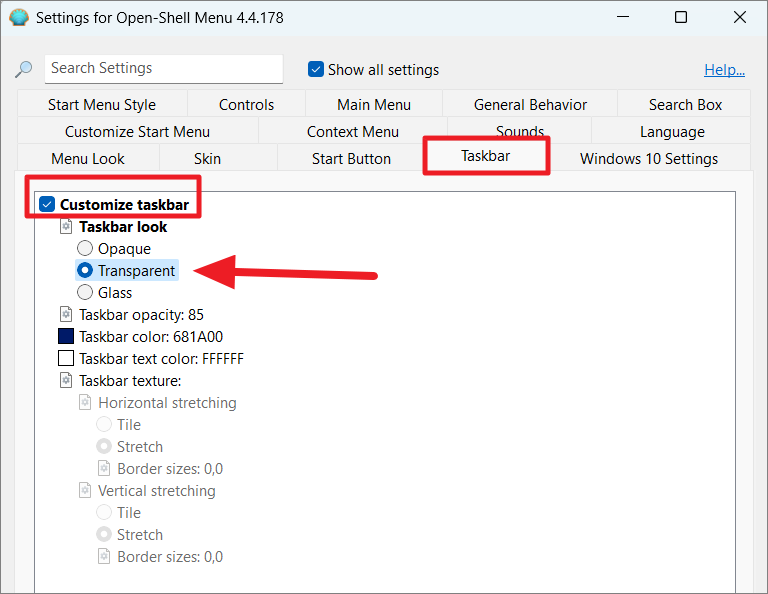
Open Shell is primarily used to customize the start menu and its offers only a few options to customize the taskbar. However, you can still change the look of the taskbar by changing opacity, color, text color, and texture.
In the Open Shell app, move to the ‘Taskbar’ tab and check the ‘Customize taskbar’. Now, you can change the taskbar look with three options – ‘Opaque’, ‘Transparent’, and ‘Glass’
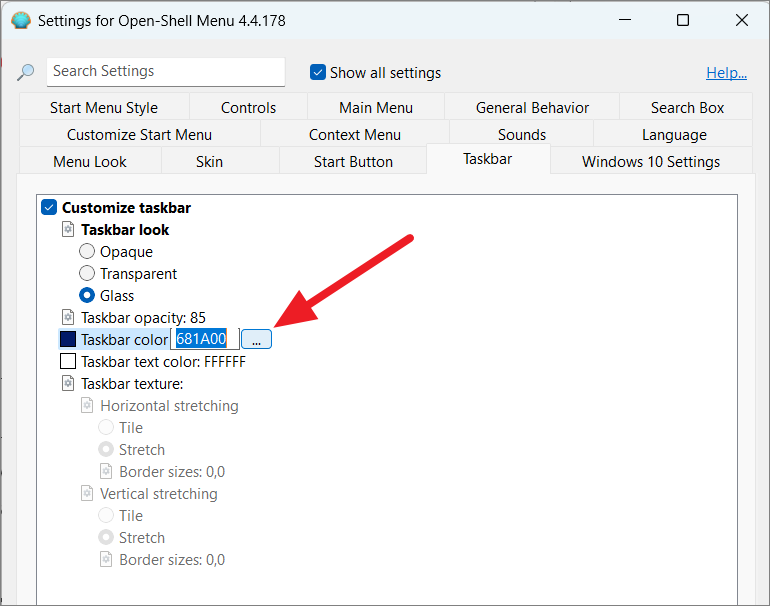
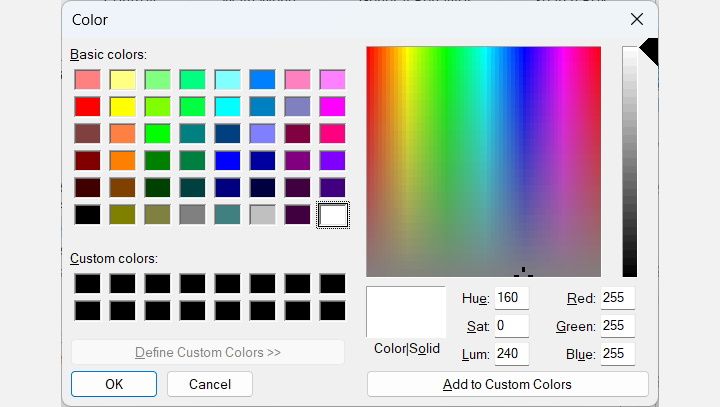
After selecting Taskbar look, you can change taskbar opacity, color, and text color. To change the taskbar color or taskbar text color, select the option and click the small rectangle box with three dots in it.
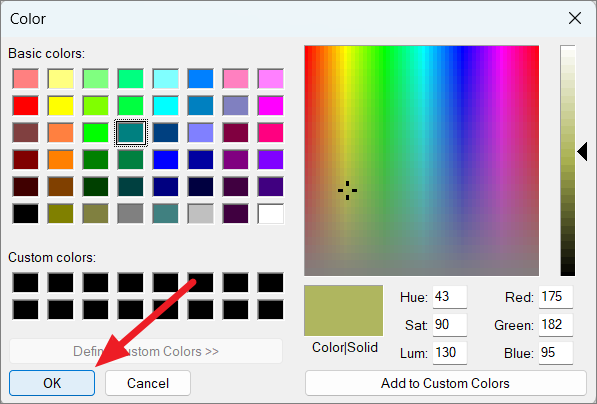
This will launch the color dialog box where you can pick your desired color. Then, click ‘OK’ to apply.
Customize File Explorer using Open Shell
Open Shell also lets you customize various aspects of the File Explorer interface. Once Open Shell is installed, you will notice an additional menu bar in the File Explorer window that contains tools to use File explorer (as shown below).
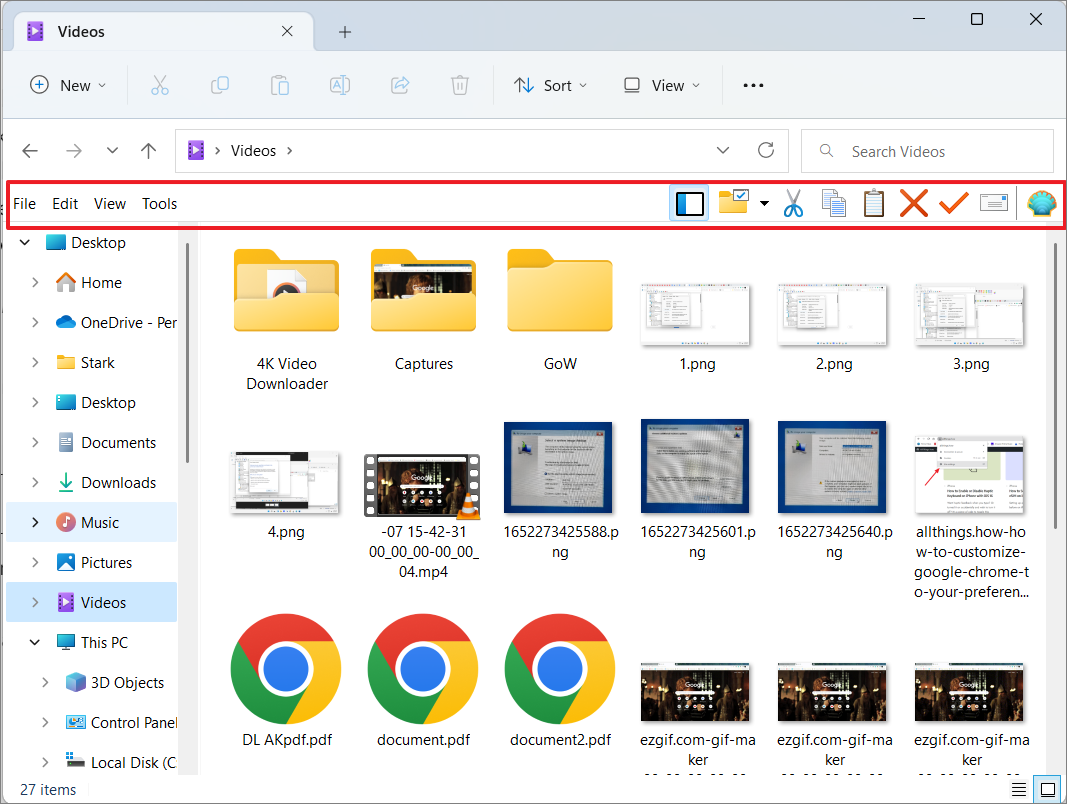
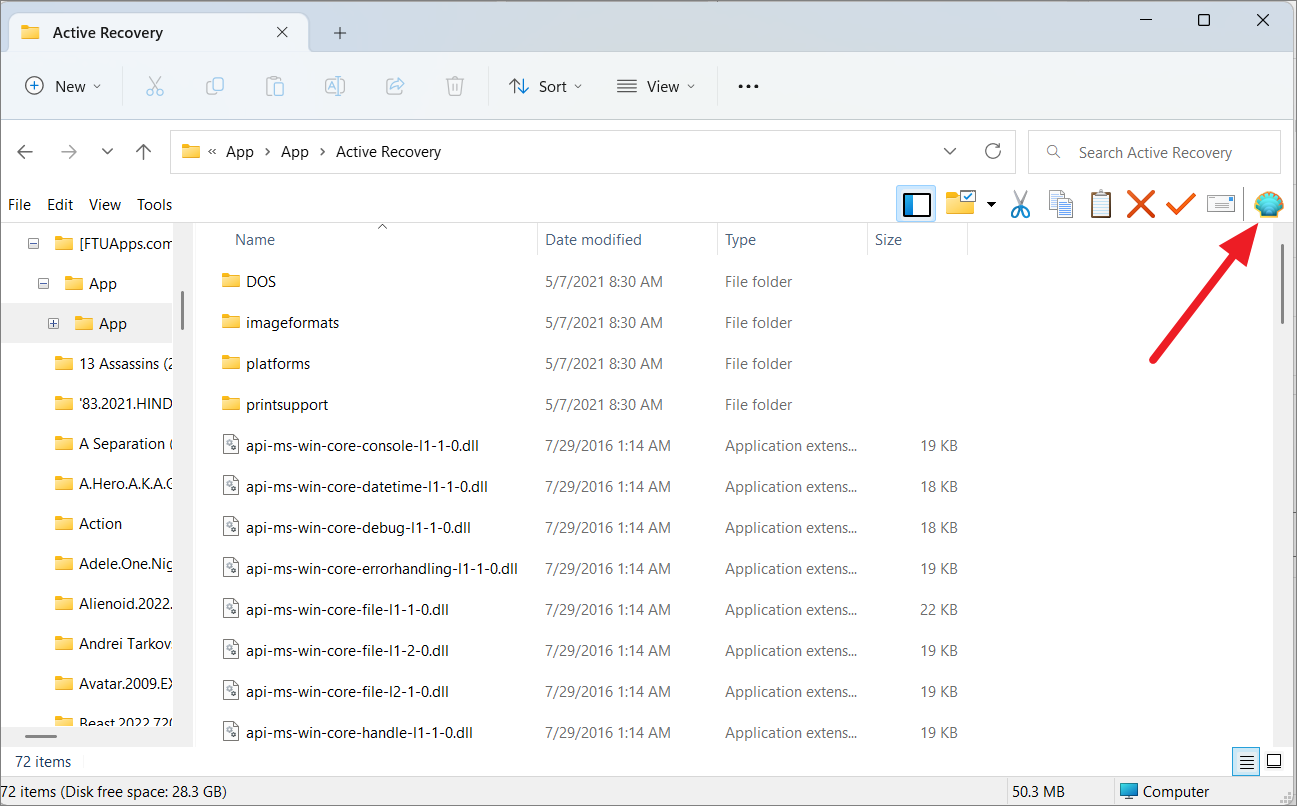
To change settings for the classic explorer, click the Shell icon in the menu bar.
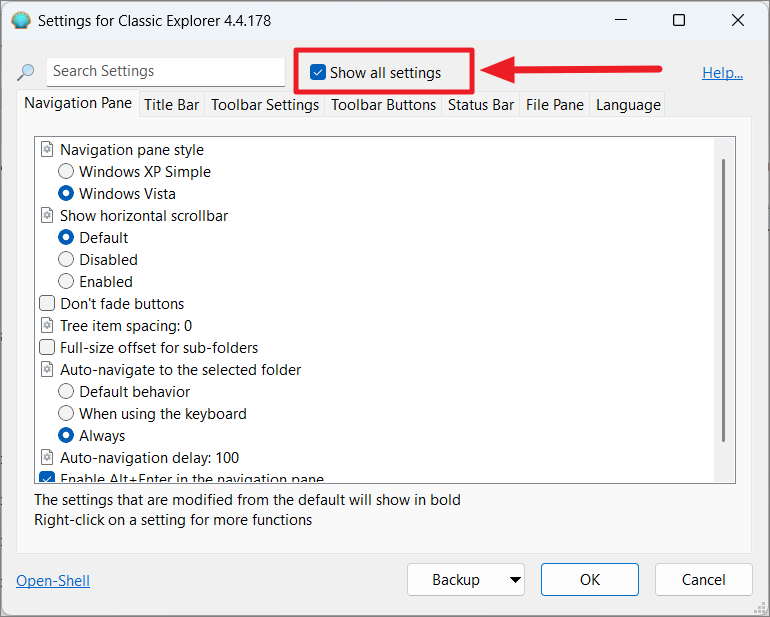
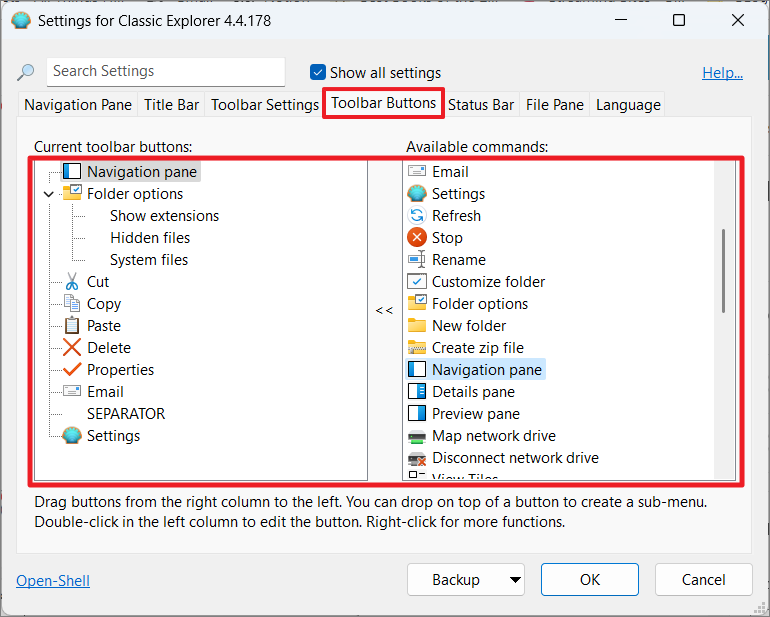
Now, check the ‘Show all settings’ option to display all explorer settings. Here, you can customize File explorer’s navigation pane, title bar, toolbar settings, toolbar buttons, Status bar, file pane, and UI language.
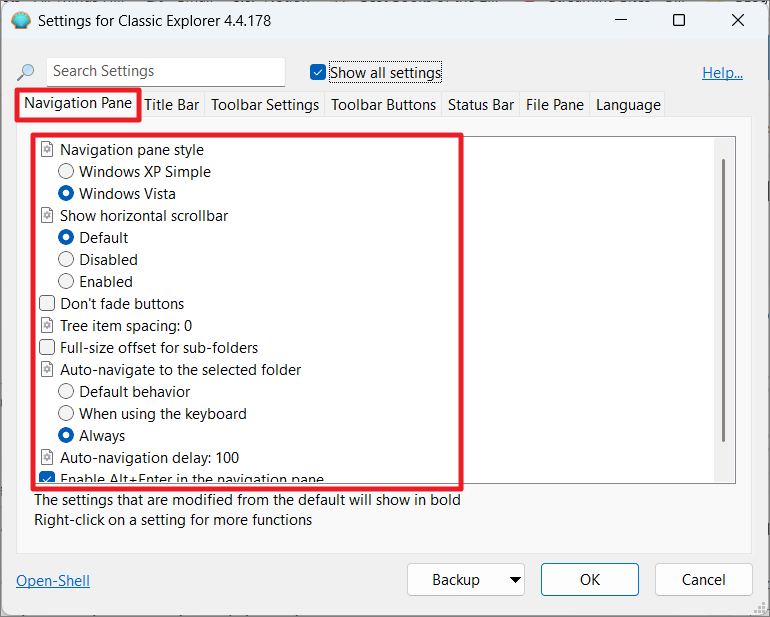
Under Navigation Pane, you can change the navigation pane style, show/hide horizontal scrollbar, control spacing between items in the folder tree, auto navigation delay, etc.
Under Toolbar settings, you can change the size of icons. The ‘Toolbar buttons’ tab lets you add, remove, and edit buttons to the toolbar to enhance usability.
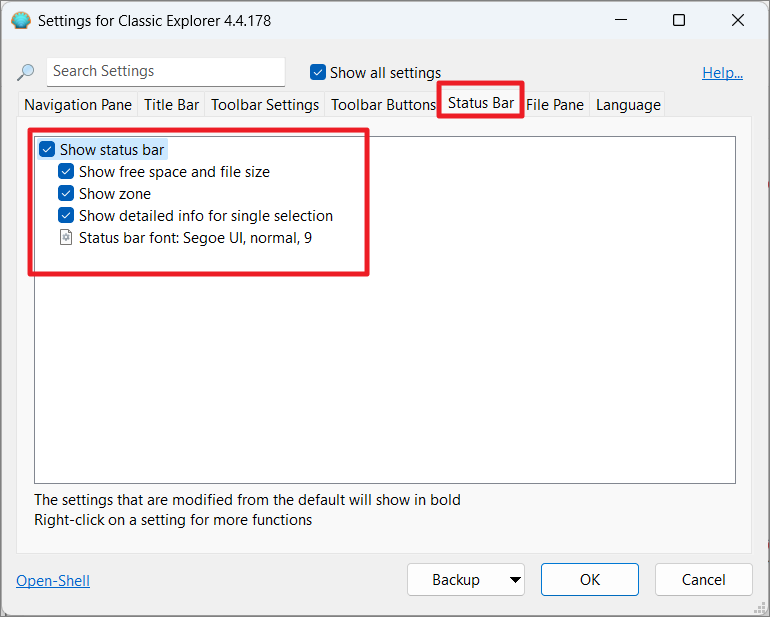
In the Status bar tab, you can choose to show or hide free space, file size, zone, and file details as well as change the status bar font style and size.
Enable Classic Taskbar in Windows 11
Although the Open Shell lets you change the look of the Taskbar, it doesn’t necessarily allow you to bring back the classic taskbar. The lack of customization makes the taskbar one of the most disliked features in Windows 11. If you hate your new taskbar, follow these instructions to enable the classic taskbar and system tray. You can tweak the registries a little bit and bring back the taskbar that looks more like the Windows 10 taskbar.
First, launch Registry Editor by hitting Windows + R and typing regedit, and then clicking ‘OK’. Click ‘Yes’ if you are prompted by the User Account Control.

Then, navigate to the following location:
HKEY_LOCAL_MACHINE\SOFTWARE\Microsoft\Windows\CurrentVersion\Shell\Update\Packages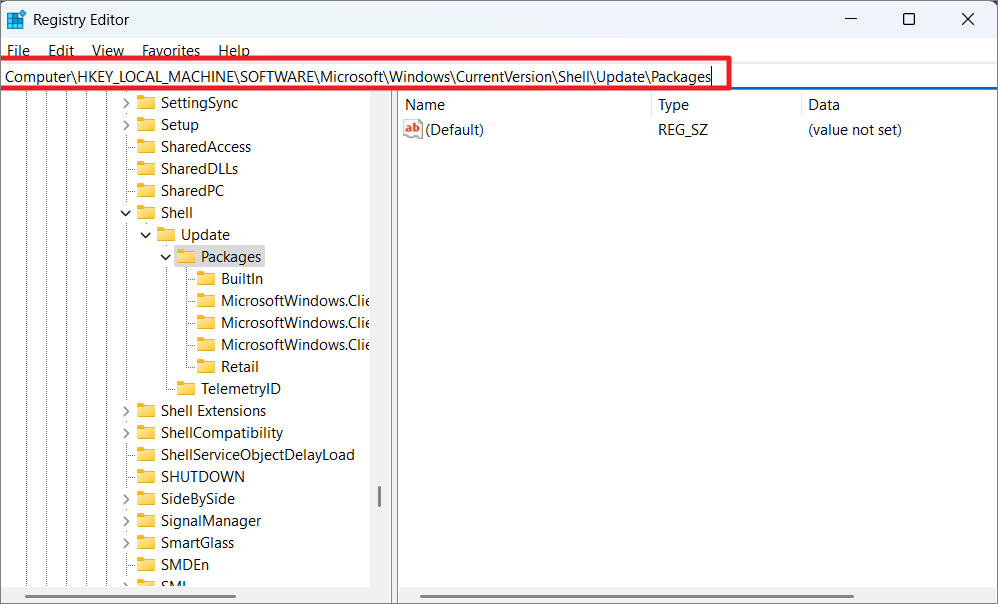
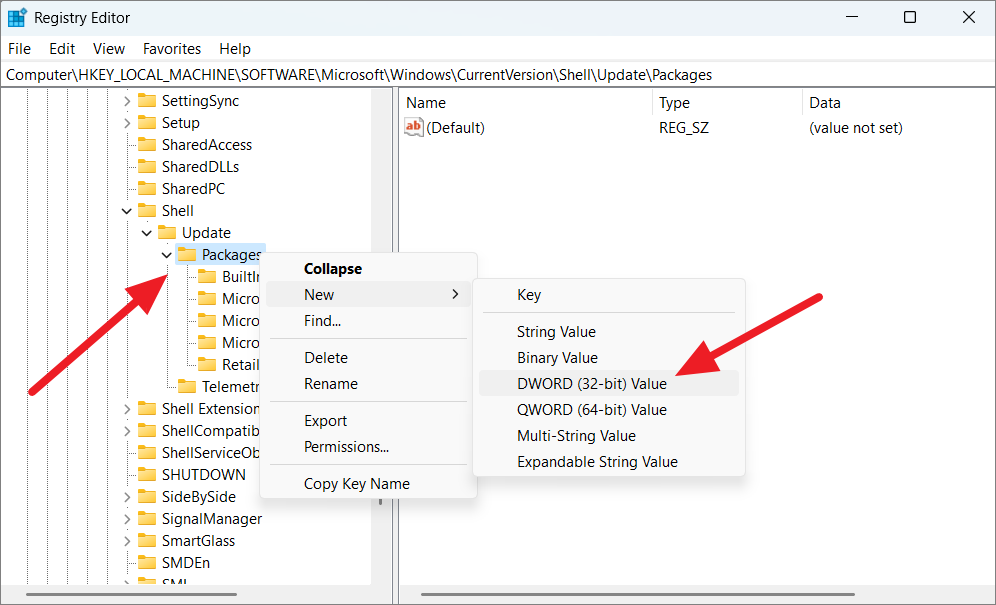
Then, create a new DWORD (32-bit) value by right-clicking the Packages folder on the left or right-clicking on an empty space in the right window pane and selecting ‘New’ and then ‘DWORD (32-bit) Value’.
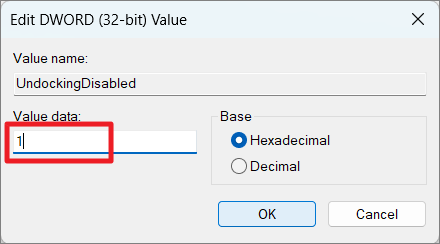
Next, rename the newly created registry value to UndockingDisabled.
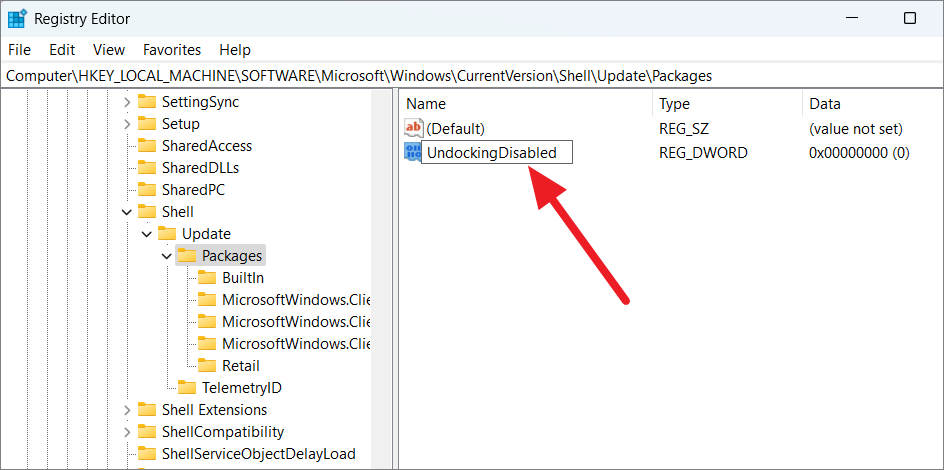
Then, set the value of ‘UndockingDisabled’ to 1.
After that close the Registry Editor and reboot your computer.
Once the system restarts, Windows 10 taskbar will be there. It also returns the classic context menu of the taskbar as shown below.

This registry tweak will even bring back the classic context menu of the desktop.

But, you will notice the volume, network, battery, and notification center icons are missing on the left side of the taskbar. To change that, open the Run dialog box (Windows + R) and type shell:::{05d7b0f4-2121-4eff-bf6b-ed3f69b894d9} , and then hit ‘Ok’.

In the Notification Area icons control panel, click on ‘Turn system icons on or off.’

In the next window, toggle Volume, Clock, Network, Battery, and Action Center icons using the respective drop-down menus. Then, click ‘OK’ to save the changes.

If you see the Search icon in the taskbar, you can hide it since it doesn’t actually work. To do that, go back to the Registry Editor and navigate to the following path:
HKEY_CURRENT_USER\Software\Microsoft\Windows\CurrentVersion\Search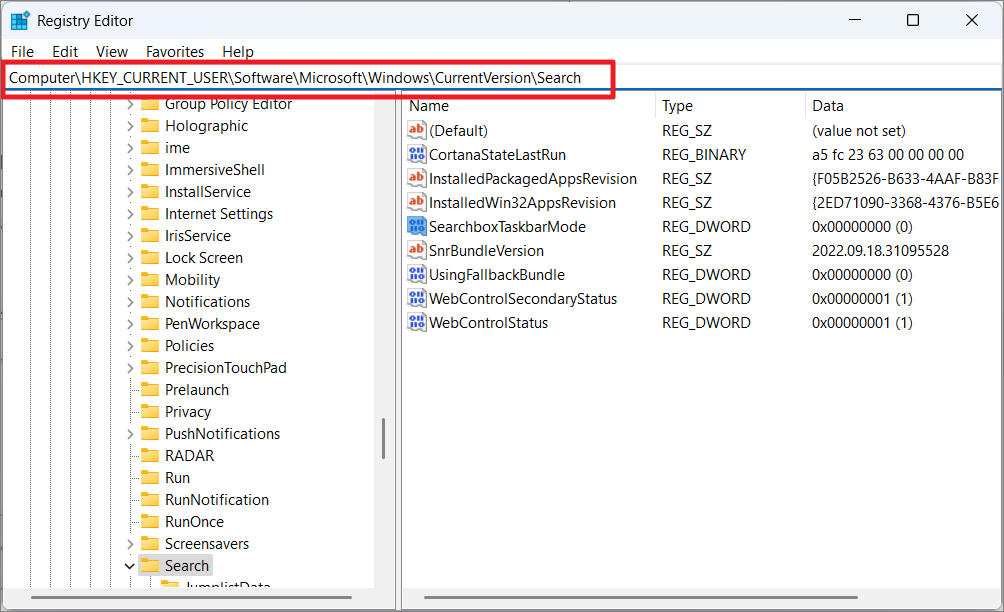
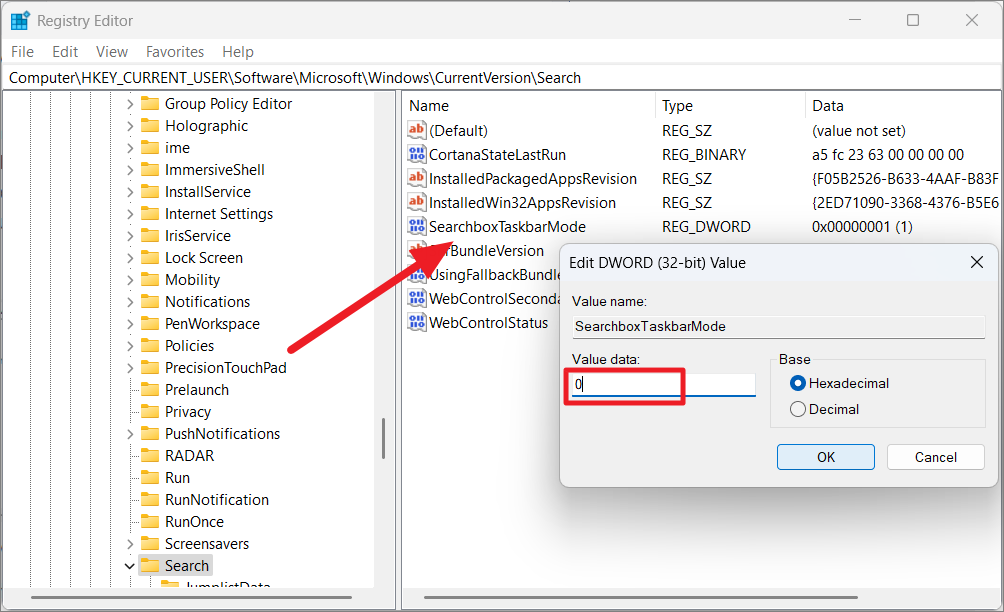
Then, locate the registry named ‘SearchTaskbarMode’ on the right side pane and change its value to 0.
Finally, you will have a taskbar that looks and works like the Windows 10 taskbar.

Open-Shell Not Working on Windows 11?
Many users have complained that Open-Shell is not working correctly on their Windows 11 computers. It could be due to several reasons including unexpected error in a program, malware, Open Shell settings not compatible or misconfigured, search index settings not compatible, corrupted system, etc. Whatever the case is, these 8 methods help you fix your Open-Shell program.
Restart your PC
Before you try any other troubleshooting methods, it is always recommended to restart your PC if you encounter any issues. Most of the problems can be resolved by performing a simple Windows restart. All you have to do is open the Start menu, click on the ‘Power’ button or click the arrow button near the Shutdown button (in case it is a classic Start menu and select ‘Restart’.
If your Start menu is not working even to access the shutdown command, then press Ctrl+Alt+Delete and click the Power button, then ‘Shut Down’ on the lock screen.
Restart your File Explorer
Windows Explorer, also known as explorer.exe is an important Windows process that controls most of the system’s graphical user interface (GUI), including the Start menu, taskbar, Open-Shell, etc. So if there is any problem with this process, it can cause conflict with the Open Shell. In such cases, follow the below instructions to restart your Windows explorer and resolve the issue:
First, right-click the Start menu button and select ‘Task Manager’. Alternatively, you can also press Ctrl+Alt+Delete and select ‘Task Manager’ from the lock screen.

When Task Manager opens, go to the ‘Processes’ tab and locate the ‘Windows Explorer’ or ‘explorer.exe’ process under the list of processes. If you cannot find the said process, just open a File Explorer window and the process will appear in the list.
Once you find the Windows Explorer process, right-click on it and select ‘Restart’ from the context menu.

As soon as do this, your screen will blink and the taskbar will disappear and reappear in a moment. After that, check if the Open-Shell is working properly.
Update Open Shell
When you install Open Shell, it also comes with a separate UI for checking updates for the app. If you are facing an unexpected error on the Open Shell or if the app keeps crashing, you can check for updates.
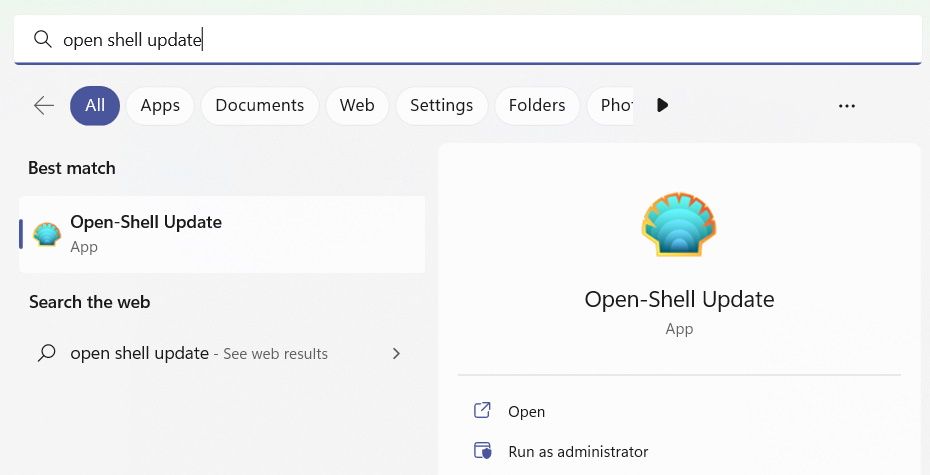
Open the Start menu. Then, search for ‘Open Shell update‘, and select the program from the result.

In the Open Shell update window, ensure the ‘Automatically check for new version’ option is checked and click on the ‘Check now’ button. If you have any pending updates, the app will download and install them.

And when you see ‘Your version of Open Shell is up to date’, click ‘OK’.

Re-register Shell Experience
Another method that solves most of the Open Shell problems is re-registering the shell experience. Here’s how you can do that:
First, open the Start menu and search for ‘Windows Powershell’ and click on the ‘Run as an administrator’ option for the top result to open it.

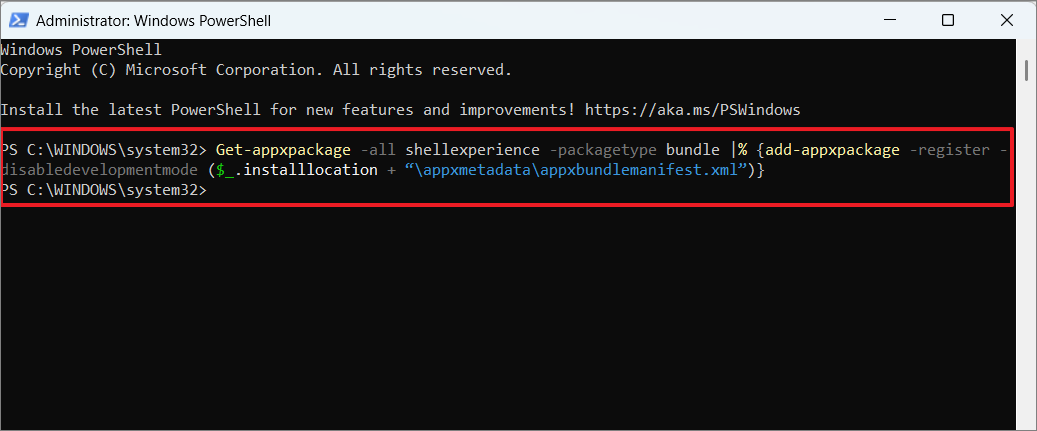
In the PowerShell window, type the following command and press Enter.
Get-appxpackage -all shellexperience -packagetype bundle |% {add-appxpackage -register -disabledevelopmentmode ($_.installlocation + “\appxmetadata\appxbundlemanifest.xml”)}Wait for the command to finish running, then close the PowerShell window and see if it has fixed the issue with the Open Shell.
You can also try the below command to Reset Shell Experience Host:
Get-AppxPackage Microsoft.Windows.ShellExperienceHost | reset-AppxPackageRebuild the Windows Search Index
If the above method doesn’t solve the Open Shell issue, you can try rebuilding the Windows search index. Windows Search Index is a database that helps you navigate to any particular location and find things by creating an index for search results, email messages, files, documents, and other content on your PC. Here’s how you can rebuild Windows Search Index:
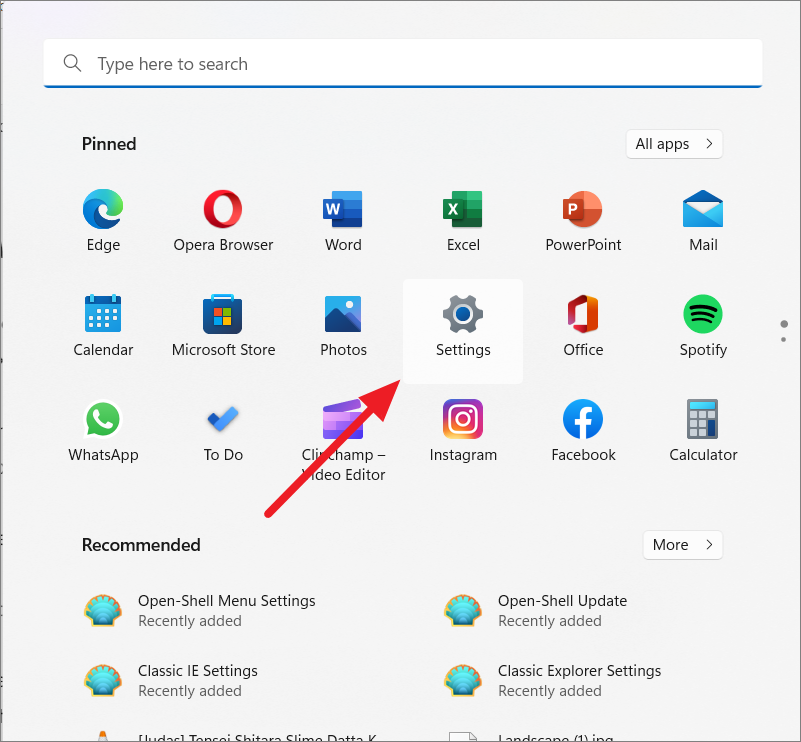
Open the Windows Settings app from the Start menu or use the Win+I shortcut.
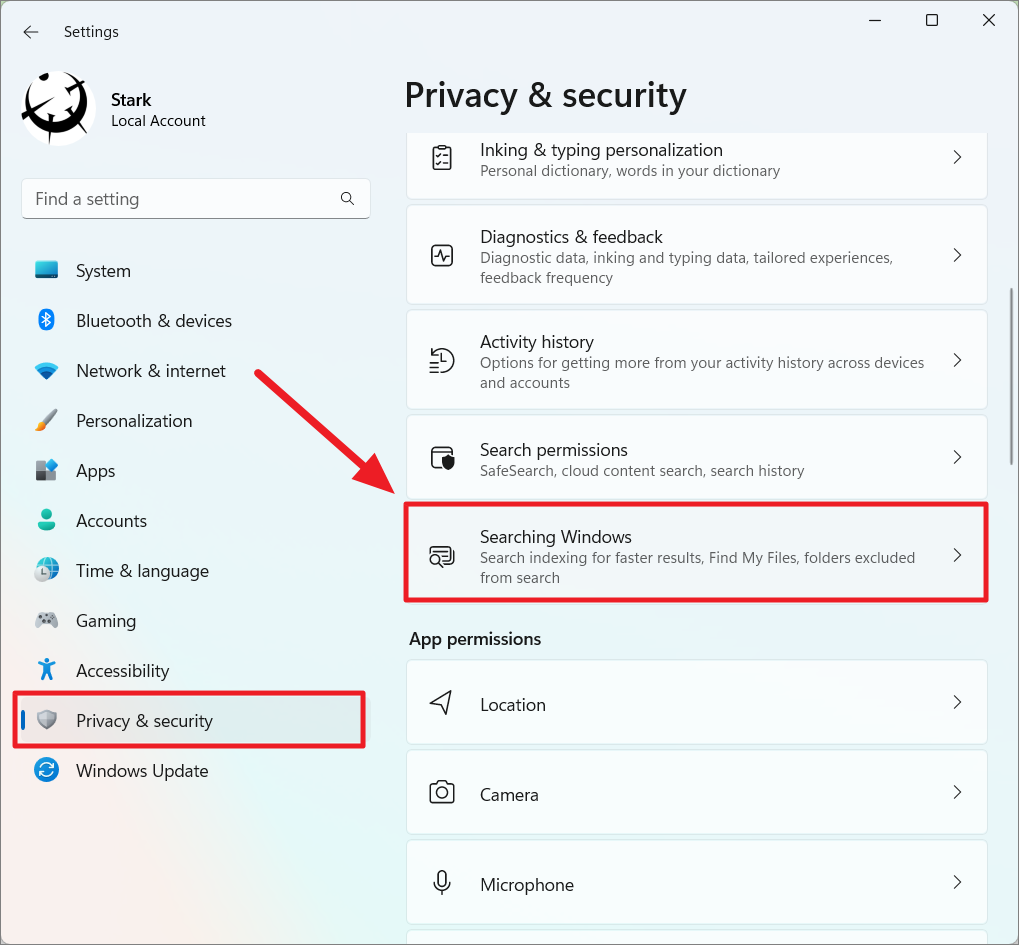
In the left pane of the Settings, click on the ‘Privacy & security’ section and then scroll down to the right and select ‘Searching Windows’.
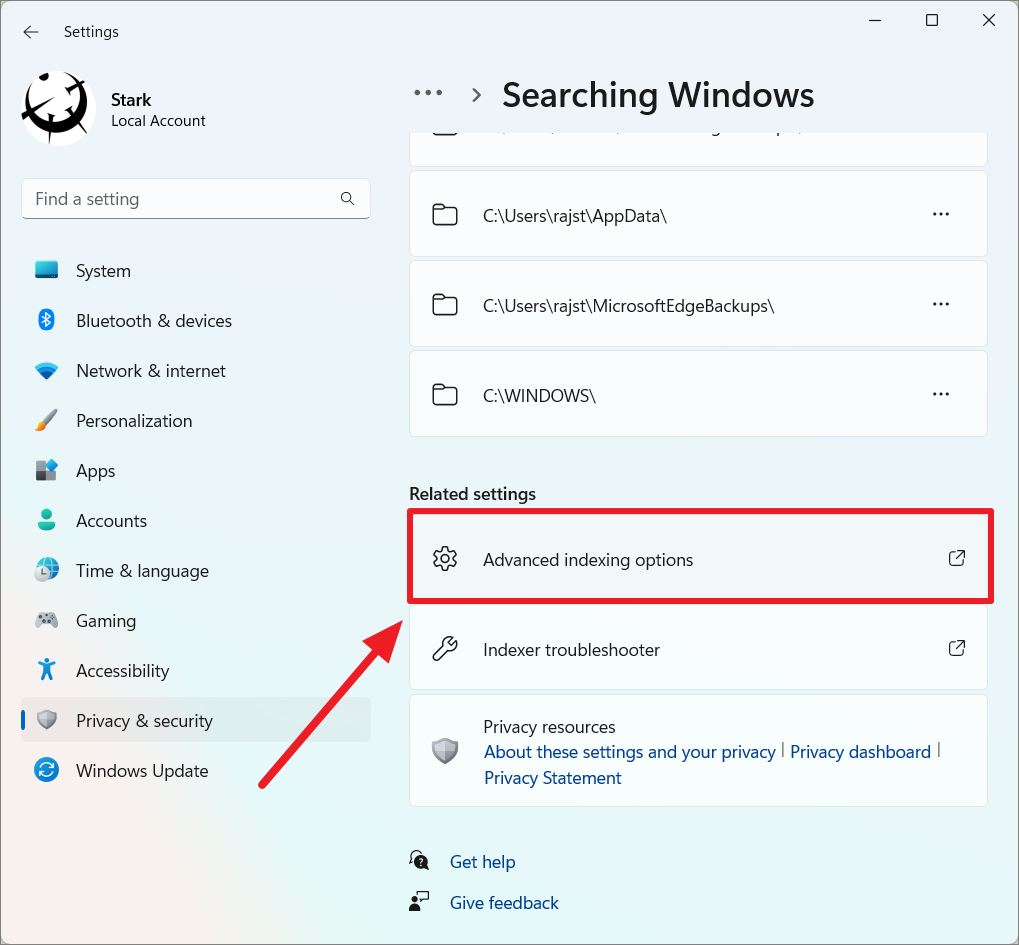
On the next page, scroll down to the Related settings section and click on the ‘Advanced indexing option’.
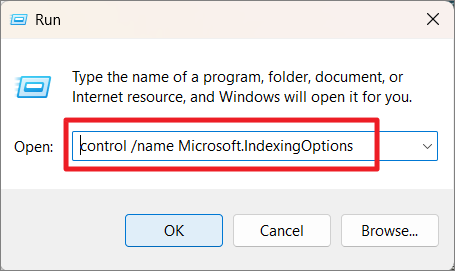
Alternatively, you can also open the Run command box (Win+R), and type control /name Microsoft.IndexingOptions, and click on ‘OK’ to open Indexing options.
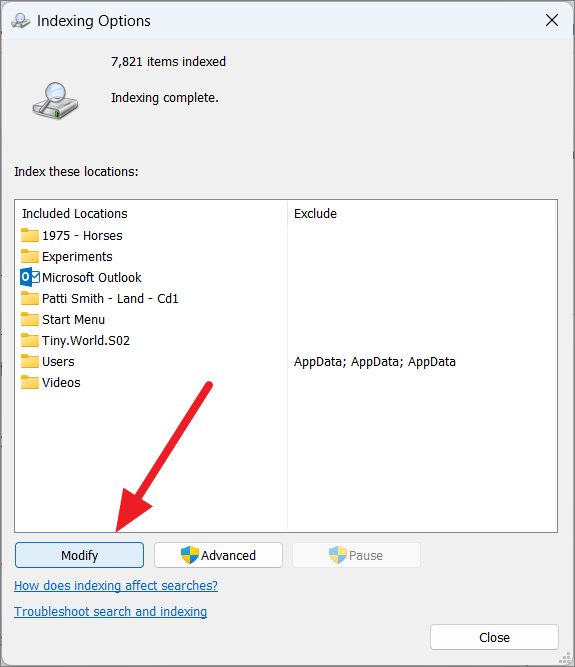
On the Indexing Options dialog box, click on the ‘Modify’ option.
In the next dialog box, click on the ‘Show all locations’ button.
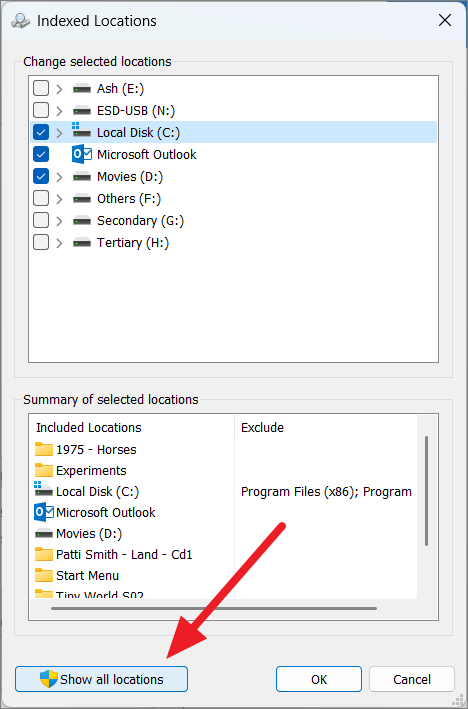
Uncheck all locations under Change selected locations and click ‘OK’.

Now back in the Indexing Options, click on ‘Advanced’.
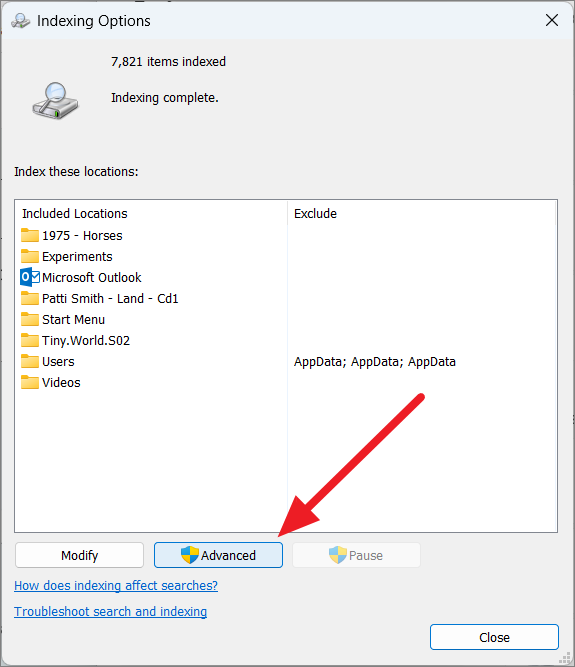
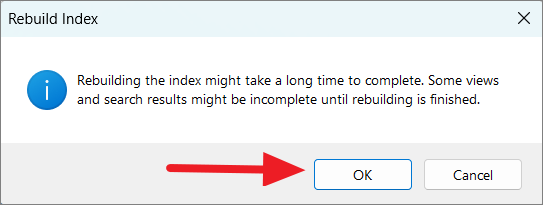
In the new Advanced Options window, click on the ‘Rebuild’ button.
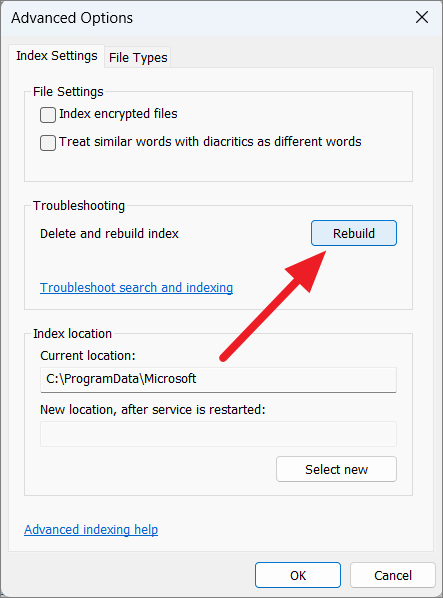
Click ‘OK’ on the prompt box to confirm the action. It will also inform you that the process might take a long time to complete and Windows search won’t work properly until it is finished.
Change Start Menu Registry Settings
‘The Open Shell not working’ issue can also be resolved by tweaking the Start menu registry settings.
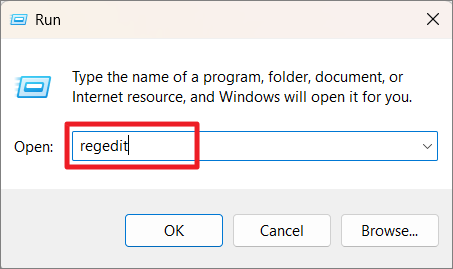
Press Win+R keyboard shortcut keys to open the Run box, type in regedit, and click ‘OK’.
In the Registry Editor, navigate to the following location using the navigation panel or copy-paste the below path in the address bar:
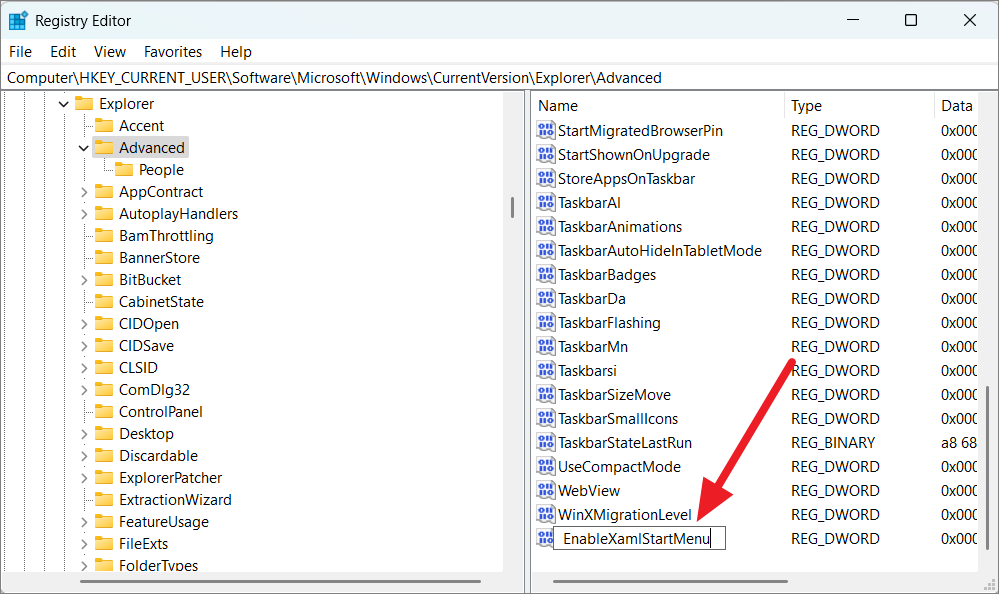
Computer\HKEY_CURRENT_USER\Software\Microsoft\Windows\CurrentVersion\Explorer\AdvancedOnce you are in the location, right-click on the ‘Advanced’ folder and select ‘New’ and then ‘DWORD (32-bit) Value’ from the sub-menu.
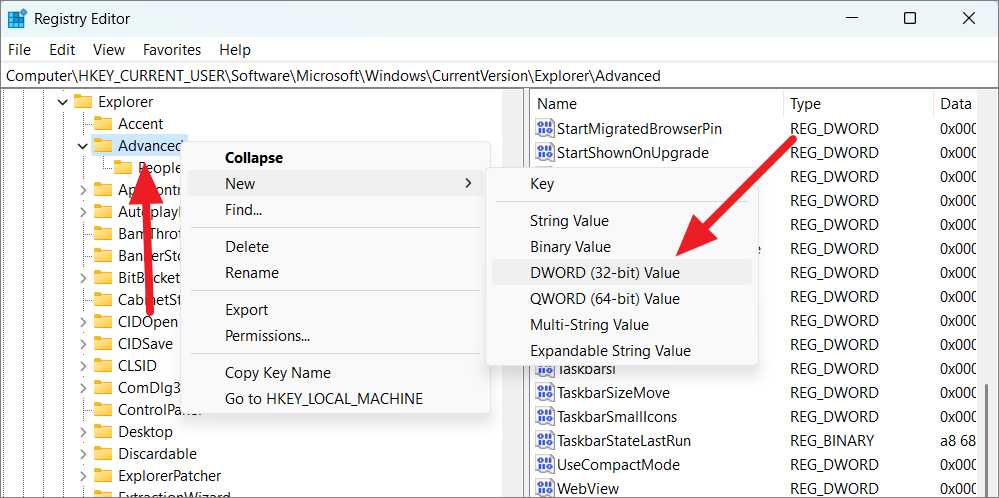
Then, rename the newly created DWORD to EnableXamlStartMenu.
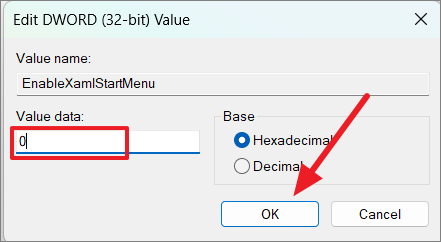
After that, double-click on the new value EnableXamlStartMenu and set its value to 0, and then ‘OK’.
Reboot your system after that and check if the Open Shell not working issue is fixed.
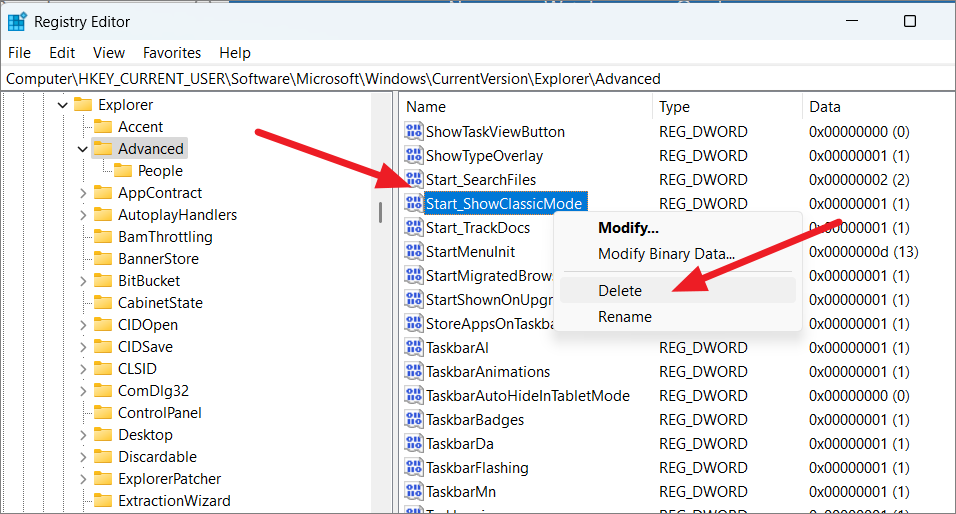
If the problem persists, go back to the same location (Advanced folder) and find another registry value called ‘Start_ShowClassicMode’. Now, right-click on it and select ‘Delete’.
Then, restart your computer.
Check for Latest Windows Updates
Outdated or corrupted system files in Windows 11 may prevent Open Shell from working. So you will need to keep your system up-to-date to fix these problems.
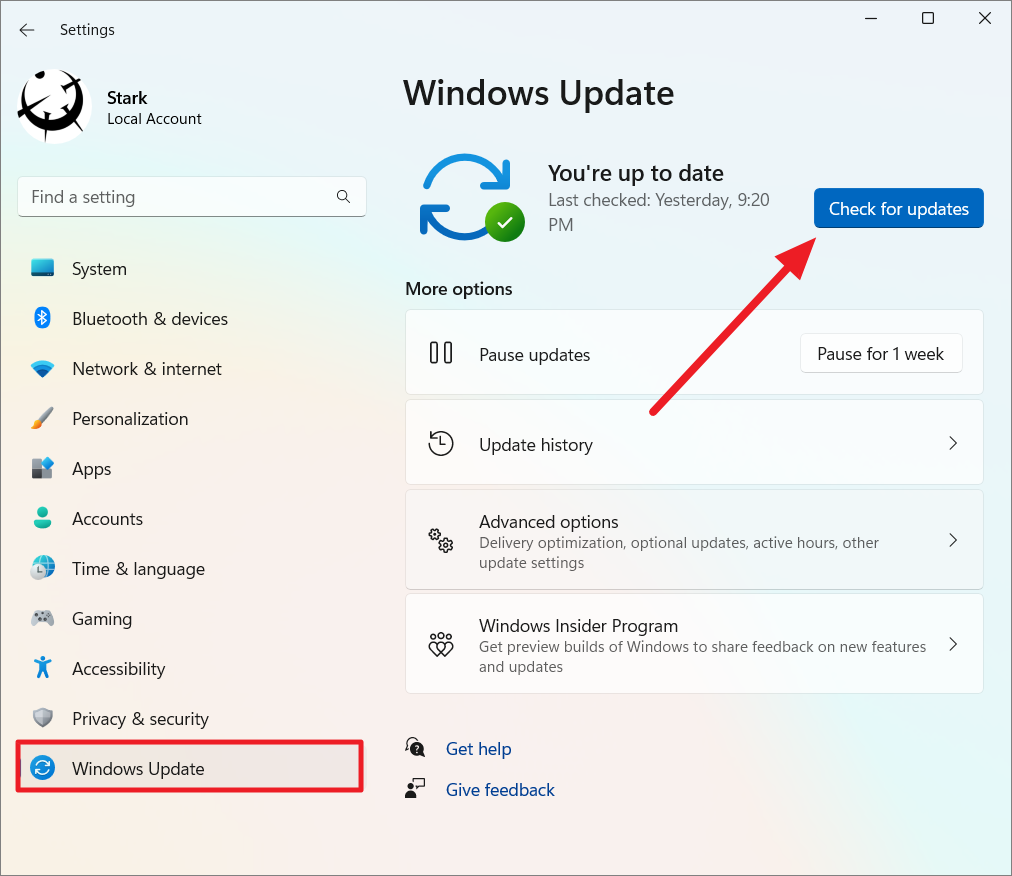
To check for updates, open Windows Settings by pressing Win+I. Go to ‘Windows Update’ on the left pane and click the ‘Check for update button on the right pane. If there are any pending updates, click ‘Download & Install’ to update Windows.
Reinstall Open Shell
If none of the above methods worked, you can reinstall the app to fix the issue. You need to uninstall the app completely from your computer and re-install it with the latest version of the app from the GitHub repository.
That’s it. Now, you know how to install and use Open Shell on your Windows 11 computer. Go on and make all the changes you want to your Windows UI.
В этой публикации, друзья, поговорим о том, как в Windows 11 сделать меню «Пуск» формата Windows 7. Или как сделать даже два меню «Пуск» — формата Windows 11 и формата Windows 7. У новой 11-й Windows современное, стильное меню «Пуск», более юзабильное из-за своего центрированного расположения на панели задач. Но если вам хочется привнести в современную операционную систему немного привычной архаики, так сказать, кастомизировать систему отголосками прошлого, это можно сделать с помощью программы Open-Shell, реализующей в Windows меню «Пуск» из старой Windows 7. Программа совершенно бесплатная, являет собой замену известной Classic Shell, ставшей популярной с выходом Windows 8 из-а отсутствующего в ней классического меню «Пуск». Разработка Classic Shell впоследствии прекратилась, а Open-Shell переняла все её возможности. Давайте более детально о последней.
Как сделать в Windows 11 меню «Пуск» как в Windows 7 с помощью Open-Shell
Программа Open-Shell, бесплатно распространяемая на GitHub, реализует в Windows 10 и 11 классическое меню «Пуск» в стиле Windows 7. Но в Windows 11, в отличие от Windows 10, оно не подменяет собой системное меню «Пуск», а реализует второе. И реализует его, как и подобает классике, в левом углу панели задач. Центрированная кнопка «Пуск» запускает системное меню «Пуск» Windows 11, у меню же Open-Shell будет своя кнопка «Пуск». Но она может по умолчанию не установиться, и тогда для запуска меню «Пуск» Open-Shell просто жмём клавишу Win.
В меню запускаем настройки меню Open-Shell.
И настраиваем отображение кнопки «Пуск». Можем выбрать вид кнопки из двух предложенных, либо добавить свой вид. Виды кнопки «Пуск» можно скачать на сайтах, посвящённых кастомизации Windows, просто вбейте в веб-поиск запрос «кнопка пуск скин».
После добавления кнопки «Пуск» в дальнейшем можем открывать настройки меню Open-Shell в контекстном меню на кнопке.
В настройках также можем сменить скин меню.
На выбор нам предлагается несколько скинов в стиле Windows XP, 7 или 8.
Есть светлые и тёмные скины.
При необходимости можем в настройках установить галочку «Show all settings» и получим доступ ко всем настроечным возможностям программы.
В числе возможностей Open-Shell:
- Настройка внешнего вида меню «Пуск», выбор разных скинов;
- Настройка кнопки «Пуск»;
- Настройка размера меню, шрифтов, иконок, прозрачности, анимации;
- Настройка поведения меню;
- Настройка контактного меню для меню «Пуск»;
- Внедрение панели инструментов для проводника;
- И прочие.
Друзья, в Windows 11 убрать системное меню «Пуск» невозможно, но если вы хотите пользоваться только меню «Пуск» Open-Shell, зайдите в приложение системных параметров по пути «Персонализация → Панель задач». И в блоке настроек «Поведение панели задач» установите выравнивание слева.
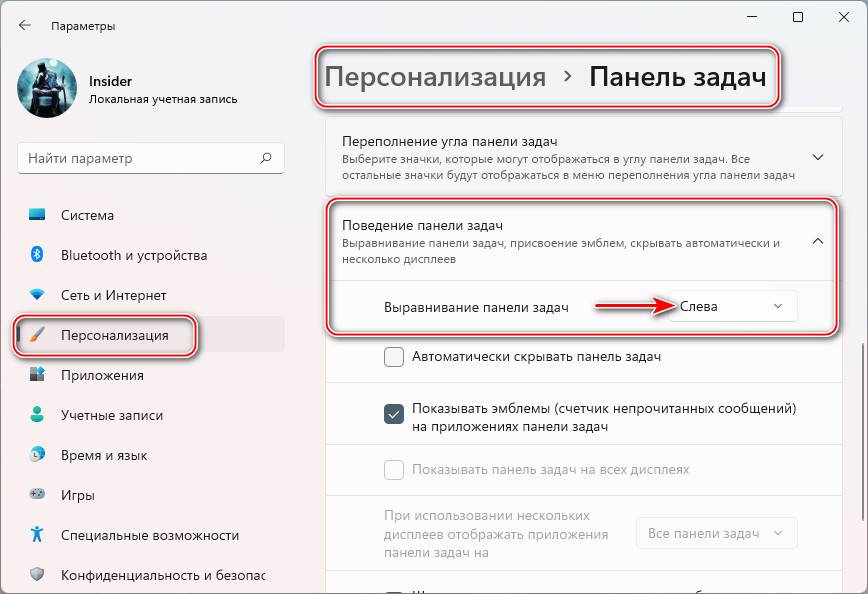
В таком случае кнопка «Пуск» Open-Shell попросту перекроет кнопку системного меню Windows 11. И у вас будет привычный классический формат панели задач и меню «Пуск» Windows. При необходимости системное меню «Пуск» Windows 11 можно запускать специальной кнопкой вверху меню Open-Shell.
1Windows 11 is great out-of-the-box, and what makes it even better is that you can customize it. However, there are limits as to how much you can tweak it. For example, if you loved the Windows 10 Start Menu, there’s no way to make the one on Windows 11 look and behave like it.
Luckily, there’s a program called Open-Shell, and it allows you to restore classic Start Menus, among other things. With it, you can improve your Windows 11 user experience by personalizing it to your liking.
Here’s an intensive guide on how to use Open-Shell on Windows 11.
Does Open-Shell Still Work on Windows 11?
Before there was Open-Shell, there was Classic Shell, which allowed users to customize their Windows 7, 8, 8.1, and 10 machines by tweaking the Start Menu, Taskbar, and File Explorer. But in December 2017, the team behind the tool stopped actively developing it. Another team picked up the project and called it Open-Shell, which is why its tagline is “Classic Shell Reborn.”
If you’re curious about what Open-Shell was before, we have a guide on how to customize Windows 10 with Classic Shell. And although the official Open-Shell repository on GitHub doesn’t list Windows 11 as a supported system, it still works on the OS.
How to Download Open-Shell
You can download the tool by going to the Open-Shell GitHub repository, scrolling down, and clicking the Downloads button.
You will then arrive at the download page of the latest release. Scroll down to the Assets section and click on the setup file to download it. In our example, this is OpenShellSetup_4_4_170.exe.
Once you’ve downloaded the setup file, go to the folder where it’s located and double-click it to launch the installer. Then, follow the instructions in the installation wizard to install Open-Shell onto your Windows 11 PC.
Now you’re ready to launch Open-Shell.
How to Launch Open-Shell on Windows 11 and Reveal All Tabs
To launch Open-Shell on Windows 11, start by pressing Win + S to bring up Windows Search. In the search box, type open shell and then click on Open-Shell Settings in the search results.
Once you’ve opened Open-Shell, tick the Show all settings checkbox at the top.
This will reveal all the tabs you can use to customize Windows 11 with Open-Shell.
How to Use Open-Shell on Windows 11
Below, will go through the most important Open-Shell tabs to get you started with Windows 11 customization using this program.
To begin with, click the Start Menu Style tab. Here, you’ll be able to restore Start Menus from Windows of old, and you can choose between Classic style, Classic with two columns, and Windows 7 style. Check the radio button for the one you want to use.

Once you’ve picked the style, scroll down and tick the Replace Start button checkbox to display the Start button on the left side of the Taskbar. You can choose the button’s icon by selecting Aero, Classic, or Custom.
If you are going for Custom, click Pick image next to it and select a PNG image to use for the Start Menu icon.
Depending on the Start button style you’ve picked, it may appear over the widget, which is also on the left side of the Taskbar. This can make it look a bit awkward. If it bothers you, and you still want to use the Start button there, read our guide on how to disable Widgets on Windows 11.
In the Start Menu Style tab, you can also click on the Advance buttons options link. This will take you to the Start Button tab, where you can further customize the Start button.
After setting up the new Start button, you can use that instead of the default one.
2. How to Customize the Taskbar With Open-Shell on Windows
To customize the Taskbar, click on the Taskbar tab, and then tick the Customize taskbar checkbox to enable the options below it.
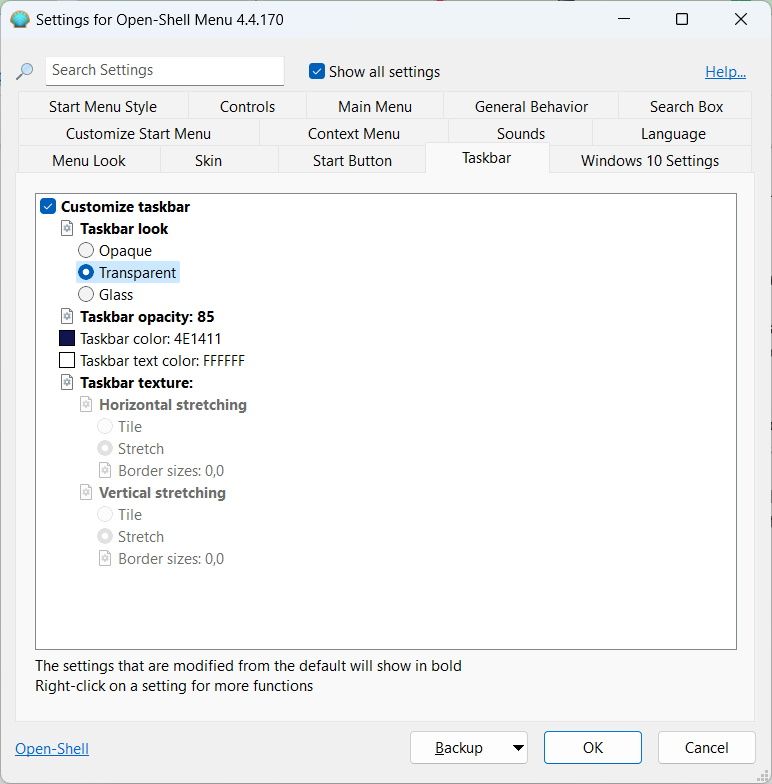
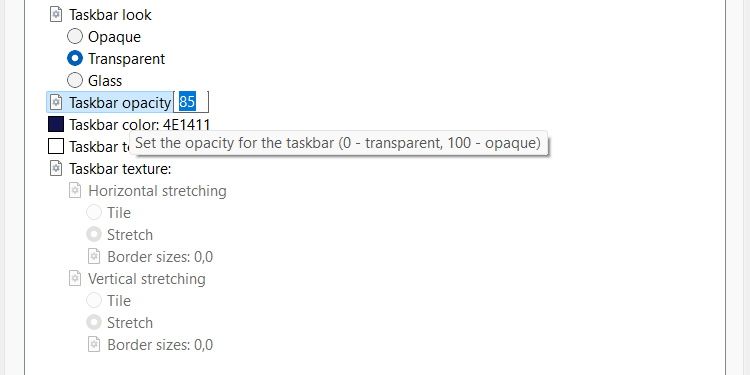
You can then tweak Taskbar look by ticking the Opaque, Transparent, or Glass radio button. If you picked Transparent, you can set the Taskbar’s transparency level by clicking Taskbar opacity and entering a number between 0 (completely transparent) and 100 (completely opaque) in the text box on the right.
You can set Taskbar color and Taskbar text color by clicking on either of these options and entering a hexadecimal color value in their respective text boxes. If you don’t have a value in mind, you can click the three horizontal dots next to the text box and pick a color from the palette menu that appears.
You can use an image as a background by clicking Taskbar texture and entering the file path to the image you want to use in the text box next to it. You can also click the three horizontal dots next to the text box, navigate to the folder with the image you want to use, and select it.
Once you pick the picture, you can set its Horizontal stretching and Vertical stretching to Tile or Stretch by ticking the appropriate radio button.
How to Update Open-Shell on Windows 11
You don’t need to download and install Open-Shell again when a new version comes out. The program’s installation also comes with a utility to update it.
To use it, connect your Windows PC to the internet and press Win + S to bring up Windows search. Then, type open shell update in the search box and click on Open-Shell Update in the search results.
Click on Check now to see if there’s an update available.
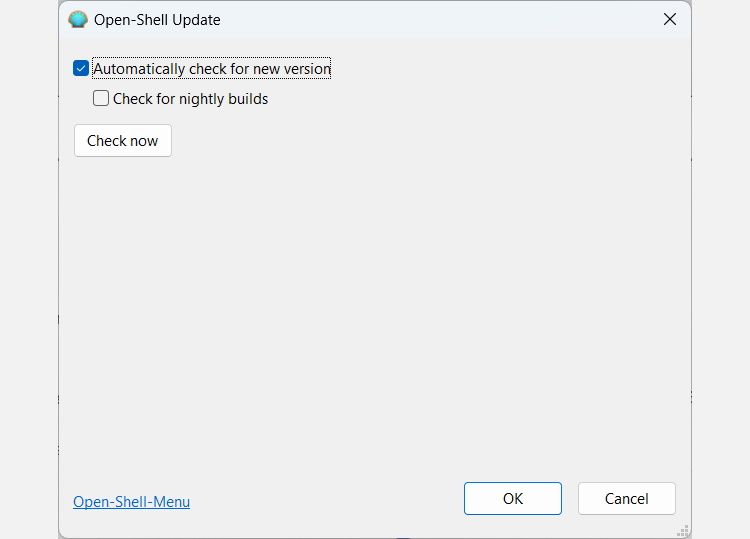
The program will then check for available updates. If you’re already running the latest version of Open-Shell on Windows 11, you will get a message saying “Your version of Open-Shell is up-to-date.” If not, the updater will download and install the new update.
Time to Enhance Windows 11 With Open-Shell
There are various ways to change the appearance and functionality of Windows 11. But if you’re looking for a quick and user-friendly way of going about it, you can’t go wrong with Open-Shell.
We’ve only shown you how to enable the classic Start Menu and customize the appearance of the Taskbar in this guide. However, you have enough knowledge to explore the other Open-Shell tabs for more customization options,