
DHCP Server Open Source Freeware Windows/Linux. MultiSubnet DHCP Server supports Dynamic, Static Leases, Relay Agents, BOOTP, PXEBOOT. Global, Range and Client Specific Options. Supports filtering of ranges on Mac Address, Vendor and User Class.
Features
- Support all Industry Standard Feaures
- Dynamic and Static Leases
- Options can be Client Specific, Range Specific or Global
- Multisubnet supports Relay Agents and PXE Boot
- Lease Status in auto refreshing html page
- Supports Duplicated Replicated Operation
- Very simple to install and use, even by person not having DHCP concepts
- Very low memory and cpu use
Project Samples
License
GNU General Public License version 2.0 (GPLv2)
Deploy secure Home Office in a minimum of time with the Remote Work solution: a unique kind of Remote Access to allow your employees to connect and work directly on their office workstations without leaving the safety of their home.
User Ratings
4.5
out of 5 stars
★★★★★
★★★★
★★★
★★
★
ease
1 of 5
2 of 5
3 of 5
4 of 5
5 of 5
4 / 5
features
1 of 5
2 of 5
3 of 5
4 of 5
5 of 5
4 / 5
design
1 of 5
2 of 5
3 of 5
4 of 5
5 of 5
3 / 5
support
1 of 5
2 of 5
3 of 5
4 of 5
5 of 5
2 / 5
User Reviews
- All
- ★★★★★
- ★★★★
- ★★★
- ★★
- ★
-
I am working with about 40 devices, two routers, one subnet. The DHCP servers built into the routers always assume that they will allocate the gateway to themselves. So, with two gateways on the same network, you need to use a separate server to deliver this DHCP server software and allow gateway router choice on the same subnet.
This allows what i have, which is the ability to choose and change the router for individual devices and it work s fine for this — for a coupe of years now.
This allows a fast but more expensive router (mobile router connected to the telephone system) to be used for the IP telephones and Digital exchange) and the slower but cheaper router (ADSL on my fixed line) to be used for surfing the web etc — and allows these to be easily changed if either router service goes down. I would recommend this arrangement for a small business internet connection to give backup protection and good IP telephone lines all at a reasonable cost — recommend Gordon Webb -
Great DHCP server. It is essentially helpful in a case of several sub-nets.
1 user found this review helpful.
-
Fantastic program. I use it to do troubleshooting in the network when dhcp details arise. It´s excellent for labs and demos. Supports several subnets. Easy to use and configure. Thanks.
2 users found this review helpful.
-
Good docs, easy to install, runs solid on windows (for a change lol)
1 user found this review helpful.
-
I haven’t use all the feature it claim, just very simple DHCPRange for Kali server. Good alternate to dnsmasq and ics-hdcp-sever without mess up with the network function.. Have to compile for x64 though. Global option is too lengthy should break down to category
1 user found this review helpful.
Read more reviews >
Additional Project Details
Operating Systems
Linux, Windows
Intended Audience
Advanced End Users, System Administrators
User Interface
Non-interactive (Daemon)
Programming Language
C++
Related Categories
C++ Init Software
At first
Recently, with the upgrade to Windows 10 Pro, I started using Hyper-V.
We had to create a Hyper-V virtual network and run a DHCP server in it, so we built it.
There were several candidates for a DHCP server, but for ease of management, we decided to use Open DHCP Server.
Open DHCP Server
http://dhcpserver.sourceforge.net/
TL;DR
- Install Open DHCP Server and run it as a Service
- Configure Windows Firewall
environment
Operation has been confirmed in the following environment.
It is the same environment described in the following article.
【Windows】 Docker Desktop for Windows and Vagrant+Hyper-V Environment Coexist #1/3 — Qiita
- OS: Windows 10 Pro 10.0.17763 Build 17763
- GitBash 2.21.0
- Vagrant 2.2.4
- Hyper-V Virtual Networks and Virtual Switches:
- Name: Hyper-V Internal with WinNAT
- WinNAT Configured
- IP address range: 192.168.254.0/23
- IP address of the host NIC: 192.168.254.1/23 (* From the VM’s point of view, it becomes the default gateway)
procedure
Installing Open DHCP Server
Follow the official website and download the file. The latest version as of 2019/3/22 is 1.73.
It seems to be distributing from Sourceforge.net.
Open DHCP Server
Since it is in executable form, specify the appropriate path and extract & install.
I installed it on «C:\opt\\OpenDHCPServer».
Configuring the Open DHCP Server
There is a file called «OpenDHCPServer.ini» in the installed folder, so open it and configure it as follows.
The original file has various explanations written in the comments, so it is a good idea to keep a backup.
OpenDHCPServer.ini
[LISTEN_ON]
192.168.254.1

[LOGGING]
LogLevel=Normal

[RANGE_SET]
DHCPRange=192.168.255.1-192.168.255.254
SubnetMask=255.255.254.0
DomainServer=8.8.8.8, 8.8.4.4
Router=192.168.254.1

[HTTP_INTERFACE]
HTTPServer=192.168.254.1:6789

[GLOBAL_OPTIONS]
The operation as a DHCP server is described in the section called [RANGE_SET]. The above settings can be summarized as follows.
- The IP address to be listened to as a DHCP server shall be «192.168.254.1»
- The IP address assigned to the DHCP client should be in the range from «192.168.255.1» to «192.168.255.254».
- Specify 8.8.8.8 and 8.8.4.4 DNS servers
- Set 192.168.254.1 as the default gateway
By setting a section called [HTTP_INTERFACE], you can check the operation status of the DHCP server from a Web browser.
Restart the Open DHCP Server
Because the Open DHCP Server runs as a Windows Service, you can restart it just like a typical Service.
First, type services.msc from the start menu to open the Services administration tool.
There is a service called «Open DHCP Server», look for it, double-click it to open it.
Press the «Stop» button to stop the service. It will take a few seconds ~ tens of seconds to complete.
Press the «Start» button to start the service.
In Windows Defender Firewall, configure permissions for the Open DHCP Server
The Open DHCP Server installer will configure it as a service, but it will not configure the firewall. You must add the settings manually.
First, from the Control Panel, open Windows Defender Firewall and open «Advanced settings».
Open Inbound Rules from the left pane, and then click New Rule…» in the right pane.
A pop-up window for setting will open, and you will follow the instructions to set it up.
First, Rule Type specifies a Program. Since it is particularly difficult to specify a DHCP server Port or Protocol, it is safe to set it with a Program.
Specifies the path to the executable. Specify «OpenDHCPServer.exe» of the folder you installed earlier.
The Action specifies Allow the connection. This allows communication to the program specified above.
Make sure that all profiles are checked. Depending on the connection profile of the network you are communicating with, you can set the allow/deny settings.
Name must be arbitrary. Here, we used «OpenDHCPServer».
Finally press the Finish button to complete the creation of the Rule.
Verify that the Inbound Rules show the Rule you just created.
This completes the configuration of Windows Defender Firewall.
Run the new virtual machine and verify that the DHCP server is working
Now, let’s check whether the DHCP server works as intended.
It is easy to create a new VM on the network and check its operation. Create a Vagrantfile like the one below and execute vagrant up.
When using Hyper-V, you need the Administrator privilege to execute vagrant up.
Vagrantfile
Vagrant.configure("2") do |config|
  config.vm.box = "Yojimbo108/AmazonLinux2"

  config.vm.provider "hyperv" do |v|
    v.memory = 1024
    v.cpus = 1
  end

  config.vm.define :"stdsv4" do |c1|
    c1.vm.hostname = "stdsv4"
  end

end
Run vagrant up. If Hyper-V has more than one virtual network, it will ask you which one you want to use, so specify it.
Also, by default, the guest VM will attempt to SMB mount the host OS folder, so it will ask for the account of the host OS.
vagrant up
Bringing machine 'stdsv4' up with 'hyperv' provider...
==> stdsv4: Verifying Hyper-V is enabled...
==> stdsv4: Verifying Hyper-V is accessible...
==> stdsv4: Importing a Hyper-V instance
    stdsv4: Creating and registering the VM...
    stdsv4: Successfully imported VM
    stdsv4: Please choose a switch to attach to your Hyper-V instance.
    stdsv4: If none of these are appropriate, please open the Hyper-V manager
    stdsv4: to create a new virtual switch.
    stdsv4:
    stdsv4: 1) DockerNAT
    stdsv4: 2) Hyper-V Internal with WinNAT
    stdsv4:
    stdsv4: What switch would you like to use? 2
    stdsv4: Configuring the VM...
==> stdsv4: Starting the machine...
==> stdsv4: Waiting for the machine to report its IP address...
    stdsv4: Timeout: 120 seconds
    stdsv4: IP: 192.168.255.2
==> stdsv4: Waiting for machine to boot. This may take a few minutes...
    stdsv4: SSH address: 192.168.255.2:22
    stdsv4: SSH username: vagrant
    stdsv4: SSH auth method: private key
    stdsv4:
    stdsv4: Vagrant insecure key detected. Vagrant will automatically replace
    stdsv4: this with a newly generated keypair for better security.
    stdsv4:
    stdsv4: Inserting generated public key within guest...
    stdsv4: Removing insecure key from the guest if it's present...
    stdsv4: Key inserted! Disconnecting and reconnecting using new SSH key...
==> stdsv4: Machine booted and ready!
==> stdsv4: Preparing SMB shared folders...
    stdsv4: You will be asked for the username and password to use for the SMB
    stdsv4: folders shortly. Please use the proper username/password of your
    stdsv4: account.
    stdsv4:
    stdsv4: Username: ****
    stdsv4: Password (will be hidden):
Error! Your console doesn't support hiding input. We'll ask for
input again below, but we WILL NOT be able to hide input. If this
is a problem for you, ctrl-C to exit and fix your stdin.
     stdsv4: Password (will be hidden): ********

Vagrant requires administrator access to create SMB shares and
may request access to complete setup of configured shares.
==> stdsv4: Setting hostname...
==> stdsv4: Mounting SMB shared folders...
    stdsv4: D:/Dev/git/server-config/vagrant_amazonlinux2_hyperv_dhcp => /vagrant
Failed to mount folders in Linux guest. This is usually because
the "vboxsf" file system is not available. Please verify that
the guest additions are properly installed in the guest and
can work properly. The command attempted was:

mount -t cifs -o vers=2.0,credentials=/etc/smb_creds_vgt-5107fd8e59246ad3b9a29689ca11bbd0-6ad5fdbcbf2eaa93bd62f92333a2e6e5,uid=1000,gid=1001 //10.1.1.34/vgt-5107fd8e59246ad3b9a29689ca11bbd0-6ad5fdbcbf2eaa93bd62f92333a2e6e5 /vagrant

The error output from the last command was:

mount: /vagrant: bad option; for several filesystems (e.g. nfs, cifs) you might need a /sbin/mount.<type> helper program.
The SMB mount failed, but the IPv4 configuration with DHCP should have been successful. vagrant ssh to verify the configuration.
vagrant ssh
$ vagrant ssh
Last login: Fri Mar  1 15:21:31 2019

       __|  __|_  )
       _|  (     /   Amazon Linux 2 AMI
      ___|\\___|___|

https://aws.amazon.com/amazon-linux-2/
4 package(s) needed for security, out of 5 available
Run "sudo yum update" to apply all updates.
[vagrant@stdsv4 ~]$
An address within the IP address range specified as a DHCP server has been assigned.
ifconfig
[vagrant@stdsv4 ~]$ ifconfig eth0
eth0: flags=4163<UP,BROADCAST,RUNNING,MULTICAST>  mtu 1500
        inet 192.168.255.2  netmask 255.255.254.0  broadcast 192.168.255.255
        inet6 fe80::215:5dff:fe14:2515  prefixlen 64  scopeid 0x20<link>
        ether 00:15:5d:14:25:15  txqueuelen 1000  (Ethernet)
        RX packets 41965  bytes 55059083 (52.5 MiB)
        RX errors 0  dropped 0  overruns 0  frame 0
        TX packets 9088  bytes 704092 (687.5 KiB)
        TX errors 0  dropped 0 overruns 0  carrier 0  collisions 0
The default gateway is also the one specified by the DHCP server.
netstat -rn
[vagrant@stdsv4 ~]$ netstat -rn
Kernel IP routing table
Destination     Gateway         Genmask         Flags   MSS Window  irtt Iface
0.0.0.0         192.168.254.1   0.0.0.0         UG        0 0          0 eth0
169.254.0.0     0.0.0.0         255.255.0.0     U         0 0          0 eth0
192.168.254.0   0.0.0.0         255.255.254.0   U         0 0          0 eth0
The DNS server is also specified by the DHCP server.
/etc/resolv.conf
[vagrant@stdsv4 ~]$ cat /etc/resolv.conf
; generated by /usr/sbin/dhclient-script
nameserver 8.8.8.8
nameserver 8.8.4.4
Check the health of the Open DHCP Server
If you set [HTTP_INTERFACE] in the Open DHCP Server configuration file, you can check the health status from a web browser.
This time, we made it possible to access HTTP with the following URL.
Let’s actually access the following URL.
http://192.168.254.1:6789/
You can check the DHCP lease status as shown below.
Supplement: Assign a specific IP address to a specific MAC address
Basically, when using DHCP, IP addresses are assigned from those that are free and cannot be fixed. However, many DHCP servers have the ability to assign a specific IP address to a specific MAC address, and so does Open DHCP Server.
You can accomplish this by adding the following configuration to the Open DHCP Server configuration file:
In this example, if the MAC address is «00:15:5d:14:25:16», «192.168.255.201» is assigned as the IP address.
OpenDHCPServer.ini
[00:15:5d:14:25:16]
IP=192.168.255.201
So, whether it is possible to use this function to give a fixed IP address to a VM instance launched with Vagrant, it is not possible at present.
You must specify a MAC address on the target VM’s NIC, but the current Vagrant does not have Hyper-V networking capabilities and cannot be specified in the Vagrantfile.
Even if you set it as follows, it will be ignored. When vagrant up is executed, errors etc. are not output.
Vagrantfile
  config.vm.define :"stdsv4" do |c1|
    c1.vm.hostname = "stdsv4"
    c1.vm.network "private_network", mac: "00155d142516" # ←この設定は無視される。
  end
See also
【Windows】Docker Desktop for Windows and Vagrant+Hyper-V Environment Coexist #1/3 — Qiita Docker Desktop for Windows and Vagrant+Hyper-V Environment Coexist #2/3 — Qiita 【Windows】 Coexistence of Docker Desktop for Windows and Vagrant+Hyper-V environments #3/3 — Qiita ← needed here
Conclusion
Until Hyper-V’s «Default Switch» runs properly and stably, it will be necessary to build a separate DHCP server.
It’s annoying, but it’s a matter of patience until the Default Switch stabilizes.
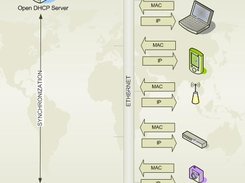
DHCP means (Dynamic Host Configuration Protocol) its provided automatically IP on your subnet. The DHCP controlled by the DHCP Server distribute network configuration such as IP, subnetmask, gateway and dns information.
When client host request IP address for DHCP server then each computer assign same subnet IP address. Another way you can use Static IP Address on your machine.
★ How To Configure Static IP address On Ubuntu 18.04
★ How To Install Zabbix Server On Ubuntu 18.04
★ How To Install Zabbix Server 3.4.4 Into Ubuntu 17.04
★ How To Create Custom Boot Partition On Ubuntu 16.04 Server
Now I have to show using portable dhcp server your windows 10 machine.
Step #01: Goto download portable dhcp server then choose latest version and click download icon.
When completed download then using it very softly otherwise you can face many problem.
!Warning – Can’t install two dhcp server on your same network
Step #02: Now open dhcpwiz file for configure dhcp IP pool.
Click Next button select your network interface on LAN. Provide DNS server name or click Next button for dhcp main IP configuration.
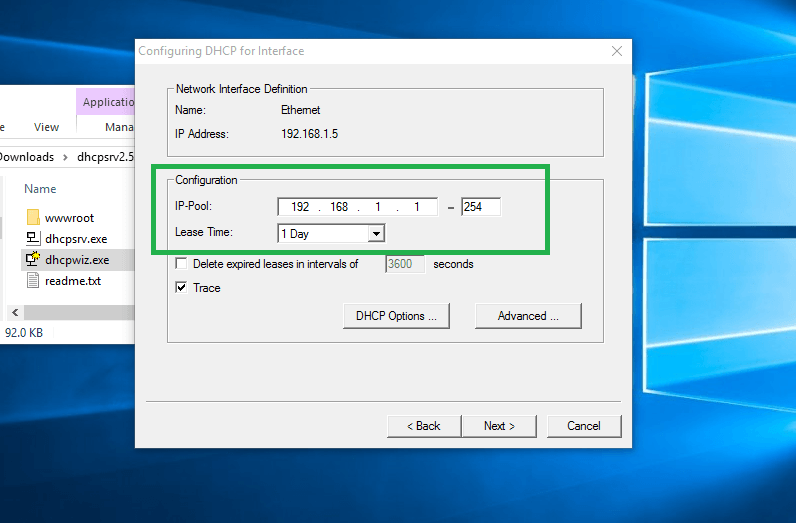
Type your network IP-Pool start and ending IP address then click Next button. See your configure as like below image.
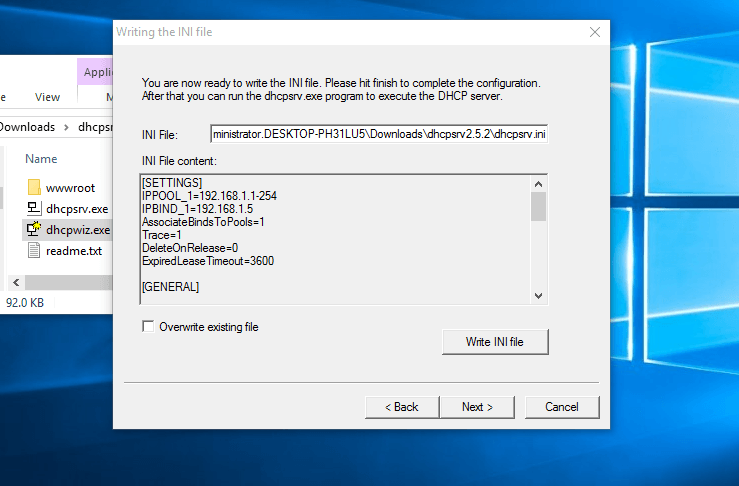
Finally click Next button without dhcpsrv.ini file and Finish. If you can check box Run dhcp server immediately.
Step #03: After configuration is ok then open dhcpsrv file for start and stop dhcp server.
Thank you for using portable dhcp server on your network.
- Author
- Recent Posts

I am system administrator as Windows and Linux platform. I have 4 years skilled from the professional period. I have to configure Linux based system such as an Asterisk VOIP system, Network monitoring tools (ZABBIX), Virtualization (XEN Server), Cloud computing (Apache CloudStack) etc. Now share my professional skill each interested person.
Thanks to all.
Open DHCP Server — это мощный инструмент для настройки и управления DHCP-сервером в операционной системе Windows 10. DHCP (Dynamic Host Configuration Protocol) — это протокол, который автоматически назначает IP-адреса и другие сетевые параметры компьютерам в локальной сети.
В этом подробном руководстве мы рассмотрим, как настроить и запустить Open DHCP Server в Windows 10. Мы покажем вам, как создать новый сервер DHCP, настроить сетевые параметры, определить диапазон IP-адресов, а также настроить другие параметры, такие как время аренды IP-адреса и сервера DNS.
Мы также расскажем вам о нескольких расширенных функциях Open DHCP Server, таких как привязка IP-адреса к MAC-адресу, фильтрация DHCP-запросов и настройка опций класса. Все эти функции помогут вам управлять сетью более эффективно и надежно.
Прежде чем начать, убедитесь, что у вас есть права администратора на компьютере, а также у вас уже установлена последняя версия Open DHCP Server. Если у вас нет этого программного обеспечения, вы можете скачать его с официального сайта разработчика.
Содержание
- Установка Open DHCP Server на компьютер с Windows 10
- Скачивание и установка Open DHCP Server
- Настройка сетевого адаптера для работы с Open DHCP Server
- Конфигурация DHCP-сервера в Open DHCP Server
- Проверка и запуск Open DHCP Server
Установка Open DHCP Server на компьютер с Windows 10
Для установки Open DHCP Server на компьютер с Windows 10 выполните следующие шаги:
- Перейдите на официальный сайт Open DHCP Server.
- Скачайте последнюю версию Open DHCP Server для Windows.
- Запустите установочный файл OpenDHCPServer.msi.
- Выберите язык установки и нажмите кнопку «Next».
- Прочитайте и примите лицензионное соглашение, затем нажмите кнопку «Next».
- Выберите папку для установки Open DHCP Server или оставьте значение по умолчанию, затем нажмите кнопку «Next».
- Выберите компоненты, которые вы хотите установить (DHCP сервер, TFTP сервер и т.д.), затем нажмите кнопку «Next».
- Выберите тип установки (Typical или Custom) и нажмите кнопку «Next».
- Отметьте пункт «Create startup icon» для создания ярлыка на рабочем столе, затем нажмите кнопку «Next».
- Нажмите кнопку «Install», чтобы начать процесс установки.
- После завершения установки нажмите кнопку «Finish».
Open DHCP Server успешно установлен на ваш компьютер с Windows 10. Теперь вы можете настроить DHCP сервер, следуя руководству пользователя Open DHCP Server.
Скачивание и установка Open DHCP Server
Шаги по скачиванию и установке Open DHCP Server:
- Откройте любой веб-браузер на вашем компьютере.
- Перейдите на официальный сайт Open DHCP Server. Ссылка на скачивание приложения обычно доступна на главной странице сайта или на странице загрузок.
- Найдите ссылку для скачивания последней версии Open DHCP Server и нажмите на нее.
- Сохраните файл установки на вашем компьютере.
- Откройте папку, в которую вы сохранили файл установки Open DHCP Server.
- Щелкните дважды по файлу установки, чтобы запустить процесс установки.
- Следуйте инструкциям мастера установки, чтобы завершить установку Open DHCP Server. Вам может потребоваться принять лицензионное соглашение и выбрать папку для установки приложения.
- После завершения установки Open DHCP Server будет доступен на вашем компьютере.
Теперь, когда вы установили Open DHCP Server, вы готовы приступить к его настройке и использованию для управления службой DHCP на вашем компьютере с операционной системой Windows 10.
Настройка сетевого адаптера для работы с Open DHCP Server
Прежде чем начать использовать Open DHCP Server в Windows 10, необходимо правильно настроить сетевой адаптер. Это позволит устройствам в вашей локальной сети получать IP-адреса и другую сетевую информацию от сервера DHCP.
Для начала откройте панель управления Windows 10 и перейдите в раздел «Сеть и интернет».
Затем выберите «Центр управления сетями и общим доступом» и найдите сетевой адаптер, который вы хотите настроить для работы с Open DHCP Server.
Щелкните правой кнопкой мыши на выбранном адаптере и выберите «Свойства».
После этого найдите вкладку «Интернет-протокол версии 4 (TCP/IPv4)» и щелкните на ней.
В открывшемся окне выберите «Использовать следующий IP-адрес» и введите IP-адрес, который будет использоваться в качестве IP-адреса сервера DHCP.
Затем введите маску подсети и, если требуется, введите IP-адрес шлюза по умолчанию и DNS-сервера.
После того как вы ввели все необходимые данные, нажмите «ОК», чтобы сохранить настройки и закрыть окно.
Теперь ваш сетевой адаптер настроен для работы с Open DHCP Server. Вы можете запустить сервер DHCP и начать предоставлять IP-адреса и другую сетевую информацию устройствам в вашей локальной сети.
Конфигурация DHCP-сервера в Open DHCP Server
После успешной установки и запуска Open DHCP Server в Windows 10 необходимо выполнить его конфигурацию для обеспечения правильной работы сервера. Конфигурация DHCP-сервера в Open DHCP Server включает в себя следующие шаги:
Шаг 1: Создание новой конфигурации
Для начала необходимо создать новую конфигурацию для DHCP-сервера. Для этого в программе Open DHCP Server откройте меню «Configuration» и выберите «New Configuration».
Шаг 2: Настройка параметров сервера
После создания новой конфигурации необходимо настроить параметры DHCP-сервера. В разделе «General» укажите имя сервера, IP-адрес сервера и маску подсети. Также можно настроить DNS-серверы, шлюз по умолчанию и другие дополнительные параметры.
Шаг 3: Настройка пулов адресов
Далее необходимо настроить пулы адресов, из которых DHCP-сервер будет выделять IP-адреса клиентам. В разделе «Address Pool» добавьте новый пул адресов, указав начальный и конечный IP-адреса, длительность аренды и другие параметры. Повторите этот шаг для каждого пула, если необходимо выделять адреса из разных диапазонов.
Шаг 4: Включение DHCP-сервера
После настройки основных параметров и пулов адресов необходимо включить DHCP-сервер. Для этого в разделе «Start/Stop» установите флажок «Start DHCP Server».
Шаг 5: Проверка работоспособности DHCP-сервера
После завершения настройки DHCP-сервера необходимо проверить его работоспособность. Подключите клиентское устройство к сети и убедитесь, что получает IP-адрес от DHCP-сервера. Также можно проверить, что клиентское устройство получает правильные DNS-серверы и шлюз по умолчанию.
После выполнения всех указанных шагов DHCP-сервер в Open DHCP Server должен быть настроен и готов к использованию. Убедитесь, что сервер работает стабильно и правильно выделяет IP-адреса клиентам.
Проверка и запуск Open DHCP Server
После установки Open DHCP Server в Windows 10 запустите приложение, следуя этим шагам:
- Откройте меню «Пуск» и найдите установленный Open DHCP Server.
- Нажмите на значок приложения, чтобы запустить его.
После запуска Open DHCP Server будет работать в фоновом режиме и будет готов к использованию.
Перед началом использования Open DHCP Server рекомендуется проверить следующие настройки:
- Убедитесь, что не используется другой DHCP-сервер в вашей сети, чтобы избежать конфликтов.
- Проверьте правильность настроек IP-адреса и подсети сервера DHCP.
- Убедитесь, что настройки сетевого интерфейса сервера корректны и соответствуют вашей сети.
Если все настройки верны, вы можете начать использовать Open DHCP Server для управления вашей сетью DHCP.
Примечание: После внесения изменений в настройки Open DHCP Server необходимо перезапустить приложение, чтобы изменения вступили в силу.
Skip to content
Search code, repositories, users, issues, pull requests…
Provide feedback
Saved searches
Use saved searches to filter your results more quickly
Sign up
- Notifications
-
Fork
10
Name already in use
A tag already exists with the provided branch name. Many Git commands accept both tag and branch names, so creating this branch may cause unexpected behavior. Are you sure you want to create this branch?
1
branch
0
tags
Code
-
Use Git or checkout with SVN using the web URL.
-
Open with GitHub Desktop
-
Download ZIP
Latest commit
Files
Permalink
Failed to load latest commit information.
Type
Name
Latest commit message
Commit time
#Open DHCP Server
Overview
Open DHCP Server is an Open Source Freeware. It has most of the Industry Standard Features. It attempts to comply with various RFC for Dynamic Host Configuration Protocol. It is released under the GNU Open Source License Agreement.
Although it has most of the features and capabilities required for use by experts, it is still very simple to configure and use. It is also well suited for small and home use by persons not having any knowledge of DHCP Protocol. The most salient features include:
- Supports upto 125 DHCP ranges.
- Supports both Static hosts and Dynamic DHCP Ranges.
- Supports BOOTP and relay agents.
- Supports multiple zones in single server.
- Supports all possible DHCP Options straightaway, no need to define option types.
- Supports filtering of DHCP Ranges on Mac Range, Vendor Options and User Options.
- Options can be Global, DHCP Range Specific or Client specific.
- Supports Replicated Fail Safe DHCP Operation.
- Multiple ways to assign option values like strings, IPs, hex strings or byte arrays.
- Lease Status is displayed on auto refreshing html page.
- Low CPU and executable size, requiring very little memory.