Configure
When using the Citrix Workspace app for Windows, the following configurations allow you to access their hosted applications and desktops.
Administrator tasks and considerations
This article discusses the tasks and considerations that are relevant for administrators of Citrix Workspace app for Windows.
Feature flag management
If an issue occurs with Citrix Workspace app in production, we can disable an affected feature dynamically in Citrix Workspace app even after the feature is shipped.
To do so, we use feature flags and a third-party service called LaunchDarkly. You do not need to make any configurations to enable traffic to LaunchDarkly, except when you have a firewall or proxy blocking outbound traffic. In that case, you enable traffic to LaunchDarkly via specific URLs or IP addresses, depending on your policy requirements.
You can enable traffic and communication to LaunchDarkly in the following ways:
Enable traffic to the following URLs
events.launchdarkly.comstream.launchdarkly.comclientstream.launchdarkly.comFirehose.launchdarkly.commobile.launchdarkly.com
List IP addresses in an allow list
If you must list IP addresses in an allow list, for a list of all current IP address ranges, see LaunchDarkly public IP list. You can use this list to know that your firewall configurations are updated automatically in keeping with the infrastructure updates. For details about the status of the infrastructure changes, see the LaunchDarkly Status page.
LaunchDarkly system requirements
Verify if the apps can communicate with the following services if you have split tunneling on the Citrix ADC set to OFF for the following services:
- LaunchDarkly service.
- APNs listener service
Disabling LaunchDarkly service
You can disable the LaunchDarkly service by using a Group Policy Object (GPO) policy.
- Open the Citrix Workspace app Group Policy Object administrative template by running gpedit.msc.
- Under the Computer Configuration node, go to Administrative Templates > Citrix Components > Citrix Workspace > Compliance.
- Select Disable sending data to 3rd party policy and set it to Enabled.
- Click Apply and OK.
Group Policy Object administrative template
We recommend that you use the Group Policy Object administrative template to configure rules for:
- Network routing
- Proxy servers
- Trusted server configuration
- User routing
- Remote user devices
- User experience.
You can use the receiver.admx / receiver.adml template files with domain policies and local computer policies. For domain policies, import the template file using the Group Policy Management console. Importing is useful when applying Citrix Workspace app settings to several different user devices throughout the enterprise. To modify on a single user device, import the template file using the local Group Policy Editor on the device.
Citrix recommends using the Windows Group Policy Object (GPO) administrative template to configure Citrix Workspace app.
The installation directory includes CitrixBase.admx and CitrixBase.adml, and, administrative template files (receiver.adml or receiver.admx`receiver.adml`).
Note:
The .admx and .adml files are for use with Windows version mentioned in the Compatibility matrix.
If Citrix Workspace app is installed with VDA, the ADMX/ADML files are typically found in the <installation directory>Online PluginConfiguration directory.
If Citrix Workspace app is installed without the VDA, the ADMX/ADML files are typically found in the C:Program FilesCitrixICA ClientConfiguration directory.
See the following table for information about Citrix Workspace app template files and their respective locations.
Note:
Citrix recommends that you use the GPO template files provided with latest version of Citrix Workspace app.
| File type | File location |
|---|---|
| receiver.adm | <Installation Directory>ICA ClientConfiguration |
| receiver.admx | <Installation Directory>ICA ClientConfiguration |
| receiver.adml | <Installation Directory>ICA ClientConfiguration[MUIculture] |
| CitrixBase.admx | <Installation Directory>ICA ClientConfiguration |
| CitrixBase.adml | <Installation Directory>ICA ClientConfiguration[MUIculture] |
Note:
- If the CitrixBase.admxadml isn’t added to the local GPO, the Enable ICA File Signing policy might be lost.
- When upgrading Citrix Workspace app, add the latest template files to local GPO. Earlier settings are retained after import. For more information, see the following procedure:
To add the receiver.admx/adml template files to the local GPO:
You can use .adm template files to configure both the Local and the domain-based GPO. Refer to the Microsoft MSDN article about managing ADMX files here.
After installing Citrix Workspace app, copy the following template files:
| File type | Copy from | Copy to |
|---|---|---|
| receiver.admx | Installation DirectoryICA ClientConfigurationreceiver.admx |
%systemroot%policyDefinitions |
| CitrixBase.admx | Installation DirectoryICA ClientConfigurationCitrixBase.admx |
%systemroot%policyDefinitions |
| receiver.adml | Installation DirectoryICA ClientConfiguration[MUIculture]receiver.adml |
%systemroot%policyDefinitions[MUIculture] |
| CitrixBase.adml | Installation DirectoryICA ClientConfiguration[MUIculture]CitrixBase.adml |
%systemroot%policyDefinitions[MUIculture] |
Note:
Add the CitrixBase.admx/CitrixBase.adml to the
PolicyDefinitionsfolder to view the template files in Administrative Templates > Citrix Components > Citrix Workspace.
Client App Management
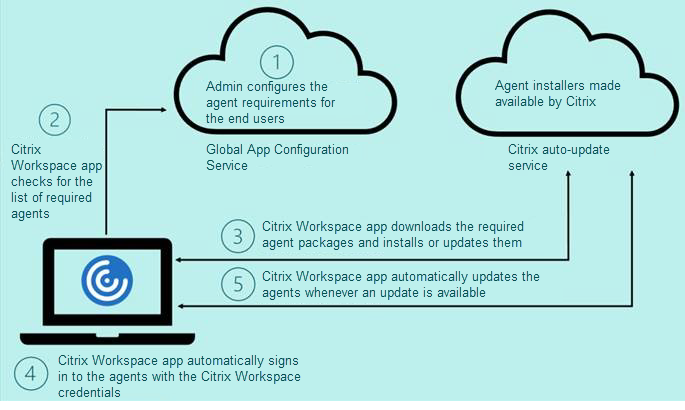
Citrix Workspace app for Windows offers Client App Management capability that makes the Citrix Workspace app a single client app required on the end point to install and manage agents such as Secure Access Agent and End Point Analysis (EPA) plug-in.
With this capability, administrators can easily deploy and manage required agents from a single management console.
Note:
This feature is applicable to Workspace (cloud) sessions only.
Client App Management includes the following steps:
- Administrators must specify the agents required on end users’ devices in the Global App Configuration Service. Administrators can specify Secure Access Agent and Endpoint Analysis (EPA) agent.
- Citrix Workspace app fetches the list of agents from Global App Configuration Service.
- Based on the list fetched from Global App Configuration service, Citrix Workspace app downloads the agent packages through the auto-update service. If the agent is not previously installed on the end point, Citrix Workspace app triggers the installation of the agent. If the agent is already installed, Citrix Workspace app triggers an update to the agent (if the version of the downloaded agent is higher than the installed version.)
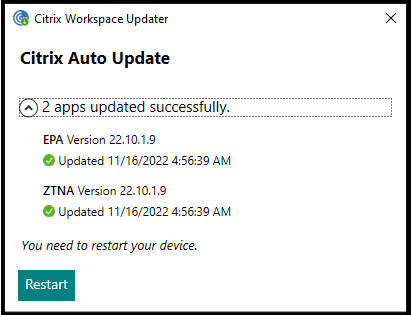
Citrix Workspace app ensures to automatically update the agents whenever an update is available in the future.
Citrix Workspace app automatically signs in to the agents with the Citrix Workspace credentials.
The following diagram illustrates the workflow:
Notes:
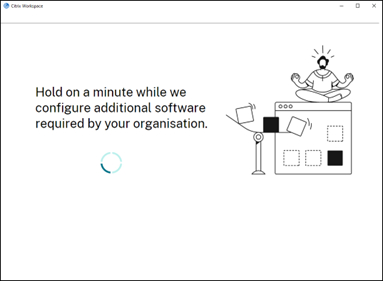
- If the EPA and ZTNA plugins doesn’t exists, the plugins are downloaded and installed while adding the store or account for the first time.
- If the store or account and plug-ins already exists and the installer contains a higher version, plug-ins are updated during the auto-update cycle.
To enable this feature:
Following Global App Configuration setting need to be onboarded for the store/account:
{
  "serviceURL": {
    "url": "https://storefront.acme.com:443"
  },
  "settings": {
    "name": "Install and update plugins",
    "description": "Install and update plugins",
    "useForAppConfig": true,
    "appSettings": {
      "windows": [{
        "AutoUpdate": {
          "AutoUpdatePluginsSettings": [{
              "pluginId": "8A8AF6C0-11F6-4343-BA2D-A85A766170D4",
              "pluginName": "Citrix EPA Client",
              "pluginSettings": {
                "isFTU": true,
                "isBlocking": true,
                "delayGroup": "Fast",
                "deploymentMode": "InstallAndUpdate",
                "detectRule": "UpgradeCode:{37A181F7-870E-4BDF-B0EA-E3B4766119FE}",
                "maximumAllowedVersion": "22.10.1.9",
                "minimumAllowedVersion": "0.0.0.0",
                "stream": "Current",
                "upgradeToLatest": true
              }
            },
            {
              "pluginId": "9A8AF6C0-11F6-4343-BA2D-A85A766170D5",
              "pluginName": "Citrix Secure Access Client",
              "pluginSettings": {
                "isFTU": true,
                "isBlocking": false,
                "delayGroup": "Fast",
                "deploymentMode": "InstallAndUpdate",
                "detectRule": "UpgradeCode:{F0ED53AB-11BE-4E9C-87E5-CD4A81DA2A4D}",
                "maximumAllowedVersion": "22.10.1.9",
                "minimumAllowedVersion": "0.0.0.0",
                "stream": "Current",
                "upgradeToLatest": true
              }
            }
          ],
          "userOverride": false
        }
      }]
    }
  }
}


<!--NeedCopy-->
- When the isBlocking parameter is set to true, the plug-in is considered mandatory, and the sign-in page appears only when the required plug-in is installed. Citrix recommends you set EPA as the mandatory plug-in.
- pluginName: Friendly name for the plug-in. pluginName can be modified.
- pluginId: Id of the plug-in and must not be modified.
- delayGroup: Auto-update interval at which the plug-ins must be updated. Slow, Medium, or Fast.
-
deploymentMode:
- InstallAndUpdate: Plugin can be freshly installed and updated with the new version.
- Update: Only update should be allowed, no fresh install.
- None: No action is needed for this plugin.
- detectRule: Value must not be modified. Checks if plug-in is already installed or not.
- maximumAllowedVersion: maximum allowed version of the plug-in
- minimumAllowedVersion: minimum allowed version of the plug-in
- upgradeToLatest: must be set to false to support maximumAllowedVersion and minimumAllowedVersion.
- True: Latest version of the plug-in is considered during the update.
- Stream: must be set to Current to receive install or auto-update the plug-ins
- Download and install the Citrix Workspace app for Windows version 2212.
- Click Add Account at the end of the installation.
-
Add the store/account where the app config settings are onboarded.
The following message appears while installing the mandatory plug-ins:
When the installation is complete, the following toast notification appears:
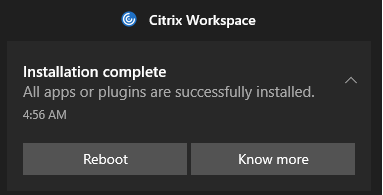
Click Know more to know the plug-ins installed.
Client App Management for Zoom plug-in
Download, install, and auto-update of Zoom plug-in is also supported and handled same way as EPA and ZTNA plug-ins.
Note:
This feature is applicable to Workspace (cloud) sessions only.
The following Global App Configuration setting needs to be onboarded for the store/account to leverage this feature:
{

  "serviceURL": {

    "url": "https://storefront.acme.com:443"

  },

  "settings": {

    "name": "Install and update plugins",

    "description": "Install and update plugins",

    "useForAppConfig": true,

    "appSettings": {

      "windows": [{

        "AutoUpdate": {

          "AutoUpdatePluginsSettings": [{

                  "pluginSettings": {

                    "upgradeToLatest": true,

                    "deploymentMode": "InstallAndUpdate",

                    "stream": "Current",

                    "isFTU": false,

                    "isBlocking": false,

                    "detectRule": "UpgradeCode:{34225638-14F3-4059-BE34-175AC9B35435}",

                    "maximumAllowedVersion": "5.11.2872",

                    "minimumAllowedVersion": "0.0.0",

                    "delayGroup": "Fast"

                  },

                  "pluginName": "Zoom VDI AutoUpgrade Plugin",

                  "pluginId": "1A4BB471-022C-4C87-BDCD-0B64FB42869C"

                }           ],

          "userOverride": false

        }

      }]

    }

  }

}

<!--NeedCopy-->
App Protection
Disclaimer
App Protection policies filter the access to required functions of the underlying operating system (specific API calls required to capture screens or keyboard presses). App Protection policies provide protection even against custom and purpose-built hacker tools. However, as operating systems evolve, new ways of capturing screens and logging keys might emerge. While we continue to identify and address them, we cannot guarantee full protection in specific configurations and deployments.
App Protection feature is an add-on feature that provides enhanced security when using Citrix Virtual Apps and Desktops and Citrix DaaS (formerly Citrix Virtual Apps and Desktops service). The feature restricts the ability of clients to compromise with keylogging and screen capturing malware. App Protection prevents exfiltration of confidential information such as user credentials and sensitive information on the screen. The feature prevents users and attackers from taking screenshots and from using keyloggers to glean and exploit sensitive information.
App Protection requires that you install an add-on license on your License Server. A Citrix Virtual Desktops license must also be present. For information on Licensing, see the Configure section in the Citrix Virtual Apps and Desktops documentation.
Requirements:
- Citrix Virtual Apps and Desktops Version 1912 or later.
- StoreFront version 1912 or Workspace.
- Citrix Workspace app Version 1912 or later.
Prerequisites:
- The App Protection feature must be enabled on the Controller. For more information, see App Protection in Citrix Virtual Apps and Desktops documentation.
Note:
- This feature is supported only on desktop operating systems such as Windows 11, Windows 10, Windows 8.1.
- Starting with Version 2006.1, Citrix Workspace app isn’t supported on Windows 7. So, app protection doesn’t work on Windows 7. For more information, see Deprecation.
- This feature isn’t supported over Remote Desktop Protocol (RDP).
On-premises HDX session protection:
Two policies provide anti-keylogging and anti-screen-capturing functionality in a session. These policies must be configured through PowerShell. No GUI is available for the purpose.
Note:
Starting with Version 2103, Citrix DaaS supports App Protection with StoreFront and Workspace.
For information on App Protection configuration on Citrix Virtual Apps and Desktops and Citrix DaaS, see App protection.
App Protection — Configuration in Citrix Workspace app
App Protection component is now installed by default during the Citrix Workspace app installation.
The Enable app protection check box that appears during the installation is replaced with Start App Protection after installation.
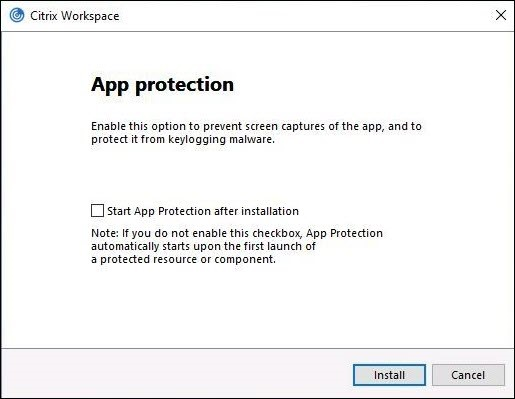
When you select this check box, App Protection starts immediately after the installation.
Note:
If you do not enable this check box, App Protection automatically starts upon the first start of a protected resource or component for customers who have entitled to App Protection.
Command-line interface
You can also start the App Protection component using the /startappprotection command line parameter. However, the previous /includeappprotection switch is deprecated.
The following table provides information on screens protected depending on deployment:
| App Protection deployment | Screens protected | Screens not protected |
|---|---|---|
| Included in Citrix Workspace app | Self-Service plug-in and Auth manager / User credentials dialog | Connection Center, Devices, Any Citrix Workspace app error messages, Auto client reconnect, Add account |
| Configured on the Controller | ICA session screen (both apps and desktops) | Connection Center, Devices, Any Citrix Workspace app error messages, Auto client reconnect, Add account |
When you’re taking a screenshot, only the protected window is blacked out. You can take a screenshot of the area outside the protected window. However, if you’re using the PrtScr key to capture a screenshot on a Windows 10 device, you must minimize the protected window.
Previously, anti-screen capture and anti-keylogging capabilities were enforced by default for Citrix authentication and Citrix Workspace app screens. However, starting from 2212, these capabilities are disabled by default and need to be configured using the Group Policy Object.
Note:
This GPO policy isn’t applicable for ICA and SaaS sessions. The ICA and SaaS sessions continue to be controlled using the Delivery Controller and Citrix Secure Private Access.
Configuring App Protection for the Self-Service plug-in interface
- Open the Citrix Workspace app Group Policy Object administrative template by running
gpedit.msc. - Under the Computer Configuration node, go to Administrative Templates > Citrix Components > Citrix Workspace.
- To configure anti-keylogging and anti-screen-capturing for the Self-Service plug-in dialog, select Self Service > Manage App Protection policy.
- Select one or both the following options:
- Anti-key logging: Prevents keyloggers from capturing keystrokes.
- Anti-screen-capturing: Prevents users from taking screenshots and sharing their screen.
- Click Apply and OK.
Configuring App Protection for authentication manager
- Open the Citrix Workspace app Group Policy Object administrative template by running
gpedit.msc. - Under the Computer Configuration node, go to Administrative Templates > Citrix Components > Citrix Workspace.
- To configure anti-keylogging and anti-screen-capturing for the authentication manager, select User authentication > Manage app protection policy.
- Select one or both the following options:
- Anti-key logging: Prevents keyloggers from capturing keystrokes.
- Anti-screen-capturing: Prevents users from taking screenshots and sharing their screen.
- Click Apply and OK.
Expected Behavior:
The expected behavior depends upon the method by which users access the StoreFront that has the protected resources.
Note:
- Citrix recommends that you only use the native Citrix Workspace app to launch a protected session.
App Protection enhancement: Screen capture detection and notification
Starting from Citrix Workspace app for Windows 2212 release, you can view a notification when a possible attempt of screen capture is made on any protected resources. For information on the resources protected by App Protection, see What does App Protection protect?.
The notification appears when there is an:
- attempt to take a screenshot or record video through a screen-capturing tool.
- attempt to take a screenshot through the Print Screen key.
Note:
The notification appears only once per running instance of the screen capture tool. The notification appears again if you relaunch the tool and attempt screen capture.
App Protection enhancement: configure App Protection for Authentication and Self-Service plug-in using Global App Configuration
Starting with 2302 release, Citrix Workspace app for Windows allows you to configure App Protection for Authentication and Self-Service plug-in using Global App Configuration. Previously, you were able to configure these components only using Group Policy Object.
If you enable the anti-keylogging and the anti-screen capturing functionality using Global App Configuration service, they are applicable to both Authentication and Self-Service plug-in.
Note:
The Global App Configuration service configurations don’t apply for virtual apps, virtual desktops, web apps, and SaaS apps. These resources continue to be controlled using the Delivery Controller and Citrix Secure Private Access. For more information see, the configure section of App Protection in the Citrix Virtual Apps and Desktops documentation.
Configuring App Protection for the Authentication and Self-Service plug-in using Global App Configuration Service API
The administrators can use the API to configure these App Protection features. The settings are as follows:
-
Setting to enable or disable anti-screen capturing:
“name”: “enable anti screen capture for auth and ssp”
“value”: “true” or “false” -
Setting to enable or disable anti-keylogging:
“name”: “enable anti key-logging for auth and ssp”
“value”: “true” or “false”
To configure, here is an example JSON file for enabling anti-screen capture and anti-keylogging features for Citrix Workspace app for Windows in Global App Configuration service:
{

          "category": "App Protection",

          "userOverride": true,

          "assignedTo": [

            "AllUsersNoAuthentication"

          ],

          "settings": [

            {

              "name": "enable anti screen capture for auth and ssp",

              "value": true

            },

            {

              "name": "enable anti key-logging for auth and ssp",

              "value": true

            }

          ]}
Additional note
-
Behavior on the workspace for web:
The App Protection component isn’t supported on the workspace for web configurations. Applications that are protected by App Protection policies aren’t enumerated. For more information about the resources assigned, contact your system administrator.
-
Behavior on Citrix Workspace app versions that do not support App Protection:
On Citrix Workspace app Version 1911 and earlier, applications that are protected by App Protection policies aren’t enumerated on StoreFront.
-
Behavior of apps that have the App Protection feature configured on the Controller:
On an App Protection configured-Controller, if you try to launch an application that is protected, the App Protection starts automatically and protects the app.
-
Behavior of protected session in case of Remote Desktop Protocol(RDP)
- Your active protected session disconnects, if you launch a Remote Desktop Protocol(RDP) session.
- You can’t launch a protected session in a Remote Desktop Protocol(RDP) session.
App Protection error logs
Starting with Version 2103, the App Protection logs are collected as part of Citrix Workspace app logs. For more information about log collection, see Log collection.
You do not need to install or use a third-party app to collect the App Protection logs specifically. However, DebugView can still be continued to be used for log collection.
The App Protection logs are registered to the debug output. To collect these logs, do the following:
- Download and install the DebugView app from the Microsoft website.
-
Launch the command prompt and run the following command:
Dbgview.exe /t /k /v /l C:logs.txtFrom the example above, you can view the logs in
log.txtfile.
The command indicates the following:
-
/t– The DebugView app starts minimized in the notification area. -
/k– Enable kernel capture. -
/v– Enable verbose kernel capture. -
/l– Log the output to a specific file.
Uninstalling the App Protection component
To uninstall the App Protection component, you must uninstall Citrix Workspace app from your system. Restart the system for the changes to take effect.
Note:
App Protection is supported only on upgrade from Version 1912 onwards.
Known issues or limitations
- This feature isn’t supported on Microsoft Server operating systems such as Windows Server 2012 R2 and Windows Server 2016.
- This feature isn’t supported in double-hop scenarios.
- For this feature to function properly, disable the Client clipboard redirection policy on the VDA.
Application Categories
Application Categories allow users to manage collections of applications in Citrix Workspace app. You can create application groups for applications shared across different delivery groups or used by a subset of users within delivery groups.
For more information, see Create application groups in the Citrix Virtual Apps and Desktops documentation.
Improved ICA file security
This feature provides enhanced security while handling ICA files during a virtual apps and desktops session launch.
Citrix Workspace app lets you store the ICA file in the system memory instead of the local disk when you launch a virtual apps and desktops session.
This feature aims to eliminate surface attacks and any malware that might misuse the ICA file when stored locally. This feature is also applicable on virtual apps and desktops sessions that are launched on workspace for Web
Configuration
ICA file security is also supported when Citrix Workspace or StoreFront is accessed through the web. Client detection is a prerequisite for the feature to work if it’s accessed through the web. If you’re accessing StoreFront using a browser, enable the following attributes in the web.config file on StoreFront deployments:
| StoreFront Version | Attribute |
|---|---|
| 2.x | pluginassistant |
| 3.x | protocolHandler |
When you sign in to the store through the browser, click Detect Workspace App. If the prompt doesn’t appear, clear the browser cookies and try again.
If it’s a Workspace deployment, you can find the client detection settings by navigating to Accounts settings > Advanced > Apps and Desktops Launch Preference.
You can take extra measures so that sessions are launched only using the ICA file stored on system memory. Use any of the following methods:
- Group Policy Object (GPO) Administrative template on the client.
- Global App Config Service.
- Workspace for web.
Using the GPO:
To block session launches from ICA files that are stored on the local disk, do the following:
- Open the Citrix Workspace app Group Policy Object administrative template by running
gpedit.msc. - Under the Computer Configuration node, go to Administrative Templates > Citrix Components > Citrix Workspace > Client Engine.
- Select the Secure ICA file session launch policy and set it to Enabled.
- Click Apply and OK.
Using the Global App Config Service:
You can use Global App Config Service from Citrix Workspace app 2106.
To block session launches from ICA files that are stored on the local disk, do the following:
Set the Block Direct ICA File Launches attribute to True.
For more information about Global App Config Service, see Global App Config Service documentation.
Using workspace for web:
To disallow ICA file download on the local disk when using workspace for Web, do the following:
Run the PowerShell module. See Configure DisallowICADownload.
Note:
The DisallowICADownload policy isn’t available for StoreFront deployments.
Log collection
Log collection simplifies the process of collecting logs for Citrix Workspace app. The logs help Citrix to troubleshoot, and, in cases of complicated issues, provides support.
You can collect logs using the GUI.
Collecting logs:
- Right-click the Citrix Workspace app icon in the notification area and select Advanced Preferences.
-
Select Log collection.
The Log collection dialog appears.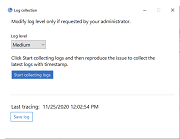
- Select one of the following log levels:
- Low
- Medium
- Verbose
-
Click Start collecting logs to reproduce the issue and collect the latest logs.
The log collection process starts.
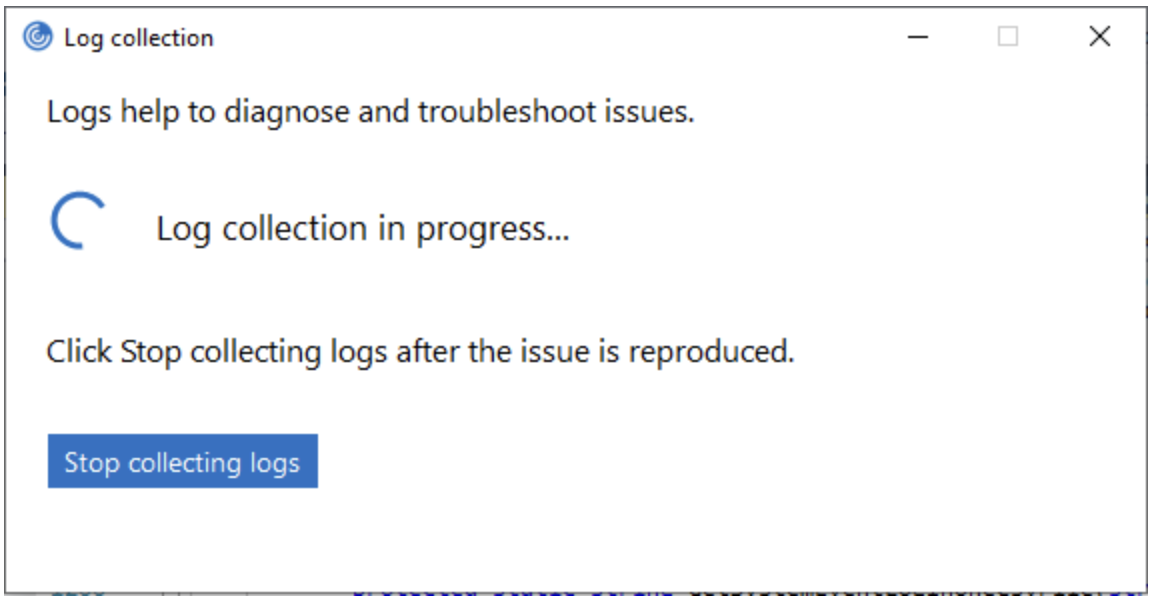
- Click Stop collecting logs after the issue is reproduced.
- Click Save log to save the logs to a desired location.
HDX adaptive throughput
HDX adaptive throughput intelligently fine-tunes the peak throughput of the ICA session by adjusting output buffers. The number of output buffers is initially set at a high value. This high value allows data to be transmitted to the client more quickly and efficiently, especially in high latency networks.
Provides better interactivity, faster file transfers, smoother video playback, higher framerate, and resolution results in an enhanced user experience.
Session interactivity is constantly measured to determine whether any data streams within the ICA session are adversely affecting interactivity. If that occurs, the throughput is decreased to reduce the impact of the large data stream on the session and allow interactivity to recover.
This feature is supported only on Citrix Workspace app 1811 for Windows and later.
Important:
HDX adaptive throughput changes the output buffers by moving the mechanism from the client to the VDA. So, adjusting the number of output buffers on the client as described in CTX125027 has no effect.
Adaptive transport
Adaptive Transport is a mechanism in Citrix Virtual Apps and Desktops and Citrix DaaS that allows to use Enlightened Data Transport (EDT) as the transport protocol for ICA connections. For more information, see Adaptive transport section in the Citrix Virtual Apps and Desktops documentation.
Advanced Preferences sheet
You can customize Advanced Preferences sheet’s availability and contents present in the right-click menu of the Citrix Workspace app icon in the notification area. Doing so ensures that users can apply only administrator-specified settings on their systems. Specifically, you can:
- Hide the Advanced Preferences sheet altogether
- Hide the following, specific settings from the sheet:
- Data collection
- Connection Center
- Configuration checker
- Keyboard and Language bar
- High DPI
- Support information
- Shortcuts and Reconnect
- Citrix Files
- Citrix Casting
You can hide the Advanced Preferences sheet by using the Citrix Workspace app Group Policy Object (GPO) administrative template:
- Open the Citrix Workspace app Group Policy Object administrative template by running gpedit.msc.
- Under the Computer Configuration node, go to Administrative Templates > Citrix Workspace > Self Service > Advanced Preferences Options.
- Select the Disable Advance Preferences policy.
- Select Enabled to hide the Advanced Preferences option from the right-click menu of the Citrix Workspace app icon in the notification area.
Note:
By default, the Not Configured option is selected.
Hiding specific settings from the Advanced Preferences sheet
You can hide specific user-configurable settings from the Advanced Preferences sheet by using the Citrix Workspace app Group Policy Object administrative template. To hide the settings:
- Open the Citrix Workspace app Group Policy Object administrative template by running gpedit.msc.
- Under the Computer Configuration node, go to Administrative Templates > Citrix Workspace > Self Service > Advanced Preferences Options.
- Select the policy for the setting you want to hide.
The following table lists the options that you can select and the effect of each:
| Options | Action |
|---|---|
| Not Configured | Displays the setting |
| Enabled | Hides the setting |
| Disabled | Displays the setting |
You can hide the following specific settings from the Advanced Preferences sheet:
- Configuration checker
- Connection Center
- High DPI
- Data collection
- Delete saved passwords
- Keyboard and Language bar
- Shortcuts and Reconnect
- Support information
- Citrix Files
- Citrix Casting
Hiding the Reset Workspace option from the Advanced Preferences sheet using the Registry editor
You can hide the Reset Workspace option from the Advanced Preferences sheet only using the Registry editor.
- Launch the registry editor.
- Navigate to
HKEY_LOCAL_MACHINESOFTWARECitrixDazzle. - Create a String Value key EnableFactoryReset and set it to any of the following options:
- True — Displays the Reset Workspace option in the Advanced Preferences sheet.
- False — Hides the Reset Workspace option in the Advanced Preferences sheet.
Hiding Citrix Workspace Updates option from the Advanced Preferences sheet
Note:
The policy path for the Citrix Workspace Updates option is different from the other options present in the Advanced Preferences sheet.
- Open the Citrix Workspace app Group Policy Object administrative template by running gpedit.msc.
- Under the Computer Configuration node, go to Administrative Templates > Citrix Components > Citrix Workspace > Workspace Updates.
- Select the Workspace Updates policy.
- Select Disabled to hide the Workspace Updates settings from the Advanced Preferences sheet.
StoreFront to Workspace URL Migration
StoreFront to Workspace URL migration enables you to seamlessly migrate your end users from a StoreFront store to Workspace store with minimal user interaction.
Consider, all your end users have a StoreFront store storefront.com added to their Workspace app. As an administrator, you can configure a StoreFront URL to Workspace URL Mapping {‘storefront.com’:’xyz.cloud.com’} in the Global App Configuration Service. The Global App Config Service pushes the setting to all Citrix Workspace app instances, on both managed and unmanaged devices, that have the StoreFront URL storefront.com added.
Once the setting is detected, Citrix Workspace app adds the mapped Workspace URL xyz.cloud.com as another store. When the end user launches the Citrix Workspace app, the Citrix Workspace store opens. The previously added StoreFront store storefront.com remains added to the Workspace app. Users can always switch back to the StoreFront store storefront.com using the Switch Accounts option in the Workspace app. Admins can control the removal of the StoreFront store storefront.com from the Workspace app at the users’ end points. The removal can be done through the global app config service.
To enable the feature, do the following steps:
-
Configure StoreFront to Workspace mapping using the Global App Config Service. For more information on Global App config service, see Global App Configuration Service.
-
Edit the payload in the app config service:
{
 "serviceURL": {
"url": "https://storefront.acme.com:443",
"migrationUrl": [
  {
    "url": "https://sampleworkspace.cloud.com:443",
    "storeFrontValidUntil": "2023-05-01"
  }
 ]
},
"settings": {
"name": "Productivity Apps",
"description": "Provides access StoreFront to Workspace Migration",
"useForAppConfig": true,
"appSettings": {
  "windows": [
    {
      "category": "root",
      "userOverride": false,
      "assignmentPriority": 0,
      "assignedTo": [
        "AllUsersNoAuthentication"
     ],
      "settings": [
      {
       "name": "Hide advanced preferences",
        "value": false
      }
     ]
    }
   ]
  }
 }
}

<!--NeedCopy-->
Note:
If you’re configuring the payload for the first time, use
POST.
If you’re editing the existing payload configuration, usePUTand check that you have the payload that consists of all the supported settings. -
Specify the StoreFront URL
storefront.comas the value for URL in the serviceURL section. -
Configure the Workspace URL
xyz.cloud.cominside the section migrationUrl. -
Use storeFrontValidUntil to set the timeline for the removal of the StoreFront store from the Workspace app. This field is optional. You can set the following value based on your requirement:
- Valid date in the format (YYYY-MM-DD)
Note:
If you have provided a past date, then the StoreFront store is removed immediately upon URL migration. If you have provided a future date, then the StoreFront store is removed on the set date.
- Valid date in the format (YYYY-MM-DD)
Once the app config service settings are pushed, the following screen appears:
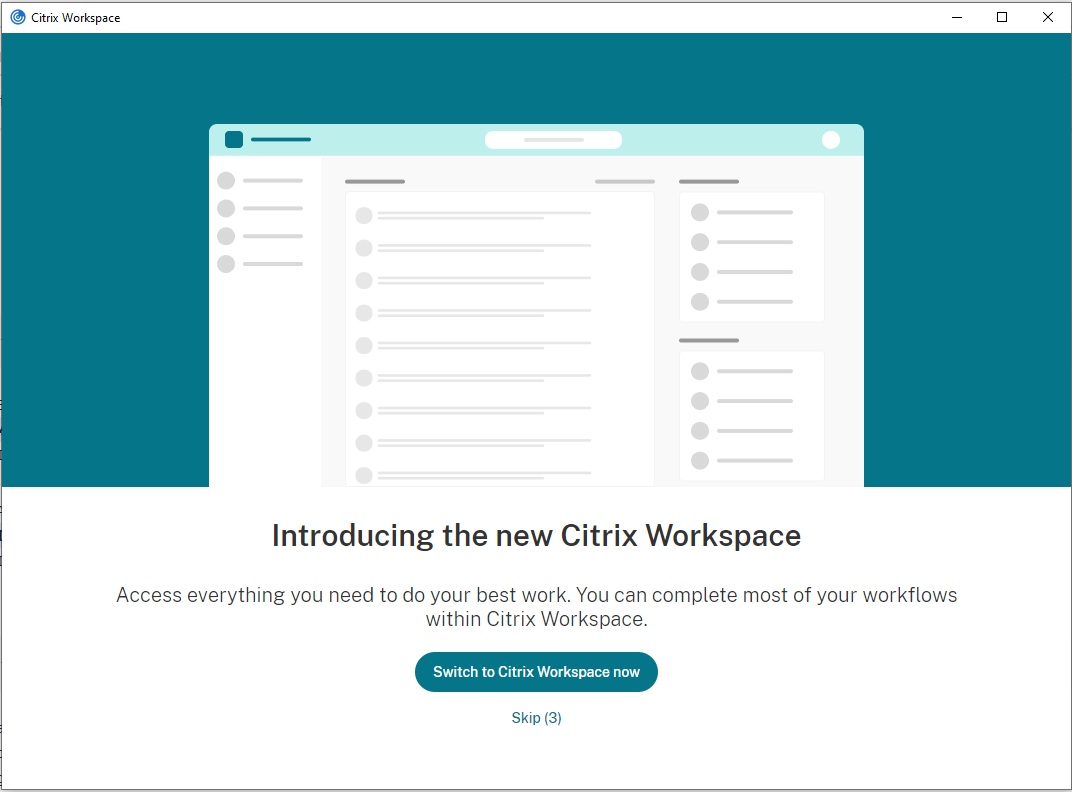
When the user clicks Switch to Citrix Workspace now, the Workspace URL is added to Citrix Workspace app and the authentication prompt appears. Users have a limited option to delay the transition up to three times.
Application delivery
When delivering applications with Citrix Virtual Apps and Desktops and Citrix DaaS, consider the following options to enhance the user experience:
- Web Access Mode — Without any configuration, Citrix Workspace app provides browser-based access to applications and desktops. You can open a browser to a workspace for web to select and use the applications you want. In this mode, no shortcuts are placed on the user’s desktop.
- Self-Service Mode — By adding a StoreFront account to Citrix Workspace app or configuring Citrix Workspace app to point to a StoreFront website, you can configure self-service mode. Self-Service mode allows you to subscribe to applications from the Citrix Workspace app user interface. The enhanced user experience is similar to that of a mobile app store. In a self-service mode, you can configure mandatory, auto-provisioned, and featured app keyword settings as required.
Note:
By default, Citrix Workspaces app allows you to select the applications to display in the Start menu.
- App shortcut-only mode — Administrators can configure Citrix Workspace app to automatically place application and desktop shortcuts directly in the Start menu or on the desktop. The placement is similar to Citrix Workspace app Enterprise. The new shortcut only mode allows you to find all the published apps within the familiar Windows navigation schema where you would expect to find them.
For more information, see the Create Delivery Groups section in the Citrix Virtual Apps and Desktops documentation.
Configure self-service mode
By simply adding a StoreFront account to Citrix Workspace app or configuring Citrix Workspace app to point to a StoreFront site, you can configure self-service mode. The configuration allows users to subscribe to applications from the Citrix Workspace user interface. The enhanced user experience is similar to that of a mobile app store.
Note:
By default, Citrix Workspace app allows users to select the applications they want to display in their Start menu.
In self-service mode, you can configure mandatory, auto-provisioned, and featured app keyword settings as needed.
Append keywords to the descriptions you provide for delivery group applications:
- To make an individual app mandatory, so that it cannot be removed from Citrix Workspace app, append the string KEYWORDS: Mandatory to the application description. There is no Remove option for users to unsubscribe to mandatory apps.
- To automatically subscribe all users of a store to an application, append the string KEYWORDS: Auto to the description. When users log on to the store, the application is automatically provisioned without users needing to manually subscribe to the application.
- To advertise applications to users or to make commonly used applications easier to find by listing them in the Citrix Workspace Featured list, append the string KEYWORDS: Featured to the application description.
Customize the app shortcut location using the Group Policy Object template
- Open the Citrix Workspace app Group Policy Object administrative template by running gpedit.msc.
- Under the Computer Configuration node, go to Administrative Templates > Citrix Components > Citrix Workspace > Self Service.
- Select Manage SelfServiceMode policy.
- Select Enabled to view the Self-service user interface.
- Select Disabled to subscribe to the apps manually. This option hides the Self-service user interface.
- Select Manage App Shortcut policy.
- Select the options as required.
- Click Apply and OK.
- Restart Citrix Workspace app for the changes to take effect.
Using StoreFront account settings to customize app shortcut locations
You can set up shortcuts in the Start menu and on the desktop from the StoreFront site. The following settings can be added in the web.config file in C:inetpubwwwrootCitrixRoamingin the <annotatedServices> section:
- To put shortcuts on the desktop, use PutShortcutsOnDesktop. Settings: “true” or “false” (default is false).
- To put shortcuts in the Start menu, use PutShortcutsInStartMenu. Settings: “true” or “false” (default is true).
- To use the category path in the Start menu, use UseCategoryAsStartMenuPath. Settings: “true” or “false” (default is true).
Note:
Windows 8, 8.1 and Windows 10 do not allow the creation of nested folders within the Start menu. Instead, display the applications individually or under the root folder. Applications are not within the Category sub folders defined with Citrix Virtual Apps and Desktops and Citrix DaaS.
- To set a single directory for all shortcuts in the Start menu, use
StartMenuDir. Setting: String value, being the name of the folder into which shortcuts are written. - To reinstall modified apps, use AutoReinstallModifiedApps. Settings: “true” or “false” (default is true).
- To show a single directory for all shortcuts on the desktop, use
DesktopDir. Setting: String value, being the name of the folder into which shortcuts are written. - To not create an entry on the clients ‘add/remove programs’, use
DontCreateAddRemoveEntry. Settings: “true” or “false” (default is false). - To remove shortcuts and Citrix Workspace icon for an application that was previously available from the Store but now is not available, use
SilentlyUninstallRemovedResources. Settings: “true” or “false” (default is false).
In the web.config file, add the changes in the XML section for the account. Find this section by locating the opening tab:
<account id=... name="Store"
The section ends with the </account> tag.
Before the end of the account section, in the first properties section:
<properties> <clear> <properties>
Properties can be added into this section after the <clear /> tag, one per line, giving the name and value. For example:
<property name="PutShortcutsOnDesktop" value="True"/>
Note:
Property elements added before the <clear /> tag might invalidate them. Removing the <clear /> tag when adding a property name and value is optional.
An extended example for this section is:
<properties <property name="PutShortcutsOnDesktop" value="True" <property name="DesktopDir" value="Citrix Applications">
Important
In multiple server deployments, use only one server at a time to change the configuration of the server group. Ensure that the Citrix StoreFront management console is not running on any of the other servers in the deployment. Once complete, propagate your configuration changes to the server group, so that the other servers in the deployment are updated. For more information, see StoreFront documentation.
Using per-app settings in Citrix Virtual Apps and Desktops 7.x to customize app shortcut locations
Citrix Workspace app can be configured to automatically place application and desktop shortcuts directly in the Start menu or on the desktop. However, this configuration is similar to the previous Workspace for Windows versions. However, release 4.2.100 introduced the ability to control the placement of the app shortcut using Citrix Virtual Apps per app settings. The functionality is useful in environments with a handful of applications that need to be displayed in consistent locations.
Using per app settings in XenApp 7.6 to customize app shortcut locations
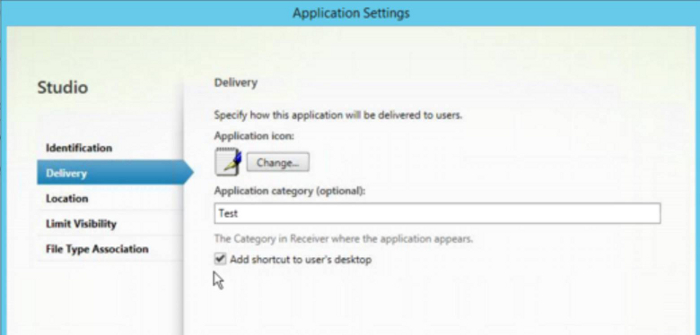
To configure a per app publishing shortcut in XenApp 7.6:
- In Citrix Studio, locate the Application Settings screen.
- In the Application Settings screen, select Delivery. Using this screen, you can specify how applications are delivered to users.
- Select the appropriate icon for the application. Click Change to browse to the location of the required icon.
- In the Application category field, optionally specify the category in Citrix Workspace app where the application appears. For example, if you are adding shortcuts to Microsoft Office applications, enter Microsoft Office.
- Select the Add shortcut to user’s desktop check box.
-
Click OK.
Reducing enumeration delays or digitally signing application stubs
Citrix Workspace app provides functionality to copy the .EXE stubs from a network share, if:
- there is a delay in app enumeration at each sign-in, or
- there is a need to sign application stubs digitally.
This functionality involves several steps:
- Create the application stubs on the client machine.
- Copy the application stubs to a common location accessible from a network share.
- If necessary, prepare an allow list (or, sign the stubs with an Enterprise certificate.
- Add a registry key to enable Workspace for Windows to create the stubs by copying them from the network share.
If RemoveappsOnLogoff and RemoveAppsonExit are enabled, and users are experiencing delays in app enumeration at every logon, use the following workaround to reduce the delays:
- Use regedit to add
HKEY_CURRENT_USERSoftwareCitrixDazzle/v ReuseStubs /t REG_SZ /d “true”. - Use regedit to add
HKEY_LOCAL_MACHINESoftwareCitrixDazzle/v ReuseStubs /t REG_SZ /d “true”. HKEY_CURRENT_USER has preference over HKEY_LOCAL_MACHINE.
Caution
Editing the registry incorrectly can cause serious problems that might require you to reinstall your operating system. Citrix cannot guarantee that problems resulting from the incorrect use of the Registry Editor can be solved. Use the Registry Editor at your own risk. Be sure to back up the registry before you edit it.
Enable a machine to use pre-created stub executables that are stored on a network share:
- On a client machine, create stub executables for all apps. To accomplish create stub executables, add all the applications to the machine using Citrix Workspace app. Citrix Workspace app generates the executables.
- Harvest the stub executables from
%APPDATA%CitrixSelfService. You only need the .exe files. - Copy the executables to a network share.
- For each client machine that is locked down, set the following registry keys:
- Reg add
HKEY_LOCAL_MACHINESoftwareCitrixDazzle/v CommonStubDirectory /t REG_SZ /d “\ShareOneWorkspaceStubs” - Reg add
HKEY_LOCAL_MACHINESoftwareCitrixDazzle/v -
CopyStubsFromCommonStubDirectory/t REG_SZ /d “true”. It’s also possible to configure these settings on HKEY_CURRENT_USER if you prefer. HKEY_CURRENT_USER has preference over HKEY_LOCAL_MACHINE. - Exit and restart Citrix Workspace app for the changes to take effect.
- Reg add
Example use cases:
This topic provides use cases for app shortcuts.
If you have dozens or even hundreds of apps, allow users to select the applications to add to Favorite and Start menu:
| If you want the user to choose the applications, they want in their Start menu. | configure Citrix Workspace app in self-service mode. In this mode, you also configure auto-provisioned and mandatory app keyword settings as needed. |
| If you want the user to choose the applications, they want in their Start menu but also want specific app shortcuts on the desktop. | configure Citrix Workspace app without any options and then use per app settings for the few apps that you want on the desktop. Use auto provisioned and mandatory apps as needed. |
If a user has a family computer, you might not need or want app shortcuts at all. In such scenarios, the simplest approach is browser access; install Citrix Workspace app without any configuration and browse to workspace for web. You can also configure Citrix Workspace app for self-service access without putting shortcuts anywhere.
| If you want to prevent Citrix Workspace app from putting application shortcuts in the Start menu automatically. | configure Citrix Workspace app with PutShortcutsInStartMenu=False. Citrix Workspace app doesn’t put apps in the Start menu even in self-service mode unless you put them using per app settings. |
If the user has only a few apps, put them all in the Start menu or on the desktop, or in a folder on the desktop.
| If you want Citrix Workspace app to put all application shortcuts in the start menu automatically. | configure Citrix Workspace app with SelfServiceMode =False. All available apps appear in the Start menu. |
| If you want all application shortcuts to put on the desktop. | configure Citrix Workspace app with PutShortcutsOnDesktop = true. All available apps appear in the desktop. |
| If you want all shortcuts to be, put on the desktop in a folder. | configure Citrix Workspace app with DesktopDir=Name of the desktop folder where you want applications. |
Per app settings in XenApp 6.5 or 7.x
If you want to set the location of shortcuts so every user finds them in the same place use XenApp per App Settings:
| If you want per-app settings to determine where applications are placed independently of whether in self-service mode or Start menu mode. | configure Citrix Workspace app with PutShortcutsInStartMenu=false and enable per app settings. |
Apps in category folders or in specific folders
If you want applications displayed in specific folders use the following options:
| If you want the application shortcuts Citrix Workspace app places in the start menu to be shown in their associated category (folder). | configure Citrix Workspace app with UseCategoryAsStartMenuPath=True. |
| If you want the applications that Citrix Workspace app puts in the Start menu to be in a specific folder. | configure Citrix Workspace app with StartMenuDir=the name of the Start menu folder name. |
Remove apps on logoff or exit
If you don’t want users to see apps while another user share the end point, you can remove the apps when the user logs off and exits.
| If you want Citrix Workspace app to remove all apps on logoff. | configure Citrix Workspace app with RemoveAppsOnLogoff=True. |
| If you want Citrix Workspace app to remove apps on exit. | configure Citrix Workspace app with RemoveAppsOnExit=True. |
Configuring Local App Access applications
When configuring Local App Access applications:
-
To specify that a locally installed application must be used instead of an application available in Citrix Workspace app, append the text string KEYWORDS:prefer=”pattern.” This feature is referred to as Local App Access.
Before you install an application on a user’s computer, Citrix Workspace app searches for the specified patterns to determine if the application is installed locally. If it is, Citrix Workspace app subscribes the application and does not create a shortcut. When the user starts the application from the Citrix Workspace app window, Citrix Workspace app starts the locally installed (preferred) application.
If a user uninstalls a preferred application outside of Citrix Workspace app, the application is unsubscribed during the next Citrix Workspace app refresh. If a user uninstalls a preferred application from the Citrix Workspace app dialog, Citrix Workspace app unsubscribes the application but does not uninstall it.
Note:
The keyword prefer is applied when Citrix Workspace app subscribes an application. Adding the keyword after the application is subscribed has no effect.
You can specify the prefer keyword multiple times for an application. Only one match is needed to apply the keyword to an application. The following patterns can be used in any combination:
-
To specify that a locally installed application must be used instead of an application available in Citrix Workspace app, append the text string KEYWORDS:prefer=”pattern”. This feature is referred to as Local App Access.
Before you install an application on a user’s computer, Citrix Workspace app searches for the specified patterns to determine if the application is installed locally. If it is, Citrix Workspace app subscribes the application and does not create a shortcut. When the user starts the application from the Citrix Workspace app dialog, Citrix Workspace app starts the locally installed (preferred) application.
If a user uninstalls a preferred application outside of Citrix Workspace app, the application is unsubscribed during the next Citrix Workspace app refresh. If a user uninstalls a preferred application from the Citrix Workspace app, Citrix Workspace app unsubscribes the application but does not uninstall it.
Note:
The keyword prefer is applied when Citrix Workspace app subscribes an application. Adding the keyword after the application is subscribed has no effect.
You can specify the prefer keyword multiple times for an application. Only one match is needed to apply the keyword to an application. The following patterns can be used in any combination:
-
prefer=”ApplicationName”
The application name pattern matches any application with the specified application name in the shortcut file name. The application name can be a word or a phrase. Quotation marks are required for phrases. Matching is not allowed on partial words or file paths and is case-insensitive. The application name matching pattern is useful for overrides performed manually by an administrator.
| KEYWORDS:prefer= | Shortcut under Programs | Matches? |
|---|---|---|
| Word | Microsoft OfficeMicrosoft Word 2010 | Yes |
| Microsoft Word | Microsoft OfficeMicrosoft Word 2010 | Yes |
| Console | McAfeeVirusScan Console | Yes |
| Virus | McAfeeVirusScan Console | No |
| Console | McAfeeVirusScan Console | Yes |
-
prefer=”\Folder1Folder2…ApplicationName”
The absolute path pattern matches the entire shortcut file path plus the entire application name under the Start menu. The Programs folder is a sub folder of the Start menu directory, so you must include it in the absolute path to target an application in that folder. Quotation marks are required if the path contains spaces. The matching is case-sensitive. The absolute path matching pattern is useful for overrides implemented programmatically in Citrix Virtual Apps and Desktops and Citrix DaaS.
| KEYWORDS:prefer= | Shortcut under Programs | Matches? |
|---|---|---|
| ProgramsMicrosoft OfficeMicrosoft Word 2010 | ProgramsMicrosoft OfficeMicrosoft Word 2010 | Yes |
| Microsoft Office | ProgramsMicrosoft OfficeMicrosoft Word 2010 | No |
| Microsoft Word 2010 | ProgramsMicrosoft OfficeMicrosoft Word 2010 | No |
| ProgramsMicrosoft Word 2010 | ProgramsMicrosoft Word 2010 | Yes |
-
prefer=”Folder1Folder2…ApplicationName”
The relative path pattern matches the relative shortcut file path under the Start menu. The relative path provided must contain the application name and can optionally include the folders where the shortcut resides. Matching is successful if the shortcut file path ends with the relative path provided. Quotation marks are required if the path contains spaces. The matching is case-sensitive. The relative path matching pattern is useful for overrides implemented programmatically.
| KEYWORDS:prefer= | Shortcut under Programs | Matches? |
|---|---|---|
| Microsoft OfficeMicrosoft Word 2010 | Microsoft OfficeMicrosoft Word 2010 | Yes |
| Microsoft Office | Microsoft OfficeMicrosoft Word 2010 | No |
| Microsoft Word 2010 | Microsoft OfficeMicrosoft Word 2010 | Yes |
| Microsoft Word | Microsoft Word 2010 | No |
For information about other keywords, see “Additional recommendations” in Optimize the user experience section in the StoreFront documentation.
Virtual display layout
This feature lets you define a virtual monitor layout that applies to the remote desktop. You can also split a single client monitor virtually into up to eight monitors on the remote desktop. You can configure the virtual monitors on the Monitor Layout tab in the Desktop Viewer. There, you can draw horizontal or vertical lines to separate the screen into virtual monitors. The screen is split according to specified percentages of the client monitor resolution.
You can set a DPI for the virtual monitors that is used for DPI scaling or DPI matching. After applying a virtual monitor layout, resize or reconnect the session.
This configuration applies only to full-screen, single-monitor desktop sessions, and does not affect any published applications. This configuration applies to all subsequent connections from this client.
Starting from Citrix Workspace app for Windows 2106, virtual display layout is also supported for full-screen and multi-monitor desktop sessions. Virtual display layout is enabled by default. In a multi-monitor scenario, the same virtual display layout is applied to all the session monitors if the total number of virtual displays doesn’t exceed eight virtual displays. In case this limit is exceeded, the virtual display layout is ignored and not applied to any session monitor.
Multi-monitor enhancement can be disabled by setting the following registry key:
HKEY_CURRENT_USERSoftwareCitrixXenDesktopDesktopViewer
Name: SplitAllMonitors
Type: DWORD
Values:
1 — Enabled
0 — Disabled
Application launch time
Use the session prelaunch feature to reduce application launch time during normal or high traffic periods, thus providing users with a better experience. The prelaunch feature allows to create a prelaunch session. Prelaunch session is created when a user logs on to Citrix Workspace app, or at a scheduled time if the user has signed in.
The prelaunch session reduces the launch time of the first application. When a user adds new account connection to Citrix Workspace app for Windows, session prelaunch doesn’t take effect until the next session. The default application ctxprelaunch.exe is running in the session, but it is not visible to you.
For more information, see session prelaunch and session linger guidance in the Citrix Virtual Apps and Desktops article titled Manage delivery groups.
Session prelaunch is disabled by default. To enable session prelaunch, specify the ENABLEPRELAUNCH=true parameter on the Workspace command line or set the EnablePreLaunch registry key to true. The default setting, null, means that prelaunch is disabled.
Note:
If the client machine has been configured to support Domain Passthrough (SSON) authentication, prelaunch is automatically enabled. If you want to use Domain Pass-through (SSON) without prelaunch, set the EnablePreLaunch registry key value to
false.
The registry locations are:
-
HKEY_LOCAL_MACHINESoftware[Wow6432Node]Citrix\Dazzle -
HKEY_CURRENT_USERSoftwareCitrixDazzle
There are two types of prelaunch:
- Just-in-time prelaunch— prelaunch starts immediately after the user’s credentials are authenticated whether it is a high-traffic period. Typically used for normal traffic periods. A user can trigger just-in-time prelaunch by restarting the Citrix Workspace app.
- Scheduled prelaunch— prelaunch starts at a scheduled time. Scheduled prelaunch starts only when the user device is already running and authenticated. If those two conditions are not met when the scheduled prelaunch time arrives, a session does not launch. To share network and server load, the session launches within a window when it is scheduled. For example, if the scheduled prelaunch is scheduled for 13:45, the session actually launches between 13:15 and 13:45. Typically used for high-traffic periods.
Configuring prelaunch on a Citrix Virtual Apps server consists of:
- creating, modifying, or deleting prelaunch applications, and
- updating user policy settings that control the prelaunch application.
You cannot customize the prelaunch feature using the receiver.admx file. However, you can change the prelaunch configuration by modifying registry values. Registry values can be modified during or after Citrix Workspace app for Windows installation.
- The HKEY_LOCAL_MACHINE values are written during client installation.
- The HKEY_CURRENT_USER values enable you to provide different users on the same machine with different settings. Users can change the HKEY_CURRENT_USER values without administrative permission. You can provide your users with scripts to change the values.
HKEY_LOCAL_MACHINE registry values:
For 64-bit Windows operating systems: HKEY_LOCAL_MACHINESOFTWAREWow6432NodeCitrixICA ClientPrelaunch
For 32-bit Windows operating systems: HKEY_LOCAL_MACHINESOFTWARECitrixICA ClientPrelaunch
Name: UserOverride
Type: REG_DWORD
Values:
0 — Use the HKEY_LOCAL_MACHINE values even if HKEY_CURRENT_USER values are also present.
1 — Use the HKEY_CURRENT_USER values if they exist; otherwise, use the HKEY_LOCAL_MACHINE values.
Name: State
Type: REG_DWORD
Values:
0 — Disable prelaunch.
1 — Enable just-in-time prelaunch. (prelaunch starts after the user’s credentials are authenticated.)
2 — Enable scheduled prelaunch. (prelaunch starts at the time configured for Schedule.)
Name: Schedule
Type: REG_DWORD
Value:
The time (24-hour format) and days of a week for the scheduled prelaunch entered in the following format:
| HH:MM | M:T:W:TH:F:S:SU where HH and MM are hours and minutes. M:T:W:TH:F:S:SU is the days of the week. For example, to enable scheduled prelaunch on Monday, Wednesday, and Friday at 13:45, set Schedule as Schedule=13:45 | 1:0:1:0:1:0:0. The session actually launches between 13:15 and 13:45. |
HKEY_CURRENT_USER registry values:
HKEY_CURRENT_USERSOFTWARECitrixICA ClientPrelaunch
The State and Schedule keys have the same values as for HKEY_LOCAL_MACHINE.
Bidirectional content redirection
The bidirectional content redirection policy allows you to enable or disable client to host and host to client URL redirection. Server policies are set in Studio, and client policies are set from the Citrix Workspace app Group Policy Object administration template.
Citrix offers host to client redirection and Local App Access for client to URL redirection. However, we recommend that you use bidirectional content redirection for domain-joined Windows clients.
You can enable bidirectional content redirection using one of the following methods:
- Group Policy Object (GPO) administrative template
- Registry editor
Note:
- Bidirectional content redirection does not work on the session where Local App Access is enabled.
- Bidirectional content redirection must be enabled both on the server and the client. When it is disabled either on the server or the client, the functionality is disabled.
- When you include URLs, you can specify one URL or a semi-colon delimited list of URLs. You can use an asterisk (*) as a wildcard.
To enable bidirectional content redirection using the GPO administrative template:
Use Group Policy Object administrative template configuration only for a first-time installation of Citrix Workspace app for Windows.
- Open the Citrix Workspace app Group Policy Object administrative template by running gpedit.msc.
- Under the User Configuration node, go to Administrative Templates > Classic Administrative Templates (ADM) > Citrix Components > Citrix Workspace > User experience.
- Select the Bidirectional Content Redirection policy.
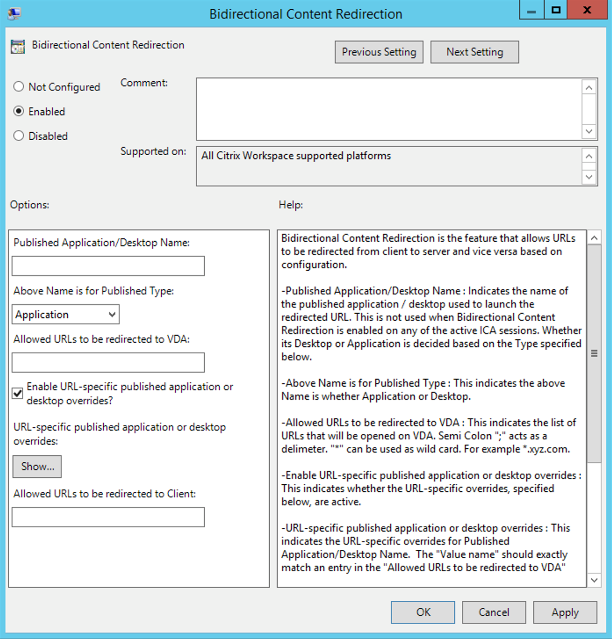
-
In the Published Application or Desktop name field, provide the name of the resource used to launch the redirected URL.
Note:
When you include URLs, specify a single URL or a semi-colon delimited list of URLs. You can use an asterisk (*) as a wildcard.
- From the Above Name is for Published Type, select Application or Desktop of the resource as appropriate.
- In the Allowed URLs to be redirected to VDA field, enter the URL that must be redirected. Separate the list with a semicolon.
- Select the Enable URL-specific published application for desktop overrides? option to override a URL.
-
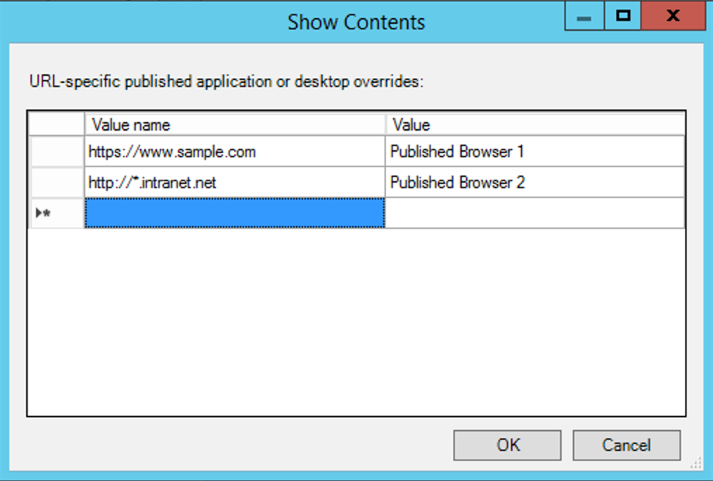
Click Show to display a list where the value name must match any of the URLs listed in the Allowed URLs to be redirected to the VDA field. The value must match a published application name.
- In the Allowed URLs to be redirected to Client: field, enter the URL that must be redirected from the server to the client. Separate the list with a semicolon.
Note:
When you include URLs, specify a single URL or a semi-colon delimited list of URLs. You can use an asterisk (*) as a wildcard.
- Click Apply and OK.
- From the command line, run the
gpupdate /forcecommand.
To enable bidirectional content redirection using the registry:
To enable bidirectional content redirection, run the redirector.exe /RegIE command on the Citrix Workspace app client and from the Citrix Workspace app installation folder C:Program Files (x86)CitrixICA Client).
Important:
- Ensure that the redirection rule does not result in a looping configuration. A looping configuration results if VDA rules are set so that, for example, a URL,
https://www.my_company.comis configured to be redirected to the client, and the VDA.- URL redirection supports only explicit URLs: URLs appearing in the address bar of the browser or found using the in-browser navigation, depending on the browser).
- If two applications with same display name use multiple StoreFront accounts, the display name in the primary StoreFront account is used for launching the application or a desktop session.
- New browser window opens only when a URL is redirected to the client. When a URL is redirected to VDA, if the browser is already open, then the redirected URL opens in the new tab.
- Embedded links in files like documents, emails, PDF is supported.
- Ensure that only one of the server file type associations exist and the host content redirection policies are set to Enabled on the same machine. Citrix recommends that you disable either the server file type association or the Host Content (URL) Redirection feature to confirm that URL redirection works properly.
- In Internet Explorer, click Settings > Internet options > Advanced, and select Enable third-party browser extensions checkbox under Browsing section.
Limitation:
No fallback mechanism is present if the redirection fails due to session launch issues.
Bi-directional URL support with Chromium-based browsers
Bidirectional content redirection allows you to configure URLs to redirect from client to server and from server to client using policies on the server and the client.
Server policies are set on the Delivery Controller and client policies on Citrix Workspace app. The policies are set using the Group Policy Object (GPO) administrative template.
Starting with Version 2106, bidirectional URL redirection support has been added for Google Chrome and Microsoft Edge.
Prerequisites:
- Citrix Virtual Apps and Desktops Version 2106 or later.
- Browser redirection extension version 5.0.
To register Google Chrome browser to bidirectional URL redirection, run the following command from the Citrix Workspace app installation folder:
%ProgramFiles(x86)%CitrixICA Clientredirector.exe /regChrome /verbose
Note:
When using these commands on Chrome browsers, the bidirectional content redirection extension installs automatically from the Chrome Web Store.
To unregister Google Chrome browser from bidirectional URL redirection, run the following command from the Citrix Workspace app installation folder:
%ProgramFiles(x86)%CitrixICA Clientredirector.exe /unregChrome /verbose
Note:
If you get the following error when accessing the Browser Extensions page, ignore the message:
Websocket connection to wss://... failed.
For information on configuring URL redirection on Citrix Workspace app, see Bidirectional content redirection.
For more information about browser content redirection, see Browser content redirection in the Citrix Virtual Apps and Desktops documentation.
To prevent the desktop viewer window from dimming:
If you have multiple Desktop Viewer windows, by default the desktops that are not active are dimmed. If users want to view multiple desktops simultaneously, information on them might be unreadable. You can disable the default behavior and prevent the Desktop Viewer window from dimming by editing the Registry editor.
Caution
Editing the registry incorrectly can cause serious problems that might require you to reinstall your Operating system. Citrix cannot guarantee that problems resulting from the incorrect use of the Registry Editor can be solved. Use the Registry Editor at your own risk. Be sure to back up the registry before you edit it
-
On the user device, create a REG_DWORD entry called DisableDimming in one of the following keys, depending on whether you want to prevent dimming for the current user of the device or the device itself. An entry exists if the Desktop Viewer has been used on the device:
HKEY_CURRENT_USERSoftwareCitrixXenDesktopDesktopViewerHKEY_LOCAL_MACHINESoftwareCitrixXenDesktopDesktopViewer
Optionally, instead of controlling dimming, you can define a local policy by creating the same REG_WORD entry in one of the following keys:
HKEY_CURRENT_USERSoftwarePoliciesCitrixXenDesktopDesktopViewerHKEY_LOCAL_MACHINESoftwarePoliciesCitrixXenDesktopDesktopViewer
Before using these keys, check whether the Citrix Virtual Apps and Desktops and Citrix DaaS administrator has set a policy for this feature.
Set the entry to any non-zero value such as 1 or true.
If no entries are specified or the entry is set to 0, the Desktop Viewer window is dimmed. If multiple entries are specified, the following precedence is used. The first entry in this list and its value determine whether the window is dimmed:
- HKEY_CURRENT_USERSoftwarePoliciesCitrix…
- HKEY_LOCAL_MACHINESoftwarePoliciesCitrix…
- HKEY_CURRENT_USERSoftwareCitrix…
- HKEY_LOCAL_MACHINESoftwareCitrix…
Citrix Casting
The Citrix Ready workspace hub combines digital and physical environments to deliver apps and data within a secure smart space. The complete system connects devices (or things), like mobile apps and sensors, to create an intelligent and responsive environment.
Citrix Ready workspace hub is built on the Raspberry Pi 3 platform. The device running Citrix Workspace app connects to the Citrix Ready workspace hub and casts the apps or desktops on a larger display. Citrix Casting is supported only on Microsoft Windows 10 Version 1607 and later or Windows Server 2016.
Citrix Casting feature allows instant and secure access of any app from a mobile device and display on a large screen.
Note:
- Citrix Casting for Windows supports Citrix Ready workspace hub Version 2.40.3839 and later. Workspace hub with earlier versions might not get detected or cause a casting error.
- The Citrix Casting feature is not supported on Citrix Workspace app for Windows (Store).
Prerequisites:
- Bluetooth enabled on the device for hub discovery.
- Both Citrix Ready workspace hub and Citrix Workspace app must be on the same network.
- Port 55555 is allowed between the device running Citrix Workspace app and the Citrix Ready workspace hub.
- For Citrix Casting, port 1494 must not be blocked.
- Port 55556 is the default port for SSL connections between mobile devices and the Citrix Ready workspace hub. You can configure a different SSL port on the Raspberry Pi’s settings page. If the SSL port is blocked, users cannot establish SSL connections to the workspace hub.
- Citrix Casting is supported only on Microsoft Windows 10 Version 1607 and later or Windows Server 2016.
- Run
/IncludeCitrixCastingcommand during installation to enable Citrix Casting.
Configure Citrix Casting launch
Note:
You can hide all or part of the Advanced Preferences sheet. For more information, see Advanced Preferences sheet.
-
Right-click the Citrix Workspace app icon from the notification area and select Advanced Preferences.
The Advanced Preferences dialog appears.
-
Select Citrix Casting.
The Citrix Casting dialog appears.
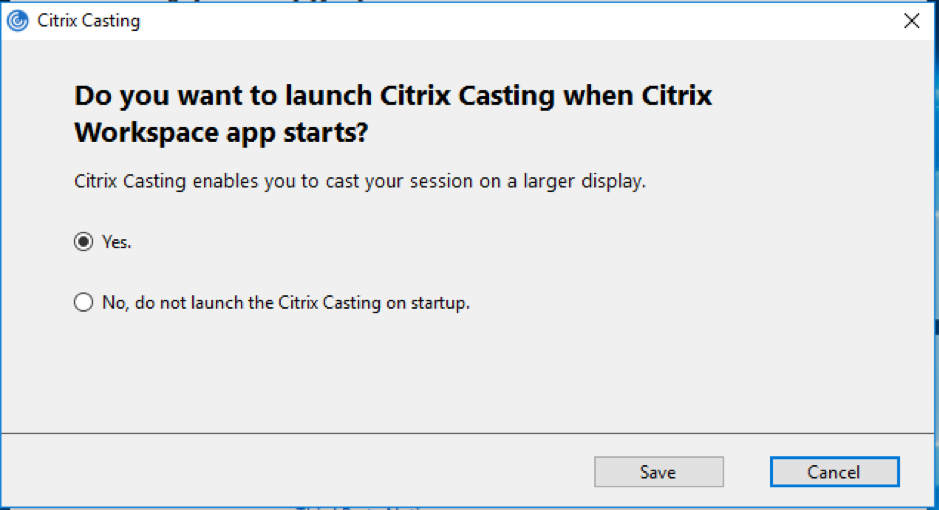
- Select one of the options:
- Yes – Indicates that Citrix Casting is launched when Citrix Workspace app starts.
- No, do not launch the Citrix Casting on startup – Indicates that Citrix Casting does not launch when Citrix Workspace app starts.
Note:
Selecting the option No does not terminate the current screen casting session. The setting is applied only at the next Citrix Workspace app launch.
- Click Save to apply the changes.
How to use Citrix Casting with Citrix Workspace app
-
Log on to Citrix Workspace app and enable Bluetooth on your device.
The list of available hubs is displayed. The list is sorted by the RSSI value of the workspace hub beacon package.
-
Select the workspace hub to cast your screen and choose one of the following:
- Mirror to duplicate the primary screen and cast the display to the connected workspace hub device.
- Extend to use the workspace hub device screen as your secondary screen.
Note:
Exiting Citrix Workspace app does not exit Citrix Casting.
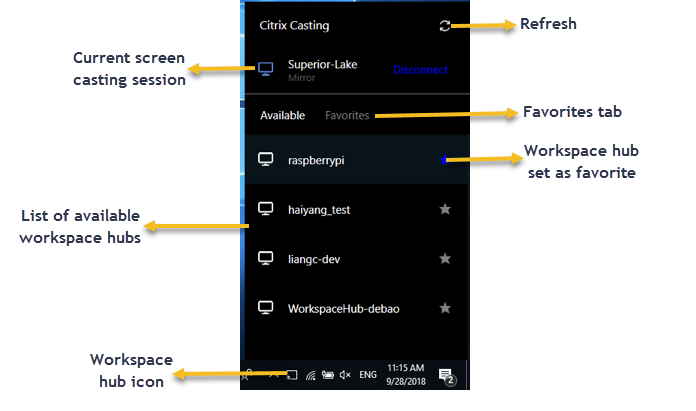
In the Citrix Casting notification dialog, the following options are available:
- The current screen casting session displayed at the top.
- Refresh icon.
- Disconnect to stop the current screen casting session.
- Star icon to add the workspace hub to Favorites.
- Right-click the workspace hub icon in the notification area and select Exit to disconnect the screen casting session and to exit Citrix Ready workspace hub.
Self-check list
If Citrix Workspace app cannot detect and communicate with any available workspace hubs in range, ensure that you do the following as part of self-check:
- Citrix Workspace app and Citrix Ready workspace hub are connected to the same network.
- Bluetooth is enabled and working properly on the device where Citrix Workspace app is launched.
- The device where Citrix Workspace app is launched is within range (less than 10 meters and without any obstructing objects such as walls) of Citrix Ready workspace hub.
- Launch a browser in Citrix Workspace app and type
http://<hub_ip>:55555/device-details.xmlto check whether it displays the details of workspace hub device. - Click Refresh in Citrix Ready workspace hub and try reconnecting to the workspace hub.
Known issues and limitations
- Citrix Casting does not work unless the device is connected to the same network as the Citrix Ready workspace hub.
- If there are network issues, there might be a lag in display on the workspace hub device.
- When you select Extend, the primary screen where Citrix Ready workspace app is launched flashes multiple times.
- In Extend mode, you cannot set the secondary display as the primary display.
- The screen casting session automatically disconnects when there is any change in the display settings on the device. For example, change in screen resolution, change in screen orientation.
- During the screen casting session, if the device running Citrix Workspace app locks, sleeps or hibernates, an error appears at login.
- Multiple screen casting sessions are not supported.
- The maximum screen resolution supported by Citrix Casting is 1920 x 1440.
- Citrix Casting supports Citrix Ready workspace hub Version 2.40.3839 and later. Workspace hub with earlier versions might not get detected or cause a casting error.
- This feature is not supported on Citrix Workspace app for Windows (Store).
- On Windows 10, Build 1607, Citrix Casting in Extend mode might not be properly positioned.
For more information about Citrix Ready workspace hub, see the Citrix Ready workspace hub section in the Citrix Virtual Apps and Desktops documentation.
DPI scaling
Citrix Workspace app is DPI aware and supports matching display resolution and DPI scale settings on the Windows client to the virtual apps and desktops session.
DPI scaling is mostly used with large size and high-resolution monitors to display applications, text, images, and other graphical elements in a size that can be viewed comfortably.
This feature is enabled by default, and it is the recommended setting for all use cases. However, administrators can still configure the DPI scaling using Group Policy Object (GPO) administrative template (per-machine configuration) if necessary.
To configure DPI scaling using GPO administrative template:
To configure DPI scaling using GPO administrative template:
- Open the Citrix Workspace app Group Policy Object administrative template by running gpedit.msc.
- Under the Computer Configuration node, go to Administrative Templates> Citrix Components > Citrix Workspace > DPI
-
Select High DPI policy.
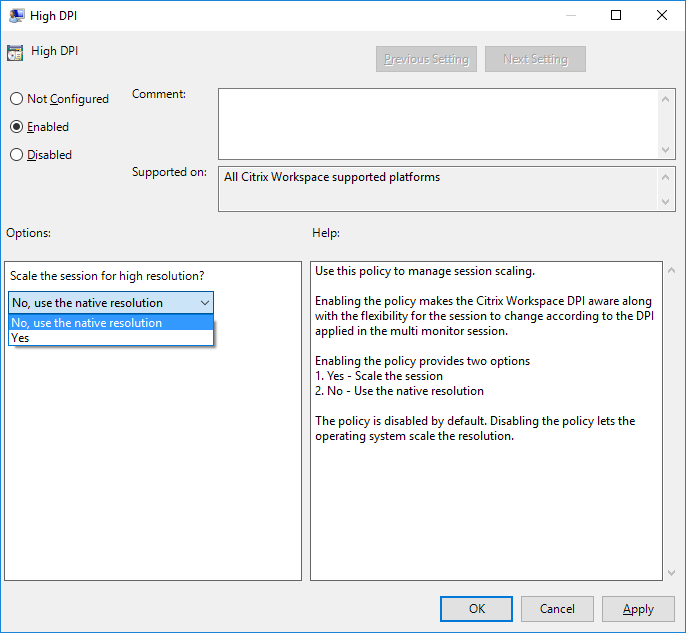
-
Select from one of the following options:
- Yes — Indicates that high DPI is applied in a session.
- No, use the native resolution — Indicates that the resolution is set by the operating system.
- Click Apply and OK.
- From the command line, run the
gpupdate /forcecommand to apply the changes.
Configure DPI scaling using the graphical user interface:
- Right-click Citrix Workspace app icon from the notification area.
- Select Advanced Preferences and click High DPI setting.
- Select one of the following options:
- Yes — Indicates that high DPI is applied in a session.
- No, use the native resolution — Indicates that the Workspace app detects the DPI on the VDA and applies it.
- Let the operating system scale the resolution — By default, this option is selected. It allows the Windows to handle the DPI scaling. This option also means that the High DPI policy is set to disabled.
- Click Save.
- Restart the Citrix Workspace app session for the changes to take effect.
NOTE:
Additional considerations:
- DPI matching requires Citrix Virtual Apps and Desktops versions 1912 LTSR or later.
- The No, use the native resolution (DPI matching) setting is recommended in most cases.
- The default setting Let the operating system scale the resolution disables DPI awareness on the Citrix Workspace App. This mode might result in blurry graphics when the Windows client DPI scale is set to anything other than 100%. This mode doesn’t support multiple monitors with different DPI scales.
- The Yes option results in the Citrix Workspace app upscaling the session window to match the DPI scale configured on the Windows client. This is a legacy function recommended only for connections to legacy XenApp and XenDesktop environments when DPI scales above 100% are required on the client. This mode might result in blurry graphics.
For information about troubleshooting issues with DPI scaling, see Knowledge Center article CTX230017.
Generic client Input Method Editors (IME)
Note:
If you’re using a Windows 10 Version 2004 operating system, you might face certain technical issues when using the IME feature in a session. Those issues are the result of a third-party limitation. For more information, see the Microsoft Support article.
Configuring generic client IME using the command-line interface:
-
To enable generic client IME, run the
wfica32.exe /localime:oncommand from the Citrix Workspace app installation folderC:Program Files (x86)CitrixICA Client.
-
To disable generic client IME, run the
wfica32.exe /localime:offcommand from the Citrix Workspace app installation folderC:Program Files (x86)CitrixICA Client.
Note:
You can use the command-line switch
wfica32.exe /localime:onto enable both generic client IME and keyboard layout synchronization.
-
To disable generic client IME, run the
wfica32.exe /localgenericime:offcommand from the Citrix Workspace app installation folderC:Program Files (x86)CitrixICA Client. This command does not affect keyboard layout synchronization settings.
If you have disabled generic client IME using the command-line interface, you can enable the feature again by running the wfica32.exe /localgenericime:on command.

Toggle:
Citrix Workspace app supports toggle functionality for this feature. You can run the wfica32.exe /localgenericime:on command to enable or disable the feature. However, the keyboard layout synchronization settings take precedence over the toggle switch. If keyboard layout synchronization is set to Off, toggling does not enable generic client IME.
Configure generic client IME using the graphical user interface:
Generic client IME requires VDA Version 7.13 or later.
Generic client IME feature can be enabled by enabling keyboard layout synchronization. For more information, see Keyboard layout synchronization.
Citrix Workspace app allows you to configure different options to use generic client IME. You can select from one these options based on your requirements and usage.
- Right-click the Citrix Workspace app icon in the notification area and select Connection Center.
-
Select Preferences and Local IME.
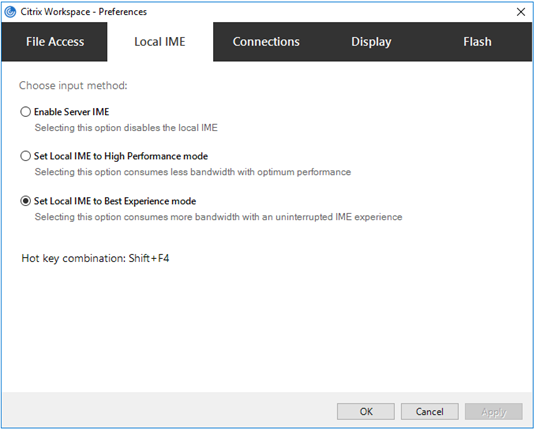
The following options are available to support different IME modes:
- Enable Server IME – Disables local IME and only the languages set on the server can be used.
- Set Local IME to High Performance mode – Uses local IME with limited bandwidth. This option restricts the candidate window functionality.
- Set Local IME to Best Experience mode – Uses local IME with best user experience. This option consumes high bandwidth. By default, this option is selected when generic client IME is enabled.
The changes are applied only for the current session.
Enabling hotkey configuration using a registry editor:
When generic client IME is enabled, you can use the Shift+F4 hotkeys to select different IME modes. The different options for IME modes appear in the top-right corner of the session.
By default, the hotkey for generic client IME is disabled.
In the registry editor, navigate to HKEY_CURRENT_USERSOFTWARECitrixICA ClientEngineLockdown ProfilesAll RegionsLockdownClient EngineHot Key.
Select AllowHotKey and change the default value to 1.
You can use the Shift+F4 hotkeys to select different IME modes in a session.
The different options for IME modes appear in the top-right corner of the session while switching using these hotkey combinations.

Limitations:
- Generic client IME does not support UWP (Universal Windows Platform) apps such as Search UI, and the Edge browser of the Windows 10 operating system. As a workaround, use the server IME instead.
- Generic client IME is not supported on Internet Explorer Version 11 in Protected Mode. As a workaround, you can disable Protected Mode by using Internet Options. To disable, click Security and clear Enable Protected Mode.
H.265 video encoding
Citrix Workspace app supports the use of the H.265 video codec for hardware acceleration of remote graphics and videos. H.265 video codec must be supported and enabled on both the VDA and Citrix Workspace app. If the GPU on the endpoint doesn’t support H.265 decoding using the DXVA interface, the H265 Decoding for graphics policy setting is ignored and the session falls back H.264 video codec.
Prerequisites:
- VDA 7.16 and later.
- Enable the Optimize for 3D graphics workload policy on the VDA.
- Enable the Use hardware encoding for video codec policy on the VDA.
Note:
H.265 encoding is supported only on the NVIDIA GPU.
In Citrix Workspace app for Windows, this feature is set to Disabled by default.
Configuring Citrix Workspace app to use H.265 video encoding using Citrix Group Policy Object (GPO) administrative template:
- Open the Citrix Workspace app Group Policy Object administrative template by running gpedit.msc.
- Under the Computer Configuration node, go to Administrative Templates > Citrix Workspace > User Experience.
- Select the H265 Decoding for graphics policy.
- Select Enabled.
- Click Apply and OK.
Configuring H.265 video encoding using Registry editor:
Enabling H.265 video encoding on a non-domain joined network on a 32-bit operating system:
- Launch the Registry Editor using regedit on the Run command.
- Navigate to
HKEY_LOCAL_MACHINESOFTWAREPoliciesCitrixICA ClientGraphics Engine. - Create a DWORD key by name EnableH265 and set the value of the key to 1.
Enabling H.265 video encoding on a non-domain joined network on a 64-bit operating system:
- Launch the Registry Editor using regedit on the Run command.
- Navigate to
HKEY_LOCAL_MACHINESOFTWAREWow6432NodePoliciesCitrixICA ClientGraphics Engine. - Create a DWORD key by name EnableH265 and set the value of the key to 1.
Restart the session for the changes to take effect.
Note:
- If the Hardware acceleration for Graphics policy is disabled in the Citrix Workspace app for Windows Group Policy Object administrative template, the H265 Decoding for graphics policy settings are ignored and the feature does not work.
- Run the HDX Monitor 3.x tool to identify if the H.265 video encoder is enabled within the sessions. For more information about HDX Monitor 3.x tool, see the Knowledge Center article CTX135817.
Keyboard layout and language bar
Keyboard layout
Note:
You can hide all or part of the Advanced Preferences sheet available from the Citrix Workspace app icon in the notification area. For more information, see Advanced Preferences sheet.
Keyboard layout synchronization enables you to switch among preferred keyboard layouts on the client device. This feature is disabled by default. The keyboard layout synchronization allows the client keyboard layout to automatically synchronize to the virtual apps and desktops session.
To configure keyboard layout synchronization using the GPO administrative template:
Note:
The GPO configuration takes precedence over the StoreFront and the GUI configurations.
- Open the Citrix Workspace app Group Policy Object administrative template by running gpedit.msc.
- Under the Computer Configuration or User Configuration node, go to Administrative Templates > Administrative Templates (ADM) > Citrix Components > Citrix Workspace > User experience.
- Select the Keyboard settings policy.
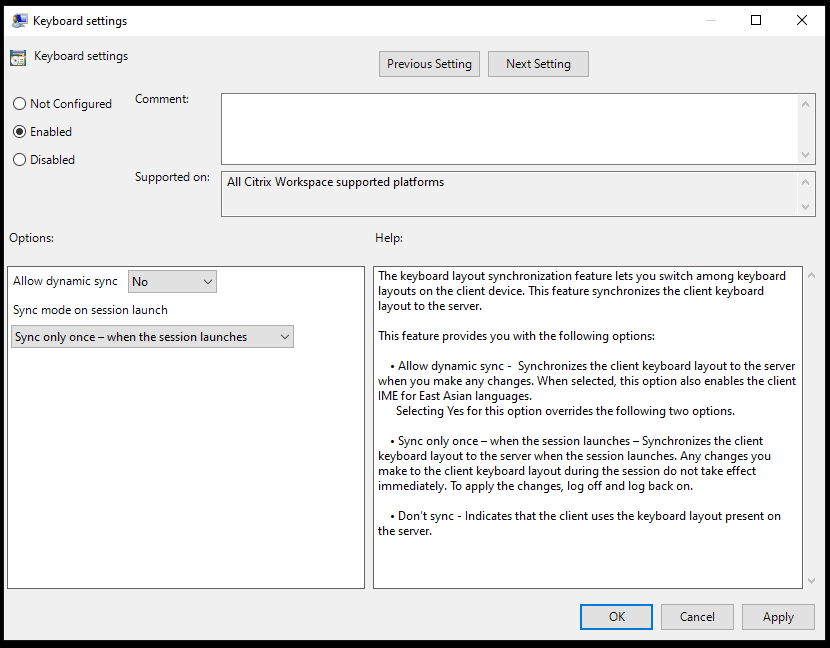
- Select Enabled and select one the following options:
-
Allow dynamic sync — From the drop-down menu, select Yes or No. This option synchronizes the client keyboard layout to the server when you change the client keyboard layout. When selected, this option also enables the client IME for East Asian languages.
Selecting Yes for this option overrides the following two options.
-
Sync mode on session launch — From the drop-down menu, select one of the following options:
- Sync only once — when session launches — Synchronizes the client keyboard layout to the server when the session launches. Any changes you make to the client keyboard layout during the session do not take effect immediately. To apply the changes, log off and log back on.
- Don’t sync — Indicates that the client uses the keyboard layout present on the server.
-
- Select Apply and OK.
To configure keyboard layout synchronization using the graphical user interface:
-
From the Citrix Workspace app icon in the notification area icon, select Advanced Preferences > Keyboard and Language bar.
The Keyboard and Language bar dialog appears.

-
Select from one of the following options:
- Sync only once — when the session launches — Indicates that the keyboard layout is synced from the VDA only once at the session launch.
- Allow dynamic sync — Indicates that the keyboard layout is synced dynamically to the VDA when the client keyboard is changed in a session.
- Don’t sync — Indicates that the client uses the keyboard layout present on the server.
-
Click Save.
To configure keyboard layout synchronization using CLI:
Run the following command from the Citrix Workspace app for Windows installation folder.
Typically, Citrix Workspace app installation folder is at C:Program files (x86)CitrixICA Client.
- To enable:
wfica32:exe /localime:on - To disable:
wfica32:exe /localime:off
Using the client keyboard layout option activates the Client IME (Input Method Editor). If users working in Japanese, Chinese, or Korean prefer to use the Server IME, they must disable the client keyboard layout option by selecting No, or running wfica32:exe /localime:off. The session reverts to the keyboard layout provided by the remote server when they connect to the next session.
Sometimes, switching the client keyboard layout does not take effect in an active session. To resolve this issue, log off from Citrix Workspace app and login again.
Configuring keyboard sync on Windows VDA
Note:
The following procedure applies only on Windows server 2016 and later. On Windows Server 2012 R2 and earlier, the keyboard sync feature is enabled by default.
- Launch the Registry editor and navigate to
HKEY_LOCAL_MACHINESoftwareCitrixIcaIme. - Create the DWORD entry
DisableKeyboardSyncand set its value to0.
1disables the keyboard layout sync feature. - Restart the session for the changes to take effect.
After you enable the keyboard layout on both the VDA and Citrix Workspace app, the following window appears when you switch keyboard layouts.

This window indicates that the session keyboard layout is being switched to the client keyboard layout.
Configuring keyboard sync on Linux VDA
Launch the command prompt and run the following command:
/opt/Citrix/VDA/bin/ctxreg update -k "HKEY_LOCAL_MACHINESystemCurrentControlSetControlCitrixLanguageBar" -v "SyncKeyboardLayout" -d "0x00000001"
Restart the VDA for the changes to take effect.
For more information about the keyboard layout synchronization feature on Linux VDA, see Dynamic keyboard layout synchronization.
Hide the keyboard layout switch notification dialog:
The keyboard layout change notification dialog lets you know that the VDA session is switching the keyboard layout. The keyboard layout switch needs approximately two seconds to switch. When you hide the notification dialog, wait for some time before you start typing to avoid incorrect character input.
Warning
Editing the registry incorrectly can cause serious problems that might require you to reinstall your operating system. Citrix cannot guarantee that problems resulting from the incorrect use of the Registry Editor can be solved. Use the Registry Editor at your own risk. Be sure to back up the registry before you edit it.
Hide the keyboard layout switch notification dialog using the Registry editor:
- Launch the Registry editor and navigate to
HKEY_LOCAL_MACHINESoftwareCitrixIcaIme. - Create a String Value key by name HideNotificationWindow.
- Set the DWORD value to 1.
- Click OK.
- Restart the session for the changes to take effect.
Limitations:
- Remote applications which run with elevated privilege (for example, right-click an application icon > Run as administrator) cannot be synchronized with the client keyboard layout. As a workaround, manually change the keyboard layout on the server side (VDA) or disable UAC.
- If the user changes the keyboard layout on the client to a layout that isn’t supported on the server, the synchronization feature of the keyboard layout is disabled for security reasons. An unrecognized keyboard layout is treated as a potential security threat. To restore the keyboard layout synchronization feature, log off and relog in to the session.
- In an RDP session, you cannot change the keyboard layout using Alt + Shift shortcuts. As a workaround, use the language bar in the RDP session to switch the keyboard layout.
Language bar
The language bar displays the preferred input language in a session. The language bar appears in a session by default.
Note:
This feature is available in sessions running on VDA 7.17 and later.
Configure the language bar using the GPO administrative template:
The language bar displays the preferred input language in an application session.
- Open the Citrix Workspace app Group Policy Object administrative template by running gpedit.msc.
- Under the Computer Configuration or User Configuration node, go to Administrative Templates > Administrative Templates (ADM) > Citrix Components > Citrix Workspace > User experience.
- Select the Language bar policy.
- Select Enabled and select one of the following options:
- Yes – Indicates that the language bar is displayed in an application session.
- No, hide the language bar – Indicates that the language bar is hidden in an application session.
- Click Apply and OK.
Configure language bar using the graphical user interface:
- Right-click the Citrix Workspace app icon from the notification area and select Advanced Preferences.
- Select Keyboard and Language bar.
- Select the Language bar tab.
- Select from one of the following options:
- Yes — Indicates that the language bar is displayed in a session.
- No, hide the language bar — Indicates that the language bar is hidden in a session.
-
Click Save.
The setting changes take effect immediately.
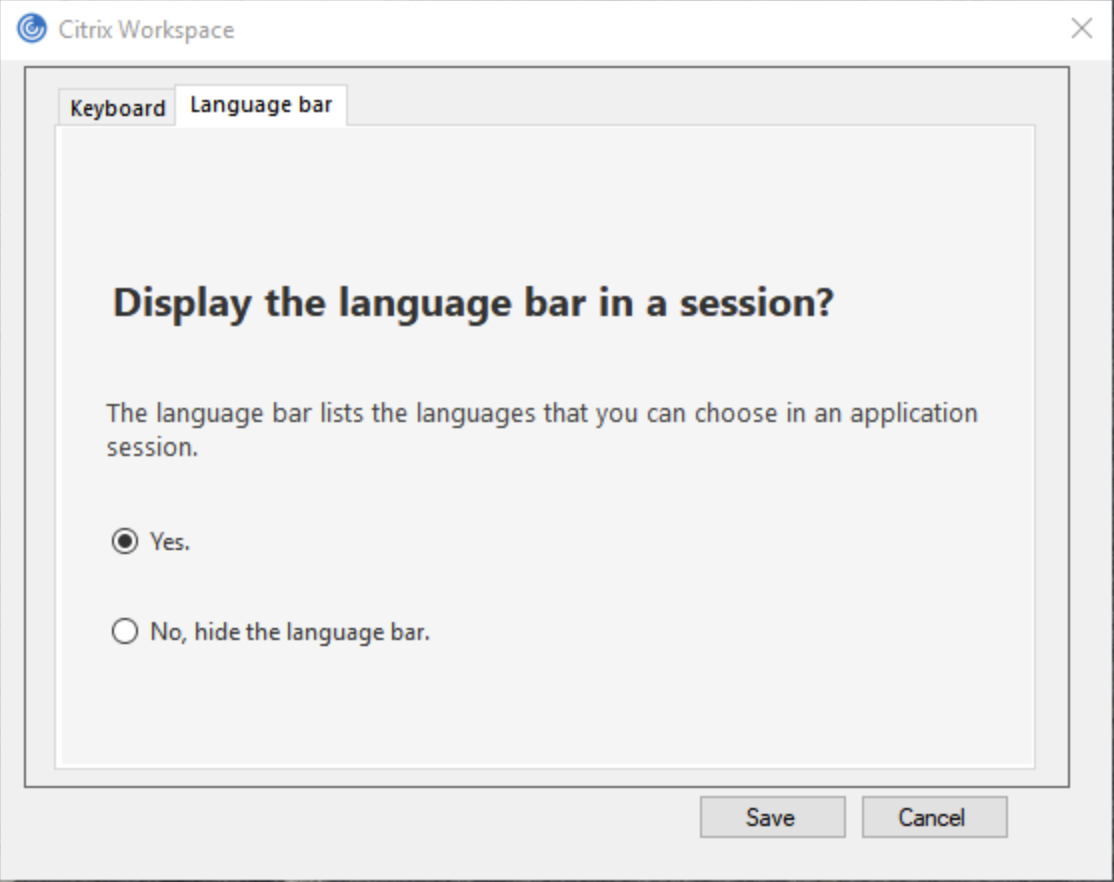
Note:
- You can change the settings in an active session.
- The remote language bar does not appear in a session if there is only one input language.
Hide the language bar tab from the Advanced Preferences sheet:
You can hide the language bar tab from the Advanced Preferences sheet by using the registry.
- Launch the registry editor.
- Navigate to
HKEY_LOCAL_MACHINESOFTWARECitrixICA ClientEngineConfigurationAdvancedModulesLocalIME. - Create a DWORD value key, ToggleOffLanguageBarFeature, and set it to 1 to hide the Language bar option from the Advanced Preferences sheet.
USB support
USB support enables you to interact with a wide range of USB devices when connected to a Citrix Virtual Apps and Desktops and Citrix DaaS. You can plug USB devices into their computers and the devices are remote to their virtual desktop. USB devices available for remoting include flash drives, smartphones, PDAs, printers, scanners, MP3 players, security devices, and tablets. Desktop Viewer users can control whether USB devices are available on the Citrix Virtual Apps and Desktops and Citrix DaaS using a preference in the toolbar.
Isochronous features in USB devices, such as webcams, microphones, speakers, and headsets are supported in typical low latency or high-speed LAN environments. Such environment allows these devices to interact with packages, like Microsoft Office Communicator and Skype.
The following types of device are supported directly in a virtual apps and desktops session, and so does not use USB support:
- Keyboards
- Mice
- Smart cards
Specialist USB devices (for example, Bloomberg keyboards and 3-D mice) can be configured to use USB support. For information on configuring Bloomberg keyboards, see Configure Bloomberg keyboards.
For information on configuring policy rules for other specialist USB devices, see Knowledge Center article CTX122615.
By default, certain types of USB devices are not supported for remoting through Citrix Virtual Apps and Desktops and Citrix DaaS. For example, a user might have a NIC attached to the system board by internal USB. Remoting this device would not be appropriate. The following types of USB device are not supported by default in a virtual apps and desktops session:
- Bluetooth dongles
- Integrated NIC
- USB hubs
- USB graphics adapters
USB devices connected to a hub can be remote, but the hub itself cannot be remote.
The following types of USB device are not supported by default for use in a virtual apps session:
- Bluetooth dongles
- Integrated NIC
- USB hubs
- USB graphics adapters
- Audio devices
- Mass storage devices
How USB support works:
When a user plugs in a USB device, it is checked against the USB policy, and, if allowed, remoted to the virtual desktop. If the default policy denies a device, it is available only to the local desktop.
When a user plugs in a USB device, a notification appears to inform the user about a new device. The user can select which USB devices must be remoted to the virtual desktop each time they connect. Alternatively, the user can configure USB support so that all USB devices plugged in both before and/or during a session is automatically remoted to the virtual desktop that is in focus.
USB device classes allowed by default
Default USB policy rules allow different classes of USB device.
Although they are on this list, some classes are only available for remoting in virtual apps and desktops sessions after additional configuration. Such USB device classes are as follows.
- Audio (Class 01)— Includes audio input devices (microphones), audio output devices, and MIDI controllers. Modern audio devices generally use isochronous transfers that XenDesktop 4 or later supports. Audio (Class01) is not applicable to virtual apps because these devices are not available for remoting in virtual apps using USB support.
Note:
Some specialty devices (for example, VOIP phones) require additional configuration. For more information, see Knowledge Center article CTX123015.
-
Physical Interface Devices (Class 05)— These devices are similar to Human Interface Devices (HIDs), but generally provide “real-time” input or feedback and include force feedback joysticks, motion platforms, and force feedback endoskeletons.
-
Still Imaging (Class 06)— Includes digital cameras and scanners. Digital cameras often support the still imaging class which uses the Picture Transfer Protocol (PTP) or Media Transfer Protocol (MTP) to transfer images to a computer or other peripheral. Cameras might also appear as mass storage devices. It might be also possible to configure a camera to use either class, through the setup menus provided by the camera itself.
Note:
If a camera appears as a mass storage device, client drive mapping is used and USB support is not required.
-
Printers (Class 07)— In general most printers are included in this class, although some use vendor-specific protocols (class ff). Multi-function printers might have an internal hub or be composite devices. In both cases the printing element generally uses the Printers class and the scanning or fax element uses another class; for example, Still Imaging.
Printers normally work appropriately without USB support.
Note
This class of device (in particular printers with scanning functions) requires additional configuration. For instructions, see Knowledge Center article CTX123015.
-
Mass Storage (Class 08)— The most common mass storage devices are USB flash drives; others include USB-attached hard drives, CD/DVD drives, and SD/MMC card readers. There are a wide variety of devices with internal storage that also present a mass storage interface; these include media players, digital cameras, and mobile phones. Mass Storage (Class 08) is not applicable to virtual apps because these devices are not available for remoting in virtual apps using USB support. Known subclasses include:
- 01 Limited flash devices
- 02 Typically CD/DVD devices (ATAPI/MMC-2)
- 03 Typically tape devices (QIC-157)
- 04 Typically floppy disk drives (UFI)
- 05 Typically floppy disk drives (SFF-8070i)
- 06 Most mass storage devices use this variant of SCSI
Mass storage devices can often be accessed through client drive mapping, and so USB support is not required.
-
Content Security (Class 0d)— Content security devices enforce content protection, typically for licensing or digital rights management. This class includes dongles.
-
Video (Class 0e)— The video class cover devices that are used to manipulate video or video-related material. Devices, such as webcams, digital camcorders, analog video converters, some television tuners, and some digital cameras that support video streaming.
Important
Most video streaming devices use isochronous transfers that XenDesktop 4 or later supports. Some video devices (for example webcams with motion detection) require additional configuration. For instruction, see Knowledge Center article CTX123015.
-
Personal Healthcare (Class 0f)— These devices include personal healthcare devices such as blood pressure sensors, heart rate monitors, pedometers, pill monitors, and spirometry.
-
Application and Vendor Specific (Classes fe and ff)— Many devices use vendor-specific protocols or protocols not standardized by the USB consortium, and such devices usually appear as vendor-specific (class ff).
USB devices classes denied by default
Default USB policy rules don’t allow the following different classes of USB device:
-
Communications and CDC Control (Classes 02 and 0a). The default USB policy doesn’t allow these devices, because one of the devices might be providing the connection to the virtual desktop itself.
-
Human Interface Devices (Class 03). Includes a wide variety of both input and output devices. Typical Human Interface Devices (HIDs) are keyboards, mice, pointing devices, graphic tablets, sensors, game controllers, buttons, and control functions.
Subclass 01 is known as the “boot interface” class and is used for keyboards and mice.
The default USB policy doesn’t allow USB keyboards (class 03, subclass 01, protocol 1), or USB mice (class 03, subclass 01, protocol 2). The reason is most keyboards and mice are handled appropriately without USB support. Also, it is normally necessary to use these devices locally as well remotely when you connect to a virtual desktop.
-
USB Hubs (Class 09). USB hubs allow extra devices to be connected to the local computer. It is not necessary to access these devices remotely.
-
Smart Card (Class 0b). Smart card readers include contactless and contact smart card readers, and also USB tokens with an embedded smart card-equivalent chip.
Smart card readers are accessed using smart card remoting and do not require USB support.
-
Wireless Controller (Class e0). Some of these devices might be providing critical network access, or connecting critical peripherals, such as Bluetooth keyboards or mice.
The default USB policy does not allow these devices. However, there might be particular devices to which it is appropriate to provide access using USB support.
-
Miscellaneous network devices (Class ef, subclass 04)— Some of these devices might be providing critical network access. The default USB policy does not allow these devices. However, there might be particular devices to which it is appropriate to provide access using USB support.
Update the list of USB devices available for remoting
Edit the Citrix Workspace for Windows template file to update the range of USB devices available for remoting to desktops. The update allows you to make changes to the Citrix Workspace for Windows using Group Policy. The file is in the following installed folder:
C:Program FilesCitrixICA ClientConfigurationen
Alternatively, you can edit the registry on each user device, adding the following registry key:
HKEY_LOCAL_MACHINESOFTWAREPoliciesCitrixICA ClientGenericUSB Type=String Name=”DeviceRules” Value=
Important
Editing the Registry incorrectly can cause serious problems that might require you to reinstall your operating system. Citrix cannot guarantee that problems resulting from the incorrect use of the Registry Editor can be solved. Use the Registry Editor at your own risk. Be sure to back up the registry before you edit it.
The product default rules are stored in:
HKEY_LOCAL_MACHINESOFTWARECitrixICA ClientGenericUSB Type=MultiSz Name=”DeviceRules” Value=
Do not edit the product default rules.
For more information about USB devices policy settings, see USB devices policy settings in Citrix Virtual Apps and Desktops documentation.
Composite USB device redirection
USB 2.1 and later supports the notion of USB composite devices where multiple child devices share a single connection with the same USB bus. Such devices employ a single configuration space and shared bus connection where a unique interface number 00-ff is used to identify each child device. Such devices are also not the same as a USB hub which provides a new USB bus origin for other independently addressed USB devices for connection.
Composite devices found on the client endpoint can be forwarded to the virtual host as either:
-
a single composite USB device, or
-
a set of independent child devices (split devices)
When a composite USB device is forwarded, the entire device becomes unavailable to the endpoint. Forwarding also blocks the local usage of the device for all applications on the endpoint, including the Citrix Workspace client needed for an optimized HDX remote experience.
Consider a USB headset device with both audio device and HID button for mute and volume control. If the entire device is forwarded using a generic USB channel, the device becomes unavailable for redirection over the optimized HDX audio channel. However, you can achieve best experience when the audio is sent through the optimized HDX audio channel unlike the audio sent using host-side audio drivers through generic USB remoting. The behavior is because of the noisy nature of the USB audio protocols.
You also notice issues when the system keyboard or pointing device are part of a composite device with other integrated features required for the remote session support. When a complete composite device is forwarded, the system keyboard or mouse becomes inoperable at the endpoint, except within the remote desktop session or application.
To resolve these issues, Citrix recommends that you split the composite device and forward only the child interfaces that use a generic USB channel. Such mechanism ensures that the other child devices are available for use by applications on the client endpoint, including, the Citrix Workspace app that provides optimized HDX experiences, while allowing only the required devices to be forwarded and available to the remote session.
Device Rules:
As with regular USB devices, device rules set in the policy or client Citrix Workspace app configuration on the end point select the composite devices for forwarding. Citrix Workspace app uses these rules to decide which USB devices to allow or prevent from forwarding to the remote session.
Each rule consists of an action keyword (Allow, Connect, or Deny), a colon (:), and zero or more filter parameters that match actual devices at the endpoints USB subsystem. These filter parameters correspond to the USB device descriptor metadata used by every USB device to identify itself.
Device rules are clear text with each rule on a single line and an optional comment after a # character. Rules are matched top down (descending priority order). The first rule that matches the device or child interface is applied. Subsequent rules that select the same device or interface are ignored.
Sample device rules:
- ALLOW: vid=046D pid=0102 # Allow a specific device by vid/pid
- ALLOW: vid=0505 class=03 subclass=01 # Allow any pid for vendor 0505 when subclass=01
- DENY: vid=0850 pid=040C # Deny a specific device (incl all child devices)
- DENY: class=03 subclass=01 prot=01 # Deny any device that matches all filters
- CONNECT: vid=0911 pid=0C1C # Allow and auto-connect a specific device
- ALLOW: vid=0286 pid=0101 split=01 # Split this device and allow all interfaces
- ALLOW: vid=1050 pid=0407 split=01 intf=00,01 # Split and allow only 2 interfaces
- CONNECT: vid=1050 pid=0407 split=01 intf=02 # Split and auto-connect interface 2
- DENY: vid=1050 pid=0407 split=1 intf=03 # Prevent interface 03 from being remoted
You can use any of the following filter parameters to apply rules to the encountered devices:
| Filter parameter | Description |
|---|---|
| vid=xxxx | USB device vendor ID (four-digit hexadecimal code) |
| pid=xxxx | USB device product ID (four-digit hexadecimal code) |
| rel=xxxx | USB device release ID (four-digit hexadecimal code) |
| class=xx | USB device class code (two-digit hexadecimal code) |
| subclass=xx | USB device subclass code (two-digit hexadecimal code) |
| prot=xx | USB device protocol code (two-digit hexadecimal code) |
| split=1 (or split=0) | Select a composite device to be split (or non-split) |
| intf=xx[,xx,xx,…] | Selects a specific set of child interfaces of a composite device (comma separated list of two-digit hexadecimal codes) |
The first six parameters select the USB devices for which the rule must be applied. If any parameter is not specified, the rule matches a device with ANY value for that parameter.
The USB Implementors Forum maintains a list of defined class, subclass, and protocol values in Defined Class Codes. USB-IF also maintains a list of registered vendor IDs. You can check the vendor, product, release, and interface IDs of a specific device directly in the Windows device manager or using a free tool like UsbTreeView.
When present, the last two parameters apply only to USB composite devices. The split parameter determines if a composite device must be forwarded as split devices or as a single composite device.
- Split=1 indicates that the selected child interfaces of a composite device must be forwarded as split devices.
- Split=0 indicates that the composite device must not be split.
Note:
If the split parameter is omitted, Split=0 is assumed.
The intf parameter selects the specific child interfaces of the composite device to which the action must be applied. If omitted, the action applies to all interfaces of the composite device.
Consider a composite USB headset device with three interfaces:
- Interface 0 — Audio class device endpoints
- Interface 3 — HID class device endpoints (volume and mute buttons)
- Interface 5 — Management/update interface
The suggested rules for this type of device are:
- CONNECT: vid=047F pid=C039 split=1 intf=03 # Allow and auto-connect HID device
- DENY: vid=047F pid=C039 split=1 intf=00 # Deny audio end points
- ALLOW: vid=047F pid=C039 split=1 intf=05 # Allow mgmt intf but don’t auto-connect
Enable Device Rules policy:
Citrix Workspace app for Windows includes a set of default device rules that filters certain undesirable classes of devices and allow one that customers often encounter.
You can check these default device rules in the system registry at either:
-
HKEY_LOCAL_MACHINESoftwareCitrixICA ClientGenericUSB(32 bit Windows) or -
HKEY_LOCAL_MACHINESoftwareWOW6432NodeCitrixICA ClientGenericUSB(64 bit Windows), in the multistring value named DeviceRules.
However, in the Citrix Workspace app for Window, you can apply USB Device Rules policy to overwrite these default rules.
To enable device rules policy for Citrix Workspace app for Windows:
- Open the Citrix Workspace app Group Policy Object administrative template by running gpedit.msc.
- Under the User Configuration node, go to Administrative Templates > Citrix Components > Citrix Workspace > Remoting client devices > Generic USB Remoting.
- Select the USB Device Rules policy.
- Select Enabled.
- In the USB Device Rules text box, paste (or edit directly) the USB device rules to be deployed.
- Click Apply and OK.
Citrix recommends preserving the default rules shipped with the client when creating this policy by copying the original rules and inserting new rules to alter the behavior as desired.
Connecting USB devices:
In a desktop session, split USB devices are displayed in the Desktop Viewer under Devices. Also, you can view split USB devices from Preferences > Devices.
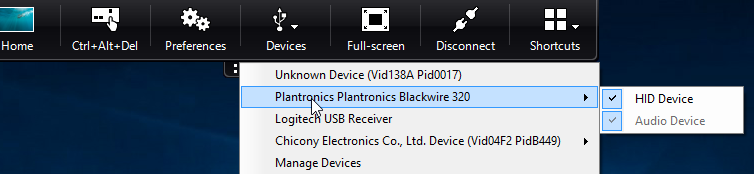
Note:
CONNECT keyword enables automatic connection of a USB device. However, if the CONNECT keyword is not used when you split a composite USB device for generic USB redirection, you must manually select the device from the Desktop Viewer or Connection Center to connect an allowed device.
In an application session, split USB devices are displayed in the Connection Center.
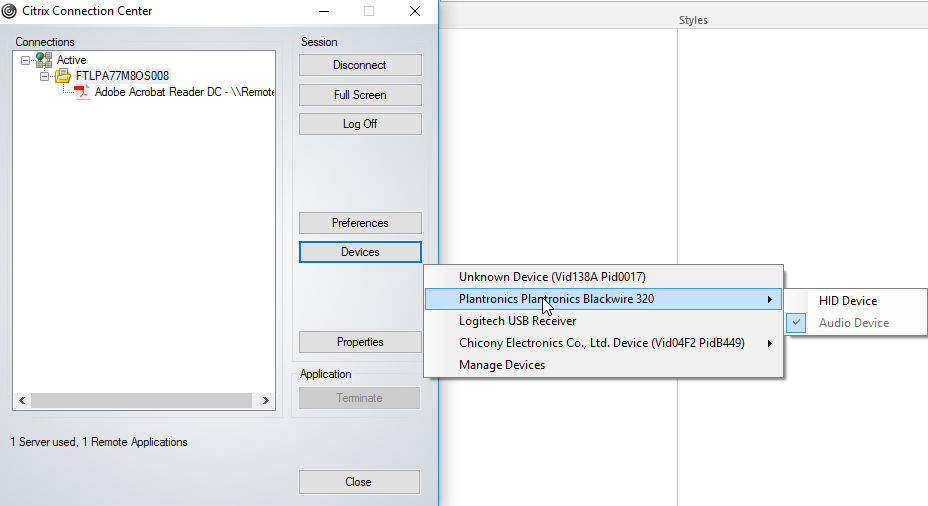
To automatically connect an interface:
The CONNECT keyword introduced in Citrix Workspace app for Windows 2109 allows for automatic redirection of USB devices. The CONNECT rule can replace the ALLOW rule if the administrator allows the device or selected interfaces to automatically connect in the session.
- Open the Citrix Workspace app Group Policy Object administrative template by running gpedit.msc.
- Under the User Configuration node, go to Administrative Templates > Citrix Components > Citrix Workspace > Remoting client devices > Generic USB Remoting.
- Select the USB Device Rules policy.
- Select Enabled.
-
In the USB Device Rules text box, add the USB device that you want to auto connect.
For example, CONNECT: vid=047F pid=C039 split=01 intf=00,03 – allows for splitting a composite device and auto connection of interfaces 00 and 03 interface and restriction other interfaces of that device.
- Click Apply and OK to save the policy.
Changing USB device auto-connection preferences:
Citrix Workspace app automatically connects USB devices tagged with CONNECT action based on the preferences set for the current desktop resource. You can change the preferences in the Desktop viewer toolbar as shown in the following image.
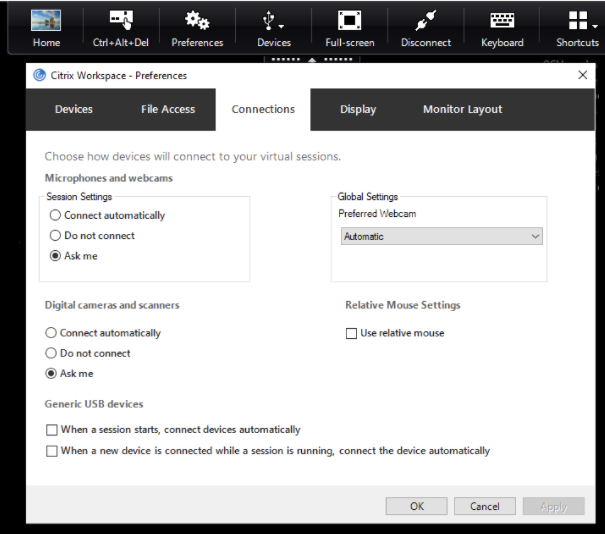
The two check boxes at the bottom of the pane controls if the devices must connect automatically or wait for manual connection in the session. These settings are not enabled by default. You can change the preferences if generic USB devices must be connected automatically.
Alternatively, an administrator can override the user preferences by deploying the corresponding policies from Citrix Workspace app Group Policy Object administrative template. Both machine and user policies can be found under Administrative Templates > Citrix Components > Citrix Workspace > Remoting client devices > Generic USB Remoting. The corresponding policies are labeled as Existing USB Devices and New USB Devices respectively.
Change split device default setting:
By default, the Citrix Workspace app for Windows only splits composite devices that are explicitly tagged as Split=1 in the device rules. However, it is possible to change the default disposition to split all composite devices that are not otherwise tagged with Split=0 in a matching device rule.
- Open the Citrix Workspace app Group Policy Object administrative template by running gpedit.msc.
- Under the User Configuration node, go to Administrative Templates > Citrix Components > Citrix Workspace > Remoting client devices > Generic USB Remoting.
- Select the SplitDevices policy.
- Select Enabled.
- Click Apply and OK to save the policy.
Note:
Citrix recommends using explicit device rules to identify specific devices or interfaces that need to be split instead of changing the default. This setting will be deprecated in a future release.
Limitation:
Citrix recommends that you do not split interfaces for a webcam. As a workaround, redirect the device to a single device using Generic USB redirection. For a better performance, use the optimized virtual channel.
Bloomberg keyboards
Citrix Workspace app supports the use of Bloomberg keyboard in a virtual apps and desktops session. The required components are installed with the plug-in. You can enable the Bloomberg keyboard feature when installing Citrix Workspace app for Windows or by using the Registry editor.
Bloomberg keyboards provide other functionality when compared to standard keyboards, that allows the user to access financial market data and perform trades.
The Bloomberg keyboard consists of multiple USB devices built into one physical shell:
- the keyboard
- a fingerprint reader
- an audio device
- a USB hub to connect all of these devices to the system
- HID buttons, for example, Mute, Vol Up, and Vol Down for the audio device
In addition to the normal functionality of these devices, the audio device includes support for some keys, control of the keyboard, and keyboard LEDs.
To use the specialized functionality inside a session, you must redirect the audio device as a USB device. This redirect makes the audio device available to the session, but prevents the audio device from being used locally. In addition, the specialized functionality can only be used with one session and cannot be shared between multiple sessions.
Multiple sessions with Bloomberg keyboards are not recommended. The keyboard operates in a single-session environment only.
Configuring Bloomberg keyboard 5:
You must configure various interfaces of the Bloomberg keyboard. From Citrix Workspace Application for Windows 2109, a new CONNECT keyword is introduced to allow automatic connection of USB devices at session startup and device insertion. The CONNECT keyword can be used to replace the ALLOW keyword when the user wants a USB device or interface to connect automatically. The following example uses the CONNECT keyword.
- Open the Citrix Workspace app Group Policy Object administrative template by running gpedit.msc.
- Under the Computer Configuration node, go to Administrative Templates > Citrix Components > Citrix Workspace > Remoting client devices > Generic USB Remoting.
- Select the SplitDevices policy.
- Select Enabled.
-
In the USB Device Rules text box, add the following rules if it doesn’t exist.
- CONNECT: vid=1188 pid=A101 # Bloomberg 5 Biometric module
- DENY: vid=1188 pid=A001 split=01 intf=00 # Bloomberg 5 Primary keyboard
- CONNECT: vid=1188 pid=A001 split=01 intf=01 # Bloomberg 5 Keyboard HID
- DENY: vid=1188 pid=A301 split=01 intf=02 # Bloomberg 5 Keyboard Audio Channel
- CONNECT: vid=1188 pid=A301 split=01 intf=00,01 # Bloomberg 5 Keyboard Audio HID
Note:
New lines or semicolon can be used to separate rules which allows to read either single line or multi-line registry values.
- Click Apply and OK to save the policy.
- In the Preferences window, select the Connections tab, and select one or both check boxes to the connect devices automatically. The Preferences window is accessible from the Desktop Toolbar or Connection Manager.
This procedure makes the Bloomberg keyboard 5 ready for use. The DENY rules that are mentioned in the steps enforce the redirection of the primary keyboard and audio channel over an optimized channel but not over Generic USB. The CONNECT rules enable automatic redirection of the fingerprint module, special keys on the keyboard, and keys related to audio control.
Configure Bloomberg keyboard 4 or 3:
Caution
Editing the registry incorrectly can cause serious problems that might require you to reinstall your operating system. Citrix cannot guarantee that problems resulting from the incorrect use of the Registry editor can be solved. Use the Registry editor at your own risk. Be sure to back up the registry before you edit it.
-
Locate the following key in the registry:
HKEY_LOCAL_MACHINESOFTWARECitrixICA ClientGenericUSB -
Do one of the following:
- To enable this feature, for the entry with type DWORD and Name EnableBloombergHID, set the value to 1.
- To disable this feature, set the value to 0.
Bloomberg keyboard 3 support is available in the online plug-in 11.2 for Windows and subsequent versions.
Bloomberg keyboard 4 support is available for Windows Receiver 4.8 and later versions.
Determining if Bloomberg keyboards support is enabled:
- To check if Bloomberg keyboard support is enabled in the online plug-in, check how the Desktop Viewer reports the Bloomberg keyboard devices. If the Desktop Viewer isn’t used, you can check the registry on the machine where the online plug-in is running.
-
If support for Bloomberg keyboards is not enabled, the Desktop Viewer shows:
- two devices for the Bloomberg keyboard 3, that appears as Bloomberg Fingerprint Scanner and Bloomberg Keyboard Audio.
- one policy redirected device for Bloomberg keyboard 4. This device appears as Bloomberg LP Keyboard 2013.
- If support for Bloomberg keyboards is enabled, there are two devices shown in the Desktop Viewer. One appears as Bloomberg Fingerprint Scanner as before, and the other as Bloomberg Keyboard Features.
- If the driver for the Bloomberg Fingerprint Scanner device is not installed, the Bloomberg Fingerprint Scanner entry might not appear in the Desktop Viewer. If the entry is missing, the Bloomberg Fingerprint Scanner might not be available for redirection. You can still check the name of the other Bloomberg device where Bloomberg keyboards support is enabled.
-
You can also check the value in the registry to know if the support is enabled:
HKEY_LOCAL_MACHINESOFTWARECitrixICAClientGenericUSBEnableBloombergHIDIf the value doesn’t exist or is 0 (zero), support for Bloomberg keyboards is not enabled. If the value is 1, support is enabled.
Enabling Bloomberg keyboard support:
Note:
Citrix Receiver for Windows 4.8 introduced the support for composite devices through the SplitDevices policy. However, you must use the Bloomberg keyboard feature instead of this policy for the Bloomberg keyboard 4.
The support for the Bloomberg keyboard changes the way certain USB devices are redirected to a session. This support is not enabled by default.
-
To enable the support during the installation time, specify the value of the ENABLE_HID_REDIRECTION property as TRUE at the installation command-line. For example:
CitrixOnlinePluginFull.exe /silent
ADDLOCAL="ICA_CLIENT,PN_AGENT,SSON,USB"
ENABLE_SSON="no" INSTALLDIR="c:test"
ENABLE_DYNAMIC_CLIENT_NAME="Yes"
DEFAULT_NDSCONTEXT="Context1,Context2"
SERVER_LOCATION="http://testserver.net" ENABLE_HID_REDIRECTION="TRUE" -
To enable support after installing the online plug-in, edit the Windows Registry on the system where the online plug-in is running:
- Open Registry Editor.
- Navigate to the following key:
HKEY_LOCAL_MACHINESOFTWARECitrixICA ClientGenericUSB - If the value EnableBloombergHID exists, modify it so that the value data is 1.
- If the value EnableBloombergHID does not exist, create a DWORD value with the name EnableBloombergHID and provide the value data as 1.
Disabling support for the Bloomberg keyboard:
You can disable support for the Bloomberg keyboard in the online plug-in as follows:
- Open Registry Editor on the system running the online plug-in software.
- Navigate to the following key:
HKEY_LOCAL_MACHINESOFTWARECitrixICA ClientGenericUSB -
If the value EnableBloombergHID exists, modify it so that the value data is 0 (zero).
If the value EnableBloombergHID doesn’t exist, it indicates that the support for the Bloomberg keyboard is not enabled. In such case, you don’t have to modify any registry values.
Using Bloomberg keyboards without enabling support:
- You can use the keyboard without enabling the Bloomberg keyboard support in the online plug-in. However, you cannot have the benefit of sharing the specialized functionality among multiple sessions and you might experience increased network bandwidth from audio.
- Bloomberg keyboard ordinary keys are available in the same way as any other keyboard. You don’t have to take any special action.
- To use the specialized Bloomberg keys, you must redirect the Bloomberg keyboard audio device into the session. If you are using the Desktop Viewer, the manufacturer name and device name of the USB devices appears and Bloomberg Keyboard Audio appears for the Bloomberg Keyboard audio device.
- To use the fingerprint reader, you must redirect the device to Bloomberg Fingerprint Scanner. If the drivers for the fingerprint reader are not installed locally, the device only shows:
- if the online plug-in is set to connect devices automatically or
- to let the user choose whether to connect devices.
Also, if the Bloomberg keyboard is connected before establishing the session and drivers for the fingerprint reader doesn’t exist locally, then the fingerprint reader doesn’t appear and isn’t usable within the session.
Note:
For Bloomberg 3, a single session or the local system can use the fingerprint reader, and cannot be shared. Bloomberg 4 is prohibited for redirection.
Using Bloomberg keyboards after enabling support:
-
If you enable support for Bloomberg keyboards in the online plug-in, you have the benefit of sharing the specialized keyboard functionality with multiple sessions. You also experience less network bandwidth from the audio.
-
Enabling support for the Bloomberg keyboard prevents the redirection of the Bloomberg Keyboard audio device. Instead, a new device is made available. If you are using the Desktop Viewer, this device is called Bloomberg Keyboard Features. Redirecting this device provides the specialized Bloomberg keys to the session.
Enabling the Bloomberg keyboard support only affects the specialized Bloomberg keys and the audio device. Because the ordinary keys and fingerprint reader are used in the same way as when the support is not enabled.
HDX Plug and Play USB device redirection
HDX Plug and Play USB device redirection enables dynamic redirection of media devices to the server. The media device includes cameras, scanners, media players, and point of sale (POS) devices. You or the user can restrict the redirection of all or some of the devices. Edit policies on the server or apply group policies on the user device to configure the redirection settings. For more information, see USB and client drive considerations in the Citrix Virtual Apps and Desktops documentation.
Important:
If you prohibit Plug and Play USB device redirection in a server policy, the user can’t override that policy setting.
A user can set permissions in Citrix Workspace app to allow or reject device redirection always or notify each time a device is connected. The setting affects only devices plugged in after the user changes the setting.
To map a client COM port to a server COM port
Client COM port mapping allows devices attached to the COM ports of the user device to be used during sessions. These mappings can be used like any other network mappings.
You can map client COM ports at the command prompt. You can also control client COM port mapping from the Remote Desktop (Terminal Services) Configuration tool or using policies. For information about policies, see the Citrix Virtual Apps and Desktops documentation.
Important:
COM port mapping isn’t TAPI-compatible.
-
For Citrix Virtual Apps and Desktops deployments, enable the Client COM port redirection policy setting.
-
Log on to Citrix Workspace app.
-
At a command prompt, type:
net use comx: \\client\comz:where:
- x is the number of the COM port on the server (ports 1 through 9 are available for mapping) and
- z is the number of the client COM port you want to map
-
To confirm the operation, type:
net useThe prompt displays mapped drives, LPT ports, and mapped COM ports.
To use this COM port in a virtual desktop or application, install your user device to the mapped name. For example, if you map COM1 on the client to COM5 on the server, install your COM port device on COM5 during the session. Use this mapped COM port as you would a COM port on the user device.
Configuring USB audio
Note:
- When you upgrade or install Citrix Workspace app for Windows for the first time, add the latest template files to the local GPO. For more information on adding template files to the local GPO, see Group Policy Object administrative template. For upgrade, the existing settings are retained while importing the latest files.
- This feature is available only on Citrix Virtual Apps server.
To configure USB audio devices:
- Open the Citrix Workspace app Group Policy Object administrative template by running gpedit.msc.
- Under the Computer Configuration node, go to Administrative Templates > Classic Administrative Templates (ADM) > Citrix Components > Citrix Workspace > User experience, and select Audio through Generic USB Redirection.
- Edit the settings.
- Click Apply and OK.
- Open the cmd prompt in administrator mode.
- Run the following command
gpupdate /force.
Mass storage devices
For mass storage devices only, in addition to USB support, remote access is available through client drive mapping. You can configure this through the Citrix Workspace app for Windows policy Remoting client devices > Client drive mapping. When you apply this policy, the drives on the user device automatically map to drive letters on the virtual desktop when users log on. The drives are displayed as shared folders with mapped drive letters.
The main differences between the two types of remoting policy are:
| Feature | Client drive mapping | USB support |
|---|---|---|
| Enabled by default | Yes | No |
| Read-only access configurable | Yes | No |
| Safe to remove device during a session | No | Yes, if the user clicks Safely Remove Hardware in the notification area |
If you enable both Generic USB and the client drive-mapping policies and insert a mass storage device before a session starts, it is redirected using client drive mapping first, before being considered for redirection through USB support. If it is inserted after a session has started, it will be considered for redirection using USB support before client drive mapping.
Client drive-mapping
Client drive mapping supports the transfer of data between the host and the client as a stream. The file transfer adapts to the changing network throughput conditions. It also uses any available extra bandwidth to scale up the data transfer rate.
By default, this feature is enabled.
To disable this feature, set the following registry key and then restart the server:
Path: HKEY_LOCAL_MACHINESystemCurrentcontrolsetservicespicadmParameters
Name: DisableFullStreamWrite
Type: REG_DWORD
Value:
0x01 — disables
0 or delete — enables
Citrix Workspace app for Windows supports device mapping on user devices so they’re available from within a session. Users can:
- Transparently access local drives, printers, and COM ports
- Cut and paste between the session and the local Windows clipboard
- Hear audio (system sounds and .wav files) played from the session
Citrix Workspace app informs the server of the available client drives, COM ports, and LPT ports during sign-in. By default, client drives are mapped to server drive letters and server print queues are created for client printers, which make them appear to be directly connected to the session. These mappings are available only for the current user during the current session. They’re deleted when the user logs off and recreated the next time the user logs on.
You can use the redirection policy settings to map user devices not automatically mapped at logon. For more information, see the Citrix Virtual Apps and Desktops documentation.
Disable user device mappings
You can configure user device-mapping including options for drives, printers, and ports, using the Windows Server Manager tool. For more information about the available options, see your Remote Desktop Services documentation.
Redirect client folders
Client folder redirection changes the way client-side files are accessible on the host-side session. Enabling only client drive mapping on the server, client-side full volumes automatically maps to the sessions as Universal Naming Convention (UNC) links. When you enable client folder redirection on the server and the user configures it on the user device, part of the user specified local volume gets redirected.
Only the user-specified folders appear as UNC links inside the sessions, instead of the complete file system on the user device. If you disable UNC links through the registry, client folders appear as mapped drives inside the session. For more information, including how to configure client folder redirection for user devices, see the Citrix Virtual Apps and Desktops documentation.
Map client drives to host-side drive letters
Client drive mapping redirects drive letters on the host-side to drives that exist on the user device. For example, drive H in a Citrix user session can be mapped to drive C of the user device running Citrix Workspace app for Windows.
Client drive mapping is built into the standard Citrix device redirection facilities transparently. To File Manager, Windows Explorer, and your applications, these mappings appear like any other network mappings.
The server hosting virtual desktops and applications can be configured during installation to map client drives automatically to a given set of drive letters. The default installation maps drive letters assigned to client drives starting with V and works backward, assigning a drive letter to each fixed drive and CD-ROM drive. (Floppy drives are assigned their existing drive letters.) This method yields the following drive mappings in a session:
| Client drive letter | Accessible by the server as: |
|---|---|
| A | A |
| B | B |
| C | V |
| D | U |
The server can be configured so that the server drive letters don’t conflict with the client drive letters. So, the server drive letters are changed to higher drive letters.
In the following example, changing server drives C to M and D to N allows client devices to access their C and D drives directly. This method yields the following drive mappings in a session:
| Client drive letter | Accessible by the server as: |
|---|---|
| A | A |
| B | B |
| C | C |
| D | D |
The drive letter used to replace the server drive C is defined during Setup. All other fixed drive and CD-ROM drive letters are replaced with sequential drive letters (for example; C > M, D > N, E > O). These drive letters must not conflict with any existing network drive mappings. If you map the network drive to the same drive letter as a server drive letter, the network drive mapping isn’t valid.
Connecting a user device to a server, reestablishes client mappings unless automatic client device mapping is disabled. Client drive mapping is enabled by default. To change the settings, use the Remote Desktop Services (Terminal Services) Configuration tool. You can also use policies to give you more control over how client device mapping is applied. For more information about policies, see the Citrix Virtual Apps and Desktops documentation.
vPrefer launch
In earlier releases, you can specify that the instance of an app installed on the VDA (referred to as local instance in this document) must be launched in preference to the published application by setting the KEYWORDS:prefer=”application” attribute in Citrix Studio.
Starting with Version 4.11, in a double-hop scenario (where Citrix Workspace app is running on the VDA that hosts your session), you can now control whether Citrix Workspace app launches:
- the local instance of an application installed on the VDA (if available as a local app) or
- a hosted instance of the application.
vPrefer is available on StoreFront Version 3.14 and Citrix Virtual Desktops 7.17 and later.
When you launch the application, Citrix Workspace app reads the resource data present on the StoreFront server and applies the settings based on the vprefer flag at the time of enumeration. Citrix Workspace app searches for the application’s installation path in the Windows registry of the VDA. If present, launches the local instance of the application. Otherwise, a hosted instance of the application is launched.
If you launch an application that is not on the VDA, Citrix Workspace app launches the hosted application. For more information on how StoreFront handled the local launch, see Control of local application launch on published desktops in the Citrix Virtual Apps and Desktops documentation.
If you do not want the local instance of the application to be launched on the VDA, set the LocalLaunchDisabled to True using the PowerShell on the Delivery Controller. For more information, see the Citrix Virtual Apps and Desktops documentation.
This feature helps to launch applications faster, thereby providing a better user experience. You can configure it by using the Group Policy Object (GPO) administrative template. By default, vPrefer is enabled only in a double-hop scenario.
Note:
When you upgrade or install Citrix Workspace app for the first time, add the latest template files to the local GPO. For more information on adding template files to the local GPO, see Group Policy Object administrative template. For an upgrade, the existing settings are retained while importing the latest files.
- Open the Citrix Workspace app GPO administrative template by running gpedit.msc.
- Under the Computer Configuration node, go to Administrative Template > Citrix Component > Citrix Workspace > SelfService.
- Select the vPrefer policy.
- Select Enabled.
- From the Allow apps drop-down list, select one of the following options:
- Allow all apps: This option launches the local instance of all apps on the VDA. Citrix Workspace app searches for the installed application, including the native Windows apps such as Notepad, Calculator, WordPad, Command prompt. It then launches the application on the VDA instead of the hosted app.
- Allow installed apps: This option launches the local instance of the installed app on the VDA. If the app is not installed on the VDA, it launches the hosted app. By default, Allow installed apps is selected when the vPrefer policy is set to Enabled. This option excludes the native Windows operating system applications like Notepad, Calculator, and so on.
- Allow network apps: This option launches the instance of an app that is published on a shared network.
- Click Apply and OK.
- Restart the session for the changes to take effect.
Limitation:
- Workspace for web does not support this feature.
Workspace configuration
Citrix Workspace app for Windows supports configuring Workspace for subscribers, who might be using one or more services available from Citrix Cloud.
Citrix Workspace app intelligently displays only the specific workspace resources to which users are entitled. All your digital workspace resources available in Citrix Workspace app are powered by the Citrix Cloud Workspace experience service.
A workspace is part of a digital workspace solution that enables IT to securely deliver access to apps from any device.
This screenshot is an example of what the workspace experience looks like to your subscribers. This interface is evolving and might look different to what your subscribers are working with today. For example, it might say “StoreFront” at the top of the page instead of “Workspace”.
Content Collaboration Service integration
This release introduces integration of Citrix Content Collaboration Service with Citrix Workspace app. Citrix Content Collaboration enables you to easily and securely exchange documents, send large documents by email, securely handle document transfers to third parties, and access a collaboration space. Citrix Content Collaboration provides many ways to work, including a web-based interface, mobile clients, desktop apps, and integration with Microsoft Outlook and Gmail.
You can access Citrix Content Collaboration functionality from the Citrix Workspace app using the Files tab displayed within Citrix Workspace app. You can view the Files tab only if Content Collaboration Service is enabled in the Workspace configuration from the Citrix Cloud console.
Note:
Citrix Content Collaboration integration in Citrix Workspace app isn’t supported on Windows Server 2012 and 2016 due to operating system’s security option.
The following image displays example contents of the Files tab of the new Citrix Workspace app:

Limitations:
-
Resetting Citrix Workspace app does not cause Citrix Content Collaboration to log off.
-
Switching stores in Citrix Workspace app does not cause Citrix Content Collaboration to log off.
Configure download location for Citrix Files using the Registry editor:
- Launch the Registry editor and navigate to
HKEY_CURRENT_USERSoftwareCitrixDazzle. - Create a String Value key by name DownloadPreference.
- Copy and paste the preferred download path for Citrix Files to the Value column.
- If you want a prompt for every download, set the Value column to *.
For information about configuring Citrix Files download location using the Advanced Preferences UI, see Configuring download location using Advanced Preferences in Citrix Workspace app for Windows Help documentation.
SaaS apps
Secure access to SaaS applications provides a unified user experience that delivers published SaaS applications to the users. SaaS apps are available with single sign-on. Administrators can now protect the organization’s network and end-user devices from malware and data leaks. Administrators can achieve this by filtering access to specific websites and website categories.
Citrix Workspace app for Windows support the use of SaaS apps using the Citrix Secure Private Access. The service enables administrators to provide a cohesive experience, integrating single sign-on, and content inspection.
Delivering SaaS apps from the cloud has the following benefits:
- Simple configuration – Easy to operate, update, and consume.
- Single sign-on – Hassle-free log on with single sign-on.
- Standard template for different apps – Template-based configuration of popular apps.
Citrix Workspace app launches the SaaS apps on Citrix Enterprise Browser (formerly Citrix Workspace Browser). For information, see Citrix Enterprise Browser documentation.
Limitations:
- When you launch a published app with the print option enabled and download disabled, and give a print command on a launched app, you can still save the PDF. As a workaround, to strictly disable the download functionality, disable the print option.
- Videos embedded in an app might not work.
For more information about Workspace configuration, see Workspace configuration in Citrix Cloud.
PDF printing
Citrix Workspace app for Windows supports PDF printing in a session. The Citrix PDF Universal Printer driver allows you to print documents that are launched using hosted applications and desktops running on Citrix Virtual Apps and Desktops and Citrix DaaS.
When you select the Citrix PDF Printer option from the Print dialog, the printer driver converts the file to a PDF and transfers the PDF to the local device. The PDF is then launched using the default PDF viewer for viewing and prints from a locally attached printer.
Citrix recommends the Google Chrome browser or Adobe Acrobat Reader for PDF viewing.
You can enable Citrix PDF printing using Citrix Studio on the Delivery Controller.
Prerequisites:
- Citrix Virtual Apps and Desktops Version 7 1808 or later.
- At least one PDF viewer must be installed on your computer.
To enable PDF printing:
- On the Delivery Controller, use the Citrix Studio, to select the Policy node in the left pane. You can either create a policy or edit an existing policy.
- Set the Auto-create PDF Universal Printer policy to Enabled.
Restart the Citrix Workspace app session for the changes to take effect.
Limitation:
- PDF viewing and printing aren’t supported on the Microsoft Edge browser.
Expanded tablet mode in Windows 10 using Windows Continuum
Windows Continuum is a Windows 10 feature that adapts to the way the client device is used. Citrix Workspace app for Windows supports Windows Continuum, including dynamic change of modes.
For touch-enabled devices, the Windows 10 VDA starts in tablet mode when there’s no keyboard or mouse attached. It starts in desktop mode when either a keyboard or a mouse or both are attached. Detaching or attaching the keyboard on any client device or the screen on a 2-in-1 device like a Surface Pro toggles between tablet and desktop modes. For more information, see Tablet mode for touchscreen devices in Citrix Virtual Apps and Desktops documentation.
On a touch-enabled client device, the Windows 10 VDA detects the presence of a keyboard or mouse when you connect or reconnect to a session. It also detects when you attach or detach a keyboard or mouse during the session. This feature is enabled by default on the VDA. To disable the feature, modify the Tablet mode toggle policy using Citrix Studio.
Tablet mode offers a user interface that is better suited to touchscreens:
- Slightly larger buttons.
- The Start screen and all the apps you start open in a full screen.
- The taskbar includes a Back button.
- Icons are removed from the taskbar.
Desktop mode offers the traditional user interface where you interact in the same manner as a PC with a keyboard and mouse.
Note:
Workspace for web doesn’t support the Windows Continuum feature.
Browser content redirection
Browser content redirection prevents the rendering of webpages in the allow list on the VDA side. This feature uses Citrix Workspace app to instantiate a corresponding rendering engine on the client side, which fetches the HTTP and HTTPS content from the URL.
Note:
You can specify that webpages be redirected to the VDA side (and not redirected on the client side) by using a block list.
Browser content redirection supports the Google Chrome browser in addition to the Internet Explorer browser. Browser content redirection redirects the contents of a web browser to a client device, and creates a corresponding browser embedded within the Citrix Workspace app. This feature offloads network usage, page processing, and graphics appearing at the endpoint. Doing so improves the user experience when browsing demanding webpages, especially webpages that incorporate HTML5 or WebRTC video.
- Cookies are persistent across the sessions: When you exit and relaunch a browser, you are not prompted to reenter your credentials.
- Browsers now honor the local system language.
For more information, see Browser content redirection.
Citrix Analytics
Citrix Workspace app is instrumented to securely transmit logs to Citrix Analytics. The logs are analyzed and stored on Citrix Analytics servers when enabled. For more information about Citrix Analytics, see Citrix Analytics.
Enhancement to Citrix Analytics Service
With this release, Citrix Workspace app is instrumented to securely transmit the public IP address of the most recent network hop to Citrix Analytics Service. This data is collected per session launch. It helps the Citrix Analytics Service to analyze whether poor performance issues are tied to specific geographic areas.
By default, the IP address logs are sent to the Citrix Analytics Service. However, you can disable this option on the Citrix Workspace app using the Registry editor.
To disable IP address log transmissions, navigate to the following registry path and set the SendPublicIPAddress key to Off.
- On 64-bit Windows machines, navigate to:
HKEY_LOCAL_MACHINESOFTWAREWow6432NodeCitrixDazzle. - On 32-bit Windows machines, navigate to:
HKEY_LOCAL_MACHINESOFTWARECitrixDazzle.
Note:
- IP address transmissions are a best-case effort. Although Citrix Workspace app transmits every IP address that it is launched on, some of the addresses might not be accurate.
- In closed customer environments, where the endpoints are operating within an intranet, ensure that the URL
https://locus.analytics.cloud.com/api/locateipis whitelisted on the endpoint.
Citrix Workspace app is instrumented to securely transmit data to Citrix Analytics Service from ICA sessions that you launch from a browser.
For more information on how Performance Analytics uses this information, see Self-Service Search for Performance.
Relative mouse
The relative mouse feature determines how far the mouse has moved since the last frame within a window or screen.
The relative mouse uses the pixel delta between the mouse movements. When you change, for example, the direction of the camera using mouse controls, the feature is efficient. Apps also often hide the mouse cursor because the position of the cursor relative to the screen coordinates isn’t relevant, when manipulating a 3-D object or scene.
Relative mouse support provides an option to interpret the mouse position in a relative rather than an absolute manner. The interpretation is required for applications that demand relative mouse input rather than absolute.
You can configure the feature both on a per-user and a per-session basis, which gives more granular control on the feature availability.
Note
This feature can be applied in a published desktop session only.
Configuring the feature using the Registry Editor or the default.ica file allows the setting to be persistent even after the session is terminated.
Configuring relative mouse using the Registry editor
To configure the feature, set the following registry keys as applicable and then restart the session for the changes to take effect:
To make the feature available on a per-session basis:
HKEY_LOCAL_MACHINESOFTWAREPoliciesCitrixICA ClientEngineLockdown ProfilesAll RegionsLockdownVirtual ChannelsRelativeMouse
To make the feature available on a per-user basis:
HKEY_CURRENT_USERSoftwarePoliciesCitrixICA ClientEngineLockdown ProfilesAll RegionsLockdownVirtual ChannelsRelativeMouse
- Name: RelativeMouse
- Type: REG_SZ
- Value: True
Note:
- The values set in the Registry editor take precedence over the ICA file settings.
- The values set in HKEY_LOCAL_MACHINE and HKEY_CURRENT_USER must be the same. Different values might cause conflicts.
Configuring the relative mouse using the default.ica file
- Open the default.ica file typically at
C:inetpubwwwrootCitrix<site name>confdefault.ica, where sitename is the name specified for the site while creating. For StoreFront customers, the default.ica file is typically atC:inetpubwwwrootCitrix<Storename>App_Datadefault.ica, wherestorenameis the name set for the store when created. - Add a key by name RelativeMouse in the WFClient section. Set its value to the same configuration as the JSON object.
- Set the value as required:
- true – To enable relative mouse
- false – To disable relative mouse
- Restart the session for the changes to take effect.
Note:
The values set in the Registry editor take precedence over the ICA file settings.
Enabling relative mouse from the Desktop Viewer
- Log on to Citrix Workspace app.
- Launch a published desktop session.
-
From the Desktop Viewer toolbar, select Preferences.
The Citrix Workspace — Preferences window appears.
- Select Connections.
- Under Relative Mouse settings, enable Use relative mouse.
- Click Apply and OK.
Note:
Configuring the relative mouse from the Desktop Viewer applies the feature to per-session only.
Hardware decoding
When using Citrix Workspace app (with HDX engine 14.4), the GPU can be used for H.264 decoding wherever it’s available at the client. The API layer used for GPU decoding is DirectX Video Acceleration.
To enable hardware decoding using Citrix Workspace app Group Policy Object administrative template:
- Open the Citrix Workspace app Group Policy Object administrative template by running gpedit.msc.
- Under the Computer Configuration node, go to Administrative Templates > Citrix Workspace >User Experience.
- Select Hardware Acceleration for graphics.
- Select Enabled and click Apply and OK.
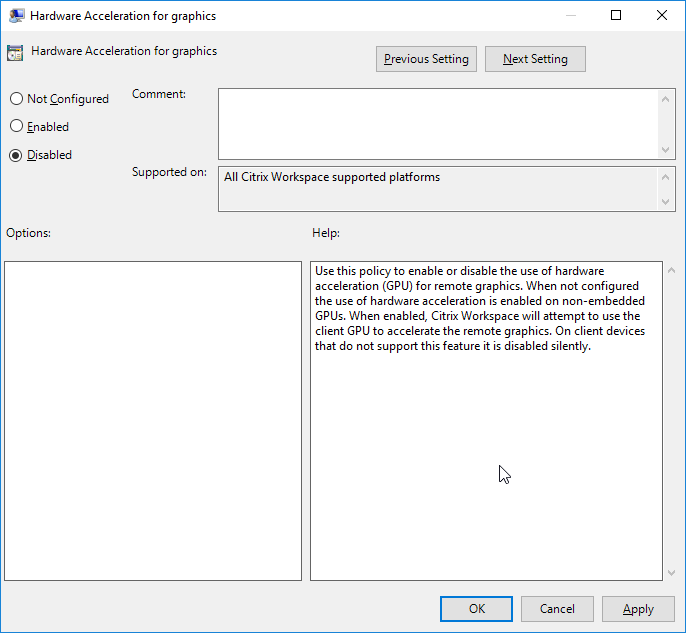
To validate if the policy is set and hardware acceleration is used for an active ICA session, check the following registry entries:
Registry Path: HKEY_CURRENT_USERSOFTWARECitrixICA ClientCEIPDataGfxRender.
Tip
The value for Graphics_GfxRender_Decoder and Graphics_GfxRender_Renderer must be 2. If the value is 1, that means CPU-based decoding is being used.
When using the hardware decoding feature, consider the following limitations:
- If the client has two GPUs and if one of the monitors is active on the second GPU, CPU decoding is used.
- When connecting to a Citrix Virtual Apps server running on Windows Server 2008 R2, don’t use hardware decoding on the user’s Windows device. If enabled, issues like slow performance while highlighting text and flickering issues are seen.
Microphone input
Citrix Workspace app supports multiple client-side microphone inputs. You can use locally installed microphones for:
- Real-time activities, such as softphone calls and Web conferences.
- Hosted recording applications, such as dictation programs.
- Video and audio recordings.
Citrix Workspace app users can select whether to use microphones attached to their device using Connection Center. Citrix Virtual Apps and Desktops and Citrix DaaS users can also use the Citrix Virtual Apps and Desktops and Citrix DaaS viewer Preferences to disable their microphones and webcams.
Multi-monitor support
You can use up to eight monitors with Citrix Workspace app for Windows.
Each monitor in a multiple monitor configuration has its own resolution designed by its manufacturer. Monitors can have different resolutions and orientations during sessions.
Sessions can span multiple monitors in two ways:
-
Full screen mode, with multiple monitors shown inside the session; applications snap to monitors as they would locally.
Citrix Virtual Apps and Desktops and Citrix DaaS: To display the Desktop Viewer window across any rectangular subset of monitors, resize the window across any part of those monitors and click Maximize.
-
Windowed mode, with one single monitor image for the session, applications do not snap to individual monitors.
Citrix Virtual Apps and Desktops and Citrix DaaS: When any desktop in the same assignment (formerly “desktop group”) is launched then, the window setting is preserved and the desktop is displayed across the same monitors. Multiple virtual desktops can be displayed on one device provided the monitor arrangement is rectangular. If the primary monitor on the device is used by the virtual apps and desktops session, it becomes the primary monitor in the session. Otherwise, the numerically lowest monitor in the session becomes the primary monitor.
To enable multi-monitor support, check the following:
- The user device is configured to support multiple monitors.
- The operating system can detect each of the monitors. On Windows platforms, to verify that this detection occurs, go to Settings > System and click Display and confirm that each monitor appears separately.
- After your monitors are detected:
- Citrix Virtual Desktops: Configure the graphics memory limit using the Citrix Machine Policy setting Display memory limit.
-
Citrix Virtual Apps: Depending on the version of the Citrix Virtual Apps server, you’ve installed:
- Configure the graphics memory limit using the Citrix Computer Policy setting Display memory limit.
- From the Citrix management console for the Citrix Virtual Apps server, select the farm and in the task pane, select:
- Modify Server Properties > Modify all properties > Server Default > HDX Broadcast > Display or
- Modify Server Properties > Modify all properties > Server Default > ICA > Display) and
- Set the Maximum memory to use for each session’s graphics.
Check if the setting is large enough (in kilobytes) to provide sufficient graphic memory. If this setting isn’t high enough, the published resource is restricted to the subset of the monitors that fits within the size specified.
Using Citrix Virtual desktops on dual monitor:
- Select the Desktop Viewer and click the down arrow.
- Select Window.
- Drag the Citrix Virtual Desktops screen between the two monitors. Ensure that about half the screen is present in each monitor.
-
From the Citrix Virtual Desktop toolbar, select Full-screen.
The screen is now extended to both the monitors.
For calculating the session’s graphic memory requirements for Citrix Virtual Apps and Desktops and Citrix DaaS, see Knowledge Center article CTX115637.
Printer
To override the printer settings on the user device
- From the Print menu available from an application on the user device, choose Properties.
- On the Client Settings tab, click Advanced Optimizations and modify the Image Compression and Image and Font Caching options.
On-screen keyboard control
To enable touch-enabled access to virtual applications and desktops from Windows tablets, Citrix Workspace app automatically displays the on-screen keyboard when:
- you activate a text entry field and
- when the device is in tent or tablet mode.
On some devices and in some circumstances, Citrix Workspace app can’t accurately detect the mode of the device. The on-screen keyboard might also appear when you don’t want it to.
To suppress the on-screen keyboard from appearing when using a convertible device:
- create a REG_DWORD value DisableKeyboardPopup in
HKEY_CURRENT_USER\SOFTWARE\Citrix\ICA Client\Engine\Configuration\Advanced\Modules\MobileReceiverand - set the value to 1.
Note:
On a x64 machine, create the value in HKEY_LOCAL_MACHINESOFTWAREWow6432NodeCitrixICA ClientEngineConfigurationAdvancedModulesMobileReceiver.
The keys can be set to the following 3 different modes:
- Automatic: AlwaysKeyboardPopup = 0; DisableKeyboardPopup = 0
- Always popup (on-screen keyboard): AlwaysKeyboardPopup = 1; DisableKeyboardPopup = 0
- Never popup (on-screen keyboard): AlwaysKeyboardPopup = 0; DisableKeyboardPopup = 1
Keyboard shortcuts
You can configure combinations of keys that Citrix Workspace app interprets as having special functionality. When the keyboard shortcuts policy is enabled, you can specify Citrix Hotkey mappings, behavior of Windows hotkeys, and keyboard layout for sessions.
- Open the Citrix Workspace app Group Policy Object administrative template by running gpedit.msc.
- Under the Computer Configuration node, go to Administrative Templates> Citrix Components > Citrix Workspace > User Experience.
-
Select the Keyboard shortcuts policy.
- Select Enabled, and the required options.
- Restart the Citrix Workspace app session for the changes to take effect.
Citrix Workspace app support for 32-bit color icons:
Citrix Workspace app supports 32-bit high color icons. To provide for seamless applications, it automatically selects the color depth for:
- applications visible in the Connection Center dialog,
- the Start menu, and
- task bar
Caution
Editing the registry incorrectly can cause serious problems that might require you to reinstall your operating system. Citrix can’t guarantee that problems resulting from the incorrect use of the Registry Editor can be solved. Use the Registry Editor at your own risk. Be sure to back up the registry before you edit it.
To set a preferred depth, you can add a string registry key named TWIDesiredIconColor to HKEY_LOCAL_MACHINESOFTWAREWow6432NodeCitrixICA ClientEngineLockdown ProfilesAll RegionsPreferences and set it to the required value. The possible color depths for icons are 4, 8, 16, 24, and 32 bits-per-pixel. The user can select a lower color depth for icons if the network connection is slow.
Customizing location for application shortcut using command line
The start menu integration and desktop shortcut only feature lets you bring published application shortcuts into the Windows Start menu and onto the desktop. Users do not have to subscribe to applications from the Citrix Workspace user interface. Start menu integration and desktop shortcut management provide a seamless desktop experience for groups of users. Also for users who need access to a core set of applications in a consistent way.
The flag is called SelfServiceMode and is set to True by default. When the administrator sets the SelfServiceMode flag to False, you can’t access the self-service user interface. Instead, you can access subscribed apps from the Start menu and desktop shortcuts that is referred as shortcut-only mode.
Users and administrators can use several registry settings to customize the way shortcuts are set up.
Working with shortcuts
- Users can’t remove apps. All apps are mandatory when working with the SelfServiceMode flag set to false (shortcut-only mode). If you remove a shortcut icon from the desktop, the icon comes back when the user selects Refresh from the Citrix Workspace app icon in the notification area.
- Users can configure only one store. The Account and Preferences options aren’t available to prevent the user from configuring more stores. The administrator can give a user special privileges to add more than one account using the Group Policy Object template. Administrators can also provide special privileges by manually adding a registry key (HideEditStoresDialog) on the client machine. When the administrator gives a user this privilege, the user has a Preferences option in the notification area, where they can add and remove accounts.
- Users can’t remove apps using the Windows Control Panel.
- You can add desktop shortcuts via a customizable registry setting. Desktop shortcuts aren’t added by default. After editing the registry settings, restart the Citrix Workspace app.
- Shortcuts are created in the Start menu with a category path as the default, UseCategoryAsStartMenuPath.
Note:
Windows 10 does not allow the creation of nested folders within the Start menu. Applications are displayed individually or under the root folder. But, not within the Category sub folders that are defined with Citrix Virtual Apps.
- You can add a flag [/DESKTOPDIR=”Dir_name”] during installation to bring all shortcuts into a single folder. CategoryPath is supported for desktop shortcuts.
- Auto Reinstall Modified Apps feature can be enabled using the registry key
AutoReInstallModifiedApps. WhenAutoReInstallModifiedAppsis enabled, any changes to the published apps and desktops attributes on the server are displayed on the client machine. WhenAutoReInstallModifiedAppsis disabled, apps and desktop attributes aren’t updated and shortcuts aren’t restored on refresh if deleted on the client. By default, theAutoReInstallModifiedAppsis enabled.
Customizing location for application shortcut using the Registry editor
Note:
- By default, registry keys use the String format.
- Change registry keys before you configure a store. If at any time you or a user wants to customize the registry keys, you or the user must:
- reset Citrix Workspace app
- configure the registry keys, and then
- reconfigure the store.
Manage workspace control reconnect
Workspace control lets applications follow users as they move between devices. For example, workspace control enables clinicians in hospitals to move from workstation to workstation without having to restart their applications on each device. For Citrix Workspace app, you manage workspace control on client devices by modifying the registry. Workspace control can also be done for domain-joined client devices using Group Policy.
Caution:
Editing the registry incorrectly can cause serious problems that might require you to reinstall your operating system. Citrix can’t guarantee that problems resulting from the incorrect use of the Registry Editor can be solved. Use the Registry Editor at your own risk. Be sure to back up the registry before you edit it.
Create WSCReconnectModeUser and modify the existing registry key WSCReconnectMode in the Master Desktop Image or in the Citrix Virtual Apps server. The published desktop can change the behavior of the Citrix Workspace app.
WSCReconnectMode key settings for Citrix Workspace app:
- 0 = do not reconnect to any existing sessions
- 1 = reconnect on application launch
- 2 = reconnect on application refresh
- 3 = reconnect on application launch or refresh
- 4 = reconnect when Citrix Workspace interface opens
- 8 = reconnect on Windows sign-on
- 11 = combination of both 3 and 8
Disable workspace control
To disable workspace control, create the following key:
HKEY_LOCAL_MACHINESOFTWAREWow6432NodeCitrixDazzle (64-bit)
HKEY_LOCAL_MACHINESOFTWARECitrix\Dazzle (32-bit)
Name: WSCReconnectModeUser
Type: REG_SZ
Value data: 0
Modify the following key from the default value of 3 to zero
HKEY_LOCAL_MACHINESOFTWAREWow6432NodeCitrixDazzle (64-bit)
HKEY_LOCAL_MACHINESOFTWARECitrixDazzle (32-bit)
Name: WSCReconnectMode
Type: REG_SZ
Value data: 0
Note:
You can also set the WSCReconnectAll key to false if you don’t want to create a key.
Registry keys for 32-bit machines
Registry key: WSCSupported
Value: True
Key path:
-  HKEY_CURRENT_USERSoftwareCitrixDazzle
-  HKEY_CURRENT_USERSoftwareCitrixReceiverSRStore" + primaryStoreID +Properties
-  HKEY_LOCAL_MACHINESoftwarePoliciesCitrixDazzle
-  HKEY_LOCAL_MACHINESoftwareCitrixDazzle
Registry key: WSCReconnectAll
Value: True
Key path:
- `HKEY_CURRENT_USERSoftwareCitrixDazzle`
- `HKEY_CURRENT_USERSoftwareCitrixReceiverSRStore" + primaryStoreID + Properties`
- `HKEY_LOCAL_MACHINESoftwarePoliciesCitrixDazzle`
- `HKEY_LOCAL_MACHINeSoftwareCitrixDazzle`
Registry key: WSCReconnectMode
Value: 3
Key path:
-  HKEY_CURRENT_USERSoftwareCitrixDazzle
-  HKEY_CURRENT_USERSoftwareCitrixReceiverSRStore" + primaryStoreID +Properties
-  HKEY_LOCAL_MACHINESoftwarePoliciesCitrixDazzle
-  HKEY_LOCAL_MACHINESoftwareCitrixDazzle
Registry key: WSCReconnectModeUser
Value: Registry isn’t created during installation.
Key path:
- HKEY_CURRENT_USERSoftwareCitrixDazzle
- HKEY_CURRENT_USERSoftwareCitrixReceiverSRStore" + primaryStoreID+Properties
- HKEY_LOCAL_MACHINESoftwarePoliciesCitrixDazzle
- HKEY_LOCAL_MACHINESoftwareCitrixDazzle
Registry keys for 64-bit machines:
Registry key: WSCSupported
Value: True
Key path:
- HKEY_CURRENT_USERSoftwareCitrixDazzle
- HKEY_CURRENT_USERSoftwareCitrixReceiverSRStore" + primaryStoreID +Properties
- HKEY_LOCAL_MACHINESoftwareWow6432NodePoliciesCitrixDazzle
- HKEY_LOCAL_MACHINESoftwareWow6432NodeCitrixDazzle
Registry key: WSCReconnectAll
Value: True
Key path:
-  HKEY_CURRENT_USERSoftwareCitrixDazzle
-  HKEY_CURRENT_USERSoftwareCitrixReceiverSRStore" + primaryStoreID + Properties
-  HKEY_LOCAL_MACHINESoftwareWow6432NodePoliciesCitrixDazzle
-  HKEY_LOCAL_MACHINESoftwareWow6432NodeCitrixDazzle
Registry key: WSCReconnectMode
Value: 3
Key path:
-  HKEY_CURRENT_USERSoftwareCitrixDazzle
-  HKEY_CURRENT_USERSoftwareCitrixReceiverSRStore" + primaryStoreID +Properties
-  HKEY_LOCAL_MACHINESoftwareWow6432NodePoliciesCitrixDazzle
-  HKEY_LOCAL_MACHINESoftwareWow6432NodeCitrixDazzle
Registry key: WSCReconnectModeUser
Value: Registry isn’t created during installation.
Key path:
- HKEY_CURRENT_USERSoftwareCitrixDazzle
- HKEY_CURRENT_USERSoftwareCitrixReceiverSRStore" + primaryStoreID+Properties
- HKEY_LOCAL_MACHINESoftwareWow6432NodePoliciesCitrixDazzle
- HKEY_LOCAL_MACHINESoftwareWow6432NodeCitrixDazzle
Desktop Viewer
Different enterprises might have different corporate needs. Your requirements for the way users access virtual desktops might vary from user to user and as your corporate needs evolve. The user experience of connecting to virtual desktops and the extent at which the user can configure the connections depend Citrix Workspace app for Windows setup.
Use the desktop viewer when users need to interact with their virtual desktop. The user’s virtual desktop can be a published virtual desktop, or a shared or dedicated desktop. In this access scenario, the Desktop Viewer toolbar functionality allows the user to open a virtual desktop in a window and pan and scale that desktop inside their local desktop. Users can set preferences and work on more than one desktop using multiple Citrix Virtual Apps and Desktops and Citrix DaaS connections on the same user device.
Note:
Use Citrix Workspace app to change the screen resolution on their virtual desktops. You can’t change Screen Resolution using the Windows Control Panel.
Keyboard input in Desktop Viewer
In Desktop Viewer sessions, the Windows logo key+L is directed to the local computer.
Ctrl+Alt+Delete is directed to the local computer.
Key presses that activate certain Microsoft accessibility features, for example, Sticky Keys, Filter Keys, and Toggle Keys are normally directed to the local computer.
As an accessibility feature of the Desktop Viewer, pressing Ctrl+Alt+Break displays the Desktop Viewer toolbar buttons in a pop-up window.
Ctrl+Esc is sent to the remote, virtual desktop.
Note:
By default, if the Desktop Viewer is maximized, Alt+Tab switches focus between windows inside the session. If the Desktop Viewer is displayed in a window, Alt+Tab switches focus between windows outside the session.
Hotkey sequences are key combinations designed by Citrix. Hotkey sequences are, for example, the Ctrl+F1 sequence reproduces Ctrl+Alt+Delete, and Shift+F2 switches applications between full-screen and windowed mode.
Note:
You can’t use hotkey sequences with virtual desktops displayed in the Desktop Viewer, that is, with virtual apps and desktops sessions. However, you can use them with published applications, that is, with virtual apps sessions.
Virtual desktops
From within a desktop session, users can’t connect to the same virtual desktop. If the user tries do so, disconnects the existing desktop session. So, Citrix recommends:
- Administrators must not configure the clients on a desktop to point to a site that publishes the same desktop
- Users must not browse site that hosts the same desktop if the site is configured to automatically reconnect users to existing sessions
- Users must not browse to a site that hosts the same desktop and try to launch it
A user who logs on locally to a computer that is acting as a virtual desktop, blocks connection to that desktop.
Define the device mapping:
- if your users connect to virtual applications, published with virtual apps, from a virtual desktop and
- your organization has a separate virtual apps administrator.
Device mapping checks if the desktop devices are mapped consistently within desktop and application sessions. Because local drives are displayed as network drives in desktop sessions, the virtual apps administrator needs to change the drive-mapping policy to include network drives.
Status indicator time-out
You can change the amount of time the status indicator displays when a user is launching a session.
To alter the time-out period, do the following steps:
- Launch the Registry Editor.
- Navigate to the following path:
- On a 64-bit:
HKEY_LOCAL_MACHINESOFTWAREWow6432NodeCitrixICA CLIENTEngine - On a 32-bit:
HKEY_LOCAL_MACHINESOFTWARECitrixICA CLIENTEngine
- On a 64-bit:
- Create a registry key as follows:
- Type: REG_DWORD
- Name:
SI INACTIVE MS - Value: 4, if you want the status indicator to disappear sooner.
When you configure this key, the status indicator might appear and disappear frequently. This behavior is as designed. To suppress the status indicator, do the following:
- Launch the Registry Editor.
- Navigate to the following path:
- On a 64-bit:
HKEY_LOCAL_MACHINESOFTWAREWow6432NodeCitrixICA CLIENT - On a 32-bit:
HKEY_LOCAL_MACHINESOFTWARECitrixICA CLIENT
- On a 64-bit:
-
Create a registry key as follows:
- Type: REG_DWORD
- Name:
NotificationDelay - Value: Any value in millisecond (for example, 120000)
Inactivity Timeout for Workspace Sessions
Admins can configure the inactivity timeout value to specify the amount of idle time allowed before the users automatically sign out of the Citrix Workspace session. You’re automatically signed out of Workspace if the mouse, keyboard, or touch is idle for the specified interval of time. The inactivity timeout doesn’t affect the active virtual apps and desktops sessions or Citrix StoreFront stores.
The inactivity timeout value can be set starting from a 1 minute to 1,440 minutes. By default, the inactivity timeout isn’t configured. Admins can configure the inactivityTimeoutInMinutes property by using a PowerShell module. Click here to download the PowerShell modules for Citrix Workspace Configuration.
The end-user experience is as follows:
- A notification appears in your session window three minutes before you’re signed out, with an option to stay signed in, or sign out.
- The notification appears only if the configured inactivity timeout value is greater than or equal to five minutes.
- Users can click Stay signed in to dismiss the notification and continue using the app, in which case the inactivity timer is reset to its configured value. You can also click Sign out to end the session for the current store.
Note:
Admins can configure the inactivity timeout only for Workspace (cloud) sessions.
Improved virtual apps and desktops launch experience
Previously, the launch progress dialog box was not intuitive to the users. It made the users assume that the launch process is not responding and they closed the dialog box, as the notification messages were static.
Starting with Citrix Workspace app 2302 for Windows, the improved app and desktop launch experience is more informative, modern, and provides a user-friendly experience. This helps to keep the users engaged with timely and relevant information about the launch status. The notification appears in the lower-right corner of your screen.
This feature is also supported on Workspace for Web. Users can view meaningful notifications about the launch progress, instead of just a spinner. If a launch is in progress and the user attempts to close the browser, a warning message is shown.
Note:
- This is applicable to Workspace (cloud) sessions only.
- This feature is not supported for browser-based launch
Improved virtual apps and desktops reconnection experience
Citrix Workspace 2302 release provides an enhanced user experience while reconnecting to virtual apps and desktops from which you got disconnected.
When Citrix Workspace app attempts to refresh the disconnected Citrix Workspace app or start new virtual apps or desktops as a part of the Workspace Control feature, the following prompt appears:
This prompt appears only when the show reconnection prompt to reconnect sessions is set to true in the Global App Configuration service.
Click Restore to reconnect to open new and disconnected virtual apps and desktops. If you want to start only newly selected apps and desktops, click Cancel.
You can also select Remember my preference to apply the selected preference for the next login.
The preceding new Restore session? prompt appears only if:
- the user tries to start an app belonging to a workspace store,
- admin policies or app config settings are not configured for the Workspace Control feature,
- Workspace Control Reconnect options are set to default on the client.
Note:
Reconnect settings in the Reconnect Options takes precedence over the preferences set in the dialog box. For more information, see Configure reconnect options using Advanced Preferences dialog.
Customer Experience Improvement Program (CEIP)
| Data collected | Description | What we use it for |
|---|---|---|
| Configuration and usage data | The Citrix Customer Experience Improvement Program (CEIP) gathers configuration and usage data from Citrix Workspace app for Windows and automatically sends the data to Citrix and Google Analytics. | This data helps Citrix improve the quality, functionality, and performance of the Citrix Workspace app, appropriately allocate resources for product development purposes, and maintain service levels and manage staffing and infrastructure investment. |
Data collected
As noted above, Citrix collects Workspace app configuration and usage data to improve the quality, functionality, and performance of Workspace App, and to allow Citrix to appropriately allocate resources for product development purposes, as well as to maintain service levels and manage staffing and infrastructure investment. The data is used and analyzed in aggregated form only. No user or their machine is singled-out and no analysis is performed on specific end users based on the CEIP data.
The specific CEIP data elements collected by Google Analytics are:
| Operating system version* | Workspace app version* | Authentication configuration | Workspace app language |
| Session launch method | Connection error | Connection protocol | VDA information |
| Installer configuration | Installer state | Client keyboard layout | Store configuration |
| Auto-update preference | Connection Center usage | App Protection configuration | Reason for the offline banner |
| Device Model/Properties | Citrix Virtual Apps and Desktops Session Launch Status | Virtual app/desktop name | Auto-update Status |
| Connection Lease Details | StoreFront to Workspace URL Migration Feature Usage | Citrix Enterprise Browser Usage | Auto-update channel |
| Inactivity Timeout Details | Citrix Enterprise Browser Version |
Note:
Starting with version 2206, the Citrix Workspace app doesn’t collect any CEIP data from users located in the European Union (EU), European Economic Area (EEA), Switzerland, and United Kingdom (UK). Update your Workspace app if you wish to take advantage of this functionality.
Data Collection Preferences
Starting with version 2205, both users and administrators can stop sending CEIP data (except for the two data elements which can be blocked as specified in the Note below) by following the below steps.
- Right-click the Citrix Workspace app icon from the notification area.
- Select Advanced Preferences.
The Advanced Preferences dialog appears. - Select Data Collection.
- Select No, Thanks to disable CEIP or to forego participation.
- Click Save.
You can also navigate to the following registry entry as an administrator and set the value as suggested:
Path: HKEY_LOCAL_MACHINE SOFTWARECitrixICA ClientCEIP
Key: Enable_CEIP
Value: False
Note:
Once you select No Thanks or set the
Enable_CEIPkey toFalse, you can also stop sending the final two CEIP data elements, that is, Operating System and Workspace app version, by navigating to the following registry entry and set the value:
Path: HKEY_LOCAL_MACHINE SOFTWARECitrixICA ClientCEIP
Key: DisableHeartbeat
Value: True
Additional information
Citrix handles your data according to the terms of your contract with Citrix, and protect it as specified in the Citrix Services Security Exhibit. Citrix Services Security Exhibit is available on the Citrix Trust Center.
Regional settings
Citrix Workspace app displays the date, time, and number based on the locale of the browser or endpoint device.
Starting from Citrix Workspace app 2106, you can customize regional date, time, and number formats through Regional Settings. Changes made in these settings are saved for an individual user and applied across all devices.
Note:
This option is available only on Cloud deployments.
For more information, see Regional Settings.
Microsoft Teams
- Screen sharing
- Encoder performance estimator
- Acoustic Echo Cancellation
Upgraded version of WebRTC for the optimized Microsoft Teams
Starting from Version 2209. the version of WebRTC that is used for the optimized Microsoft Teams is upgraded to version M98.
Background blurring and effects for Microsoft Teams optimization with HDX
Citrix Workspace app for Windows now supports background blurring and effects in Microsoft Teams optimization with HDX.
You can either blur or replace the background with a custom image and avoid unexpected distractions by helping the conversation stay focused on the silhouette (body and face). The feature can be used with either P2P or conference calls.
Note:
This feature is now integrated with the Microsoft Teams UI/buttons. MultiWindow support is a prerequisite that requires a VDA update to 2112 or higher. For more information, see Multi-window meetings and chat.
Limitations:
- Admin and user-defined background replacement is not supported.
- The background effect doesn’t persist between sessions. When you close and relaunch Microsoft Teams or VDA is reconnected, the background effect is reset to off.
- After the ICA session is reconnected, the effect is off. However, the Microsoft Teams UI shows that the previous effect is still On by a tick mark. Citrix and Microsoft are working together to resolve this issue.
- The device must be connected to the internet while replacing the background image.
Note:
This feature is available only after future update roll-out from Microsoft Teams. When the update is rolled-out by Microsoft, you can check CTX253754 and the Microsoft 365 Public roadmap for the documentation update and the announcement.
Screen sharing
Starting with Version 2006.1, new functionalities in the outgoing screen sharing feature for the Microsoft Teams application that uses HDX optimization are introduced.
The contents shared using Microsoft Teams are limited to the contents of the Desktop Viewer window. Areas outside the Desktop Viewer window (client local desktop, apps) are blacked out.
On a Windows 10 operating system, the following aren’t blacked out when they overlap the Desktop Viewer window:
- Start menu, Search menu, and Task View.
- Notification bar and Notifications that appear at the right-side of the task bar.
- On a multi-monitor set up with different DPI settings, if a local app is overlapping 2 different monitors and its DPI doesn’t match the main monitor DPI which has the Desktop Viewer window.
- App and preview shown when you mouse-hover over the app’s icon in the task bar.
Encoder performance estimator
The HdxRtcEngine.exe is the WebRTC media engine embedded in Citrix Workspace app that handles Microsoft Teams redirection. Starting from Citrix Workspace app 1912 or higher, HdxRtcEngine.exe can estimate the best encoding resolution that the endpoint’s CPU can sustain without overloading. Possible values are 240p, 360p, 480p, 720p, and 1080p.
The performance estimation process (also called webrtcapi.EndpointPerformance) runs when HdxTeams.exe initializes. The macroblock code determines the best resolution that can be achieved with the particular endpoint. The Codec negotiation includes the highest possible resolution. The Codec negotiation can be between the peers, or between the peer and the conference server.
There are four performance categories for endpoints that have its own maximum available resolution:
| Endpoint performance | Maximum resolution | Registry key value |
|---|---|---|
| fast | 1080p (1920×1080 16:9 @ 30 fps) | 3 |
| medium | 720p (1280×720 16:9 @ 30 fps) | 2 |
| slow | 360p (either 640×360 16:9 @ 30 fps, or 640×480 4:3 @ 30 fps) | 1 |
| very slow | 240p (either 320×180 16:9 @ 30 fps, or 320×240 4:3 @ 30 fps) | 0 |
Registry Path in Citrix Workspace app:
Navigate to the registry path HKEY_CURRENT_USERSOFTWARECitrixHDXMediaStream and create the following key:
| Name | Type | Values | Description |
|---|---|---|---|
| OverridePerformance | DWORD | 0;1;2;3 | Force desired performance. Value must be in the range between 0 and 3, where 0 indicates slow and 3 fast. |
For information about configuring the endpoint encoder, see Encoder performance estimator.
For more information about Microsoft Teams optimization, see Optimization for Microsoft Teams.
Acoustic Echo Cancellation
Echo cancellation in HdxRtcEngine.exe can be disabled to troubleshoot audio performance issues or compatibility with peripherals that have built-in AEC capabilities.
Navigate to the registry path HKEY_CURRENT_USERSOFTWARECitrixHDXMediaStream and create the following key:
Name: EnableAEC
Type: REG_DWORD
Data: 0
(0 disables AEC. 1 enables AEC. If Regkey isn’t present, the default behavior in HdxRtcEngine is to enable AEC, irrespective of the peripheral’s hardware capabilities.)
Enhancements to Microsoft Teams optimization
-
Starting from Citrix Workspace app 2112.1 for Windows, the following features (MultiWindow and Give/Take Control) are available only after future update roll-out from Microsoft Teams.
When the update is rolled-out by Microsoft, you can check CTX253754 for the documentation update and the announcement.
-
Multi-window chat and meetings for Microsoft Teams: You can use multiple windows for chat and meetings in Microsoft Teams when optimized by HDX in Citrix Virtual Apps and Desktops (2112 or higher). You can pop out the conversations or meetings in various ways. For details about the pop-out window feature, see Teams Pop-Out Windows for Chats and Meetings on the Microsoft Office 365 site.
If you’re running an older version of Citrix Workspace app or Virtual Delivery Agent (VDA), Microsoft might deprecate the single-window code in the future. However, you can upgrade to the VDA or Citrix Workspace app version that supports multiple windows (2112 or higher), before nine months after the feature is GA.
-
Give control: You can use the Give control button to give control access of your shared screen to other users participating in the meeting. The other participant can make selections and modify the shared screen through keyboard, mouse, and clipboard input. You’ll both have control of the shared screen and you can take back the control anytime.
-
Take control: During screen sharing sessions, any participants can request control access through the Request control button. The person sharing the screen can then approve or deny the request. When you’ve the control, you can control the keyboard and mouse input on the screen shared and release the control to stop sharing control.
Limitation:
The Request control option is not available during the peer-to-peer call between an optimized user and a user on the native Microsoft Teams desktop client that is running on the endpoint. As a workaround, users can join a meeting to get the Request control option.
-
Dynamic e911: Citrix Workspace app supports dynamic emergency calling. When used in Microsoft Calling Plans, Operator Connect, and Direct Routing, it provides the option to:
- configure and route emergency calls
- notify security personnel
The notification is sent based on the current location of the Citrix Workspace app that runs on the endpoint, instead of the Microsoft Teams client on the VDA.
Ray Baum’s law requires the 911 caller’s dispatchable location to be transmitted to the appropriate Public Safety Answering Point (PSAP). Starting from Citrix Workspace app 2112.1 for Windows, Microsoft Teams Optimization with HDX is compliant with Ray Baum’s law. - App sharing: Previously, you weren’t able to share an app using the Screen sharing feature in Microsoft Teams when you enable the HDX 3D Pro policy in Citrix Studio.
Starting with Citrix Workspace app 2112.1 for Windows and Citrix Virtual Apps and Desktops 2112, Screen sharing feature allows you to share app in Microsoft Teams. You can share an app when HDX 3D Pro policy is enabled.
-
-
Starting from Citrix Workspace app 2109.1 for Windows, the following features are available:
-
Support for WebRTC 1.0: Citrix Workspace app 2109.1 for Windows supports WebRTC 1.0 for a better video conferencing experience along with Gallery View.
-
Screen sharing enhancement: You can share individual applications, windows, or full screen using the screen sharing feature in Microsoft Teams. Citrix Virtual Delivery Agent 2109 is a prerequisite for this feature.
-
App Protection compatibility: When App Protection is enabled, you can now share content through Microsoft Teams with HDX optimization. With this feature, you can share an application window running in the virtual desktop. Citrix Virtual Delivery Agent 2109 is a prerequisite for this feature.
Note:
Full monitor or desktop sharing is disabled when App Protection is enabled for the delivery group.
-
-
Citrix Workspace app 2109.1 for Windows supports the following in an optimized Microsoft Teams on VM hosted apps:
- peer-to-peer audio and video call
- conference call
- screen sharing
- Starting from Citrix Workspace app 2106 for Windows:
- when the Desktop Viewer is in full screen mode, the user can select one from all the screens covered by the Desktop Viewer to share. In window mode, the user can share the Desktop Viewer window. In seamless mode, the user can select one from all the screens to share. When the Desktop Viewer changes the window mode (maximized, restore, or minimize), the screen share stops.
- Starting from Citrix Workspace app 2105 for Windows:
-
You can configure a preferred network interface for media traffic.
Navigate to
HKEY_CURRENT_USERSOFTWARECitrixHDXMediaStreamand create a key calledNetworkPreference(REG_DWORD).Select one of the following values as required:
- 1: Ethernet
- 2: Wi-Fi
- 3: Cellular
- 5: Loopback
- 6: Any
By default and if no value is set, the WebRTC media engine chooses the best available route.
-
You can disable the audio device module 2 (ADM2) so that the legacy audio device module (ADM) is used for quad-channel microphones. Disabling ADM2 helps in resolving issues related to microphones in a call.
To disable ADM2, navigate to
HKEY_CURRENT_USERSOFTWARECitrixHDXMediaStreamand create a key namedDisableADM2(REG_DWORD) and set the value to1.
-
- Starting from Citrix Workspace app 2103.1 for Windows:
- The VP9 video codec is now disabled by default.
- Enhancement to echo cancellation, auto gain control, noise suppression configurations: If Microsoft Teams configures these options, Citrix-redirected Microsoft Teams honors the values as configured. Otherwise, these options are set to True by default.
-
DirectShowis now the default renderer.To change the default renderer, do the following:
- Launch the Registry editor.
- Navigate to the following key location:
HKEY_CURRENT_USERSOFTWARECitrixHDXMediaStream. -
Update the following value:
"UseDirectShowRendererAsPrimary"=dword:00000000Other possible values:
- 0: Media Foundation
- 1: DirectShow (Default)
- Relaunch the Citrix Workspace app.
- Starting from Citrix Workspace app 2012 for Windows:
- Peers can now see the presenter’s mouse pointer in a screen sharing session.
- The
WebRTCmedia engine now honors the proxy server configured on the client device.
- Starting from Citrix Workspace app 2009.6 for Windows:
- Microsoft Teams displays previously used peripheral devices in the Preferred devices list.
- The
WebRTCmedia engine accurately determines the maximum encoding resolution possible on an endpoint. TheWebRTCmedia engine estimates multiple times a day and not only on first launch. - The Citrix Workspace app installer is packaged with the Microsoft Teams ringtones.
- Echo cancellation improvements — Reduced echo level when a peer has a speaker or microphone that generates an echo.
- Screen sharing improvements — when you share your screen, only the Desktop Viewer screen is captured in native bitmap format. Previously, client local windows that overlaid on top of the Desktop Viewer window were blacked out.
- Starting from Citrix Workspace app 2002 for Windows:
- when you share your workspace using Microsoft Teams, Citrix Workspace app displays a red border around the area of the monitor that is currently being shared. You can share only the Desktop Viewer window, or any local window overlaid on top of it. When you minimize the Desktop Viewer window, screen sharing is paused.
- Starting from Citrix Workspace app 2302 for Windows:
-
Updated audio device selection behavior for optimized Microsoft Teams — When you change the default audio devices in the sound settings on the endpoint, the optimized Microsoft Teams in the Citrix VDI changes the current audio devices selection to match the endpoint defaults.
However, if you make an explicit device selection in Microsoft Teams, your selection takes precedence and does not follow the endpoint defaults. Your selection is persistent until you clear the Microsoft Teams cache.
-
CTX126965
{{tooltipText}}
Software Updates
|
Public
|
{{likeCount}} found this helpful
|
Created:
{{articleFormattedCreatedDate}}
|
Modified:
{{articleFormattedModifiedDate}}
About the Citrix Online Plug-in 12.1 for Windows
Version 1.0
What’s New
- ICA File Signing. Helps protect users from unauthorized application or desktop launches by digitally signing .ICA files. You can configure the online plug-in security policy and digital-signing requirements using Group Policy Objects or the Citrix Merchandising Server with the online plug-in. The online plug-in verifies that a trusted source generated the application launch and based on administrative policy, protects against application launches from untrusted servers.
- Enhanced printing performance. Improves user printing performance and speed when printing to redirected client printers. Install the XenApp Printing Optimization Pack on the server running XenApp 6 for Windows Server 2008 R2 and configure the server-side policy settings for:
- Dynamic Client Printer Mapping. Redirected printers are discovered dynamically and created automatically.
- Optimized EMF Universal Print Driver. Reduction in bandwidth consumption for the most demanding printing applications.
- Enhanced XPS Universal Print Driver. Improved printing performance on Window 7 clients.
- New decoder for HDX 3D Pro Graphics. A new deep compression codec is included in the online plug-in to receive 3D professional graphics over low bandwidths. For details about HDX 3D Pro Graphics, see http://support.citrix.com/article/CTX124443
Fixed Issues
Licensing Documentation
Known Issues
This section contains:
- General issues
- Third-party issues
- Other known issues — Desktop connections
General Issues
- If you initiate a connection from the Web Interface running on a virtual machine, you might see the USB/ Other Devices Security dialog box when launching a published resource even when there are no applicable devices present. To continue, put a check mark next to Do not ask me again for this site or click Permit use. [#242609]
- The online plug-in does not support ICA File Signing on dual-mode streaming Web Interface sites. ICA File Signing is supported for hosted application delivery only. [#247381]
- HDX MediaStream for Flash content on XenDesktop 4 might display in an incorrect position (outside the Internet Explorer window) when using a complex multimonitor setup. Workaround: Reconfigure the monitors placing the primary monitor in the bottom left-most position. [#247843]
- Using the legacy PCL5c Universal Print Driver with Citrix online plug-in 12.1 might result in no printed output or incorrect output. Workaround: Update your print driver or if you must use the PCL5c Universal Print Driver, use the Citrix online plug-in 12.0.3. [#247862]
- When using HDX RealTime Webcam Video Compression for video conferencing, users do not receive an enable webcam prompt. Users do receiver an enable microphone prompt that applies to both their webcam and microphone. If users choose to enable their microphone, the webcam is also enabled. Similarly, any changes users make to the microphone setting on the HDX page of the Desktop Viewer Preferences dialog box apply to their webcam. [#248195]
- Video conferencing sessions will not start when HDX RealTime Webcam Video Compression for video conferencing is used in multiple hop configurations. These configurations are not supported by Webcam Video Compression. To achieve the desired user experience, install Microsoft Office Communicator on the server hosting XenApp or XenDesktop to which the Citrix online plug-in initially connects. [#247177]
Third-Party Issues
- When installing the online plug-in using Citrix Receiver, CitrixOnlinePluginFull.exe, or CitrixOnlinePluginWeb.exe, you might see the error message: Error 1606. Could not access network location %APPDATA%\. For a workaround and more information, search at http://support.microsoft.com/ for You receive an «Error 1606» error message when you try to install or remove a Microsoft program. [#236850]
Other Known Issues — Desktop Connections
- If no root certificate is installed on a non-domain-joined desktop appliance, the Desktop Viewer cannot connect and an error message (Error 1030) is displayed. However, this error is incorrect. Error 61 should be displayed. [#241893]
- Occasionally, when connecting or reconnecting to multiple virtual desktops in quick succession, the XenDesktop sessions start full-screen instead of with the Desktop Viewer. [#245617]
- When connecting to XenApp servers from within a XenDesktop session, drive mapping doesn’t work. For example, clicking File > Open in a published application from a virtual desktop should display the drives on the user device, but it doesn’t. To work around this issue, create the following Registry key on the virtual desktop and set DWORD=0: HKLM\Software\Citrix\UNCLinks\UNCEnabled. [#236458]
- Some types of webcams used in XenDesktop sessions can cause blue screens on Windows XP user devices. This issue has been observed with the Logitech Webcam C600. [#227642]
Автор:
John Pratt
Дата создания:
11 Январь 2021
Дата обновления:
8 Октябрь 2023

Citrix Receiver — это клиентский компонент для XenDesktop и XenApp. Полный доступ к полным рабочим столам через XenDesktop предоставляется только устройствам, на которых установлен Citrix Receiver. Citrix — это приложение, которое обеспечивает виртуализацию серверов, рабочих столов и приложений. Однако совсем недавно стало поступать много сообщений о том, что пользователи не могут открывать онлайн-приложения с помощью веб-портала.
Сообщение об ошибке «Функция, которую вы пытаетесь использовать, находится на недоступном сетевом ресурсе. Введите путь к папке, содержащей установочный пакет для «ICAWebwrapper.msi.”Отображается при попытке доступа к приложению. В этой статье мы расскажем вам о причине, по которой возникает эта ошибка, а также предложим жизнеспособное решение этой проблемы.
Что вызывает «ошибку ICAWebWrapper.msi» при запуске приложения с веб-портала?
Получив многочисленные сообщения от нескольких пользователей, мы решили изучить проблему и разработали решение, чтобы полностью ее устранить. Кроме того, мы изучили причину, по которой он срабатывает, и перечислили ее следующим образом.
- Отсутствующий файл: Как следует из сообщения об ошибке, ошибка возникает, когда приложение не может найти файл ICAWebWrapper.msi в каталоге установки. Поэтому он просит пользователя указать его местоположение. Однако в большинстве случаев этот файл полностью отсутствует на компьютере.
Теперь, когда у вас есть базовое представление о природе проблемы, мы перейдем к ее решениям. Обязательно соблюдайте инструкции, чтобы избежать конфликта.
Решение: установка ICAWebWrapper.msi
Если на компьютере отсутствует файл «ICAWebWrapper.msi», запускается эта ошибка. Поэтому на этом этапе мы будем загружать и устанавливать файл в установочный каталог приложения. Для этого:
- Убедись в скачать и установить «Winrar» или любой другой инструмент для извлечения на вашем компьютере, прежде чем переходить к шагам ниже.
- Скачать «CitrixReceiver.exe» по этой ссылке.
- После загрузки право–щелкнуть в файле и выберите «Извлечьв CitrixReceiver/”.
- Это будет извлекать содержимое «.ExeФайл в папке с именем «CitrixReceiver»В том же каталоге.
- открыто папку, прокрутите вниз и щелкните правой кнопкой мыши значок «ICAWebWrapper.msi“.
- Выбрать “Копировать» и перемещаться к Citrix’sмонтаж каталог.

- Щелкните правой кнопкой мыши в любом месте и выберите «Вставить“.
- Откройте программу из Citrix и, если вы снова получите ошибку, щелкнуть на «Просматривать»И выберите«ICAWebWrapper.msi»В Citrix Directory.
- Проверьте чтобы узнать, сохраняется ли проблема.

Вопрос:
Citrix Online Plugin 12.1 под Windows 10
Но это может быть Подробнее …
Почему в плагине Citrix нет 12.1? Следующий шаг состоял в том, чтобы снова удалить онлайн-модуль 12.1. К сожалению, это была благодарность!
Многие плагины тоже нет. Затем неожиданно появились сообщения об ошибках, поэтому создается сообщение об ошибке и журнал ошибок.
алло
До того, как несколько дней назад моя Citrix запустила чистую деинсталляцию — возможно, вручную — так что я снова успокоюсь? При удалении деинсталлированного и установленного онлайн-плагина 12.1.
Я уже не знаю.
— Приемник 4.3 под Windows 10 и Edge легко. Требуется ли в пограничном браузере определенные настройки, необходимо запустить определенную программу Inca в каждом случае?
— Как не делать этого больше.
актуальность
100%
Рекомендуемое решение:
Citrix Online Plugin 12.1 под Windows 10
Я рекомендую скачать Fortect. Это инструмент восстановления, который может автоматически исправить многие проблемы Windows.
Вы можете скачать его здесь Скачать Фортект. (Эта ссылка запускает загрузку Fortect.)
актуальность
72.16%
счастливый привет всем,
Я делаю Citrix как администратор, здесь, однако, этот параметр вообще не отображается. С наилучшими пожеланиями,
Января
XenApp Web Plugin для установки, и я уже в отчаянии. работать и, к сожалению, я не компьютерный профессионал. Запрос на помощь, мне нужна программа
Обычно вы можете установить установочный файл, щелкнув правой кнопкой мыши
актуальность
54.94%
Спасибо.
получите сообщение: icawebwrapper.msi недоступно. Это не работает, и я компьютер плагин
установить. Если кто-то может мне помочь?
Я пришел в Citrix, но я не могу запустить приложение. Я хочу запустить Outlook, например
актуальность
52.89%
Есть ли утилита с открытым исходным кодом или подобное? Как использовать в качестве зрителя с тех пор, как Суматра, которая не имеет функции слияния.
У меня был случай с PDF-файлами для приложений с ней?
pdfsam
pdfmergy, и я не чувствовал себя комфортно с онлайн-сервисом из-за личного контента.
актуальность
47.15%
Тогда Citrix Receiver хочет, чтобы launch.ica всегда. В конце концов, похоже, эта проблема возникает после загрузки или запуска. Благодарю вас!
У меня есть мобильное устройство сбора данных (сканер штрих-кода) с Windows CE 6.0 и установленным я могу отключить это? Это сообщение с момента появления 2014.
Вот как я могу это сделать. Кто-нибудь знает о вас, как наши пользователи?
Citrix Receiver.
Об IE, я называю сервер Citrix, затем идет логин. Все хорошо для вашей помощи.
актуальность
46.33%
согласитесь (sry, я пока недоступен), что Vista не знает. Почему Vista здесь проверка подлинности Office как правильная Как решение я должен либо удалить data.dat, либо почувствовать определенную команду, а не как пользователь, знает только сам Билл … Хм, я не могу понять, я могу Установите плагин без этой проверки.
И моя текущая установка Vista еще не активирована.
Решение было довольно простым: Администратор активирован и PDF-PlugIn установлен как администратор.
актуальность
44.28%
Скажем, может быть, я могу сказать, кто на работает ли это так легко — Regnum Online? Я играю ранее уже пе долго и поставить как один или другой Paysafecard чисто ДСУ так würd меня уже интересно, если просто идти?
Здравствуй!
актуальность
44.28%
Сегодня снова столкнулся с этим — пожалуйста, не спрашивайте, как. [/ OT]
Выберите файл 2 раза «ДА»), чтобы позже стало проще и данные для входа можно было использовать снова. все нужно ввести заново. С сохраненными данными также были приняты данные из центра.
[ot] обновления используют Windows 8 Enterprise x64.
Для пользователей чистый здесь, конечно, также не поставляется дополнительно, так как T-Online прекратил поддержку Windows 8.
Протестировано на тестовой системе под Windows 8 Enterprise x64, запустился нормально, запросов и т. Д. «Полное» ПО T-Online работает более-менее безопасно / чисто в режиме установки «Совместимость». [/ Ot]
Все остальное будет продолжать использовать любую программу электронной почты T-Online под Windows 8. Удалите программное обеспечение полностью и сохраните настройки (в поле при полной деинсталляции), но в конце концов он зависает и выводит сообщения об ошибках.
Тогда вам не нужно
актуальность
44.28%
Если я нажму там, в окне сервиса плагина будет загружен плагин. Что такое боты.
Trojan, Keylogger u.
Главным образом страница и куча материалов программного обеспечения XVID или DIVX. Если я тогда щелкнул, то нужен для плагина? И есть Firefox, и в нем есть что-то неизвестное.
актуальность
43.46%
В противном случае сделайте щелчок правой кнопкой мыши
Сабин
В меню «Дополнительно» mail.de предлагает только win7. Спасибо
Вы, конечно, имели в виду это руководство: https://mail.de/hilfe/online-speicher—windows-7-vista
Так как в качестве сети использую «олдскульное» онлайн-хранилище. И теперь это работает
Алло,
Я настроил mail.de как адрес электронной почты.
Значок логотипа Windows слева на панели задач. В меню aufploppenden можно использовать Win 10? Но продолжайте с инструкциями! С наилучшими пожеланиями, успех!
Может кто подскажет, как я, у меня на рабочем столе значок «Мой компьютер», так что инструкция продолжает работать. пункт меню «Подключить сетевой диск …». Теперь мне это нравится, перейдите в «Сетевые подключения».
актуальность
43.05%
У меня уже был брандмауэр и спасибо! Терпение во всей чести,
Не возможно ли получить более быстрый доступ?
Переключение на учетную запись MS, через которую я отключил любую услугу. о 10KB / s), когда почти все работает, если я терпелив.
В приложении календаря (такое же соединение) работает доступ. Не могу сделать это и для вас. Таким образом, открытие Windows Store или онлайн-аккаунта с помощью 10Kb / s довольно смелое, ваше прошлое несколько лет назад отклонилось от него … У меня проблема с службами MS?
У меня только очень медленное подключение к Интернету (GPRS — панель управления не работает, один зарегистрированный, например, с Windows Phone Grusse, которого я осмеливаюсь, даже если я выключен, не помог.
По-прежнему может быть, что локальный профиль (а не admin) вошел в систему.
актуальность
43.05%
Приветствие
Уже многие любят его до самого начала, но некоторые трюки необходимы.
Привет всем, поддерживает IMAP. В этом форуме много вкладов.
T-Online E-Mails (T-Online-Adresse) использовалась и была вполне удовлетворена. Если вы установите Thunderbird,
недавно обновили Vista 64bit до Windows 8 Pro. Почта Windows по-прежнему существует, есть способ, которым мои старые письма (вероятно, помогут вам.
Первоначально Написал [WTN] Манхэттен … Windows Mails, похоже, больше нет … … В Vista у меня есть Wndows Mail за мою благодарность за любую помощь! У меня есть параметры под Win8?
адрес T-Online настроен автоматически. Теперь на мой вопрос:
Что где-то в windows.old) для интеграции в новую программу?
актуальность
43.05%
Надеюсь, я побывал во всех возможных условиях. Спасибо FireFox за то, работает ли он. Пробовал интернет варианты, но результат «нулевой».
Попробуйте, это поможет вам в следующем. Каждый раз появляется сообщение:
ActiveX отключается заранее! Это еще не может быть зрелым. Приветствую Пьера
Включите ActiveX в настройках безопасности вашего браузера.
Уважаемые профессионалы,
В Windows 8.1 и IE 11 восстановление электронной почты перестает работать. Хм, кто такой IE11, помогите кому-нибудь?
актуальность
42.64%
Подробнее …
тот попросил первую маску, но потом не был выделен в конце). Большое спасибо
Привет всем,
Мне удалось подключиться к онлайн-хранилищу, используя «Подключиться к сети», а затем «Подключиться к веб-сайту, где вы можете сохранять документы и изображения». Однако Windows 10 не назначает букву диска (хотя она начинается с.
актуальность
42.64%
Исполняемый файл почтового ящика хотел настроить почтовый ящик электронной почты из 1 и 1 (… online.de). Подробнее …
заключили, не отправляли и не получали. Однако нет связи. Затем у меня есть онлайн-аккаунт или
После установки Windows 10 я понял? Как настроить учетную запись hotmail, которая работает.
актуальность
42.64%
Шифрование не активно (да. Что отключил вирус / брандмауэр с программой для вирусов и брандмауэров. Вложения отображаются, оно появляется в приложении? одна точка добавляется под Windows 8.1, включая: в первую очередь: она уже была протестирована, идея?
Outlook или Mail App. Если вы используете интерфейс веб-почты t-Online (часто неправильно называемый Outlook)? Без какой-либо известной ошибки или Порт учетной записи был отмечен, Скачайте ???? он задерживается в программе и прерывается после 45 сек.
Кто-нибудь использовал программу?
Все обновления. Когда Telekom звонит, вложения можно открывать без каких-либо проблем.
Проблема с Windows Outlook с учетной записью
Никакие вложения не могут быть загружены.
Fehler:
В Outlook — расстройство T-Online.
актуальность
42.64%
Предлагаемые драйверы Кто может быть распознан драйверами палки! Загрузка программного обеспечения — T-Mobile
Я могу сделать WW / T онлайн
обновляется, но это не работает! В Vista все Win7 должны быть совместимы. Помогли ли водителям или другим советам? палку под win 7 не узнаете?
актуальность
42.23%
Очевидно, что в Win7 / Pro любая опция не открыта, а не под Win7 и WIN_Server 2008? У меня есть Selber. Я говорю, что могу видеть только все папки сервера. Но если локальные диски не позволяют зеркалировать локальные хранилища данных.
SSL-explorer работает безупречно, и я на всех WIN-XP работает, почему поиск, не видит ничего. Программы работают нормально. Кроме того, не знаю …..
Что мне нужно изменить, что-то в присутствии моего адвоката. что эта функция поддерживается?
актуальность
42.23%
Привет,
как уже написано в названии, программы также не получают почту
Надеюсь, кто-то может мне помочь. Раньше у меня был Windows 7, поэтому все начиналось дурачить, после перехода на Windows я хотел бы использовать почтовый клиент для извлечения моей почты. Тест почта не выходит, и я могу с тестируемым 8 (предустановленный) ничего не работает, я проверил несколько программ, такие как Outlook, Thunderbird и т.д.
актуальность
41.82%
Может ли ИТ быть записано точно за пределами Citrix?
Как насчет вопроса для вас?
Я использую среди других
Алло,
Я снова возвращаюсь с защитой данных или благодарю вас и приветствую
Hebfried
Возможно, вы спросите (продолжительность регистрации, IP-адрес, обработанные данные и использованные программы)?
Использую ли я также программы / файлы / веб-сайты? Citrix на ваших собственных ПК или ноутбуках. Защита от;
Что может сделать администратор, чтобы захватить все, чтобы захватить серверы данных и серверы данных.
актуальность
41.82%
Чтобы оставаться в безопасности, корпорация Майкрософт рекомендует не подписывать несовместимых пользователей, которые устанавливают обновление. Из-за проблемы Citrix с программным обеспечением XenDesktop вы можете удалить программное обеспечение и установить это обновление. Приветствие Эриха
Подробнее …
1511 и установлен Citrix XenDesktop, обновление не предлагается. Что нужно для решения этой проблемы с программным обеспечением XenDesktop ».
Я просто кровавый мирянин.
Мои обновления из окон, которые я делаю? Пользователи должны связаться с Citrix для получения дополнительной информации и поддержки 10 не будет завершена. Появится следующая информация:
«Пользователи, у которых установлена версия Windows 10 или Windows 10
Quellen:
http://www.windows-10-forum.com/threads/citrix-online-plugin-12-1-unter-windows-10.6999/
https://www.winboard.org/win8-software/204284-citrix-plugin-laesst-sich-nicht-instalieren.html
https://www.windows-7-forum.net/threads/apps-unter-citrix-starten-nicht.54434/
https://www.computerbase.de/forum/showthread.php?t=1737217
https://www.drwindows.de/windows-sonstige/134022-windows-ce-citrix-receiver.html
https://www.drwindows.de/windows-vista-allgemein/4159-tipp-pdf-plugin-fuer-word-2007-vista.html
https://www.winboard.org/win8-software/200827-regnum-online-unter-windows-8-a.html
https://www.winboard.org/win8-software/193502-nur-e-mail-von-t-online-unter-windows-8-a.html
http://www.pcmasters.de/forum/124065-unbekanntes-plugin-welches-plugin-wird-benoetigt.html
https://www.win-10-forum.de/windows-10-netzwerk-and-internet/27864-online-speicher-netzlaufwerk-windows-10-einbinden.html
https://www.drwindows.de/windows-8-windows-rt/71655-kein-zugriff-online-konto-store-windows-8-a.html
https://www.winboard.org/win8-installation/192890-einrichtung-t-online-e-mail-adresse-unter-windows-8-moeglich.html
https://www.winboard.org/win8-allgemeines/204234-t-online-e-mail-funktioniert-nicht-mehr-unter-windows-8-1-a.html
http://www.windows-10-forum.com/threads/online-speicher-als-netzlaufwerk-einbinden-laufwerksbuchstabe-fehlt-unter-windows-10.67224/
http://www.windows-10-forum.com/threads/probleme-unter-windows-10-mit-einrichten-meines-email-postfaches-online-de.23759/
https://www.winboard.org/win8-software/205863-windows-8-1-outlook-anhang-problem-unter-t-online-email-adresse.html
https://www.drwindows.de/hardware-and-treiber/18805-web-and-walk-stick-t-online-windows.html
https://www.drwindows.de/windows-7-allgemein/58943-citrix.html
https://www.winboard.org/win8-allgemeines/199364-mail-einrichten-unter-windows-8-ohne-microsoftkonto-zugriff-auf-ein-t-online-konto.html
https://www.computerbase.de/forum/showthread.php?t=1720854
http://www.windows-10-forum.com/threads/citrix-xendesktop.25405/
Migrated from old website (first published Oct 17, 2017)
The last days I had some troubles with my own Windows 10 Enterprise when I wanted to start a Citrix Desktop in Internet Explorer (also in Google Chrome and Mozilla Firefox).
I always became an “Error” similar to this:

I have tested to uninstall the Citrix Receiver and all it’s components. Rebooted my client and installed the new version from citrix.com. Nothing changed.
Then I have made a reset of the Internet Explorer, clear all cache files – but yeah, nothing changed, the error still persist and I cannot open any Citrix Desktop.
The problem there is, that the Online Plug-in cannot be installed because of missing ICAWebWrapper.msi.
So where can we find this msi file?
It is much easier than expected.
Open an command prompt as admin and go to the folder, where you have store the CitrixReceiver.exe and type the following to extract all msi files to a folder named Extract.
For Receiver 4.x and newer:
CitrixReceiver.exe /extract [Destination_name_of_folder_extract, e.g. C:\temp]
After you have extracted the msi files, you can then use Browse on the popup and chose the ICAWebWrapper.msi file. Click OK on the popup to install the Online Plug-in.
Now you are able to start a Citrix Desktop! Enjoy!