Последнее время стало модным использовать продвинутую командную строку в PowerShell или bash/zsh. В этой статье я расскажу, что нужно сделать в PowerShell, WSL, Windows Terminal и VS Code, чтобы кастомизировать командную строку и воспользоваться всеми её преимуществами.

Краткий план действий:
- Установка шрифта Nerd
- Установка и настройка Oh My Posh для PowerShell
- Установка и настройка Oh My Posh для WSL
- Настройка Windows Terminal для правильного отображения глифов
- Настройка Windows VS Code для правильного отображения глифов
Из официальной документации я мало что понял. Пришлось разбираться самому. Поэтому сейчас я по порядку опишу путь, который пришлось пройти мне, чтобы заставить всё работать как надо.
Установка шрифта Nerd
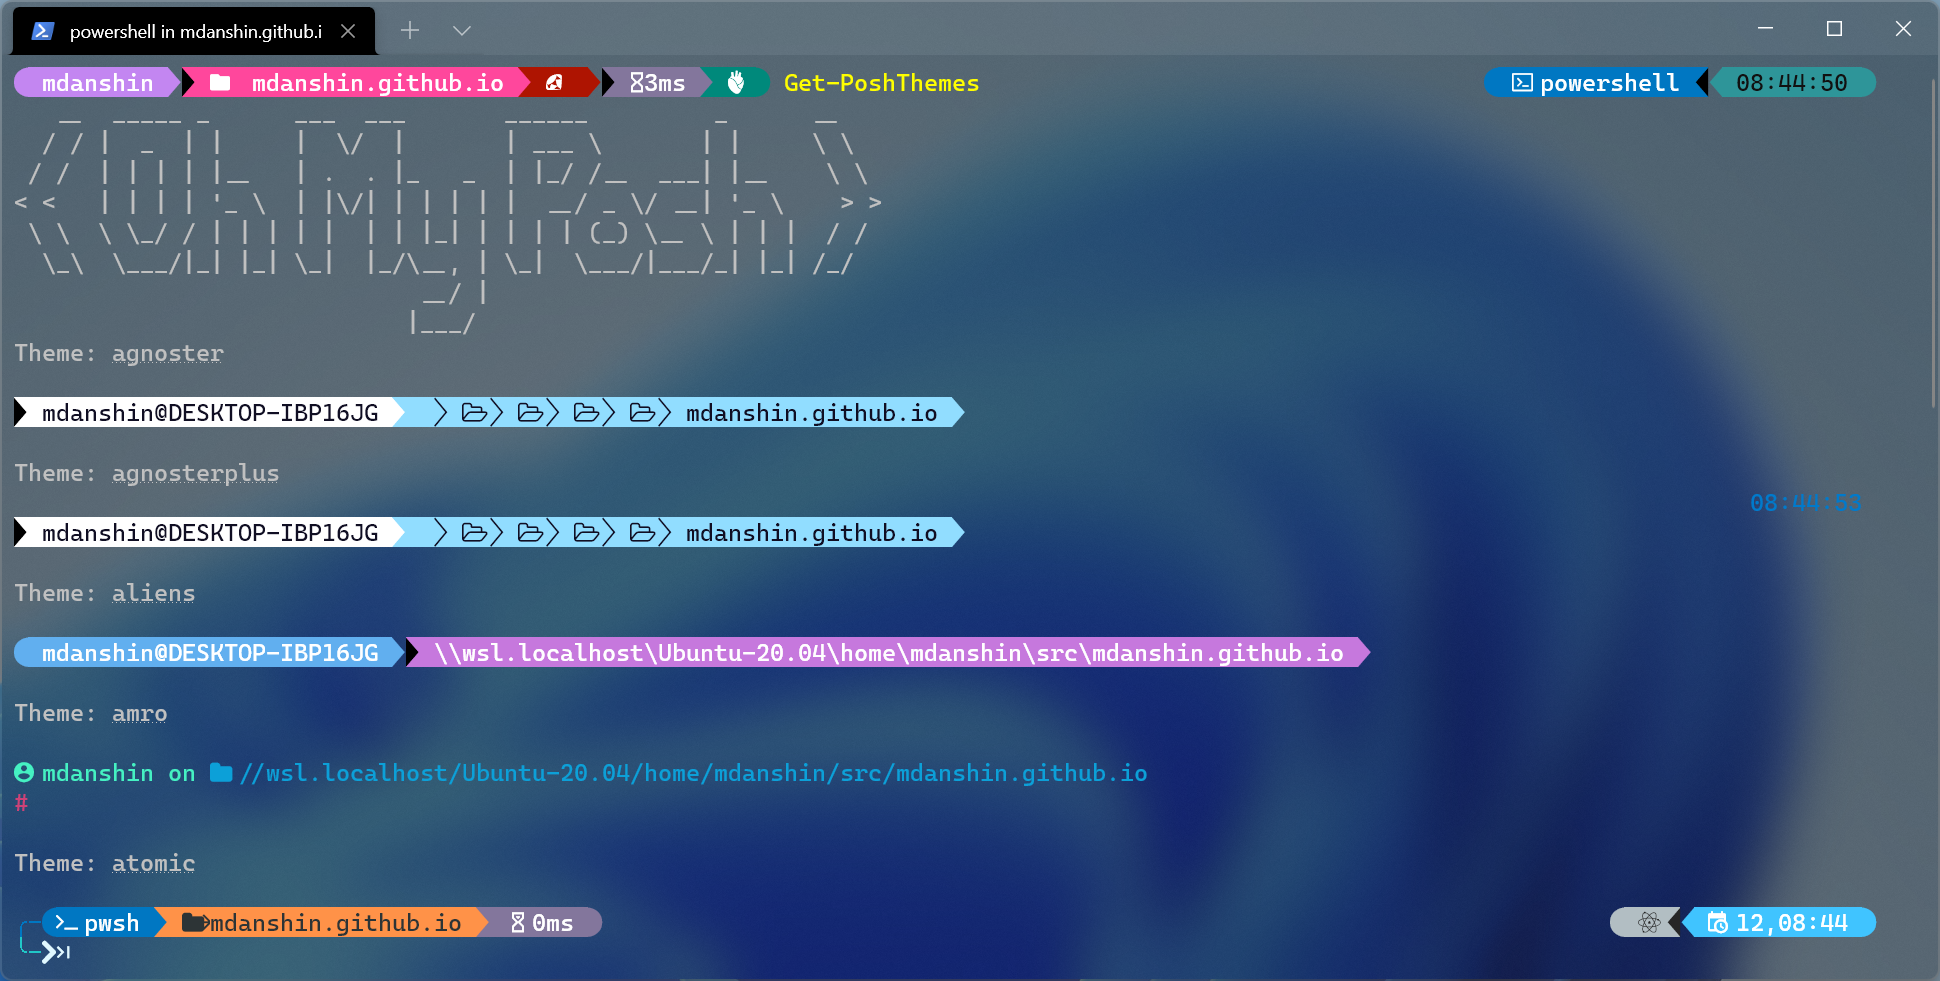
На картинке выше, показаны некоторые варианты оформления (тем) командной строки. На самом деле таких тем много, и вы можете их изменять и создавать свои. Как вы видите, почти все варианты содержат глифы (графические символы). Если шрифт, который используется в терминале, не содержит соответствующие глифы, в командной строке могут появиться символы замены, например квадрат — ▯ или знак вопроса �. Чтобы в терминале отображались все глифы, нужно сначала установить шрифт Nerd с сайта проекта https://www.nerdfonts.com/.
Nerd Fonts улучшает предназначенные для разработчиков шрифты с большим количеством глифов (значков). В частности, чтобы добавить большое количество дополнительных глифов из популярных «культовых шрифтов», таких как Font Awesome, Devicons, Octicons и других.
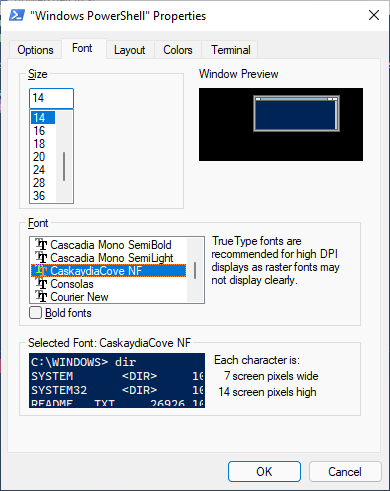
Посмотрев несколько шрифтов, я остановил свой выбор на Caskaydia Cove Nerd Font.
Все шрифты можно посмотреть по ссылке https://www.nerdfonts.com/font-downloads.
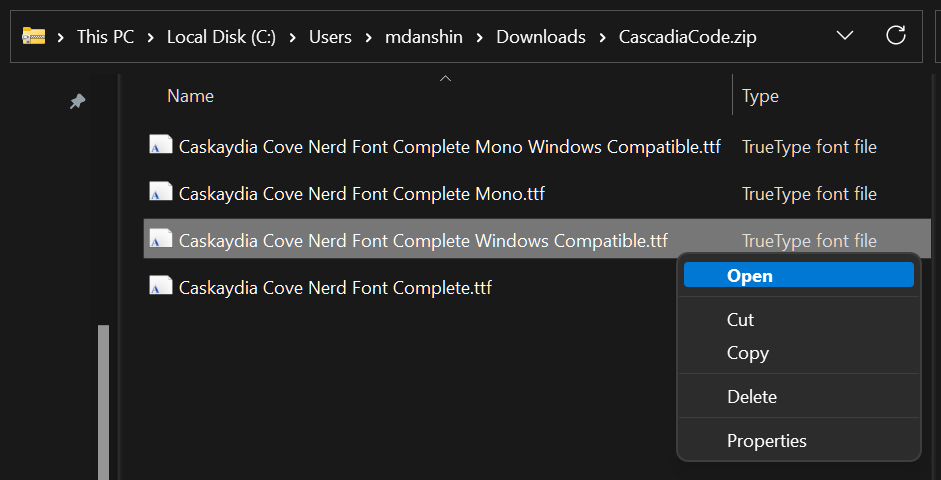
Скачав нужный шрифт, нужно его установить. Заходим в архив, выбираем нужный шрифт и открываем его.
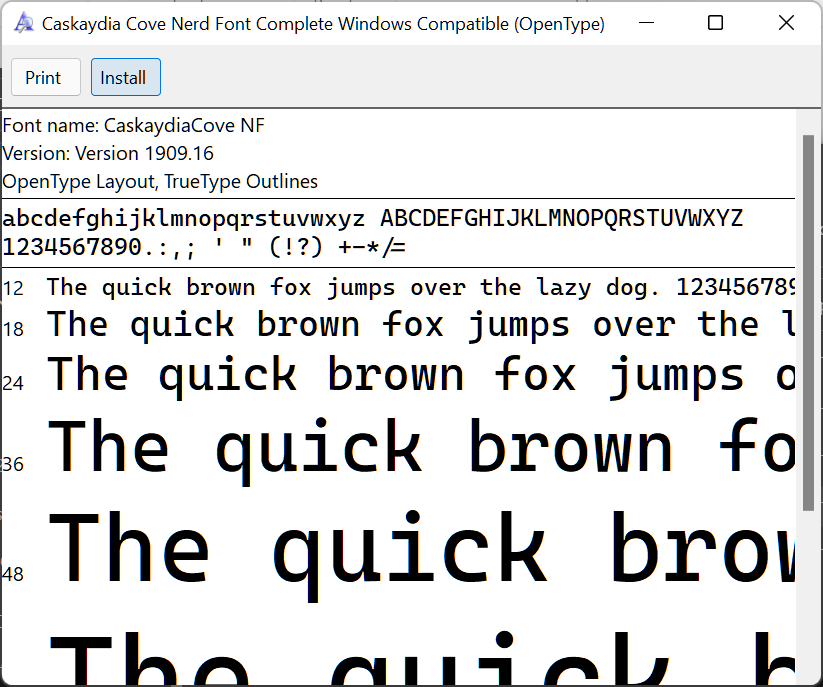
А затем, в открывшемся окне, нажимаем кнопку Install
Шрифт установлен, можно переходить к следующему шагу — установке Oh My Posh.
Установка и настройка Oh My Posh для PowerShell
Как сказано в официальной документации, Oh My Posh — это настраиваемый механизм командной строки, для любой оболочки, которая имеет возможность настроить командную строку с помощью функции или переменной. Чтобы воспользоваться этим механизмом в PowerShell, нужно установить и импортировать соответствующий модуль.
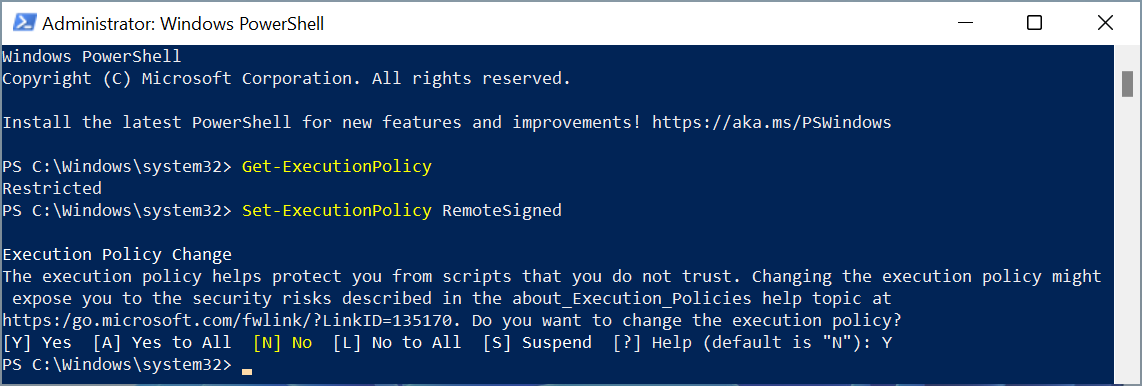
Но это может не получится, если параметр ExecutionPolicy в PowerShell установлен в Restricted или иное значение, которое не позволяет запускать удалённые скрипты. Что бы проверить текущие политики, выполните команду Get-ExecutionPolicy. Чтобы их изменить, запустите PowerShell от имени администратора и выполните команду и нажмите Y, а затем Enter для подтверждения.
Set-ExecutionPolicy RemoteSigned
Это позволит вам установить нужный модуль.
ВНИМАНИЕ: После изменения ExecutionPolicy закройте окно
PowerShell, которое вы открывали с повышенными привелегиями и откройте новое, с правами обычного пользователя.
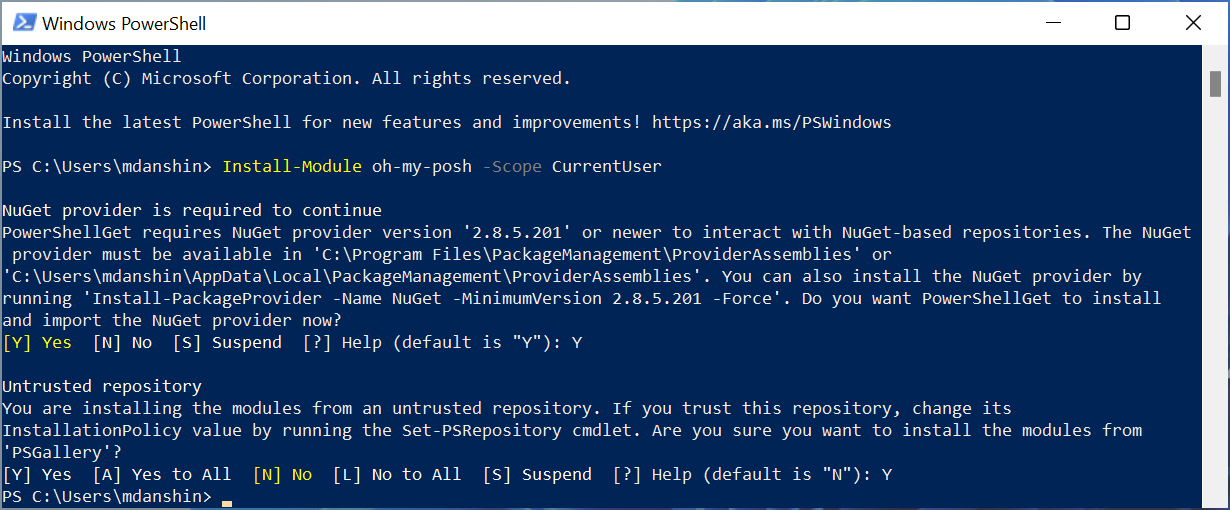
Чтобы установить модуль Oh My Posh выполните следующую команду.
Install-Module oh-my-posh -Scope CurrentUser
Если пакетный менеджер NuGet ещё не установлен, то PowerShell запросит разрешение на его установку. Введите Y и нажмите Enter.
Далее вас предупредят, что вы собираетесь ставить модуль из недоверенного репозитория PSGallery. На самом деле всё нормально. Просто изначально все репозитории считаются недоверенными. Можете смоело продолжать установку введя Y и нажав Enter.
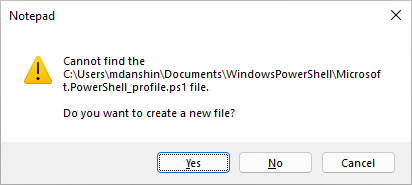
Обновите профиль PowerShell, отредактировав файл Microsoft.PowerShell_profile.ps1. Самым простым способом открытия этого файла, явялется выполнение следующей команды.
Если файла не существует, то система предложет вам его создать. Нажмите Yes в диалоговом окне.
Добавьте следующий фрагмент в конце файла. Вместо jandedobbeleer можете написать название другой темы. Я для себя выбрал именну эту.
Import-Module oh-my-posh
Set-PoshPrompt -Theme jandedobbeleer
Сохраните и закройте файл. Теперь каждый новый экземпляр PowerShell будет запущен с импортом Oh My Posh и установкой темы командной строки.
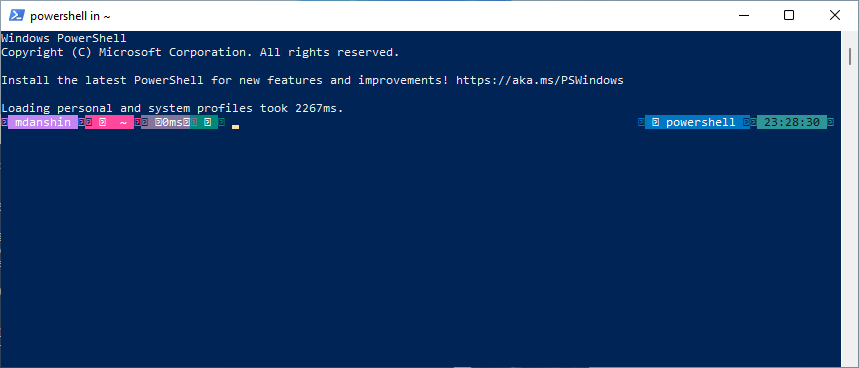
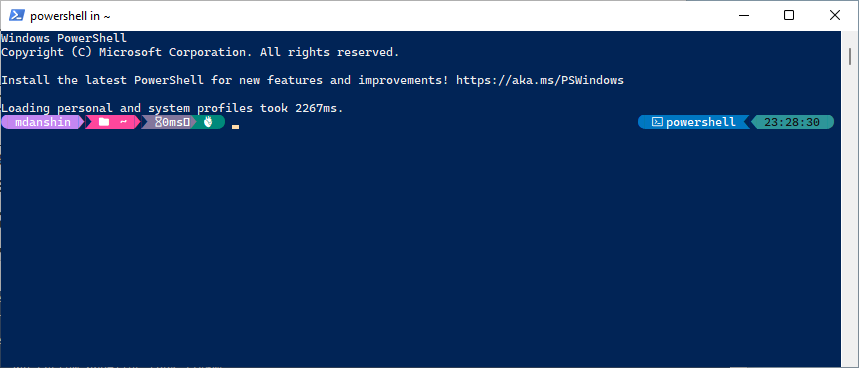
Запустите новый экземляр PowerShell. При первом запуске вы можете увидеть процесс импорта установленного ранее модуля Oh My Posh. Он выполниться один раз. Все последующие запуски PowerShell будут проходить как обычно.
После запуска вы увидите обновлённую командную строку, как показано на картинке ниже. Обратите внимание, что не все символы отображаются корректно. Это связано с тем, что в терминале PowerShell сейчас используется шрифт, который не поддерживает глифы.
Зайдите в настройки терминала PowerShell и выберите шрифт с поддержкой глифов, который вы установили ранее. Или установите его сейчас, если вы пропустили этот шаг.

Как установить шрифт с поддержкой глифов, смотри в начале статьи.
Как только вы установите нужный шрифт, вы сразу же увидите правильное отображение командной строки.
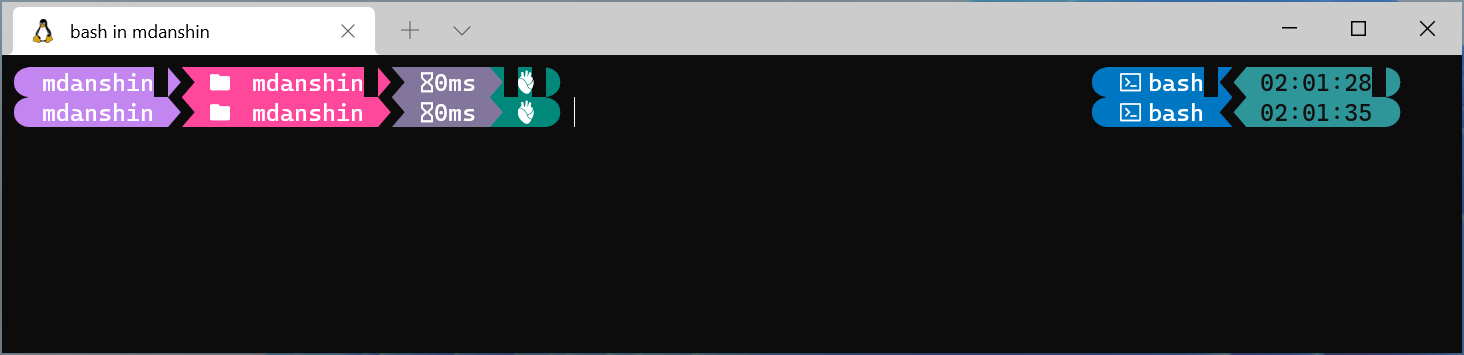
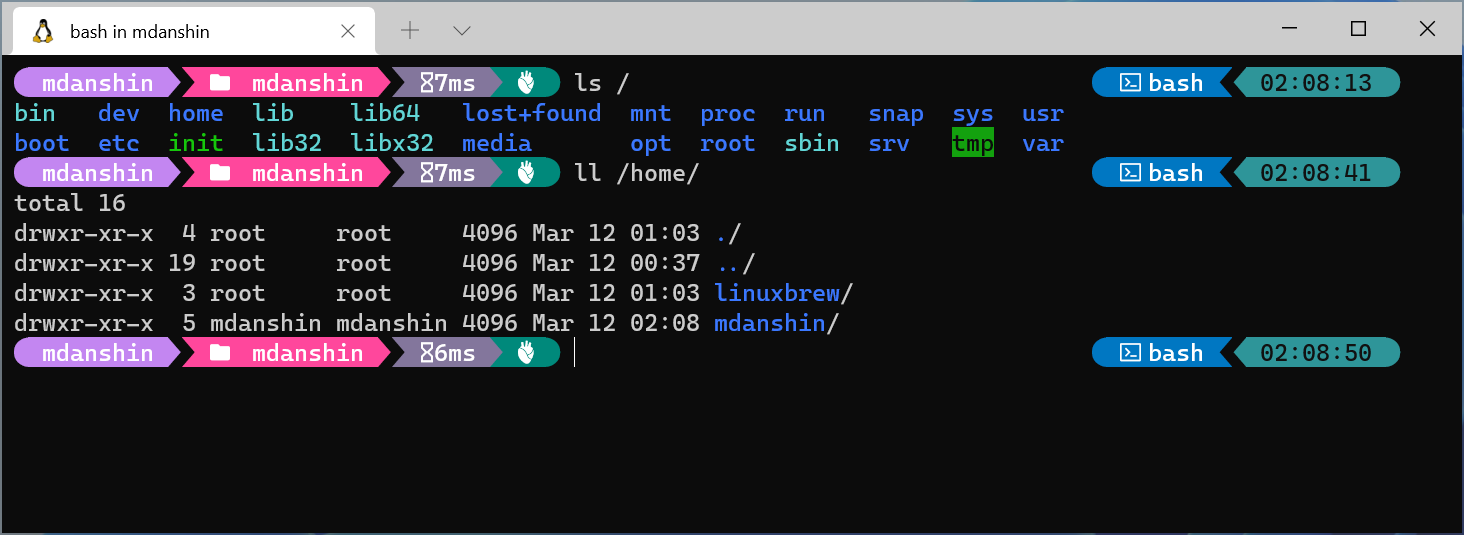
Установка и настройка Oh My Posh для WSL
Если вы используете Windows 10 версии 2004 и выше (Build 19041 и выше) или Windows 11, и у вас ещё не установлен WSL, но вы хотите его установить, то запустите команду
wsl --installв терминале powershell с повышенными привилегиями, а после установки WSL перезапустите Windows. После перезапуска, установка продолжится. Более подробные сведения об установке и настройке WSL смотрите в моей статье “Установка и настройка WSL”(comming soon...)
Для установки Oh My Posh в Linux (WSL) нам потребуется пакетный менеджер Homebrew. Поэтому сначала запустите WSL и установите там Homebrew, выполнив следующую команду и следуйте инструкциям в окне терминала.
/bin/bash -c "$(curl -fsSL https://raw.githubusercontent.com/Homebrew/install/HEAD/install.sh)"
После того, как Homebrew будет установлен, нужно выполнить неколько команд, чтобы добавить Homebrew в PATH и в профиль командной оболочки bash.
test -d ~/.linuxbrew && eval "$(~/.linuxbrew/bin/brew shellenv)"
test -d /home/linuxbrew/.linuxbrew && eval "$(/home/linuxbrew/.linuxbrew/bin/brew shellenv)"
test -r ~/.bash_profile && echo "eval \"\$($(brew --prefix)/bin/brew shellenv)\"" >> ~/.bash_profile
echo "eval \"\$($(brew --prefix)/bin/brew shellenv)\"" >> ~/.profile
После установки и настройки Homebrew, можно приступать к установке Oh My Posh. Выполните следубщие команды.
brew tap jandedobbeleer/oh-my-posh
brew install oh-my-posh
Установите пакет unzip. Он понадобится для распаковки архива с темами. Этот шаг можно пропустить, если вы скачаете тему самостоятельно, извлекёте из архива файл с темой для Oh My Posh и положите его в домашнюю директорию пользователя. Иначе, выполните нижеследующие команды.
Теперь нужно скачать и распаковать темы.
mkdir -p $(brew --prefix)/oh-my-posh/themes
wget https://github.com/JanDeDobbeleer/oh-my-posh/releases/latest/download/themes.zip -O $(brew --prefix)/oh-my-posh/themes/themes.zip
unzip $(brew --prefix)/oh-my-posh/themes/themes.zip -d $(brew --prefix)/oh-my-posh/themes
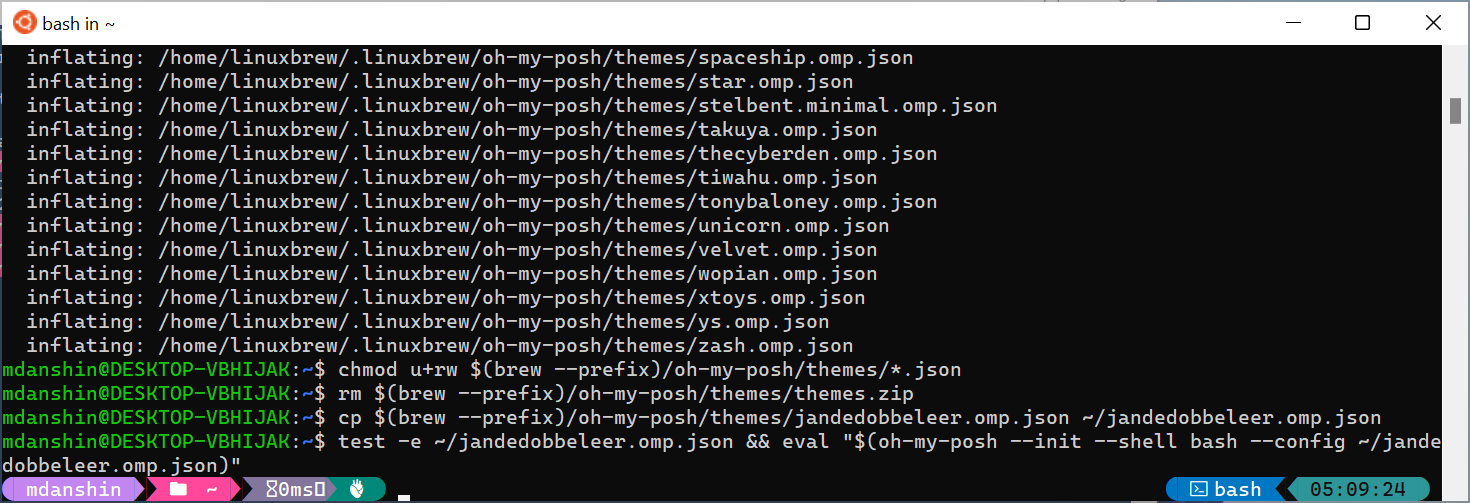
chmod u+rw $(brew --prefix)/oh-my-posh/themes/*.json
rm $(brew --prefix)/oh-my-posh/themes/themes.zip
Скопируйте файл темы в домашнюю директорию.
cp $(brew --prefix)/oh-my-posh/themes/jandedobbeleer.omp.json ~/jandedobbeleer.omp.json
А затем запустите oh-my-posh.
test -e ~/jandedobbeleer.omp.json && eval "$(oh-my-posh --init --shell bash --config ~/jandedobbeleer.omp.json)"
Вы увидите, что командная строка изменилась. Если она отображается не правильно, то измените шрифт в настройках вашего терминила, как говорилось ранее.
На этом установка и настройка Oh My Posh для WSL завершена.
Настройка Windows Terminal для правильного отображения глифов
После запуска Windows Terminal вам нужно будет тольк сменить шрифт, иначе командная строка будет отображаться без глифов.

Чтобы это исправить, зайдите в настройки Windows Terminal, выберите профиль по умолчанию и на вкладке Appearance установите нужный шрифт. Затем нажмите Save и откройте новое окно терминала.
На этот раз командная строка будет отображать глифы, но есть одна проблема. При открытии WSL-терминала, первая командная строка отображается с дефектом. В ней присутствуют пропуски. Я не понял почему это происходит. Если нажать Enter, то следующая строка отобразиться нормально.
Я не придумал ничего лучше, чем добавить команду очистки экрана в файл .profile, чтобы она выполнялась каждый раз, при запуске сессии. Вы тоже можете это сделать, выполнив следующую команду.
echo "clear" >> ~/.profile
Теперь, если переоткрыть терминал, то всё будет выглядеть как надо.
И на этом часть по настройке Windows Terminal завершена. Посмотрите другю мою статью, где я описываю, как настроить более приятный вид Windows Terminal (comming soon...).
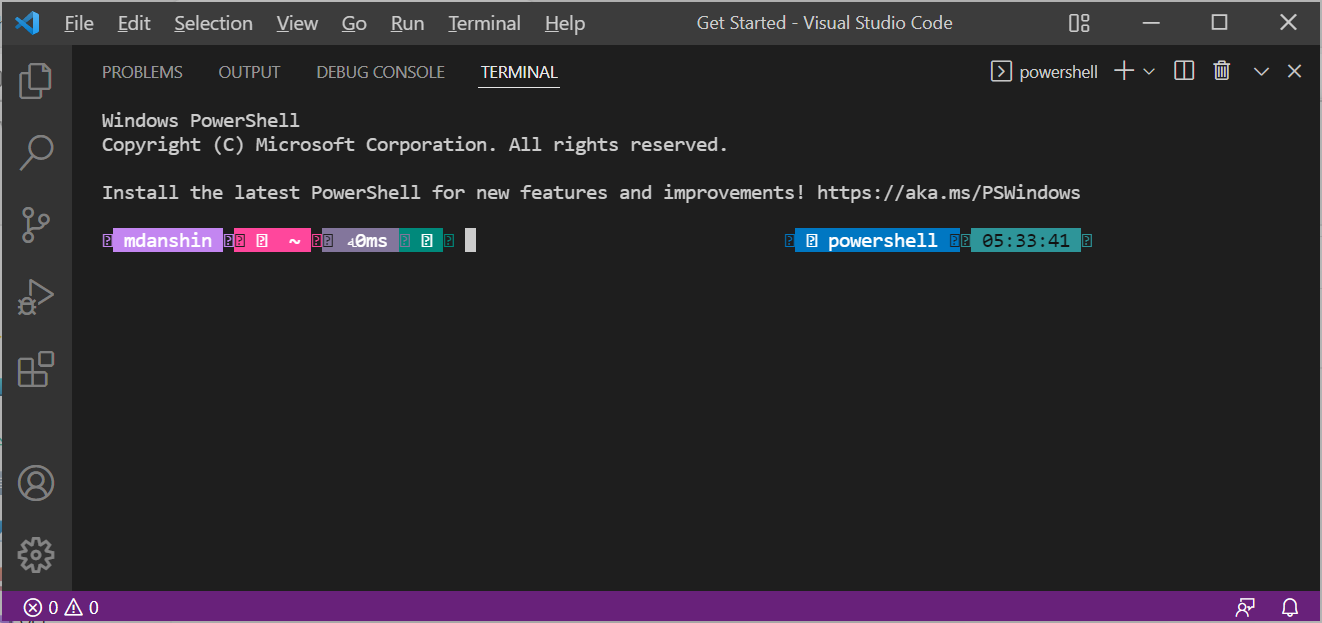
Настройка VS Code для правильного отображения глифов
Если вы откроете VS Code, и в нём откроете Terminal, то вы увидите, что глифы в нём тоже отображатся неправильно. Всё дело в настройках шрифтов.
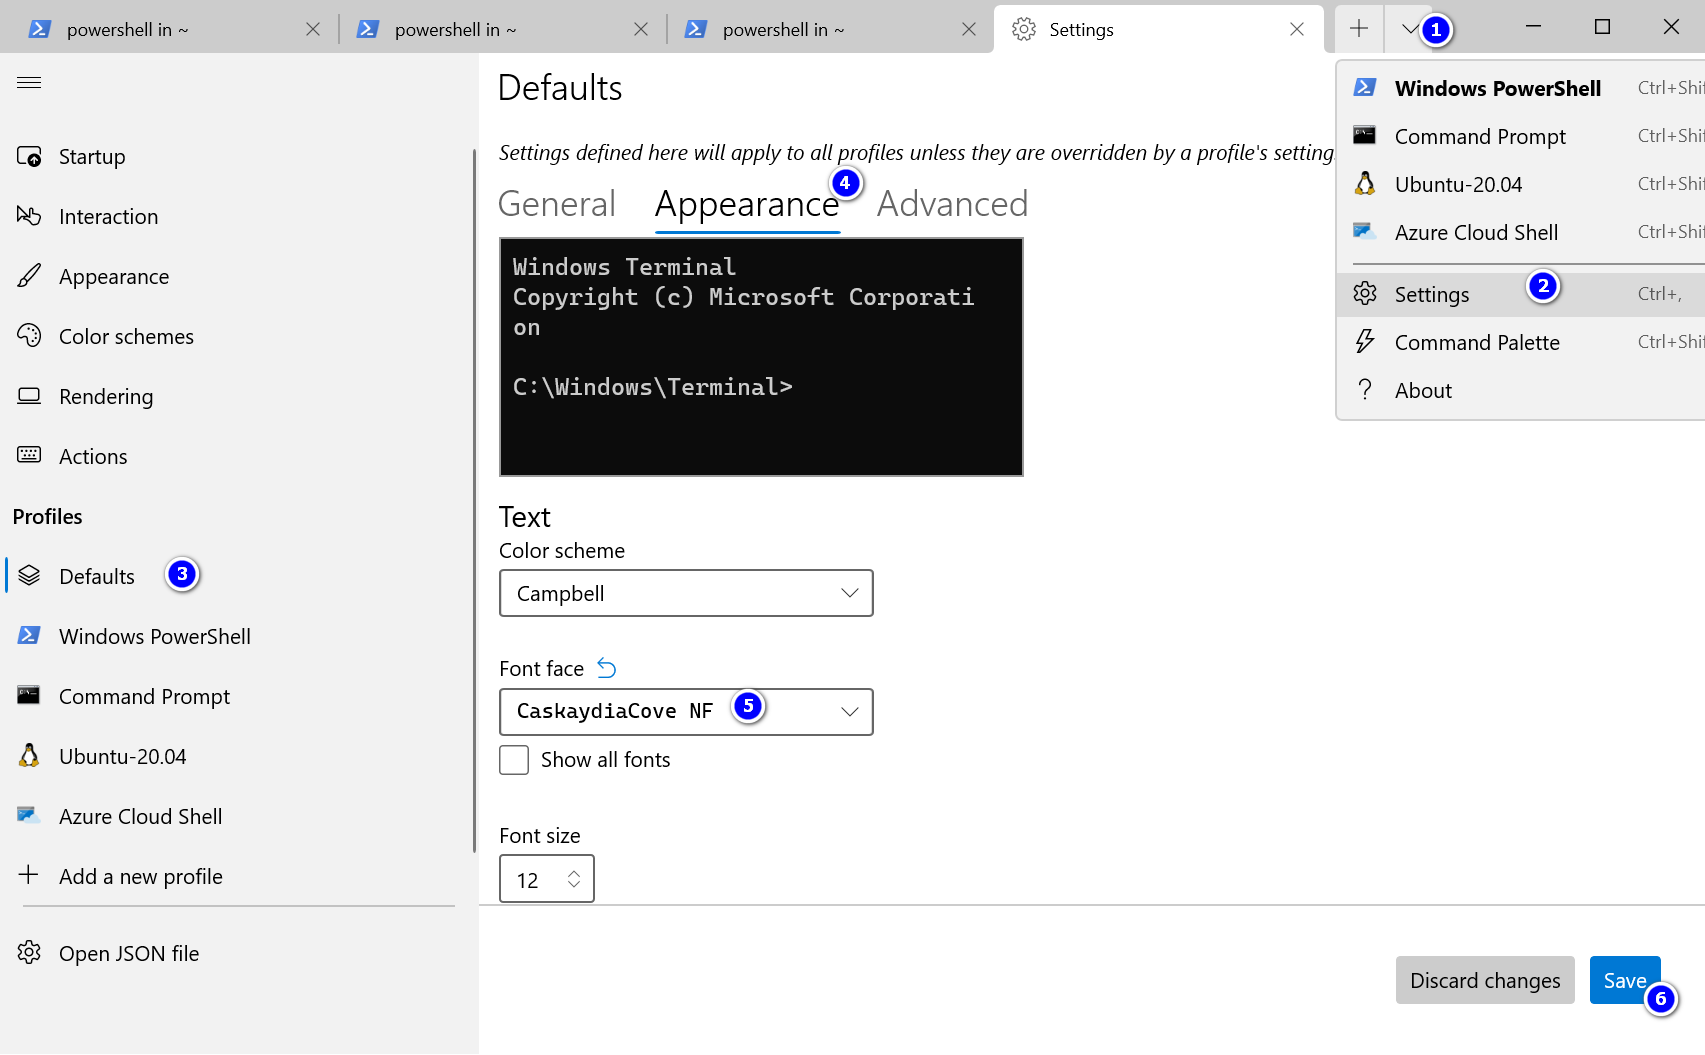
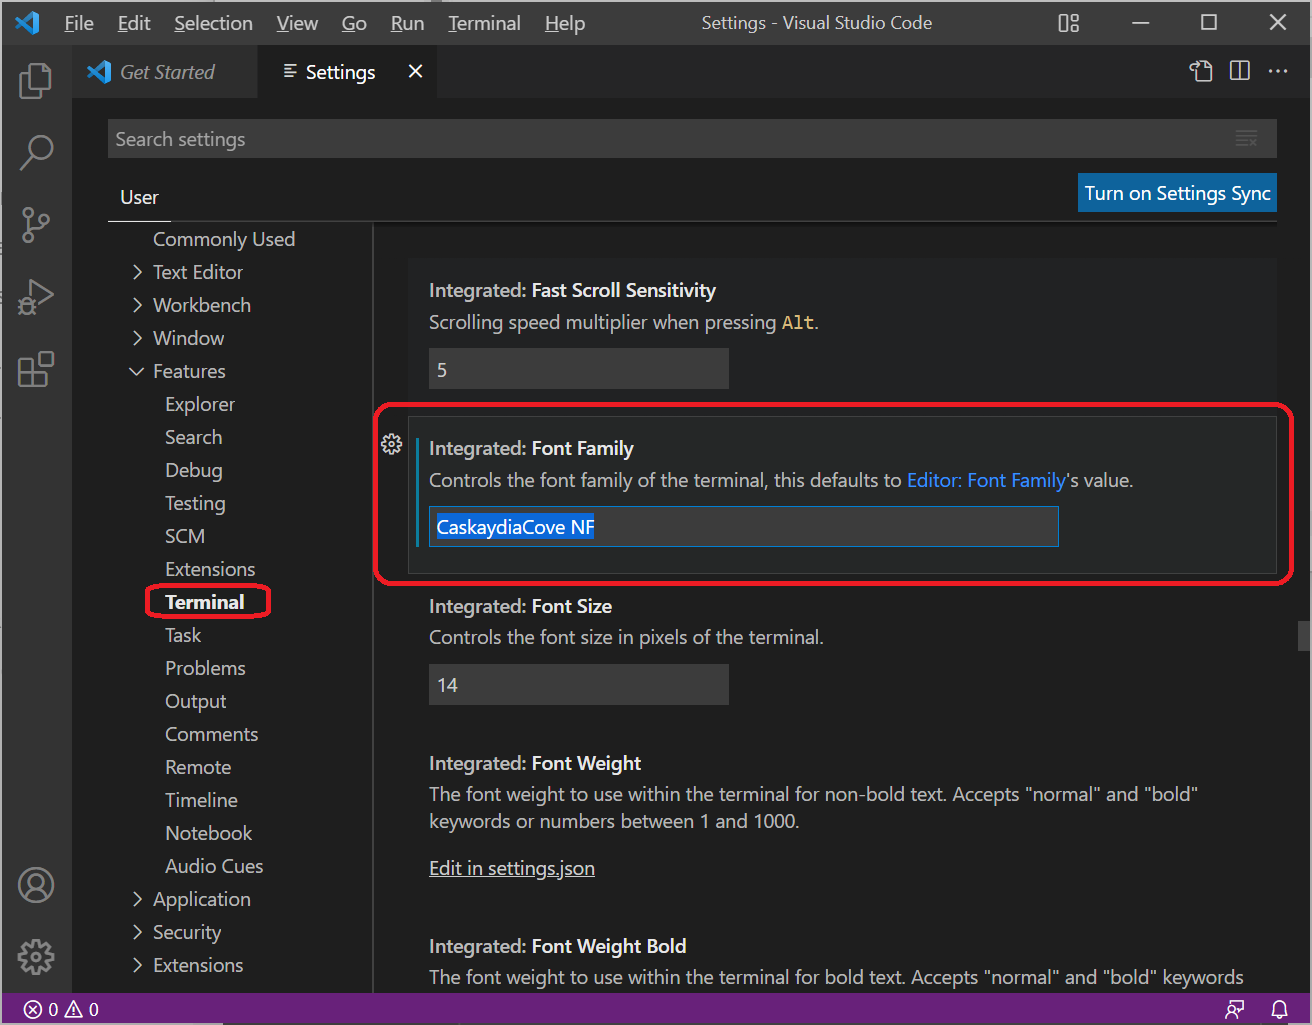
Зайдите в настройки, выберите Terminal, пролистайте до настройки Integrated: Font Family и введите название своего шрифта. В моём случае это CaskaydiaCove NF. Полное название настройки terminal.integrated.fontFamily, можете вбить её в строку поиска настроек, для быстрого перехода к ней.
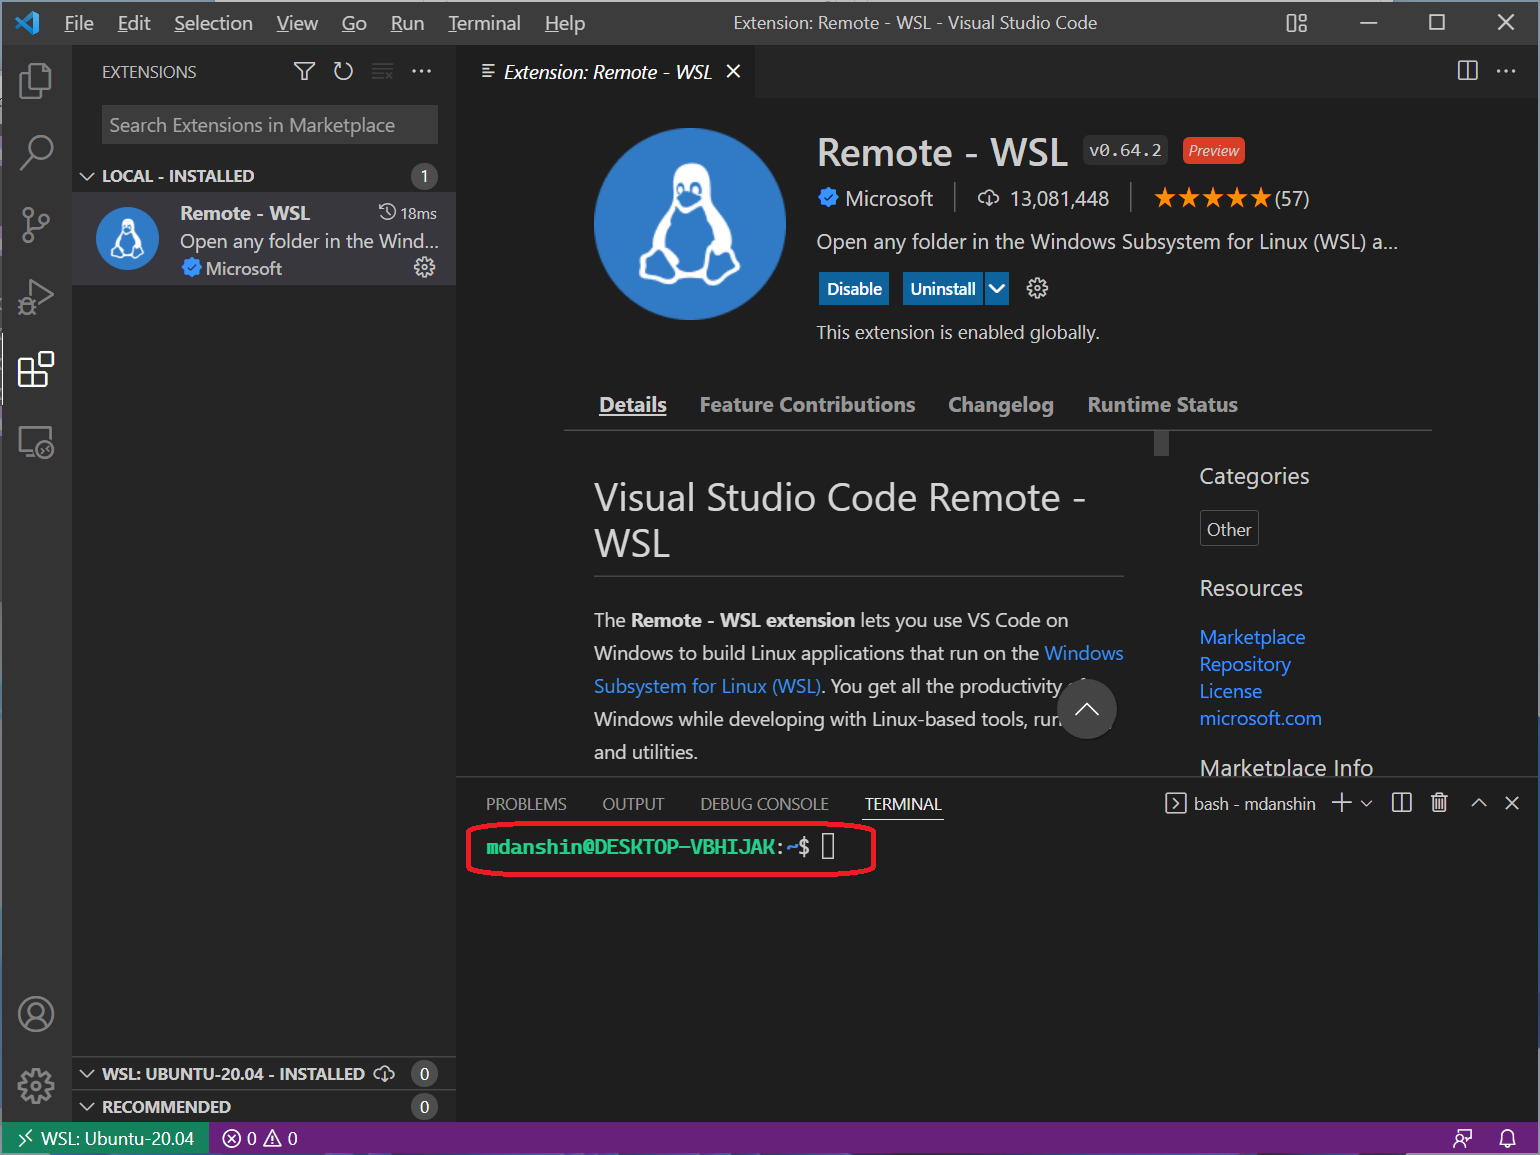
Если вы используете плагин Remote - WSL в VS Code, то возможно вам пригодится ещё один совет. Дело в том, что когда вы откроете новую сессию в WSL в VS Code, то заметите, что там ничего не поменялось. VS Code, при запуске bash в WSL, не читает данные из файла .profile, которые мы туда поместили.
Чтобы это исправить, можно ввести команду
Параметр -l (согласно справочной странице) заставляет «bash действовать так, как если бы он был вызван как оболочка входа в систему». Оболочки входа читают определенные файлы инициализации из вашего домашнего каталога, такие как
.profile.
Но чтобы не делать это каждый раз вручную, давайте изменим конфигурацию VS Code.
К уже имеющимся настройкам, если они есть, добавьте следующие.

"terminal.integrated.defaultProfile.linux": "bash",
    "terminal.integrated.profiles.linux": {
        "bash": {
            "path": "bash",
            "args": [
                "-l"
            ]
        }
    }
Сохраните и перезапустите WSL-сессию. На этот раз у Вас всё должно отображаться правильно.
Вот и всё, чем я хотел поделиться в этой статье. Оставльяйте свои комментарии и отзывы. Всем мира и добра!
I’ve long blogged about my love of setting up a nice terminal, getting the prompt just right, setting my colors, fonts, glyphs, and more. Here’s some of my posts.
- How to make a pretty prompt in Windows Terminal with Powerline, Nerd Fonts, Cascadia Code, WSL, and oh-my-posh
- Patching the new Cascadia Code to include Powerline Glyphs and other Nerd Fonts for the Windows Terminal
- What’s the difference between a console, a terminal, and a shell?
- Taking your PowerShell prompt to the next level with Windows Terminal and Oh my Posh 3
I want to take a moment to update my pretty prompt post with a little more detail and a more complex PowerShell $PROFILE, due to some changes in Oh My Posh, PowerShell, and the Windows Terminal. I doubt that this post is perfect and I’m sure there’s stuff here that is a little extra. But I like it, and this post will serve as my «setting up a new machine» post until I get around to writing a script to do all this for me in one line.
I love my prompt.

Let’s get you set up!
Get PowerShell
I don’t mean Windows PowerShell (that’s «classic» now) I mean the .NET Core-powered cross-platform PowerShell. There’s a LOT of ways to get it but I’m a Store person usually so I can get PowerShell (and it’ll auto update) from the Microsoft Store or just «winget install Microsoft.PowerShell» from the command line with winget.
Get Windows Terminal and set a default Shell
Get Windows Terminal if you don’t already have it, you can get Windows Terminal free from the Store. If you don’t have access to the Microsoft Store, the builds are published on the GitHub releases page. It comes with a lovely font called Cascadia Code…but…
Now that you have Windows Terminal, you’ll notice that it knows that you have PowerShell installed and will add it to your Windows Terminal dropdown menu! You can set PowerShell as your default Profile — that’s the one you’ll get by default when you make a new Tab — in settings:

Upgrade your Terminal/Console Fonts
I like fonts with lots of Glyphs so I also download and Install Caskaydia Cove Nerd Font Complete. This is the same Cascadia Code font but MODIFIED to include hundreds of special characters that you can use to make your prompt cooler.
IMPORTANT NOTE: The string literal name of this font for use in settings or VS Code is «CaskaydiaCove NF». If you’re using Cascadia Code, there are different strings for each. The NUMBER ONE question I get is ‘why don’t my glyphs/fonts show up right in Windows Terminal/VS Code?’ and the answer is almost always «you’re using the wrong font string.» It’s usually either an extra space or a missing space, so don’t be afraid to double check.

Remember that Windows Terminal has a lovely Settings UI but you can always click «open JSON file» to manage the settings.json as text if you prefer. Here’s mine. Yours will be different and you should customize it! The Windows Terminal documentation is fantastic. Again, see how PowerShell is in BOLD? That’s because it’s my default.

Now, let’s add a little…spice…
Add «Oh My Posh» to your Shell
Oh My Posh has amazing docs so check them out. Do note that some stuff has changed, especially from v2 to v3.
EXCITING NOTE: Oh My Posh is portable and works on any shell, so I use it on both my «Pwsh» (PowerShell) in Windows and my Bash shells on WSL running Ubuntu.
You can install Oh My Posh with with PowerShell’s «Install-Module» or with the platform-specific install instructions. I used the latter, which is somewhat new, but it’s tomato/tomato, so use what works for you.
Again, read the docs but the idea on Windows is basically this (or get it from GitHub):
winget install JanDeDobbeleer.OhMyPosh
# restart shell to reload PATH
Then edit $PROFILE and add the following line, remembering at this point that oh-my-posh is an executable on the PATH.
oh-my-posh --init --shell pwsh --config ~/jandedobbeleer.omp.json | Invoke-Expression
I have changed my Oh My Posh from Jan’s default to include my own stuff, and I keep my latest up in a GitHub Gist and also in my DropBox/OneDrive so it’s always syncing to all my machines. Mine is this, after I download from my gist.
oh-my-posh --init --shell pwsh --config D:/Dropbox/ohmyposhv3-2.json | Invoke-Expression
Yours will vary. Again, read the docs and experiment! Once added, reload your profile for the changes to take effect, or restart your shell.
. $PROFILE
That .json file is filled with «segments» that are documented on the Oh My Posh site in a lot of detail. Overwhelming detail. You can add your computer’s battery, your Azure Subscription, the dotnet or node version of your current folder, really anything. Even your Spotify songs. I’m going to make one that show my Blood Sugar.
Go explore Oh My Posh Themes and then modify them with your own additional Segments.
Again, note that your fonts will need the right glyphs or it will look weird.
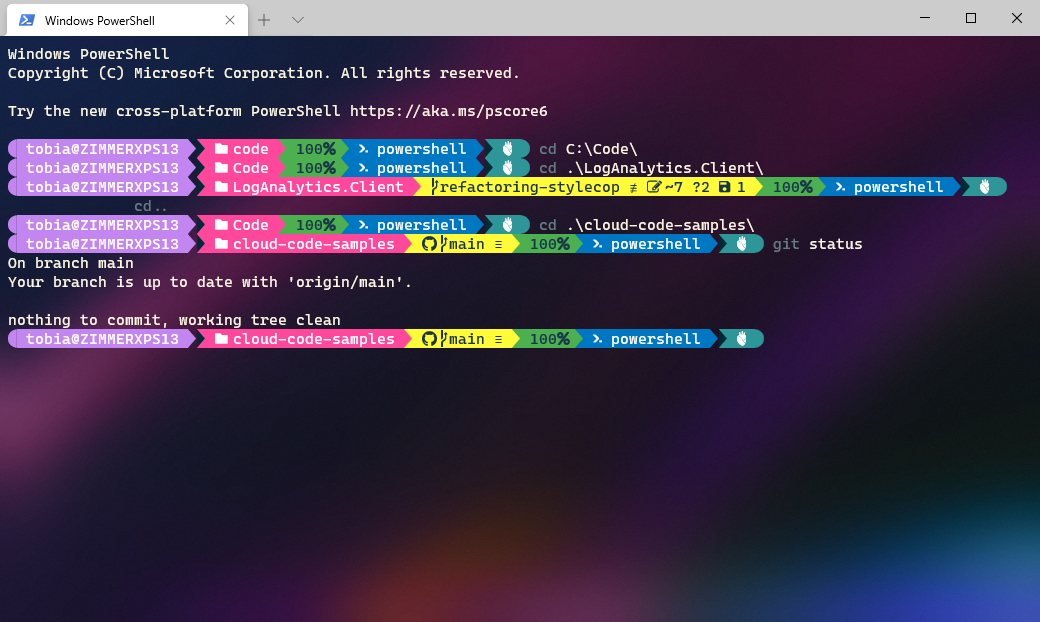
Here’s a GOOD prompt:

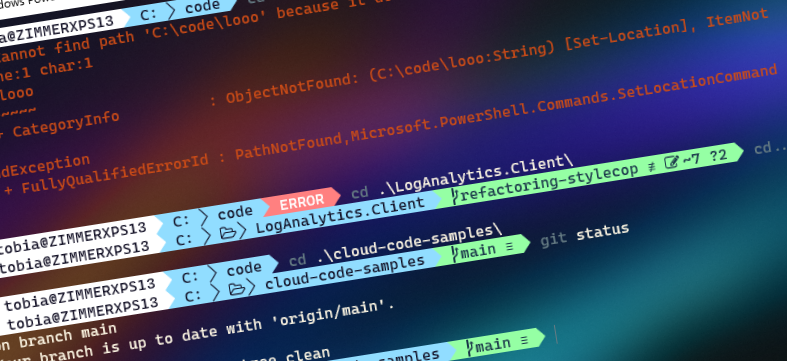
Here’s a BAD prompt with an issue!
![]()
Why is it wrong? Either the .json file that is your config has been saved wrong or corrupted the Unicode Glyphs, or you’ve got a font that doesn’t have those glyphs.
Re-assert your Git segment in Oh My Posh
Some folks want full git info, status, added, modified, untracked, etc and others just want the current git branch. Check the Git segment and the Posh Git segment to make sure you are getting the performance AND information you need.
I needed to turn on «display_stash_count» and «display_upstream_icon» in my config json, like this:
{
"type": "git",
"style": "powerline",
"powerline_symbol": "",
"invert_powerline": false,
"foreground": "#193549",
"background": "#fffb38",
"leading_diamond": "",
"trailing_diamond": "",
"properties": {
"display_status": true,
"display_stash_count": true,
"display_upstream_icon": true
}
},
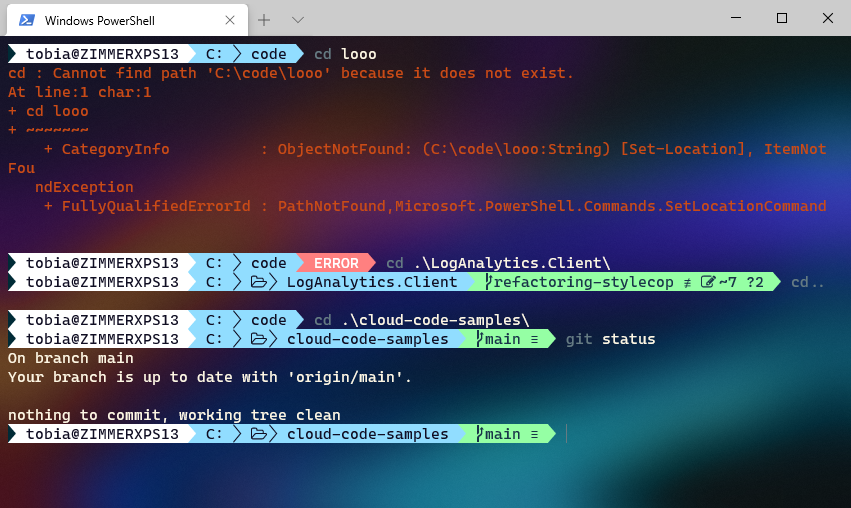
Again, this is all optional and affect performance slightly, but be aware of these properties. I believe I have these set the right way I want them in my public gist. Here is me moving around my source code with «z» in stead of cd, but note the prompt changes.

Turn your PowerShell directories up to 11 with Terminal-Icons
Is your prompt not extra enough? That’s because your directory listing needs color AND cool icons!
Install-Module -Name Terminal-Icons -Repository PSGallery
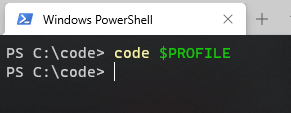
And then add one line to my $profile (edit with «code $profile»):
Import-Module -Name Terminal-Icons
Sweet!

How far is too far?
At this point you’re basically done, but I also LOVE PSReadLine. It’s great generally but also nice for bash and Emacs types who are moving to PowerShell or use PowerShell for work.
I’ve added features like «ctrl shift b» at the command line will run «dotnet build.» Why? Because I can and because it’s muscle memory so I’m making my prompt work for me.
You can also add Predictive Autocomplete to your prompt if you like but I’ll leave that as an exercise to the reader! My PowerShell profile is on a public gist, and while it’s not perfect and likely has issues, it works for me!
Enjoy! Thanks to the Windows Terminal Team and the always lovely Jan De Dobbeleer from Oh My Posh, as well as Brandon Olin from Terminal Icons.
Check out our Sponsor! YugabyteDB is a distributed SQL database designed for resilience and scale. It is 100% open source, PostgreSQL-compatible, enterprise-grade, and runs across all clouds. Sign up and get a free t-shirt!
About Scott
Scott Hanselman is a former professor, former Chief Architect in finance, now speaker, consultant, father, diabetic, and Microsoft employee. He is a failed stand-up comic, a cornrower, and a book author.
![]()
![]()
![]()
About Newsletter
Hosting By


Hello everyone! Today I gonna show you how to set up the Windows terminal to look great.
✨ Content
- Install the Windows terminal
- Install Oh My Posh
- Install fonts
- Install icons
- Select the prompt
- Set up the terminal background
⚙ Requirements
- Windows ≥ 10
- Oh My Posh
- Nerd fonts
📚 GitHib Repo
- https://github.com/slydragonn/dotfiles
1. Install Windows Terminal
To install this terminal you should have Windows 10 or 11. It’s very easy, You direct to the Microsoft store and search Windows terminal and install this option:

Or install the Terminal via this link: https://apps.microsoft.com/store/detail/windows-terminal/9N0DX20HK701
2. Install Oh My Posh
You can install Oh My Posh via Winget, scoop, or manually with PowerShell commands.
- ohmyposh.dev
I installed it via Winget:
winget install JanDeDobbeleer.OhMyPosh -s winget
Enter fullscreen mode
Exit fullscreen mode
3. Install fonts
This part is important because the fonts are giving the icons for their own terminal.
- NerdFonts
I installed the Hack Nerd Fonts:

Then, you should extract the font files and copy them and move to this place.
Note: Search fonts settings, then drag and drop the files and press install fonts.

And Select in the Terminal the Hack Nerd Fonts:

4. Install Icons
For you can see the icons in your terminal, you should install the next repository:
- devblackops/Terminal-Icons
To install:
Install-Module -Name Terminal-Icons -Repository PSGallery
Enter fullscreen mode
Exit fullscreen mode
Usage: Copy this code into Microsoft.PowerShell_profile.ps1 file on the route ⇒ C:\Users\YOUR_USER_NAME\OneDrive\Documentos\PowerShell
Import-Module -Name Terminal-Icons
Enter fullscreen mode
Exit fullscreen mode
and your terminal looks like this:

5. Select the prompt
Oh My Posh has many themes for the terminal, I like the half-life theme and to select this theme you write inside the config file the next code:
# C:\Users\YOUR_USER_NAME\OneDrive\Documentos\PowerShell\Microsoft.PowerShell_profile.ps1
oh-my-posh init pwsh --config "$env:POSH_THEMES_PATH\half-life.omp.json" | Invoke-Expression
Enter fullscreen mode
Exit fullscreen mode
And this is the result:

6. Set up the terminal background
Go to the terminal settings and activate the option “Use the acrylic material in the tab row” ubicated in the appearance section and save.

Then go to predeterminate values/appearance and in the transparency section active the material acrylic, play with the opacity, and save:

And the result looks like this:

This is what the config file looks like:
oh-my-posh init pwsh --config "$env:POSH_THEMES_PATH\half-life.omp.json" | Invoke-Expression

Import-Module -Name Terminal-Icons
Enter fullscreen mode
Exit fullscreen mode
And that’s all, Thank you for reading, and see you later 
Я занимаюсь фронтенд-разработкой уже довольно длительное время (больше года) и работа под Windows меня удовлетворяла абсолютно всем, кроме некоторых неудобств в командной строке. Я конечно же смотрю большое количество обучающих видеороликов от профессиональных программистов и вижу, что большинство разработчиков использует в качестве своей основной рабочей системы MacOS и командную оболочку zsh со специальными настройками oh-my-zsh (это целый фреймворк, который позволяет максимально гибко кастомизировать оболочку). В Windows 10 давно нет никаких проблем с командным оболочками: можете использовать устаревшую cmd, можете установить PowerShell Core, а можете скачать Git SCM и без проблем использовать bash для Windows из её поставки (вы обязательно её скачаете для использования git на компьютере с Windows). И это не говоря про замечательную подсистему WSL2, которая позволяет установить вам полноценный дистрибутив Linux на выбор и получать оттуда доступ к ресурсам Windows (прямой доступ к вашей файловой системе в первую очередь).
Лично я остановил свой выбор на git bash, PowerShell Core, а в качестве терминала использую новую версию Windows Terminal и встроенный терминал в редактор кода VS Code. Каково же было моё удивление, когда я узнал, что существует проект oh-my-posh, который запросто позволяет вам сделать из PowerShell подобие zsh (да подобие, но так как фронтендеры используют командную строку в качестве вспомогательного инструмента запуска скриптов, консольных утилит и работы с git, то мне данный вариант вполне подойдёт). Самое основное, что мне нужно было от командной строки это индикация параметров git и она там ничем не отличается от подобной в oh-my-zsh. Ну и поддержка тем на закуску, потому что все хотят сделать красоту.
Установить oh-my-posh довольно просто и я это сделал буквально за несколько шагов с помощью вот этого гайда. Первым делом, конечно, стоит установить последнюю версию PowerShell Core с репозитория github. В отличии от Windows Terminal, который самостоятельно устанавливается и обновляется из Microsoft Store, PS Core пока так не умеет. Не лишне будет прописать использование именно PowerShell Core для встроенного терминала VS Code. Делается это через редактирование соответствующего параметра в настройках settings.json (в новых версиях редактора этот параметр устареет, но под Windows пока работает):
![]()
Устанавливаем модули поддержки git и oh-my-posh:
Install-Module posh-git -Scope CurrentUser
Install-Module oh-my-posh -Scope CurrentUser
![]()
Включаем приглашение командной строки и выбираем тему oh-my-posh (список тем и их названия вы можете посмотреть и выбрать здесь):
Set-Prompt
Set-Theme Sorin

Если вы в это время находились в своём репозитории git, то вы уже должны были увидеть указание на ветку и другие параметры git, но возможно вы увидели в командной строке какие-то кракозябры и прямоугольники вместо понятных символов. Ничего страшного, просто ваш шрифт консоли не поддерживает вывод символов Powerline и надо его сменить. К счастью, дизайнеры шрифтов давно поняли нужды программистов и все последние версии популярных шрифтов для программистов идут уже с поддержкой лигатур и powerline (обычно такие можно отличить по приписке PL в конце). Например версия шрифтов Cascadia идёт с вариантом PL, в Fira Code уже есть эти символы, а все шрифты из набора Nerd Fonts пропатчены специальным образом. Так же можете сами пропатчить любой шрифт символами Powerline с помощью специального скрипта, но вряд ли этим будут заниматься все (просто знайте о такой возможности). Сменить шрифт в Terminal можно через редактирование профиля темы в текстовом файле (не очень удобно для новичков, зато крайне просто и наглядно), а в VS Code в настройках, введя в поиск «terminal font«. В новых версиях терминала сделали полноценное меню для редактирования настроек.
 |
| Редактирование настроек оформления в Terminal |
Все эти изменения, которые вы сделали, действуют только в рамках одного сеанса и неплохо было бы их сохранить на постоянной основе в настройки пользователя. Для этого вам нужно запустить любой редактор и внести изменения в файл профиля. Я сделал это командой «code $PROFILE» (команда code это сокращенная команда для запуска VS Code), куда внёс следующие строки:
Import-Module posh-gitImport-Module oh-my-posh
Set-Theme SorinImport-Module PSFzf
Последний модуль PSFzf отвечает за удобный поиск команд и файлов в строке (т.н. fuzzy search, написан на языке программирования Go). Установка его слегка замороченная, так что можете его пока не ставить, тем более я сам пока не разобрался как им пользоваться и какая мне от него польза. Сначала вам надо найти и скачать скомпилированную версию PSFzf (ссылка на неё вывалится при попытке установить командой Install-Module PSFzf -Scope CurrentUser) и закинуть её в системный каталог типа system32, чтобы она была доступна через PATH. После этого надо зарегистрировать сочетания клавиш для неё и загрузить:
Remove-PSReadlineKeyHandler ‘Ctrl+r’
Remove-PSReadlineKeyHandler ‘Ctrl+t’
Import-Module PSFzf

И вот, после все этих манипуляций (достаточно несложных даже для начинающего программиста) у вас на компьютере с Windows будет превосходная командная строка, которая будет радовать глаз. Кстати, некоторые программисты «виндузятники» даже используют Vim и программируют именно в нём, отрицая другие редакторы кода или полноценные IDE для Windows. Лично я предпочитают для быстрых правок консольный редактор micro, который в дефолтном состоянии очень похож на линуксовый nano. Надеюсь вы поняли, что любая операционная система для программиста лишь инструмент для решения задач, а внешний вид и функциональность можно настроить дополнительно по своему желанию.
Не слушайте тех людей, которые кричат, что для программиста обязательно нужен Linux и ничего больше — Windows 10 в 2020 году это прекрасная операция система и для развлечений, и для работы программистом.
Update: недавно обнаружил аналогичный проект от известного программиста, который похожим образом «прокачивает» PowerShell и другие командные оболочки. Называется проект — Starship и под капотом он использует язык программирования Rust.
Кстати, сама Microsoft на своём портале учит как красиво раскрашивать коммандную строку. Вот здесь ещё один гайд про то, как навернуть свой терминал улучшениями.
This is another post in the series about fun and helpful Windows Terminal tips and tricks. Here’s a list of the posts in this series.
- Enable transparent background in Windows Terminal
- Set images as background in Windows Terminal
- Set the default starting directory in Windows Terminal
- Install custom themes in Windows Terminal
- Using third-party terminals within Windows Terminal
- Making Windows Terminal look awesome with oh-my-posh
What is oh-my-posh?
Oh my Posh is a custom prompt engine for any shell that has the ability to adjust the prompt string with a function or variable.
— https://ohmyposh.dev/docs/
Here’s what my Windows Terminal looks like when I have Oh-my-posh installed, along with the posh-git tools that provide the added git-specific metadata in the command prompt. The theme I selected for this is Alien.
Before the configuration, it makes sense to select a theme.
- See the ready-made themes on the ohmyposh.dev website.
Installing oh-my-posh
Following the instructions, here are the things we need to do. I’m using winget to install, which is an awesome package manager for Windows.
Install the oh-my-posh module.
winget install JanDeDobbeleer.OhMyPosh -s winget
For more insights about what options and configurations are available, check out the docs: Installation — Oh My Posh
Make sure you restart your terminal/console to make the changes have effect.
Modify the PowerShell profile
Finally, if you want to standardize your PowerShell shell to always use oh-my-posh, you need to modify your $PROFILE.
The docs mention you can use Notepad, but I prefer to use Visual Studio Code. The choice is yours. Here’s how I’m modifying the file and adding the required module and theme config so they are applied when launching my PowerShell sessions next time.
Add the necessary configurations. Make a note of the Theme name here, which is one of the names of all the downloaded themes.
Import-Module oh-my-posh
Set-PoshPrompt -Theme Aliens
Install fonts with support for the glyphs
Moving on, the final missing piece on a normal machine is to get the Powerlines fonts working. In the docs of oh-my-posh, it’s recommended to use NerdFonts.
I like Caskaydia Cove Nerd Font, which has the font name CaskaydiaCove NF when configuring it in the Windows Terminal font settings.
- Download a NerdFont
- Optionally, make use of the Windows Terminal Cascadia Code, which now has support for powerlines, too.
Make a choice, install the fonts you want to work with, and reboot your terminal.
In the picture here, I settled for one of the themes that are easier on the eyes, Agnoster.
I’m happy with the configuration, and I really like to get the visual indicators in the terminal about my git status, and the overall terminal look and feel resonate well with me.
- Learn more about configuring the transparent backgrounds in Windows Terminal.
Enjoy.

Hi, I’m Tobias! 👋
I write about Microsoft Azure, security, cybersecurity, compliance, cloud architecture, Microsoft 365, and general tech!