В этой статье рассмотрим особенности подготовки и установки Office 365 (Microsoft 365) на терминальном сервере с ролью Remote Desktop Services (RDS) для одновременного использования множеством пользователя. Режим совместной активации Office 365 ProPlus используется в RDS, VDI решениях, и в сценариях, когда несколько пользователей по очереди используют один общий компьютер.
По умолчанию лицензия Microsoft 365 Apps позволяет пользователю установить и активировать Office 365 на максимум 5 устройствах. Однако есть сценарии, когда у пользователя нет персонального компьютера и ему приходится постоянно работать под своим аккаунтом за разными компьютерами (RDS, VDI хосты, общие компьютеры и т.д.). Чтобы не учитывать лимит на количество активаций лицензий Office 365 для пользователя, вы можете установить Office 365 на таких компьютерах, RDS серверах в режиме shared computer activation.
В этой статье рассмотрены основные правила лицензирования и отличия между классическими версиями Office (2013,2016,2019) и Office 365.
Требования:
- В первую очередь, нужно иметь в виду что для использования на терминальном (RDS) сервере подходят следующие лицензии (подписки) Office 365 с поддержкой desktop virtualization: Microsoft 365 Apps for Enterprise (он же Office 365 ProPlus), Office 365 E3 или Office 365 E5;
- Пользователи должны авторизоваться на общем компьютере (RDS сервере) под своим учетными записями, к которым привязаны лицензии Microsoft 365 Apps;
- На вашем сервере должна быть установлена и настроена роль Remote Desktop Services (это может быть как отдельно стоящий сервер, так и сервер в ферме RDS с Connection Broker). RDS хост должен быть нацелен на сервер лицензирования RDS, а на сервере лицензирования должно быть достаточное количество User или Device RDS CAL.
- Все предыдущие версии Microsoft Office необходимо удалить перед установкой Office 365 ProPlus.
Установка Office 365 ProPlus на RDS сервере в режиме общего использования выполняется из командной строки с помощью специального XML файла конфигурации.
Ранее мы уже рассказывали, что для установки современных версий MS Office (Office 365 и Office 2019) вместо MSI установщиков используется метод установки Click-to-run (C2R). C2R Installer загружает установочные файлы из Интернета (из CDN сети Microsoft)
Для кастомной установки C2R версий Office нужно использовать специальную утилиту развёртывания Microsoft Office Deployment Tool (ODT) — https://www.microsoft.com/en-us/download/details.aspx?id=49117.
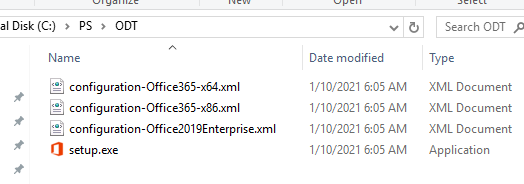
Скачайте и установите officedeploymenttool. В каталоге установки появятся примеры XML файлы для настройки параметров установки пакетов Office 365 и Office 2019 Enterprise, а также установочный файл C2R – setup.exe.
В конфигурационном файле configuration-Office365-x64.xml вы можете указать какие продукты из состава Office 365 нужно установить. По умолчанию устанавливаются все приложения, установить определенные приложения Office из графического Click2Run Installer нельзя (подробнее об этом в статье “Как выборочно установить отдельное приложение в Office 365/2019/2016”).
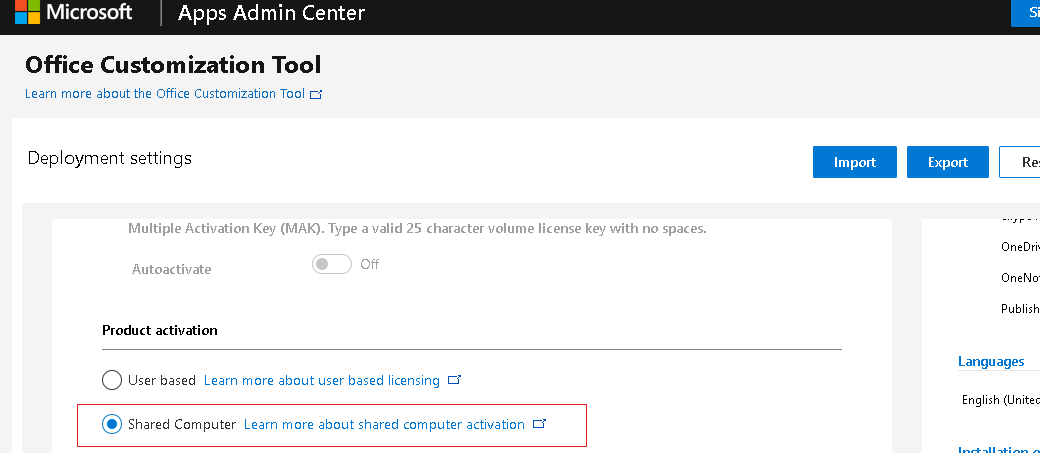
Вы можете вручную задать нужные параметры установки Office в конфигурационном файле configuration-Office365-x64.xml. Однако гораздо проще сгенерировать XML с нужными параметрами установки с помощью веб-инструмента Microsoft — https://config.office.com/ (Office Customization Tool). Перейдите на эту страницу, выберите параметры установки Office (архитектура, язык, какие программы устанавливать, нужно ли ставить Visio и Office и ряд других параметров). Обязательно в разделе Licensing and Activation выберите Product activation – Shared Computer.
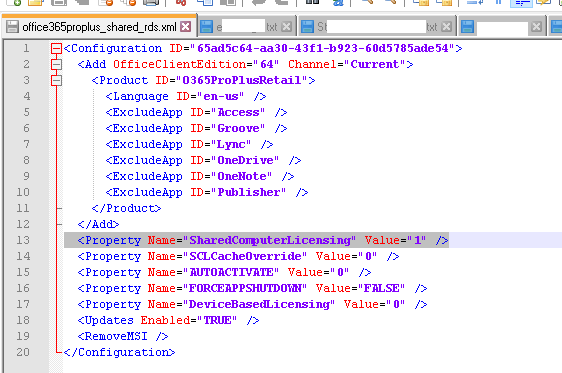
Сохраните полученный XML файл как office365proplus_shared_rds.xml и откройте его в любом текстовом редакторе.
В данном XML файле указаны параметры установки пакета Office 365. Обратите внимание на следующий параметр:
<Property Name="SharedComputerLicensing" Value="1" />
Этот параметр (совместная активация компьютера) нужно обязательно указать, если вы планируете использовать копию Office 365 для одновременной работы нескольких пользователей (RDS сервер, VDI компьютер, общий компьютер, или обычная Windows с возможностью одновременного RDP доступа). Без этого параметра вам придется активировать Office 365 только для одного пользователя.
Переведите RDS сервер в режим установки приложений:
change user /install
Если на RDS сервере в ферме есть активные RDP сессии пользователей, можно перевести его в режим обслуживания и завершить текущие сессии:
change logon /drain
Для установки Office 365 на RDS сервере в соответствии с данными, указанными в конфигурационном файле, используйте команду:
setup /configure office365proplus_shared_rds.xml
Обратите внимание, что в нашем случае C2R установщик Office 365 скачает все необходимые файлы из Интернета. Однако вы можете заранее загрузить установочный файлы Office 365 в сетевую папку на вашем файлом сервере и использовать ее в качестве источника установочных файлов. В этом случае в XML файле можно указать источник установки.
Замените строку
<Add OfficeClientEdition="64" Channel="Current">
на
<Add SourcePath="\\msk-fs01\Distr\Office365" Add OfficeClientEdition="64" Channel="Current">
После окончания установки, переведите RDS хост в обычный режим:
change user /execute
Как происходит активация лицензия Office 365 пользователей? Каждый пользователь при первом запуске любого приложения Office получит запрос на вход в аккаунт Office 365 (email и пароль). Если у вас настроена синхронизация между Office 365 (Azure Active Directory) и on-premises Active Directory, то если пользователя вошел на компьютер под аккаунтом, которому в Office 365 уже назначена лицензия, его лицензия автоматически активируется.
Для такого пользователя будет получен токен лицензии с серверов активации Office Licensing Service в Интернете со сроком действия 30 дней. Через 30 дней, Office 365 попробует автоматически продлить токен лицензии.
Думаю, понятно, что в случае с исползованием Office 365 с RDS хоста нужен постоянный доступ в интернет для проверки и активации лицензий пользователей на серверах Microsoft. Какого-то аналога службы KMS нет.
Если вы установили Office 365 без опции SharedComputerLicensing в XML файле, то чтобы целиком переставлять пакет, можно изменить тип установки Office365 из реестра. Для этого в ветке реестра HKEY_LOCAL_MACHINE\SOFTWARE\Microsoft\Office\ClickToRun\Configuration нужно изменить значение Reg_SZ параметра SharedComputerLicensing на 1.
Либо включить отдельный параметр групповой политики Use shared computer activation из административных шаблонов GPO для Office в секции. Computer Configuration -> Administrative Templates -> Microsoft Office 2016 (Computer) –> License Settings.
Если этого не сделать, то при запуске приложений Office 365 вторым пользователям появится ошибка:
This copy of Microsoft Office cannot be used on a computer running Terminal Services. To use Office on a computer running Terminal Services, you must use a Volume License of Office.
You can install Office 365 ProPlus on a Remote Desktop Services (RDS) server to allow multiple users to use Office 365. These users connect remotely to a Windows Server machine that is configured as a terminal server. A terminal server may be part of a virtual desktop infrastructure (VDI). In Office 365 ProPlus, there are two scenarios of RDS deployment for shared usage – on a shared virtual machine (VM) and on a remote desktop server. This blog post explains how to install Office 365 ProPlus on a Remote Desktop Services server.
Before getting into the installation process, let’s explore some of the capabilities of Office 365 ProPlus.
What is Office 365 ProPlus?
Office 365 ProPlus is the full version of Microsoft Office 365. The system requirements for this version are similar to those of other MS Office versions. However, Office 365 ProPlus is not web-based: it is installed locally on a user’s computer. There are also differences in deployment and licensing compared with traditional standalone non-subscription versions of MS Office. An internet connection is required at least once per month to check the status of the license subscription. Office 365 ProPlus is a subscription plan that allows you to install Office 365 ProPlus on up to five machines with a single license.
What year is Microsoft Office 365 ProPlus?
Office 365 ProPlus is updated regularly. As of March 2020, the latest version of Office 365 Pro Plus is v.1912 released in 2020. The first version was released in 2016 and was called Office 365 ProPlus 2016.
What is the difference between Office 365 and Office Professional Plus?
MS Office Professional Plus (2016, for example) is a traditional version of Microsoft Office that is licensed on a perpetual basis (a device-based model) but is updated until the support period ends. Office 365 uses a subscription licensing method (a user-based model) and is updated until you pay for subscription. Office 365 offers different editions for subscription, including ProPlus, E1, E3, E5, etc. Note that Office 365 ProPlus in not the only edition that supports desktop virtualization. Office 365 ProPlus, Office 2016 ProPlus and Office 2016 Standard are recent versions that support terminal environments.
Requirements
The main requirements to install Office 365 ProPlus on a remote desktop server are:
- A supported version of a terminal server (RDS-Remote Desktop Server); a supported Windows version for Office 365 – Windows 8.1, Windows Server 2016 and newer
- A configured terminal server (remote desktop server)
- A supported version/edition of Office 365 (that supports desktop virtualization)
- Office 365 ProPlus license (Office 365 subscription plan with ProPlus)
- Office Deployment Tool
- An internet connection
When your environment meets the requirements, you can go to Office 365 ProPlus remote desktop configuration.
Configuration
Installing Office 365 ProPlus on a terminal server requires the use of command line and editing the XML configuration file that will be used during installation. You can install Office 365 ProPlus by using the workflow below.
It is recommended that you uninstall all previous versions of Microsoft Office from the computer before you install Office 365 ProPlus on that machine.
Creating the directory
Create the directory to store the files needed for the installation process.
C:\temp\Office365install\
If you need to deploy Office 365 ProPlus on multiple servers, you can share this directory (for example, \\server_name\Office365install\) and use this single shared directory for installation.
Downloading Office Deployment Tool
Download the Office Deployment Tool (ODT) from the Microsoft website by using the links below:
- Version 2013
- Version 2016
In this example, we’re using Office 365 Deployment Tool 2016.
ODT supports shared computer activation. When shared computer activation is enabled, you can install Office 365 without performing its activation. Later, a user signs into the computer on which Terminal Services are running. Then, they can access Office 365 using shared computer activation. Office 365 will check the license and will activate Office 365 temporarily until the user logs out. When another user logs into Office 365 installed on a terminal server, the activation for the previous user that logged out is cancelled. This approach allows you to use the resources of the terminal server more flexibly and effectively.
The installer file of Office Deployment Tool is downloaded:
officedeploymenttool_12325-20288.exe
Run the file with administrative privileges. Accept the license agreement and select a directory to which you want to extract files. In our case, the files will be extracted to the same directory:
C:\temp\Office365install
Now you see setup.exe and three xml files.
Configuring the installation
You have to create a custom xml file in the directory where setup.exe is located. In this example, the name of the configuration file is config.xml and this file controls the installation process. Edit this xml file in the text editor such as Notepad or Notepad++. The configuration below is ready for use. However, you can modify the configuration according to your needs.
<Configuration>
<Add SourcePath=”C:\temp\Office365install”
OfficeClientEdition=”64″ Channel=”Current”>
<Product ID=”O365ProPlusRetail”>
<Language ID=”en-us” />
</Product>
</Add>
<Display Level=”None” AcceptEULA=”TRUE” />
<Property Name=”SharedComputerLicensing” Value=”1″ />
<Logging Level=”Standard” Path=”%temp%” />
</Configuration>
In the configuration above, the Product ID is O365ProPlusRetail. You can also install additional Office software by adding similar sections with the following parameters:
- VisioProRetail – Microsoft Office Visio
- ProjectProRetail – Microsoft Office Project
- AccessRuntimeRetail – Microsoft Office Access
- LanguagePack – a language pack for Microsoft Office
For example, to install Visio, add the following section to the xml configuration file:
</Product>
<Product ID=”VisioProRetail”>
<Language ID=”en-us” />
</Product>
Note that these two strings must be added to the default configuration to install Office 365 ProPlus in remote desktop environments:
<Display Level=”None” AcceptEULA=”TRUE” />
<Property Name=”SharedComputerLicensing” Value=”1″ />
If you shared a directory where installation files are stored, use that shared directory that is accessible for multiple servers instead of the local directory of this server. In our example C:\temp\Office365install would be changed to \\server_name\Office365install\ for this purpose.
The display level is set to None for enabling the silent installation of Office 365 ProPlus to avoid the activation of Office before installation is done. With the silent mode, you will not see any elements of the user interface, not even the progress bar, during the installation process. If you set Display Level=”Full”, you will be able to see installation progress.
Installing Office 365 ProPlus
Run CMD as Administrator (Start > CMD).
Go to the directory where the files of Office Deployment Tool are stored:
cd C:\temp\Office365install
Run the following command to download Office 365ProPlus installation files:
setup.exe /download config.xml
Wait for a few minutes. The time needed to download the files depends on the speed of your internet connection. When the cursor moves to a new line and allows you to run a new command, it means that the downloading process has been completed. If you run the same command later, for example, in two months, the installation files will be updated.
You can see a subfolder that is named Office in the Office365install directory. You can check the folder properties and its size to make sure that the files have been downloaded properly.
Now run the next command to extract and configure files and install Office 365 ProPlus on an RDS Server.
setup.exe /configure config.xml
Wait until installation is done.
Now log into the terminal server with a remote desktop client and run the needed Office 365 ProPlus application. Enter the Office 365 credentials associated with the subscription plan – otherwise most features will be locked.
Troubleshooting
Sometimes the following error can occur:
This copy of Microsoft Office 2016 cannot be used on a computer running Terminal Services. To use Office 2016 on a computer running Terminal Services, you must use a Volume License of Office.
If the method explained above didn’t help you install Office 365 ProPlus on a remote desktop server, try to edit some registry values on that server.
- Open the registry editor (Win+R > regedit) and go to this path:
HKEY_LOCAL_MACHINE\SOFTWARE\Microsoft\Office\ClickToRun\Configuration - Add the SharedComputerLicensing key and set its value to 1.
- Press Win+R and run gpedit.msc to open the local group policy editor.
- Edit the policy or create this policy if it doesn’t exist:
Computer Configuration\Policies\Administrative Templates\Microsoft Office 2016 (Machine)\Licensing Settings - Edit the value: Use shared computer activation
- And set its state to Enabled
To Conclude
Microsoft Office can be installed on machines running Windows and macOS. The web version of Office 365 can be used from anywhere on any machines that have a web browser. If you install Office 365 ProPlus on a remote desktop server, users can get Microsoft Office applications from any machine and any place where they have network access to the terminal server. A subscription plan with a per-user and a not per-machine licensing model is to be used in this case.
Search code, repositories, users, issues, pull requests…
Provide feedback
Saved searches
Use saved searches to filter your results more quickly
Sign up
Join
- Learn
- Windows
- Windows Server


to enable IT peers to see that you are a professional.
Last Updated:
Jan 27, 2023
4 Minute Read
-
Spice
-
Reply (2)
-
Subscribe
-
Share
Opens a new window
-
Facebook
Opens a new window -
Twitter
Opens a new window -
Reddit
Opens a new window -
LinkedIn
Opens a new window
-


to enable IT peers to see that you are a professional.

What’s this?
Microsoft Office 365
- Microsoft Office 365 |
- Microsoft Teams |
- Data Backup |
- VMware |
- Microsoft SharePoint
Sign Up
Доброго времени суток.
Так как с простыми вопросами здесь не ходят, приходится выдумывать сложные 
Итак по сабжу.
Имеем:
Windows Server 2016
Office deployment tool
Лицензии Office 365 бизнес премиум
Лицензии Office 365 корпоративный Е3
Задача:
Установить пакет Office и грамотно пролицензировать для многопользовательского юзания.
Что вышло:
Используя ODT при вот таком вот конфиге
<Configuration>
<Add SourcePath=»C:\office365\» OfficeClientEdition=»32″ >
<Product ID=»O365BusinessRetail«>
<Language ID=»ru-ru» />
</Product>
</Add>
<Updates Enabled=»TRUE» UpdatePath=»c:\office365\» />
<Display Level=»None» AcceptEULA=»TRUE» />
<Property Name=»SharedComputerLicensing» Value=»1″ />
<Logging Path=»c:\office365\» />
</Configuration>
На выходе получаем, что лицензируется офис только у пользователей с «Лицензия Office 365 корпоративный Е3», при том что инсталится версия «MS Office 365 Business — ru-ru». А вот ребята с «Лицензией Office 365 бизнес премиум»
остаются в пролете.
Внимание вопрос!
Где я накосячил и куда копать?
