Как очистить кэш у принтера
Очистка памяти принтера:
1. На начальном экране выберите Параметры > Устройство > Обслуживание > Очистка при простое.
2. Поставьте флажок Очистить энергонезависимую память и коснитесь СТЕРЕТЬ.
3. Следуйте указаниям на дисплее.
- Очистка памяти принтера: выберите Параметры > Устройство > Обслуживание > Очистка при простое и поставьте флажок Очистить энергонезависимую память.
- Чтобы посмотреть кэш принтера в Windows, откройте «Свойства» принтера и перейдите на вкладку «Дополнительно».
- Чтобы очистить кэш принтера в Windows 10, откройте службу «Диспетчер печати» и удалите все файлы из папки %windir%\System32\spool\PRINTERS.
- Чтобы освободить очередь принтера, выберите команды Документ > Отменить и подождите, пока задание печати исчезнет из очереди.
- Чтобы почистить печать принтера, выберите Панель инструментов принтера и на вкладке Службы устройства выберите Чистка печатающих головок.
- Чтобы удалить документ из памяти принтера, выберите Обращение к памяти > меню удаления.
- Чтобы очистить буфер принтера через настройки Windows, выберите принтер, на котором нужно отменить задание и выберите « Документ» — « Отмена».
- Чтобы сбросить кэш на принтере, открываем оснастку «Службы» и удалите все файлы из папки C:\Windows\System32\spool\PRINTERS.
- Чтобы очистить кэш в браузерах, используйте горячие клавиши: Ctrl+Shift+Del в Google Chrome, Internet Explorer и Mozilla Firefox, и Ctrl+Alt+E в Safari.
- Как посмотреть кэш принтера
- Как очистить кэш принтера Windows 10
- Как освободить очередь принтера
- Как почистить печать принтера
- Как очистить кэш принтера на компьютере
- Как очистить буфер принтера
- Как сбросить кэш на принтере
- Какие кнопки нажать чтобы очистить кэш
Как посмотреть кэш принтера
В контекстном меню откройте «Свойства» принтера и перейдите на вкладку «Дополнительно». Здесь должна стоять галочка «Вести журнал сообщений очереди печати». Если галочка уже стоит, то Windows уже сохраняет историю печати.
Как очистить кэш принтера Windows 10
Данный способ можно выполнить и по другому: зайдите в «Службы» (напишите «Службы» в поиске), откройте службу «Диспетчер печати» => нажмите на «Остановить» => не закрывая саму службу откройте в проводнике %windir%\System32\spool\PRINTERS => удалите все файлы из открывшейся папки => запустите службу «Диспетчер печати».
Как освободить очередь принтера
Выберите команды Документ > Отменить. Нажмите кнопку Да, чтобы отменить задание печати. Подождите, пока задание печати исчезнет из очереди, а затем закройте диалоговое окно принтера.
Как почистить печать принтера
В области Параметры печати выберите Панель инструментов принтера. Откроется Панель инструментов принтера. На вкладке Службы устройства выберите Чистка печатающих головок ( ). Нажмите кнопку Очистка, чтобы начать процесс.
Как очистить кэш принтера на компьютере
Удаление документа из памяти принтера:
1. Убедитесь в том, что питание принтера включено.
2. Нажмите кнопку ФАКС (FAX). Отображается экран ожидания факса.
3. Нажмите кнопку Меню (Menu).
4. Выберите Обращение к памяти (Memory reference), затем нажмите кнопку OK.
5. Выберите меню удаления, затем нажмите кнопку OK.
Как очистить буфер принтера
Как очистить очередь на печать через настройки Windows:
Выберите принтер, на котором нужно отменить задание — кликните по нему. Выберите Открыть очередь. Должна открыться очередь печати, отображающая все задания на печать для выбранного принтера. Выберите документ, затем выберите « Документ» — « Отмена».
Как сбросить кэш на принтере
Открываем оснастку «Службы», через окно выполнить (Нажмите Win и R одновременно), введя слово services. msc. Переходите в папку C:\Windows\System32\spool\PRINTERS и все от туда удаляете. Запускаете службу и получаете чистый spooler в вашей системе, как видите реально не более минуты все занимает.
Какие кнопки нажать чтобы очистить кэш
Горячие клавиши:
1. Google Chrome: Ctrl+Shift+Del > Очистить кэш > Очистить историю Ctrl+Shift+Del > Clear browsing data.
2. Internet Explorer: Ctrl+Shift+Del > Временные файлы Интернета > Удалить
3. Mozilla Firefox: Ctrl+Shift+Del > Кэш > Очистить сейчас
4. Safari: Ctrl+Alt+E > Очистить
5. Opera: Ctrl+Shift+Del >Очистить историю
Оставить отзыв (1)
Рассмотрим особенности очистки «подвисшей» очереди печати в системах Windows. Рассмотренная методика позволяет удалить из очереди документы, которые по какой-то причине не печатаются и мешают отправке на печать других файлов и документов.
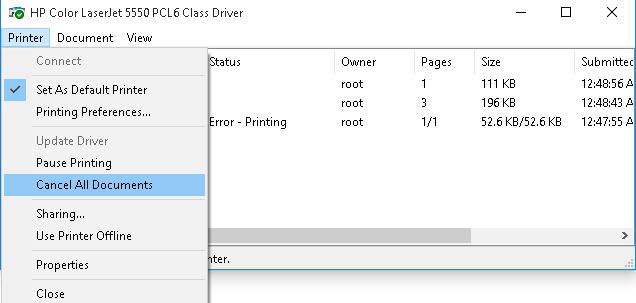
«Мягкий» способ очистки текущей очереди печати принтера выполняется из окна Панели управления (Control Panel ->Devices and Printers). В списке принтеров нужно найти проблемный принтер, щелкнуть по нему ПКМ и выбрать в меню пункт See what’s printing.
 В открывшемся окне управления очередью печати принтера в меню выбираем пункт Printer-> Cancel All Documents . Все документы, в том числе зависшие, должны удалиться из очереди печати принтера.
 В том случае, если какие-то документы не удаляются из очереди печати, значит они в данный момент заблокированы системой или драйвером самого принтера. Они пропадут из очереди печати после перезагрузки. Если перезагрузка выполнить проблематично, можно принудительной удалить все задания из очереди службы печати Windows.
Важно. Приведенная ниже методика очистки очереди печати удаляет ВСЕ имеющиеся задания печати на ВСЕХ принтерах системы. Это нужно иметь в виду, особенно при очистке зависшей очереди печати на выделенном принт-сервере на базе Windows.
Напомним, что при отправке документа на печать на принтер, служба печати Windows (Print Spooler) формирует задание печати и создает два файла: один с расширением .SHD (содержит настройки задания печати), второй — .SPL (хранит собственно данные, которые нужно распечатать). Таким образом, задания печати будут доступны службе печати, даже после закрытия программы, инициировавшей печать. Данные файлы хранятся в каталоге спулера (по умолчанию, «%systemroot%\System32\spool\PRINTERS”). После успешной печати, эти файлы автоматически удаляются из этого каталога, и, соответственно, из очереди печати.
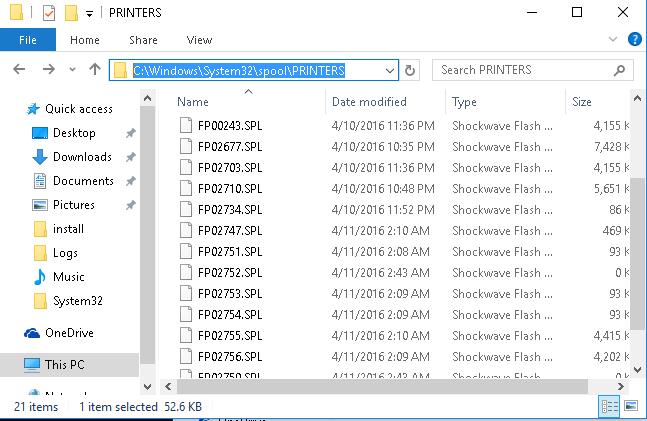
Нам нужно вручную очистить содержимое этой папки, тем самым мы удалим все задания в памяти Print Spooler.
Откройте командную строку с правами администратора и последовательно выполните команды:
net stop spooler
del %systemroot%\system32\spool\printers\*.shd /F /S /Q
del %systemroot%\system32\spool\printers\*.spl /F /S /Q
net start spooler
 Этот набор команд последовательно останавливает службу печати Windows, рекурсивно удаляет все файлы с расширениями *.shd и *.spl из каталога %systemroot%\system32\spool\printers и запускает остановленную службу.
Архив с готовым bat файлом можно скать по ссылке reset_spooler.zip (запускать от имени администратора)
Примечание. В том случае, если скрипт не работает, проверьте, что в свойствах принт-сервера (Панель управления -> Devices and Printers -> кнопка Print Server Properties в верхнем меню -> вкладка Advanced -> в поле Spool folder location указан каталог C:\windows\system32\spool\Printers. В 99% случаев это должно быть так. Если путь к каталогу спулера отличается, нужно будет поправить путь к нему в скрипте. 
Рассмотренные выше методики помогут очистить очередь печати в любой версии Windows, будь то Windows 7, 8 или Windows 10.
Contents
- Why Does This Happen?
- How to Clear Printer Queue in Windows 10
- Cancel the Current Document
- Restart Your Devices
- Fix 1: Clear the Print Queue Manually
- Fix 2: Use the Command Prompt to Clear the Print Queue
- Fix 3: Set up a Batch File to Clear the Print Queue
- Fix 4: Restart the Printer or Reinstall its Driver
- Use the Windows Troubleshooter
- What if My Printer Queue Won’t Clear?

It can be frustrating when you want to use your printer but a previous document is in the queue. You try to print several other files to see if printing would start, but they all get lined up. No error message is received, and yet the status remains “Printing” indefinitely.
If you’re experiencing this issue, follow the steps in this article to learn how to clear your printer queue.
Why Does This Happen?
In Windows, the print files are not directly sent to the printer. They arrive first in the spooler, which is a program that manages all print jobs. The spooler is useful as it enables you to change the order of pending print jobs or delete them.
When there’s a problem, the files just remain in the queue. And once the first file in can’t be printed, neither will those behind it.
A print job may also get stuck if there are background app conflicts.
In addition, the printer’s driver might be problematic and cause issues with the spooler.
How to Clear Printer Queue in Windows 10
There are different solutions to this problem, depending on its cause. We’ll be going over the different fixes one after the other, from simple to complex.
Cancel the Current Document
Sometimes, the solution would be to cancel the file that is not printing correctly.
To delete a print job in Windows 10, just follow these steps:
- Go to Settings and select Printers.
- Click on Open Queue and select the problematic file.
- Cancel the print job.
If the printer still doesn’t respond, go to the Printer Menu and cancel all documents.
Restart Your Devices
If there’s still no result, the next step would be to restart your computer and the printer. Sometimes, your operating system or system memory gets stuck and halts some processes. It’s also possible that your printer is no longer responding due to some system glitches.
A simple reboot can fix the problem in this case.
Shut down your system and unplug it from its power source. You should also unplug your printer from the power source. Wait for a minute or two and plug both devices in again. Turn them on and try printing the file again.
You have tried the simple fixes outlined above to no avail. Have no fear. This is a common issue. And there are easy ways to fix a print queue that isn’t clearing in Windows 10.
There are three solutions you can use:
- Clear the print queue in Windows manually.
- Clear the print queue using the command prompt.
- Set up a batch file to clear the print queue.
- Restart the printer and reinstall the driver.
- Use Windows Troubleshooter.
Fix 1: Clear the Print Queue Manually
You have to manually disable the Print Spooler service and delete the files in the queue. The process is easy. Here’s how to do it:
- Switch the printer off.
- Click the Windows 10 search button in the taskbar.
- Type Services in the search box.
- In the Services window, navigate to Print Spooler.
- Double-click Print Spooler.

- In the window, click on the Stop button to disable Print Spooler.
- Open File Explorer on Windows 10 task bar.
- Go to C:\Windows\System32\spool\PRINTERS. You’ll find the folder that contains a log of documents on the print queue.
- Press Ctrl + A on your keyboard to select all the files in the folder. Delete them.
- Open the Printer Spooler dialogue box again.
- Go to the Startup Type drop-down menu and select Automatic.
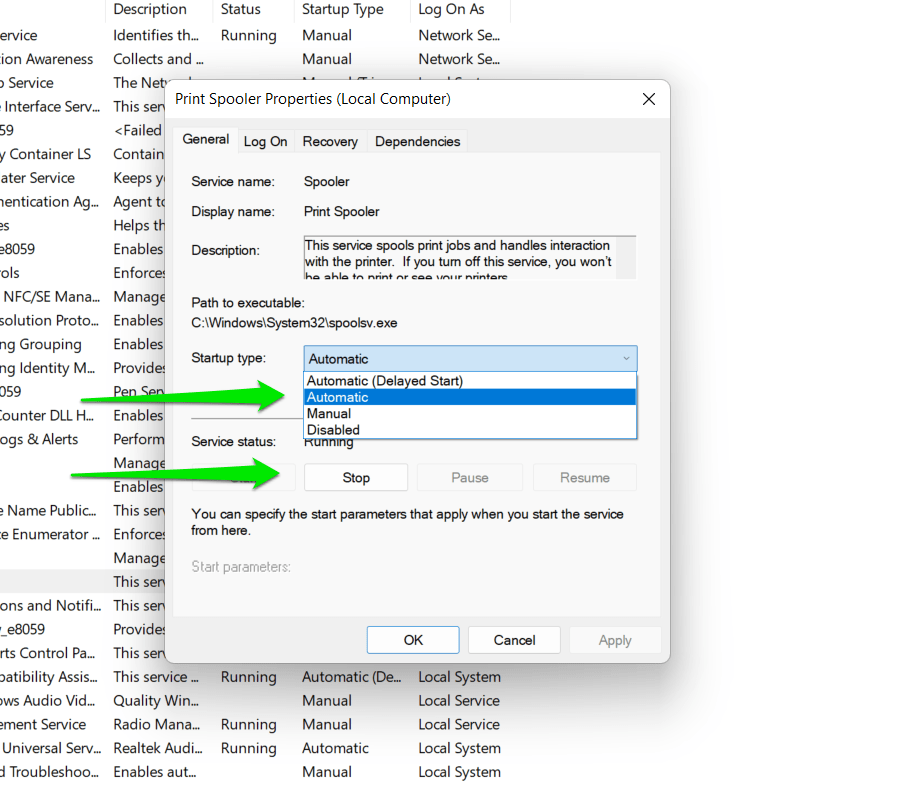
- Click on the Start button to turn the Printer Spooler on.
- Turn your printer on and try to print a file.
Fix 2: Use the Command Prompt to Clear the Print Queue
The fastest way to clear the print queue is through the command prompt. All you have to do is enter and run a few commands:
- Turn off your printer.
- Press Windows key + X.
- In the Command Prompt (Admin) window, type net stop spooler and hit enter on your keyboard. This will switch off the print spooler.
- Type “del C:\Windows\System32\spool\PRINTERS* /Q” (without the quotes) and press the Return key. The printer job queue will now be erased.
- Type “net start spooler” (no quotes) and press Enter on your keyboard. This will switch the print spooler back on.
- Turn on your printer and print a file.
Fix 3: Set up a Batch File to Clear the Print Queue
To clear the held-up print queue with a batch file, follow these steps:
- Turn off your printer.
- Open the search box, type Notepad and hit enter on your keyboard.
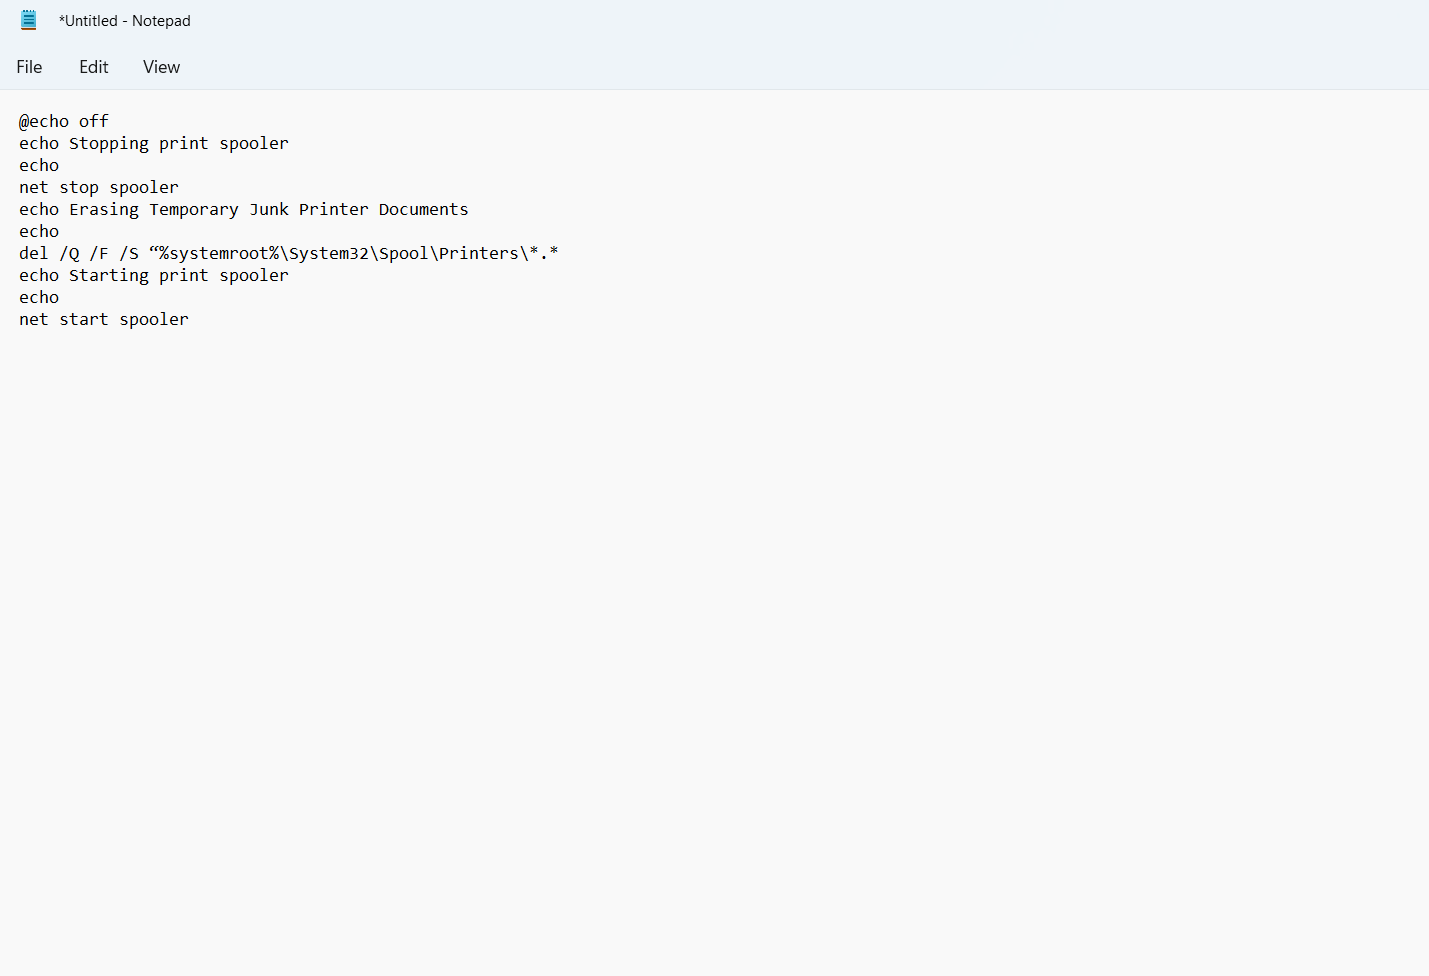
- Copy the text below and paste in Notepad:
@echo off
echo Stopping print spooler
echo
net stop spooler
echo Erasing Temporary Junk Printer Documents
echo
del /Q /F /S “%systemroot%\System32\Spool\Printers\*.*
echo Starting print spooler
echo
net start spooler
- Go to File > Save as. In the window, under the Save as type drop-down menu, select All Files.
- In the File name box, delete *.txt and type Printer Queue.bat (You can save the file with any name. But whatever it is, .bat should be at the end).
- Click on Save. Note the folder the file is saved in.
- Open the folder that contains the batch file. To run it, click the Printer Queue batch.
- Turn your printer on. Try printing a document.
Fix 4: Restart the Printer or Reinstall its Driver
As we mentioned, the printer’s driver may be acting up. The driver is the piece of software that facilitates communication between the printer and the operating system. It could become corrupt, outdated, or missing and start causing problems.
To troubleshoot the driver, disable and enable the printer. If that doesn’t work, you can reinstall the driver. Follow these steps:
- Right-click the Windows start button or press the Win + X shortcut.
- Click on Device Manager when you see the Power User menu.
- Once the Device Manager window opens, locate your printer, right-click it, and select Disable.
- After disabling the device, right-click the printer again and click on Enable.
- Try printing the file again to check if the issue has been resolved.
If the print queue is still stuck, try reinstalling the driver. Follow these steps:
- Open the Device Manager, right-click on the printer and click on Uninstall Device.
- Select Uninstall in the confirmation dialog and restart your computer.
- Windows will attempt to reinstall the driver automatically after your system restarts.
- Try printing the file.
You should also consider downloading and installing the printer’s updated driver. This solution should work if your current driver is broken or outdated. Head to the printer’s manufacturer’s website and search for your operating system’s driver.
You can also get rid of driver issues automatically using a dedicated tool such as Auslogics Driver Updater. When you install and run the program, it automatically checks for outdated, corrupt, and missing drivers and installs their latest versions.
Using Auslogics Driver Updater means you won’t have to bother about downloading and installing drivers yourself. If your printer’s driver is the problem, the tool will let you know and ensure you install the correct update for your operating system.
Use the Windows Troubleshooter
Windows has a built-in troubleshooter that can help you find and fix problems with devices like your printer. Follow these steps:
- Launch the Settings application using the Win + I shortcut.
- Click on Update & Security when you see the Settings application.
- Go to the left side of the Update & Security window and click on Troubleshoot.
- Click on Additional Troubleshooters on the Troubleshoot page and select Printer.
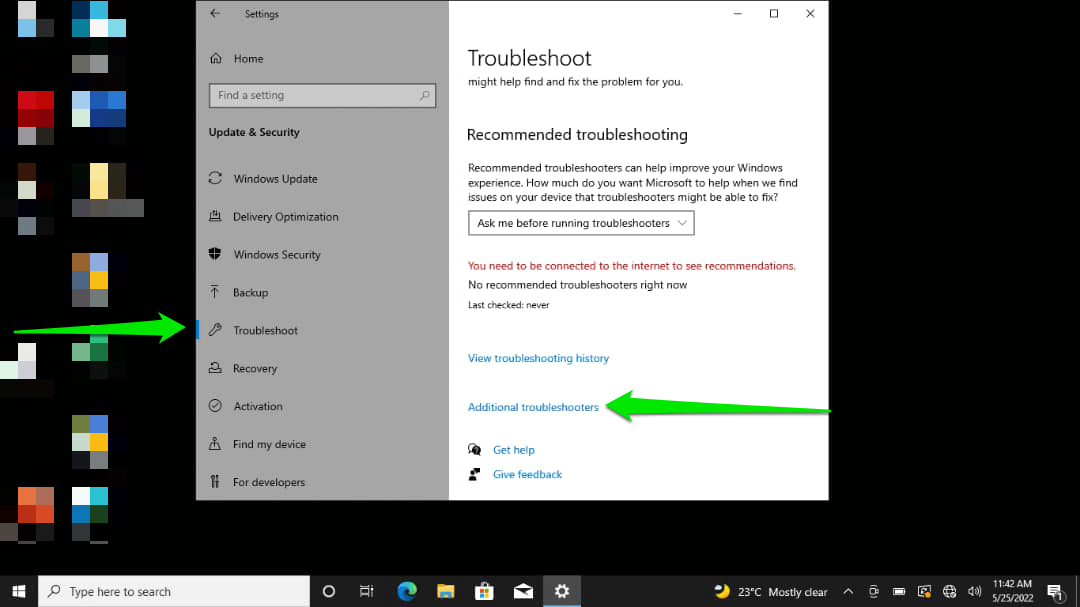
- Run the troubleshooter.
- If the program finds issues, allow it to fix them.
What if My Printer Queue Won’t Clear?
If you often get files in the printer queue that won’t print or clear, it may be a compatibility issue with the data to be printed. This is common when you try to print a web page with fonts or styles that your printer cannot identify or convert to printed text. The fixes outlined above should resolve the issue.
Configuration issues can also cause a glitch in the print job queue – for example, when you try to network print to a missing IP address. Uninstall and reinstall the printer software to fix it. You should also carry out some troubleshooting on your network or reach out to your technician for assistance.
We hope you find these solutions useful…
Do leave a comment in the section below.
by Matthew Adams
Matthew is a freelancer who has produced a variety of articles on various topics related to technology. His main focus is the Windows OS and all the things… read more
Updated on
Many users reported that the printer queue won’t clear on their PC. This can be a big problem and prevent you from printing other documents. However, you can fix that issue with these solutions.
All printers have a print queue that queues documents for printing. However, that queue can sometimes get jammed, or stuck, which can halt printing altogether. When this happens, some might try manually deleting documents from the print queue; but find that the Cancel option doesn’t work. Then rebooting Windows might not even do the trick. These are a few ways to fix a print queue that isn’t clearing in Windows 10.
How we test, review and rate?
We have worked for the past 6 months on building a new review system on how we produce content. Using it, we have subsequently redone most of our articles to provide actual hands-on expertise on the guides we made.
For more details you can read how we test, review, and rate at WindowsReport.
Can’t delete print job in Windows 10? Try these solutions
- Clear the Print Queue in Windows
- Clear the Print Queue with the Command Prompt
- Set up a Batch File to Clear the Print Queue
Solution 1 – Clear the Print Queue in Windows
One way to fix the problem with the printer queue on your PC is to manually clear the queue. To do that, you need to manually disable the Print Spooler service and delete the files from the queue. This is simpler than it sounds, and you can do it by following these steps:
- Firstly, switch off the printer.
- Click the Windows 10 Cortana button and input ‘services’ into the search box.
- Now you can select Services to open the window shown directly below.

- Scroll down until you get to Print Spooler. Then you can double-click Printer Spooler to open its window below.

- To disable the Printer Spooler, press the Stop button.
- Press the File Explorer button on Windows 10 taskbar.
- Now navigate to C:WindowsSystem32spoolPRINTERS in File Explorer. That will open a folder that includes a log of open and unprinted documents in the queue to print.
- Hold the Ctrl key and select all the files in the folder. Then press the X Delete button at the top of File Explorer to erase them.
- Next, open the Printer Spooler Properties dialog window again. Press the Start button on that window to switch the Printer Spooler back on.
- Now turn your printer back on and print something.


Solution 2 – Clear the Print Queue with the Command Prompt
You can also clear the print queue on your PC right from Command Prompt. This is a bit advanced solution, but it’s also the fastest one since you can perform it simply by running a few commands:
- First, press the Win key + X hotkey to open the Win + X menu.
- Now select Command Prompt (Admin) to open the window directly below.

- Type ‘net stop spooler‘ into the Command Prompt and press Enter to switch the print spooler off.
- Next, enter ‘del %systemroot%System32spoolprinters* /Q‘ into the Command Prompt and press Return key. That will erase the stuck printer queue.
- Input ‘Net Start Spooler‘ to restart the Printer Spooler.
- Switch on your printer and start printing.


- Full Fix: Print Spooler keeps stopping on Windows 10/11
- Fix: Credentials Supplied Are Not Sufficient Error on Windows 11
- 4 Ways to Fix PCL XL Error Subsystem Kernel on Windows
Solution 3 – Set up a Batch File to Clear the Print Queue
Batch files can also fix a number of things. That includes stuck printer queues. This is how you fix the print queue with a batch file.
- Enter ‘Notepad’ in your Cortana search box and select to open the Notepad.
- Copy and paste the following text into Notepad with the Ctrl + C and Ctrl + V hotkeys.
- @echo off
- echo Stopping print spooler.
- echo.
- net stop spooler
- echo Erasing Temporary Junk Printer Documents
- echo.
- del /Q /F /S “%systemroot%System32SpoolPrinters*.*
- echo Starting print spooler.
- echo.
- net start spooler
- Click File > Save as to open the window below.

- Select All Files from the Save as type drop-down menu.
- Delete *.txt from the File Name box, and replace it with Printer Queue.bat. The file can have any title, but it must include .bat at the end.
- Click Save to save the batch file.
- Open the folder you saved the batch file to, and then you can click the Printer Queue batch to run it.
- Turn your printer on and print a document.

Those are three quick and effective fixes for a printer queue that isn’t clearing in Windows 10. If your printer queue often gets stuck, consider updating the printer’s driver with Device Manager. You can save new drivers to Windows 10 from printer manufacturer websites. In addition, you can also run a Printer troubleshooter in Windows 10.
![]()
Иногда пользователи отправляют на печать слишком много документов, из-за чего в списке задач принтера создается большая очередь. Обычно такое происходит при использовании одного принтера многими людьми (например, в большом офисе) или из-за многократного отправления документов на печать неопытным пользователем. В таких ситуациях на принтере формируется очередь печати, что потенциально приводит к некоторым проблемам – повторной печати одних и тех же документов, невозможности распечатать какую-либо документацию в срочном порядке, зависанию печати и т.д. Чтобы решить эти и многие другие проблемы, необходимо внести изменения в работу принтера, а именно очистить очередь печати принтера любым доступным способом.
Сегодня мы подробно рассмотрим этот вопрос. Сначала расскажем, как посмотреть очередь печати принтера в Windows 10. Затем представим подробное описание методов, позволяющих отменить очередь печати в принтере. В конце подготовленной статьи подскажем, что делать, если очистить очередь печати стандартными способами не получается.
Содержание
- Как посмотреть очередь печати принтера?
- Как очистить очередь печати в Windows 10?
- Как удалить очередь печати на принтере через свойства принтера?
- Как убрать очередь печати на принтере через службу Диспетчер печати?
- Что делать, если не удается очистить очередь печати в Windows 10?
Как посмотреть очередь печати принтера?
В ряде случаев пользователи принтеров не уверены, что очередь печати заполнена ненужными документами, поэтому не спешат очищать список задач. В таких ситуациях стоит изначально глянуть, какие документы находятся в очереди печати, и только затем принимать решение о целесообразности ее очистки. Чтобы посмотреть очередь печати принтера в Windows 10, последовательно выполните нижеперечисленные действия:
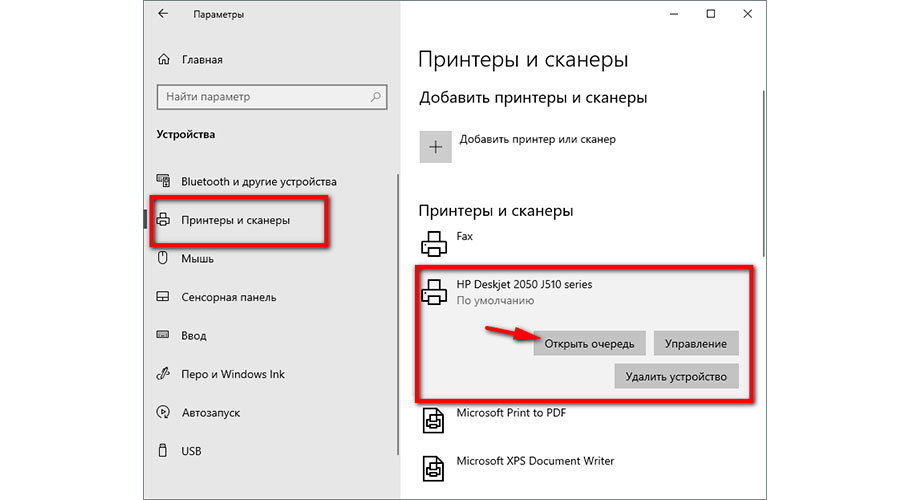
- убедитесь в подключении принтера к ПК, после чего нажмите на компьютере Пуск;
- последовательно выберите пункты меню Параметры, Устройства, Принтеры и сканеры;
- найдите требуемый принтер в списке подключенных устройств и нажмите «Открыть очередь».
Если открывшийся список забит ненужными документами, то можно удалить очередь печати на принтере и отправить документы на печать заново. Если в списке только необходимые файлы, то и менять ничего не нужно. Если присутствуют лишние материалы (но большая часть задач требует выполнения), то достаточно отменить неактуальные задачи (опция «Отменить» в контекстном меню конкретной задачи). Если ненужных материалов слишком много (или есть сомнения в целесообразности распечатки конкретных файлов), то есть смысл целиком отменить очередь печати, а затем вручную запустить процесс распечатки нужных документов заново.
Названия пунктов меню могут отличаться от указанных из-за особенностей конкретных (особенно неофициально модифицированных) версий Windows. Если Вы не найдете точных совпадений, то выбирайте схожие по названиям пункты. С высокой вероятностью это поможет добиться нужного результата.
Как очистить очередь печати в Windows 10?
Процесс очистки очереди печати не отличается сложностью. Более того, возможно выполнение этой задачи разными способами. Далее мы рассмотрим самые легкие методы достижения цели, не требующие от пользователей какой-либо подготовки или высокого уровня владения ПК и оргтехникой.
Как удалить очередь печати на принтере через свойства принтера?
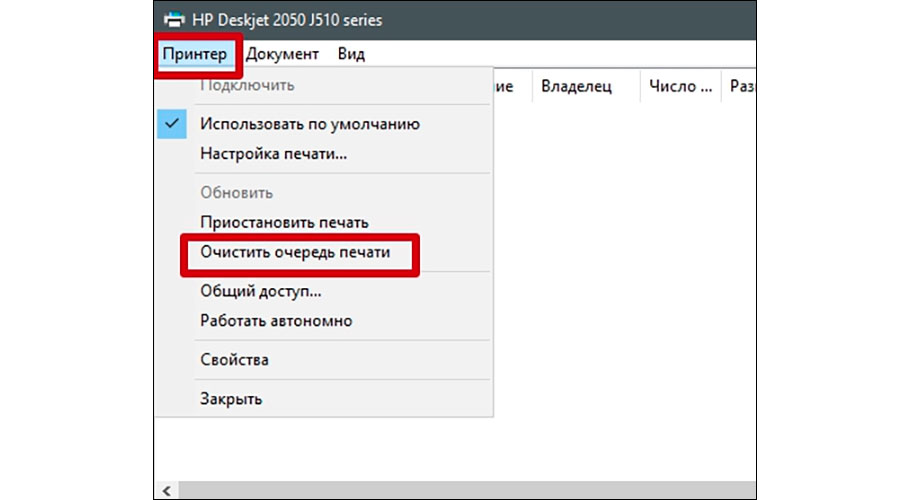
Это самый быстрый вариант. Для очистки надо зайти в Свойства принтера и выбрать функцию «Очистить очередь печати». Сделать это можно двумя методами. Первый мы уже описывали в прилагаемой выше инструкции «Как посмотреть очередь печати принтера». Второй выглядит следующим образом:
- зайдите в Панель управления (если не найдете соответствующего ярлыка, то просто введите упомянутое словосочетание в поисковую строку Windows рядом с кнопкой Пуск), а затем перейдите в меню Просмотр устройств и принтеров;
- найдите в списке нужный принтер, перейдите в его контекстное меню (нажмите на название ПКМ), выберите Просмотр очереди печати;
- в строке управления (находится в верхней части открывшегося окна) нажмите на Принтер (крайняя левая кнопка) и выберите опцию «Очистить очередь печати».
Если в трее есть значок используемого принтера, то решение можно упростить. Достаточно будет зайти в свойства принтера нажатием на соответствующий значок, а затем удалить очередь печати на принтере уже известным вам способом.
Как убрать очередь печати на принтере через службу Диспетчер печати?
Если первый способ не дал результата, то стоит попробовать убрать очередь на печать с помощью отключения и последующего запуска службы Диспетчер печати. Перечень требуемых действий выглядит таким образом:
- включите Панель управления и зайдите в раздел Администрирование;
- в перечне доступных опций нажмите на строку Службы;
- в новом окне найдите строку Диспетчер печати, нажмите на нее ПКМ и выберите «Остановить».
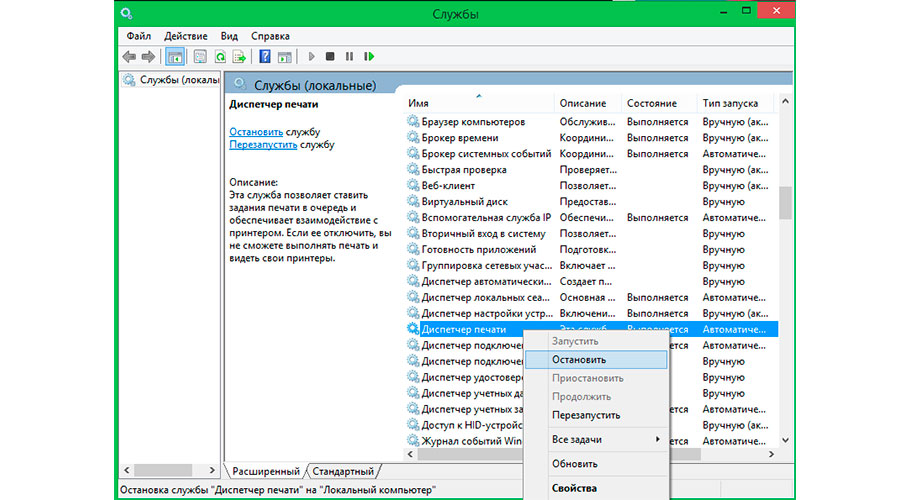
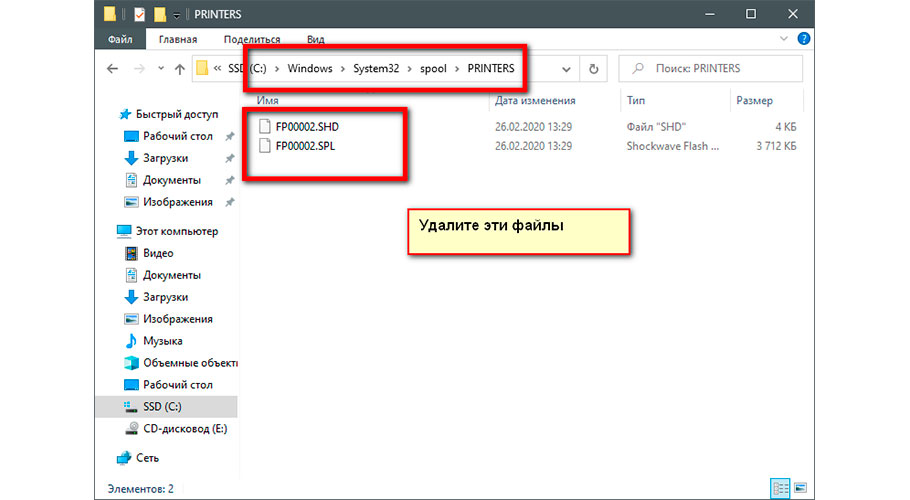
Далее понадобится найти папку C:\Windows\System32\spool\PRINTERS\ (сделать это можно через Компьютер или любой файловый менеджер на выбор пользователя) и вручную удалить все данные из этой папки. Затем останется лишь вернуться к предыдущему окну и снова активировать работу Диспетчера печати (для этого достаточно нажать на соответствующую строку ПКМ и выбрать опцию «Запустить»). Альтернативный вариант применения этого способа представлен на видео в конце статьи.
Обратите внимание, что применение этого способа сбросит очередь печати на всех подключенных принтерах, поэтому сначала завершите печать на тех устройствах, где нет проблем с очередью, и только затем применяйте представленный метод.
Что делать, если не удается очистить очередь печати в Windows 10?
Если два вышеперечисленных метода не помогли, то проблема, скорее всего, заключается в некорректно работающем программном обеспечении. В этом случае мы рекомендуем сначала обновить драйвера для принтера. Если не поможет – выберите проблемный принтер в Диспетчере устройств и запустите встроенное средство диагностики неполадок. С высокой долей вероятности это действие позволит решить текущую проблему и предотвратит возникновение ошибок при печати в будущем. При отсутствии результата обратитесь за консультацией к производителю принтера.
Ваше Имя:
Ваш вопрос:
Внимание: HTML не поддерживается! Используйте обычный текст.
Оценка:
Плохо
Хорошо
Введите код, указанный на картинке:

