Item Preview
There Is No Preview Available For This Item
This item does not appear to have any files that can be experienced on Archive.org.
Please download files in this item to interact with them on your computer.
Show all files
94
Views
1
Favorite
DOWNLOAD OPTIONS
Uploaded by
RetroescentTech
on
SIMILAR ITEMS (based on metadata)
Windows 7 ISO For VMware is an ideal OS for professionals and individuals. It comes with features that make every task execution easy and smooth. It is even seen as superior to Windows Vista by users.
Table of Contents
After its release in 2009, this operating system is still famous. This operating system is the best for its performance, stability, and user interface.
What is VMware
VMware is there to help you use your computers in various ways. It makes it easier to reach programs and files. For example, you can run different programs on your computer simultaneously. The main benefit is that it allows you to install multiple operating systems on your computers.
For example, if you run windows vista and want to try windows 7, you can do this by installing a guest OS of Windows 7. That is how; you can even get an entire virtual domain on the same PC.
So, now you no longer have to purchase multiple PCs to meet the certification and development needs. If you have a laptop with impressive processing power and enough space, you can install multiple OS on the same PC using VMware.
DOWNLOAD
Download VMware
DOWNLOAD: Windows 7 ISO For Virtual BOX
VMware Tools:
The latest version of the VMware tool contains the automatically installed tools. Therefore, you don’t need to worry about the VMware tools. It already has the following tools;
- VMware device drivers
- VMware tools service
- User process
- Tools Control panel
Does VMware run on windows 7?
A virtualization platform allows the installation of multiple operating systems on a computer. You can experiment with different OS without affecting your primary operating system.
Does VMware run on windows 7, 32-bit?
Yes, it does. VMware workstation 16 runs various guest operating systems.
Is VMware free for a user?
Yes, if you want to use VMware for personal and non-commercial use, then it is free. You can use it at home for free.
Which one is Better, VMware or Virtual Box?
Both are great software that allows you to run multiple OS on a single desktop. However, if you have worked on VMware, you know it has better data management tools and compatibility. Secondly, it is ideal for business use as well. Generally, the virtual machines that VMware creates are faster than the virtual box.
How can I Download Windows 7 for VMware?
- To do so, you need to go to VMware Workstation Download Center.
- Secondly, click the Download link for VMware Workstation for Windows or VMware Workstation for Linux.
- Then, you can click on the download now option.
- If you have an account with Customer Connect, you can log in to your profile to view your account information.
Conclusion
Windows 7 is an incredible operating system you can use. Similarly, VMware is an ideal virtualization program that permits you to run windows seven inside a virtual machine on your computer. You can download it and give it a try for free. Indeed, this is the best program for all users. You can benefit greatly from this software.
Yaseen Ali is a Passionate Gamer and tech enthusiast with a deep love for exploring the virtual and digital realms. Yaseen has dedicated countless hours to mastering games, dissecting hardware, and staying at the forefront of the tech world.
Search “Windows 7 ISO file” and you will find tons of results. Visit any of them and download Windows 7. Soon you will find either Windows 7 setup files are either broken, corrupted, or infected.
To avoid any of those, you can use the given link below to download Windows 7 ISO for PC and laptop. You can also use Windows 7 ISO for VirtualBox and VMware too. From using Windows 7 for upgrading your system from earlier versions of Windows such as Windows XP to perform a clean installation on a PC, all of them can be done using the setup file of Windows 7.

Windows 7 is a great option for businesses and corporations. While Windows 7 is a great option to perform from basic to advanced work on the other hand the extended support for Windows 7 has been ended too.
Microsoft Windows 7 reached its end of life on January 14, 2020. Only reason now users are using Windows 7 is cause they are installing it on older hardware or want to perform virtualization.
While both of them require product keys for installation. Product keys can be accessed from retail stores or from sites online. Whereas downloading ISO files is quite a challenge, as you might get infected files with the system files of Windows 7.
Why should you download from us?
A few years ago, users who had Windows 7 product keys had the option to download the setup of Windows 7 in an ISO file from Microsoft’s official page.
However; now you can’t even download the ISO file from the official Microsoft page. The only way to get Windows 7 is to get it from third-party sites. While they provide the ISO files for free, you might also get:
- Corrupt Windows 7 system files.
- There is the possibility that the system files of Windows 7 can be missing.
- The setup file of Windows 7 can be infected by viruses, malware, or spyware.
So, use the links to download Windows 7; create a bootable USB, upgrade your Windows, perform a clean installation, or do virtualization. Or you can also Dual Boot Windows 11 and Windows 7
Windows 7 ISO Free Download for VirtualBox

Use a great OS with low spec requirements. Here you will use the direct link to download the original untouched ISO file full version of Windows 7. It is the offline installer of Windows 7 that can be used on 32-bit systems and 64-bit systems.
Microsoft Windows 7 was the successor of Windows XP and was later succeeded by Windows 8.1. The OS is great in terms of stability and performance. And on installing the OS, you will get tons of powerful tools.
The OS comes in different editions each for a specific purpose. So, here are all the editions of Windows 7 with links to download them too.
Related: Free Download Windows XP ISO for VirtualBox

Windows 7 Starter
The most basic edition of Windows 7. This edition was for users with low-spec PC. It was available for 32-bit CPU architectures PC only and was for basic uses. The edition lacked tons of features but was the most affordable edition of Windows 7.

Windows 7 Home Basic
Home basic was for home users. It was the edition with multi-media support. This edition of Windows 7 has an Aero theme with Aero visual graphic support. Windows has all the basic features and tools needed for a day-to-day user.

Windows 7 Home Premium
In Windows 7 Home Premium, you will find all the entertainment tools. Home Premium also has an Aero theme but also a clear glassy look. In this edition of Windows 7, Microsoft also added the Media Center too.

Windows 7 Professional
Professional edition was released for small businesses. This edition of Windows had all the networking tools required for a business. As a comparison to Home Premium, you will find Professional improved in terms of performance and number of features.

Windows 7 Enterprise
You will find Enterprise more appealing as compared to previous editions. This edition was released for large companies and organizations. It was suitable for both national and international firms. All the tools required for a big company are present in this edition with additional security.

Windows 7 Ultimate
Ultimate editions it the most powerful edition in Windows 7. You will find all the other features present in Ultimate. Features such as Home Group, Jump list, Snap, Windows Search, BitLocker, Windows Defender, Windows Firewall, and much more.
Windows 7 VirtualBox Image Download

Previously on Microsoft’s official site, an Image file of Windows 7 was available. You had the option to download Windows 7 ISO Image for VirtualBox or any other virtual machine.
The ISO IMAGE was provided with “.vbox” extension. Normally you would find them as “setup1.box” or “setup2.box” files.
All work needed was to download it and then directly use it on any Virtual Machine. However; now you won’t find the Windows 7 IMAGE.
And even if I will create one for you, still you can burn it on any device. You can’t create any sort of bootable device. As for just burning the IMAGE file, you will need to perform a great deal of work. Instead, you can download Windows 7 ISO file and use it on your virtual machine.
This way, you have the option to perform virtualization and to make a bootable device too.
How to download Windows 7 ISO Image for VirtualBox for free?
To download Windows 7 ISO Image for VirtualBox, you can visit iTechscreen. Here you can download all ISO Images of Windows, macOS, and Linux. Use the direct link to download Windows 7 ISO Image file for free and there is no need to create any sort of account.
Visit the site, and navigate to Windows 7 ISO. Select your Windows 7 edition and download the ISO file. Get the ISO file for free without any risk of malware, virus, or other threats.

Once you have downloaded the file then you can also use them on VirtualBox. Here are some examples of Windows installed on VirtualBox.
Related: How to Install Windows 11 on VirtualBox?
Related: How to install Windows 10 on VirtualBox?
Requirement for installing Windows 7
If you are having a VirtualBox then I am quite sure that you have all the specs to run Windows 7. However; these are the required minimum specs to run Windows 7 on any system.
- 1 GHz of Processor or above
- 32-bit or 64-bit supported processor
- 15 Gb Hard Disk Space for 32 bit or 20GB Space for 64bit
- DirectX 9 Graphics to use Windows Aero Feature
Use the downloaded Windows 7 ISO to create a bootable USB
Yes, you can use the downloaded Windows 7 file to create a bootable USB. Once you have created a bootable USB, then you can use it to perform a clean installation or to upgrade your system.
Is it legal to download Windows 7?
You can download Windows 7 setup file without any issue. However; you will need to purchase product keys to activate the OS. Using any sort of script file or activator to activate your Windows 7 is totally illegal.
How can I update my Windows 7?
Back in 2020, Windows reached its end of life. This means no more updates for Windows will be provided. The only way to update your Windows is to manually download the updated files. And to download the updated files, you will need to go to the Microsoft Windows catalog.
What is the best version of Windows 7?
In the entire Windows 7 series, Windows 7 Ultimate is probably the best one out there. Ultimate has all the tools and features other Windows editions have. Not only the performance is improved in this edition but the stability is also better. Out of all the Windows 7 editions, you are recommended to use Windwos7 Ultimate.
Where can I download the Genuine ISO file of Windows 7?
To download genuine untouched Windows 7 ISO files, you can visit iTechscreen. Here you can download all versions of Windows files that can be used to upgrade, for a clean installation, or for virtualization purposes. As there is the Windows 7 ISO file for VirtualBox.
Download Windows 7 IMAGE or ISO?
If you are confused between downloading the ISO or Image file of Windows 7 then you are recommended to download the ISO file. As you can perform a clean installation, upgrade your Windows, do virtualization or create a bootable USB with the ISO file. Whereas, Image files can be only used for virtualization only. On other hand to create a bootable device Image will take hours of work.
Виртуализация операционной системы стала широко распространенным явлением среди пользователей, которым требуется запускать различные операционные системы на одном компьютере. Для этого существует множество платформ виртуализации, одной из самых популярных является VMware. Если вы хотите установить Windows 7 на VMware, вам понадобится образ операционной системы.
Windows 7 – одна из самых популярных версий Windows, которой до сих пор пользуются многие пользователи. Однако, скачать официальный ISO-файл с Windows 7 можно только тем, кто обладает оригинальной лицензией на данную операционную систему. В случае, если у вас нет оригинального диска или лицензии, вы можете скачать Windows 7 ISO для VMware.
Скачать образ Windows 7 ISO для VMware можно с различных ресурсов в Интернете. Важно выбирать надежные источники, чтобы избежать загрузки вирусов или нелицензионных копий операционной системы. На самом деле, легально скачать Windows 7 ISO можно только с официального веб-сайта Microsoft, однако, эта возможность отключена для большинства пользователей.
Ниже мы предоставим вам подробную инструкцию, как скачать Windows 7 ISO для VMware с официального сайта Microsoft.
Как скачать Windows 7 ISO для VMware
Если вы планируете установить Windows 7 на виртуальную машину VMware, вам понадобится скачать файл образа операционной системы Windows 7 в формате ISO. В этой статье мы расскажем, как получить Windows 7 ISO для VMware.
Шаг 1: Проверьте системные требования
Перед тем как скачать Windows 7 ISO, убедитесь, что ваш компьютер или сервер соответствуют системным требованиям Windows 7. Убедитесь, что у вас достаточно места на жестком диске и оперативной памяти для установки Windows 7 на виртуальную машину VMware.
Шаг 2: Откройте официальный сайт Microsoft
Откройте веб-браузер и перейдите на официальный сайт Microsoft, чтобы скачать Windows 7 ISO. На этом сайте вы найдете ссылки для загрузки разных версий Windows 7.
Шаг 3: Выберите нужную версию Windows 7
На официальном сайте Microsoft выберите нужную версию Windows 7, которую вы хотите установить на виртуальную машину VMware. В зависимости от ваших потребностей и требований выберите соответствующую версию Windows 7, например, Home Basic, Professional или Ultimate.
Шаг 4: Загрузите файл ISO
Нажмите на ссылку для загрузки выбранной версии Windows 7. Это приведет вас к странице загрузки. На этой странице вы можете выбрать язык и архитектуру системы (32-битная или 64-битная). Выберите нужные параметры и нажмите на кнопку «Скачать».
Шаг 5: Дождитесь завершения загрузки
После нажатия кнопки «Скачать», дождитесь, пока файл образа Windows 7 ISO полностью загрузится на ваш компьютер или сервер. Это может занять некоторое время в зависимости от скорости вашего интернет-соединения.
Шаг 6: Готово!
После завершения загрузки вы получите файл Windows 7 ISO, готовый для использования на виртуальной машине VMware. Теперь вы можете установить Windows 7 на виртуальную машину и начать ее использование.
Установка Windows 7 на виртуальную машину VMware может быть очень полезной, если вам нужно запустить программы или приложения, которые несовместимы с более новыми версиями Windows. Скачайте Windows 7 ISO для VMware и наслаждайтесь использованием Windows 7 на виртуальной машине с помощью VMware!
In this article, we will examine how to set up Windows 7 Ultimate 64 Bit on a new virtual machine using the VMware Workstation 17 Pro virtualization program on the Windows 10 64 Bit operating system.
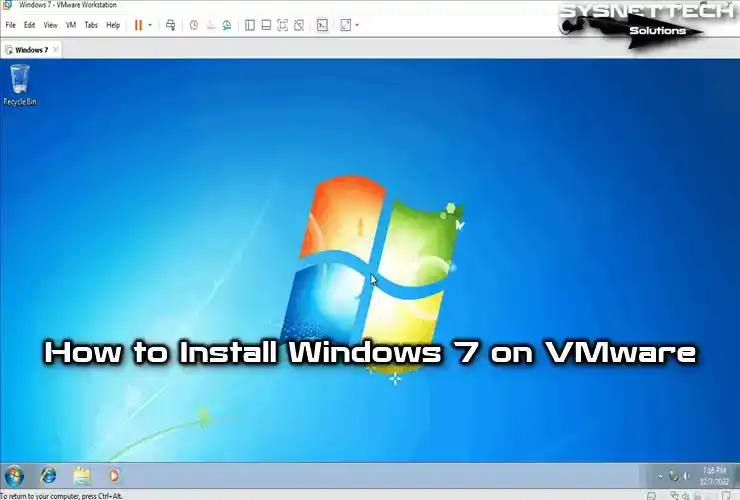
How to Set Up Windows 7 on a Virtual Machine Using VMware Workstation 17 Pro
As you know, VMware Workstation is a virtualization program that allows you to set up and run one or more virtual machines on your physical computer. Although this program is paid, it is more powerful and stable than other software in terms of performance.
With VMware Pro, you can even install old Windows operating systems on your host computer, but sometimes with the development of new versions, some systems may experience incompatibility problems. In such cases, you can troubleshoot by downgrading or installing updates for the relevant operating system.
In our previous articles, we installed Windows 7 using other virtualization programs;
- How to Run Windows 7 on VirtualBox
- How to Run Windows 7 on Hyper-V
- How to Run Windows 7 on Fusion
How to Create a New VM for Windows 7
You may not be able to run Windows 7-compatible software on your Windows 10 computer. Therefore, you can install a compatible operating system for the program you want to run by using virtualization software without having to install Windows 7 on your PC from scratch.
Step 1
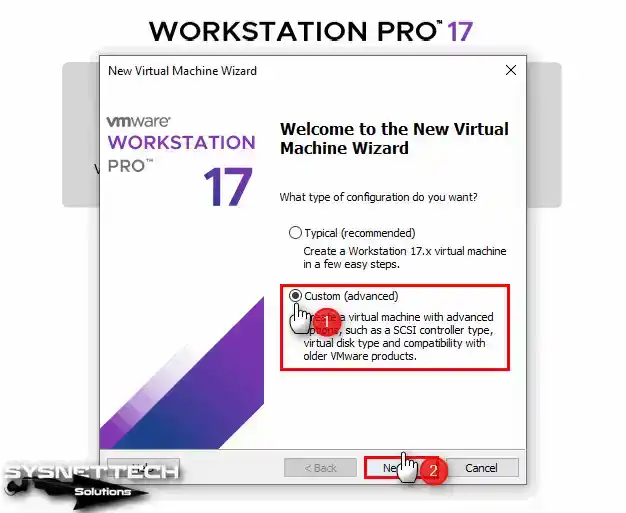
Open VMware Workstation 17 Pro and click Create a New Virtual Machine to create a new virtual computer.
Next, the New Virtual Machine Wizard window will open. In this window, select the Custom (Advanced) option to make more stable settings and click the Next button.
Step 2
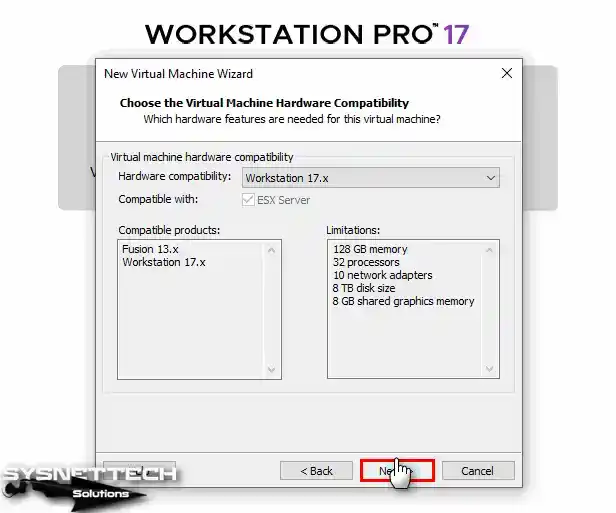
In the VMware Hardware Compatibility window, select the latest version (Workstation 17.x) and then click the Next button.
Step 3
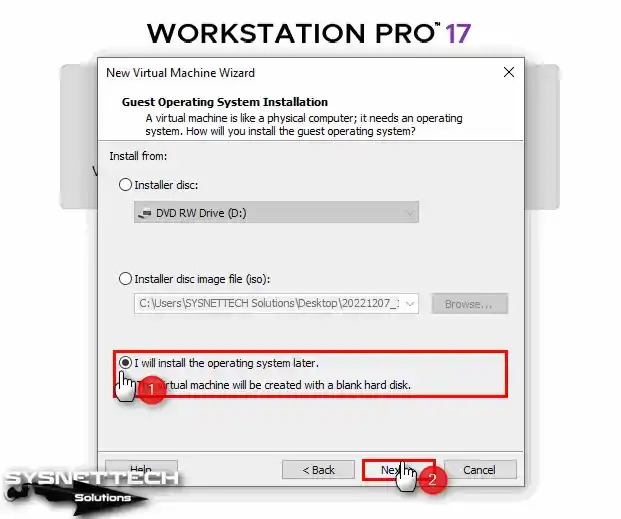
In this step, when you add the Windows 7 ISO file to the virtual machine, other settings will be automatically selected by the virtualization program, and you will also be able to configure fields such as license key or username.
To add the ISO file to the virtual machine later and start the installation later, check I will install the operating system later and click Next.
Step 4
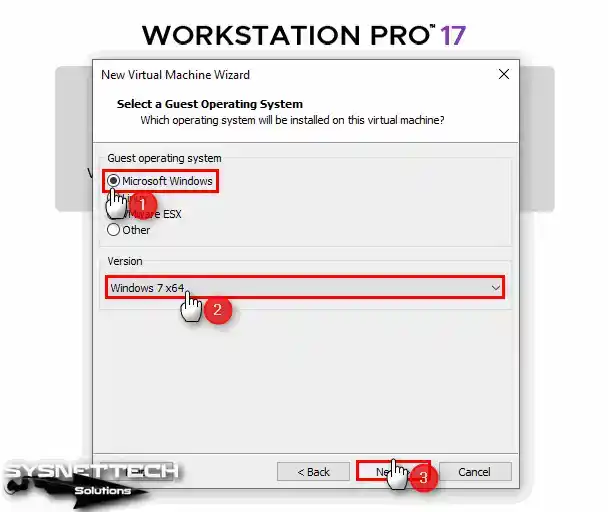
In the Guest operating system selection window, first tick Microsoft Windows, and then select Windows 7 x64 from the Version section and click the Next button.
Step 5
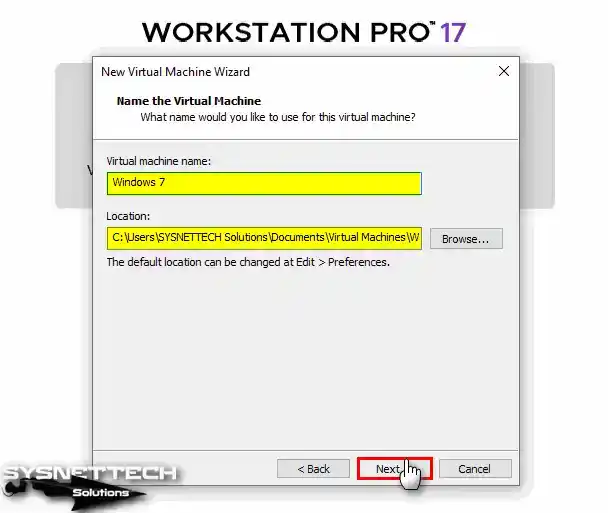
In the Virtual Machine Name window, specify a name for your virtual machine, and select the location where you want to store the virtual machine in the Location section.
In this step, you can also store the virtual machine files on an external HDD, but if your host computer has an NVMe or SSD disk, we recommend that you install it on the existing drive.
Step 6
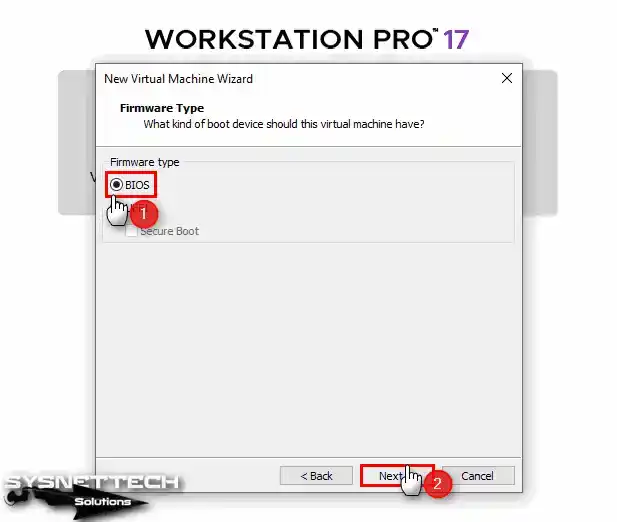
In the Firmware Type window, select the BIOS commonly used for legacy systems and click Next.
Step 7
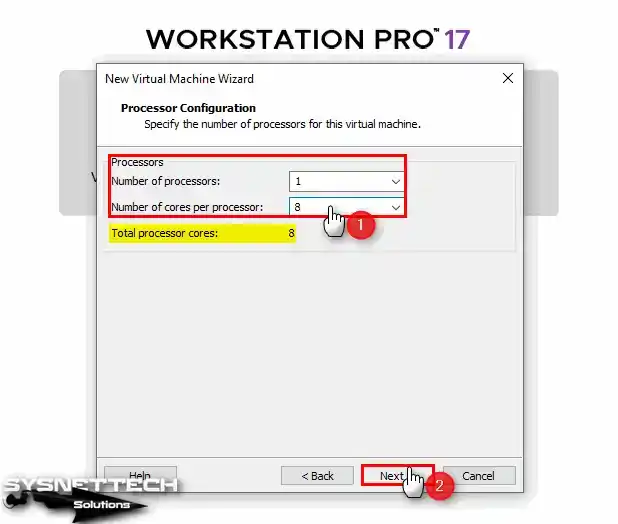
You can set the number of processors or cores here, depending on your host’s processor hardware type and performance. For example, you can configure 1 processor and 8 cores per processor for the virtual computer.
Step 8
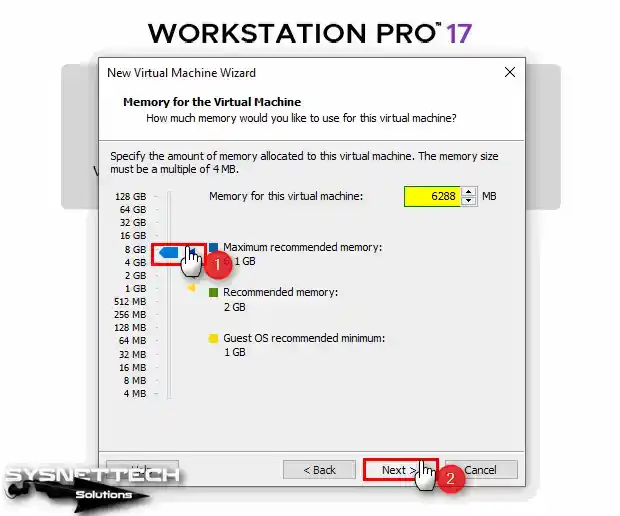
Configure the recommended or maximum memory size for your Windows 7 virtual computer, or specify half the size of RAM installed on your host here.
Step 9
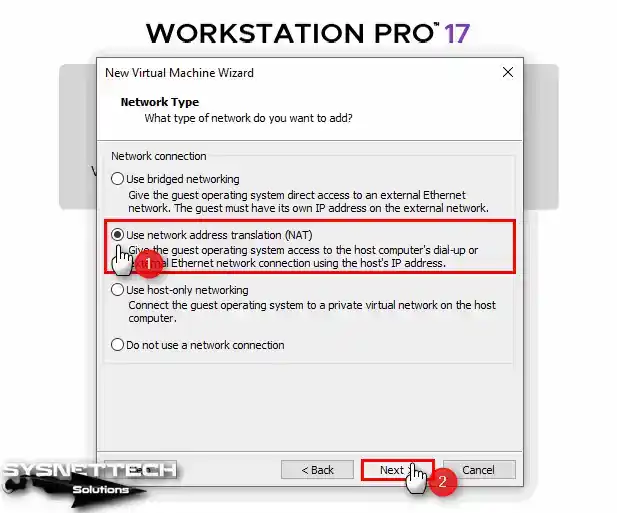
Select NAT, which is selected by default in the Network Type window, and click the Next button.
Step 10
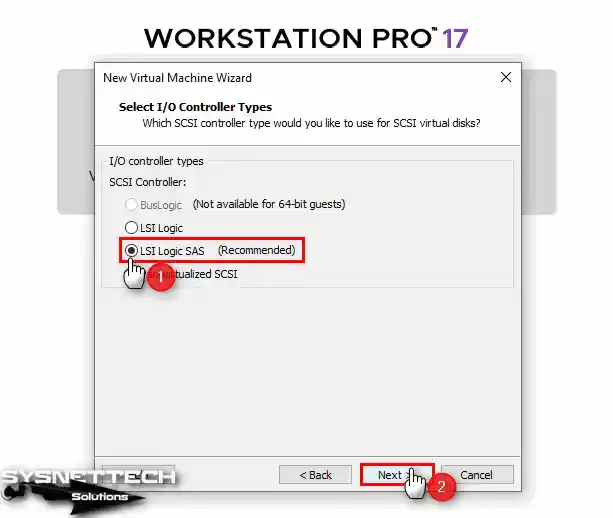
In the I/O Controller types window, check LSI Logic SAS (Recommended) and click Next.
Step 11
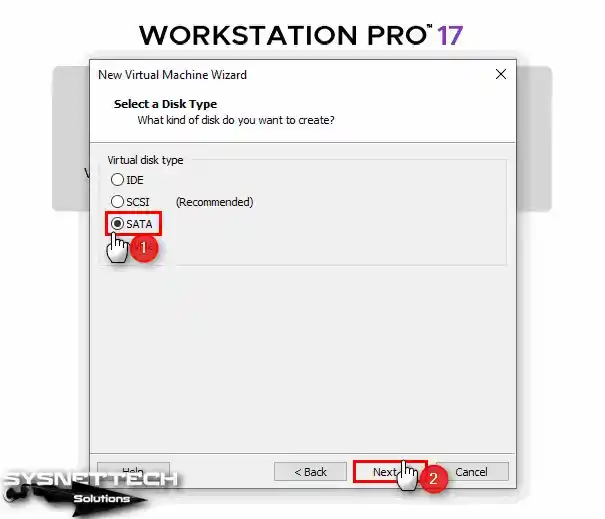
Check SATA in the disk type window and click Next.
Step 12
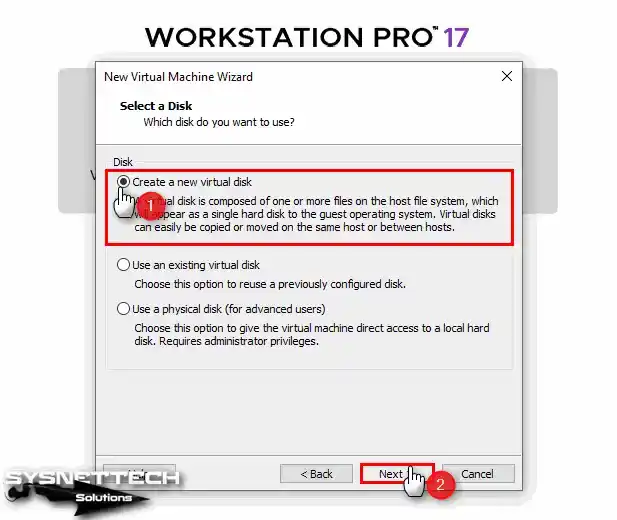
You need to create a new virtual disk for the virtual machine. Check the Create a new virtual disk option and click the Next button to continue.
Step 13
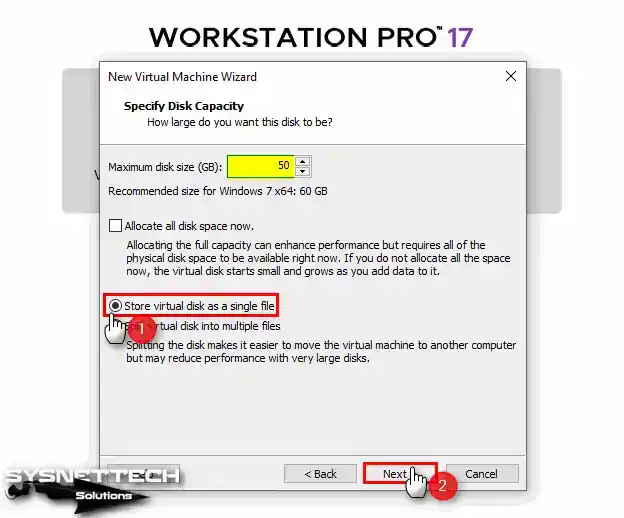
A disk size of 50 GB will be sufficient for a Windows 7 virtual machine. However, depending on the work you will do, determine the disk size and select the Store virtual disk as a single file option.
Step 14
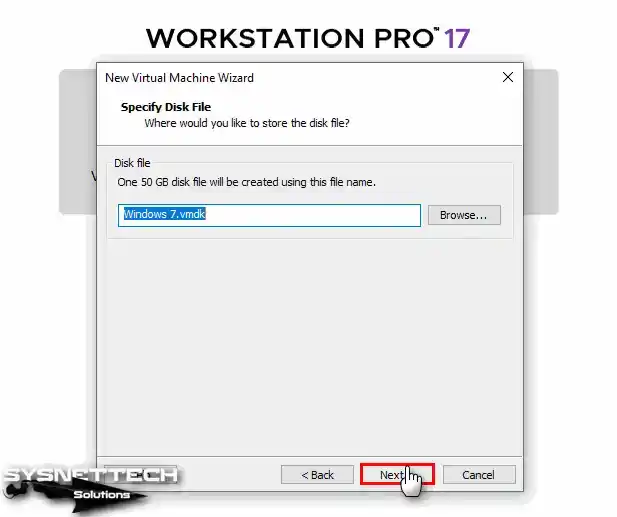
Leave the storage location of the disk file in the default location and click Next without changing the name of the disk file.
Step 15
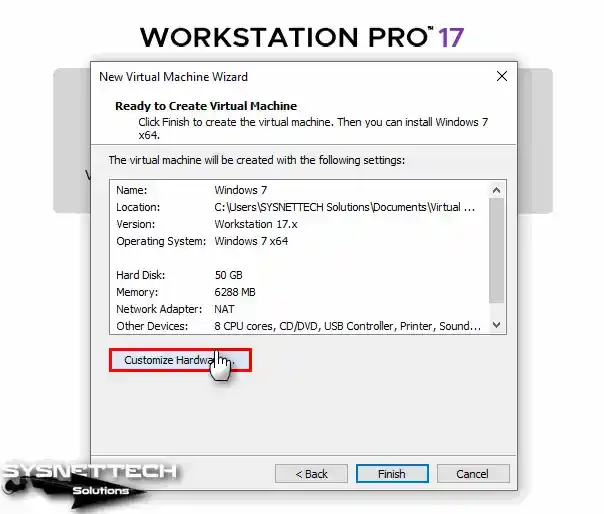
At the final stage of creating the virtual machine, click the Customize Hardware button.
Step 16
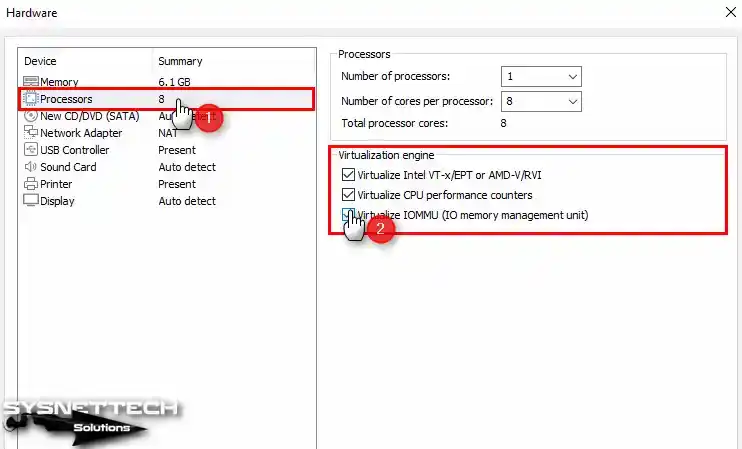
Click on the processor hardware in the virtual machine settings, and then tick the Virtualize Intel VT-x/EPT or AMD-V/RVI, Virtualize CPU Performance Counters and Virtualize IOMMU (IO Memory Management Unit) options.
Step 17
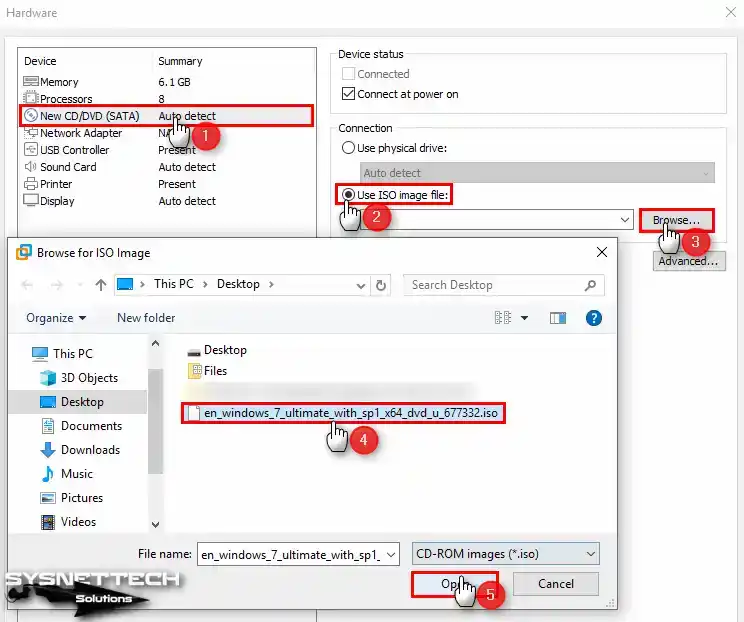
Click the CD/DVD device and click the Browse button to add the ISO file to the virtual machine to set up Windows 7. Then, download the Windows 7 ISO file that we used in this article to your computer by clicking this link, and then select the image file and click the Open button.
Step 18
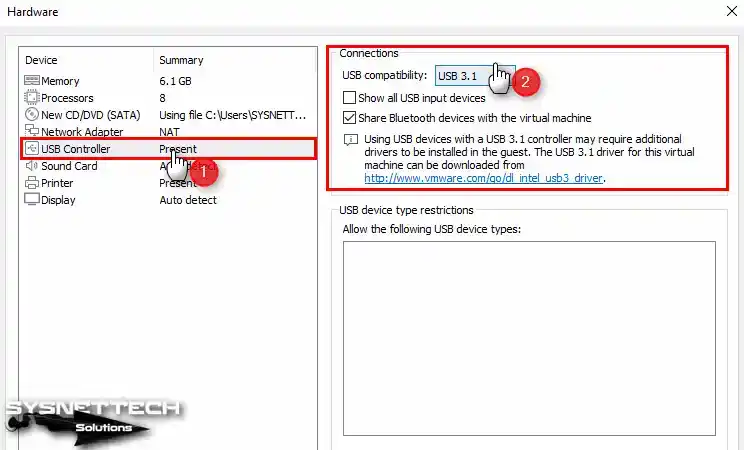
Click the USB Controller device and configure the compatibility setting to 3.1 and tick the Show all USB input devices and Share Bluetooth devices with the virtual machine options.
Step 19
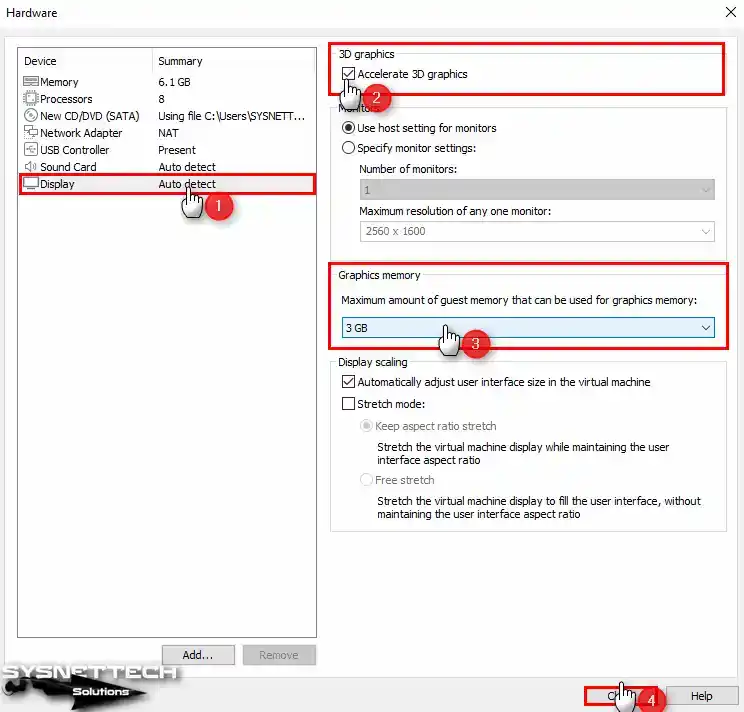
After clicking on the display device, enable 3D graphics acceleration from the options listed on the right and set the Graphics Memory value to half the amount of RAM you have specified for the virtual machine.
Step 20
To install Windows 7 on VMware, after creating a new virtual machine, click the Finish button to close the guest machine’s hardware properties window.
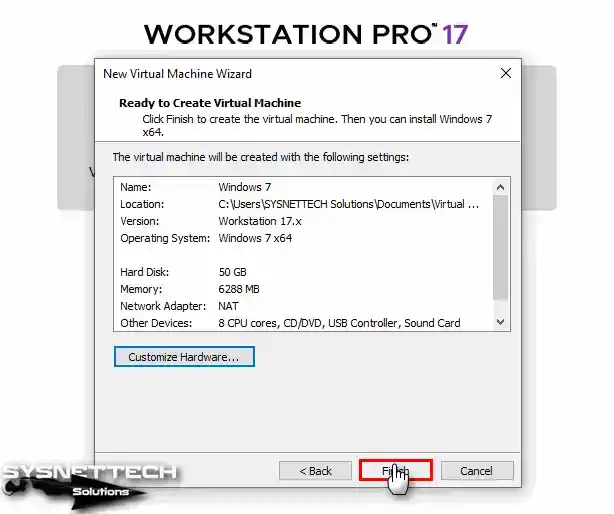
Step 21
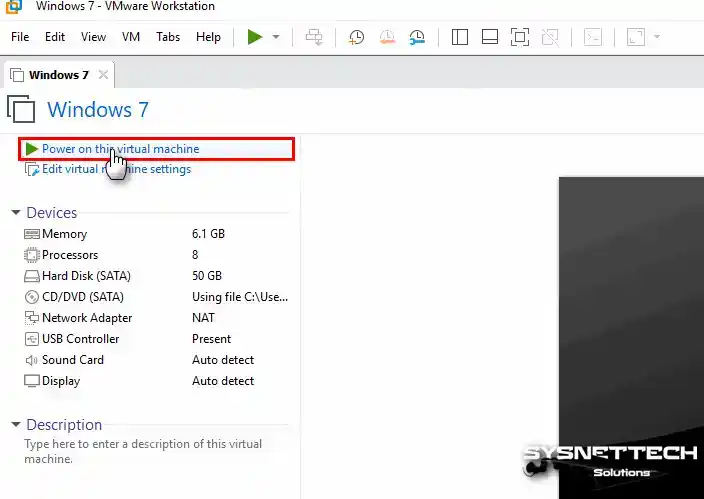
You can now start the Windows 7 operating system installation by clicking the Power on this virtual machine button.
How to Install Windows 7
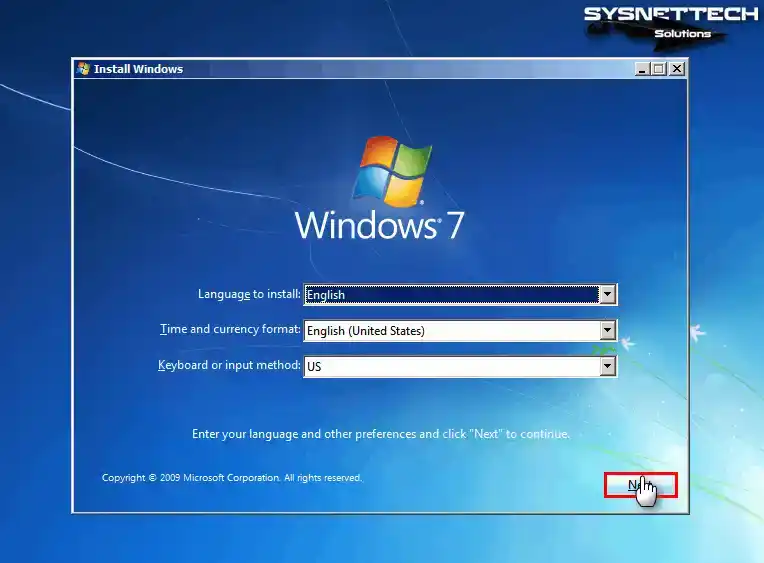
After preparing and running the Windows 7 virtual computer, when the first setup screen opens, follow the steps below for step-by-step installation.
Step 1
Configure the display language, time zone, and keyboard layout for your Windows 7 operating system and click Next.
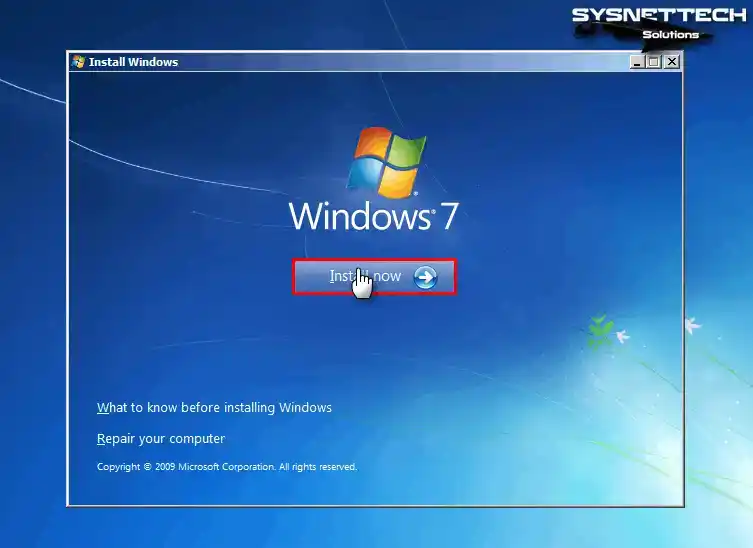
Step 2
After configuring the necessary settings, click the Install Now button.
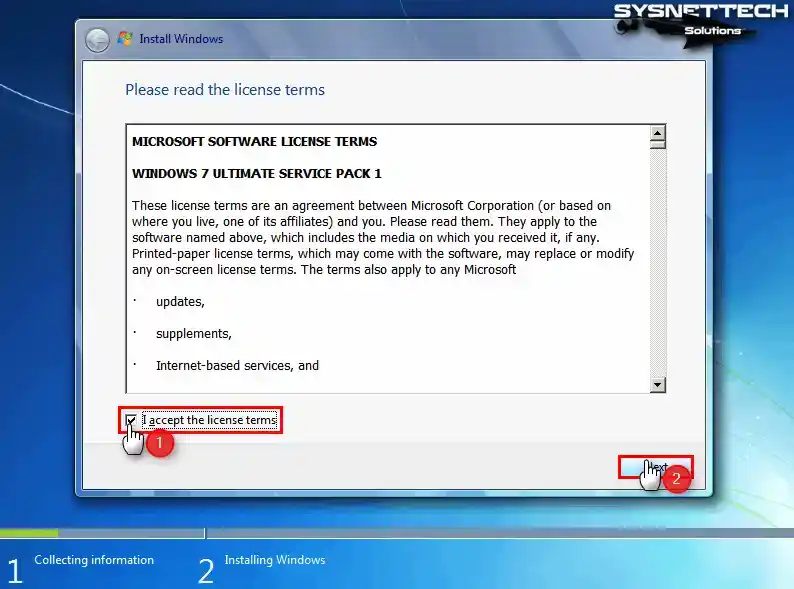
Step 3
Accept the Windows 7 Ultimate Service Pack 1 license agreement and click Next.
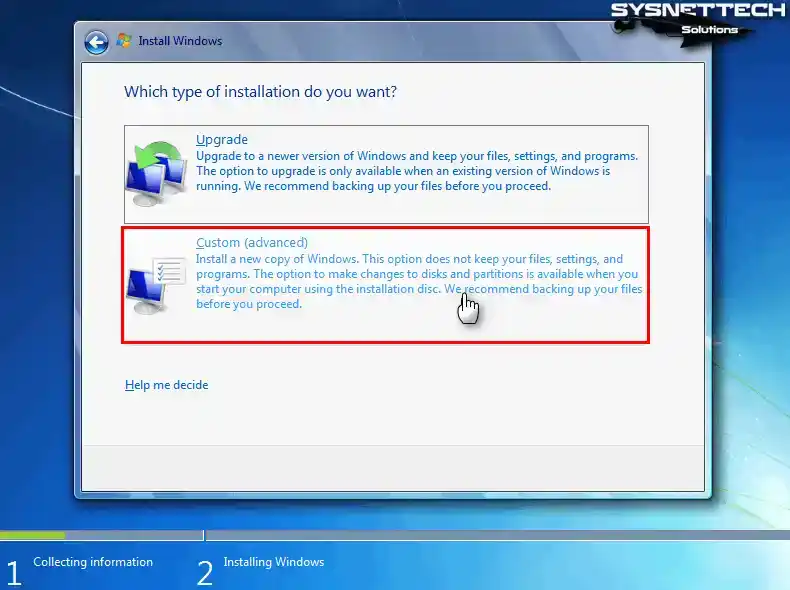
Step 4
To build a clean Windows 7 on the virtual machine, you need to choose Custom (Advanced). If you want to upgrade a previously ready system to a different version, you must continue with the Upgrade option.
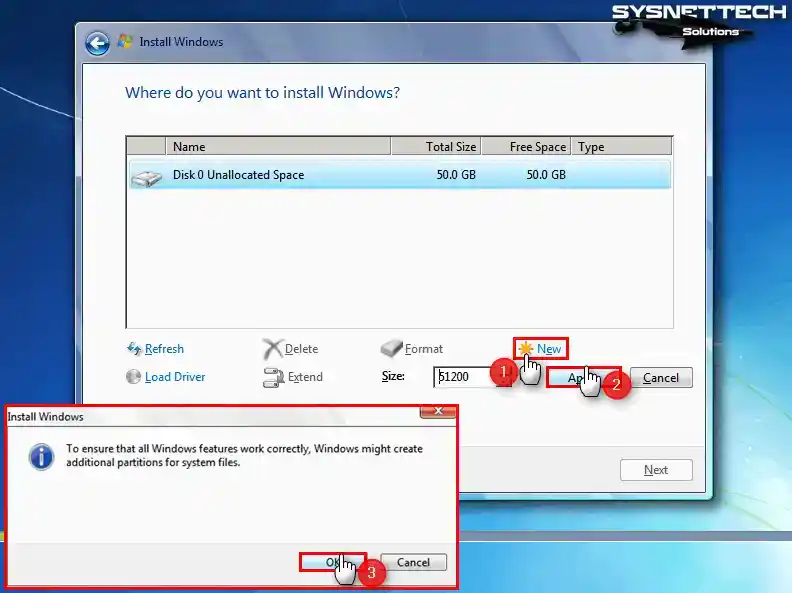
Step 5
Click Drive Options in the disk configuration window. Click the New button to create a new partition on the virtual disk. Click the Apply button to use the entire 50 GB hard disk size.
Click OK in the information window that states that additional partitions will be created so that Windows features can work properly.
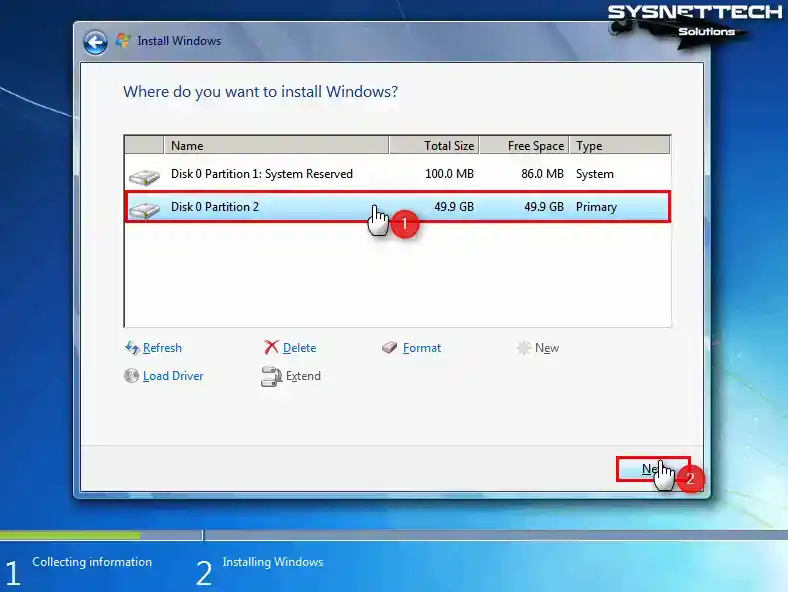
Step 6
To install the Windows system, select Disk 0 Partition 2 and click Next.
Step 7
Wait while the Windows installation files are being expanded.
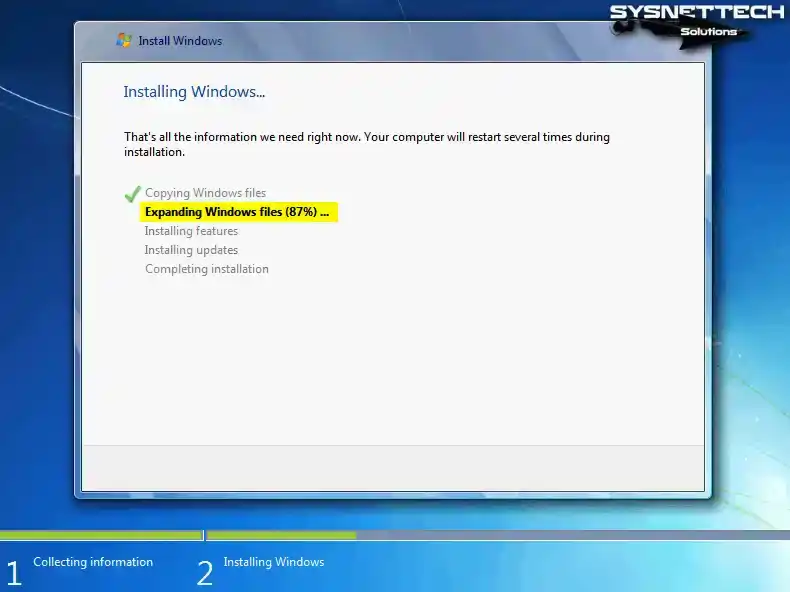
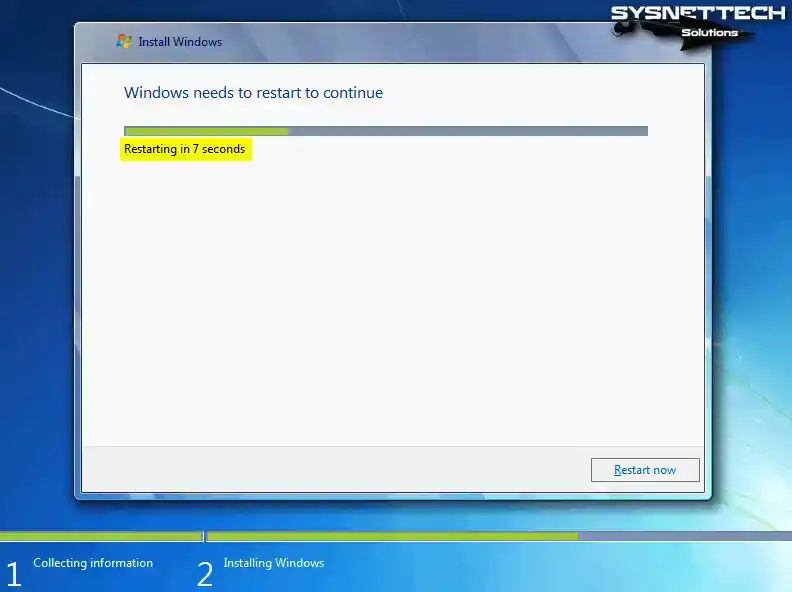
Step 8
The virtual computer will restart automatically after 10 seconds when the system files are copied. If you want to start immediately, click the Restart Now button.
Step 9
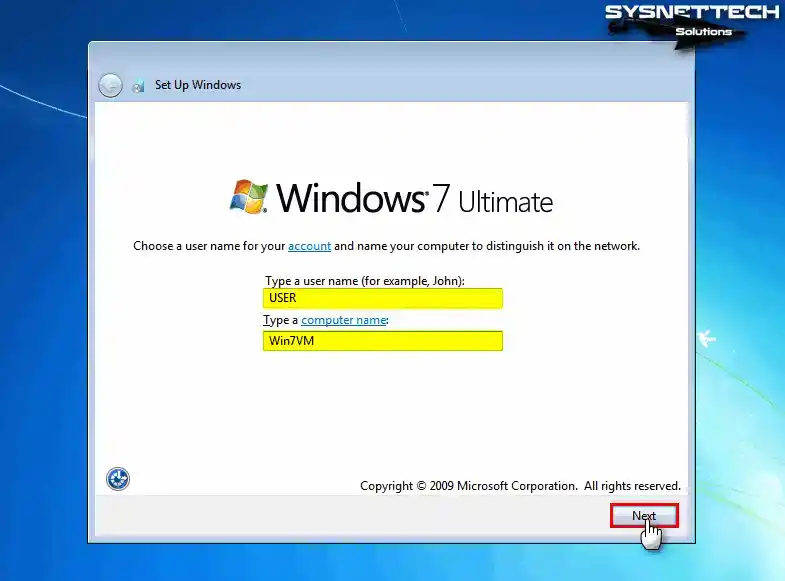
While your virtual system restarts, wait while the Windows system updates the registry and other settings.
After your computer’s registry settings are updated, you will see the user account creation window. In this window, type a new username and computer name and click Next.
Step 10
If you want to set a Windows password for your user account, type the password you specified in both boxes. If you are going to create more than one user account on your system, we recommend specifying a hint.

Step 11
If you have a Windows license key, you can enter it in this window. Then click Next to enter the license key.

Step 12
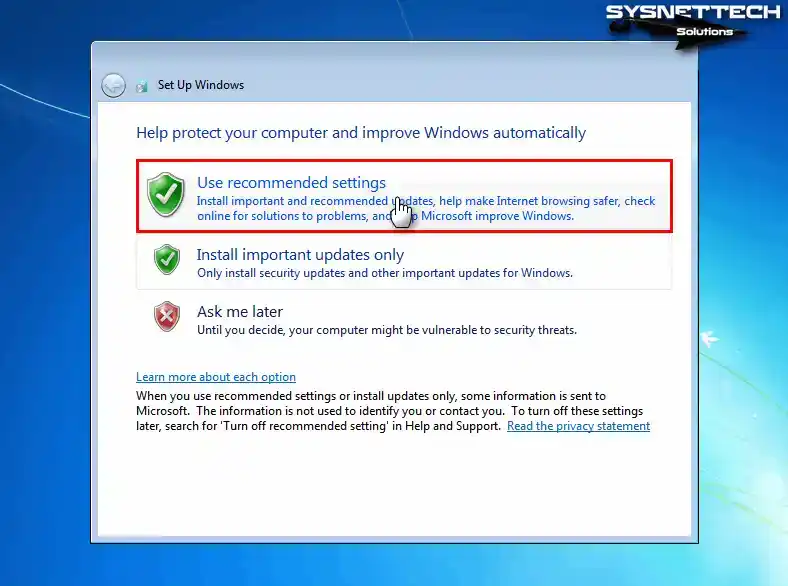
You can select Ask me later to configure the Windows firewall in detail for the software you will use later, or Use Recommended Settings to accept the settings recommended by Windows.
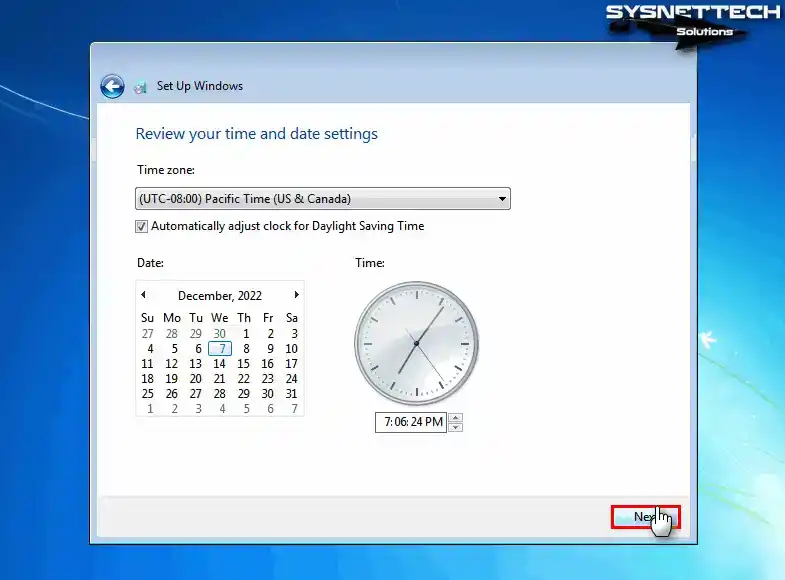
Step 13
Configure the time zone and time of your country of residence and click Next.
Step 14
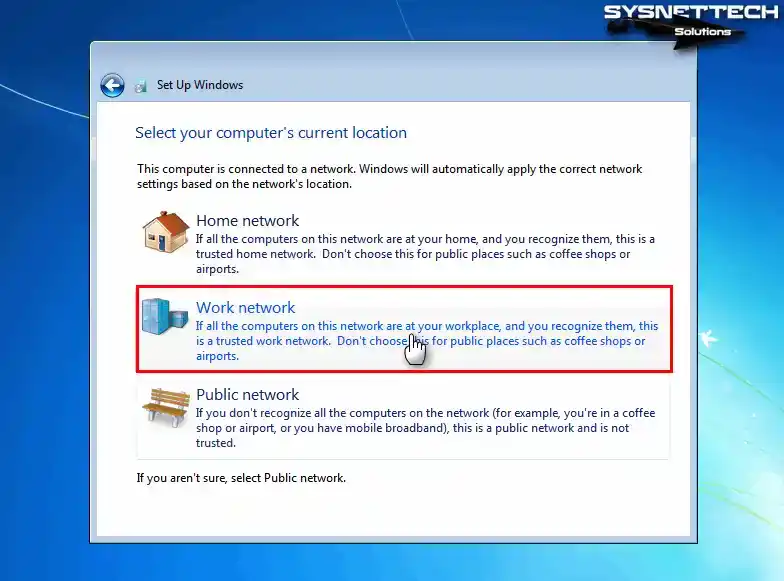
For what purpose you are using your network structure, select one of the Home, Work, and Public options and continue.
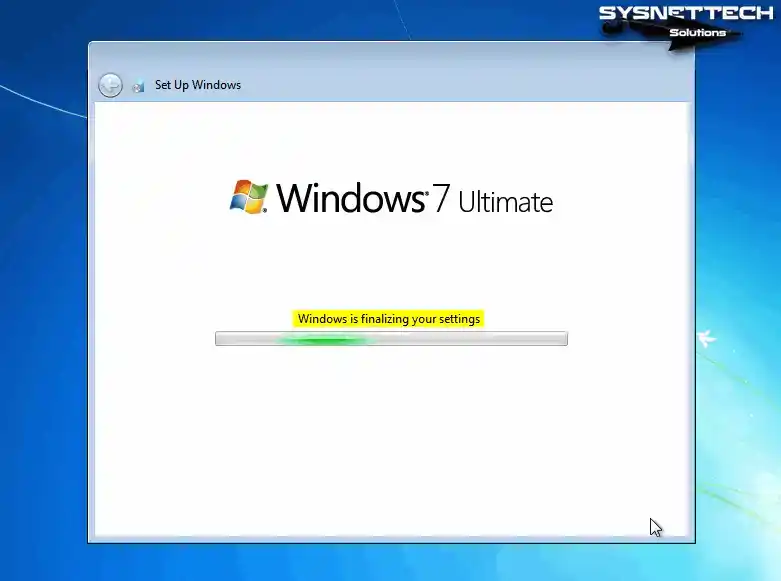
Step 15
Wait while the Windows wizard configures your system’s final settings.
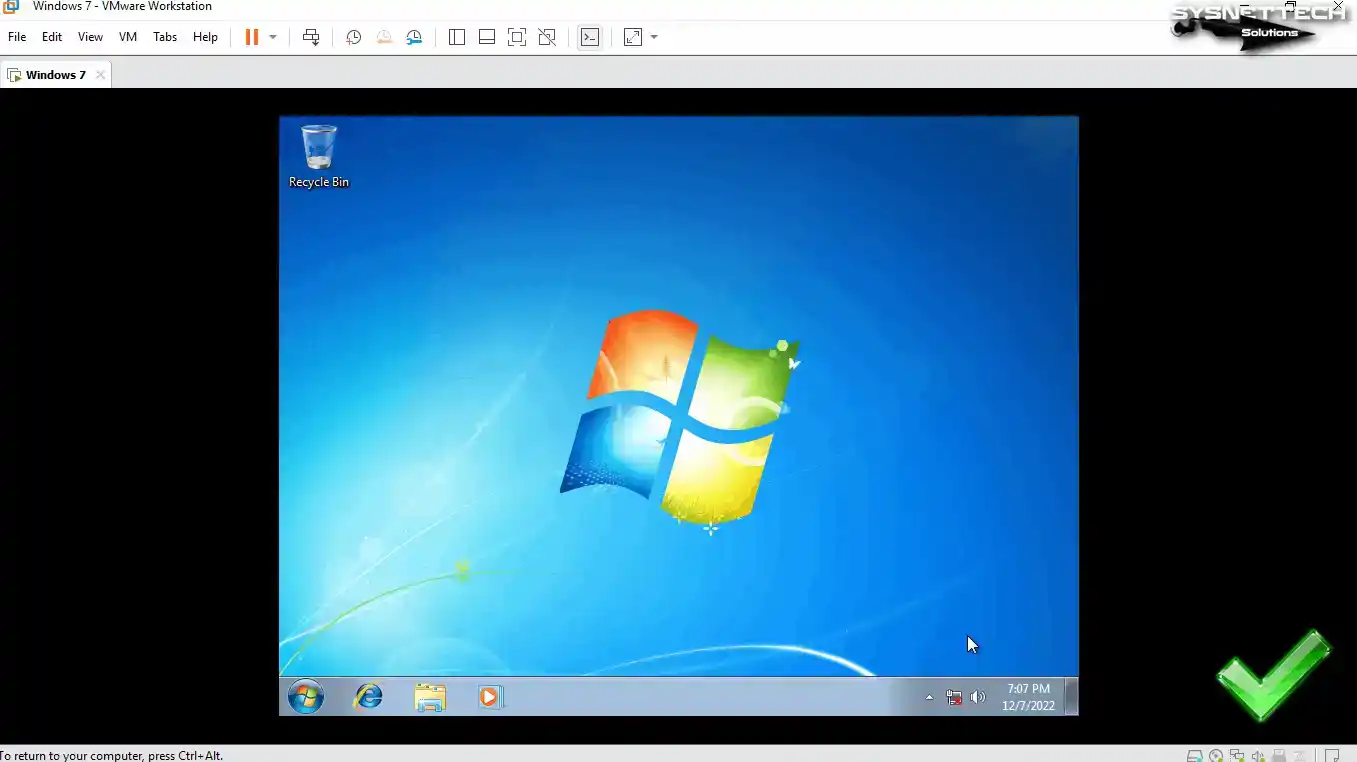
Step 16
Wait for a while your desktop is being prepared in the Windows 7 welcome window and finally you will see the desktop screen.
How to Install VMware Tools
VMware Tools for Windows 7 virtual pc was installed without any problem in old versions of Workstation Pro, but now users may encounter various errors in new versions.
VMware Tools is necessary software for your guest machine to use your host’s hardware more efficiently. With this tool, you can transfer files between host and guest, and use host hardware such as a webcam. In addition, you can share a folder on the network thanks to the Shared Folder structure.
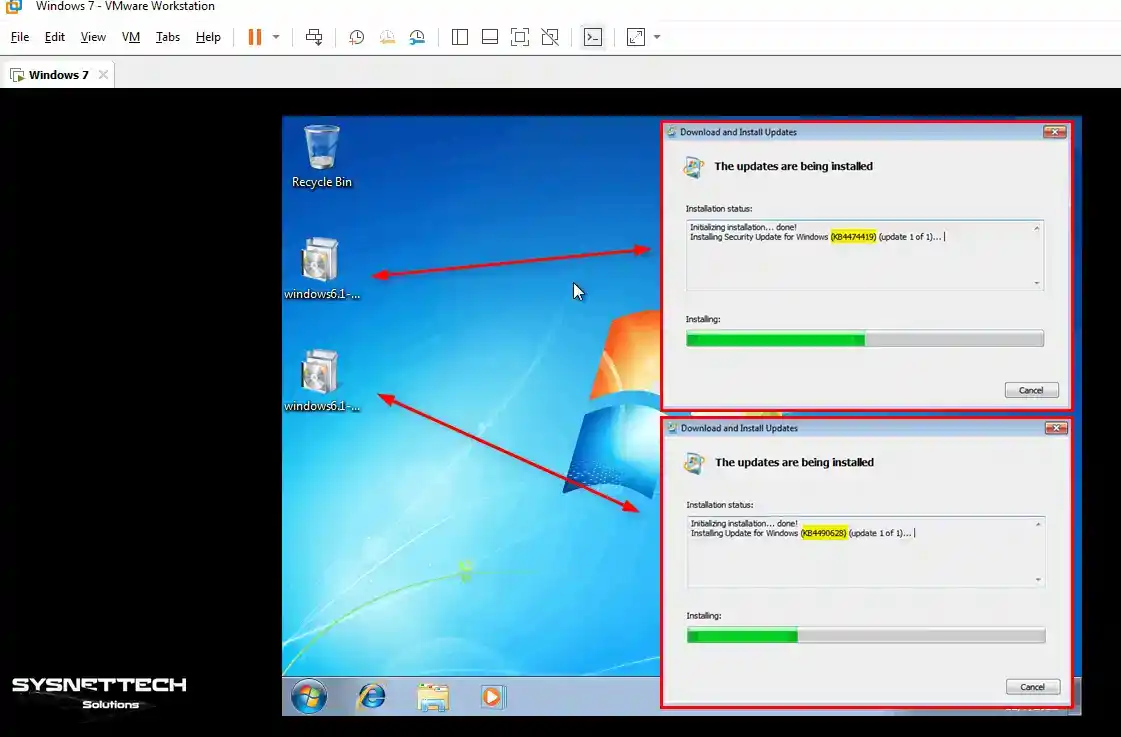
Step 1
Before installing VMware Tools on your Windows 7 x64 guest machine, you need to install the kb4474419 and kb4490628 update packages on your system. If you do not install these Windows update packages on your system, you will receive the following errors during the installation phase.
Setup failed to install the VSock Virtual Machine Communication Interface Sockets driver automatically. This driver will have to be installed manually.Setup failed to install the Host Guest Shared Folders driver automatically. This driver will have to be installed manually.Click the button below to download the update packages for Windows 7 x64 to your host system. The name and extension of the file you downloaded will be “Windows 7 x64 kb4474419 kb4490628.iso”. Add this file to your guest machine and install the update packages and restart your system.
Windows 7 x64 kb4474419 kb4490628.iso
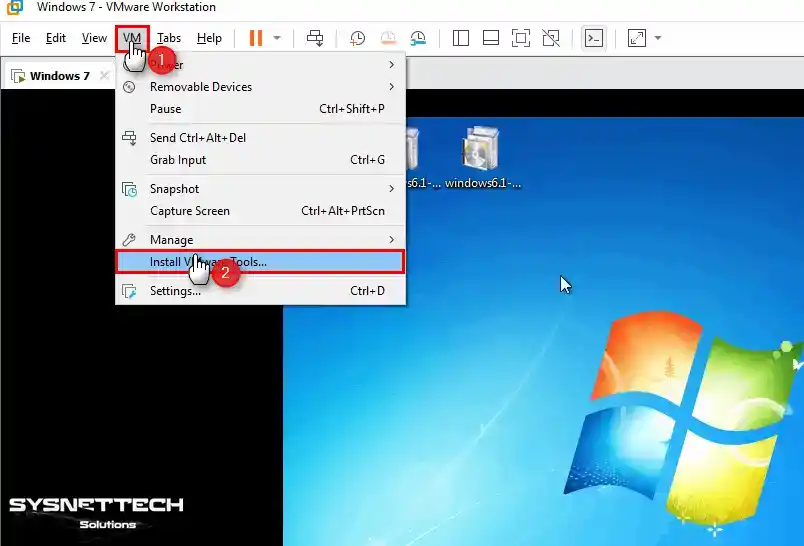
Step 2
To install the virtual machine tools, click the VM from the tool menu and then click Install VMware Tools.
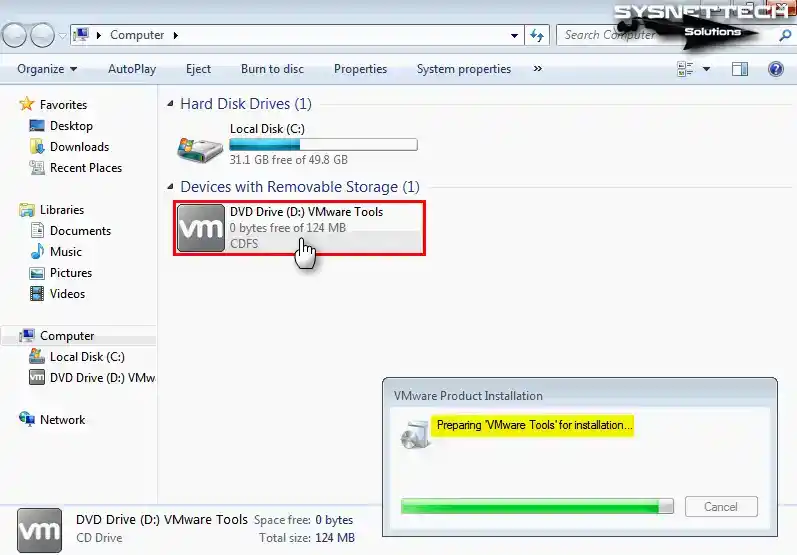
Step 3
If the VMware Tools installation wizard did not start automatically and is taking too long, open My Computer and double-click on the DVD device as in the image below.
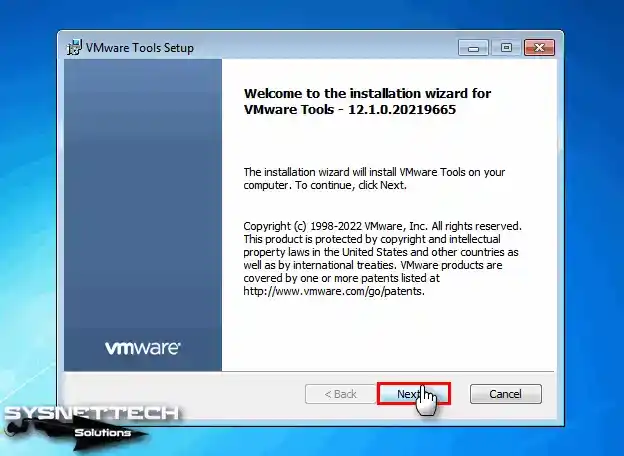
Step 4
Continue by clicking Next in the VMware Tools setup wizard.
Step 5
In the Choose Setup Type window, select Complete and click Next. If you want to make a change, you can go back with the Back button.

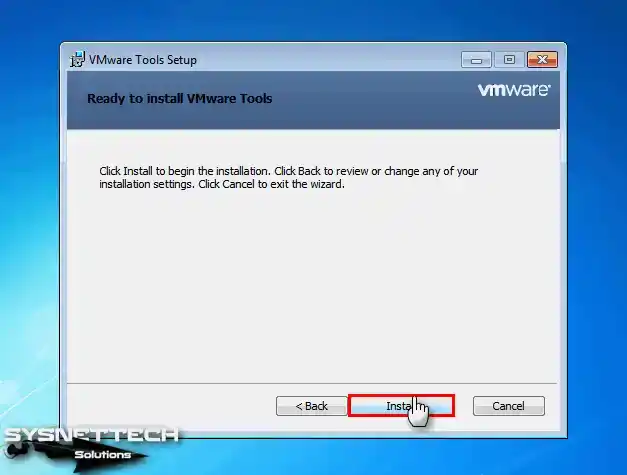
Step 6
Click Install to start installing the virtual machine drivers and continue.
Step 7
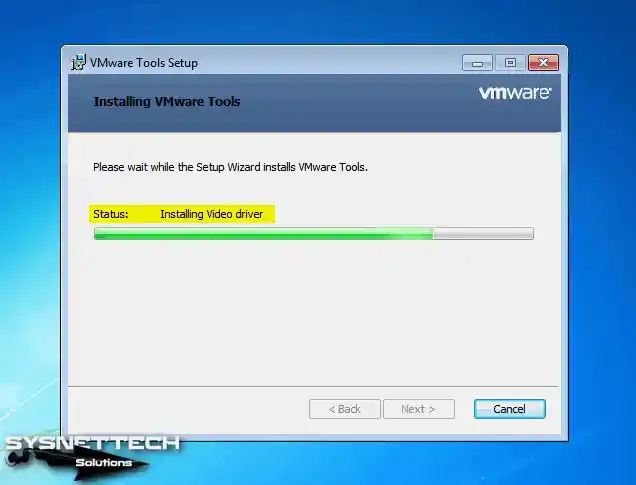
Wait while your virtual system’s graphics card or other drivers are loading.
Step 8
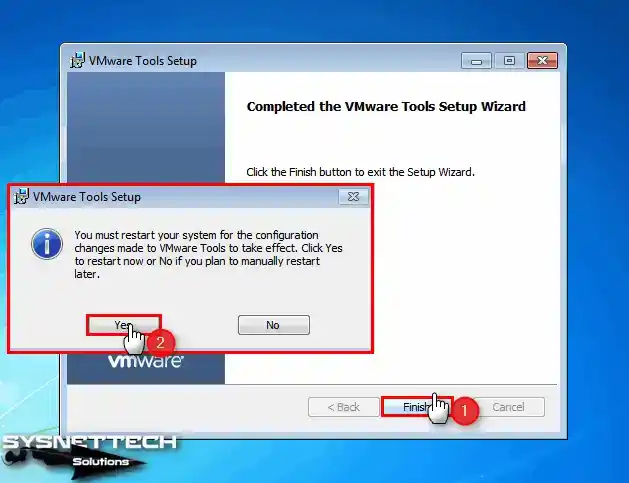
After installing the drivers for your guest system, restart your system for the changes to take effect.
Step 9
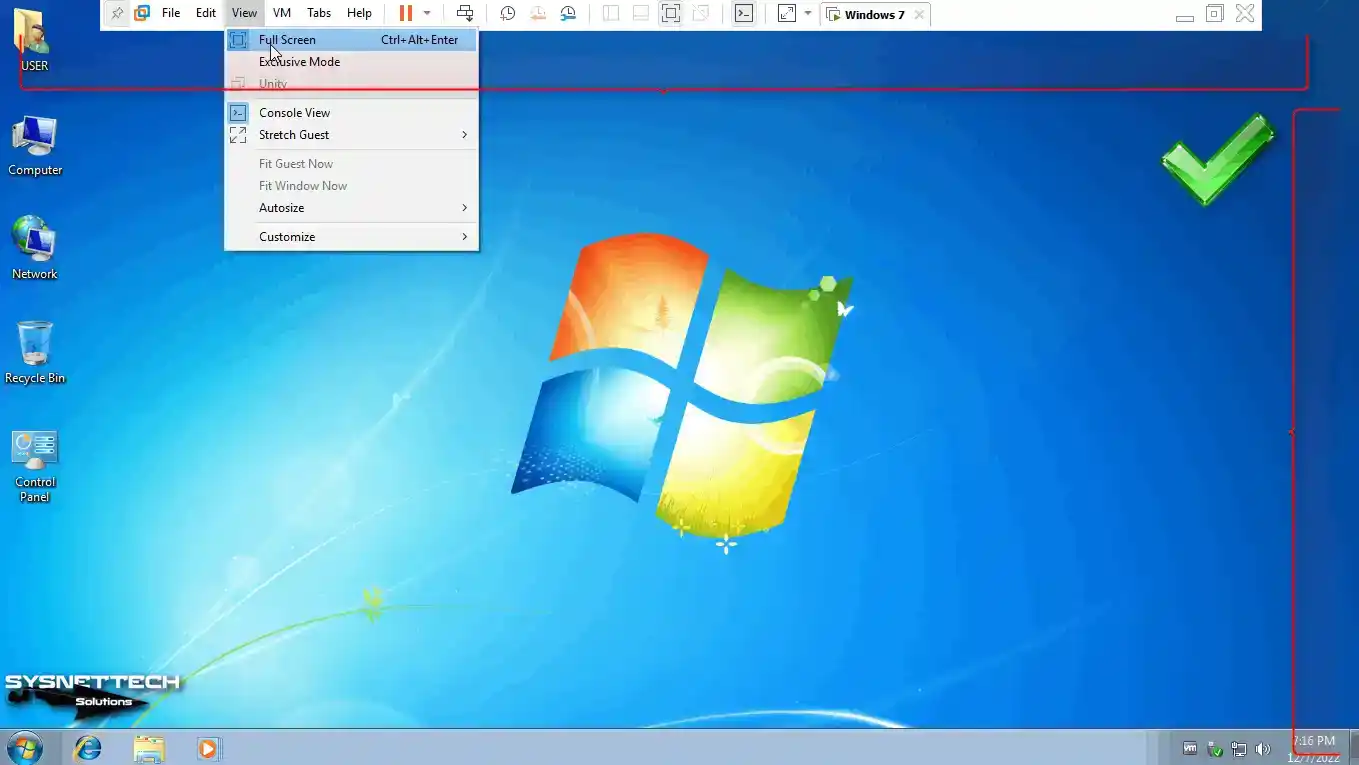
When you restart your system, you can see that the screen resolution is fit to the full screen. However, USB 3.x drivers will not be installed automatically.
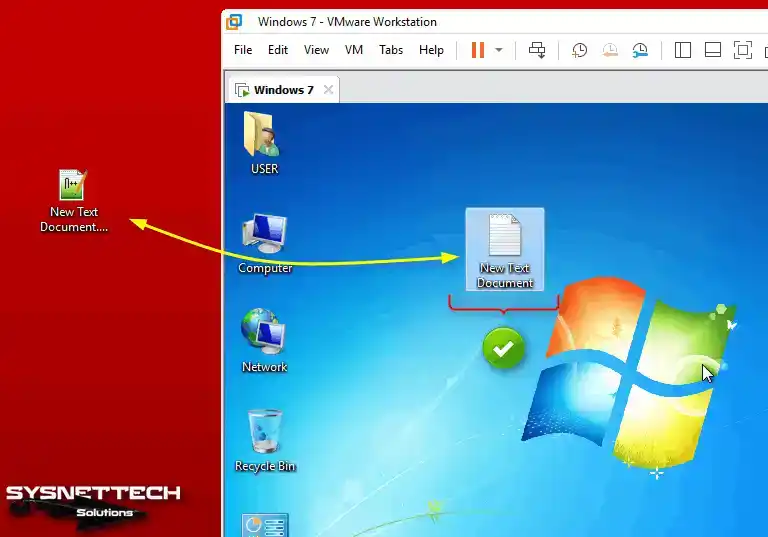
Step 10
Create a text document on the desktop or other location of your host system and try to transfer files by dragging and dropping them to your VM and you will see that the operation was successful.
How to Configure Shared Folder
After installing a Windows or Linux operating system with VMware, you can use the Shared Folder structure to share files more easily between the host and the VM with a common folder you specify on your host device.
Shared Folder works with a shared folder structure on the network. You can access the shared folder you created from both Network and My Computer.
Step 1
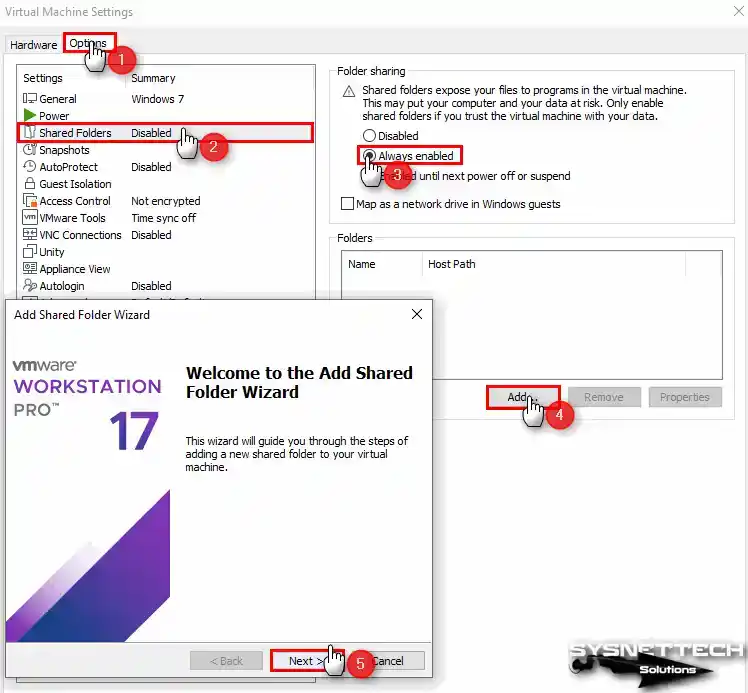
Click VM / Settings to create a new Shared Folder on the virtual computer you have installed. After opening the virtual machine settings, click Options and then click Shared Folders. Enable Always Enabled in the Folder Sharing tab and click the Add button to select and add a folder on your host.
When the Shared Folder wizard opens, click Next.
Step 2
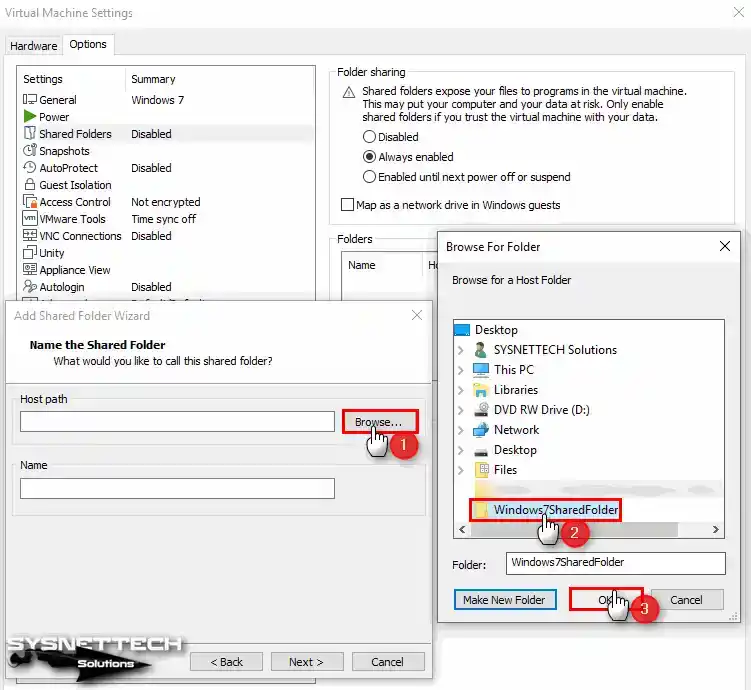
After clicking Browse to set the Host Path, create a shared folder in any location of your host computer and select it.
Step 3
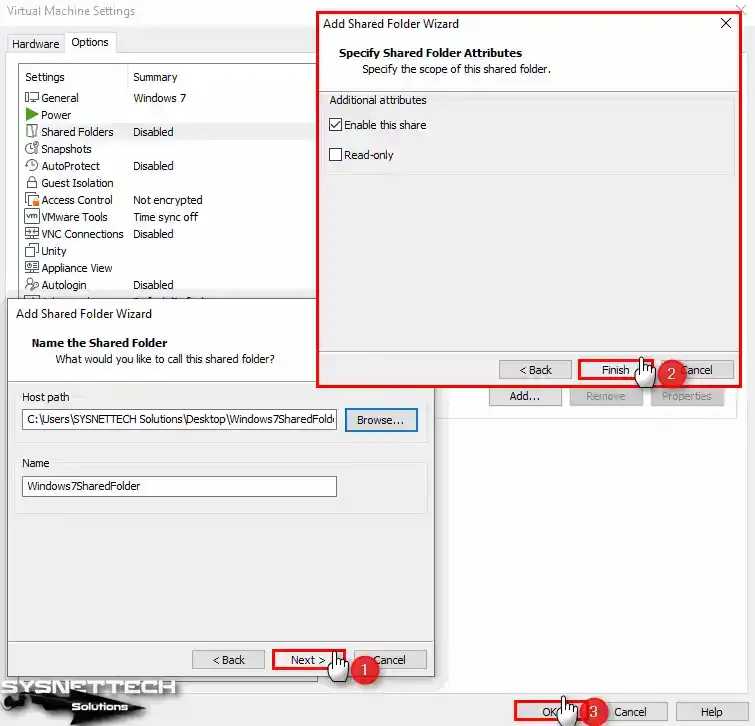
You can enable or disable folder sharing in the Additional Attributes window. In addition, if you choose Read-Only, you will not be able to make any changes to the folder you shared, but you can view the contents of the folder and open the related files.
Step 4
Open Network and check if the Shared Folder feature is working, and you can see the shared folder created between the host and the VM.
Finally, enable the Map as a network drive in Windows guests option and click the OK button to close the window.
How to Use USB Flash Memory
USB 3.0 drivers will not be installed automatically after installing VMware Tools. Because the installation media of old operating systems do not contain the drivers for this hardware. If you installed a Windows 10 machine, these drivers would be installed automatically.
Step 1
Open Device Manager in Windows 7 and check the Universal Serial Bus (USB) Controller in Other Devices, and you can see that the drivers are not installed.
To manually install USB drivers:
- To manually install the corresponding driver, first, double-click the Universal Serial Bus (USB) Controller device.
- Click the Update Driver button in the Universal Serial Bus (USB) Controller Properties window.
- Click Browse my computer for driver software.
- Select Intel’s USB driver folder and click OK.
- After selecting the driver folder, click Next to start the installation.
- When you try to install the USB 3.0 driver manually, you will be able to install it this time. You can see that the Intel(R) USB 3.0 eXtensible Host Controller has been successfully installed.
- When you examine Device Manager again, you will see Unknown Device. You have successfully installed the USB Controller driver, but not the Root Hub driver. This is because the driver provided by Intel is not fully compatible.
- Download the Intel (R) USB 3.0 Root Hub driver from this link to your computer and try to manually install the unknown driver in the same way.
- To install the unknown driver, point to the location of the downloaded folder on your computer and click OK.
- You can see the Intel(R) USB 3.0 Root Hub driver installed successfully.

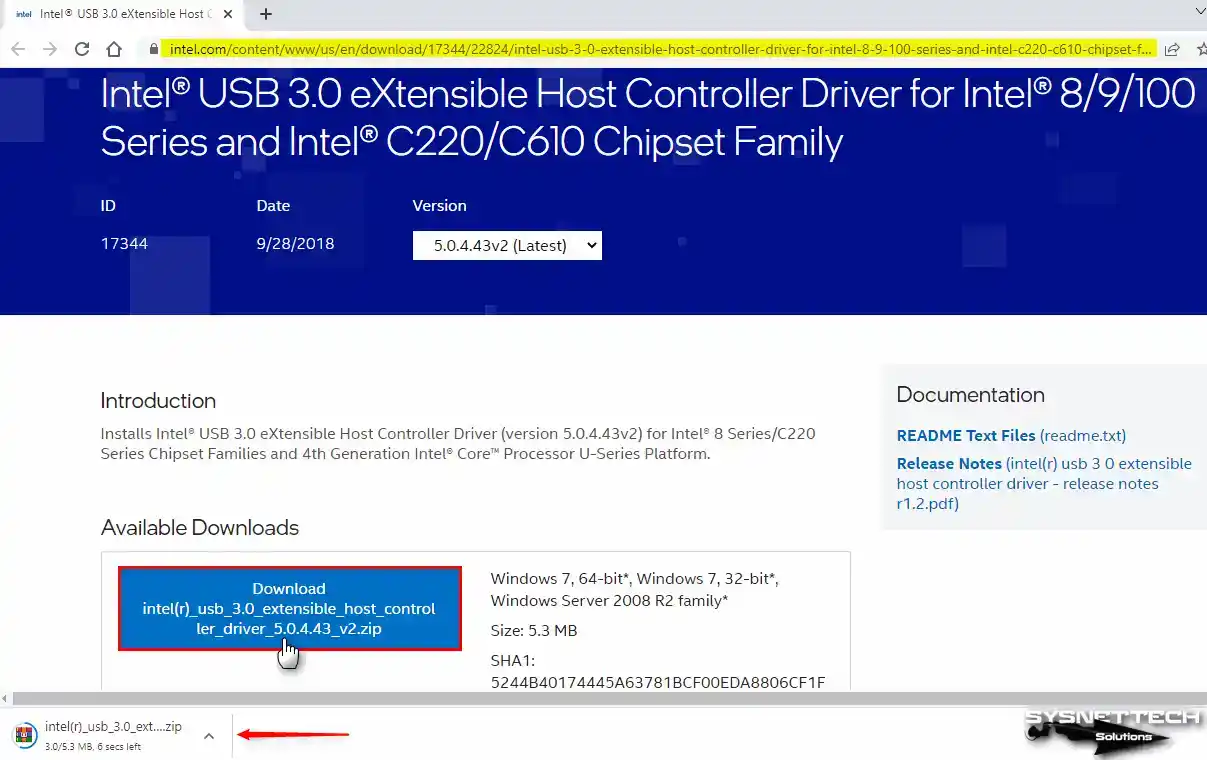
Step 2
To download the necessary drivers for USB 3.0/3.1 devices to work on the virtual machine, open the guest machine settings and open the download page by clicking the link specified on the USB device or here.
Download the intel(r)_usb_3.0_extensible_host_controller_driver_5.0.4.43_v2.zip file from the Intel download website to your computer and copy it to your VM.
Step 3
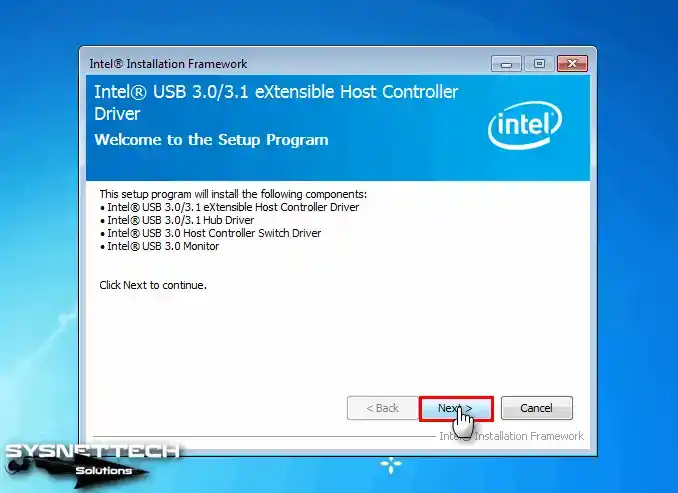
When you open the Intel USB 3.0/3.1 eXtensible Host Controller Driver wizard, check the components to be installed and click Next.
Step 4
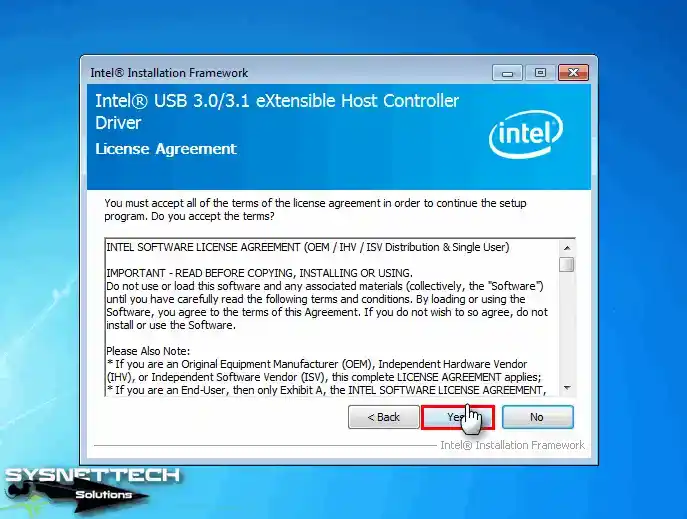
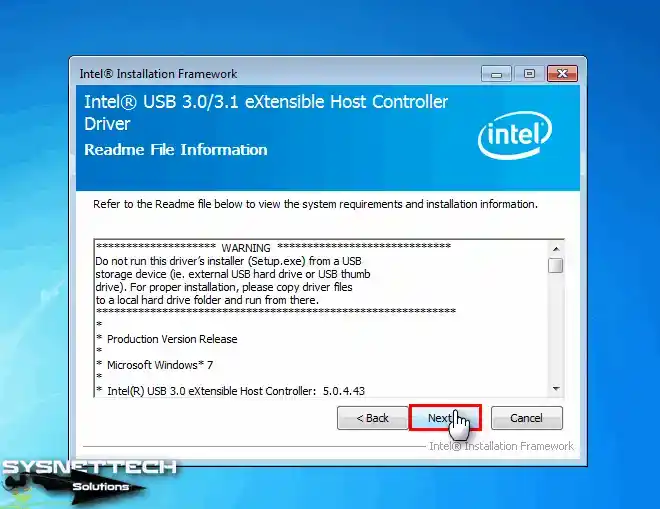
Accept the license agreement of the Intel USB driver software.
Step 5
Click Next in the window that tells you to make sure that no external USB devices are plugged into your computer during the installation phase.
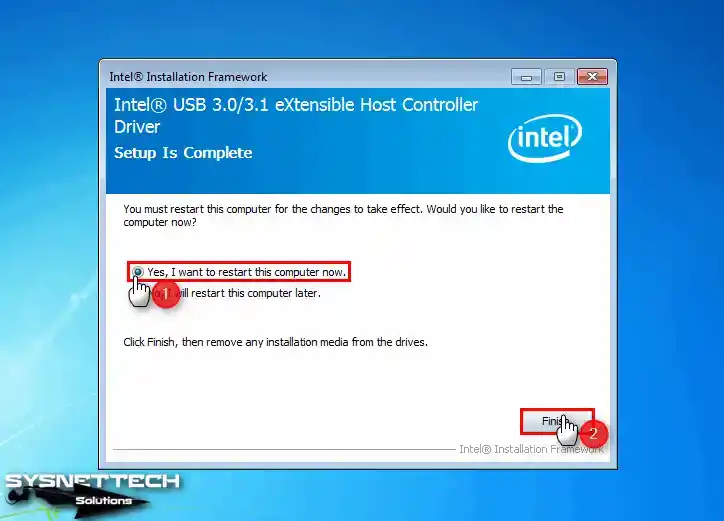
Step 6
After installing the USB 3.0/3.1 drivers in Windows 7, choose to restart your system.
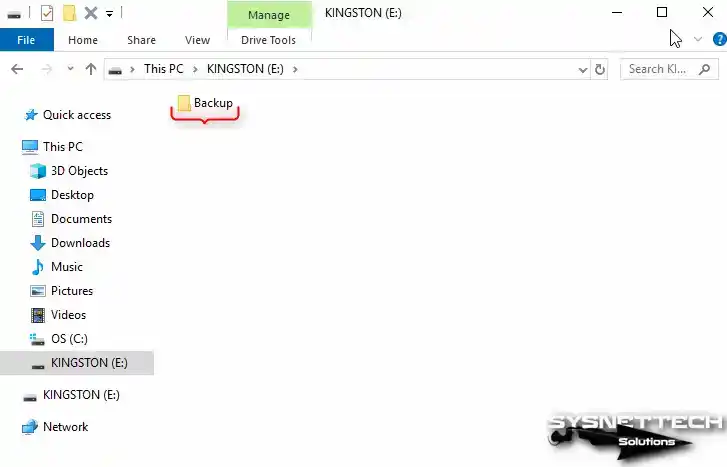
Step 7
Plug a USB 3.x supported flash memory into your host and create a folder named Backup, for example.
Step 8
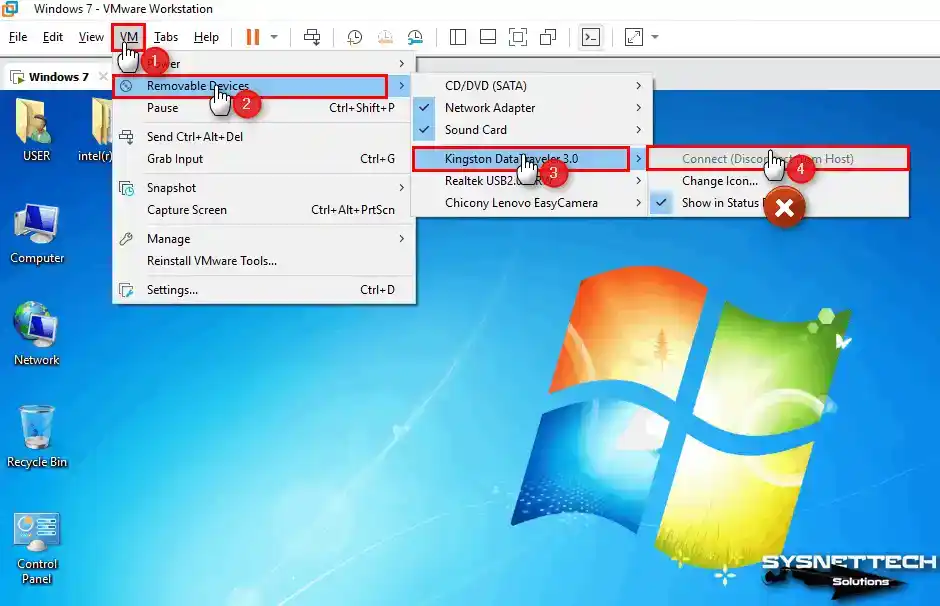
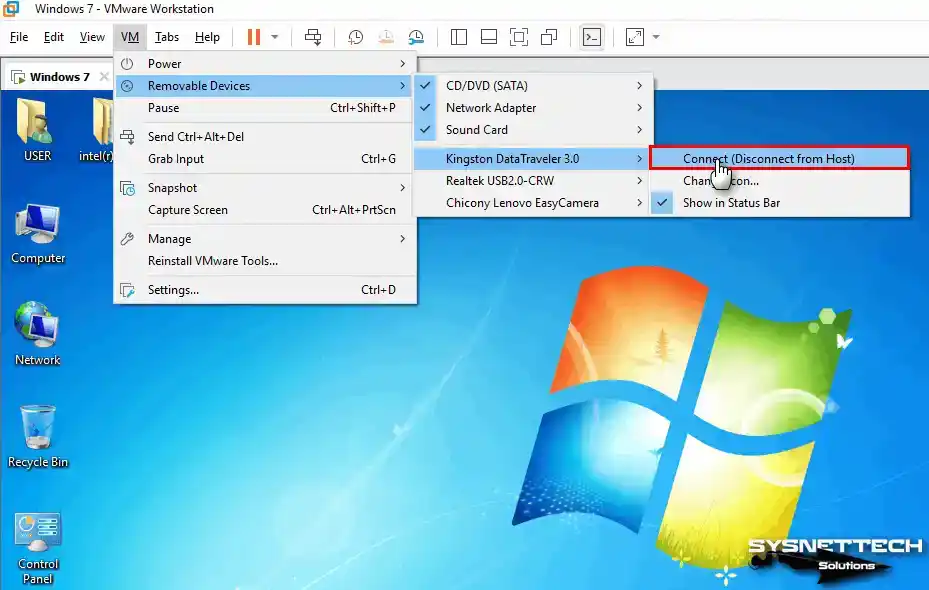
To connect the USB stick that you have connected to your host to the VM, click VM / Removable Devices / Name of Your USB / Connect from the Workstation tool menu.
If the Connect option is inactive or grayed out as in the image below, first turn off your virtual PC.
Step 9
Open the Windows 7.vmx file and change usb.restrictions.defaultAllow=”FALSE” to “TRUE” and save the file.
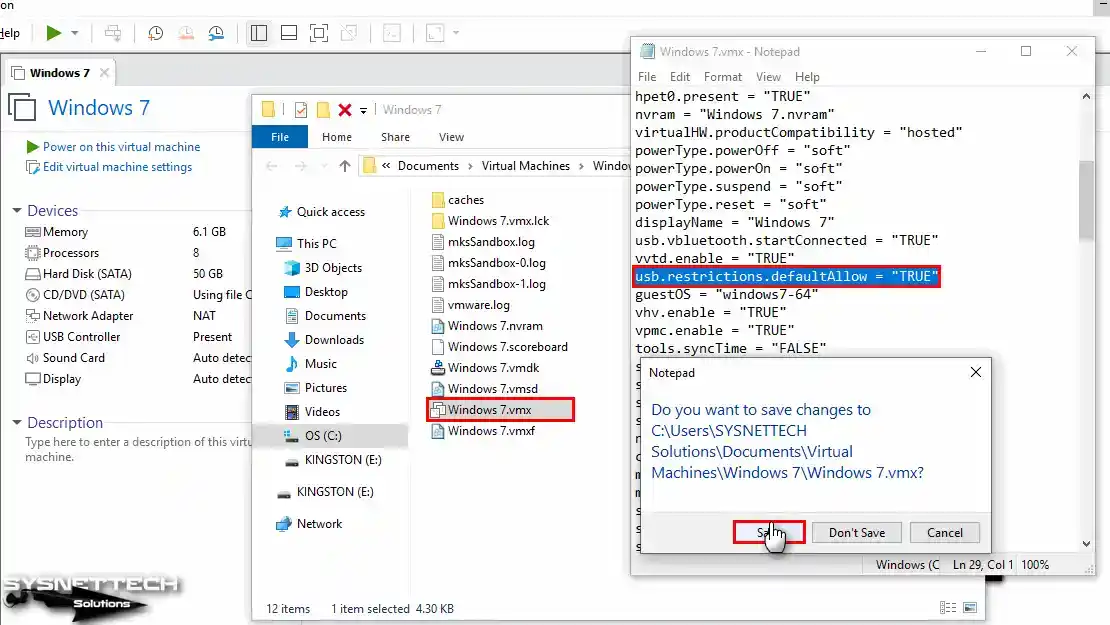
Step 10
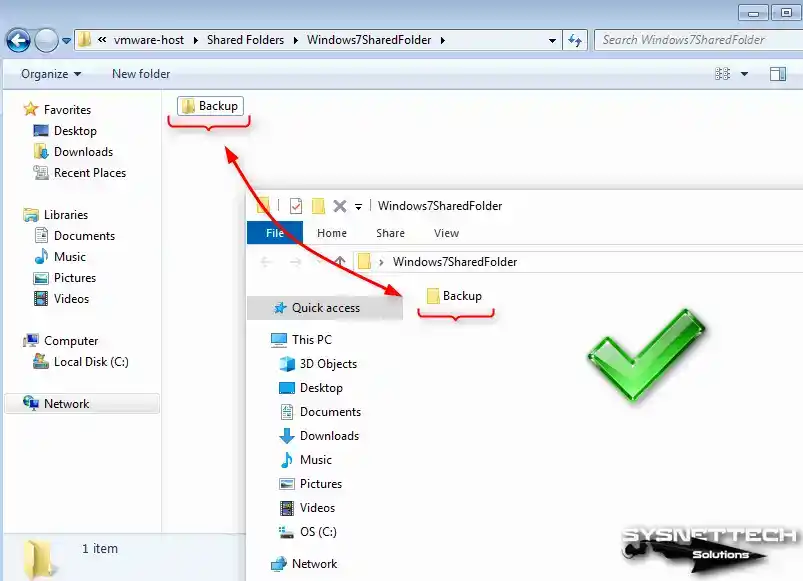
When you try to plug your USB disk into your virtual computer again, you can see that the Connect option is active this time.
Step 11
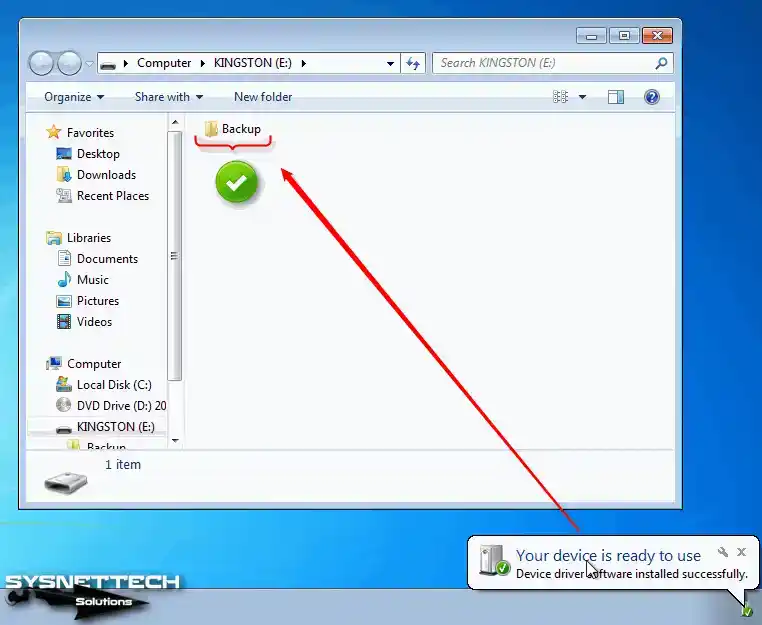
When you insert your flash memory into your VM, you can now see the folder called Backup that you created in it.
How to Delete the Virtual Machine
It is very easy to completely remove a Windows or other operating system that you have prepared with VMware Workstation Pro from your host computer.
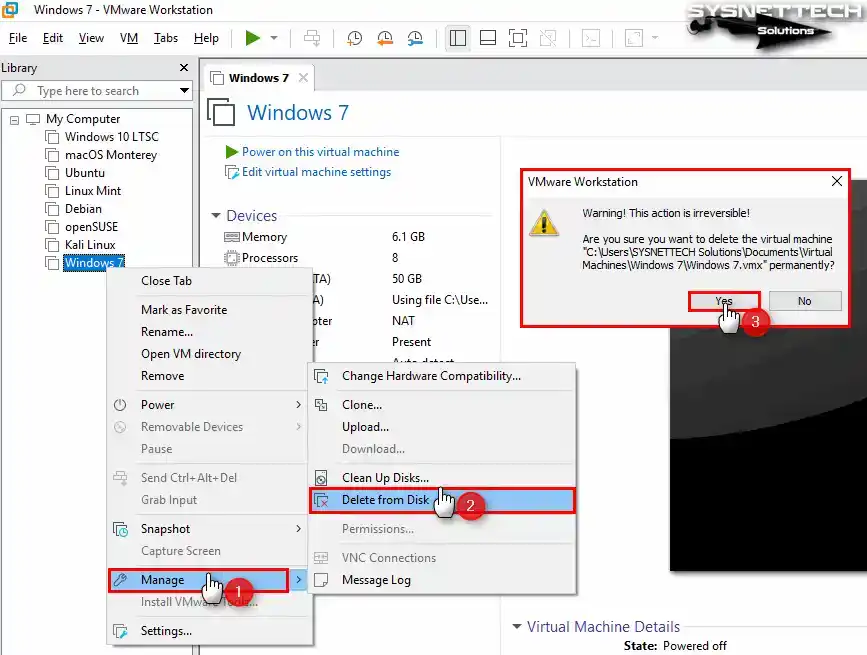
Right-click on the guest machines you want to delete from the guest machines listed on the left panel of Workstation Pro, and then click Manage / Delete From Disk and click Yes to confirm the operation in this irreversible window that opens.
Video
Installing Old Versions
Workstation Pro
YouTube Video
Slide
Related Articles
♦ How to Increase Disk Capacity in VMware
♦ How to Use VMware on Ubuntu
♦ Download VMware Workstation Pro
♦ What is VMware Fusion?
♦ How to Update VMware Workstation