В этой статье мы рассмотрим, как обновить версию Windows PowerShell до актуальной 5.1 и установить (обновить) PowerShell Core 7.3. В предыдущей статье мы рассказывали, что на данный момент есть две ветки PowerShell:
- старая версия Windows PowerShell (максимальная версия 5.1, которая более не развивается);
- новая платформа PowerShell Core (сейчас доступна версия 7.3).
Несмотря на то, что нумерация версий PowerShell продолжается с 5.1 (6.0, 6.1, 7.0 и т.д.), это две разные платформы. Соответственно мы отдельно рассмотрим как обновить Windows PowerShell и PowerShell Core.
PowerShell Core 7.x максимально совместима с Windows PowerShell. Это означает, что вы можете запускать свои старые скрипты и командлеты в PowerShell Core.
Содержание:
- Обновление Windows PowerShell до 5.1
- Установка/обновление PowerShell Core 7.x
- Установка/обновление PowerShell Core на удаленных комьютерах
- Обновление PowerShell через Windows Update или WSUS
Обновление Windows PowerShell до 5.1
Во всех версиях, начиная с Windows 10 и Windows Server 2016, Windows PowerShell 5.1 уже установлен по-умолчанию.
В предыдущих версиях (Windows 7/8.1 и Windows 2008 R2/2012) обновление до PowerShell 5.1 нужно выполнять вручную. Например, в Windows Server 2012 R2 (Windows 8.1) установлен PowerShell 4.0.
Попробуем обновить версию Windows PowerShell в Windows Server 2012 R2 до версии 5.1.
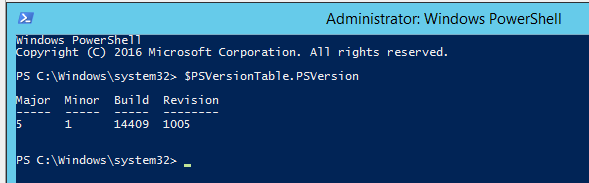
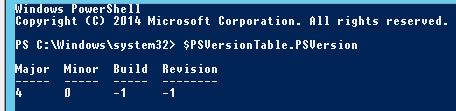
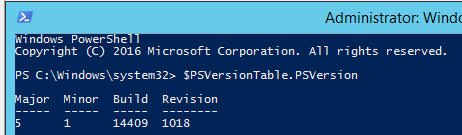
Сначала проверьте текущую версию PowerShell (на скриншоте видно, что это PowerShell 4.0):
$PSVersionTable.PSVersion

Чтобы обновить вашу версию PowerShell до 5.1, нужно установить пакет Windows Management Framework (WMF) 5.1, который в свою очередь требует наличия .NET Framework 4.5.2 (или более поздней версии). Убедитесь, что у вас установлена версий .NET 4.5.2 или выше командой:
(Get-ItemProperty ‘HKLM:\SOFTWARE\Microsoft\NET Framework Setup\NDP\v4\Full’ -Name Release).Release

В моем случае код 378675 говорит о том, что установлена версия .NET 4.5.1. Поэтому мне нужно скачать и установить более новую .NET Framework 4.8 (ссылка на офлайн установщик https://go.microsoft.com/fwlink/?linkid=2088631 —
ndp48-x86-x64-allos-enu.exe
).
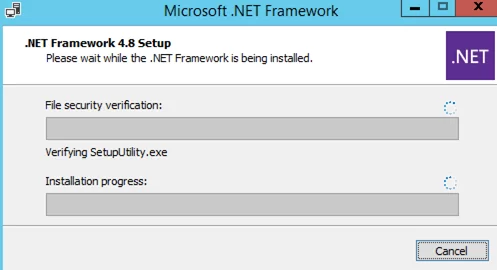
Установите .NET 4.8 (потребуется перезагрузка).

Если установить WMF 5.1, но не установить .NET 4.5.2 (или более новый), часть функций PowerShell не будет работать.
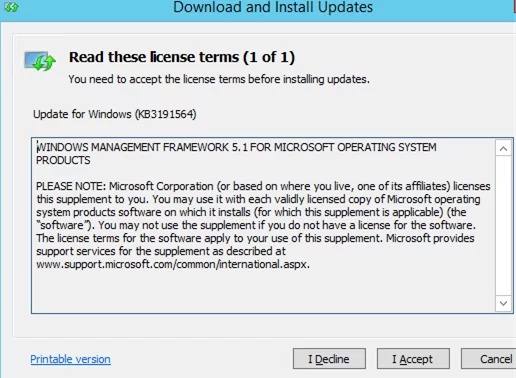
Скачайте WMF 5.1 для Windows Server 2012 R2 —
Win8.1AndW2K12R2-KB3191564-x64.msu
(https://go.microsoft.com/fwlink/?linkid=839516).
Установите MSU файл Windows Management Framework 5.1.
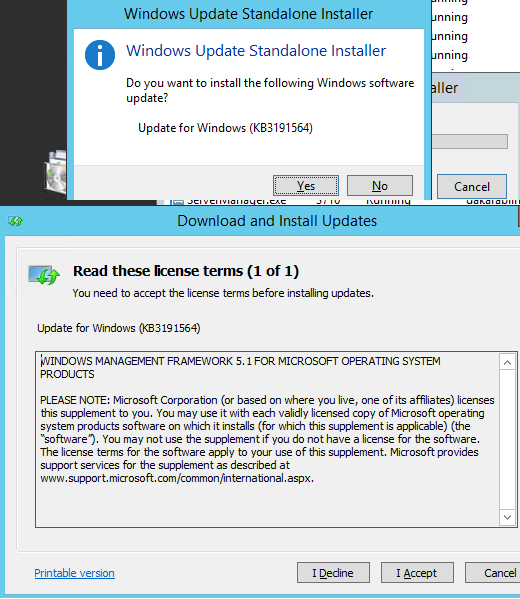
После перезагрузки сервера, запустите консоль powershell.exe и убедитесь, что версия была обновлена до PowerShell 5.1.
Если у вас остались снятые с поддержки Windows Server 2008 R2 и Windows 7, вы можете обновить на них версию PowerShell с 2.0 до 5.1 аналогичным способом. Сначала устанавливается .Net Framework 4.5.2 (или выше) и затем WMF 5.1 (ссылки загрузки будут другими, чем для Windows Server 2012 R2).
Установка/обновление PowerShell Core 7.x
PowerShell Core является кроссплатформенной и находится в стадии активной разработки (в отличии от Windows PoweShell 5.1). По сути, PowerShell Core это новая платформа, которая устанавливается в операционной системе вместе с классическим Windows PowerShell. Т.е. нельзя обновить PowerShell 5.1 до PowerShell Core 7.1. PowerShell 7 устанавливается на компьютере отдельно от Windows PowerShell 5.1 (side by side).
На данный момент доступны версии PowerShell Core 6.x и 7.x. Рекомендуется всегда устанавливать последнюю версиях PowerShell (сейчас это 7.3), если вам не требуется особая совместимость с legacy скриптами.
Вы можете обновить (установить) версию PowerShell Core в Windows 10 и 11 несколькими способами:
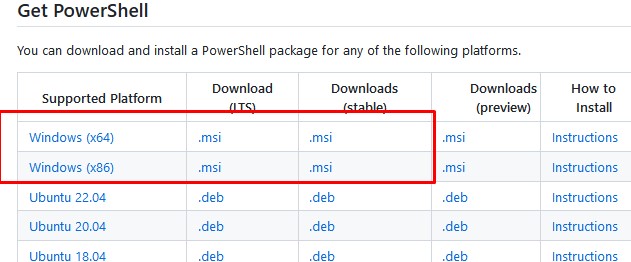
- С помощью MSI установщика PowerShell Core, который можно скачать на GitHub
- С помощью менеджера пакетов WinGet
- С помощью магазина приложений Microsoft
Далее мы рассмотрим все эти способы на примере обновления PowerShell Core до 7.3 в Windows 10 22H2
Обновить PowerShell Core с помощью MSI установщика
Если вы хотите установить PowerShell Core с помощью MSI пакета, перейдите на старицу проекта https://github.com/PowerShell/PowerShell и скачайте установочный пакет для вашей версии ОС. На момент написания статьи последняя версия v7.3.3 Release of PowerShell от 24 февраля 2023 (например, PowerShell-7.3.3-win-x64.msi или PowerShell-7.3.3-win-x86.msi). Для продуктивной среды используйте Stable или LTS релизы.
Скачайте msi файл и установите его.
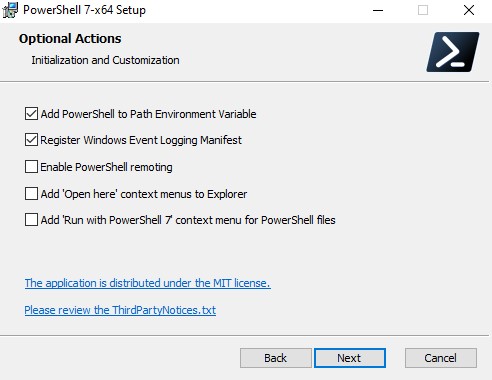
Доступны следующие опции установки:
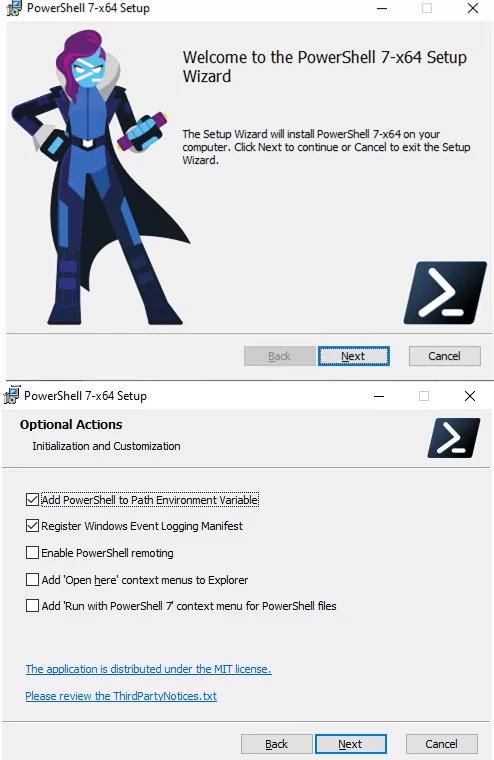
- Add PowerShell to Path Environment Variable
- Register Windows Event Logging Manifest (для событий PowerShell будет создан отдельный журнал Event Viewer
%SystemRoot%\System32\Winevt\Logs\PowerShellCore%4Operational.evtx
) - Enable PowerShell Remoting (включает и настраивает WinRM для PowerShell Remoting)
- Add ‘Open here’ context menu to Explorer
- Add ‘Run with PowerShell 7’ context menu for PowerShell files
Далее вы можете включить автоматическое обновление PowerShell Core через WIndows Update/WSUS (рассмотрено ниже).
Для установки PowerShell Core из MSI пакета средствами SCCM/MDT/скриптами в тихом режиме можно использовать команду установки со следующими параметрами:
- ADD_EXPLORER_CONTEXT_MENU_OPENPOWERSHELL
- ADD_FILE_CONTEXT_MENU_RUNPOWERSHELL
- ENABLE_PSREMOTING
- REGISTER_MANIFEST
- ADD_PATH
- DISABLE_TELEMETRY
- USE_MU – использовать Microsoft Update для получения обновлений PSCore
- ENABLE_MU – разрешить обновление PowerShell Core через Windows Update
Например, команда установки может выглядеть так:
msiexec.exe /package PowerShell-7.3.3-win-x64.msi /quiet ADD_EXPLORER_CONTEXT_MENU_OPENPOWERSHELL=1 ENABLE_PSREMOTING=1 REGISTER_MANIFEST=1 ADD_PATH=1 ENABLE_MU=1 ADD_PATH=1
Вы можете обновить PowerShell непосредственно из консоли. Чтобы установить или обновиться до последней версии PoSh Core, выполните команду:
iex "& { $(irm https://aka.ms/install-powershell.ps1) } -UseMSI"
Данная команда загружает установочный MSI файл PowerShell 7.3 с GitHub и запускает установку через MSI Installer.

После окончания установки открывается окно PowerShell Core (pwsh.exe), проверьте версию PowerShell и убедитесь, что теперь это PoSh 7.3.3.
Используем менеджер пакетов WinGet для установки/обновления PowerShell Core
Если у вас установлен пакетный менеджер WinGet, вы можете установить или обновить версию PowerShell до актуальной командой:
winget install --id Microsoft.Powershell --source winget
Либо можно установить конкретную версию PowerShell Core:
winget install --id=Microsoft.PowerShell -v "7.1.2" -e
При использовании менеджера пакетов Chocolatey, используйте команды (для 5.1):
choco install powershell -y
choco upgrade powershell -y
Для обновления PowerShell 7.x:
choco upgrade pwsh -y
Обратите внимание на каталоги различных версий PowerShell:
- Windows PowerShell 5.1:
$env:WINDIR\System32\WindowsPowerShell\v1.0 - PowerShell Core 6.x:
$env:ProgramFiles\PowerShell\6 - PowerShell 7.x:
$env:ProgramFiles\PowerShell\7
Если на компьютере был установлен PowerShell 6.x, то при установке PowerShell 7.3 каталог
$env:ProgramFiles\PowerShell\6
автоматически удаляется.
Обратите внимание, что имя исполняемого файла среды PowerShell изменился. Теперь это
c:\Program Files\PowerShell\7\pwsh.exe
. У него собственная иконка в меню Start.
- Для запуска Windows PowerShell, основанного на .NET Framework используется команда
powershell.exe - Для запуска PowerShell Core, основанного на .NET Core, нужно использовать команду
pwsh.exe
Т.е. теперь на этом компьютере есть две версии: Windows PowerShell 5.1 и PowerShell Core 7.3.
Чтобы узнать версию PowerShell можно проверять версию файла pwsh.exe:
(Get-Command 'C:\Program Files\PowerShell\7\pwsh.exe').Version
Так можно проверить версию файла на удаленном компьютере:
Invoke-Command -Computername computer1 -Scriptblock {(Get-Command 'C:\Program Files\PowerShell\7\pwsh.exe').Version}
Чтобы запустить предыдущую версию PowerShell (например 4), используйте команду:
C:\Windows\System32\WindowsPowerShell\v1.0\powershell.exe -Version 4
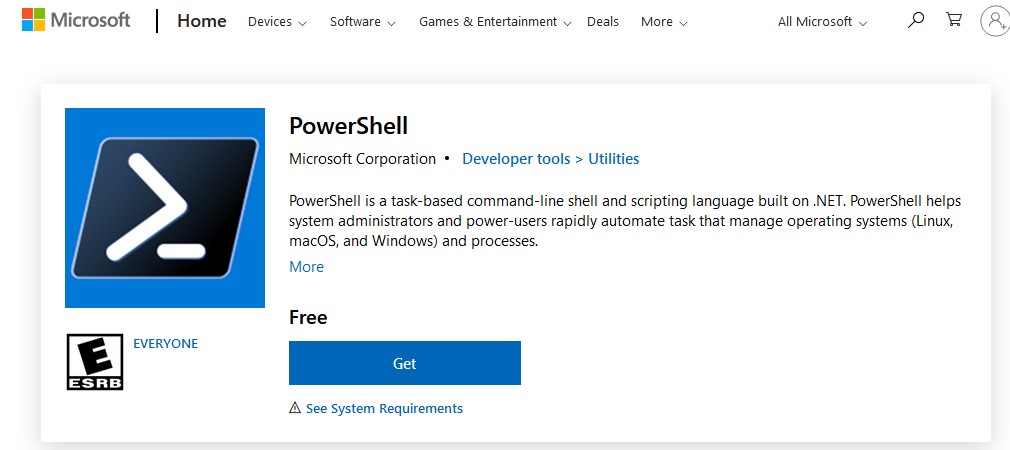
Установка PowerShell Core через Microsoft Store
В Windows 10 и 11вы можете установить или обновить PowerShell через магазин приложений Microsoft Store. Приложение PowerShell можно найти в магазине вручную, или воспользуйтесь этой ссылкой.
Также вы можете установить магазинную версию PowerShell через WinGet:
winget search powershell --source msstore
winget install --id 9MZ1SNWT0N5D
Преимущество установки PowerShell Core через Microsoft Store в том, что магазин прилжений будет автоматически контролировать установленную версию PowerShell и автоматически устанавливать обновления по мере их появления.
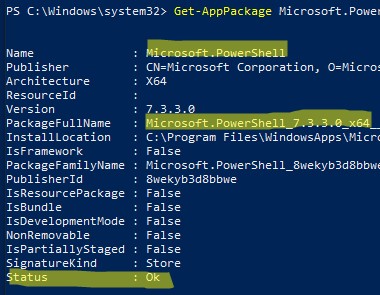
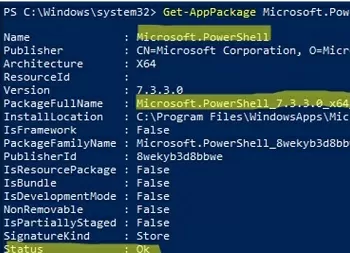
Вы можете проверить, установлена ли у вас Store версия PowerShell Coreс помощью команды:
Get-AppPackage Microsoft.PowerShell
В этом примере пакет Microsoft.PowerShell_7.3.3.0_x64__8wekyb3d8bbwe установлен.
Но есть и недостатки, связанные с тем, что такой PowerShell будет запускаться в песочнице.
Установка/обновление PowerShell Core на удаленных комьютерах
Рассмотрим два сценария установки или обновления версии PowerShell Core на множестве компьютерах.
Обновление PowerShell Core с помощью GPO
В домене Active Directory вы можете централизованно установить и обновить PowerShell Core с помощью групповой политики. Воспользуйтесь возможностями установки программ с помощью MSI пакетов в GPO.
- Скачайте установочный MSI файл PowerShell и скопируйте его в каталог SYSVOL на контроллере домена;
- Откройте консоль управления доменными GPO (
gpmc.msc
), создайте новую GPO и назначьте ее на OU с компьютерами и серверами; - Перейдите в раздел GPO Computer Configuration –> Software Settings, создайте новый пакет и укажите для него путь к установочному MSI файлу PowerShell в SYSVOL;

Для более тонкого нацеливания политики на клиентов можно использовать WMI фильтры GPO.
- Для обновления групповых политик установки ПО нужно перезагрузить компьютеры. Во время загрузки на всех компьютерах будет установлена новая версия PowerShell.

Обновление PowerShell на удаленных компьютерах из командной строки
Вы можете обновлять PowerShell на удаленных компьютерах из командной строки.
- Первый способ позволяет удаленно обновить PowerShell на компьютере с помощью MSI установщика в сетевом каталоге:
Invoke-Command -ComputerName dc01 -ScriptBlock {Start-Process msiexec.exe -ArgumentList '/package "\\srv1\share\PowerShell-7.3.3-win-x64.msi" /quiet ADD_EXPLORER_CONTEXT_MENU_OPENPOWERSHELL=1 ENABLE_PSREMOTING=1 REGISTER_MANIFEST=1' -Wait} - Следующий скрипт позволит выбрать все активные компьютеры с Windows 10 из домена Active Directory и запустить на каждом из них загрузку и установку PowerShell Core:
$creds = $(Get-Credential)
$computers = Get-ADComputer -Filter 'operatingsystem -like "*Windows 10*" -and enabled -eq "true"'
ForEach ($computer in $computers) {
Invoke-Command -ComputerName $computer -Credential $creds {iex "& { $(irm https://aka.ms/install-powershell.ps1) } -UseMSI -Quiet"}
}
Будьте внимательными при использовании команд PowerShell Remoting при подключении к удаленным компьютерам (Enter-PSSession, Invoke-Command). Если вам нужно подключиться к точке управления PowerShell 7 нужно использовать команду:
Enter-PSSession -ComputerName dc01 -ConfigurationName "powershell.7"
Иначе вы подключитесь к точке PowerShell Remoting 5.1.
Обновление PowerShell в Linux дистрибутивах чаще проще всего выполняется через нативный менеджер пакетов.
Обновление PowerShell через Windows Update или WSUS
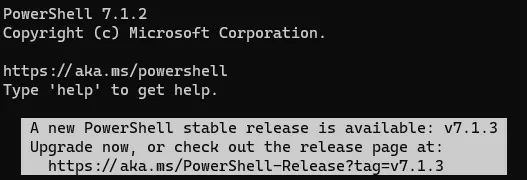
До версии PowerShell Core 7.2 не поддерживалось автоматическое обновление pwsh.exe. После выхода нового релиза в консоли появилось уведомление:
A new PowerShell stable release is available. Upgrade now, or check out the release page at: https://aka.ms/PowerShell-Release?tag=v7.1.3
Начиная с версии 7.2, PowerShell Core поддерживает автоматическое обновление через Windows Update ( Microsoft Update, Windows Update for Business, внутренний WSUS сервер или SCCM). Для этого при установке MSI пакета нужно включить соответствующие опции.
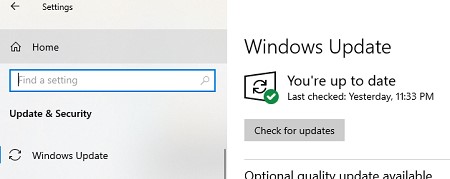
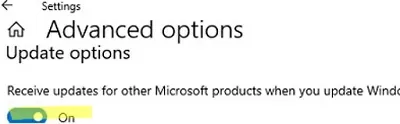
Проверьте, что в панели управления Settings -> Update and Security -> Windows Update -> Advanced Options теперь включена опция Receive updates for other Microsoft products when you update Windows.

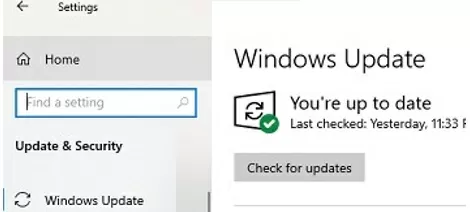
Теперь, когда вы нажимаете кнопку Check for Updates или запускаете сканирование обновлений через модуль PSWindowsUpdate, вы также будете получать обновления для PowerShell Core.
This article describes how to update Windows PowerShell to the latest version 5.1 and how to install (upgrade) PowerShell Core 7.3. There are currently two branches of PowerShell:
- The classic Windows PowerShell (the maximum version is 5.1, which is no longer being developed.);
- The new PowerShell Core platform (version 7.3 is available now).
Although the PowerShell version numbering continues from 5.1 (6.0, 6.1, 7.0, 7.1, and so on), they are two different platforms. Therefore, updating Windows PowerShell and PowerShell Core will be covered separately.
PowerShell Core 7.x is the version that is most compatible with classic Windows PowerShell. This means that you can easily run your old PS1 script files and cmdlets in PowerShell Core.
Contents:
- Upgrading to Windows PowerShell 5.1
- How to Install or Update PowerShell Core 7?
- Installing/Updating PowerShell Core on Remote Computers
- Updating PowerShell via Windows Update or WSUS
Upgrading to Windows PowerShell 5.1
Windows PowerShell 5.1 is already installed by default in all versions, starting with Windows 10 and Windows Server 2016.
You must manually upgrade to PowerShell 5.1 for earlier versions (Windows 7/8.1 and Windows 2008 R2/2012). For example, Windows Server 2012 R2 (Windows 8.1) has PowerShell 4.0 installed.
Let’s try upgrading the Windows PowerShell version to 5.1 in Windows Server 2012 R2.
First, check the current PowerShell version (the screenshot shows that it’s PowerShell 4.0):
$PSVersionTable.PSVersion
To upgrade your PowerShell version to 5.1, install the Windows Management Framework 5.1, which requires the .NET Framework 4.5.2 (or later). Make sure that .NET 4.5.2 or higher is installed using this command:
(Get-ItemProperty ‘HKLM:\SOFTWARE\Microsoft\NET Framework Setup\NDP\v4\Full’ -Name Release).Release

In my case, the release version 378675 means that the .NET Framework version 4.5.1 is installed. So, I have to download and install the latest .NET Framework 4.8 (here is the link to the offline installer: https://go.microsoft.com/fwlink/?linkid=2088631 — ndp48-x86-x64-allos-enu.exe).
Install the .NET 4.8 package (you will need to restart your computer):
If you install WMF 5.1 without .NET 4.5.2, some PowerShell features will not be available.
Download WMF 5.1 for Windows Server 2012 R2 — Win8.1AndW2K12R2-KB3191564-x64.msu (https://go.microsoft.com/fwlink/?linkid=839516).
Install the Windows Management Framework 5.1 from the MSU file.
After you restart the server, open the powershell.exe console and make sure that the PowerShell version has been updated to 5.1.
If you have unsupported Windows 7 or Windows Server 2008 R2, you can upgrade the PowerShell version from 2.0 to 5.1 in the same way. First, install .Net Framework 4.5.2 (or newer), then WMF 5.1 (the download links will be different from those for Windows Server 2012 R2).
How to Install or Update PowerShell Core 7?
PowerShell Core is cross-platform and under active development (unlike Windows PowerShell 5.1). Actually, PowerShell Core is a new platform installed on the operating system alongside the classic Windows PowerShell. This means that you cannot upgrade from PowerShell 5.1 to PowerShell Core 7.3. PowerShell 7.x is installed on your computer separately from Windows PowerShell 5.1 (side-by-side).
PowerShell Core 6.x and 7.x are available at this time. It is recommended that you always install the latest version of PowerShell (currently 7.3) unless you need special compatibility with legacy scripts.
There are several ways to upgrade (install) the PowerShell Core version on Windows 10 and 11:
- Use the PowerShell Core MSI installer, which is available to download from GitHub;
- Using the built-in Windows 10/11 package manager WinGet;
- Using the Microsoft Store.
Next, using the example of updating PowerShell Core to 7.3 on Windows 10 22H2, we will look at all of these methods.
Upgrading the PowerShell Core Using MSI installation
If you want to install PowerShell Core using the MSI package, go to the project page https://github.com/PowerShell/PowerShell and download the installation package for your OS version. At the time of writing, the most recent release of PowerShell is v7.3.3, dated 24 February 2023 (for example, PowerShell-7.3.3-win-x64.msi or PowerShell-7.3.3-win-x86.msi). Use only stable or LTS releases for a production environment.
Download the MSI file and install it.
The following installation options are available:
- Add PowerShell to Path Environment Variable
- Register Windows Event Logging Manifest (a separate Event Viewer log is created for PowerShell events.
%SystemRoot%\System32\Winevt\Logs\PowerShellCore%4Operational.evtx) - Enable PowerShell Remoting (enables and configures WinRM for PowerShell Remoting)
- Add ‘Open here’ context menu to Explorer
- Add ‘Run with PowerShell 7’ context menu for PowerShell files
Next, you can enable automatic updates of the PowerShell Core through Windows Update/WSUS (see below).
To install PowerShell Core from an MSI package using SCCM/MDT/scripts in quiet mode, you can use a command with the following parameters:
- ADD_EXPLORER_CONTEXT_MENU_OPENPOWERSHELL
- ADD_FILE_CONTEXT_MENU_RUNPOWERSHELL
- ENABLE_PSREMOTING
- REGISTER_MANIFEST
- ADD_PATH
- DISABLE_TELEMETRY
- USE_MU – use the Microsoft Update to get PSCore updates
- ENABLE_MU – allow the PowerShell Core to be updated through Windows Update
For example, the command for a silent installation might look something like this:
msiexec.exe /package PowerShell-7.3.3-win-x64.msi /quiet ADD_EXPLORER_CONTEXT_MENU_OPENPOWERSHELL=1 ENABLE_PSREMOTING=1 REGISTER_MANIFEST=1 ADD_PATH=1 ENABLE_MU=1 ADD_PATH=1
You can upgrade PowerShell directly from the console. To install or upgrade to the latest version of PowerShell Core, run the following command:
iex "& { $(irm https://aka.ms/install-powershell.ps1) } -UseMSI"
This command downloads the PowerShell 7.3 MSI file from GitHub and then starts the installation via the MSI installer.

When the installation is complete, the PowerShell Core (pwsh.exe) window appears. Check the PowerShell version to ensure that it is updated to PoSh 7.3.3.
Using WinGet Package Manager to Install or Update PowerShell Core
If you have the WinGet package manager installed, you can install or update your PowerShell version to the latest command:
winget install --id Microsoft.Powershell --source winget
Or, you can install a specific version of PowerShell Core:
winget install --id=Microsoft.PowerShell -v "7.1.2" -e
If you have the Chocolatey package manager installed, use the commands (for 5.1):
choco install powershell -y
 choco upgrade powershell -y
or for PowerShell 7.x:
choco install pwsh -y
 choco install pwsh -y
Note the default directories for different versions of PowerShell:
- Windows PowerShell 5.1:
$env:WINDIR\System32\WindowsPowerShell\v1.0 - PowerShell Core 6.x:
$env:ProgramFiles\PowerShell\6 - PowerShell Core 7.x:
$env:ProgramFiles\PowerShell\7
If PowerShell 6.x was installed on your computer, the $env:ProgramFiles\PowerShell\6directory is automatically removed when you install PowerShell 7.3.
Note that the name of the PowerShell executable file has changed. In PowerShell Core, it is c:\Program Files\PowerShell\7\pwsh.exe. It has its own icon in the Start menu.
- To run .NET Framework-based Windows PowerShell, the
powershell.execommand is used - To run .NET Core-based PowerShell Core, use the
pwsh.exe
This means that you have both Windows PowerShell 5.1 and PowerShell Core 7.3 installed on your computer.
To find the version and build of PowerShell that is installed on your device, you can check the version of the pwsh.exe file:
(Get-Command 'C:\Program Files\PowerShell\7\pwsh.exe').Version

This is how you can check the version of a file on a remote computer:
Invoke-Command -Computername computer1 -Scriptblock {(Get-Command 'C:\Program Files\PowerShell\7\pwsh.exe').Version}
Windows PowerShell provides a special backward compatibility mode that allows you to run an older version of PowerShell even if you have newer versions installed. You can use the following command to run a specific version of PowerShell example, 4.0):
C:\Windows\System32\WindowsPowerShell\v1.0\powershell.exe -Version 4
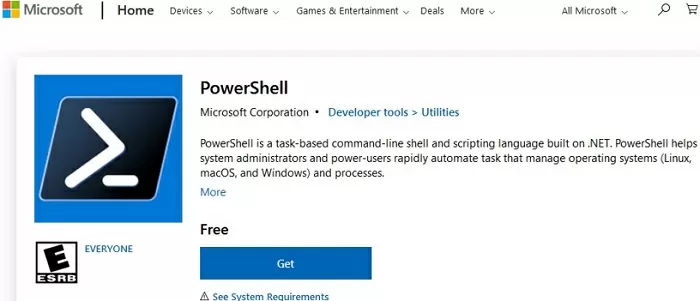
Install PowerShell Core on Windows 10 and 11 via Microsoft Store
On Windows 10 and 11, you can install or update PowerShell through the Microsoft Store. You can manually find the PowerShell app in the Store or use this link.
You can also use WinGet to install the Store version of PowerShell:
winget search powershell --source msstore
 winget install --id 9MZ1SNWT0N5D
The advantage of installing PowerShell Core from the Microsoft Store is that the App Store automatically checks your installed version of PowerShell and automatically installs updates as they become available.
To verify that you have installed the Store version of PowerShell Core, use the command:
Get-AppPackage Microsoft.PowerShell
The Microsoft.PowerShell_7.3.3.0_x64__8wekyb3d8bbwe package is installed in this example.
However, there are also drawbacks to the fact that such an instance of PowerShell will be running in a sandbox environment.
Installing/Updating PowerShell Core on Remote Computers
Consider two scenarios for installing or updating the PowerShell Core on multiple remote computers.
Deploying PowerShell Core with Group Policy
You can use Group Policy to centrally deploy and update PowerShell Core in an Active Directory domain. Use the features of the GPO to deploy MSI packages to domain computers.
- Download the PowerShell MSI installation file and copy it to the SYSVOL directory on the domain controller;
- Open the Domain Group Policy Management Console (
gpmc.msc), create a new GPO and link it to the OU with computers and servers; - Go to the GPO section Computer Configuration -> Software Settings, create a new package, and specify the path to the PowerShell MSI installation file in the SYSVOL folder in the domain (use the UNC path);

To more accurately target your policy to domain devices, you can use the GPO WMI filters.
- To update the Group Policy settings for the software installation, you must restart the computers. The new version of PowerShell will be installed on all computers at startup.

How to Update PowerShell on a Remote Computer from the Command Prompt?
You can use the command line prompt to update PowerShell on a remote computer.
- The first method uses an MSI installer in a shared network folder to remotely update PowerShell on a computer:
Invoke-Command -ComputerName mun-srv01 -ScriptBlock {Start-Process msiexec.exe -ArgumentList '/package "\\mun-fs01\install\PowerShell-7.3.3-win-x64.msi" /quiet ADD_EXPLORER_CONTEXT_MENU_OPENPOWERSHELL=1 ENABLE_PSREMOTING=1 REGISTER_MANIFEST=1' -Wait}
- The following script selects all enabled computers running Windows 10 from the Active Directory domain and starts downloading and installing PowerShell Core on each of them:
$ADComputers = Get-ADComputer -Filter 'operatingsystem -like "*Windows 10*" -and enabled -eq "true"'
 ForEach ($computer in $ADcomputers) {
 Invoke-Command -ComputerName $computer {iex "& { $(irm https://aka.ms/install-powershell.ps1) } -UseMSI -Quiet"}
 }
Take care when using PowerShell Remoting commands when connecting to remote computers (with the Enter-PSSession and Invoke-Command cmdlets). If you need to connect to a PowerShell 7 endpoint, you must use the command:
Enter-PSSession -ComputerName dc01 -ConfigurationName "powershell.7"
Otherwise, you will connect to the PowerShell Remoting 5.1 endpoint.
The most common way to update the PowerShell Core on Linux distros is to use the native package manager.
Updating PowerShell via Windows Update or WSUS
Prior to PowerShell Core 7.2, pwsh.exe was not automatically updated. There was only a notification in the console after the release of a new version:
A new PowerShell stable release is available. Upgrade now, or check out the release page at: https://aka.ms/PowerShell-Release?tag=v7.1.3
Starting with version 7.2, PowerShell Core supports automatic updates through Windows Update (Microsoft Update, Windows Update for Business, internal WSUS server, or SCCM). To do this, you must enable the appropriate options during the installation of the MSI package.
Check that the Receive updates for other Microsoft products when you update Windows option is now enabled under Settings -> Update and Security -> Windows Update -> Advanced options.
Now, when you click the Check for Updates button or run an update scan through the PSWindowsUpdate module, you will also receive updates for PowerShell Core.
Skip to content
По умолчанию в только что установленной ОС из дистрибутива SW_DVD9_Windows_Svr_Std_and_DataCtr_2012_R2_64Bit_English_-4_MLF_X19-82891.iso Windows Server 2012 R2 Std версия PowerShell имеет версию 4.0, а чтобы поставить версию 5.1 нужно установить пакет .NET Framework 4.7.1
Действия ниже выполняю при авторизации в системе с правами Администратора (Login: ekzorchik):
Win + X → Command prompt (Admin)
C:\Windows\system32>powershell
PS C:\Windows\system32> get-host | findstr /I “Version”
Version: 4.0
устанавливаю NDP471-KB4033342-x86-x64-AllOS-ENU.exe, не перезагружаюсь после, а выбираю Restart Later
а после
windowsblue-kb3191564-x64_91d95a0ca035587d4c1babe491f51e06a1529843.msu
и вот только после нужно отправить систему в перезагрузку
нажимаю на Restart Now от инсталлятора пакета обновления KB3191564
проверяю
Win + X → Command prompt (Admin)
C:\Windows\system32>powershell
PS C:\Windows\system32> get-host | findstr /I “Version”
Version: 5.1.14409.1005
Отлично, что мне и требовалось. Ну а далее, уже перехожу к настройке системы на дальнейшее использования.
На этом моя заметка для себя завершена и уже не нужно искать по заметкам на компьютере, что и как нужно сделать дабы обновить PowerShell на Windows Server 2012 R2 Std, тут просто открываю свой блок и знаю от и до, что нужно сделать. С уважением, автор блога Олло Александр aka ekzorchik.
PowerShell is a command-line shell and scripting language developed by Microsoft Corporation for executing, automating and managing tasks in Windows operating systems. It is widely used by system administrators, developers, and IT professionals who seek to simplify repetitive administrative tasks and automate complex workflows on Windows platforms.
As organizations look for ways to boost productivity and efficiency, PowerShell is gaining wider adoption as a powerful automation tool. If you are a server administrator, you may need to upgrade your PowerShell version to take advantage of new features and improve performance. In this article, we will show you how to upgrade your PowerShell version on Windows Server 2012 R2, a popular version of the Windows server platform.
Video Tutorial:
With every new version of PowerShell, Microsoft introduces new features and improvements that can enhance the functionality of your Windows servers. Upgrading your PowerShell version can offer the following benefits:
- Improved Security: Newer PowerShell versions are built with better security features to protect your Windows servers and data.
- Bug Fixes: Each new version of PowerShell addresses known issues and bugs, which can improve the stability of your Windows servers.
- New Features: PowerShell releases often include new features that can help you automate tasks more efficiently and effectively.
- Higher Performance: Newer PowerShell versions are optimized for performance, so upgrading can help you improve the speed and responsiveness of your Windows servers.
Method 1: Upgrade PowerShell via Windows Update
If you have automatic Windows Update enabled, then upgrading PowerShell is as simple as running Windows update. Windows update will detect the latest version of PowerShell available and automatically download and install it for you.
- Open the Start Menu and search for «Windows Update«.
- Click on «Check for Updates«.
- Windows will check for available updates and display them. Look for any updates related to PowerShell and click «install» to upgrade your PowerShell to the latest available version.
- Wait for the update to complete and restart your server if needed.
Pros:
- Easy and straightforward process.
- No need to manually download and install anything.
- Windows Update is a trusted source, so you don’t need to worry about malware.
- Automatic Windows Update can keep your Windows server up-to-date with the latest security patches and updates.
Cons:
- Windows Update may not always detect the latest version of PowerShell available.
- The update process may take longer if there are other updates pending.
- Manually selecting the PowerShell update requires active monitoring of the update process.
Method 2: Upgrade PowerShell via PowerShell Gallery
PowerShell Gallery is a centralized repository for PowerShell modules and scripts. You can use PowerShell Gallery to download and install the latest version of PowerShell on your Windows server.
- Open PowerShell as an Administrator.
- Run the following command to check if there is a newer version available:
Find-Module PowerShellGet | Install-Module
- Run the following command to install the new version of PowerShell:
Install-Module -Name PowerShellGet -Force
- The latest version of PowerShell should now be installed. Verify by running the following command:
Get-Host | Select-Object Version
Pros:
- PowerShell Gallery always contains the latest version of PowerShell.
- You can install PowerShell version without needing to update from Windows Update feature.
- PowerShell Gallery can offer more PowerShell resources beyond the PowerShell core itself.
Cons:
- You need an active internet connection to download the newer PowerShell version from PowerShell Gallery.
- Manually upgrading PowerShell via PowerShell Gallery can take more time than the automatic Windows Update.
Method 3: Upgrade through Microsoft’s Installer Package
Microsoft makes available a package (installer file) that can upgrade PowerShell to the latest available version. You can use this package to upgrade PowerShell on Windows Server 2012 R2.
- Download the latest version of PowerShell from Microsoft’s Download Center website.
- Run the installer package and select the default settings, unless you want to change the configuration.
- Wait for the installer to complete and restart the server.
- Verify that PowerShell is upgraded to the latest version by opening PowerShell as an Administrator and running the following command:
Get-Host | Select-Object Version
Pros:
- You can download and install the newer PowerShell version anytime and anywhere.
- You can control PowerShell’s install configurations, i.e. if you are administering a server farm, this might be very useful in some cases.
- Microsoft’s download center resources are generally more reliable for carrying-out installations.
Cons:
- You have to download and install the package manually.
- You need to actively monitor the installation process.
- Since you are manually downloading and installing the package, you will lose the «automatic updates» feature (as in Method 1).
What to Do If You Can’t Upgrade PowerShell?
Some factors may prevent upgrading PowerShell to newer versions. If you encounter such errors, you can try the following measures:
- Disable Execution Policy: Execution policies may prevent PowerShell from running installation commands. You can temporarily disable the policy by running the command:
Set-ExecutionPolicy Unrestricted
- Check Management Framework Components: Management Framework components (which may include PowerShell) may be required to be installed on the server. If not included, you can need to install Windows Management Framework via Windows Update or manually download and install them from Microsoft’s download center.
- Check PowerShell Dependencies: PowerShell is dependent on certain system files and settings, including .NET Framework components. Make sure you have the right components installed in your server system.
- Check Compatibility Issues: Newer PowerShell versions may have compatibility issues with some applications. Validate with your application supplier for compatibility.
- Backup: If you still can’t upgrade PowerShell and it is a critical component in your infrastructure, back-up your PowerShell scripts, modules and configurations before attempting to repair or reinstall PowerShell.
Bonus Tip: Enable PowerShell Tab Completion
Tab completion is a great productivity feature in PowerShell that allows you to type part of a command and then press the «Tab» key to automatically complete the command. If you don’t use this feature, you might be missing out on a faster way to enter commands.
- Open PowerShell as an Administrator.
- Type the following command and press «Enter«:
Set-PSReadLineOption -EditMode Windows
- Tab completion should now be enabled.
5 FAQs
Q1: Why is PowerShell Upgrade Needed?
A: Upgrading PowerShell ensures that you are running a version of PowerShell that is optimized for performance, has the newest features and bug-fixes, and is more secure. It is also needed to smoothly support newer applications and workloads.
Q2: Is it possible to install multiple versions of PowerShell on the same system?
A: Yes. Multiple versions of PowerShell can be installed on the same system. However, this is generally not recommended unless for specific reasons like installing Beta or release candidates PowerShell versions.
Q3: Do I need to restart my system after upgrading PowerShell?
A: Yes. Restarting your system after installing or updating PowerShell is necessary to ensure that all the necessary processes required by PowerShell are initialized appropriately.
Q4: Will PowerShell scripts break down after upgrading PowerShell?
A: Your existing scripts may or may not break down. Newer versions of PowerShell are generally backwards-compatible, but you should validate that your present scripts execute correctly in the new version after upgrading.
Q5: Can the upgrade process roll-back to the previous version of PowerShell?
A: PowerShell upgrade process is non-revertible, making it almost impossible to roll back to the previous version once PowerShell has undergone an upgrade. It is recommended to keep a backup before upgrading PowerShell.
Final Thoughts
Upgrading PowerShell is an essential process that sometimes becomes a critical part of daily system maintenance. Doing it right way ensures your PowerShell capabilities for effective administration, task automation and workflow becomes optimized. With the three explained methods (and possible limitations encountered), you can be confident to upgrade PowerShell version on your Windows Server 2012 R2 platform successfully.
Keeping your PowerShell version up-to-date makes sure that you can use the latest features and cmdlets in your scripts. But how do you update PowerShell?
There are two versions of PowerShell at the moment, Windows PowerShell 5.1 and PowerShell Core (7.x). Most modules are switching over to PowerShell 7, but 5.1 is still mainly used. Luckily we can use those two versions next to each other.
In this article
In this article, I will explain how you can update both versions of PowerShell, and how to install/upgrade to PowerShell 7. If you are unsure which version you are currently using, then check this article on how to view your PowerShell version.
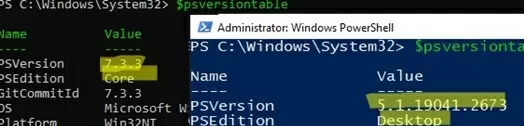
PowerShell 5.1 is still the most commonly used and installed PowerShell version at the moment. If you open the Terminal or PowerShell on a Windows 10/11 computer or Windows Server 2016 and newer and type in $PSVersionTable then you will see that version 5.1 (1) is installed.
The version number exists out of 4 parts:
| Major | Minor | Build | Revision |
|---|---|---|---|
| 5 | 1 | 22621 | 963 |
If you check the PowerShell version on another machine, then you might have noticed that the build and revision numbers are different. Now you might think, how can I update PowerShell so the build numbers match?
The problem here is that PowerShell 5.1 is part of the Windows Management Framework 5.1 and is updated automatically with your Windows Updates. As we can see in the screenshot above, the build and revision numbers match the Build Version of the OS (2).
Good to know is that PowerShell 5.x isn’t developed anymore. The latest version is 5.1 and there won’t be any updates for it anymore. PowerShell Core 7.x is the successor of PowerShell 5.1.
Update from older PowerShell versions
On older operating systems, like Windows Server 2012 R2, you can still find PowerShell 4 installed. PowerShell 3 and 4 can be updated to PowerShell 5.1. To do this we will need to install the Windows Management Framework 5.1, which you can download here at Microsoft. The following operating systems are supported:
- Windows Server 2012 R2
- Windows Server 2012
- Windows Server 2008 R2 SP1
- Windows 8.1
- Windows 7 SP1
Make sure that you select the correct version of your OS and that have installed .Net Framework 4.5 or higher.
After the installation, you will need to reboot the computer to use the new PowerShell version.
Upgrade PowerShell
PowerShell Core 7, commonly revert to as PowerShell 7, is a completely new version of PowerShell. One of the biggest differences is that it not only can be used on Windows but also on macOS or Linux for example. This means that we cannot upgrade PowerShell 5.1 to 7, but instead, we can install PowerShell 7 next to version 5.1.
This way you can use both versions simultaneously on a single computer, which is a good thing. Because not all modules and cmdlets are available in PowerShell 7. So before you can fully switch over to the new version, you will need to do a lot of testing to make sure that all your script keep working.
To install PowerShell 7 we have a couple of options:
- WinGet – The built-in package manager in Windows 10 and 11
- MSI Installer – Best option for Windows Servers
- Microsoft Store
- Dev Home – Currently in preview, but allows you to easily install all required packages on your dev machine. Read more about Dev Home in this article.
Using WinGet to Install PowerShell 7
WinGet is a built-in command line tool in Windows that allows you to install packages on your Windows 10 or 11 computer. The advantage of WinGet is that you only need to run a single command to install a package.
At the moment there are two versions available of PowerShell 7, the stable version and a preview version. I recommend installing the stable version in production environments. To view the available versions you can run the following command:
winget search Microsoft.PowerShell

# Result
Name               Id                           Version Source
---------------------------------------------------------------
PowerShell         Microsoft.PowerShell         7.3.4.0 winget
PowerShell Preview Microsoft.PowerShell.Preview 7.4.0.3 winget
To install PowerShell 7 run the following command:
winget install --id Microsoft.Powershell --source winget
Winget will download the package after which the MSI installer will start:
Using the MSI
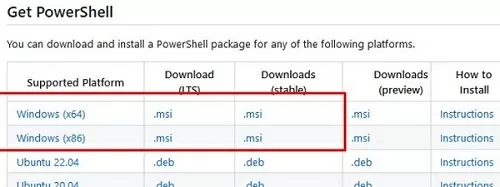
The Windows Package Manager (Winget) downloads the latest MSI file automatically. If you can’t or don’t want to use WinGet, then you can also download the MSI file manually from the PowerShell GitHub page. Another (easier) option is to use the download link here in the Microsoft documentation.
- Open the PowerShell GitHub Page
- Click on the latest Release version in the right sidebar
- Scroll all the way down on the release page
- Download the latest PowerShell-7.x.x-win-x64.msi file
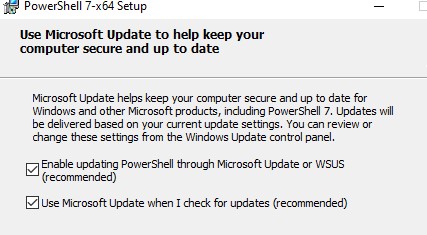
Open the MSI after it’s downloaded. We have a couple of options that we can enable. I recommend installing all options from the installer:
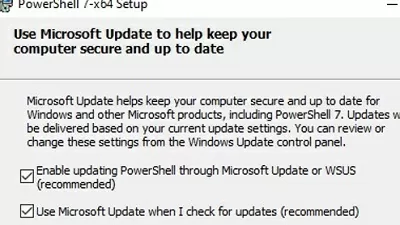
On the next page, leave both updating options enabled. This way you will always have the latest stable version of PowerShell 7 installed on your computer.
Install with Microsoft Store
Personally, I don’t use the Microsoft Store much, but it’s possible to install PowerShell through the store. Simply open the Store and search for PowerShell 7. Make sure you select PowerShell and not the PowerShell Preview version and click on Get.
Using PowerShell 7
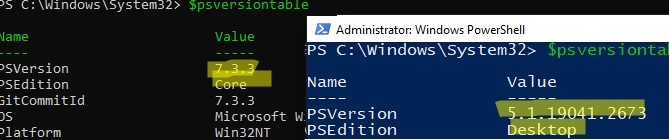
PowerShell 7 is a different app/console than PowerShell 5.1. If you open Terminal or PowerShell from the start menu and run the command $PSVersionTable, then you will see that the version number is still 5.1. This is normal because you are actually using PowerShell 5.1 at that moment.
To use PowerShell 7, you have two options:
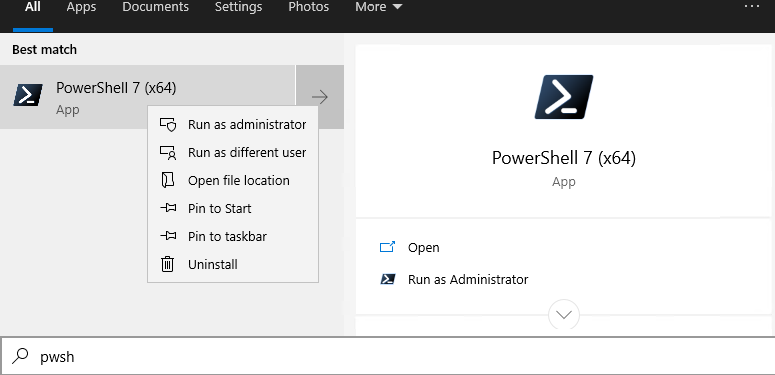
- Open it from the Start Menu
- Open it through Terminal > New Tab
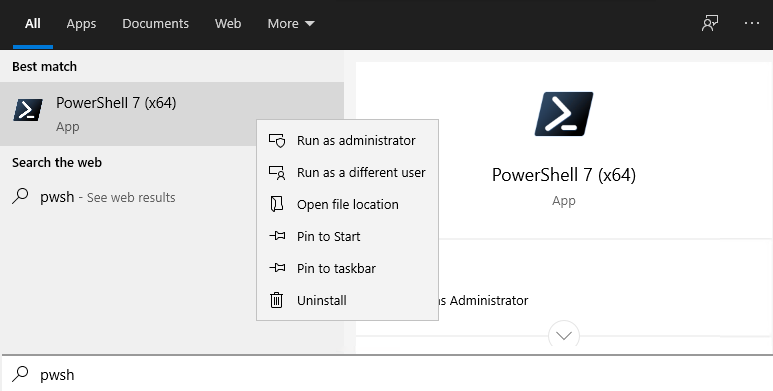
To open it from the start menu, just search for the PowerShell 7 app. This will open the new version in the terminal app.
Another option is to use the built-in Windows Terminal. If you click on the drop-down arrow (1) next to the new tab icon, then you can select PowerShell, which is PowerShell 7. We can also change the default PowerShell version in Terminal to PowerShell 7.
Click on the drop-down arrow (1), choose Settings, and change the default profile (2) to PowerShell.
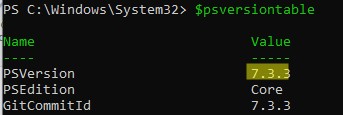
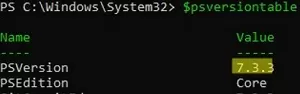
If you run the command $PSVersionTable in the new PowerShell console, then you will see that the PSVersion is set to 7.x.x and the PSEdition is Core:
Update PowerShell 7 Command
PowerShell Core 7 is being actively developed at the moment. A new release comes out pretty much every month. Now PowerShell 7 should update with your Windows Updates if you have version 7.2 or higher. But we can also manually update PowerShell with a single command to the latest version. For this, we will be using the command-line tool WinGet.
To view which version you have currently installed you can use the WinGet List command below:
winget list --id Microsoft.Powershell

# Result
Name             Id                   Version Available Source
--------------------------------------------------------------
PowerShell 7-x64 Microsoft.PowerShell 7.3.2.0 7.3.4.0   winget
As you see in the results above, PowerShell version 7.3.2 is currently installed. Also, the latest available version is listed, which is at the moment of writing, version 7.3.4. To update PowerShell we can use the upgrade parameter in Winget:
winget upgrade --id Microsoft.Powershell
After the upgrade is complete you will need to reload the console to use the new version.
Wrapping Up
Keeping PowerShell 7 up-to-date is important to make sure that your scripts work on all device. However, PowerShell 5.1, won’t receive any updates anymore, but is still mainly used. Personally I try to write most of my new scripts in PowerShell 7 when possible. This will make them future prove.
I hope this articled helped you with updating PowerShell. If you have any questions or tips, just drop a comment below.