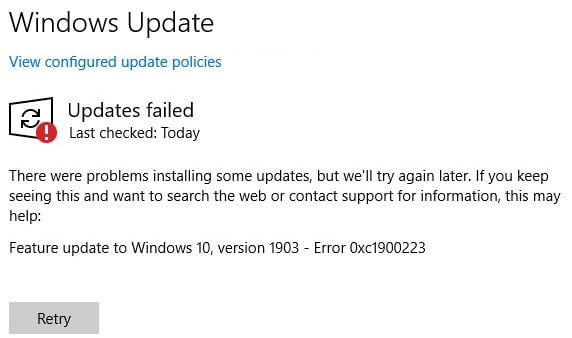
Некоторые пользователи Windows 10 сталкиваются с ошибкой 0xc1900223, когда пытаются обновить операционную систему обычным способом, т.е. через Центр обновления. В большинстве задокументированных случаев подобная ошибка возникает в процессе установки апдейта 1903, причем зачастую на 97%. Сегодня мы расскажем вам, как можно избавиться от ошибки 0xc1900223 меньше чем за 10 минут!
Решение ошибки 0xc1900223
Метод №1 Принудительное обновление ОС через папку $getcurrent
Всякий раз, когда вы пытаетесь установить ранее отложенное обновление, Windows 10 автоматически создает папки $GetCurrent и $SysReset на системном разделе. В этих папках находятся логи всех последних процессов установки апдейтов для ОС, а иногда — и установочные файлы для этих апдейтов. Вот что вам нужно сделать следующее:
- откройте Проводник системы;
- перейдите в C:/$getcurrent;
Заметка: вам нужно включить показ скрытых файлов в настройках того же Проводника (Вид → Скрытые элементы).
- найдите папку нужного вам обновления и запустите исполняемый файл внутри этой папки;
- следуйте за инструкциями на экране;
- перезагрузите ПК после завершения установки апдейта.
Метод №2 Обновление через средство создания установочного носителя
Если автоматические средства все еще отказываются нормально функционировать, то вы можете обновить Windows 10 с помощью средства создания установочного носителя. Перейдите по следующей ссылке, чтобы загрузить средство:
- https://www.microsoft.com/ru-ru/software-download/windows10
Как только средство будет у вас на компьютере, запустите его от имени администратора (!) и выбирайте опции, ответственные за обновление ОС. В таком случае вы обновите систему и никакая ошибка 0xc1900223 не появится. После работы со средством обязательно перезагрузите свой ПК, если этого не произошло автоматически.
Метод №3 Отключение блокировщика рекламы
Ошибка 0xc1900223 способна возникать при обновлении Windows 10 из-за установленных на ПК пользователя блокировщиков рекламы, по крайней мере, если верить утверждениям ряда пользователей в сети. Если на вашем компьютере установлен standalone-клиент какого-то блокировщика, то мы рекомендуем временно отключить его и посмотреть, исчезнет ли ошибка.
Метод №4 Удаление кэша DNS
По всей видимости, кэш DNS может вызывать всяческие неполадки при загрузке апдейтов для системы. Чтобы это исправить, достаточно удалить этот кэш, выполнив несколько простых команд в командной строке. Вот что вам нужно сделать:
- нажмите Win+R;
- впишите cmd и нажмите C trl+Shift+Enter;
- выполните следующий ряд команд:
- ipconfig /flushdns
- ipconfig /registerdns
- ipconfig /release
- ipconfig /renew
- после выполнения всех команд перезагрузите ПК.
Метод №5 Установка обновления через каталог Майкрософт
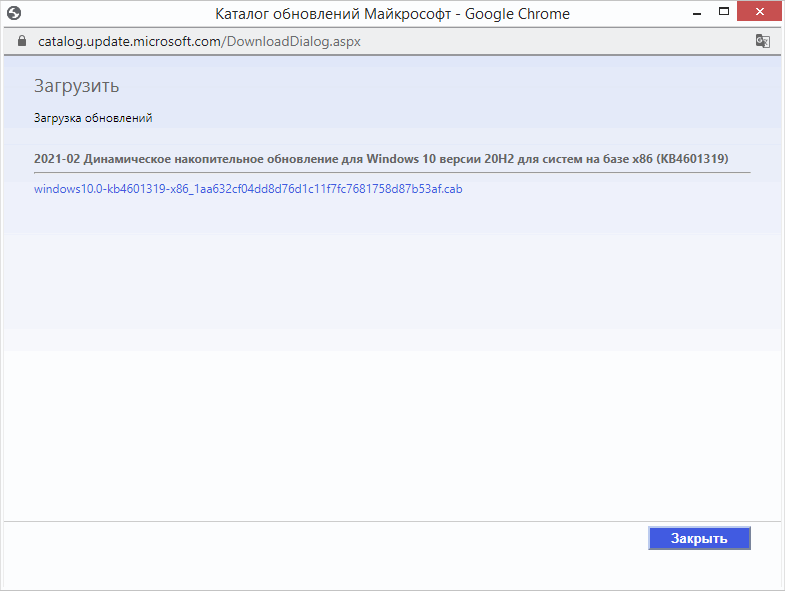
Если никакие из вышеуказанных методов не сработали для вас, то всегда можно прибегнуть к ручной установке нужного обновления. Рассмотрим пример на крупном апдейте 1903 для Windows 10. Чтобы начать процесс ручной установки, для начала вам нужно перейти по следующей ссылке:
- https://www.catalog.update.microsoft.com/Search.aspx?q=4522355
Далее скачайте апдейт 1903 подходящей версии. Запустите загруженный файл и следуйте инструкциям на своем экране. По окончанию установки перезагрузите компьютер. Все, обновление установлено и никакой ошибки 0xc1900223 в этом случае не появилось. По такому же принципу устанавливаются и другие обновления.
Метод №6 Сброс всех компонентов Центра обновления
Не хотите вручную обновлять Windows? Тогда давайте попытаемся с вами реанимировать Центр обновления. Предлагаем вам сбросить каждый компонент Центра обновления. Выполняется данная процедура следующим образом:
- нажмите Win+R;
- впишите в пустую строку cmd и нажмите Ctrl+Shift+Enter;
- выполните в командной строке нижеуказанный ряд команд:
- net stop wuauserv
- net stop cryptSvc
- net stop bits
- net stop msiserver
- ren C:\Windows\SoftwareDistribution SoftwareDistribution.old
- ren C:\Windows\System32\catroot2 Catroot2.old
- net start wuauserv
- net start cryptSvc
- net start bits
- net start msiserver
- перезагрузите ПК.
Как только войдете в систему, запустите процесс обновления Windows. Если какой-то из компонентов Центра был действительно поврежден, то описанные выше действия должны исправить ситуацию — ошибка 0xc1900223 исчезнет.
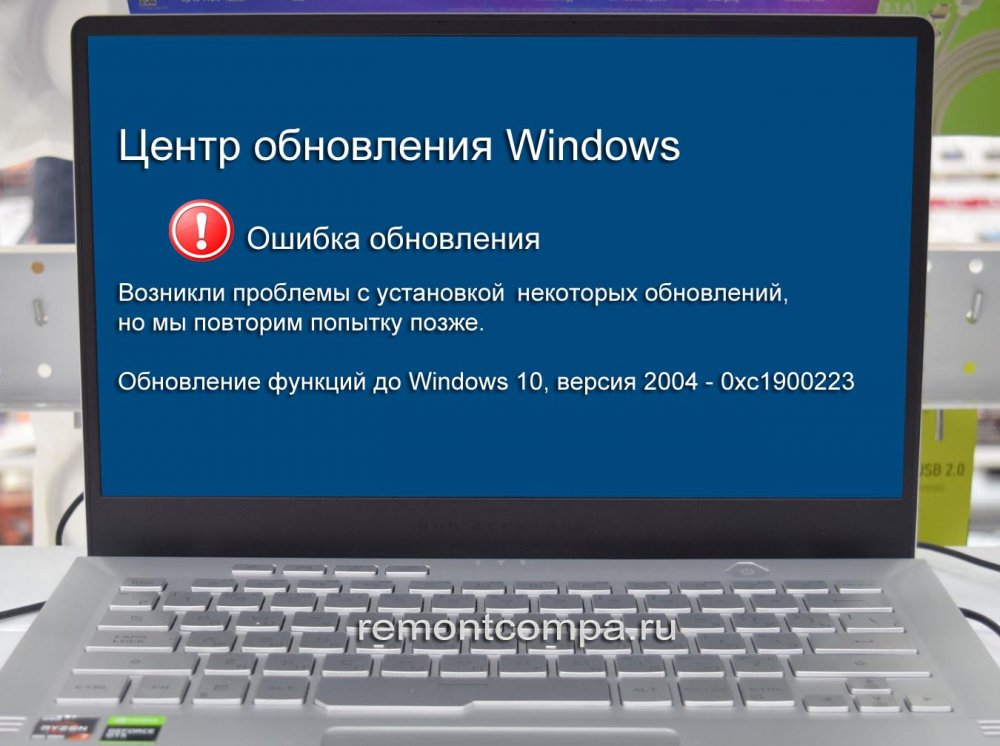
Существует два основных способа обновления Windows 10 до новой сборки — в полуавтоматическом режиме через Центр обновлений и в режиме ручном, используя скачанный установочный ISO-образ свежей версии операционной системы. Первый способ проще и удобнее, с другой стороны, при его использовании чаще приходится сталкиваться с разного рода ошибками, например, с ошибкой с кодом 0xc1900223, возникающей после загрузки пакетов обновления на компьютер, чаще всего в тот момент, когда процедура апдейта уже подходит к концу. Появление этой ошибки было отмечено пользователями при попытке обновления до сборки 2004 и выше, но не исключено, что столкнуться с ней вам придётся и в более новых редакциях системы.
 Так, схожие следствия имеет ошибка с кодом 0xc1900404, также препятствующая завершению процедуры установки обновлений, но при этом встречающаяся в Windows 10 2004. Причиной обеих ошибок чаще всего становится повреждение установочных файлов, вызванное сбоями в работе самого Центра обновления, нестабильным интернет-соединением, реже к ошибкам приводит некорректная конфигурация компьютера. Так или иначе, ошибка 0xc1900223 не является фатальной, её, как и другие подобные ошибки Центра обновлений, можно исправить достаточно простыми методами.
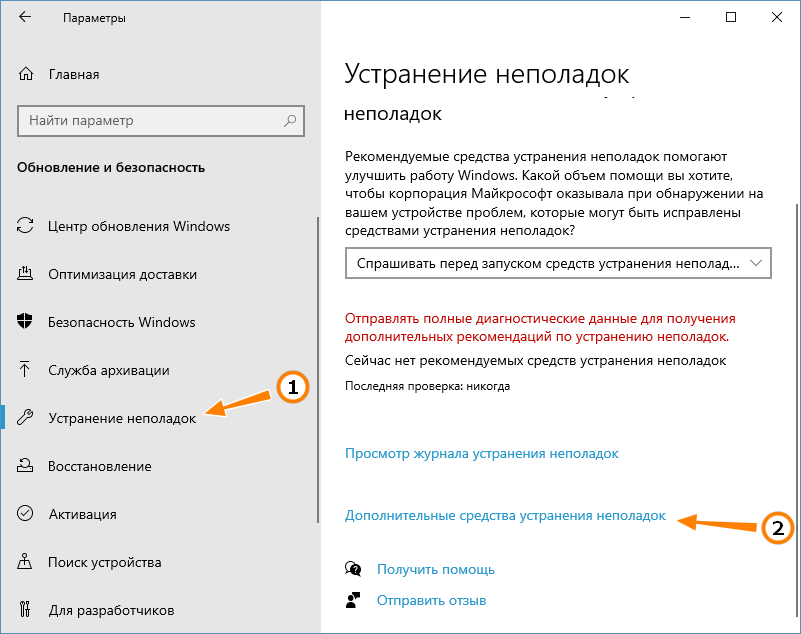
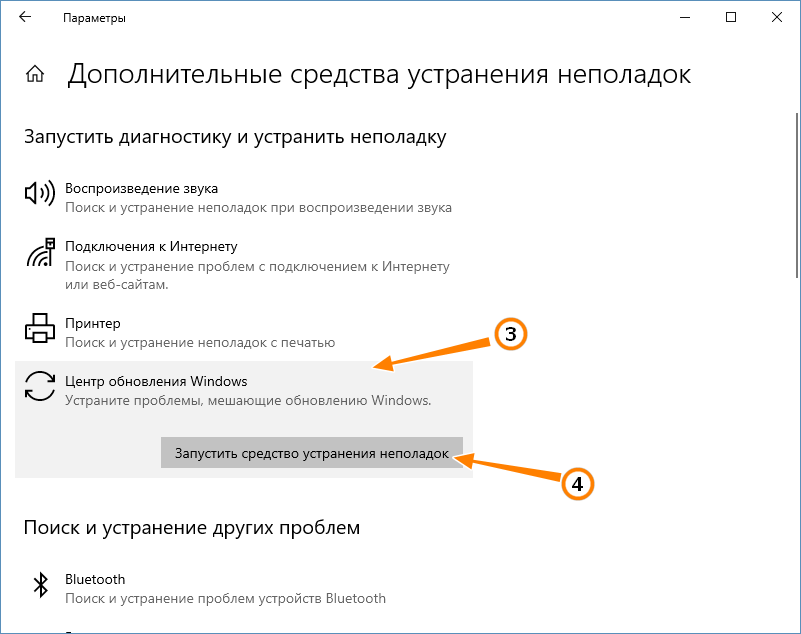
Первое, что следует предпринять в такой ситуации — пустить в ход встроенный инструмент устранения неполадок. Напоминаем, что запустить его можно из раздела «Обновление и безопасность» приложения Параметры. Выбираем Устранение неполадок → Дополнительные средства устранения неполадок → Центр обновления Windows. Если ошибки будут найдены, программа сообщит об этом и предпримет необходимые действия для решения проблемы.
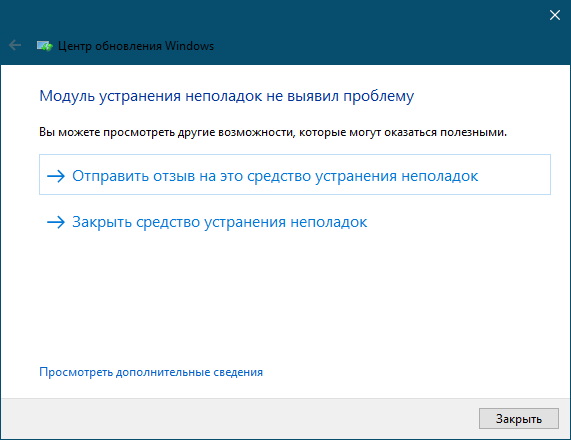 Если средство устранения неполадок не выявило проблем, но вы всё равно считаете, что Центр обновления работает некорректно, сбросьте его настройки к дефолтным. Для этих целей можно использовать утилиту WUReset или скрипт ResetWUEng, скачав их с сайта wureset.com/downloads.html.
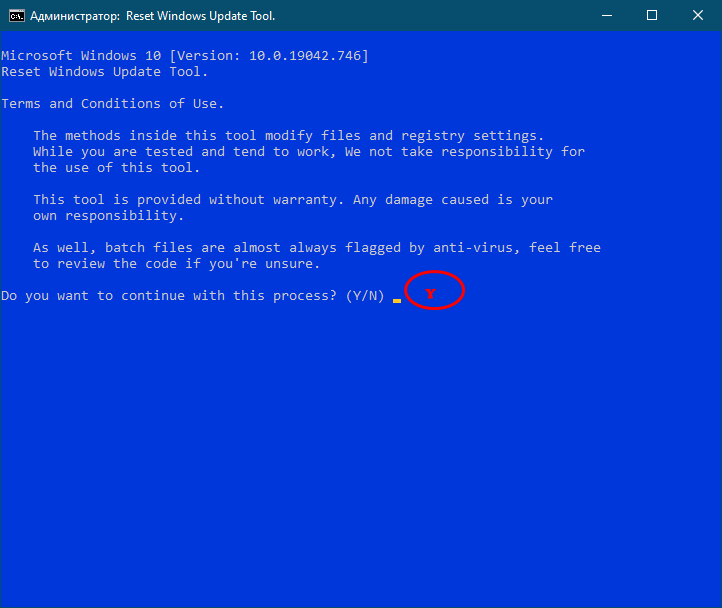
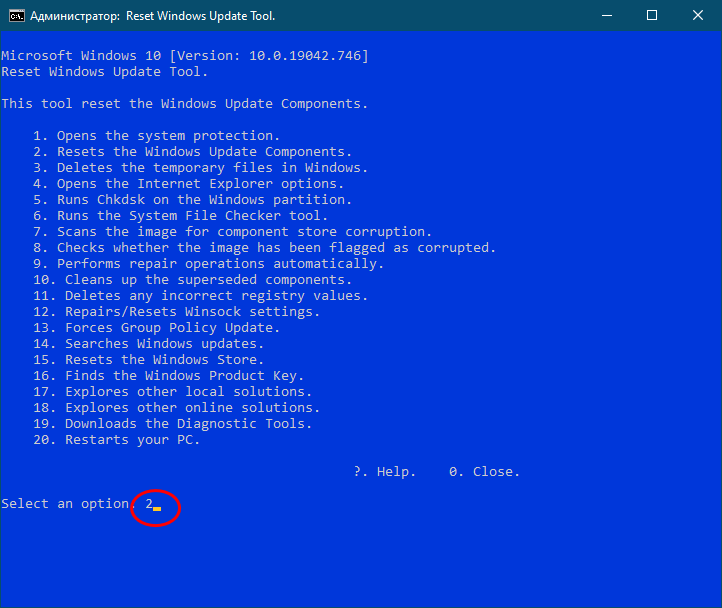
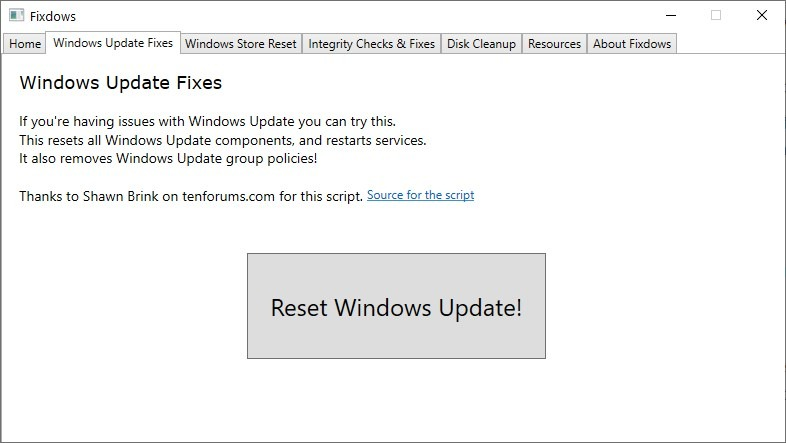
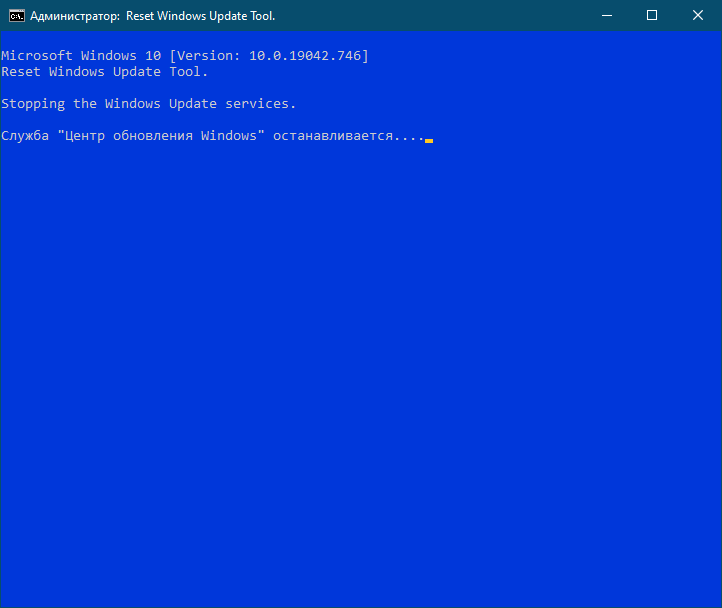 Есть ещё такой инструмент как Fixdows, упрощающий процедуру сброса Центра обновлений до максимума, нажатием одноименной кнопки, смотрите приложенный скриншот.
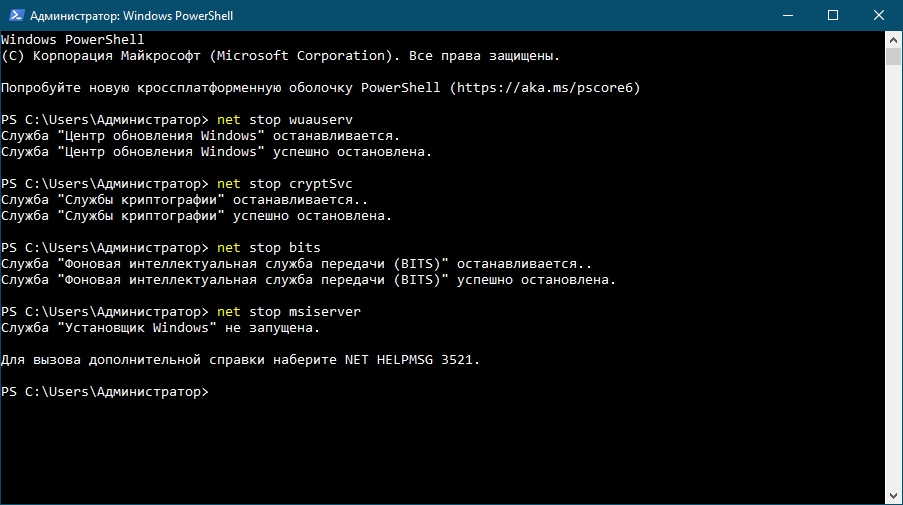
Если этого оказалось недостаточно, удалите все загруженные Центром обновления файлы апдейта вручную. Для этого нужно очистить содержимое каталогов кэша %windir%\SoftwareDistribution и %windir%\System32\catroot2, предварительно остановив связанные службы следующими командами в запущенной от имени администратора консоли CMD или PowerShell:
1. net stop wuauserv
2. net stop cryptSvc
3. net stop bits
4. net stop msiserver
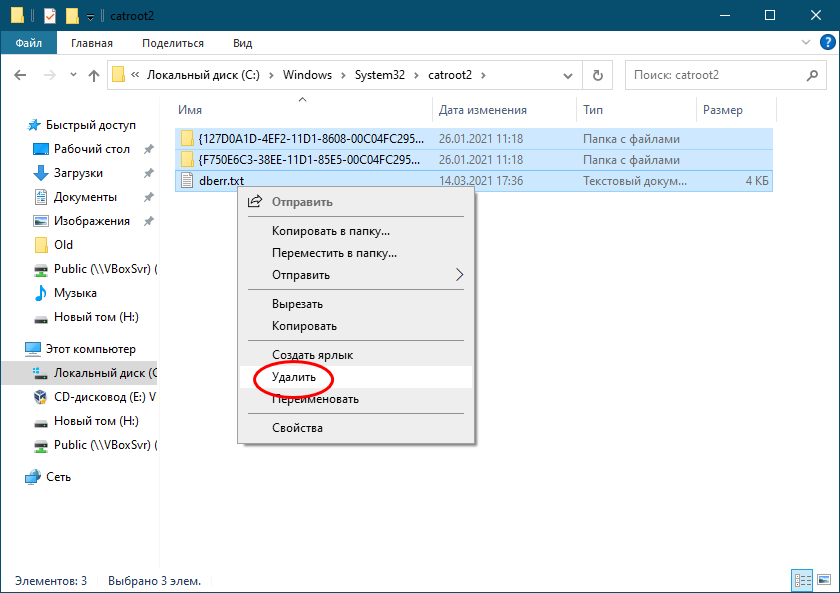
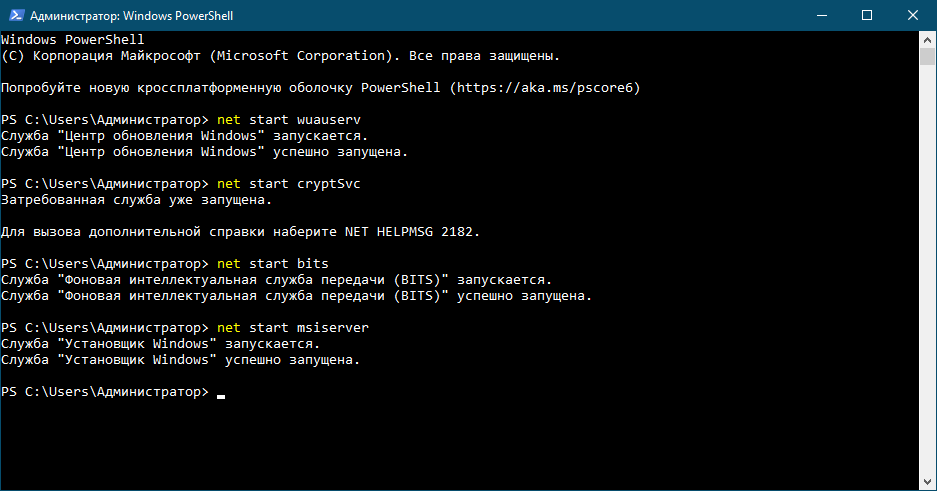
 Затем полностью очищаем содержимое каталога SoftwareDistribution и catroot2, после чего запускаем приостановленные службы теми же командами, заменив в них ключ «stop» на «start». В рамках очистки временных файлов рекомендуется удалить также и скрытую папку C:\$WINDOWS.~BT, если таковая имеется.

В качестве дополнительной меры рекомендуется очистить кэш DNS, сбросить сетевые настройки. Если ошибка 0xc1900223 была связана с проблемами сетевой конфигурации, эти простые действия позволят её устранить. Запустите от имени администратора командную строку или PowerShell и выполните в ней последовательно эти команды:
1. ipconfig /flushdns
2. netsh winsock reset
3. netsh winsock reset proxy
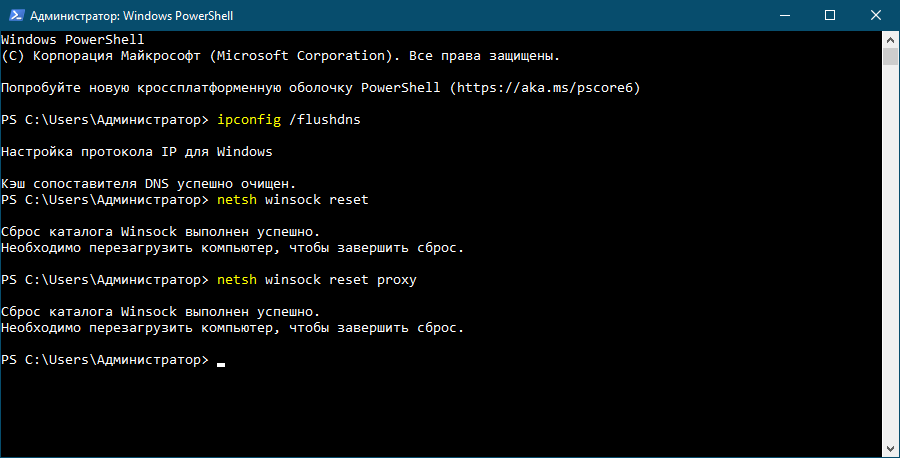 По завершении процедуры сброса перезагрузите компьютер.
Не используете сторонние программы, изменяющие конфигурацию сетевого подключение на глобальном уровне. Отключите VPN, если на компьютере у вас установлен такой инструмент как Pi-Hole для Windows, временно остановите его службу командами pihole и pihole disable, выполненными в командной строке.
Как уже было сказано, обновить Windows 10 можно не только через Центр обновления, но и как-то иначе, например, с помощью официального инструмента Media Creation Tool, созданного Microsoft. Эта программа автоматически проверяет компьютер на совместимость с актуальной версией Windows, после чего загружает с сервера Microsoft входящие в состав дистрибутива установочные файлы и запускает процедуру обновления системы. Подробно останавливаться на данном моменте мы не будем, так как эта тема уже неоднократно раскрывалась на страницах нашего сайта.
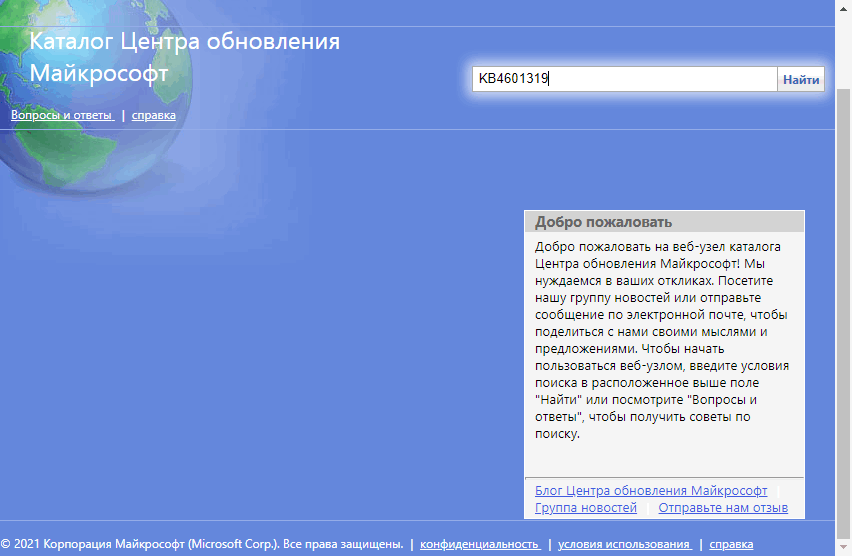
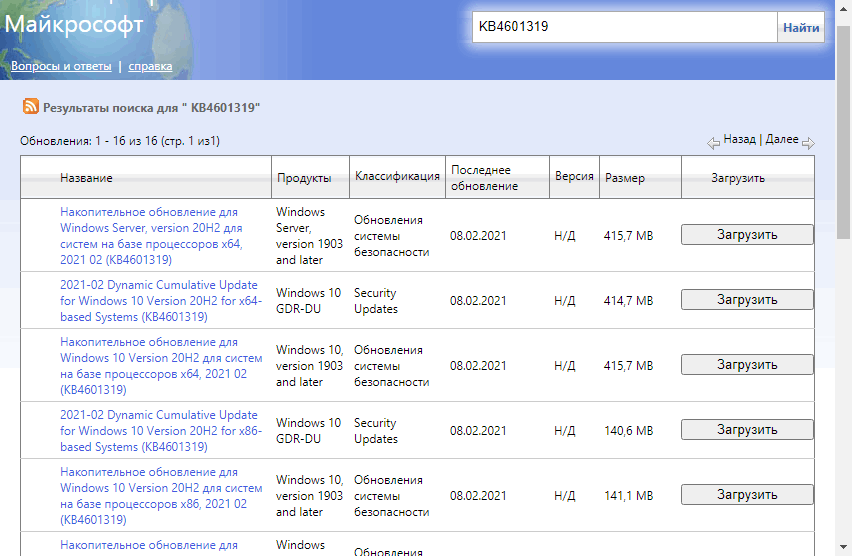
 Если вы выяснили, что ошибка вызывается при попытке установки конкретного обновления, попробуйте установить его в автономном режиме, скачав соответствующий пакет с каталога Центра обновлений Microsoft. Предположим, нам нужно скачать и установить пакет KB4601319. Переходим на страницу Центра обновления Microsoft, вставляем в поисковое поле номер пакета, выполняем поиск по базе, скачиваем файл MSU или CAB. Пакет MSU устанавливаем как обычную программу, установку пакета CAB производим командой dism.exe /online /add-package /packagepath:полный-путь-к-файлу-cab.

Ну и не забываем, то упомянутая ошибка может быть вызвана повреждением системных файлов, обеспечивающих работу Центра обновлений. Выполняем в запущенной от имени администратора командной строке sfc /scannow, а если команда вернёт ошибку, то dism.exe /online /cleanup-image /restorehealth, восстанавливающую само хранилище компонентов.
Согласно Microsoft, ошибка 0xc1900223 указывает на то, что возникла проблема с загрузкой и установкой выбранного обновления. Центр обновления Windows попытается повторить попытку позже, и в данный момент вам ничего не нужно делать. Однако ошибка повторяется каждый раз, когда вы пытаетесь установить обновление.

Утилита SetupDiag регистрирует эту ошибку:
Ошибка: SetupDiag сообщает о внезапном сбое нижнего уровня. Последняя операция: ошибка завершения: 0xC1900223 – 0x20009 LogEntry: ошибка MOUPG CSetupManager :: ExecutePreDownloadMode (8491): результат = 0xC1900223
Общие методы устранения неполадок Центра обновления Windows не могут исправить эту ошибку. Эта статья покажет вам, как предотвратить ошибку 0xc1900223 в Windows 10.
Ошибка 0xc1900223 может возникнуть, если ваш компьютер не может подключиться к серверу Центра обновления Майкрософт или сети распространения контента. Это может произойти, если вы ранее заблокировали диапазон адресов серверов Microsoft или использовали специализированную программу, записанную в файл Windows HOSTS. Эта ошибка также может возникнуть, если вы воспользуетесь выделенным DNS-сервером для блокировки сторонних веб-адресов.
1. Отключите программное обеспечение VPN.
Иногда программное обеспечение VPN может мешать процессу обновления Windows. Если вы используете VPN-соединение для подключения к рабочей сети, отключитесь от сети и выключите программное обеспечение VPN (если доступно), а затем попробуйте выполнить обновление еще раз.
2. Переименовать файл HOSTS (временный)
Если отключение программного обеспечения VPN не работает или вы не используете VPN, попробуйте переименовать файл HOSTS.
Шаг 1. Откройте папку C: WindowsSystem32DriversEtc.
Шаг 2: Переименуйте файл с именем HOSTS в HOSTS.OLD. Для переименования файла вам потребуются права администратора. При появлении запроса нажмите «Продолжить».
Шаг 3. Откройте окно командной строки и введите следующую команду, чтобы удалить кеш DNS Windows:
ipconfig / flushdns
Шаг 4. Попробуйте снова установить обновление Windows.
Шаг 5: После завершения переименуйте HOSTS.OLD обратно в HOSTS. Также проверьте файл HOSTS и убедитесь, что вы не блокируете адреса серверов Microsoft Update.
3. Измените преобразователь DNS.
DNS-серверы, блокирующие рекламу, такую как Pi-Hole, могут вызвать 0xc1900223 или что-то подобное. Для установки обновлений Windows необходимо временно отключить Pi-Hole.
Если вы использовали Pi-Hole на уровне маршрутизатора, вам нужно будет вернуться к разрешению DNS по умолчанию, используемому поставщиком Интернет-услуг, или использовать один из бесплатных (временных) DNS-серверов:
- Google Public DNS: 8.8.8.8 и 8.8.4.4
- Cloudflare: 1.1.1.1
Затем удалите кеш DNS Windows, выполнив команду ipconfig / flushdns из окна командной строки.
Альтернативы исправлению ошибки 0xc1900223
Примечание. Этот метод не помогает, если программное обеспечение или драйвер, установленные в вашей системе, несовместимы с устанавливаемым обновлением. Если конкретное обновление несовместимо с конфигурацией системы, вы увидите следующее сообщение на странице настроек Центра обновления Windows:
Известные проблемы с обновлением задокументированы в Windows 10 версии 1909 и Windows Server версии 1909 – сведения о выпуске Windows.
https://docs.microsoft.com/en-ca/windows/release-information/status-windows-10-1909
Перед установкой обновления с помощью помощника по обновлению Windows 10 или средства создания мультимедиа необходимо решить известные проблемы или проблемы совместимости.
Хотя вы не сможете установить обновления функций (v1903, v1909 и т. Д.) Через канал Windows Update, есть как минимум два других способа установить их в вашей системе.
- Посетите веб-сайт загрузки Microsoft Windows 10 здесь.
- Загрузите последнюю версию помощника по обновлению Windows (предпочтительно) и запустите его. Следуйте инструкциям и обновите Windows 10.
(или же)
- Загрузите средство создания мультимедиа здесь.
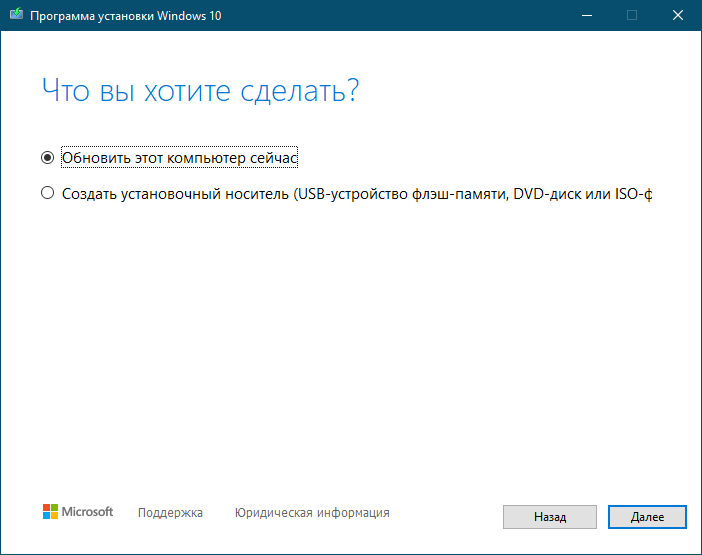
- Запустите Media Creation Tool и выберите Обновить этот компьютер сейчас.
- Следуйте инструкциям на экране и завершите процесс. Обратите внимание, что Media Creation Tool защищает ваши файлы, приложения и настройки по умолчанию, если вы выбрали опцию «Обновить этот компьютер сейчас» (на предыдущем экране).
Это обновит вашу установку Windows 10 без возникновения ошибки. 0xc1900223.
Check these solutions verified by our team and confirmed
by Matthew Adams
Matthew is a freelancer who has produced a variety of articles on various topics related to technology. His main focus is the Windows OS and all the things… read more
Updated on
- Error 0xc1900223 for Windows updates can arise because of corrupted system files and update components.
- Running SFC and DISM scans might resolve error this error for some users.
XINSTALL BY CLICKING THE DOWNLOAD
FILE
Error 0xc1900223 is a Windows Update issue that can arise on Windows 11 and 10. This can be a problem and result in Windows Update not working.
Users can’t download and install Windows build or patch updates because of error 0xc1900223. If you need to fix error 0xc1900223, try applying the potential fixes below for that update issue.
What causes error 0xc1900223?
There isn’t any one specific cause for the 0xc1900223 update error. That error can arise because of any of the following causes:
How we test, review and rate?
We have worked for the past 6 months on building a new review system on how we produce content. Using it, we have subsequently redone most of our articles to provide actual hands-on expertise on the guides we made.
For more details you can read how we test, review, and rate at WindowsReport.
- Glitches with Windows Update components: Windows Updates glitches can arise because of corrupted data in the catroot2 and SoftwareDistribution folders. Sometimes deleting the SoftwareDistribution folder can fix the issue.
- System files: Corrupted system files can cause Windows updates to fail.
- Windows Update service isn’t running: Error 0xc1900223 occurs when the Windows Update service isn’t enabled and running.
- Network issues: The 0xc1900223 error can also occur because of network connectivity issues caused by corrupted or outdated DNS cache data. Flushing DNS can sometimes help with that.
How can I fix error 0xc1900223?
1. Open the Windows Update troubleshooter tool
- First, click Start, and the Settings app pinned to that button’s menu.
- Select the Troubleshoot Settings category.

- Click the Other trouble-shooters box to view a list of repair tools.

- Select the Run option for opening Windows Update.

- Then wait for the Windows Update troubleshooter to detect issues and hopefully apply fixes. It will display a completed troubleshooting overview when it’s done.


2. Enable and Run the Windows Update service
- Open the Run command dialog by holding the Windows button on the keyboard and pressing R.
- Type in services.msc within Run’s text box.
- Select Run’s OK option to view Services.

- Double-click the listed Windows Update service.

- Select Automatic for the service’s startup.
- Click Start to start Windows Update.

- Press Apply on the Windows Update Properties window.


After restarting the service, check if error 0xc1900223 is gone.

NOTE
If Windows Update is already enabled and running, stop the service by right-clicking it and selecting Stop. Right-click it again and select Start to restart the service.
3. Clear the DNS (Domain Name System)
- To view the search tool’s box, press the Windows and S keys simultaneously.
- Find Command Prompt by inputting the search phrase cmd.
- Click Command Prompt’s Run as administrator option on the right side of the search tool.

- Input this DNS flush command and press Return:
ipconfig /flushdns
- Also, input these separate ipconfig commands and press Return after each one entered:
ipconfig /registerdns
ipconfig /release
ipconfig /renew
- Finally, restart your laptop or desktop by selecting Power and then Restart from Start menu options.


This is a simple method, but it can help with error 0xc1900223, so be sure to try it.
- The Windows 11’s weather widget now offers a detailed weather forecast
- Windows 11 adds more apps to the share links feature
4. Run a scan with the System File Checker
- Open Command Prompt with administrative privileges.
- First, execute this Deployment Image Servicing and Management command:
DISM.exe /Online /Cleanup-image /Restorehealth
- Then type in this SFC utility command and press Return:
sfc /scannow
- Wait for the SFC scan to finish and show an outcome message.


5. Rename the SoftwareDistribution and Catroot2 folders
- Open Command Prompt with administrative rights as outlined in method three.
- Disable Windows Update components by executing the following separate commands:
net stop wuauserv
net stop cryptSvc
net stop bits
net stop msiserver - Next, rename SoftwareDistribution to SoftwareDistribution.old by executing this command:
ren C:\Windows\SoftwareDistribution SoftwareDistribution.old
- Input this rename command for the catroot2 folder and hit Enter:
ren C:\Windows\System32\catroot2 Catroot2.old
- Restart the stopped update components by inputting and executing these commands:
net start wuauserv
net start cryptSvc
net start bits
net start msiserver - Restart your PC after restarting the services.


So, that’s how you can get error 0xc1900223 fixed on Windows 11 PCs. We don’t promise those potential fixes for error 0xc1900223 will work for everyone, but they’re some of the more likely solutions.
There are also workarounds for error 0xc1900223. You can instead try installing updates by downloading them from the Microsoft Update Catalog. Or you can install a build update with the Media Creation Tool.
You can discuss error 0xc1900223 in the comments section below. Feel free to add any questions about fixing that error or even share other resolutions for it there.
![]()
The Windows 10 error code 0xc1900223 frequently emerges during feature updates, usually becoming apparent when the update process reaches about 97%. The problem often inhibits the installation of the Windows 10 21H2 update, despite numerous restarts and standard troubleshooting attempts.
An enablement package has been proposed as a possible solution for facilitating the upgrade. However, for some users, this approach has proved ineffective, yielding a notification stating the update’s incompatibility with their systems.
Error code 0xc1900223 signifies an issue during the download and installation of a selected update. It typically surfaces when the computer fails to connect to Microsoft Update servers or its content delivery network. Such a situation can occur if users have previously blocked certain Microsoft server addresses, either manually or through a specialized program that edits the Windows HOSTS files. Moreover, some users have experienced this error when using a specialized DNS server to block third-party web addresses.
Potential Causes
Most users encounter the error 0xc1900223 when they try to install a Windows Update conventionally. There are several reasons why this error occurs, and these include:
- Corrupt files
- Corrupt Windows Update files
- Software incompatibility (mostly with AV tools)
Fixing Error Code 0xc1900223: Detailed Steps and Precautions
The Pi-Hole software is an ad-blocker that operates similar to a VPN-like DNS. It’s designed to prevent websites from loading malicious content that could potentially cause malware infections. However, this network ad-blocker might interfere with the Windows update process, resulting in errors such as 0xc1900223.
To successfully update, you may need to either temporarily disable or completely uninstall Pi-Hole. Note: Always ensure that you have created a system restore point or have a backup of your data before making any significant changes to your system.
How to Disable Pi-Hole
- Press “Win + R” to open the Run dialog box.
- Type “cmd” and press “Ctrl + Shift + Enter” to open the elevated Command Prompt with administrator rights.
- Click “Yes” when prompted by the User Account Control (UAC).
- In the elevated Command Prompt, type “pihole” to invoke the Pi-Hole Utility.
- Type “pihole disable” and press Enter.
- Try installing the update to see if it completes successfully.
- If the update installs successfully, you can enable Pi-Hole again by typing “pihole enable” in the elevated Command Prompt and hitting Enter.
How to Uninstall Pi-Hole
- Press “Win + R” to open the Run dialog box.
- Type “cmd” and press “Ctrl + Shift + Enter” to open the elevated Command Prompt with administrator rights.
- Click “Yes” when prompted by the UAC.
- In the elevated Command Prompt, type “pihole uninstall” and press Enter.
- Restart the computer after successfully running the command.
- Try installing the Windows Update to see if it completes successfully.
Enabling $GetCurrent and $SysReset Folders
The $GetCurrent and $SysReset folders in your C: drive hold crucial files related to the Windows Update process. The $GetCurrent folder is naturally hidden, so you will need to unhide it first:
- In File Explorer’s navigation bar, type “C:/$GetCurrent” and press Enter.
Alternatively, you can:
- Open File Explorer.
- Go to the “View” tab.
- Check the box for “Hidden items”.
- Open the “Media Folder” then double-click on the “Start Executable’.
- Try installing the update.
Resetting Windows Update
If the error arises due to an unavailable, halted, or damaged Windows component, consider resetting Windows Update:
- Press the “Windows Key.”
- Type “cmd” into the dialog box.
- Right-click on the Command Prompt and choose “Run as Admin.”
- Click “Yes” on the UAC pop-up.
- In the Command Prompt, execute the following commands one by one, pressing Enter after each:
-
- net stop wuauserv
- net stop cryptSvc
- net stop bits
- net stop msiserver
-
- Press “Win + E” to open File Explorer.
- Right-click on the “SoftwareDistribution” folder and choose the rename option.
- Rename the folder to “SoftwareDistribution.old.”
- Navigate to the “System32” subfolder, right-click the ‘catroot2’ folder and rename it to “Catroot.old.”
If these suggestions don’t solve the issue, consider using the “Upgrade this PC Now” feature of the Media Creation Tool or manually install the update through the “Microsoft Update Catalog.” Always ensure to backup your data before making any significant changes, and don’t hesitate to seek professional help if the problem persists.
User-Suggested Approaches to Resolve Windows Update Errors
Manually Installing the Feature Update
One proposed method to bypass update issues involves manually installing the latest feature update using the Media Creation Tool. In cases where this doesn’t resolve the issue, it’s recommended to record the error code and utilize the Setupdiag tool, providing logs for further examination.
Addressing Problems with the Media Creation Tool
Certain users have encountered errors like 0xC1900101 – 0x20017 while trying to reinstall Windows with the Media Creation Tool. Logs from the Setupdiag tool can be shared for further analysis and troubleshooting.
Deleting the Software Distribution Folder
Some users have reported success in resolving update issues by deleting the Software Distribution folder in SAFE MODE and then attempting a fresh download using a link provided by Microsoft. This folder is where Windows stores its update files. By clearing this folder, it may be possible to fix issues related to corrupted or incomplete update files.
Clearing the Software Distribution Folder in SAFE MODE
However, please note that there were instances where users faced difficulties deleting the Software Distribution folder in SAFE MODE. It was later clarified that the entire folder (not just its contents) needs to be removed specifically in SAFE MODE for this method to be effective.
Using Command Prompt and Contacting Microsoft Support
Another strategy discussed among users includes using the Command Prompt to delete problematic files. If this method doesn’t resolve the issue, reaching out to Microsoft Support directly is advised.
Manual Installation of Specific Update Packages
There have been reports of successful updates after manually downloading and installing specific update packages (like KB5003212) from the Microsoft Update Catalog.
Updating BIOS and Uninstalling Specific Software
Further suggestions from the user community include updating the BIOS and uninstalling certain software (like Bitdefender antivirus) during the upgrade. This advice is particularly pertinent if an error is related to the system’s AMD processor.
Conclusion
The Windows 10 error code 0xc1900223, while common, can be addressed through various troubleshooting strategies. It’s critical to keep in mind that its manifestation is typically triggered by the process of installing feature updates. Each solution, ranging from disabling or uninstalling Pi-Hole to resetting Windows Update, has the potential to resolve the error depending on the specific cause.
Nevertheless, the effectiveness of each approach can vary among different users and systems. Some have found success with user-suggested strategies, including manually installing updates or deleting the Software Distribution folder in SAFE MODE. Others have sought assistance from Microsoft Support or turned to more technical solutions like BIOS updates and targeted software uninstallation.
The key to resolving error code 0xc1900223 ultimately lies in understanding its root causes and applying the most appropriate fix for your system’s unique configuration and issues. If the issue persists despite the suggested solutions, don’t hesitate to seek professional help or contact Microsoft Support directly. Always remember to back up your data before making any significant changes to your system. This practice ensures data safety and allows for system restoration should any unforeseen complications arise during the troubleshooting process.
Give us some love and rate our post!