Node.js is one of the most popular development platforms nowadays. It allows developers to create server-side applications using JavaScript. Updating Node versions can be tricky, but it’s crucial for your development environment.

![Download Now: An Introduction to JavaScript [Free Guide]](https://no-cache.hubspot.com/cta/default/53/52e488f1-9b65-4968-b59f-38009a1c92a3.png)
This blog post will take you through updating Node.js on Mac, Windows, and Linux. We’ll also give you some tips to make the process as smooth as possible. First, we’ll discuss why keeping your Node up-to-date is essential.
Let’s get started!
Why is it important to keep Node up-to-date?
Node.js is an open-source platform. New features, bug fixes, and security updates are constantly released. Newer versions of Node.js will have better performance, stability, and security. That’s why it’s essential to keep up-to-date with the latest version of Node
Why update the Node version, if a project already runs smoothly?
Keeping your Node up-to-date ensures your code runs with the latest security and bug fixes and gets access to the latest features. If you don’t keep your Node up-to-date, it could lead to security vulnerabilities and other issues. Even if your code is impeccable, any third-party code integrated into your work — directly or indirectly — can have its own security faults.
Now that we know how important it is to update Node, how do you update it? Let’s look at updating Node on Mac, Windows, and Linux.
There are a few ways to update Node on Mac and Windows. We’ll talk about using a package manager such as NPM or manually downloading the latest version and installing it yourself.
Using NPM:
To update Node using NPM, do the following:
- Open the Terminal and check your current Node version:
node -v - Install n package using the following command:
npm install -g n
This command will install a tool called «n» which you can use to update Node easily. - To update Node, run the following command in your terminal:
n latest
This command will install the latest version of Node on your system. - Now you can verify that your update is complete by rechecking your Node version:
node -v
You can also manually download and install the latest Node version from the official website.
How to Update Node Versions on Linux
Updating Node on Linux is a bit different from how it’s done on Windows and Mac. To update Node, you’ll need to use a package manager such as NVM or APT.
Using nvm:
NVM (Node Version Manager) is a tool that allows you to manage multiple versions of Node on your system. You can use nvm to install, update, and switch between different versions of Node.
To update your version of Node using nvm, do the following:
- Check if you already have nvm installed on your system:
nvm —version - If it’s not installed, install nvm using this command:
curl -o- https://raw.githubusercontent.com/nvm-sh/nvm/v0.35.3/install.sh | bash - Once nvm is installed, check your current version of Node by running the following command:
node -v - Then update your version of Node using the following command:
nvm install node —reinstall-packages-from=node - And finally, verify that your update is complete by rechecking your Node version:
node -v
Using APT (Advanced Package Tool):
APT is a package manager for Debian-based Linux distributions such as Ubuntu and Debian. To update Node using APT, do the following:
- First, check your current version of Node by running the following command:
node -v - Then run this command to install the latest version of Node:
sudo apt-get install nodejs - And finally verify that your update is complete by rechecking your Node version:
node -v
These are just a few ways to update Node on Mac, Windows, and Linux. Keep in mind that it’s important to keep up-to-date with the latest version of Node not only for security reasons but also to get access to new features and bug fixes.
Tips For Updating Your Node Version
Updating Node versions can be a simple process. Here are some tips to make it easier:
- Make sure your existing Node version is up to date before upgrading. You may experience issues during the updating process if it still needs to be updated.
- Test any new features or bug fixes on a development environment before deploying them to production. This will help ensure that everything works as expected before making any changes live.
- Ensure your development environment is backed up regularly if anything goes wrong during the upgrade process.
- Keep an eye on the Node release notes for new updates or software changes.
By following these tips and using the above methods, you can ensure that your node version is always up-to-date with the latest features and security patches!
Final Thoughts on Updating Node Version
The benefits of Node.js is countless. From its easy-to-use environment, modern features, and constant updates, Node is a popular choice for developing applications. Keeping your version of Node up-to-date is important to get the best performance, security, and features out of it. With multiple options available such as Mac, Windows, and Linux, updating Node is accessible and can be done quickly with just a few steps.
Использовать Bash-скрипт для управления/переключения нодой: nvm.
Версия для Windows.
Особый смак в переключениях активной версии ноды, например:
nvm list
 * 4.6.1
   0.12.0

node -v
   v4.6.1

nvm use 0.12.0
   Now using node v0.12.0

node -v
   v0.12.0
Если хочется попроще, то предлагаю использовать следующий алгоритм:
-
Очистить кэш
npm:npm cache clean -f -
Установить менеджер версий NodeJS:
n:npm install -g n -
Установить версию ноды:
-
Стабильная версия:
n stable -
Последняя версия:
n latest -
Установка определённой версии:
n 0.8.14 -
Удаление определённой версии:
n rm 0.8.14Или:
n - 0.8.14
-
Для OS X можно использовать менеджер пакетов Homebrew:
$ brew upgrade node
ответ дан 27 фев 2017 в 5:07
2
Когда мне на CentOs 7 требовалось обновить версию NodeJs(там по-моему изначально 6-ая стоит), поскольку в частности не устанавливался Puppeteer я обновлялся до 10-ой версии по этой статье http://blog.ivru.net/?id=221
Если коротко там написано, что NodeJs стандартной версии на CentOs 7 устанавливается выполнением команды: yum install nodejs
При этом если Вам нужна более свежая версия NodeJs чем стандартная, Вы можете перед установкой выполнить команду curl -sL https://rpm.nodesource.com/setup_10.x | sudo bash — в данном примере команды для установки будет выбрана 10-ая версия, Вы перед нажатием Enter можете отредактировать версию на нужную Вам.
Более подробно по установке читайте по ссылке, так же в этой же статье Вы сможете найти файлы необходимых репозиториев(по умолчанию или необходимых для установки) в случаи если Ваши файлы повреждены и попытка установки заканчивается ошибкой.
ответ дан 13 окт 2020 в 5:46
![]()
skvernoslovskvernoslov
6013 серебряных знака9 бронзовых знаков
2
Чтобы обновить nodejs, на windows, можно скачать файл .msi и установить его. https://nodejs.org/en/download/
ответ дан 27 фев 2017 в 6:37
![]()
spectre_itspectre_it
3,2894 золотых знака29 серебряных знаков52 бронзовых знака
Чтобы обновить npm на windows,нужно вызвать powrshell от администратора и прописать следующее
Set-ExecutionPolicy Unrestricted -Scope CurrentUser -Force
npm install -g npm-windows-upgrade
npm-windows-upgrade
ответ дан 14 ноя 2017 в 19:11
![]()
vasily_dumovvasily_dumov
4122 серебряных знака15 бронзовых знаков
1
Способ, который подходит для любой ОС (включая Windows, Mac и Linux)
Просто зайдите на официальный сайт Node.js (nodejs.org), скачайте установщик и запустите.
Программа установки позаботится обо всём, и уже после нескольких кликов по кнопке «Далее» вы станете счастливым обладателем Node.js на своём компьютере. С 2020 года именно этот способ обновления NodeJS является рекомендуемым. Это самое простое и проверенное временем решение.


Советы от профессионалов
- Установка NodeJS включает в себя NPM (менеджер пакетов Node).
- Чтобы проверить версию NPM, используйте команду
npm versionилиnode --version. - Если вы предпочитаете CLI, для обновления NPM используйте
npm install -g npm, а затемnpm install -g node.- Дополнительные сведения см. в документации по команде
install.
- Дополнительные сведения см. в документации по команде
- Следите за блогом NodeJS — Vulnerabilities, чтобы не пропустить важные исправления для брешей в безопасности. Поддерживайте свой NodeJS в актуальном состоянии.
- Операционные системы, поддерживаемые Node.js:
- Windows, Linux, MacOS, IBM AIX.
- Для пользователей Docker вот официальный образ Node.js.
Это перевод моего ответа.
ответ дан 20 дек 2022 в 12:45
![]()
Introduction
Node.js is an open-source JavaScript runtime environment. Since Node.js has an active community of users, minor updates of the software come out every few weeks.
You may be using Node.js as a layer of the MEAN stack or in a different JS framework. Either way, make sure to update Node.js regularly to ensure system security.
There are several ways to install Node.js and NPM. Likewise, there are several ways to update your Node.js version, depending on the operating system running on your machine.
In this article, you will learn how to update to the latest Node.js version on Linux, Windows, and macOS.
3 Ways to Update Node.js to Latest Version on Linux Systems
There are different ways to update Node.js if you are using a Linux-based system. Although using the Node Version Manager is the easiest and most recommended option, you can also update with the local package manager or by downloading the binary packages.
Option 1: Update Node.js with NVM (Node Version Manager)
The best way to upgrade Node.js is with NVM, a practical tool for managing multiple Node.js versions.
1. Start by updating the package repository with the command:
sudo apt update2. Install NVM using the curl command:
curl -o- https://raw.githubusercontent.com/nvm-sh/nvm/v0.38.0/install.sh | bashNote: If you don’t have curl, install the utility by running the command: sudo apt install curl.
Alternatively, you use wget and run the command:
wget -q0- https://raw.githubusercontent.com/nvm-sh/nvm/v0.38.0/install.sh | bash3. Close and reopen the terminal for system to recognize the changes or run the command:
source ~/.bashrc5. Then, verify if you have successfully installed NVM:
nvm --version6. Before upgrading Node.js, check which version you have running on the system:
nvm ls7. Now you can check for newly available releases with:
nvm ls-remote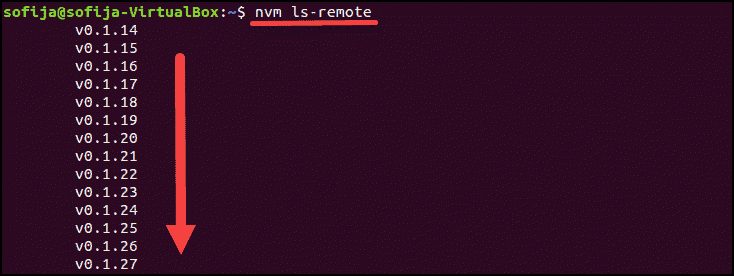
8. To install the latest version, use the nvm command with the specific Node.js version:
nvm install [version.number]Option 2: Update Node.js with NPM (Node Package Manager)
As an alternative, you can use Node’s official package manager to update Node.js. NPM is a tool for installing and managing package dependencies.
If you have Node on your system, you have NPM, as well. With the npm command, you can check running Node.js versions and install the latest release.
By adding the n module, you can interactively manage Node.js versions.
1. First, clear the npm cache:
npm cache clean -f
2. Install n, Node’s version manager:
npm install -g n
3. With the n module installed, you can use it to:
Install the latest stable version:
sudo n stable
Note: Some Ubuntu distros may respond with the command not found output after running the n command. To fix this issue run sudo -E env "PATH=$PATH" [command]. For example, to install the latest stable version, as in the example above, you would run sudo -E env "PATH=$PATH" n stable.
Install the latest release:
sudo n latest
Install a specific version:
sudo n [version.number]
Option 3: Update Node.js with Binary Packages
Updating Node.js with binary packages is the least recommended option. However, if it is the only way you can upgrade to the latest Node.js version, follow the steps outlined below.
1. Navigate to Node’s official downloads page where you can find all available packages. There you can download the source code or pre-built installer for the LTS versions or the latest release.
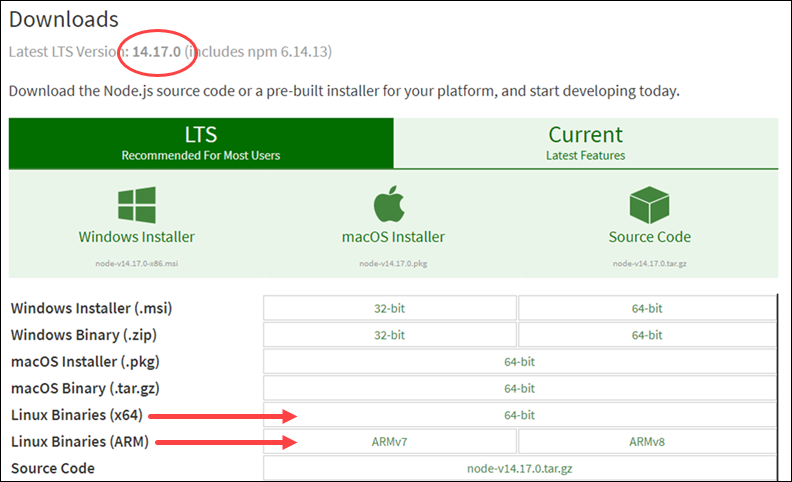
2. You can either download the package from your browser or find the version number you need and add it to the wget command:
wget https://nodejs.org/dist/v14.17.0/node-v14.17.0-linux-x64.tar.xz3. Next, install xz-utils used to extract the binary package:
sudo apt-get install xz-utils4. Extract and install the package with the command:
sudo tar -C /usr/local --strip-components 1 -xJf node-v14.17.0-linux-x64.tar.xzUpdating Node.js on Windows and macOS follows the same principles.
There are two simple ways to upgrade:
- Download the latest Node.js release from its official download page and install the new Node.js release.
- Install the n module and update Node.js inside the terminal window.
Option 1: Update Node.js on Windows and macOS with Installer
One way to update your Node.js is to go to its official download page and install the newest release. Bz doing so, the system should overwrite the older version with the updated one.
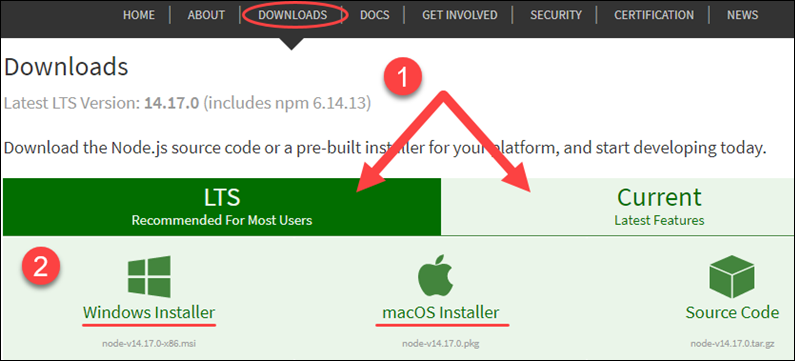
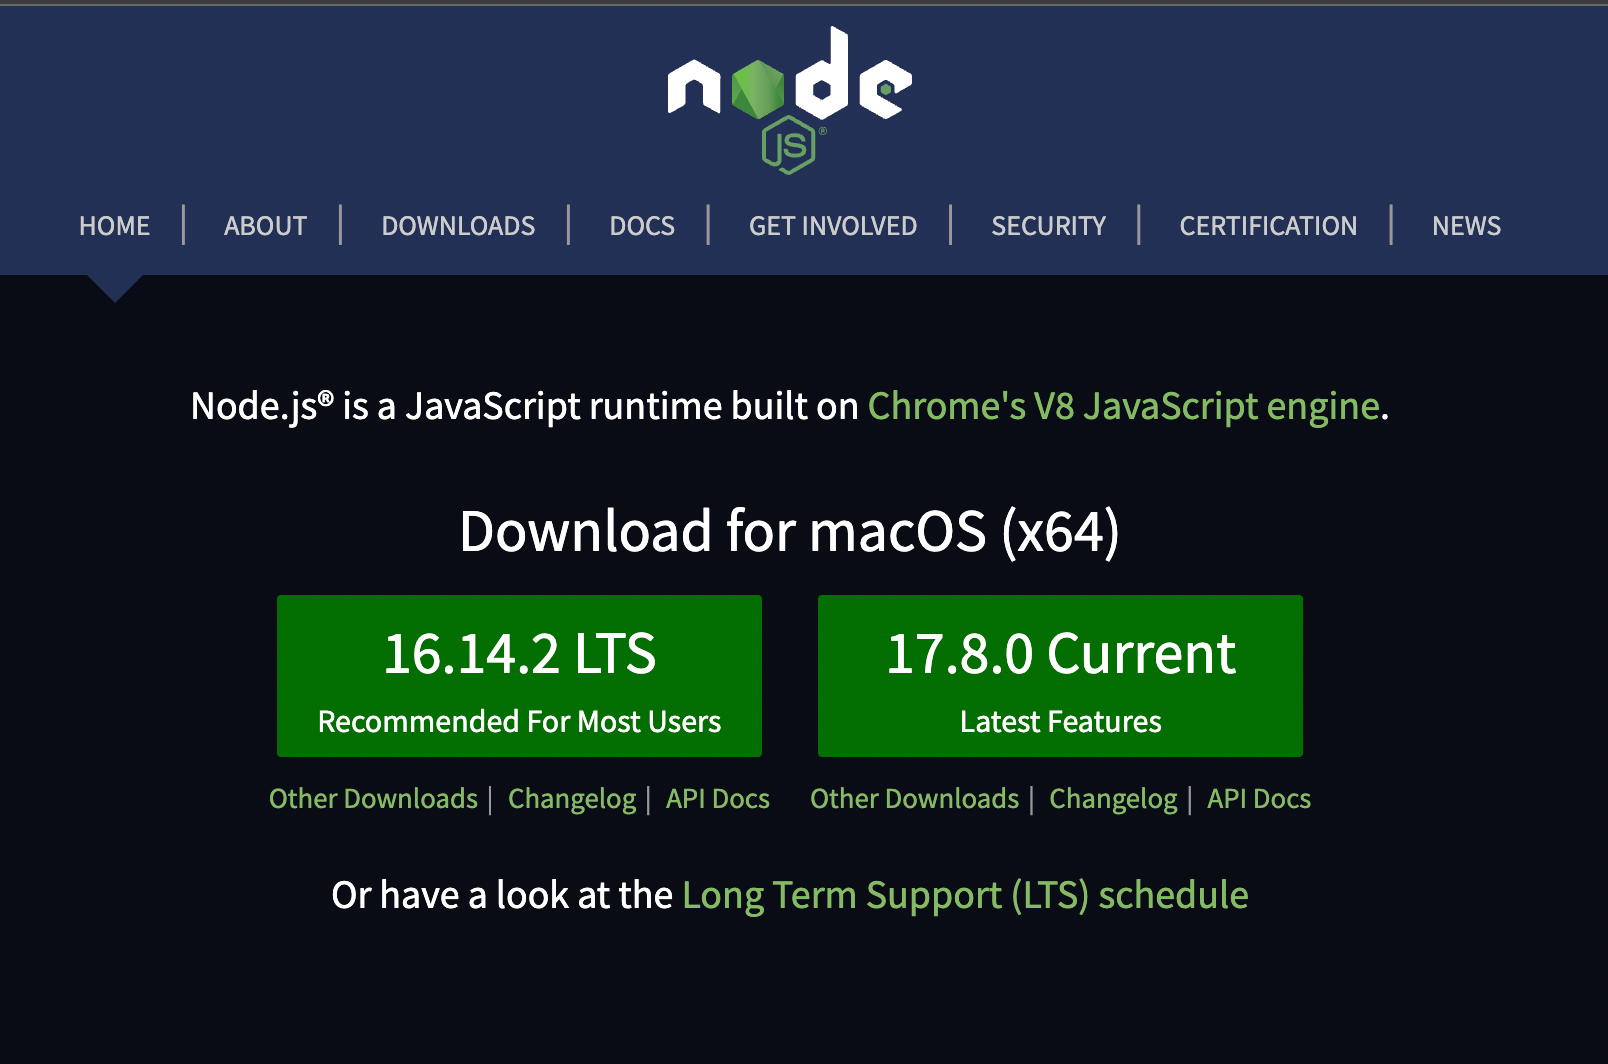
1. Navigate to the Node.js website and click on the latest stable version or the newest current release (with the latest features).
2. After deciding the version, click on the Windows or the macOS Installer, depending on the system you are using. The system downloads the package and stores it in the specified directory.
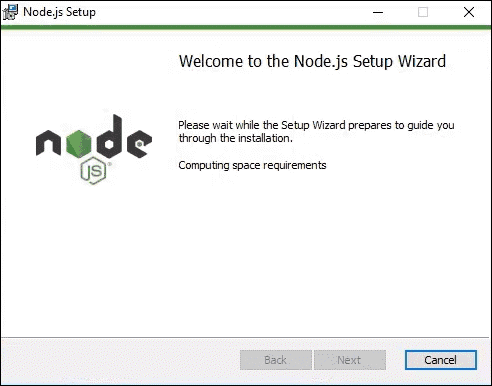
3. Once the download is complete, run the installer.
4. The Node.js Setup Wizard appears and guides you through the installation.
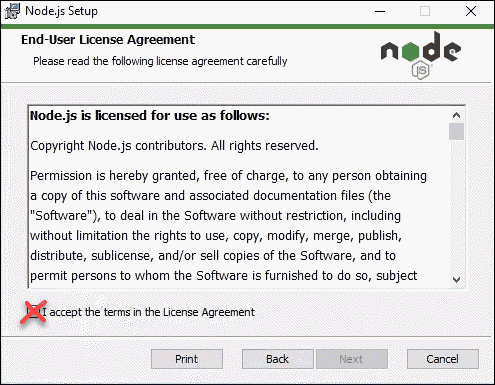
5. Accept the License Agreement by checking the box and click Next.
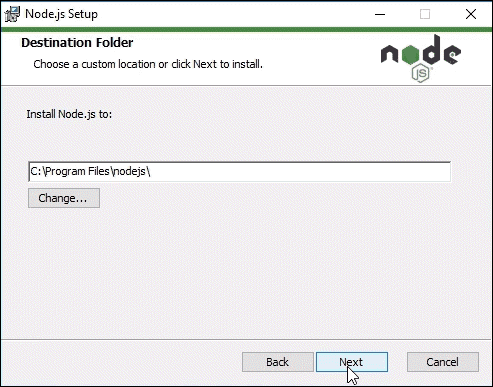
6. Choose the destination folder where you want to install Node.js.
7. Node.js allows you to select how you want to install the Node features. Change the way the features are installed by clicking on the icons in the tree.
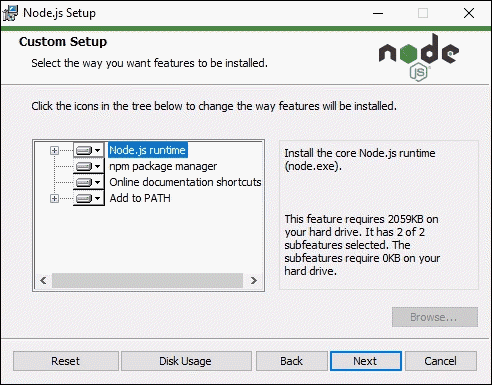
8. With that, the latest Node.js is ready to install. Click Install to confirm, wait until the installation completes, and click Finish.
9. Check the Node.js version with the command:
node -vNote: Sometimes, the system fails to overwrite the older Node.js release and you may end up with two versions. If such problems occur, you may want to consider updating with NPM, outlined in the section below.
Option 2: Update Node.js on Windows and macOS with NPM
If you want to upgrade Node.js from the command line, use the n model within the npm command. The n feature allows you to interact with different Node.js versions.
1. Before updating the Node.js release, check which version you are currently using with:
node -v2. Next, clear npm cache with the command:
npm cache clean -f3. Install n globally:
npm install -g n4. Now that you have n installed, you can use the module to install the latest stable release of Node.js:
sudo n stableAlternatively, you can install the Node.js release with the latest features:
sudo n latestOr, install a specific version number with:
n [version.number]Conclusion
The best part of open-source technology is its strong community of users constantly working on upgrading the software.
Node.js is a good example of such software as new versions come out regularly. Users can choose whether they want to work with the LTS (the long-term supported version) or the latest version with the newest features.
This article should have helped you update Node.js on any operating system.

Node is a runtime environment that allows developers to execute JavaScript code outside the browser, on the server-side.
NPM, on the other hand, is a package manager for publishing JavaScript packages (also known as Node modules) to the npm registry. You can also use it to install packages to your applications.
To install Node, you have to go to the Nodejs website to download the installer. After downloading, you can run the installer, follow the steps, agree to the terms and conditions, and have the installer on your device.
When you install Node, you also get the npm CLI which you can use to manage packages in your applications.
However, Node and NPM can be updated separately to their latest versions, and in the rest of this article, I’ll show you how.
1. Use NPM to Update Your Node Version
To update Node with NPM, you will install the n package, which will be used to interactively manage node versions on your device.
Here are the steps:
Clear the NPM cache
When you install dependencies, some modules are cached to improve the speed of installation in subsequent downloads. So first, you want to clear the NPM cache.
Install n
npm install -g n
You’ll need to install this package globally as it manages the Node versions at the root.
Install a new version of Node
n lts
n latest
The two commands above install the long-term support and latest versions of Node.
Remove previously installed versions
n prune
This command removes the cached versions of the previously installed versions and only keeps the latest installed version.
2. Use NVM to Update Your Node Version
NVM stands for Node Version Manager, and as the name implies, it helps you manage your Node Versions. With NVM, you can install Node versions and specify the version of Node that a project uses.
NVM makes it easy to test projects across various Node versions.
To update a Node Version with NVM, you have to install NVM first.
Here is the installation guide for NVM.
When installed, you can install packages with:
nvm install [version]
You can install the latest version with:
nvm install node
And uninstall other versions with:
nvm uninstall [version]
With many versions installed, you may also want to specify the version to use at a particular time. One way to do this is by setting a default alias like this:
nvm alias default [version]
This way, Node executions will run with the specified version.
3. Download Updated Node Binaries
And you can also get the latest versions from the Node.js website. On it, you can find the latest and long-term support versions for your device.
Downloading the latest version also gives you the latest version of NPM.
How to Update NPM
Just as you use NPM to update packages, you can use NPM to update itself. Here’s the command to achieve this:
npm install -g npm@latest
This command will install the latest version of NPM globally.
On Mac, you may have to pass the sudo command before NPM, as this installs NPM at the root of your device, and you need privileges to do that.
Conclusion
In this article, we’ve seen how to update Node and NPM to their latest versions.
To reiterate, when you install Node, you automatically get NPM. If you also update Node by installing the binaries from the website, you get an updated NPM.
We also saw other ways to update Node and NPM globally on your device.
Learn to code for free. freeCodeCamp’s open source curriculum has helped more than 40,000 people get jobs as developers. Get started
I hope that you will find Node version 12 new capabilities compelling and soon you will upgrade your app to it.
In turn, you will get advanced debugging, intelligent coding with the powerful IntelliSense engine, interactive window, quick tracking of performance issues, unit testing, typescript integration, source control, cloud integration, and npm integration.
To get started in this walkthrough, this post captures the steps on how to update Node.js in Visual Studio, Windows/macOS, and NPM.
First, see a couple of useful tricks to check which Node.js npm version you have installed:
Write the command line to update Node.js npm:
“node -v” or “npm -v” simply type the one you want to check.
If the installed version of npm is not the latest one, you can update it using the syntax code:
npm npm@latest -g(Note: The -g flag is used to update npm globally.)
Secondly, see which Node/Npm version Visual Studio you are using.
Now, use Visual Studio Command Prompt that is also called Visual Studio plugin. It can help you open a command line.
If you are not able to use Visual Studio Command Prompt, you can use the “Task Runner Explorer” by adding a task and running it in this way:
"check": "node -v && npm -v"
Another way is using C:\Program Files (x86)\Microsoft Visual Studio 14.0\Web\External\” on your Window’s.
(Note: This way you will come to know about the local version of your Visual Studio.)
If you have any issues with these steps, you can call for help from the industry’s best Node.js developers on a particular project on which you happen to be working.
All of this is fine. A developer is expecting to have Node.js updated on Microsoft Visual Studio that supports all those new features.
Steps to Update Node.js in Visual Studio
Development teams usually build one or two node.js update strategy that can be sometimes using an automated process. Or, sometimes updates can be based on the goodwill of the developer. The second one seems to be the riskiest approach. Consider applying the first strategy by using automated tools to update node.js.
For Example:
The tool like greenkeeper offers automatic dependency management for node.js npm dependencies. It improves your code quality, catches problems that you would have missed, easy to use, and reliable.
So, if you wish to get an update Node.js, there’re actually simple ways to do so. Here are the ways how to update node.js in Visual Studio and various operating systems.
Start by installing the new global version on node.js on your computer. Simply visit the Node.js download page and start installing the new version. Like the newest version, Node 12 is packed with notable features.
- Node 12 runs on the V8 engine for faster JavaScript execution
- Improved startup time by 30%
- Node 12 supports TLS 1.3 for increased security of codes
- N-API improvements to prevent libraries from breaking
To tell Visual Studio to use the global version follow the command:
Go to Tools > Options > Projects and Solutions > External Web Tools
Visual Studio uses the $(PATH) to look for its external tools. When performing node.js installation make sure that the $(PATH) should be first on your list.
If that doesn’t work, you can restart the Visual Studio. Or, you can add the usual path directly to the list in which node.js is installed by clicking on “Add” and set “C:\Program Files\nodejs\.” Now, restart the system and recheck the node.js update process.
(Note: If it doesn’t work, make sure node.js is actually installed in that folder. If it is there, but still not work, try uninstalling, remove that folder manually, and install it again.)
How to Update Node.js on Windows and Mac Operating System?
Already familiar with the Node.js updating steps on Windows. Great, these are the foundation of a successful development strategy. However, in the past decade, the node.js development world had gone through dramatic changes but the updating processes were left intact. Some modern node.js update techniques can even replace the traditional ones to give you a better and leaner update strategy with a better ROI.
Example:
If you wish to upgrade Node.js on Windows and Mac OS, then simply visit the Node.js homepage and select your operating system.
From there, a wizard will magically update your Node, and replace the older version with the new one.
Now, See How to Update Node.js Using npm (Node Package Manager)
To update node.js you can use Node Package Manager (npm) that is already preinstalled. But before you start updating node.js, make sure your npm is of the latest version. Here are a few simple steps to follow to update your npm.
First, you need to find out the version of your Node Package Manager (npm), by running npm -v command.
After checking the version, you can run the command npm install npm@latest -g to install the latest version of Node Package Manager.
Finally, use the command npm -v to check whether your new version of npm was successfully installed or not.
Further, to update node.js using npm, use n module. Also, use the following code to clear cache memory from your Node Package Manager and install the latest version of node.js:
sudo npm cache clean -f
sudo npm install -g n
sudo n stable
(Note: If you are looking for a specific version of node.js, you can also use the command n #.#.#.)
Also, See the Steps for Updating NPM (Node Package Manager) in Visual Studio
This will not take much of your time. If you have installed node.js from their official website, you probably have installed NPM with it. To check it, you can use the command line: “npm-v”.
To upgrade npm in Visual Studio, you can follow the command:
cd C:\Program Files (x86)\Microsoft Visual Studio 14.0\Web\External\ npm install npm@latestThis is how you can update Visual Studio’s NPM version to the latest one.
Final Words — Improve Your Skills with the Right Knowledge
There are various other techniques to update node.js that can help you take the right steps at the right time. Nevertheless, many developers neither having a strategy for effectively performing node.js update. Spending a few hours on reading the steps I have shared here can make a great difference to your knowledge on node.js updates and development processes.