Корпорация Microsoft выпустила серверную операционную систему Windows Server 2016, дополнив ее поддержкой контейнеров и новым изданием Nano Server. Windows Server 2016 разрабатывалась несколько лет и параллельно с совершенствованием ОС выходили ее предварительные версии. С 1 октября 2016 года доступна линейка продуктов Windows Server 2016, состоящая из шести изданий: WS 2016 Datacenter, Standard, Essentials, MultiPoint Premium Server, CAL, Windows Remote Desktop Services CAL 2016.
Одним из основных направлений при разработке Microsoft Server 2016 стала поддержка публичных и частных облаков. Многие инновации Windows Server 2016 заимствованы из Azure и доведены до уровня мейнстрима. В Windows Server 2016 также значительно усовершенствован гипервизор Hyper-V, появилась поддержка контейнеров и Nano Server – новая «урезанная» версия Windows Server. Цель все та же – нативная поддержка облачных приложений.
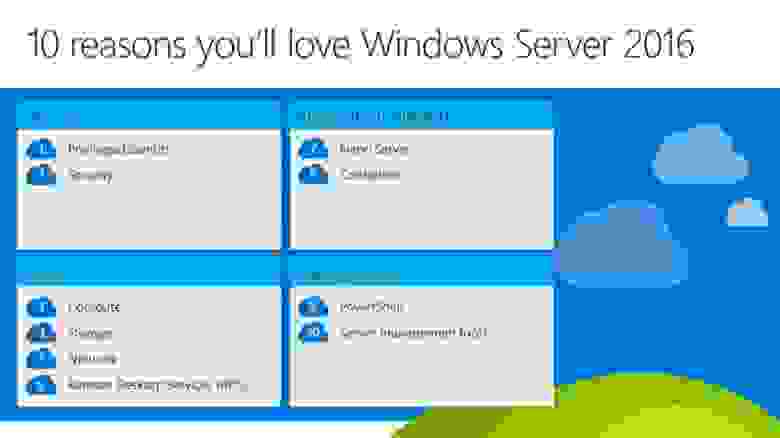
10 причин полюбить Windows Server 2016: безопасность (управление привилегиями/идентификационными данными, средства защиты), платформа для приложений (Nano Server, контейнеры), платформа для программно-определяемых дата-центров (вычисления, хранение данных, сетевые функции, RDS), управление (средства управления сервером, новая версия PowerShell).
По сути эта ОС напоминает Windows 10 в серверном исполнении. В Server 2016 используется то же ядро, что и в Windows 10 Anniversary, и, введя ver в командной строке, вы получите тот же ответ: Microsoft Windows [Version 10.0.14393]. В Windows Server 2016 — то же меню «Пуск», что и в Windows 10 Anniversary (при инсталляции с Desktop Experience).

Windows Server 2016, теперь с «рабочим столом» Windows 10.
Что интересного можно отметить? В списке Microsoft – более 40 новых средств, включая вложенную виртуализацию для контейнеров Hyper-V и развертывания хостов Hyper-V в Azure или других публичных облаках. Многие новые средства Hyper-V относятся к созданию и обслуживанию гостевых ВМ.
Можно «на лету» менять емкость виртуальных дисков, памяти, добавлять и удалять виртуальные сетевые карты. Виртуальным машинам можно предоставлять дискретный доступ к устройствам на шине PCIe, таким как контроллеры дисков. А кластер Windows Server 2012 R2 с Hyper-V можно обновить до Server 2016 без прерывания сервисов.
Конечно, некоторые решения не дешевы, а потому к категории массовых не относятся. Например, защищенная от аварий конфигурация с двумя разнесенными на разные площадки системами Azure Stack. Конечно, можно запустить Azure Stack и на одном сервере, но, скорее, с целью тестирования. Тем не менее, большинство изменений касаются самого широкого круга пользователей.
Обновленный гипервизор
Многочисленным доработкам подвергся гипервизор Hyper-V. Можно выделить следующие изменения:
- Клиент Hyper-V поддерживает Windows 10.
- Совместимость с Connected Standby.
- Назначение дискретного устройства.
- Мониторинг активности виртуальных машин для оптимизации использования системных ресурсов (RCT).
- Использование альтернативных аккаунтов при подключении к другой системе Windows Server 2016.
- Обновленный протокол управления и другие улучшения.

Новые функциональные возможности Hyper-V – самые востребованные и ожидаемые новшества Windows Server 2016 (по данным опроса SpiceWorks). Их отмечают более 30% респондентов.
В нем появилась и поддержка вложенной виртуализации (Nested virtualization), позволяющая запускать виртуальные машины на гипервизоре, который сам установлен в виртуальном окружении.

Вложенная виртуализация означает, что можно запустить Hyper-V в ВМ, являющейся гостевой на сервере Hyper-V, гостевом на сервере Hyper-V и т.д.
Такая возможность может быть актуальной для разработчиков и моделирования виртуальных инфраструктур, а также для более эффективного использования контейнерных приложений. Устранены и многие прежние ограничения.

Hyper-V в Server 2016 стал более масштабируемым.
Теперь Microsoft Hyper-V позволяет выделять виртуальной машине до 12 Тбайт ОЗУ (вместо одного) и до 240 виртуальных процессоров (вместо 64). Хост Hyper-V поддерживает ОЗУ до 24 Тбайт. Для снижения непроизводительных потерь и усиления безопасности на хосте Hyper-V можно запустить Nano Server. Для администрирования в этом случае можно использовать PowerShell и удаленный доступ.
Безопасность
В Windows Server 2016 дальнейшее развитие получили механизмы обеспечения безопасности. В частности, в отдельный контейнер Hyper-V под названием Virtual Security Module (VSM) помещены самые ценные системные данные, криптографические модули Windows Server 2016, компоненты, отвечающие за целостность ядра ОС, пароли и пр. Доступ к этим данным невозможен даже при компрометации системы.
Еще одно важное средство — виртуальный TPM (Trusted Platform Module), позволяющий задействовать в виртуальных машинах средства шифрования с использованием Bitlocker, и Credential Guard для безопасного хранения идентификационных данных. Применение Virtual TPM особенно актуально, например, при размещении ВМ в облаке.

Host Guardian Service – важный компонент обеспечения безопасности. Он работает в сочетании с другими компонентами Windows Server 2016 и обеспечивает высокий уровень защиты Shielded VM.
В плане безопасности интересным решением стали защищенные виртуальные машины — Shielded VM, но для их создания требуется Windows Server Datacenter и отдельный сервер со службой Host Guardian Service для хранения ключей и проверки прав ВМ на запуск на конкретной платформе.

Host Guardian Service используется для верификации запуска Shielded VM. А с помощью инструментария Guarded Fabric можно гибко сконфигурировать сетевую инфраструктуру и разбить ее на отдельные изолированные сетевые сегменты.
Технология Shielded VM позволяет создавать в облачной инфраструктуре защищенные виртуальные машины, доступ к которым может получить только их владелец. Администратору разрешено только включать и выключать такие виртуальные машины. Вмешиваться в их работу, читать данные, перехватывать трафик, менять их конфигурацию он не имеет права. Механизм Shielded VM может быть востребован хостинг-провайдерами, предоставляющими услуги аренды виртуальных серверов.
Возможность подключения виртуального дисплея к ВМ средствами администрирования Hyper-V в Shielded VM также заблокирована. Как же исправить ВМ, если что-то пошло не так, и она не запускается? На этот случая Microsoft предлагает хитрое решение – запуск такой ВМ внутри другой Shielded VM. При создании Shielded VM нужно также учитывать, что требования к системным ресурсам у них повышенные.
Улучшенный PowerShell обеспечивает более легкий и всесторонний контроль над средами, что значительно повышает уровень безопасности системы. Также одной из ключевых функций безопасности является разграничение прав доступа при администрировании.
В Windows Server 2016 также появилось средство под названием Just Enough Administration (JEA). Это означает, что администраторы могут логиниться под временными аккаунтами, ограниченными определенными ролями. То есть администратор, войдя в систему с зараженного вирусом ПК, большого вреда не причинит. Windows Credential Guard также ограничивает возможный ущерб от вредоносных программ при таком сценарии. А временные права администрирования (Just in Time Administration) можно предоставить с помощью Microsoft Identity Manager Privileged Access Manager.
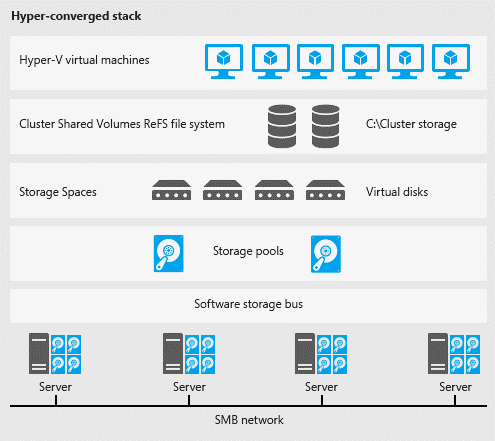
Хранение данных и сети – Software Defined
Как известно, в Window Server 2012 помощью Storage Spaces можно создавать отказоустойчивые пулы памяти на дисках SAS, подключенных к серверу без помощи традиционной SAN (Storage Area Network). Storage Spaces Direct дает возможность напрямую подключать к кластеру Server 2016 накопители SAS, SATA или SSD. Это можно использовать для создания программно-конфигурируемых систем хранения (Software-Defined Storage, SDS).

Storage Spaces Direct можно использовать для прямого подключения накопителей.
Появилась возможность динамического управления пропускной способностью виртуальных дисков Storage Quality of Service (QoS). Применять политики Storage QoS можно как к дисковой подсистеме отдельной виртуальной машины, так и к группе ВМ.

Storage Replica реализует блочную синхронную репликацию между сконфигурированными серверами с использованием протокола SMB 3.1.1.
С помощью инструментария Storage Replica администраторы могут реплицировать данные между удаленными серверами, кластерными системами и центрами обработки данных, повышая тем самым их катастрофоустойчивость и предотвращая потери на уровне файловой системы.
Для поддержки SDN (Software Defined Networking) в Server 2016 добавлена роль Network Controller. Сетевой контроллер предназначен для управления в Hyper-V виртуальными коммутаторами, балансировщиками нагрузки, правилами межсетевых экранов и виртуальными шлюзами. Поддерживаются также VXLAN (Virtual Extensible Local Area Network).
Nano Server
Nano Server – это еще более компактный вариант Server Core. Его удобно использовать как хост-систему для развертывания виртуальных машин, использовать в качестве сервера DNS или IIS, для запуска приложений в контейнерах.

Улучшения в уровне обслуживания: меньше уязвимостей, меньше перезагрузок.
По данным Microsoft, у Nano Server на 93% меньше размер VHD, он требует на 80% меньше перезагрузок. Такую систему можно применять для различных специальных функций и задач. Причем Nano Server работает как на физическом сервере, так и в ВМ. GUI у него нет – только инструменты Sysinternals.
Nano Server удобно также использовать в инфраструктуре Microsoft Cloud Platform для поддержки облачных служб и обслуживания приложений, функционирующих в виртуальном окружении, контейнерах или на физических серверах. Его можно применять для развертывания вычислительных кластеров и построения горизонтально-масштабируемых файловых хранилищ.

Благодаря своей компактности и эффективному использованию ресурсов Nano Server обеспечивает более высокую плотность ВМ, то есть на одном физическом хосте можно разместить больше экземпляров ОС, что сокращает расходы на ИТ-инфраструктуру.
Контейнеры
Важное отличие Windows Server 2016 от предыдущих версий серверных операционных систем Microsoft — поддержка технологий контейнеров. Контейнеры Windows Server — часть открытого проекта Docker. Они позволяют запускать приложения в изолированных средах на разных платформах, оперативно развертывать и перемещать их между серверами.
В Windows поддерживаются контейнеры двух видов — контейнеры Windows Server и контейнеры Hyper-V. Облегченные серверные контейнеры не требуют лицензии Windows. Контейнеры Windows Server функционируют подобно контейнерам Docker для платформы Linux. Они используют общее ядро операционной системы, что делает их более компактными и гибкими, чем обычные виртуальные машины.

У каждого контейнера Hyper-V своя копия ядра Windows Server, и изоляцию осуществляет не операционная система, а гипервизор.
Контейнеры Windows Server делят ресурсы ОС, но ведут себя как независимые экземпляры операционной системы. Однако в среде ОС Windows Server нельзя запустить контейнер Linux и наоборот. Для запуска контейнера его образ берется из репозитория (публичного или частного) и при необходимости модифицируется.
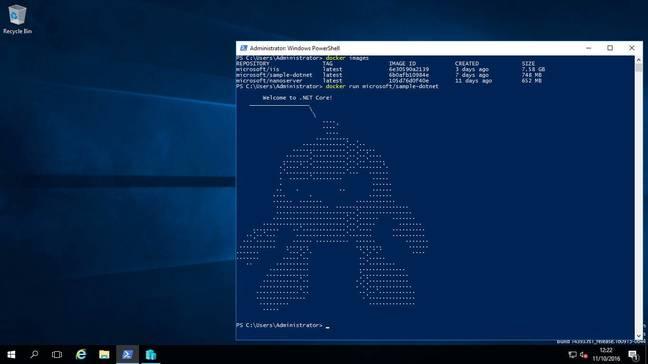
Контейнер Docker, работающий в Windows Server 2016.
Контейнеры Hyper-V изолированы средствами виртуализации, имеют свою копию ядра Windows, а в версии Standard лицензия для них не нужна. У таких контейнеров более высокий уровень изоляции, сравнимый с виртуальными машинами. Данный подход более требователен к ресурсам сервера, но повышает стабильность работы серверной ОС и надежность функционирования контейнеров.
Управляются оба вида контейнеров одинаково. Управление контейнерами Windows Server и Hyper-V может осуществляться как средствами PowerShell и WMI, так и при помощи инструментов Docker. Последние предоставляют единую среду администрирования и позволяют управлять контейнерными приложениями в среде Windows Server или Linux.

Конфигурирование контейнеров в Windows Server 2016. Контейнеры Hyper-V могут использоваться для запуска приложений с повышенными требованиями к информационной безопасности.
Хороший вариант для развертывания контейнеров — Nano Server. Однако нужно помнить, что Nano Server – это урезанная Windows. Если IIS, например, в нем работает, то .NET Framework – уже нет (только кросс-платформенная .NET Core). Не все приложения в настоящее время совместимы с Nano Server.

Образы Docker в Nano Server могут быть очень компактными.
Контейнеры Docker в Windows — пока что на начальном этапе. Потребуется время, чтобы администраторы их освоили, а разработчики – довели до ума. Microsoft понадобится также пополнить соответствующими опциями имеющийся инструментарий вроде Visual Studio.
Другие возможности
В Windows Server 2016 реализовано и множество других новшеств. Система получила новый механизм скачивания и раздачи обновлений, функционирующий по принципу P2P-протокола BitTorrent, поддержку протокола SSH. Windows Server 2016 поставляется с Windows Management Framework 5.1 и новой версией PowerShell, использующей .NET Framework 4.6.
Обновленный Windows PowerShell позволяет оперировать еще большим количеством командлетов (cmdlets), которые выполняют различные задачи управления. В частности, PowerShell 5 предлагает командлеты для управления локальными пользователями и группами и командлет Get-ComputerInfo для получения подробной информации о системе.
Нововведения коснулись и служб Active Directory. Теперь можно использовать смарт-карты для аттестационных ключей. Доменные службы Active Directory обеспечивают еще более высокий уровень безопасности при идентификации корпоративных и персональных устройств.
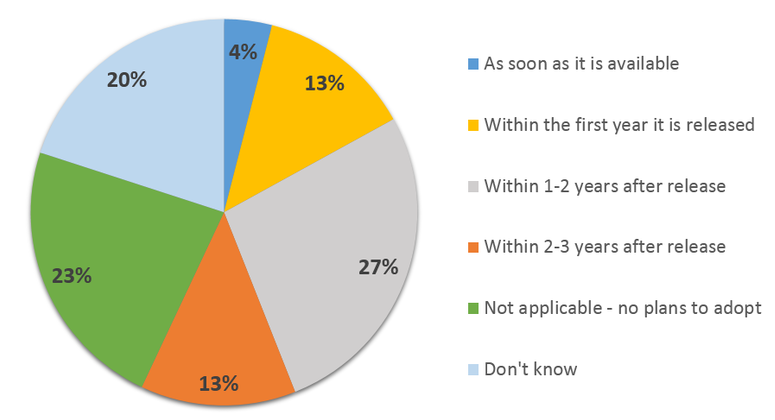
Планы перехода организаций на Windows Server 2016 (по данным опроса SpiceWorks, проведенного в ноябре 2015 года).
Появился новый формат файлов конфигурации виртуальных машин (.VMCX и .VMRS) с более высокой степенью защиты от сбоев на уровне хранилища, была добавлена возможность безопасной загрузки гостевых операционных систем Linux и поддержка OpenGL и OpenCL службой удаленных рабочих столов Remote Desktop Service (RDS).
Механизм обновления ОС хостов кластера без его остановки (Cluster Operating System Rolling Upgrade) дает возможность с нулевым временем простоя обновить кластер последовательным апдейтом отдельных его узлов.
В состав Windows Server 2016 включен также инструментарий IP Address Management (IPAM), позволяющий упростить управление IP-адресами. Конечно, обо всех новшествах новой ОС в одной статье рассказать невозможно. Это лишь весьма поверхностный «первый взгляд».
Издания Windows Server 2016
Сколько всего изданий у Windows Server 2016? Хороший вопрос. Выше говорилось о шести. Есть издания Standard и Datacenter, различающиеся схемами лицензирования. Standard включает лицензии только для двух ВМ или контейнеров Hyper-V под Windows Server, в то время как в Datacenter количество ВМ не ограничивается. Версия Datacenter потребуется для работы с некоторыми новыми средствами, включая Storage Spaces Direct, Storage Replica, Shielded Virtual Machine и ряд сетевых функций. Стоит версия Standard от 882 долл. для 16 ядер. Datacenter обойдется минимум в 6155 долл.

Функциональные отличия изданий Datacenter и Standard в Windows Server 2016.
Ниже представлены функции, которые есть только в редакции Windows Server 2016 Datacenter:
- Storage Spaces Direct — расширение технологии Storage Spaces для создания высокодоступных кластерных хранилищ;
- Storage Replica — технология блочной репликации данных между хранилищами;
- Shielded Virtual Machines — технология защиты содержимого виртуальных машин Hyper-V;
- Host Guardian Service — серверная роль, предназначенная для поддержки защищенных виртуальных машин (Shielded VM) и предотвращения несанкционированного доступа к ним;
- Network Fabric — централизованный мониторинг и управление сетевой инфраструктурой;
- Microsoft Azure Stack — поддержка SDN-стека для построения гибридных решений.
Nano Server лицензируется как средство Windows Server, но требует лицензии Software Assurance вместо базовой и отдельно не продается. Есть еще бесплатная Windows Hyper-V Server, используемая только как хост Hyper-V, а также версия Windows Server Essentials для малого бизнеса — до 25 пользователей и 50 устройств, для которой не нужны лицензии CAL (Client Access Licenses). Essentials стоит 501 долл., но существуют более дешевые OEM-версии. OEM-версии Windows Server Foundation больше не поставляются.

Назначение изданий Windows Server 2016 и модели лицензирования.
Есть еще пара специальных изданий: Windows Storage Server для систем хранения и Multipoint Premium Server, в основном для удаленных десктопов в сфере образования. Версии Standard и Datacenter по умолчанию инсталлируются без GUI (опция Server Core).
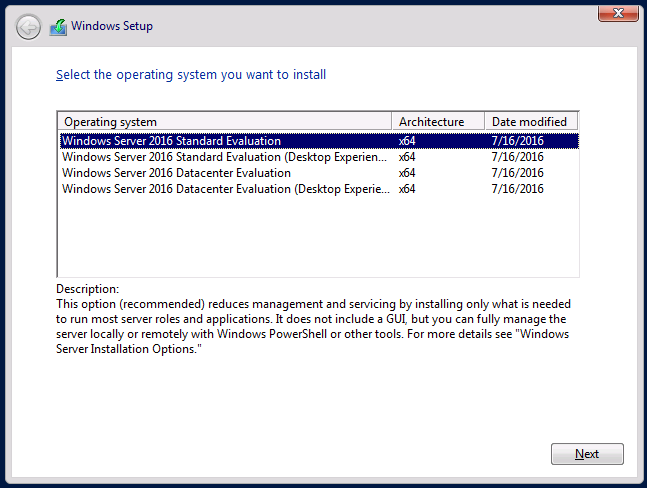
По умолчанию процедура установки Windows Server 2016 выполняется без GUI.
Резюмируя, можно отметить, что Windows Server 2016 предоставляет много возможностей для полноценного развертывания и функционирования ИТ-инфраструктуры в облаке. Новая ОС облегчает возможность доступа и идентификации служб и приложений организации в том случае, если они размещены и в облаке, и на физических серверах. Серверная платформа Microsoft активно развивается в соответствии с тенденциями развития индустрии и предпочтениями бизнеса. Работа проделана немалая, система развивается в правильном направлении. Проверить работу Windows Server 2016 можно, взяв виртуальный VPS сервер на бесплатный тестовый период в 3 дня.
Microsoft Windows Server 2016 представляет собой зрелую современную платформу корпоративной виртуализации, позволяющую обеспечить качественное, масштабируемое и, одновременно, очень гибкое функционирование ИТ инфраструктуры любой организации. Lenovo — один из первых вендоров, представивший гарантированное комплексное решение для развертывания систем на Windows Server 2016.
Данное предложение будет интересно:
- ИТ-подразделениям компаний, модернизирующим и/или виртуализирующим ИТ-инфраструктуру, а также
- финансовым подразделениям, которые смогут перевести существенные капитальные затраты при организации такого рода решений в операционные.
|
|
Всё оборудование и все работы на условиях помесячной оплаты + лицензирование ПО (опция) Нет капитальных затрат! |
 |
|
 |
+ биллинговая система (опция) |


Особенности реализации
|
|
|
Управление и использование частного облака полностью передается ИТ-подразделению клиента. В течение всего срока проекта Облакотека осуществляет консультации по вопросам эксплуатации. Расширенная техническая поддержка может содержать внедрение и сопровождение систем контроля качества платформы, таких как System Center Operation Manager, Data Protection Manager, а также работы, связанные с эксплуатацией и масштабированием платформы.
При необходимости осуществления учета (расчетов) потребления ресурсов частного облака подразделениями/структурами клиента Облакотека может предоставить сервис биллинговой системы, которая может быть интегрирована с учетной системой клиента (1С).
Цены и расчеты
Цены на использование «Частного облака на Windows Server 2016» начинаются от 350р./1Gb установленной памяти в месяц, но окончательно определяются в момент проектирования и определения конфигурации.
Размещение в ЦОДах Tier III, биллинговая система, лицензирование ПО Microsoft, расширенная техническая поддержка являются дополнительными платными опциями.
Услуги оформляются в виде твердого контракта, сроком на 3 года с фиксированными в рублях ежемесячными платежами. По окончании контракта возможны сценарии продолжения обслуживания по сниженным ценам, выкупа оборудования по остаточной стоимости или его возврата в Облакотеку с, возможно, одновременным построением нового современного на тот момент частного облака.
Обратиться
Windows Server 2016 это взаимодействующая с облаком операционная система (ОС), обеспечивающая новые слои безопасности и инноваций Microsoft Azure для приложений и инфраструктуры
Современные клиенты хотят получать доступ к своим приложениям разными способами и быть уверенными в том, что могут выполнить свои повседневные задачи самым безопасным и эффективным образом. И их не интересует, из чего складываются ИТ инфраструктуры, и с какими проблемами команда поддержки этих окружающих сред сталкивается изо дня в день.
Microsoft Windows Server 2016
Если вы сегодня запускаете ИТ среды, как удовлетворить вышеупомянутые проблемы? Могут ли ваши приложения и инфраструктура отвечать предъявляемым к ней требованиям? Можете ли вы удовлетворить предлагаемые облаком темпы инноваций, гибкость и скорость передачи? В этих отношениях, перед локальной инфраструктурой, встаёт всё больше задач. Однако не все готовы перейти в облако, и встречается много случаев, где из-за множества причин вы этого сделать не можете. Например, договорные обязательства, которые не предусматривают перемещение данных в облако.
Но, даже если вы не можете или просто не хотите работать с облаком сегодня, по-прежнему важно модернизировать инфраструктуры, так чтобы была возможность использовать все разработки и достижения Microsoft в будущем.
Подготовка облака в Windows Server 2016
Проще говоря, Windows Server 2016 это взаимодействующая с облаком операционная система (ОС), которая обеспечивает новые слои безопасности и инноваций Microsoft Azure для приложений и инфраструктуры вашего бизнеса.
Microsoft потратила много времени на опрос клиентов и сбор информации о том, что для них важно и как она может удовлетворить будущие потребности в инфраструктуре заказчика. Эти запросы Microsoft разделила на три основных направления. На рисунке ниже показаны основные повторяющиеся темы, которые хотели бы решать использующие появившиеся сейчас в Windows Server 2016 инновационные функции, клиенты.
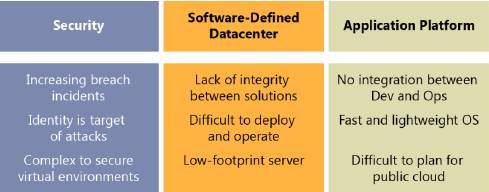
Категории обратной связи для Windows Server 2016
В ответ на это корпорация Майкрософт сосредоточилась на этих трёх китах и представила отчёт о каждом из них.
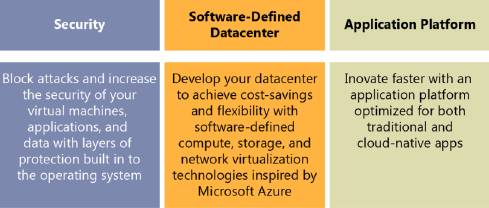
Ключевые компоненты и соответствующий отчёт Microsoft для Windows Server 2016
Microsoft, исходя из того, чему они научились при построении и эксплуатации Azure, использовала эти основы для разработки инновационных функций и интегрировала их непосредственно в Windows Server 2016.
Эти основы обеспечили ясное понимание того, что Windows Server 2016, при рассмотрении вопроса о безопасности обработки данных и платформы не только для традиционных приложений, но и миграции в облако клиентских программ — вполне перспективная ОС.
Следующие подразделы показывают, что Microsoft обещает предоставить и, что более важно, как она будет выполнять эти обещания.
Безопасность
Новые функции управления привилегированным доступом, дают Windows Server 2016 инструменты для защиты виртуальных машин (VM), предотвращая атаки и выявляя подозрительную активность.
Вот то, что Windows Server 2016 может сделать:
- Предотвратить, связанный с нарушением административных учётных данных, риск. Используя новые функции управления привилегированной идентификацией, вы можете ограничить доступ к опциям Just Enough и Just-In-Time 1. А, с помощью учётных данных Credential Guard, вы можете защитить административные учётные данные от краж Pass-the-Hash.
- Защитить виртуальные машины от скомпрометированных администраторов с помощью экранированного Vms. Экранированная виртуальная машина — это виртуальная машина поколения 2, которая имеет виртуальный доверенный платформенный модуль (TPM), зашифровывается с использованием BitLocker и может работать только на одобренных хостах этой структуры.
- Уменьшить центр обработки данных и повысить доступность к нему, благодаря just-enough ОС. Новые опции развёртывания Nano Server в 25 раз быстрее, чем Windows Server, и все же предполагают опыт работы на компьютере. Это минимизирует внешние атаки, повышает доступность, сокращает время развёртывания, использование ресурсов и время запуска.
- Добавить ещё большую защиту для каждого развёртывания Windows Server 2016. Независимо от того, работаете ли вы в любом облаке или локально, вы можете воспользоваться дополнительными функциями безопасности, такими как целостность кода (Code Integrity) и контроль потока (Control Flow Guard). Что обеспечивает запуск только разрешённых исполняемых файлов и защиту от неизвестных уязвимостей.
- Обнаружить вредоносное поведение с помощью расширенного аудита безопасности, оптимизированного для выявления угроз. Используя новые категории аудита для членства в группах и PNP, для идентификации и добавления дополнительной информации и для аудита событий, администраторы могут глубже погрузиться в обнаружение новых угроз.
- Защитить от атак вредоносных программ с помощью встроенной защиты. Теперь в Windows Server 2016 добавлен защитник Windows. Он оптимизирован для поддержки разных ролей сервера и интегрирован с Windows PowerShell для проверки на вредоносные программы.
- Ограничить воздействия в случае вторжений. Если вы страдаете от нарушений безопасности, в Windows Server 2016, с помощью групп безопасности сети и распределенного брандмауэра, можно ограничить это воздействие сегментацией сети на основе рабочей нагрузки или деловых потребностей. Можно применить богатый выбор политик внутри и между сегментами.
- Использовать контейнеры Hyper-V для уникального дополнительного уровня изоляции контейнерных приложений без каких-либо изменений в контейнере образа. Контейнеры Hyper-V обеспечивают изоляцию на аппаратном уровне, предоставляя администраторам дополнительную уверенность в безопасности.
Программное обеспечение центра обработки данных.
Windows Server 2016 — более гибкая и экономически эффективная OS для ЦОД. Она использует программное обеспечение распределённых вычислений, хранилища и сетевые функции виртуализации.
Программное обеспечение распределённых вычислений
В следующем списке представлены лишь некоторые из новых функций, которые подпадают под стек программного обеспечения распределённых вычислений Windows Server 2016:
- Минимизация внешних атак. Повышение доступности и сокращение использования ресурсов just-enough ОС с помощью опции развёртывания Nano Server, которая в 25 раз быстрее, чем стандартная Windows Server.
- Облегчение перемещения в облако. Запуск ваших задач в Microsoft Hyper-V. Гипервизор запускает Azure и Azure Stack.
- Развёртывание приложений на нескольких операционных системах с лучшей в классе поддержкой Linux на Hyper-V.
- Обновление инфраструктуры кластеров Windows Server 2016. Используя обновления кластера смешанного режима, с нулевым временем простоя ваших приложений и рабочей нагрузки и без необходимости нового оборудования.
Поддержка.
- Повышение доступности приложений с улучшенной отказоустойчивостью кластера для кратковременных сбоев в сети и хранилищах.
- Добавление дополнительной отказоустойчивости кластерам, используя для подключения к ресурсам в Azure Cloud Witness.
- Автоматизирование управления сервером с помощью собственных инструментов, таких как Desired State Configuration (Требуемая конфигурация состояния) и Windows PowerShell 5.0.
- Управление серверами Windows из любого места с помощью нового инструмента управления GUI-сервером на базе веб-сервера — службы, работающей в Azure. Особенно полезна для управления «быстрыми» вариантами развёртывания, такими как Nano Server и Server Core.
Определяемое программным обеспечением хранилищ
В следующем списке представлены некоторые из доступных в Windows Server 2016 функций хранилищ корпоративного уровня:
- Создание высокодоступных и масштабируемых программно-определяемых систем хранения за долю стоимости Storage Area Network (SAN) или Network Attached Storage (NAS). Storage Spaces Direct, для создания конвергентных или гиперконверсированных архитектур хранения, использует стандартные серверы с локальным хранилищем.
- Создание доступности целостности бизнеса и аварийного восстановления в центрах данных с репликацией синхронного хранилища Storage Replica.
- С помощью функций Quality of Service (QoS) убедиться, что пользователи критически важных приложений имеют приоритетный доступ к ресурсам хранения.
Программно-определяемые сети
Ниже перечислены некоторые, входящие в Windows Server 2016, новые, связанные с определением сети, функции:
- Развёртывание сложных рабочих станций с сотнями сетевых политик (изоляция, QoS, безопасность, балансировка нагрузки, переключение, маршрутизация, шлюз, DNS, и т.д.) с помощью масштабируемого сетевого контроллера в считанные секунды, как это делается в Azure.
- Динамическое сегментирование своей сети на основе потребностей рабочей нагрузки. Использование распределенных брандмауэров Azure и групп сетевой безопасности, применение богатых политик внутри и между сегментами. Маршрутизирование или зеркалирование трафика сторонних виртуальных устройств для обеспечения ещё более высоких уровней безопасности.
- Обеспечение большей доступности сервисов благодаря программному масштабированию и масштабируемости инфраструктуры (хост, программный балансировщик нагрузки, шлюз, сетевой контроллер) и рабочих нагрузок.
- Управление своими гибридными рабочими нагрузками, включая их запуск в контейнерах, и перемещение их между серверами и облаками, используя возможности виртуальных сетей на основе VXLAN и NVGRE и многозадачных гибридных шлюзов.
- Оптимизация своей стоимости / производительности, когда вы объединяете доступ к удалённой прямой памяти (RDMA) и трафик арендатора на одних и тех же объединённых сетевых интерфейсных картах (NIC), тем самым снижая стоимость и обеспечивая необходимые гарантии производительности на 40G и выше.
Платформа приложений Windows Server 2016
Windows Server 2016 обеспечивает новые пути развёртывания и запуска приложений, локально или в Azure, используя новые возможности, такие как Windows контейнеры и быстрый вариант развёртывания Nano Server.
- Контейнеры в Windows Server 2016 предлагают, необходимые для современных облачных приложений, быстроту и компактность. Контейнеры Windows Server используют контейнеры экосистемы Windows и контейнеры Hyper-V с их дополнительным слоем изоляции для деликатных приложений, не требуя дополнительного кодирования.
- Использование легковесной опции развёртывания Nano Server для быстроты и гибкости применения. Это идеальный вариант для запуска приложений из контейнеров или микрослужб.
- Запуск традиционных приложений от первого лица, например, SQL Server 2016, с лучшей в своём классе производительностью, безопасностью и доступностью.
- Экономия денег, перенос в Windows Server, лицензий которыми вы владеете, на Azure, и оплата более низких базовых цен с помощью Azure Hybrid Use Benefit. (Обязательный SA.)
- Разветвление служб
С Nano Server, вы получите более активное обновление операционной системы, включающее в себя, в течение всего её жизненного цикла, новые функции и дающее необходимые разработчикам инструменты. Например, последнюю версию Agile и/или другие безопасные технологии Microsoft.
Microsoft любит Linux!
Ни для кого не секрет, что Microsoft потратила много денег на то, чтобы Linux получил больший опыт корпоративного уровня в экосистеме Microsoft. Корпорация Майкрософт внесла свой вклад в ядро Linux и активно поддерживает службы интеграции Linux / Linux Integration Services (LIS), что гарантирует работу Linux в Hyper-V.
На сегодня, корпорация Microsoft, полностью поддерживает следующие дистрибутивы в Hyper-V, с добавлением в будущем.
- Red Hat Linux
- OpenSUSE
- CentOS
- Ubuntu
- Debian
- Oracle Linux
Направление — описание
Сеть — полная поддержка виртуального масштабирования Receive-Side Scaling (vRSS) для оптимизации сетевой производительности Linux. Быстрое добавление/удаление виртуальных сетевых адаптеров NICS
Хранение — поддержка дисков с быстрым добавлением и онлайн изменением хранилища
Управление — упрощённое управление, с помощью обычных инструментов, например, PowerShell DSC
Производительность — производительность Linux в Hyper-v, по сравнению с гипервизорами, полностью конкурентоспособна.
System Center 2016
Как мы уже упоминали, Windows Server 2016 — облачная ОС, которая имеет много, взятых из Azure, новых функций. Эти функции могут выступать в качестве основы программного обеспечения центров обработки данных (SDDC). Однако, облака — будь то государственные или частные — должны управляться, а System Center 2016 инструмент управления центра обработки данных, который, для достижения этой цели, получил пользу от ключевых вложений.
System Center 2016 был обновлён и разблокировал все ключевые возможности Windows Server 2016, которые позволяют вам реализацию и управление полным SDDC на базе Windows Server 2016.
Ниже приведены лишь некоторые из вложений, включённых в релиз System Center 2016:
Device Management/Управление устройством.
Включает поддержку развёртываний Windows 10, регистрацию MDM в Azure Active Directory и ограничение доступа на основе регистрации устройства и политики.
Provisioning/Резервирование.
Вложения здесь включают поддержку функций Hyper-V для Windows Server 2016, обновление простоя кластера, упрощённую организацию сети, выделение защищённой виртуальной машины, управление защищённым хостом и поддержку vCenter 5.5.
Monitoring/Мониторинг.
Для этой категории Microsoft добавила поддержку Nano Server, хранилище Windows, SMI-S, каталог MP, улучшенную производительность, расширенную визуализацию данных и партнерской программы SCOM.
Automation/Автоматизация.
Здесь улучшение включает облегчение миграции в облако, интеграционные пакеты SCO и ранбуки (журналы запуска).
Self-Service/Самообслуживание.
В области самообслуживания, вы можете улучшить удобство использования и производительность, портал самообслуживания HTML5 и новый обменный коннектор.
Data Protection/Защита данных.
Здесь вы можете воспользоваться преимуществами вложений, включая поддержку Azure Express Route, экранированной виртуальной машины и пространств хранения Direct.
Все эти усовершенствования пакета System Center предоставляют организациям необходимые им возможности создания облака нового поколения. Но, вложения на этом не заканчиваются, теперь System Center 2016 может получать доступ к новым интеграциям Microsoft Operations Management Suite.
Эти интеграции разблокируют новые функции, дополняющие и без того широкие возможности System Center, давая администраторам лучший обзор, защиту, контроль и безопасность в их IT окружающей среде в масштабах облака. Возможности Operations Management Suite и встроенная интеграция в Microsoft Power BI, позволяют администраторам, с помощью нескольких кликов, создавать мощные, динамические отчёты и визуализацию.
На рисунке ниже показан образец панели мониторинга, которая управляется из стандартных пакетов данных, включённых в подписку Operations Management Suite. Вы можете увидеть, что по умолчанию, при развёртывании этих интеллектуальных пакетов и подключении источников данных, вы можете работать с богатой визуальной информацией.
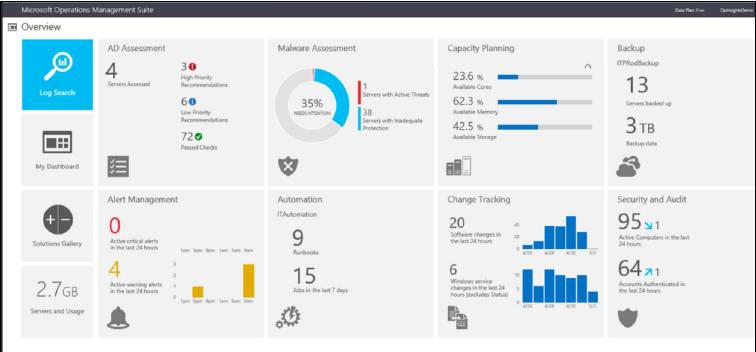
Панель управления Operations Management Suite
При нажатии кнопки «Плитка», вы получите ещё больше информации в области фокусировки. По умолчанию, каждый пакет данных имеет свой собственный набор правил, но администраторы, в несколько кликов, могут создать свой набор правил и впоследствии создавать визуализацию этой информации.
Operations Management Suite может дополнять существующее развёртывание System Center или выступать в качестве автономной платформы, управляющей развёрнутыми в любом облаке и в локальной среде системами.
Платформа Operations Management Suite разделена на следующие этапы:
Статистика и аналитика.
Этот раздел сосредоточен на сборе данных из нескольких источников, сопоставлении действий и предоставлении механизмов, с помощью которых вы можете воздействовать на результаты. Для инициирования действий используются оповещения и поиски. Он также способен отображать и понимать зависимости рабочих нагрузок в одной и той же разрядности.
Безопасность и борьба с угрозами.
Этот компонент, созданный на основе данных и анализа безопасности Microsoft, поможет вам предотвращать, обнаруживать и реагировать на угрозы более эффективно, чем когда-либо прежде. Видя происходящее в вашей среде, вы можете облегчать ситуации и проводить политику полного контроля своей ИТ экосистемы, включая облако.
Автоматизация и управление.
Этот компонент концентрируется на предоставлении контроля ИТ администраторам. Здесь вы можете вызывать из созданных в компоненте Insights end Analytics оповещений, журналы запуска и повысить эффективность работы с помощью автоматизации.
Защита и восстановление.
Этот компонент основан на простом и эффективном облаке резервного копирования и аварийного восстановления для организаций. С ним вы можете автоматизировать аварийное восстановление ваших журналов запуска (runbook) на управляемой и эффективной основе.
Эти компоненты имеют важное значение для понимания того, что составляет Operations Management Suite и как вы можете создать свой пакет. Так как он не представляет все доступные или входящие в галерею сегодня, возможные пакеты решений. На следующем рисунке показаны пакеты решений, которые клиенты могут использовать для получения дополнительной информации и обзора своей ИТ среды, как сегодня, так и в будущем:
Решения доступные в Operations Management Suite сегодня, а также будущие решения.
Установка и настройка удаленных рабочих столов на основе Microsoft VDI
 Опубликовано: 17.12.2022
Рабочие столы на основе DVI позволяют создать для каждого пользователя свое рабочее пространство с изолированными настройками. Подключение будет выполняться как на терминальный сервер, только попадать мы будем в изолированную виртуальную машину.
В данной инструкции будут приведены примеры развертывания и настройки роли удаленных рабочих столов на основе Windows Server 2012 R2.
Предварительная настройка инфраструктуры
Выполнение системных настроек
Настройка Active Directory
Подготовка организационных юнитов
Установка роли Hyper-V
Подготовка шаблона виртуальных машин
Развертывание и настройка роли удаленных рабочих столов на основе ВМ
Установка роли
Настройка развертывания
Создание коллекции
Проверка подключения с компьютера клиента
Дополнительная информация
Подготовка сервера
Для развертывания роли VDI необходимо, чтобы в нашей инфраструктуре были серверы со следующими ролями:
- Active Directory Domain Services (AD DS).
- Hyper-V на отдельном сервере от AD DS.
Настройка операционной системы
Подготовим наш сервер к работе. Для этого необходимо:
- Установить обновления.
- Задать статический IP-адрес.
- Переименовать компьютер.
- Указать правильные часовой пояс и время.
AD DS
В сети необходимо наличие активного каталога. Это обязательное требование для поддержки инфраструктуры VDI. При этом, данная роль должна работать на отдельной машине от сервера с ролью VDI.
При отсутствии Active Directory необходимо его установить и настроить. Если мы имеем один единственный сервер, то AD DS можно развернуть на отдельной виртуальной машине, а из самого хоста виртуализации сделать VDI.
Как установить соответствующую роль и создать новый лес с доменом подробнее рассказано в статье по ссылке ниже.
OU
Также нам нужны учетные записи, под которыми мы будем заходить на виртуальные машины. После установки роли AD открываем оснастку Пользователи и компьютеры Active Directory — создаем организационные подразделения для виртуальных машин, учетных записей и сами записи:

* в данном примере мы создали организационный юнит VDI Desktops для компьютеров и VDI Users для пользователей.
Hyper-V
Данная роль является центральной для развертывания VDI. Чтобы ее установить, открываем панель управления сервером — в правой верхней части нажимаем Управление — Добавить роли и компоненты:

В открывшемся окне нажимаем Далее — в окне «Выбор типа установки» оставляем Установка ролей и компонентов:

… Далее. В следующем окне выбираем наш сервер — Далее.
Выбираем роль Hyper-V:

… если откроется дополнительное окно, выбрать Добавить компоненты. Далее.
Кликаем несколько раз Далее до окна «Создание виртуальных коммутаторов» — выбираем сеть, которую будем использовать для виртуальных машин:

… Далее. «Миграция виртуальной машины» — Далее.
В окне «Хранилища по умолчанию» оставьте пути как есть или задайте свои значения:

… Далее — в последнем окне Установить.
Перезагружаем сервер.
Создание шаблона виртуальных машин
Для подготовки системы мы будем использовать встроенную в Windows утилиту sysprep. В процессе ее работы текущая система становится больше неработоспособной. Убедитесь, что в качестве будущего эталона выбрана чистая система без важных данных и настроек.
Создаем виртуальную машину и устанавливаем на нее операционную систему Windows. В моем случае использовалась Windows 10 Pro.
Создать виртуальную машину можно с помощью графического интерфейса (Диспетчер Hyper-V) или команд Powershell.
Далее в рамках подготовки шаблона выполняем:
1. Установку операционной системы.
2. Удаление лишних учетных записей и включение встроенной записи администратора. При необходимости, можно создать дополнительных пользователей.
3. Задаем имя компьютера.
4. Вводим компьютер в домен.
5. Готовим эталонный образ: настраиваем систему по желанию и устанавливаем нужные программы.
Когда виртуальная машина будет готова, открываем командную строку в нашем Windows 10 и выполняем команду:
c:windowssystem32sysprepsysprep.exe /oobe /generalize /shutdown /mode:vm
После недолгого выполнения шаблон будет готов. Напоследок, отключите примонтированный установочный ISO, если он использовался для установки Windows.
Развертывание терминальных служб
Переходим к установке и настройке служб удаленных рабочих столов.
Установка роли удаленных рабочих столов
Открываем панель управления сервером — в правой верхней части нажимаем Управление — Добавить роли и компоненты:
В открывшемся окне нажимаем Далее — в окне «Выбор типа установки» оставляем Установка служб удаленных рабочих столов:

… Далее. В окне «Выбор типа развертывания» оставляем Стандартное развертывание:

… Далее. В окне «Выбор сценария развертывания» оставляем Развертывание рабочих столов на основе виртуальных машин:

… Далее. «Обзор служб ролей» — Далее.
В следующих 3-х окнах нужно выбрать серверы, на которые мы будем развертывать роли «Посредник подключений к удаленному рабочему столу», «Веб-доступ к удаленным рабочим столам», «Узел виртуализации удаленных рабочих столов» — если сервер один, то все данных роли ставим на него.
В окне «Подтверждение выбора» ставим галочку Автоматически перезапускать конечный сервер, если это потребуется и кликаем по Развернуть:

В процессе установки наш сервер перезагрузится. После перезагрузки развертывание продолжится — по окончании процесса закрываем окно:

Настройка свойств развертывания
В панели управления сервером кликаем по Службы удаленных рабочих столов:

В открывшемся окне находим «Обзор развертывания» — кликаем по Задачи — выбираем Изменить свойства развертывания:

В открывшемся окне «Настройка развертывания» переходим в раздел Active Directory — в разделе «Подразделение» выбираем ранее созданный организационный юнит VDI Desktops:

… мы увидим ошибку о том, что наше подразделение неправильно настроено — просто нажимаем Применить — система внесет необходимые настройки и значок ошибки пропадет.
Создание коллекции
Открываем консоль управления сервером, переходим к роли удаленных рабочих столов и кликаем по Коллекции:

Справа нажимаем Задачи и выбираем Создать коллекцию виртуальных рабочих столов:

На странице приветствия просто нажимаем далее:

Вводим имя коллекции (в моем случае, VDI):

На следующей странице у нас есть возможность выбрать тип коллекции — это будет общий пул виртуальных машин или у каждого пользователя своя индивидуальная ВМ. Оставляем по умолчанию:

Выбираем ранее созданный шаблон, на основе которого будут выделяться виртуальные машины:

На следующем этапе мы можем указать файл ответов sysprep для более детальной настройки машины при старте. Мы же оставляем все как есть:

На данном этапе мы выбираем часовой пояс, который нам подходит, а также имя подразделения, куда будут помещаться создаваемые виртуальные машины — в нашем примере это VDI Desktops:

Указываем группу безопасности, пользователям которой будет разрешено подключение по RDS к виртуальным машинам (в моем случае, достаточно Domain Users), также мы можем задать максимальное количество виртуальных машин, которые могут быть созданы на Hyper-V для данной коллекции. Еще мы можем задать свой префикс, который будет использоваться в качестве имени компьютера виртуальной машины:

На следующей странице можно оставить настройки по умолчанию или указать другое количество виртуальных машин, которые будут созданы заранее:

Укажем, где будут храниться виртуальные машины — в выбранной папке будет создан каталог с именем коллекции, а в нем будут создаваться файлы виртуальных машин и дисков:

При желании, мы можем указать общий каталог для хранения профилей пользователей. Это важно, чтобы при подключении к новой виртуальной машине все пользовательские данные сохранялись. Мы же не будем использовать данную возможность:

На последнем шаге мастера мы подтверждаем наши настройки:

Начнется процесс настройки и создания виртуальных машин. В зависимости от их количества, процедура может занять много времени. Ждем — в итоге мы должны увидеть сообщение об успешном создании коллекции:

Я столкнулся с ошибкой:
Не удалось получить подробные сведения о шаблоне виртуального рабочего стола.
В моем случае, проблема была из-за использующегося снапшота для шаблона виртуальной машины. После его удаления проблема исчезла.
Наш сервер готов.
Подключаемся к серверу с клиентского компьютера
Файл для подключения доступен на веб-интерфейсе терминального сервера. Его можно получить, перейдя в браузере по адресу https://<имя сервера RDS>/RDWeb/, введя доменные логин и пароль и выбрав подключение к нашей коллекции:

Для удобства, мы можем скачать данный файл и передать его нужным пользователям.
Запустив коллекцию мы должны получить приглашение на ввод логина и пароля, после чего мы окажемся на созданной по шаблону виртуальной машине.
Если мы хотим подключаться к нашему серверу через Remote Desktop Gateway, то откроем файл подключения к коллекции текстовым редактором и добавим строки:
…
gatewayhostname:s:rdg.dmosk.local
gatewayusagemethod:i:1
…
* где rdg.dmosk.local — адрес шлюза удаленных рабочих столов.
** эти опции могут уже присутствовать в файле, тогда нужно их проверить и при необходимости, отредактировать.
Читайте также
Другие полезные инструкции, которые дополнят данное руководство:
1. Как установить роль контроллера домена на Windows Server.
2. Установка и настройка терминального сервера на Windows Server.
3. Установка и использование Remote Desktop Gateway.

Three years back I wrote a blog post on Deploying Windows 8 Virtual Desktop Infrastructure on Windows Server 2012 that has been wildly popular and received lots of blog comments. With the release of Windows 10 anticipated within the next month, I felt it would be appropriate to do an update to this blog post. This time, I will show how to deploy Windows 10, using NVIDIA GRID K1 graphics cards, RemoteFX, and Windows Server 2016 (not the official name, still being called ‘Technical Preview 2’). The Windows Server 2016 host is an HP DL380 Gen8 server with two GRID K1 cards and will act as my Remote Desktop Virtualization Host. For the RDS Connection Broker/Gateway server, I’ve deployed Windows Server 2016 into a virtual machine that will be externally facing.
To get started, I’ll show the experience of installing Windows Server 2016 (Technical Preview 2 build 10074) bare metal. Boot from the installation media and click Next:

Click Install now:

Select Windows Server Technical Preview 2 (with local admin tools)
and click Next:

Accept the terms and click Next:

Click Custom:

Select the Unallocated Space and click Next:

Monitor the installation progress:

Setup the Administrator account by clicking OK:

Enter and repeat a password:

Click OK:

First thing I noticed, unlike previous versions of Windows Server, there is no Server GUI by default! Fantastic. Great work Microsoft. Server Manager launches automatically, but there’s no Explorer shell. To add that, navigate to Manage -> Add Roles and Features:

Click Next:

Select Role-based or feature-based installation and click Next:

Leave default and click Next:

Click Next:

In Features, scroll down and expand User Interfaces and Infrastructure. Select Server Graphical Shell and click Next:

Optionally you can select to restart the server automatically. Click Install:

Once complete, click Close:

If the server didn’t automatically reboot, you can initiate a reboot by running ‘shutdown –f –r –t 0’:

Next, because this is an HP ProLiant server, I’m going to install all the Windows Drivers by mounting the Service Pack for ProLiant media and doing an automatic installation. Be sure to install any available firmware or Windows Drivers for your applicable server. Fortunately, the latest version of HP SPP is already Windows Server 2016 ready, that was a nice surprise.

Once the server drivers are installed, I installed the NVIDIA Graphics Drivers for my GRID K1 cards. You can find these on NVIDIA’s website. Click Agree and Continue:

Select Express and click Next:

Click Restart Now when complete:

Navigating to Device Manager, I noticed all drivers were installed (no unknown devices), including my NVIDIA GRID K1 cards:

Next, I’ll install the Hyper-V and RDS Virtualization Host roles. From Server Manager, click Add Roles or Features. Click Next:

Leave defaults and click Next:

Click Next:

Scroll down and select Remote Desktop Services:

Click Next to bypass features:

Click Next:

Select Remote Desktop Virtualization Host:

Review the roles and features that will be automatically installed and click Add Features:

Click Next:

Click Next:

Select the appropriate network adapter(s) and click Next:

Click Next:

Leave defaults or customize if desired and click Next:

Check the box to Restart automatically. Select Yes:

Click Install:

A server reboot may be initiated. If so, log back in and review the progress. Click Close:

Next, I’ll setup my Windows 10 Master Virtual Machine in Hyper-V. In Server Manager, select Hyper-V. Right click the Server and click Hyper-V Manager (you can get to this from the start menu as well):

On a new installation, no Virtual Machines exist. To verify that the NVIDIA GRID K1 cards are available for RemoteFX, click Hyper-V Settings:

Select Physical GPUs, and click the drop-down to view all GPUs. Ensure each GPU has the ‘Use this GPU with RemoteFX’ selected. Click OK when finished:

For my Windows 10 Virtual Machine, I’m going to use Windows 10 Pro Insider Preview (build 10130).
Click New, Virtual Machine:

Click Next:

Enter a name for the Master VM. For my environment, I used Win10-M. Click Next:

Select Generation 2:

Enter a Memory value and click Dynamic Memory:

Select a network connection:

Enter a VHD size (and location if desired):

Select Install from bootable image and browse to the Win10 ISO:

Click Finish:

We need to modify a couple properties. Right click the VM and click Settings:

For starters, I’ll bump the Processors to 2 (defaults to 1 vCPU):

Click Add Hardware and select RemoteFX 3D Video Adapter:

Optionally, I can modify the number of monitors, resolution, and dedicated video memory available to the VM:

Right click and select Connect:

The virtual machine will automatically boot to the Win10 ISO:

Click Next:

Click Install Now:

Accept and click Next:

Click Custom:

Select the Unallocated Space and click Next:

Review the installation progress:

Click Use Express Settings:

Click My Organization and click Next:

Click Join a domain and Continue:

Enter a username and password and click Next:

Optional: Install any applicable Windows Updates (this may take a while):

For my build, some of the Windows updates required a reboot:

This would also be the ideal time to install any base image applications that any user would need access to (Microsoft Office, Adobe Reader, etc.). Normally, this is when I would also Sysprep the VM in order to create an Automatic Pool of Virtual Desktops. Unfortunately, the build of Windows 10 that I am using is unable to Sysprep. After fighting with it for a while, I decided to bypass Sysprep for now, and just clone the VMs using Hyper-V. For more details on the errors I encountered, see this blog post. Unfortunately the fix (stopping the tiledatamodelsvc) did not resolve my issues (Error SYSPRP Failed while deleting repository files under ‘C:ProgramDataMicrosoftWindowsAppRepository’). I’m hopeful Microsoft will have this fully resolved by the time Windows 10 is ready to ship, otherwise it will be fairly difficult to deploy in Enterprise environments as most every deployment tool relies on Sysprep…
We’ll come back to the Windows 10 Virtual Machine in a little while. For now, let’s configure our RDS environment for VDI.
I’ve deployed a second Windows Server 2016 VM as I mentioned. This server will act as my RD Connection Broker, RD Web Access, and Gateway Server (VMWS16RDS01). From Server Manager on VMWS16RDS01, I need to add the RDS Virtualization Host (DL380Gen8). Right click All Servers and click Add Servers:

Type the server name and click the arrow to add it to the selection:

With both servers added, I’ll select Manage -> Add Roles and Features:

Click Next:

This time I’ll select Remote Desktop Services Installation and click Next:

Select Standard Deployment and click Next:

Select Virtual Machine Based Desktop Deployment and Click Next:

Click Next:

Move the RD Connection Broker (VMWS16RDS01) over using the arrow and click Next:

Move the RD Web Access server (VMWS16RDS01) over using the arrow and click Next:

Move the RD Virtualization Host (DL380Gen8) over using the arrow and click Next:

Select Restart automatically and click Deploy:

Review the installation progress:

Once completed, click Close:

Next, we’ll configure the RD Gateway by clicking the Green + Button in the topology:

Move the RD Gateway (VMWS16RDS01) over using the arrow and click Next:

Enter a Fully Qualified DNS Name (FQDN) for the remote access URL and click next:

Click Add:

Review the progress and click “Configure certificate” when completed:

For my environment, I have a pre-existing certificate in .PFX format that I will use, so I’ll click Select existing certificate:

Enter the path to the existing certificate, password, and click OK:

Click Apply to complete the step for each service. Rinse and repeat this process until each Role Service has a certificate assigned. Once finished, click OK to close:

Click Close:

Next, we need to add the RD Licensing Server. If you already have an RD Licensing Server, be sure to add it to Server Manager, then click the Green + button above RD Licensing:

Move the RD Licensing server (VMWS12DC01) over using the arrow and click Next:

Click Add:

Click Review RD Licensing properties for the deployment:

Select the licensing mode (Per Device or Per User) and click OK:

Click Close:

Review the topology to make sure each step has been completed. We’ll come back to create our initial collection.

Since I can’t use the automatic provisioning process of RDS 2016, I’ll export and import the Win10 VMs and join them to the domain manually. In Hyper-V Manager, right click the Windows 10 Master VM and click Export:

Enter a path and click Export:

Monitor the progress under the Status column:

Once completed, the status field will be blank. Click Import Virtual Machine on the Actions pane:

Click Next:

Browse to the path of the Windows 10 Master VM and click Next:

Click Next:

Select Copy the virtual machine and click Next:

Click Store the virtual machine in a different location and enter a path for each option (I prefer to make this unique for each VM, i.e. ‘Win10-01’) and click Next:

Enter a path for the VHD location (I prefer to make this unique for each VM, i.e. ‘Win10-01’) and click Next:

Click Finish:

Review the progress during import:

Once imported, it’s good to rename the Virtual Machine to avoid confusion:

Next, I’ll boot the VM, rename it to match the Virtual Machine name, and join the domain. These steps are normally taken care of by the automatic deployment process, but since Sysprep is broken I can do this manually. Once joined to the domain, I’ll login to verify access.

In Server Manager on the RDS server, navigate to Collections. In the Tasks section, click Create Virtual Desktop Collection:

Review and click Next:

Enter a Name for the Collection. This will be the name users will see when they connect through the Gateway or RD Web Access servers. Click Next:

Select Personal virtual desktop collection. Normally I would also select Automatically create and manage virtual desktops, but this requires the Master VM to be Sysprep’d to create. With Automatic creation deselected, click Next:

Select the Virtual Desktops on the Hyper-V host and click Add (can optionally select multiple if more than one VM was imported). Click Next:

Select Enable automatic user assignment and click ‘Add the user account to the local administrators’. Click Next:

Enter the usernames or security groups of users assigned to this collection:

Review and click Create:

Click Close:

For external access, a Network Address Translation (NAT) needs to be setup, along with an External DNS record pointed at the NAT address. In the firewall, the following ports need to be allowed:
RD Web Access/Gateway Server:
TCP: 80,443
UDP: 3391
No ports need to be opened to the VDI desktops or the Virtualization Host, only to the RD Web Access/Gateway server.
To make the user experience a little smoother, I’ll setup an HTTP redirect on the RD Web/Gateway server. In IIS, navigate to ServerSitesDefault Web Site. Double click HTTP Redirect:

Click Redirect requests to this destination and enter https://ExternalFQDN/RDWeb. Click Only redirect requests to content in this directory. Click Apply:

Review the changes and ensure they applied properly:

Now, when users browse to http://ExternalFQDN instead of seeing the default IIS page (below):

Users will now be redirected to the correct authentication page. Now we’re ready to login! Enter the domainuser name and password. Select This is a private computer and click Sign In:

Click the RDP icon to connect:

Now, a domain user (DEMODane.Young) is assigned as a local administrator to the Persistent Virtual Desktop. We can see the VM name is Win10-01 and the connection was brokered successfully.

At this point I’m ready to get started using my persistent Windows 10 Virtual Desktop, brokered using Windows Server 2016 on a Hyper-V 2016 host! I hope you’ve enjoyed this blog post and that I’ve shown you how quick it can be to get up and running using a 100% Microsoft solution. I am excited to see Windows 10 become available, and start deployments using other brokers including Citrix and VMware. For now, my Windows 10 RDP and RemoteFX environment will have to suffice.
If you have any questions, comments, or just want to leave feedback, please feel free to do so below.
Thanks!
— @youngtech
This is the last piece of the puzzle in our RDS series. In this part we will discuss why or when to implement this insted of RDS Session Host environment. VDI stands for Virtual Desktop Infrastructure and it is built around the Windows Client OS while RDS is built around the Windows Server OS. When you configure VDI you are creating a pool of VMs and each user will get it’s own VM. This flexibility provides an isolated environment for the user. As each user enjoys a dedicated VM with an OS, they can install or uninstall applications with full or partial administration rights within the VM. When you configure RDS Session Host, all users will share that server and non of them will be able to make changes, install applications, make it personal. All of that is possible with VDI, specially if you have users that need to run heavy applications.
Some of the questions that we need to answer before deploying VDI are:
- Storage
- Servers
- Network
- What type of desktops we want to deploy?
- Storage – Storage is a KEY item and usually what KILLS VDI. It is the biggest performance bottleneck in a virtual infrastructure. So this needs to be planned carefully especially if you will run persistent VDI.
Local vs Shared Storage
Big question. Do I run it on a local storage or do I run it on some form of shared storage?
Local -> If you’re using local storage, there are two scenarios you want to target, a pooled VDI and RD session host. RD session host is a single server. You can back it up. You can restore it. You can have farms of it. If it’s pooled VDI, the desktops are funds mentally replaceable. Because when the user logs off it reverts. So you can destroy and recreate desktops without having a real significant impact so having local direct attach storage is a viable option for that.
Shared -> Personal VDI, user profile disks, pooled VDI templates. All of these include clustering, CSV or SMB attached storage.
- Servers – On how many hosts will you run these VMs on? A single one? What if it dies? Everything dies as well. When we are configuring VDIs a Hyper-V cluster is preferred.
- Network – Another important piece in our deployment. Latency, redundancy, scalability are just some of the parts we need to plan before pulling the trigger on a VDI rollout.
- Desktop Types – here we need to decide if we are going to implement Persistent-VDI or Non-Persistent VDI.
Persistent VDI – It is a 1:1 mapping which means that if you have 50 users you MUST have 50 VMs running. Every user get it’s own VDI. Each desktop runs from a separate disk image. The user’s settings are saved and appear each time at login. These types of desktops allow more personalization, each desktop may be as unique as you want, but they require more storage and backup. Persistent VDI is basically the same setup we have with our physical laptops. Persistent VDI is popular in static scenarios where individual end users are always the same and use the same workstations. They are coordinated with WSUS and Config manager to avoid patch storms through excessive disk I/O.
Non-Persistent VDI – In this deployment none of the users settings or data is saved once they log out. At the end of a session, the desktop reverts back to its original state and the user receives a fresh image the next time he/she logs in. With this deployment if you know you usually get only 20 users connected at any given time you can have a pool of 20 VMs instead of 50. This means less servers, less storage and so on.
When you are deploying non-persistent VDI’s you are creating a “Master Image” or a “Golden Image”. Since nonpersistent desktops are built from a master image, it’s easier for administrators to patch and update the image, back it up quickly and deploy company-wide applications to all end users. Users can’t alter desktop settings or install their own applications. Requirements are reduced because we have only one image to manage and we have support for user profile disks to persist user changes. When it comes to updating the golden image, if there’s an update that comes in, update the gold, reconstruct, update the gold, reconstruct. You do this as often as you want, and the tools within Windows make this completely transparent to the user because Server Manager
will allow you to roll these things out as people use them.
TIPS! I would recommend that (before you configure VDI deployment) you make sure that you focus on user profiles (you may not necessarily be on this same Windows install over and over again) and follow that by applications and then you can start talking about, okay, we’re going to give you a user session and a desktop, do I do that in a session desktop, do I do that in a personal VDI or a pooled VDI. Those are the first things you need to solve before you configure virtualization layer, storage etc.
Let’s see how we can deploy VDI’s. In a production environment, you will need to have a physical Hyper-V host (Cluster is preferred) that will host RD Virtualization Host role. My Hyper-V host is a VM (with nested virtualization enabled). No need for physical server because this is just a demo. All servers are domain joined.
Infrastructure
DC01 – Domain Controller
RDS-VDI – Connection Broker, Web Access
HV01-VDI – Hyper-V host (RD Virtualization Host) – 20 GB RAM, 10 vCPU
I already created new organizational unit called VDI. This will be the default OU which will host our VDI’s. Next, I have configured DHCP so that VDI’s get correct network settings. Make sure that you have this before you proceed.
Be sure to add all servers that will be part of the deployment to all servers in server manager on connection broker. Lets, start our deployment by starting server manager and clicking on Manage –> Add Roles and Features -> Remote Desktop Services Installation

Select Standard Deployment –> Next
On the Deployment Scenario select Virtual machine-based desktop deployment

Specify Connection Broker, Web Access and RD Virtualization Host servers. When you select RD Virtualization Host you will have the option to create a new virtual switch. Check this if you want to allow the wizard to create a new virtual switch within Hyper-V to be used for our virtual desktops.

And on the confirmation page tick Restart the destination server automatically if required and click on Deploy

First part is done.

Before we proceed and create a golden template and collection let’s jump into server manager and edit our RDS deployment.

You will notice 2 new sections. Active Directory and Export Location. On the Active Directory section we are configuring permissions so that our connection broker can join VDI’s do a domain. Broker will require full control. As I posted before I already created new OU called VDI. When you select your OU you will receive an error.

To fix this you can hit apply. In some cases if you are not using account that has the permissions to configure this you will need to click on generate script and run the script with account that has the permissions. If you use account that has required permissions, when you click on Apply, you will see the message like this.


Next we have Export Location. The export location is a global setting that applies to all collections in the deployment. When you create a managed collection (a collection that is based off of a gold image is a managed collection) , we have to export the gold image to this location and store it using the collection name. This is where your gold image will live for the lifetime of the collection, and it is not updated until you either re-create all desktops or delete that collection and create a new one, where we will export the gold image again (a gold image can only be used for one collection). Once done click OK

Our next step is to create a golden template. I will use Windows 10 Enterprise iso file and create a template with some applications on it. Now when you are done create a checkpoint before running sysprep. Doing this will give you option to revert to point before sysprep.

Once done run sysprep with command
%WINDIR%system32sysprepsysprep.exe /generalize /shutdown /oobe

Now we are ready to create a collection.

On the Before you begin page click Next. On the Collection Name page specify the collection name and click next

On the Collection Type page choose what would you like to create. We already discussed about these options and if you feel unsecure about it please go back to the beginning of this post. I will keep the defaults and click next. (You will notice green checkmark which represent capabilities of the collection. If you click on Personal, those will change)

Now we need to select our Template. I have only one. Click next

On the Virtual Desktop Settings page keep the defaults and click next

Now we need to specify Time Zone, domain and the OU that we would like to use. Once done click next

On the Specify users and groups page you can specify which group will have access to VDIs, how many we would like to create and what prefix we would like to use.
I created a group called VDI_Users and I am going to create 2 VDI’s. Next for naming scheme I chose to use WIN10-1 for the first one.

On virtual desktop allocation page we can specify how many VDI’s will be created on specific host. I have only one Hyper-V host so there is not much to choose but if you have more then 1 you can select how many VDI’s are going to be created on each host

On this page we are deciding where are we going to store VDI’s. In my case that will be on a D: drive on the Hyper-v host. You will notice a checkbox Automatically roll back the virtual desktop when user logs off. We are creating a Pooled VDI collection so this is a good option. Keep it as is and click next

Now on this page I will uncheck User Profile Disks because I don’t care about user settings in my demo. Remember that if you want to save user settings in a pooled VDI collection you will need to have this.

On the Confirmation Page click Create


After a couple of minutes our collection is deployed with our VMs.

If we login to our DC we will see that VDI OU is populated with these 2 VMs and we can see those VMs in Hyper-V manager as well.

and we can see it in RD Web Access

Let’s explore the collection properties. Click on the collection and under Tasks click on Edit Properties.

General Section, Here we can change the Collection Name, we can decide if this collection will appear in Web access and we can enable save delay in minutes.
Enable save delay (in minutes): If you enable this option, when the user logoff the machine will rollback and after x min it will go into the save state.

Virtual Desktops Section, This will give us information about our configuration

User Groups section, here you edit who will be able to access collection.
Client Section, Here we can configure/change settings for clients and decide if they will be able to access drives, clipboard etc.
User Profile Disks –> UPD’s can be configured here
On the Collection main page we have option to configure Remote Apps

and if you scroll down you will see Virtual Desktop Template section. This will tell us which golden image we are using and some additional info. We will discuss more about this when we will be talking about golden image update and re-creation of VDI’s.

Last but not least is the Virtual Desktops section. Here we can see our VDI’s, who is logged on and the connection status. We can see that a user called N is logged on WIN10-2 and that connection is Active. If you click on tasks you will be able to add more desktops, recreate all desktops (later on this one) etc..

If you right click on a VDI you will be able to do things like save and delete.

UPDATE GOLDEN IMAGE AND RECREATE ALL DESKTOPS
What if we need to add new applications to our VDI’s in pooled collection? What if we need to change something or what if we need to update our golden template? These are the steps that we need to go through when updating/modifying our golden template.
If you remember I created a checkpoint before running sysprep. I did that to revert back to a normal state before I ran sysprep. So our first step is to revert back to normal state.

If you get a warning message Are you sure you want to apply the selected checkpoint hit YES. Once done start the template VM and install apps, update it or make changes to it. I will install some apps on it and then we need to run sysprep again. Before running sysprep I will create a new checkpoint. When new updates are available I will revert to this point and update the image.

Once done run sysprep with shutdown, oobe and generalize options.
%WINDIR%system32sysprepsysprep.exe /generalize /shutdown /oobe
Our VM is sysprepped and ready to be deployed. Login to Connection Broker and start the server manager. Click on RDMS and click on the collection. Under the Virtual Desktop section click on TASKS and Recreate All Virtual Desktops.

First step is to select the template. Once done, click next

User Logoff Policy section, here we have 2 options. The first option
- When the user logs off from the virtual dsktop: this will re-create all desktops with no user. If there are users that are logged on the re-creation will begin when they log off. We have time frame as well that we can use to force re-creation of the desktops regardless if the user is logged in or not. If there are any users logged in between the dates we choose they will be logged off and re-creation will start.

Second option
Based on a schedule:
- Recreate virtual desktops now and log off all users -> this will force recreation immediatelly regardless of user activity.
- Recreate virtual desktops now and log off users at a specified time –> here we can choose specific time to start with the re-creation.

I will choose Recreate virtual desktops now and log off all users, once done click next and click CREATE.

Process of exporting the template will begin. Once done all desktops will be re-created. During this period all VMs will be deleted and then recreated.

If we connect to our Hyper-V host we can see the process. I am connected to one of my VM’s as well.

Re-creation will first delete the VM and then re-create it.

Now if I try to connect again we will see that the VM is going through the sysprep process.

Once done the VM’s will first be in a saved state and then they will boot up and users will be able to connect to them.


That’s it. I hope this has been informative for you.
Stay Tuned!
Cheers,
Nedim
Table of Contents
- Chapter 1 – Building Our Learning Environment
- Download Windows Server 2016
- What is Virtual Box?
- Downloading VirtualBox
- Installing VirtualBox
- What is a Virtual Machine?
- VirtualBox Overview
- Creating a VM in VirtualBox
- Creating a VirtualBox Host-only Network
- Chapter 2 – Windows Server 2016 Overview
- Installing Windows Server 2016
- Basic Windows Server 2016 Configuration
- Server Manager
- Roles & Features
- Roles
- Features
- Chapter 3 – Building a Windows Domain and Domain Controller
- What is a Windows Domain and Domain Controller?
- Adding the Active Directory Domain Services Role
- Chapter 4 – Joining a Windows 10 Workstation to Our Domain
- Downloading Windows 10
- Installing Windows 10
- Joining our Workstation to our Windows Domain
- Credits
Chapter 1 – Building Our Learning Environment
In this chapter we are going to accomplish a couple of important things:
- Download Windows Server 2016
Windows Server 2016 is an Operating System designed by Microsoft that supports enterprise-level management, data storage, applications, and communications. It is used by countless companies to operate their back-end IT operations.
Pretty much any big company that you can think of uses Windows Server in some way or another although there are alternatives such as Linux Operating systems.
- Download & Install Oracle VM VirtualBox
This program will be our Virtual Machine manager. In later lectures we will cover exactly what a VirtualMachine is and how you will use them. Once we download these two files and install VirtualBox we will be ready to move on
to the next section
Download Windows Server 2016
Now it’s time to download Windows Server 2016. Thankfully Microsoft offers a free trial version for 2016 that anyone can download for evaluation (or in our case, training) purposes. To download Windows Server 2016, open your preferred
web browser and navigate to technet.microsoft.com. Click the “Downloads” page on the navigation menu.

Make sure you select Windows Server 2016, and no the Windows Server 2016 Technical Preview 5:

Again, DO NOT DOWNLOAD Windows Server 2016 Technical Preview 5:

Click on Windows Server 2016 to show the download page. Before you can download Server 2016 you must register and sign in. Click on the “Sign In” button

Once you are brought to the sign-in page you either need to log in or click the “Create One” button to create a new account. Once you are logged in you will be brought back to the download page. Under Windows Server 2016, choose
the file type “ISO” and click “Register to continue”

Now you will be prompted to enter personal information such as your name, email address, etc. Enter in all the required information and click continue. The download will begin and now you just need to wait for the download to finish.
Make sure you know where you are downloading the file so you can access it later.

In the next lecture we are going to open VirtualBox and create the Virtual Machine that we will install Windows Server 2016. If you want to save time go ahead and start the next lecture while this download is running and that way
when the download is complete you will be ready to move on.
What is Virtual Box?
VirtualBox is a powerful x86 and AMD64/Intel64 virtualization product for enterprise as well as home use. Not only is VirtualBox an extremely feature rich, high-performance product for enterprise customers, it is also the only
professional solution that is freely available as Open Source Software under the terms of the GNU General Public License (GPL) version 2. For more information, visit
https://www.VirtualBox.org/wiki/VirtualBox.
Downloading VirtualBox
To download VirtualBox, navigate to
https://www.virtualbox.org/wiki/Downloads. Click on “x86/amd64” for Windows hosts (see screenshot below) or choose the correct option for your operating system.

Save the file to a location on your HDD that will be easy to access
Installing VirtualBox
Once the download completes, launch the downloaded installer file to being the installation. The setup wizard will appear. Click “Next” to start the install.

The following screen will prompt you to the select installation directory and the features you would like to install. If you would like to install VirtualBox in locations other than the default location click “Browse” to do so,
otherwise, click Next and continue.

The next screen will prompt you to select if you would like VirtualBox icons on your desktop or quick launch bar. This is user preference but make sure to leave to box check to register file extensions. Once you have made your
selections click “Next”.

Now you will be prompted that you will lose network connectivity briefly. Make sure that this will not affect anything you are working on before moving forward. Click “Yes” to move forward.

Now you are ready to install click “Install”. During the installation you will see several pop ups asking you to install different types of “device software.” Check the “Always trust software from ‘Oracle Corporation’” checkbox
and click “Install.”

Once the installation is complete all you need to do is leave the “Start Oracle VM VirtualBox 5.0.20 after installation” checkbox checked and click “Finish”.
What is a Virtual Machine?
Now we are going to learn the basics of VirtualBox and its capabilities. VirtualBox will operate our Virtual Machines (VMs) and the virtual network they will operate on. But first, let’s learn what a VM is. The short answer is
that a Virtual Machine is a software computer, or a computer within a computer. A computer that is stored on a physical computers hard-drive. You can use a VM just like you would use any computer or server. You can power it on, install Windows (or Linux),
browse the web, install server applications, connect it to internal and external networks, etc… You may ask why we would want to use a Virtual Machine instead of a physical server? Well, since the VM is stored on the hard disk drive (HDD) of a physical server,
we can copy, duplicate, delete, or move a VM at any time, meaning they are extremely portable and can be sent across the internet if need be. So if you need to transport a virtual server from Washington DC to Hawaii, that is no longer a time or cost issue.
Take a scenario where you need to repeatedly create several servers to perform service (File / Print server, Domain Controller, etc…) to various customer networks each week. You can utilize a Virtual Machine to make this task much faster by creating a single
VM and installing the OS (Operating System), all the required OS and third party updates and any necessary software. You can consider this a baseline VM. Now every time you need to deploy a new server you simply clone your baseline VM with a new name, make
any required tweaks to the VM and you’re ready to go. No more physically assembling a server and completing repetitive steps such as installing the OS, updates, software and boxing and shipping for every new server instance. Keep in mind cloning a virtual
machine is as simple as right-clicking and selecting clone. There are two terms that you must know in order to successfully work with VMs: Host and Guest. The Host is the computer that the Virtual Machine is installed on. The Guest is the VM the runs on the
Host. A Host can run several Guest VMs while a Guest VM generally only operates on one Host computer (unless the hosts are clustered, not covered in this course).

In this example we have a single Host that is running three Guest VMs. You can run as many VMs on the Host as long as the Host computer has physical resources to spare for the VM, meaning that you cannot create a VM that has more
RAM or processing power than your host computer has available. Generally, a VM will only have a fraction of the total storage capacity and processing power that it’s host computer has. For this reason, the host computer is usually a very powerful computer
that is designed to run several VMs at once. Since some of you will be running these VMs at home on your personal computer, you may need to keep some of the VMs powered off while others are turned on or keep the combined VMs processing power as low as possible.
VirtualBox Overview
Now let’s take a look at VirtualBox’s GUI. At the top we have our program options such as File, Group, and Help. Below that we have controls for managing our VMs; New, Settings, Discard, and Start. In the left pane we have a window
that displays all of our VMs and VM Groups. In the middle we have the settings of our VM and a live preview of the VM if it is powered on.

If you click the File dropdown on the menu, the first option you will see is preferences.

Click this option or press Crtl+G to open the preferences menu.

Here we can change several key configurations for VirtualBox. If you want to store your VMs on a drive other than your C drive, you can change the “Default Machine Folder” located under the General tab. Under the Input tab you
can view and change the keyboard shortcuts for both VirtualBox and Virtual Machines. It is worthwhile to look over these shortcuts and memorize those that will be useful to you. For example, Ctrl+F for full screen is a favorite of mine. The Update tab allows
you to specify the interval at which VirtualBox with check for updates. This only relates to VirtualBox and has no effect on Virtual Machine updates. These settings are perfectly fine left at default. If you prefer to use VirtualBox in a language other than
English, you can change those settings under the Language tab. The Display tab allows you to set the maximum screen size although I strongly recommend that you do not change this setting. The Network tab allows us to create and manage Virtual Networks for
either NAT (Network Address Translation) or Host-only Networks. Let me explain the difference between the two: For a reason I cannot understand VirtualBox decided to create a new network type called a “NAT Network”. This is very different from a “NAT” networking
adapter that can be selected on your VMs and you should know they are not the same. On your VMs you will have (among others) two distinct options, NAT and NAT Network. A “NAT Network” and “NAT Adapter” (these are two different things in VirtualBox) are the
easiest way to have internet access from a VM. Generally, neither of these adapters require any configuration from the Host Computer or Guest VM. Keep in mind that a VM that has a “NAT Network” adapter configured cannot communicate with its Host but can communicate
with other VMs on the same NAT network. While if a VM has a NAT Adapter configured, the VM will only be able to reach the internet and not the Host computer or other VMs on the Host computer. A Host-only network allows a VM to communicate with other VMs as
well as the Host computer. A Host-only network does not allow a VM to reach outside of the Host (no internet access). On our VMs we are going to use two networking adapters; a NAT adapter and Host-only adapter allowing us to have internet access as well as
an internal network that our Guest VMs can communicate with each other and the Host computer. The next tab is Extensions. Extension packs are offered by VirtualBox on their
download page and add support for USB 2.0 and 3.0, VirtualBox RDP and PXR boot for Intel Cards. You do not have to install any extension packs if you do not want to. The last option is for proxy settings.
I have no need for this and you probably don’t either, but if you are connected to the internet through a proxy you can enter that information here. Close the Preferences window by either clicking Cancel or the X at the top right hand corner of the screen.
The next feature we are going to talk about is the Import / Exporting Appliance settings.

These can be reached from the File menu on VirtualBox. When VirtualBox refers to “Appliance,” they mean VM. These two options allow you to import or export VMs at any time. This comes in handy when you want to move a VM from one
host to another. Next is the Virtual Media Manager. This tool allows you to manage your VM related files that are being used such as the virtual Hard Disk Drives (HDDs, which are the *.vdi files), mounted ISOs and floppy disks. If you need to detach a virtual
HDD from a VM you can select the file from the list and click “Release”.

There is also the Network Operations Manager which has nothing to do with VirtualBox networks but rather is used when VirtualBox is checking for updates. You may click the “Check for Updates” if you wish but by default VirtualBox
checks for you once every day. Lastly, If you VM warnings you may reset them by clicking the “Reset all Warnings” button.

Next we have the Machine option on the file menu. This is your menu for VM management. You can create, clone, group, modify, start or stop selected VMs from this menu. You may also create a Desktop shortcut on your desktop for
any select VM and you can view the logs of a VM for troubleshooting purposes. It is also worth noting you may click the “Add…” button to add a VM that has not been exported as an appliance yet. You may also clone a VM at any time using either a full clone
or a linked clone. A full clone copies both the VM and the HDD. A linked clone copies a VM but still builds on the original HDD file. Note that a linked clone only builds on top of the HDD file of the cloned machine, and does not actually modify the HDD for
the cloned machine as well.

There are three types of ways to start a VM; Normal, Headless and Detachable. A Normal start is when you launch a VM with a Window that must remain open in order for the VM to operate. A Headless start is when you power on a VM
without a Window. This is useful for Servers that you don’t need to interact with. A detachable start is experimental and is a mix of the two previous start methods.

In theory you should be able to detachably start a VM and a window will open. That window may be closed without powering off the VM by selecting “Continue running in the background.” Keep in mind this is experimental and not all
features work with this type of start (3D acceleration for example). I have been unable to successfully get this feature to work but it’s definitely worth a try. You may also view the files of a VM that is stored on your host computer by selecting the VM and
choosing “Machine > Show in Explorer.”

Creating a VM in VirtualBox
Now it is time to learn the detailed steps of creating a VM in VirtualBox. The objective of this lecture is to create a VirtualMachine that we will install and configure to be our first domain controller. A domain controller is
a Microsoft server that is responsible for security authentication within a Windows Domain – a domain controller can also manage computer and user accounts that are inside of it’s domain. You do can things like remotely deploy software to the computer, change
a user’s desktop background, configure scheduled tasks, Windows updates, and much, much more. The first thing we need to do is open VirtualBox. Next either select the “New” button at the top left-hand corner of the screen, select “Machine > New”, or press
Ctrl + N.

The Create Virtual Machine window will appear. Choose the “Expert Mode” button in the bottom part of the screen and wait for the window to reappear. Now you need to enter the VM name, type, version, memory size and whether or not
you want to create a hard disk.

I am going to put the name as “Windows Server 2016 – DC01”. Note that this is not actually the computer name, but the name that VirtualBox will use when storing the VM in its inventory. The “DC01” part stands for Domain Controller
01, meaning it is the first domain controller in our environment. Notice that I selected “Windows 2012 (64-bit)” as the version. This is because at the time of this writing Server 2016 was released less than a month ago and VirtualBox has not updated their
software to include this version. Do not worry if you only see Windows 2012 as the latest version as it will run the newer OS perfectly fine. I am going to specify 4 GB of Ram since my host computer has 16GB of RAM. I know some students have gotten away with
using much less than 4 GB so use as little as you can but you will certainly at least need 1 GB of RAM. Notice that you cannot allocate more RAM than what your physical system (the VM Host) has. Click “Create” and we are ready to move on to the next screen.

The next screen is asking us to create the virtual hard disk. The important thing is to move the size above 25gb. I strongly recommend that you use dynamically allocated for the method of storing the VM and moving the file size
up to at least 60 GB. Click “Create” and wait for the VM to be VM to be created. Now you can see the VM has been created and is listed in our inventory.

Now let’s learn how to edit the settings of a VM. You may do this by right-clicking the VM and choosing “Settings” or selecting the VM and pressing Crtl+S.


There are a lot of settings here so I am just going to point out what I believe are important. Under the General tab, select Advanced and change the “Shared Clipboard” and “Drag’n’Drop” to bi-directional. This will allow you to
copy / paste and drag and drop between your Host computer and your VM. Be warned, this feature does constantly fail in VirtualBox but it is extremely convenient when it is actually working.

If you would like to add an additional hard disk file, this can be done under the Storage tab by clicking on the

floppy disk with a plus sign icon and choosing “Add Hard Disk.” You may also add additional virtual disk drives if required, but that is not necessary for our purposes. To mount an ISO to the default virtual disk drive, select
the disc icon that reads “empty” and click the disk

dropdown on the right-hand side of the screen and select “Choose Virtual Optical Disk File”.

Next you need to navigate to and select the ISO file you wish to mount. If you have a physical CD that you would like to mount to the VM you can choose the “Host Drive” option instead of the virtual optical disk file. The network
tab allows us to configure VM network adapters as well as add subsequent networking adapters. Notice that the default option is the “NAT.” This is because a NAT adapter is the easiest to use when getting started.

Finally, we have the Shared Folders tab. This allows you to share files from your Host computer between your Guest VM without direct network connectivity. You may create a new shared folder and select a valid path on your Host
PC. Be sure to choose “Auto-mount” for convenience if you choose to use this.

Now you know how to create a VM and manage its properties.
Creating a VirtualBox Host-only Network
In order for our Guest VMs to communicate with other Guest VMs and our Host computer, we need to create a Host-only network. To do this, open VirtualBox and click on File > Preferences. Go under the Network tab and select “Host-only
Networks.” Select the plus button on the right-hand side of the screen to create a new network.

When you are prompted by user account control (UAC) select yes and wait for the network to be created.

VirtualBox is creating a new networking adapter for your VMs to use as a Host-only network. Once this is complete, you will see the new network listed under Host-only Networks. Select the network and choose the

edit icon.

You can see the network settings for our host-only network displayed here. Navigate to the DHCP Server tab and make sure “Enable Server” is un-checked (

), and navigate back to the Adapter Tab. Note that it automatically picks an IPv4 Address from an available subnet on your network but you are free to change this at any time. If you would like to change it to something else, you
need to verify that this network is not already in use on your network. More than likely it is not, but let’s check anyway to be sure. Open command prompt by hitting the Windows Key and searching for CMD. Once command prompt loads, enter the command “ipconfig”.
This will list all of your network adapter configurations.

If you have never viewed this information before, you need to look for each network adapters “IPv4 Address”. I have found two:


The first is my new VirtualBox Host-only network. The second is my Hosts IP that is handed out by my home network. Since I want to make my subnet similar to my host network, I am going to use the following address for my Host-only
network: 192.168.0.1. Close command prompt and return to the VirtualBox Host-only Network Details window. I will enter this IP into the IPv4 Address field and click “OK”.

Select OK on the VirtualBox Preferences window and select “Yes” when you are prompted by UAC. Now we need to connect our Guest VM to our newly created network. To do this open the settings of the VM and navigate to Network. Select
the Adapter 2 tab and check the “Enable Network Adapter” checkbox. Select “Host-only Adapter” from the “Attached to” drop-down list and make sure the name is the same as the network you just created (this will not be an issue if you only created one network).
Click OK to close the Settings window and wait for the settings to save. Now our VM is connected to the Host-only Network and all that will need to be done on the VM is configure its local VM network adapter settings when we install Windows.
Chapter 2 – Windows Server 2016 Overview
Installing Windows Server 2016
We are ready to install Windows Server on our VM. First we need to mount (or attach) the ISO we downloaded earlier to our VM and then we can launch the VM and begin the installation. Right click on the VM and choose settings. Select
the Storage tab and select the “Empty”

followed by the disk

dropdown list. Select “Choose Virtual Optical Disk File…”

Browse to the ISO file you want mount and select “Open”. Now you will see the ISO is mounted to the VM.

Now to begin the installation we simply need to power on the VM. Make sure the VM is selected and click the “Start”

button at the top of the VirtualBox window. In the beginning it will load the Windows files from the disk, this shouldn’t take more than a few minutes.

Once the files have been loaded you will be prompted to select your language and keyboard input method. I will the default options and click Next. On the next screen choose the “Install Now”. You will be brought to the OS installation
screen:

If you have installed Server 2012 right away you will notice that unlike Windows Server 2012, there is no option for “Server with a GUI,” but instead it is now called “Desktop Experience.” If you do not choose a Desktop Experience
version you will install what was known as (Server Core). You will need to use the command line to complete tasks and will not have a user interface (no use of the mouse). In Server 2012, the datacenter and standard versions contained the exact same set of
features and the only difference was the licensing capabilities. This is no longer the case however. With the Standard version you may only have 2 operating system environments while Datacenter is unlimited. The Datacenter version also includes 3 new features
not included with standard; new storage features (Storage Spaces Direct and Storage Replica), shielded Virtual Machines and Host Guardian Service (more secure VMs), a new networking stack (better network performance). Since we are using this as a trial and
do not need to pay for these, I am going to choose the “Datacenter (Desktop Experience)” version – I recommend that you do the same. On the next screen accept the licensing agreement

and click next.

On the next screen you will be prompted for the type of installation you want. If you already have Windows Server 2012 installed you may choose an Upgrade. Upgrades can be nice as they will keep your files and settings intact if
possible, however, even Microsoft claims that you should perform a fresh (Custom) install if at all possible. In my experience I have never had an Upgrade work without having things break later on. Since we do not have an OS installed, we do not have any choice
other than choosing Custom. On the next screen you will be asked choose where you want to install the operating system. If you have more than one HDD mounted to the VM then you will see them listed here. Note that it is also possible to create partitions (subdivisions)
of your HDD if you would like by selecting the drive and choosing the “New”

button and entering the size of the new partition. We have no need to do this so just click “Next” to continue the installation.

Now the installation will begin. This install generally takes at least 20 minutes so now is a good time to take a break and wait for the installation to finish. Once the installation is complete you will be prompted to enter the
password for the built-in account “Administrator.” It is very important that you don’t forget this password so make sure you write the password down if your work policy allows or memorize it and click finish.

The computer will finish the installation and you will be brought to the login screen:

You may login with the Administrator credentials you just created by pressing Right-CRTL + DEL and entering the new password you just created.
Basic Windows Server 2016 Configuration
In this lecture we are going to do some basic configurations. First we are going to install VirtualBox Guest Additions and setup some basic preferences. Setup the computer’s network configuration and make sure it can reach then
internet as well as communicate with our Host computer. Finally, we will change the computer name and reboot the server. Open the VM and Press Right-Crtl+DEL to enter your login credentials. Wait for the server to fully load then at the top of the VM window,
select “Devices > Insert Guest Additions CD image…”.

Open File Explorer by clicking the folder

icon on the task bar. Select “This PC” on the left side of the File Explorer. Under Devices and Drives you should see the VirtualBox Guest Additions CD.

Double click on this CD to launch the installation. Once the welcome appears click next through the prompts and select Install. During the installation process you will be asked to install device software. Click the Install button
to continue.

Once the installation is complete you will be required to reboot the server. Choose the finish button and wait for the server to complete the reboot. Once the computer reboots, log back into your desktop and wait for Windows to
fully load. Once Windows is fully loaded we need to open Server Manager and Command Prompt. To do this, click the windows

button in the bottom left and choose the

server manager button. I recommend that you right-click on this button, choose “More > Pin to taskbar” as you will be using it quite often.

Once you are done with that I also recommend that you pin command prompt to the taskbar. You can find the command prompt launcher by clicking the windows button again and searching for “cmd”.

Now we are going to setup our network connection for our Host-only network. If you are running a physical Server or your particular environment doesn’t use VirtualBox or a Host-only network you can skip this step. However, if you
have been following all of the steps I have done so far continue on and follow these steps. Open command prompt and enter the command “ipconfig”. We are looking for your two ethernet adapters 1 and 2.

If you do not see the same settings I do then you likely do not have the exact same network settings that I have on the Guest VM. Notice the first adapter has an IP address of 10.0.2.15. I have assigned adapter 1 on my VM to be
a NAT adapter. If I attempt to run the command “ping google.com” for example, I can test to see if I have internet connectivity.

I can see I am getting replies from Google.com. This tells me that I am connected to the internet. Now I need to get the second adapter working. Notice the IP is a 169.254.***.*** address. This means that the computer itself was
unable to find a DHCP server on the network and instead assigned a private IP address to itself. We need to configure an IP address the is on the same network as the Host-only network we have created in previous lessons. To do this, we need to exit the full
screen on the VM (Crtl + F) and open File > Preferences on the VirtualBox window. Navigate to Network and select “Host-only Networks”. Select your Host-only network and click the “Edit Selected” button.


Notice if you navigate to the DHCP Server it is turned off. This is what our VM got a 169.254.***.*** address. Do not turn this back on however as we will be creating our own DHCP server on this VM later. We need to give our VM’s
second adapter an IP address in the range of 192.168.0.2-254. Navigate back to your Guest VM and open the Server Manager Window. Choose the “Local Server” tab and edit the settings for “Ethernet 2” by selecting the blue “IPv4…” text to the right.

Right click on the Ethernet 2 Adapter and choose Properties.


Uncheck the “Internet Protocol Version 6” checkbox, select “Internet Protocol Version 4” and choose Properties. Check the “Use the following IP address:” and enter the following information.

Remember, you can use any address between 2 – and 254 for the last octet of your IP address, but I am going to choose .10. Choose the subnet mask and this information will be automatically prefilled. Next, choose the “Default Gateway”.
This will be the address of our network. If you remember, we set this in VirtualBox to be the 192.168.0.1 address. For DNS settings we are going to set the preferred DNS server to a loopback IP address which is 127.0.0.1. This IP address points back to the
local server, and although we haven’t built the DNS server yet we will be doing that in the future. For the alternate IP address we will use Google’s DNS servers which is 8.8.8.8. Select OK and close out of the Properties window. Now before we can communicate
between our other VMs and our Host we need to modify the firewall settings of our local server. Go back to the Server Manager > Local Server and modify the settings for “Windows Firewall”.

Choose Advanced settings on the left hand side of the screen and click “Windows Firewall Properties”.

We need to customize the protected network connections for Domain, Private, and Public profiles. Choose the “Customize” button for “Protected Network Connections” and uncheck your Host-only network which in my case is “Ethernet
2”.

Select OK and repeat these steps for the Private and Public profiles. This will allow traffic on our Host-only network to pass through our network adapter without being blocked or rejected. Now we need to verify that we can communicate
between our Host computer and our Guest VM. To do this we are going to attempt to ping our Guest VM from our Host computer. Exit full-screen on the VM and on your Host Computer open Command Prompt. Attempt to ping the VM by typing the ping command followed
by the IP address of the Server you just configured. In my case I set it to 192.168.0.10 so I will attempt to ping this address.

Here we can see that I can successfully ping the Guest VM. Now we have a VM server that can reach the internet as well as communicate with other VMs and the Host computer. Next we are going to rename the server. By default the
server will be named with a “WIN” prefix. To change your server name, open the Server Manager and navigate to Local Server. Click the computer name to open the System Properties.

Select “Change” and enter a new name. I am going to type in the name “ITFDC01”. ITF stands for my website name, “itFlee” and DC stands for “Domain Controller”. The 01 simply means that this is the first domain controller in this
network.

Click OK and click OK again when you are notified you must restart. Select Close on the “System Properties” and choose “Restart Now” when the window appears.

Now we are done making the basic configuration changes.
Server Manager
The primary way you manage your server is with a program that is included with all versions of Windows Server called “Server Manager”. By default, Server manager will launch when the operating system starts, but if it doesn’t you
can start it by clicking the Windows button and selecting “Server Manager”.

Server manager allows you to manage your local server as well as other servers on your local network. From here you can manage the computer name, IP address, firewall settings, Windows updates, view Events, Services, and much,
much more. On the left pane you will see Dashboard, Local Server, All Servers, and File and Storage Services. The first three items relate to the server or remote servers. The fourth is a server role called “File and Storage Services” (note that this is installed
by default). Whenever you install new server roles they will appear in this pane.

The dashboard gives a quick overview of your server and allows you to configure the server quickly. If there are any issues with the local server or remote servers (such as a service that failed to start) you will see them on this
screen. To see errors with remote servers you need to first add them as a remotely managed server. Errors with remove servers will be shown under the “All Servers” section.

The local server tab will give you detailed information about the server you are currently logged into. If you need to change anything from the computer name, domain membership, firewall, network settings etc, this is the place
to do it. You will also have all of your events and services listed here. There is much more to the local server tab, but this is the most important parts of it. The all servers tab allows you to view the same information on the local server and for remote
servers, but you cannot change the server properties (computer name, domain, firewall settings, etc). The last tab is File and Storage Services. This server role includes technologies that help you set up and manage one or more file servers, which are servers
that provide central locations on your network where you can store files and share them with users.
Roles & Features
Let’s talk about two key terms that you must know in order to successfully work with Windows Server 2016; Roles and Features.
Roles
A server role is a set of software programs that allow a server to provide a specific service to its network. An example of a role would be adding the DHCP role to our server. This will allow the server to act as a DHCP server
Features
Features are individual software programs that are sometimes required to be installed by roles, although they can be independently installed without roles as well. You can add or remove roles and features by selected the Manage
button at the top right-hand corner of the Server Manager window and selecting either “Add” or “Remove Roles and Features”

The windows for adding and removing roles are nearly identical. One allowing you to check checkboxes for roles and the other allowing you to uncheck role checkboxes. If you open the “Add Roles and Features” window you will be presented
with the “Before You Begin” tab. This tab has no functionality and is simply informational so I recommend that you check the “Skip this page by default” checkbox and click next.

The Installation Type tab gives you two options. The first option is the most common and is for installing roles and features on a single server. The second option is for installing roles onto a virtual machine (not related to
VirtualBox). Choose the first option and click next.

If you have added remote servers to manage then they will be listed here. You can also choose to install the roles on a virtual hard disk. Unless you are using Hyper-V (we are using VirtualBox), you likely won’t use this second
option. Click next.

On the Server Roles tab, you can choose any of the roles you would like to add to the server. If you only want to install features, you do not have to check any of these checkboxes. For this lecture, we are going to install and
uninstall roles and features so you understand how it works. Choose the “Fax Server” check box. You will get a popup stating that you need to add required features in order to install this role. Click “Add Features”, and then click Next.

The Features tab looks very similar to Server Roles tab. If we had not selected any roles to install, we would not be able to progress past this screen. It is important for you to know that you do not have to install roles, but
you must at least install features in order to complete this wizard. The features required by the Fax Server role are already checked for installation, so simply click next to continue. The next screen will prompt us about the new Fax Server role we are installing.
Generally when you add a new server role, you will have some type of informational tabs added to the wizard. Click Next through the prompts. When you are brought to the Role Services tab, you can check additional services if you would like them. Since this
role is temporary and just an example, I am not going to include any of these optional role services. Click Next. Now we are brought to the Confirmation tab. If you would like you can check the “restart the destination server…” checkbox but I am going to leave
it unchecked since I plan to uninstall the role immediately. As a general rule, it is a good idea to check this checkbox.

Click Install and you will be brought to the results window.

Note that you may close this wizard at any time, and the installation will still continue. Once the window is closed, you may view the progress by clicking on the flag icon on the top right-hand corner of Server Manager.

Once the installation is complete, refresh Server Manager by either pressing F5 or by pressing the refresh button next to the notifications button.

On the notifications button you will see new notification stating that you must complete the post-deployment configurations.

Just about every role you install will require some type of post-deployment configuration – since we are about to uninstall this role, we do not need to complete this. Now, let’s uninstall the newly installed Server Role. Click
Manage > “Remove Server Roles and Features.” Click next through the prompts, choosing the same settings we did when adding the Server Role. When you get to the Server Roles tab, uncheck the “Fax Server” checkbox.

You will get the popup stating that you can remove the features that were required by the server role. Notice that this list is not exactly the same as the features we were required to install. This is because we will need to uninstall
additional roles as well. Click the Remove Features button and uncheck the “Print and Document Services” checkbox. Again, you will be prompted to remove features that require the role. Click the Remove Features button. Click Next until you reach the confirmation
Window. This time, check the “Restart the Destination Server Automatically if required” checkbox. Select Yes when you receive the warning message about the reboot. Click the Remove button and wait for the uninstall to finish and the Server to reboot.
Chapter 3 – Building a Windows Domain and Domain Controller
What is a Windows Domain and Domain Controller?
Windows Domains have been around since 1993 with the release of Windows NT. They provide System Administrators an efficient way to manage small or large networks. You only need one Domain Controller (DC) to build a Windows Domain
although most Windows Domains contain several servers and computers. A DC is any server that has the Active Directory Domain Services (AD DS) role installed. The server’s job is to handle authentication request across the domain. Domain controllers hold the
tools Active Directory and Group Policy among others — so when you need to create new user accounts or change domain policies, this is all done from a domain controller. You can have several domain controllers within a domain but there is only one primary
or main domain controller. The primary reason for having more than one DC is fault tolerance. The critical information (user, computer account information, etc) is replicated between the DCs so if one goes down the client computers will switch to the other
DC that is still functioning. Domain controllers use a tool called Active Directory Users and Computers, commonly referred to as AD or Active Directory. This tool is used to not only manage user and computer accounts but also acts as a directory service for
resources on your network (like printers, file shares etc). When a domain user searches for a printer to install, they will find all the printers that have been added to the Domain Controller with AD. AD is a tool to manage domain users, computers, printers,
file shares, groups, and more – these are all considered AD objects. Groups contain members which can be any valid AD object (user, computer, etc.). By default, there are several groups that come with AD like Domain Admins, Domain Users, etc. All of these
AD objects are stored within folders called Organizational Units. Group Policy Management (often called GP or Group Policy) is another important tool that is located on a Domain Controller. It allows an administrator to manage all domain users or domain computers
remotely. Group Policy uses GPOs (Group Policy Objects) to manage the settings of valid AD objects. You can target specific AD objects, specific OUs, or the entire domain. Basically anything you want to create a custom setting for, you can do it with Group
Policy – You can configure the desktop backgrounds for certain users and/or computers, manage what websites they can visit (in Internet Explorer only), manage security settings or countless other settings. To recap what we have covered in this lecture; a Windows
Domain allows management of large (or small) computer networks, they use a Windows server called a “DC” or Domain Controller, a DC is any server that has the AD DS role installed, DCs respond to authentication request across the domain, DCs have the tools
AD (Active Directory) and GP (Group Policy), Active Directory contains Objects and OUs (Organizational Units) and GP contains GPOs (Group Policy Objects) and manage settings for AD objects.
Adding the Active Directory Domain Services Role
we are going to create a Domain Controller by installing the Active Directory Domain Services (AD DS) role. Remember that any server running the AD DS role is considered a domain controller. We are going to add this role to our
server and create a new domain called “itflee.com”. This is the name of my website and if you would like you can create any domain name you want. You won’t break any “real” websites since there are no internet DNS servers pointing to the domain that we are
about to create. Finally, once we add the AD DS role we will promote the server as a Domain Controller. You should already know how to install a server role on the server you are currently logged in to but I am going to cover the steps again. Open Server Manager
and select Manage > Add Roles and Features

On the Installation Type Screen leave the default option “Role-based or feature-based…” checkbox check and click next.

On the Server Selection screen choose the server we built earlier called “ITFDC01” and click next.

In the server roles list choose the “Active Directory Domain Services” role

. You will see a popup window stating you cannot install AD DS unless certain role services or features are also installed:

Click the Add Features button

and then click Next to proceed to the Features screen. We do not need any additional features as all the required features were already added. Again click Next. Now you will be brought to the AD DS screen. It tells us that we will
also need install the DNS role if we do not already have it set up.

Click Next and continue on to the Confirmation screen. Here we can see the roles and features we are about to install. Click Install and wait for the installation to finish. Once the installation is complete you will have post-deployment
configuration steps to complete as well:

Click the notification flag next to manage and choose “Promote this server to a domain controller”. The AD DS configuration wizard will appear giving us three options:

The first option, “Add a Domain Controller to an existing domain” is for adding additional domain controllers to a domain you have already created. This option is not suitable for us now because we have not created a domain yet.
The second option, “Add a new domain to an existing forest” is for adding child (also called sub) domains. Let me explain. We are going to create a domain called itflee.com. If that domain already existed we could create a sub (or child) domain called courses.itflee.com.
In theory we could setup this sub domain called courses.itflee.com simply to separate our students and teachers from the administrators who reside in the domain itflee.com.

You could configure this sub domain so that Admins from the itflee.com domain can reach into the courses.itflee.com domain, but students and teachers could not reach back to the resources in the itflee.com. Again this is not an
appropriate option for us because the itflee.com domain does not yet exists. The third option is to “Add a new forest”. This allows us to create and specify a new domain. Choose this option and specify a root domain name.

I am going to enter itflee.com and click next. It will take a second before the Domain Controller Options screen will appear to just be patient while it processes. The first two options Forest Functional Level and Domain Functional
Level specify which operating system the DC will use. You need to specify the OS you are using (in this case it is Windows Server 2016). There is a bug with the latest version of Server 2016 where the developers did not configure this screen to show the latest
version as “Server 2016” but instead show it as the “Windows Server Technical Preview” so I have to choose this options.

Make sure the Domain name System (DNS) server checkbox is checked. If you remember, when we installed the AD DS role it said that we had to install this in order for the DC to function properly. The Global Catalog option means
that the server will list all active directory objects. This is a requirement for a primary domain controller or when we are creating a new domain forest.

If you choose the Read Only Domain Controller option, then the domain controller will not be able to make changes to the domain. We will want to make changes to our domain so do not check this checkbox. Type in a DSRM password
and make sure that you either write it down or memorize it. The DSRM (Directory Services Restore Mode) password allows an administrator to take an instance of AD offline for reasons like maintenance or troubleshooting. This is not a commonly used password
but you will want to keep “just in case”. Click next to proceed on to the DNS options. On the DNS Options screen you will see a warning about the DNS delegation.

This warning means that people on the internet will not be able to resolve local DNS names on your local DNS server (names like itflee.com or ITFDC01 etc). This is fine because we don’t want people on the internet to be able to
access our server for security reasons. Click next and proceed on to the Additional Options. The NetBIOS domain name is populated for us as ITFLEE. The NetBIOS name is an abbreviation of the Fully Qualified Domain Name (FQDN) which is itflee.com. I am going
to leave this at the default of ITFLEE and click continue.

On the Paths screen we can see the default paths chosen for the folders that are required by AD DS. If you would like to choose an alternate drive you can do so by clicking the “…” button

and choosing the alternate path. I recommend that you leave them at the default setting and click next.

We are brought to the Review Options screen where we can see all of the options we have chosen so far. If you would like you can click the “View script” button

and you will be presented with a PowerShell script that you can save in order to later execute and quickly complete the wizard with the same settings we just used. Close the PowerShell script and click next. Now we are brought
to the “Prerequisites Check” window. The wizard is going to go verify that the server is ready to be promoted as a DC. This will take a few minutes before it is ready so just be patient wait for it to complete the checks. Once the checks complete at the top
you will see that all prerequisite checks have passed:

If you have errors, you can address the errors (Google is your friend) and click the rerun prerequisite checks text:

Under the view results window we can see there are various warnings. None of these are critical but it is worth reading through them. We can see that the first one is a security setting stating that anything with crypography not
compatible with Windows NT 4.0 will be blocked. This is not an issue for us because we are not using old servers or old technology. The second is in regards to our first networking adapter not having a static IP address. This is because the first adapter is
connected to our NAT adapter and will not be used for our local domain. This can be ignored. The third warning is about the DNS delegation. Again we do not care if people on the internet can resolve our DNS records within our network.

Click the install button and wait for the installation to complete and the server to reboot. This can take a good while depending on the speed of your server so you will need to be patient while it works. I am going to speed up
this video so you don’t need to sit and watch the entire installation. Once the installation completes and the server reboots, press ctrl+alt+del to log in. The first thing you will notice is the NetBIOS name of our domain precedes the user account we are
logging into (in this case, “ITFLEEAdministrator”). This is in the format of [Domain Name][Domain Username].

If we had multiple domain names we could specify a different domain name by typing the name of the domain we want to use followed by a backslash and the name of the user account you want to log into. Type in the password you used
to create the administrator account when you installed the server and log in. Under the server manager you will see the new server roles of AD DS and DNS.

That is all we have to do to get our Windows Domain and Domain Controller fully operational.
Chapter 4 – Joining a Windows 10 Workstation to Our Domain
Downloading Windows 10
Now we are going to download a Windows 10 ISO installation file from Microsoft. An ISO file is a disc image file that can emulate a CD or DVD. This file cannot be natively opened on Windows, but VirtualBox will be able to read
the ISO and get the Windows installation files from the ISO. It’s important for you to know that we are going to complete this lecture from our Host computer and not from a Virtual Machine. To download Windows 10, open your preferred web-browser on your Host
computer and navigate to google.com. In the search bar type in “Windows 10 Download Tool”. The first result with be
Microsofts software downloads page that allows us to download the Windows 10 Media Creation Tool. Click the
Download tool now button and wait for the download to complete.

Once the download is complete, launch the installer file.


Once the installation has begun, accept the license terms and on the following screen you want to select
Create installation media for another PC and click Next.

On the next screen you can leave the default settings or if you want you could customize them by unchecking the
Use the recommended options for this PC checkbox. I am going to leave them at the default setting and click
Next.

On the next screen choose the ISO file checkbox. This option allows us to download an ISO file that we can later mount to a VM and use to install Windows 10.

Click Next and choose where you want to save the new ISO file. I recommend that you change the name from
Windows.iso to Windows10.iso. We don’t want to be confused between this ISO and Windows Server ISO later on down the road.

Click Save and now we simply need to wait for the download to finish.
Installing Windows 10
Next we need to create a new VM and install Windows 10. The reason why we are doing this is so we can later join the new computer to our Windows Domain and learn how to manage a client computer from a DC. To get started, the first
thing we need to do is create a new Virtual Machine. Open VirtualBox and click on the New button.

The Create Virtual Machine window will appear. If you see the
Expert button at the bottom of the Window, go ahead and switch over to that mode.


I am going to name my VM “Windows 10 VM”. Once I input that name it automatically selects the
Type, Version and Memory Size. Make sure you check the Create a virtual hard disk
now checkbox and click Create. The Create Virtual Hard Disk window will appear. Leave the file location at the default setting. Specify the HDD size you want in gigabytes. I am going to use 80 GB. Make sure
Dynamically Allocated is checked and click Create.

Now we need to mount the Windows 10 ISO we downloaded earlier. To mount an ISO means to virtually insert the disc into the computer (or VM). Right-click on the VM and select Settings. Navigate to the
Storage tab. Select the empty disc icon and under Attributes on the right side of the window click the disc icon and select
Choose Virtual Optical Disk File…

Browse to and open the Windows 10 ISO we downloaded earlier with the Microsoft Media Creation Tool. Now you should see “Windows10.iso” in the CD icon under the
Storage Tree.

The last thing we need to do is put our VM on the Host-only network we previously created for our domain controller. Click on the
Network tab and choose Adapter 2. Check the
Enable Network Adapter checkbox and change the Attached to dropdown list from
NAT to Host-only Adapter. Make sure that the same network you’re using for your DC is listed under
Name.

Click OK to close the settings Window. We are now ready to begin the installation of Windows 10. Right-click on the VM and choose
Start > Normal Start. The VM will begin to power on an it will load the Windows installation files.

Once the initial loading is complete you will be prompted to enter your language, time settings and keyboard method. Make sure you select the correct Keyboard method as this can making using the OS nearly impossible if it is wrong.
Mine is configured correctly by default so I am just going to click Next. On the next screen click
Install now. The following screen will prompt you to enter your license key. If you have one you may enter it now otherwise click the
I don’t have a product key button at the bottom of the screen.

The next screen will ask you what version you want to install. Select the appropriate version you would like to install and click
Next.

You now need to accept the license terms and click Next. Since we do not already have an OS installed that we are upgrading, we need to choose
Custom: Install Windows only (advanced).

The next screen asks us to choose the HDD we want to install the OS on. The default options are fine so I am going to click
Next. Now the installation will begin. This will take about 20 minutes to complete so I am going to speed up this video. You can pause this lecture until your installation is complete and we will complete the installation.

Once the installation completes you will be brought to the
Get going fast screen. Click Use Express settings to continue.

On the next screen you will need to specify who owns the PC. Since we are going to join this computer to a domain you will want to select
My work or school owns it and click Next.

On the next screen we want to choose Join a local Active Directory domain and click
Next.

Now we need to create our local user account for this machine. I am going to use the username paul.hill.local and I will create a password and a hint. Click
Next. Now we need to decide if we want to use Cortana or not. I am going to choose
Not now because I don’t want the computer slowed down unnecessarily by Cortana. Now the desktop will load and we are done install Windows 10. We just need to install VirtualBox Guest Additions. On the VM window, select
Devices > Insert Guest Additions CD Image… Once the CD mounts run the installation just like you did for our Domain Controller and reboot the computer when complete.
Joining our Workstation to our Windows Domain
we are going to join our newly created Windows 10 VM to our itflee.com domain. The first thing we will need to do is manually configure our TCP/IP settings so we can communicate with our DC then we can rename the computer and join
it to our Domain. We will also switch over to our Domain Controller and see where our new computer was automatically placed in Active Directory. In order to complete this lecture, we will need our Domain Controller running so we can join our new Windows 10
VM to the domain. Open your Windows 10 VM and if you still have the “VirtualBox Guest Additions CD Image” mounted we can unmount it by selecting
Devices > Optical Drives > Remove Disk from optical drive. Now we need to log into the VM. Press right-crtl+del and type in your user credentials that you created when you installed the OS. Once you are logged in and Windows has fully loaded,
click the Start button and search for “Network”. Click Network and Sharing Center when it appears.

Select the Ethernet 2 text on the right hand side of the screen.

Choose the Properties button. Uncheck
IPv6 since we are not going to be using this internet protocol. Select
IPv4 and choose Properties.

Select the Use the following IP address checkbox and for the
IP address enter 192.168.0.50 — we could use any unused IP address ending with 2 – 254 but I am going to use .50. Press the tab key and the
Subnet mask will be automatically populated as 255.255.255.0 which is correct. Now under the Default gateway enter 192.168.0.1 which is the same address as the host only network we created in VirtualBox. For the
Preferred DNS server we want to enter the IP of our DC which is 192.168.0.10.

Click OK and close out of the
IPv4 Properties and Ethernet 2 Status windows. Now we want to verify that we can communicate with our DC by attempting to ping it. A ping command sends a message to a target computer and asks for a response. If we get a response, we
know that we can communicate with the target computer. To ping a computer we need to open Command Prompt. Press the start button and type “CMD” in the search box. You will see Command Prompt show up in the results.

Start Command Prompt and enter the command ping “192.168.0.10”.

We can see that we are getting responses back from our DC. Now that we know we are able to communicate with the DC we need to rename this computer and join it to our Windows Domain. Press the Windows button again and search for
“System”. Click the Control Panel System that appears in the search results.

You will see a section called “Computer name, domain, and workgroup settings”. Click the
Change settings text to the right of this.

The System Properties window will appear. Click the
Change… button in the middle of the screen. Enter a computer name. I am going to use “ITFWS001” for ITFLEE WORKSTATION 001. Check the
Domain checkbox and enter the name of the domain you want to join. In my case it is “itflee.com��

Click OK. Now we will be prompted to enter our domain administrative credentials so we can join this computer to the domain. We can use the “Administrator” account we used to create our Domain Controller. Enter
the username “Administrator” and the password you used when creating your domain controller VM.

Click OK. In a moment you will see the “Welcome to the itflee.com domain” message appear. Click
OK and you will then be notified that you must restart the computer. Click
OK and Close the computer settings window. Now you will be asked to reboot your computer. Click
Restart Now and wait for your computer to reboot.

Now while the computer is rebooting let’s switch over to our Domain Controller. If you are in full screen mode on the Windows 10 VM press right-crtl+F to exit full screen mode and switch over to our Domain Controller. Log in to
your DC and once Windows fully loads open Server Manager and select Tools > Active Directory Users and Computers. Navigate to itflee.com > Computers. Notice we can see our new workstation has been added to built-in OU called Computers.

Now our Windows 10 workstation is on the same network as our Domain Controller and we have successfully joined it to the Windows Domain that we created earlier. We can now practice managing the workstation from our Domain Controller
using Active Directory and Group Policy. Spend some time experimenting (change the desktop background with group policy, edit security settings etc…).
Credits
Originally posted at
https://www.itflee.com
Hello Dev, welcome to this comprehensive guide on Windows Server 2016 Cloud Hosting. As you know, cloud hosting is becoming increasingly popular due to its scalability, reliability, and cost-effectiveness. In this article, we will explore everything you need to know about hosting your applications on Windows Server 2016 in the cloud. Let’s get started!
What is Windows Server 2016 Cloud Hosting?
Windows Server 2016 Cloud Hosting is the hosting of applications and services on a cloud-based infrastructure that is built on the Windows Server 2016 operating system. This allows you to take advantage of the scalability, flexibility, and cost-effectiveness of cloud-based hosting while leveraging the power of the Windows Server 2016 operating system.
With Windows Server 2016 Cloud Hosting, you can deploy your applications and services quickly and easily, without having to worry about managing the underlying infrastructure. This allows you to focus on what matters most: developing and delivering great software.
Benefits of Windows Server 2016 Cloud Hosting
There are many benefits to hosting your applications and services on Windows Server 2016 in the cloud. Here are just a few:
|
Benefit |
Description |
|---|---|
|
Scalability |
Cloud hosting allows you to scale your infrastructure up or down as needed, ensuring that you have the resources you need when you need them. |
|
Reliability |
Cloud hosting providers typically offer highly available infrastructure, ensuring that your applications and services are always accessible. |
|
Cost-effectiveness |
Cloud hosting allows you to pay only for the resources you need, making it a cost-effective solution for hosting your applications and services. |
|
Flexibility |
With cloud hosting, you can easily deploy your applications and services to multiple regions around the world, ensuring that your users have the best possible experience. |
Getting Started with Windows Server 2016 Cloud Hosting
If you’re ready to get started with Windows Server 2016 Cloud Hosting, there are a few things you need to know. Here are some steps to guide you through the process:
Step 1: Choose a Cloud Hosting Provider
The first step in hosting your applications on Windows Server 2016 in the cloud is to choose a cloud hosting provider. There are many cloud hosting providers to choose from, each with its own strengths and weaknesses.
When choosing a cloud hosting provider, you should consider factors such as pricing, availability, support, and scalability. Some popular cloud hosting providers include Microsoft Azure, Amazon Web Services, and Google Cloud Platform.
Step 2: Create a Windows Server 2016 Virtual Machine
Once you have chosen a cloud hosting provider, the next step is to create a Windows Server 2016 virtual machine. A virtual machine is a software emulation of a physical machine, and it allows you to run Windows Server 2016 in the cloud.
To create a Windows Server 2016 virtual machine, you will need to log in to your cloud hosting provider’s dashboard and follow the instructions provided. This typically involves selecting the operating system, choosing the size of the virtual machine, and specifying any additional configuration settings.
Step 3: Configure Your Virtual Machine
Once you have created your Windows Server 2016 virtual machine, the next step is to configure it. This involves setting up things like networking, storage, and security.
When configuring your virtual machine, you should consider factors such as performance, reliability, and security. Some best practices for configuring your virtual machine include:
- Use an appropriate virtual machine size for your workload
- Use multiple disks for data storage
- Enable automatic updates and backups
- Enable security features such as firewalls and antivirus software
Step 4: Deploy Your Applications and Services
Once your virtual machine is configured, the final step is to deploy your applications and services. This involves installing any necessary software and configuring your application settings.
When deploying your applications and services, you should consider factors such as performance, scalability, and availability. Some best practices for deploying your applications and services include:
- Use load balancers to distribute traffic across multiple virtual machines
- Use auto-scaling to automatically scale your infrastructure as needed
- Use high availability features such as fault tolerance and disaster recovery
- Monitor your infrastructure for performance and reliability
Frequently Asked Questions (FAQ)
What is the difference between Windows Server 2016 and Windows Server 2019?
Windows Server 2016 and Windows Server 2019 are both operating systems designed for servers. The main difference between the two is that Windows Server 2016 was released in 2016, while Windows Server 2019 was released in 2019.
Some of the key differences between the two operating systems include:
|
Feature |
Windows Server 2016 |
Windows Server 2019 |
|---|---|---|
|
Virtualization |
Hyper-V version 2016 |
Hyper-V version 2019 with improved support for Kubernetes and Linux containers |
|
Security |
Windows Defender Advanced Threat Protection |
Windows Defender Advanced Threat Protection with improved support for virtual machines and containers |
|
Networking |
Software-defined networking with Windows Server 2016 |
Improved support for software-defined networking with Windows Server 2019 |
|
Containers |
Support for Docker containers in Windows Server 2016 |
Improved support for Kubernetes and Linux containers in Windows Server 2019 |
What are some best practices for securing a Windows Server 2016 virtual machine?
Securing a Windows Server 2016 virtual machine is an essential part of hosting your applications and services in the cloud. Here are some best practices for securing your virtual machine:
- Enable Windows Defender Antivirus
- Use the Windows Firewall
- Disable unnecessary services and features
- Use strong passwords for all user accounts
- Enable multi-factor authentication
- Encrypt all data in transit and at rest
- Regularly apply security updates
How can I monitor the performance of my Windows Server 2016 virtual machine?
Monitoring the performance of your Windows Server 2016 virtual machine is an important part of ensuring that your applications and services are running smoothly. Here are some tools and techniques you can use to monitor your virtual machine:
- Use the Windows Performance Monitor tool to monitor CPU, memory, and disk usage
- Use the Windows Event Viewer to monitor system events and errors
- Use third-party monitoring tools such as SolarWinds or Nagios
- Set up alerts and notifications to be notified of any performance issues
Conclusion
Windows Server 2016 Cloud Hosting is a powerful and cost-effective way to host your applications and services in the cloud. By leveraging the scalability, reliability, and flexibility of cloud-based hosting, you can easily deploy your applications and services to users around the world. With the best practices and tips outlined in this article, you should be well-equipped to get started with Windows Server 2016 Cloud Hosting. Good luck!