Resources
- CUDA Documentation/Release Notes
- MacOS Tools
- Training
- Sample Code
- Forums
- Archive of Previous CUDA Releases
- FAQ
- Open Source Packages
- Submit a Bug
- Tarball and Zip Archive Deliverables
ПРОГРАММИРОВАНИЕ:
Как установить драйвер NVIDIA CUDA, CUDA Toolkit, CuDNN и TensorRT в Windows
Хорошие и простые руководства с пошаговыми инструкциями

Резюме:
В этой статье устанавливаются драйверы и программы, необходимые для использования графических процессоров NVIDIA для обучения моделей и выполнения пакетных выводов. Он загружает и устанавливает драйверы CUDA, CUDA Toolkits и обновления CUDA Toolkit. Он загружает, распаковывает и перемещает файлы CuDNN и TensorRT в каталог CUDA. Он также настраивает, создает и запускает образец BlackScholes для тестирования графического процессора.
Оглавление:
- Установить требования
- Установить драйвер CUDA
- Установить CUDA Toolkit 10
- Установить CUDA Toolkit 11
- Установить библиотеку CuDNN
- Установить библиотеку TensorRT
- Протестируйте GPU на образце CUDA
Приложение:
- Учебники: настройка искусственного интеллекта
- Учебники: курс искусственного интеллекта
- Учебники: репозитории искусственного интеллекта
Установите требования:
В этом разделе загружается и устанавливается Visual Studio с поддержкой C и C ++.
# open the powershell shell
1. press “⊞ windows”
2. enter “powershell” into the search bar
3. right-click "windows powershell"
4. click “run as administrator”
# download the visual studio 2019 installer
invoke-webrequest -outfile "$home\downloads\vsc.exe" -uri https://download.visualstudio.microsoft.com/download/pr/45dfa82b-c1f8-4c27-a5a0-1fa7a864ae21/9dd77a8d1121fd4382494e40840faeba0d7339a594a1603f0573d0013b0f0fa5/vs_Community.exe
# open the visual studio 2019 installer
invoke-item "$home\downloads\vsc.exe"
# install visual studio 2019
1. check “desktop development with c++”
2. click "install"
Установите драйвер CUDA:
В этом разделе загружается и устанавливается последняя версия драйвера CUDA на тот момент.
# download the cuda driver installer
invoke-webrequest -outfile "$home\downloads\cuda_driver.exe" -uri https://us.download.nvidia.com/Windows/471.68/471.68-desktop-win10-win11-64bit-international-nsd-dch-whql.exe
# open the cuda driver installer
invoke-item "$home\downloads\cuda_driver.exe"
# install the cuda driver
1. select “nvidia graphics driver”
2. click "agree & continue"
3. click "next"
Установите CUDA Toolkit 10:
В этом разделе загружается и устанавливается CUDA Toolkit 10 и обновления.
# download the cuda toolkit 10 installer
invoke-webrequest -outfile "$home\downloads\cuda_toolkit_10.exe" https://developer.download.nvidia.com/compute/cuda/10.2/Prod/network_installers/cuda_10.2.89_win10_network.exe
# open the cuda toolkit 10 installer
invoke-item "$home\downloads\cuda_toolkit_10.exe"
# install cuda toolkit 10
1. click "agree & continue"
2. click "next"
3. select custom (advanced)
4. click "next"
5. uncheck “nvidia geforce experience components”
6. uncheck “driver components”
7. uncheck “other components”
8. click "next"
# download the cuda 10 update 1installer
invoke-webrequest -outfile "$home\downloads\cuda_10_update_1.exe" https://developer.download.nvidia.com/compute/cuda/10.2/Prod/patches/1/cuda_10.2.1_win10.exe
# open the cuda 10 update 1 installer
invoke-item "$home\downloads\cuda_10_update_1.exe"
# install the cuda 10 update 1
1. click "agree & continue"
2. click "next"
# download the cuda 10 update 2 installer
invoke-webrequest -outfile "$home\downloads\cuda_10_update_2.exe" https://developer.download.nvidia.com/compute/cuda/10.2/Prod/patches/2/cuda_10.2.2_win10.exe
# open the cuda 10 update 2 installer
invoke-item "$home\downloads\cuda_10_update_2.exe"
# install the cuda 10 update 2
1. click "agree & continue"
2. click "next"
Установите CUDA Toolkit 11:
В этом разделе загружается и устанавливается CUDA Toolkit 11.
# download the cuda toolkit 11 installer
invoke-webrequest -outfile "$home\downloads\cuda_toolkit_11.exe" https://developer.download.nvidia.com/compute/cuda/11.4.1/network_installers/cuda_11.4.1_win10_network.exe
# open the cuda toolkit 11 installer
invoke-item "$home\downloads\cuda_toolkit_11.exe"
# install cuda toolkit 11
1. click "agree & continue"
2. click "next"
3. select custom (advanced)
4. click "next"
5. uncheck “nvidia geforce experience components”
6. uncheck “driver components”
7. uncheck “other components”
8. click "next"
Установите библиотеку CuDNN:
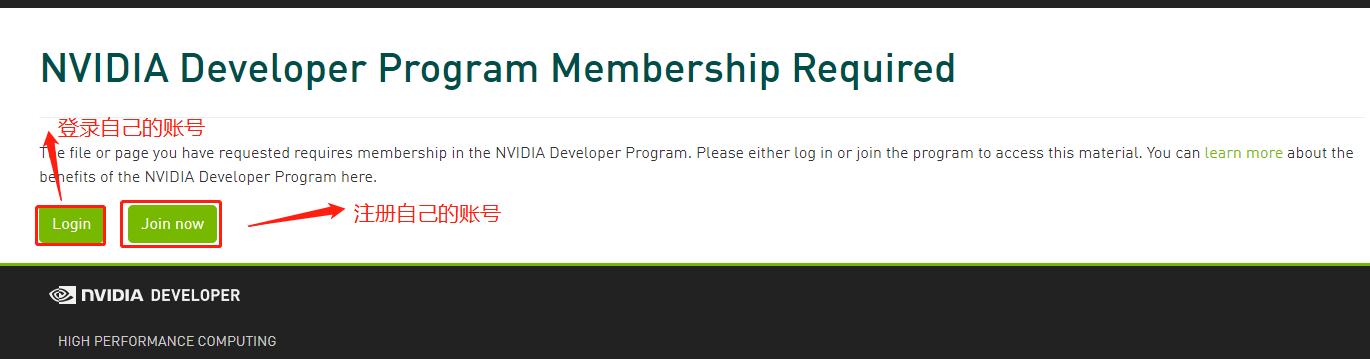
Этот раздел присоединяется к Программе разработчика NVIDIA и загружает библиотеку CuDNN, распаковывает и перемещает файлы в каталог CUDA.
# join the nvidia developer program
start-process iexplore "https://developer.nvidia.com/developer-program"
# download the cudnn library for cuda toolkit 10
start-process iexplore https://developer.nvidia.com/compute/machine-learning/cudnn/secure/8.2.2/10.2_07062021/cudnn-10.2-windows10-x64-v8.2.2.26.zip
# unzip the cudnn library for cuda toolkit 10
expand-archive "$home\downloads\cudnn-10.2-windows10-x64-v8.2.2.26.zip" -destinationpath "$home\downloads\cudnn_cuda_toolkit_10\"
# move the dll files
move-item "$home\downloads\cudnn_cuda_toolkit_10\cuda\bin\cudnn*.dll" "c:\program files\nvidia gpu computing toolkit\cuda\v10.2\bin\"
# move the h files
move-item "$home\downloads\cudnn_cuda_toolkit_10\cuda\include\cudnn*.h" "c:\program files\nvidia gpu computing toolkit\cuda\v10.2\include\"
# move the lib files
move-item "$home\downloads\cudnn_cuda_toolkit_10\cuda\lib\x64\cudnn*.lib" "c:\program files\nvidia gpu computing toolkit\cuda\v10.2\lib\x64"
# download the cudnn library for cuda toolkit 11
start-process iexplore https://developer.nvidia.com/compute/machine-learning/cudnn/secure/8.2.2/11.4_07062021/cudnn-11.4-windows-x64-v8.2.2.26.zip
# unzip the cudnn library for cuda toolkit 11
expand-archive "$home\downloads\cudnn-11.4-windows-x64-v8.2.2.26.zip" -destinationpath "$home\downloads\cudnn_cuda_toolkit_11\"
# move the dll files
move-item "$home\downloads\cudnn_cuda_toolkit_11\cuda\bin\cudnn*.dll" "c:\program files\nvidia gpu computing toolkit\cuda\v11.4\bin\"
# move the h files
move-item "$home\downloads\cudnn_cuda_toolkit_11\cuda\include\cudnn*.h" "c:\program files\nvidia gpu computing toolkit\cuda\v11.4\include\"
# move the lib files
move-item "$home\downloads\cudnn_cuda_toolkit_11\cuda\lib\x64\cudnn*.lib" "c:\program files\nvidia gpu computing toolkit\cuda\v11.4\lib\x64"
Установите библиотеку TensorRT:
Этот раздел загружает библиотеку TensorRT, распаковывает и перемещает файлы в каталог CUDA и устанавливает несколько необходимых программ на Python.
# downloadthe tensorrt library for cuda toolkit 10 start-process iexplore https://developer.nvidia.com/compute/machine-learning/tensorrt/secure/8.0.1/zip/tensorrt-8.0.1.6.windows10.x86_64.cuda-10.2.cudnn8.2.zip # unzip the tensorrt library for cuda 10 expand-archive "$home\downloads\tensorrt-8.0.1.6.windows10.x86_64.cuda-10.2.cudnn8.2.zip" "$home\downloads\tensorrt_cuda_toolkit_10\" # move the dll files move-item "$home\downloads\tensorrt_cuda_toolkit_10\tensorrt-8.0.1.6\lib\*.dll" "c:\program files\nvidia gpu computing toolkit\cuda\v10.2\bin\"# downloadthe tensorrt library for cuda toolkit 11 start-process iexplore https://developer.nvidia.com/compute/machine-learning/tensorrt/secure/8.0.1/zip/tensorrt-8.0.1.6.windows10.x86_64.cuda-11.3.cudnn8.2.zip # unzip the tensorrt library for cuda 11 expand-archive "$home\downloads\tensorrt-8.0.1.6.windows10.x86_64.cuda-11.3.cudnn8.2.zip" "$home\downloads\tensorrt_cuda_toolkit_11\" # move the dll files move-item "$home\downloads\tensorrt_cuda_toolkit_11\tensorrt-8.0.1.6\lib\*.dll" "c:\program files\nvidia gpu computing toolkit\cuda\v11.4\bin\" # install graph surgeon python -m pip install "$home\downloads\tensorrt_cuda_toolkit_11\tensorrt-8.0.1.6\graphsurgeon\graphsurgeon-0.4.5-py2.py3-none-any.whl" # install onnx graph surgeon python -m pip install "$home\downloads\tensorrt_cuda_toolkit_11\tensorrt-8.0.1.6\onnx_graphsurgeon\onnx_graphsurgeon-0.3.10-py2.py3-none-any.whl" # install universal framework format python -m pip install "$home\downloads\tensorrt_cuda_toolkit_11\tensorrt-8.0.1.6\uff\uff-0.6.9-py2.py3-none-any.whl"
Протестируйте графический процессор на примере CUDA:
В этом разделе настраивается, строится и запускается образец BlackScholes.
# open the visual studio file
start-process "c:\programdata\nvidia corporation\cuda samples\v11.4\4_finance\blackscholes\blackscholes_vs2019.sln"
# edit the linker input properties
1. click the "project" menu
2. click "properties"
3. double-click "linker"
4. click "input"
5. click "additional dependencies"
6. click the "down arrow" button
7. click "edit"
# add the cudnn library
1. type "cudnn.lib" at the bottom of the additional dependencies
2. click "ok"
# add the cuda toolkit 11 directory
1. click "cuda c/c++"
2. double-click "cuda toolkit custom dir"
3. enter "c:\program files\nvidia gpu computing toolkit\cuda\v11.4"
4. click "ok"
# build the sample
1. click the “build” menu
2. click “build solution”
# run the sample
cmd /k "c:\programdata\nvidia corporation\cuda samples\v11.4\bin\win64\debug\blackscholes.exe"
«Наконец, не забудьте подписаться и удерживать кнопку хлопка, чтобы получать регулярные обновления и помощь».
Приложение:
Этот блог существует, чтобы предоставить комплексные решения, ответить на ваши вопросы и ускорить ваш прогресс в области искусственного интеллекта. В нем есть все необходимое, чтобы настроить компьютер и пройти первую половину курса fastai. Он откроет вам самые современные репозитории в подполях искусственного интеллекта. Он также будет охватывать вторую половину курса фастая.
Учебники: настройка искусственного интеллекта
В этом разделе есть все, что нужно для настройки вашего компьютера.
# linux
01. install and manage multiple python versions
02. install the nvidia cuda driver, toolkit, cudnn, and tensorrt
03. install the jupyter notebook server
04. install virtual environments in jupyter notebook
05. install the python environment for ai and machine learning
06. install the fastai course requirements
# wsl 2
01. install windows subsystem for linux 2
02. install and manage multiple python versions
03. install the nvidia cuda driver, toolkit, cudnn, and tensorrt
04. install the jupyter notebook home and public server
05. install virtual environments in jupyter notebook
06. install the python environment for ai and machine learning
07. install ubuntu desktop with a graphical user interface
08. install the fastai course requirements
# windows 10
01. install and manage multiple python versions
02. install the nvidia cuda driver, toolkit, cudnn, and tensorrt
03. install the jupyter notebook home and public server
04. install virtual environments in jupyter notebook
05. install the programming environment for ai and machine learning
# mac
01. install and manage multiple python versions
02. install the jupyter notebook server
03. install virtual environments in jupyter notebook
04. install the python environment for ai and machine learning
05. install the fastai course requirements
Учебники: курс искусственного интеллекта
Этот раздел содержит ответы на анкету в конце каждого урока.
# fastai course
01. chapter 1: your deep learning journey q&a
02. chapter 2: from model to production q&a
03. chapter 3: data ethics q&a
04. chapter 4: under the hood: training a digit classifier q&a
05. chapter 5: image classification q&a
06. chapter 6: other computer vision problems q&a
07. chapter 7: training a state-of-the-art model q&a
08. chapter 8: collaborative filtering deep dive q&a
Учебники: репозитории искусственного интеллекта
Этот раздел содержит современные репозитории в различных подполях.
# repositories related to audio
01. raise audio quality using nu-wave
02. change voices using maskcyclegan-vc
03. clone voices using real-time-voice-cloning toolbox
# repositories related to images
01. achieve 90% accuracy using facedetection-dsfd
Nvidia Cuda Driver is essential software to communicate your CUDA-enabled GPU (Graphics Card) and Operating System installed in your computer. If you are looking for driver for CUDA-enabled GPU, then you are in right place. Here, we are going to discuss about Nvidia CUDA, and how to download and install its driver in your machine.
What is Nvidia CUDA?
CUDA stands for ‘Compute Unified Device Architecture’. It is parallel computing platform and application programming interface (API) model designed & developed by Nvidia Company. It offers software developers and software engineers to use a CUDA-enabled GPU for general purpose processing.
CUDA platform offers developers direct access to GPU’s Virtual computer architecture and parallel computational components to run computer kernels. This platform is designed to work with some programming language including C, C++ and FORTRAN. Nvidia CUDA powered GPUs also supports programming framework like OpenACC and OpenCL and HIP by compiling (translating) such code to CUDA.
Nvidia CUDA-Enabled GPUs can run thousands of Computing Threads
CUDA-enabled GPUs (Graphics Processing Units) have hundreds of cores that can execute thousands of computing tasks or threads simultaneously. These cores have shared resources such as a register file and shared memory which offers parallel tasks executing on these cores to transfer data without transmitting it over System memory bus.
System Requirements for Nvidia CUDA
If you want to use Nvidia CUDA on your Windows device, then you should make sure that you have CUDA-capable GPU, a supported version of Microsoft Windows, a supported version of Microsoft Visual Studio and Nvidia CUDA Toolkit all are installed properly.
CUDA Toolkit installer package includes Nvidia Cuda Driver which support the application development for all CUDA-capable GPUs supported by CUDA Toolkit. For example, if you are deploying applications Nvidia Tesla products in a server or cluster environment, you should make sure latest Tesla driver is installed in your device.
Installer package include the CUDA Toolkit, CUDA samples, CUDA Tools such as Nsight Visual Studio Edition for windows, and Nsight Eclipse Edition for Linux and MacOS and developers drivers. The installer package will also give an option to install the included driver. If you select the option to install Nvidia Cuda Driver, this replaces the driver with currently installed driver in your computer.
How to download and install Nvidia Cuda Driver on Windows 10?
CUDA Drivers are included in Nvidia CUDA Toolkit so you need to download and install Nvidia CUDA Toolkit, and Nvidia drivers will automatically installed with this installer.
Step 1: At first, you need to visit ‘Nvidia CUDA Downloads Page’ (Official)
Step 2: Depending Operating System version and architecture, download the latest CUDA Toolkit in your computer like ‘CUDA Toolkit 11.2’
Step 3: Double-click on ‘Setup file’ or ‘Downloaded file’ and follow on-screen instructions to finish installation. This way, the driver and toolkit will be installed in your computer for CUDA to function.
Step 4: Once done, reboot your device to see the changes.
How to Download or Reinstall Nvidia Cuda Driver on Windows 10 using ‘Windows Update’?
The installation of Nvidia CUDA Toolkit and CUDA driver may fails if Windows update starts after the installation has begun. Wait to complete Windows Update process and try installation again using above method. Or you can get the Nvidia Cuda Driver update using ‘Windows Update’.
Step 1: Press ‘Windows + I’ keys together from keyboard to open ‘Settings’ App
Step 2: In the opened ‘Settings’ App, go to ‘Update & Security > Windows Update’
Step 3: Click on ‘Check for updates’ button under ‘Windows update’ section. This way, you can download the latest Nvidia Cuda Driver or CUDA Driver update in your computer.
Step 4: Once done, restart your computer to see the changes.
Conclusion
I am sure this post helped you on How to download and install Nvidia Cuda Driver update, CUDA Toolkit in your computer. You can read & follow our instructions to do so. If this post really helped you, then you can share this post with others to help them.
Nvidia.CUDA, Release version: 12.1
Command Line
Download Links For Version 12.1
Download Links For Version 12.0.1
Download Links For Version 11.8
Download Links For Version 11.7
Download Links For Version 11.6
Download Links For Version 11.5
Download Links For Version 11.3
Info
last updated 4/23/2023 5:12:46 AM
Publisher:
License:
Dependencies
No dependency information
Share
1. Драйвер видеокарты
Установите драйвер nvidia заранее, Windows обычно устанавливает драйвер nvidia автоматически
Вы можете перейти на официальный сайт, чтобы скачать драйвер без установки драйвера.
https://www.geforce.cn/drivers
Выберите собственный драйвер видеокарты и установите его по умолчанию.
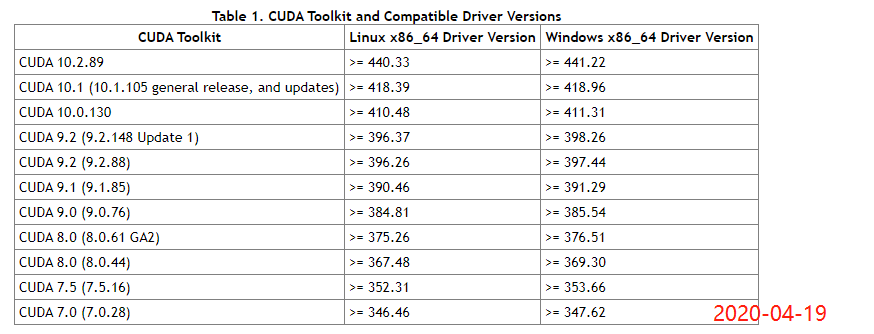
Перед загрузкой проверьте взаимосвязь между драйвером видеокарты и номером версии cuda, как показано на рисунке ниже, а затем выполните выборочную установку.
https://docs.nvidia.com/cuda/cuda-toolkit-release-notes/index.html
Номер версии драйвера nvidia: nvidia-smi для просмотра, как показано в красном поле на следующем рисунке:
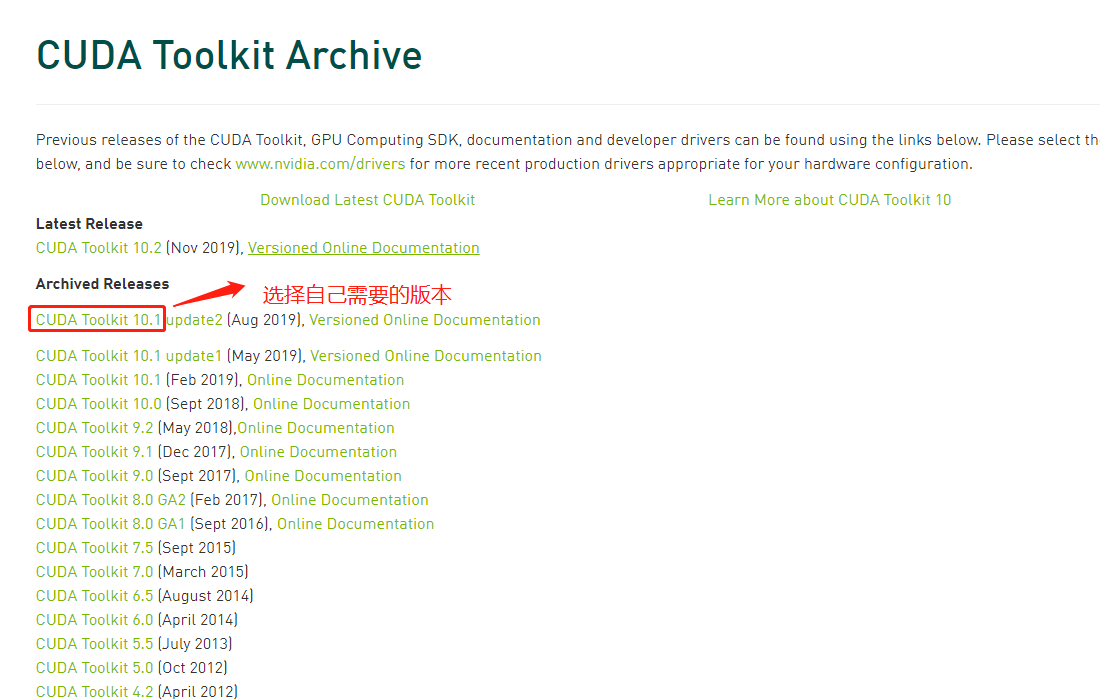
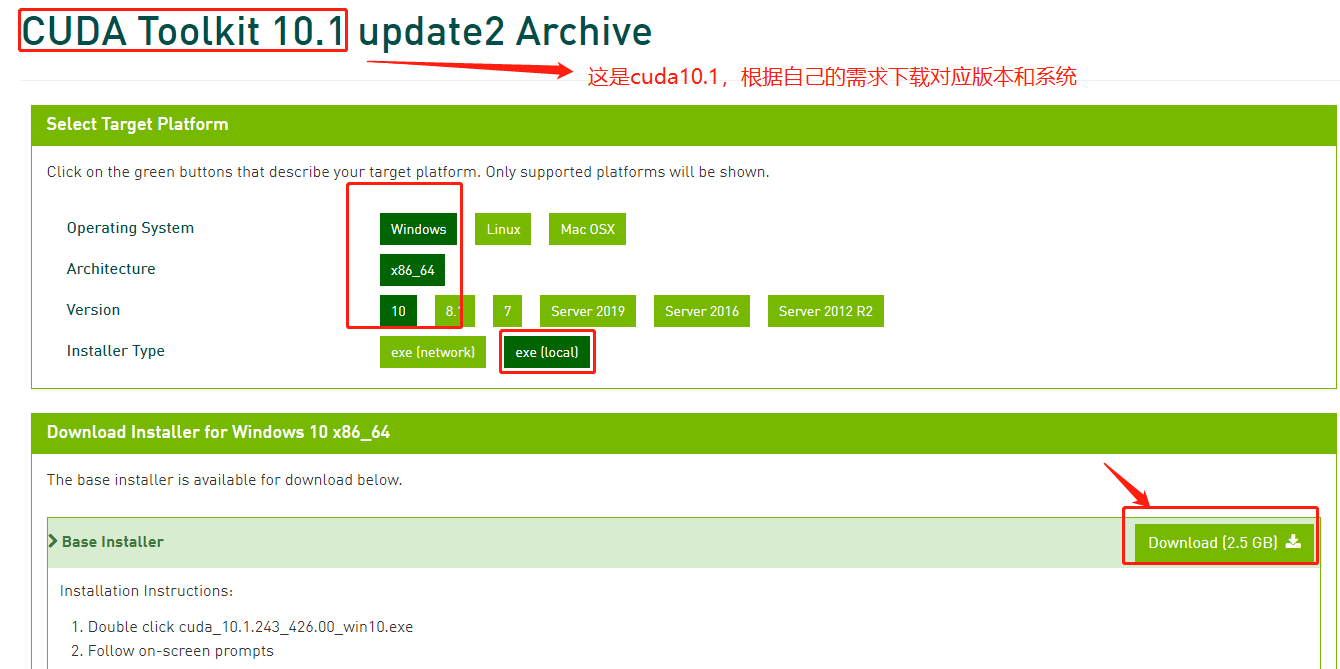
cuda скачатьhttps://developer.nvidia.com/cuda-toolkit-archive:
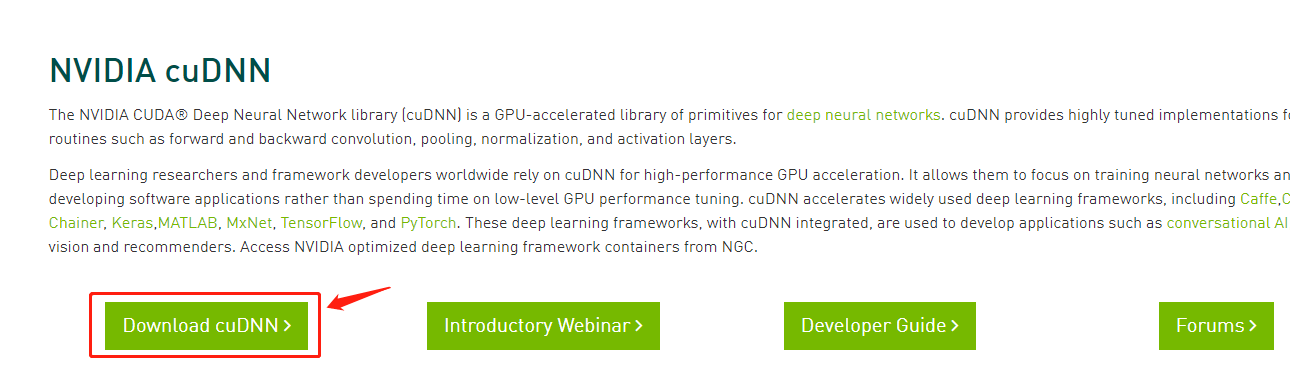
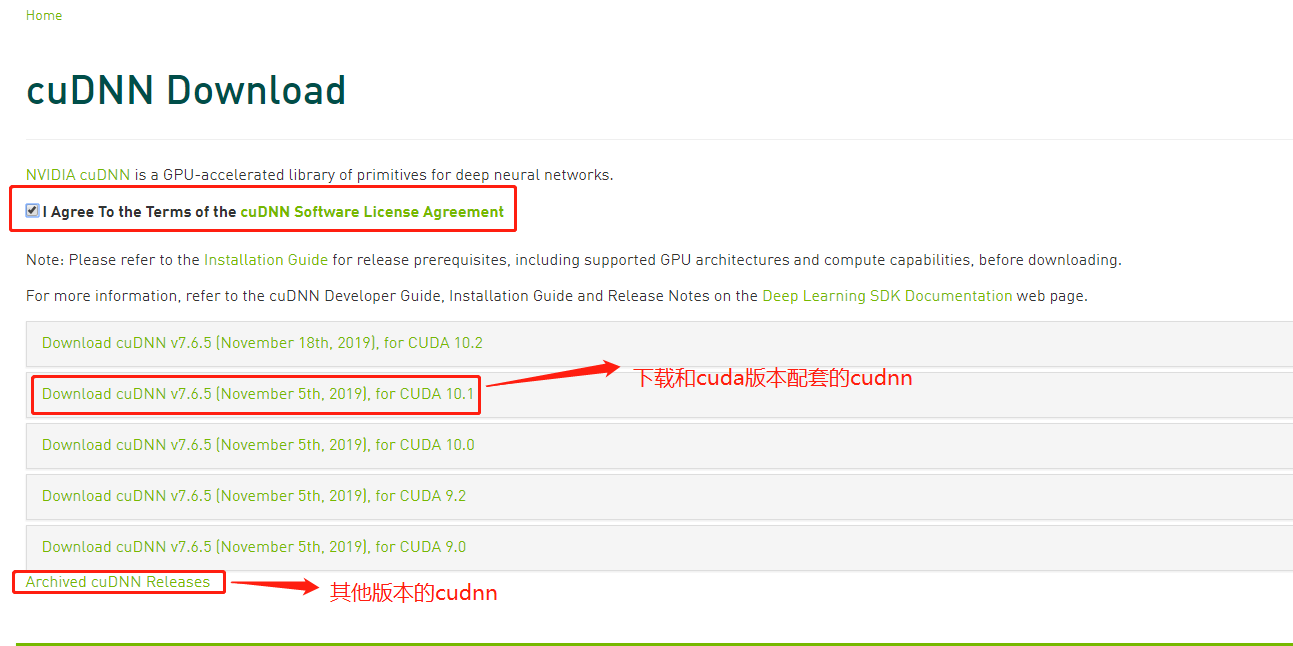
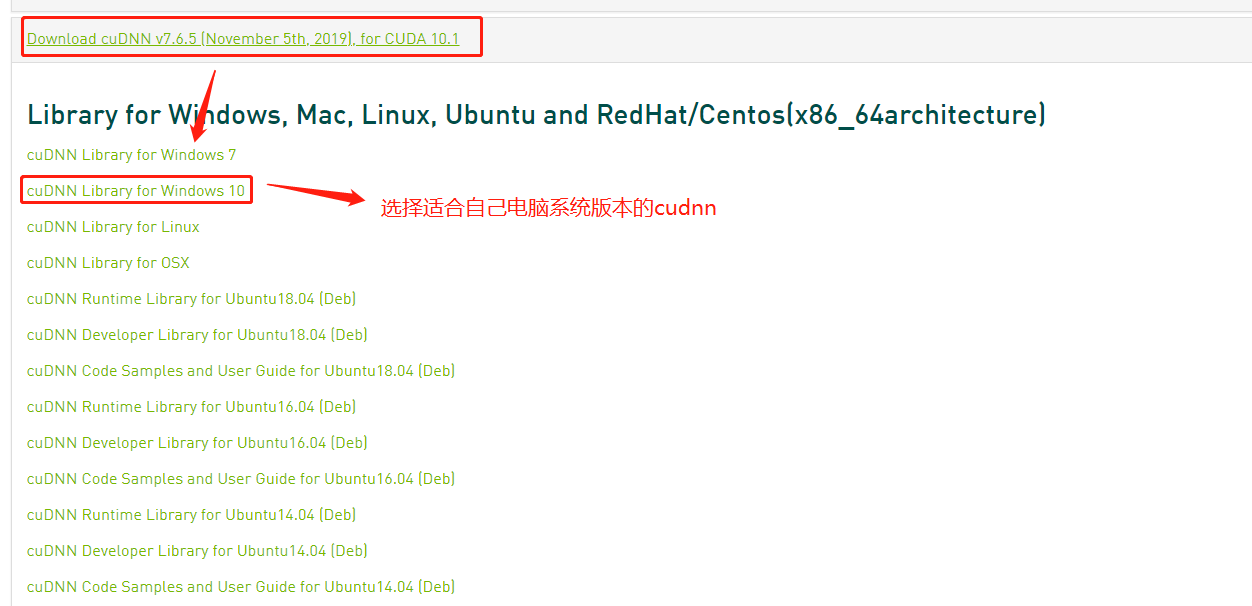
cudnn скачать
cudnn ссылка:https://developer.nvidia.com/cudnn

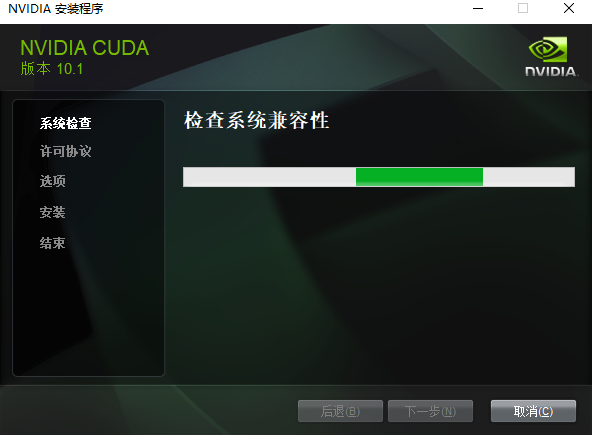
Два, установите cuda
На компьютере установлен графический драйвер nvidia
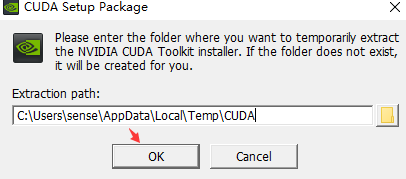
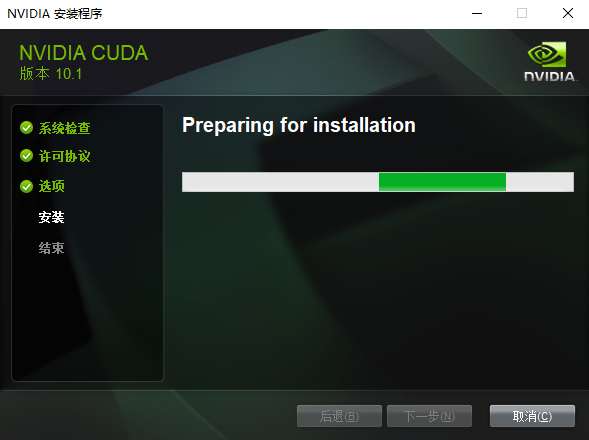
Установите программное обеспечение cuda, если я установил vs2017. Компилятор Visual Studio C ++ устанавливать не обязательно.
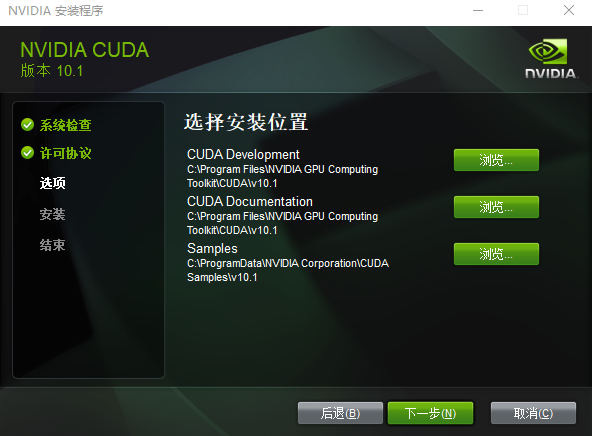
Путь установки по умолчанию, постарайтесь не менять способ поиска пути позже
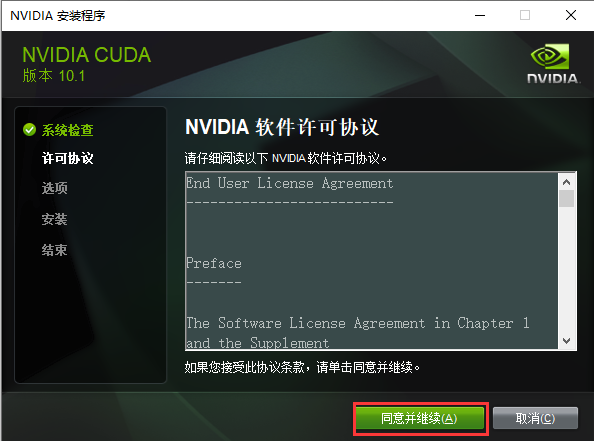
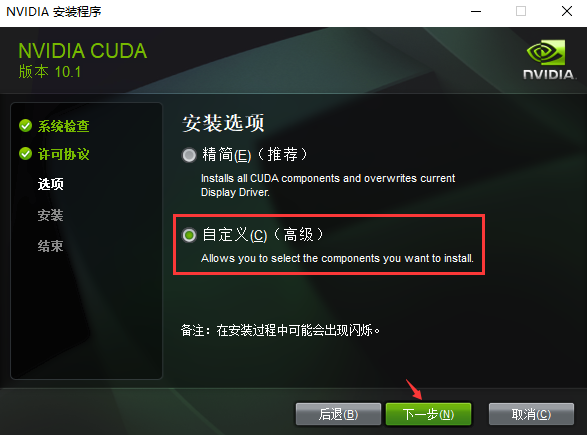
Установите программное обеспечение компилятора vs c ++ напрямую следующим образом
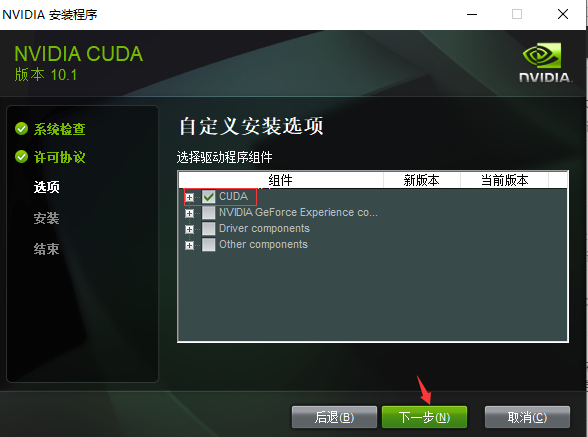
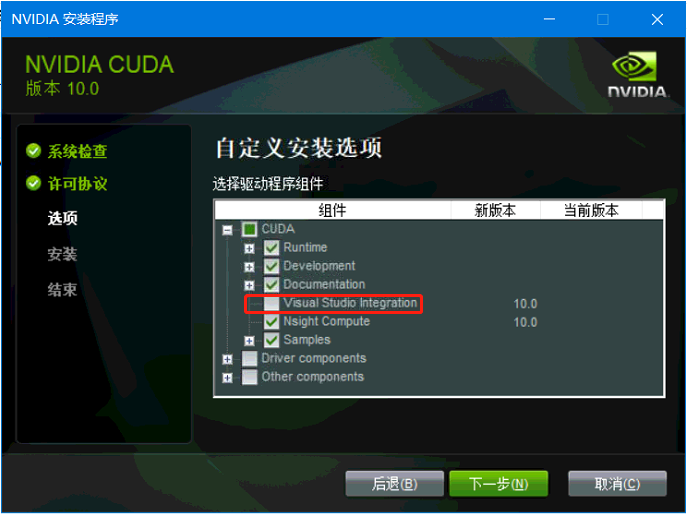
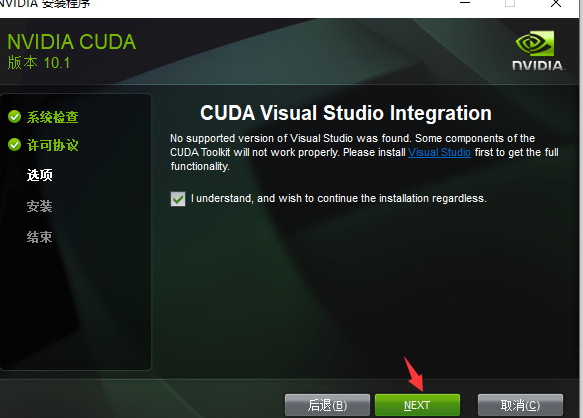
Если программное обеспечение для компиляции vs c ++ не установлено, необходимо отключить интеграцию с Visual Studio, как показано на рисунке ниже.
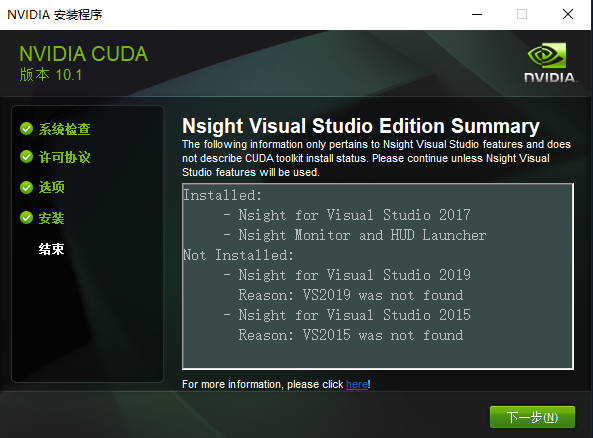
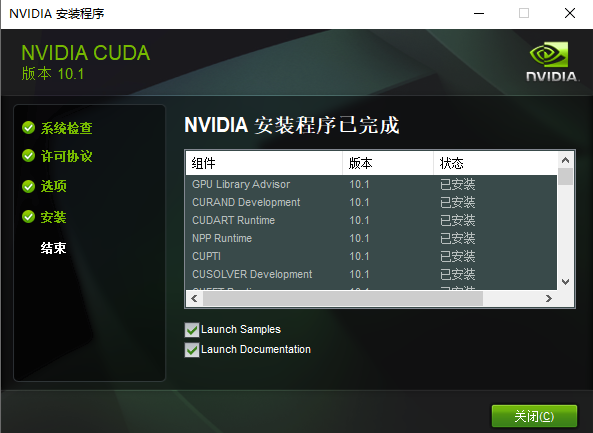
Тестовая установка прошла успешно

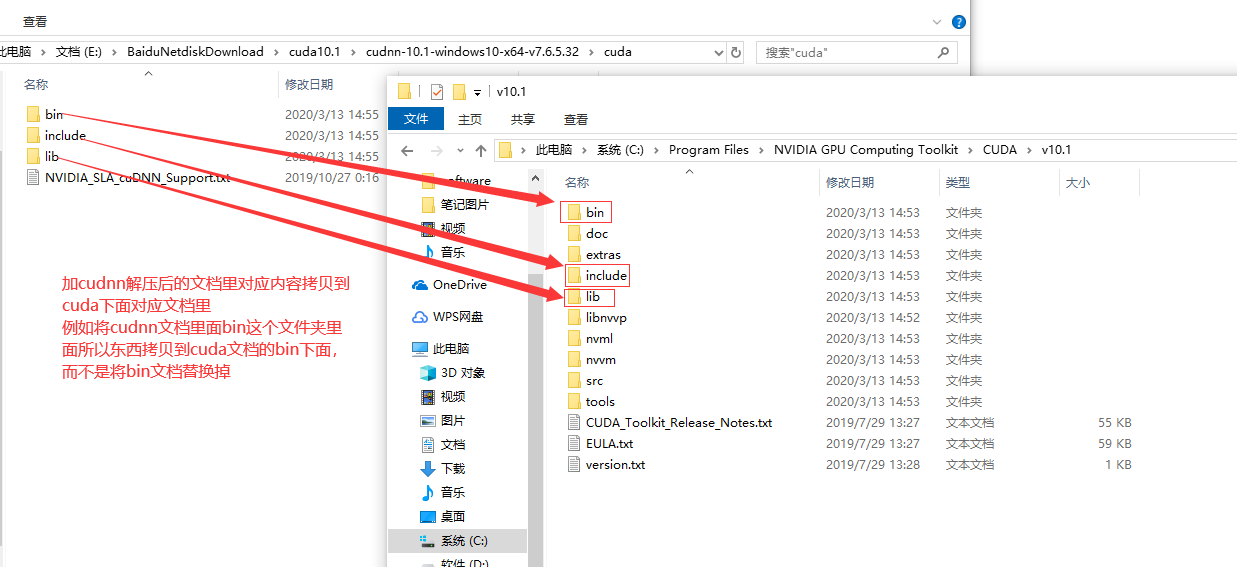
Три, установите cudnn
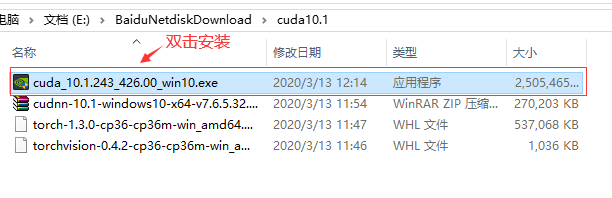
Разархивируйте cudnn-10.1-windows10-x64-v7.6.5.32.zip
Путь установки cuda по умолчанию
C:\Program Files\NVIDIA GPU Computing Toolkit\CUDA\v10.1
В-четвертых, добавьте cuda в системную среду
Затем установите переменные среды:
Щелкните правой кнопкой мыши компьютер и откройте Свойства -> Дополнительные параметры системы -> Переменные среды. Вы можете увидеть, что в системе есть еще две переменные среды CUDA_PATH и CUDA_PATH_V10_1. Затем добавьте в систему следующие переменные среды:
 CUDA_SDK_PATH = C: \ ProgramData \ NVIDIA Corporation \ CUDA Samples \ v10.1 (это путь к месту установки по умолчанию)
CUDA_LIB_PATH = %CUDA_PATH%\lib\x64
CUDA_BIN_PATH = %CUDA_PATH%\bin
CUDA_SDK_BIN_PATH = %CUDA_SDK_PATH%\bin\win64
CUDA_SDK_LIB_PATH = %CUDA_SDK_PATH%\common\lib\x64
тогда:
Добавьте в конце системной переменной PATH:
%CUDA_LIB_PATH%;%CUDA_BIN_PATH%;%CUDA_SDK_LIB_PATH%;%CUDA_SDK_BIN_PATH%;
 Добавьте еще 4 следующие (путь установки по умолчанию):
C:\Program Files\NVIDIA GPU Computing Toolkit\CUDA\v10.1\lib\x64;
C:\Program Files\NVIDIA GPU Computing Toolkit\CUDA\v10.1\bin
C:\ProgramData\NVIDIA Corporation\CUDA Samples\v10.1\common\lib\x64;
C:\ProgramData\NVIDIA Corporation\CUDA Samples\v10.1\bin\win64;
Если вы выберете настраиваемый путь, указанные выше пути по умолчанию должны быть соответственно заменены вашим настраиваемым путем. Ниже приводится конфигурация моих переменных среды и PATH:


После завершения настройки мы можем проверить успешность настройки, в основном с помощью встроенного CUDA deviceQuery.exe и bandwithTest.exe:
Сначала запустите cmd или powershell с помощью win + R, cd to … \ extras \ demo_suite в каталоге установки, а затем выполните bandwidthTest.exe и deviceQuery.exe соответственно, вы должны получить следующее изображение:
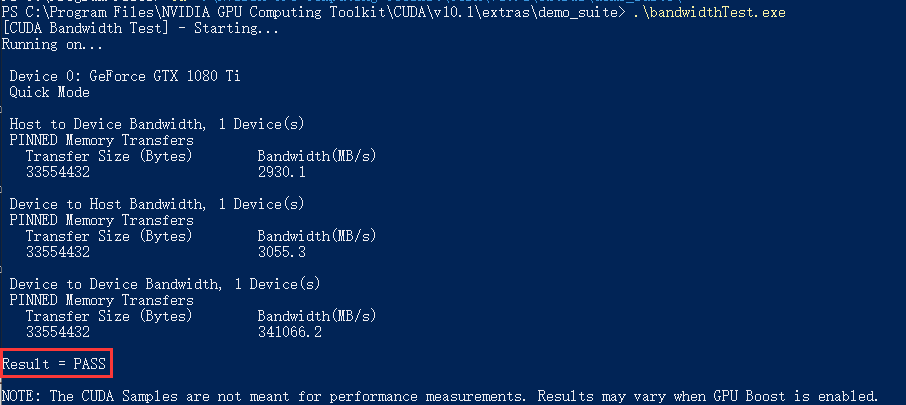
Результат = ПРОЙДЕН означает, что cuda успешно установлена
ссылка:
- https://blog.csdn.net/u010618587/article/details/82940528
- https://blog.csdn.net/u011473714/article/details/95042856