NVIDIA загружает много фоновых процессов и иногда некоторые из них накладывают отпечаток на производительность. Одна из проблем заключается в том, что процесс Nvidia Container чрезмерно грузит процессор, при этом замедляется работа компьютера и других программ.
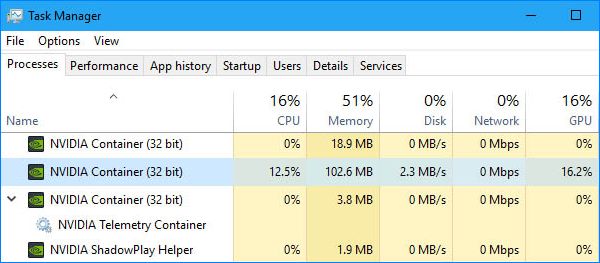
В основном, нагрузка на процессор возрастает в ходе игры или при выполнении ресурсоемких задач. Но иногда процесс Nvidia Container использует много ресурсов во время простоя системы. Есть несколько эффективных способов решить эту проблему.
Существует несколько основных причин, которые могут спровоцировать нагрузку процессора:
- Проблема возникает после установки новых драйверов и быстро решается путем отката к предыдущей версии.
- Еще одним источником высокой нагрузки является GeForce Experience. Поэтому лучше удалить эту программу, поскольку она не предоставляет каких-либо важных функций.
- В большинстве случаев нагрузка возникает через контейнер телеметрии (NVIDIA Telemetry Container). Решается путем отключения службы и предотвращением ее запуска.
Решение 1: Возврат к предыдущей версии драйверов
Если после обновления драйверов видеокарты компьютер начинает медленнее работать, то с ними что-то не так, поскольку заставляют процесс Nvidia Container использовать больше ресурсов, и тем самым больше грузить процессор, чем требуется. Поэтому лучше сделать возврат к предыдущему рабочему набору драйверов и дождаться нового обновления от NVIDIA.
Для этого откройте поисковую строку Windows, введите «Диспетчер устройств» и выберите его из списка доступных результатов. Или можно совместным нажатием клавиш Windows + R вызвать диалоговое окно «Выполнить», набрать команду «devmgmt.msc» и подтвердить на ОК ее запуск.

В Диспетчере устройств разверните раздел Видеоадаптеры, кликните правой кнопкой мыши на видеокарте и выберите «Удалить».

Подтвердите диалоги и подсказки, которые могут потребоваться для подтверждения удаления текущего драйвера графического устройства, и дождитесь завершения процесса.
На сайте NVIDIA перейдите в расширенный поиск, введите информацию о видеокарте и операционной системе и нажмите «Поиск».
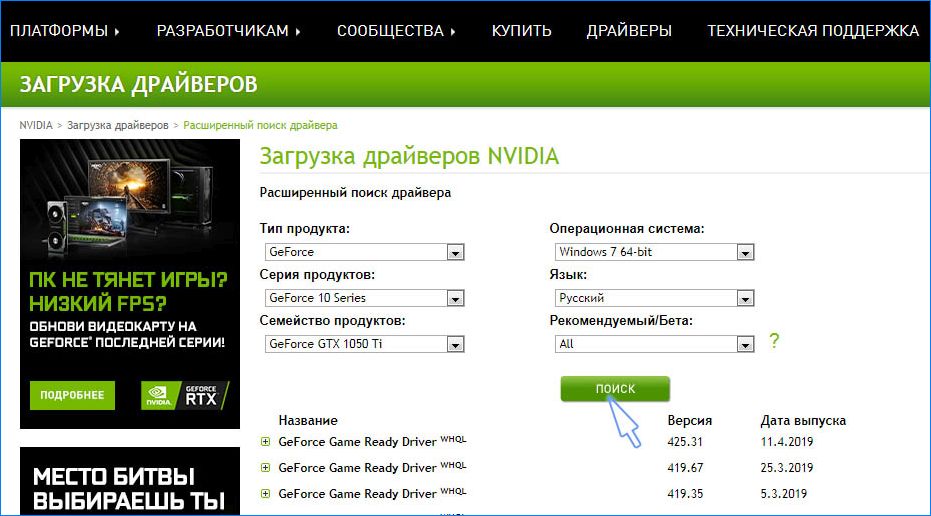
Отобразится список всех доступных драйверов. Найдите для вашей видеокарты и сохраните его на свой компьютер. Запустите скачанный файл и следуйте инструкциям на экране до завершения установки. Теперь проверьте, сильно ли грузит nvidiacontainer.exe процессор.
Решение 2: Удаление GeForce Experience
GeForce Experience — это сопутствующее приложение для видеокарт GeForce GTX, разработанное компанией NVIDIA. Программа поддерживает драйвера в актуальном состоянии, автоматически оптимизирует параметры игр и предоставляет возможность обмениваться игровыми скриншотами и видео.
При этом она не так важна, и от нее не зависит правильная работа драйверов. Есть случаи, когда после удаления GeForce Experience удалось исправить проблему высокой нагрузки процессора контейнером NVIDIA.
Нажмите кнопку Пуск и перейдите в Панель управления. Если установлен Windows 10, кликните на значок шестеренки.
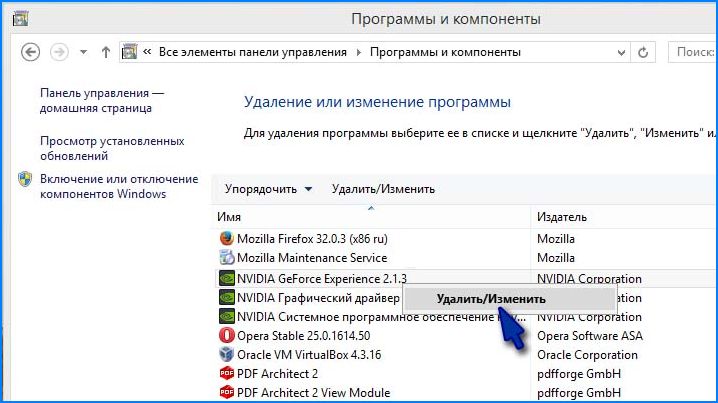
В Панели управления измените параметр «Просмотр» в верхней правой части окна на «Категорию» и перейдите в раздел «Программы и компоненты».
Перейдите на запись GeForce Experience в списке, нажмите на ней правой кнопкой мыши и выберите «Удалить». Следуйте инструкциям на экране для удаления приложения, при завершении перезагрузите компьютер.
Затем откройте Диспетчер задач и посмотрите, упала ли нагрузка на процессор контейнером NVIDIA Container.
Решение 3: Отключение контейнера телеметрии Nvidia и запланированных заданий
Контейнер телеметрии – это служба, входящая в программное обеспечение NVIDIA, в основном используется для отслеживания некоторых ваших журналов, поведения и сбора других подобных данных. Она может отсылать информацию на сервера NVIDIA об ошибках в работе графики и сопутствующих программ.
При отключении заданий, запланированных службой или полностью контейнера телеметрии в целом можно уменьшить нагрузку на процессор.
Откройте Панель управления, переключите Просмотр в верхней правой части окна на «Крупные значки». Перейдите в раздел «Администрирование», затем кликните на «Планировщик заданий».
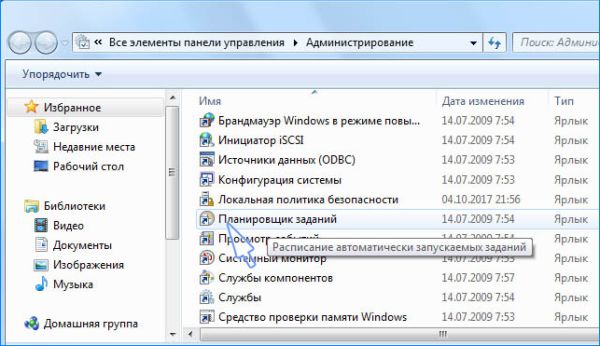
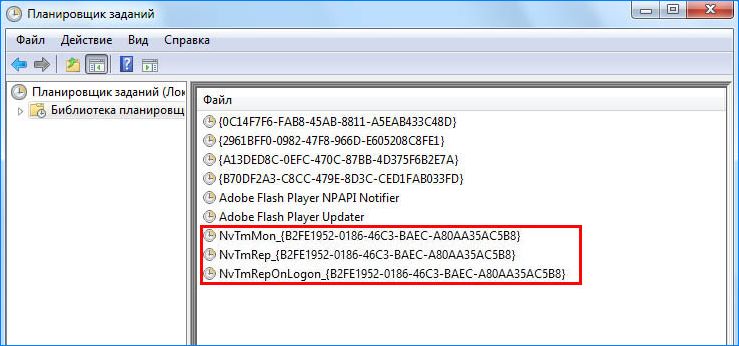
Задания находятся в Библиотеке планировщика». Найдите все задания, название которых начинается на «NvTm», кликните на них правой кнопкой мыши и выберите «Отключить».
После отключения заданий нужно отключить запуск контейнера телеметрии NVIDIA Container. Это должно решить проблему с высокой нагрузкой на процессор.
Откройте диалоговое окно «Выполнить» совместной комбинацией клавиш Win+R. Наберите команду services.msc и нажмите на ОК.
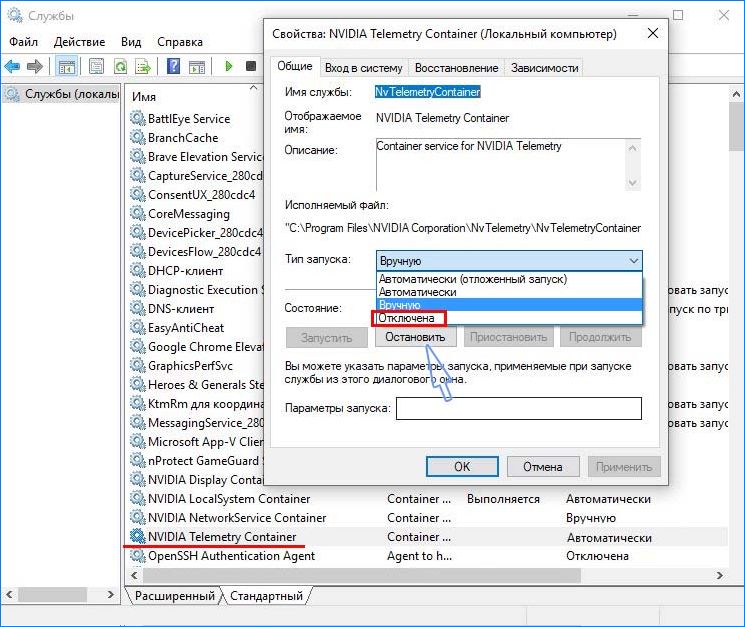
Найдите в списке контейнер телеметрии (NVIDIA Telemetry Container), правим кликом мыши по нему откройте контекстное меню и выберите Свойства. Если эта служба запущена (можно проверить рядом сообщение о ее состоянии), нужно ее остановить, нажав кнопку Стоп.
Переключите Тип запуска в состояние «Отключена». Подтвердите все диалоговые окна, которые могут появиться при изменении типа запуска. После этого нагрузка должна уменьшится в разы, проверьте в Диспетчере задач, насколько контейнер грузит процессор.
Если хотите запустить Telemetry Container снова, то может возникнуть уведомление об ошибке:
«Windows не удалось запустить службу на локальный компьютер. Ошибка 1079: учетная запись, указанная для этой службы отличается от учетной записи, указанной для иных служб в том же процессе».
Если это произошло, выполните следующие действия.
В Свойствах службы перейдите на вкладку «Вход в систему» и нажмите на «Обзор».
В поле «Выберите имена выбираемых объектов» введите имя учетной записи, кликните «Проверить имена». Дождитесь, пока имя станем доступным и нажмите на ОК. Затем введите пароль. После этого, служба NVIDIA Telemetry Container запустится без ошибки.
 Владельцы видеокарт NVIDIA GeForce могут заметить два экземпляра процесса NVDisplay.Container.exe в диспетчере задач, а после недавних обновлений драйверов — иногда и высокую нагрузку на процессор со стороны этого процесса.
Сначала о том, что это за процесс: NVDisplay.Container.exe предназначен для работы элемента «Панель управления NVIDIA» в панели управления (также её можно запустить из контекстного меню рабочего стола). Но с последних версий драйвера он стал также использоваться и для сбора дополнительных данных телеметрии (в дополнение к тем, что собирает процесс NvTelemetryContainer.exe), что иногда и приводит к высокой нагрузке на процессор.
При необходимости вы можете либо исправить высокую нагрузку на процессор, вызываемую NVDisplay.Container.exe или вовсе отключить этот процесс (однако, при этом перестанет запускаться «Панель управления NVIDIA») — оба варианта рассмотрены далее в инструкции.
Исправление высокой нагрузки на процессор со стороны NVDisplay.Container.exe

Первый способ не предполагает отключения этого процесса, а лишь может позволить решить проблему с высокой нагрузкой на CPU, вызываемой NVDisplay.Container.exe. Шаги будут следующими:
- Удалите папку
C:\Program Files\NVIDIA Corporation\Display.NvContainer\plugins\LocalSystem\DisplayDriverRAS
- Удалите папку
C:\Program Files\NVIDIA Corporation\DisplayDriverRAS
- Завершите процессы NVDisplay.Container.exe в диспетчере задач.
- Перезагрузите компьютер.
После перезагрузки высокая нагрузка на процессор в диспетчере задач должна пропасть, при этом сам процесс будет работать, а панель управления NVIDIA останется доступной.
Как отключить NVDisplay.Container.exe
Существуют различные способы отключения процесса NVDisplay.Container.exe. Самый простой из них — отключение соответствующей службы. Этот метод будет предпочтительнее, если вам иногда требуется панель управления NVIDIA (т.к. сделанные изменения легко откатить).
Чтобы отключить процесс этим способом, можно использовать следующие шаги:
- Нажмите клавиши Win+R на клавиатуре, введите services.msc и нажмите Enter.
- В открывшемся списке служб Windows найдите NVIDIA Display Container LS и дважды нажмите по ней.

- Нажмите кнопку «Остановить», а затем в поле «Тип запуска» установите «Отключено» и примените настройки.


После этих шагов процесс NVDisplay.Container.exe не будет появляться в диспетчере задач, пока вы вручную его не запустите.
Еще один вариант — и вовсе не устанавливать этот компонент на компьютер. В установщике драйвера NVIDIA этого сделать не получится даже после выбора пользовательского варианта установки, однако сторонняя утилита NVSlimmer позволяет выполнить задачу.
Перед тем, как выполнять описываемое
- Скачайте утилиту NVSlimmer (официальный сайт — guru3d.com/files-details/nvidia-driver-slimming-utility.html )
- Запустите её и укажите путь к установщику драйвера NVIDIA (его можно скачать с официального сайта, а можно найти резервную копию у себя на компьютере в скрытой папке C:\ProgramData\NVIDIA Corporation\Downloader в одной из вложенных папок с именем, состоящим из букв и цифр).
- В NVSlimmer выберите, какие компоненты должны быть включены в установщик драйвера, можно оставить лишь пункты в разделе Core functionality, если вам требуются только драйверы. За NVDisplay.Container.exe отвечает соответствующий пункт в разделе Miscellaneous.

- Нажмите Install для запуска установки, либо Repackage для того, чтобы подготовить новый файл-установщик для последующей установки драйвера без лишних компонентов. Рекомендую использовать второй вариант, затем удалить имеющиеся драйверы NVIDIA с помощью Display Driver Uninstaller, а уже после этого запустить подготовленный установщик.

В результате всех этих действий вы получите только нужные компоненты драйвера NVIDIA GeForce без сопутствующих утилит, в том числе без процесса NVDisplay.Container.exe.
These days, many people are extremely enthusiastic about games. To experience games realistically and efficiently, avid gamers and even normal people are adding external add-ons like graphic cards to their CPU to improve their efficiency. One such popular graphic card is NVIDIA which is owned by an American company that produces graphics cards exclusively for the maximum gaming experience. Unfortunately, sometimes running many processes in the background tends the CPU to get overheated which in turn slows down its function. When it happens it automatically affects the system as well as game performance. This NVIDIA container high CPU usage problem should be fixed as soon as possible. If not, it could threaten the livelihood of your PC. Thus, this article will guide you with all possible methods to find your potential fix for NVIDIA container high memory usage.

Table of Contents
Several reasons cause Nvidia container high CPU usage. Check out the list mentioned below to understand its factors.
- Malfunction in the recently updated NVIDIA graphics driver.
- The additional software GeForce Experience sometimes due to incompatibility issues overload your CPU.
- Enabled NVIDIA Telemetry Container could affect the usual CPU usage as they are responsible for gathering data specific to graphic card function.
Below are all the possible troubleshooting methods to fix the said issue.
Method 1: Restart PC
The simple and basic thing you need to perform for any kind of error you are facing should be rebooting your system or laptop. This fundamental step could fix your problem especially related to graphic cards. The usual fact is that during heavy usage of the system the CPU manages memory to regulate various functions. Still, overclocking can affect the CPU. Also, in recent times graphics are becoming a significant part of any PC and many gamers use NVIDIA graphics card as it is considered to be the strongest in the market. Follow these steps to restart PC.
1. Press the Windows key.
2. Click on the Power icon.
3. Then, select the Restart option.

If rebooting does not help, then try out other methods given below.
Method 2: Update Graphics Driver
The graphic driver is a significant attribute of any online game. If you are an avid gamer, then you might know the fact that GPU manufacturers release updates and the latest features. Also, to avoid any kind of technical glitches it is essential to update the graphic driver as they are behind the system performance. So, update the graphic driver and see if this update works out in your favor. Read our guide on 4 ways to update graphic drivers in Windows 10.

Also Read: What is NVIDIA Virtual Audio Device Wave Extensible?
Method 3: Install Older NVIDIA Driver Version
Many users reported that they are facing this issue especially after updating the NVIDIA driver. This might be possible because the latest version can come with certain bugs which are yet to be fixed. Hence, the best option here is to uninstall the current NVIDIA driver and download the older version. To do so, follow the steps given below.
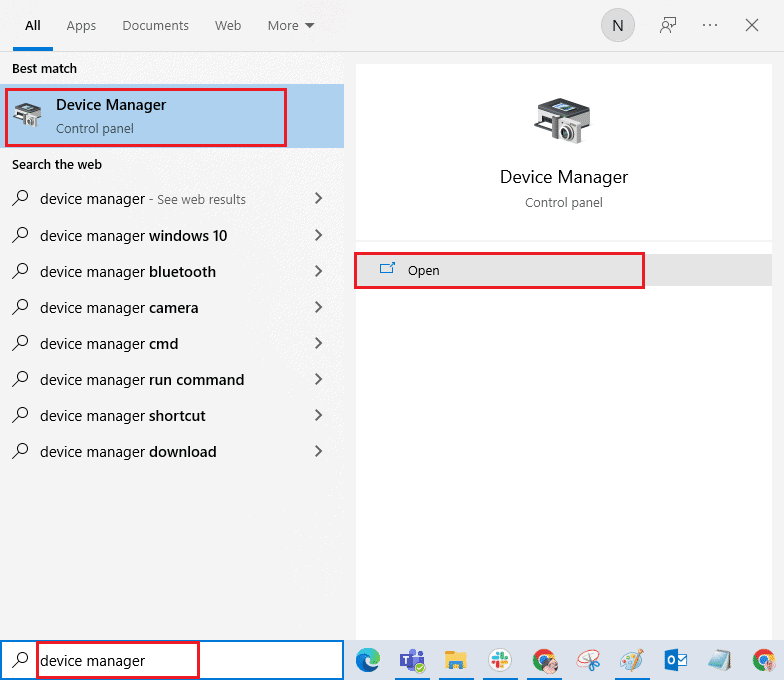
1. Hit the Windows key, type device manager, and click on Open.
2. Double-click on Display adapters to expand the drivers.

4. Here, right-click the NVIDIA graphics driver or adapter and select Uninstall device in the context menu.

5. Follow the on-screen instructions to uninstall the driver.
6. Go to the official NVIDIA website and fill up the NVIDIA adapter model details and select the Search button.

7. On the new page, click Download to download the older version.

8. Run the setup file and follow the on-screen instructions to install the driver.
9. Once installed, reboot your PC and check if the NVIDIA container high memory usage issue is fixed.
Also Read: Fix Steam Client Bootstrapper High CPU on Windows 10
Method 4: Disable NVIDIA Task Scheduler
The task scheduler present in your system is used to set up many tasks like creating logs, reporting bugs, and many more for NVIDIA software. Many users reported that disabling NVIDIA Task Scheduler has the potential to resolve the NVIDIA container high CPU usage. But, note that turning it off does not affect the personal gaming experience in any way. Implement the instructions given below:
1. Press Windows + R keys together simultaneously to launch the Run dialog box.

2. Type taskschd.msc and hit Enter key to open the Task Scheduler.

3. Select the Task Scheduler Library on the left pane.

4. Search for NvTm tasks.

5. Right-click each task and select Disable from the context menu.

6. Finally, restart your PC.
Also Read: How to Fix NVIDIA ShadowPlay Not Recording
Method 5: Disable NVIDIA Telemetry Container Service
The NVIDIA Telemetry Container accompanies NVIDIA software as a service program. It helps to maintain logs, and behaviors of the system. Also, they are used to disclose any undesired happenings to the NVIDIA. Similar to the NVIDIA task scheduler, disable the NVIDIA Telemetry Container to fix the NVIDIA container high CPU usage problem. Follow the steps to do it.
1. Open the Run dialog box, type services.msc, and hit Enter key to launch Services.

2. Locate NVIDIA Telemetry Container on the Services window. Then, right-click it and select Properties from the context menu.

3. Here, set the Startup type to Disabled from the dropdown options.
Note: If the Service status is Running, click on the Stop button.

4. Now, click Apply and then OK to save the changes made.
Once done, check NVIDIA container high CPU usage issue is resolved.
Method 6: Restart NVIDIA Services
Simply restarting certain NVIDIA-related services can fix any computer memory-associated issue. This is because some services restrict the GPU functioning to its full capability and thus cause high CPU usage. Here is how to restart some NVIDIA services.
1. Launch Services from the Run dialog box.

2. On the Services window, locate NVIDIA Display Container Local System from the services list. Then, right-click on it and select Stop from the context menu.
3. Now, once again right-click the NVIDIA Display Container Local System and select Restart from the drop-down menu.

4. Repeat the above steps to restart the following services too:
- NVIDIA Display Container LS
- NVIDIA FrameView SDK Container

Also Read: Fix NVIDIA Control Panel Missing in Windows 10
Method 7: Disable Shadowplay Attribute
In case the Shadowplay attribute is present in the GeForce Experience which is used to record gameplay and capture pictures while gaming causing hindrance to the game, then the error might pop up. Therefore, toggle off the in-game overlay feature. Perform the steps given below to do it.
1. Launch the GeForce Experience application.

2. Sign in with your account credentials if not logged in and wait for a few moments.
3. Then, click on the gear icon to go to Settings.

4. On the General tab, locate IN-GAME OVERLAY. Toggle it off to disable its working mode.

Method 8: Turn Off nvdisplay.container.exe
The regular problem with NVIDIA container is that whenever a new software or driver is installed, a new file directory source is added. Now, such files prevent the software from functioning and create conflict. Also, note that removing these files does not cause any data loss or harm. Therefore, follow the below-mentioned instructions and delete these newly created files to fix NVIDIA container high memory usage issue.
1. Press Windows + E keys together and launch File Explorer.

2. Navigate to the following folder path.
C:\Program Files\NVIDIA Corporation\Display.NvContainer\plugins\LocalSystem\
Note: The location may vary as per your installation.

3. Select the DisplayDriverRAS folder and press the Shift + Delete keys together. Then, move to the given folder location path below.
C:\Program Files\NVIDIA Corporation

4. Once again, delete the folder from here as well.
5. Press Ctrl + Shift + Esc keys simultaneously to open Task Manager.
6. Select nvdisplay.container.exe process and click the End Task button.

7. Finally, reboot your PC and check if NVIDIA container high memory usage is rectified.
Also Read: Fix NVIDIA Control Panel Not Opening
Method 9: Uninstall GeForce Experience
The GeForce carries a GeForce graphics card even though the application is developed by NVIDIA. There are certain occurrences where users faced NVIDIA container high memory usage problems right after installing this software. Hence, implement the below-mentioned steps and uninstall GeForce Experience Application.
1. Press the Windows key and type control on the search bar. Click Open to launch the Control Panel application.

2. Set the View by > Category then click on the Programs setting.

3. Click on the Uninstall a program under the Programs and Features section.

4. Locate NVIDIA GeForce Experience from the program list. Right-click it and select Uninstall.

5. Click Uninstall on the confirmation prompt window.
6. Now. restart your PC and check if the NVIDIA container high CPU usage is resolved.
Also Read: NVIDIA Installer Failed Error on Windows 10 [SOLVED]
Method 10: Uninstall Telemetry Container Package
Still no luck? Then there is one last method to try. But note that this solution is not recommended as a potential fix as it can damage the system. Ensure to create a restore point before trying out this method. Read our guide on How to Create a System Restore Point on Windows 10 for creating a backup.
The telemetry container package is the one that controls the whole process. Thus, removing it has resolved the high CPU usage problem for many users. Here is how to perform it.
1. Press the Windows key and type Command Prompt, then click on Run as administrator.

2. Type the following command and hit Enter key to execute it.
rundll32 "%PROGRAMFILES%\NVIDIA Corporation\Installer2\InstallerCore\NVI2.DLL",UninstallPackage NvTelemetryContainer

Check if this method fixed the NVIDIA container high CPU usage issue.
Recommended:
- Fix Netflix Audio and Picture Out of Sync on Android
- Fix The Request Failed Due to a Fatal Device Hardware Error
- Fix ARK Keeps Crashing on Windows 10
- Fix Frosty Mod Manager Not Launching Game in Windows 10
We hope this guide was helpful and you were able to fix NVIDIA container high CPU usage on Windows 10. Let us know which method worked the best for you. Please feel free to reach us for any queries or suggestions via the comment section given below.
Выпущенный компанией NVIDIA на прошлой неделе графический драйвер Game Ready Driver версии 531.18 WHQL содержит ошибку, которая приводит к повышенному использованию ресурсов центрального процессора. NVIDIA проблему признала. Встречается она не на всех видеокартах.
Источник изображений: NVIDIA
Известно, что содержащаяся в составе графического драйвера Game Ready Driver 531.18 WHQL ошибка приводит к тому, что процесс NVIDIA Container может потреблять более 10 % доступных ресурсов центрального процессора после запуска или выхода из той или иной игры. Повышенное использование ресурсов можно обнаружить в диспетчере задач Windows, отображающем текущие процессы использования ресурсов компьютера.
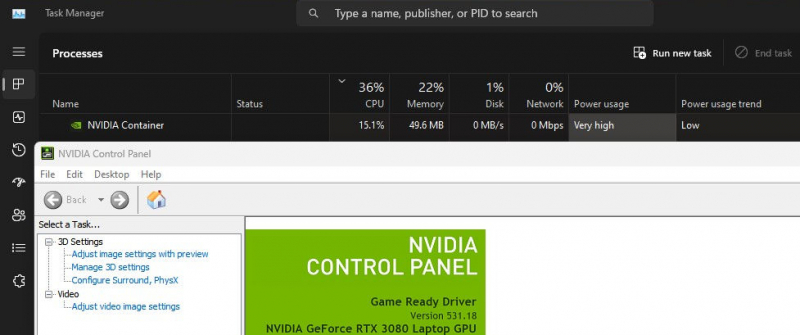
Для столкнувшихся с данной проблемой оптимальным вариантом на данный момент будет откат до предыдущей версии драйвера 528.49 WHQL. Если драйвер переустанавливать не хочется, то можно принудительно завершить процесс NVIDIA Container или перезагрузить компьютер.
Компании NVIDIA известно об указанной выше проблеме, и она добавила её в список ошибок, требующих исправления с будущими обновлениями драйвера.
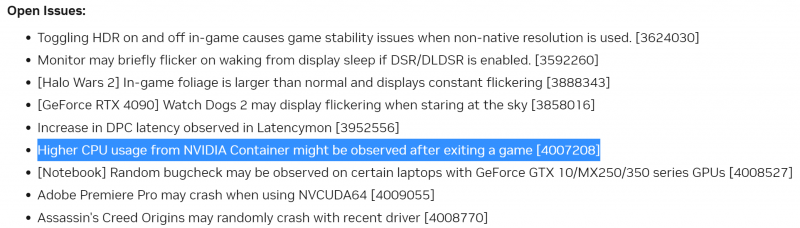
Известные ошибки, которые будут исправлены в ближайших обновлениях драйвера NVIDIA
Весьма вероятно, что с учётом серьёзности ошибки, исправление для неё будет выпущено в ближайшее время.
Если вы заметили ошибку — выделите ее мышью и нажмите CTRL+ENTER.
В некоторых случаях загруженность ЦП увеличивается на 10-15%.
- О том, что драйвер версии 531.18 для видеокарт GeForce приводит к увеличению нагрузки на процессор ПК после выхода из игр, сообщили в компании NVIDIA. До этого на проблему обратили внимание владельцы графических ускорителей.
- Нагрузку на процессор создаёт программа NVIDIA Container. Как отметили пользователи видеокарт GeForce, исправить проблему можно, перезагрузив ПК или принудительно закрыв процесс NVDisplay.Container.exe.
- В NVIDIA сообщили, что знают о проблеме и работают над тем, чтобы её устранить, судя по всему, в следующем обновлении драйверов или в качестве внеочередного критического исправления.
- Для того, чтобы решить проблему, не дожидаясь обновления от NVIDIA, можно откатиться к драйверу версии 528.49. Кроме того, в сети нашли способ исправить баг, удалив один из DLL-файлов.