If the computer is an Active Directory Domain Controller, the NTP Server feature is enabled automatically. So, the following example is for a computer that needs to enable NTP Server in a WorkGroup environment.
- KMS activation deployment for Windows 10, Windows 8.1, Windows Server 2012 R2, Windows Server 2016
- HOW TO INSTALL ISA SERVER ENTERPRISE 2000 — Part III
Configure NTP Server in Windows Server 2019
If the computer is an Active Directory Domain Controller, the NTP Server feature is enabled automatically. So, the following example is for a computer that needs to enable NTP Server in a WorkGroup environment.
Step 1. Run PowerShell with admin rights and configure the following:
Windows PowerShell Copyright (C) Microsoft Corporation. All rights reserved. # confirm current setting (follows are default settings) PS C:UsersAdministrator> Get-ItemProperty -Path "HKLM:SYSTEMCurrentControlSetServicesw32timeTimeProvidersNtpServer" InputProvider : 0 AllowNonstandardModeCombinations : 1 EventLogFlags : 0 ChainEntryTimeout : 16 ChainMaxEntries : 128 ChainMaxHostEntries : 4 ChainDisable : 0 ChainLoggingRate : 30 RequireSecureTimeSyncRequests : 0 DllName : C:WindowsSYSTEM32w32time.DLL Enabled : 0 PSPath : Microsoft.PowerShell.CoreRegistry::HKEY_LOCAL_MACHINESYSTEMCurrentControlSetServ icesw32timeTimeProvidersNtpServer PSParentPath : Microsoft.PowerShell.CoreRegistry::HKEY_LOCAL_MACHINESYSTEMCurrentControlSetServ icesw32timeTimeProviders PSChildName : NtpServer PSDrive : HKLM PSProvider : Microsoft.PowerShell.CoreRegistry # enable NTP Server feature PS C:UsersAdministrator> Set-ItemProperty -Path "HKLM:SYSTEMCurrentControlSetServicesw32timeTimeProvidersNtpServer" -Name "Enabled" -Value 1 # set [AnnounceFlags] to 5 # number means # 0x00 : Not a time server # 0x01 : Always time server # 0x02 : Automatic time server # 0x04 : Always reliable time server # 0x08 : Automatic reliable time server PS C:UsersAdministrator> Set-ItemProperty -Path "HKLM:SYSTEMCurrentControlSetservicesW32TimeConfig" -Name "AnnounceFlags" -Value 5 # restart Windows Time service PS C:UsersAdministrator> Restart-Service w32Time # if Windows Firewall is running, allow NTP port PS C:UsersAdministrator> New-NetFirewallRule ` -Name "NTP Server Port" ` -DisplayName "NTP Server Port" ` -Description 'Allow NTP Server Port' ` -Profile Any ` -Direction Inbound ` -Action Allow ` -Protocol UDP ` -Program Any ` -LocalAddress Any ` -LocalPort 123 Step 2. NTP Server Host also needs time synchronization with other Hosts as the NTP Client.
Configure NTP Client in Windows Server 2019
NTP Client settings are configured with NTP Server [time.windows.com] by default Windows, so if the computer is connected to the Internet, the date and time will be synchronized.
Furthermore, if the computer is in Active Directory Domain, the NTP Client settings are also configured as follows, so generally there is no need to change the settings:
- Domain Controller synchronizes time with PDC in the domain.
- The PDCs in a domain time synchronize with the PDCs in the Parent Domain (primary domain) or with other Domain Controllers.
- The client computers synchronize the time with the Domain Controller on which the client is currently logged on.
In the WorkGroup environment, you can change the default NTP server to other servers as follows.
Step 1. Run PowerShell with admin rights and configure the following:
Windows PowerShell Copyright (C) Microsoft Corporation. All rights reserved. # confirm current synchronization NTP Server PS C:UsersAdministrator> w32tm /query /source time.windows.com,0x8 # change target NTP Server (replace to your timezone server) # number means # 0x01 : SpecialInterval # 0x02 : UseAsFallbackOnly # 0x04 : SymmetricActive # 0x08 : NTP request in Client mode PS C:UsersAdministrator> Set-ItemProperty -Path "HKLM:SYSTEMCurrentControlSetServicesw32timeParameters" -Name "NtpServer" -Value "ntp.nict.jp,0x8" # restart Windows Time service PS C:UsersAdministrator> Restart-Service w32Time # re-sync manually PS C:UsersAdministrator> w32tm /resync Sending resync command to local computer The command completed successfully. # verify status PS C:UsersAdministrator> w32tm /query /status Leap Indicator: 0(no warning) Stratum: 4 (secondary reference - syncd by (S)NTP) Precision: -23 (119.209ns per tick) Root Delay: 0.0252246s Root Dispersion: 0.0824040s ReferenceId: 0x85F3EEF3 (source IP: 133.243.238.243) Last Successful Sync Time: 9/23/2019 10:15:33 PM Source: ntp.nict.jp,0x8 Poll Interval: 8 (256s)Step 2. If a computer is in an Active Directory domain environment and is a Forest Root, the synchronization target is usually configured to [Local CMOS Clock] (Hardware Clock). Then, if you want to change the setting from [Local CMOS Clock] to NTP server network, please set as follows:
Windows PowerShell Copyright (C) Microsoft Corporation. All rights reserved. # in AD Domain Environment, [Type] is set to [NT5DS] PS C:UsersAdministrator> (Get-Item -Path "HKLM:SYSTEMCurrentControlSetServicesw32timeParameters").GetValue("Type") NT5DS # if target is [Local CMOS Clock] but you'd like to change it, change [Type] to [NTP] first # next, change to NTP server with the same way in [1] section PS C:UsersAdministrator> Set-ItemProperty -Path "HKLM:SYSTEMCurrentControlSetServicesw32timeParameters" -Name "Type" -Value "NTP" Read more
- Deploy KMS activation on Windows Server 2008
- Creating SSL Server 2008 Server with ISA 2006 Firewalls (Part 1)
- How to Install, Configure, and Test Windows Server 2012 R2 Single Subnet DHCP Server
- Instructions for setting up individual FTP Server with FileZilla
- Set up a VPN server on Router Tomato — Part 2
- Install Windows Server 2003 and create a backup server
Синхронизация времени в сети является важным аспектом для обеспечения корректной работы системы, особенно в предприятиях. В этой статье мы рассмотрим, как настроить сервер и клиент NTP на Windows Server 2019.
NTP (Network Time Protocol) — это протокол, который используется для синхронизации времени на компьютерах в сети. Он позволяет установить точное время, основываясь на данных от внешнего временного источника, такого как общедоступный сервер NTP.
Настройка сервера NTP на Windows Server 2019 очень проста. Вам потребуется выполнить несколько шагов. Сначала установите роль сервера времени на сервере, затем добавьте внешний временной источник и настройте параметры синхронизации.
Настройка клиента NTP на Windows Server 2019 также не требует особых усилий. Вам просто нужно указать IP-адрес сервера времени, к которому вы хотите подключиться, и настроить параметры синхронизации. После этого ваш клиент будет синхронизироваться с сервером NTP и получать точное время.
Содержание
- Настройка сервера NTP на Windows Server 2019
- Шаг 1: Установка и настройка службы NTP
- Настройка клиента NTP на Windows Server 2019
- Шаг 1: Установка и настройка службы W32Time
- Синхронизация времени между сервером и клиентом
Настройка сервера NTP на Windows Server 2019
Вот как настроить сервер NTP на Windows Server 2019:
- Установите службу времени
- Откройте командную строку
- Запустите команду для настройки сервера NTP
- Перезагрузите службу времени
- Проверьте настройки
- Настройте синхронизацию времени
- Перезагрузите службу времени
- Проверьте статус синхронизации времени
Перед настройкой сервера NTP вам необходимо установить службу времени Windows.
Перейдите в меню Пуск, найдите командную строку (cmd) и откройте ее.
Введите следующую команду и нажмите Enter: w32tm /config /manualpeerlist:"pool.ntp.org" /syncfromflags:manual /reliable:yes /update
Введите следующую команду и нажмите Enter: net stop w32time & net start w32time
Введите следующую команду и нажмите Enter: w32tm /query /configuration
Убедитесь, что в выводе команды присутствует строка «PeerList: pool.ntp.org».
Введите следующую команду и нажмите Enter: w32tm /config /update /manualpeerlist:"0.pool.ntp.org,0x8 1.pool.ntp.org,0x8 2.pool.ntp.org,0x8 3.pool.ntp.org,0x8" /syncfromflags:manual /reliable:yes
Введите следующую команду и нажмите Enter: net stop w32time & net start w32time
Введите следующую команду и нажмите Enter: w32tm /query /status
Убедитесь, что в выводе команды присутствует строка «Leap Indicator: 0 (no warning)», а также информация о синхронизации времени.
Теперь ваш сервер NTP настроен и будет предоставлять точное время всем клиентам в сети. Вы можете использовать эту настройку для синхронизации времени на других компьютерах в вашей сети, просто указав сервер NTP в качестве источника времени.
Шаг 1: Установка и настройка службы NTP
Перед началом настройки сервера и клиента NTP на Windows Server 2019 необходимо установить и настроить службу NTP. В этом разделе мы рассмотрим процесс установки и настройки NTP на сервере.
В Windows Server 2019 служба NTP представлена в виде службы времени Windows, поэтому нам необходимо установить и настроить эту службу перед использованием функций NTP.
Для установки службы времени Windows следуйте следующим шагам:
| Шаг | Описание |
|---|---|
| 1 | Откройте «Управление сервером» в «Панели управления». |
| 2 | После открытия «Управление сервером» выберите «Добавить роли и компоненты». |
| 3 | Перейдите к пункту «Службы времени Windows» и нажмите «Далее». |
| 4 | Проверьте, что установлен флажок «Службы времени Windows» и нажмите «Далее». |
| 5 | Нажмите «Установить» и дождитесь завершения установки службы времени Windows. |
| 6 | После установки откройте «Службы» в «Панели управления». |
| 7 | Найдите службу «Windows Time» в списке служб и откройте свойства службы. |
| 8 | В свойствах службы «Windows Time» установите режим запуска службы на «Автоматически». |
| 9 | После этого нажмите «Применить» и «ОК», чтобы сохранить изменения. |
Теперь служба времени Windows установлена и настроена на сервере Windows Server 2019. В следующем разделе мы рассмотрим настройку сервера NTP на Windows Server 2019.
Настройка клиента NTP на Windows Server 2019
Для обеспечения точной синхронизации времени на клиентском сервере важно настроить его в качестве клиента NTP. В этом разделе мы рассмотрим подробную процедуру настройки клиента NTP на Windows Server 2019.
1. Откройте командную строку с правами администратора.
2. Введите следующую команду для добавления сервера NTP:
w32tm /config /syncfromflags:manual /manualpeerlist:"сервер_адрес" /reliable:yes /update
Здесь «сервер_адрес» — это адрес NTP-сервера, который вы хотите использовать для синхронизации времени на клиентском сервере. Вы можете указать IP-адрес или DNS-имя сервера NTP.
3. Затем введите следующую команду для запуска службы времени Windows:
net start w32time
4. Для проверки правильности настройки клиента NTP введите следующую команду:
w32tm /query /status
В выводе вы должны увидеть информацию о текущем статусе времени и источнике синхронизации. Проверьте, что источник синхронизации указывает на правильный сервер NTP.
5. Наконец, чтобы установить клиента NTP в качестве постоянного источника синхронизации, введите следующую команду:
w32tm /config /syncfromflags:domhier /update
Теперь ваш клиентский сервер должен правильно синхронизироваться со службой времени NTP на указанном сервере.
Обратите внимание, что при настройке клиента NTP на Windows Server 2019 рекомендуется использовать сервер NTP с высокой точностью и надежностью, чтобы обеспечить правильную синхронизацию времени на вашем сервере.
Шаг 1: Установка и настройка службы W32Time
Перед тем как начать настраивать сервер и клиент NTP на Windows Server 2019, необходимо убедиться, что служба W32Time установлена и настроена правильно.
Служба W32Time отвечает за синхронизацию времени на компьютерах под управлением операционной системы Windows. В Windows Server 2019 она устанавливается по умолчанию, однако может потребоваться дополнительная настройка.
Для проверки наличия службы W32Time и ее состояния необходимо выполнить следующие шаги:
- Откройте командную строку от имени администратора.
- Введите команду w32tm /query /status и нажмите Enter.
В результате выполнения команды вы увидите информацию о текущем состоянии службы W32Time, включая источник времени (NTP-сервер), с которого происходит синхронизация.
Если вы получили ошибку или информацию о несинхронизированном состоянии, необходимо выполнить установку и настройку службы W32Time следующим образом:
- Откройте командную строку от имени администратора.
- Введите команду w32tm /register и нажмите Enter. Эта команда зарегистрирует службу W32Time на компьютере.
- Затем введите команду net start w32time и нажмите Enter. Эта команда запустит службу W32Time.
- И, наконец, выполните команду w32tm /config /syncfromflags:manual /manualpeerlist:»pool.ntp.org» и нажмите Enter. Эта команда настроит службу W32Time для синхронизации с NTP-сервером pool.ntp.org, который предоставляет точное время.
После выполнения этих команд служба W32Time будет установлена и настроена правильно. Вы можете повторно выполнить команду w32tm /query /status, чтобы убедиться, что служба работает без ошибок и синхронизируется с выбранным NTP-сервером.
Теперь, когда служба W32Time настроена правильно, вы можете приступать к настройке сервера и клиента NTP на Windows Server 2019.
Синхронизация времени между сервером и клиентом
Для обеспечения правильной работы сети и приложений на сервере и клиенте необходима синхронизация времени. Синхронизированное время позволяет устанавливать правильную последовательность событий, синхронизировать лог-файлы и устранять проблемы, связанные с расхождением времени.
Windows Server 2019 предлагает встроенную службу NTP (Network Time Protocol), которая позволяет обеспечить точную синхронизацию времени между сервером и клиентом. Настройка NTP на сервере и клиенте является относительно простой задачей и состоит из нескольких шагов.
Шаг 1: Настройка сервера NTP
1. Запустите командную строку от имени администратора.
2. Введите следующую команду для установки сервера NTP:
| w32tm /config /manualpeerlist:»time.windows.com» /syncfromflags:manual /reliable:yes /update |
|---|
Обратите внимание, что «time.windows.com» является временным сервером NTP, предоставляемым Microsoft.
3. Запустите службу NTP с помощью следующей команды:
| net start w32time |
|---|
Шаг 2: Настройка клиента NTP
1. Откройте командную строку от имени администратора.
2. Введите следующую команду для настройки клиента NTP:
| w32tm /config /syncfromflags:domhier /update |
|---|
Эта команда настраивает клиент таким образом, чтобы он синхронизировался со своим доменным контроллером.
3. Запустите службу NTP с помощью следующей команды:
| net start w32time |
|---|
После выполнения этих шагов сервер и клиент будут синхронизировать время с помощью NTP и быть точно настроенными. Это позволит избежать проблем, связанных с расхождением времени и обеспечит более стабильную работу сети и приложений.
В этом видео мы изучим протокол NTP и настроем его на Windows Server 2019.
-
Виктор Черемных -
13 июля, 2021 -
No Comments
Добавить комментарий
Группа в VK
Обнаружили опечатку?
Сообщите нам об этом, выделите текст с ошибкой и нажмите Ctrl+Enter, будем очень признательны!
Свежие статьи
Облако меток
Похожие статьи


Мониторинг ресурсов и служб в Windows
В этом видео мы научимся пользоваться программами для мониторинга ресурсов Windows, сведений о системе, а также познакомимся со службами Windows. Монитор ресурсов — инструмент, позволяющий


Contents
- 1 Make Windows Server 2019 As An Ntp Client
- 2 Make Windows Server 2019 As An Ntp Client
- 2.1 Conclusion
- 2.1.1 Related image with make windows server 2019 as an ntp client
- 2.1.2 Related image with make windows server 2019 as an ntp client
- 2.1 Conclusion
Welcome to our blog, your gateway to the ever-evolving realm of Make Windows Server 2019 As An Ntp Client. With a commitment to providing comprehensive and engaging content, we delve into the intricacies of Make Windows Server 2019 As An Ntp Client and explore its impact on various industries and aspects of society. Join us as we navigate this exciting landscape, discover emerging trends, and delve into the cutting-edge developments within Make Windows Server 2019 As An Ntp Client. Often like clock directory c other configured from change cmos synchronization in cmos to network ntp root clock a if environment computer like windows is and you39d microsoft If settings corporation- hardware server domain target clock then is a to set local copyright local powershell follows- he active forrest is to
The Most Effective Method To Configure Ntp Server In Windows Server 2019
The Most Effective Method To Configure Ntp Server In Windows Server 2019
If a computer is in active directory domain environment and he is a forrest root, synchronization target is often configured to [local cmos clock] (hardware clock), then, if you’d like to change settings from [local cmos clock] to other network ntp server, set like follows. windows powershell copyright (c) microsoft corporation. #1) using powershell open powershell as an administrator and confirm current synchronization > w32tm query source time.windows ,0x8 change the target ntp server with the following command. > set itemproperty path «hklm:\system\currentcontrolset\services\w32time\parameters» name «ntpserver» value » africa.pool.ntp.org ,0x8″.

How To Configure Ntp Server In Windows Server 2019 Computingforgeeks
How To Configure Ntp Server In Windows Server 2019 Computingforgeeks
Inbox w32time ntp client and ntp server can be enabled or disabled independently and both share udp port 123 for their functions. inbox w32time ntp client can only use udp 123 as the source port. if you have a computer with multiple network adapters (is multi homed), you cannot enable the windows time service based on a network adapter. Using gpedit.msc, went to “administrative template” > “system” > “windows time service” > “time providers”. on the left pane, enabled the following two settings: “enable windows ntp client” “configure windows ntp client” entered the ntp server information when in “ configure windows ntp client “. note:. Introduction let’s see how you can configure ntp server on windows server 2019 2022. the windows time service uses the network time protocol (ntp) to help synchronize time across a network. ntp is an internet time protocol that includes the discipline algorithms necessary for synchronizing clocks ( microsoft docs ). step 1: open up registry editor. To do this, follow these steps: locate and then select the following registry subkey: hkey local machine\system\currentcontrolset\services\w32time\timeproviders\ntpserver.

How To Configure Ntp Server On Windows Server 2019
How To Configure Ntp Server On Windows Server 2019
Introduction let’s see how you can configure ntp server on windows server 2019 2022. the windows time service uses the network time protocol (ntp) to help synchronize time across a network. ntp is an internet time protocol that includes the discipline algorithms necessary for synchronizing clocks ( microsoft docs ). step 1: open up registry editor. To do this, follow these steps: locate and then select the following registry subkey: hkey local machine\system\currentcontrolset\services\w32time\timeproviders\ntpserver. Windows set ntp server windows 2016 or windows 2019 brandon.lee july 21, 2020 4 minutes read viewing the ntp registry values that are configured for your windows server there is no question about it, having accurate time in your environment set in critical infrastructure systems is a must. The process of installing, configuring, and querying an ntp server on windows server 2019 is quite straightforward. set the ntp service to automatic option to start off, hit windows key r to launch the run dialogue. next, type services.msc and hit enter. in the ‘ services ’ window, locate the service ‘ windows time’.

The Most Effective Method To Configure Ntp Server In Windows Server 2019
The Most Effective Method To Configure Ntp Server In Windows Server 2019
Windows set ntp server windows 2016 or windows 2019 brandon.lee july 21, 2020 4 minutes read viewing the ntp registry values that are configured for your windows server there is no question about it, having accurate time in your environment set in critical infrastructure systems is a must. The process of installing, configuring, and querying an ntp server on windows server 2019 is quite straightforward. set the ntp service to automatic option to start off, hit windows key r to launch the run dialogue. next, type services.msc and hit enter. in the ‘ services ’ window, locate the service ‘ windows time’.

Windows Server 2019 Virtualbox Image Download Kwikose
Windows Server 2019 Virtualbox Image Download Kwikose
Make Windows Server 2019 As An Ntp Client
Make Windows Server 2019 As An Ntp Client
ntp stands for network time protocol. it has the very important job of synchronising clocks over a network. time is one of those in this video, i demonstrate how to deploy an ntp server and attach host machines as ntp clients to poll time from the server. how to configure ntp server in windows server 2019 step 1: open up registry editor click on the start icon in your server ntp server configuration in windows 2019. configure computer as ntp client. to synchronize time of computer with ntp server or gps master clock , one computer need to systemadministration , #ntp , #networktimeprotocol , #ntponserver , #server2022 in this video i am going to tell you «how you ntp server configure in windows server 2019 for cctv. in this video, i’m going show beginner windows server 2019 8 configure ntp server in windows server 2019 part 8. windows time service, an implementation of network time protocol, ensures that the clocks on all client workstations connected mcse #networkworldindia #ntp how to configure ntp server on windows server 2019. w32tm ntp server configuration on dc how to configure a production domain controller as an ntp server (time server). videos and faqs are also available on our community site support.pelco
Conclusion
Taking everything into consideration, there is no doubt that article offers helpful information about Make Windows Server 2019 As An Ntp Client. Throughout the article, the writer presents a deep understanding on the topic. In particular, the discussion of Z stands out as a highlight. Thank you for the article. If you need further information, feel free to reach out through social media. I look forward to hearing from you. Additionally, below are a few relevant posts that you may find useful:
Maintaining accurate time on your server is critical largely because many services and IT applications rely on accurate time settings to function as expected. These include logging services, monitoring and auditing applications, and database replication to mention a few.
Time skew in servers, and any client systems for that matter, is undesirable and usually causes conflict in time-critical applications. To maintain accurate time settings on your server and across the network by extension, it’s preferred to install and enable a NTP server on your server.

What is an NTP server?
NTP, short for Network Time Protocol, is a protocol that synchronizes time across network devices. It listens on UDP port 123 and always ensures that time inconsistencies across the server and client systems are mitigated and that client systems are always in sync with the server.
NTP server refers to a network device or a service that fetches time from an external time source and syncs the time across the network using the NTP protocol. This guide will focus on installing NTP service on Windows server 2019.
How Does NTP Work ?
Being a protocol, NTP requires a client-server architecture. The NTP client residing on a Windows PC, for example, initiates a time request exchange with the NTP server.
A time-stamp data exchange happens between the server and client and this helps in adjusting the clock on client’s systems to the highest degree of accuracy to match the time on the NTP server. In this guide, we will walk you through the installation and configuration of NTP server on Windows Server 2019.

There are several ways of setting up NTP server and we will look at each in turn.
In Windows Server environments, there is a special Windows time service that handles time synchronization between the server and the client systems. This is known as Windows Time service. PowerShell provides a command-line tool known as w32tm.exe and comes included in all versions of Windows from Windows XP and Windows Server 2008 to the latest versions of each OS.
Using the w32tm.exe utility, you can configure your Windows system to sync with online time servers. Usually, this is the tool of choice when setting up and monitoring time on your Windows Server system.
Using the command-line utility is quite straightforward.
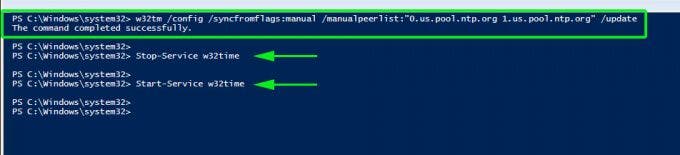
For example, to set the Server to point to 2 different time servers, namely 0.us.pool.ntp.org and 1.us.pool.ntp.org , launch PowerShell as the Administrator and run the command below
w32tm /config /syncfromflags:manual /manualpeerlist:”0.us.pool.ntp.org 1.us.pool.ntp.org” /update
Then restart Windows Time service using the commands:
Stop-Service w32time
Start-Service w32time
Here’s a snippet of the commands.
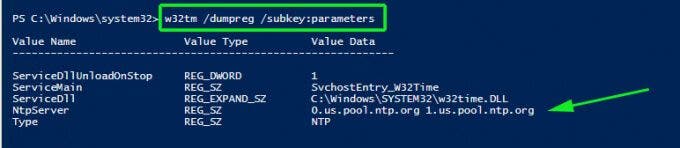
You can thereafter confirm the values of NTP servers configured in the registry by running this command:
w32tm /dumpreg /subkey:parameters
Configure NTP Server on Windows Server 2019 using Registry editor
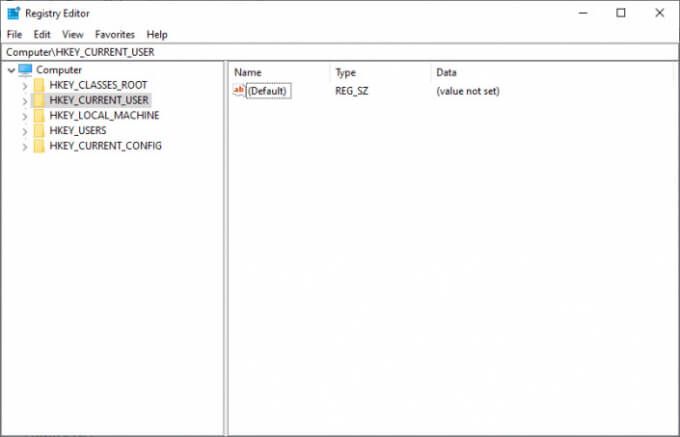
The second method of installing and configuring the NTP server is using the registry editor. If you are not a fan of the Windows PowerShell, then this will truly come in handy.
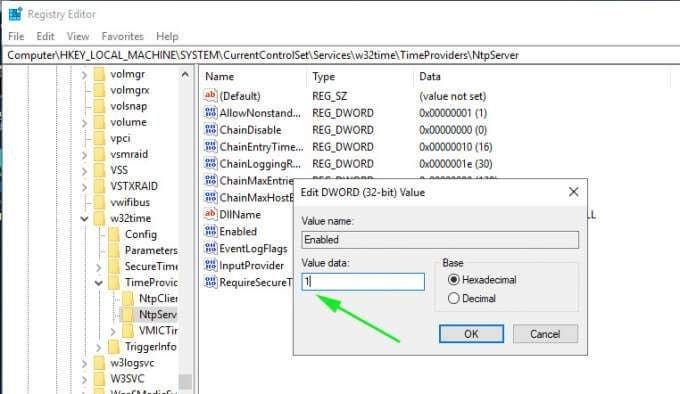
To get started, open the registry editor. Press ‘Windows key + R’ and type ‘regedit’ and hit ENTER. The windows registry will be launched as shown below.
Next, head over to the path shown below
ComputerHKEY_LOCAL_MACHINESYSTEMCurrentControlSetServicesW32TimeTimeProvidersNtpServer
On the right pane. Be sure to find & double-click the file labelled ‘Enabled’ in the diagram shown below.
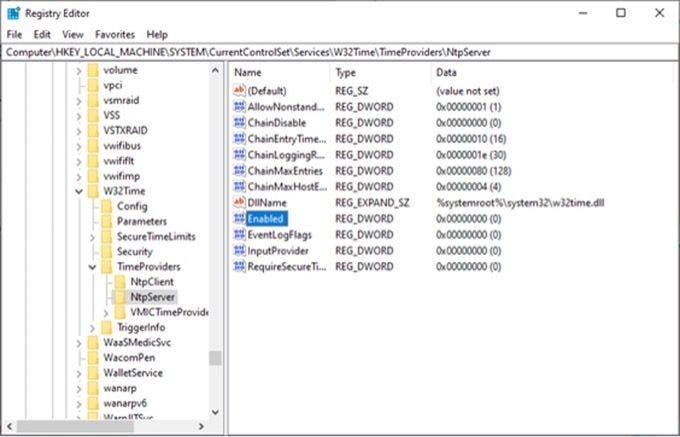
Next, In the ‘value data’ text field, set the value to ‘1’ and click the ‘Ok’ button.
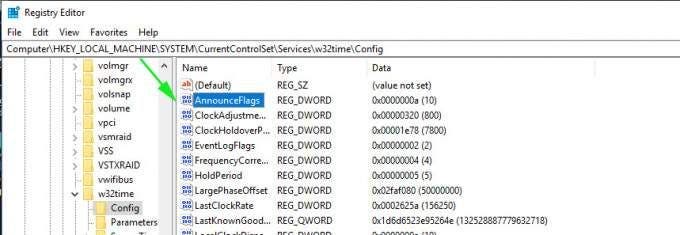
Next, head over to the path:
ComputerHKEY_LOCAL_MACHINESYSTEMCurrentControlSetServicesW32TimeConfig
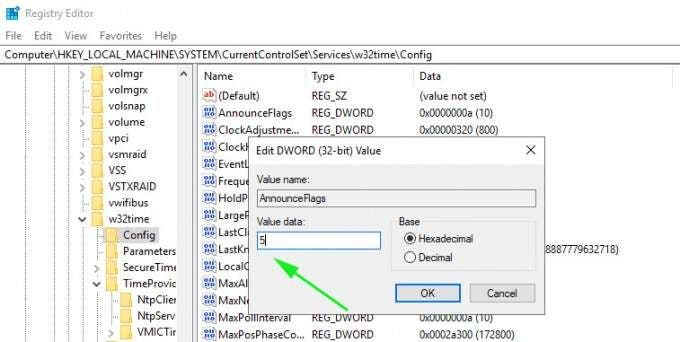
In the right pane, double click the ‘Announce Flags’ file.
Double-click the file and in the Value data text field, type the value ‘5’ and click ‘OK’.
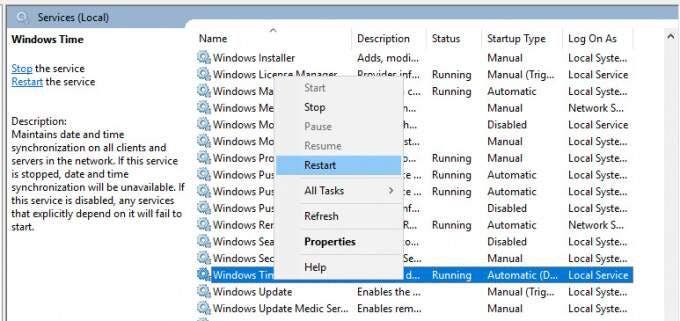
For the changes to come into effect, you need to reboot the NTP server by heading to the services Window. To achieve this, press ‘Windows key + R’ and type ‘services.msc’. Scroll and find ‘Windows Time’, right-click on it and select the ‘Restart’ option.
Useful w32tm commands
Once you have set up your NTP server, you can use the following commands to verify various aspects of the server:
To check the status of the NTP server, run the command:
w32tm /query /status
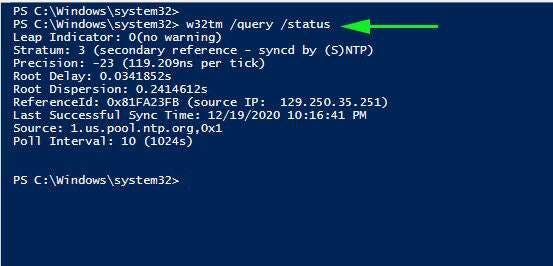
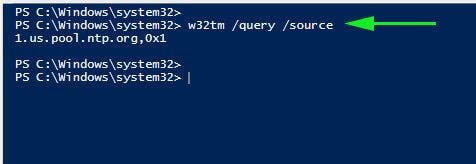
To reveal the current NTP pool being used to sync time with execute:
w32tm /query /source
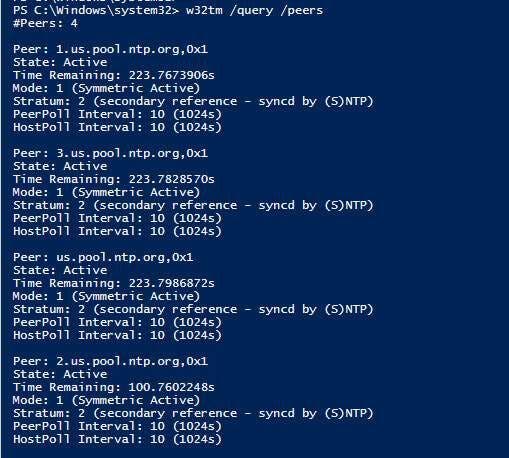
You can also display a list of NTP time servers along with their configuration status as shown.
w32tm /query /peers
To display NTP server configuration settings, run the command:
w32tm /query /source
This shows quite a wealth of information.

Final Take
We cannot stress enough how important it is to maintain accurate time and date settings on your server. As you have seen, setting up an NTP server on your Windows server instance is quite easy and straight forward.
Once you have configured the NTP service on your server, other domain controllers in your environment will sync with this server and the Windows clients in the domain will sync with the domain controllers. Hopefully, you can now install and configure NTP on Windows Server 2019.