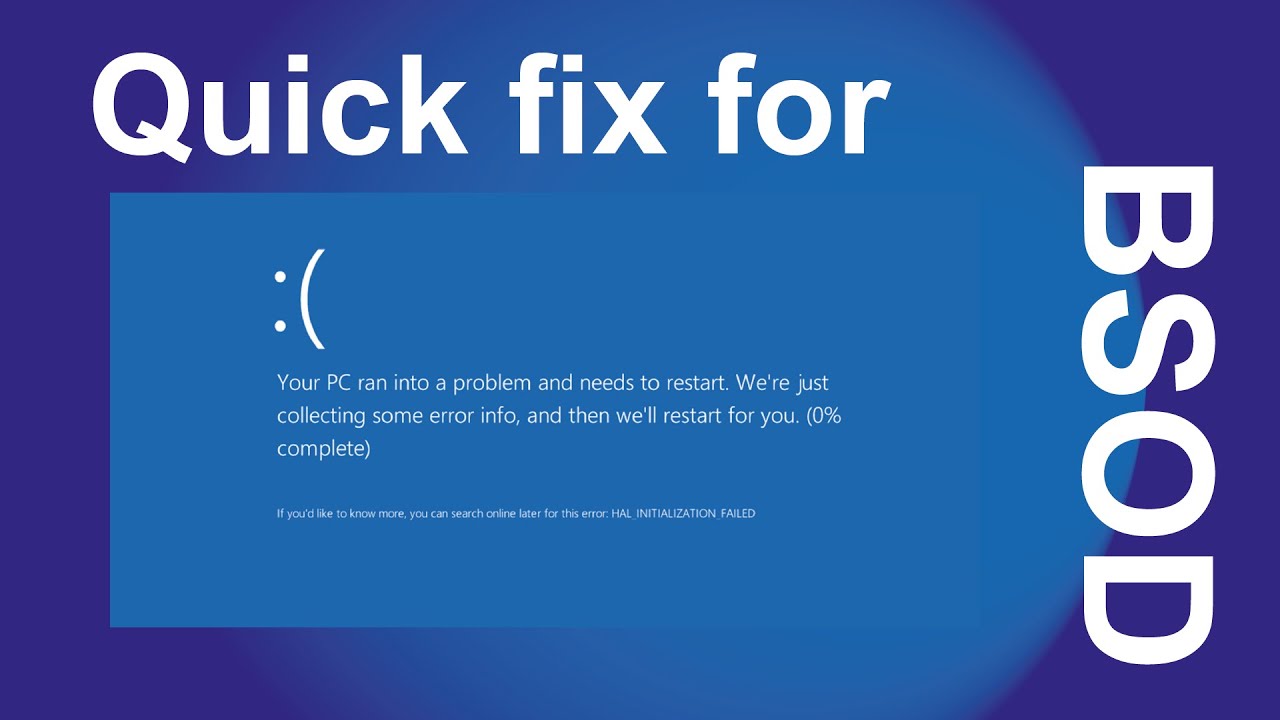
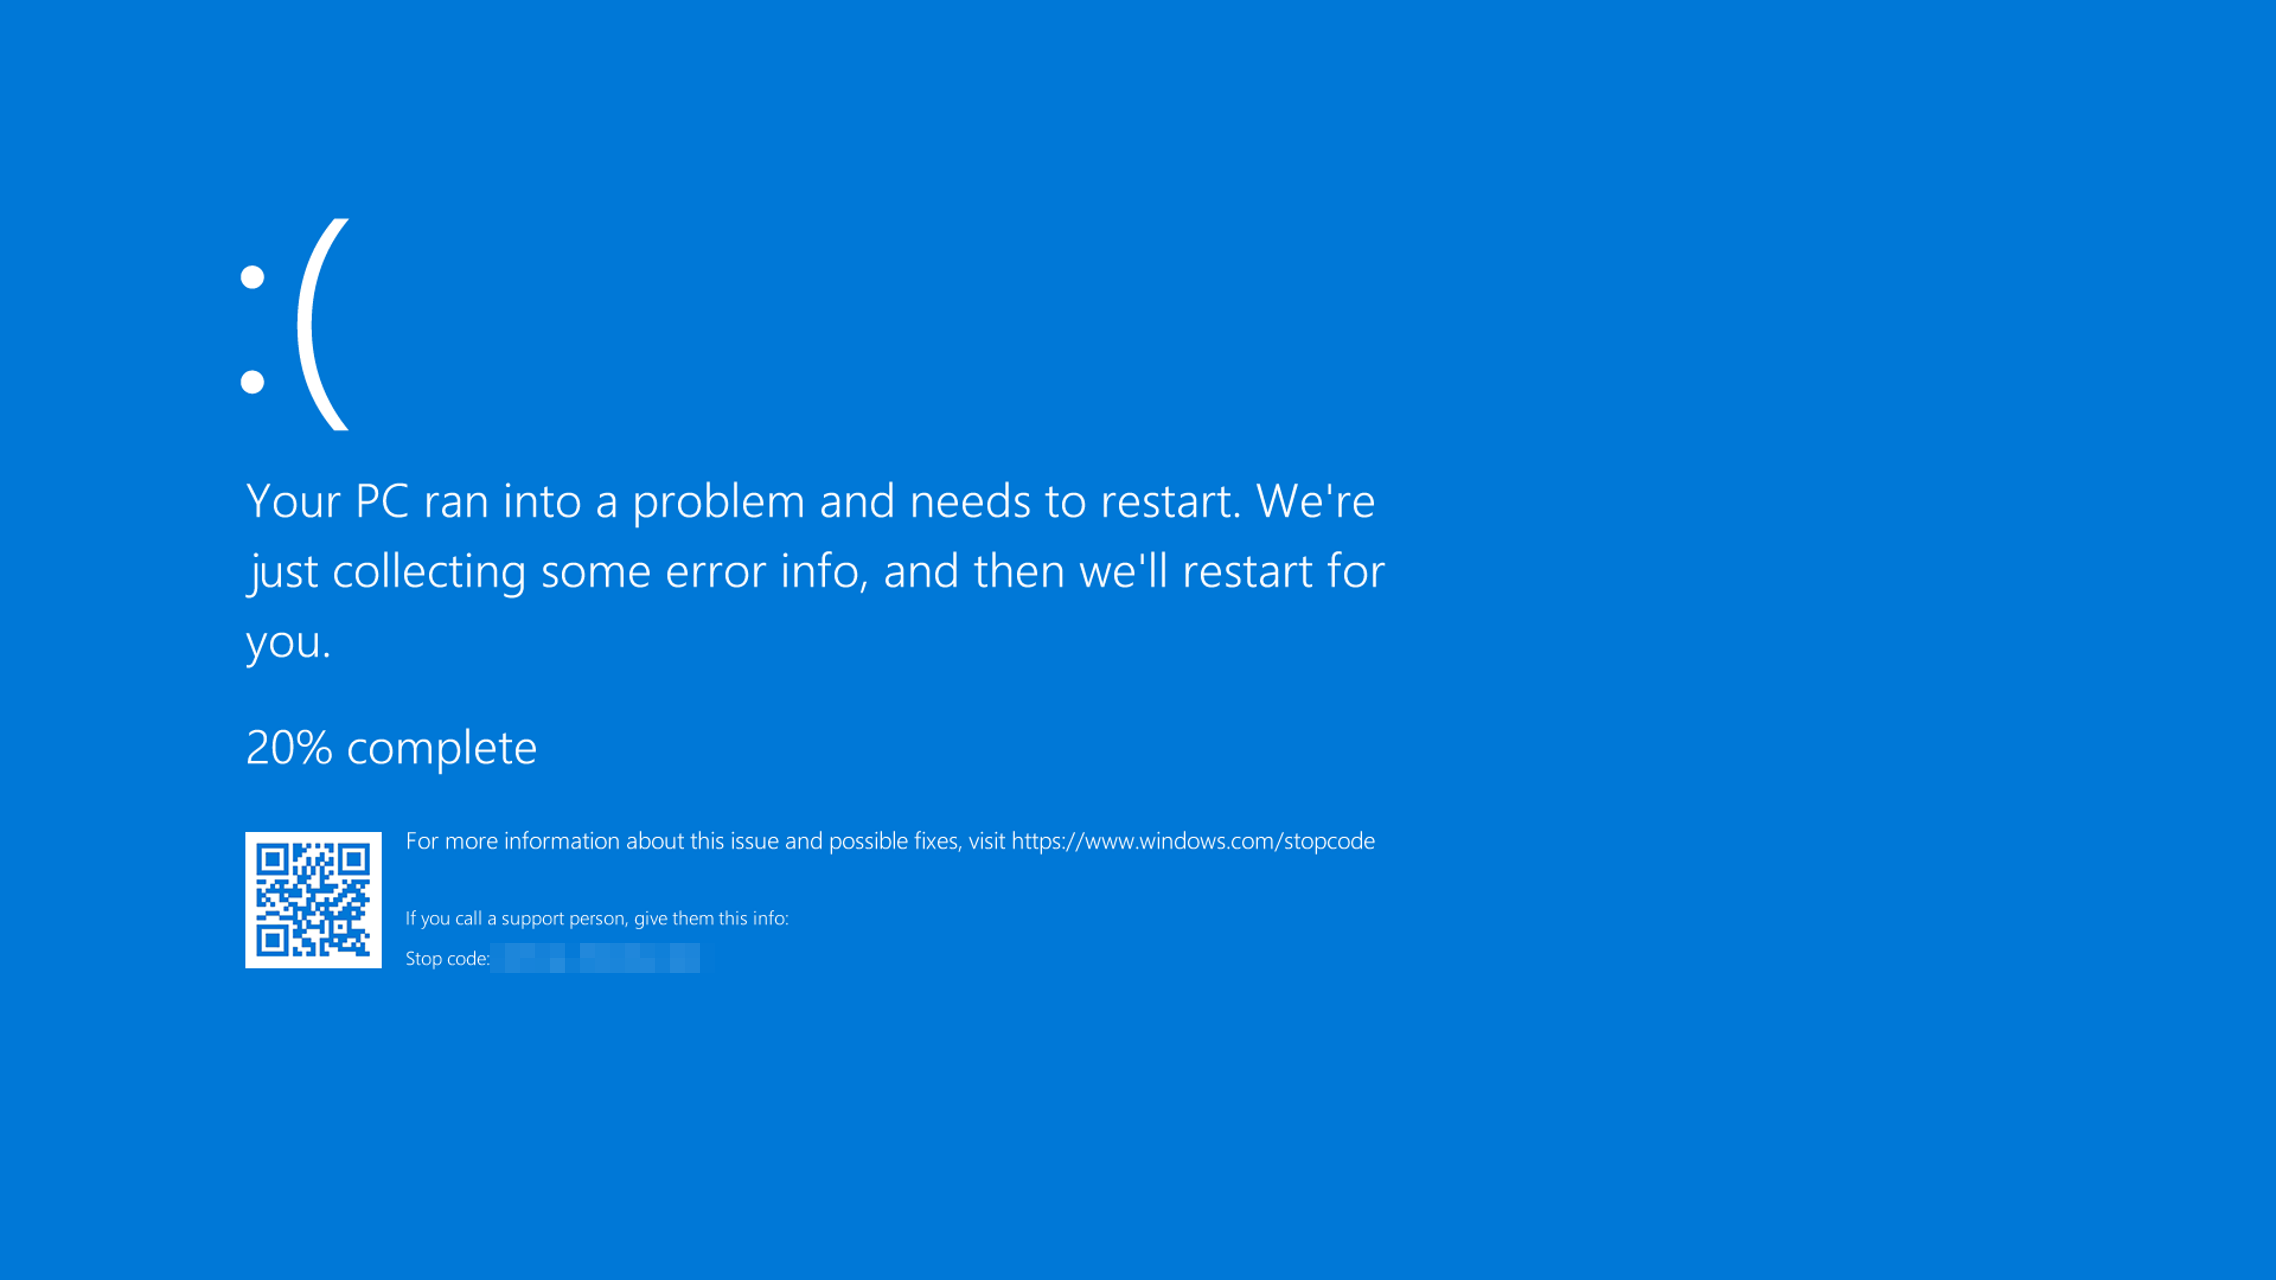
Во время работы или при включении компьютера внезапно может появиться так называемый «синий экран смерти». Если вчитаться в текст, написанный поверх, то там будет указана причина сбоя – некорректная работа файла Ntoskrnl.exe. Этот элемент очень важен для функционирования ОС, и когда с ним что-то происходит, пользоваться ПК становится невозможно.

Что такое Ntoskrnl.exe
Когда вы включаете компьютер, запускается целый ряд служб, в том числе, Ntoskrnl.exe, который подготавливает к работе драйверы и визуализирует изображение на экране. При этом может произойти ошибка, что влечет за собой остановку процесса. Данная служба обычно располагается на диске «С» вместе с другими компонентами системы и занимает несколько папок: System32, Driver Cache и т. п.

Причины неисправности
Ошибка ntoskrnl.ехе может возникать по целому ряду причин:
- Некорректный оверклокинг и андервольтинг, приведший к перегреву.
- Физическое удаление файла (вообще-то это достаточно трудно сделать, но возможно, если использовать ПО, влияющее на системные элементы).
- Повреждение/замена файла вирусом.
- Повреждение записей в реестре.
- Наличие проблемных или старых драйверов.
- Внутренний системный сбой.
- Сбой в работе винчестера.
- ОС не обновлена до актуальной версии.
- Повреждение или сбой в работе ОЗУ.
Возможные решения
Ошибка ntoskrnl.exe – это серьёзно, но не всегда фатально, и сейчас мы расскажем, как её исправить.
- Для начала нужно добраться до «Десктопа» и получить доступ к функциям ПК, так как, синий экран закрывает собой все пространство.
- Для этого выполните перезагрузку, и нажимайте клавишу F2 или Del (иногда бывают и другие варианты, это зависит от внутренней структуры системы ввода-вывода).
- Перед вами развернутся опции БСВВ.
- Выберите пункт Load setup defaults («Загрузить настройки по умолчанию»).

- Кликните по F10, чтобы подтвердить выбор.
- Снова перезапустите ПК – синий экран исчезнет, и можно будет переходить к исправлению ошибки.

Очистка реестра
Пока не вернулась ошибка ntoskrnl.exe с синим экраном (кстати, чаще всего она возникает на windows 7), нужно начать действовать. Первым делом попробуйте почистить реестр от неправильно выполненных и устаревших записей. Удобнее и безопаснее всего делать это с помощью специальных утилит, например, небезызвестной CCleaner.
- Скачайте программу и установите её.
- Откройте окно и слева в списке найдите главу «Очистка реестра».
- Нажмите «Анализ» и дождитесь обнаружения всех проблемных записей.

- Вверху укажите «Выделить все» и «Исправить выделенное».

- Программа предложит сделать копию реестра – соглашайтесь, только сохраняйте ее не в «Документы» на диске «С», как указано по умолчанию, а в отдельную папку на диске «D».

- После очистки запустите «Анализ» ещё раз – и так до тех пор, пока список повреждённых элементов не останется пустым.


Исправление диска
Далее нужно проверить системный диск и исправить кое-какие ошибки, если они будут обнаружены. Для этого:
- Найдите значок «Компьютер» и разверните содержимое.

- Дважды щелкните ПКМ по диску «С» (у вас он может называться как-нибудь еще – главное, помните, что нам нужен раздел, где хранится ОС);

- Выберите последний пункт «Свойства», а затем подпункт «Сервис» и запустите проверку.

- Компьютер может несколько раз перезагрузиться в процессе – это нормально, не волнуйтесь.


Для этих же целей проверяем внутренние системные файлы и исправляем неполадки следующим образом:
- Нажмите Win+R и дождитесь появления небольшого окошка со строкой ввода.
- Впишите в нее «cmd».

- Теперь появится окно с черным полем, куда нужно ввести: «sfc/scannow» и нажать «Интер».

- Также можно задать команду «chkdsk».


Подождите, пока не появится сообщение об успешном выполнении операции, а потом перезагрузите ПК.
Проверка на вирусы
Нередко причиной остановки запуска Windows бывают вирусы, которые удаляют файл Ntoskrnl.exe из корневой папки Winnt_root\System32. Не сбрасывайте со счетов такую возможность и обязательно проверьте систему:
- Установите какой-нибудь хороший антивирус: Касперского, «Доктор веб», «Эсет» и т. п.
- Запустите полную проверку всех дисков.

- Дождитесь окончания процедуры (это может занять много времени, можно оставить на ночь).
- Удалите все вредоносные файлы или переместите в карантин – лучше поступить так, как рекомендует антивирус.

- Проверьте файловую систему на ошибки и восстановите все поврежденное, как это было описано выше.


Если вирус занесен какой-то программой, ее необходимо деинсталлировать. Скорее всего, добровольно удаляться она не захочет – тогда вам поможет деинсталлятор (например, Uninstall Tool) и опция «принудительное удаление».
Обновление ОС и драйверов
Иногда проблемы с ntoskrnl.exe и синий экран возникают из-за того, что система давно не обновлялась: в Windows 10 сложно отключить автоматическую установку пакетов, но в седьмой версии такое часто происходит – просто зайдите в Update Center и запустите обновления, а для драйверов оборудования скачайте их отдельно (только обращайте внимание на разрядность: x64 или х86 для 64-bit систем). Удалите все драйвера старого, не используемого оборудования: принтеров, графических планшетов, сканеров, МФУ и т.п. («Панель управления» — «Диспетчер устройств» — клик правой кнопкой по устаревшему устройству – команда «Удалить»).

Восстановление системы
И, наконец, если все предыдущие шаги не увенчались успехом, можно восстановить систему до того состояния, когда все нормально работало. Чтобы сделать это, нужно:
- На Windows 7 последовательно открываем: «Пуск» – «Все программы» – «Стандартные» – «Служебные» – «Восстановление системы», на Windows 10 в «Поиск» наберите «Создание точки восстановления» и откройте соответствующий значок.

- Нажмите «Далее» в появившемся окне и выбираем «Показать точки восстановления».
- Выберите дату, когда компьютер стабильно работал.

- Нажмите «Готово».


Дождитесь окончания процесса – ни в коем случае не выключайте компьютер из сети и позаботьтесь о том, чтоб у ноутбука не села батарея.
Contents
- What Is Ntoskrnl.exe?
- What Causes the Ntoskrnl.exe Error?
- How to Fix Windows 10 BSOD Caused by Ntoskrnl.Exe
- Fix 1: Update Your Drivers
- Fix 2: Run a Scan with the Windows Memory Diagnostic Tool
- Fix 3: Run the System File Checker (SFC)/CHKDSK Scan
- Fix 4: Reset Overclocking Settings for Your Devices
- Fix 5: Install Windows Updates
- Fix 6: Perform a System Restore
- Fix 7: Check Your Hardware
- Fix 8: Check for Malware
![Ntoskrnl.Exe BSOD Error on Windows 11/10 [FIXED]](https://www.auslogics.com/en/articles/wp-content/uploads/2019/09/fix-ntoskrnl-exe-bsod.jpg)
You’ve encountered a Blue Screen of Death that points towards Ntoskrnl.exe as the culprit. Before it got to this, you probably noticed the following symptoms:
- Slow PC performance.
- High CPU usage and subsequent overheating.
- Random system reboots.
Then finally, during system boot, you receive an error message that says “ntoskrnl.exe file is missing.”
Don’t get worried much. It’s not a problem that cannot be handled. So please keep reading to find out how to get rid of the Ntoskrnl.exe BSOD.
P.S. If you don’t want to read the full article, you may simply watch a short video showing a quick fix here:
What Is Ntoskrnl.exe?
Ntoskrnl.exe (short for Windows NT operating system kernel) is an essential Windows component responsible for hardware abstraction, process and memory management, and various other system services.
It consists of:
- Cache manager
- Kernel
- Memory manager
- Executive
- Security reference monitor
- Scheduler (Dispatcher)
Since it’s a fundamental part of Windows, when it encounters a problem, your computer crashes and displays a BSOD. The issue could occur repeatedly. You might also get a ‘Memory management’ error code.
What Causes the Ntoskrnl.exe Error?
There’s no one thing that could be said to be the cause. The issue could be software- or hardware-related. But the possible factors include:
- Your device drivers are outdated, corrupt, or incompatible. This is why it is important to ensure you keep them regularly updated.
- Faulty RAM. Replacing the sticks should fix the issue.
- Your RAM and local storage may be inadequate in keeping up with the activities you carry out on your computer. This leads to frequent freezing, and subsequently to the Ntoskrnl.exe error.
- You overclocked your devices.
- Some of your system files are corrupt.
How to Fix Windows 10 BSOD Caused by Ntoskrnl.Exe
Now that we’ve seen the possible causes, let’s go ahead and present the solutions:
- Update your drivers
- Run a scan with the Windows Memory Diagnostic Tool
- Run the System File Checker (SFC)/CHKDSK scan
- Reset overclocking settings for your devices
- Install Windows updates
- Perform a system restore
- Check your hardware
You can perform these fixes sequentially or randomly, according to your discretion.
Let’s begin.
Fix 1: Update Your Drivers
We recommend you use Auslogics Driver Updater to scan for all outdated and faulty drivers on your PC. It will automatically install the latest manufacturer-recommended versions. The tool recognizes your system specifications, so you don’t have to worry about downloading the wrong drivers.
You could also perform the update manually through Device Manager or by visiting the official website of your device manufacturer to search for each one of your drivers. Ensure you get the versions that are compatible with your OS.
Here’s how to fix Ntoskrnl.exe blue screen error on Windows 11 with Device Manager:
- Hold down the Windows key and simultaneously press X to load the Power User Menu.
- Select Device Manager.
- Navigate to where the problematic driver is. If you’re looking to update the graphics card driver, expand Display Drivers. If you wish to update the microphone driver, expand Audio Inputs and Outputs. And so on.
- Right-click the driver and select Update Driver.
- Select Search Automatically for Drivers.

Windows will download and install the driver update. Reboot the system so the affected device can start using the new driver.
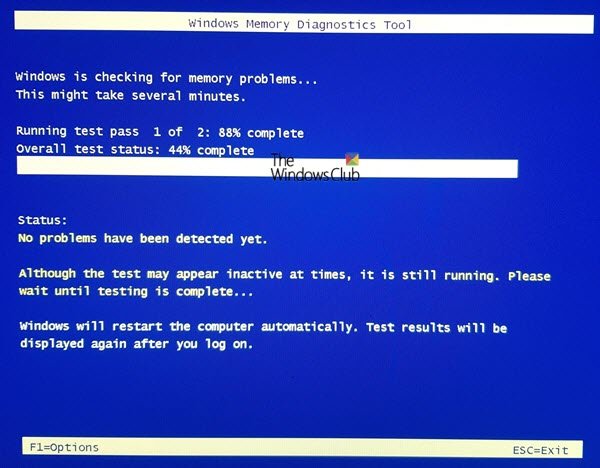
Fix 2: Run a Scan with the Windows Memory Diagnostic Tool
The BSOD could be related to a faulty memory (RAM) module. So, here’s how to run Windows Memory Diagnostic tool on Windows 11:
- Close all open windows.
- Go to the Start menu.
- Type ‘Windows Memory Diagnostic’ into the search bar and then click the option when it appears in the results list.
- Click on the option that says ‘Restart now and check for problems (recommended).’
- Your system will restart, and the scan will commence. Wait for it to complete. It may take a while (could be up to an hour depending on the size of your RAM).
- After the scan, you’ll get the results once you log into your computer.
Fix 3: Run the System File Checker (SFC)/CHKDSK Scan
The problem could be due to corrupt system files. An SFC scan will detect and repair them.
Follow these easy steps:
- Go to the Start menu.
- Type ‘CMD’ in the search bar and right-click on Command Prompt from the search results.
- Select ‘Run as administrator’ to open an elevated Command Prompt window.
- You will receive a User Account Control (UAC) confirmation dialog. Click the Yes button.
- Copy and paste ‘sfc /scannow’ in the window (make sure you don’t include the inverted commas) and press Enter on your keyboard. If you choose to type the line, there should be a space between ‘sfc’ and ‘/scannow.’
- Wait for the scan to complete. You will then get a report on the repairs that were achieved.
If the scan shows that some problems were unable to be fixed, run a CHKDSK scan. Here’s how:
- Press the Windows logo key + X combination on your keyboard to open the WinX menu.
- Locate Command Prompt (Admin) in the list and click on it. This will open an elevated Command Prompt.
- Click the Yes button when presented with the User Account Control (UAC) confirmation dialog.
- In the window that opens, type (or copy and paste) ‘CHKDSK /f /r’ and press Enter (don’t include the inverted commas).
- You may be asked whether you want the scan to be performed when next your computer boots up. Type ‘y’ and press enter.
- Wait for the scan to complete.
Afterwards, run the SFC scan once more.
Fix 4: Reset Overclocking Settings for Your Devices
Although overclocking is a smart way of exploiting the maximum capability of your hardware, it can also lead to overheating, hardware breakdowns, and system crashes. Stop overclocking your devices if you are experiencing the Ntoskrnl.exe error.
You can use a trusted program to change the settings. But you can also do so through BIOS/UEFI. The procedure will differ for each device. Therefore, look up the instructions on how to get it done.
Fix 5: Install Windows Updates
Follow these easy steps to update Windows so you can stop searching for ways to fix the Ntoskrnl.exe BSOD error on Windows 11:
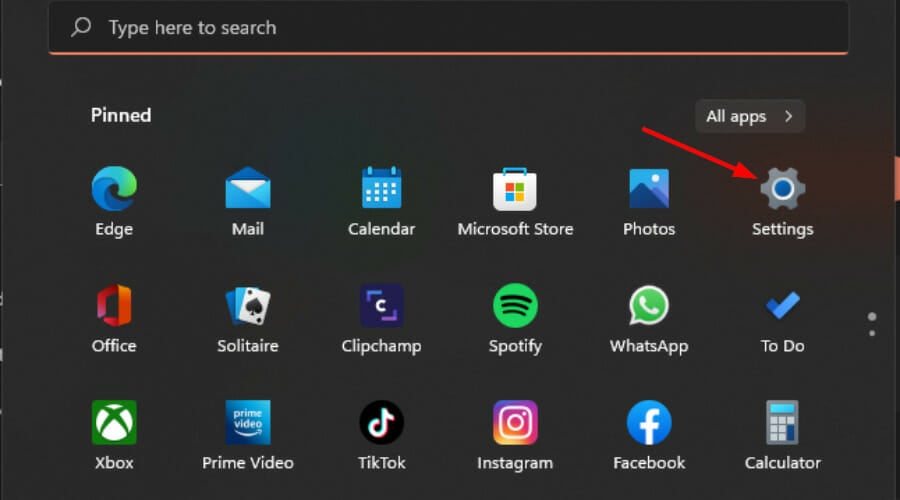
- Use the Windows key + X combo to open the Power User menu and select Settings to launch the app on Windows 11. You can also use the Windows key + I shortcut to quickly launch Settings.
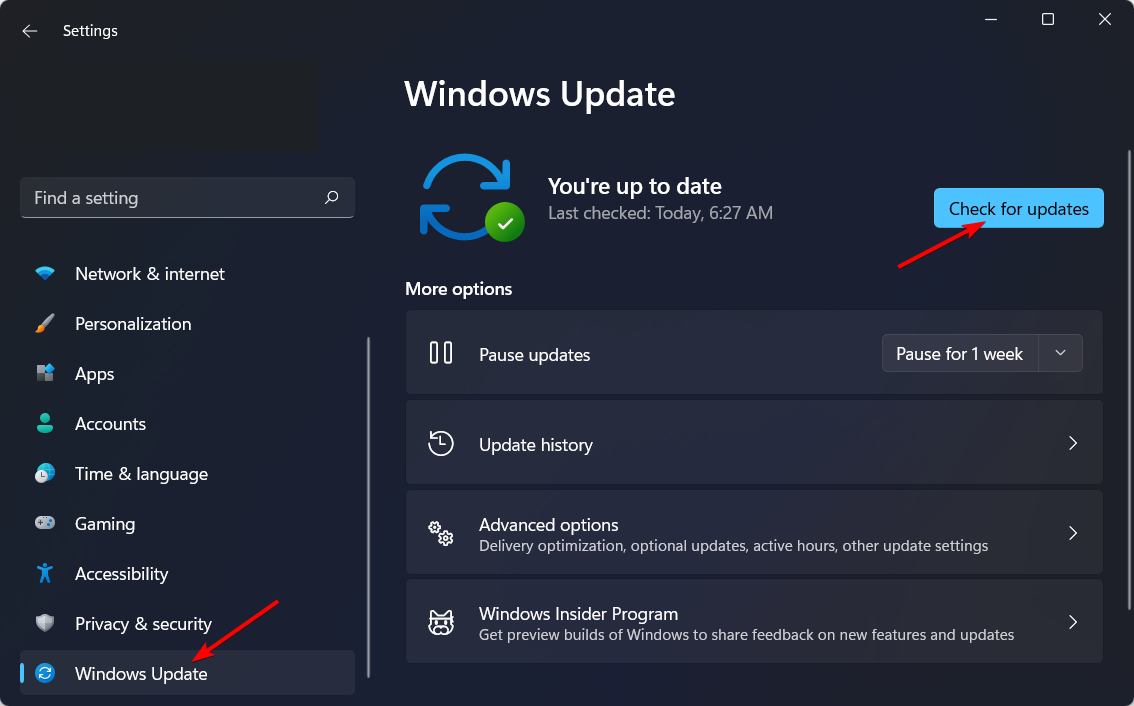
- On the main Settings screen, hit Windows Update on the left navigation pane.
- Click Check for Updates.
Windows will search for and download available updates. You can reboot your PC immediately to install significant updates or wait until your next routine restart.
In some cases, a recent update might be the cause of the Ntoskrnl.exe BSOD. You can try uninstalling the most recent update and see if that solves the problem.
- On the Windows Update screen, select Update History.
- On the Update History page, click Uninstall Updates.
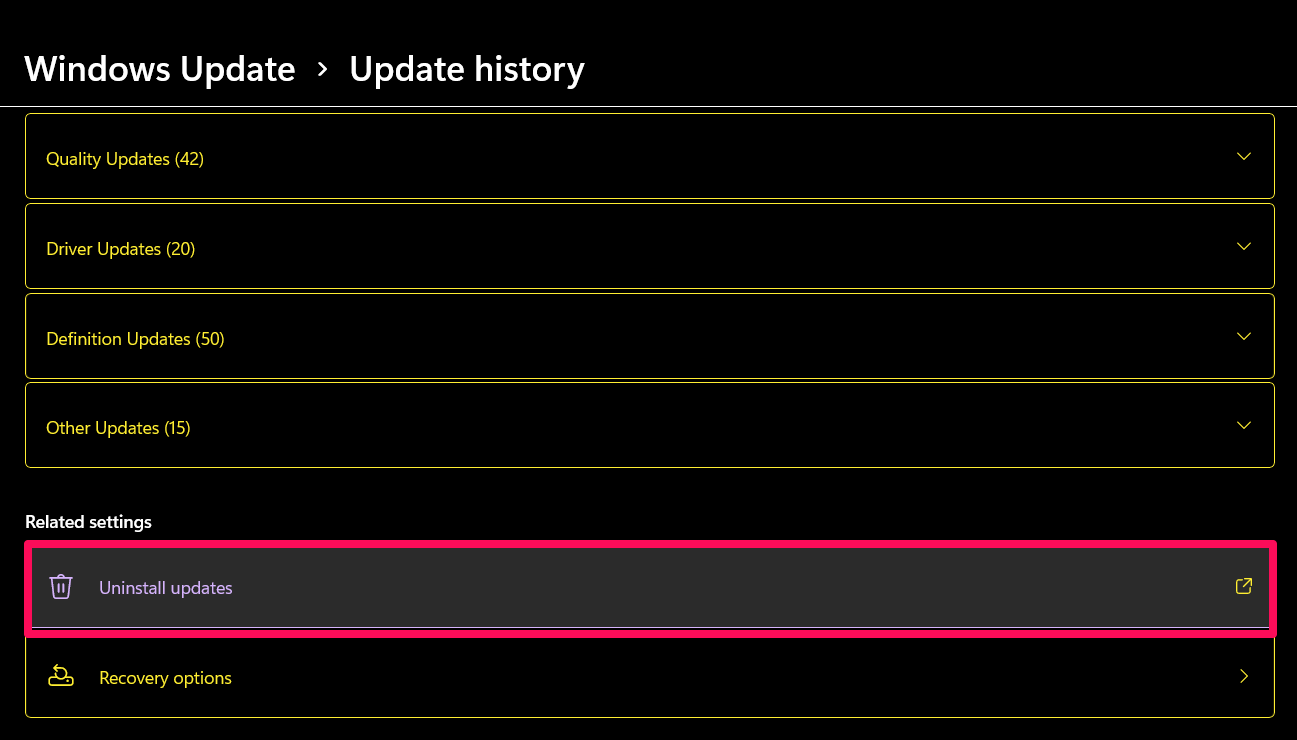
- We now go to the Uninstall an Update Page in Programs and Features. Locate the most recent update or the one you consider suspicious and uninstall it.
After uninstalling the update, reboot your system.
On Windows 10:
- Press the Windows logo key + I combination on your keyboard to open the Settings app.
- Click on Update and Security.
- Select Windows Update and then click the ‘Check for Updates’ button on the right-hand side of the window. If there are any available, windows will download and install them automatically.
Restart your PC and then see if the problem has been resolved.
Fix 6: Perform a System Restore
System restore will take your OS back to a time when no issues existed. Follow these easy steps to get it done:
- Use the Windows key + I hotkey to launch Settings.
- Go to System > About.
- Select System Protection.
- On the System Properties window, click System Restore.
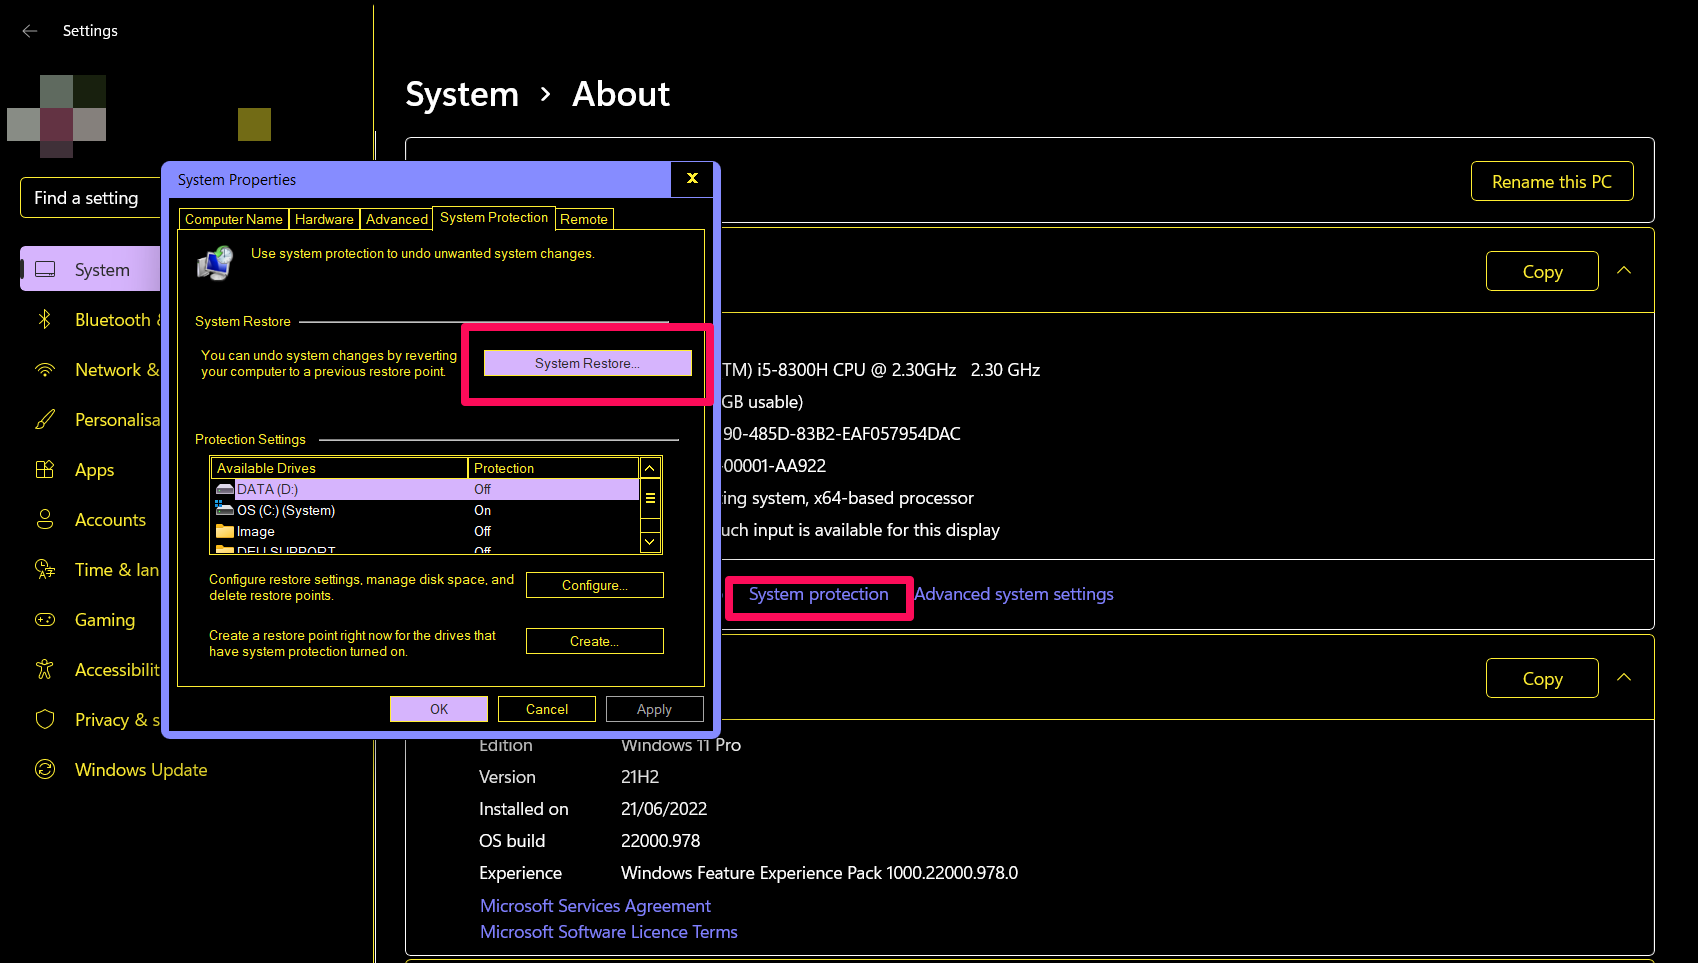
- When the System Restore window opens, click Next and select a restore point.
Follow the onscreen wizard to finish up the process.
Fix 7: Check Your Hardware
A failing RAM module or Solid State Drive (SSD) could be the cause of the error you are dealing with. Replace your hard sticks and see if the issue will be resolved.
We suggest you visit an expert to help you perform this fix.
If you have two RAM slots, you can try removing both sticks. Clean the slots, and reinsert one stick. See if that fixes the issue. If no, reinsert the other stick and try again.
If your Windows OS is installed on your SSD, reinstalling it should resolve the issue.
Fix 8: Check for Malware
A hidden virus or malware on your computer can contribute to the blue screen. Windows 11 ships with a native security apps that checks for threats in real-time but there is no 100% guarantee that the automatic function will catch everything every time.
To make sure,you can manually scan for threats yourself. Here’s how:
- Hit the Windows key to launch the Start menu.
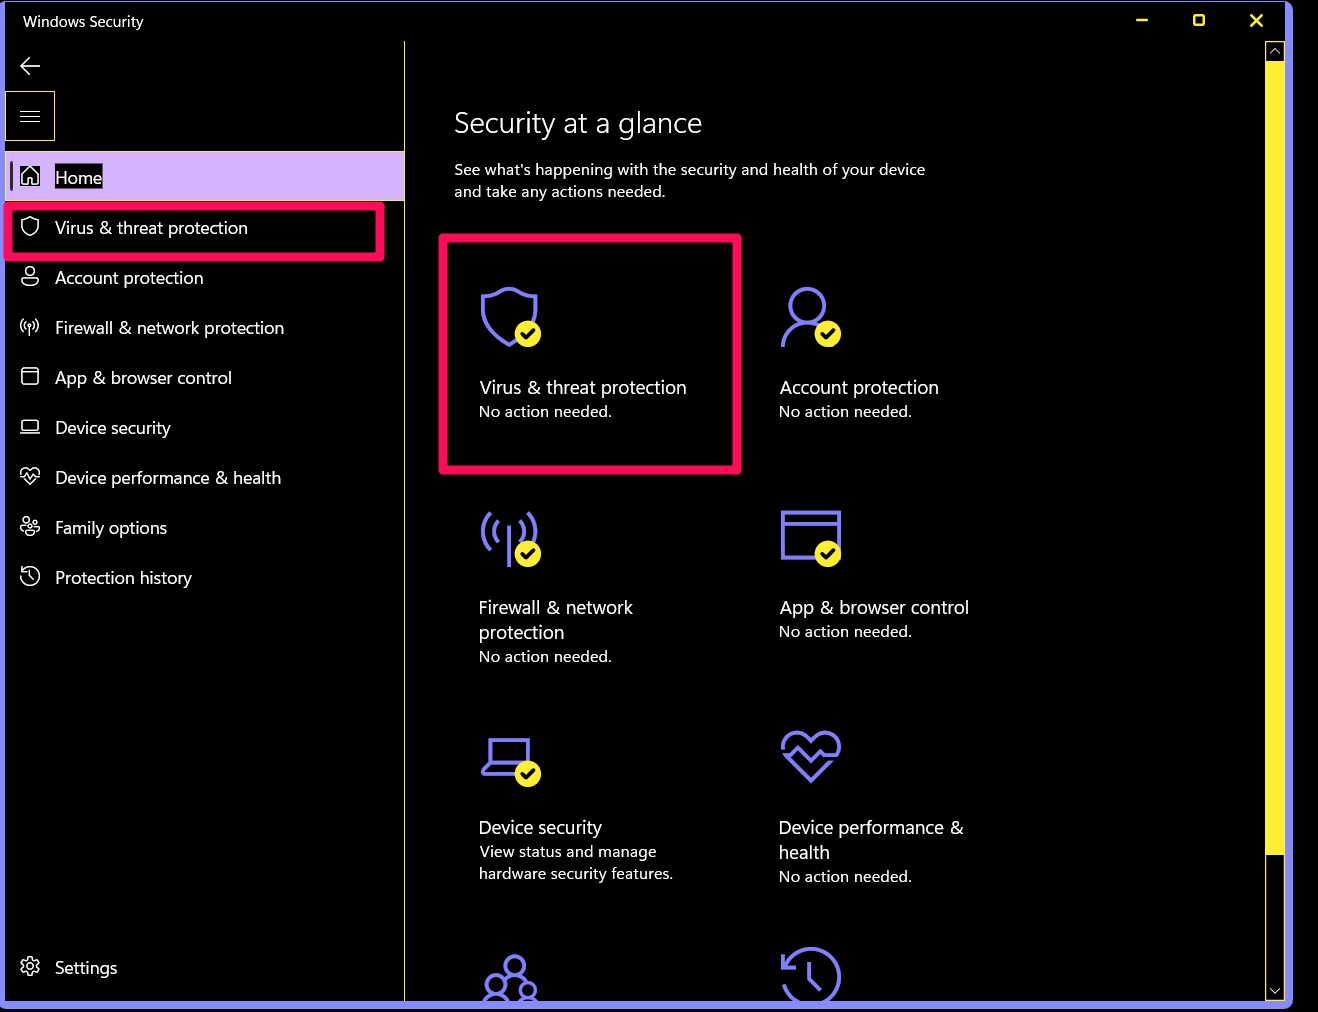
- Type “security” and select Windows Security from the search results.
- Select Virus & Threat Protection on the left navigation pane or just select it from the main screen.
- Click the Quick Scan button to commence a quick check of your system.
- If the Quick Scan doesn’t detect anything, you can run a deeper scan. Click the Scan Options link.
- On the next page, select Quick Scan or Microsoft Defender Offline Scan and click the Scan Now button.
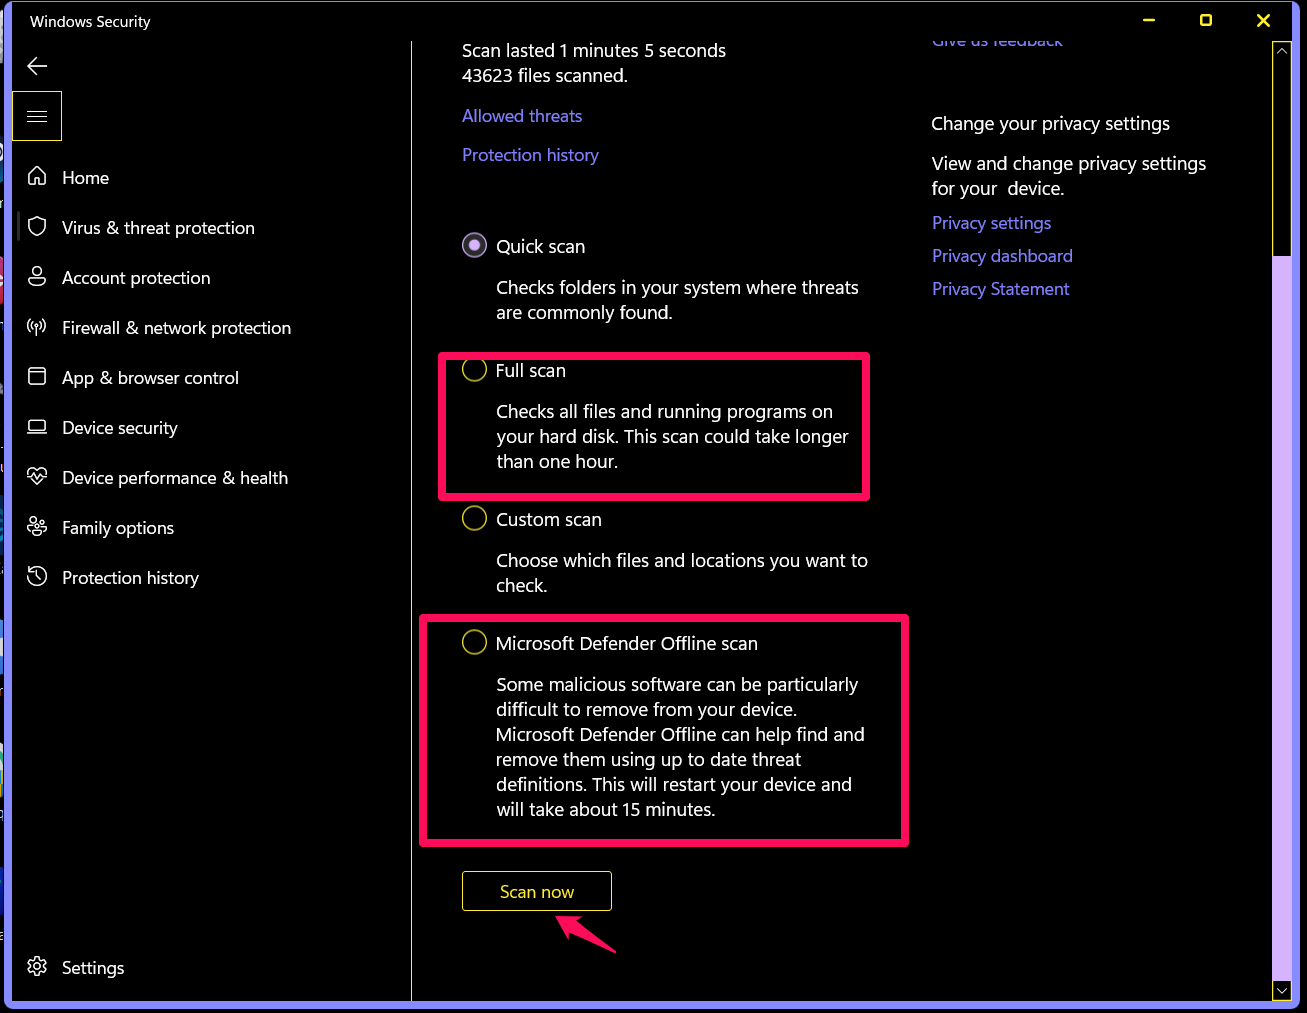
The Microsoft Defender Offline Scan will take about 15 minutes while the Full scan may take longer depending on the volume of files on your system.
If nothing turns up after the scan(s), you can try a trusted third-party security software like Auslogics Anti-Malware.
We hope these solutions have been of help to you.
If you have any questions, remarks, or further suggestions, please feel free to share them in the section below.
We’ll like to hear from you.
Use Auslogics Driver Updater to resolve any driver-related problems in a Windows PC
This article talked about by MiniTool Software Limited mainly provides more than 9 workable methods to deal with ntoskrnl.exe blue screen of death stop code error in Windows 11. Generally speaking, no matter what situation you are in, you can find a solution here!
Ntoskrnl.exe BSOD Windows 11 refers to a blue screen of death (BSOD) caused by the Windows 11 operating system (OS) kernel executable (ntoskrnl.exe). It means that there is a problem with the file. Without this file, the system will not run.
A BSOD problem is not a catastrophe. It just forces you to reboot your computer and tries to protect your OS files from further damage. What you need to do is to troubleshoot the issue starting from the error message the blue screen gives you. Now, let’s see how to fix Windows 11 ntoskrnl exe blue screen error.
Tip: Most of the below solutions also apply to Windows 10, 8.1, 8, 7.
#1 Check for Memory Errors
First of all, you should check the integrity of your RAM relying on Windows Memory Diagnostic tool or third-party programs.
- Open Windows 11 Memory Diagnostic.
- In the Windows Memory Diagnostic window, select Restart now and check for problems (recommended).
- Then, your PC will reboot into the Windows Memory Diagnostic Tool and check for problems.

If the tool finds some issues, you need to reseat and swap RAM sticks on a desktop or reseat memory on a laptop if it’s accessible. If you still receive the ntoskrnl.exe BSOD Windows 11 error, you should contact your memory manufacturer.
#2 Check for Corrupted Files
Besides memory problems, you should check for corrupted files that can result in ntoskrnl exe BSOD. Usually, you can take advantage of System File Checker (SFC) or Deployment Image Servicing and Management (DISM) to do that.
- Open one command line platform, command prompt (CMD) or PowerShell.
- Input DISM /Online /Cleanup-Image /RestoreHealth and press Enter.
- Type sfc /scannow and press Enter.

Both commands will search for corrupted system files and replace them with healthy ones.
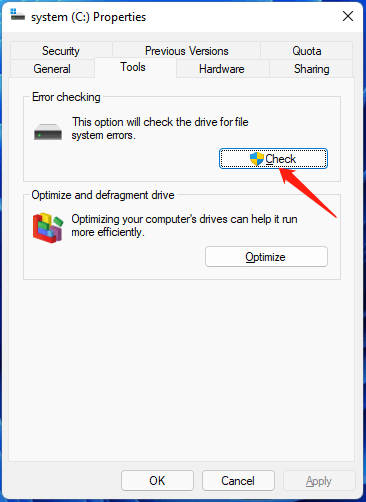
The corresponding graphic utility is Disk Check that locates in disk Properties > Tools.
#3 Check for Disk Problems
Also, you are recommended to check hard disk drives for physical damage like bad sectors, which is able to prevent Windows from running properly. To achieve that, you can make use of the Disk Surface Test feature of MiniTool Partition Wizard app.
MiniTool Partition Wizard DemoClick to Download100%Clean & Safe
Or, you can use the CHKDSK utility to do so. Just key in chkdsk /r /f into the command platform and press Enter. It will prompt the requirement for restart, just type Y to confirm.
#4 Check for Virus/Malware
Ntoskrnl.exe BSOD Windows 11 issue can also be caused by viruses or malware interfering. Although the Windows Security app is protecting your computer in real-time. Yet, it might miss something, especially for cattish malware. So, it is necessary that you take a manual scan of your machine depending on Windows Security or a third-party security tool you prefer.
1. Navigate to Start > Settings > Privacy & security > Windows Security.
2. On the Windows Security page, select Virus & threat protection.

3. Next, click on the Quick scan button to carry out a general check for viruses.

4. If the quick scan does not find any problem. You can further conduct a full scan by clicking on the Scan options on the above screen and choosing Full scan on the next screen.

A full and deeper scan will scan every corner and file on your PC. Thus, it will take a much longer time than a quick scan. Please take your patience and wait until it finishes.
Or, if you have your favorite antivirus software instead of Windows Defender, you can take advantage of it to check for malware or virus such as Avast, Bitdefender, Malwarebytes, etc.
#5 Update/Reinstall Device Drivers
A driver problem (damage, missing, or out-of-date) can also cause blue screen ntoskrnl exe error. If this is your situation, you can deal with it by updating or reinstalling the specific drivers. Yet, which driver(s) should you take action with? Think about which driver(s) you have operated on recently, update or reinstall. Then, let’s start with it (them).
- Open Windows 11 Device Manager.
- Unfold the section that contains the specific device.
- Find the specific device, right-click on it and choose Update driver.

If you would like to reinstall the device driver, just choose Uninstall device and restart your PC. Then, Windows will reinstall the corresponding driver for you automatically.
Tip: Many users have reported that updating Realtek High Definition Audio drivers fixes the ntoskrnl.exe BSOD Windows 11 issue.
#6 Install/Uninstall Windows 11 Updates
Moreover, updating OS is always a possible fix for system-related problems. There is a great chance that Microsoft has already patched the ntoskrnl-exe BSOD error and released an update. So, all you need to do is to update your system to the latest version.
To achieve that, just go to Settings > Windows Update and check for updates. By default, it will automatically check for updates and install the updates for you.
However, on the contrary, some people claim that uninstalling recent Windows update save them out. They think the system update is the cause of ntoskrnl BSOD.
1. Move to Setting > Windows Update > Update history.
2. On the Update history page, find and click Uninstall updates.

3. In the new popup, select your recent system update or the suspicious update and click Uninstall.

Follow the instructions to complete the task.
#7 Disable Overclocking
If you have enabled CPU overclocking for better computer performance, then it is time to disable it once you receive blue screen of death ntoskrnl.exe issue.
#8 Clean Boot Windows or Boot Windows into Safe Mode
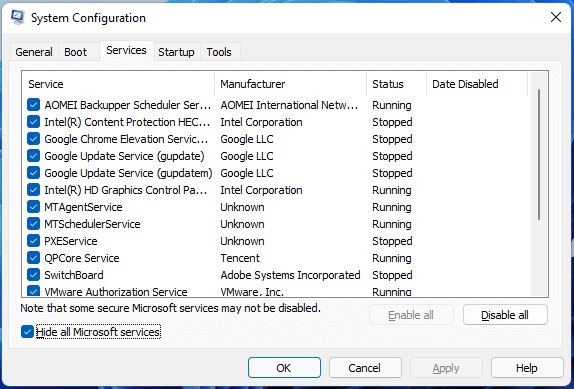
If you are still suffering from ntoskrnl.exe BSOD Windows 11 problem, you can try to boot your computer into safe mode, a special diagnostic mode for troubleshooting computer problems. In the Startup Settings, you should choose Enable Safe Mode with Command Prompt. Then, you can fix ntoskrnl.exe blue screen issue with the commands described above.

Or, you can clean boot your computer, which only uses the minimal startup programs and drivers to load the system. Clean boot grants you more control over which services and applications to run during startup than safe mode. However, you can only test one service or app per boot. Thus, you have to boot your PC a lot of times to find out the problematic service or app.
#9 Troubleshoot Blue Screen of Death Errors
Finally, you can still troubleshoot ntoskrnl.exe BSOD Windows 11 problem by following the guide on this page. It will help you with common stop error codes including the following ones:
- CRITICAL_PROCESS_DIED
- SYSTEM_THREAD_EXCEPTION_NOT_HANDLED
- IRQL_NOT_LESS_OR_EQUAL
- VIDEO_TDR_TIMEOUT_DETECTED
- PAGE_FAULT_IN_NONPAGED_AREA
- SYSTEM_SERVICE_EXCEPTION
- DPC_WATCHDOG_VIOLATION
Other Possible Solutions
In addition to the methods mentioned above, there are some other ways that might handle ntoskrnl exe BSOD.
- Restore Windows 11 to a previous state.
- Close Android emulators.
- Uninstall suspicious third-party programs like antivirus.
- Use a third-party BSOD fixing program.
- Remove or replace faulty RAM sticks.
- …
Keep Data Safe During Ntoskrnl.exe BSOD Windows11
Hope at least one of the above solutions manages to solve your problem successfully. If unfortunately, none of them can assist you, there is still something you should do – ensure the safety of your data!
Before the possible data damage or loss happens, you are strongly recommended to back up important files to another safer place, better out of the current computer, and especially when you decide to reset Windows. Therefore, you need the help of a professional and reliable data backup program like MiniTool ShadowMaker, which can back up files/folders, partitions/volumes, system, and even the entire hard disk easily with just a few steps.
MiniTool ShadowMaker TrialClick to Download100%Clean & Safe
- Download, install, and launch MiniTool ShadowMaker on the current PC. If you cannot boot up your machine already, you can install this software on another working computer, create a bootable USB with its Media Builder feature, and insert the bootable USB into the crushed PC to boot it up (firstly change the boot order in BIOS). Connect another USB with the target computer to save the backup image file.
- In the main interface of MiniTool ShadowMaker, move to its Backup tab from the top menu.
- In the Backup tab, click the Source module to select the files and folders you’d like to protect.
- Click the Destination module to pick up a location to store the backup image. Here, external storage is recommenced like the plugged USB flash drive.
- Finally, click the Back up Now button to start the process.

When the backup completes, disconnect the USB that contains the backup image. If you finally get the ntoskrnl.exe BSOD Windows 11 error handled but with some files lost, you can use the backup image to restore those files also relying on MiniTool ShadowMaker (Restore tab). If the original computer is completely damaged, you can still have your data by restoring them to your new PC.
What if your original machine is completely down with data loss but you have no backup at hand? The last chance you can try is to take its internal hard disks out, connect them with a working computer, install MiniTool Power Data Recovery on the working machine, and try to recover the data on the corrupted hard disks. If you are lucky and scan out some files with MiniTool Power Data Recovery, just save them on another healthy disk instead of the original corrupted drives.
MiniTool Power Data Recovery TrialClick to Download100%Clean & Safe
To Wrap Things Up
Until now, you should have learned how to deal with ntoskrnl.exe BSOD Win11 problem. If unfortunately, you are still struggling to handle the issue, just share your case in the below comment zone and maybe our readers have a fix. Or, if you have successfully solved the error in a way that is not mentioned in this article, please share it with us.
On the other hand, if you encounter any problem while using MiniTool products, please [email protected] and you will be answered as soon as possible!
Another BSOD error to quickly get rid of
by Claire Moraa
Claire likes to think she’s got a knack for solving problems and improving the quality of life for those around her. Driven by the forces of rationality, curiosity,… read more
Updated on
- Getting a BSOD means a perfectly working OS can crash and damage your data without any prior warning.
- Usually, a corrupt BIOS could be the root cause of this issue, but let’s have a closer look at why this happens and possible fixes.
XINSTALL BY CLICKING THE DOWNLOAD
FILE
Have you ever gotten a Blue Screen of Death? If you have, then you know just how frustrating it can be. Well, there are different variations of the error, and the ntoskrnl.exe BSOD in Windows 11 seems to be bugging users more recently.
The ntoskrnl.exe BSOD crash error can occur for several reasons, including hardware and software issues, as well as driver problems. This article will provide useful information on how to fix the ntoskrnl.exe BSOD error in Windows 11.
What is Ntoskrnl.exe BSOD?
Misconfigured system files in your Windows OS usually cause a ntoskrnl.exe BSOD error. The ntoskrnl.exe file is part of the Microsoft Windows NT kernel (NTOSKRNL), and it’s used to control access to several resources, including memory and processor time.
One of the most common causes of a ntoskrnl.exe BSOD error is a damaged or missing system file. Various events, including malware infections and hardware failures can cause these.
Other causes include:
- Hardware issues – You may have a faulty CPU or GPU in your hands and have no option but to upgrade your graphics card.
- Outdated drivers – Using old drivers can cause issues such as BSOD. The best solution is to use a specialized tool, Outbyte Driver Updater, to automatically update them.
- Corrupted BIOS settings – You may end up with a corrupt BIOS if you’ve changed the settings recently and didn’t properly save them before rebooting Windows.
- Virus or malware infection – It’s always recommended to have a good anti-malware program to scan your computer for malware.
- Corrupted system files – Windows relies on many files to run smoothly, and if one of these files gets corrupted or damaged, you need to repair the corrupt system files, or the entire system will crash.
Symptoms of this problem include:
How we test, review and rate?
We have worked for the past 6 months on building a new review system on how we produce content. Using it, we have subsequently redone most of our articles to provide actual hands-on expertise on the guides we made.
For more details you can read how we test, review, and rate at WindowsReport.
- You experience frequent crashes and system slowdowns.
- Unusual error messages may appear on the screen, such as driver_power_state_failure ntoskrnl.exe.
- The system hangs while starting up, shutting down, or when you are trying to open a program.
Is Ntoskrnl.exe necessary?
The ntoskrnl.exe process is an executable file that belongs to Windows Kernel-Mode Drivers developed by Microsoft Corporation for the Windows NT operating system family as well as subsequent server versions.
The kernel is the core of Microsoft Windows and is responsible for handling hardware requests and allocating resources to applications.
It’s also responsible for managing memory on your PC. This means that any errors with this file can cause a range of problems for your computer.
While the file process may be necessary, you must also know that Ntoskrnl.exe can cause high CPU usage.
What can I do to fix the Ntoskrnl.exe BSOD error in Windows 11?
Here’s what you should first do:
- Clean up temporary files, especially if you’ve been using your computer for a while. You may have accumulated a lot of temporary files that are no longer needed.
- Remove unnecessary programs from your PC, including startup programs.
- Check your hard disk health to ensure it is not faulty.
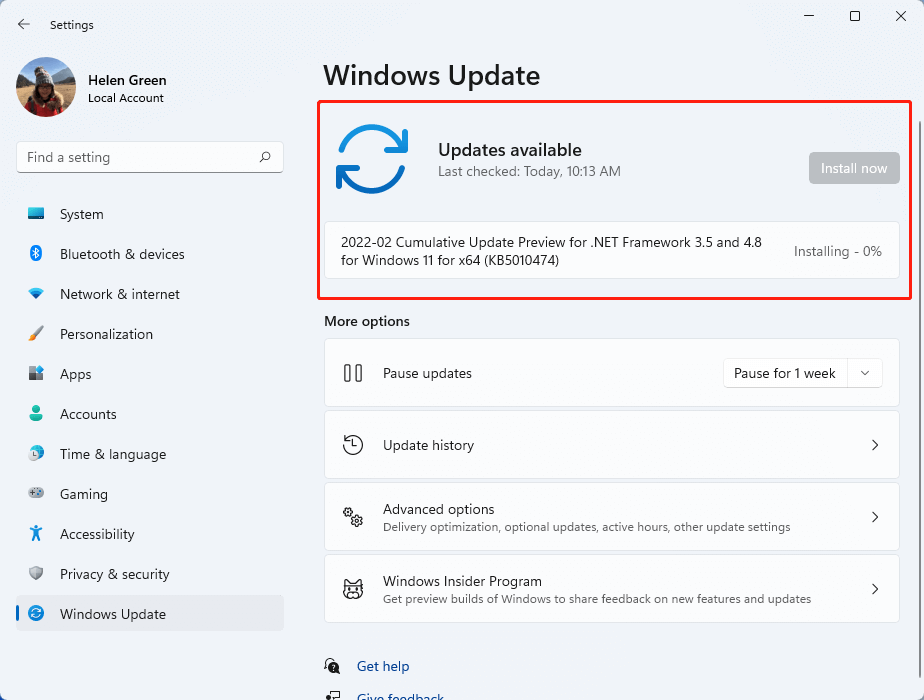
1. Check for Windows updates
- Hit the Windows key and select Settings.

- Click on Windows update, then select Check for updates.

- Download and install if any are available.
2. Run a System File Checker scan
- Hit the Windows key, type cmd in the search bar, and click Run as administrator.

- Type the following command and press Enter:
sfc /scannow


Running the SFC scan will repair/replace any corrupt system files and should get things up and running in the case of ntoskrnl.exe BSOD IRQL_NOT_LESS_OR_EQUAL in Windows 10.
3. Run the CHKDSK command
- Hit the Windows key, type cmd in the search bar, and click Run as administrator.
- Type the following command, replace the C letter with your drive’s letter, and press Enter:
chkdsk C: /f
4. Disable overclocking
Overclocking is a process in which you increase the performance of your CPU by increasing its clock speed. However, if you have overclocked your CPU too much, then your computer might crash due to overheating.
The problem with overclocking is that it puts more stress on your system’s hardware and may cause instability or crashes. If you’re getting BSOD errors after overclocking, you should try reducing the frequency of your processor and see if that fixes the problem.
- Microsoft added a scrollable view option to Quick Settings
- Where is the Control Panel in Windows 11?
- Can Windows 11 Run Fortnite? We’ve Tested it
- Fix: There Was a Problem Processing Game Logic Error on Apex
5. Boot to Safe Mode
If you’re having issues with your PC, it’s always best to start in Safe Mode. This will stop all non-essential processes and services from running, which may help reduce the chance of running into this error.
By doing so, you can scan for viruses or malware on your computer and see if it is causing issues.
Aside from BSOD errors, the file can also cause a Driver power state failure, so we recommend that you always keep your drivers up-to-date.
How do I fix Ntoskrnl exe missing or corrupt?
Here are a few ways you can fix a missing or corrupt Ntoskrnl.exe:
- Run the Check Disk tool: If the file exists but can’t be accessed due to issues with the drive, running the Check Disk utility should do the trick.
- Restore to the last know good boot configuration: When you are unable to boot the PC due to a missing or corrupt Ntoskrnl.exe, the best option is to boot into the last known good configuration from the BIOS.
- Unplug peripherals: Certain peripherals, especially keyboards, are found to trigger the error. Some users shared that unplugging the keyboard when the PC is being turned on and then reconnecting it after Windows boots helps.
Hopefully, these solutions have been able to resolve the issue, and the ntoskrnl.exe BSOD error is a thing of the past in your Windows 11.
Feel free to drop us a comment down below if you have tried any additional solutions that we have not mentioned.
![]()
If you are getting NTOSKRNL.exe Blue Screen error on Windows 11 or Windows 10, here is how you can fix the issue on your PC. This problem mainly occurs when there is some new hardware installed, memory issues, faulty drivers or some system files are corrupted. Either way, you can get rid of the issue with the help of these tips.

What is ntoskrnl.exe?
It is the kernel of the operating system which does and controls almost everything. It is responsible for hardware virtualization, process, and memory management. If you have seen BSOD where there is mention of Ntoskrnl.exe and is related to memory. Apart from this file, three more kernel files work along with ntoskrnl.exe. They are ntkrnlmp.exe, ntkrnlpa.exe and ntkrpamp.exe.
To fix NTOSKRNL.exe BSOD error on Windows 11/10, follow these steps:
- Unplug all external devices
- Remove recently installed hardware
- Install driver for the new hardware
- Troubleshoot in Clean Boot State
- Run Windows Memory Diagnostic
- Run CHKDSK
- Run DISM.
To learn more about these steps, continue reading.
1] Unplug all external devices
It is the first thing you need to do when you are getting the NTOSKRNL.exe BSOD error on your computer. As it is a hardware and driver-related issue, you can try solving this issue by unplugging all the external devices. It could be a printer, USB pen drive, external hard drive, Bluetooth adapter, etc. No matter what device is attached to your computer, you need to unplug it and check if it resolves the issue or not.
2] Remove recently installed hardware
If you have recently installed new hardware and the problem started after that, it is recommended to remove that hardware. Let’s assume that you have installed new RAM. If the speed of the old RAM doesn’t match the new RAM, you can find the aforementioned BSOD on your computer. It could be RAM, hard drive, DVD writer, graphics card, etc. Therefore, it is highly recommended to remove the newly installed hardware and check if the problem remains or not.
3] Install driver for the new hardware
In many cases, you might not need to install a driver in order to use newly installed hardware. For example, RAM or Memory doesn’t require you to install a driver. However, if you have installed a graphics card, you must have to install the corresponding driver. Similarly, if you have installed a Wi-Fi adapter, a driver might be required.
If so, you need to install the driver. If a CD is given to you with the hardware, you can find the driver there. On the other hand, you can also download the driver from the official website of the hardware manufacturer.
4] Troubleshoot in Clean Boot State
As mentioned earlier, it is a driver-related issue. If you have recently installed a new driver, it could cause a problem on your Windows 11 or Windows 10 computer. If so, troubleshooting in the Clean Boot State could be a proficient solution for you. Only booting your PC into the Clean Boot State won’t fix the problem. You need to enable or disable drivers at times to get things done. If you want to try, you can read this article to perform a Clean Boot to troubleshoot this BSOD.
5] Run Windows Memory Diagnostic Tool
Windows Memory Diagnostic Tool can check for potential issues in your RAM or Memory and fix them automatically. As it is an in-built utility, you do not need to install any third-party app or anything else. However, it takes a few minutes to get things resolved. Therefore, you can follow this guide to learn how to run Windows Memory Diagnostic Tool on Windows 11/10 PC.
Fix: NTOSKRNL.exe high CPU, Memory & Disk usage problem
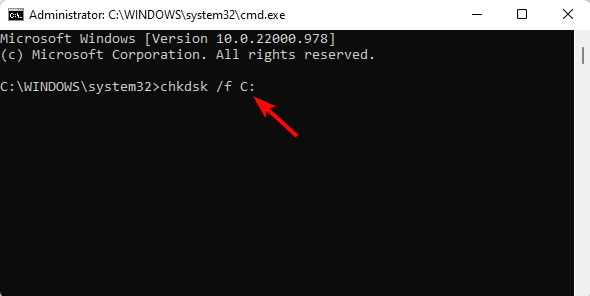
6] Run CHKDSK
If the Windows Memory Diagnostic Tool doesn’t help, you can check for hard drive issues. The easiest way to do that is by using the CHKDSK utility. In case you don’t know, it is a command-line tool, which finds potential issues related to the hard drive and fixes them on its own. You can follow this detailed guide to learn more about the CHKDSK parameters and how it works.
7] Run DISM
DISM or Deployment Image Servicing and Management helps you fix issues regarding the Windows System Image. If there is any problem with any system file, DISM utility can troubleshoot it within moments. Like the CHKDSK, DISM tool is also an in-built utility, which uses Command Prompt to run on your computer. That is why you can use this guide to learn how to run DISM tool on Windows 11/10 PC.
Read: Kernel ntoskrnl.exe is missing or contains errors, Error code 0xc0000221
Why is ntoskrnl.exe causing BSOD?
Ntoskrnl.exe causes BSOD when there are some issues with the RAM or Memory installed in your computer. If you have two RAMs of different speeds, you might find this issue on your computer. On the other hand, this error might occur due to faulty hardware and corrupted system files as well.
What is the quickest solution to fixing a corrupted ntoskrnl.exe file?
The quickest way to fix the ntoskrnl.exe BSOD error on Windows 11 or Windows 10 is by following the aforementioned solutions. As this error can occur due to different reasons on different computers, you need to follow these solutions one after one and all of them. However, in most cases, running the Windows Memory Diagnostic tool fixes the problem within moments.
That’s all! Hope these guides worked.
Similar Blue Screens:
- 0x000000EF, CRITICAL PROCESS DIED error in Windows
- IRQL NOT LESS OR EQUAL Bugcode 0xA BSOD on Windows.