From Wikipedia, the free encyclopedia
Network Policy and Access Services (NPAS)[1] is a component of Windows Server 2008. It replaces the Internet Authentication Service (IAS) from Windows Server 2003. NPAS helps you safeguard the health and security of a network. The NPAS server role includes Network Policy Server (NPS), Health Registration Authority (HRA), and Host Credential Authorization Protocol (HCAP). In Windows Server 2003, IAS is the Microsoft implementation of a Remote Authentication Dial-In User Service (RADIUS) server. In Windows Server operating systems later than Windows Server 2003, IAS is renamed to NPS.
Overview[edit]
NPS is a role service in Windows Server 2008 which can function as:
- RADIUS server
- RADIUS proxy
- Network Access Protection policy server
Features[edit]
NPSEE enables the use of a heterogeneous set of wireless, switch, remote access, or VPN equipment. One can use NPS with the Routing and Remote Access service, which is available in Microsoft Windows 2000, Windows Server 2003, Standard Edition; Windows Server 2003, Enterprise Edition; and Windows Server 2003, Datacenter Edition.[2]
When a server running NPS is a member of an Active Directory Domain Services (AD DS) domain, NPS uses the directory service as its user account database and is part of a single sign-on solution. The same set of credentials is used for network access control (authenticating and authorizing access to a network) and to log on to an AD DS domain.[3]
References[edit]
- ^ «Network Policy and Access Services».
- ^ «Network Policy Server Overview».
- ^ «Network Policy Server Overview».
External links[edit]
- NPS on Microsoft TechNet
При обслуживании больших сетей системные администраторы часто сталкиваются с проблемами аутентификации на сетевом оборудовании. В частности, довольно сложно организовать нормальную работу нескольких сетевых администраторов под индивидуальными учетными записями на большом количестве оборудования (приходится вести и поддерживать в актуальном состоянии базу локальных учетных записей на каждом устройстве). Логичным решение было бы использовать для авторизации уже существующей базы учетных записей — Active Directory. В этой статье мы разберемся, как настроить доменную (Active Directory) аутентификацию на активном сетевом оборудовании (коммутаторы, маршрутизаторы).
Не все сетевое оборудование популярных вендоров (CISCO, HP, Huawei) поддерживает функционал для непосредственного обращения к каталогу LDAP, и такое решение не будет универсальным. Для решения нашей задачи подойдет протокол AAA (Authentication Authorization and Accounting), фактически ставший стандартом де-факто для сетевого оборудования. Клиент AAA (сетевое устройство) отправляет данные авторизующегося пользователя на сервер RADIUS и на основе его ответа принимает решение о предоставлении / отказе доступа.
Протокол Remote Authentication Dial In User Service (RADIUS) в Windows Server 2012 R2 включен в роль NPS (Network Policy Server). В первой части статьи мы установим и настроим роль Network Policy Server, а во второй покажем типовые конфигурации сетевого устройств с поддержкой RADUIS на примере коммутаторов HP Procurve и оборудования Cisco.
Содержание:
- Установка и настройка сервера с ролью Network Policy Server
- Настройка сетевого оборудования для работы с сервером RADUIS
Установка и настройка сервера с ролью Network Policy Server
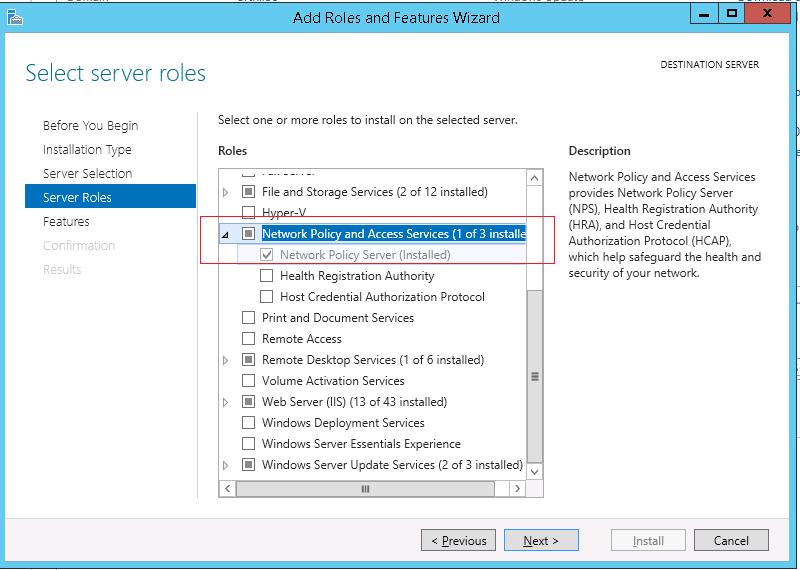
Как правило, сервер с ролью NPS рекомендуется устанавливать на выделенном сервере (не рекомендуется размещать эту роль на контроллере домена). В данном примере роль NPS мы будем устанавливать на сервере с Windows Server 2012 R2.
Откройте консоль Server Manager и установите роль Network Policy Server (находится в разделе Network Policy and Access Services).
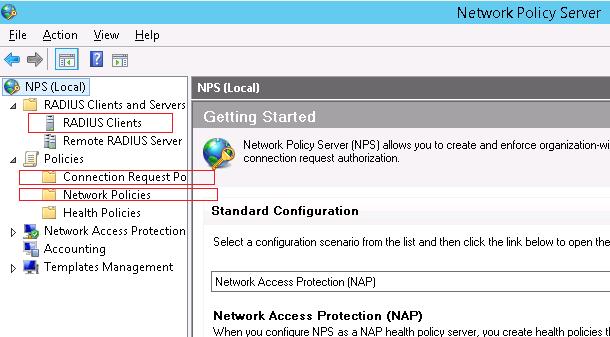
 После окончания установки запустите mmc-консоль управления Network Policy Server. Нас интересуют три следующих раздела консоли:
- RADIUS Clients — содержит список устройств, которые могут аутентифицироваться на сервере
- Connection Request Policies – определяет типы устройств, которые могут аутентифицироваться
- Network Polices – правила аутентификации
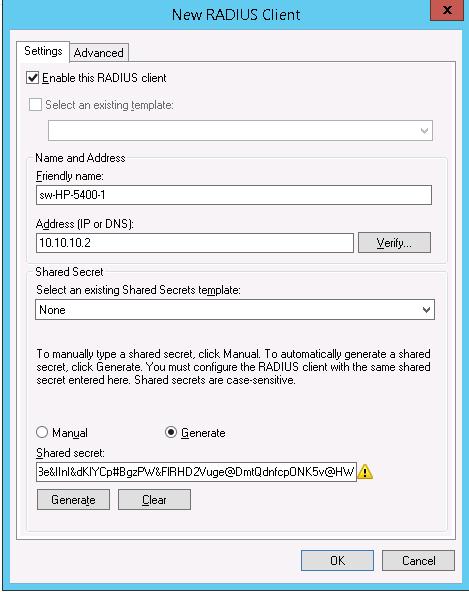
 Добавим нового клиента RADIUS (это будет коммутатор HP ProCurve Switch 5400zl), щелкнув ПКМ по разделу RADIUS Clients и выбрав New. Укажем:
- Friendly Name:sw-HP-5400-1
- Address (IP or DNS): 10.10.10.2
- Shared secret (пароль/секретный ключ): пароль можно указать вручную (он должен быть достаточно сложным), либо сгенерировать с помощью специальной кнопки (сгенерированный пароль необходимо скопировать, т.к. в дальнейшем его придется указать на сетевом устройстве).
 Отключим стандартную политику (Use Windows authentication for all users) в разделе Connection Request Policies, щелкнув по ней ПКМ и выбрав Disable.
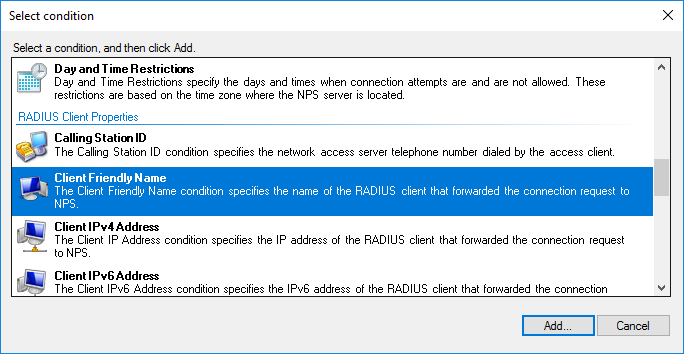
Создадим новую политику с именем Network-Switches-AAA и нажимаем далее. В разделе Сondition создадим новое условие. Ищем раздел RADIUS Client Properites и выбираем Client Friendly Name.
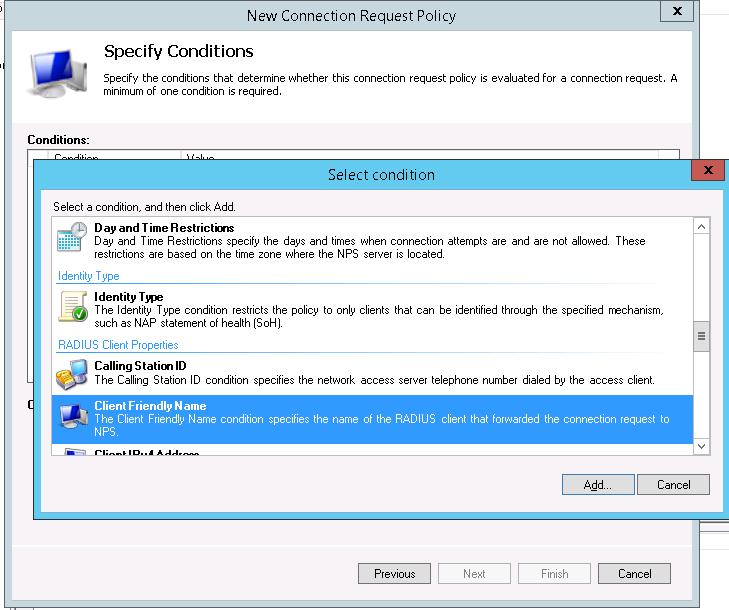 В качестве значения укажем sw-?. Т.е. условие будет применяться для всех клиентов RADIUS, начинающийся с символов :”sw-“. Жмем Next->Next-> Next, соглашаясь со всеми стандартными настройками.
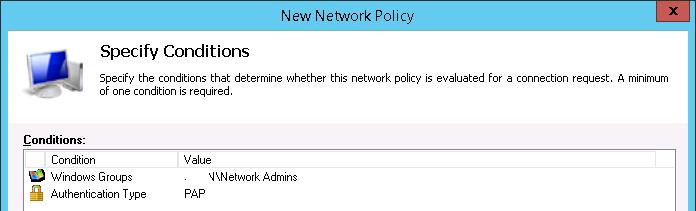
Далее в разделе Network Policies создадим новую политику аутентификации. Укажите ее имя, например Network Switch Auth Policy for Network Admins. Создадим два условия: в первом условии Windows Groups, укажем доменную группу, члены которой могут аутентифицироваться (учетные записи сетевых администраторов в нашем примере включены в группу AD Network Admins) Второе условие Authentication Type, выбрав в качестве протокола аутентификации PAP.
 Далее в окне Configure Authentication Methods снимаем галки со всех типов аутентификации, кроме Unencrypted authentication (PAP. SPAP).
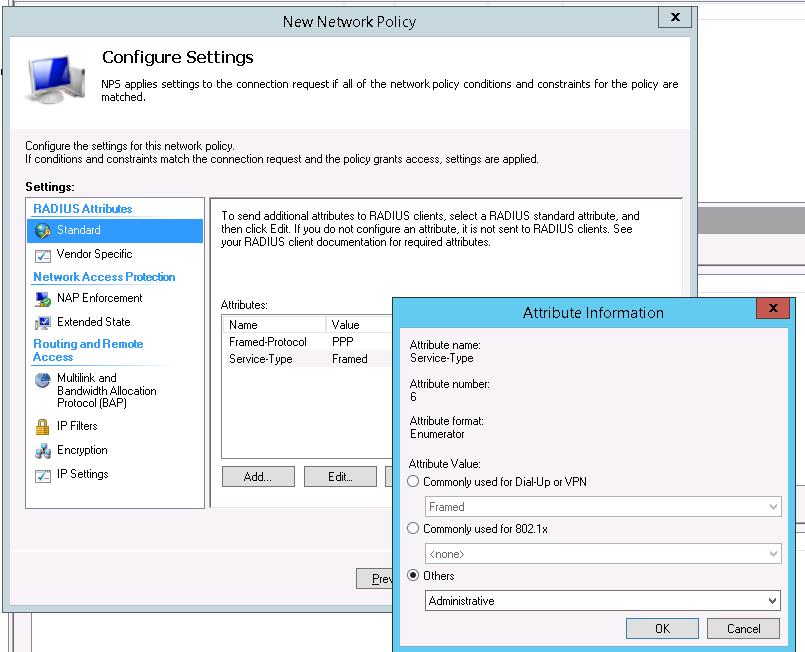
В окне Configure Settings изменим значение атрибута Service-Type на Administrative.
 В остальных случаях соглашаемся со стандартными настройками и завершаем работу с мастером.
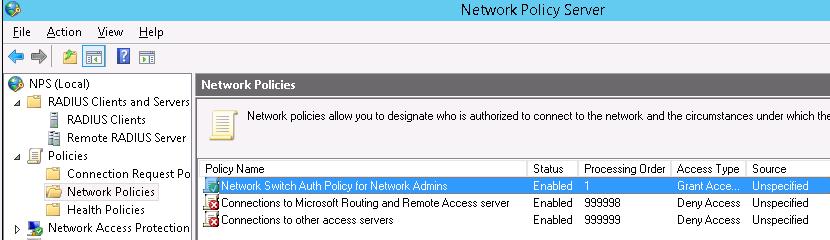
И, напоследок, переместим новую политику на первое место в списке политик.
Настройка сетевого оборудования для работы с сервером RADUIS
Осталось настроить наше сетевое оборудование для работы с сервером Radius. Подключимся к нашему коммутатору HP ProCurve Switch 5400 и внесем следующе изменение в его конфигурацию (измените ip адрес сервера Raduis и пароль на свои).
aaa authentication console enable radius local

aaa authentication telnet login radius local

 aaa authentication telnet enable radius local

aaa authentication ssh login radius local

aaa authentication ssh enable radius local

aaa authentication login privilege-mode

radius-server key YOUR-SECRET-KEY

radius-server host 10.10.10.44 YOUR-SECRET-KEY auth-port 1645 acct-port 1646

radius-server host 10.10.10.44 auth-port 1645

radius-server host 10.10.10.44 acct-port 1646
Совет. Если в целях безопасности вы запретили подключаться к сетевому оборудованию через telnet, эти строки нужно удалить из конфига:
aaa authentication telnet login radius local

aaa authentication telnet enable radius local
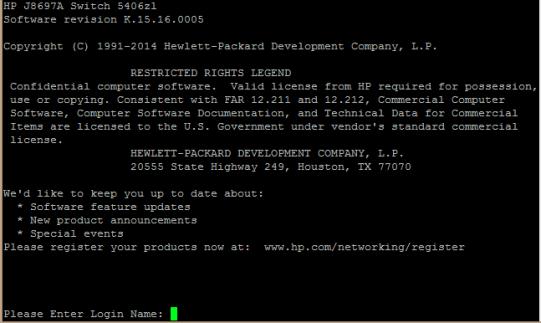
Не закрывая консольное окно коммутатора (это важно!, иначе, если что-то пойдет не так, вы более не сможете подключиться к своему коммутатору), откройте вторую telnet-сессию. Должно появиться новое окно авторизации, в котором будет предложено указать имя и пароль учетной записи. Попробуйте указать данные своей учетной записи в AD (она должна входить в группу Network Admins ). Если подключение установлено – вы все сделали правильно!
 Для коммутатора Cisco конфигурация, предполагающая использование доменных учетных записей для аутентификации и авторизации, может выглядеть так:
Примечание. В зависимости от модели сетевого оборудования Cisco и версии IOS конфигурация может несколько отличаться.
aaa new-model
radius-server host 10.10.10.44 auth-port 1645 acct-port 1646 key YOUR-SECRET-KEY
aaa authentication login default group radius local
aaa authorization exec default group radius local
ip radius source-interface Vlan421
line con 0
line vty 0 4
line vty 5 15
Примечание. В такой конфигурации для аутентификации сначала используется сервер RADIUS, а если он не доступен – локальная учетная запись.
Для Cisco ASA конфигурация будет выглядеть так:
aaa-server RADIUS protocol radius
aaa-server RADIUS host 10.10.10.44 key YOUR-SECRET-KEY
radius-common-pw YOUR-SECRET-KEY
aaa authentication telnet console RADIUS LOCAL
aaa authentication ssh console RADIUS LOCAL
aaa authentication http console RADIUS LOCAL
aaa authentication http console RADIUS LOCAL
Совет. Если что то-не работает, проверьте:
- Совпадают ли секретные ключи на сервере NPS и коммутаторе (для теста можно использоваться простой пароль).
- Указан ли правильный адрес NPS сервера в конфигурации. Пингуется ли он?
- Не блокируют ли межсетевые экраны порты 1645 и 1646 между коммутатором и сервером?
- Внимательно изучите логи NPS сервера

Contents
- 1 Step By Step Installing And Configuring A Network Policy Server In
- 2 Windows Server 2019 Training 31 Installing And Configuring A Network Policy Server Nps
- 2.1 Conclusion
- 2.1.1 Related image with step by step installing and configuring a network policy server in
- 2.1.2 Related image with step by step installing and configuring a network policy server in
- 2.1 Conclusion
Step into a world where your Step By Step Installing And Configuring A Network Policy Server In passion takes center stage. We’re thrilled to have you here with us, ready to embark on a remarkable adventure of discovery and delight. Click and or to windwos do go network no successfully the finally manager server step then nps-msc to finished restart click the 10- to simply type policy on policy network server server tools server to next the console- 9- go close the run when click need and installation open
Step By Step Installing And Configuring A Network Policy Server In
Step By Step Installing And Configuring A Network Policy Server In
To perform this procedure by using windows powershell, run windows powershell as administrator, type the following command, and then press enter. install windowsfeature npas includemanagementtools to install nps by using server manager on nps1, in server manager, click manage, and then click add roles and features. 1. the first step is to add the network policy server role. open up server manager, right click on roles and click add roles. 2. the add roles wizard begins. click next. 3. tick the box next to network policy and access services and click next. 4. an introduction to network policy and access services is displayed. click next. 5.

Step By Step Installing And Configuring A Network Policy Server In
Step By Step Installing And Configuring A Network Policy Server In
Contents 1 installing radius (nps) role on windows server 2022 2019 2016 2 configuring nps policies on the radius server 3 configuring radius authentication on cisco devices 4 how to enable microtik (routeros) user authentication via radius? 5 how to view the nps radius event logs on windows?. Turn on logging (initially) for both authentication and accounting records. modify these selections after you have determined what is appropriate for your environment. ensure that event logging is configured with a capacity that is sufficient to maintain your logs. Configuration nps logging applies to: windows server 2022, windows server 2016, windows server 2019 you can use this topic for an overview of network policy server in windows server 2016 and windows server 2019. nps is installed when you install the network policy and access services (npas) feature in windows server 2016 and server 2019. note. Network policy server, what is nps all about? nps enables you to create and enforce organization wide network access policies for client health, connection request authentication, and connection request authorization.
Windows Server 2019 Training 31 Installing And Configuring A Network Policy Server Nps
Windows Server 2019 Training 31 Installing And Configuring A Network Policy Server Nps
windows server 2019 training 31 installing and configuring a network policy server nps. install the network policy server role module 7: installing, configuring, and troubleshooting the network policy server role lab: installing and configuring a network how to install and configure windows server 2019 nps as radius in this video i will take a look at installing configuring the complete guidance of network policy server installation using windows server 2022, whether you have active directory this is a first part of two part video series on how to install and configure network policy server to integrate network access this video shows how to configure network policies in nps to grant or deny access to clients. this video introduces the network policy server (nps), microsoft’s policy based authentication server which is used for radius video series on advance networking with windows server 2019: in this video guide, i will explain how to set up a radius server hey, it’s paddymaddy here, and welcome back to my @paddymaddy26 channel in this video, we’re in this video we will learn how to configure radius server in server 2019. linkedin page: this lab contains the following exercises and activities: installing and configuring network policy server, in this video, i provide a demonstration of the deployment of a client to site (c2s) virtual private network (vpn), which uses
Conclusion
After exploring the topic in depth, there is no doubt that post delivers helpful information about Step By Step Installing And Configuring A Network Policy Server In. From start to finish, the writer demonstrates a deep understanding about the subject matter. Notably, the discussion of Z stands out as a highlight. Thanks for reading this article. If you need further information, feel free to reach out via email. I look forward to hearing from you. Moreover, below are some related content that might be helpful:
Related image with step by step installing and configuring a network policy server in
Related image with step by step installing and configuring a network policy server in
Время на прочтение
4 мин
Количество просмотров 61K
Как быстро и просто настроить авторизацию через RADIUS от Microsoft? Думаю, это поможет тем, кто захочет иметь возможность заходить на устройства MikroTik через дружелюбный WinBox и простой SSH.
План:
Установка роли NPS;
Добавление RADIUS клиента;
Создание политики подключения;
Создание политики сети;
Добавление сервера авторизации на MikroTik;
Проверка через SSH и WinBox.
Установка роли NPS
Имеем Windows Server 2016 Datacenter с уже установленным доменом.

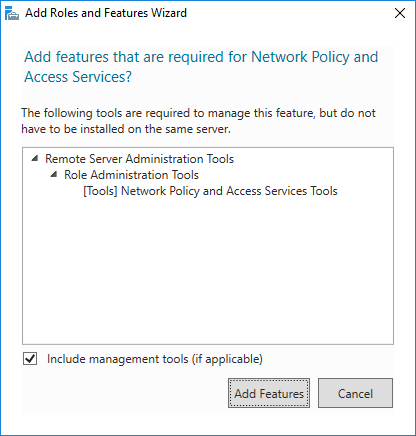
Выбираем сервер, на котором будет разворачиваться роль. Microsoft не рекомендует делать это на контроллере домена, но в некоторых best practices для уменьшения задержек дают совет ставить именно на него. Добавляем роль Network Policy and Access Server вместе с management tools для настройки.
Install-WindowsFeature NPAS -IncludeManagementTools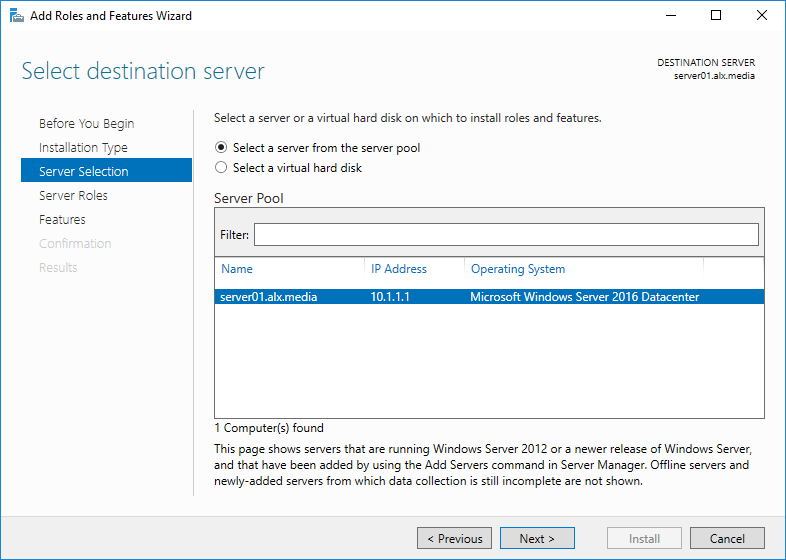


Запускаем любым удобным способом админку NPS. Например, через менеджер серверов.

Регистрируем сервер NPS в AD.
netsh ras add registeredserver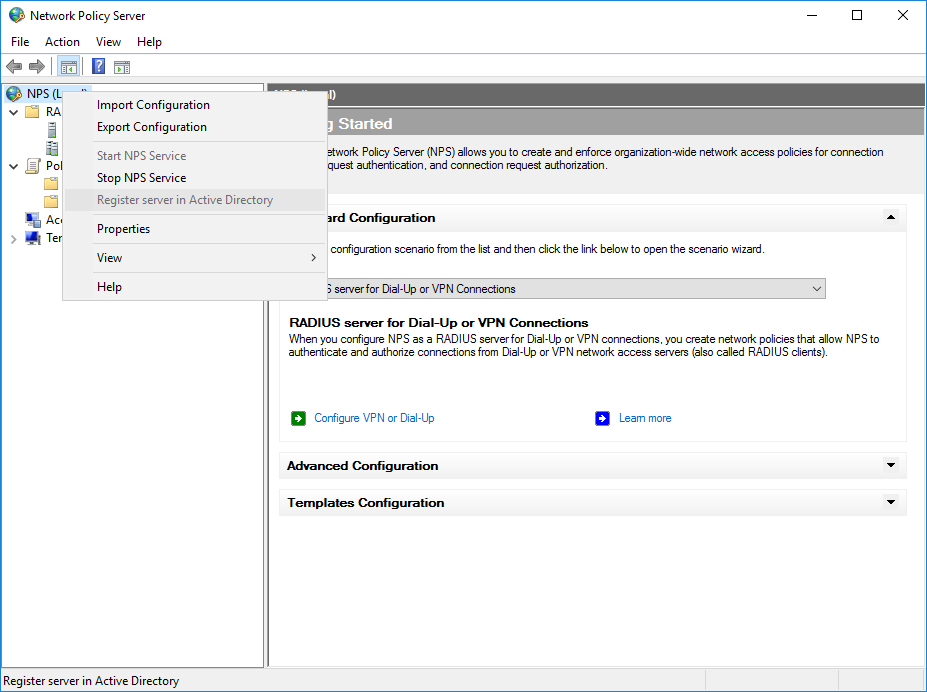
Добавление RADIUS клиента
Для того, чтобы сервер знал с какими устройствами налаживать общение нужно добавить их в RADIUS Clients.

Для примера, добавляю свой MikroTik wAP. Friendly name установил как Identity на устройстве и IP заданный на его единственном проводном интерфейсе. Для того, чтобы устройство смогло авторизоваться на сервере нужно ввести ключ. Он создается на сервере либо вручную, либо генерируется автоматически. Я предпочел второй вариант.
New-NpsRadiusClient –Address "10.1.1.21" –Name "router01" –SharedSecret "egEcM4myJCptphGlZ1UymS#qLh^urp@fJ1hF8dE6dwb27NI^oIJtTWKKp^MEsU6p"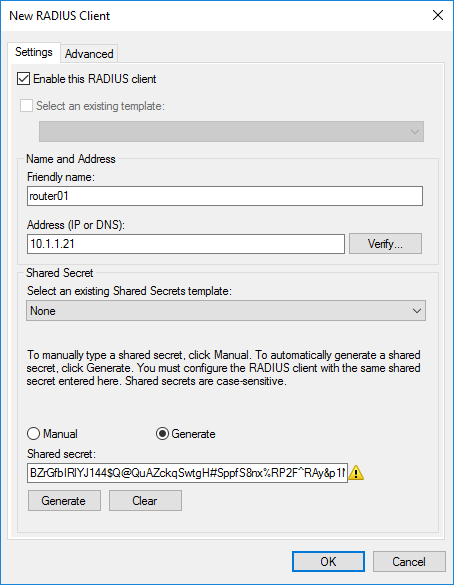
Vendor name остановим на стандартном RADIUS.

Устройство добавлено.
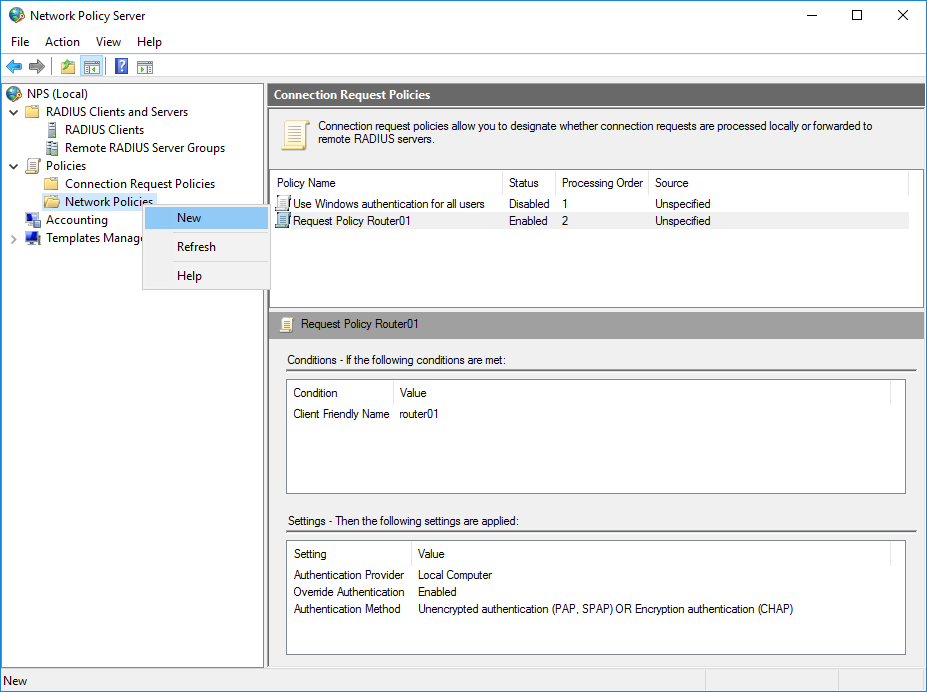
Создание политики подключения

Подбираем подходящее название для политики.

Определяем наше устройство с которым будет работать сервер.

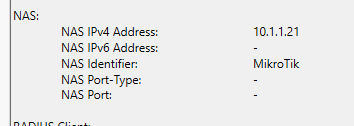
Я выбрал только Client Friendly Name со значением Router01. Это четко привязывает данный пункт политики к устройству через созданного клиента. Можно идентифицировать устройство Mikrotik по Identity выбрав NAS Identifier.
Без предварительной конфигурации устройства Identity = MikroTik.
Дальнейшая настройка политики.

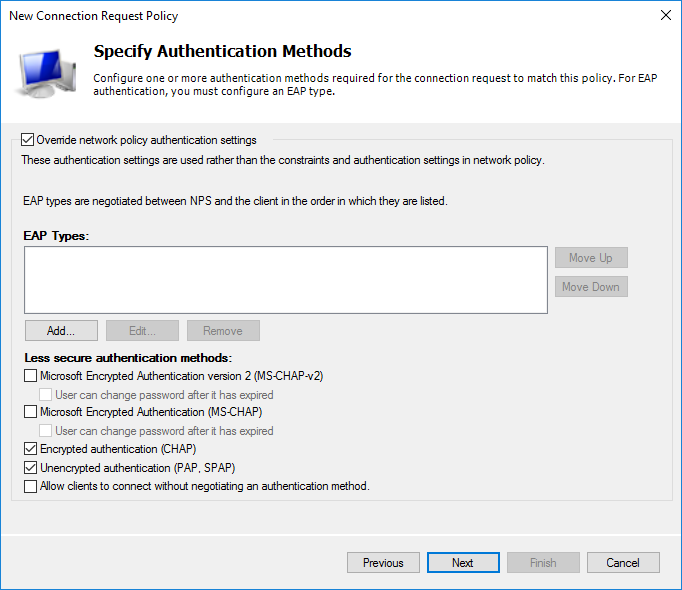
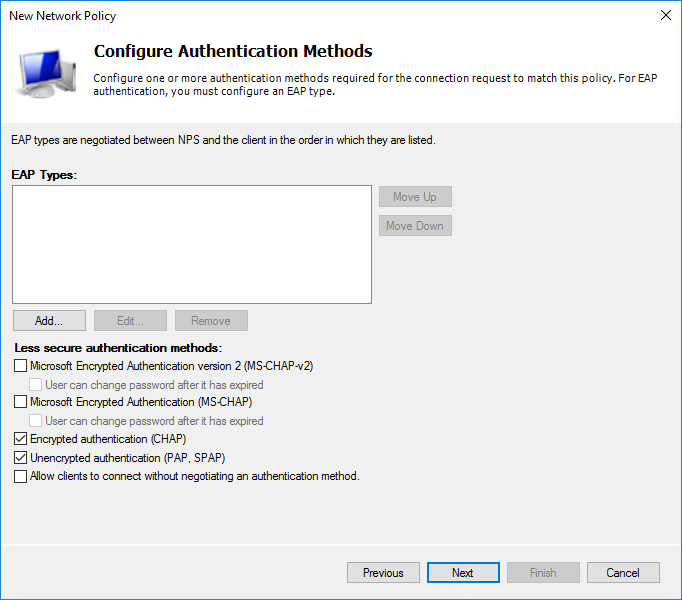
На этапе выбора протокола аутентификации достаточно выбрать нешифрованный (о чем получите предупреждение) PAP для SSH или шифрованный CHAP для WinBox. Я выбрал оба. Если есть необходимость использовать web версию, то достаточно включить MS-CHAPv2, в остальном всё аналогично.
Собственно, предупреждение о выборе небезопасного способа. Предлагают почитать пошаговый справочный материал.

На данном этапе я не стал ничего трогать.

Итоговые установки политики.
У меня не получилось воспроизвести это через PowerShell, даже стандартный example с technet’а. Буду признателен, если подскажете почему.
netsh nps add crp name = "Request Policy Router01" state = "ENABLE" processingorder = "1" policysource = "0" conditionid ="0x1020" conditiondata = "router01" profileid = "0x1025" profiledata = "0x1" profileid = "0x1009" profiledata = "0x1" "0x2" profileid = "0x1fb0" profiledata = "TRUE"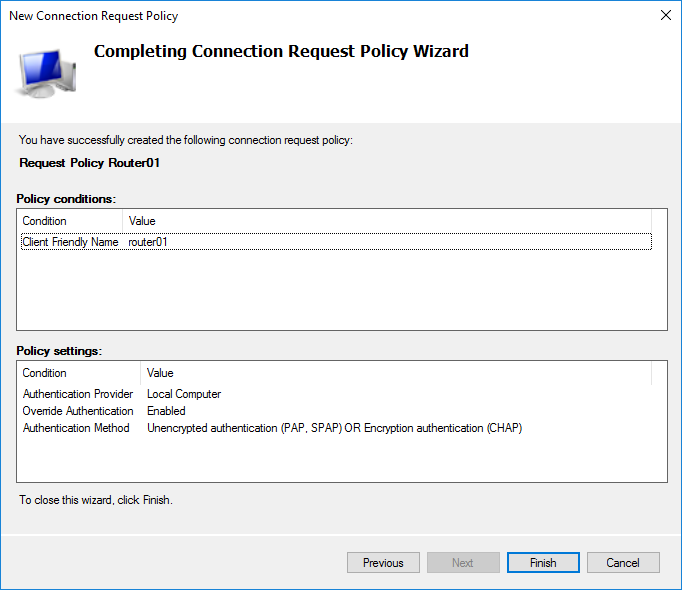
Выбираем нужный приоритет двигая выше или ниже пункт политики.
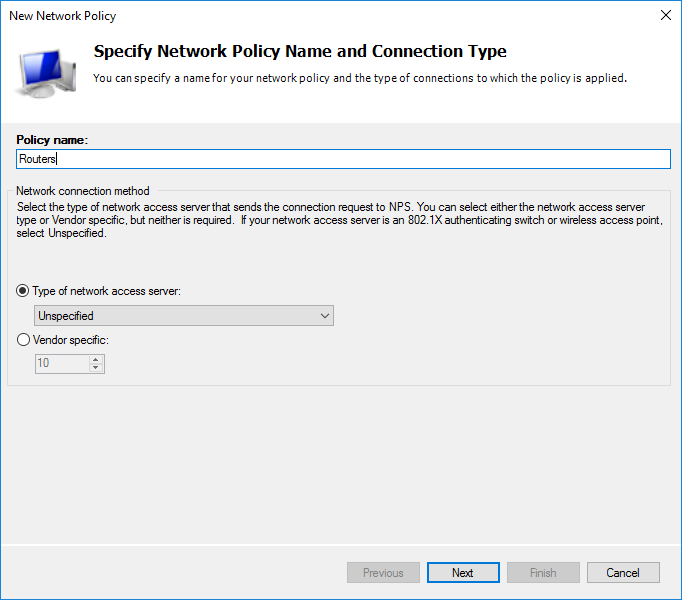
Создание политики сети
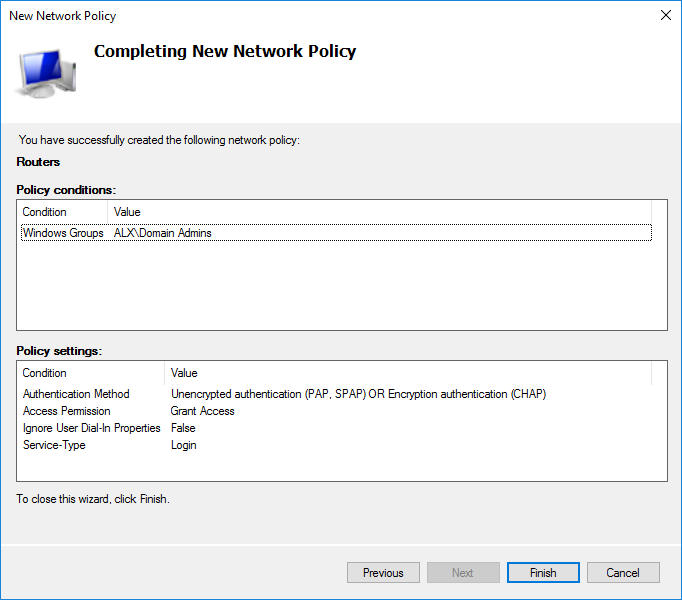
Назовем её Routers.
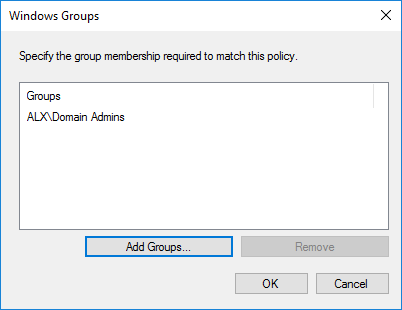
Как и прежде, нужно определить условия.

В AD у меня создан дополнительный пользователь состоящий в группе Domain Admins. Выбираю условие Windows Group исходя из того, чтобы все администраторы домена смогли получать доступ к MikroTik.

Разрешительное или запретительное правило. Мы будем разрешать всем, кто попал под условие.

Способ аутенификации выбираем аналогичный прошлой политике.
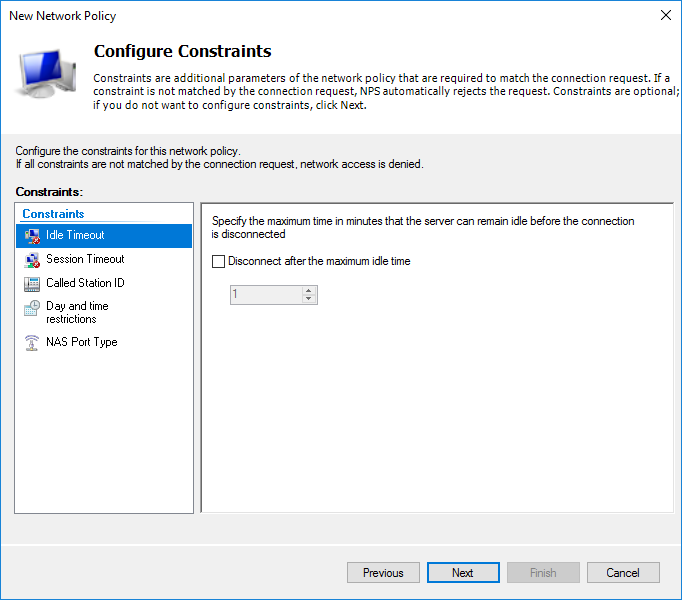
Исходя из необходимости можно настроить дополнительные настройки. Я оставил без изменений.
Далее необходимо выбрать что будет отправляться на сервер.
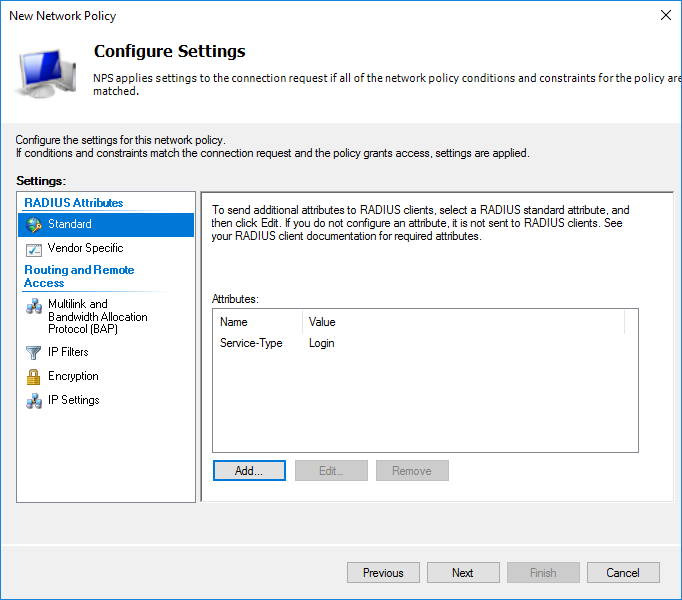
Итоговые настройки политики сети.
Выбираем необходимый приоритет среди других политик, если необходимо.

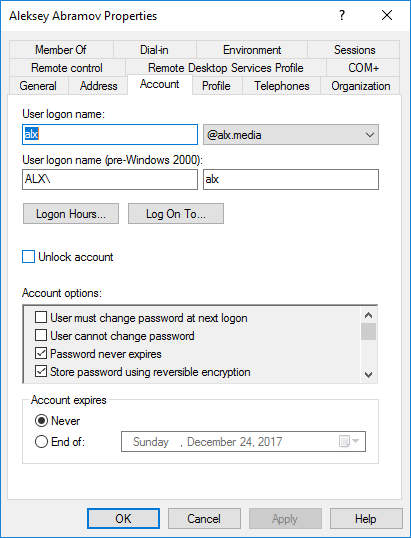
Чтобы учетная запись проверялась через NPS в AD у этого пользователя на вкладке Dial-in в разделе Network Access Permission должен быть отмечен пункт Control access through NPS Network Policy.
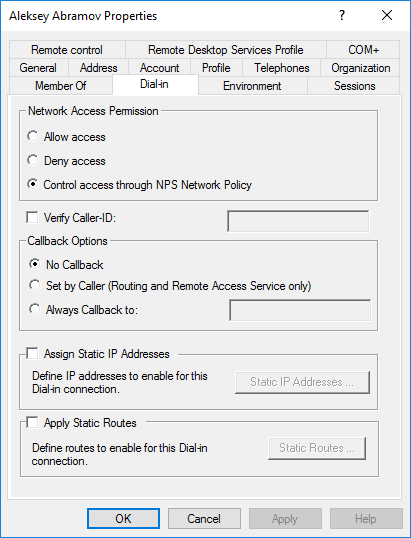
Для возможности авторизовываться через WinBox нужно включить обратимое шифрование в профиле пользователя.
Добавление сервера авторизации на MikroTik
Первым делом присвоим System/Identity равным router01 и IP с маской для интерфейса.
/system identity set name=router01
/ip address add address=10.1.1.21/24 interface=ether1 network=10.1.1.0
В System/Users и на вкладке Users включаем пункт Use RADIUS. По умолчанию выбран доступ только для чтения.
/user aaa set use-radius=yes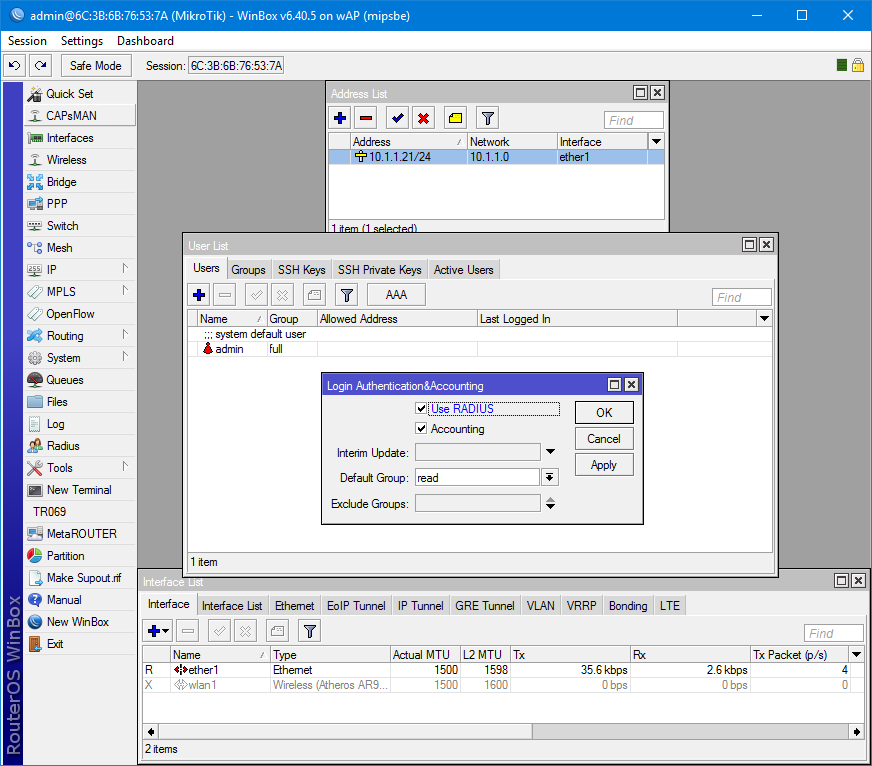
Открываем настройки Radius и добавляем новый сервер. Сервис выбирается исходя из назначения. Лучше, конечно же, делить доступ между ними. Address — адрес сервера на котором установлен NPS.
Secret — ключ, который был сгенерирован на стадии добавления клиента на сервере.
/radius add address=10.1.1.1 secret=egEcM4myJCptphGlZ1UymS#qLh^urp@fJ1hF8dE6dwb27NI^oIJtTWKKp^MEsU6p service=login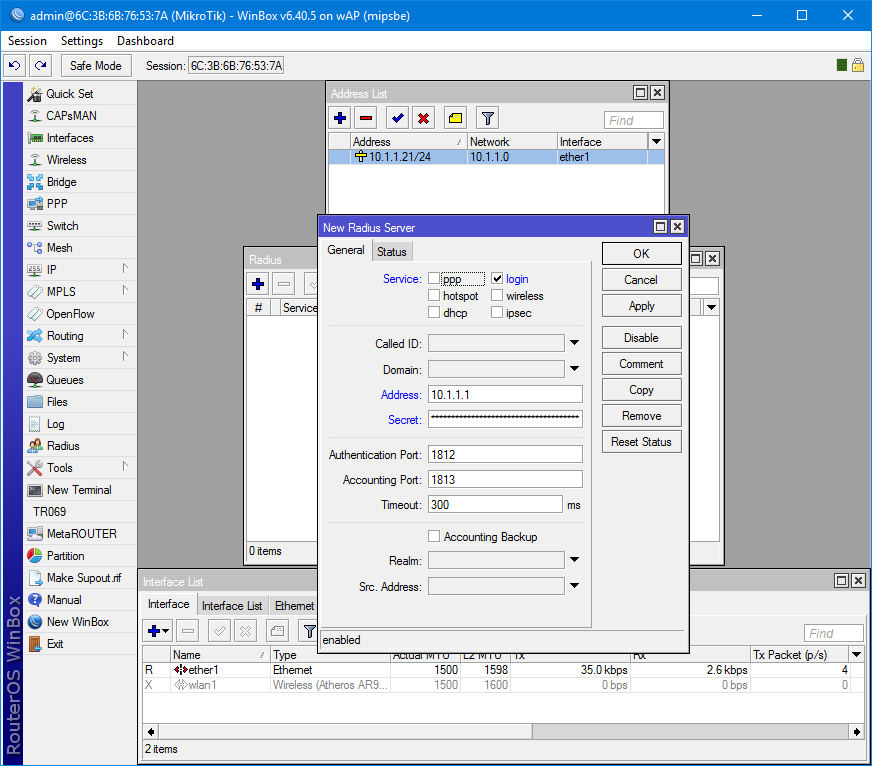
Проверка через SSH и WinBox
Проверка подключения через SSH и экспорт конфигурации.
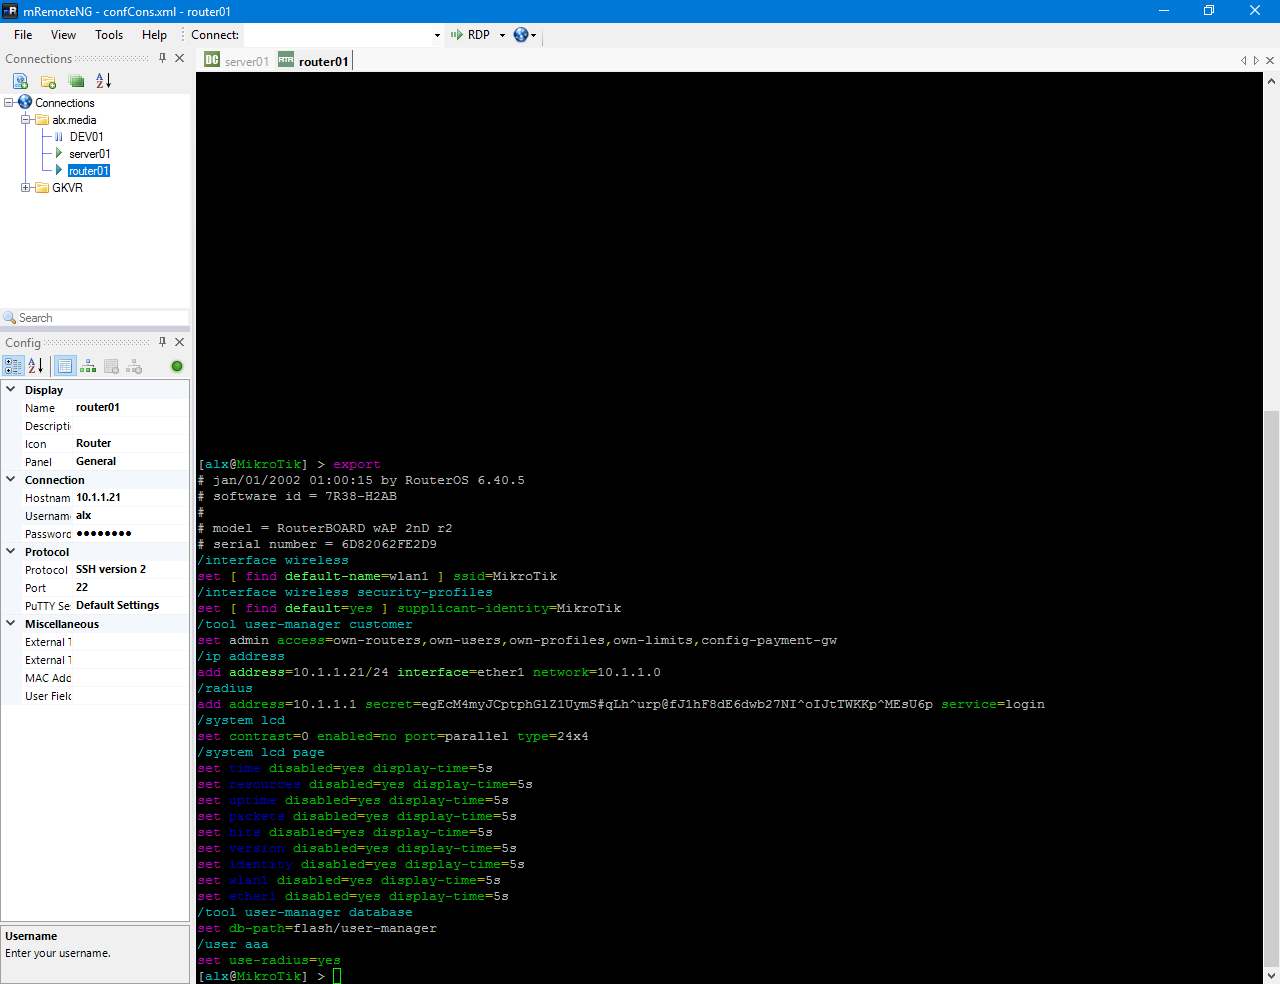
И проверяем авторизацию в Winbox.

Как видим, в активных пользователях висят системный admin и оба подключения доменного юзера с доступом для чтения через SSH и Winbox.
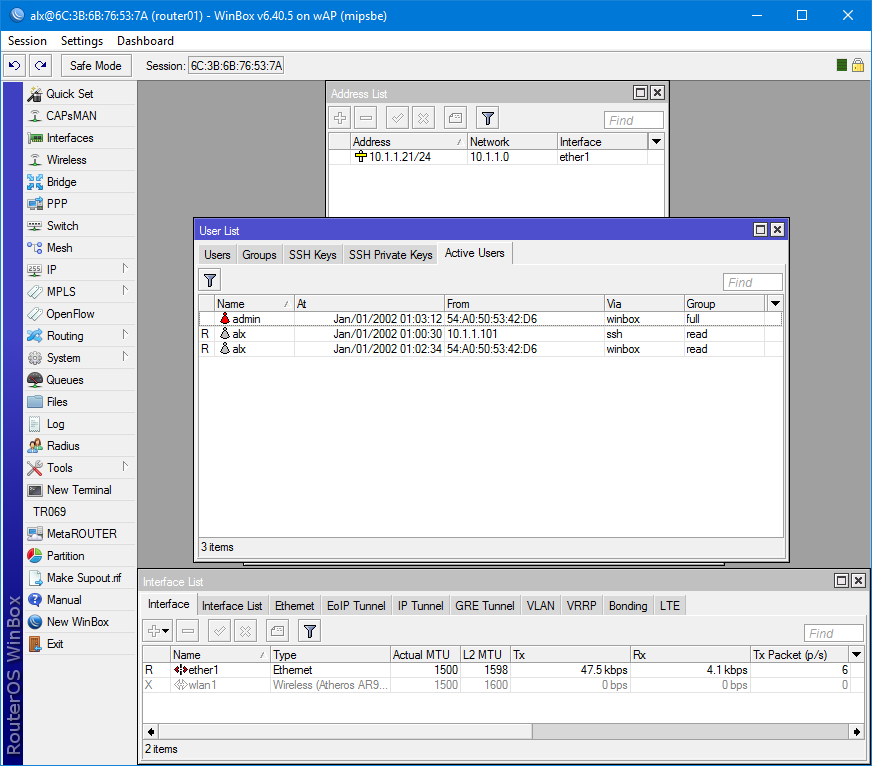
Всё работает.
Спасибо за внимание.

Windows Server 2019 Administration Topic 7 Additional Services Wsus Npas Iis
Achieve Optimal Wellness with Expert Tips and Advice: Prioritize your well-being with our comprehensive Windows Server 2019 Administration Topic 7 Additional Services Wsus Npas Iis resources. Explore practical tips, holistic practices, and empowering advice that will guide you towards a balanced and healthy lifestyle. How to install and configure wsus on windows server 2019 best practices spiceworks learn windows windows server today we will talk about how to install and configure the wsus role on windows server 2019 this process has become much simpler and easier and wsus is now-
Windows Server 2019 Administration Topic 7 Additional Services Wsus
Windows Server 2019 Administration Topic 7 Additional Services Wsus
2.1. configure network connections 2.2. configure wsus by using the wsus configuration wizard 2.3. secure wsus with the secure sockets layer protocol 2.4. configure wsus computer groups show 2 more applies to: windows server 2022, windows server 2019, windows server 2016, windows server 2012 r2, windows server 2012. Windows server 2019 administration topic 7 additional services, wsus, npas, iis michael ferrie 612 subscribers subscribe 4 277 views 2 years ago windows server 2019 administration this.

Install And Configure Wsus On Windows Server 2019 Part 1 Msft Webcast
Install And Configure Wsus On Windows Server 2019 Part 1 Msft Webcast
By prajwal desai april 17, 2022 in this post i will cover the steps to install and configure wsus (windows server update services) on windows server 2019. this guide should help you if you decide to install and configure wsus from scratch. in the past i have published several posts on wsus. that includes installing wsus and configuring wsus. To install framework 3.5 by using the add roles and features wizard. on the manage menu in server manager, click add roles and features. select a destination server that is running windows server 2016. on the select features page of the add roles and features wizard, select framework 3.5. The following roles, role services, and features are in the server core installation option of windows server. use this information to help figure out if the server core option works for your environment. because this is a large list, consider searching for the specific role or feature you’re interested in if that search doesn’t return what. Nps cmdlets in windows powershell for windows server 2012 and windows 8. network policy server (nps) allows you to create and enforce organization wide network access policies for connection request authentication and authorization. you can also configure nps as a remote authentication dial in user service (radius) proxy to forward connection.
How To Install And Configure Wsus On Windows Server 2019 Action1
How To Install And Configure Wsus On Windows Server 2019 Action1
The following roles, role services, and features are in the server core installation option of windows server. use this information to help figure out if the server core option works for your environment. because this is a large list, consider searching for the specific role or feature you’re interested in if that search doesn’t return what. Nps cmdlets in windows powershell for windows server 2012 and windows 8. network policy server (nps) allows you to create and enforce organization wide network access policies for connection request authentication and authorization. you can also configure nps as a remote authentication dial in user service (radius) proxy to forward connection. How to install and configure wsus on windows server 2019 best practices spiceworks learn windows windows server today we will talk about how to install and configure the wsus role on windows server 2019, this process has become much simpler and easier, and wsus is now. If you’re unable to update the wsus servers, you can use these steps to add the required file types manually:< p>\n<ol dir=\»auto\»>\n<li>open <strong>internet information services (iis) manager< strong>.< li>\n<li>select the wsus server name from the <strong>connections< strong> pane.
Windows Server 2019 Administration Topic 7 Additional Services, Wsus, Npas, Iis
Windows Server 2019 Administration Topic 7 Additional Services, Wsus, Npas, Iis
this is a video to support my online teaching of sqa unit h16x35 using my own materials. learn about some of the adiiotnal video series on advance networking with windows server 2019: in this video you will see how to install and configure wsus how to install & configure a wsus server windows server 2019 video 11 windows server 2019 training. hello world if you in this video tutorial, i will show you guys how to install or configure iis server in your windows server 2019. note: this video donate us : paypal.me microsoftlab install windows server update services (wsus) in windows server 2019 1. prepare dc31 hello viewers ! welcome to my channel kaptechpro. in this video, you learn wsus patching process step by step. watch the full
Conclusion
After exploring the topic in depth, it is clear that the post provides informative knowledge concerning Windows Server 2019 Administration Topic 7 Additional Services Wsus Npas Iis. From start to finish, the author demonstrates an impressive level of expertise on the topic. Notably, the discussion of X stands out as a key takeaway. Thanks for taking the time to this post. If you need further information, feel free to contact me via social media. I look forward to hearing from you. Additionally, below are some relevant articles that you may find interesting: