Having trouble starting your Dell laptop in safe mode? Don’t worry, you’re not alone. This guide will help you get started quickly and easily. Below are the steps to start your Dell laptop in safe mode in Windows 10:
- Press the Power button to turn on your laptop.
- Press F8 key while the Dell logo appears to open the Advanced Boot Options menu.
- Enter the Advanced Boot Options menu and use the arrow keys to select Safe Mode with Networking.
- Press Enter to start Windows 10 in Safe Mode.

How Do I Force My Laptop Into Safe Mode Windows 10?
Forcing your laptop into safe mode in Windows 10 is an important step to ensure the safety of your system and data. Safe mode is a diagnostic mode of a computer operating system that starts with minimal set of resources and services. It can help you troubleshoot problems on your PC, and can also be used to access advanced recovery options.
To force your laptop into safe mode in Windows 10, you can follow the steps below:
- Press Windows + I keys to open the Settings window.
- Click on Update & Security.
- Click on Recovery from the left pane.
- Under Advanced Startup, click Restart Now.
- Your PC will restart and the Choose an Option screen will appear. Click on Troubleshoot.
- Click on Advanced Options.
- Click on Startup Settings.
- Click on Restart.
- Your PC will restart and a list of options will appear. Press 4 or F4 to start your PC in Safe Mode.
Once your laptop is in safe mode, you can troubleshoot any issues you may have with your system and resolve them. You can also use safe mode to access the advanced recovery options provided by Windows 10.
How Can I Go In Safe Mode In Dell Laptop?
Safe Mode is a diagnostic mode of a computer operating system (OS). It can also refer to a mode of operation by application software. Safe Mode is intended to help fix most, if not all problems within an operating system. To use Safe Mode on a Dell laptop, the user must restart the computer and press the F8 key during the startup process.
Once the user has accessed the Advanced Boot Options menu, they can select Safe Mode from the list. Safe Mode will provide the user with limited access to the operating system. This mode is useful for troubleshooting problems with programs and drivers that might not start correctly or that might prevent Windows from starting correctly.
In Safe Mode, users can uninstall programs, delete drivers, delete system restore points, and troubleshoot the laptop. The user can also access the command prompt and run various commands to troubleshoot the laptop. To exit Safe Mode and restart the laptop normally, the user can select the ‘Restart’ option from the Safe Mode menu.
Why Is F8 Not Working For Safe Mode?
F8 is a key that commonly used to access Windows Safe Mode, but it does not work for all versions of Windows. This is due to a feature called Fast Startup, which is designed to help a computer start up faster by pre-loading some of the necessary system files. Unfortunately, this can interfere with the F8 key, preventing it from accessing Safe Mode.
In order to use the F8 key to access Safe Mode, you must first disable Fast Startup. To do this, you will need to open the Control Panel, select ‘Hardware and Sound’, followed by ‘Power Options’. Once you are in the ‘Power Options’ window, select ‘Choose what the power button does’ and then click ‘Change settings that are currently unavailable’. Scroll down and you will find the ‘Turn on fast startup (recommended)’ option. Uncheck this option and click ‘Save Changes’.
Once Fast Startup is disabled, the F8 key should work to access Safe Mode. To do this, you will need to press the F8 key repeatedly as soon as the computer starts booting up. This will bring up the Advanced Boot Options menu, from which you can select ‘Safe Mode’.
How Do I Start In Safe Mode Without F8?
Safe Mode is a troubleshooting feature in Windows that allows users to boot a computer into a limited state with minimal features and drivers. By booting in Safe Mode, users can troubleshoot problems with their computer, diagnose system issues and fix them. There are various ways to start Windows in Safe Mode, but the F8 key is the most common method.
However, if your computer is not responding to the F8 key, there are other ways to start your computer in Safe Mode. Here are some of the different ways to boot Windows in Safe Mode without using the F8 key:
- Use the System Configuration Utility:
To start Windows in Safe Mode via the System Configuration Utility, press the Windows + R keys on your keyboard to open the Run window. Type msconfig in the search box and hit enter.- In the System Configuration window, switch to the Boot tab
- Check the Safe Boot option and choose either the Minimal or Alternate Shell option
- Click Apply and then OK to save the changes
- Restart your computer and it will boot into Safe Mode
- Use Windows Advanced Options Menu:
To start Windows in Safe Mode via the Advanced Options Menu, press the Windows + R keys on your keyboard to open the Run window. Type shutdown /r /o in the search box and hit enter.- This will launch the Advanced Options Menu where you will be able to choose the Safe Mode option
- Choose the Safe Mode option from the list and your computer will boot into Safe Mode
- Use Command Prompt:
To start Windows in Safe Mode via the command prompt, press the Windows + R keys on your keyboard to open the Run window. Type cmd in the search box and hit enter.- This will launch the Command Prompt window where you can type the following command: bcdedit /set {default} bootsafemode on
- Press enter and then type shutdown /r to restart the computer and boot into Safe Mode
How To Start Windows 10 In Safe Mode While Booting
Starting your Dell laptop in safe mode is an important step to take when troubleshooting issues or making changes to your system. Safe mode is a diagnostic mode of a computer operating system that starts up with the minimum of drivers and processes. It is often used to troubleshoot and diagnose problems with the computer’s hardware and software.
To start your Dell laptop in safe mode on Windows 10, you will need to access the Advanced Startup options. To do this, first power off your computer by pressing and holding the power button until the laptop shuts down. Once the laptop is off, press the power button again to turn it on. When the Dell logo appears, press the F8 key several times until the Advanced Boot Options menu appears. Select ‘Safe Mode’ from the menu and your computer will boot into safe mode.
When your laptop has finished booting into safe mode, you will be presented with a list of options. You can choose to run the computer in normal mode, or you can select one of the other available options. You can also access additional settings from the Advanced Boot Options menu. To access these settings, press the F8 key again at the Advanced Boot Options screen and then select the ‘Advanced Options’ button. From here, you can access a range of options such as System Restore, System Configuration, and Startup Repair.
Once you have finished troubleshooting or making changes to your system, you can exit safe mode by restarting your computer. When the computer restarts, it will boot into normal mode.
How To Start Windows 11 In Safe Mode While Booting
Booting your Dell laptop in safe mode can be done in two different ways. The first method is to press the F8 key while the laptop is booting up, and the second method is to use the Advanced Startup Options menu in Windows 10.
F8 Method:
1. Power on the laptop and wait for the Dell logo to appear on the screen.
2. As soon as the logo appears, press and hold the F8 key on the laptop keyboard.
3. A boot menu will appear with a list of options.
4. Use the arrow keys to select Safe Mode and then press Enter.
Advanced Startup Options Menu:
1. Click on the Start button and select Settings.
2. Click on Update & Security and select Recovery.
3. Click on the Advanced Startup options and select Restart Now.
4. When the Choose an Option screen appears, select Troubleshoot.
5. Select Advanced options and then select Startup Settings.
6. Click the Restart button and press the F4 key on the laptop keyboard to enter Safe Mode.
Windows 10 Safe Mode From Bios
To start Windows 10 in Safe Mode from BIOS, it is necessary to access the BIOS settings first. To do this, press the F2 key when the Dell logo appears on the screen during the startup of your laptop. Next, you have to navigate to the Boot tab and find the Boot Priority settings. Here, you need to select the USB drive or CD/DVD drive as your first boot device. After that, select the Safe Mode option from the list of available options. Finally, save the changes and exit the BIOS settings.
- Press the F2 key when the Dell logo appears on the screen during the startup of your laptop.
- Navigate to the Boot tab and find the Boot Priority settings.
- Select the USB drive or CD/DVD drive as your first boot device.
- Select the Safe Mode option from the list of available options.
- Save the changes and exit the BIOS settings.
Dell Safe Mode F8 Not Working
Windows 10 offers a safe mode option which can be used to start the computer in a limited state. The Windows 10 safe mode is useful for troubleshooting problems, as it loads with minimal drivers and services, thus allowing the user to identify and rectify the issue. Dell laptop users can boot into safe mode with a few simple steps.
- Restart your Dell laptop and press the F8 key repeatedly when the Dell logo appears on the screen. If the key doesn’t work, press the F11 key and then the F8 key.
- As soon as you press the F8 key, the Advanced Boot Options menu should appear. Select the “Safe Mode” option from the menu.
- Once you select the “Safe Mode” option, the laptop will restart and launch the Windows 10 safe mode. You can now start troubleshooting any problems with your laptop.
If the F8 key doesn’t work, it is possible that the Advanced Boot menu has been disabled in the system BIOS. To enable the menu, restart the laptop and press the F2 key. Navigate to the “Advanced” tab in the BIOS and enable the “Advanced Boot Options” menu. Exit the BIOS and restart the laptop. You should now be able to boot into the Windows 10 safe mode.
Dell Safe Mode, Windows 11
Starting a Dell laptop in Safe Mode Windows 10 is a quick and easy process. Safe Mode is a troubleshooting option for Windows that starts your computer with a minimal set of drivers and services. When troubleshooting certain system issues, it can be helpful to boot into Safe Mode to diagnose and fix the problem.
To start your Dell laptop in Safe Mode, first power it off by pressing and holding the power button for a few seconds. When the laptop is off, press and hold the F8 key on your keyboard. As soon as the Dell logo appears, release the F8 key and you will be taken to the Advanced Boot Options menu.
In the Advanced Boot Options menu, use the arrow keys to select the Safe Mode option and press Enter. Your laptop will then boot into Safe Mode. Depending on your laptop’s settings, you may be asked to login. Once logged in, you will be taken to the Safe Mode desktop. To exit Safe Mode and boot into the normal Windows 10 desktop, simply restart the laptop.
- Power off your Dell laptop by pressing and holding the power button for a few seconds.
- Press and hold the F8 key on your keyboard.
- As soon as the Dell logo appears, release the F8 key and you will be taken to the Advanced Boot Options menu.
- In the Advanced Boot Options menu, use the arrow keys to select the Safe Mode option and press Enter.
- Your laptop will then boot into Safe Mode.
- Depending on your laptop’s settings, you may be asked to login.
- Once logged in, you will be taken to the Safe Mode desktop.
- To exit Safe Mode and boot into the normal Windows 10 desktop, simply restart the laptop.
How To Boot Into Safe Mode Windows 10 Without Login
Booting into safe mode on Windows 10 without logging in requires a few simple steps. To start the process, hold down the power button on the Dell laptop to shut it down. Once the laptop is powered off, press and hold the F8 key and then press the power button again to turn on the laptop. This will bring up the Advanced Boot Options menu.
Using the arrow keys on the keyboard, select the ‘Safe Mode with Networking’ option and press Enter. This will start up the laptop into Safe Mode without prompting you to log in. Once the laptop is booted up, you can use any programs that are available in Safe Mode. To exit Safe Mode, simply restart the laptop and it will boot into Windows 10 as normal.
It’s possible to boot into Safe Mode with Command Prompt, though this is more complex. To do this, follow the same steps as above. Then select the ‘Safe Mode with Command Prompt’ option from the Advanced Boot Options menu. This will open the Command Prompt which you can use as normal. To exit Safe Mode, you will need to type in the command ‘exit’.
Windows 10 Safe Mode From Cold Boot
Windows 10 safe mode is a troubleshooting mode that allows you to access the operating system with a limited set of drivers and files. This can help you to identify and resolve issues with software or drivers that would otherwise prevent Windows from starting normally. To start a Dell laptop in safe mode from a cold boot, you will need to access the Advanced Boot Options menu.
Here are the steps to start a Dell laptop in Safe Mode from a cold boot:
- Restart the computer and hold down the F8 key during the boot process. This will bring up the Advanced Boot Options menu.
- Using the arrow keys, select the Safe Mode option from the menu.
- Press Enter to start the computer in Safe Mode.
Once the computer is in Safe Mode, you can use it to diagnose and fix any issues preventing Windows from starting normally. To exit Safe Mode and restart the computer in normal mode, simply restart the computer.
Windows 10 Safe Mode Key
Windows 10 Safe Mode is an important feature for troubleshooting a PC. It allows you to start the computer with only essential system services and programs. This can help identify and fix problems that cause the computer to stop working properly. To start Dell Laptop in Safe Mode, you need to access the Advanced Startup Options.
- Restart your Dell laptop.
- Tap the “F8” key repeatedly after the Dell logo appears on the screen.
- Once you are in the Advanced Boot Options menu, use the arrow keys to select “Safe Mode” and press “Enter.”
- Your Dell laptop will now start in Safe Mode.
Once the laptop is in Safe Mode, you can troubleshoot any potential issues. You can access the System Configuration window from the Start menu to change the startup settings. You can also perform a system restore to a point before the problem started. When you are done troubleshooting, you can restart the computer and select “Normal Mode” from the Advanced Boot Options menu. This will start the computer in normal mode.
How to start Windows 10 in Safe Mode
Safe Mode is an important feature that helps you troubleshoot, diagnose, and fix problems with your Dell laptop. Though it may seem complicated at first, learning how to start your Dell laptop in Safe Mode Windows 10 is easy and can help you get back to work faster. With the steps outlined above, you should be able to boot into Safe Mode with no issues. If you have any additional questions, the Dell support team is always available to answer them.

Today a big day that we are writing on the Dell PC which will enjoyable and good for the Dell readers. We have seen from the past experiences that there are many Windows 10 Dell users which are looking to enter into Windows 10 Safe Mode Dell. We earlier said that there are many old ways of getting the Safe Mode in Windows 10. For example, in the past, you can get How to Start Windows 10 Safe Mode F8. Also, many users do same that to open the Safe Mode using Windows 10 Safe Mode From Command Prompt.
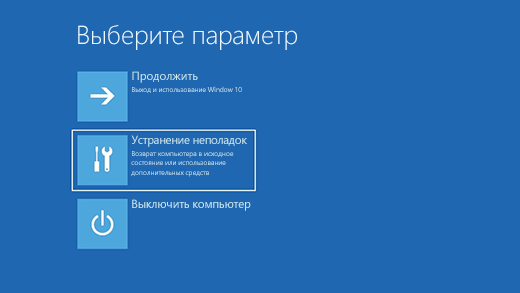
To get any errors in Windows 10, you can go and choose to Safe Mode. In this article, we will describe How to enter into Safe Mode in Windows 10 Dell.
How to get into Windows 10 Safe Mode Dell Laptop in single Click
In a single click means you can enter the Safe Mode with Restart button. For this, we are going to introduce the easiest way. Follow the below Steps:
- Go to Start Menu > Click on the Power Button.
- Hold down the Shift Key and keep press the Restart button.
- A new Blue Screen will appear where you have three options:
- Continue
- Troubleshoot
- Turn off your PC
Three options here you have. Click on the Troubleshoot then click on Advanced Options. In the advanced options, you may have different options like:
- System Restore
- Command Prompt
- System Image Recovery
- Startup Settings.
- Startup Repair
- Go back to the previous version
Here you have to choose Startup Repair for entering into Windows 10 Safe Mode Dell. Furthermore, your PC will automatically restart. After a restart, there are two types of Windows 10 Safe Mode:
- Enter Safe Mode in Normal Mode.
- Safe Mode with Networking.
Both the ways are same, In networking, you can use the internet in Safe mode in Windows 10.
Get into Windows 10 Safe Mode Dell using F8 keyPress
As we know that there does not display such feature that we get into Windows 10 Safe mode dell using F8 or Shift F8 key. But we will tell you the easy way using the F8 key in Windows 10.
How to enable Windows 10 Safe Mode using F8 key Dell
Open the Command prompt in admin mode. For example, go to Start menu or Cortana Search type “Command Prompt”. Right Click on it and “Run as Administrator”. Copy the below command and paste it into your Command prompt and press Enter.
BCDEDIT /SET {DEFAULT} BOOTMENUPOLICY LEGACY
This command will enable or fix the pressing F8 key or Shift + F8 key in Windows 10 permanently. On the other hand, you can also disable this feature in Windows 10 for Windows 10 Safe mode using F8 key by using the below Command. After then, whenever you like, you can enable this feature again.
Note: After enabling this, don’t forget to Restart your PC. because once you restart then press the F8 key or Shift + F8 key then Windows 10 Safe Mode Dell laptop works.
How to disable Windows 10 Safe Mode using F8 key Dell
BCDEDIT /SET {DEFAULT}BOOTMENUPOLICY STANDARD
That’s all!
What to do if F8 Windows 10 Safe Mode now Working?
We recommend following the few steps in Windows 10 to go into Safe mode with another way using System COnfiguration.
- First of all, using keyboard press Windows+R.
- Find from List and Press the Run Option.
- Type msconfig in the Run.
- From the top Menu Bar, Select Boot.
- Now there are few options.
- Minimal: It is used for Normal Windows 10 Safe Mode F8.
- Second is, Alternate shell: If you want to enter Windows 10 Using Command Prompt only.
- Third, Active Directory repair: It is used to repair the Active Directory server.
- Fourth, Network: Its mean you can get into safe mode with networking in Windows 10.
- After reboot, you are in Safe Mode Windows 10.
Conclusion for Windows 10 Safe Mode Dell:
Above we have mentioned how to enter the Safe Mode in Dell using simple ways. We use System Configuration, F8 or Shift F8 key and Restart option to enter Windows 10 Safe mode dell.
Let us know in the Comment if you have any problem.
В безопасном режиме запуск Windows выполняется с использованием ограниченного набора файлов и драйверов. Если проблема не возникает в безопасном режиме, это означает, что параметры по умолчанию и базовые драйверы устройств не вызывают проблему. Наблюдение за Windows в безопасном режиме позволяет сузить источник проблемы и помочь в устранении неполадок на компьютере.
Существует две версии безопасного режима: Безопасный режим и Безопасный режим с загрузкой сетевых драйверов. Безопасный режим с сетью добавляет сетевые драйверы и службы, необходимые для доступа к Интернету и другим компьютерам в сети.
Изучите следующие разделы, чтобы узнать, как запустить компьютер в безопасном режиме в разделе «Параметры», на экране входа в систему, на черном или пустом экране.
-
Нажмите клавиши Windows + I на клавиатуре, чтобы открыть параметры. Если это не сработает, нажмите кнопку Пуск , а затем выберите Параметры .
-
Выберите Восстановление системных > .
Открытие параметров восстановления -
В разделе Параметры восстановления рядом с пунктом Расширенный запуск выберите Перезапустить сейчас.
-
После перезагрузки компьютера на экране Выберите параметр выберите Диагностика > Дополнительные параметры > Параметры загрузки > Перезапуск. Возможно, вам будет предложено ввести ключ восстановления BitLocker.

-
После перезагрузки компьютера вы увидите список параметров. Нажмите клавиши 4 или F4, чтобы запустить компьютер в безопасном режиме. Или, если вам нужно будет использовать Интернет, выберите 5 или нажмите клавишу F5 для безопасного режима с сетью.


Если вам не удается открыть «Параметры» для перехода в безопасный режим, перезагрузите устройство на экране входа в Windows.
-
На экране входа Windows нажмите и удерживайте клавишу SHIFT при выборе Power > Перезапустить .
-
После перезагрузки компьютера на экране Выбор параметра выберите Устранение неполадок > Дополнительные параметры > Параметры запуска > Перезагрузка. Возможно, вам будет предложено ввести ключ восстановления BitLocker.
-
После перезагрузки компьютера вы увидите список параметров. Нажмите клавиши 4 или F4, чтобы запустить компьютер в безопасном режиме. Или, если вам нужно будет использовать Интернет, выберите 5 или F5 для безопасного режима с сетью.
Примечание: Если вы зашифровали свое устройство, для запуска в безопасном режиме вам потребуется ключ BitLocker.
Перед переходом в безопасный режим необходимо войти в среду восстановления Windows (winRE). Для этого вам потребуется повторно выключить устройство, затем выполнить следующие действия:
-
Нажмите кнопку питания на устройстве и удерживайте ее нажатой в течение 10 секунд, чтобы выключить устройство.
-
Снова нажмите кнопку питания, чтобы включить устройство.
-
После появления первого признака запуска Windows (например, на некоторых устройствах отображается логотип производителя при перезапуске) удерживайте нажатой кнопку питания в течение 10 секунд, чтобы отключить устройство.
-
Снова нажмите кнопку питания, чтобы включить устройство.
-
После перезагрузки Windows удерживайте кнопку питания на устройстве нажатой в течение 10 секунд, чтобы выключить устройство.
-
Снова нажмите кнопку питания, чтобы включить устройство.
-
Разрешите устройству перезапуститься в режим автоматического восстановления и выберите Дополнительные параметры , чтобы ввести winRE.
В среде winRE выполните следующие действия, чтобы перейти в безопасный режим.
-
На экране Выбор параметра выберите Устранение неполадок > Дополнительные параметры > Параметры запуска > Перезапуск.
-
После перезагрузки устройства вы увидите список параметров. Выберите параметр 5 в списке или нажмите клавишу F5, чтобы запустить безопасный режим с подключением к сети.
Если вам нужны дополнительные сведения об ошибке черного или пустого экрана, см. статью Устранение ошибок черного или пустого экрана.
Примечания: Перезапуска устройства должно быть достаточно, чтобы выйти из безопасного режима обратно в обычный режим. Однако если по какой-либо причине компьютер по-прежнему загружается в безопасном режиме самостоятельно после перезапуска, попробуйте следующее:
-
Нажмите клавишу с логотипом Windows + R.
-
Введите msconfig в полеОткрыть и нажмите кнопку ОК.
-
Перейдите на вкладку Загрузка.
-
В разделе Параметры загрузкиснимите флажокБезопасная загрузка.
-
Нажмите клавишу с логотипом Windows + I на клавиатуре, чтобы открыть раздел «Параметры». Если это не сработает, нажмите кнопку Пуск , а затем выберите Параметры .
-
Выберите Обновить & восстановление > безопасности .
Открытие параметров восстановления -
В разделе Особые варианты загрузки выберите элемент Перезагрузить сейчас.
-
После перезагрузки компьютера на экране Выбор параметра выберите Устранение неполадок > Дополнительные параметры > Параметры запуска > Перезагрузка. Возможно, вам будет предложено ввести ключ восстановления BitLocker.
-
После перезагрузки компьютера вы увидите список параметров. Нажмите клавиши 4 или F4, чтобы запустить компьютер в безопасном режиме. Или, если вам нужно будет использовать Интернет, выберите 5 или нажмите клавишу F5 для безопасного режима с сетью.
Если вам не удается открыть «Параметры» для перехода в безопасный режим, перезагрузите устройство на экране входа в Windows.
-
На экране входа Windows нажмите и удерживайте клавишу SHIFT при выборе Power > Перезапустить .
-
После перезагрузки компьютера на экране Выбор параметра выберите Устранение неполадок > Дополнительные параметры > Параметры запуска > Перезагрузка. Возможно, вам будет предложено ввести ключ восстановления BitLocker.
-
После перезагрузки компьютера вы увидите список параметров. Нажмите клавиши 4 или F4, чтобы запустить компьютер в безопасном режиме. Или, если вам нужно будет использовать Интернет, выберите 5 или F5 для безопасного режима с сетью.
Примечание: Если вы зашифровали свое устройство, для запуска в безопасном режиме вам потребуется ключ BitLocker.
Перед переходом в безопасный режим необходимо войти в среду восстановления Windows (winRE). Для этого вам потребуется повторно выключить устройство, затем выполнить следующие действия:
-
Нажмите кнопку питания на устройстве и удерживайте ее нажатой в течение 10 секунд, чтобы выключить устройство.
-
Снова нажмите кнопку питания, чтобы включить устройство.
-
После появления первого признака запуска Windows (например, на некоторых устройствах отображается логотип производителя при перезапуске) удерживайте нажатой кнопку питания в течение 10 секунд, чтобы отключить устройство.
-
Снова нажмите кнопку питания, чтобы включить устройство.
-
После перезагрузки Windows удерживайте кнопку питания на устройстве нажатой в течение 10 секунд, чтобы выключить устройство.
-
Снова нажмите кнопку питания, чтобы включить устройство.
-
Разрешите полностью перезагрузить устройство. Будет активирована среда восстановления Windows.
В среде winRE выполните следующие действия, чтобы перейти в безопасный режим.
-
На экране Выбор параметра выберите Устранение неполадок > Дополнительные параметры > Параметры запуска > Перезапустить.
-
После перезагрузки устройства вы увидите список параметров. Выберите параметр 5 в списке или нажмите клавишу F5, чтобы запустить безопасный режим с подключением к сети.
Если вам нужны дополнительные сведения о черном или пустом экране, изучите раздел Устранение ошибок типа «черный» или «пустой» экран.
Примечания: Перезапуска устройства должно быть достаточно, чтобы выйти из безопасного режима обратно в обычный режим. Однако если по какой-либо причине компьютер по-прежнему загружается в безопасном режиме самостоятельно после перезапуска, попробуйте следующее:
-
Нажмите клавишу с логотипом Windows + R.
-
Введите msconfig в полеОткрыть и нажмите кнопку ОК.
-
Перейдите на вкладку Загрузка.
-
В разделе Параметры загрузкиснимите флажокБезопасная загрузка.
Нужна дополнительная помощь?
Нужны дополнительные параметры?
Изучите преимущества подписки, просмотрите учебные курсы, узнайте, как защитить свое устройство и т. д.
В сообществах можно задавать вопросы и отвечать на них, отправлять отзывы и консультироваться с экспертами разных профилей.
Найдите решения распространенных проблем или получите помощь от агента поддержки.
Nowadays, having a laptop is essential for most of us. But have you ever encountered a problem with your Dell laptop? Does it take too long to start or get stuck at a certain point? If so, you might need to start it in Safe Mode. In this article, we will show you how to start your Dell laptop in Safe Mode Windows 10. We’ll discuss the importance of Safe Mode and the different ways you can access it. After reading this article, you will be able to know how to get your Dell laptop working again in no time. So, let’s begin!
How to Start Dell Laptop in Safe Mode Windows 10?
- Press the Windows key + R to open the Run dialog box.
- Type “msconfig” into the Run dialog box and press Enter.
- On the System Configuration pop-up window, click on the Boot tab.
- In the Boot options section, select the Safe boot check box.
- Click on the radio button next to “Minimal”.
- Click Apply, then click OK.
- The System Configuration pop-up will close and you will be prompted to restart your computer. Click Restart.
- Your computer will now restart in Safe mode.

How to Boot Dell Laptop into Safe Mode on Windows 10?
Starting your Dell laptop in safe mode is a great way to troubleshoot potential software problems. Safe mode allows you to boot into a limited version of Windows 10 with only essential services running, which can help you identify and fix issues that may be preventing your laptop from booting normally. Here’s how to start your Dell laptop in safe mode on Windows 10.
Restart into Safe Mode
The easiest way to start your Dell laptop in safe mode is to restart it while pressing the F8 key (on some laptops, it may be F5 or F7). This will bring up the Advanced Boot Options menu, which will allow you to select the option to start your laptop in safe mode. You can also start your laptop in safe mode using the Windows Recovery Environment (WinRE). This can be accessed by pressing the F11 key while your laptop is booting.
Using System Configuration
If you don’t want to restart your laptop to get into safe mode, you can use the System Configuration tool to enable safe mode. To do this, press the Windows + R keys to open the Run dialog, type “msconfig” and press Enter. This will open the System Configuration window. Go to the Boot tab, select the “Safe boot” checkbox and click OK. This will enable safe mode, and your laptop will restart in safe mode the next time it boots.
Using Command Prompt
You can also use the Command Prompt to enable safe mode. To do this, press the Windows + X keys to open the Power User menu, select “Command Prompt (Admin)” and press Enter. This will open an elevated Command Prompt window. Type “bcdedit /set {default} safeboot minimal” and press Enter. This will enable safe mode, and your laptop will restart in safe mode the next time it boots.
Using Advanced Startup
You can also use the Advanced Startup feature to enable safe mode. To do this, press the Windows + I keys to open the Settings window, go to “Update & Security”, select “Recovery” and click “Restart now” under Advanced startup. This will restart your laptop and open the Advanced startup menu. Select “Troubleshoot”, then “Advanced options”, then “Startup Settings”, then “Restart”. This will restart your laptop and open the Startup Settings menu. Select the option to enable safe mode and your laptop will restart in safe mode.
Using System Restore
If you want to start your laptop in safe mode to perform a system restore, you can use the Windows Recovery Environment (WinRE). This can be accessed by pressing the F11 key while your laptop is booting. This will open the Windows Recovery Environment, which will allow you to select the option to perform a system restore. This will start your laptop in safe mode and allow you to restore your system to a previous state.
Using Windows Update
If you want to start your laptop in safe mode to install a Windows update, you can use the Windows Update tool. To do this, press the Windows + I keys to open the Settings window, go to “Update & Security”, select “Windows Update” and click “Check for updates”. This will check for available updates and allow you to install them. If an update requires a restart, you can select the option to restart in safe mode. This will start your laptop in safe mode and allow you to install the update.
Few Frequently Asked Questions
1. What is Safe Mode?
Safe Mode is a diagnostic startup mode in Windows 10 that is used to help troubleshoot issues. It starts up with minimal system services, so it can be used to identify and fix problems that may prevent Windows from loading normally. It also allows you to run diagnostic and repair programs that can help you solve problems with your computer.
2. How do I start my Dell laptop in Safe Mode?
To start your Dell laptop in Safe Mode, you will need to press and hold the F8 key while the computer is booting up. This will bring up the Advanced Boot Options menu, where you can select the “Safe Mode” option. Once in Safe Mode, you will be able to run diagnostics and repair programs.
3. What should I do if I can’t boot into Safe Mode?
If you are unable to boot into Safe Mode, then you will need to try to access the Advanced Boot Options menu by pressing and holding the F8 key while the computer is booting up. If this does not work, then you will need to try using the System Recovery Options menu, which can be accessed by pressing and holding the F10 key while the computer is booting up.
4. What are the benefits of using Safe Mode?
Using Safe Mode can be beneficial in many ways. It can help you troubleshoot and identify problems with your computer that may prevent Windows from loading normally, and it can also allow you to run diagnostic and repair programs that can help you solve those problems. It can also help you uninstall and reinstall drivers, software, and hardware that may be causing problems with your computer.
5. Is it safe to use Safe Mode?
Yes, it is safe to use Safe Mode. It does not contain any malicious software and only runs the essential components of Windows, so it is a safe environment to use for troubleshooting and repair.
6. What should I do if I can’t access the Advanced Boot Options menu?
If you are unable to access the Advanced Boot Options menu, then you will need to try using the System Recovery Options menu, which can be accessed by pressing and holding the F10 key while the computer is booting up. This menu will allow you to access a variety of recovery options, including the ability to repair the operating system, restore the system to a previous restore point, and access a command prompt.
How to start Windows 10 in Safe Mode
As a professional writer, I can confidently say that following the instructions outlined in this article will help you start your Dell laptop in safe mode on Windows 10. This mode can be an invaluable tool for troubleshooting and resolving issues with your laptop. With the help of the steps outlined in this article, you can easily and safely start your Dell laptop in safe mode on Windows 10.
Содержание
- 1 Как запустить безопасный режим Windows 10 Dell?
- 2 Как включить ноутбук Dell в безопасном режиме?
- 3 Как через биос зайти в безопасный режим Windows 10?
- 4 Что делать если компьютер не запускается в безопасном режиме?
- 5 Как войти в безопасный режим Windows 10 если операционная система не загружается?
- 6 Как в биосе зайти в безопасный режим?
- 7 Как включить ноутбук Dell?
- 8 Как запустить восстановление системы через биос?
- 9 Как запустить компьютер с помощью биос?
- 10 Как восстановить систему через f2?
- 11 Как запустить компьютер в безопасном режиме Windows 7 через биос?
Как запустить безопасный режим Windows 10 Dell?
Из экрана входа:
После перезапуска компьютера на экране Выберите параметр выберите Диагностика > Дополнительные параметры > Параметры загрузки > Перезапуск. После перезапуска компьютера должен появиться список параметров. Нажмите клавишу 4 или F4, чтобы запустить компьютер в Безопасном режиме.
Способ 1
- Включите питание компьютера.
- Удерживая нажатой клавишу SHIFT, несколько раз быстро нажмите клавишу F8 во время загрузки. Откроется меню «Режим восстановления» перед началом загрузки операционной системы.
Как через биос зайти в безопасный режим Windows 10?
Нажмите клавишу 4 или F4, чтобы запустить компьютер в Безопасном режиме. Если вам будет нужен Интернет, нажмите клавиши 5 или F5, чтобы войти в Безопасный режим с загрузкой сетевых драйверов. > Перезапуск.
Что делать если компьютер не запускается в безопасном режиме?
Не запускается безопасный режим — используйте параметры «Конфигурация системы» Выполните действия, чтобы перейти к настройкам запуска и перезагрузить систему до точки, в которой можете выбрать безопасный режим. В настройках щелкните «восстановление» и в разделе «Расширенный запуск» жмите «Перезагрузить сейчас».
Как войти в безопасный режим Windows 10 если операционная система не загружается?
[Ноутбук] Windows 10 — Как зайти в Безопасный режим, если система не загружается и сбросить параметры системы?
- Нажмите [Дополнительные параметры].
- Выберите [Параметры загрузки].
- Нажмите [Перезагрузить].
- Выберите 4 пункт (нажмите F4 на клавиатуре) для входа в Безопасный режим.
18 мая 2020 г.
Как в биосе зайти в безопасный режим?
Данный способ самый простой и проверенный. Для этого вам понадобится перезагрузить компьютер и до того, как начнётся загрузка операционной системы, нажать на клавишу F8 или комбинацию Shift+F8. Затем должно появится меню, где потребуется выбрать вариант загрузки ОС.
Как включить ноутбук Dell?
Если открыть крышку, то есть экран, ноутбука, то в правом верхнем углу над клавиатурой вы найдете кнопку Включения. Единократно нажав на нее, вы включите компьютер. Если же он не включается при нажатии, то стоит проверить заряд батареи, можно просто подключить к ноутбуку зарядку и попробовать снова нажать на кнопку.
Как запустить восстановление системы через биос?
Введите команду «fixboot», нажмите Enter, а затем клавишу Y (в русской раскладке Н). Подождите, пока будут восстановлены загрузочные сектора Windows. Через некоторое время компьютер будет перезагружен. Снова зайдите в биос и укажите в параметре «First Boot Device» название своего системного жесткого диска.
Как запустить компьютер с помощью биос?
Чтобы зайти в BIOS, нужно успеть многократно нажать клавишу или комбинацию клавиш до загрузки операционной системы. Обычно это клавиши Delete, Esc., F1, F2, F12 (зависит от производителя) . На некоторых ноутбуках присутствовать специальная кнопка для доступа в Setup.
Как восстановить систему через f2?
Перезапустите компьютер, нажмите»F2″, чтобы войти в BIOS, и нажмите»Alt+F», чтобы восстановить CMOS. После нажатия комбинационной клавиши вы услышите резкий звуковой сигнал. Для некоторых версий BIOS, вы можете нажать «F9», чтобы восстановить CMOS.
Как запустить компьютер в безопасном режиме Windows 7 через биос?
Для того, чтобы зайти в безопасный режим Windows 7: Перезагрузите компьютер Сразу после экрана инициализации BIOS (но еще до появления заставки Windows 7) нажмите клавишу F8. Учитывая то, что этот момент сложно угадать, можно с самого включения компьютера нажимать раз в полсекунды на F8.