После того, как вы установили Node, давайте попробуем создать наш первый веб-сервер.
Создайте файл с именем «app.js» и скопируйте следующий код:
const http = require('http');

const hostname = '127.0.0.1';
const port = 3000;

const server = http.createServer((req, res) => {
  res.statusCode = 200;
  res.setHeader('Content-Type', 'text/plain');
  res.end('Hello World');
});

server.listen(port, hostname, () => {
  console.log(`Server running at http://${hostname}:${port}/`);
});
Далее запустите ваш веб-сервер, используя команду node app.js, откройте http://localhost:3000 в браузере и вы увидите сообщение ‘Hello World’.
Когда заходит речь о сервере, то под этим словом может подразумеваться либо программа (сервер), либо компьютер (сервер), на котором работает одна или несколько программ-серверов. Здесь, очевидно, рассматривается программа-сервер.
Сама по себе программа-сервер — это лишь часть распределенной программы, которую называют клиент-серверным приложением. Здесь слово «распределенная» означает, что функциональность программы разделена на две части: клиентскую и серверную. Клиентская часть (клиент) отправляет запросы, а серверная часть (сервер) отвечает на них. Клиент и сервер могут находиться как на одном и том же компьютере, так и на разных компьютерах в компьютерной сети.
В вебе клиент и сервер общаются посредством запросов от клиента и ответов клиенту от сервера в рамках протокола HTTP (если рассматривать общение по компьютерной сети на прикладном уровне сетевой модели). В вебе клиент и сервер вместе называют распределенным веб-приложением (также называют просто «веб-приложением»). Клиент могут называть веб-клиентом, а сервер — веб-сервером. Также веб-приложением могут называть как отдельно клиент, так и отдельно сервер. Еще веб-приложением могут называть часть кода сервера, которую пишет программист со стороны сервера, используя библиотеки (фреймворки), написанные другими. Так что с термином «веб-приложение» есть некоторая путаница. Нужно понимать, что он означает, ориентируясь по контексту, в котором он применяется.
Таким образом, нужно понимать, что для демонстрации работы веб-сервера понадобится и веб-клиент. У нас в качестве веб-клиента будет выступать браузер. Браузер и веб-сервер, который будет написан и запущен далее, составят распределенное веб-приложение.
* * *
Программист, который хочет написать веб-сервер, должен понимать, что сетевая модель состоит из уровней и при каждом запросе от клиента и ответе клиенту от сервера сообщение проходит все уровни сетевой модели. На прикладном уровне (самом верхнем) общение проходит по протоколу HTTP, как было указано выше. На уровне ниже (транспортном) общение проходит по протоколу TCP, что значит, что веб-сервер должен манипулировать номером порта. На уровне ниже транспортного (сетевой уровень) общение проходит по протоколу IP, что значит, что веб-сервер должен манипулировать IP-адресом.
Обычно в учебниках и руководствах, когда речь заходит о написании простейшего веб-сервера, используется IP-адрес «127.0.0.1». Это неспроста. Во-первых, нужно отметить, что тут подразумевается общение по сети в рамках протокола IP версии 4 (IPv4), это видно по строению указанного IP-адреса. Во-вторых, указанный IP-адрес входит в группу IP-адресов (подсеть) 127.0.0.0 – 127.255.255.255. Эта группа IP-адресов предназначена для локального использования, то есть для использования в рамках одного компьютера (IP-адреса этой группы не могут использоваться в интернете).
Таким образом, речь идет о написании и запуске локального веб-сервера. То есть обе части нашего распределенного веб-приложения (клиентская и серверная) будут находиться на одном и том же компьютере — нашем компьютере. Для общения между клиентом и сервером у нас, как я понимаю, даже не будет задействована сетевая карта нашего компьютера.
Почему в учебниках используется этот IP-адрес? Потому что локальный веб-сервер обычно используется для отладки распределенных веб-приложений. Это логично: пока наше распределенное веб-приложение не отлажено, нет смысла соваться в интернет или локальную сеть (в том числе и по соображениям безопасности). Кроме этого, для отладки распределенного веб-приложения в локальной сети или в интернете потребуется доступ к частям распределенного веб-приложения с обеих сторон (с двух компьютеров): и со стороны клиента, и со стороны сервера. Конечно же, удобнее отлаживать и тестировать распределенное веб-приложение на одном и том же нашем компьютере, так что логично, что мы будем использовать локальный веб-сервер, а сетевое общение будет происходить без выхода в сеть.
После отладки веб-сервера в качестве локального (с IP-адресом «127.0.0.1») этот же веб-сервер можно легко применить в локальной сети или в интернете, просто поменяв IP-адрес на нужный.
* * *
Текст программы (простейшего веб-сервера) на языке JavaScript я взял из статьи «Introduction to Node.js» (по-русски «Введение в среду выполнения Node.js»), которая является частью учебника по работе со средой выполнения «Node.js»:
https://nodejs.dev/learn/introduction-to-nodejs
Саму эту среду выполнения я установил ранее, об этом я написал несколько отдельных постов (например, вот этот). Напомню, у меня на компьютере установлена операционная система «Windows 10 Pro» (64-разрядная).
Итак, текст программы на языке JavaScript:
const http = require('http'); // включение модуля из стандартной библиотеки Node.js

const hostname = '127.0.0.1'; // веб-сервер работает локально
const port = 3000;
                              // веб-сервер возвратит такой ответ на любой запрос
const server = http.createServer((req, res) => {
  res.statusCode = 200;
  res.setHeader('Content-Type', 'text/plain');
  res.end('Hello World\n');
});
                              // запуск веб-сервера
server.listen(port, hostname, () => {
  console.log(`Server running at http://${hostname}:${port}/`);
});
Программа никак не анализирует параметр req, содержащий объект с информацией о запросе от клиента. Ведь наш веб-сервер очень примитивен: на любой запрос он лишь возвращает ответ (объект в переменной res) с кодом состояния 200 (запрос обработан успешно) и с текстом «Hello World» в теле ответа.
Этот текст я поместил в текстовый файл с именем index.js (в кодировке UTF-8). В принципе, имя файла может быть и другим, это не имеет значения для работы веб-сервера. Имя файла понадобится при запуске программы в среде выполнения «Node.js». Этот файл я поместил в следующий каталог:
C:\inetpub\wwwroot\node\
По идее, каталог тоже не имеет значения, наша программа может быть запущена из любого каталога. Главное — правильно указать путь к файлу с текстом программы при запуске ее в среде выполнения «Node.js».
Запустим нашу программу в среде выполнения «Node.js» через интерфейс командной строки. Я для этого использую программу «Windows PowerShell», но, конечно, это не единственный способ. Предварительно я захожу в нужный каталог в программе «Проводник Windows», а затем с помощью комбинации клавиши «Shift» и правой кнопки мыши (хотя тут нужно помнить, что функциональность кнопок мыши можно менять местами) открываю контекстное меню, в котором выбираю пункт «Открыть окно PowerShell здесь» (хотя тут нужно помнить, что этот пункт в контекстном меню может быть настроен по-другому). В результате этих манипуляций у меня открывается окно программы «Windows PowerShell», в котором не требуется переходить в другой каталог, мы уже и так находимся в том каталоге, где нужно.
Вводим следующую команду:
node index.js
После чего получаем следующее:

Наш веб-сервер запущен и работает, об этом свидетельствует сообщение, выдачу которого мы запланировали в своей программе:
Server running at http://127.0.0.1:3000/
Чтобы проверить работу нашего веб-сервера, откроем браузер (у меня — «Microsoft Edge» на движке «Chromium»). Откроем в браузере новую вкладку (по-английски «tab») и введем в адресной строке следующий адрес URL:
127.0.0.1:3000
Полностью (с указанием протокола — «HTTP») адрес URL вводить необязательно (хотя, можно ввести и полностью http://127.0.0.1:3000/, это не будет ошибкой), потому что браузер по умолчанию считает, что сетевое общение будет происходить по протоколу HTTP.
После введения этого адреса URL и нажатия клавиши «Enter» браузер (клиент нашего распределенного веб-приложения) отправит запрос с методом «GET» по протоколу HTTP на указанный IP-адрес и указанный порт. Наш веб-сервер (серверная часть нашего распределенного веб-приложения) вернет в ответ на запрос сообщение, в теле которого будет текст «Hello World». Итак, вот что у меня получилось:

Браузер может отображать не только HTML-страницы, но и другие веб-документы, в том числе текстовые (обычный текст). В нашем случае, как раз, браузер отобразил текстовый документ, состоящий из фразы «Hello World».
Таким образом, пока наш веб-сервер работает, мы можем сколько угодно раз открывать сколько угодно вкладок в браузере с указанным адресом URL и будем получать в ответ от веб-сервера текст «Hello World».
Как прекратить работу нашего веб-сервера? Если закрыть окно программы «Windows PowerShell», в котором мы запускали веб-сервер (или не закрывать, а ввести в этом окне комбинацию клавиш «Ctrl+C»), то работа нашей программы (простейшего веб-сервера) будет прекращена. После этого при вводе в адресную строку браузера адреса URL http://127.0.0.1:3000/ мы уже не получим в ответ текст с фразой «Hello World».

Node.js с Express — это популярный дуэт, используемый многими приложениями во всем мире. Данный урок познакомит вас с функциональностью этих инструментов на примере сборки простого веб-сервера.
Создаваемый сервер будет обслуживать HTML-страницу, доступную другим людям. К концу статьи вы усвоите базовые знания о:
- Node.js;
- Express;
- npm;
- создании маршрутов Express;
- обслуживании HTML;
- настройке статических ресурсов Express.
Совет: не копируйте код урока, а напишите его сами. Это позволит вам лучше его понять и усвоить.
Создание и инициализация проекта
Первым шагом будет создать пустой каталог для проекта. Это можно сделать обычным способом либо из терминала с помощью следующих команд:
mkdir express-server
cd express-server
После создания проекта нужно его инициализировать:
npm init -y
Эта команда создает файл package.json и инициализирует его с предустановленными значениями. Если вы захотите сами заполнить его поля, удалите флаг -y и следуйте инструкциям.
После инициализации проекта Node.js мы переходим к следующему шагу — добавлению Express. Установка пакетов в Node.js выполняется командой npm install packageName.
Для добавления последней стабильной версии Express выполните:
npm install express
После установки Express файл package.json будет выглядеть так:
{
  "name": "express-server",
  "version": "1.0.0",
  "description": "",
  "main": "index.js",
  "scripts": {
    "test": "echo \"Error: no test specified\" && exit 1"
  },
  "keywords": [],
  "author": "",
  "license": "ISC",
  "dependencies": {
    "express": "^4.17.1"
  }
}
Express перечислен среди dependencies, значит, он установился успешно. Переходим к третьему шагу — созданию сервера.
Создание сервера Express
Прежде чем продолжать, нужно создать для сервера JS-файл. Выполните в терминале следующую команду:
touch index.js
Теперь откройте этот файл и пропишите в нем:
const express = require('express');
const app = express();
Что эти строки делают?
- Первая импортирует Express в проект, чтобы его можно было использовать. При каждом добавлении в проект пакета необходимо импортировать его туда, где он будет использоваться.
- Вторая строка вызывает функцию
express, которая создает новое приложение, после чего присваивает результат константеapp.
Создание маршрутов и прослушивание порта
Говоря простым языком, маршрут представляет конечную точку, к которой могут обращаться пользователи. Он ассоциируется с HTTP-глаголом (например, GET, POST и пр.) и получает путь URL. Кроме того, он получает функцию, которая вызывается при обращении к этой конечной точке.
Пропишите в файле следующий код:
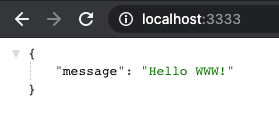
app.get('/', (req, res) => {
    res.send({ message: 'Hello WWW!' });
});
Разберем его согласно приведенной ранее структуре:
- Он связан с HTTP-глаголом — в данном случае GET.
- Он получает URL — здесь это домашняя страница (
/). - Он получает функцию, которая будет вызываться при обращении к конечной точке.
Следовательно, когда пользователь выполняет запрос GET к домашней странице, т.е. localhost:3333, вызывается стрелочная функция и отображается фраза “Hello WWW!”
Последним шагом подготовки сервера к работе будет настройка слушателя. Понадобится указать для приложения конкретный порт. Напишите нижеприведенный код в конец JS-файла.
app.listen(3333, () => {
    console.log('Application listening on port 3333!');
});
Чтобы иметь возможность запускать сервер, вам нужно будет вызывать метод listen. При этом вы также можете изменить номер порта (3333) на любой другой.
Доступ к приложению в браузере
Для запуска приложения выполните в терминале node index.js. Имейте в виду, что index.js — это произвольное имя, которое я выбрал для данного урока, так что можете назвать его app.js или как-угодно иначе.
Теперь, когда сервер запущен, можно обратиться к нему в браузере. Перейдите по адресу http://localhost:3333/, перед вами должно отобразиться следующее сообщение:
Вы отлично справились с настройкой веб-сервера Node.js + Express. В следующем разделе мы настроим статическое содержимое, а именно JavaScript, CSS, HTML, изображения и т.д.
Статические файлы
Наше приложение пока что выглядит не очень. Почему бы не добавить ему структуру и стилизацию? Но куда все это нужно добавлять?
В этом разделе вы узнаете, как настраивать и передавать статические ресурсы, такие как HTML, JavaScript, CSS и изображения.
Импорт модуля path
Первым делом нужно импортировать в приложение модуль path. Устанавливать ничего не нужно, потому что path предустановлен в Node изначально.
Пропишите в начале файла эту строку:
const path = require('path');
Зачем вообще этот модуль? Он позволяет генерировать абсолютные пути, которые необходимы для передачи статических файлов. Добавьте следующую строку в приложение перед определением маршрутов:
app.use(express.static(path.join(__dirname, 'public')));
path.join получает два аргумента:
- Текущую рабочую директорию (cwd).
- Вторую директорию, которую нужно объединить с cwd.
В качестве упражнения попробуйте вывести в консоль path.join(__dirname, 'public') и посмотрите, что получится.
На данный момент сервер должен выглядеть так:
const path = require('path');
const express = require('express');
const app = express();

app.use(express.static(path.join(__dirname, 'public')))

app.get('/', (req, res) => {
    res.send({ message: 'Hello WWW!' });
});

app.listen(3333, () => {
    console.log('Application listening on port 3333!');
});
Создание каталога public и добавление ресурсов
Создайте каталог и перейдите в него с помощью следующих команд:
mkdir public
cd public
Теперь создадим пустые файлы, куда затем добавим HTML, CSS и JavaScript. Выполните в терминале следующие команды:
touch app.js
touch index.html
touch styles.css
Мы оставим app.js максимально простым, добавив только сообщение, подтверждающее, что он работает:
alert('it works');
То же и с styles.css. Для проверки его работоспособности мы установим цвет фона на синий:
html {
    background-color: blue;
}
В завершении нужно написать HTML, чтобы отображать все это на домашней странице. Откройте index.js и добавьте следующий HTML-код:
<!DOCTYPE html>
<html lang="en">
<head>
<meta charset="UTF-8">
<meta name="viewport" content="width=device-width, initial-scale=1.0">
<script src="/app.js"></script>
<link rel="stylesheet" href="/styles.css">
<title>My server</title>
</head>
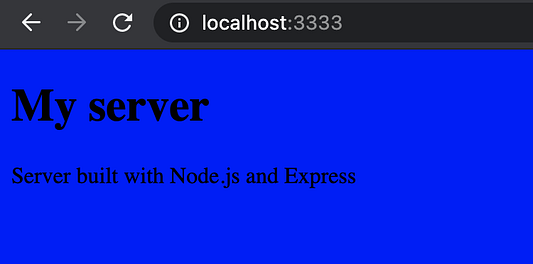
<body>
<h1>My server</h1>
<p>Server built with Node.js and Express</p>
</body>
</html>Теперь остается всего один шаг.
Передача HTML-файла
Мы почти закончили. Осталось только обработать HTML-код. Для этого нужно перейти в файл index.js и прописать в нем следующее:
app.get('/', (req, res) => {
    res.sendFile(`${__dirname}/public/index.html`);
});
Если вы уже ранее работали с Node.js и Express, то можете спросить: “Что здесь делает метод sendFile и почему мы не используем render?” Метод render мы использовать не можем, так как не задействуем никакой движок (например, Pug, EJS и т.д.). Следовательно, когда кто-либо обращается к домашней странице, мы отправляем назад HTML-файл.
Итоговый код сервера должен выглядеть так:
const path = require('path');
const express = require('express');
const app = express();

app.use(express.static(path.join(__dirname, 'public')))

app.get('/', (req, res) => {
    res.sendFile(`${__dirname}/public/index.html`);
});

app.listen(3333, () => {
    console.log('Application listening on port 3333!');
});
COPY
Если теперь вы перейдете по http://localhost:3333, то увидите домашнюю страницу с синим фоном. Естественно, сначала нужно будет закрыть надоедливое всплывающее окошко.
Заключение
К завершению статьи у вас должно получиться простое веб-приложение.
В этом уроке мы узнали:
- о Node.js;
- об Express и о том, как использовать его для создания небольшого веб-приложения;
- как создавать маршруты;
- как настраивать статическое содержимое в приложении Node.js + Express;
- как передавать простой HTML-файл в Express.
Читайте также:
- Создаем Telegram-бота с помощью Node.js за 3 минуты
- Найти и обезвредить: утечки памяти в Node.js
- Создание многопользовательской игры с использованием Socket.io при помощи NodeJS и React
Читайте нас в Telegram, VK и Яндекс.Дзен
Перевод статьи Catalin Pit: Node.js + Express Tutorial for 2021 — Build a Web Server Using Node.js and Express
Hello. In this tutorial, we will create a simple node.js web server and handle the HTTP requests. The node.js framework is commonly used to create server-based applications which are further used to show the contents to the users.
1. Introduction
1.1 Setting up Node.js
To set up Node.js on windows you will need to download the installer from this link. Click on the installer (also include the NPM package manager) for your platform and run the installer to start with the Node.js setup wizard. Follow the wizard steps and click on Finish when it is done. If everything goes well you can navigate to the command prompt to verify if the installation was successful as shown in Fig. 1.

To set up the application, we will need to navigate to a path where our project will reside. For programming stuff, I am using Visual Studio Code as my preferred IDE. You’re free to choose the IDE of your choice.
2.1 Setting up dependencies
Navigate to the project directory and run npm init -y to create a package.json file. This file holds the metadata relevant to the project and is used for managing the project dependencies, script, version, etc. Add the following code to the file wherein we will specify the required dependencies.
package.json
{
  "name": "webserver",
  "version": "1.0.0",
  "description": "nodejs and webserver",
  "main": "index.js",
  "scripts": {
    "test": "echo \"Error: no test specified\" && exit 1"
  },
  "keywords": [
    "nodejs",
    "webserver"
  ],
  "author": "c-danatl",
  "license": "MIT",
  "dependencies": {
    "nodemon": "^2.0.9"
  }
}
To download the dependencies navigate to the directory path containing the file and use the npm install command. If everything goes well the dependencies will be loaded inside the node_modules folder and you are good to go with the further steps.
2.2 Creating the index controller
Create a controller file that will import the HTTP module using the require(…) function. This module will be used to create the webserver and specify the callback function with a request and response parameter.
index.js
// importing node.js core module
const http = require('http');

// application endpoints -
// Index - http://localhost:5001/

const server = http.createServer(function (req, resp) {
    // handling incoming requests here

    // setting response header
    resp.writeHead(200, { 'Content-Type': 'text/html' });
    // setting response content
    resp.write('<html><body><p>Welcome to javacodegeeks</p></body></html>');
    resp.end;

    // todo - similarly you can create other endpoints.
});

// start app
// listen for any incoming requests
const PORT = process.env.PORT || 5001;
server.listen(PORT, () => {
    console.log(`Server started on port ${PORT}`);
});
3. Run the Application
To run the application navigate to the project directory and enter the following command as shown in Fig. 2. If everything goes well the application will be started successfully on port number 5001.

4. Project Demo
When the application is started, open the browser of your choice and hit the following url – http://localhost:5001. The index page will be shown to the user as in Fig. 3.

That is all for this tutorial and I hope the article served you with whatever you were looking for. Happy Learning and do not forget to share!
5. Summary
In this tutorial, we learned to create a node.js web server using simple steps. You can download the source code of this tutorial from the Downloads section.
6. Download the Project
This was a programming tutorial to create a web server in a node.js application.

An experience full-stack engineer well versed with Core Java, Spring/Springboot, MVC, Security, AOP, Frontend (Angular & React), and cloud technologies (such as AWS, GCP, Jenkins, Docker, K8).
The following is an excerpt from the book Get Programming with Node.js, published by manning.com. You can purchase the book here at a 37% discount by using the code fccwexler.
 This article is a practical introduction to using Node.js. We’re going to go over installing Node.js, learn about npm, and then we’re going to build a Node.js module and jump right in to initializing a web server. Feel free to follow along at home as you read!
Installing Node.js
Node.js is growing in popularity and support. Because of this, new versions to download are being deployed quite frequently, and it’s important to stay up to date with the latest versions to see how they may benefit or otherwise impact the applications you’re building. At the time of writing, the version of Node.js to download is 7.6 or greater.
NOTE: The release of Node.js 7.6 comes with support for ES6 syntax. ES6 (ECMAScript 2015) is a recent update to JavaScript, with syntax improvements for defining variables, functions, and OOP code altogether. To keep up with updates to JavaScript, download the latest stable version of Node.js as your development progresses.
There are a couple of ways to download and install Node.js, all of which are listed on the Node.js main site.
Because Node.js is platform-independent, you can download and install it on macOS, Windows, or Linux and expect full functionality.
The simplest way to install Node.js is to go to the download link and follow the instructions and prompts to download the installer for the latest version of Node.js.
NOTE: When you install Node.js, you also get npm, the Node.js ecosystem of external libraries (multiple files of code other people wrote) that can be imported into your future projects. You’ll learn more about npm in the next section.
Figure 1. Node.js installer page
When the installer file is downloaded, double-click the file from your browser’s download panel or from your computer’s download folder. The installer will open a new window that looks like Figure 1 and write all necessary files and core Node.js libraries to your system. You may be asked to accept licensing agreements or give the installer permission to install Node.js onto your computer. Follow the prompts to click through the installation.
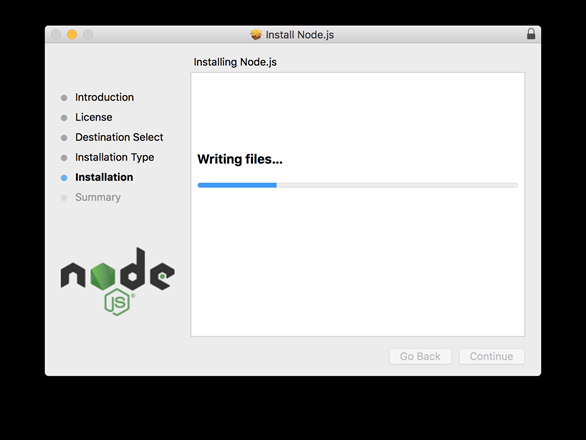
Figure 2. Node.js writing to your machine
Terminal and your PATH
You’ll be working mostly in your computer’s terminal, which is built-in software used to navigate and run commands on your computer without a graphical interface. This book teaches using the Unix terminal (Bash) commands. Those of you who are Windows users can follow along using Window’s CMD terminal window (you may need to look up command-equivalents throughout the book). You can reference this table comparing Windows and Unix commands. To make things easier on Windows, you can download and install an additional Bash terminal called GitBash from git-scm.com.
Make a note of where your version of Node.js and npm are installed on your machine. This information is shown in the final window in the installer. The installer attempts to add these directory locations to your system’s PATH.
Your computer’s PATH variable is the first place the terminal will look for resources used in development. Think of it like your computer’s index for quickly finding the tools you need. By adding these tools’ original file path or directory locations to the PATH variable, terminal won’t have any problems finding them. If you experience any problems starting Node.js in your terminal, follow the installation steps here.
Making sure everything’s installed correctly
Now that you have Node.js installed, let’s use terminal to make sure everything is installed correctly. Open terminal (or GitBash) and type the following command at the prompt: node-v.
The output of this command should show you the version of Node.js you’ve just installed. Similarly, you can check the version of npm that you’ve installed by running the command npm -v at the command prompt.
NOTE: If your terminal responds with an error or with nothing at all, it’s possible that your installation of Node.js was not successful. In the case of an error, try copying and pasting that error into a search engine to look for common solutions or simply try repeating the installation process.
Now that you have Node.js installed and your terminal running, you need somewhere to write your code. Although text editors come in many different forms and can be used to make non-code files as well, text editors designed specifically for developers often come prepackaged with helpful tools and plugins. I recommend installing the Atom text editor, which you can download at atom.io.
TIP: If you ever forget where you installed Node.js or npm, you can open a command window and type either which node or which npm at the prompt to see the corresponding location. From a Windows command-line prompt, use where in place of which.
Planning Your App
Imagine that you want to build an application for your city’s community-supported agriculture (CSA) club. Through this application, users could subscribe to receive food from local farms and distributors. The application ensures that your community gets healthy food and stays connected. You plan to use Node.js to build this web application and you want to start by verifying users’ zip codes to see if they live close enough for delivery. The question is: will you need to build your own tool to make this possible?
Luckily for us, the answer is no, npm can be used to install Node.js packages, libraries of code others have written that you can use to add specific features to your application. In fact, there’s a package for verifying locations based on zip codes. We’ll take a closer look at that package and how to install it in a little bit.
Creating a Node.js Module
A Node.js application is ultimately made up of many JavaScript files. For your application to stay organized and efficient, these files need to have access to each other’s contents when necessary. Each file, whose code is collectively related, is called a module. Let’s look at our app again and add some positive messages to it. You can create a file called messages.js with the following code:
let messages = ["You are great!", "You can accomplish anything!", "Success is in your future!"];
Keeping these messages separate from the code you’ll write to display them will make your code more organized. To manage these messages in another file, you need to change the let variable definition to use the exports object, like so:
exports.messages =["You are great!", "You can accomplish anything!", "Success is in your future!"];
Just like other JavaScript objects, you are adding a messages property on the Node.js exports object, which can be shared between modules.
NOTE: The exports object is actually a property of the moduleobject. module is both the name of the code files in Node.js and one of its global objects. Using exports is essentially a shorthand for module.exports.
The module is ready to be required (imported) by another JavaScript file. You can test this by creating another file called printMessages.js, whose purpose is to loop through the messages and log them to your console with the code in listing 1. First, require the local module by using the require object and the module’s filename (with or without a .js extension). Then, refer to the module’s array by the variable set up in printMessages.js.
Listing 1. log messages to console in printMessages.js
const messageModule = require(’./messages’); 1

messageModule.messages.forEach( (m) => { 2

  console.log(m);

});
- Require the local
messages.jsmodule. - Refer to the module’s array through
messageModule.messages.
require is another Node.js global object used to locally introduce methods and objects from other modules. Node.js interprets require('./messages'); to look for a module called messages.js within your project directory and allow code within printMessages.js to use any properties added to the exports object.
Next, we’ll use npm, another tool for adding modules to your project.
Running npm Commands
With your installation of Node.js, you also got Node Package Manager (npm). As the name suggests, npm is responsible for managing the external packages (modules others have built and made available online) in your application. Throughout application development, npm will be used to install, remove, and modify these packages. Entering npm -l in your terminal brings up a list of npm commands with brief explanations.
Listing 2 contains a few npm commands that you’ll want to know about.
Listing 2. Npm commands to know
npm init. Initializes a Node.js application and creates apackage.jsonfilenpm install <package>. Installs a Node.js package.npm publish. Saves and uploads a package you built to the npm package community.npm start. Runs your Node.js application (provided thepackage.jsonfile is set up to use this command).npm stopwill quit the running application.
When using the npm install <package>, appending --save to your command installs the package as a dependency for your application. Appending --global installs the package globally on your computer to be used anywhere within terminal. These command extensions, called flags, have the shorthand forms of -S and -g, respectively. npmuninstall <package> reverses the install action. Should a project call for it, the npm install express -S can be used to install the Express.js framework, and npm install express-generator -g to install the Express.js generator for use as a command-line tool.
Modules and packages
Throughout your development with Node.js, you’ll hear the terms module and package thrown around a lot. Here’s what you need to know:
- Modules are individual JavaScript files containing code that pertains to a single concept, functionality, or library.
- Packages may contain multiple modules or a single module. Packages are used to group together files offering relevant tools.
NOTE: “Dependencies” are Node.js modules used by an application or another module. If a package is considered an application dependency, it must be installed (at the version specified by the application) before the application can be expected to run successfully.
If there’s some functionality you’d like to incorporate into your application, there’s likely a package you can find online at npmjs.com to perform that task. Let’s go ahead and add the ability to find where your users are located based on their zip code.
To do this, we’ll need to install the cities package, built to convert text addresses into location coordinates. However, we’re still missing one thing from this project before the package can be installed successfully. We’ll need to properly initialize a Node.js project and create a package.json file used by npm for installing cities, which we will do in the next section.
Quick Check Exercise: Which flag do you use if you want to install a package globally on your computer?
Initializing a Node.js Application
Every Node.js application or module will contain a package.json file to define the properties of that particular project. This file lives at the root level of your project. Typically, this file is where you’ll specify the version of your current release, the name of your application, and the main application file. This file is important for npm to save any packages to the node community online.
To get started, create a folder called zip_connection, navigate to your project directory in terminal, and use the npm init command to initialize your application. You’ll be prompted to fill out the name of your project, the application’s version, a short description, the name of the file from which you’ll start the app (entry point), test files, git repositories, your name (author), and a license code. For now, just be sure to enter your name and press enter to accept all the default options. Once you confirm all these changes, you should see a new package.json file in your project directory resembling the contents of Listing 3.
Listing 3. Result of your package.json file in your zip_connection project
{
  "name": "zip_connection",
  "version": "1.0.0",
  "description": "An app to promote locally sourced food.",
  "main": "printMessages.js",
  "scripts": {
    "test": "echo \"Error: no test specified\" && exit 1"
  },
  "author": "Jon Wexler",
  "license": "ISC"
}
This example package.json contains a name, version, description, starting file, custom scripts, an author, and license.
Now your application has a starting point for saving and managing application configurations and packages. You should be able to install cities by navigating to your project folder and running the following in terminal:
npm install cities --save
Also, with this installation, your project folder will have just gained a new folder called node_modules. The code contents of the cities package you just installed lives in this folder.
TIP: The --save flag will save the cities package as a dependency for this project. Check your package.json file now to see how the package is listed under dependencies. Because your node_modules folder will grow in size, it is not recommended to include it when you share the project code online. However, anyone who downloads the project can enter npm install to automatically install all the project dependencies listed in this file.
Test out this new package by adding the lines in Listing 4 to main.js. We’ll start by requiring the locally installed cities package and make it available in this file. Then we’ll use the zip_lookup method from the cities package to find a city by its zip code. The result is stored in a variable called myCity.
Listing 4. Implementing the cities package in main.js
const cities = require(’cities’);
var myCity = cities.zip_lookup(10016);
console.log(myCity);
The code above does the following:
- Require the
citiespackage. - Store the resulting city from using the
zip_lookupmethod. - Log the results to your console.
The resulting data from that zip code is printed to console as shown in Listing 5.
Listing 5. Sample result from running the main.js in terminal
{ zipcode: ’10016’,
  state_abbr: ’NY’,
  latitude: ’40.746180’,
  longitude: ’-73.97759’,
  city: ’New York’,
  state: ’New York’ }
The cities zip_lookup method returns a JavaScript object with coordinates.
Quick Check Exercise: Which terminal command initializes a Node.js application with a
package.jsonfile?
Building a Simple Web Server in Node.js
The tech community raves about Node.js and its use of JavaScript as a server-side language, and that’s exactly what we’re going to do now: build it!
This section covers some basic functions of the http module, a Node.js library of code used for handling requests over the internet. Through a few short steps, you’ll convert a few lines of JavaScript into an application with which you can communicate on your web browser. Web servers are the foundation of most Node.js web applications. They allow you to load images and HTML web pages to users of your app.
Let’s consider that application that we’re working on to connect users from the same zip code. Before you deliver the complete application, the community might like to see a simple site with the flexibility to improve and add features in the future. How long do you think it will take you to build a prototype?
With Node.js, you can use the http module to get a web server with sufficient functionality built within hours.
Understanding web servers
Before getting started, let’s discuss some important web server concepts. After all, the final product will look and feel a lot better if you have clear expectations for the result ahead of time.
Web servers and HTTP
A web server is software designed to respond to requests over the internet by loading or processing data. Think of a web server like a bank teller, whose job is to process your request to deposit, withdraw, or simply view money in your account. Just as the bank teller follows a protocol to ensure that they process your request correctly, web servers follow the Hypertext Transfer Protocol (HTTP), a standardized system globally observed for the viewing of web pages and sending of data over the internet.
One way a client (your computer) and a server communicate is through the use of HTTP verbs. These verbs indicate what type of request is being made. For example, is the user trying to load a new web page or are they updating information in their profile page? The context of a user’s interaction with an application is an important part of the request–response cycle.
Here are the two most widely used HTTP methods you’ll encounter:
GET. This method is used to request information from a server. Typically, a server responds with content you can view back on your browser (e.g. clicking a link to see the home page of a site).POST. This method is used to send information to the server. A server may respond with an HTML page or redirect you to another page in the application after processing your data (e.g. filling out and submitting a sign-up form).
Consider what happens when you visit google.com. Behind the scenes, you’re actually making a request to Google’s servers, which in turn sends a response back to you, rendering their famous “Google Search” landing page. This request–response relationship allows for a channel of communication between the user and the application. Notice in Figure 3 how a bundle of data is sent to the application’s server in the form of a request and, once the server processes the request, it issues a bundle of data back in the form of a response. This is how most of your interactions on the internet are facilitated.
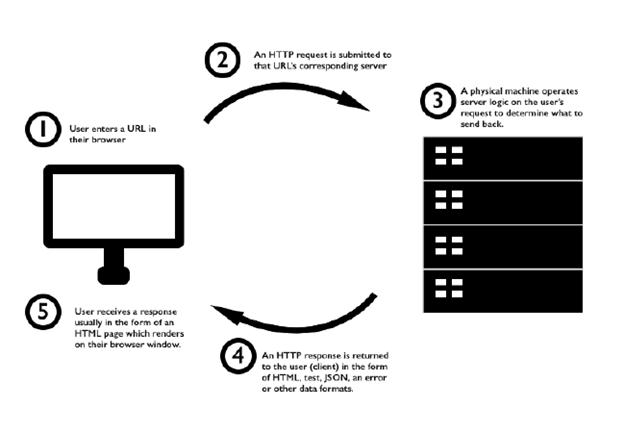
Figure 3. A web server sends your browser web pages, images and other resources on request
When you enter the URL you want to see in your browser, an HTTP request is sent to a physical computer elsewhere. This request contains some information indicating whether you want to load a web page or send information to that computer.
You might build a fancy application with many bells and whistles, but at the core there is web server, handing its communication on the internet. These concepts will make more sense the more practice you get. For now, let’s start building our web server.
Quick Check Exercise: What does a web server receive from the client and what does it send back?
Initialize the application with npm
To get started with a Node.js web application, you first need to initialize the project in your project folder on terminal. Open a terminal window and create a new directory called simple_server with mkdir. You can initialize the project with npm init.
NOTE: npm stands for Node package manager. Your node projects rely on this tool to install and build Node.js applications.
Running the npm init command initiates a prompt to create a package.json file (Figure 4). As the prompt explains, you’ll walk through configuring the most basic settings of your Node.js application in this file.
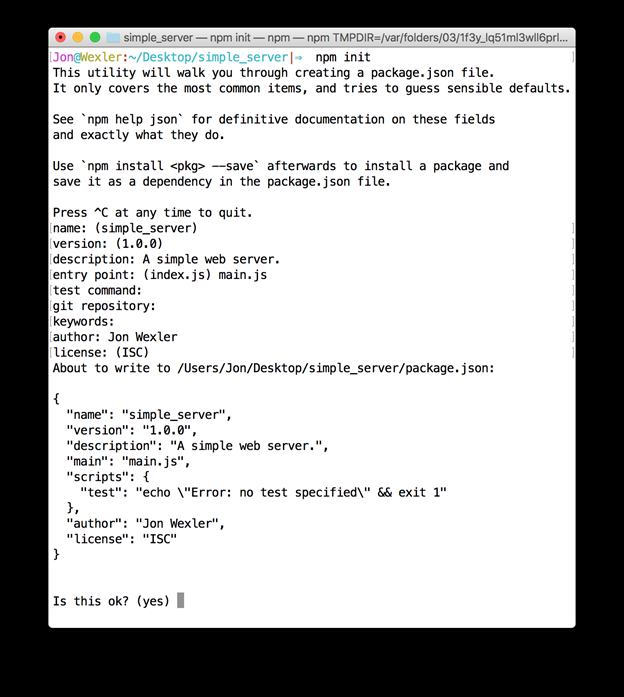
Figure 4. Filling out the Node.js initializer prompts
For now, you can add main.js as the entry point, a short description, your name as the author, and elect to use the default values offered by hitting the enter key until the end of the prompt is reached.
You’ll then be asked to confirm your settings with a preview of your package.json file. Press enter to confirm and return to the regular terminal prompt.
Code the application
When you installed Node.js at the beginning of this article, the core library was installed too. Within that library is a module called http, which we talked about earlier. This is what you’ll use to build your web server. We’ll also use another core module called url to examine the contents of the URL we visit in the web browser.
NOTE: Remember, modules in Node.js are libraries of code that come packaged to offer specific functionality to your application. Here, the http module helps you communicate across the Web using HTTP.
In your text editor, create a new file called main.js and save it in the project folder containing the package.json file created above. This file will serve as the core application file, and is where your application will literally serve web pages to your users. In the following application, we’ll use the cities package to determine a city based on the provided zip code. We’ll get the zip code from the end of the URL, the query parameter. This parameter follows the URL path, starting with a question mark and a key value pair. In our example, we’ll use zipCode as the key and provide it some zip code value. For example, if I visit http://localhost:3000/?zipCode=10016 I’ll extract the zip code, 1006, and discover the city is New York!
Before we analyze every aspect of what we’re about to build, let’s take a look at all of the code. The first line of code requires you to import specific Node.js core modules called http and url. We save those two modules along with the cities module as constants, because we don’t expect this value to change like a normal variable might. We use the http variable as a reference to the http module to create a server. In ES6 it is conventional to structure a callback function with its parameters in parentheses, followed by ⇒ instead of the function keyword. In this code block, we use the response parameter in the callback function to send content back to the user’s request. The first line uses a writeHead method to define some basic properties for the response’s HTTP header. In this case, we’re returning a 200 response code and html content-type to indicate the server received a request successfully and will return content in the form of HTML. This code takes the server instance, server, and runs the listen method to indicate the server is ready for incoming requests at port 3000. Before we submit a response, we use the url module to extract the query at the end of the request’s URL using url.parse(request.url, true).query;.
Using an if statement, we check if there is a zip code parameter we can use with query.zipCode. If there is, we use its value in our cities.zip_lookup(query.zipCode) line and chain .city to pull the city’s name from the results. Otherwise, we set the city as “not found”. In the end, we return some HTML to the user’s screen with some text and the city associated with the zip code provided.
Listing 6. Simple web application code for main.js
const cities = require(’cities’);
const url = require(’url’);
const http = require(’http’);
const app = http.createServer((request, response) => {
  var city, query;
  query = url.parse(request.url, true).query;
  if (query.zipCode) city = cities.zip_lookup(query.zipCode).city;
  else city = "not found"
  response.writeHead(200, {"Content-Type": "text/html"});
  response.write(`<h1>The city you are in is ${city}.</h1>`);
  response.end();
});

app.listen(3000);
const cities = require(’cities’);: Requiring the necessary modules.const app = http.createServer((request, response) =>: Setting up the server and extracting the query parameters.if (query.zipCode) city = cities.zip_lookup(query.zipCode).city;: Checking for city results from a zip code.response.writeHead(200, {"Content-Type": "text/html"});: Setting up the response.app.listen(3000);: Telling the server to listen on port 3000.
There it is in all of its glory! Not so terrible. In only a few lines of code you can also build a web server like this. Give it a try!
NOTE: If you don’t specify a port number, your operating system will choose a port for you. This port number is what you’ll soon use to confirm through your web browser that your web server is running.
Callbacks in Node.js
Part of what makes Node.js so fast and efficient is its use of callbacks. Callbacks are not new to JavaScript, but they are overwhelmingly used throughout Node.js and are thus worth mentioning.
A callback is essentially an anonymous function (a function without a name) that is set up to be invoked as soon as another function completes. The benefit of callbacks is you don’t have to wait for the original function to complete processing before other code is run.
Consider virtually depositing a check to your bank account by uploading a picture to your bank’s mobile app. A callback is equivalent to receiving a notification a couple days later to let you know the check has been verified and deposited. In between that time you were able to go about your normal routine.
In the http web server example, incoming requests from the client are received on a rolling basis, and thereupon pass the request and response as JavaScript objects to a callback function.
Warning: Method names are case sensitive. For example, using createserver() will throw an error.
The createServer() method generates a new instance of http.Server, a built-in Node.js class with tools to evaluate HTTP communication. With this newly created server instance, your app is prepared to receive HTTP requests and send HTTP responses. The argument in createServer() is a callback function that is invoked whenever a certain event occurs within the server. For example, once the server is running and your application’s root URL (home page) is accessed, an HTTP request event will trigger this callback and allow you to run some custom code. In this case, the server will return a simple HTML response.
NOTE: 200 is the HTTP status code for “OK”, used to indicate that there was no issue in returning content in an HTTP response header. To get a list of other HTTP status codes, enter http.STATUS_CODES in the Node.js REPL shell.
Right below that line, you’re writing one line of HTML in the response with write() and closing the response with end(). You must end your response with end() to tell the server you are no longer writing content. Not doing so will leave the connection open to send more in the response and the server will ultimately never consider the response complete.
With this code in place, you’re ready to start your Node.js application from the terminal.
Quick Check Exercise: Why should you use const instead of var to store the HTTP server in your application?
Run the Application
The last step is an easy one: navigate to your project’s directory using terminal and run node main.js in your terminal window. Next, open any browser to the address localhost:3000. You won’t see any indication in the terminal window that the server has started, but you’ll soon see in the browser that everything is working properly. Your terminal window should resemble Figure 5.
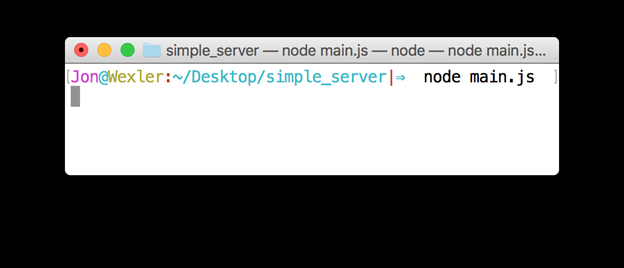
Figure 5. Running a basic Node.js server
To start with, the browser window should display that no city was found. Next, try adding a zip code as the query parameter by visiting http://localhost:3000/?zipCode=10016. The browser window should display the city as New York, as shown in the figure below. Congratulations! Your first Node.js web application is up and running. This is big and it’s about to get bigger and better.
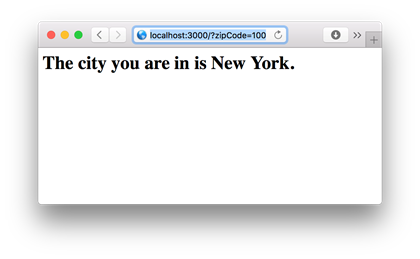
Figure 6. You’re in New York!
To stop the application, enter Ctrl + C in your terminal window. You can also close the terminal window, but you risk not shutting down the application properly, and it could continue to run behind the scenes (requiring more command-line magic to kill the process).
Quick Check Exercise: When you navigate to
localhost:3000while your server is running, what type of HTTP request do you expect you’re making?
Summary
In this article, we installed Node.js, learned about npm and creating Node.js modules, and that Node.js has built-in functionality for creating web servers via the http module. We configured a new Node.js application via the package.json file. Using the http module and createServer(), we created a web server with minimal effort, a stepping stone to building robust applications with Node.js, which we were able to run through the terminal. Lastly, we used the cities packages within our http server to locate cities by their zip codes and respond with the city name to the user’s browser.
Hopefully, you’re even more interested in learning Node.js than you were at the beginning of this article. If you want to see more, download the free first chapter of Get Programming with Node.js and see this slide deck on Slideshare.net. You can purchase the book here at a 37% discount by using the code fccwexler.