Introduction
we build projects based on a specific version of tools, dependencies, and packages. And quite often, these tools and packages get updated. What happens when you need to work on a project that requires a previous version of Node? Do you have to uninstall the current version and install the version you need? what happens after you finish working on the project?
In this post, I will share how you can switch between multiple versions of Node and manage your projects easily using Node Version Manager(NVM) on windows.
As developers, we work on many projects that run on different versions of packages. I recently had a similar challenge where my system is running Node v 16.14.2 which is the latest version at the time, and the project I want to work on required Node v 16.8.0. Hence, the motivation for writing this article.
Node Version Manager (NVM)
Node Version Manager (NVM) is a tool that allows developers to easily switch between multiple node versions without having to manually uninstall and install a new version anytime the need arises. Just as the name implies, nvm manages our Node version.
Installing NVM on Windows
Now before you install NVM, be sure to uninstall any existing installation of Node from your system to avoid complications during installation. Head over to Github and download nvm-setup.zip from the list of available options and follow through a regular installation process, nothing new.
TL;DR
Further information on installing NVM on windows can be found here.
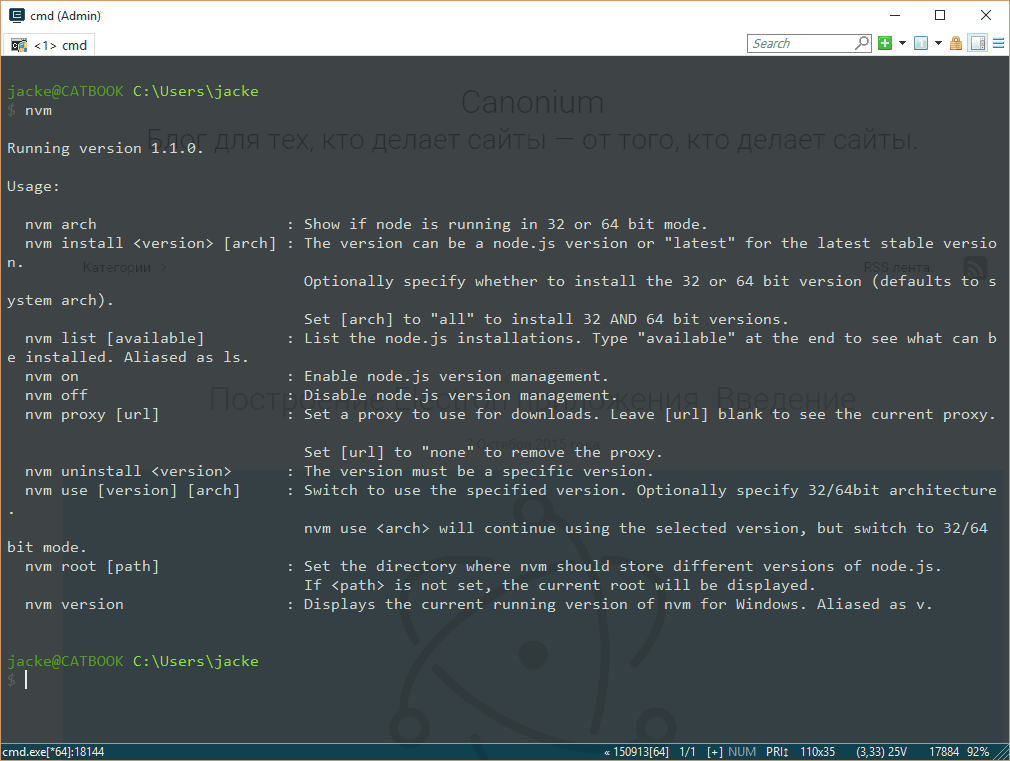
After successfully installing NVM, open up your terminal and enter the following command
nvm help
Enter fullscreen mode
Exit fullscreen mode
If the installation was successful, you should get a response like the image below.

Installing Node.js using NVM on Windows
The next step after installing NVM is to install Node. NVM makes it very easy to install multiple versions of Node with a single command. Before we proceed, it is important to note that NVM requires a level of permission to make changes to your system. Open up PowerShell as an administrator and enter the following command to install Node.
nvm install lts
Enter fullscreen mode
Exit fullscreen mode
The above command installs the current and most recent LTS version of Node. Optionally, you can install «latest» for the latest version available. To install an older version of Node, specify the version number with the command nvm install <version-number>
nvm install 8.17.0
Enter fullscreen mode
Exit fullscreen mode
Let’s install an even older version, so we can see clearly how easy it is to switch and manage these different node versions.
nvm install 6.5.0
Enter fullscreen mode
Exit fullscreen mode
If everything works correctly, you should have three (3) versions of Node installed onto your system. Let’s confirm this by entering the next command in the terminal.
nvm list
Enter fullscreen mode
Exit fullscreen mode
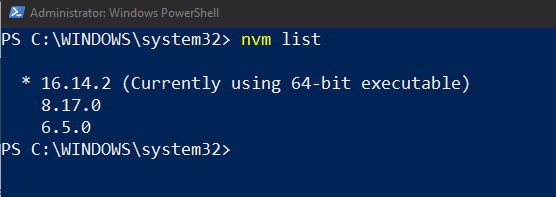
The nvm list command displays a list of all installed node versions and specifies the currently active version.
Switching Between Node.js Versions
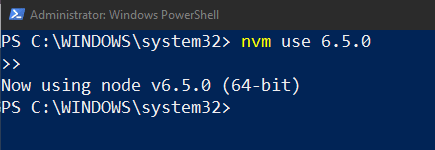
By default, your system should be running the first version of Node you installed. In my case, it would be Node v16.14.2 which is the LTS version at the time. To use any of the available versions, enter the next command nvm use <version>.
nvm use 6.5.0
Enter fullscreen mode
Exit fullscreen mode
You should get the following response.
Alternatively, you can enter the following command nvm current to see the currently active version.

It is also important to note **that each Node version you install automatically comes with a **node package manager(npm) that is compatible with the Node version.
Uninstalling a Node.js Version
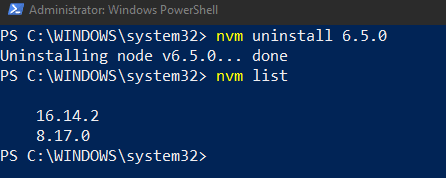
To uninstall a Node version, enter the command nvm uninstall <version>.
nvm uninstall 6.5.0
Enter fullscreen mode
Exit fullscreen mode
That’s as easy as it gets when using NVM. There are more options you can explore when you run the nvm help command. But I don’t want to bore you with that information.
Conclusion
NVM makes switching between Node versions a seamless experience. Hope you are able to set up and use NVM to manage Different Node versions on your system. If you found this post useful, you can live a like and share. Connect with me on Twitter for more content like this. That would be all for now, see you in the next one.
Вопрос экономии времени и удобства окружения разработчика — штука сложная. Работая с Node.js, иногда приходится тестировать своё приложение не только в той версии, которую используете вы, но и в тех, что были выпущены до неё или даже после. В большинстве своём, это касается пакетов (библиотек), которые распространяются через npm. Разумеется, вы можете использовать для этих целей Travis CI, но этот инструмент создан не для этого.
Наиболее простым способом устанавливать и переключать версии Node.js на Linux является использование утилиты nvm. Для разработчиков, которые «сидят» на Windows, существует порт этой утилиты, хотя и менее продвинутый. Разбираемся в управлении версиями Node.js через консоль в Windows.
nvm (Node Version Manager) — это довольно простой скрипт, который позволяет устанавливать, переключать и удалять версии Node.js на лету. Проще говоря, nvm даёт вам возможность держать на одной машине любое количество версий Node.js. При установке новой версии для неё создаётся отдельная директория, например, 5.0.0 или 4.2.2. При переключении версий скрипт подменяет путь до Node.js в PATH.
При этом нужно помнить, что глобальные пакеты для каждой версии свои и никак не пересекаются. Это значит, что если вы глобально установили пакет, используя Node.js версии 4.2.2 и переключились на версию 5.1.0, то этот же пакет вам придётся устанавливать повторно уже для этой версии.
Установка nvm
Напомню, что речь сейчас идёт про Windows, и установить nvm здесь так же «сложно», как и любую другую программу или игру. Для этого вам придётся перейти в репозиторий nvm-windows и загрузить установочный пакет. Далее процедура полностью стандартна, как и для любого другого установочного файла в Windows: выбираете директорию установки и несколько раз кликаете на «Далее».
Установка Node.js
Теперь, когда у вас установлен nvm, пришло время добавить новую версию Node.js. Для этого потребуется прочитать справку, которую можно вызвать, используя команду nvm.
Сначала посмотрим на список доступных для установки версий Node.js, который можно открыть командой $ nvm list available. В этом списке доступны как стабильные, так и нестабильные релизы.
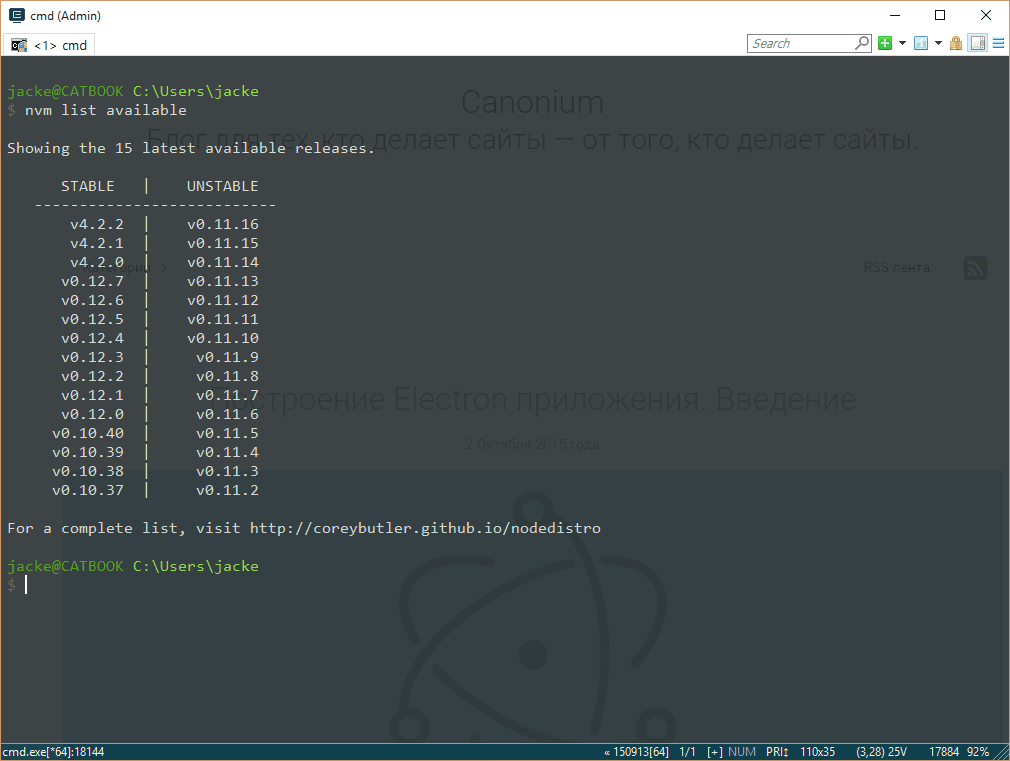
Обратите внимание, что здесь не хватает 5-ой версии Node.js. Дело в том, что создатель nvm для Windows ещё не подготовил новый релиз, добавляющий 5-ую версию Node.js в этот список.
Итак, установим последнюю версию Node.js четвертой ветки. Для этого, к сожалению, потребуется полностью прописать версию Node.js, хотя в версии под Linux и OSX можно просто указывать мажорную цифру (4 или 5).
$ nvm install 4.2.2
Тоже самое можно проделать с пятой веткой:
$ nvm install 5.1.0
Помимо версии, при установке есть возможность указать разрядность, например, для установки Node.js 5.1.0 32-битной разрядности следует выполнить
$ nvm install 5.1.0 32
Переключение версий
Посмотрим на список уже установленных версий Node.js на вашей машине, выполнив в консоли команду $ nvm list:

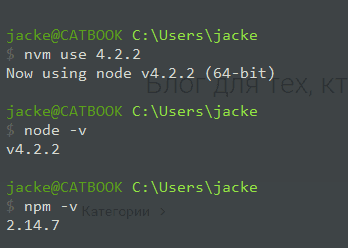
Для того, чтобы начать использовать Node.js версии 4.2.2, нужно прописать в консоли $ nvm use 4.2.2. После этого из консоли станет доступна именно эта версия Node.js и поставляемая вместе с ней версия npm:
Соответственно, чтобы переключиться на Node.js версии 5.1.0, нужно выполнить команду:
$ nvm use 5.1.0
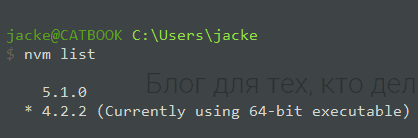
Теперь, когда вы выполняете команду $ nvm list, в выводе будет присутствовать указатель текущей версии:
Создание синонимов
Я вынужден был создать этот заголовок в виду того, что «настоящий» nvm позволяет назначать установленным версиям Node.js синонимы. К сожалению, пока что nvm для Windows не умеет этого.
Немного про глобальные пакеты
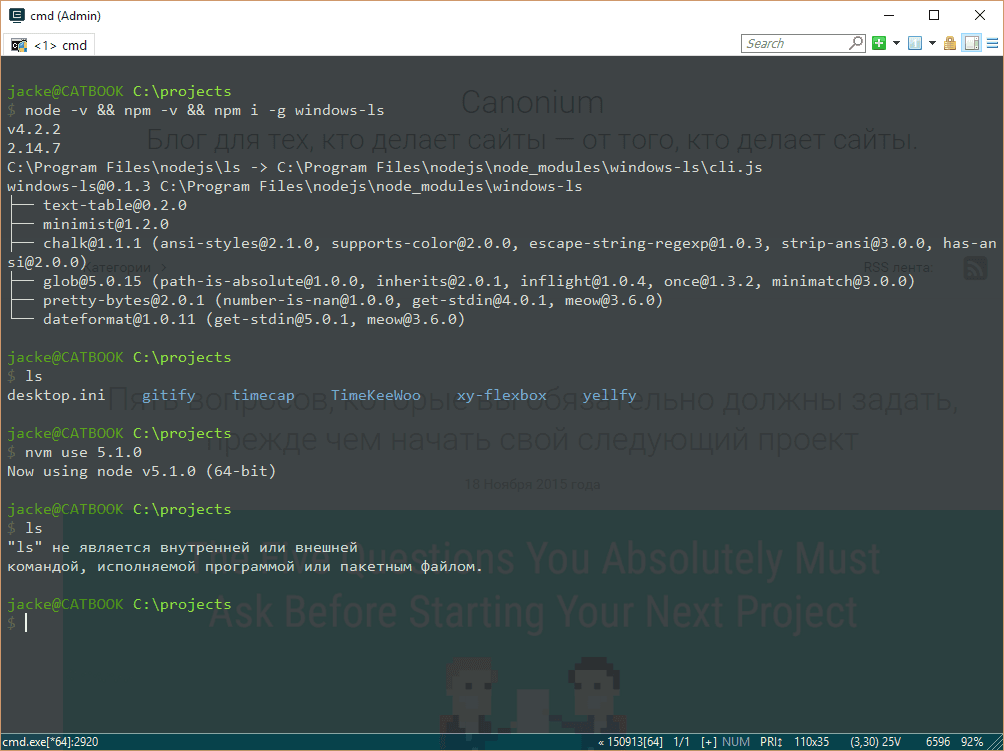
Как я уже говорил в начале, nvm разделяет версии Node.js по директориям, и, из-за этого, устанавливаемые глобально пакеты доступны лишь в той версии, в которой они были установлены.
Для примера я установлю свой же пакет windows-ls в версии 4.2.2 и попытаюсь использовать его в версии 5.1.0. В итоге я получаю ошибку, говорящую о том, что такого пакета нет.
Итоги
Все мы знаем, что Windows — это не та платформа, на которую ориентированы разработчики инструментов, которые нужны веб-разработчикам. Примеров, отображающих эту ситуацию довольно много и для каждого они свои, поэтому приводить я их здесь не буду. Рассмотренная в этой статье утилита делает жизнь разработчикам на Windows чуточку лучше, позволяя сконцентрироваться на работе, а не загрузке, установке и удалении различных версий Node.js.

Встречались ли вы с ситуацией, когда какой-нибудь ваш проект требует версию node.js меньше, чем у вас установлена. На UNIX системах переключить версию node сравнительно легко. А вот для Windows немного сложнее. Ниже описан один из самых лёгких способов это сделать.
Для начала качаем NVM (Node Version Manager) для Windows по ссылке. Там среди прочей информации о версиях, будут предложены несколько инсталлях, в том числе для обновления уже установленного NVM. Для случая «с нуля» выбираем nvm-setup.zip (или как он будет зваться в дальнейшем) и ставим. Дальше лучше перезагрузить систему.
Свидетельством успешной установки будет работоспособность в терминале команды nvm version. Она должна нам вывести нечто подобное:
nvm version
1.1.9
Теперь, если мы проверим наличие всех установленных версий node и текущую, введём nvm list
nvm list
16.13.1
Допустим, нам для проекта нужна версия node 14. Ставим её:
nvm install 14Установится версия 14.19.0 — последняя в серии 14. Если хотим установить конкретную версию, указываем это в nvm-команде.
Сейчас, если мы посмотрим список установленных версий, то увидим следующее:
nvm list
16.13.1
14.19.0
Чтобы переключиться на нужную версию из уже имеющихся, вводим:
nvm use 14.19.0Теперь эта версия будет актуальной и чтобы вернуться к прежней, используем те же команды.

Будь в курсе свежих новостей
All Platforms (Mac, Linux & Windows) 2023
If you just need to upgrade your old version of Node.js to the latest one and don’t need multiple versions, simply over-write your existing executable with the new one.
Download the Latest Node.js from nodejs.org/en/download

This Just Works! TM on all platforms and is the easiest/fastest method.
When you run node -v in your terminal you will see the the latest version.
Mac
If you originally installed Node.js using brew then run:
brew upgrade node
Managing Multiple Versions of Node.js:
If you need to run multiple versions of Node.js on your machine e.g. if you have an older project that targets a specific version on AWS Lambda, then NVM (Node Version Manger) is your friend!
Step 1 — Get NVM
curl -o- https://raw.githubusercontent.com/nvm-sh/nvm/v0.39.3/install.sh | bash
If you’re curious about the installation command read the source code
… its been reviewed by several node.js security experts
Step 2 — Install the Specific Version of Node.js you need
Once you’ve got NVM you can install a specific version of Node.js using the nvm command:
nvm install v18.15.0
Note: you may need to close & re-open your terminal window for nvm command to be available.
You should expect to see something like this in your terminal:
Now using node v18.15.0
You now have the latest Node.js on your machine.
And if you need to temporarily switch to a different/previous version, you can do it with a simple nvm command.
Note: avoid using
sudowith Node/NPM as it violates the security principal of least privilege
NVM is considered «better» than N for managing multiple Node.js versions because the verbose commands mean it is much easier to keep track of what you are doing in your Terminal/SSH Log. It is used by the team at NPM the creators/custodians of the Node.js World!
In the early 2000s, Javascript was used only as a sprinkler to put some client-side magic, such as Form Validation, etc., in web applications thus, to implement server-side functionality, such as interacting with databases, etc., a different programming language had to be used.
This often led to the need for separate development teams for the backend and frontend, resulting in increased development time and costs.
Also, many web developers who got accustomed to writing Javascript code started to ask the community, “how can Javascript code be executed on my PC”? See this StackOverflow thread from 2010 below:-
https://stackoverflow.com/questions/2941411/executing-javascript-without-a-browser
On May 27, 2009, a Ruby developer, Ryan Dahl, released the initial version of a Javascript runtime or interpreter NodeJS, based on Chrome’s Javascript V8 Browser Engine, which allowed developers to execute Javascript code without a browser.
Thus, NodeJS became the solution to the above problems, and software development companies started using NodeJS for web development.
In this article, I will guide you on how to install NodeJS on your PC and also how to change NodeJS versions for developing web applications for different NodeJS versions.
How to Install NodeJS?
NodeJS can be installed in different ways on all major operating systems Linux, Mac, and Windows. The table below guides you to pick the best way for you:-
| Platform | Installation Methods | Popularity | Benefits | Features |
| Linux | 1. Package Manager (e.g. apt-get, yum, pacman, etc)
2. Binary archives (.tar.gz) 3. nvm |
High | Easy to install, updates available through package manager | Multiple versions can be installed and managed through nvm |
| Mac | 1. Homebrew
2. Mac installer (.pkg) 3. nvm |
High | Easy to install and use | Multiple versions can be installed and managed through nvm |
| Windows | 1. Windows installer (.msi)
2. Chocolatey 3. nvm-windows |
Low | Easy to install with Windows installer, package manager available through Chocolatey | Multiple versions can be installed and managed through nvm-windows |
You can further go to NodeJS’ official download page to download a compatible installer for your operating system.
Mac
If you are on Mac then you can download the .pkg file and double-click it to run and install NodeJS on your MacBook.
Windows
If you are on Windows then you can download the .msi file and double-click it to run and install NodeJS on your Windows PC.
Linux
If you are a Linux person and use Ubuntu then you can run the following command to install NodeJS on your Ubuntu system.
curl -fsSL https://deb.nodesource.com/setup_19.x | sudo -E bash - &&\
sudo apt-get install -y nodejs
You can follow the instructions here to install NodeJS if you use Debian or if you use any other flavors of Linux.
An alternate method to install NodeJS – NVM
However, I prefer using an alternate method for installing NodeJS than using my operating system’s package manager. As you can see in the table above, an installation method called ‘nvm’ is also mentioned to install NodeJS.
‘nvm’ is called Node Version Manager and is used primarily to install NodeJS as it provides extra features such as changing node version which the default installation methods do not provide.
NVM is a savior when I need to change my NodeJS version to test my React web application for different NodeJS versions.
What is NVM – Node Version Manager?
As a Javascript developer myself, managing multiple projects often requires me to install and manage specific NodeJS versions.
Also, sometimes I need to test my NodeJS web application to see if it is compatible with any previous versions (or latest development releases) of NodeJS.
To manage and install specific Node.js versions, I turn to Node Version Manager (NVM).
NVM is a shell script, or a popular environment manager for NodeJS, that automates the installation and management of multiple Node.js versions on a single machine, making it a convenient tool for my development projects.
I find NVM’s command-line interface (CLI) easy to use for installing, switching between, and removing different NodeJS versions.
Can different versions of NodeJS be installed and managed without NVM?
Well, NVM is the preferred method to install and manage different versions of NodeJS for many, however, a Javascript developer, Daniel Young, created his own shell script to install and switch node versions without NVM.
The above shell script, however, lacks the comprehensive features of NVM such as bash completion, version lookup, etc.
Is NVM similar to NPM, Yarn, or PNPM?
No, NVM allows you to install and manage different NodeJS versions on your system whereas NPM (Node Package Manager), Yarn, and PNPM (Performant NPM) allow you to install and manage different Node modules and 3rd party packages.
You can install and manage different 3rd party Javascript programs such as middlewares, ORMs, Backend Queue Managers, etc using NPM, Yarn, and PNPM. I personally use both NPM and Yarn.
A few techie friends of mine prefer using PNPM over NPM due to its speed and efficiency.
You can compare NPM, Yarn, and PNPM by going to this feature comparison on PNPM’s website.
How to change the NodeJS version by using NVM?
Here’s a step-by-step guide on how to change your NodeJS versions using NVM:-
Install Node Version Manager (NVM)
To install the latest version 0.39.3 of NVM as of 13/03/2023, open your terminal and run the following command:-
curl -o- https://raw.githubusercontent.com/nvm-sh/nvm/v0.39.3/install.sh | bash
The above command will download and run the NVM installation script installing the latest version of Node Version Manager (NVM) on your system to help you with changing of NodeJS versions in your workflow during NodeJS development.
Once the installation is complete you can check if NVM is installed on your system by running the following command in your terminal:-
nvm -version

List all NodeJS versions available to install by using NVM
You can list all the NodeJS versions available to install on your system. I prefer using ‘LTS’ Long Term Support versions as they tend to be more stable and are supported for longer periods of time helping you to maintain your NodeJS app more efficiently.
Run the following command to list all NodeJS versions:-
nvm ls-remote
Run the following to list only LTS NodeJS versions:-
nvm ls-remote --lts
Install the latest NodeJS version by using NVM
Run the following command:-
nvm install 19.7.0

Install the latest LTS NodeJS version by using NVM
Run the following command:-
nvm install --lts

List all the NodeJS versions installed by using NVM on your system
Run the following command to list all installed NodeJS versions on your system:-
nvm list

As you can see in the above image we have 3 different versions of NodeJS installed on the system. NVM installs a compatible version of NPM too during the installation of a NodeJS version. Let us try changing the NodeJS versions using NVM next.
Which current NodeJS version are you using right now?
Let us see the current NodeJS and NPM versions in use on your system:-
node --version

Let us change the NodeJS version to the latest by using NVM:-
nvm use 19.7.0

As you can see above we can easily change the NodeJS versions on our systems.
Remember this change is NOT persistent for the user you are logged in as on your system i.e. the moment you close this terminal window the NodeJS version falls back to default unless you change it using NVM again inside the new terminal window.

How to set a default NodeJS version for your system?
Let us assume we want to use the latest LTS NodeJS version as default. And, to do so run:-
nvm alias default 18.15.0

Now, to see the change close your current terminal window and open a new window, and then run:-
nvm list

Now, whenever you will open a new terminal window or a tab then your NodeJS version will be the default one you set up above. To change the default NodeJS version you can run the nvm alias default NODEJS_VERSION command again inside your terminal.
How to set up a default NodeJS version project-wise?
Many times you will need to use different NodeJS versions for your different projects but with the current setup, we will have to manually change the NodeJS version by using NVM for each project.
To solve this, NVM checks, the moment you cd PROJECT_NAME inside the terminal, if a NodeJS project has a .nvmrc file in its root folder to see the project’s default NodeJS version, and then automatically uses (and installs too if not already installed) the specified NodeJS version.
my-project/
├── .nvmrc
├── node_modules/
├── package.json
├── src/
│   ├── index.js
│   └── components/
│       ├── App.js
│       └── Header.js
└── yarn.lock
Conclusion
In this article I have explained how to install NodeJS using the official method, and also introduced an alternative method to manage different versions of NodeJS using NVM (Node Version Manager).
With NVM, you can effortlessly switch between different versions of NodeJS and install multiple versions simultaneously without any conflicts.
It’s important to note that NVM is distinct from package managers such as NPM, Yarn, or PNPM, which are designed to manage packages and dependencies within a specific version of NodeJS.
If you enjoyed this article, check out our other guides below;
- Change Node Version: A Step-by-Step Guide
- Caching Node JS: Boosting Performance & Efficiency
- Unlock the Power of Node.JS Microservices
- Unlocking the Power of Nodejs Websocket
- Best Node JS IDE & Text Editors for Application Development
Key Questions
Was NodeJS the first to make Javascript execute outside the browser?
No, there were many other alternatives to NodeJS or other ways to run Javascript on the server side such as ASP, JSP, Spidermonkey, and Rhino Javascript Engine, however, either they became obsolete or couldn’t solve the developer’s problems.
Are there any alternatives available for NVM?
Yes, there are 4 best alternatives to NVM, which are:-
NVS:- offers efficient and automatic version switching, with a consistent and easy-to-use command-line interface
Nodist:- a good choice for Windows users
N:- a lightweight and easy-to-use option
Volta:- provides a more holistic development environment
However, NVM is the most popular and widely used option for installing, managing, and changing NodeJS versions on a single system.
How do I set up NVM on Windows?
NVM is not available for Windows systems, however, there is a program called nvm-windows which you can download from https://github.com/coreybutler/nvm-windows and go through its README to start changing NodeJS versions on your Windows PC.