На чтение 10 мин. Просмотров 1.3k. Опубликовано
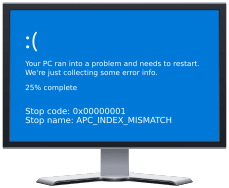
Мы все сталкивались с компьютерной ошибкой хотя бы один раз, и, хотя многие компьютерные ошибки относительно безопасны, ошибки BSoD – нет. В Windows 10 и во всех других версиях Windows ошибки BSoD обычно перезагружают компьютер, чтобы предотвратить его повреждение, которое может нарушить вашу работу и привести к потере важных данных. Как видите, ошибки BSoD могут быть проблематичными, поэтому сегодня мы собираемся показать вам, как исправить ошибку NO MORE IRP STACK LOCATIONS.
Исправить больше никаких стеков IRP BSoD в Windows 10
Содержание .
- Держите Windows 10 и драйверы обновленными
- Запустите средство устранения неполадок BSOD
- Запустите сканирование SFC
- Запустить DISM
- Проверьте жесткий диск
- Удалите антивирусное программное обеспечение
- Переустановите ваши аудио драйверы
- Проверьте ваше оборудование
- Сбросить Windows 10
Как исправить ошибку NO MORE IRP STACK LOCATIONS в Windows 10
Решение 1. Обновляйте свои Windows 10 и драйверы
Чтобы избежать ошибок BSoD, важно поддерживать Windows 10 в актуальном состоянии с последними исправлениями. Microsoft постоянно работает над улучшением Windows 10, и многие из этих исправлений предлагают новые функции и обновления безопасности. Кроме того, многие исправления устраняют проблемы с несовместимым аппаратным и программным обеспечением, и поскольку многие ошибки BSoD вызваны несовместимостью аппаратного или программного обеспечения, вы можете понять, почему крайне важно регулярно использовать Центр обновления Windows.
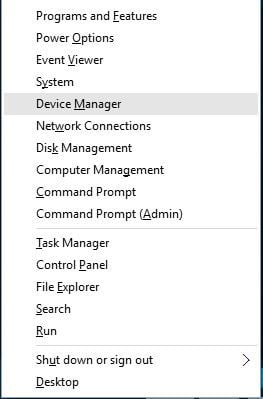
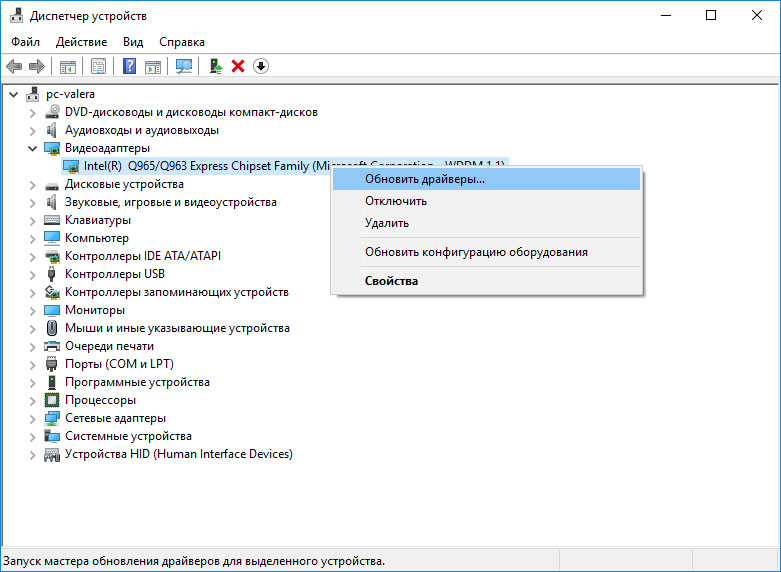
Помните, что регулярного обновления Windows 10 недостаточно для предотвращения ошибок BSoD, и в дополнение к загрузке обновлений также важно регулярно обновлять драйверы. Загрузка последних драйверов относительно проста, и вам нужно перейти на веб-сайт производителя вашего оборудования и загрузить последние версии драйверов для вашего оборудования. Кроме того, вы также можете использовать диспетчер устройств для загрузки всех необходимых файлов. Для этого выполните следующие действия:
-
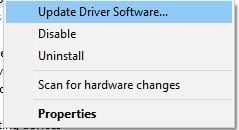
Нажмите Клавишу Windows + X , чтобы открыть расширенное меню пользователя. Выберите Диспетчер устройств из списка.

-
Когда откроется Диспетчер устройств , найдите драйвер, который вы хотите обновить, щелкните его правой кнопкой мыши и выберите Обновить программное обеспечение драйвера .
-
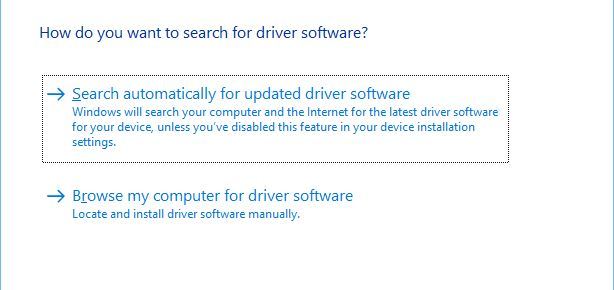
Выберите Автоматический поиск обновленного программного обеспечения драйвера и подождите, пока Windows 10 загрузит драйвер.
- Повторите этот процесс для всех устройств, которые вы хотите обновить.


Обновлять драйверы автоматически
Поиск драйверов самостоятельно может занять много времени. Поэтому мы советуем вам использовать инструмент, который сделает это автоматически. Использование автоматического средства обновления драйверов, безусловно, избавит вас от необходимости поиска драйверов вручную и всегда будет поддерживать вашу систему в курсе последних версий драйверов.
Модуль обновления драйверов Tweakbit (одобрен Microsoft и Norton Antivirus) поможет вам автоматически обновлять драйверы и предотвращать повреждение ПК, вызванное установкой неправильных версий драйверов. После нескольких тестов наша команда пришла к выводу, что это наиболее автоматизированный решение.
Вот краткое руководство о том, как его использовать:
-
Загрузите и установите средство обновления драйверов TweakBit
-
После установки программа начнет сканирование вашего компьютера на наличие устаревших драйверов автоматически. Driver Updater проверит установленные вами версии драйверов по своей облачной базе данных последних версий и порекомендует правильные обновления. Все, что вам нужно сделать, это дождаться завершения сканирования.
-
По завершении сканирования вы получите отчет обо всех проблемных драйверах, найденных на вашем ПК. Просмотрите список и посмотрите, хотите ли вы обновить каждый драйвер по отдельности или все сразу. Чтобы обновить один драйвер за раз, нажмите ссылку «Обновить драйвер» рядом с именем драйвера. Или просто нажмите кнопку «Обновить все» внизу, чтобы автоматически установить все рекомендуемые обновления.
Примечание. Некоторые драйверы необходимо установить в несколько этапов, поэтому вам придется нажмите кнопку «Обновить» несколько раз, пока все его компоненты не будут установлены.


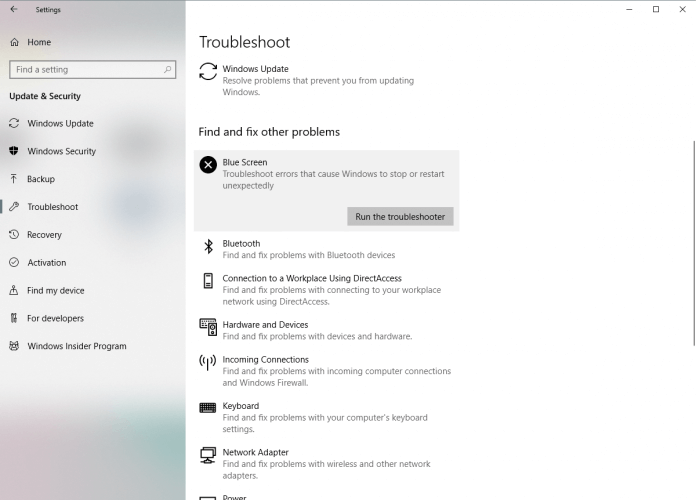
Решение 2. Запустите средство устранения неполадок BSOD .
Если обновление драйверов не помогло, обратитесь за помощью к некоторым средствам устранения неполадок. Первое средство устранения неполадок, которое мы собираемся здесь попробовать, – это встроенное средство устранения неполадок Windows 10.
Вот как запустить средство устранения неполадок BSOD в Windows 10:
- Откройте приложение Настройки и перейдите в раздел Обновление и безопасность .
- Выберите «Устранение неполадок» в меню слева.
-
Выберите BSOD на правой панели и нажмите Запустить средство устранения неполадок .
- Следуйте инструкциям на экране для устранения неполадок.

Решение 3. Запустите сканирование SFC
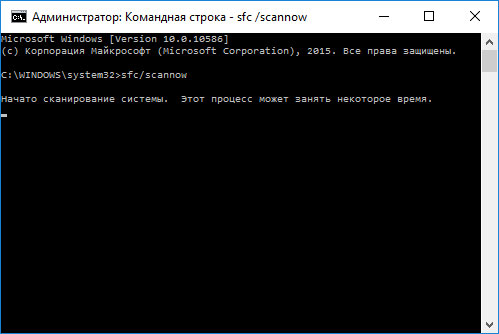
Следующий инструмент устранения неполадок, который мы собираемся попробовать, – это сканирование SFC. Это инструмент командной строки, который сканирует вашу систему на наличие поврежденных файлов и разрешает их (если это возможно).
Вот как запустить сканирование SFC в Windows 10:
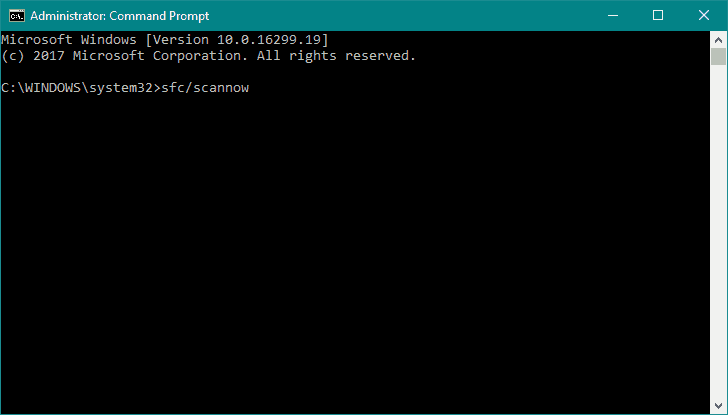
- Щелкните правой кнопкой мыши кнопку «Пуск» и откройте Командную строку (Admin).
-
Введите следующую строку и нажмите Enter: SFC/SCANNOW
- Подождите, пока процесс не будет завершен (это может занять некоторое время).
- Если решение найдено, оно будет применено автоматически.
- Теперь закройте командную строку и перезагрузите компьютер.

Решение 4. Запустите DISM .
DISM – это третье средство устранения неполадок командной строки, которое мы собираемся попробовать здесь. Обслуживание образов развертывания и управление ими (DISM), как следует из названия, заново развертывает образ системы, что может быть полезно при решении таких проблем, как НЕТ БОЛЬШЕ РАСПОЛОЖЕНИЙ IRP STACK.
Мы рассмотрим как стандартные, так и процедуры, которые используют установочный носитель ниже:
- Стандартный способ
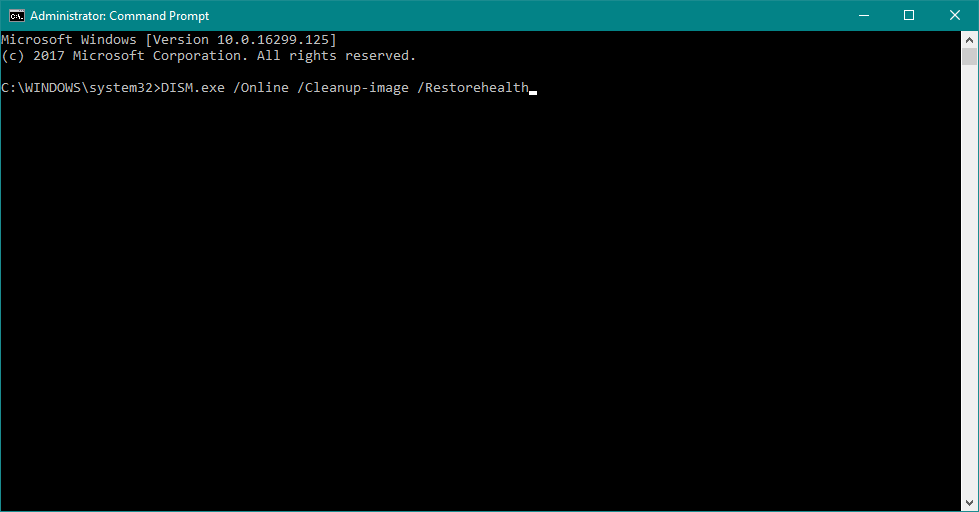
- Щелкните правой кнопкой мыши Пуск и откройте командную строку (администратор).
-
Вставьте следующую команду и нажмите Enter:
-
-
DISM/Online/Cleanup-Image/RestoreHealth
-
DISM/Online/Cleanup-Image/RestoreHealth
-
- Подождите, пока сканирование не закончится.
- Перезагрузите компьютер и попробуйте обновить снова.

- С установочного носителя Windows
- Вставьте установочный носитель Windows.
- Щелкните правой кнопкой мыши меню «Пуск» и выберите в меню «Командная строка» («Администратор»).
-
В командной строке введите следующие команды и нажмите Enter после каждого:
- dism/online/cleanup-image/scanhealth
- dism/online/cleanup-image/restorehealth
-
Теперь введите следующую команду и нажмите Enter:
- DISM/Online/Cleanup-Image/RestoreHealth /source:WIM:X:SourcesInstall.wim:1/LimitAccess
- Обязательно измените значение X с буквой подключенного диска при установке Windows 10.
- После завершения процедуры перезагрузите компьютер.
Решение 5. Проверьте жесткий диск
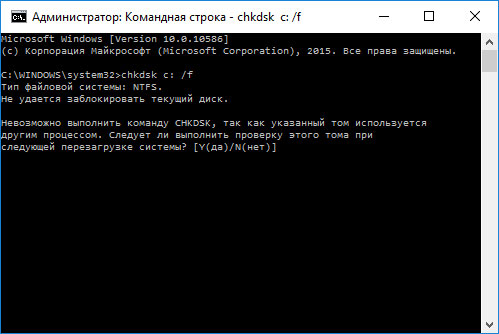
Если с вашим жестким диском что-то не так, проблемы с BSOD вполне возможны. Итак, запустите команду, которая проверит состояние вашего жесткого диска и предоставит решение (если возможно).
Вот как запустить команду chkdsk в Windows 10:
- Введите Расширенный запуск (перезагрузите компьютер, удерживая клавишу Shift ).
- Выберите Устранение неполадок> Дополнительные параметры .
- Выберите Командная строка в списке параметров.
-
Когда появится командная строка, введите следующие строки и нажмите Enter после каждой строки, чтобы запустить ее:
- bootrec.exe/rebuildbcd
- bootrec.exe/fixmbr
- bootrec.exe/fixboot
-
Некоторые пользователи также рекомендуют запускать дополнительные команды chkdsk . Для выполнения этих команд вам необходимо знать буквы дисков для всех разделов жесткого диска. В командной строке вы должны ввести следующее (но не забудьте использовать буквы, которые соответствуют разделам вашего жесткого диска на вашем ПК):
-
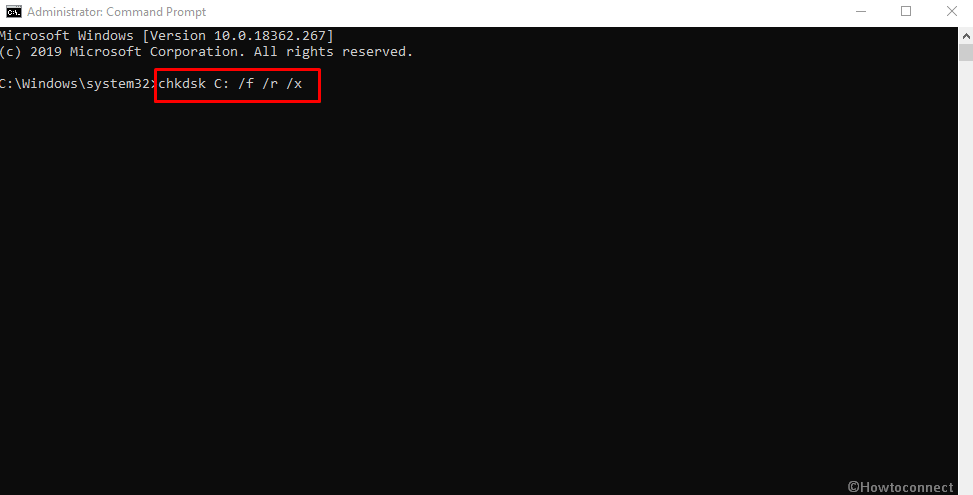
chkdsk/r c:
- c hkdsk/r d:
Это только наш пример, так что имейте в виду, что вы должны выполнять команду chkdsk для каждого раздела жесткого диска, который у вас есть.
-
chkdsk/r c:
- Перезагрузите компьютер и проверьте, решена ли проблема.

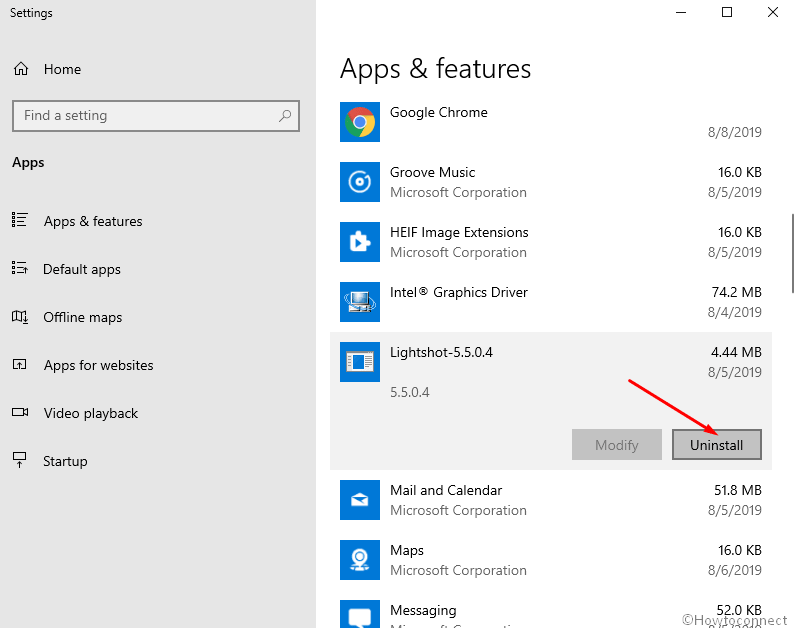
Решение 6 – удалите антивирусное программное обеспечение
Нередко антивирусное программное обеспечение вызывает ошибку BSoD, например, НЕТ БОЛЬШЕ РАСПОЛОЖЕНИЙ IRP STACK. Многие пользователи подтвердили, что после удаления антивирусного программного обеспечения ошибка BSoD была полностью устранена. По словам пользователей, Total Defense, Avast, Kaspersky и Norton могут вызвать появление этой ошибки, и для решения этой проблемы вам придется удалить вышеупомянутое программное обеспечение.
Имейте в виду, что антивирусное программное обеспечение иногда оставляет некоторые записи реестра и файлы, и даже эти файлы могут вызывать ошибку BSoD. Чтобы полностью удалить антивирусное программное обеспечение, рекомендуется использовать специальные инструменты удаления. Многие охранные компании предлагают специальные деинсталляторы для своего программного обеспечения, и вы можете скачать эти инструменты бесплатно.
Немногие пользователи жаловались на то, что они вообще не могут получить доступ к Windows 10 из-за ошибки NO MORE IRP STACK LOCATIONS, и если вы не можете получить доступ к Windows 10, вам придется удалить антивирус с помощью безопасного режима. Чтобы получить доступ к безопасному режиму, выполните следующие действия:
- Перезагрузите компьютер несколько раз во время загрузки, чтобы начать процесс автоматического восстановления.
- Выберите Устранение неполадок> Дополнительные параметры> Параметры запуска . Нажмите кнопку Перезагрузить .
- Когда ваш компьютер перезагрузится снова, вы увидите список параметров. Нажмите F5 или 5 , чтобы выбрать Безопасный режим с сетевым подключением .
- После входа в безопасный режим попробуйте удалить антивирусное программное обеспечение.
Если проблема устранена после удаления антивирусного программного обеспечения, вы можете установить более новую версию или попробовать другую антивирусную программу. Мы рассмотрели лучшие антивирусные программы Windows 10 не так давно, так что вы можете попробовать их.
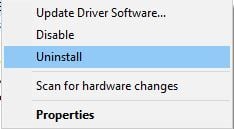
Решение 7. Переустановите аудиодрайверы .
Немногие пользователи сообщили, что из-за звуковых драйверов возникла ошибка NO MORE IRP STACK LOCATIONS, и для исправления этой ошибки пользователям пришлось удалить и переустановить аудиодрайвер. Чтобы удалить аудио драйвер, вам нужно сделать следующее:
- Запустите Диспетчер устройств . Это можно сделать, нажав Ключ Windows + X и выбрав Диспетчер устройств из списка.
-
После запуска Диспетчер устройств найдите свой аудиодрайвер, щелкните его правой кнопкой мыши и выберите в меню Удалить . Если доступно, установите флажок Удалить программное обеспечение драйвера для этого устройства и нажмите ОК .
- После удаления драйвера перезагрузите компьютер.
- Если компьютер стабилен и ошибка BSoD исправлена, вы можете продолжить использовать драйвер по умолчанию или попытаться загрузить последнюю версию аудио драйвера для вашего устройства.

- ЧИТАЙТЕ ТАКЖЕ: исправьте ошибку «Исключение системной службы» в Windows 10
Решение 8. Проверьте свое оборудование
Если проблема все еще сохраняется, вы можете проверить ваше оборудование. Самая частая причина ошибки BSoD – ваша оперативная память, и вы можете проверить ее с помощью MemTest86 +. Имейте в виду, что для получения точных результатов необходимо поддерживать процесс тестирования в течение нескольких часов.
Если ваша оперативная память работает должным образом, проблема может быть вызвана вашим жестким диском, материнской платой или любым другим аппаратным компонентом. В дополнение к проверке оборудования, мы настоятельно рекомендуем вам проверить, правильно ли подключено ваше оборудование, и убедиться в отсутствии ослабленных контактов. Если ваш компьютер заполнен пылью, рекомендуется также очистить его с помощью сжатого воздуха.
Решение 9. Сброс Windows 10
Если ошибка NO MORE IRP STACK LOCATIONS вызвана программной проблемой, перезагрузка Windows 10, вероятно, исправит ее. Помните, что при перезагрузке Windows 10 все файлы и папки будут удалены с диска C, поэтому обязательно создайте резервную копию. Чтобы выполнить сброс Windows 10, выполните следующие действия:
- Перезагрузите компьютер несколько раз во время загрузки Windows 10. Это запустит автоматическое восстановление.
- Выберите Устранение неполадок> Сбросить этот компьютер> Удалить все> Только диск, на котором установлена Windows .
- Следуйте инструкциям, чтобы завершить процесс сброса.
Если проблема по-прежнему сохраняется даже после выполнения сброса Windows 10, наиболее вероятной причиной ошибки является неисправное оборудование или его несовместимость.
Ошибка NO MORE IRP STACK LOCATIONS может привести к значительному количеству проблем, но эту ошибку обычно можно устранить, удалив антивирусное программное обеспечение. Если это решение не работает для вас, попробуйте любое другое решение из этой статьи.
Примечание редактора . Этот пост был первоначально опубликован в июне 2016 года и с тех пор был полностью переработан и обновлен для обеспечения свежести, точности и полноты.
by Milan Stanojevic
Milan has been enthusiastic about technology ever since his childhood days, and this led him to take interest in all PC-related technologies. He’s a PC enthusiast and he… read more
Updated on
- To avoid any BSoD errors, you need to keep your Windows 10 up-to-date. So use the Windows Update regularly because Microsoft issues a lot of patches and fixes that might solve this kind of errors.
- The next thing to do is to update the drivers for your hardware. BSoDs signal problems with your hardware but a poorly written driver can also do that.
- We have a special section dedicated to Troubleshooting BSoD errors. Bookmark it because it can be a lifesaver in these delicate moments.
- If you’re an adult, it’s highly improbable that you didn’t see a Windows 10 error. Check our Windows 10 errors Hub because it can be an important source of solutions.
We all encountered a computer error at least once, and while many computer errors are relatively harmless, BSoD errors are not.
In Windows 10 and in all other versions of Windows, BSoD errors will usually restart your PC in order to prevent damage, and that can disrupt your work and cause you to lose important data.
As you can see, BSoD errors can be problematic, therefore today we’re going to show you how to fix NO MORE IRP STACK LOCATIONS error.
How can I fix NO MORE IRP STACK LOCATIONS BSoD in Windows 10?
Table of contents:
- Keep your Windows 10 and drivers updated
- Run the BSOD Troubleshooter
- Run the SFC scan
- Run DISM
- Check the hard drive
- Uninstall your antivirus software
- Reinstall your audio drivers
- Check your hardware
- Reset Windows 10
How to fix NO MORE IRP STACK LOCATIONS error in Windows 10
Solution 1 – Run the BSOD Troubleshooter
If updating your drivers didn’t get the job done, let’s seek help from some troubleshooting tools. The first troubleshooter we’re going to try here is Windows 10’s built-in troubleshooter.
Here’s how to run the BSOD troubleshooter in Windows 10:
- Open the Settings app and go to Update & Security section.
- Select Troubleshoot from the menu on the left.
- Select BSOD from the right pane and click Run the troubleshooter.

- Follow the instructions on the screen to complete the troubleshooter.
Solution 2 – Keep your Windows 10 and drivers updated
In order to avoid BSoD errors, it’s important that you keep Windows 10 up to date with the latest patches.
Microsoft is constantly working on improving Windows 10, and many of these patches offer new features and security updates.
In addition, many patches are fixing issues with incompatible hardware and software.
And since many BSoD errors are caused by hardware or software incompatibility, you can see why it is crucial to use Windows Update regularly.
Bear in mind that updating Windows 10 regularly isn’t enough to prevent BSoD errors, and in addition to downloading updates, it’s also important to keep your drivers up to date as well.
Downloading the latest drivers is relatively simple, and you need to do is to go to your hardware manufacturer’s website and download the latest drivers for your hardware.
In addition, you can also use Device Manager to download all the necessary files. To do that follow these steps:
How we test, review and rate?
We have worked for the past 6 months on building a new review system on how we produce content. Using it, we have subsequently redone most of our articles to provide actual hands-on expertise on the guides we made.
For more details you can read how we test, review, and rate at WindowsReport.
- Press Windows Key + X to open Power User Menu. Select Device Manager from the list.

- Once Device Manager opens, locate the driver you wish to update, right-click it and choose Update Driver Software.

- Select Search automatically for updated driver software and wait for Windows 10 to download the driver.

- Repeat this process for all the devices you want to update.
Update drivers automatically
Searching for drivers on your own can be time-consuming. So, we advise you to use a tool that will do this for you automatically.
Using an automatic driver updater will certainly save you from the hassle of searching for drivers manually, and it will always keep your system up to date with the latest drivers.
A dedicated third-party tool will help you update drivers automatically and prevent PC damage caused by installing the wrong driver versions.
After several tests, our team concluded that this is the best-automatized solution.
Most common Windows errors and bugs can result from faulty or incompatible drivers. An outdated system can lead to lags, system issues, or even BSoDs.
You can prevent these problems by using an automatic tool that will search and install the correct drivers on your computer with just a few clicks. That’s why we recommend you use Outbyte Driver Updater.
Here’s how to do it:
- Download and install the Outbyte Driver Updater app.
- Launch the software.
- Wait for the app to detect all incompatible drivers.
- Afterward, it will show you a list of the drivers found to select the ones to Update or Ignore.
- Click on Update & Apply Selected to download and install the newest versions.
- Restart your PC to ensure the applied changes.


Outbyte Driver Updater
Use this software and solve all driver-related issues from your PC.
Disclaimer: You may need to upgrade the app from the free version to perform specific actions.
Solution 3 – Run the SFC scan
The next troubleshooting tool we’re going to try is the SFC scan. This is a command-line tool that scans your system for broken files and resolves them (if possible).
Here’s how to run the SFC scan in Windows 10:
- Right-click on the Start Menu button, and open Command Prompt (Admin).
- Enter the following line and press Enter: sfc/scannow

- Wait until the process is done (it may take a while).
- If the solution is found, it will automatically be applied.
- Now, close the Command Prompt and restart your computer.
Solution 4 – Run DISM
DISM is the third command-line troubleshooter we’re going to try here.
Deployment Image Servicing and Management (DISM), as its name, says, re-deploys the system image all over again, which might be helpful when resolving issues like NO MORE IRP STACK LOCATIONS.
We’ll walk you through both standard and the procedure that utilizes the installation media below:
- Standard way
- Right-click Start and open Command Prompt (Admin).
- Paste the following command and press Enter:
- DISM /Online /Cleanup-Image /RestoreHealth

- DISM /Online /Cleanup-Image /RestoreHealth
- Wait until the scan is finished.
- Restart your computer and try updating again.
- With the Windows installation media
- Insert your Windows installation media.
- Right-click the Start menu and, from the menu, choose the Command Prompt (Admin).
- In the command line, type the following commands and press Enter after each:
- dism /online /cleanup-image /scanhealth
- dism /online /cleanup-image /restorehealth
- Now, type the following command and press Enter:
- DISM /Online /Cleanup-Image /RestoreHealth /source:WIM:X:SourcesInstall.wim:1 /LimitAccess
- Make sure to change an X value with the letter of the mounted drive with Windows 10 installation.
- After the procedure is finished, restart your computer.
Solution 5 – Check the hard drive
If there’s something wrong with your hard drive, BSOD issues are quite possible. So, go and run a command that will test the state of your hard drive, and provide a solution (if possible).
Here’s how to run the chkdsk command in Windows 10:
- Enter the Advanced Startup (Restart your computer while holding the Shift key).
- Choose Troubleshoot > Advanced Options.
- Select Command Prompt from the list of options.
- When Command Prompt appears, enter the following lines and press Enter after each line in order to run it:
- bootrec.exe /rebuildbcd
- bootrec.exe /fixmbr
- bootrec.exe /fixboot
- Some users are also suggesting that you need to run additional chkdsk commands as well. To perform these commands, you need to know drive letters for all your hard drive partitions. In Command Prompt you should enter the following (but remember to use the letters that match your hard drive partitions on your PC):
- chkdsk /r c:
- chkdsk /r d:
This is just our example, so keep in mind that you have to perform chkdsk command for every hard drive partition that you have.
- chkdsk /r c:
- Restart your computer and check if the issue is resolved.
Solution 6 – Uninstall your antivirus software
It’s not uncommon for antivirus software to cause a BSoD error such as NO MORE IRP STACK LOCATIONS.
Many users confirmed that after uninstalling their antivirus software the BSoD error was completely resolved.
According to users, Total Defense, Avast, Kaspersky, and Norton can cause this error to appear, and in order to fix this problem, you’ll have to remove the aforementioned software.
Bear in mind that antivirus software sometimes leaves certain registry entries and files behind, and even those files can cause BSoD errors to manifest.
In order to completely remove antivirus software, it’s recommended to use the dedicated uninstaller tools.
Many security companies offer dedicated uninstallers for their software, and you can download these tools for free.
Few users complained that they are unable to access Windows 10 at all due to NO MORE IRP STACK LOCATIONS error.
And if you can’t access Windows 10, you’ll have to remove your antivirus by using Safe Mode. To access Safe Mode, follow these steps:
- Restart your computer a few times while it boots to start the Automatic Repair process.
- Choose Troubleshoot > Advanced options > Startup Settings. Click Restart button.
- When your computer restarts again you’ll see a list of options. Press F5 or 5 to select Safe Mode with Networking.
- After you enter Safe Mode try to remove your antivirus software.
If the problem is fixed after uninstalling your antivirus software, you might want to install the newer version or try a different antivirus program.
We covered the best Windows 10 antivirus programs not that long ago, so you might want to check them out.
Solution 7 – Reinstall your audio drivers
Few users reported that NO MORE IRP STACK LOCATIONS error was caused due to audio drivers, and in order to fix this error, users had to remove and reinstall the audio driver.
To uninstall an audio driver you need to do the following:
- Start Device Manager. You can do that by pressing Windows Key + X and choosing Device Manager from the list.
- Once the Device Manager starts, locate your audio driver and right click it and choose Uninstall from the menu. If available, check Delete the driver software for this device and click OK.

- After the driver is uninstalled, restart your computer.
- If the PC is stable and BSoD error is fixed you can continue using the default driver, or you can try and download the latest audio driver for your device.
Solution 8 – Check your hardware
If the problem still persists, you might want to check your hardware. The most common cause of BSoD error is your RAM memory, and you can test it by using MemTest86+.
Keep in mind that in order to get accurate results you need to keep the testing process running for a couple of hours.
If your RAM is working properly, the problem might be caused by your hard drive, motherboard, or any other hardware component.
In addition to checking hardware, we strongly advise you to check if your hardware is properly connected and to make sure that there are no loose contacts.
If your computer is filled with dust, it’s also a good idea to clean it by using a pressurized can of air.
Solution 9 – Reset Windows 10
If the NO MORE IRP STACK LOCATIONS error is caused by a software problem, resetting Windows 10 will probably fix it.
Keep in mind that resetting Windows 10 will delete all files and folders from your C drive, so make sure that you create a backup. To perform a Windows 10 reset, do the following:
- Restart your computer few times while Windows 10 boots. This will start Automatic Repair.
- Choose Troubleshoot > Reset this PC > Remove everything > Only the drive where Windows is installed.
- Follow the instructions in order to complete the reset process.
If the problem still persists even after you performed Windows 10 reset, the error is most likely caused by faulty hardware or hardware incompatibility.
NO MORE IRP STACK LOCATIONS error can cause you a fair amount of problems, but this error can be usually solved by removing your antivirus software.
If that solution doesn’t work for you, feel free to try any other solution from this article.
![]()
Plenty of complaints have been filed in last few days reporting NO_MORE_IRP_STACK_LOCATIONS blue screen error is prominent on Windows 10 PC. Several users have noticed an inconsistent and obsolete touchpad driver is responsible. With constant flashing on desktop display and bluish accent upfront, the company represents the issue definitely a BSOD error code in Operating System. These types of issue are pretty common in Windows 10 and found to cause devastating damage. The errors need immediate resolution and we are here today to eradicate the issue accordingly with proper workarounds.
When Microsoft found a series of Blue Screen of Death errors haunting them and they are having a never-ending effect, tech expert gave them identifying codes. Furthermore, as a continuous proceeding, NO_MORE_IRP_STACK_LOCATIONS BSOD has a bug check code of 0x00000035. People often term it as Stop Error code 0x00000035 and they are preferably originated from Hardware including Software abnormality. After the bug cause vulnerability in the system, computer freezes randomly making PC inaccessible. Working along becomes too tough as the functionality drops down for a slow operation. However, the greatest problem happens when Windows starts restarting by itself without prior concern. While we can have a series of effective workarounds for eliminating software-oriented BSOD error codes. However, hardware issues leave no scope but changing the whole unit.
Here is how to fix NO_MORE_IRP_STACK_LOCATIONS BSOD Error in Windows 10 –
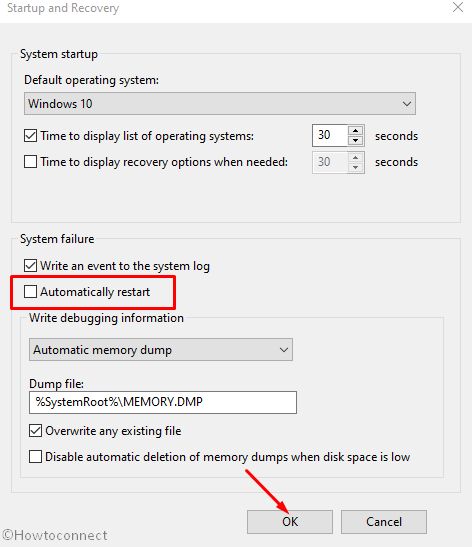
1] Disable Automatic Restart
Automatic Restart setting is rated as number one causing result for flashing NO_MORE_IRP_STACK_LOCATIONS BSOD error in Windows 10. This is a basic resolution and will not probably resolve the issue completely. However, you would surely have enough scope to fix the error. You may proceed with the following steps given below –
Step-1: Press Win+S hotkey and let the Windows search bar prompt.
Step-2: In the search bar, type control and press the Enter key.
Step-3: Make the view of control panel either into a small or large icon, locate System and do a click on it.
Step-4: From the left pane of the following page, select Advanced system settings.
Step-5: Once a new pop-up flash with System Properties, go to the Advanced tab.
Step-6: Move down and select Settings located under the Startup and Recovery section.
Step-7: Underneath the System failure, uncheck the box of Automatically restart option.
Step-8: Finally, click on the OK button to process ahead.
2] Run Blue Screen Troubleshooter to fix NO_MORE_IRP_STACK_LOCATIONS
Microsoft with each update for Windows 10 releases something big and remarkable. As a series of this, the company has introduced Blue Screen Troubleshooter in the Settings app. The reason was pretty clear as BSOD error codes are found to be ruled out in the operating system. If you are using any version greater than Fall Creators update, can use this tool to eliminate error NO_MORE_IRP_STACK_LOCATIONS. Follow the below procedures to use the fix –
- Right-click on the Start button and select Settings from the leftmost column.
- On the following page, click on Update & Security section.
- From the left pane, select Troubleshoot and then switch to the corresponding right.
- Scroll and locate Blue Screen option from there
- Once you find, click on it and select Run the troubleshooter.
Upon executing the tool properly, Windows 10 will fix Bsod error code NO_MORE_IRP_STACK_LOCATIONS automatically.
3] Boot Windows 10 to Safe Mode
Lots of notorious bugs were following Windows soon after Microsoft developed it. At that point, something was truly necessary that can effectively block those problems. However, Safe Mode is one of the common remedy considered for most of the BSOD error code including NO_MORE_IRP_STACK_LOCATIONS. This is how to Boot Windows 10 into Safe Mode –
- Press the Windows+ I hotkeys and let Windows Settings appear.
- Click on Update & Security section.
- On the next page, select Recovery from the left pane and move along to right side.
- Scroll to Advanced startup segment and click the button Restart now.
- As your Windows restarts, it will ask you to choose the next step. Choose Troubleshoot from Startup Screen.
- In the Troubleshoot menu click Advanced Options and subsequently on Startup Settings.
- Now you will be informed that the computer can be restarted with the use of additional settings one of which is Enable Safe Mode. Press Restart.
- Subsequent to this, choose Enable Safe Mode by pressing F4.
Once deployed, the Operating System will be launched with default apps and services only. For that reason, there is a little possibility of recurrence the error again. Unfortunately, if the issue appears again, it is quite sure that any third-party application or Hardware problem is the culprit for the vulnerability.
4] Eradicate the faulty Windows update files
Microsoft releases Windows updates after a certain period comprising updated features and bug fixes. Tech Giant urges its users to download them using the Settings application. In fact, they do not indulge into troubles in the midway but if the installation process terminates abnormally, you will have NO_MORE_IRP_STACK_LOCATIONS BSOD error in the Computer. All these problematic files need immediate removal in this respect. follow these below steps to do so –
- Press Win+I hotkey and let the Windows Settings appear.
- Click on Update & Security category.
- This will by default open Windows Update page.
- Move to the adjacent right and Select View update history link.
- On the succeeding page, click on Uninstall updates in order to remove the faulty files.
5] Reconnect the External Hardware Devices
Often NO_MORE_IRP_STACK_LOCATIONS BSOD error comes in after connecting an additional hard drive with the device. In that case, you have to remove the accessory and reconnect it again following correct procedures. The guidelines are as follows –
- Detach all the plugged accessories from the device and Restart it.
- When the operating system boots successfully, attach the accessories again with your PC successively and check which one is causing NO_MORE_IRP_STACK_LOCATIONS.
- Thereafter, Download the updated drivers for that specific hardware from the manufacturer website and then Install them.
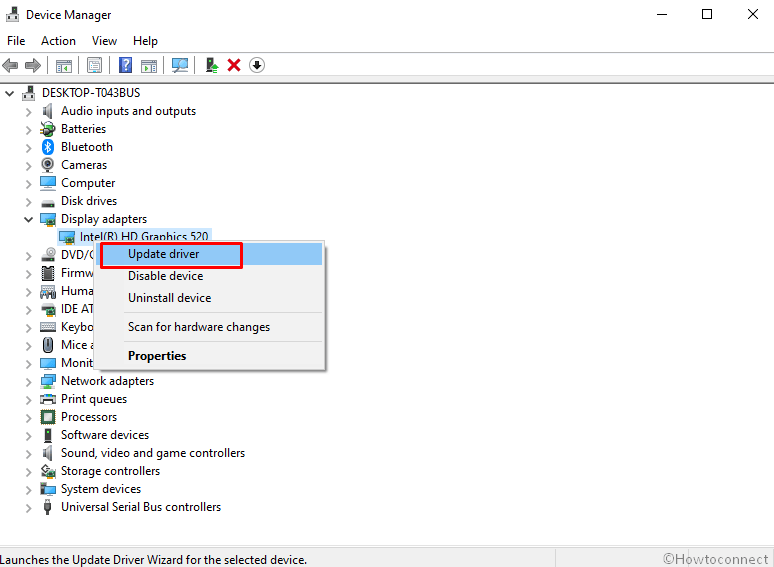
6] Update corrupted Drivers with Device Manager
An outdated or incompatible device driver is the major reason for which NO_MORE_IRP_STACK_LOCATIONS Windows 10 BSOD error shows up in Users device. Sometimes, people notice the same issue just after installing a new Hard Drive and by using a corrupted USB stick as well. Installing their drivers using the DVD from the delivery package or downloading from unauthorized websites found the culprit. Accordingly, simply you need to update all drivers going through Device Manager. This is how you can move on –
- Do a right-click on the Start button and select Device Manager from the Windows 10 Power user menu.
- On the following screen, locate the devices having exclamation mark beside them and expand the same by double-clicking.
- Right-click on the driver that has a yellow indication and select Update driver option to initiate the process.
- Now the system will preview two options; Choose Search automatically for updated driver software.
- When you are done, Restart the Windows to make the changes effective.
7] Uninstall Program causing NO_MORE_IRP_STACK_LOCATIONS
If you have two or more similar programs in the same device, they can create conflict with each other in worst cases resulting in erasing important files. In the process, NO_MORE_IRP_STACK_LOCATIONS BSOD error occurs. In that scenario, you can uninstall similar programs if they are not so relevant. If necessary, go for reinstalling them again later on. Here is the process to proceed on –
Step#1: Press Win+I keys altogether to open Windows Settings apps.
Step#2: Click on Apps category.
Step#3: On to the next page, move alongside right from the left pane.
Step#4: Locate the program may cause issues NO_MORE_IRP_STACK_LOCATIONS or you have recently installed.
Step#5: Once found, make a click on it and select the Uninstall option from the extended pane.
Step#6: When a small pop-up appears, again click on Uninstall to confirm the process.
Step#7: After complete the Uninstallation process, visit the official manufacturer website to Download and reinstall them again in PC.
See – How to Uninstall Software From Windows 10 After Creators Update
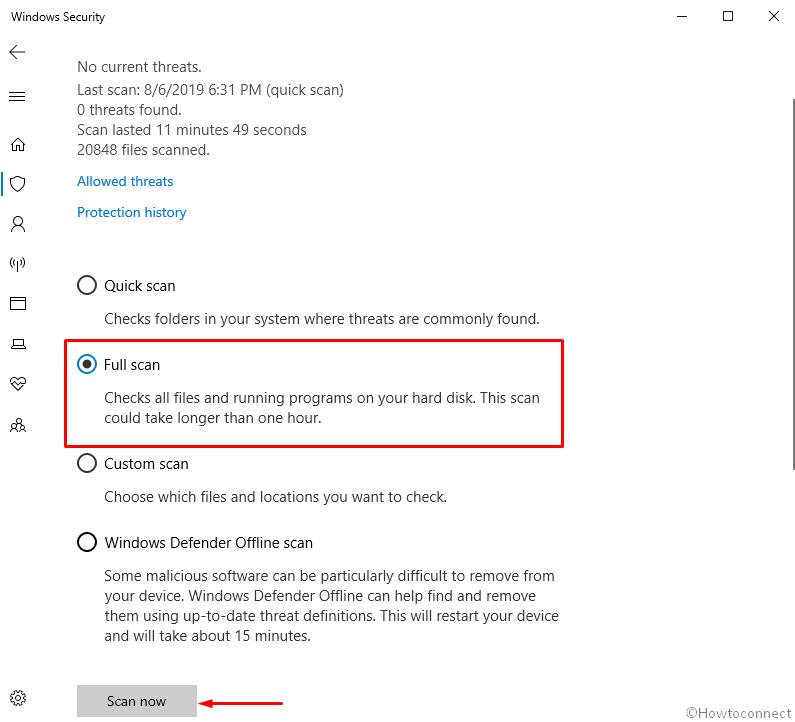
8] Scan your full system in Windows Security
In this tech-based world, Virus comes at the top if we talk about the threats. People can be stuck anytime anywhere while browsing or clicking a suspicious link in the Spam mail. When they get the entrance, remove system components potentially which are indeed very necessary for the operating system. Therefore, NO_MORE_IRP_STACK_LOCATIONS BSOD error in Windows 10 is more likely to happen. Performing a Full Scan can save you in this regard. You can accomplish the task using “Windows Security”, a default program of Windows 10. Following guidelines will help you to do so –
- Click on the Action Center icon from the Taskbar and select All Settings.
- Once the app opens up, click the Update & Security icon.
- Select Windows Security from the left column.
- Move to the adjacent right and choose Virus & threat protection option.
- On the following window, select Scan options link.
- Select the radio button of Full scan and then click Scan now option to initiate the process.
9] Remove Third-Party Antivirus Program
Third-party antivirus programs are not trusted every time and quite often they create issues. Sometimes, NO_MORE_IRP_STACK_LOCATIONS BSOD error in Windows 10 is also a result of using them.
With the Internet spread all over, Malware gets easy entrance to the system and cause destruction. Microsoft introduced the best Utility ever for Malware issue and Windows Security is a complete solution. Therefore, you can easily go for uninstalling them to escape hassles. For example, we are showing the standard way to uninstall Avast Antivirus from your computer –
- Press Win+R at a time to launch the Run dialog box.
- In the stipulated bar, type appwiz.cpl and select OK button.
- On the following page, locate Avast Free Antivirus from the appearing list and do a click on the same.
- Hit the Uninstall button from the top menu.
- Subsequent to this window, select the Uninstall tab at the bottom and then click on Next.
- At this time, a UAC prompts, give your consent by choosing the Yes option.
- Wait for a moment, a confirmation message will appear entitled “Uninstall finished”.
- Upon completion, select the Restart button and then click on Finish.
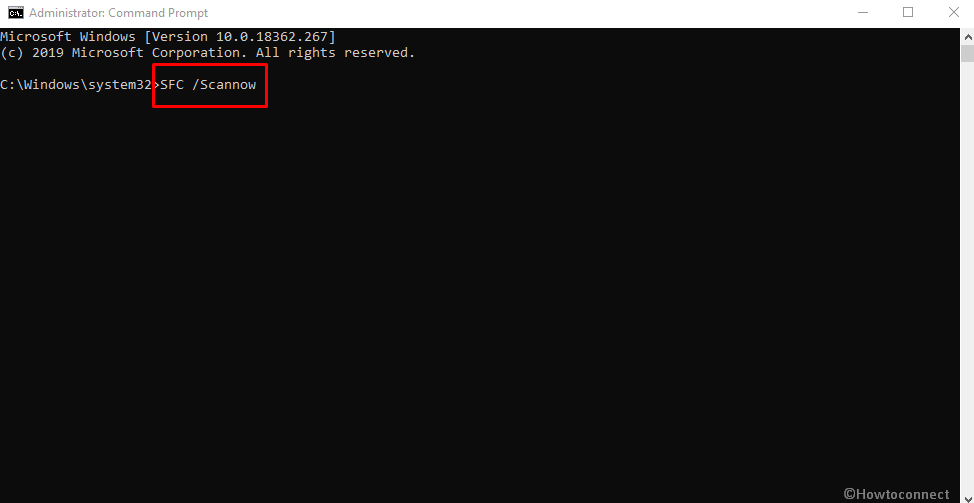
10] Run Windows System File Checker (“SFC /Scannow”)
Windows soon after came in the field, indulged in so many unknown bugs including error NO_MORE_IRP_STACK_LOCATIONS. According to the company, corrupted and obsolete System File is one of the major components which can cause BSOD errors mostly. Microsoft, as a fix, discovered a new utility namely of System File Checker. This is one of the best resolutions deployed in the Command Prompt. This is how you need to proceed –
- Right-click on the Windows logo residing at the extreme left of the taskbar.
- When the Power user menu appears, trace out Run and hit it.
- Type cmd.exe in the text bar located next to Open.
- Now, press and hold Ctrl +Shift and then hit the Enter key.
- This will launch the command prompt as administrator. Alternatively, you can just press Ctrl + Shift keys and then click the OK button on the dialog.
- When the black window appears, type the syntax SFC /Scannow and hit Enter key.
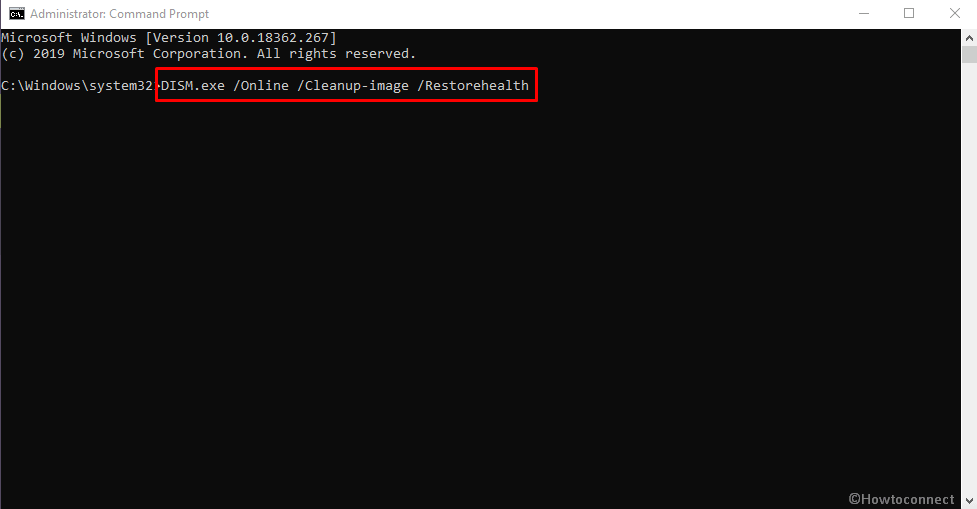
11] Use Deployment Image Servicing and Management (DISM) tool
Windows image files, in many cases, become damaged and cause NO_MORE_IRP_STACK_LOCATIONS BSOD error in Windows 10. Microsoft has a built-in utility for resolving this issue and that is Deployment Image Servicing and Management (DISM) tool. To execute the workaround follow the instruction –
- Press Win+S hotkey and let Taskbar search appear.
- Type cmd in the given bar.
- When the result flashes, right-click on it and then select Run as administrator from the context menu.
- If a UAC prompts up, click on Yes to give consent.
- On the following screen, type the following text code and hit Enter –
DISM.exe /Online /Cleanup-image /Restorehealth
Note – Usually the process gets stuck at 20%. If this happens with you too, don’t get stress as it normal phenomena.
- When the DISM scan gets over, Reboot your PC to make the changes effective.
12] Run CHKDSK Utility to solve NO_MORE_IRP_STACK_LOCATIONS
Sometimes, Bad segments in the Hard Disk causes NO_MORE_IRP_STACK_LOCATIONS BSOD error in Windows 10 error. We need to identify these segments and Microsoft has a new tool for this purpose also. This utility significantly detects the harmful segments and then rectify accordingly. Proceed with the following guidelines –
- Press Win+S keys together and call up Taskbar Search on the screen.
- Type cmd.exe in the Search box.
- When Command Prompt appears in the result, do a right-click on it.
- From the context menu, select Run as Administrator.
- Once UAC prompts for permission, click on the Yes button.
- On the following screen, type the following command matching with the shown format- chkdsk [Drive:] [parameters]
- With the command ‘CHKDSK’, System will only show the disk status but will not fix any issues present.
- Therefore, we need to specify the command in the following way- /f /r /x.
Here,
“f” will force the utility to fix up found issues from the volume.
Letter “r” will detect the poor sectors in the Hard Disk.
Notation “x” will make the whole volume to dismount before initiating the process. Hence, finally, the command will look like- chkdsk C: /f /r /x
Note – C: is the drive letter where the OS is installed. If you have used other drivers to do the same task, replace the letter with D:, E: and so on.
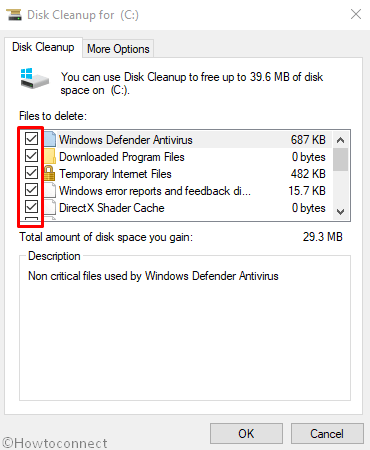
13] Clean Junk from the system using Disk Cleanup utility
As the work progresses each day, Operating System produces huge unnecessary items, files, caches in it and stores them in Hard Disk Drives. Once gets in bigger volume, Lump of these files occupies huge space and Drive runs in a shortage of free space. Ultimately, the computer will be slower and also cause NO_MORE_IRP_STACK_LOCATIONS BSOD errors. Therefore, the cleaning of these junks is a dire need to maintain a healthy working system. Disk Cleanup utility is designed for freeing up space in Hard Drive. The tool will search and analyze each and every component and remove the unnecessary ones.
- Open the Run dialog by pressing Win+R hotkeys.
- When it opens, type cleanmgr in the text field and click on the OK button.
- When the tiny dialog box appears, do a click on the dropdown menu and select Drive letter C: followed by pressing the OK button.
- Disk Cleanup utility will prompt shortly analyzing the amount of space it can recover from the volume.
- Select the Clean up system files from the bottom of the appearing wizard.
- Choose the same drive letter and allow the Disk Cleanup for (C:) to be visible and start working as well.
- Before proceeding this method, ensure you have restored all the important items from Recycle Bin if present.
- Check all the options except Downloads.
- Finally, hit the OK button.
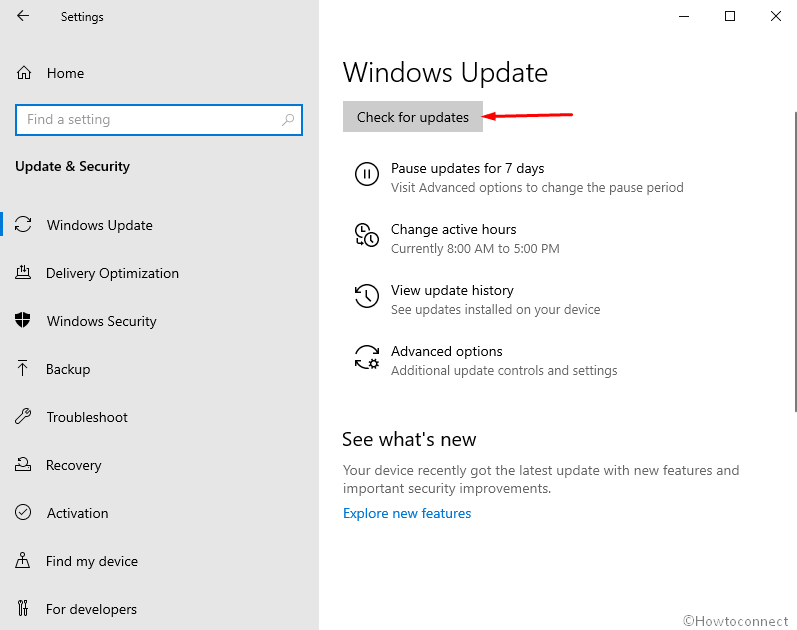
14] Install all possible Windows Updates
Microsoft technicians are dedicated and they have been offering utmost sincerity to offer maximum benefits to the users every time. As a part of this, Updates are available after every definite period of time and they always have bug fixes inside. Obsolete Windows Operating System is more likely to cause NO_MORE_IRP_STACK_LOCATIONS BSOD error in Windows 10. Therefore, download the available updates using the below instructions –
- Press Win+I altogether and let Windows Settings appear.
- Click on Update & Security category.
- On the following screen, move along the right side of the Windows Update.
- You might see ‘You’re up to date” dialog here with the last checked date mentioned. Nevertheless, hit Check for updates option
- At this time, the system will look for available updates for your windows.
- After finishing the searching process, you will see the updates on the screen. Choose Download option under updates are ready to download.
Instructions – 4 Ways to Update Windows 10
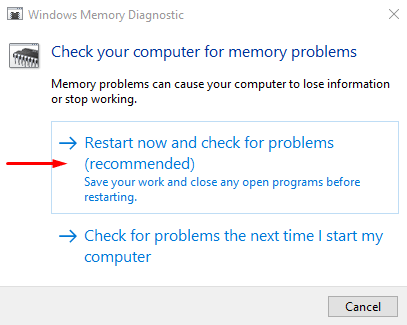
15] Resolve the issues associated with RAM
An incorrect memory, defective Random Access Memory (RAM), wrong allocation may call up NO_MORE_IRP_STACK_LOCATIONS BSOD in Windows 10. Therefore, a perfect solution is mandatory to rectify these issues. Since, scanning the stick is a bit complicated, Memory Diagnostic tool. In this way, your problematic sectors will be identified and you can resolve it later. Move through the following steps –
- First of all, make sure that you have saved and closed all the in-progress apps on the device before proceeding.
- Press Win+S and allow Taskbar Search to appear.
- Type Windows Memory Diagnostic and select the same from the appeared result.
- Thereafter, a pop-up menu will appear. Click on Restart now and check for problems (recommended) from the rolled in Pop up menu.
- When the system starts, you will see a blue screen window. It will detect the memory issues. After the process reaches 100%, Windows will restart automatically.
- Once it starts up again, you can see the results in the notification area of the taskbar.
- Alternatively, if you find the above process nonfunctional, just navigate to the following path – Do a right-click on Start Menu => Event Viewer => Windows Log => System.
16] Use Previous System Restore Point
This workaround is optional for the uses since it needs a having a previously created Restore Point. Therefore, you can obviously skip this one and follow to next resolution. Upon application to this workaround, the operating system will roll back to a point of no error. Here is the detail of the method –
- Press Win+R keys and invoke Run dialog box.
- Type ‘rstrui’ and hit the Enter key.
- This action will call in System Restore wizard on the screen. Click on the Next option allowing the device to generate your PC’s Restore points.
- To see more of the restore points, hit the boxes Show more restore points option.
- Subsequently, choose the last Restore Point you have created on the machine followed by clicking the Next option.
- From the following window, hit the Finish button to initiate the full process.
17] Perform a clean install
It will be really pathetic at the same time frustrating if you could not fix error NO_MORE_IRP_STACK_LOCATIONS using any of the above workarounds. However, we believe that no problems come without a solution. Yet we have one more resolution to apply for fixing error code 0x00000035. This is a complete installation of Windows 10. The final remedy if done with utmost perfection will potentially remove all the bugs. Eventually, there will be no chance of any error or issue further.
It is wiser to save all the necessary files and data in a safe place as Backup. Since this is a professional Workaround, you might seek help from skilled people to accomplish.
Methods:
1] Boot Windows 10 to Safe Mode
2] Resolve the issues associated with RAM
3] Disable Automatic Restart
4] Eradicate the faulty Windows update files
5] Reconnect the External Hardware Devices
6] Run Blue Screen Troubleshooter
7] Uninstall Faulty Application
8] Use Previous System Restore Point
9] Scan your full system in Windows Security
10] Remove Third-Party Antivirus Program
11] Update corrupted Drivers with Device Manager
12] Run Windows System File Checker (“SFC /Scannow”)
13] Use Deployment Image Servicing and Management (DISM) tool
14] Run CHKDSK Utility
15] Clean Junk from the system using Disk Cleanup utility
16] Install all possible Windows Updates
17 Perform a clean install1] Disable Automatic Restart
2] Run Blue Screen Troubleshooter
3] Boot the operating system to Safe Mode
4] Eradicate the faulty Windows update files
5] Reconnect the External Hardware Devices
6] Update corrupted Drivers with Device Manager
7] Uninstall Program causing NO_MORE_IRP_STACK_LOCATIONS
8] Scan your full system in Windows Security
9] Remove Third-Party Antivirus Program
10] Run Windows System File Checker (“SFC /Scannow”)
11] Run Deployment Image Servicing and Management (DISM) tool
12] Run CHKDSK Utility
13] Cleaning Junk from the system using Disk Cleanup utility
14] Install all possible Windows Updates
15] Resolve the issues associated with RAM
16] Use Previous System Restore Point
17] Perform a clean install
That’s all!!
Repair any Windows problems such as Blue/Black Screen, DLL, Exe, application, Regisrty error and quickly recover system from issues using Reimage.
In Windows 10 and in all other versions of Windows, BSoD errors will usually restart your PC in order to prevent damage, and that can disrupt your work and cause you to lose important data.
As you can see, BSoD errors can be problematic, therefore today we’re going to show you how to fix NO MORE IRP STACK LOCATIONS error.
Table of contents:
How to fix NO MORE IRP STACK LOCATIONS error in Windows 10
Solution 1 – Run the BSOD Troubleshooter
If updating your drivers didn’t get the job done, let’s seek help from some troubleshooting tools. The first troubleshooter we’re going to try here is Windows 10’s built-in troubleshooter.
Here’s how to run the BSOD troubleshooter in Windows 10:
Solution 3 – Run the SFC scan
The next troubleshooting tool we’re going to try is the SFC scan. This is a command-line tool that scans your system for broken files and resolves them (if possible).
Microsoft is constantly working on improving Windows 10, and many of these patches offer new features and security updates.
In addition, many patches are fixing issues with incompatible hardware and software.
And since many BSoD errors are caused by hardware or software incompatibility, you can see why it is crucial to use Windows Update regularly.
Bear in mind that updating Windows 10 regularly isn’t enough to prevent BSoD errors, and in addition to downloading updates, it’s also important to keep your drivers up to date as well.
Downloading the latest drivers is relatively simple, and you need to do is to go to your hardware manufacturer’s website and download the latest drivers for your hardware.
In addition, you can also use Device Manager to download all the necessary files. To do that follow these steps:
Update drivers automatically
Searching for drivers on your own can be time-consuming. So, we advise you to use a tool that will do this for you automatically.
Using an automatic driver updater will certainly save you from the hassle of searching for drivers manually, and it will always keep your system up to date with the latest drivers.
A dedicated third-party tool will help you update drivers automatically and prevent PC damage caused by installing the wrong driver versions.
After several tests, our team concluded that this is the best-automatized solution.
Disclaimer: this program needs to be upgraded from the free version in order to perform some specific actions.
Here’s how to run the SFC scan in Windows 10:
Solution 4 – Run DISM
DISM is the third command-line troubleshooter we’re going to try here.
Deployment Image Servicing and Management (DISM), as its name, says, re-deploys the system image all over again, which might be helpful when resolving issues like NO MORE IRP STACK LOCATIONS.
We’ll walk you through both standard and the procedure that utilizes the installation media below:
Standard way
With the Windows installation media
Solution 5 – Check the hard drive
If there’s something wrong with your hard drive, BSOD issues are quite possible. So, go and run a command that will test the state of your hard drive, and provide a solution (if possible).
SPONSORED
Here’s how to run the chkdsk command in Windows 10:
Solution 6 – Uninstall your antivirus software
It’s not uncommon for antivirus software to cause a BSoD error such as NO MORE IRP STACK LOCATIONS.
Many users confirmed that after uninstalling their antivirus software the BSoD error was completely resolved.
According to users, Total Defense, Avast, Kaspersky, and Norton can cause this error to appear, and in order to fix this problem, you’ll have to remove the aforementioned software.
Bear in mind that antivirus software sometimes leaves certain registry entries and files behind, and even those files can cause BSoD errors to manifest.
In order to completely remove antivirus software, it’s recommended to use the dedicated uninstaller tools.
Many security companies offer dedicated uninstallers for their software, and you can download these tools for free.
Few users complained that they are unable to access Windows 10 at all due to NO MORE IRP STACK LOCATIONS error.
And if you can’t access Windows 10, you’ll have to remove your antivirus by using Safe Mode. To access Safe Mode, follow these steps:
If the problem is fixed after uninstalling your antivirus software, you might want to install the newer version or try a different antivirus program.
We covered the best Windows 10 antivirus programs not that long ago, so you might want to check them out.
Solution 7 – Reinstall your audio drivers
Few users reported that NO MORE IRP STACK LOCATIONS error was caused due to audio drivers, and in order to fix this error, users had to remove and reinstall the audio driver.
To uninstall an audio driver you need to do the following:
Solution 8 – Check your hardware
If the problem still persists, you might want to check your hardware. The most common cause of BSoD error is your RAM memory, and you can test it by using MemTest86+.
Keep in mind that in order to get accurate results you need to keep the testing process running for a couple of hours.
If your RAM is working properly, the problem might be caused by your hard drive, motherboard, or any other hardware component.
In addition to checking hardware, we strongly advise you to check if your hardware is properly connected and to make sure that there are no loose contacts.
If your computer is filled with dust, it’s also a good idea to clean it by using a pressurized can of air.
Solution 9 – Reset Windows 10
If the NO MORE IRP STACK LOCATIONS error is caused by a software problem, resetting Windows 10 will probably fix it.
Keep in mind that resetting Windows 10 will delete all files and folders from your C drive, so make sure that you create a backup. To perform a Windows 10 reset, do the following:
If the problem still persists even after you performed Windows 10 reset, the error is most likely caused by faulty hardware or hardware incompatibility.
NO MORE IRP STACK LOCATIONS error can cause you a fair amount of problems, but this error can be usually solved by removing your antivirus software.
If that solution doesn’t work for you, feel free to try any other solution from this article.
Name *
Email *
Commenting as . Not you?
Save information for future comments
Comment
Δ
Skip to content
Как убрать NO_MORE_IRP_STACK_LOCATIONS (0x00000035)?
Как убрать « NO_MORE_IRP_STACK_LOCATIONS » ( 0x00000035)?
На компьютере или ноутбуке под управлением Windows появился «синий экран смерти»? После появления сообщения «
NO_MORE_IRP_STACK_LOCATIONS » (
0x00000035) система перезагружается? Ищите как исправить
0x00000035: «
NO_MORE_IRP_STACK_LOCATIONS »?
Как просмотреть информацию об ошибках, исправить ошибки в Windows 10, 8 или 7
Причины появления ошибки
- На жестком диске компьютера или ноутбука не достаточно места. Для правильной работы ОС Windows 10 на системном диске должно быть свободно 2 — 10 ГБ.
- На компьютер был установлен не совместимый BIOS или прошивка была повреждена.
- Установлены не совместимые с ОС драйвера устройств.
- Реестр Windows был поврежден или удален. Возможно в результате очистки были удалены системные ключи реестра.
- Ативирусное программное обеспечение или компьютерные вирусы могут заблокировать системные файлы или удалить важные ключи реестра.
- В результате ошибок в работе программы для резервного копирования.
- В результате обновления ОС Windows.
Актуально для ОС: Windows 10, Windows 8.1, Windows Server 2012, Windows 8, Windows Home Server 2011, Windows 7 (Seven), Windows Small Business Server, Windows Server 2008, Windows Home Server, Windows Vista, Windows XP, Windows 2000, Windows NT.
Вот несколько способов исправления ошибки «
NO_MORE_IRP_STACK_LOCATIONS »:
Восстановите удаленные файлы
Часто появление BSoD ошибок приводит к утери важных файлов. Блокировка файлов компьютерными вирусами, ошибки в работе программ для резервного копирования, повреждение или перезапись системных файлов, ошибки файловой системы или наличие битых секторов диска – это не далеко полный список причин удаления данных.
Исправление соответствующих ошибок восстановит работоспособность устройства, но не всегда восстановит повреждённые или утерянные файлы. Не всегда имеется возможность устранить ту или иную ошибку без форматирования диска или чистой установки операционной системы, что также может повлечь за собой утерю файлов.
Загрузите бесплатно и просканируйте ваше устройство с помощью Hetman Partition Recovery. Ознакомьтесь с возможностями программы и пошаговой инструкцией.
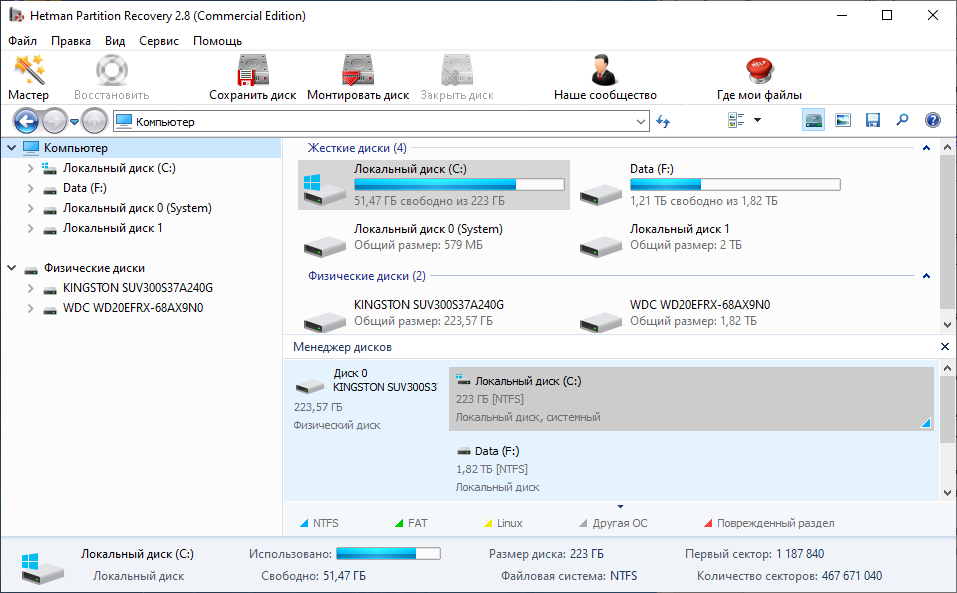
Программа для восстановления данных
Запустите компьютер в «безопасном режиме»
Если ошибка «NO_MORE_IRP_STACK_LOCATIONS » (0x00000035) возникает в момент загрузки Windows и блокирует любую возможность работы с системой, попробуйте включить компьютер в «безопасном режиме». Этот режим предназначен для диагностики операционной системы (далее ОС), но функционал Windows при этом сильно ограничен. «Безопасный режим» следует использовать только если работа с системой заблокирована.
Чтобы запустить безопасный режим сделайте следующее:
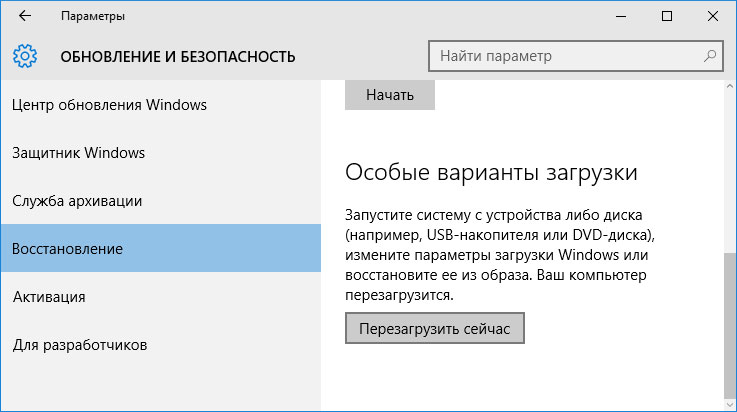
- Перейдите в меню Пуск и выберите Параметры.
- В открывшемся окне параметров перейдите в меню Обновление и Безопасность и выберите раздел Восстановление.
- В разделе Восстановление найдите Особые варианты загрузки и нажмите кнопку Перезагрузить сейчас.
- После этого Windows перезагрузится и предложит выбрать следующее действие. Выберите Поиск и устранение неисправностей.
- В меню Поиск и устранение неисправностей кликните на Дополнительные параметры, далее — Параметры загрузки.
- Далее Windows уведомит вас о том, что компьютер можно перезагрузить с использованием дополнительных параметров загрузки. Укажите — Включить безопасный режим. Нажмите Перезагрузить.
- После перезагрузки выберите Включить безопасный режим нажав клавишу F4.
Как загрузить Windows в безопасном режиме
Обновите драйвер через Диспетчер устройств
Вы установили новое аппаратное обеспечение на компьютере? Возможно вы начали использовать новое USB-устройство с вашим компьютером. Это могло привести к ошибке «NO_MORE_IRP_STACK_LOCATIONS ». Если вы установили драйвер устройства используя диск, который поставляется вместе с ним, или использовали драйвер не c официального сайта Microsoft, то причина в нем. Вам придется обновить драйвер устройства, чтобы устранить эту проблему.
Вы можете сделать это вручную в диспетчере устройств Windows, для того выполните следующие инструкции:
- Нажмите кнопку Windows, затем введите диспетчер устройств с клавиатуры.
- Выберите Диспетчер устройств из списка.
- Просмотрите список категорий устройств, нажмите на стрелочку рядом с категорией вашего нового устройства. Драйвер может быть отмечен желтым треугольником.
- Кликните правой кнопкой мыши на имя устройства и нажмите Обновить драйвер.
- Далее откроется окно Мастера обновления драйверов с двумя опциями:
- Автоматический поиск обновленных драйверов. Windows проверит наличие наиболее подходящего драйвера для этого устройства в автоматическом режиме.
- Выполнить поиск драйверов на этом компьютере. Используйте эту опцию, что бы самостоятельно указать ОС файлы драйвера.
Перезагрузите компьютер после установки драйвера.
Используйте sfc /scannow для проверки всех файлов системы
Повреждение или перезапись системных файлов может привести к ошибке «NO_MORE_IRP_STACK_LOCATIONS ». Команда sfc находит поврежденные системные файлы Windows и заменяет их.
- Нажмите кнопку Windows, затем введите cmd с клавиатуры.
- Правой кнопкой мышки кликните на CMD и запустите от имени администратора.
- В окне командной строки введите sfc /scannow и нажмите Enter.
Этот процесс может занять несколько минут.
Как восстановить системные файлы Windows 10

Проверьте диск с Windows на наличие ошибок командой chkdsk c: /f
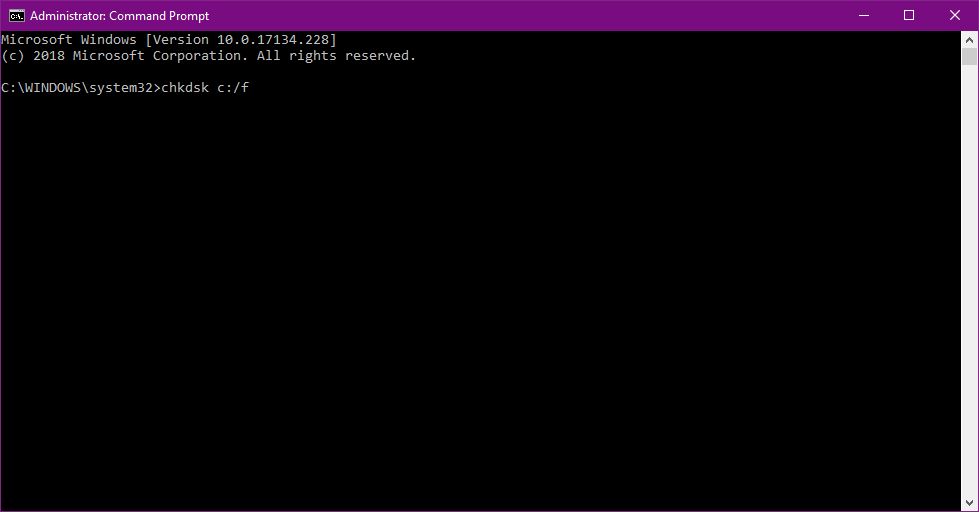
Возможно к синему экрану с «NO_MORE_IRP_STACK_LOCATIONS » привела ошибка файловой системы или наличие битых секторов диска. Команда CHKDSK проверяет диск на наличие ошибок файловой системы и битых секторов. Использование параметра /f заставит программу автоматически исправлять найденные на диске ошибки, а параметр /r позволяет найти и «исправить» проблемные сектора диска. Для запуска следуйте инструкциям:
- Нажмите кнопку Windows, затем введите CMD с клавиатуры.
- Правой кнопкой мышки кликните на CMD и запустите от имени администратора.
- В окне командной строки введите chkdsk c: /f и нажмите Enter (используйте ту букву диска, на котором установлена ОС).
Дождитесь окончания процесса и перезагрузите компьютер.
Используйте режим совместимости со старой версией Windows
Отключите лишние программы из автозагрузки Windows
Программное обеспечение, вызывающее «NO_MORE_IRP_STACK_LOCATIONS » (0x00000035), может быть прописано в автозагрузку Windows и ошибка будет появляться сразу после запуска системы без вашего участия. Удалить программы из автозагрузки можно с помощью Диспетчера задач.

- Загрузитесь в Безопасном режиме.
- Кликните правой кнопкой мышки на Панели задач, затем на пункте Диспетчер задач.
- Перейдите на вкладку Автозагрузка.
- Чтобы убрать ту или иную программу из автозагрузки выберите её из списка и отключите, нажав кнопку Отключить в правом нижнем углу окна.
Обратитесь в поддержку Microsoft
Microsoft предлагает несколько решений удаления ошибки «голубого экрана». «NO_MORE_IRP_STACK_LOCATIONS » (0x00000035) можно убрать с помощью Центра обновления или обратившись в поддержку Windows.
- Перейдите на сайт технической поддержки Microsoft.
- Введите код и сообщение об ошибке в поисковую строку и следуйте найденным рекомендациям.
- Если вы не найдете готового решения, то задайте вопрос в сообществе — возможно вам ответит сертифицированный системный администратор.
Установите последние обновления системы
С обновлениями Windows дополняет базу драйверов, исправляет ошибки и уязвимости в системе безопасности. Загрузите последние обновления, что бы избавиться от ошибки «NO_MORE_IRP_STACK_LOCATIONS » (0x00000035).
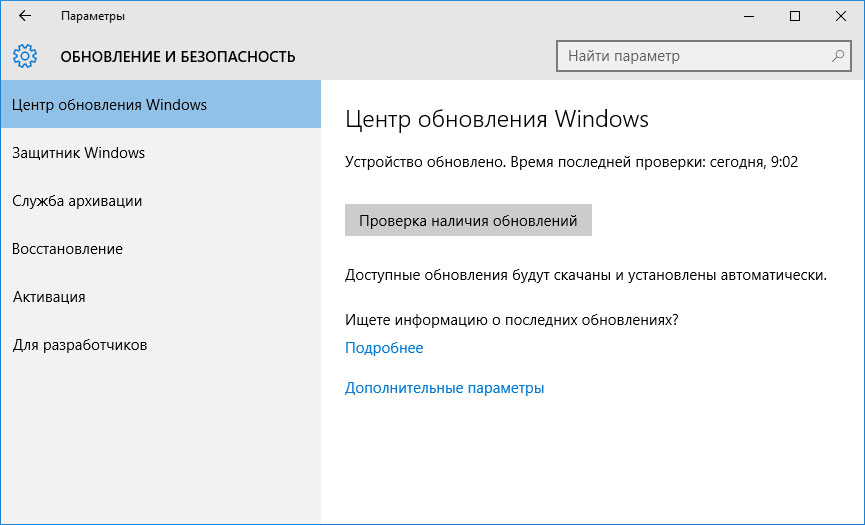
Запустить Центр обновления Windows можно следующим образом:
- Перейдите в меню Пуск и выберите Параметры.
- В окне Параметров перейдите в меню Обновление и Безопасность.
- Для установки последних обновлений Windows нажмите кнопку Проверка наличия обновлений и дождитесь окончания процесса их поиска и установки.
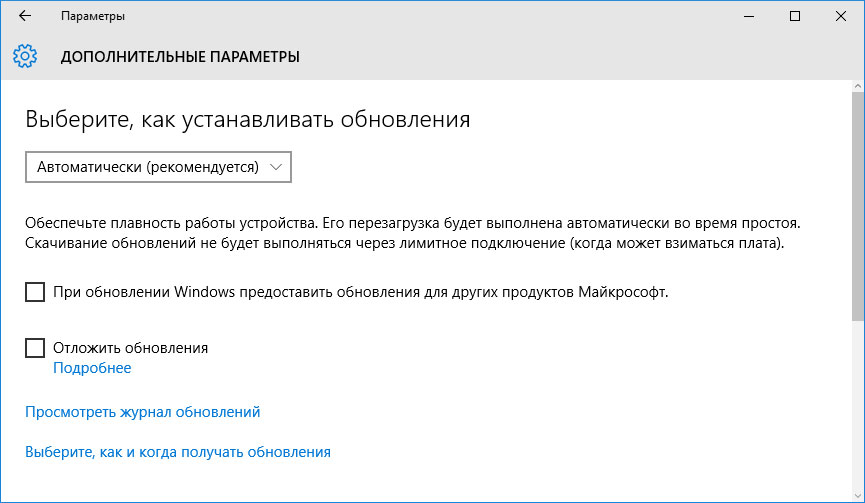
Рекомендуется настроить автоматическую загрузку и установку обновлений операционной системы с помощью меню Дополнительные параметры.
Чтобы включить автоматическое обновление системы необходимо запустить Центр обновления Windows:
- Перейдите в меню Пуск и выберите Параметры.
- В окне Параметров перейдите в меню Обновление и Безопасность и выберите подменю Центр обновления Windows. Для установки последних обновлений Windows нажмите кнопку Проверка наличия обновлений и дождитесь окончания процесса их поиска и установки.
- Перейдите в Дополнительные параметры и выберите, как устанавливать обновления — Автоматически.
Запустите проверку системы на вирусы
«Синий экран смерти» с ошибкой «NO_MORE_IRP_STACK_LOCATIONS » 0x00000035 может вызывать компьютерный вирус, заразивший систему Windows.
Для проверки системы на наличие вирусов запустите установленную на компьютере антивирусную программу.
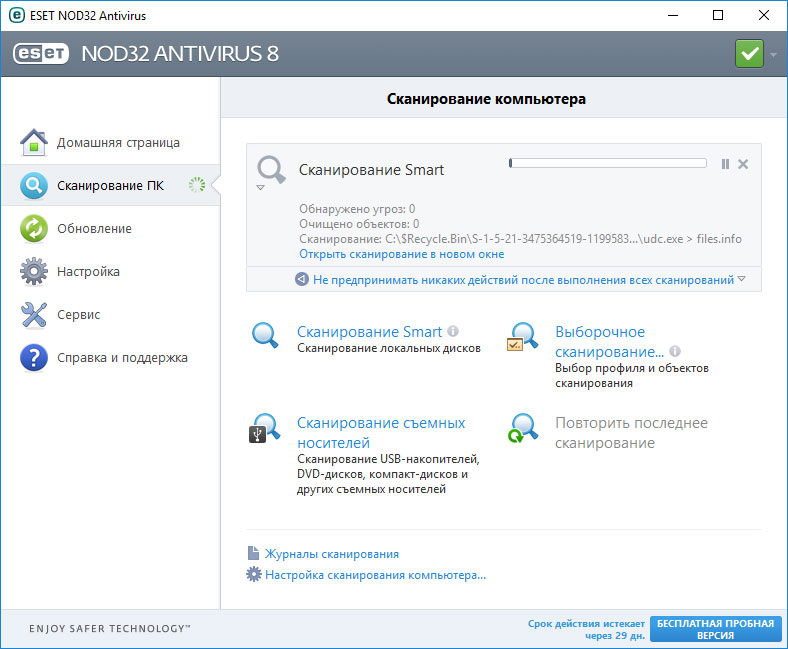
Современные антивирусы позволяют проверить как жесткие диски, так и оперативную память. Выполните полную проверку системы.
Выполните проверку оперативной памяти
Неполадки с памятью могут привести к ошибкам, потере информации или прекращению работы компьютера.
Прежде чем проверять оперативную память, отключите её из разъёма на материнской плате компьютера и повторно вставьте в него. Иногда ошибка NO_MORE_IRP_STACK_LOCATIONS » вызвана неправильно или не плотно вставленной в разъём планкой оперативной памяти, или засорением контактов разъёма.
Если предложенные действия не привели к положительному результату, исправность оперативной памяти можно проверить средствами операционной системы, с помощью средства проверки памяти Windows.
Запустить средство проверки памяти Windows можно двумя способами:
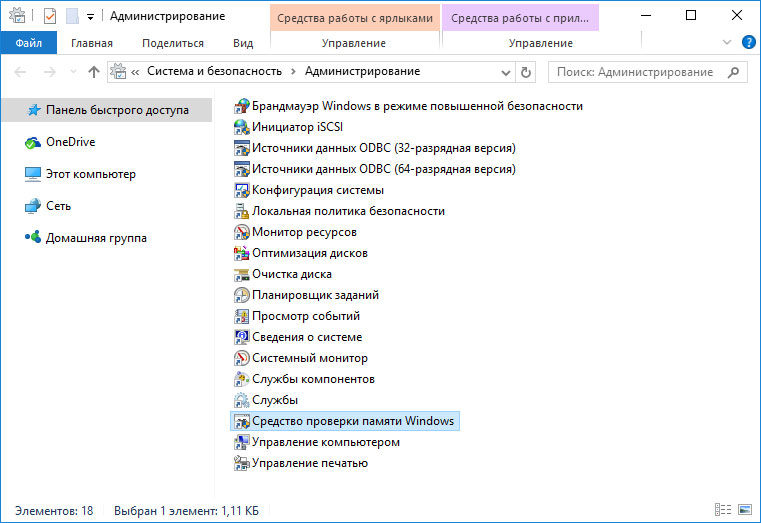
- С помощью Панели управления:

Перейдите в Панель управления / Система и безопасность / Администрирование. Запустите приложение Средство проверки памяти Windows.
- С помощью средства Выполнить:

Запустите средство Выполнить с помощью комбинации клавиш Windows + R. Наберите mdsched и нажмите Enter. После чего откроется средство проверки Windows.
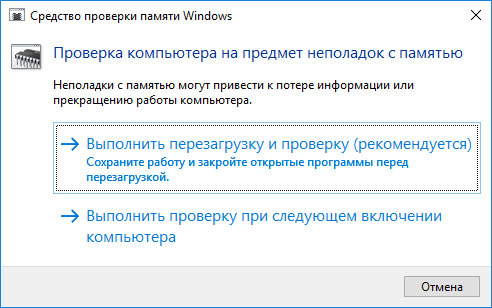
Для начала проверки выберите один из предлагаемых вариантов, проверка оперативной памяти в соответствии с которым будет запущена после перезагрузки компьютера.
Если в результате проверки будут определены ошибки, исправить которые не представляется возможным, то такую память необходимо заменить (замене подлежит модуль памяти с неполадками).
Выполните «чистую» установку Windows
Если не один из перечисленных методов не помог избавиться от NO_MORE_IRP_STACK_LOCATIONS », попробуйте переустановить Windows. Для того чтобы выполнить чистую установку Windows необходимо создать установочный диск или другой носитель с которого планируется осуществление установки операционной системы.
Загрузите компьютер из установочного диска. Для этого может понадобиться изменить устройство загрузки в BIOS или UEFI для более современных компьютеров.
Следуя пунктам меню установщика укажите диск, на который вы хотите установить Windows. Для этого понадобится отформатировать его. Если вас не устраивает количество или размер локальных дисков, их можно полностью удалить и заново перераспределить.
Помните, что форматирование, удаление или перераспределения дисков удалит все файлы с жесткого диска.
После указания диска для установки Windows запуститься процесс копирования системных файлов и установки операционной системы. Во время установки от вас не потребуется дополнительных действий. В течении установки экран компьютера будет несколько раз гаснуть на непродолжительное время, и для завершения некоторых этапов установки компьютер будет самостоятельно перезагружаться.
В зависимости от версии Windows на одном из этапов от вас может понадобиться выбрать или внести базовые параметры персонализации, режим работы компьютера в сети, а также параметры учётной записи или создать новую.
После загрузки рабочего стола чистую установку Windows можно считать законченной.
Примечание. Прежде чем приступить к выполнению чистой установки Windows заранее побеспокойтесь о наличии драйверов ко всем установленным устройствам и сохранности ваших файлов. Загрузите и сохраните драйвера на отдельный носитель информации, а для важных данных создайте резервную копию.
Как сбросить Windows 10 к исходному состоянию
Как сбросить Windows 10, 8, 7 если компьютер не загружается