15.04.2020
Просмотров: 11985
При включении ПК с Windows 7, а также с Windows 10, пользователь может столкнуться с ошибкой No boot disk has been detected or the disk has failed, которая указывает на то, что загрузочный диск поврежден или не обнаружен. Возникает такая ошибка в следующей ситуации: при загрузке Windows система ищет на диске нужную для себя информацию, а если HDD или SSD поврежден, неправильно указана приоритетность загрузки носителей в BIOSе, неверно подключено устройство к материнской плате, поврежден сам загрузчик или системные файлы, то появляется такое сообщение.
Читайте также: Решение проблеммы Disk boot failure, insert system disk and press?
Исправляем ошибку No boot disk has been detected or the disk has failed
Если на вашем ПК появилась ошибка No boot disk has been detected or the disk has failed, то в первую очередь нужно переподключить диск. Если у вас ноутбук, то придется отключить его от сети, вытянуть батарею, на несколько секунд зажать кнопку питания, чтобы снять остатки заряда с материнской платы и открыть крышку нижней части. Некоторые модели ноутбуков на нижней части имеют разбивку по отсекам, поэтому может понадобиться открутить только какую-то часть.
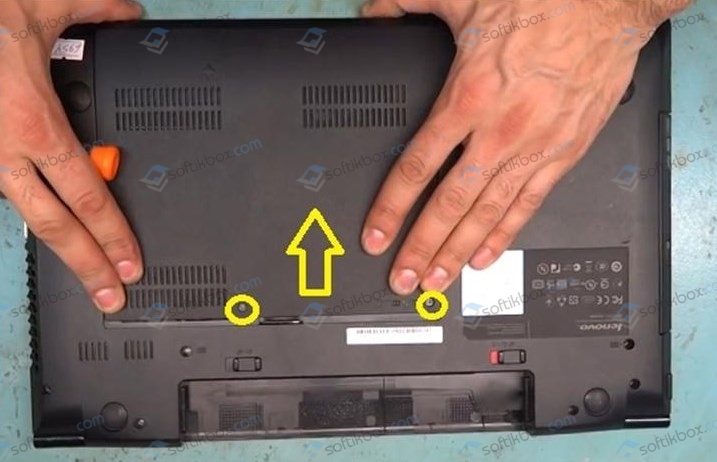
Далее нужно отсоединить HDD или SSD от порта. Смотрим, чтобы диск не был закреплен винтиками. В обычном системном корпусе вам придется только отключить SATA кабель от диска. Продуваем порт и контакты диска от пыли.
Подключаем диск обратно, проверяем, исчезла ли ошибка No boot disk has been detected or the disk has failed.
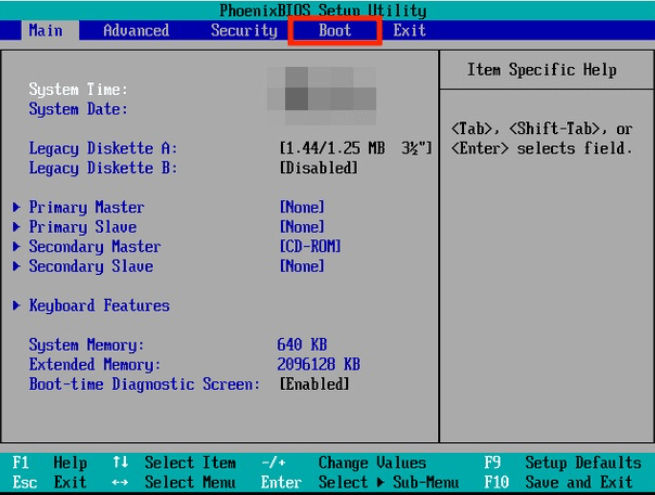
Следующим шагом будет проверка приоритетности загрузки носителей. Для этого нужно при включении ПК начать нажимать клавишу F2 или DEL. Комбинацию клавиш для входа в BIOS стоит посмотреть в спецификациях к ноутбуку или материнской плате. В BIOSe нужно найти раздел «Boot Device Priority» или «Boot Option». Здесь на первом месте должен стоять жесткий диск, далее дисковод (если есть), а далее – по желанию пользователя. Если на первом месте не стоит носитель, нужно его переместить и потом нажать «F10», чтобы сохранить изменения в системе.
После перезагрузки ПК нужно проверить систему на работоспособность некоторое время.
Если ошибка No boot disk has been detected or the disk has failed после манипуляций с BIOS-ом не исчезла, стоит загрузиться в безопасном режиме (при загрузке ПК нажимаем F8). Далее выбираем командную строку с правами Администратора и вводим sfc /scannow, чтобы выполнить проверку системных файлов на целостность.
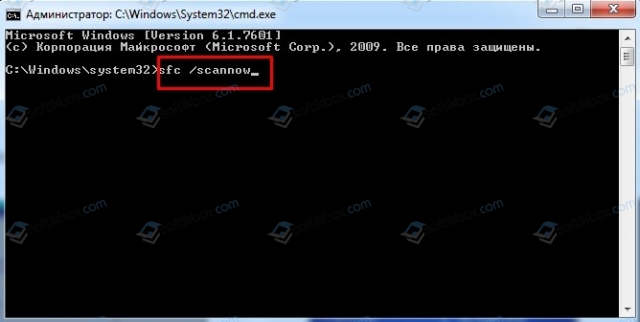
Если утилита обнаружит нарушение целостности файлов, то исправит поврежденные элементы. Если не удаётся выполнить восстановление, то можно подключить к ПК установочный диск, загрузиться в режиме восстановления системы, выбрать командную строку и ввести sfc /scannow /offbootdir=c:\ /offwindir=c:\windows.
Если же повреждений не обнаружено, то нужно в этой же командной строке ввести wmic diskdrive get model,status.
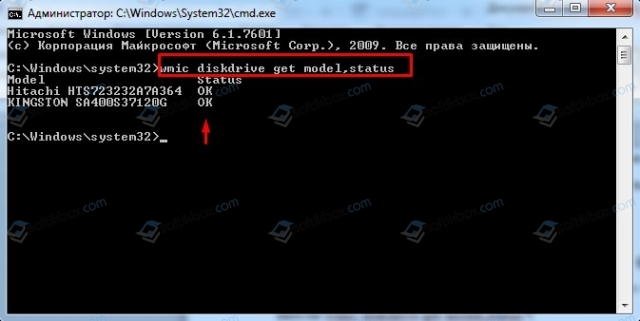
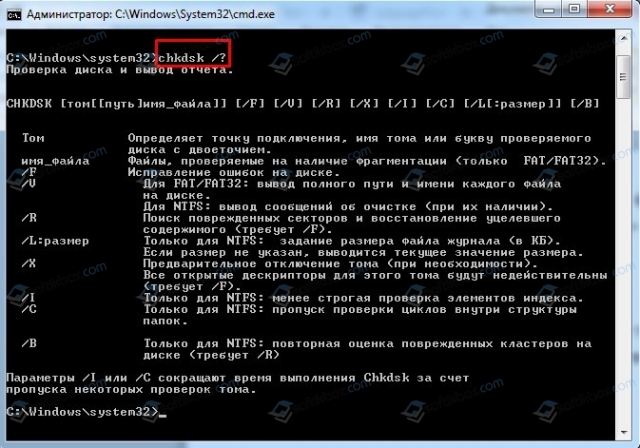
В графе «Статус» должно быть указано «ОК». Если указано «Caution» или «Pred Fail», то диск скоро выйдет из строя. Для более глубокой проверки в командной строке можно ввести «chkdsk /?», а далее указать букву для команды. Утилита проверит жесткий диск на ошибки.
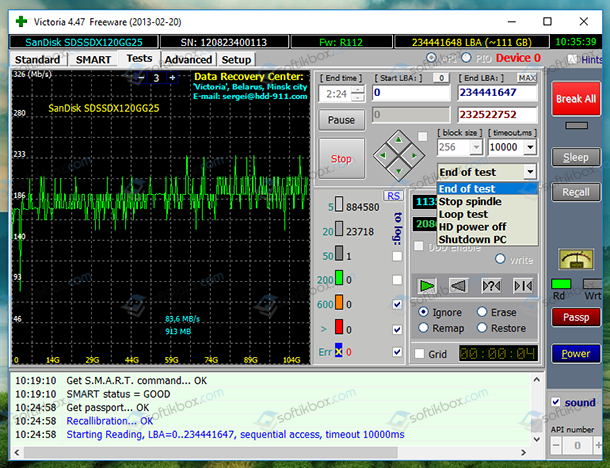
Для проверки жесткого диска на предмет битых секторов нужно скачать и запустить от имени Администратора программу Victoria HDD. Если жесткий диск неисправен, то программа покажет количество как битых, так и медленно читающихся секторов.
Если диск в порядке, но ошибка No boot disk has been detected or the disk has failed продолжает появляться на вашем ПК, то исправить ошибку можно с помощью отката системы до более раннего состояния. Для этого можно воспользоваться точкой восстановления системы или установочным диском.
Key Takeaways:
- «No boot disk has been detected or the disk has failed» error usually occurs when booting the computer.
- A wrong boot configuration or a corrupt boot disk may cause the no boot disk has been detected error.
- EaseUS will provide six options to fix the error, and you can follow this tutorial.
HP or Acer users may receive no boot disk has been detected error when booting their PC. The system cannot find the boot information needed to load the operating system. EaseUS will help you analyze the detailed cause and provide possible solutions to boot your computer successfully.
The computer needs to boot up the system by checking the hard drive for boot information and other operational information. No boot disk has been detected or the disk has failed, indicating that the boot information retrieval has failed. The following are some common causes of this error:
- Faulty or loose hard disk connection
- Incorrect boot order setting
- Corrupt boot configuration data
- Failed hard drive
- HDD/SSD missing operating system
After understanding the causes of these difficulties, we will continue to show you effective solutions on how to solve the no boot disk has been detected or the disk has failed problem. If you like this passage, click the social buttons below to share it with others in need.
Six Solutions to Fix No Boot Disk Has Been Detected Error
Knowing why the error occurred, you can jump directly to the target solution for error repair. Instead, you can fix the undetected boot disk error through these troubleshooting steps in order:
- 1. Check the Hard Disk Connection
- 2. Change the Boot Order
- 3. Repair the Boot Sector
- 4. Check the File System
- 5. Run the Automatic Repair
- 6. Do A fresh install of Windows
This guide will provide detailed step-by-step instructions for each method:
📖Extend Reading: Default Boot Device Missing or Boot Failed
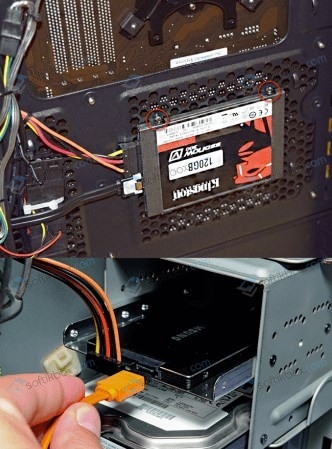
1. Check the Hard Disk Connection
To fix the boot error, check the hard drive connection and ensure it is properly connected to your computer. Laptop shaking may cause the connected wires to loose, resulting in undetected boot disk errors. Please be careful when handling it to avoid damaging the hardware.
Step 1. Turn off the computer remove the battery, and remove the HDD from the computer.
Step 2. Clean all ports and cables and reconnect the HDD.
Note: If you do not have professional tools and practical knowledge, it is better to consult a computer person or engineer to help you.
![]()
2. Change the Boot Order
If the boot disk is not at the top of the boot order, the computer will try to boot from another source. This may also cause the problem of undetected disk errors if the computer cannot find valid boot information. For this case, you can change the computer’s boot order in the BIOS as follows:
Step 1. Turn on your computer and enter BIOS by holding F1/F2/F12/Del or another specified key.
Step 2. Select the Boot option from the list of options.
Step 3. Find the computer’s boot order and use the arrows to move it up.
If this method is not working, please continue to try other fixes.
Also read: The System Cannot Find Any Bootable Devices
3. Repair the Boot Sector
The master boot record is located at the beginning of the bootable hard disk, and it helps your computer boot successfully. A corrupted MBR can also cause the system to fail to recognize the boot information and thus fail to boot your computer. Therefore, you must repair the boot sector. There are two ways that users can repair the boot sector:
Use EaseUS Partition Master to Rebuild MBR
EaseUS Partition Master is a versatile disk management tool. It simplifies the steps of the Windows built-in tool to help you quickly repair the MBR. Creating a WinPE bootable disk makes it possible to easily boot your computer without losing data. If you are not familiar with computer operations, this tool is perfect for you:
Free download this powerful tool and rebuild MBR:
Step 1. Create a WinPE bootable disk
- Launch EaseUS Partition Master, and click «Bootable Media» on the toolbar. Select «Create bootable media».
- Click «Next» to finish the process.

Step 2. Boot EaseUS Partition Master Bootable USB
- Connect the bootable USB or CD/DVD to your PC.
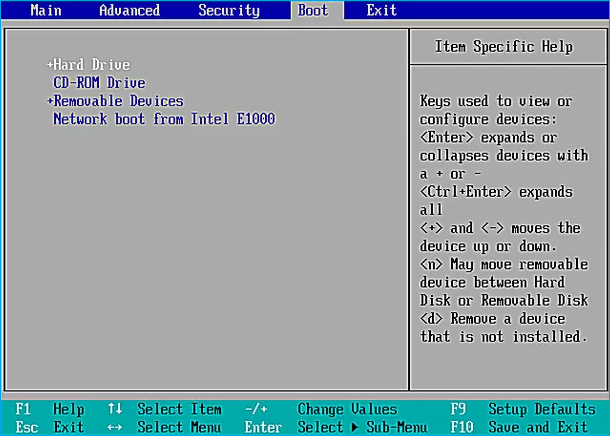
- Press F2 or Del when you restart the computer to enter the BIOS screen. Set and boot your computer from «Removable Devices» or «CD-ROM Drive». And then EaseUS Partition Master will run automatically.
Step 3. Rebuild MBR
- Click «Toolkit» and choose «Rebuild MBR».

- Select the disk and the type of MBR. Then, click «Rebuild».

- After that, you can see «MBR has been successfully rebuilt on Disk X».

If you meet other boot errors, you can use EaseUS Partition Master to fix them:
Use CMD to Rebuild MBR
If you are familiar with computer commands, you should use the Windows Media Creation Tool to create bootable media and then use the command prompt to repair the MBR in the Windows recovery environment:
Step 1. Boot your computer from the Windows bootable installation CD or DVD.
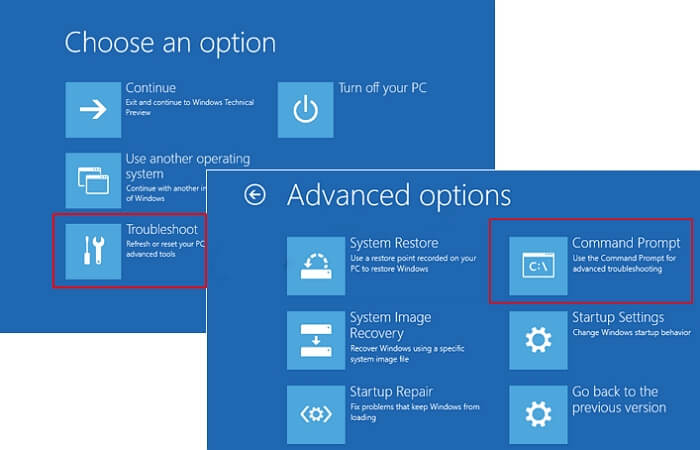
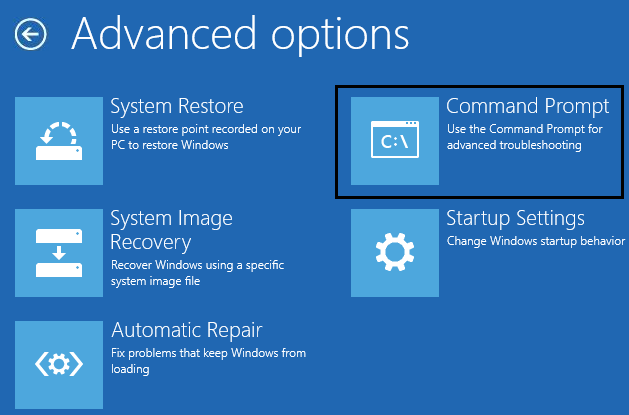
Step 2. Start the command prompt: select Troubleshoot in Choose an option and select Command prompt in Advanced options.
Step 3. Enter the following commands in sequence at the command prompt box and press enter:
- bootrec /fixmbr
- bootrec /fixboot
- bootrec /scanos
- bootrec /rebuildbcd
Please be careful when entering the commands to avoid data loss. You can then reboot your computer to see if the problem with the failed disk has been resolved.
4. Check the File System
If something is wrong with your system hard drive, you may also get a «the disk has failed» error. In this case, you have two ways to detect and fix the file system error on your hard disk. Both ways are based on the same principle as method 3, requiring you to have created bootable media. You can check the file system as follows:
Use EaseUS Partition Master to Check File System
EaseUS Partition Master provides «Check File System» and «Disk Surface Test» to help you find and fix hard disk errors. It is an alternative to Windows commands, but it is simpler and more comprehensive in solving problems. After you create bootable USB in Method 3, you can open your computer and use the tool directly:
Step 1. Right-click the target partition that has a problem.
Step 2. Choose «Advanced» > «Check File System».
Step 3. Confirm if you want to hide the partition or not.
Step 4. In the Check File System window, check the «Try to fix errors if found» option.
Step 5. Click «Start» to check errors on your partition.
In addition, the tool can check hard drive health comprehensively and alert you if there are problems with hard drive performance or temperature.
Run CHKDSK to Check File System
CHKDSK is a method Windows provides to detect and repair file system errors. Similar to method 3, you need to go to the command prompt:
Step 1. Start your computer from a Windows bootable device.
Step 2. Go to Advanced Options and select Command Prompt.
Step 3. Type the command: chkdsk c: /f/R/X and press Enter.

Extend reading: How to Run CHKDSK on SSD
5. Run the Automatic Repair
You can also run the Automatic Repair/Startup Repair on your system to fix the error that prevents your PC from booting. Before you start, you must also use EaseUS Partition Master or Windows installation media to enter the Windows recovery environment.
Step 1. Boot from the CD/DVD and press any key to continue.
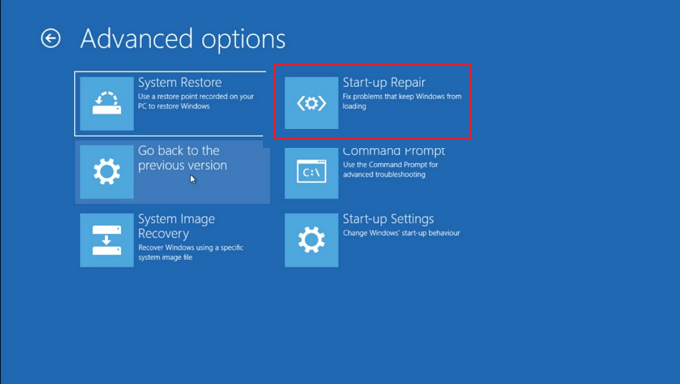
Step 2. Click on Repair your computer and select Troubleshoot.
Step 3. Select Advanced options>Automatic/Start-up Repair.
Step 4. Wait for Windows to finish repairing automatically.
6. Do A Fresh Install of Windows
If all solutions are not working, a Windows system may fail. You can fix the error by doing a fresh install of Windows. This method will erase all files, so you can back up important information or copy a partition to another drive before doing a fresh install.
Read more about installing Windows at: How to Clean Install Windows
You May Also Like:
Conclusion
Six solutions are provided to fix the boot error: «no boot disk has been detected, or the disk has failed» error. Whether using an HP laptop or another computer, you can find solutions to boot problems in this article. Among other things, EaseUS Partition Master provides a quick and easy solution to help you create bootable media and fix the most likely errors.
FAQs About No Boot Disk Has Been Detected
If you have more questions about this topic, you can check out the simple questions and answers below 1:
1. What should I do if no bootable device shows?
No bootable device is probably because you did not change the boot order. To fix the error, you should change the bootable device first:
Step 1. Restart your computer and enter the BIOS screen.
Step 2. Under the Boot tab, find the hard drive and move it to the top of the boot order.
2. What does no boot disk has been detected mean?
No boot disk has been detected means that your computer will not boot. This could be because your boot disk is corrupt or poorly connected to your computer, and the computer cannot access it to retrieve boot information.
3. Why does «media test failure, check cable» happen?
This error indicates that there is a problem with the PXE of the computer. Problems with your boot sequence configuration, corrupt boot devices, corrupt boot sectors, or power supply problems can all cause this error.
На чтение 4 мин Опубликовано
Активным пользователям компьютера должна быть знакома ошибка “ERROR: No boot disk has been detected or the disk has failed”, которая может выскакивать как при включенном ПК, так и при включении Windows. Что это за сообщение, в каких ситуациях оно появляется, как разобраться с ним? Обо всем по порядку.

Содержание
- Что означает ошибка
- No boot disk has been detected or the disk has failed — решаем сбой
- Решение всех возможных проблем:
- Используем командную строку:
- Заключение
Что означает ошибка
Данное сообщение означает, что “Загрузочный диск не обнаружен или произошел его сбой”. Проявляется сбой в абсолютно разных ситуациях. Хуже, когда это происходит при включении компьютера. Оповещение может быть на экране во время активной работы за ПК, время от времени или постоянно. Даже если это случается редко, рекомендуем все же отыскать проблему и устранить ее.
Причины возникновения неполадок:
- возможно, не до конца был вставлен жесткий диск;
- неисправность винчестера (HDD, SSD), его отсутствие;
- сбился диск (нарушена целостность изнутри);
- слетели настройки BIOS, испорчена батарейка;
- установка нового железа (материнская плата, диск, блок питания);
- проблемы с Windows (реестр, мусор).
No boot disk has been detected or the disk has failed — решаем сбой
В большинстве случаев, причину найти удается достаточно быстро, просто проверив жесткий диск на сбои или настроив BIOS. Но, нередки ситуации, когда приходится заменять винчестер или переустанавливать систему.
Решение всех возможных проблем:
- Убедитесь, что диск вставлен в разъем до конца.
- Проверьте HDD на целостность, просто вставив в другой компьютер или, если он у вас на гарантии, отнесите в магазин. Также, вытяните его из компьютера вместе со шлейфами и заново вставьте.
- Проверьте систему на наличие ошибок. При включении ПК нажимайте на F12 (или F2), зайдите в «Boot menu» — «Utility partition» или «Diagnostics». Жмите Run (enter) и начнется автопроверка на возможные неполадки. После этого вам укажут на них.
- Зайдите в биос, при включении ПК нажав многократно F10, либо Delete, F12, F11, ESC, Fn+F1 и тд. (зависит от ноутбука, стационара и виндовса). Отыщите пункт “File” — выбираем «Apply Default and Exit» и подтверждаем. Эта команда сбрасывает все до заводских и чаще всего помогает.

Сброс BIOS до заводских настроек - Далее найдите «Boot Menu» — «Boot sequience» («Boot Priority») — поставьте, чтобы HDD (SATA) загружалось первым (если стоит Never — изменить на Always). Загрузка сети (LAN) должна стоять в выключенном режиме (Disabled).

Проверьте приоритет загрузки в Биосе - Если у вас имеется установочный диск, можете вставить его и при загрузке выбрать “Восстановление” — ”Устранение неполадок“ — ”Дополнительные параметры” — “Автоматическое восстановление”. Далее — перезагрузитесь.


Используем командную строку:
Зайдите в командную строку. Пуск — Выполнить — пишем cmd.exe и входим от имени администратора. Если ПК не включается, заходим в “Дополнительные параметры”, описанные в пункте выше, и там будет такая опция. В открытом окне выполняем поочередно: sfc /scannow c: /offbootdir=c: /offwindir=c:windows — пойдет проверка, после перезагрузитесь. Не помогло? — впишите следующее:
- bootrec.exe /FixMbr;
- bootrec.exe /FixBoot;
- bootrec.exe /RebuildBcd;
- Дождитесь выполнения и запустите перезапуск системы.

Если убедились в том, что диск исправен, но все равно не заходит в Windows, переустановите его. В случае, когда проблема с батарейкой BIOS, просто купите новую и замените (она стоит не много). Это легче, чем разбирать ПК и проверять вольтметром.
Заключение
Зачастую, баг “ERROR: No boot disk has been detected or the disk has failed” решается достаточно быстро. С помощью вышеописанных действий ее может устранить даже новичок. Если вы успешно после такого сбоя открыли систему, то обязательно прогоните систему через специальные программки CrystalDiskInfo, HDDScan, Victoria и прочие. К примеру, первая утилита покажет степень износа жесткого диска, входящие напряжения и выявит малейшие неисправности и работе.
No Boot Disk Has Been Detected or the Disk Has Failed [SOLVED]: The error itself says that No boot disk has been detected which means either the boot configuration is not set correctly or your hard disk has corrupted. Boot configuration can be changed in BIOS (Basic Input/Output System) setup but if your hard disk is corrupted to the point where it can’t be fixed then it’s time to renew it. When the system can’t find the boot information required to load the operating system then it shows the following error message: No boot disk has been detected or the disk has failed

There can be a variety of reason for “No Boot Disk Has Been Detected or the Disk Has Failed” error such as:
- Hard disk connection to the system is faulty or loose (which is silly, I know, but this do happen sometimes)
- Your system Hard disk has failed
- Boot order is not set correctly
- The operating system from the disk is missing
- The BCD (Boot Configuration Data) is corrupted
Table of Contents
Anyway, without wasting any time let’s see how to Fix No Boot Disk Has Been Detected or the Disk Has Failed error with the help of the following troubleshooting steps:
Method 1: Make sure the Boot order is properly set
You may be seeing the “No boot disk has been detected or the disk has failed” because the boot order is not properly set which means that computer is trying to boot from another source which doesn’t have an operating system thus failing to do so. In order to fix this issue, you need to set the Hard Disk as the top priority in the Boot order. Let’s see how to set proper boot order:
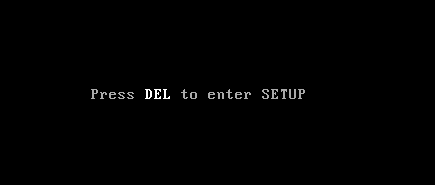
1.When your computer starts (Before the boot screen or the error screen), repeatedly press Delete or F1 or F2 key (Depending upon your computer’s manufacturer) to enter BIOS setup.
2.Once you are in BIOS setup select Boot tab from the list of options.

3.Now make sure that the computer Hard disk or SSD is set as a top priority in the Boot order. If not then use up or down arrow keys to set hard disk at the top which means the computer will first boot from it rather than any other source.
4.Press F10 to save and exit changes in the BIOS setup.
Method 2: Check if Computer Hard Disk is properly connected
In many reports, this error occurs because of the faulty or loose connection of hard disk in the system. In order to make sure that is not the case here you need to open your Laptop/Computer casing and check for the issue. Important: It is not advised to open your computer case if your computer is under warranty or you don’t have any knowledge about what you are doing. In this situation, you may require external help such as an expert technician to check the connection for you.
Once you have checked the proper connection of hard disk is established, reboot your PC and this time you may have Fix No Boot Disk Has Been Detected or the Disk Has Failed” error message.
Method 3: Run Diagnostic at startup to check if the Hard disk is failing
If the above two methods weren’t helpful at all then there is a chance that your hard disk might be damaged or corrupted. In any case, you need to replace your previous HDD or SSD with a new one and install Windows again. But before running to any conclusion, you must run Windows Diagnostic to check if you really need to replace HDD/SSD.

To run Diagnostics restart your PC and as the computer starts (before the boot screen), press F12 key and when the Boot menu appears, highlight the Boot to Utility Partition option or the Diagnostics option and press enter to start the Diagnostics. This will automatically check all the hardware of your system and will report back if any issue is found.
Method 4: Run Chkdsk and Automatic Repair/Start Repair.
1.Insert the Windows 10 bootable installation DVD and restart your PC.
2.When prompted to Press any key to boot from CD or DVD, press any key to continue.

3.Select your language preferences, and click Next. Click Repair your computer in the bottom-left.

4.On choose an option screen, click Troubleshoot.

5.On Troubleshoot screen, click Advanced option.

6.On the Advanced options screen, click Automatic Repair or Startup Repair.

7.Wait til the Windows Automatic/Startup Repairs complete.
8.Restart your PC and you have Fix No Boot Disk Has Been Detected or the Disk Has Failed, if not, continue.
9.Again go to Advanced options screen and this time select Command Prompt instead of Automatic Repair.
10.Type the following command in cmd and hit enter:
Sfc /scannow
sfc /scannow /offbootdir=c:\ /offwindir=c:\windows

11.Let system file checker run as it can take some time.
12.Once finish, restart your PC and see if you’re able to Fix No Boot Disk Has Been Detected or the Disk Has Failed error.
Solution 5: Repair install Windows
If none of the above solution work for you then you can be sure that your HDD is fine but you may be seeing the error “No Boot Disk Has Been Detected or the Disk Has Failed” because the operating system or the BCD information on the HDD was somehow erased. Well, in this case, you can try to Repair install Windows but if this also fails then the only solution left is to Install a new copy of Windows (Clean Install).
Also, see How to fix BOOTMGR is missing Windows 10.
That’s it you have successfully Fix No Boot Disk Has Been Detected or the Disk Has Failed error but if you still have any questions then please ask them in the comment’s section.
“No boot disk has been detected or the disk has failed” error usually pops up when users try to boot up computer. It normally refers to that the boot configuration is incorrect or the boot disk is corrupt. This article will introduce 7 approaches to this issue.
Are you disturbed by the “No boot disk has been detected or the disk has failed” error? It generally indicates that something wrong has occurred to the boot configuration or the boot disk on your computer. To eliminate it, you can utilize the following 7 solutions.

Solution 1: Ensure Boot Disk Connected Properly
There are chances that the error results from faulty or loose connections of your computer’s hard disk. Therefore, to identify if the faulty connection is culprit, you need to open the computer case to check the cables. Of course, this step seems a bit knotty for novices. So, you had better contact professionals for help.
Solution 2: Check Computer’s Boot Order
In addition, improper boot order on the computer can result in this error as well. So, you ought to check the boot sequence.
- Firstly, restart your computer and meanwhile press “Delete” or “F1” or “F2” key to enter BIOS setup screen.
- Then, turn to the “BIOS” tab in the above option list.
- Next, you can check the boot device priority to see if the computer hard drive as the top priority. If not, change the order.
- Lastly, press “F10” to save the changes and exit BIOS setup.
Solution 3: Run Diagnostic for Boot Disk Check
If the above means don’t help in fixing this error, it is likely that the hard drive is experiencing some issues. In this situation, you need to scan and repair the disk, such as using the inbuilt “Windows Diagnostic” tool.
- At first, restart computer and press “F12” key.
- When entering Boot menu, highlight “Utility Partition” or “Diagnostics”.
- Then, press “Enter” to run the tool.
- It will auto check all hardware on the computer and report the found issues.
Solution 4: “Automatic Repair” on Boot Disk
Aside from “Diagnostic”, Windows also offers “Automatic Repair” feature for disk repair.
- To start with, insert Windows installation DVD.
- Then, restart the PC.
- Next, press any key to boot from the DVD.
- Later, click “Repair your computer” > “Troubleshoot” > “Advanced Options” > “Automatic Repair”.
- After the repair, try to reboot PC.
Solution 5: Run CHKDSK and SFC
Provided that the “Automatic Repair” is helpless, don’t be discouraged. Just utilize CHKDSK and SFC to repair the disk again.
- At the outset, follow the steps in Solution 4 to enter “Advanced Options” list.
- Then, choose “Command Prompt” option.
- In the command prompt window, input the following lines and press “Enter”:
sfc /scannow /offbootdir=c:\ /offwindir=c:\windows
chkdsk c: /r
- Ultimately, exit command prompt and restart the PC.
Solution 6: Repair Boot Sector
Moreover, provided that the boot sector is bad, the error will occur too. Hence, it is essential to repair the boot sector.
- Like the above solution, launch command prompt.
- Then, try the following command lines one by one.
bootrec.exe /FixMbr
bootrec.exe /FixBoot
bootrec.exe /RebuildBcd
- After that, exit command prompt and reboot PC.
Solution 7: Clean Install Windows
If unfortunately, all the solutions above are useless, it is possible that the criminal is the malfunctioning Windows system. In this situation, you can try “clean install Windows”. But, in this way, all the data in the boot disk will be erased. After that, you have to attempt data recovery, such as employing PST recovery software to get back lost PST data.
Author Introduction:
Shirley Zhang is a data recovery expert in DataNumen, Inc., which is the world leader in data recovery technologies, including recover mdf and outlook repair software products. For more information visit www.datanumen.com