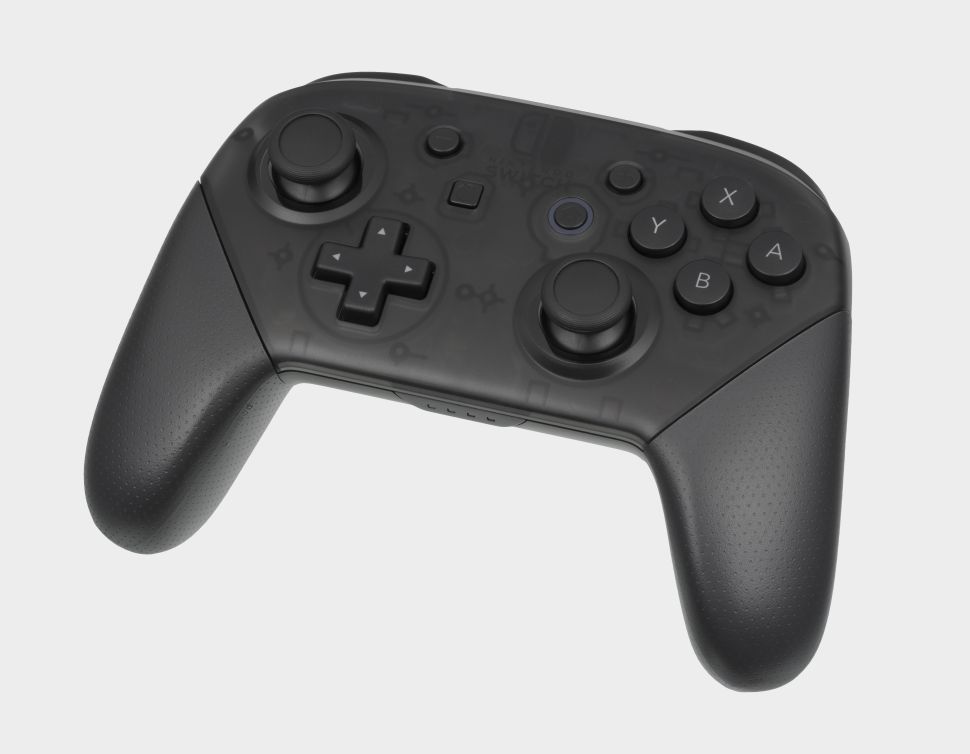
Nintendo не думала о компьютерных геймерах, когда создавала контроллер Switch Pro, но это не помешает нам использовать его в любом случае. Это фантастический контроллер с очень долгим временем автономной работы, отличными аналоговыми джойстиками и лицевыми кнопками, намного крупнее, чем маленькие на джойстиках Switch. Если он у вас есть и вы готовы перейти на него с древней панели Xbox 360, это сильный соперник для вашего следующего контроллера ПК.
Благодаря конфигуратору контроллера Steam, который имеет официальную поддержку контроллера Nintendo Switch Pro, использовать его для большинства компьютерных игр очень просто. Это в основном plug-and-play. Но если вы хотите играть в игры, которых нет в Steam, вам понадобится это руководство.
Вот как заставить ваш контроллер Nintendo Switch Pro работать в Steam или Windows через проводное соединение или Bluetooth. Для начала вам понадобится контроллер Nintendo Switch Pro (очевидно) и кабель USB-C.
Как использовать Switch Pro Controller в Steam
Встроенная поддержка контроллера Steam включает в себя контроллер Switch Pro с 2018 года, что упрощает использование контроллера в играх Steam. Включить его предельно просто. Начните с подключения контроллера к вашему ПК.
1. Откройте Steam и меню настроек. Найдите вкладку «Контроллер» и откройте «Общие настройки контроллера». Слева вы должны увидеть несколько вариантов поддержки конфигурации. Естественно, мы хотим включить поддержку конфигурации Switch Pro.
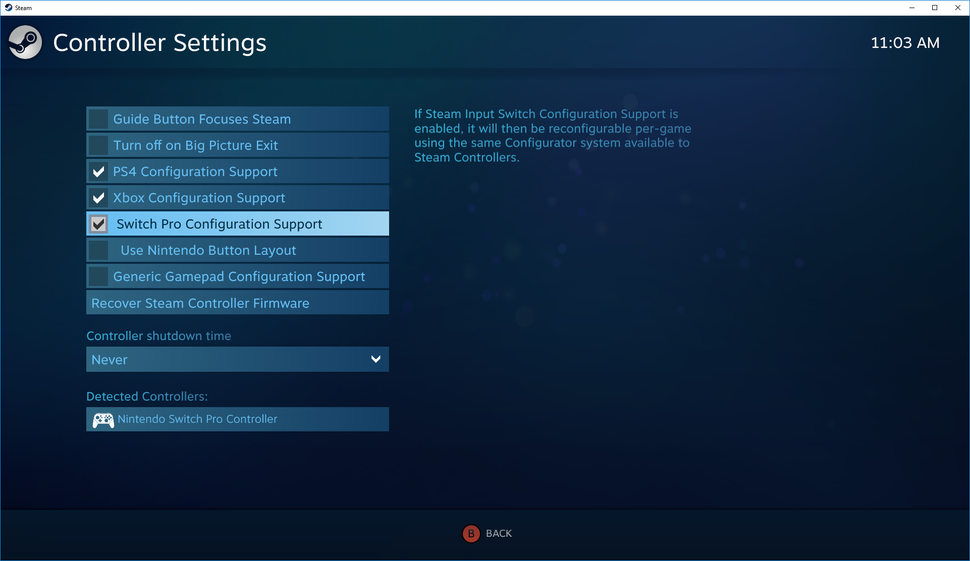
Если вам нравится ваш контроллер Pro с перекидными кнопками X / Y и A / B, вы также можете включить макет кнопок Nintendo, чтобы игры использовались по умолчанию. Если этот параметр не включен, ваш контроллер Pro будет рассматриваться как контроллер Xbox. Вы также можете изменить элементы управления для каждой игры, щелкнув правой кнопкой мыши эту игру в своей библиотеке, выбрав «Изменить конфигурацию контроллера Steam» и переназначив каждую кнопку.

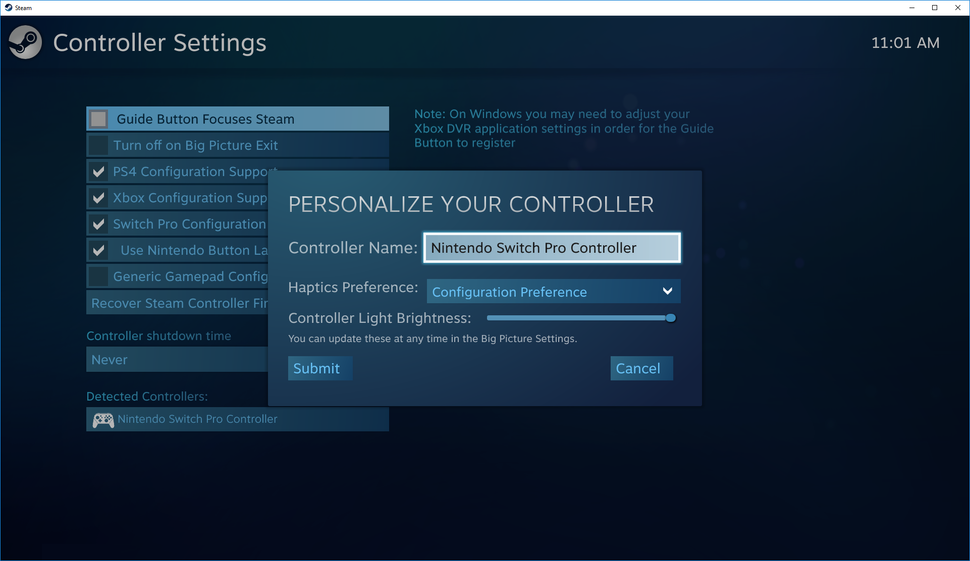
3. Пока вы здесь, найдите время, чтобы персонализировать свой контроллер Switch, выбрав его в разделе «Обнаруженные контроллеры». Если ваш контроллер не регистрируется должным образом, начните с нажатия «Идентифицировать», затем откройте настройки контроллера. Вы можете изменить название, яркость светового кольца кнопки «Домой» и использовать ли гироскопический датчик движения.
На странице настроек контроллера вы также можете откалибровать гироскопический датчик и джойстики вашего контроллера, нажав «Калибровать», но вам следует откалибровать контроллер только в случае возникновения проблем с задержкой. Если он не сломан, не чините его: если вы откалибруете перед тем, как попробовать свой контроллер в игре, вы действительно можете создать проблему с задержкой. Если вы когда-нибудь почувствуете необходимость откалибровать контроллер, нажмите «Калибровка», установите его на плоскую поверхность и следуйте подсказкам кнопок.
Итак, если все кажется правильным, просто сохраните свой профиль и вуаля, вы готовы к работе. Всякий раз, когда вы хотите использовать свой контроллер, обязательно подключите его перед открытием Steam или любых игр Steam, чтобы предотвратить любые проблемы с подключением.
ИГРЫ НЕ В STEAM
Настройка Switch Pro Controller для игр, отличных от Steam
Использование Steam — действительно простой способ заставить этот контроллер работать. Если вы не играете в игры через Steam, использование контроллера Switch Pro по-прежнему возможно, но для этого потребуется небольшая дополнительная работа, особенно для подключения Bluetooth. Но хорошая новость заключается в том, что теперь он изначально распознается в Windows, что помогает ускорить процесс.
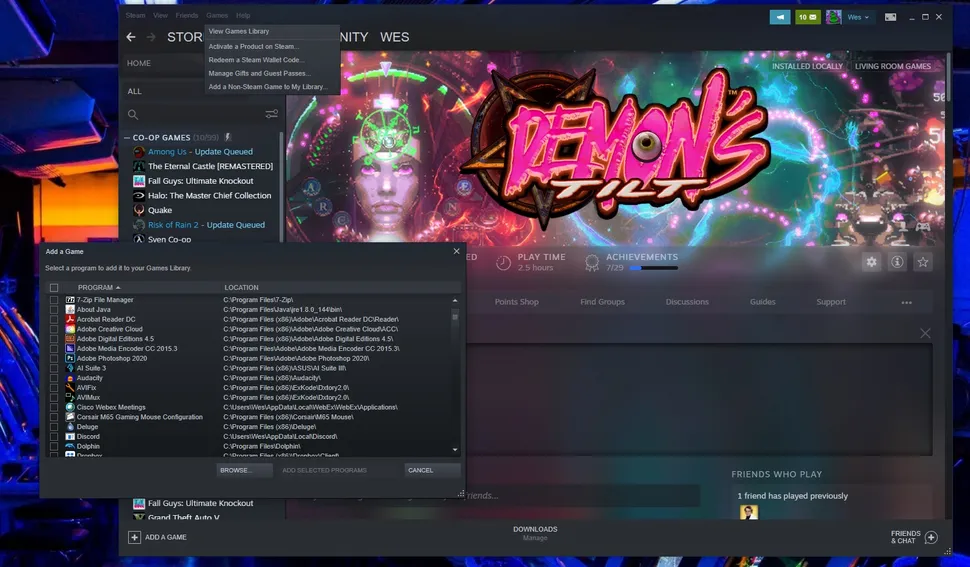
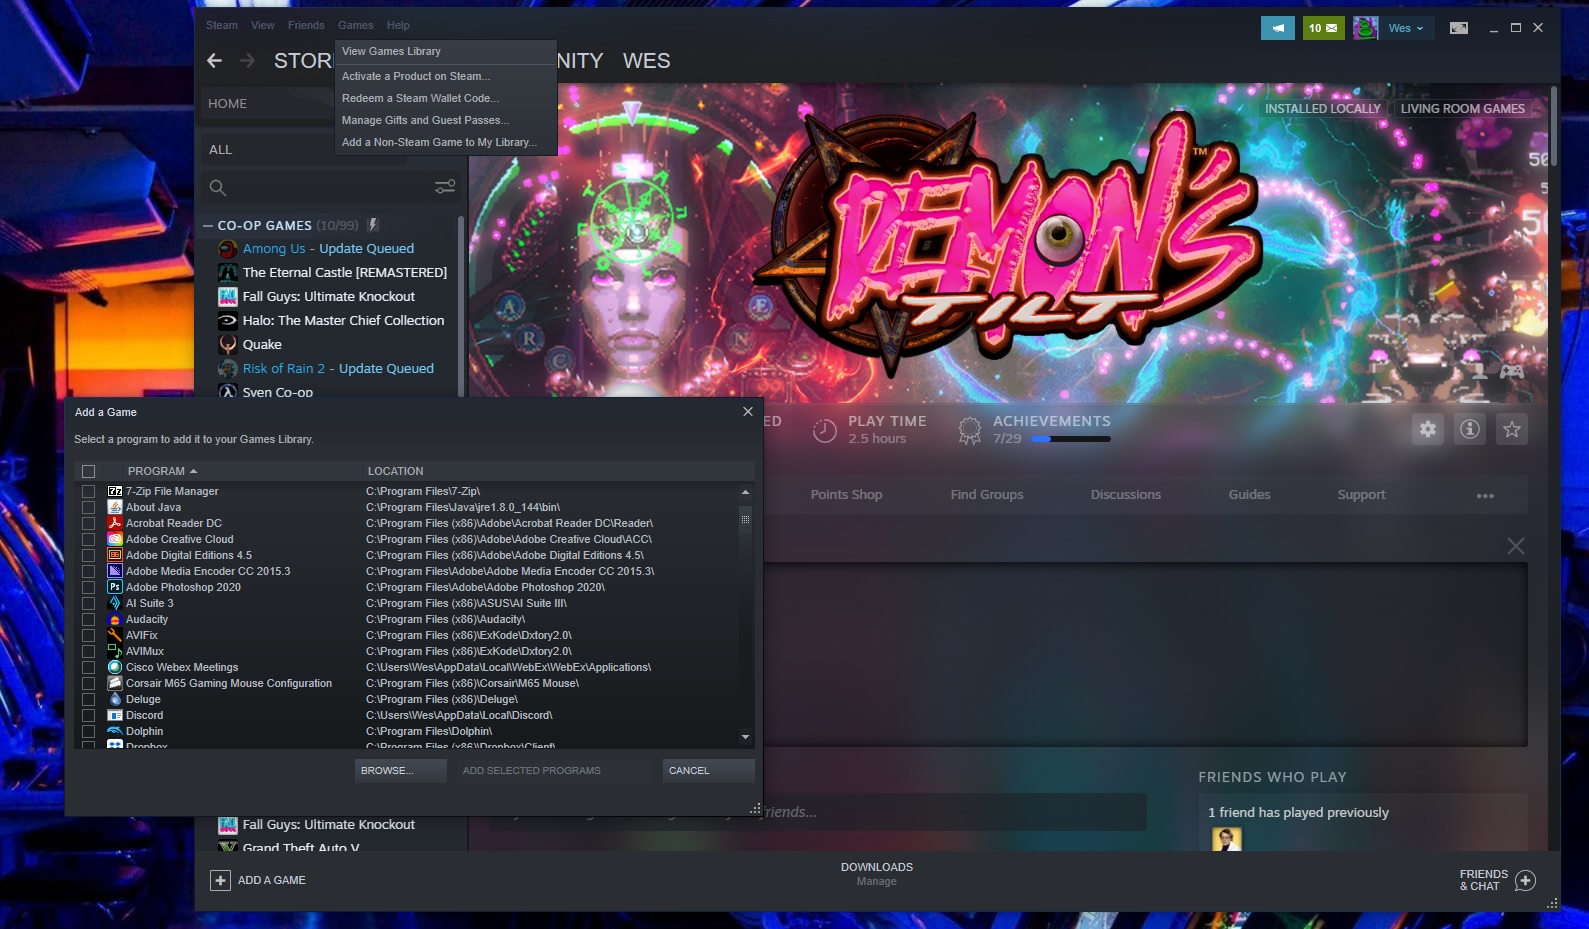
Самое простое решение для игр, отличных от Steam, — это вернуть Steam в игру. Steam имеет функцию «Добавить в библиотеку» для исполняемых файлов Windows, которая позволяет вам добавлять другие программы в вашу библиотеку Steam, а затем использовать оверлей Steam. Это работает даже для эмулятора Nintendo GameCube / Wii Dolphin!
Как вы можете видеть на изображении выше, щелкните меню «Игры» в Steam, затем выберите вариант «Добавить не-Steam игру в мою библиотеку …», чтобы открыть список программ на вашем ПК. В большинстве случаев это должно позволить вам добавить игру и использовать контроллер со Steam в качестве посредника. Ура!
BLUETOOTH
Как настроить геймпад Nintendo Switch Pro работать через Bluetooth на ПК
Вот что вам нужно для начала:
Аппаратное обеспечение
- Контроллер Nintendo Switch Pro
- Адаптер Bluetooth (опционально)
- Беспроводной адаптер Bluetooth 8Bitdo (опционально)
Программного обеспечения
- x360ce (если вы не используете ключ 8Bitdo)
Адаптер 8Bitdo: простая поддержка Bluetooth и XInput
Адаптер $ 20 8Bitdo Bluetooth поможет вам обойти большую часть привередливой установки ниже путем обработки соединения Bluetooth и делают играть хорошо для Windows с контроллером без какого — либо программного обеспечения любительском. Это заставит Windows видеть контроллер, как геймпад Xbox, и поддерживает ввод кнопок / джойстика и управление движением (но не вибрацию). В качестве бонуса это будет работать на нескольких консолях, а также с множеством других контроллеров, включая Switch Joy Cons, контроллер PS4, пульты Wii и многое другое.
Если вы не хотите тратить 20 долларов, следуйте приведенному ниже руководству.
Сложный путь: руководство по установке Windows
Вам нужно выполнить эти шаги, только если вы не используете Switch Pro Controller через Steam.
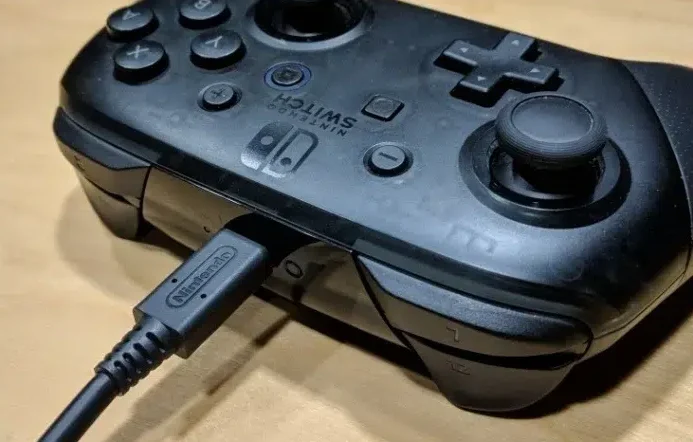
1. Подключите контроллер Switch Pro к ПК с помощью кабеля USB. У вас должна быть возможность использовать кабель USB-A — USB-C, поставляемый с контроллером, или вы можете использовать кабель USB-C — USB-C, если на вашем компьютере есть соответствующий порт. Через несколько секунд должна появиться Windows 10 с новым подключенным устройством: Pro Controller.
Вы почти там! Но поскольку это контроллер DirectInput (как и большинство геймпадов, кроме Xbox), если вы не используете встроенный интерфейс контроллера Steam, некоторые игры не распознают контроллер без дополнительного программного обеспечения.
2. Загрузите 32-разрядную и 64-разрядную версии x360ce и сохраните их файлы .zip в новой папке. Я использую 64-битную систему, и вы, вероятно, тоже, но для некоторых игр требуется 32-битная версия, поэтому загрузите их обе сейчас, чтобы сэкономить время позже. К счастью, x360ce сообщит вам, какая версия вам нужна.

3. Вам необходимо устанавливать x360ce индивидуально для каждой новой игры, и этот процесс может незначительно отличаться в зависимости от игры. К счастью, первый шаг всегда один и тот же: найдите исполняемый файл (или приложение) вашей игры. Вы найдете его в локальных файлах игры — иногда он закопан в папку, иногда прямо перед ним.
4. Найдя нужную папку, скопируйте и вставьте в нее ZIP-файл x360ce. Теперь извлеките его содержимое. Это даст вам файл приложения с маленьким значком контроллера. Открой это. Если вам нужна 32-разрядная версия x360ce, в этот раз появится подсказка. В противном случае вы получите сообщение о том, что вам нужно создать файл .dll. Щелкните «Создать».

5. После того, как вы создадите базовый файл .dll, в другом окне будет предложено выполнить поиск настроек контроллера. Щелкните Автоматический поиск параметров и убедитесь, что установлен флажок Искать в Интернете. Это приведет к раскладке кнопок для вашего контроллера Switch Pro, и, к счастью для нас, раскладка по умолчанию идеально подходит для большинства игр. Щелкните Далее, а затем Готово.
6. Проверьте кнопки и аналоговые джойстики на вашем контроллере. Если все пойдет по плану, они должны выровняться с виртуальным контроллером Xbox 360, отображаемым в x360ce. Если все в порядке, нажмите «Сохранить» и закройте x360ce. Он включится в фоновом режиме, как только вы начнете игру. Если ваш контроллер по-прежнему не регистрируется, попробуйте удалить .dll по умолчанию из локальных файлов вашей игры (steam_api.dll), но не забудьте сначала сохранить копию.
7. Вы должны повторять эти шаги для каждой игры, в которую хотите играть с контроллером Switch Pro. Итак, повторим: найдите локальные файлы, вставьте .zip x360ce, распакуйте и запустите, создайте и сохраните профиль, затем сохраните и закройте x360ce перед открытием игры.
Использование контроллера Switch Pro
x360ce работает, считывая команды DirectInput как команды XInput, что и поддерживают большинство современных игр. Теперь, когда он установлен, ваш контроллер Switch Pro должен вести себя как контроллер Xbox 360 в большинстве игр. Однако некоторые игры не будут работать с геймпадами DirectInput. Например, в Ведьмак 3 нельзя играть с помощью этого метода с помощью контроллера Switch Pro. Если повезет, в ближайшие месяцы какой-нибудь гений найдет обходной путь.
По сравнению с другими контроллерами, мне приходилось чаще переназначать свои внутриигровые кнопки при использовании контроллера Switch Pro. Мой макет x360ce был правильным, но игра не регистрировала его правильно. Однако после переназначения элементов управления геймпада во внутриигровых настройках он отлично работал для каждой игры, которую я пробовал.
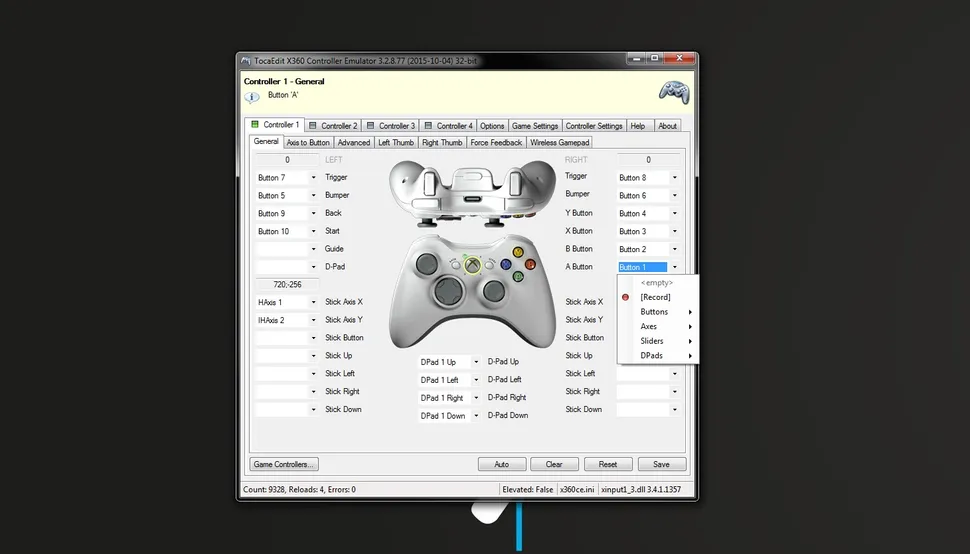
Вам не нужно переназначать какие-либо кнопки в x360ce, но если вам это нужно или вы хотите, просто щелкните раскрывающееся меню на кнопке, которую вы хотите переназначить, нажмите «Запись» и нажмите нужную кнопку на вашем контроллере. Обязательно сохраните свой профиль после внесения любых изменений.
Трудный путь: настройка Bluetooth в Windows
Вам нужно выполнить эти шаги только в том случае, если вы хотите играть по беспроводной сети и решили не покупать адаптер 8Bitdo для подключения по Bluetooth.
Обратите внимание, что если вы решите подключиться через Bluetooth, без использования описанного выше метода адаптера 8Bitdo, вы не сможете зарядить контроллер, пока он подключен, поэтому перед началом убедитесь, что его батарея полностью заряжена.
Сначала отсоедините его от коммутатора, удерживая маленькую круглую кнопку в верхней части контроллера слева от порта USB-C. (Если ваш коммутатор находится в той же комнате, что и ваш компьютер, я рекомендую выключить его, просто чтобы сохранить среду Bluetooth в чистоте. Мы также не хотим, чтобы он знал, что мы на два раза меньше. Вы можете легко повторно подключить свой Pro к коммутатору через кабель.)
Поднимите настройки Bluetooth и начните поиск новых устройств, затем нажмите ту же маленькую кнопку в верхней части контроллера еще раз. Он должен автоматически подключиться через 30 секунд до минуты. Примечание: индикаторы в нижней части контроллера будут продолжать мигать даже после сопряжения.
С этого момента следуйте инструкциям выше, чтобы использовать x360ce с вашим контроллером. Возможно, вам придется повторно сопрягать контроллер каждый раз в зависимости от того, какой Bluetooth-ключ вы используете, и ваших настроек Bluetooth.
WiinUPro и WiinUSoft также являются давними фаворитами для использования Bluetooth для воспроизведения контроллеров Nintendo на ПК, и они также добавили поддержку контроллера Switch Pro. Однако, чтобы использовать контроллер Switch Pro с этими программами, вам нужно перепрыгнуть через еще несколько обручей Bluetooth. x360ce — более простая альтернатива, которую также можно использовать с другими геймпадами DirectInput. На данный момент мы считаем, что это лучший способ использовать контроллер Switch Pro на ПК, кроме как через Steam.
Не нужен контролер? Вот обзор лучших игровых клавиатур и лучших игровых мышей.
Nintendo Switch Pro – это продвинутый контроллер, который отлично подходит для игр. Он достаточно надёжен, прекрасно лежит в руке, имеет хорошую чувствительность и виброотдачу. Но что делать, если вы хотите подключить такой контроллер к своему компьютеру?
В этой статье мы наглядно рассмотрим несколько способов подключения Switch Pro при помощи прямого подключения по кабелю, беспроводного адаптера и сторонних программ, вроде XInput или Betterjoy. К счастью, в последнее время подключать геймпады стало куда проще, чем раньше, и даже сама компания Valve внедрила поддержку в своём приложении Steam.
Используем проводное подключение
Это самый простой и тривиальный способ для подключения Switch Pro на ПК. Для этого потребуется лишь проводной кабель USB-A на USB-C, или USB-C на USB-C, если на вашем компьютере есть соответствующий разъём.
- Подключаем кабель к контроллеру Switch Pro.

- Подключаем другой конец к компьютеру.
На этом подключение заканчивается. Windows 10 и Windows 11 автоматически распознает новое устройство и применит все необходимые настройки. Однако для того, чтобы геймпад корректно работал в играх, его необходимо будет настроить в Steam Big Picture.
Подключение контроллера беспроводным способом
Для беспроводного подключения вам потребоваться адаптер Bluetooth или встроенный Bluetooth, если это позволяет ваша материнская плата.
- Зарядите Pro контроллер на несколько процентов, чтобы этого было достаточно для подключения к компьютеру.
- Удерживайте кнопку синхронизации на контроллере в течение нескольких секунд, пока не начнёт мигать индикатор.
- Включаем Bluetooth на компьютере.
- Откройте системный трей (рядом с системными часами) и щёлкните правой кнопкой мыши на иконке Bluetooth. Это также можно сделать через параметры системы.
- Нажимаем “Добавить устройство”.
- Выбираем первый пункт “Bluetooth”.
- В списке доступных устройств должен появиться “Pro Controller”. Выбираем его.
После этих действий ваш контроллер будет подключён к компьютеру. Теперь можно приступать к настройке в Steam.
Настройка Steam Big Picture
Чтобы убедиться в том, что всё работает как надо, необходимо зайти в Steam в режиме Big Picture.
- Переходим в настройки Big Picture
- В левой части экрана выбираем категорию “Контроллер”.
- В настройке внешнего контроллера находим пункт “Включить систему ввода Steam для контроллеров Switch Pro” и переключаем ползунок.
Если Pro контроллер уже подключён к компьютеру, Steam может автоматически распознать новое устройство, и вы сможете начать использование Big Picture при помощи геймпада.
Также в Steam можно изменить раскладку кнопок для контроллера. В зависимости от ваших предпочтений, кнопки A/B/X/Y можно оставить как есть или изменить их как на Xbox. Эти настройки можно задать для каждой отдельной игры, а также включить вибрацию и откалибровать стики.
При использовании Pro контроллера через Steam, он работает обычный геймпад для любых игр. Запустив любую игру из режима Big Picture, вы сможете открыть оверлей с настройками контроллера Pro Controller. Если игра не поддерживает полностью управление с геймпада, вы можете переназначить некоторые клавиши или включить совместимость с Xbox контроллерами.
Использование Bluetooth адаптера
Если на вашем компьютере отсутствует встроенная возможность подключения по Bluetooth, то для таких целей подойдёт внешний Bluetooth адаптер. Он стоит небольших денег и позволяет легко подключать к компьютеру новые устройства, например, Switch Pro Controller, джойконы Switch Joy-Cons, или даже контроллер от Wii U. Принцип настройки подключения ничем не отличается от того, что было описано выше – достаточно подключить адаптер по USB и найти с его помощью наш Switch Pro Controller.
Программа Direct XInput Wrapper
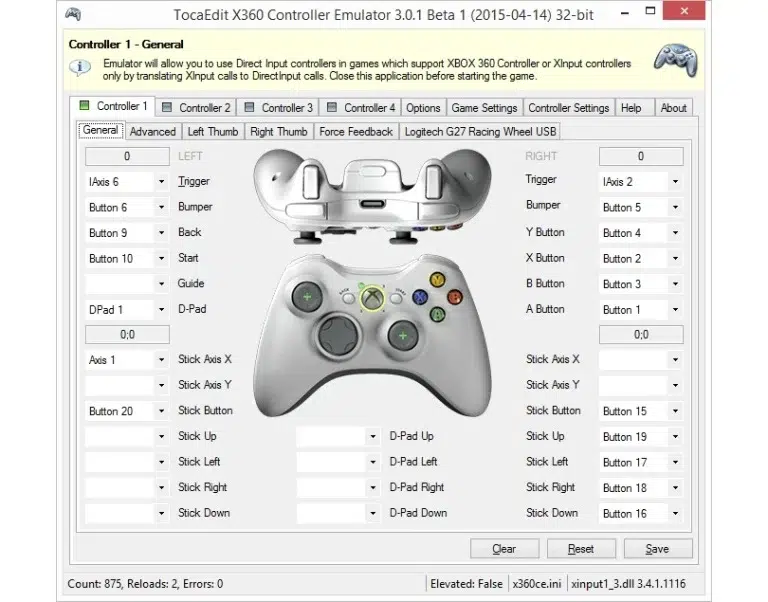
Direct XInput Wrapper – это программа эмуляции, которая преобразует ввод одного контроллера в другой, чтобы Windows успешно распознавала различные игровые устройства без использования адаптера или Steam Big Picture. Программа с открытым исходным кодом позволяет эмулировать геймпад Xbox 360, и поддерживает Switch Pro Controller, включая Joy-Cons.
Подобные программы помогают гибко настраивать контроллер в Windows, но в них придётся немного повозиться, чтобы настроить управление так, как вам нужно.
Можно ли подключить джойконы
Джой-коны прекрасно проявляют себя на Nintendo Switch, но их использование на ПК может быть нецелесообразным. Однако хорошая новость заключается в том, что Joy-Con можно подключить как обычный контроллер при помощи того же Bluetooth адаптера, как и Switch Pro Controller. Однако Windows будет воспринимать каждый джой-кон по отдельности (как отдельные контроллеры). Для того чтобы заставить работать их в паре на компьютере, может потребоваться программа эмуляции Betterjoy, которая предназначена именно для работы с контроллерами от Nintendo.

Денис Быковский
Профессиональный лингвист-переводчик. Пишу информационные статьи о свежих событиях в видеоиграх, IT-технологиях, и программировании.
The Nintendo Switch Pro Controller is one of the priciest «baseline» controllers in the current console generation, but it’s sturdy, feels good in hand, has an excellent directional pad, and features impressive motion sensors and vibration tech. On top of that, the gamepad uses Bluetooth, so you don’t need an adapter to connect it with your PC.
The Pro Controller appears to Windows as a DirectInput controller rather than an XInput controller like the Xbox Series X/S gamepad (or the fancier Xbox Elite Core Controller), so it can be a bit of a chore to get it working with your PC games. Fortunately, Valve added full Switch Pro Controller support to Steam, so that probably covers a good chunk of your game library. Non-Steam games require additional steps that we’ll walk you through.
Of course, you can’t use your Switch Pro Controller with your PC until you first connect it to your PC. You have two options: wired and wireless. Wired is simplest, but wireless is, well, wireless. And it requires a bit of work.
(Credit: Will Greenwald)
Connect Your Switch Pro Controller to PC With a Wired Connection
-
Plug your Pro Controller cable (or any USB-A-to-USB-C data cable, or USB-C-to-USB-C data cable if your PC has a USB-C port) into the controller.
-
Plug the other end of the cable into your PC.
That’s it! The controller will be detected by Windows 10 as «Pro Controller.» You can move on to Steam setup steps below.
(Credit: Microsoft)
Connect Your Switch Pro Controller to PC With a Wireless Connection
You need a Bluetooth adapter or onboard Bluetooth for this, but it’s also easy.
-
With the Pro Controller charged, press and hold the Sync button on the top of the gamepad for a few seconds until the indicator lights start flashing.
-
Open the system tray and right-click the Bluetooth icon.
-
Click «Add Bluetooth Device.»
-
Click «Add Bluetooth or other device.»
-
Click «Bluetooth» (because Windows needs to be reassured that you really want to use Bluetooth).
-
The Pro Controller should show up on the list of available devices (if it doesn’t, make sure the indicator lights are still flashing back and forth). Click it, and pair the controller.
-
Now you can move on to Steam setup.
(Credit: Valve)
Steam Setup
To make sure everything works as it should between the Pro Controller and your PC game, you should use Steam’s Big Picture mode, the couch-friendly lean-back menu system that works well with a gamepad.
-
If Steam doesn’t open automatically into Big Picture when you connect the Pro Controller, open Steam and enter the Settings menu.
-
Click General Controller Settings, which opens a full-screen, Big Picture window.
-
Click «Switch Pro Configuration Support.»
If the Pro Controller is connected, the mouse cursor should disappear and you should be able to navigate Big Picture with the gamepad. You can toggle «Use Nintendo Button Layout» depending on whether you prefer the A/B/X/Y buttons to be mapped as they are on the Pro Controller (clockwise X, A, B, Y from the top), or as they’re mapped on an Xbox controller (clockwise Y, B, A, X from the top).
When set up through Steam, the Pro Controller should work like an Xbox gamepad with any Steam game. You can toggle vibration on and off by clicking the controller under «Detected Controllers» in the same setup screen as before. If the analog sticks seem off, you can manually calibrate them by clicking Calibrate. You can also set how long the controller stays connected before disconnecting, so that it goes to sleep.
(Credit: Valve)
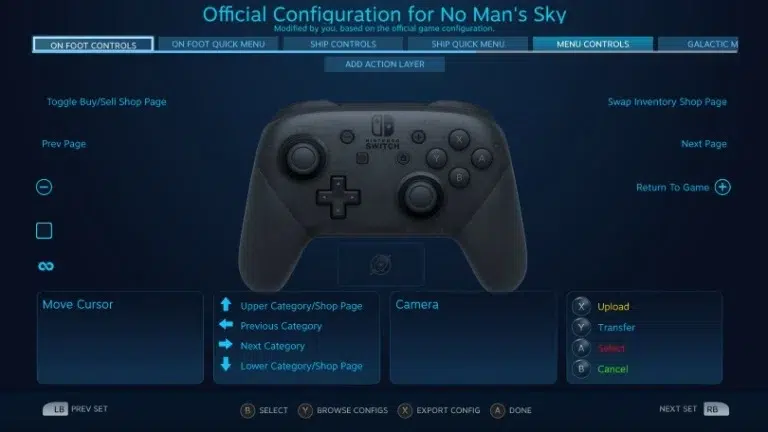
Using Big Picture ensures that Steam’s controller support and over-the-game remapping and configuration options appear as they should, which won’t likely be the case if you open a game from the desktop. This happened when we played No Man’s Sky; the controller worked with the game through Big Picture, but the mapping was strange when launched through the desktop.
With the game running through Big Picture mode, you should enter the Pro Controller’s controller options to bring up Steam’s Switch Pro Controller overlay. It lets you check the controller mappings for different situations and fix them when needed. You can manually map each input on the Pro Controller to any keystroke or gamepad input, but the default configuration should work for most games. This is helpful if any controls seem slightly off with the default settings; running in No Man’s Sky by clicking the right stick was finicky without manual corrections.
(Credit: 8Bitdo)
Hardware Alternative: 8BitDo Wireless USB Adapter
Steam’s Pro Controller support is welcome, but you’re out of luck if you want to play non-Steam games with the controller because of how Windows detects it. You can fix this in one of two ways: using a hardware Bluetooth adapter specifically designed for multiple gamepad types, or using a software-based, XInput wrapper.
The 8BitDo Wireless USB Adapter is a $20 Bluetooth adapter that lets you easily connect the Switch Pro Controller, Switch Joy-Cons, or even the Wii U Pro Controller to your PC. The adapter handles all of the XInput details, so connecting the Switch Pro Controller to it with the physical sync button instead of through your PC’s Bluetooth menu makes it work like a PC-friendly Xbox gamepad.
(Credit: x360ce)
Software Alternative: DirectInput-to-XInput Wrapper
This is the most powerful and most complicated option. Instead of relying on Steam or a USB adapter to do the job, you use a software wrapper to translate the Pro Controller’s inputs into a format that Windows 10 can better work with.
Recommended by Our Editors
X360ce is an open-source program that lets you control how Windows sees your non-XInput controller. It’s a robust wrapper that emulates an Xbox 360 gamepad by mapping nearly any other input to the gamepad’s inputs. The project is effectively complete and/or dead at this point; x360ce was last updated in 2020, but the program will work just fine even without ongoing development.
Betterjoy is another program for getting the Switch Pro Controller, as well as Joy-Cons, working as XInput devices. Its most recent release is from 2021.
Software wrappers should get the job done if you’re willing to install and tinker with them a bit until the Switch Pro Controller works the way you want it to. It may take more than a bit of work; third-party driver wrappers are extremely finicky.
(Credit: Will Greenwald)
What About Joy-Cons?
Joy-Cons are incredibly powerful and flexible on the Switch, but they’re awkward on the PC. The good news is that you can connect Joy-Cons to your PC just by pairing them over Bluetooth like the Switch Pro Controller. The bad news is that each Joy-Con will register as its own controller, and getting two Joy-Cons to work together as one gamepad can be difficult. Betterjoy, mentioned above, can help streamline that process.
 Why You Should Game on a PC
How to Connect Other Game Controllers
For more, see our guide on how to choose the right controller for your PC. If you have a PS4, PS5, or Xbox controller that you want to connect to PC, we have instructions for those gamepads, too.
Like What You’re Reading?
Sign up for Tips & Tricks newsletter for expert advice to get the most out of your technology.
This newsletter may contain advertising, deals, or affiliate links. Subscribing to a newsletter indicates your consent to our Terms of Use and Privacy Policy. You may unsubscribe from the newsletters at any time.
Nintendo didn’t build the Switch Pro controller to connect to PC, but guess what: it’s such a nice controller, we’re using it anyway.
Nintendo’s perfectly hefty controller has killer battery life and a layout that feels subtly different from the similar Xbox gamepad; it’s a great pick for playing console ports and action games on PC, once you get it set up. And it’s so much better than those joycons, am I right?
There are a few ways to go about connecting the Switch Pro controller to PC, but using Steam is my go-to recommendation because it takes away all the fuss of setup. Nintendo didn’t make the Switch Pro controller PC compatible itself, but Valve did—thanks, Valve! If you mainly want a controller to play Steam games, using the Switch Pro Controller is practically as plug-and-play as an Xbox pad. But if you want to play non-Steam games, you’ll need the rest of this guide.
Here’s how to get your Nintendo Switch Pro controller working in Steam or for other Windows games, both over wired USB and Bluetooth. To start, you’ll need a Nintendo Switch Pro controller (obviously) and a USB-C cable.
Switch Pro controller to PC: Steam setup
How to use the Switch Pro Controller in Steam
Steam’s built-in controller configurator recognizes Nintendo’s controller as soon as you plug it in, which makes using the controller super easy in Steam games. Enabling it is extremely simple. Start by… plugging the controller into your PC.
1. Open Steam and the settings menu. Find the Controller tab and open «General Controller Settings.» You should see a few configuration support options on the left. Toggle on «Switch Configuration Support.»

2. If you like your Pro controller with flip-flopped X/Y and A/B buttons, you can also enable the Nintendo button layout so games default to it (Microsoft had to go and reverse them on its controller, for some reason, and it’s still confusing). If this option is not enabled, your Pro controller will be treated like an Xbox controller.
You can also change your controls game-by-game by right-clicking that game in your library, selecting Edit Steam Controller Configuration, and remapping each button.

3. While you’re here, take the time to personalize your Switch controller by selecting it under Detected Controllers. If your controller isn’t registering properly, start by clicking Identify, then open the controller’s preferences. You can change the name, the brightness of the home button’s light ring, and whether to use the gyro motion sensor.

4. From the controller settings page, you can also calibrate your controller’s gyro sensor and joysticks by clicking Calibrate, but you should only calibrate your controller if you run into latency issues. If it ain’t broke, don’t fix it. If you ever feel the need to calibrate your controller, click Calibrate, set it on a flat surface, and follow the button prompts.
So, if everything feels right, just save your profile and voila, you’re ready to go. Whenever you want to use your controller, be sure to plug it in before opening Steam or any Steam games to prevent any connection issues.
Switch Pro controller to PC: Non-Steam games
Setting up the Switch Pro Controller for non-Steam games
Using Steam is the really easy way to get this controller working. If you aren’t playing games via Steam, using a Switch Pro controller is still an option but it requires a little extra work, particularly for a Bluetooth connection. But the good news is that it’s now natively recognized in Windows, which helps speed things up.
The easiest solution for non-Steam games is to actually bring Steam back into the picture. Steam has an «Add to library» feature for Windows executables that allows you to add other programs to your Steam library, and then make use of the Steam overlay. This even works for the Nintendo GameCube/Wii emulator Dolphin!
As you can see in the image above, click the «Games» menu in Steam, then choose the «Add a Non-Steam game to my library…» option to pull up a list of programs on your PC. In most cases, this should allow you to add a game and use a controller with Steam as an intermediary. Hooray!
Switch Pro controller to PC: Bluetooth connectivity
How to get Bluetooth working on PC
Here’s what you need to start:
Hardware
- Nintendo Switch Pro controller
- Bluetooth dongle (or built-in Bluetooth)
- 8Bitdo wireless Bluetooth adapter (optional)
Software
- BetterJoy (if you don’t use the 8Bitdo dongle)

8Bitdo adapter: Easy Bluetooth and XInput support
The $20 8Bitdo Bluetooth adapter helps you bypass most of the finicky setup below by handling the Bluetooth connection and making Windows play nice with the controller without any extra software. It’ll make Windows see the controller like it would an Xbox gamepad, and supports the button/joystick inputs and motion controls (but not vibration). As a bonus, this will work on multiple consoles and with tons of other controllers, too, including the Switch Joy Cons, PS4 controller, Wii remotes, and more.
If you don’t want to spend the $20, follow the guide below.
The (slightly) harder way: Windows installation guide
Note: You only need to follow these steps if you’re not using the Switch Pro Controller through Steam.
1. Plug your Switch Pro controller into the PC with a USB cable. You should be able to use the USB-A to USB-C cable that came with the controller, or you can use a USB-C to USB-C cable, if your PC has the appropriate port. Within a few seconds, Windows 10 should pop up with a new connected device: Pro Controller.
You’re most of the way there! But because this is a DirectInput controller (like most gamepads other than the Xbox’s), if you aren’t using Steam’s built-in controller interface, some games won’t recognize the controller without some extra software.
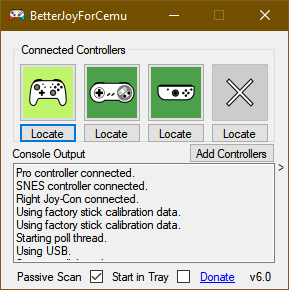
2. Download BetterJoy and install it.
BetterJoy is a piece of open source software specifically built to use the Switch Pro controller and joy-cons as generic XInput devices (and to make them easier to use with emulators).
Unzip BetterJoy, open the folder it created when you unzipped it, and head to the drivers folder within. Install its drivers and reboot as it instructs you to. That’s pretty much the install process. Now it’s time to connect that controller.
The (slightly) harder way: Windows Bluetooth setup
You only need to follow these steps if you want to play wirelessly and chose not to buy the 8Bitdo adapter for Bluetooth connectivity.
Note that if you decide to connect via Bluetooth, without using the 8Bitdo adapter method above, you cannot charge the controller while it’s connected, so make sure its battery is topped off before you start.
First, disconnect it from your Switch by holding the small circular button on the top of the controller to the left of the USB-C port. (If your Switch is in the same room as your PC, I recommend turning it off, just to keep your Bluetooth environment clear. We also don’t want it to know we’re two-timin’ it. You can easily reconnect your Pro controller to your Switch via cable.)
Pull up your Windows Bluetooth settings and start a search for new devices, then press the same small button on the top of your controller one more time. It should automatically pair after 30 seconds to a minute.
Using your Switch Pro controller in PC games
BetterJoy works by reading DirectInput commands as XInput commands, which is what most modern games support. Now that it’s installed, your Switch Pro controller should behave like an Xbox 360 controller in most games. But first you have to launch BetterJoy for Cemu (the name of the executable) from its install folder.
Once it’s open, click the «Locate» button and it should find your Switch controller if it’s paired via Bluetooth. Once connected, you can click Map buttons to change as desired.
And with that you’re ready to game: your controller should show up and work in any game that an Xbox controller would.
Not a controller person? Here’s a round-up of the best gaming keyboards, and best gaming mouse.
Sign up to get the best content of the week, and great gaming deals, as picked by the editors.
![]()
Download Article
All the different ways to connect a Nintendo Switch Pro controller to a PC
![]()
Download Article
- Connecting the Controller to a PC
- Using Steam
- Using the 8Bitdo Adapter
- Using Betterjoy
|
|
|
The Nintendo Switch Pro controller is one of the best controllers on the market. It’s sturdy, has great battery life, and feels great. Unfortunately, it wasn’t designed to work with your PC right out of the box. But that doesn’t mean you can’t use it with your PC! There are a few ways you can connect your Nintendo Switch Pro controller to a PC using Steam, a wireless adapter, or third-party software. This wikiHow article teaches you simple ways to connect your Nintendo Switch Pro controller to any PC.
Things You Should Know
- You can connect the Nintendo Switch Pro controller to your PC using a wired connection or Bluetooth.
- Open Steam and go into Settings. Click «Controller» and enable Steam input for the Switch Pro controller to play Steam games with the Switch Pro controller.
- You can also use an 8Bitdo wireless adapter or free software called Betterjoy to enable Windows support for the Switch Pro controller.
-

1
Use a wired connection. The easiest way to connect a Nintendo Switch Pro controller to a PC is to use a wired connection. To do this, you just need to connect the charging cable that came with the controller (or any USB-C cable) to the top of the controller, and then connect the other end to any free USB port on your PC.
-
2
Use a Bluetooth connection. One of the biggest advantages of using a Switch Pro controller is that it uses Bluetooth. This means you don’t need an adapter to connect your Nintendo Switch controllers to a PC. However, you will still need to use Steam or other software to get it to work with your PC games. Use the following steps to connect your Switch Pro controller to your PC using Bluetooth:[1]
- Make sure the controller is fully charged.
- Press and hold the sync button on the top of the controller until the LEDs start flashing.
- Click the Windows Start menu.
- Click the Settings/Gear icon.
- Click Bluetooth & Devices.
- Make sure Bluetooth is turned on.
- Click Add device.
- Click Bluetooth.
- Click Pro Controller.
- Click Done.


Advertisement
-
1
Open Steam. Click the Steam icon, which resembles a blue circle with a white piston. Steam has built-in support for the Nintendo Switch Pro controller. This makes it easy to play Steam games with the Nintendo Switch Pro controller. To play non-Steam games, you will need to add them to Steam or use third-party software or an adapter.
- If you don’t have Steam installed, you can download and install Steam at https://store.steampowered.com/.
-
2
Open the Settings menu. To do so, click Steam in the menu bar at the top. Then click Settings.
-
3
Click Controller. It’s in the menu bar to the left. This displays options for controllers.
-
4
Install Xbox Extended Feature Support driver. This adds some extended controller features to Steam. To install the Extended Feature Support driver, click Install next to «Xbox Extended Feature Support.»
-
5
Click the toggle switch next to «Enable Steam Input for Switch Pro controller.» It’s one of the options below «Extended Gamepad Settings.»
-
6
Enable or disable Switch Pro Controller features. If the Nintendo Switch Pro controller is connected to your PC via a wired connection or Bluetooth, connections, you should see three options you can toggle on and off at the top of the menu. They are as follows:
- Game rumble: This option toggles the controller’s vibration on or off.
- Steam haptics: This allows you to use the rotation and motion sensing features in games that support it.
- Use Nintendo Button Layout: This will switch the A and B buttons with the X and the Y buttons so that the button layout feels more like the traditional Nintendo button layout rather than the Xbox button layout. This doesn’t work in all games.
-
7
Add non-Steam games to Steam. Games that you launch through Steam generally support the Nintendo Switch Pro controller. However, non-Steam games may not work as well if they are not launched through Steam. Luckily, you can add non-Steam games to your Steam library. Use the following steps to do so:
- Open Steam.
- Click Add a Game in the lower-left corner.
- Click Add a Non-Steam Game.
- Click the checkbox next to the game you want to add. Alternatively, you can click Browse and select the executable file for the game you want to add.
- Click Add Selected Programs.


Advertisement
-
1
Purchase an 8Bitdo Wireless adapter. The Wireless 8Bitdo adapter costs just under $20 and allows you to connect your Nintendo Wireless Pro controller (and other game console controllers) to your PC and other game consoles. It supports a variety of inputs, including XInput, which Windows uses to allow applications to receive input from an Xbox controller.<ref.https://learn.microsoft.com/en-us/windows/win32/xinput/getting-started-with-xinput</ref> Basically, it tricks Windows into thinking your Switch Pro controller is an Xbox controller. No additional software is needed.
-
2
Connect the 8Bitdo adapter to your Windows PC. You can plug it into any free USB port on your PC.
-
3
Press and hold the pair button on the wireless adapter. It’s on the top of the wireless adapter. An LED light will start blinking, indicating it is in pairing mode.
-
4
Press and hold the Sync button on the Switch Pro controller. It’s on the top of the Switch Pro controller. This puts the Switch Pro controller in pairing mode. The LED light will become solid when the adapter pairs with the Switch Pro controller.
-
5
Press any button. When the Switch Pro controller connects with the 8Bitdo adapter, press any button on the Nintendo Switch Pro controller to auto-connect with the adapter. You can now play any game on Windows with the Nintendo Switch Pro controller.


Advertisement
-
1
Download and install Betterjoy. Betterjoy is a free and open-source program that maps the Nintendo Switch Pro (and Joy-Con) controller to XInput, which Windows uses to support the Xbox controller on Windows. It basically tricks your PC into thinking the Nintendo Switch Pro controller is an Xbox controller. Use the following steps to download and install Betterjoy:
- Go to https://github.com/Davidobot/BetterJoy/releases/ in a web browser.
- Click the zip file for the latest version.
- Extract the contents of the zip file in your Downloads folder.
- Open the Drivers folder.
- Double-click the «ViGEmBusSetup» MSI file to install the drivers. Run the «x64» version for 64-bit versions of Windows and «x86» for 32-bit versions of Windows.
- Restart your computer.
- Go back into the Betterjoy folder.
- Right-click the «BetterJoyforCemu.exe» file and click Run as administrator.
-
2
Connect the Nintendo Switch Pro controller. You can connect it using a wired connection or using Bluetooth.
-
3
Open Betterjoy. If it’s not already open, open the «BetterJoyforCemu.exe» file in the Betterjoy folder. This will display the Betterjoy program. The Nintendo Switch Pro controller should be displayed in the first box in the upper-right corner. You can now play Windows games with your Nintendo Switch Pro controller.
- If you want to change the button mapping, click Map Buttons and reassign the button configuration to your liking.[2]
- If you want to change the button mapping, click Map Buttons and reassign the button configuration to your liking.[2]


Advertisement
Ask a Question
200 characters left
Include your email address to get a message when this question is answered.
Submit
Advertisement
Thanks for submitting a tip for review!
References
About This Article
Thanks to all authors for creating a page that has been read 1,364 times.
Did this article help you?
Get all the best how-tos!
Sign up for wikiHow’s weekly email newsletter
Subscribe
You’re all set!
—
—