Технология NIC Teaming (или Load Balancing/Failover – LBFO, или NIC bonding) позволяет объединить несколько физических сетевых адаптеров (NIC) в одну логическую сетевую карту. В этой статье мы рассмотрим, как настроить NIC Teaming в Windows Server 2019/2016/2012R2 и в десктопых версиях Windows 10 и 11.
Содержание:
- Настройка NIC Teaming в Windows Server 2019
- Используем PowerShell для настройки NIC Teaming в Windows Server
- Создаем группу сетевых адаптеров NIC Teaming в Windows 10 и 11
Для чего может понадобится объединять сетевые адаптеры в группу NIC Teaming?
- Увеличение пропускной способности. Например, объединив две сетевые 1 Гб сетевые карты в одну группу NIC Teaming, вы получите общую полосу пропускания на логическом адаптере 2 Гбит/с;
- Управление балансировкой нагрузки на сетевые карты – можно управлять распределением трафика между NIC сервера;
- Отказоустойчивость – при выходе из строя любой из сетевых карт, добавленных в группу NIC teaming, остальные подхватывают ее функции, и связь с сервером не прерывается. Для критически важных серверов этот механизм может защитить от простоя сервиса во время выхода из строя сетевого коммутатора или Ethernet порта на нем, сетевого кабеля (которым ваш хост подключен к коммутатору). Для реализации такой возможности, достаточно подключить сетевые карты в разные физические коммутаторы.
В Windows Server 2012R2/2016/2019/2022 технология NIC Teaming не совместима с Single-root I/O virtualization (SR-IOV), TCP Chimney и Remote Direct Memory Access (RDMA).
Настройка NIC Teaming в Windows Server 2019
Вы можете настроить NIC Teaming в Windows Server начиная с версии 2012. Рассмотрим, как объединить несколько сетевых адаптеров в Windows Server 2019 в одну группу NIC Teaming. Режим NIC Teaming по умолчанию отключен в Windows Server.
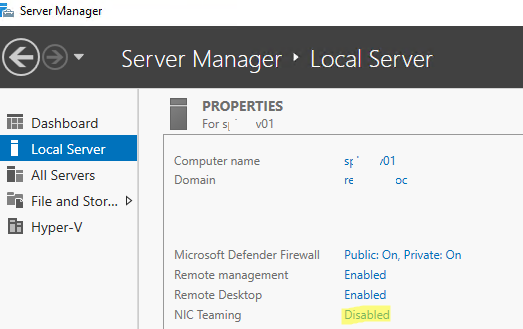
Чтобы включить его, откройте консоль Server Manager, выберите локальный сервер (Local Server) и в его свойствах выберите пункт “NIC Teaming: Disabled“.
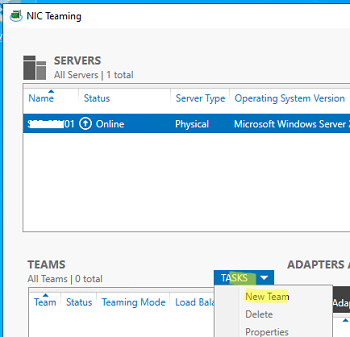
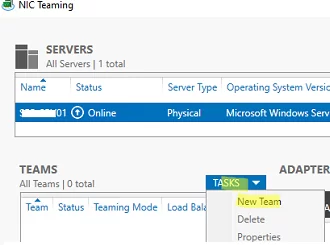
В появившемся окне в левой нижней панели выберите пункт Tasks -> New Team (Создать группу).
Далее нужно указать имя группы (Team Name) и выбрать сетевые адаптеры, которые будут входить в эту группу.
В Windows Server 2019 в одну NIC Teaming групп можно объединить до 32 физических сетевых адаптеров, главное, чтобы они работали на одной скорости.
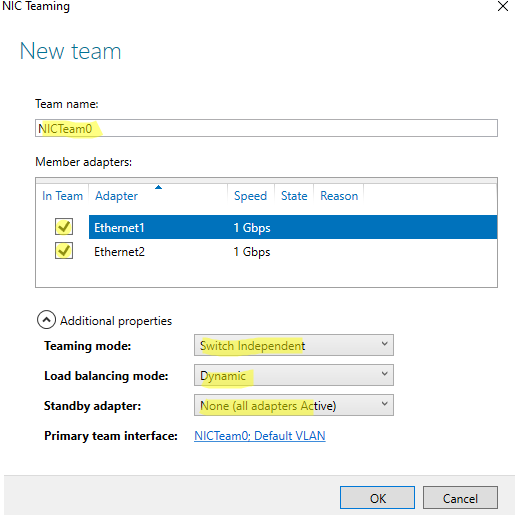
Ниже можно настроить специальные параметры группы. От данных параметров зависит правила и эффективность NIC Teaming. Рассмотрим эти настройки подробнее.
Режим поддержки групп (Teaming Mode). Данный параметр определяет способ взаимодействия группы с сетевым оборудованием (коммутатором)
- Static Teaming (IEEE 802.3ad)— статический режим работы с зависимостью от сетевого оборудования. Все адаптеры группы должны быть подключены к одному коммутатору, Ethernet порты которого настроены на использование статической агрегации каналов (требуется настройка на коммутаторе);
- Switch Independent (режим по-умолчанию) – группа работает независимо от коммутатора, для реализации не нужно дополнительно настраивать сетевое оборудование. В этом режиме разные сетевые адаптеры группы можно подключить к разным коммутаторам для повышения отказоустойчивости (защита от сбоев в коммутаторах);
- LACP (Link Aggregation Control Protocol, LACP, IEEE 802.1ax) – режим также зависит от сетевого оборудования. Нужно включить и настроить на коммутаторе динамическую агрегацию каналов по протоколу LACP.
Режим балансировки нагрузки (Load Balancing mode) – задает как распределяется сетевой трафик по NIC в группе.
- Address Hash — для каждого из адаптеров вычисляется специальный хэш (на основании MAC или IP-адресов отправителя и получателя) и привязывается определенному физическому адаптеру. Весь трафик от данного отправителя будет идти через этот NIC;
- Hyper-V Port — режим можно использовать для сервера с ролью Hyper-V. Позволяет привязать конкретный адаптер группу NIC teaming к конкретному порту на виртуальном коммутаторе Hyper-V;
- Dynamic – опция по умолчанию, совмещает оба типа балансировки нагрузки.
Один из адаптеров в группе можно назначить резервным (Standby adapter). В обычном режиме работы данная NIC не используется для передачи трафика. При неполадке на любом другом адаптере в группе NIC Teaming, он тут-же занимает его место. В общем случае и без данной функции при выходе из строя любой сетевой карты, не будет простоя сервиса, т.к. ее нагрузка автоматически распределится между оставшимися картами в группе.
Выберите нужные параметры, нажмите ОК и новая группа Nic Teaming будет создана.
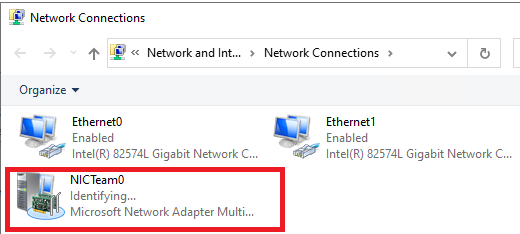
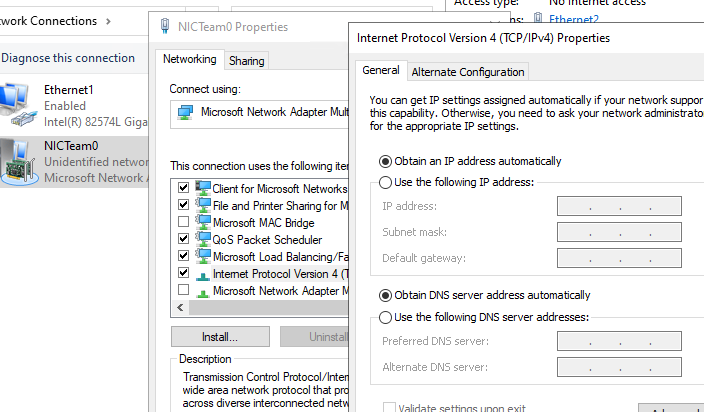
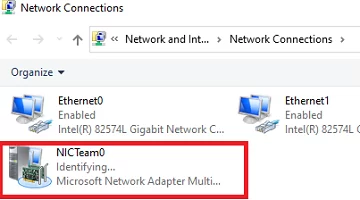
Откройте список сетевых подключения в панели управления Windows. Убедитесь, что в Windows Server появился новый сетевой адаптер Microsoft Network Adapter Multiplexor Driver (его иконка немного отличается). Это и есть виртуальный адаптер группы NIC Teaming.
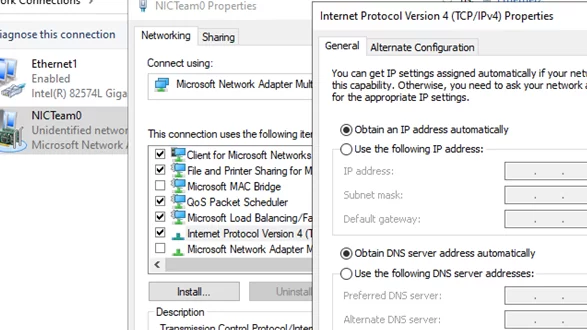
Дальнейшая настройка параметров сетевой карты (протоколы, IPv4/v6 адрес) осуществляется теперь в свойствах этого адаптера.
У всех остальных сетевых адаптеров, которые вы добавили в группу NIC Teaming уже не будет собственных IP адресов.
При удалении группы NIC Teaming предыдущие настройки сетевых адаптеров восстанавливаются.
В дальнейшем вы можете добавить или удалить сетевые адаптеры в группу NIC Teaming.
Вы можете использовать группу NIC Teaming для настройки нескольких VLAN интерфейсов в Windows Server. Для этого можно даже создать группу NIC Teaming из одного сетевого адаптера.
Используем PowerShell для настройки NIC Teaming в Windows Server
Вы можете создавать и управлять группами NIC Teaming не только из графического интерфейса Windows, но и с помощью PowerShell. Вы можете использовать PowerShell для настройки NIC Teaming в Windows Server Core
В Windows Server для управления MIC Teaming есть встроенный модуль NetLbfo. Выведите список сетевых адаптеров на сервере:
Get-NetAdapter

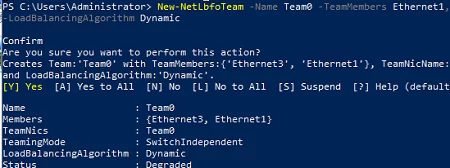
Создайте новую группу с Team0 из адаптеров с именами Ethernet1 и Ethernet3. Выберите режим работы NIC Teaming: Switch Independent с динамической балансировкой.
New-NetLbfoTeam -Name Team0 -TeamMembers Ethernet1,Ethernet3 -TeamingMode SwitchIndependent -LoadBalancingAlgorithm Dynamic
Доступные параметры:
- TeamingMode:
Static
,
SwitchIndependent
,
Lacp - LoadBalansingAlgorithm:
TransportPorts
,
IPAddresses
,
MacAddresses
,
HyperVPort
,
Dynamic
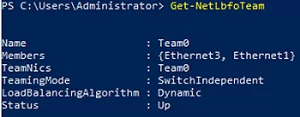
Информацию о группах NIC Teaming на сервере можно вывести с помощью команды:
Get-NetLbfoTeam
Name : Team0
Members : {Ethernet3, Ethernet1}
TeamNics : Team0
TeamingMode : SwitchIndependent
LoadBalancingAlgorithm : Dynamic
Status : Up
Можно настроить IP адрес интерфейса NIC Teaming с помощью PowerShell:
New-NetIPAddress -InterfaceAlias team0 -IPAddress 192.168.13.100 -PrefixLength 24 -DefaultGateway 192.168.13.1
Set-DnsClientServerAddress -InterfaceAlias team0 -ServerAddresses 192.168.13.10
Выполните команду
Get-NetAdapter
. Обратите внимание, что LinkSpeed сетевого адаптера группу NIC Teaming — 2 Гбит/с.

Чтобы изменить настройки группы NIC Teaming используется командлет Set-NetLbfoTeam:
Set-NetLbfoTeam -Name team0 -TeamingMode LACP
Если выполнить эту команду в ВМ, появится ошибка
Set-NetLbfoTeam : 'SwitchIndependent' is the only TeamingMode value supported in a Virtual Machine
Чтобы через NIC Teaming добавить отдельный VLAN интерфейс, используйте команду:
Add-NetLbfoTeamNIC -Team Team0 -VlanID 10
Удалить группу NIC Team можно командой:
Remove-NetLbfoTeam -Name Team0
Создаем группу сетевых адаптеров NIC Teaming в Windows 10 и 11
Вы можете использовать NIC Teaming для объединения сетевых карт не только в Windows Server, но и в клиентских версиях Windows 10 и 11. Главное, чтобы производитель вашей сетевой карты поддерживал для нее режим Link aggregation / NIC teaming/ LBFO.
Например, NIC Teaming работает из коробки с драйверами картами Realtek PCIe GbE Family Controller ( 10.35.510.2019) или Intel(R) 82574L Gigabit Network Connection.
Чтобы собрать группу NIC Teaming в Windows 10 (в этом примере это Windows 10 20H2), откройте консоль PowerShell и выведите список сетевых адаптеров:
Get-NetAdapter
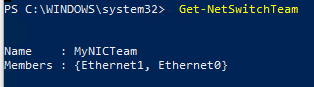
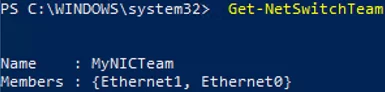
Соберем группу NIC Team из адаптеров Ethernet0 и Ethernet1.
New-NetSwitchTeam -Name "MyNICTeam" -TeamMembers "Ethernet0","Ethernet1"

Проверьте, что в системе появился новый интерфейс NIC Teaming.
Get-NetSwitchTeam
Не забудьте задать для него сетевые настройки. Теперь у вас появился новый интерфейс с пропускной способностью 2 Гбит/с.

Для удаления созданной группы NIC Team, также нужно использовать PowerShell:
Remove-NetSwitchTeam -Name "MyNICTeam"
Hello and welcome to another Windows Server 2019 tutorial. In this article, we will configure NIC teaming in Windows Server 2019.
NIC Teaming feature was initially introduced with windows server 2012. It is also known as Load Balancing/Fail Over (LBFO), NIC Teaming allows you to group between one and 32 physical Ethernet network adapters into one or more software-based virtual network adapters.
These virtual network adapters provide fast performance and fault tolerance in the event of a network adapter failure. After configuring NIC Teaming all the traffic from the OS will pass through that virtual network interface.
NIC teaming in Windows Server 2019 supports two modes:
- Switch Independent Mode: In this mode, you can connect your all network interfaces to different switches.
- Switch Dependent Mode: In this mode, you can connect your all network interfaces to the same switch.
The only requirement to create NIC Teaming is, Windows Server 2019 must have two or more physical network adapters.
Now let’s configure NIC Teaming so we can see how all of this works in Windows Server 2019.
Create a NIC Teaming in Windows Server 2019:
First, Open Server Manager and then click on Local Server. As you can notice that we have two network adapter on this server and both are set to obtain IP address automatically.
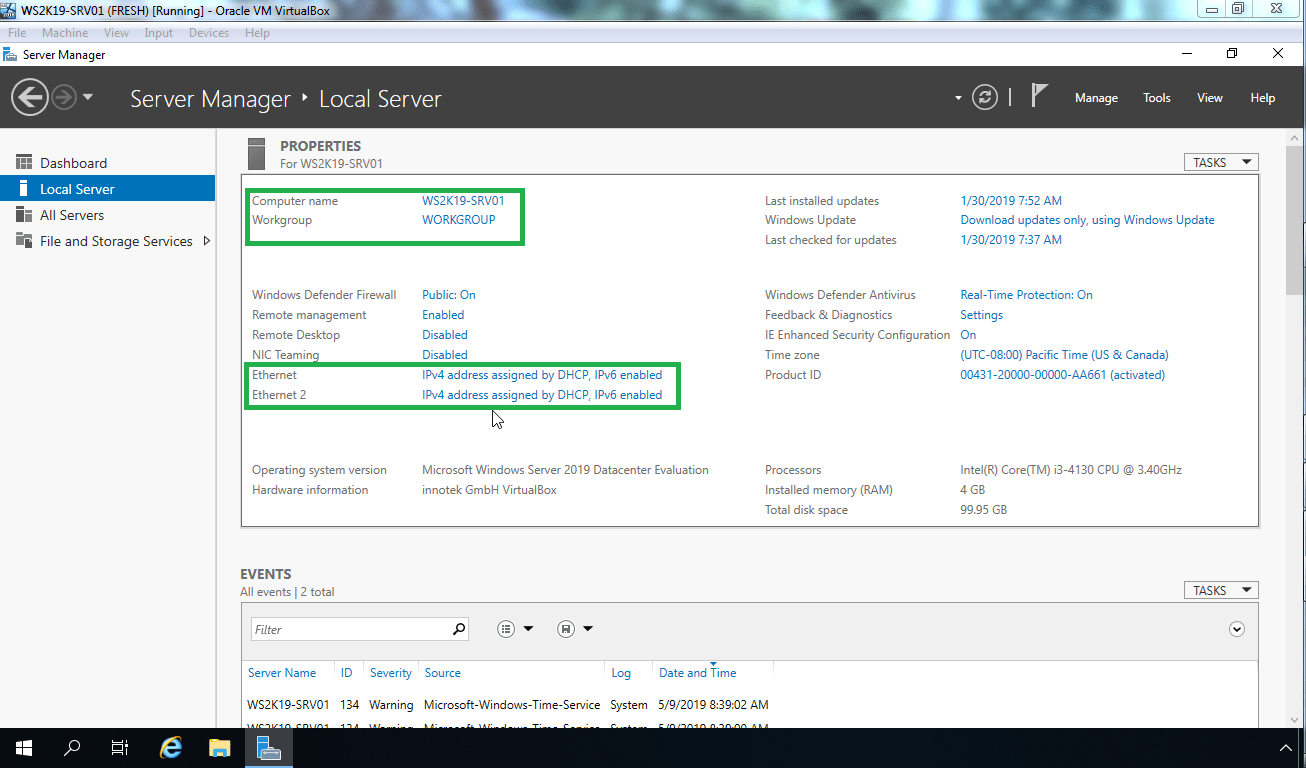
Here we can see that NIC teaming is disabled. To configure NIC teaming click on Disabled link. The NIC Teaming dialog box appears.

Go to Tasks pane and click New Team.

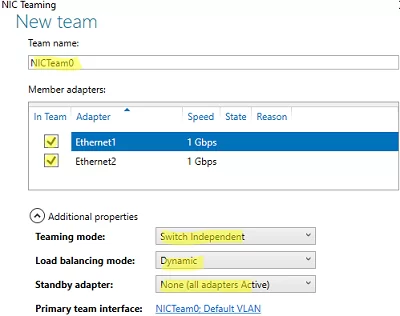
In the Team name box, type MYLAB-TEAM1, and select the adapter you want to include in this NIC Team.

In my case, I am going to select, Ethernet and Ethernet 2.

Click on Additional properties. Select values for Teaming mode, Load balancing mode, and Standby adapter.
Teaming Mode: Switch Independent
Load balancing mode: Dynamic
Standby adapter: None
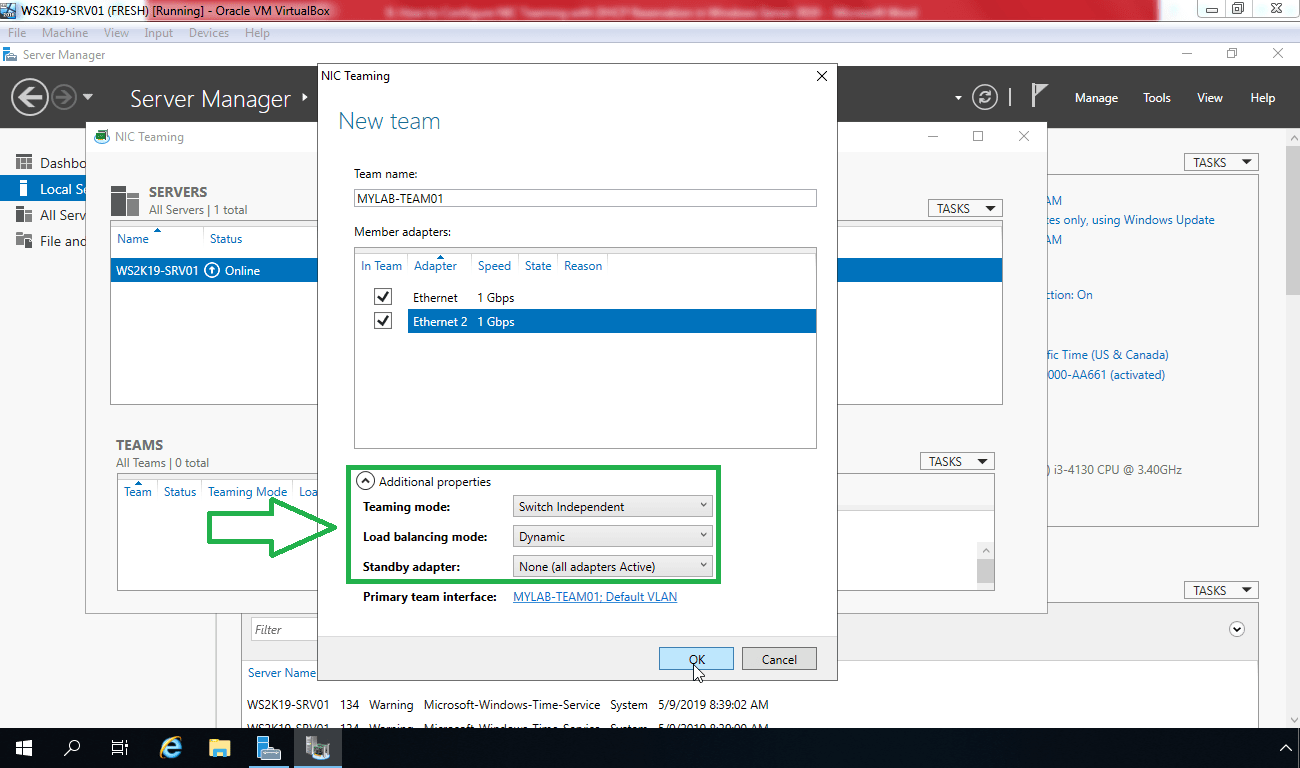
If you want to configure or assign a VLAN number to the NIC Team, click the link to the right of Primary team interface.
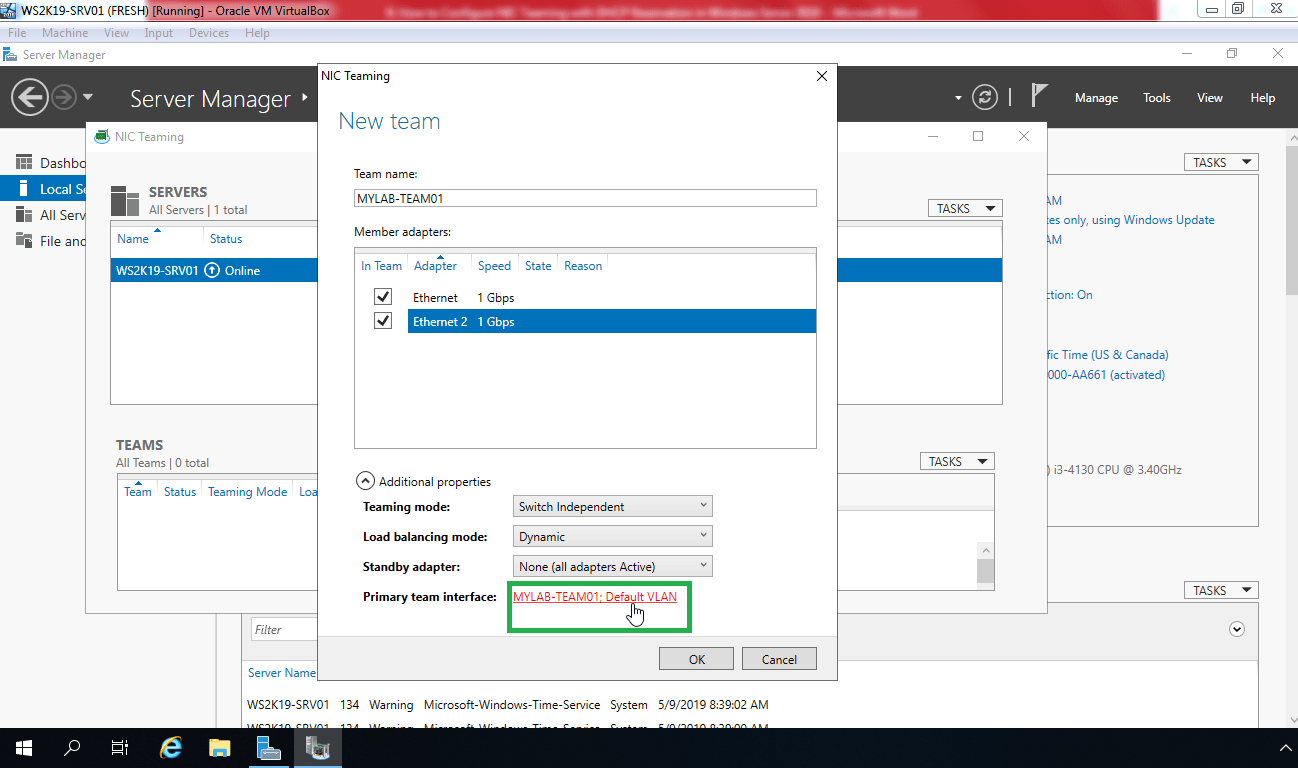
But for this tutorial, we are going to use default VLAN. So I am not going to change anything.
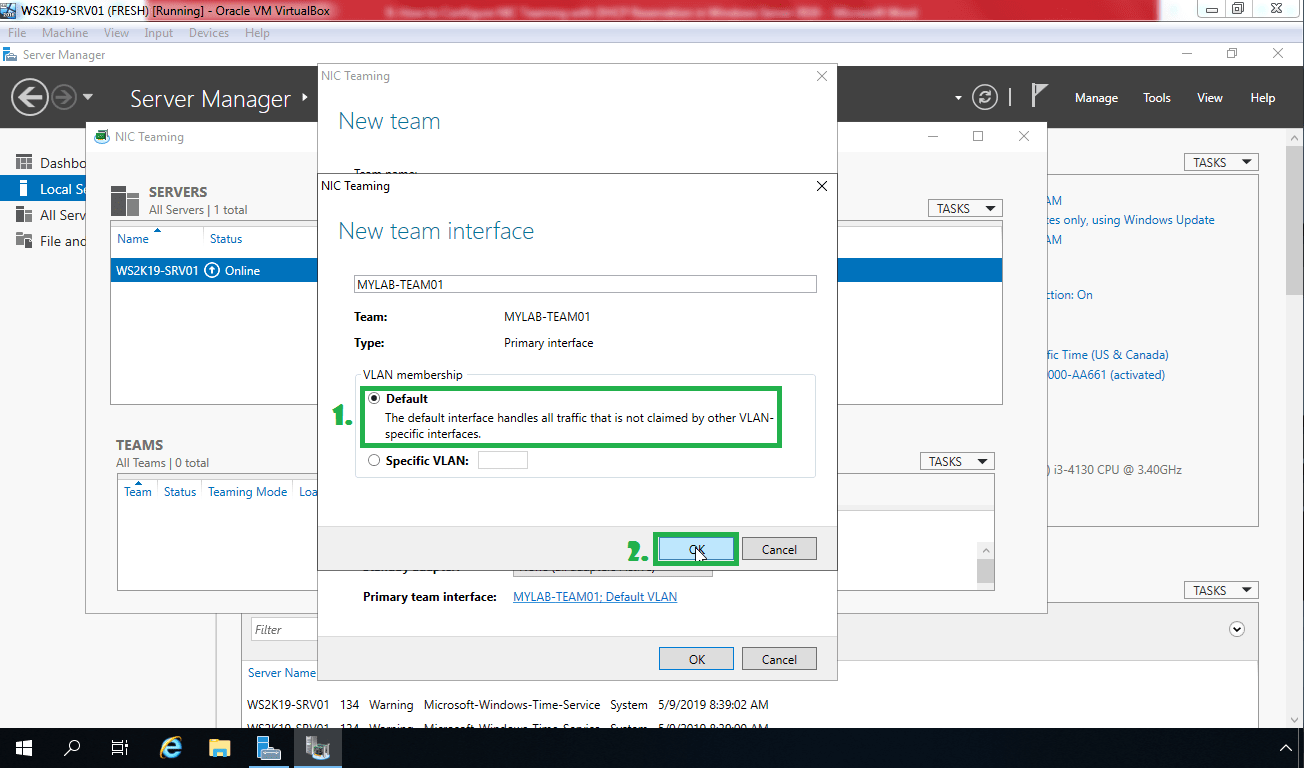
Once you are ready with all the settings, click on OK.

Now NIC team “MYLAB-TEAM1” is ready. We can verify the member network adapters of the NIC Team and can also check which network adapter is active or not.

Assign an IP address to the NIC Team:
Open Run menu by pressing Windows Key and R from the keyboard. Type ncpa.cpl and press enter to open Network connection console.
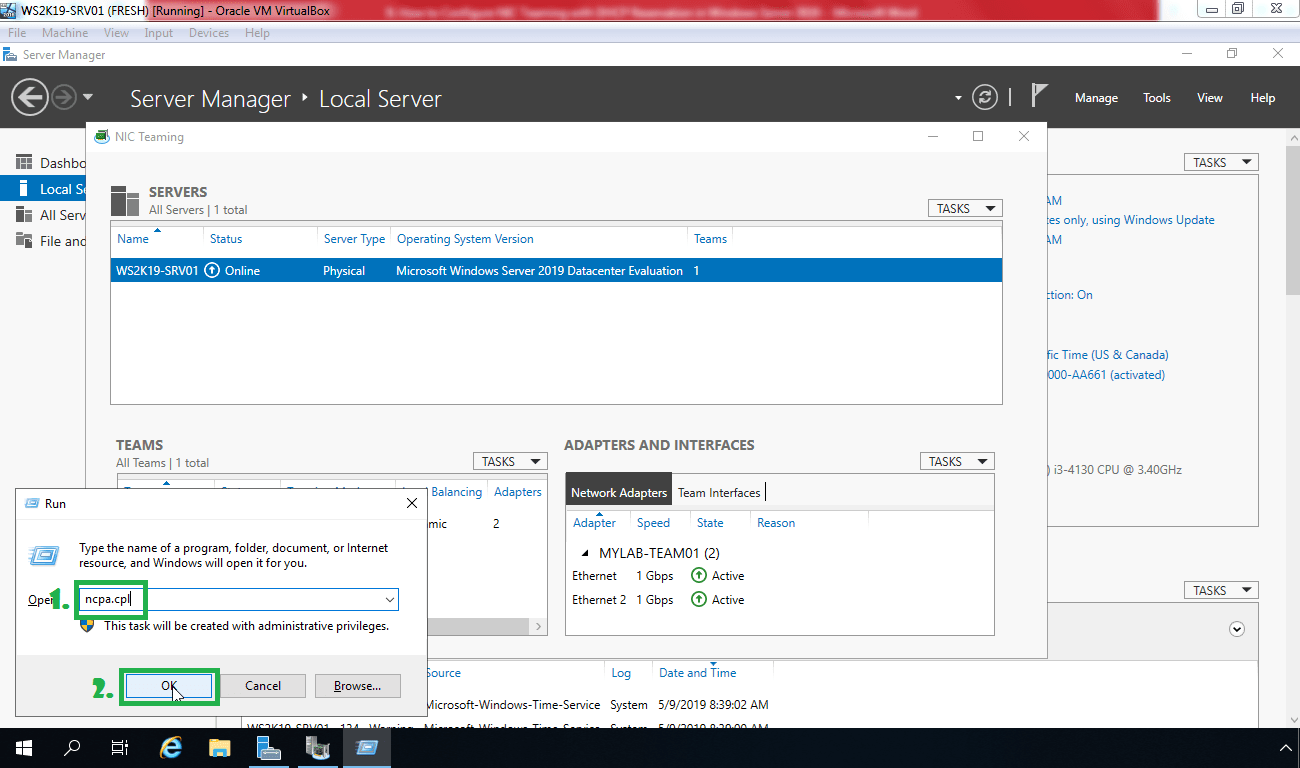
In this console, we can see all the networks Adapters and the NIC team which we have created.To open the properties of New NIC Team (MYLAB-TEAM1), Right click on MYLAB-TEAM1 then click on properties.

Select IPv4 option and then click on properties.

Select the option of Use the following IP address and type an IP address, subnet mask, gateway address, and DNS server address as per your network setup.
In our case, it will be,
IP Address: 172.18.72.7
Subnet Mask: 255.255.255.0
Gateway: 172.18.72.1
DNS server: 172.18.72.5

Now, click on Ok to apply the settings and to close the console.

Right click on “MYLAB-TEAM1” and select status. You can see the speed of NIC team (It will be 2 Gbps, as we have used two adapter). Now click on details as well.

To verify current IP configuration, Let’s open command prompt
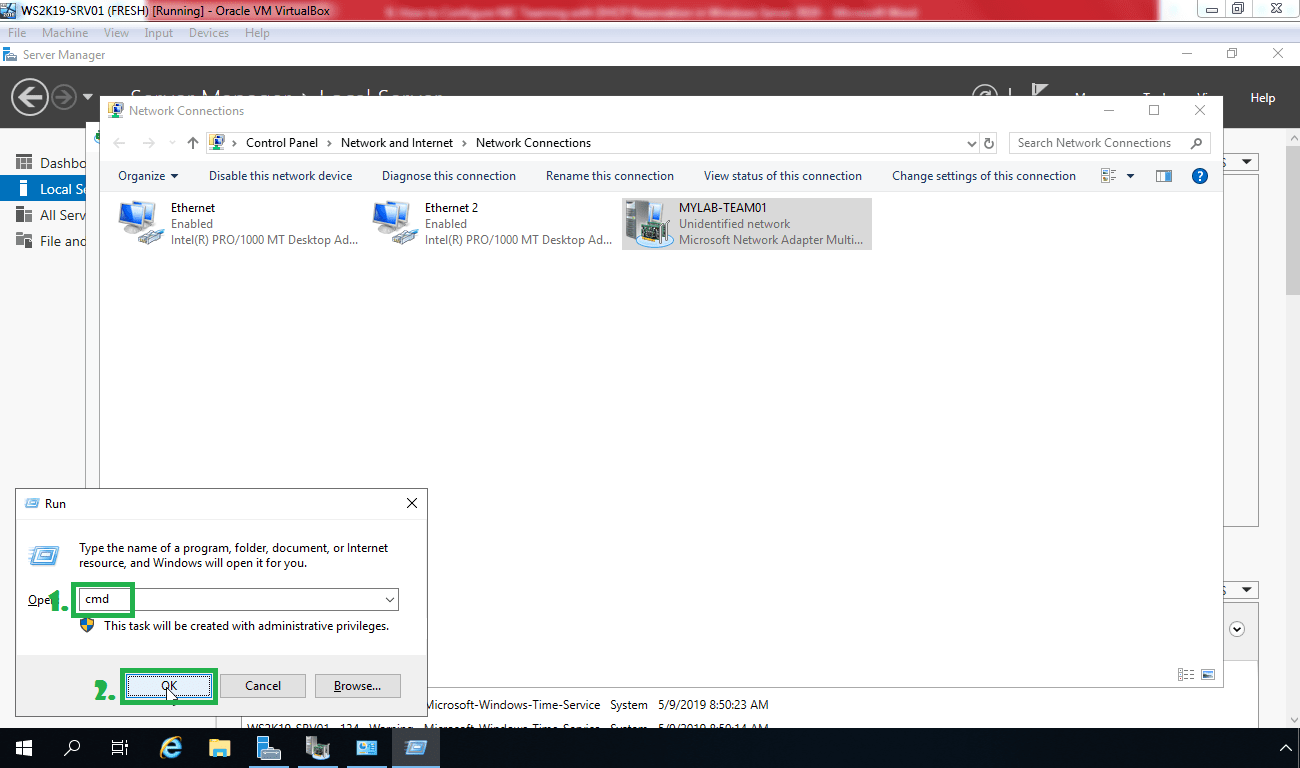
Type ipconfig command to check the newly assigned IP address.

Now let’s check network connectivity with domain controller by pinging 172.18.72.5.

Steps to configure NIC teaming in Windows Server 2019 is very easy and straight forward. That’s all for now.
Thank you for taking the time to read this article. See you all in the next Windows Server 2019 tutorial.
Post Views: 6,210
NIC Teaming (or Load Balancing/Failover – LBFO, or NIC bonding) allows joining multiple physical network adapters (NICs) into a single logical network card. In this article, we’ll show how to configure NIC Teaming on Windows Server 2019/2016/2012R2 and on Windows 10/11 desktop computers.
Contents:
- Configuring a NIC Teaming on Windows Server 2019
- How to Create NIC Teaming on Windows Server with PowerShell?
- How to Enable NIC Teaming on Windows 10 and 11?
Why may you need to combine multiple network adapters into a NIC Team?
- Increase throughput. For example, by joining two 1GB network cards into a NIC Team, you will get a 2Gbit/s bandwidth on a logical adapter;
- Manage network card load balancing. You can balance the network traffic across active NICs.
- Fault tolerance. If any of your network cards in a NIC Team fails, the rest cards take their functions and the connection with the server is not interrupted. For critical servers, the mechanism protects a service against downtime if a network switch or an Ethernet port on it fails, or if a network cable (connecting your host and switch) is damaged. To implement this feature, it is enough to connect network cards to different physical switches.
In Windows Server 2022/2019/2016/2012R2, NIC Teaming is not compatible with Single-Root I/O Virtualization (SR-IOV), TCP Chimney, and Remote Direct Memory Access (RDMA).
Configuring a NIC Teaming on Windows Server 2019
You can configure NIC Teaming on Windows Server 2012 or newer. Let’s see how to combine multiple network adapters into a NIC Team interface on Windows Server 2019. NIC Teaming is disabled by default on Windows Server.
To enable it, open the Server Manager, select Local Server, and click NIC Teaming: Disabled in its properties.

In the next window, select Tasks -> New Team in the left bottom pane.
Then enter a Team name and select the network adapters you want to add to the group.
In Windows Server 2019, you can add up to 32 physical network adapters to a NIC Team. The only requirement is the same connection speed on the team adapters.
You can select special team options. The options set NIC Teaming rules and performance. Let’s take a closer look at these settings.
Teaming Mode. The option sets how the group interacts with the network switches:
- Static Teaming (IEEE 802.3ad) is a static operation mode depending on your network hardware. All team adapters must be connected to the same switch, which Ethernet ports are configured to use static channel aggregation (additional switch configuration is required);
- Switch Independent (a default mode) — the NIC Team works independently of the switch; no additional configuration of network hardware is needed. If this mode is on, you can connect different network adapters to different switches to improve fault tolerance (protection against switch failure);
- LACP (Link Aggregation Control Protocol, LACP, IEEE 802.1ax) is the mode that depends on your network hardware as well. You need to enable and configure the dynamic link aggregation using the LACP on your switch.
Load Balancing mode sets how network traffic is distributed between NICs in the team.
- Address Hash — a special hash is assigned to each physical adapter (based on sender and recipient MAC or IP addresses). All traffic from a specific sender will go through this NIC;
- Hyper-V Port — you can use this mode on a server with the Hyper-V role. It allows you to bind an adapter from your NIC Team to a specific port on a Hyper-V virtual switch;
- Dynamic is a default option combining both load balancing types.
You can make one of the adapters in the group a Standby adapter. In a normal operation mode, this NIC is not used to process traffic. If any other adapter in your NIC Team fails, it will be replaced by a standby one. Actually, if this function is not enabled, there will be no service downtime when any network adapter fails, since its load will be automatically distributed among other cards in the group.
Select the settings you need, click OK and a new NIC Team will be created.
Open the list of network connections in the Control Panel. Make sure that a new device labeled Microsoft Network Adapter Multiplexor Driver (it has a different icon) has appeared. This is the NIC Teaming virtual adapter.
Further configuration of the network card (protocols, IPv4/v6 address) is performed in the properties of the NICTeam adapter.
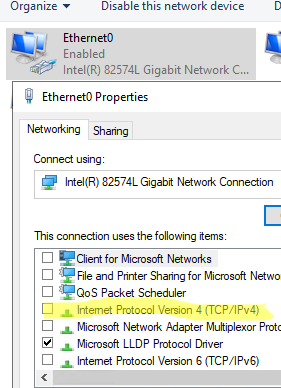
Network adapters that you add to a NIC group will no longer have their own IP addresses.

If you remove a NIC Team, the previous network adapter settings will be restored.
Later you can add or remove network adapters to your NIC Team.
You can use the NIC Teaming to configure multiple VLAN interfaces on Windows Server. To do it, you can even create a NIC Teaming group from a single network adapter.
How to Create NIC Teaming on Windows Server with PowerShell?
You can create and manage NIC Teams both through the Windows graphical interface and PowerShell. PowerShell can be used to set up NIC Teaming on Windows Server Core.
You can use the built-in NetLbfo module on Windows Server to manage NIC Teaming. Display a list of network adapters on your server:
Get-NetAdapter

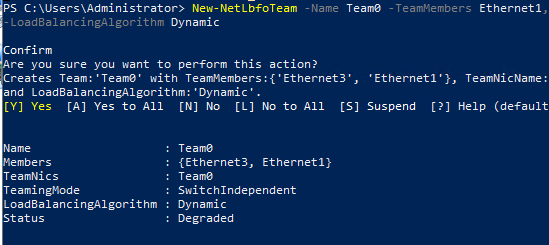
Create a new Team0 from the adapters named Ethernet1 and Ethernet3. Select NIC Teaming mode: Switch Independent with dynamic load balancing.
New-NetLbfoTeam -Name Team0 -TeamMembers Ethernet1,Ethernet3 -TeamingMode SwitchIndependent -LoadBalancingAlgorithm Dynamic
Available options:
- TeamingMode: Static SwitchIndependent, Lacp
- LoadBalansingAlgorithm: TransportPorts, IPAddresses, MacAddresses, HyperVPort, Dynamic
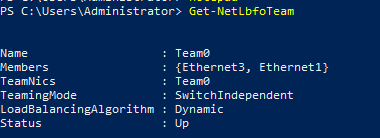
To get information about NIC Teams on a server, use the command below:
Get-NetLbfoTeam
Name : Team0
Members : {Ethernet3, Ethernet1}
TeamNics : Team0
TeamingMode : SwitchIndependent
LoadBalancingAlgorithm : Dynamic
Status : Up
You can use PowerShell to configure an IP address of your NIC Teaming interface and other network settings:
New-NetIPAddress -InterfaceAlias team0 -IPAddress 192.168.13.100 -PrefixLength 24 -DefaultGateway 192.168.13.1
 Set-DnsClientServerAddress -InterfaceAlias team0 -ServerAddresses 192.168.13.10
Run the Get-NetAdapter command. Note that the LinkSpeed of the NIC Teaming network adapter is 2 Gbit/s.

To change the NIC Teaming group settings, use the NetLbfoTeam cmdlet:
Set-NetLbfoTeam -Name Team0 -TeamingMode LACP
If you run this command in a VM, the following error appears:
Set-NetLbfoTeam : 'SwitchIndependent' is the only TeamingMode value supported in a Virtual Machine
To add an additional VLAN interface via NIC Teaming, run the command below:
Add-NetLbfoTeamNIC -Team Team0 -VlanID 44
You can remove a NIC Team using this command:
Remove-NetLbfoTeam -Name Team0
How to Enable NIC Teaming on Windows 10 and 11?
You can use NIC Teaming to combine network adapters both in Windows Server and in desktop versions of Windows 10 and 11. The main thing is that your network card must support Link aggregation, NIC teaming, or LBFO.
For example, NIC Teaming works out of the box with Realtek PCIe GbE Family Controller (10.35.510.2019) or Intel(R) 82574L Gigabit Network Adapter.
To create a NIC Team on Windows 10 (in this example, it is Windows 10 20H2), open your PowerShell console and list network adapters:
Get-NetAdapter
Let’s create a NIC Team of Ethernet0 and Ethernet1 adapters.
New-NetSwitchTeam -Name "MyNICTeam" -TeamMembers "Ethernet0","Ethernet1"

Make sure that a new NIC Teaming interface has appeared on the computer:
Get-NetSwitchTeam
Don’t forget to set its network settings. Now you have got a new 2 Gbit/s interface.

To remove a NIC Team, use PowerShell:
Remove-NetSwitchTeam -Name "MyNICTeam"
In my blog entitled “Inter-VLAN Routing Between Virtual Machines” I created two subnets and made the necessary configuration on the router and in Hyper-V Manager to communicate between hosts in two different VLANs. The configuration works great but there is one glaring limitation – scalability. If I wanted to add more VLANs and assign those VLANs to a subnet, I would need to add more NICs. To address this limitation, I will configure a NIC Team in Windows Server 2019 and specify in Hyper-V Manager what VLAN I want my VMs to use for network communication.
A NIC Team is a way to group together several physical interfaces into one logical interface for the purpose of improving network performance and redundancy. In Cisco IOS this is also called an EtherChannel.
For this task I purchased an Intel Pro 1000 PT 1Gb Quad Port Ethernet Server Adapter. My hope was that I would be able to put all the ports in a Team or create two Teams with two ports in each team but this computer is only able to see two of the 4 ports on the server adapter. After troubleshooting for a few hours I could not figure out why my computer is unable to see all the ports. Perhaps there is some kind of hardware limitation unique to the Dell Optiplex 7010. I decided to power through and just use the two ports I am able to use.
VLAN Aware vs VLAN Capable
One of the things that came up for me as I was accomplishing this task is distinguishing the difference between VLAN Awareness and VLAN Capability. In the Hyper-V Virtual Switch Manager you are given the option of specifying a VLAN however when using this, you are not actually creating a VLAN. VLANs are created on the port of the network switch (VLAN capable). However, what Windows Server 2019 can do is acknowledge that a packet is tagged with a specific VLAN and pass the traffic to the switch to make the appropriate forwarding decision (VLAN aware). This is great because typically computers drop packets that are tagged with a VLAN.
NIC Team Configuration
To create a NIC Team, open the Server Manager and with “Local Server” selected in the left navigation pane, select the NIC Teaming option under the server properties. Then select “Tasks” under the “Teams” section and you will be able to select the interfaces you would like to join your new NIC Team, the Teaming mode and the Load balancing mode. In figure 1-1 I have right clicked on the NIC Team I created and selected properties which is identical to the screen you see when creating a new NIC Team:
LACP or Link Aggregation Control Protocol allows the switch to dynamically negotiate which links between the switch and the host get added to the Link Aggregation Group (LAG). LACP in Windows Server operates in “active mode” so that means that on the switch I will also need to configure LACP in active mode. Im not overly concerned about load balancing performance so for the load balancing algorithm I went with Dynamic.
For this task I have also slightly amended the topology from my blog entitled “Inter-VLAN Routing Between Virtual Machines.” Since the EHWIC in my router does not support Link Aggregation, I will add a multilayer switch:
EtherChannel Configuration
Below are the commands issued on S1 to configure a L2 EtherChannel:
It is important first to make sure that both ports on the switch have the same configuration before creating the EtherChannel. I issued the #interface range command and grabbed both the fa1/0/1 and fa1/0/2 interface, configured the encapsulation protocol and set both to trunk mode. Then I created the etherchannel by issuing the #channel-group command and configured the negotiation protocol as “active” to specify to the switch that I want it to use LACP. Finally, I issued the #show etherchannel summary command to show that etherchannel is in an “up” state.
Confusingly, Cisco uses “etherchannel” , “channel group” , and “port channel” all to refer to the same thing. The output of this show command shows that I created a new logical interface called “Po1” and the protocol being used is LACP. The letters “S” and “U” are in parenthesis which according to the key in the show command output, indicate that this new logical interface is in use and is operating in L2. Success! The last thing to do now is specify in the Hyper-V Manager which VLANs I want to be used for network communication for the VLANs:
First I selected the Virtual Switch Manager and renamed my vSwitch. Then I chose the NIC Team which is represented as “Microsoft Network Adapter Multiplexor Driver” and binded this NIC Team to the External vSwitch. I want the Hyper-V Host to participate in this vSwitch so I also selected the option “Allow management operating system to share this network adapter” The final piece of configuration for this external vSwitch is to specify VLAN 100 as the VLAN I want the Hyper-V host to use to communicate on the network.
Next I needed to configure a static IP address to the virtual NIC:
The last piece of Hyper-V config is assigning each VM to the external switch “BH-vSwitch” and specifying the VLAN that I want each VM to use for network communication. BH-VM-SRV1 will be use VLAN 100 and BH-VM-SRV2 will use VLAN 110:
All that’s left is to test connectivity! From the Hyper-V host I was able to successfully ping the gateway of VLAN 100 as well as each VM as shown in figure 1-7 below. I was also able to successfully ping BH-VM-SRV1 from BH-VM-SRV2 and vice-versa.
Windows Server
Просмотров: 41

В данной статье мы с вами поговорим про объединение сетевых адаптеров (NIC Teaming) и рассмотрим его создание на примере Windows Server 2022.
Что такое NIC Teaming
NIC Teaming (или LFBO – Load Balancing and Failover) – это технология объединения нескольких сетевых карт в одну логическую для обеспечения отказоустойчивости и возможности увеличения полосы пропускания. Данная настройка стала доступна в Windows Server начиная с версии 2012. На рисунке ниже представлен общий вид:

На данном рисунке у нас указаны:
NIC1 и NIC2 – это наши сетевые адаптеры на сервере;
NIC Teaming group – это сам процесс настройки технологии;
NIC – это уже логическая сетевая карта, полученная из объединения NIC1 и NIC2.
В данном конкретном примере у нас представлена только одна группа из двух адаптеров. В одну группу можно включать до 32х сетевых адаптеров, но должны быть соблюдены следующие требования:
- У адаптеров должна быть одинаковая пропускная способность (нельзя объединить адаптер 100 Mbps и 1Gbps);
- Адаптеры должны соответствовать стандарту WHQL (должны иметь цифровую подпись Microsoft).
Teaming mode
По режиму управления группой есть 2 режима работы — Switch dependent и Switch independent:
- Switch dependent — требует настройки коммутатора, к которому подключены адаптеры сервера. Как правило, используется протокол LACP;
- Switch independent – при работе в этом режиме сетевые карты могут быть подключены к разным коммутаторам.
Load balancing
Помимо выбора режима управления группой (teaming mode) также можно выбрать подходящий для нас режим балансировки нагрузки. Это режимы Hyper – V Port и Address Hash:
- Hyper – V Port – в данном режиме порт виртуального коммутатора Hyper – V ставится в соответствие сетевому адаптеру группы, перенаправляя весь исходящий трафик ВМ через этот сетевой адаптер;
- Address Hash – в данном режиме для каждого сетевого пакета будет вычисляться хэш на основе адресов получателя и отправителя и уже этот хэш будет ассоциироваться с адаптером группы. Все сетевые пакеты с одинаковым хэшем будут направляться тому же адаптеру. Хэш вычисляется по следующим значениям:
- MAC – адреса отправителя и получателя. Используется, если у нас идет не IP – трафик;
- IP – адреса отправителя и получателя. Используется, если трафик отличен от TCP/UDP;
- TCP – порты отправителя и получателя совместно с IP. Вычисление хэша на основе этих значений более равномерно распределяет трафик.
Настройка NIC Teaming
Для настройки NIC Teaming в Windows Server 2022 выполним следующие действия:
1. Заходим в Server Manager:

Находим раздел NIC Teaming и нажимаем на Disabled;
2. Откроется окно NIC Teaming для создания группы:

3. Выбираем Tasks – New Team:

4. В новом окне создания группы:

Team name – указываем имя нашей создаваемой группы;
Member adapters – выбираем сетевые адаптеры, которые будут находиться в этой группе;
Teaming mode – в нашем случае оставляем Switch independent;
Load balancing mode – в нашем случае оставляем Address Hash;
Standby adapter – оставляем None;
Primary team interface – оставляем по умолчанию;
Нажимаем ОК;
5. Если создание прошло успешно, то мы увидим примерно следующую картину:

Как видим, оба адаптера у нас работают, группа создана;
6. Переходим в Network Connection и видим, что у нас появился новый адаптер, представляющий нашу группу:

Настраивается он аналогично любому другому сетевому адаптеру. Настраиваем сетевые параметры адаптера и можно начинать работать.