Технология NIC Teaming (или Load Balancing/Failover – LBFO, или NIC bonding) позволяет объединить несколько физических сетевых адаптеров (NIC) в одну логическую сетевую карту. В этой статье мы рассмотрим, как настроить NIC Teaming в Windows Server 2019/2016/2012R2 и в десктопых версиях Windows 10 и 11.
Содержание:
- Настройка NIC Teaming в Windows Server 2019
- Используем PowerShell для настройки NIC Teaming в Windows Server
- Создаем группу сетевых адаптеров NIC Teaming в Windows 10 и 11
Для чего может понадобится объединять сетевые адаптеры в группу NIC Teaming?
- Увеличение пропускной способности. Например, объединив две сетевые 1 Гб сетевые карты в одну группу NIC Teaming, вы получите общую полосу пропускания на логическом адаптере 2 Гбит/с;
- Управление балансировкой нагрузки на сетевые карты – можно управлять распределением трафика между NIC сервера;
- Отказоустойчивость – при выходе из строя любой из сетевых карт, добавленных в группу NIC teaming, остальные подхватывают ее функции, и связь с сервером не прерывается. Для критически важных серверов этот механизм может защитить от простоя сервиса во время выхода из строя сетевого коммутатора или Ethernet порта на нем, сетевого кабеля (которым ваш хост подключен к коммутатору). Для реализации такой возможности, достаточно подключить сетевые карты в разные физические коммутаторы.
В Windows Server 2012R2/2016/2019/2022 технология NIC Teaming не совместима с Single-root I/O virtualization (SR-IOV), TCP Chimney и Remote Direct Memory Access (RDMA).
Настройка NIC Teaming в Windows Server 2019
Вы можете настроить NIC Teaming в Windows Server начиная с версии 2012. Рассмотрим, как объединить несколько сетевых адаптеров в Windows Server 2019 в одну группу NIC Teaming. Режим NIC Teaming по умолчанию отключен в Windows Server.
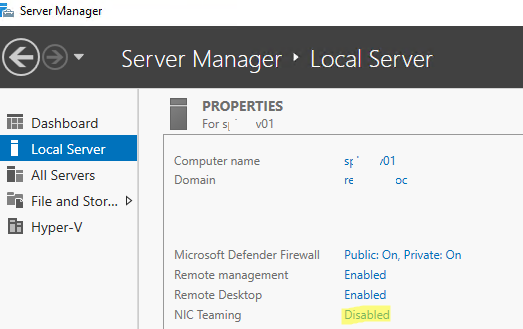
Чтобы включить его, откройте консоль Server Manager, выберите локальный сервер (Local Server) и в его свойствах выберите пункт “NIC Teaming: Disabled“.
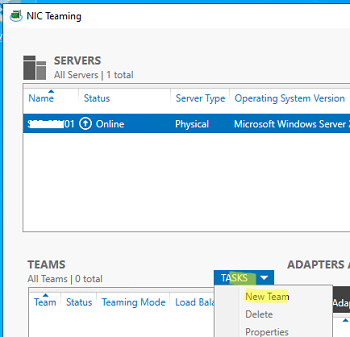
В появившемся окне в левой нижней панели выберите пункт Tasks -> New Team (Создать группу).
Далее нужно указать имя группы (Team Name) и выбрать сетевые адаптеры, которые будут входить в эту группу.
В Windows Server 2019 в одну NIC Teaming групп можно объединить до 32 физических сетевых адаптеров, главное, чтобы они работали на одной скорости.
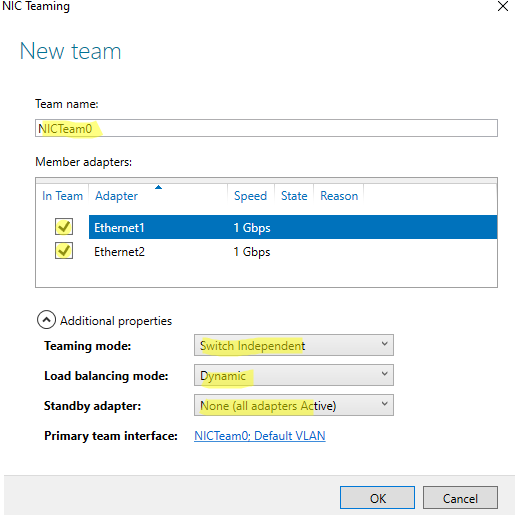
Ниже можно настроить специальные параметры группы. От данных параметров зависит правила и эффективность NIC Teaming. Рассмотрим эти настройки подробнее.
Режим поддержки групп (Teaming Mode). Данный параметр определяет способ взаимодействия группы с сетевым оборудованием (коммутатором)
- Static Teaming (IEEE 802.3ad)— статический режим работы с зависимостью от сетевого оборудования. Все адаптеры группы должны быть подключены к одному коммутатору, Ethernet порты которого настроены на использование статической агрегации каналов (требуется настройка на коммутаторе);
- Switch Independent (режим по-умолчанию) – группа работает независимо от коммутатора, для реализации не нужно дополнительно настраивать сетевое оборудование. В этом режиме разные сетевые адаптеры группы можно подключить к разным коммутаторам для повышения отказоустойчивости (защита от сбоев в коммутаторах);
- LACP (Link Aggregation Control Protocol, LACP, IEEE 802.1ax) – режим также зависит от сетевого оборудования. Нужно включить и настроить на коммутаторе динамическую агрегацию каналов по протоколу LACP.
Режим балансировки нагрузки (Load Balancing mode) – задает как распределяется сетевой трафик по NIC в группе.
- Address Hash — для каждого из адаптеров вычисляется специальный хэш (на основании MAC или IP-адресов отправителя и получателя) и привязывается определенному физическому адаптеру. Весь трафик от данного отправителя будет идти через этот NIC;
- Hyper-V Port — режим можно использовать для сервера с ролью Hyper-V. Позволяет привязать конкретный адаптер группу NIC teaming к конкретному порту на виртуальном коммутаторе Hyper-V;
- Dynamic – опция по умолчанию, совмещает оба типа балансировки нагрузки.
Один из адаптеров в группе можно назначить резервным (Standby adapter). В обычном режиме работы данная NIC не используется для передачи трафика. При неполадке на любом другом адаптере в группе NIC Teaming, он тут-же занимает его место. В общем случае и без данной функции при выходе из строя любой сетевой карты, не будет простоя сервиса, т.к. ее нагрузка автоматически распределится между оставшимися картами в группе.
Выберите нужные параметры, нажмите ОК и новая группа Nic Teaming будет создана.
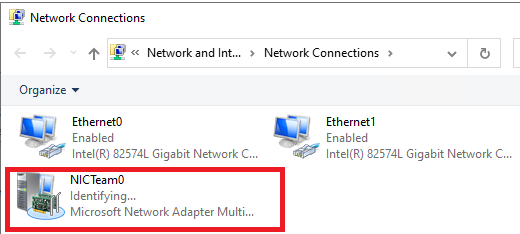
Откройте список сетевых подключения в панели управления Windows. Убедитесь, что в Windows Server появился новый сетевой адаптер Microsoft Network Adapter Multiplexor Driver (его иконка немного отличается). Это и есть виртуальный адаптер группы NIC Teaming.
Дальнейшая настройка параметров сетевой карты (протоколы, IPv4/v6 адрес) осуществляется теперь в свойствах этого адаптера.
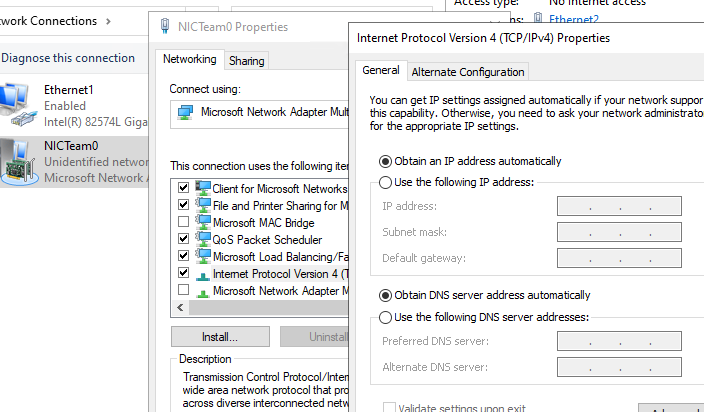
У всех остальных сетевых адаптеров, которые вы добавили в группу NIC Teaming уже не будет собственных IP адресов.
При удалении группы NIC Teaming предыдущие настройки сетевых адаптеров восстанавливаются.
В дальнейшем вы можете добавить или удалить сетевые адаптеры в группу NIC Teaming.
Вы можете использовать группу NIC Teaming для настройки нескольких VLAN интерфейсов в Windows Server. Для этого можно даже создать группу NIC Teaming из одного сетевого адаптера.
Используем PowerShell для настройки NIC Teaming в Windows Server
Вы можете создавать и управлять группами NIC Teaming не только из графического интерфейса Windows, но и с помощью PowerShell. Вы можете использовать PowerShell для настройки NIC Teaming в Windows Server Core
В Windows Server для управления MIC Teaming есть встроенный модуль NetLbfo. Выведите список сетевых адаптеров на сервере:
Get-NetAdapter

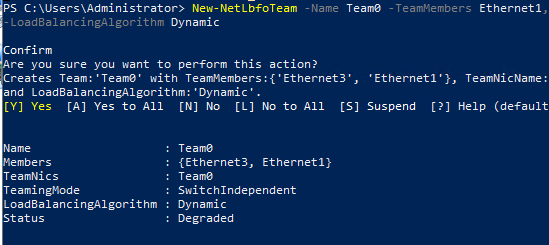
Создайте новую группу с Team0 из адаптеров с именами Ethernet1 и Ethernet3. Выберите режим работы NIC Teaming: Switch Independent с динамической балансировкой.
New-NetLbfoTeam -Name Team0 -TeamMembers Ethernet1,Ethernet3 -TeamingMode SwitchIndependent -LoadBalancingAlgorithm Dynamic
Доступные параметры:
- TeamingMode:
Static
,
SwitchIndependent
,
Lacp - LoadBalansingAlgorithm:
TransportPorts
,
IPAddresses
,
MacAddresses
,
HyperVPort
,
Dynamic
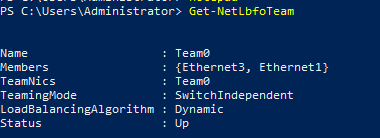
Информацию о группах NIC Teaming на сервере можно вывести с помощью команды:
Get-NetLbfoTeam
Name : Team0
Members : {Ethernet3, Ethernet1}
TeamNics : Team0
TeamingMode : SwitchIndependent
LoadBalancingAlgorithm : Dynamic
Status : Up
Можно настроить IP адрес интерфейса NIC Teaming с помощью PowerShell:
New-NetIPAddress -InterfaceAlias team0 -IPAddress 192.168.13.100 -PrefixLength 24 -DefaultGateway 192.168.13.1
Set-DnsClientServerAddress -InterfaceAlias team0 -ServerAddresses 192.168.13.10
Выполните команду
Get-NetAdapter
. Обратите внимание, что LinkSpeed сетевого адаптера группу NIC Teaming — 2 Гбит/с.

Чтобы изменить настройки группы NIC Teaming используется командлет Set-NetLbfoTeam:
Set-NetLbfoTeam -Name team0 -TeamingMode LACP
Если выполнить эту команду в ВМ, появится ошибка
Set-NetLbfoTeam : 'SwitchIndependent' is the only TeamingMode value supported in a Virtual Machine
Чтобы через NIC Teaming добавить отдельный VLAN интерфейс, используйте команду:
Add-NetLbfoTeamNIC -Team Team0 -VlanID 10
Удалить группу NIC Team можно командой:
Remove-NetLbfoTeam -Name Team0
Создаем группу сетевых адаптеров NIC Teaming в Windows 10 и 11
Вы можете использовать NIC Teaming для объединения сетевых карт не только в Windows Server, но и в клиентских версиях Windows 10 и 11. Главное, чтобы производитель вашей сетевой карты поддерживал для нее режим Link aggregation / NIC teaming/ LBFO.
Например, NIC Teaming работает из коробки с драйверами картами Realtek PCIe GbE Family Controller ( 10.35.510.2019) или Intel(R) 82574L Gigabit Network Connection.
Чтобы собрать группу NIC Teaming в Windows 10 (в этом примере это Windows 10 20H2), откройте консоль PowerShell и выведите список сетевых адаптеров:
Get-NetAdapter
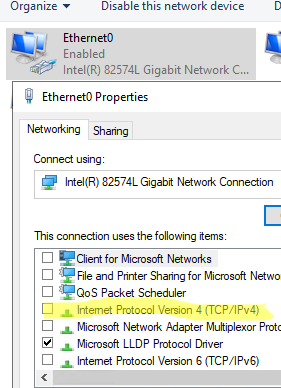
Соберем группу NIC Team из адаптеров Ethernet0 и Ethernet1.
New-NetSwitchTeam -Name "MyNICTeam" -TeamMembers "Ethernet0","Ethernet1"

Проверьте, что в системе появился новый интерфейс NIC Teaming.
Get-NetSwitchTeam
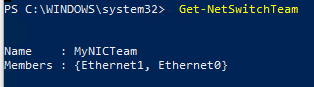
Не забудьте задать для него сетевые настройки. Теперь у вас появился новый интерфейс с пропускной способностью 2 Гбит/с.

Для удаления созданной группы NIC Team, также нужно использовать PowerShell:
Remove-NetSwitchTeam -Name "MyNICTeam"
Nic teaming or Link aggregation are various ways to combine multiple network connections to gain more speed, or it can be used for network redundancy.
In previous versions of Windows 10 Pro (before release 1809), I used to use New-NetLbfoTeam PowerShell cmdlet, and it works fine, but after the 1809 release, it stops working.
After hours of research on the internet, I find out that LBFO is no more supported on Windows 10 anymore an only works for Server Operating Systems. I will mention the LBFO cmdlet as well, so in case if you are working on windows servers, you can configure NIC Teaming.
Let’s configure the NIC Teaming:
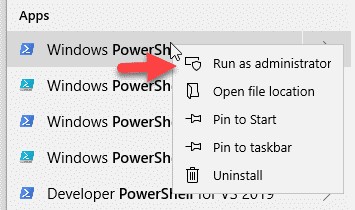
First, open up Windows PowerShell as an administrator.
Next, type the Get-NetAdapter cmdlet in the PowerShell to see the list of Network Adapters available on your computer. I am going to use two Realtek Network Adapter attached to my computer you choose what is convenient for you and write them down for the next command.
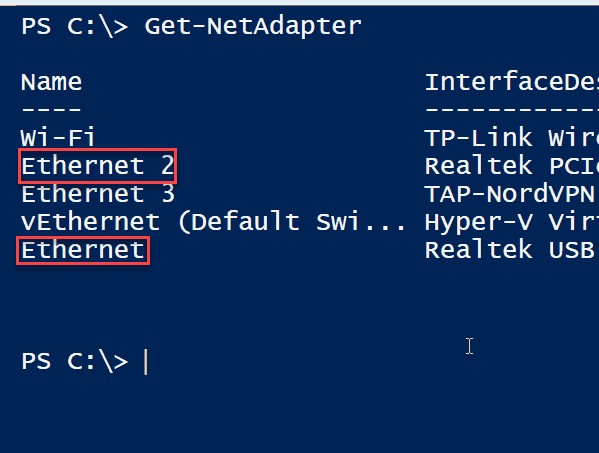
Then type the New-NetSwitchTeam command in the Powershell, and for the Name parameter value type any name you like for me, I’m using 2Gpbs as the name. TeamMembers parameter value will need the name of the network adapters, which are going to be part of NIC teaming for me Ethernet and Ethernet 2.
New-NetSwitchTeam -Name "2Gpbs" -TeamMembers "Ethernet","Ethernet 2"

After running the PowerShell command, if you did not receive any error, it’s mean you were successful. If you receive any error, make sure you type the command correctly or recheck your network adapter names.
Now run Get-NetSwitchTeam command to make sure your team is configured.
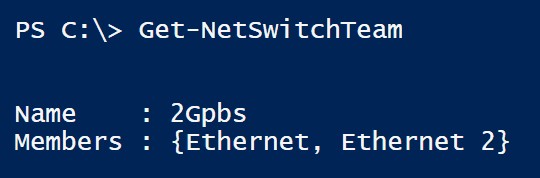
As you can see the Nic Teaming is configured successfully on Windows 10 Pro. If you want to know more about this cmdlet, please visit New-NetSwitchTeam. If you face any issue leave a comment, and I will reply as soon as possible.
Before we end this topic if you want to know more about the NetLbfoTeam command visit New-NetLbfoTeam.
Now it only works for Server Operating systems.
New-NetLbfoTeam -Name "Team1" -TeamMembers "NIC1","NIC2"
In this blog post, we will discuss how to set up NIC Teaming in Windows 10. NIC Teaming, also known as Load Balancing/Failover (LBFO), is a feature that allows you to combine multiple network adapters to provide increased bandwidth and redundancy. This can help improve your network’s performance and reliability.
Prerequisites
Before we begin, make sure you have the following:
- At least two network adapters installed on your Windows 10 machine.
- Administrator privileges on the machine.
Step 1: Enabling the LBFO Feature
The first step is to enable the Load Balancing/Failover feature on your Windows 10 machine. To do this, open PowerShell as an administrator and run the following command:
Install-WindowsFeature -Name LBFOThis command will install the necessary components for NIC Teaming. Once the installation is complete, you can proceed to the next step.
Step 2: Creating a New Team
Now that we have the LBFO feature enabled, we can create a new team for our network adapters. To do this, open PowerShell as an administrator and run the following command:
New-NetLbfoTeam -Name "YourTeamName" -TeamMembers "NIC1,NIC2" -TeamingMode SwitchIndependent -LoadBalancingAlgorithm DynamicReplace YourTeamName with a name for your team, and NIC1,NIC2 with the names of your network adapters. You can find the names of your network adapters by running this command:
Get-NetAdapterThis command will create a new team with the specified network adapters, using the Switch Independent teaming mode and the Dynamic load balancing algorithm. You can adjust these settings as needed to suit your requirements.
Step 3: Configuring the Team
Once you have created your new team, you can configure its settings, such as IP address and DNS server. To do this, open the Network Connections window by pressing Win+X and selecting Network Connections. Then, right-click on your new team and select Properties.
In the Properties window, you can configure the settings for your team, such as IPv4 and IPv6 settings. When you have finished configuring your team, click OK to save your changes.
Step 4: Testing the Team
Now that your team is set up and configured, you should test its functionality. To do this, you can use the ping command in PowerShell or Command Prompt, or you can try browsing the web or accessing network resources. If your team is functioning correctly, you should have increased bandwidth and redundancy compared to using a single network adapter.
Conclusion
In this blog post, we have demonstrated how to set up NIC Teaming in Windows 10 using PowerShell. By using this feature, you can improve your network’s performance and reliability. We hope this guide has been helpful, and we encourage you to explore further the capabilities of NIC Teaming in your environment.
![]()
————————————————————————————————————————————
UPDATE: According to Microsoft, this was never supposed to work. We will need to rely on third party NIC teaming software for client operating systems.
See the Technet thread here: https://social.technet.microsoft.com/Forums/office/en-US/936e8936-810c-434f-9e06-525daafa50b8/teaming-not-possible-in-win10pro-insider-builds-10565-and-10576-error-87?forum=WindowsInsiderPreview
Intel NIC Teaming Software: http://www.intel.com/content/www/us/en/support/network-and-i-o/ethernet-products/000005667.html
Broadcom Downloads: https://www.broadcom.com/support
Be sure to check and make sure any NIC you are purchasing is compatible with Windows 10 and the NIC teaming software.
————————————————————————————————————————————
There may be times that you will require more network bandwidth on Windows clients to transfer files much quicker. Because most network cards are 10/100/1000, you are limited to gigabit speeds (using a gigabit switch, of course). There are other alternatives, such as buying a 10Gb NIC and switch to speed up the network, but one simple way to accomplish this is by using NIC teaming.
An easy way to create a network team was included in Windows Server 2012. This functionality was also included in the client version of Windows as well, just without a GUI. Because there is no graphical interface, we will be configuring a team using Powershell.
This example is being presented using a Windows 10 virtual machine with two virtual NICs attached. This same concept will apply to any Windows 8+ computer with two or more network adapters.
Gathering Information
To get started, we will need to gather some information. The command will require you to use the actual name of the adapters to include them in the team. While you can use the default options, I recommend renaming the adapters to something easier to understand. You can see my example of this at the beginning of this article detailing How To Enable NIC Teaming in Windows Server 2012 R2.
1. Open the Network Connections control panel applet by clicking Start and typing ncpa.cpl into the start search. Hit the Enter Key to continue.

2. Note the names of the network adapters exactly as they are displayed. In this example, the two network adapters are named Ethernet and Ethernet 2.
Creating the Network Team
The command we will be running is a Powershell command built into Windows Server and Client Operating systems. Microsoft has a TechNet article detailing all of the parameters for the command that you can check out at: https://technet.microsoft.com/en-us/library/jj130849(v=wps.630).aspx
1. Click Start and in the Start Search, type Powershell
2. Right click the Powershell icon and choose Run as Administrator
3. If you are prompted to allow the action by User Account Control, click Yes.
4. Enter the command new-NetLBFOTeam [TEAMNAME] “[NIC1]”, “[NIC2]” and press the Enter Key.
[TEAMNAME] – The name you want to give to the team of network adapters
[NIC1] – The name of the first network adapter found from above
[NIC2] – The name of the second network adapter found from above

5. Finally, Open the Network Connections control panel applet by clicking Start and typing ncpa.cpl into the start search. Hit the Enter Key to continue.
You can see that the new team you created is now available. You should also note that the IP Configuration options of the network adapters included in the team are disabled. You can configure a static IP address on the teamed network adapter, or allow it to obtain an IP address from DHCP normally.

If you don’t have 2 network cards in your computer, check out http://amzn.to/1kqsTV3 for an Intel Dual Port PCI-e network card to get you started.
Tags: 102.adpater88.1cardClientDesktopfasterhow.tolbfoNetworkNewnew-netlbfoteamnicPowershellteamWindows
Introduction
Have you ever had the frustrating experience of trying to download a large file or stream your favourite show, only to be held back by sluggish internet speeds? Or you’ve been kicked out of an online gaming session due to a laggy connection. Well, we’ve got some good news for you. With NIC Teaming on your Windows 10 computer, you can kiss those pesky network problems goodbye! Are you ready to find out more? Buckle up, and let’s dive in.
You might be wondering, «What on earth is NIC Teaming?» Great question! NIC stands for Network Interface Card, a little gadget in your computer that lets you connect to networks. But when you’ve got several NICs working together – that’s when you have NIC Teaming. Imagine a group of superheroes with their own powers coming together to fight crime more effectively. That’s what NICs do but for your internet connection. They combine their strengths to deliver a faster, more reliable network performance.
You may ask, «Why should I even consider NIC Teaming?» Well, that brings us to our next point.
Detailed Explanation of NIC Teaming
Remember our superhero analogy? Let’s expand on that. The Network Interface Card is like a superhero for your computer’s network connection. It possesses the power to connect your computer to a network, whether it’s wired or wireless. Just like every superhero needs a team, multiple NICs can form a team, too, a technique known as link aggregation or network bonding.
But how does this team work together, you ask? They create a single, logical interface, much like merging several lanes of traffic into one highway. This allows more data to flow through, reducing congestion and speeding up your network connection. It’s like having the express lane all to yourself!
Why Consider NIC Teaming for your Windows 10
Now that you know what NIC Teaming is, let’s talk about why you should care. Here’s the deal — NIC Teaming provides you with a bunch of benefits that can make your internet experience a whole lot smoother. Let’s take a closer look:
- Increased Bandwidth: Think of this as upgrading from a narrow dirt path to a multi-lane superhighway. By combining multiple network connections, you get a significant boost to your available bandwidth. And who doesn’t love faster downloads and seamless streaming?
- Improved Network Reliability: Imagine if you had a backup superhero ready to jump in whenever your favourite superhero takes a break. That’s essentially what NIC Teaming does for your network. If one connection fails, the others are there to pick up the slack. No more unexpected downtime!
- Load Balancing: With NIC Teaming, your network traffic gets evenly distributed across multiple connections. This can help prevent those annoying bottlenecks and keep your network performing at its best.
- Flexibility and Scalability: Fancy terms, right? They mean that NIC Teaming lets you adjust your network connections as needed. Need more speed? Add another connection. It’s that easy!
Practical Guide: Enabling NIC Teaming on Windows 10
Excited to try out NIC Teaming? Here’s a step-by-step guide to get you started. But remember, you’ll need multiple physical network connections and compatible network adapters. Don’t worry; we’ll guide you through it.
- Check Hardware Compatibility
Just as you wouldn’t try to fit a square peg in a round hole, you need to ensure your computer has multiple network adapters supporting teaming. You can check this by visiting the manufacturer’s website or reading through the product documentation.
2. Open Network Connections
Press the magical combo of the Windows key + X on your keyboard, and choose «Network Connections» from the menu that pops up. Alternatively, right-click the network icon in the system tray and select «Open Network & Internet settings.»
3. Create a New Team:
In the Network Connections window, tap the Alt key on your keyboard. This will reveal a menu bar. Click on «Advanced» and pick «New Team» from the dropdown menu.
4. Select Network Adapters
Now, in the New Team window, you get to select the network adapters you want to include in your team. Hold down the Ctrl key on your keyboard while selecting to choose multiple adapters.
5. Configure Team Settings
With the network adapters selected, it’s time to configure the team settings. Here, you can decide the teaming mode and load balancing algorithm, among other advanced options.
6. Assign IP Address
This step involves assigning an IP address to your team. You can either let Windows do it automatically (DHCP) or assign a specific static IP address.
7. Apply Changes
After all, that, click on the «OK» button to create the team. Windows will apply your changes, and you should have a new network adapter representing your team.
8. Test and Verify
The last step is ensuring that NIC Teaming works properly. Run a network speed test or transfer large files between devices on your network. You should notice a significant improvement in network performance.
Conclusion
Well, there you have it. By enabling NIC Teaming, you can supercharge your network performance and say goodbye to annoying lags and slow downloads. Whether you’re a student trying to stream educational videos, a professional handling large data files, or a gamer aiming for the perfect kill shot, NIC Teaming has got you covered.
Remember to verify the compatibility of your network adapters before enabling NIC Teaming. And always remember, with a little bit of tweaking and configuring, you can unlock the full potential of your network connections. Happy networking!
Frequently Asked Questions (FAQs)
1. Can I enable NIC teaming on any Windows 10 computer?
NIC teaming needs multiple physical network connections and compatible network adapters. Make sure your computer meets these requirements before enabling NIC teaming.
2. Will enabling NIC teaming increase my internet speed?
NIC teaming can boost your available bandwidth by combining multiple network connections. However, your internet service provider (ISP) ultimately limits your internet speed.
3. Can I enable NIC teaming on a wireless network?
While NIC teaming is typically used with wired network connections, some wireless adapters might support teaming. But it’s less common and widely supported than with wired connections.
4. Can I add or remove network connections from a NIC team?
Yes, you can! NIC teaming offers flexibility and scalability. You can add or remove network connections as needed without disrupting existing connections.
5. Do I need special software or hardware for NIC teaming?
Windows 10 has built-in support for NIC teaming. But you will need multiple physical network connections and compatible network adapters that support teaming.