-
Скачиваем отсюда https://nginx.org/ru/download.html и распаковываем куда-нибудь.
-
Дальше читаем тут https://nginx.org/ru/docs/windows.html
ВНИМАНИЕ: командуstart nginxобязательно даем прямо из каталога, в котором лежит nginx.exe, в противном случае при дальнейшей работе будут ошибки (все пути в конфигурации прописаны как относительные, только поменяв их все, можно запускать откуда угодно).
Вообще рекомендуется держать консоль открытой в этом каталоге до самого конца выполнения инструкций, однако для работы nginx это необязательно — если её закрыть, он продолжит работать. -
Открываем http://localhost/ — должно заработать.
Установка PHP
-
Скачиваем с https://windows.php.net/download (ZIP-архив Non Thread Safe x64), замечаем номер в «VC(число)» — понадобится на следующем шаге.
Прописываем каталог в PATH. -
Открываем командную строку, запускаем
php -v.
Должно выскочить окно с надписью «The program can’t start because VCRUNTIME140.dll».
Если запуск прошел без ошибок, пропускаем следующий пункт. -
Ищем на странице загрузки из п.1 в левой колонке ссылку на VC нужного номера. Скачиваем x64.exe, устанавливаем.
После этого возвращаемся на предыдущий пункт. На этот раз команда должна показать версию php.
Конфигурация локального сайта в nginx
-
Выбираем локальное имя хоста (как
localhost, только какое-то другое, например,mysite) и каталог, где будут находиться его файлы (например,D:\sites\mysite). -
В конец файла
(каталог nginx)/nginx.confперед последней закрывающей скобкой добавляем раздел:server { listen 80; server_name mysite; root D:\sites\mysite; } -
В консоли, находясь в каталоге nginx.exe, даем команду
nginx -s reload, чтобыnginxперечитал конфигурацию. -
Открываем файл
C:\Windows\System32\Drivers\etc\hosts, добавляем строчку127.0.0.1 mysiteФайл защищен системой ото всех пользователей, кроме администратора, поэтому перед записью понадобится открыть его свойства и дать там нужные права и потом вернуть, как было.
-
Открываем в браузере ссылку http://mysite/ (обязательно с
http://, иначе браузер станет отправлять в поисковые системы). Должна отобразиться страница 404 от nginx.
Налаживание взаимодействия nginx и PHP
-
В раздел
serverконфигурации добавляем такие строки:location ~\.php$ { fastcgi_pass 127.0.0.1:9123; fastcgi_param SCRIPT_FILENAME $document_root$fastcgi_script_name; include fastcgi_params; }(
9123— номер порта, можно выбрать какой-нибудь другой)Из консоли даем команду
nginx -s reload. -
В консоли переходим в каталог, куда распакован PHP. Даем команду
php-cgi.exe -b 127.0.0.1:9123Закрывать окно консоли нельзя, иначе интерпретатор PHP перестанет работать.
Можно прописать путь к каталогу PHP в системной переменной
PATHи запускать его без указания полного пути. -
Создаем файл
D:\sites\mysite\test.phpсо следующим содержимым:<?php echo "This is PHP script on mysite";Открываем http://mysite/test.php — текст должен отображаться.
Взаимодействие налажено!
См. также https://www.nginx.com/resources/wiki/start/topics/examples/phpfastcgionwindows/
PHP: ini-файл и модули расширений
Вышеуказанные процедуры позволяют успешно запустить и использовать PHP, однако он будет «голым» — без расширений (в т.ч. таких необходимых, как mysqli, mbstring и др.) и без настроек, т.к. он не прочитает ни одного ini-файла.
PHP может автоматически загрузить файл php.ini из нескольких каталогов. Первое место, где он станет его искать — рядом с php.exe. В пакете есть файл php.ini-development. Нужно создать рядом его копию с именем php.ini, открыть и внести следующие изменения:
-
Раскомментировать строку
extension_dir = "ext"— в результате PHP станет искать модули расширений в подкаталогеextрядом сphp.exe
(относительный путь интерпретируется именно от exe-, а не от самого ini-файла)Проверяем, подключился ли файл, с помощью команды
php --ini. Результат должен быть примерно следующим:Configuration File (php.ini) Path: C:\Windows Loaded Configuration File: {каталог с дистрибутивом PHP}\php.ini Scan for additional .ini files in: (none) Additional .ini files parsed: (none)Вторая строчка говорит о том, что ini-файл успешно загрузился.
На первую строчку (про С:\Windows) внимания обращать не следует, т.к. ini-файла по указанном адресу нет.
-
Найти нужные расширения и раскомментировать строки, где они подключаются. Например,
extension=mysqliи т.д.Все расширения перечислены рядом, и найти нужные среди них несложно. Рекомендуется включить следующие:
- curl
- fileinfo
- gd
- mbstring
- exif
- mysqli
- soap
Просмотреть список подключенных расширений можно, дав команду
php -m. Непустой изначально список после вышеописанной манипуляции пополнится.
PHP загружает расширения при запуске exe-файла интерпретатора. Если нужно подключить новое, следует остановить php-cgi.exe (или php.exe соответственно) и запустить его заново.
PHP и MySQL
Чтобы установить связь между PHP и MySQL, не требуется никаких специальных действий, кроме собственно создания соединения (разумеется, должен быть включен соответствующий модуль, например, mysqli).
Проверить соединение можно так:
echo "Connecting to MySQL server... ";

// $host = 'localhost'; // если соединяемся через named pipe (аналог Unix-сокета),
$host = ".";            // то в качестве хоста указываем "."
$user = "someone";
$password = "a password";
$mysqli = new mysqli($host, $user, $password);

if ($mysqli->connect_error)
	echo $mysqli->connect_error;
else
	echo "Connected successfully!";
Об установке и минимальной настройке MySQL под Windows см. здесь.
Неудобства работы под Windows
-
в путях файловой системы используется обратный слэш (
\), а не прямой (/) — типаD:\sites\mysite\...вместо/sites/mysite/..., что влияет, в частности, на содержимое констант__DIR__и__FILE__;
как следствие, весь код, рассчитанный на разбор пути по слэшу, перестаёт работать -
невозможно установить русскую локаль с UTF-8:
setlocale(LC_ALL, 'rus')всегда приводит к использованию windows-1251, и изменить это никак не получается
Installing a web server using a distribution package like XAMPP, and WinNMP are probably the easiest solution to make your localhost server works. But what if we wanted to make it from scratch? and avoid duplication whenever we install a composer, laravel and other development kit. Also, you’re free to upgrade them whenever a new version comes out.
The guide has been updated to run on the latest Windows 11, it should work on Windows 10, 8 and 7.
Table of Contents
- Nginx
- PHP
- MySQL
- Using Installer
- Using Zipped
- Add them to PATH environment
- Wrap Up
If you’re not running the latest Windows 11, you need to install the version of VC_Redist you can get it from at https://support.microsoft.com/en-us/topic/the-latest-supported-visual-c-downloads-2647da03-1eea-4433-9aff-95f26a218cc0, then look for Visual Studio 2015, 2017 and 2019, then download your either vc_redist.x86.exe or vc_redist.x64.exe. If you don’t have that, you’ll get this error message when using the PHP.
The code execution cannot proceed because VCRUNTIME140.dll was not found. Reinstalling the program may fix this problem.or if you have a lower version of VC_Redist installed, you’ll get this error.
'vcruntime140.dll' 14.0 is not compatible with this PHP build linked with 14.16 in Unknown on line 0 - Google SearchThat’s for installing the prerequisite. Let’s now install the latest version of NGINX 1.19.6 + PHP 8.0+ MySQL 8.0.22.
To install nginx, you need to download it from http://nginx.org/en/download.html. Select the Mainline version zip files. Currently, it’s nginx/Windows-1.19.6.
Once downloaded, create a folder in your computer. You may follow our naming convention or create your own. In our case we create a folder at C:\WebServer.
After created a folder, create again a folder for our Nginx. It should be C:\WebServer\nginx.
Unzip the downloaded nginx-1.19.6.zip at C:\WebServer\nginx folder.
It’s all good for now, we can discuss later how we activate it.
PHP
To get binaries installation for PHP on Windows, you can grab it at https://windows.php.net/download/.
Then at the PHP 8.0, download the VS16 x64 Non Thread Safe zip file, so we can use it alongside with our Nginx and MySQL.

If you want to use the older version, PHP 7.4, download the VC15 x64 Non Thread Safe zip file.

Once downloaded, create a folder C:\WebServer\php and extract the file at C:\WebServer\php
MySQL
There are two ways to install MySQL by its installer or via zip. Both has pros and cons. Installing using its installer is easier and will not allow you to set things. Advantage of using the zipped version is its portability, you can easily transfer everything in a new computer.
Using Installer
To install MySql, you can downloaded the installer version at https://dev.mysql.com/downloads/installer/. Pick the mysql-installer-web-community-8.0.23.0.msi.

Run the installation, and when you are asked to what to install. Just install MySQL Server, other module is not needed.
You’ll then asked to set your MySQL password. Just fill up the form and when finish, the MySQL will run automatically.
We also suggest to start MySQL when windows start.
Using Zipped
You can download the zipped version at https://dev.mysql.com/downloads/mysql/. Scroll down and look for Windows (x86, 32 & 64-bit), ZIP Archive.

Once done, create a folder and unzipped the downloaded file at C:/WebServer/mysql.
Launch a command prompt as a Administrator and we can now initialize the MySQL setup.
cd C:/WebServer/mysql/bin
mysqld --initialize-insecure
You can then run the mysql using this command. Make sure to Allow Access when it asked for permission.
cd C:/WebServer/mysql/bin
mysqld --console
You need to open a new command prompt window to login to our MySQL. (Do not close the previous command prompt or else you’ll get an error saying ‘error 2003 (HYOO): Can’t connect to MySQL server on ‘localhost’ (10061))
cd C:/WebServer/mysql/bin
mysql -u root
In MySQL 8.0 and above, the default authentication plugin is caching_sha2_password which not allow you to connect to the mysql using the default native login in php. Most users will get this error message saying “Connection failed: The server requested authentication method unknown to the client”. To enable it back to native, we have to set your root password with mysql_native_password.
ALTER USER 'root'@'localhost' IDENTIFIED WITH mysql_native_password BY '';
FLUSH PRIVILEGES;
Add them to PATH environment
In order for us to call nginx, php and MySQL straight from the command line or Windows Powershell without going to its directory, this is needed for other module like Laravel and Composer. We need to add it in the PATH directory.
In the Search bar (Cortana) in your Windows taskbar, just search Edit the system environment variables.

At the bottom, Click the Environment Variables.

Then, you can either add both on User Variables for YOUR_USERNAME or System variables path. Look for Path then click Edit.

Now, we have to add these directories. If you use the installer for MySQL, no need to add the C:\WebServer\mysql\bin.
C:\WebServer\nginx
C:\WebServer\php
C:\WebServer\mysql\bin
Once done, click OK.
To see if it works, try running these commands using the Windows Powershell or Command Prompt.
php -v
mysqld -V
nginx -v
You should get these output.
PHP 8.0.1 (cli) (built: Jan  5 2021 23:43:33) ( NTS Visual C++ 2019 x64 )
Copyright (c) The PHP Group
Zend Engine v4.0.1, Copyright (c) Zend Technologies

Ver 8.0.22 for Win64 on x86_64 (MySQL Community Server - GPL)

nginx version: nginx/1.19.6
You cannot call yet the nginx -t at the command prompt, because this will cause an error which are looking for files on its relative directory. We can discuss this later on how to get rid of this using a batch command file.
nginx: [alert] could not open error log file: CreateFile() "logs/error.log" failed (3: The system cannot find the path specified)
2020/02/27 11:43:49 [emerg] 400#7148: CreateFile() "C:\WebServer/conf/nginx.conf" failed (3: The system cannot find the path specified)
nginx: configuration file C:\WebServer/conf/nginx.conf test failed
Wrap up
Now that we already added them to path. Let’s do some finishing touch.
To make PHP communicate with our MySQL. At C:\WebServer\php, we need to add the module in our PHP. First, rename the php.ini-production to php.ini file
After renaming it, open the php.ini file, search for extension=/path/to/extension/mysqli.so and uncomment the line by removing the semi-colon “;”, then change its value to our mysqli dll (Unfortunately, we need to manually add the exact path of the dll because it is causing error when just using the default extension name).
; When the extension library to load is not located in the default extension
; directory, You may specify an absolute path to the library file:
;
extension=C:\WebServer\php\ext\php_mysqli.dll
You can then also enable other module extension (DLLs) that are needed for your program. Like the following that are needed for WordPress.
extension=C:\WebServer\php\ext\php_curl.dll
extension=C:\WebServer\php\ext\php_pdo_mysql.dll
extension=C:\WebServer\php\ext\php_mbstring.dll
extension=C:\WebServer\php\ext\php_gd.dll
extension=C:\WebServer\php\ext\hp_soap.dll
We also need to edit our loadable extensions module to avoid PHP Warning for our MySQL. Search and find the ;extension_dir = "ext" then uncomment and replace the value with extension_dir = "c:\WebServer\php\ext\". (Credits to Mohamed for this tip)
; Directory in which the loadable extensions (modules) reside.
; http://php.net/extension-dir
;extension_dir = "./"
; On windows:
extension_dir = "c:\WebServer\php\ext\"
In the next step, we will be making a batch file. But there is a problem, running nginx and php-cgi in the batch command line will not allow us to execute the next line of code. Simply because the program is not yet closed for it to proceed on to the next line.
In order for us to run each lines of code of our batch file, we need to hide the command prompt windows by using RunHiddenConsole, you can download this at their official website (https://redmine.lighttpd.net/attachments/660/RunHiddenConsole.zip).
At C:\WebServer\nginx, unzip the RunHiddenConsole.zip.
Then still at C:\WebServer\nginx, we need to create a batch file called C:\WebServer\nginx\myserver.bat. This is where we will start and stop our nginx and php-cgi by using a single command line. Add the following code. (Thank you to Mohamed for enhancing this code).
@echo off
cd C:\WebServer\nginx


IF "%1" == "stop" (
	GOTO STOPSERVER
)else IF "%1" == "start" (
	GOTO STARTSERVER
)else (
	echo Use these commands:
	echo.
	echo myserver start
	echo myserver stop
)
GOTO END

:STARTSERVER
QPROCESS * | find /I /N "mysqld.exe">NUL
IF "%ERRORLEVEL%"=="0" (
	echo MYSQLD is already running.
)else (
	RunHiddenConsole.exe mysqld --console
	echo MYSQLD is now running.
)

QPROCESS * | find /I /N "nginx.exe">NUL
IF "%ERRORLEVEL%"=="0" (
	echo NGINX is already running.
)else (
	RunHiddenConsole.exe nginx
	echo NGINX is now running.
)

QPROCESS * | find /I /N "php-cgi.exe">NUL
IF "%ERRORLEVEL%"=="0" (
	echo PHP-CGI is already running.
)else (
	RunHiddenConsole.exe php-cgi -b 127.0.0.1:9000
	echo PHP-CGI is now running.
)

echo.
echo To stop, type "myserver stop"

GOTO END

:STOPSERVER

QPROCESS * | find /I /N "mysqld.exe">NUL
IF "%ERRORLEVEL%"=="0" (
	taskkill /F /IM mysqld.exe>NUL
	echo MYSQLD ended successfully.
)else (
	echo MYSQLD is not running
)

QPROCESS * | find /I /N "nginx.exe">NUL
IF "%ERRORLEVEL%"=="0" (
	::nginx -s stop
	taskkill /F /IM nginx.exe>NUL
	echo NGINX ended successfully.
)else (
	echo NGINX is not running
)

QPROCESS * | find /I /N "php-cgi.exe">NUL
IF "%ERRORLEVEL%"=="0" (
	taskkill /F /IM php-cgi.exe>NUL
	echo PHP-CGI ended successfully.
)else (
	echo PHP-CGI is not running
)

:END
After that, you can now use these commands for starting and stopping your server at the Command Prompt.
- myserver start – It will start Nginx, and PHP
- myserver stop – It will stop all instances of Nginx and PHP
But before running the commandline above, we have to edit some blocks on our C:/WebServer/nginx/conf/nginx.conf.
First we have to make sure index.php is been recognized by our nginx. find the location / {} block and change it with the following:
        location / {
            root   html;
            index  index.php index.html index.htm;
        }
Next is we have to make sure nginx know where to run the php files. Find and uncomment the block that says location ~ .php$ {}, the one that says “pass the PHP scripts to FastCGI server listening on 127.0.0.1:9000”. Change it with the following:
        location ~ \.php$ {
            	root           html;

    		fastcgi_pass   127.0.0.1:9000;
    		fastcgi_index  index.php;
    		fastcgi_param  SCRIPT_FILENAME  $document_root$fastcgi_script_name;
    		include        fastcgi_params;
        }
Once everything is good. Create a file in C:\WebServer\nginx\html\testing.php. Then write this sample PHP codes with MySQL connection checker (Make sure to fill up your MySQL login, the default username is root).
<?php
	echo "PHP works!<br/><br/>";

	$servername = "localhost";
	$username = "root";
	$password = "";

	// Create connection
	$conn = mysqli_connect($servername, $username, $password);

	// Check connection
	if (!$conn) {
	    die("Connection failed: " . mysqli_connect_error());
	}
	echo "Connected to MYSQL successfully";


?>
Then at the command prompt. Let’s start our server. (Do not forget to Allow Access when Windows Defender Firewall is asking for permission.)
myserver startYou should get example output below.
MYSQLD is now running.
NGINX is now running.
PHP-CGI is now running.

To stop, type "myserver stop"
Now to really check its indeed running. Check at your browser and access https://localhost/testing.php.
PHP works!

Connected to MYSQL successfullyИз данного HOWTO Вы узнаете как установить и настроить связку nginx + php (в режиме FastCGI) + СУБД MySQL для работы под операционной Microsoft Windows.
Мы подробно рассмотрим вопросы установки, базовой и расширенной настройки, а также безопасности.
В статье приводятся примеры скриптов запуска и остановки, а также примеры файлов конфигурации nginx и php.
Подробности смотрите под катом.
Шаг 1. Подготовка к установке
Для начала рекомендуем в корне системного диска создать каталог nginx (например, c:\nginx\), а в нём подкаталоги public_html, php и mysql. Лучше всего связка работает, когда все основные компоненты находятся в одном каталоге. В каталог php мы будем устанавливать интерпретатор PHP5, в mysql соответственно данную СУБД, а в public_html — файлы главного сайта.
Разместив все компоненты таким образом, Вы сделаете пакет перемещаемым (Portable) и готовым к работе с любого компьютера.
Шаг 2. Загрузка необходимых компонентов
Нам потребуются следующие компоненты:
- PHP — http://windows.php.net/download/. Вам необходимо скачать версию с инсталлятором (*.msi) в варианте Thread Safe;
- MySQL — http://dev.mysql.com/downloads/mysql/. Также скачайте версию с msi-инсталлятором;
- nginx — http://nginx.org/ru/download.html. Скачайте последнюю версию;
- RunHiddenConsole — http://redmine.lighttpd.net/attachments/660/RunHiddenConsole.zip.
Шаг 3. Установка компонентов
По окончании скачивания приступайте к установке компонентов согласно данному алгоритму:
- распакуйте архив с nginx в созданный на шаге 1 каталог в корне (например, c:\nginx\). Далее в данном HOWTO будет использоваться именно этот каталог, поэтому если Вы изменили путь, сделайте соответствующие правки;
- установите PHP в каталог c:\nginx\php\:
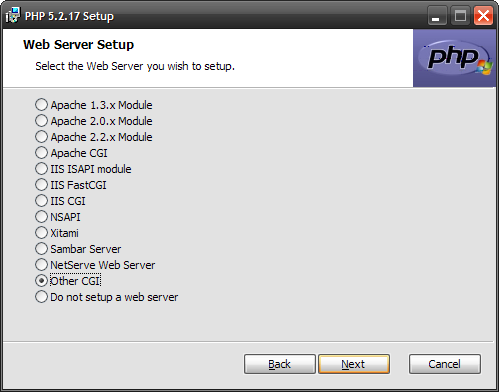
- на этапе выбора типа установки (Web Server Setup) обязательно выберите вариант «Other CGI«, иначе модули, необходимые для работы PHP в режиме FastCGI не будут установлены;

PHP — Web Server Setup - на этапе выбора необходимых модулей (Choose Items to Install) обязательно выберите MySQL, MySQLi и OpenSSL (если хотите далее настроить SSL). Также рекомендуется выбрать модули, необходимые для большинства CMS: bzip2, Curl, Exif, GD2, Gettext, XML. Если Вы забыли что-то нужное и оно Вам потребуется, Вы всегда сможете доустановить/удалить эти компоненты, снова запустив программу установки PHP и выбрав пункт Change.
PHP — выбор компонентов
- на этапе выбора типа установки (Web Server Setup) обязательно выберите вариант «Other CGI«, иначе модули, необходимые для работы PHP в режиме FastCGI не будут установлены;
- установите СУБД MySQL в каталог c:\nginx\mysql\. Здесь нет ничего сложного. В мастере конфигурации выберите стандартную конфигурацию и обязательно задайте пароль администратора (пароль встроенной учётной записи суперпользователя root);
- распакуйте архив RunHiddenConsole.zip в каталог c:\nginx\.

Шаг 4. Создание скриптов запуска и остановки
Для быстрого запуска набора Вам потребуется создать в каталоге c:\nginx\ 3 файла: start.cmd, shutdown.cmd и restart.cmd, предназначенные соответственно для запуска, остановки и перезапуска серверов.
Листинг файла start.cmd (запуск сервера):
@echo off
echo Starting servers...
set PHP_FCGI_MAX_REQUESTS=0
set SRVPATH=C:\nginx
net start MySQL
start /D%SRVPATH% nginx.exe
%SRVPATH%\RunHiddenConsole.exe %SRVPATH%\php\php-cgi.exe -b 127.0.0.1:9000 -c %SRVPATH%/php/php.ini
Листинг файла shutdown.cmd (остановка сервера):
@echo off
echo Shutting down servers...
taskkill /IM nginx.exe /F
taskkill /IM php-cgi.exe /F
net stop MySQL
Листинг файла restart.cmd (перезапуск сервера):
@echo off
echo Shutting down servers...
taskkill /IM nginx.exe /F
taskkill /IM php-cgi.exe /F
net stop MySQL
echo Starting servers...
set PHP_FCGI_MAX_REQUESTS=0
set SRVPATH=C:\nginx
net start MySQL
start /D%SRVPATH% nginx.exe
%SRVPATH%\RunHiddenConsole.exe %SRVPATH%\php\php-cgi.exe -b 127.0.0.1:9000 -c %SRVPATH%/php/php.ini
Если Вы изменили путь со стандартного C:\nginx\, на что-то другое, внесите соответствующие правки в скрипты.
Если требуется запускать сервер nginx+php+mysql при загрузке системы, то добавьте задание на автозапуск скрипта start.cmd с помощью оснастки Назначенные задания Windows.
Откройте файл c:\nginx\conf\nginx.conf в любом текстовом редакторе (я рекомендую Notepad++).
1. Измените строку:
worker_processes 1;
Здесь вместо 1 укажите количество рабочих процессов nginx. Рекомендуется указывать число, равное количеству ядер процессора.
2. Уберите символ комментария (решётку) у строки:
error_log logs/error.log;
Это позволит включить запись логов ошибок в файл error.log, который Вы всегда найдёте в каталоге c:\nginx\logs\.
3. Измените значение директивы server{} для nginx без использования SSL:
server {
 listen 80 default;
 server_name localhost;

 server_tokens off;

 #charset koi8-r;

 #access_log logs/access.log  main;

 location / {
 root c:/nginx/public_html;
 index index.html index.htm index.php;
 }

 location ~ \.php$ {
 fastcgi_pass 127.0.0.1:9000;
 fastcgi_index index.php;
 fastcgi_param SCRIPT_FILENAME $document_root$fastcgi_script_name;
 include fastcgi_params;
 }

 location ~ /\.ht {
 deny all;
 }

 #error_page 404 /404.html;

 error_page 500 502 503 504 /50x.html;
 location = /50x.html {
 root html;
 }
}
Если Вы хотите использовать SSL, Вам потребуется совсем иной конфиг:
server {
 listen 443 default;
 server_name localhost;

 server_tokens off;

 ssl on;
 ssl_certificate C:/nginx/private/ssl_cert_domain.pem;
 ssl_certificate_key C:/nginx/private/ssl_cert_domain.key;

 ssl_session_timeout 5m;

 ssl_protocols SSLv2 SSLv3 TLSv1;
 ssl_ciphers ALL:!ADH:!EXPORT56:RC4+RSA:+HIGH:+MEDIUM:+LOW:+SSLv2:+EXP;
 ssl_prefer_server_ciphers on;

 #charset koi8-r;

 #access_log logs/access.log  main;

 location / {
 root c:/nginx/public_html;
 index index.html index.htm index.php;
 }

 location ~ \.php$ {
 fastcgi_pass 127.0.0.1:9000;
 fastcgi_index index.php;
 fastcgi_param SCRIPT_FILENAME $document_root$fastcgi_script_name;
 include fastcgi_params;
 fastcgi_param HTTPS on;
 }

 #error_page 404 /404.html;

 error_page 500 502 503 504 /50x.html;
 location = /50x.html {
 root html;
 }

 location ~ /\.ht {
 deny all;
 }
}
Здесь C:/nginx/private/ssl_cert_domain.pem — файл сертификата SSL, а C:/nginx/private/ssl_cert_domain.key — закрытый ключ для него. Внимание! При старте сервера у Вас запросят пароль для расшифровки закрытого ключа, поэтому чтобы не вводить его постоянно, во время создания (получения) сертификата оставьте поле ввода пароля пустым (это конечно небезопасно, но экономит время во время запуска сервера). В новых версиях возможно появится функция указания пароля в конфиге (как у Apache).
Вы можете включить ведение логов доступа (access.log), убрав символ комментария у строки #access_log logs/access.log main;.
Вы также можете переопределить страницы ошибок 404, 500, 502, 503, 504 и 403 путём указания в директиве error_page кода ошибки и имени файла, который будет отображаться при её возникновении.
Шаг 6. Настройка php и безопасность
Откройте текстовый файл C:\nginx\php\php.ini в любом текстовом редакторе. Из соображений безопасности рекомендуем изменить строку
safe_mode = Off
на
safe_mode = On
Также найдите в файле строку
disable_functions =
и замените её на следующую:
disable_functions = exec,passthru,shell_exec,system,proc_open,popen,curl_exec,curl_multi_exec,parse_ini_file,show_source
Эти действия включат безопасный режим для PHP (Safe Mode), при котором запрещены большинство небезопасных функций и исполнение файлов, а также отключит ряд потенциально уязвимых функций. Внимание! Если Ваша CMS не работает при включённом режиме PHP Safe Mode, отключите его, либо поставьте правильную CMS ;-).
Если Вы являетесь разработчиком и хотите видеть ошибки и сообщения PHP, то найдите строку
display_errors = Off
и замените её на
display_errors = On
Для исправления опасной уязвимости в PHP, позволяющей выполнять PHP-код из загружаемых файлов, найдите в php.ini строку
;cgi.fix_pathinfo=1
уберите символ комментария (;) около неё и замените на следующую:
cgi.fix_pathinfo = 0
Дальнейшие настройки файла изменять не требуется — всё уже настроено оптимально для большинства применений программой установки PHP.
Шаг 7. Обработка нескольких PHP-файлов одновременно
К сожалению, PHP в Windows не умеет создавать копии своих экземпляров, поэтому придётся заранее запускать несколько копий и описать их использование в конфиге nginx.
В файле start.cmd пропишите запуск php-cgi.exe на разные номера портов:
%SRVPATH%\RunHiddenConsole.exe %SRVPATH%\php\php-cgi.exe -b 127.0.0.1:9000 -c %SRVPATH%/php/php.ini
%SRVPATH%\RunHiddenConsole.exe %SRVPATH%\php\php-cgi.exe -b 127.0.0.1:9001 -c %SRVPATH%/php/php.ini
%SRVPATH%\RunHiddenConsole.exe %SRVPATH%\php\php-cgi.exe -b 127.0.0.1:9002 -c %SRVPATH%/php/php.ini
%SRVPATH%\RunHiddenConsole.exe %SRVPATH%\php\php-cgi.exe -b 127.0.0.1:9003 -c %SRVPATH%/php/php.ini
%SRVPATH%\RunHiddenConsole.exe %SRVPATH%\php\php-cgi.exe -b 127.0.0.1:9004 -c %SRVPATH%/php/php.ini
Запустите столько процессов, сколько вам потребуется (обычно достаточно 5-20). В нашем примере используется 5 экземпляров с номерами портов 9000 — 9004.
Откройте файл nginx.conf в текстовом редакторе и перед директивой server {} пропишите следующие строки:
upstream backend {
server 127.0.0.1:9000;
server 127.0.0.1:9001;
server 127.0.0.1:9002;
server 127.0.0.1:9003;
server 127.0.0.1:9004;
}
Теперь откройте файл fastcgi_params и в самом начале пропишите следующее:
fastcgi_connect_timeout 1;
fastcgi_next_upstream timeout;
fastcgi_pass backend;
Обязательно уберите fastcgi_pass 127.0.0.1:9000; во всех директивах location.
Пример готового конфига nginx.conf:
worker_processes 4;

error_log logs/error.log;

events {
worker_connections 1024;
}

http {
include mime.types;
default_type application/octet-stream;
sendfile on;
keepalive_timeout 65;
gzip on;
upstream backend {
server 127.0.0.1:9000;
server 127.0.0.1:9001;
server 127.0.0.1:9002;
server 127.0.0.1:9003;
server 127.0.0.1:9004;
}
server {
listen 80 default;
server_name localhost;
server_tokens off;
location / {
root C:/nginx/public_html;
index index.html index.htm index.php;
location ~ \.php$ {
include fastcgi_params;
}
}
error_page 500 502 503 504 /50x.html;
location = /50x.html {
root html;
}
location ~ /\.ht {
deny all;
}
}
}
Пример конфига, использующего SSL:
worker_processes 4;

error_log logs/error.log;

events {
worker_connections 1024;
}

http {
include mime.types;
default_type application/octet-stream;
sendfile on;
keepalive_timeout 65;
gzip on;
upstream backend {
server 127.0.0.1:9000;
server 127.0.0.1:9001;
server 127.0.0.1:9002;
server 127.0.0.1:9003;
server 127.0.0.1:9004;
}
server {
listen 443 default;
server_name localhost;
server_tokens off;
ssl on;
ssl_certificate C:/nginx/private/ssl_cert_domain.pem;
ssl_certificate_key C:/nginx/private/ssl_cert_domain.key;
ssl_session_timeout 5m;
ssl_protocols SSLv2 SSLv3 TLSv1;
ssl_ciphers ALL:!ADH:!EXPORT56:RC4+RSA:+HIGH:+MEDIUM:+LOW:+SSLv2:+EXP;
ssl_prefer_server_ciphers on;
location / {
root C:/nginx/public_html;
index index.html index.htm index.php;
location ~ \.php$ {
include fastcgi_params;
fastcgi_param HTTPS on;
}
}
error_page 500 502 503 504 /50x.html;
location = /50x.html {
root html;
}
location ~ /\.ht {
deny all;
}
}
}
Пример файла fastcgi_params:
fastcgi_connect_timeout 1;
fastcgi_next_upstream timeout;
fastcgi_pass backend;

fastcgi_param  QUERY_STRING       $query_string;
fastcgi_param  REQUEST_METHOD     $request_method;
fastcgi_param  CONTENT_TYPE       $content_type;
fastcgi_param  CONTENT_LENGTH     $content_length;

fastcgi_param  SCRIPT_NAME        $fastcgi_script_name;
fastcgi_param  REQUEST_URI        $request_uri;
fastcgi_param  DOCUMENT_URI       $document_uri;
fastcgi_param  DOCUMENT_ROOT      $document_root;
fastcgi_param  SCRIPT_FILENAME    $document_root$fastcgi_script_name;
fastcgi_param  SERVER_PROTOCOL    $server_protocol;
fastcgi_param  HTTPS              $https if_not_empty;

fastcgi_param  GATEWAY_INTERFACE  CGI/1.1;
fastcgi_param  SERVER_SOFTWARE    nginx/$nginx_version;

fastcgi_param  REMOTE_ADDR        $remote_addr;
fastcgi_param  REMOTE_PORT        $remote_port;
fastcgi_param  SERVER_ADDR        $server_addr;
fastcgi_param  SERVER_PORT        $server_port;
fastcgi_param  SERVER_NAME        $server_name;

# PHP only, required if PHP was built with --enable-force-cgi-redirect
fastcgi_param  REDIRECT_STATUS    200;
fastcgi_index  index.php;
Шаг 8. Тестирование и заключение
Запустите серверы и создайте в каталоге C:\nginx\public_html\ файл test.php со следующим содержанием:
<?php
phpinfo();
?>
Откройте этот файл в браузере по адресу http://localhost/test.php и если Вы увидели информацию об установленном сервере, значит всё работает корректно и Вы можете приступать к использованию сервера.
Шаг 9. Готовые примеры файлов конфигурации
По многочисленным просьбам мы решили выложить примеры всех файлов конфигурации nginx в Git-репозитории. В данный момент доступно три разных готовых конфига:
- nginx_simple.conf — простейший конфиг для запуска одного сайта без поддержки SSL;
- nginx_ssl.conf — конфиг для запуска одного сайта с поддержкой SSL;
- nginx_vhosts.conf — специально настроенный конфиг с относительными путями, поддержкой SSL, виртуальных хостов (позволяет держать несколько сайтов на одном сервере) и отдельных логов.
Там же вы найдете готовые скрипты запуска и остановки сервера, а также файл конфигурации PHP.
In the past, whenever I needed a web server on Windows, I would install the XAMPP distribution (comes with Apache, PHP, and MySQL) and call it a day. This time, I wanted to use Nginx instead of Apache as the web server. Below are the steps I took to install Nginx, PHP and MySQL separately on Windows 7.
Install Nginx
Nginx is pretty easy to install on Windows. Just do the following:
- Download the latest Nginx for windows version. (Currently, only 32-bit versions are available.)
- Unzip to a directory like “c:\nginx”.
- Create two subdirectories which “nginx.exe” expects to exist:
mkdir c:\nginx\logs
mkdir c:\nginx\temp - If you want to change the document root from the default “c:\nginx\html” and/or enable directory listing, edit the “c:\nginx\conf\nginx.conf” file and adjust the global “location /” declaration like so:
location / {
#root html; # comment out default root at «nginx_install_dir\html»
root /www; # use new root «c:\www» (assuming nginx is install on c: drive)
index index.html index.htm;
autoindex on; # Add this to enable directory listing
} - To run the Nginx web server, launch the “Command Prompt” and issue these commands:
# Go to Nginx installation directory
c:
cd \nginx# Start Nginx
start nginx.exeNotes:
- Running “c:\nginx\nginx.exe” without changing to the “c:\nginx” directory will fail because Nginx will look for the log and temp subdirectories, which won’t exist under another directory.
- The “start” command will launch Nginx in a separate window; otherwise, Nginx would take control of the current “Command Prompt” window. That separate window will appear and quickly disappear.
- It is not necessary to run the “Command Prompt” as an administrator.
- Browse to http://localhost/ . You should see a “Welcome to nginx!” page.
- To quit Nginx, in the “Command Prompt” window, do the following:
# Go to Nginx installation directory
c:
cd \nginx# Quit Nginx
nginx.exe -s quitIf you have started Nginx more than once, the quit command above will only kill the last Nginx process started. To kill all Nginx processes, run the following:
taskkill /F /IM nginx.exe
To avoid launching multiple instances of Nginx, I created the following “intelligent” Nginx start and stop batch script files.
Create a file named “start_nginx.bat” with the content below:
@ECHO OFF
REM Start Nginx
tasklist /FI «IMAGENAME eq nginx.exe» 2>NUL | find /I /N «nginx.exe»>NUL
IF NOT «%ERRORLEVEL%»==«0» (
REM Nginx is NOT running, so start it
c:
cd \nginx
start nginx.exe
ECHO Nginx started.
) else (
ECHO Nginx is already running.
)
And create a file named “stop_nginx.bat” with this content:
@ECHO OFF
REM Stop Nginx
tasklist /FI «IMAGENAME eq nginx.exe» 2>NUL | find /I /N «nginx.exe»>NUL
IF «%ERRORLEVEL%»==«0» (
REM Nginx is currently running, so quit it
c:
cd \nginx
nginx.exe -s quit
ECHO Nginx quit issued.
) else (
ECHO Nginx is not currently running.
)
Install and Configure PHP
To install PHP on Windows:
- Browse to php.net, click on the “Windows downloads” link, and download the latest thread safe version. Either 32-bit or 64-bit versions will work.
- Unzip to a directory, like “c:\nginx\php”.
- Select a PHP configuration (I recommend the development version):
copy c:\nginx\php\php.ini-development c:\nginx\php\php.ini
We will run the “c:\nginx\php\php-cgi.exe” server to allow Nginx to execute PHP scripts using the FastCGI protocol.
- Edit “c:\nginx\conf\nginx.conf” to uncomment the FastCGI section and update the fastcgi_param entries like so:
# pass the PHP scripts to FastCGI server listening on 127.0.0.1:9000
#
location ~ \.php$ {
root html;
fastcgi_pass 127.0.0.1:9000;
fastcgi_index index.php;
#fastcgi_param SCRIPT_FILENAME /scripts$fastcgi_script_name;
fastcgi_param REQUEST_METHOD $request_method;
fastcgi_param SCRIPT_FILENAME $document_root$fastcgi_script_name;
include fastcgi_params;
}Notes:
- Don’t forget to update the “root” location value if you are not using the default “c:\nginx\html” directory.
- The fastcgi_param values are recommended extra parameters passed to PHP scripts for their optional use.
- Add the following to the bottom of the “start_nginx.bat” file:
REM Start php-cgi
tasklist /FI «IMAGENAME eq php-cgi.exe» 2>NUL | find /I /N «php-cgi.exe»>NUL
IF NOT «%ERRORLEVEL%»==«0» (
REM php-cgi is NOT running, so start it
start /min c:\nginx\php\php-cgi.exe -b localhost:9000 -c c:\nginx\php\php.ini
ECHO php-cgi started.
) else (
ECHO php-cgi is already running.
)Notes:
- Use localhost instead of 127.0.0.1 to support both IPv4 and IPv6 addressing (if it is enabled). 127.0.0.1 was not resolvable on my IPv6-enabled Windows installation. (Strangely, using 127.0.0.1 in the nginx.conf’s FastCGI section above is okay though.)
- Unfortunately, “start php-cgi.exe” will show a separate “Command Prompt” window which will remain visible; the “/min” parameter flag is used to minimize that window. If you really want to prevent that window from appearing, you’ll need to use a VBScript to execute the batch file.
- The order in which Nginx and php-cgi are launched does not matter.
- The PHP distribution has a “php-win.exe” file which supposedly is the same as “php-cgi.exe” but without throwing up a “Command Prompt” window; however, I could not get “php-win.exe” to run as a server.
- Add the following to the bottom of the “stop_nginx.bat” file:
REM Stop php-cgi
tasklist /FI «IMAGENAME eq php-cgi.exe» 2>NUL | find /I /N «php-cgi.exe»>NUL
IF «%ERRORLEVEL%»==«0» (
REM php-cgi is currently running, so quit it
taskkill /f /IM php-cgi.exe
ECHO php-cgi killed.
) else (
ECHO php-cgi is not currently running.
) - Create a PHP test script at “c:\nginx\html\info.php”with the following content:
- Run “start_nginx.bat” to launch Nginx and php-cgi. Browse to http://localhost/info.php and you should see information about the PHP installation.
Install MySQL
Let’s get MySQL up and running:
- Download the latest MySQL Community Server. I suggest the “ZIP Archive” distributions, either the 32-bit or 64-bit version. Click the Download button. You don’t need to log in to download, just click the “No thanks, just start my download” link at the bottom of the page.
- Unzip to a directory like “c:\nginx\mysql”.
- Select the default MySQL configuration:
copy c:\nginx\mysql\my-default.ini c:\nginx\mysql\my.ini
- Initialize MySQL by running the “Command Prompt” as an administrator (so Windows registry keys and service can be created) and these commands:
# Current directory must be the MySQL installation directory
cd c:\nginx\mysql# Initialize database with root user and blank password
bin\mysqld —initialize-insecure# Install MySQL as a Windows service
bin\mysqld —install-manual# Start MySQL Server service
net start mysql - Test by running these commands (administrator privileges not required):
# Run MySQL client, skipping password input since blank
c:\nginx\mysql\bin\mysql.exe -u root —skip-password# Run some commands and a query
mysql> SHOW databases;
mysql> USE mysql;
mysql> SHOW tables;
mysql> DESC user;
mysql> SELECT * FROM user;# Assign new root password
mysql> ALTER USER ‘root’@‘localhost’ IDENTIFIED BY ‘new_password’;# Quit MySQL client
mysql> quit;# Run MySQL client with password prompt
c:\nginx\mysql\bin\mysql.exe -u root -p
# Input the new_password - Enable PHP mysqli extension by uncommenting the line below in “c:\nginx\php\php.ini”:
- Create a test script named mysql.php with the following content:
<?php
// HTML response header
header(‘Content-type: text/plain’);// Database connection parameters
$DB_HOST = ‘localhost’;
$DB_PORT = 3306; // 3306 is default MySQL port
$DB_USER = ‘root’;
$DB_PASS = »; // blank or new_password
$DB_NAME = ‘mysql’; // database instance name// Open connection (all args can be optional or NULL!)
$mysqli = new mysqli($DB_HOST, $DB_USER, $DB_PASS, $DB_NAME, $DB_PORT);
if ($mysqli->connect_error) {
echo ‘Connect Error (‘ . $mysqli->connect_errno . ‘) ‘ . $mysqli->connect_error . PHP_EOL;
} else {
// Query users
if ($result = $mysqli->query(‘SELECT User FROM user’)) {
echo ‘Database users are:’ . PHP_EOL;
for ($i = 0; $i < $result->num_rows; $i++) {
$result->data_seek($i);
$row = $result->fetch_assoc();
echo $row[‘User’] . PHP_EOL;
}
$result->close();
} else {
echo ‘Query failed’ . PHP_EOL;
}
}// Close connection
$mysqli->close();
?> - Run “stop_nginx.bat” followed by “start_nginx.bat” to restart Nginx and php-cgi processes. Browse to http://localhost/mysql.php and you should see a listing of the MySQL database users.
- You can stop and/or uninstall the MySQL Server service by running “Command Prompt” as an administrator and issuing these commands:
# Stop MySQL Server service
net stop mysql# Uninstall MySQL Server service
sc delete mysql
You don’t have to run MySQL Server as a Windows service. Instead, you can run MySQL Server from the “Command Prompt” (administrator privileges not required) like so:
# Start MySQL Server
c:\nginx\mysql\bin\mysqld.exe
# Stop MySQL Server
c:\nginx\mysql\bin\mysqladmin.exe -u root shutdown
Unfortunately, the “mysqld.exe” will take control of the “Command Prompt” window and the “start” command does not work in this case, so you will need to open a second “Command Prompt” window in order to issue the shutdown command.
Some info taken from:
- Nginx + PHP + MySQL on Windows in 6 minutes
- How to check if a process is running via a batch script
- Understanding and Implementing FastCGI Proxying in Nginx
- 2.10.1.1 Initializing the Data Directory Manually Using mysqld
- Executing statements
- 2.3.5.6 Starting MySQL from the Windows Command Line
The last time I posted a tutorial on Nginx, there wasn’t a native port of the server available. Riez Opuz posted a link to his Xenstack project on that post that prompted me to write the rest of what I’ve been putting off. It’s a good way to tweak the stack to your own needs.
I tried to leave this as “in 5 minutes”, but then I remembered how long it would take to download MySQL… Even on broadband.
Kevin Worthington had very kindly provided a Cygwin build that ran on Windows, however Nginx now has a Windows build that we can use and this time, we can add MySQL to the list as well. To keep everything compatible, we’ll be using the 32 bit versions for all downloads.
Once you’ve also downloaded Nginx (0.8.53 at the time of this post), head on to the PHP libraries and remember to download the Windows Libraries only (5.3.3 as of today) and select the thread safe version. The first steps are the same with the exception of the download link to MySQL and we need the no-install download.
Make sure to follow this directory structure!
Extract the Nginx files to C:\nginx
Extract PHP to C:\nginx\php
Extract MySQL to C:\nginx\mysql
First, let’s configure MySQL
MySQL no-install is a freakin’ huge download so feel free to delete mysql-test, Embedded, sql-bench and folders named debug once unzipped. If you want to minimize the folder even more, you can optionally delete any .pdb files. This would come in handy if you want to deploy the whole ensamble on a thumb drive or package it for a demo application and are really penny-pinching the available storage space.
Once the cleanup is complete, copy my-medium.ini in C:\nginx\mysql\ into my.ini. I think the medium configuration takes care of most uses and, for a moderately busy site, it fares pretty well.
Always try to copy exising files before making changes instead of outright renaming them. This way, if something goes wrong with the new configuration, we still have the original handy to start over..
Open up the newly copied my.ini file and change the [client] block to match the following.
[client]
#password	= your_password
port		= 3306
socket		= c:/nginx/mysql/tmp/mysql.sock
Note the Unix style forward-slashes.
Now in the [mysqld] block in the same file, change to match the following :
[mysqld]
port		= 3306
socket		= c:/nginx/mysql/tmp/mysql.sock
basedir		= c:/nginx/mysql
datadir		= c:/nginx/mysql/data
bind-address	= localhost
enable-named-pipe
skip-external-locking
key_buffer_size = 16M
max_allowed_packet = 1M
table_open_cache = 64
sort_buffer_size = 512K
net_buffer_length = 8K
read_buffer_size = 256K
read_rnd_buffer_size = 512K
myisam_sort_buffer_size = 8M
Now let’s try and run our MySQL server
Start a new command line window…
Note: If you’re running Windows Vista or above with UAC enabled, you need to right click on the command line link and select “Run as administrator”.. If you get a message saying “Install/Remove of the Service Denied!” when trying to start MySQL later on, then you probably have UAC running, so this step is very important.
Navigate to C:\nginx\mysql\bin\ and run :
mysqld --install-manualThere should be a slight delay followed by a “Service successfully installed”. We then must run :
net start mysql…And if there are no errors noted, then Congratulations!
Before we proceed, we need to run some housekeeping operations. In the same command line window, run :
mysqladmin -u root password newpasswordWhere newpassword is your new MySQL root password. This is an important step toward securing your installation.
Now that we’ve changed our root password enter the following :
mysql -u root -pWhich will give you a password prompt. Enter your newpassword created before. Once you’re logged in, you’re at the MySQL console.
If you need to change your root password at a future date, run mysql as above type the following :
update mysql.user set password=PASSWORD('new-newpassword') where user='root';Note that passwords are encoded before storage in the database, so we need to run the PASSWORD function on our new-newpassword. Once that’s done, be sure to run :
flush privileges;Now we need to remove all the junk that came with the server.
Delete the test databases and anonymous users (Always remember the semicolon at the end!) :
delete from mysql.user where user='root' and host!='localhost';drop database test;delete from mysql.db where db='test' or db='test\_%';And finally flush privileges and quit :
flush privileges; quit;Now if we need to, we can stop MySQL by running the following (in C:\nginx\mysql\bin\ as an Administrator of course):
net stop mysqlAnd if we need to remove it from our services entirely, run the following :
mysqld --removeOnward to setting up PHP
Pages: 1 2 3