About two years ago Microsoft® announced .NET Core, a framework that allows you to develop and run .NET applications natively on Linux and Mac systems. ASP.NET Core includes Kestrel, an internal web server library.
As indicated in the documentation for Kestrel on the Microsoft website and the GitHub repository, you typically run Kestrel behind a production web server such as IIS or NGINX. In this tutorial, we’ll describe how to implement Kestrel behind NGINX and NGINX Plus.
The .NET Core application deployment architecture is similar to the deployment architecture of Node.js or Go applications. NGINX provides .NET apps with traffic management features that simplify production deployment and scalability of the apps. You can run multiple .NET applications on the same or different machines, and NGINX or NGINX Plus performs load balancing and intelligent traffic routing between them.
The following instructions explain how to quickly build a “Hello World” app using .NET Core, run it on Linux, and deploy it behind an NGINX or NGINX Plus reverse proxy with advanced traffic‑management functionality.
Install .NET Core using the instructions on the Microsoft website.
In our example we’re using Ubuntu 16.04. The following commands were correct at the time of writing, but are subject to change because Kestrel is still under development. Consult the .NET Core documentation as necessary.
$ sudo apt-get install apt-transport-https
$ sudo sh -c 'echo "deb [arch=amd64] https://apt-mo.trafficmanager.net/repos/dotnet-release/ xenial main" > /etc/apt/sources.list.d/dotnetdev.list'
$ sudo apt-key adv --keyserver apt-mo.trafficmanager.net --recv-keys 417A0893
$ sudo apt-get update
$ sudo apt-get install dotnet-dev-1.0.0-preview2-003131
Install NGINX:
$ sudo apt-get install nginxInstall NGINX Plus if you want live activity monitoring, active health checks, or both. See the instructions in the NGINX Plus Admin Guide.
Run the “Hello World” App
Install and initialize a “Hello World” app in the parent directory of your choice:
$ cd parent-dir-for-apps
$ mkdir app
$ cd app
$ dotnet restore
To check that the app is working, run the dotnet run command.
Run the Kestrel HTTP Server
-
Edit the ./project.json file to add Kestrel as a dependency to the project.
{ "version": "1.0.0-*", "buildOptions": { "debugType": "portable", "emitEntryPoint": true }, "dependencies": {}, "frameworks": { "netcoreapp1.0": { "dependencies": { "Microsoft.NETCore.App": { "type": "platform", "version": "1.0.1" }, "Microsoft.AspNetCore.Server.Kestrel": "1.0.0" }, "imports": "dnxcore50" } } } -
Copy this code for a simple app to a new file called Program.cs. It returns the current date and time, running Kestrel on port 5000 on localhost.
using System; using Microsoft.AspNetCore.Builder; using Microsoft.AspNetCore.Hosting; using Microsoft.AspNetCore.Http; namespace ConsoleApplication { public class Program { public static void Main(string[] args) { var host = new WebHostBuilder() .UseKestrel() .Configure(app => { app.Run(async (context) => await context.Response.WriteAsync("Current date: " + DateTime.Now + "n")); }) .Build(); host.Run(); } } } -
Run the
dotnetruncommand to start the .NET Core server:$ dotnet run Project app (.NETCoreApp,Version=v1.0) will be compiled because inputs were modified Compiling app for .NETCoreApp,Version=v1.0 Compilation succeeded. 0 Warning(s) 0 Error(s) Time elapsed 00:00:01.9047678 Hello World! Hosting environment: Production Content root path: /app/bin/Debug/netcoreapp1.0 Now listening on: http://localhost:5000 Application started. Press Ctrl+C to shut down. -
Run the
curlcommand to test connectivity and HTTP:$ curl -v localhost:5000 * Rebuilt URL to: localhost:5000/ * Trying ::1... * Connected to localhost (::1) port 5000 (#0) > GET / HTTP/1.1 > Host: localhost:5000 > User-Agent: curl/7.47.0 > Accept: */* > < HTTP/1.1 200 OK < Date: Tue, 14 Feb 2017 19:50:59 GMT < Transfer-Encoding: chunked < Server: Kestrel < Current date: 02/14/17 12:50:59 PM * Connection #0 to host localhost left intact
At this point .NET Core is running on Linux and serving dynamic data using Kestrel as the HTTP server.
Configure NGINX or NGINX Plus to Reverse Proxy the .NET Application
With NGINX or NGINX Plus as a reverse proxy for the .NET application, you can easily configure security with SSL/TLS, HTTP/2 support, and many other features for fast application delivery on the same machine where the .NET Core application is running. The following instructions assume that NGINX and NGINX Plus are already installed on your system; if not, see Install .NET Core, NGINX, and NGINX Plus.
-
Install an SSL certificate. There are several ways to obtain one:
- Buy it from a well‑known certificate authority (CA)
- Have your corporate IT group or CA generate it
- Export it from an existing IIS server
- Use a free CA like Let’s Encrypt
- Generate a self‑signed certificate directly
For the purposes of quickly spinning up a sample .NET Core app with SSL, we’re generating a self‑signed certificate and associated key with this
opensslcommand. We’re installing the certificate and key in the standard location for NGINX, /etc/nginx, but you can choose a different location.$ openssl req -x509 -subj /CN=localhost -days 365 -set_serial 2 -newkey rsa:4096 -keyout /etc/nginx/cert.key -nodes -out /etc/nginx/cert.pem Generating a 4096 bit RSA private key .........++ ............................++ writing new private key to '/etc/nginx/cert.key' ----- -
Configure reverse proxy in the default NGINX and NGINX Plus configuration file for HTTP virtual servers.
The main NGINX and NGINX Plus configuration file is /etc/nginx/nginx.conf. However, several NGINX distributions (as well as NGINX Plus) follow the convention that you do not place much actual configuration in the main file, but instead create smaller, function‑specific files in a subdirectory of /etc/nginx:
- For NGINX Open Source builds provided by nginx.org, and for NGINX Plus, the directory is /etc/nginx/conf.d, and the default file for HTTP virtual servers is default.conf.
- For NGINX Open Source builds distributed with Ubuntu, the directory is /etc/nginx/sites-enabled, and the default file for HTTP virtual servers is default.
The content of the function‑specific files in these directories is then read into the main (nginx.conf) file with an
includedirective, for example:include /etc/nginx/conf.d/*.conf; include /etc/nginx/sites-enabled/*;If you are not sure which is the default configuration file for HTTP virtual servers on your system, find the relevant
includedirective in /etc/nginx/nginx.conf.To configure NGINX or NGINX Plus as a reverse proxy, add the following three configuration blocks to the default configuration file for HTTP virtual servers:
-
The first
serverblock accepts HTTP requests on port 80 and redirects them to the virtual server for HTTPS requests. -
The second
serverblock accepts HTTPS requests on port 443 and proxies them to a group of one or more upstream (backend) servers, here called dotnet. (If in Step 1 you installed your self‑signed SSL certificate in a directory other than /etc/nginx, substitute the correct path in thessl_certificateandssl_certificate_keydirectives.) -
The
upstreamblock defines the dotnet group of backend servers.In Run the Kestrel HTTP Server, we configured Kestrel on
localhost:5000, meaning that it listens for both IPv4 and IPv6 traffic on that port. (Configuring Kestrel for just one protocol can cause instability and potentially502errors.) Similarly, NGINX and NGINX Plus resolvelocalhostto both its IPv4 and its IPv6 address (127.0.0.1 and ::1). For the sake of simplicity, here we identify the upstream server as127.0.0.1instead oflocalhost, so it listens for IPv4 traffic only. You can uselocalhostif you are comfortable with a more advanced configuration that includes IPv6.
server { listen 80 default_server; listen [::]:80 default_server; return 301 https://$host$request_uri; } server { listen 443 ssl http2 default_server; listen [::]:443 ssl http2 default_server; ssl_certificate /etc/nginx/cert.pem; ssl_certificate_key /etc/nginx/cert.key; location / { proxy_pass http://dotnet; proxy_set_header Host $host; } } upstream dotnet { zone dotnet 64k; server 127.0.0.1:5000; } -
Run this
curlcommand to test connectivity to the .NET Core app via HTTPS. (You can also point your browser at your Linux server instead.)$ curl -kv https://localhost * Rebuilt URL to: https://localhost/ * Trying ::1... * Connected to localhost (::1) port 443 (#0) ...[SKIPPED]... < HTTP/1.1 200 OK < Server: nginx/1.10.0 (Ubuntu) < Date: Tue, 14 Feb 2017 20:22:07 GMT < Transfer-Encoding: chunked < Connection: keep-alive < Current date: 02/14/17 1:22:07 PMNote: If you see
502BadGatewayerrors, it means that NGINX or NGINX Plus cannot connect to your .NET application. Make sure it’s running and serving responses on port 5000.If you have installed the
nghttp2package, you can also run the followingnghttpcommand to test connectivity over HTTP/2. Look for the line highlighted in orange in the following example, near the beginning of the rather lengthy output.$ nghttp -v https://localhost [ 0.000] Connected The negotiated protocol: h2 [ 0.009] send SETTINGS frame (niv=2) [SETTINGS_MAX_CONCURRENT_STREAMS(0x03):100] [SETTINGS_INITIAL_WINDOW_SIZE(0x04):65535] [ 0.009] send PRIORITY frame (dep_stream_id=0, weight=201, exclusive=0)
Configure NGINX Plus Live Activity Monitoring and Active Health Checks
At this point we’ve finished the basic configuration of NGINX or NGINX Plus with .NET Core. NGINX or NGINX Plus is providing HTTP handling, passive health checks, security with SSL/TLS, and HTTP/2 connectivity for our .NET Core app.
If you have installed NGINX Plus, you can configure two additional capabilities: live activity monitoring and active health checks.
Configure Live Activity Monitoring
[Editor – This section has been updated to refer to the NGINX Plus API, which replaces and deprecates the separate extended Status module originally discussed here.]
Add the following server block to the default NGINX configuration file for HTTP virtual servers. We strongly recommend that you restrict access to the statistics and metrics. Here we allow access only to users on localhost and a local network.
For more information on live activity monitoring, see Live Activity Monitoring of NGINX Plus in 3 Simple Steps on our blog and the NGINX Plus Admin Guide.
server {
    listen 8080;
    allow 127.0.0.1;   # Allow localhost to access the statistics
    allow 10.3.3.0/24; # Allow local network to access the statistics
    deny all;          # Prevent access from anywhere else

    root /usr/share/nginx/html;

    location / {
        return 302 /dashboard.html;
    }

    location /api {
        api write=on;
    }

    location = /dashboard.html {
        root /usr/share/nginx/html;
    }

    # Redirect requests made to the old dashboard
    location = /status.html {
        return 301 /dashboard.html;
    }
}
Configure Active Health Checks
Active health checks guarantee that NGINX Plus sends traffic only to applications that are working correctly. You define the HTTP requests that NGINX Plus periodically sends to the app, and the type of response that the app must return to be considered healthy.
Here we require that the response from the app meets the following conditions:
- The response code is
200OK - The app server is Kestrel and not some other software
- The body of the response includes the words “Current date”
- The app responds within a 1‑second timeout period
In the default configuration file for HTTP virtual servers, add the following location block to the main server block (the block for HTTPS traffic defined in Step 2 of Configure NGINX or NGINX Plus to Reverse Proxy the .NET Application):
location @healthcheck {
    proxy_pass http://dotnet;
    proxy_set_header Host localhost;
    health_check match=currentdate;
    proxy_connect_timeout 1s;
    proxy_read_timeout 1s;
}
Also add the following match block at the same level in the hierarchy as the server and upstream blocks:
match currentdate {
status 200;
header Server = Kestrel;
body ~ "Current date";
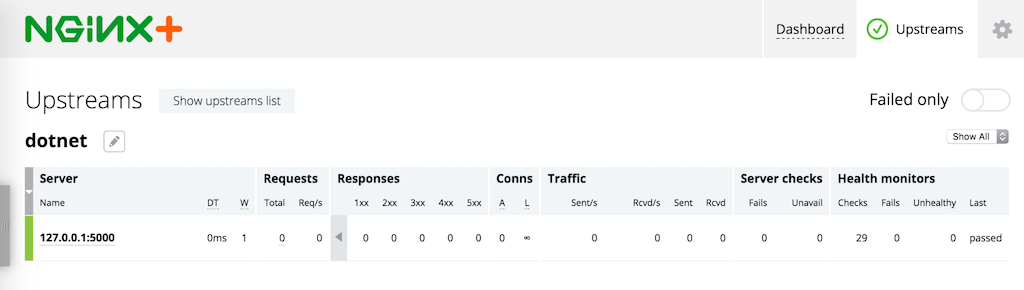
}You can verify that your backend app is healthy on the Upstreams tab of the built‑in live activity monitoring dashboard (point your browser at //http://nginx-plus-server-address:8080/):
For more NGINX configuration options, see the Microsoft documentation.
Conclusion
For production‑ready deployments of the apps you develop with ASP.NET, NGINX and NGINX Plus provide the traffic‑management features you need in a reverse proxy. NGINX and NGINX Plus provide security, scalability, authentication, traffic limiting, and intelligent routing of your HTTP requests to .NET Core applications.
To try NGINX Plus for yourself, start your free 30-day trial today or contact us to discuss your use cases.
Posted
—
11 min read
There are only two things a web server needs to be…..fast…..really fast…..and secure.
About NGINX
NGINX (Pronounced engine-x) is a popular open source web server. It can act as a reverse proxy server for TCP, UDP, HTTP, HTTPS, SMTP, POP3, and IMAP protocols, as well as a load balancer and a HTTP cache.
NGINX in fact overtook Apache as the most popular web server among the top 1000 websites. After playing with it for a while now, I have to say that I can see why.
There are two flavours of NGINX. The first is the open source version which is free, the other is called NGINX Plus and provides some more advanced features (all of which can be replicated with open source plugins but with a lot effort) and proper support but at the cost of a few thousand dollars.
There is a Windows version of NGINX but I wouldn’t recommend using it for real as it doesn’t perform as well as the Linux version and it’s not as well tested. You can however use it to try out NGINX.
Alternatively, if you are running on Windows 10 Anniversary Update, you can install Bash for Windows and install the linux version. However the process is not that straightforward. Again, the caveat is that it can only be used for testing and not in production.
IIS vs NGINX
NGINX has no UI, it’s all command line driven but don’t let that put you off, the CLI interface only has three commands you actually need:
- Check my NGINX config (
nginx -t). - Load my NGINX config (
nginx -s reload). - By default the
nginx.conffile is located in the NGINX installation folder. You can use that file or your own using (nginx -c [nginx.conf File Path]).
IIS on the other hand does have a UI and what a travesty it is. It hasn’t really changed for several years and really needs a usability study to hack it to pieces and start again.
The command line experience for IIS is another matter. It has very powerful IIS extensions you can install and the latest version of IIS even has an API that you can use to make simple HTTP calls to to update it.
Configuration is where NGINX shines. It has a single super simple nginx.conf file which is pretty well documented. IIS is also actually pretty simple to configure if you only rely on the web.config file.
Setting up NGINX
The ASP.NET Core Documentation site has some very good documentation on how to get started on Ubuntu. Unfortunately, it’s not as simple as just installing NGINX using apt-get install nginx, there are a few moving parts to the process and a lot more moving parts if you want to install any additional modules.
If you’re on Windows, as I mentioned earlier you have the options of installing NGINX using Bash for Windows 10 Anniversary Update but I couldn’t get this working. Alternatively you can download the NGINX executable for Windows. If you do this, beware that NGINX tries to start on port 80 and there are a number of things that use that port already on Windows:
- Skype uses port 80 (Why?), turn it off in the advanced settings.
- Turn off IIS.
- Stop the SQL Server Reporting Services service.
Once you have NGINX setup, you need to run your ASP.NET Core app using the Kestrel web server. Why does ASP.NET Core use two web servers? Well Kestrel is not security hardened enough to be exposed on the internet and it does not have all of the features that a full blown web server like IIS or NGINX has. NGINX takes the role of a reverse proxy and simply forwards requests to the Kestrel web server. One day this may change. Reliably keeping your ASP.NET Core app running in Linux is also described in the ASP.NET Core Documentation.
Aiming For The Perfect Config File
You’ve got NGINX running, all you need now is a nginx.conf file to forward requests from the internet to your ASP.NET Core app running using the Kestrel web server.
I have taken the time to combine the recommendations from the HTML5 Boilerplate project, the ASP.NET Core NGINX Documentation, the NGINX Docs and my own experience to build the nginx.config (and mime.types file) file below specifically for the best performance and security and to target .NET Core apps.
Not only that but I’ve gone to extreme lengths to find out what every setting actually does and have written short comments describing each and every setting. The config file is self describing, from this point forward it needs no explanation.
# Configure the Nginx web server to run your ASP.NET Core site efficiently.
# See https://docs.asp.net/en/latest/publishing/linuxproduction.html
# See http://nginx.org/en/docs/ and https://www.nginx.com/resources/wiki/

# Set another default user than root for security reasons.
# user						xxx;

# The maximum number of connections for Nginx is calculated by:
# max_clients = worker_processes * worker_c
worker_processes			1;

# Maximum file descriptors that can be opened per process
# This should be > worker_connections
worker_rlimit_nofile		8192;

# Log errors to the following location. Feel free to change these.
error_log					logs/error.log;
# Log NXingx process errors to the following location. Feel free to change these.
pid							logs/nginx.pid;

events {

    # When you need > 8000 * cpu_cores connections, you start optimizing
    # your OS, and this is probably the point at where you hire people
    # who are smarter than you, this is *a lot* of requests.
    worker_connections		8000;

    # This sets up some smart queueing for accept(2)'ing requests
    # Set it to "on" if you have > worker_processes
    accept_mutex			off;

    # These settings are OS specific, by defualt Nginx uses select(2),
    # however, for a large number of requests epoll(2) and kqueue(2)
    # are generally faster than the default (select(2))
    # use epoll; # enable for Linux 2.6+
    # use kqueue; # enable for *BSD (FreeBSD, OS X, ..)

}

http {

    # Include MIME type to file extension mappings list.
    include                 mime.types;
    # The default fallback MIME type.
    default_type            application/octet-stream;

    # Format for our log files.
    log_format              main '$remote_addr - $remote_user [$time_local]  $status '
                                 '"$request" $body_bytes_sent "$http_referer" '
                                 '"$http_user_agent" "$http_x_forwarded_for"';

    # Log requests to the following location. Feel free to change this.
    access_log              logs/access.log  main;

    # The number of seconds to keep a connection open.
    keepalive_timeout       29;
    # Defines a timeout for reading client request body.
    client_body_timeout     10;
    # Defines a timeout for reading client request header.
    client_header_timeout   10;
    # Sets a timeout for transmitting a response to the client.
    send_timeout            10;
    # Limit requests from an IP address to five requests per second.
    # See http://nginx.org/en/docs/http/ngx_http_limit_req_module.html#limit_req_zone
    limit_req_zone          $binary_remote_addr zone=one:10m rate=5r/s;

    # Disables emitting Nginx version in error messages and in the 'Server' HTTP response header.
    server_tokens           off;

    # To serve static files using Nginx efficiently.
    sendfile                on;
    tcp_nopush              on;
    tcp_nodelay             off;

    # Enable GZIP compression.
    gzip                    on;
    # Enable GZIP maximum compression level. Ranges from 1 to 9.
    gzip_comp_level         9;
    # Enable GZIP over HTTP 1.0 (The default is HTTP 1.1).
    gzip_http_version       1.0;
    # Disable GZIP compression for IE 1 to 6.
    gzip_disable            "MSIE [1-6]\."
    # Enable GZIP compression for the following MIME types (text/html is included by default).
    gzip_types              # Plain Text
                            text/plain
                            text/css
                            text/mathml
                            application/rtf
                            # JSON
                            application/javascript
                            application/json
                            application/manifest+json
                            application/x-web-app-manifest+json
                            text/cache-manifest
                            # XML
                            application/atom+xml
                            application/rss+xml
                            application/xslt+xml
                            application/xml
                            # Fonts
                            font/opentype
                            font/otf
                            font/truetype
                            application/font-woff
                            application/vnd.ms-fontobject
                            application/x-font-ttf
                            # Images
                            image/svg+xml
                            image/x-icon;
    # Enables inserting the 'Vary: Accept-Encoding' response header.
    gzip_vary               on;

    # Sets configuration for a virtual server. You can have multiple virtual servers.
    # See http://nginx.org/en/docs/http/ngx_http_core_module.html#server
    server {

        # Listen for requests on specified port including support for HTTP 2.0.
        # See http://nginx.org/en/docs/http/ngx_http_core_module.html#listen
        listen                      80 http2 default;
        # Or, if using HTTPS, use this:
        # listen                      443 http2 ssl default;
        # Configure SSL/TLS
        # See http://nginx.org/en/docs/http/configuring_https_servers.html
        ssl_certificate             /etc/ssl/certs/testCert.crt;
        ssl_certificate_key         /etc/ssl/certs/testCert.key;
        ssl_protocols               TLSv1.1 TLSv1.2;
        ssl_prefer_server_ciphers   on;
        ssl_ciphers                 "EECDH+AESGCM:EDH+AESGCM:AES256+EECDH:AES256+EDH";
        ssl_ecdh_curve              secp384r1;
        ssl_session_cache           shared:SSL:10m;
        ssl_session_tickets         off;
        # Ensure your cert is capable before turning on SSL Stapling.
        ssl_stapling                on;
        ssl_stapling_verify         on;

        # The name of the virtual server where you can specify one or more domains that you own.
        server_name					localhost;
        # server_name    example.com www.example.com *.example.com www.example.*;

        # Match incoming requests with the following path and forward them to the specified location.
        # See http://nginx.org/en/docs/http/ngx_http_core_module.html#location
        location / {

            proxy_pass              http://localhost:1025;

            # The default minimum configuration required for ASP.NET Core
            # See https://docs.asp.net/en/latest/publishing/linuxproduction.html?highlight=nginx#configure-a-reverse-proxy-server
            proxy_cache_bypass      $http_upgrade;
            # Turn off changing the URL's in headers like the 'Location' HTTP header.
            proxy_redirect          off;
            # Forwards the Host HTTP header.
            proxy_set_header        Host $host;
            # The Kestrel web server we are forwarding requests to only speaks HTTP 1.1.
            proxy_http_version      1.1;
            proxy_set_header        Upgrade $http_upgrade;
            # Adds the 'Connection: keep-alive' HTTP header.
            proxy_set_header        Connection keep-alive;

            # Sets the maximum allowed size of the client request body.
            client_max_body_size    10m;
            # Sets buffer size for reading client request body.
            client_body_buffer_size 128k;
            # Defines a timeout for establishing a connection with a proxied server.
            proxy_connect_timeout   90;
            # Sets a timeout for transmitting a request to the proxied server.
            proxy_send_timeout      90;
            # Defines a timeout for reading a response from the proxied server.
            proxy_read_timeout      90;
            # Sets the number and size of the buffers used for reading a response from the proxied server.
            proxy_buffers           32 4k;

        }

    }

}

types {

    # An expanded list of MIME type to file extension mappings for Nginx.

    # Data Interchange
    application/atom+xml                  atom;
    application/json                      json map topojson;
    application/ld+json                   jsonld;
    application/rss+xml                   rss;
    application/vnd.geo+json              geojson;
    application/xml                       rdf xml;

    # JavaScript
    application/javascript                js;

    # Manifest files
    application/manifest+json             webmanifest;
    application/x-web-app-manifest+json   webapp;
    text/cache-manifest                   appcache;

    # Media files
    audio/midi                            mid midi kar;
    audio/mp4                             aac f4a f4b m4a;
    audio/mpeg                            mp3;
    audio/ogg                             oga ogg opus;
    audio/x-realaudio                     ra;
    audio/x-wav                           wav;
    image/x-icon                          cur ico;
    image/bmp                             bmp;
    image/gif                             gif;
    image/jpeg                            jpeg jpg;
    image/png                             png;
    image/svg+xml                         svg svgz;
    image/tiff                            tif tiff;
    image/vnd.wap.wbmp                    wbmp;
    image/webp                            webp;
    image/x-jng                           jng;
    video/3gpp                            3gp 3gpp;
    video/mp4                             f4p f4v m4v mp4;
    video/mpeg                            mpeg mpg;
    video/ogg                             ogv;
    video/quicktime                       mov;
    video/webm                            webm;
    video/x-flv                           flv;
    video/x-mng                           mng;
    video/x-ms-asf                        asf asx;
    video/x-ms-wmv                        wmv;
    video/x-msvideo                       avi;

    # Microsoft Office
    application/msword                                                         doc;
    application/vnd.ms-excel                                                   xls;
    application/vnd.ms-powerpoint                                              ppt;
    application/vnd.openxmlformats-officedocument.wordprocessingml.document    docx;
    application/vnd.openxmlformats-officedocument.spreadsheetml.sheet          xlsx;
    application/vnd.openxmlformats-officedocument.presentationml.presentation  pptx;

    # Web Fonts
    application/font-woff                 woff;
    application/font-woff2                woff2;
    application/vnd.ms-fontobject         eot;
    application/x-font-ttf                ttc ttf;
    font/opentype                         otf;

    # Other
    application/java-archive              ear jar war;
    application/mac-binhex40              hqx;
    application/octet-stream              bin deb dll dmg exe img iso msi msm msp safariextz;
    application/pdf                       pdf;
    application/postscript                ai eps ps;
    application/rtf                       rtf;
    application/vnd.google-earth.kml+xml  kml;
    application/vnd.google-earth.kmz      kmz;
    application/vnd.wap.wmlc              wmlc;
    application/x-7z-compressed           7z;
    application/x-bb-appworld             bbaw;
    application/x-bittorrent              torrent;
    application/x-chrome-extension        crx;
    application/x-cocoa                   cco;
    application/x-java-archive-diff       jardiff;
    application/x-java-jnlp-file          jnlp;
    application/x-makeself                run;
    application/x-opera-extension         oex;
    application/x-perl                    pl pm;
    application/x-pilot                   pdb prc;
    application/x-rar-compressed          rar;
    application/x-redhat-package-manager  rpm;
    application/x-sea                     sea;
    application/x-shockwave-flash         swf;
    application/x-stuffit                 sit;
    application/x-tcl                     tcl tk;
    application/x-x509-ca-cert            crt der pem;
    application/x-xpinstall               xpi;
    application/xhtml+xml                 xhtml;
    application/xslt+xml                  xsl;
    application/zip                       zip;
    text/css                              css;
    text/html                             htm html shtml;
    text/mathml                           mml;
    text/plain                            txt;
    text/vcard                            vcard vcf;
    text/vnd.rim.location.xloc            xloc;
    text/vnd.sun.j2me.app-descriptor      jad;
    text/vnd.wap.wml                      wml;
    text/vtt                              vtt;
    text/x-component                      htc;

}
NGINX Modules
Like IIS, NGINX has modules that you can add to it, to provide extra features. There are a number of them out there. I’ve listed two that I care about and you should too.
Installing modules is best done by downloading the NGINX source, as well as the modules you need and then compiling the application. There is a feature called dynamic modules which lets you dynamically load additional separate modules after installing NGINX but the link suggests third party modules may not be supported so I didn’t try it out.
HTTP 2.0
The ngx_http_v2_module module lets you use HTTP 2.0. HTTP 2.0 gives your site a very rough ~3-5% performance boost and that’s before using any of it’s more advanced features which not many people are using yet.
Brotli Compression
The ngx_brotli module lets NGINX use the Brotli compression algorithm. If you haven’t heard about Brotli, you should take note. Brotli is a compression algorithm built by Google and is perhaps set to take over from GZIP as the compression algorithm of the web. It’s already fully supported on Firefox, Chrome and Opera with only Edge lagging behind.
Depending on how much extra CPU power you are wanting to use (it can max out your CPU at the highest compression levels, which could DoS your site if someone makes too many requests, so be careful what compression level you choose), Brotli can compress files and save you around 10-20% bandwidth over what GZIP can do! Those are some significant savings.
.NET Boxed
I have updated the .NET Boxed project template, so you can now choose the web server (IIS or NGINX) you want to use. If you choose to use NGINX, you can have it pre-configured just for you, right out of the box.
Conclusions
The main reason, I’ve been taking a serious look at NGINX is hard cash. Running Linux servers in the cloud can costs around half the price of a Windows server. Also, you can nab yourself some pretty big performance wins by using the modules I’ve listed.
There are some interesting overlaps between ASP.NET Core and NGINX. Both can be used to serve static files, HTTP headers, GZIP files etc. I think ASP.NET Core is slowly going to take on more of the role that traditionally was the preserve of the web server.
The cool thing is that because ASP.NET Core is just C#, we’ll have a lot of power to configure things using code. NGINX lets you do more advanced configuration using the Lua language and soon even in JavaScript but putting that logic in the app where it belongs and where you can do powerful things makes sense to me.
June 28, 2016 by Anuraj Estimated read time : 3 mins
ASP.NET Core Nginx Reverse Proxy Load balancing
This post is about running your ASP.NET Core application with Nginx as reverse proxy on Windows. Nginx is a web server. It can act as a reverse proxy server for HTTP, HTTPS, SMTP, POP3, and IMAP protocols, as well as a load balancer and an HTTP cache. Nginx runs on Unix, Linux, BSD variants, OS X, Solaris, AIX, HP-UX, and Windows. Released under the terms of a BSD-like license, Nginx is free and open source software. Few months back on K-MUG Techday, on a NodeJS session, I asked the question about using NodeJS in enterprise project, then I got introduced to Nginx and reverse proxy concepts in NodeJS. Similar to Node, ASP.NET Core is also supports the Kestrel hosting than IIS, it can be also used along with Nginx and can be hosted in Linux as well..
You can download the Windows version of Nginx from the Nginx download page. You can find more details on Nginx windows version here. Once downloaded, extract the Nginx zip file. And you can run the Nginx.exe file. By default Nginx.exe runs on port 80, if you have IIS installed and running, Nginx.exe will fail to start. You can configure the default port for nginx in the “nginx.conf” file, under “conf” directory. You can modify the server / listen property.
Here is the minimal Nginx configuration to use with Kestrel.
server {
    listen 8080;
    server_name 172.16.198.154;

    root /samplewebapp/wwwroot;

    location ~ \.(jpg|jpeg|gif|png|ico|css|zip|tgz|gz|rar|bz2|pdf|txt|tar|wav|bmp|rtf|js|flv|swf|html|htm|woff2|svg)$ {
        expires 1d;
        access_log off;
        add_header X-Static-File true;
    }

    location / {
        proxy_pass http://127.0.0.1:5000;
        proxy_set_header Connection "";
        proxy_http_version 1.1;
    }
}
You can configure Nginx for load balancing web applications as well. Right now I am configuring Nginx to load balance ASP.NET Core applications running on top of Kestrel. You can do it with Docker as well. For this post I am running Kestrel on different port numbers and load balancing using Nginx default load balancing strategy (Round Robin), and here is the configuraion for load balancing.
upstream localhostapp {
	server 172.16.198.154:5000;
	server 172.16.198.154:5001;
	server 172.16.198.154:5002;
}

server {
	listen       8080;
	server_name  172.16.198.154;

	location / {
		proxy_pass http://localhostapp;
		proxy_set_header Connection keep-alive;
		proxy_set_header Host $host;
	}
}
This configuration tells Nginx to accept requests on port 8080 and proxy those requests to 172.16.198.154:5000, 172.16.198.154:5001 and 172.16.198.154:5002. Now you can shutdown the Nginx.exe using “nginx -s quit” command and restart, and browse the application with 8080 port, you can see your application is load balanced.
Happy Programming 
Interesting article? Share it with your friends.
NginX is a basket full of interesting features, but here, I’ll focus on using it as reverse proxy.
Resources
Theses are the resources I’ve used and read to use NginX as my local reverse proxy for KESTREL.
- https://aspnetmonsters.com/2016/07/2016-07-17-nginx/
- NginX download: http://nginx.org/en/download.html
- nginx for windows: http://nginx.org/en/docs/windows.html
- An intro to nginx for KESTREL: https://aspnetmonsters.com/2016/07/2016-07-17-nginx/
- Beginner’s Guide: http://nginx.org/en/docs/beginners_guide.html
- Increase names hash bucket size: http://charles.lescampeurs.org/2008/11/14/fix-nginx-increase-server_names_hash_bucket_size
- nginx server block: http://stackoverflow.com/questions/13240840/nginx-reverse-proxy-multiple-backends
- automatic proxy settings overrides your local hosts file: http://stackoverflow.com/questions/17842750/windows-hosts-file-not-working
download nginx
Let’s install NginX first. It’s highly recommend that you use NginX on linux, not windows though. We just do it on windows for local development. Let’s go to http://nginx.org/en/download.html and download windows binary. Unzip it and rename the folder like C:\nginx
To test, you run nginx.exe. I got a message like this.
nginx: [emerg] bind() to 0.0.0.0:80 failed (10013: An attempt was made to access a socket in a way forbidden by its access permissions)
It’s because port :80 is already being used. On windows machine, there are a few applications that could be using port 80. It might be Skype, IIS or Sql Server Reporting. In my case, it was SQL server Reporting service. So I went to services and stopped it.
Once you stopped any service that occupied port 80, ngingx should be able to bind to port 80.
Now let’s set up the configuration for our needs.
nginx configuration
I’ve made a back-up of the existing nginx.conf like nginx — backup.conf.
Here is my configuration.
worker_processes  1;

error_log  logs/error.log;
error_log  logs/error.log  notice;
error_log  logs/error.log  info;

pid        logs/nginx.pid;

events {
    worker_connections  1024;
}

http {
    include       mime.types;
    default_type  application/octet-stream;

    log_format  main  '$remote_addr - $remote_user [$time_local] "$request" '
                      '$status $body_bytes_sent "$http_referer" '
                      '"$http_user_agent" "$http_x_forwarded_for"';

    access_log  logs/access.log  main;
    sendfile        on;
    keepalive_timeout  65;
    gzip  on;

    server {
        listen       80;
        server_name  localhost;

        location / {
          proxy_pass http://127.0.0.1:8060/;
        }
    }
}
It listens to port 80 and the server name is localhost. It will redirect the requst to localhost:8060 where my asp.net core app’s running on kestrel. However, I don’t want to use localhost. I’d like to map a subdomain to the app like awesomeapp.mydomain.com.
So I’ve added host entry and changed the server name.
c:\windows\system32\drivers\etc\hosts
127.0.0.1 ir-local.services.com
caution
Make sure you don’t have automatic proxy settings and put your address in the proxy exemption list. (http://stackoverflow.com/questions/17842750/windows-hosts-file-not-working). If you have automatic proxy, it’ll override your hosts file entry
nginx.conf
http {
    include       mime.types;
    default_type  application/octet-stream;

    log_format  main  '$remote_addr - $remote_user [$time_local] $host "$request" '
                      '$status $body_bytes_sent "$http_referer" '
                      '"$http_user_agent" "$http_x_forwarded_for"'
                      '$host $http_host';

    access_log  logs/access.log main;
    sendfile        on;
    keepalive_timeout  65;
    gzip  on;
    server_names_hash_bucket_size 64;

    server {
        listen       80;
        server_name  ir-local.astalavista.com;
        access_log  logs/access.ir.local.log main;

        location / {
          proxy_set_header X-Real-IP $remote_addr;
          proxy_set_header Host $host;
          proxy_set_header X-Forwarded-For $proxy_add_x_forwarded_for;
          proxy_pass http://127.0.0.1:8060;
        }
    }
}
In the meantime, I came across an error, “nginx: [emerg] bind() to 0.0.0.0:80 failed (10013: An attempt was made to access a socket in a way forbidden by its access permissions)”. It’s becasue my domain names were quite long. You can increase the size of hash bucket in the config.
http {
    server_names_hash_bucket_size 64;
    ...
}
Few weeks ago I showed how to host ASP NET Core on Windows Server behind IIS. Compared to Windows Server, Ubuntu with nginx offers a quicker way to get started and a better control over the kestrel process.
Today we will see how to host an ASP NET Core application on Ubuntu. This post will be composed of three parts:
- Install nginx
- Configure nginx
- Host ASP NET Core
1. Install nginx
Start by installing nginx.
sudo apt-get update
sudo apt-get install nginx
After installing nginx, the daemon should have been installed and started. We should be able to navigate to http://localhost and see the nginx default page.
This page is the default root folder of nginx which can be found under /var/www/html/.
We should also be able to interact with it just like any other daemon managed by systemd:
sudo systemctl start nginx
sudo systemctl stop nginx
sudo systemctl restart nginx
sudo systemctl status nginx
And similarly it can be debugged via journald:
sudo journalctl -xeu nginx
If you aren’t familiar with systemd, you can read my previous blog post on how to Manage Kestrel process with systemd.
2. Configure nginx reverse proxy
Nginx is configured using configuration files known as sites.
It is made of modules containing directives allowing us to configure the behaviors of the proxy. The full documentation list all modules.
Here we will use server and location directives coming from the main module and some other directives coming the proxy module.
Nginx comes with a default configuration which can be found under the sites available /etc/nginx/sites-available/default. This is the default created with runs the index page from nginx.
We can create multiple configutations under the sites-available folder like so:
/sites-available/default
/sites-available/myapp.com
/sites-available/helloworld.net
Those configurations will not yet be used by nginx. We need to enable them by having them in the sites-enable folder. This is achieved by creating a symlink, if we navigate to /etc/nginx/sites-enabled, we can find the symlink of default.
ln -s /etc/nginx/sites-available/myapp /etc/nginx/sites-enabled/myapp
In this example we will setup a frontend with an api. The frontend is a static html page which calls the backend via an api which is built in ASP NET Core.
To setup this, we can start by making our static page available by putting it into our app folder.
/usr/share/myapp/www/index.html.
Then we can setup the first location.
server {
    listen 80 default;
    listen [::]:80;
    server_name myapp.com www.myapp.com;
    root /usr/share/myapp/www;

    location / { }
}
Here we created a server which serves the default index on myapp.com. We listen on port 80 where [::]:80 is meant for ipv6.
root is used to change the root folder to find the index file.
server_name defines the hostname which is handled by this configuration.
The location targets / with an empty content. This will then look for the default page which is the index file.
Now that the static files are served, we can proxy calls going to /api to our kestrel process:
server {
    listen 80;
    listen [::]:80;
    server_name myapp.com www.myapp.com;
    include /etc/nginx/conf.d/http;

    location / { }

    location /api/ {
        include /etc/nginx/proxy_params;
        proxy_pass http://localhost:5000/;
    }
}
include is a directive from the core module which allows us to include a set of directives.
We included proxy_params which is a set of directives condensed for proxying. This file can be found in /etc/nginx/proxy_params.
We also included a set of http params which set the connection to keep-alive.
# /etc/nginx/conf.d/http
proxy_http_version 1.1;
proxy_set_header Connection keep-alive;
proxy_set_header Upgrade $http_upgrade;
proxy_cache_bypass $http_upgrade;
For http://localhost:5000/, the URI / is important as it indicates to nginx that we want to append the rest of the path and remove the matching part. Because of that, on /api/, the trailing slash is equally important as nginx appends a slash (else the proxy would be http://localhost/api/a/b/c => http://localhost:5000//a/b/c which won’t be valid).
Once we are done we can check if the configuration is valid nginx -t. Next we can reload nginx with sudo systemctl restart nginx.
Provided that the symlink was already created, we should now be able to navigate to our static index and to our api endpoints.
3. Host ASP NET Core
Just to complete the loop, we can create a simple ASP NET Core application with a single endpoint returning a json object.
public class HomeController: Controller
{
    [HttpGet("/home")]
    public IActionResult Get()
    {
        return Json(new { test = "test" });
    }
}
We can then uploaded on our server via scp. If you are not familiar with ssh on linux, you can refer to my previous blog post on ssh
scp -r /myapp hostname1:~/
sudo mv ~/myapp /usr/share/myapp
We upload our binaries to /usr/share/myapp as it is the recommended linux filesystem path.
https://en.m.wikipedia.org/wiki/Filesystem_Hierarchy_Standard
Then we can start the process using systemd like how I explained on my previous blog post on How to manage Kestrel with systemd.
And that conclude this post. Now that we have our app setup and nginx setup, we should be able to navigate to the site!
Conclusion
Today we saw how we could configure nginx to proxy our static content and our api. We saw how to work with nginx modules and directives and more importantly where to find the documentation. Lastly we saw how we could put our application on the server and have it proxied behind nginx. Hope you like this post, see you next time!