In this article, I will explain how you can install and configure an NFS Server on a Windows 2019 Server. I will also show you the steps to create an NFS shared folder and mount the shared folder on Linux clients.
What is the Network File System (NFS)?
Network File System (NFS) provides a file-sharing solution that lets you transfer files between computers running Windows Server and other non-Windows operating systems such as Linux or UNIX using the NFS protocol.
NFS in Windows Server includes Server for NFS and Client for NFS. A computer running Windows Server can use Server for NFS to act as an NFS file server for other non-Windows client computers.
Client for NFS allows a Windows-based computer running Windows Server to access files stored on a non-Windows NFS server.
Understanding Test lab:
For this, we will use the virtual test lab created in VirtualBox.
- WS2K19-DC01: Domain Controller and DNS
- UBUNTU1804: Ubuntu OS, NFS client.
Install Server for NFS role service in Windows Server 2019:
To install the Server for NFS role service in Windows Server 2019, follow the below steps:
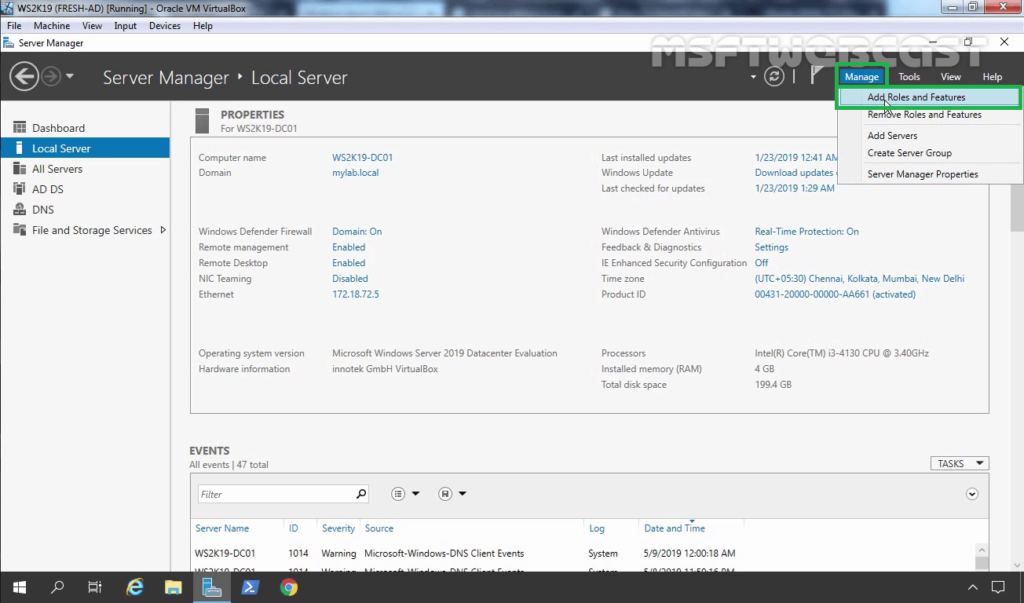
1. Open Server Manager. Click on Tools and select Add Role and Features.
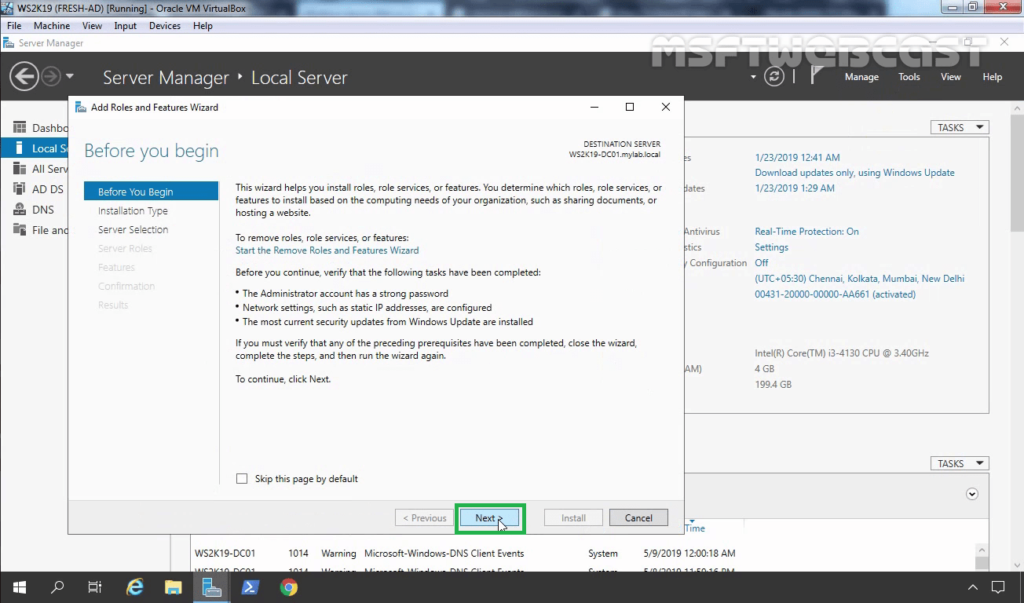
2. On the Before you begin page, click Next.
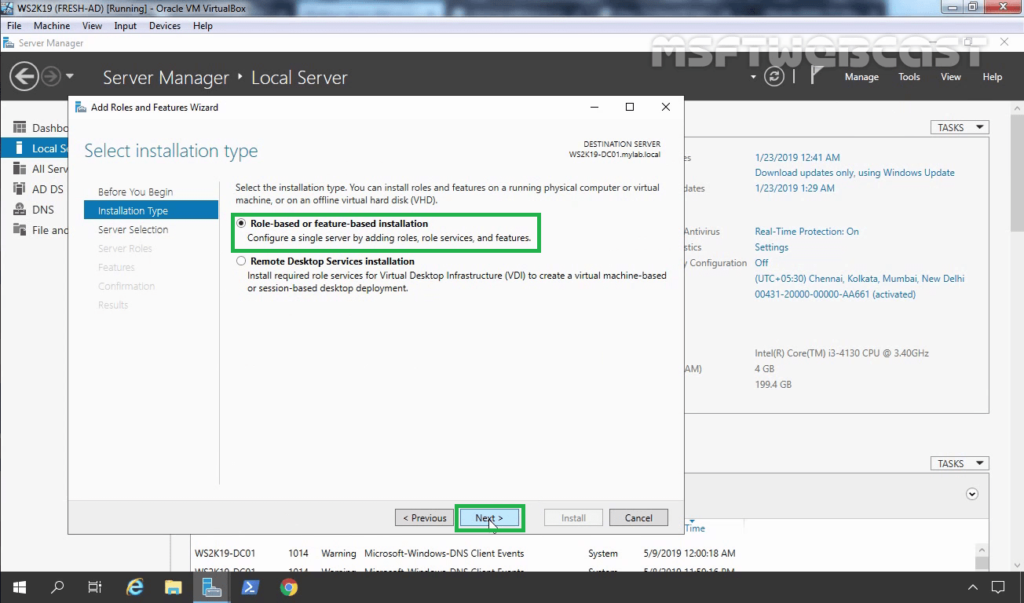
3. Select Role-based or feature-based installation and click Next.
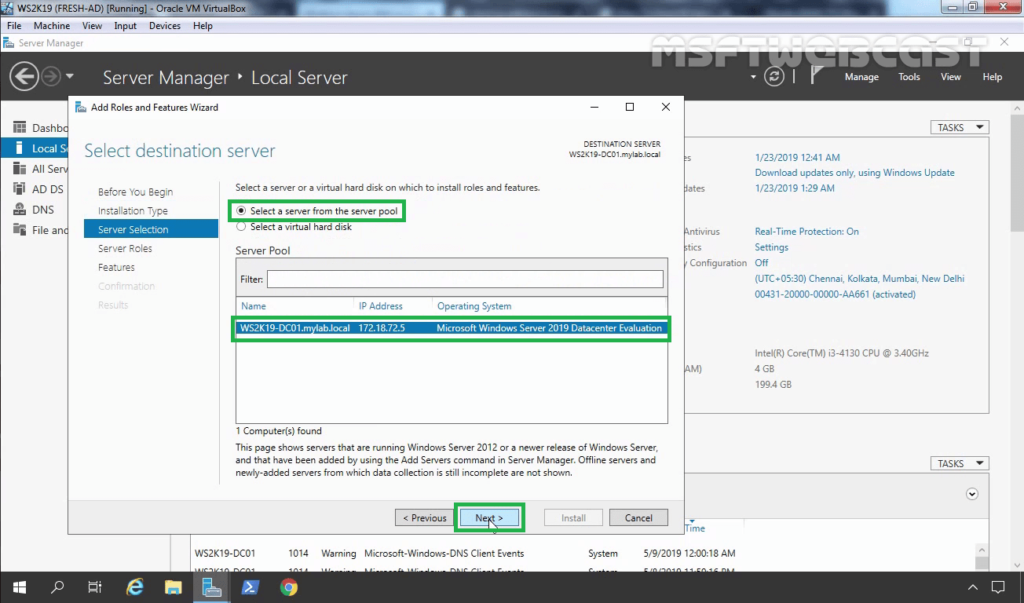
4. Select a server from the server pool on which you want to install the Network File System for Server role service, click Next.
5. On select server roles page, expand File and Storage Services, expand File and iSCSI Services. Select Server for NFS checkbox.
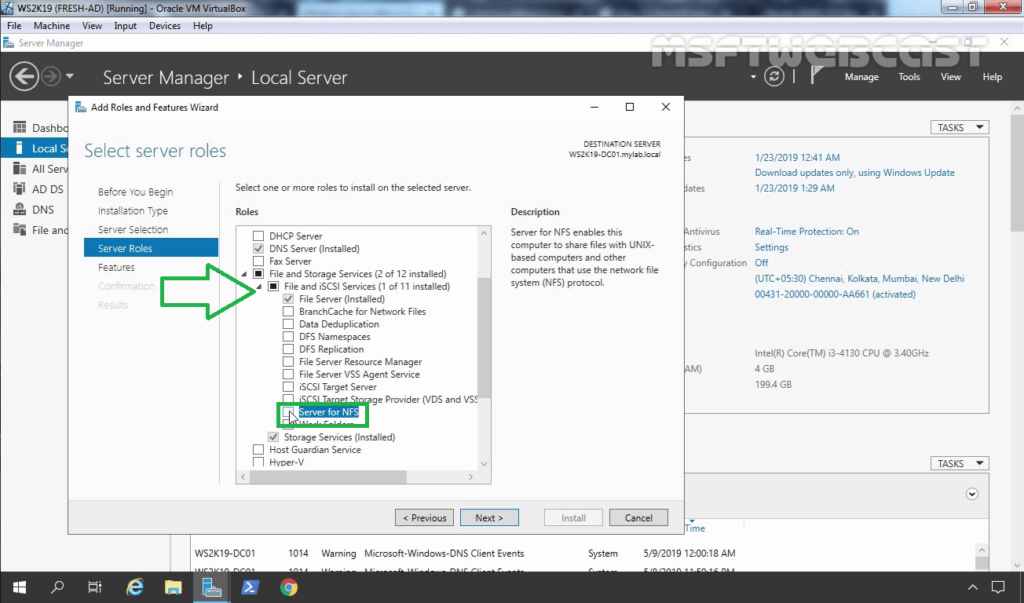
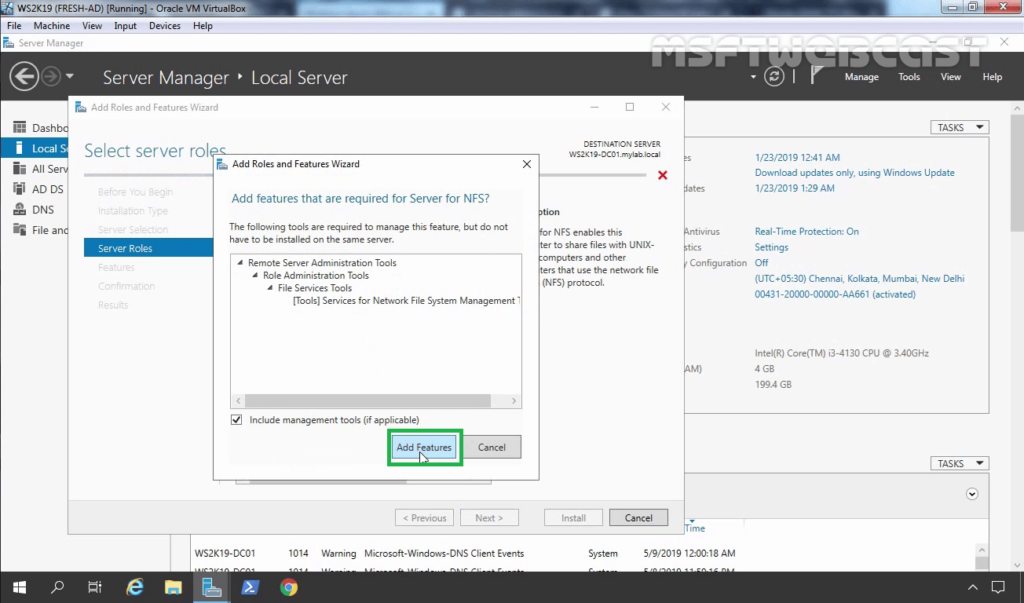
6. A new window will pop up, click on Add Features to include required features and management tools needed by the NFS server.
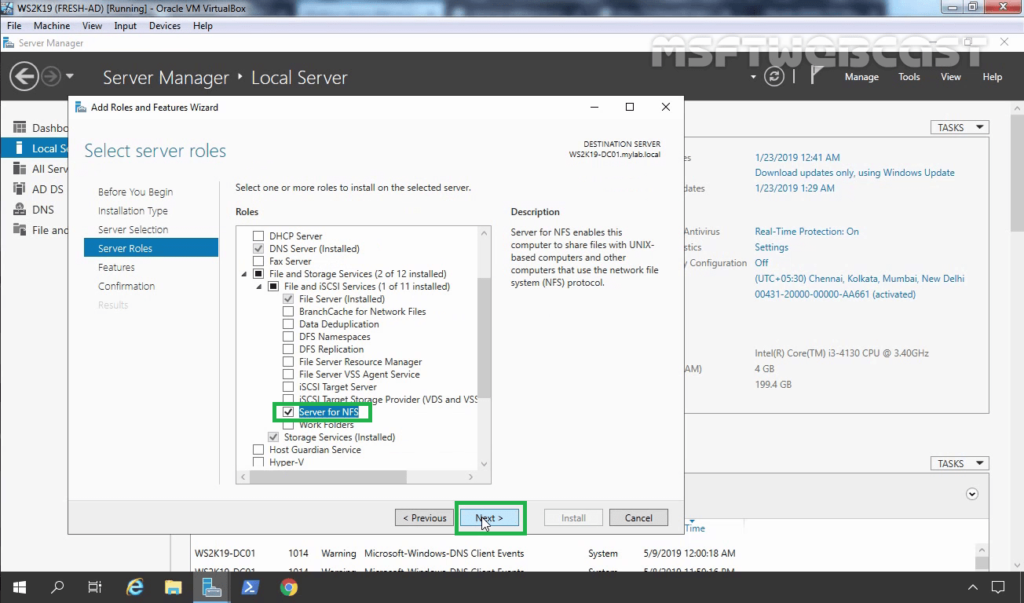
7. Make sure that the Server for NFS role service is selected. Click Next.
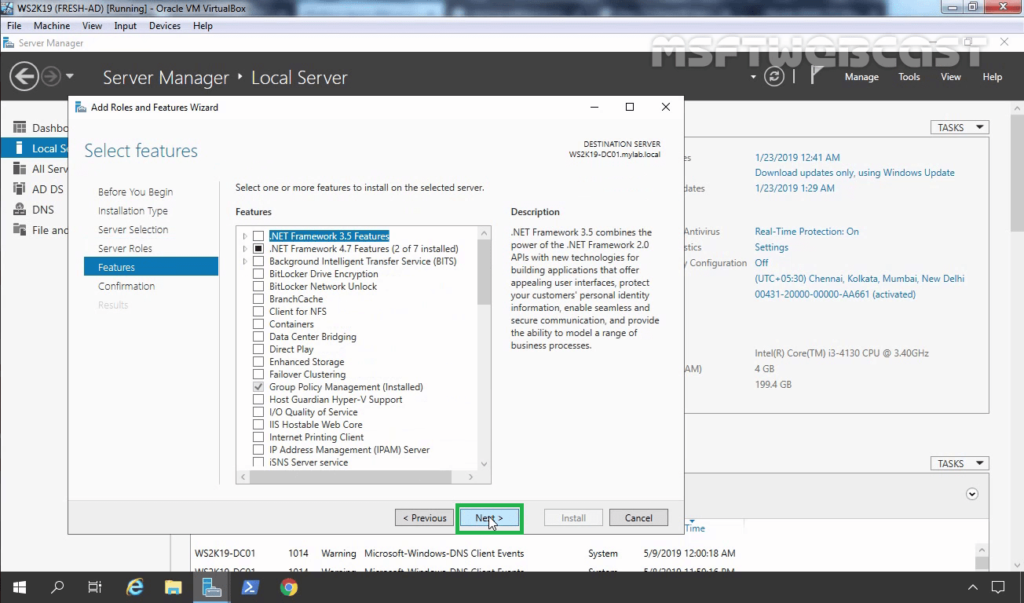
8. On select features, click Next.
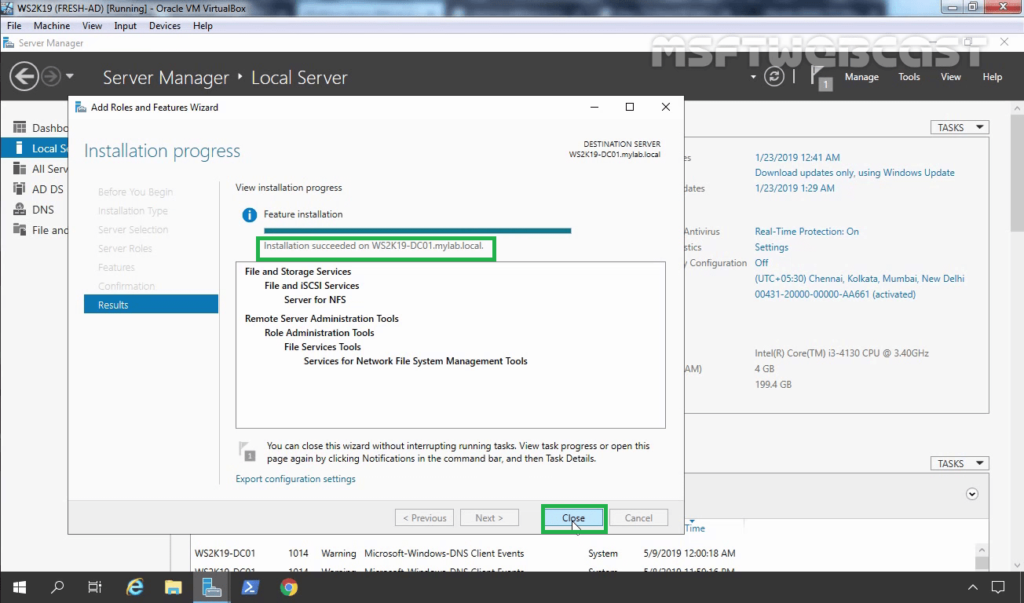
9. Click Install and complete the installation process.
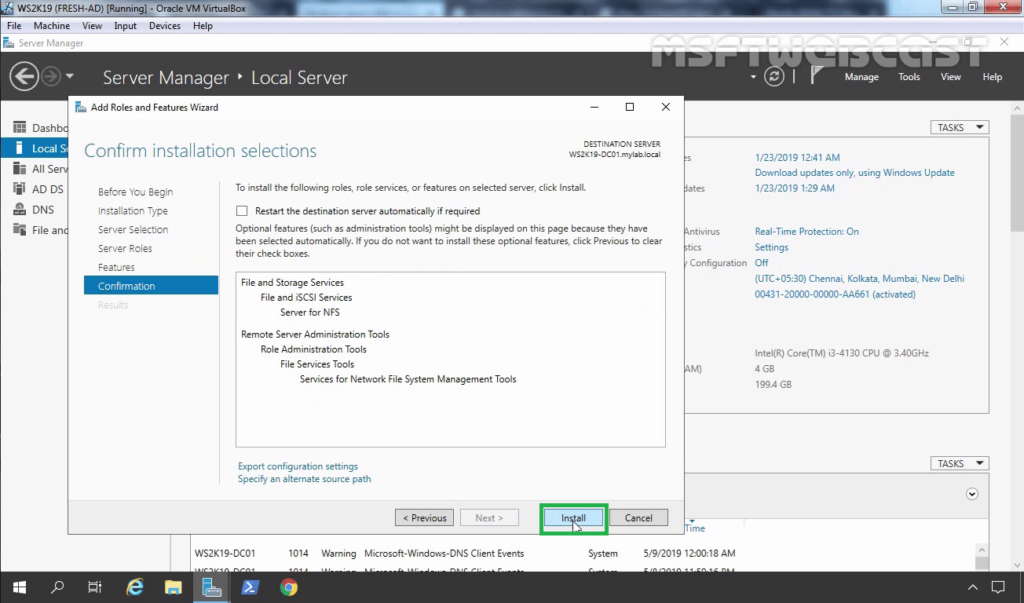
10. Click Close to finish the installation.
How to Create an NFS Shared Folder on Server 2019:
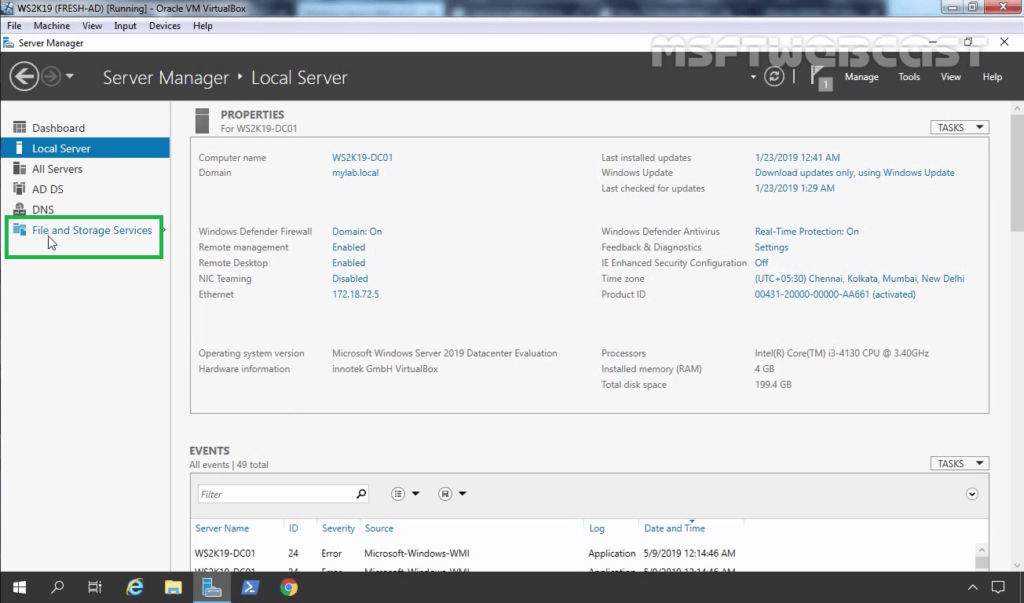
After installing the Server for NFS on Windows Server 2019, the next step is to create an NFS shared folder by using the File and Storage Services console.
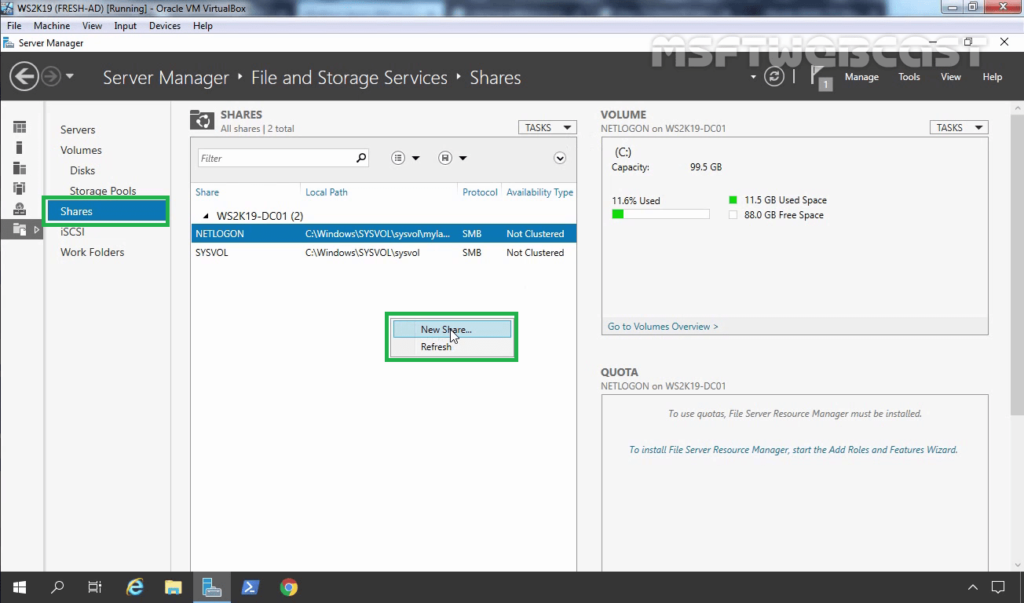
11. On the Server Manager Console, click on File and Storage Services.
12. Click on Shares. Right-click in the empty area and select New Share.
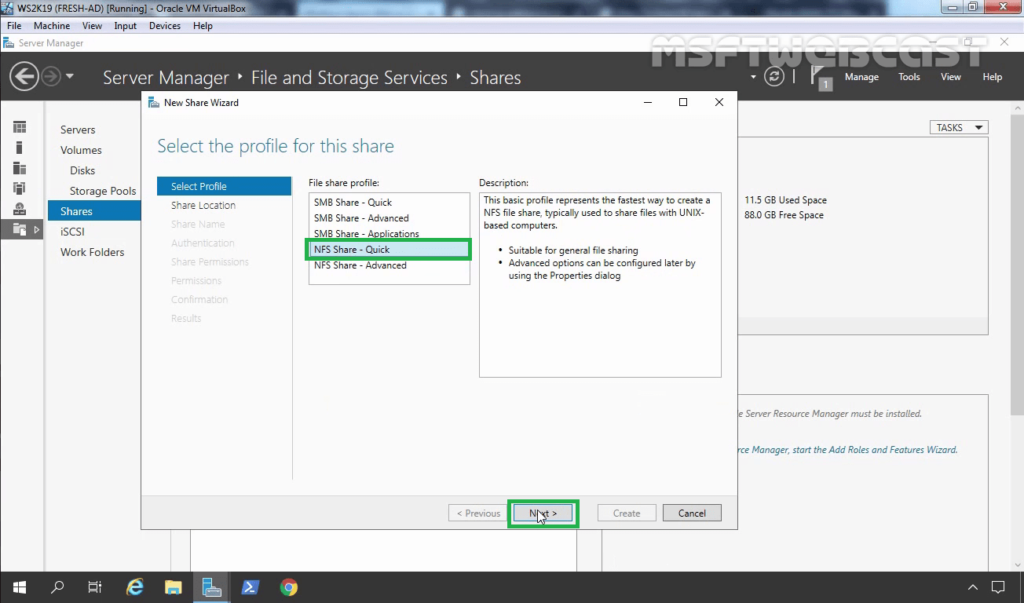
13. On Select the profile for this share, select NFS Share – Quick profile. Click Next.
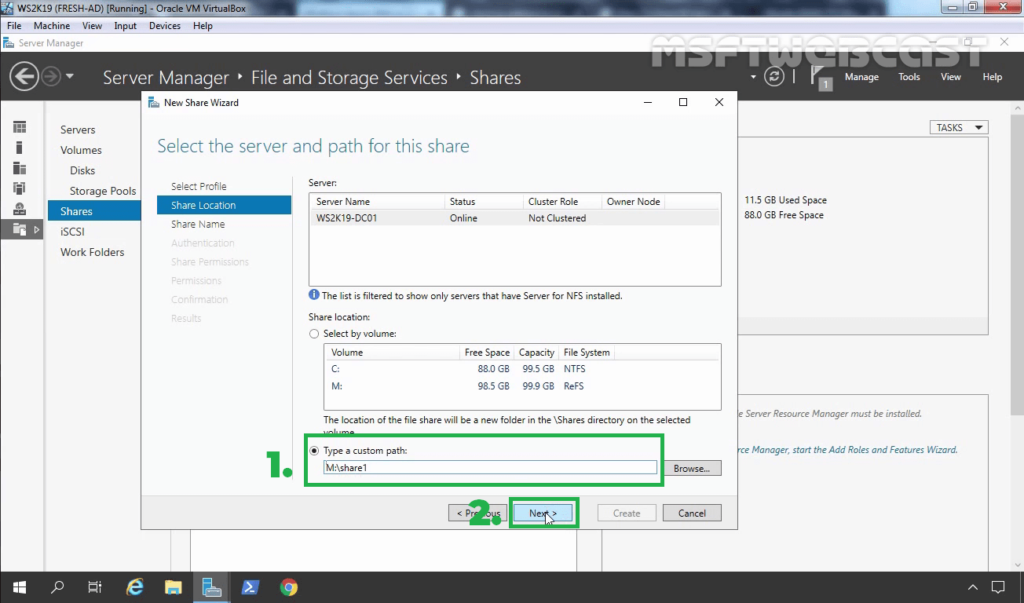
14. To configure a specific folder as NFS shared folder, select the checkbox Type a custom path and type the path for the specific folder you’d like to set as a shared folder. Click Next.
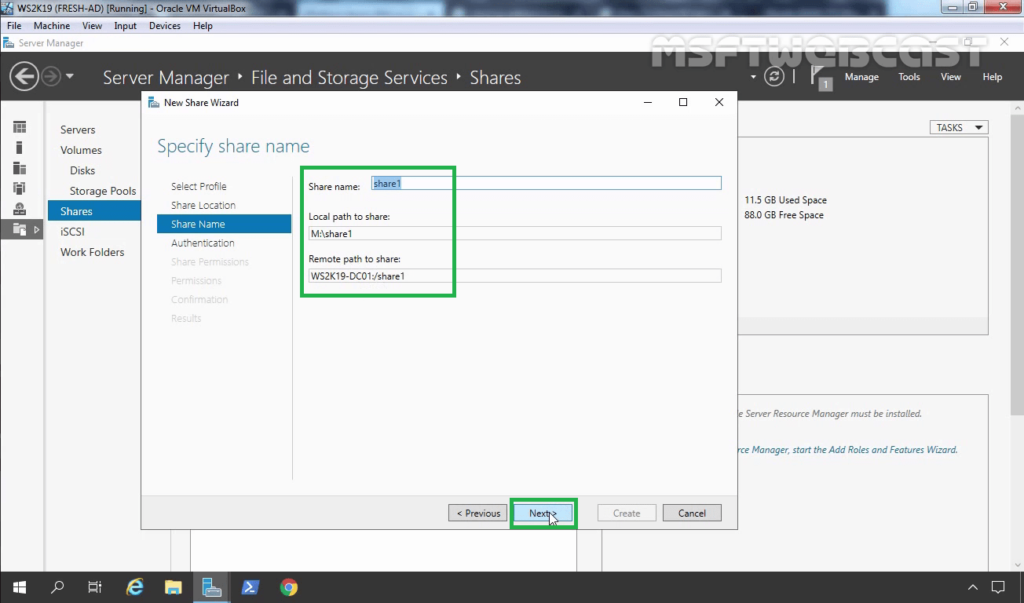
15. Verify share name, local path and remote path for NFS shared folder. Click Next.
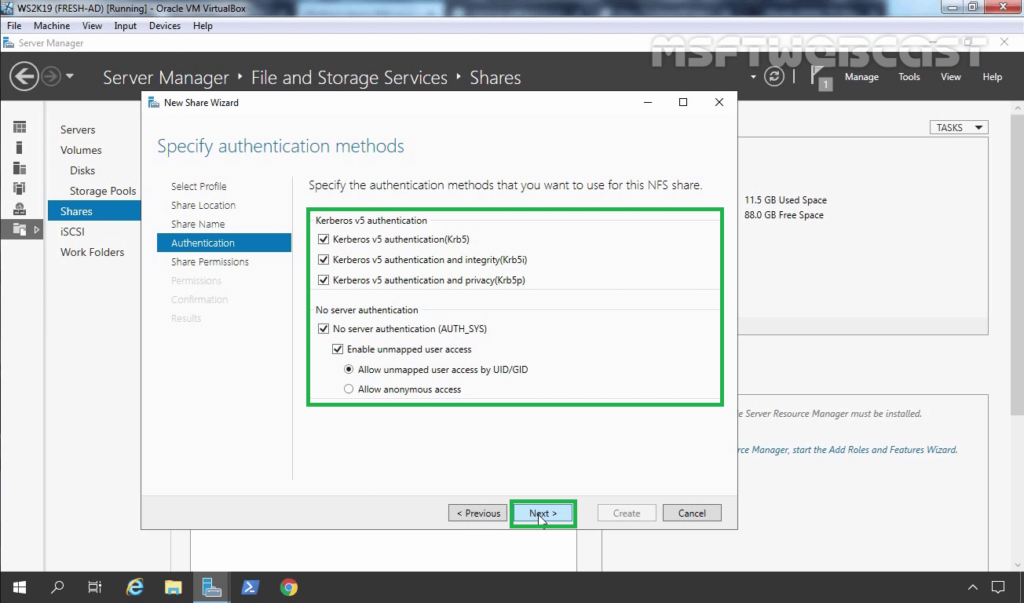
16. Specify the Authentication methods as per your requirement.
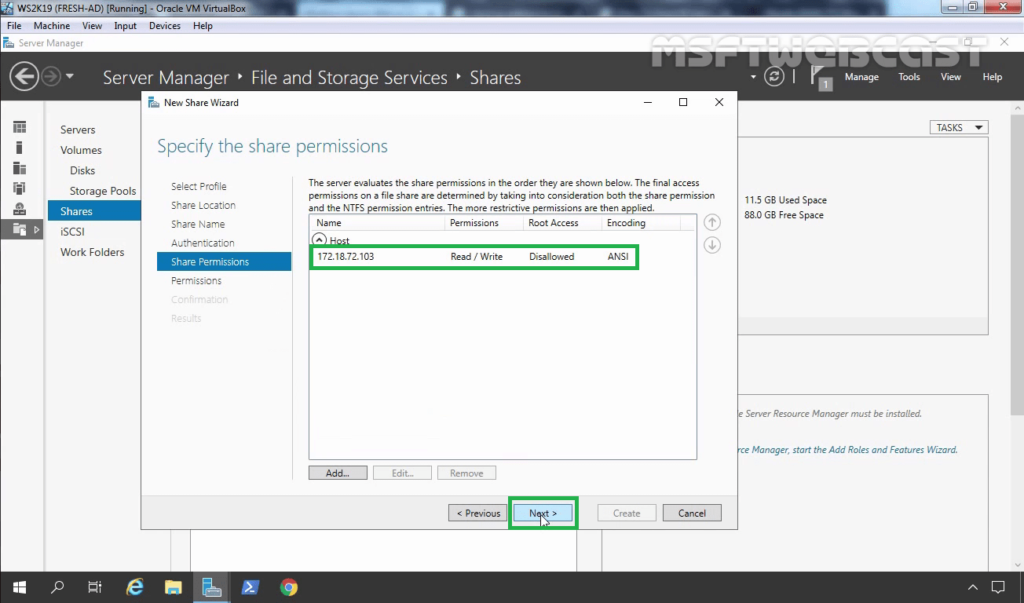
17. To set up the NFS share permissions, click Add button.
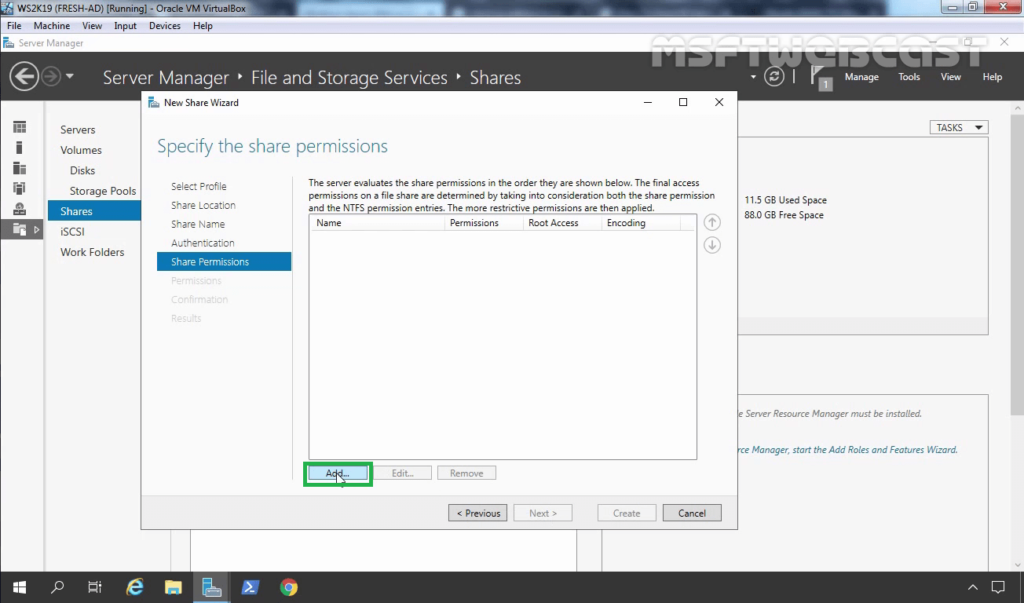
18. Specify the Hosts you’d like and assign the access permissions from the drop-down menu.
- Host: 172.18.72.103 (IP address of Ubuntu VM)
- Share Permissions: Read/Write
19. Click on Add.
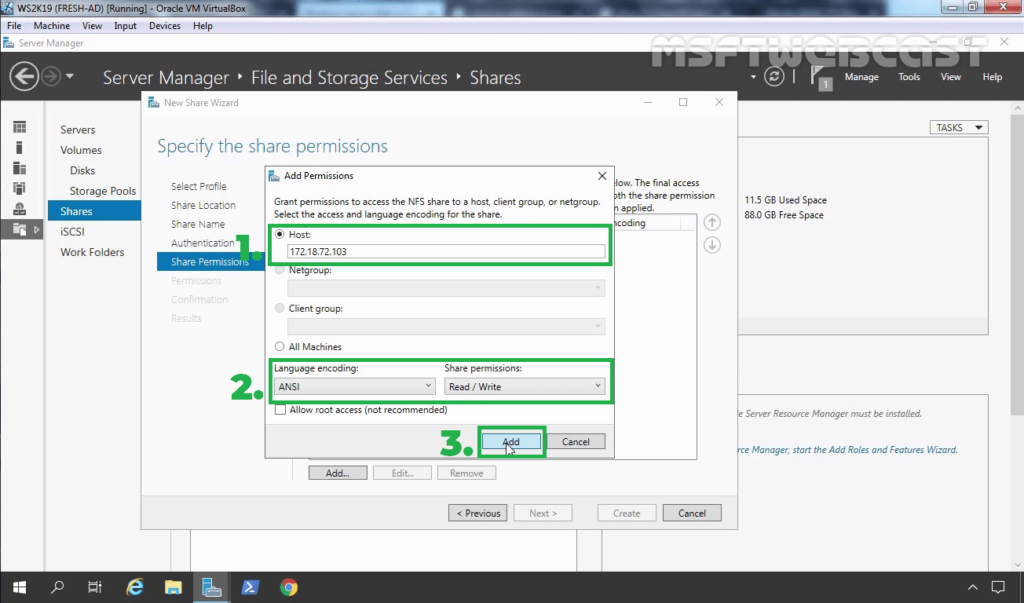
20. Using the same steps, you can add permission for other Hosts as well. Click Next.
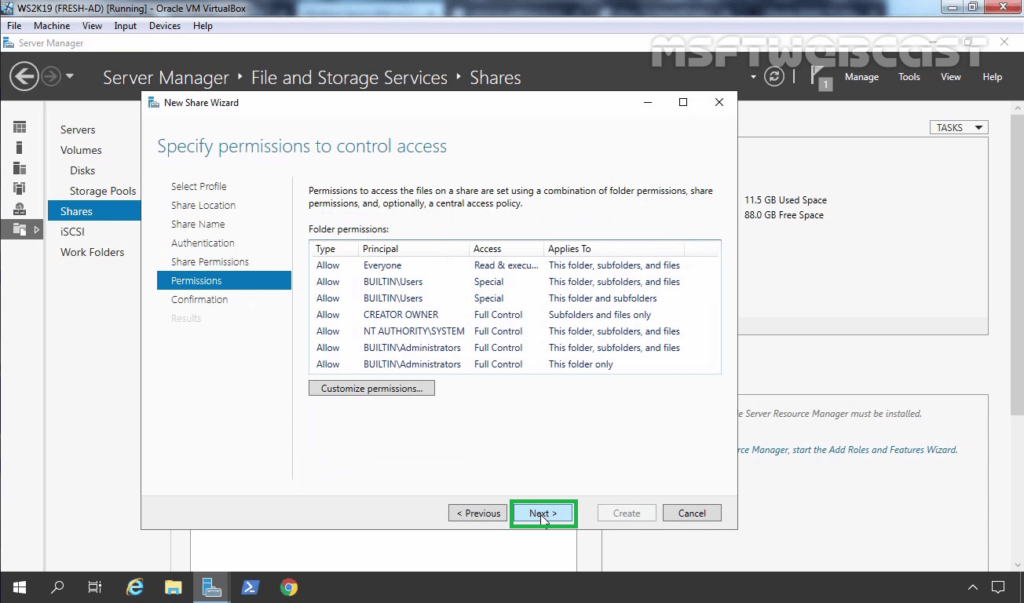
21. Specify NTFS permission. As we are just testing NFS sharing, we are going with default permission. Click Next.
22. Review the selections, click on the Create button.
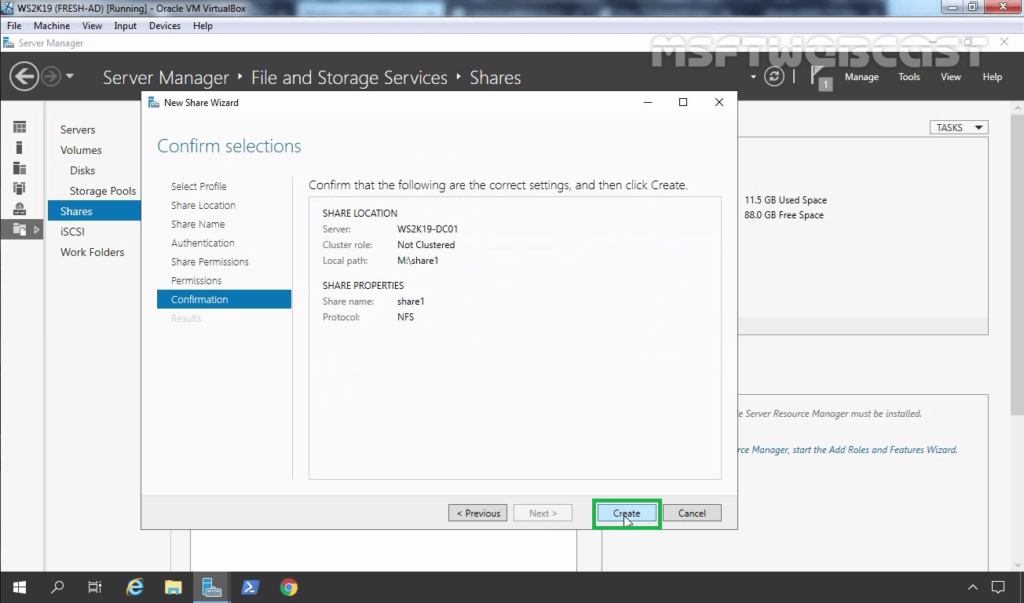
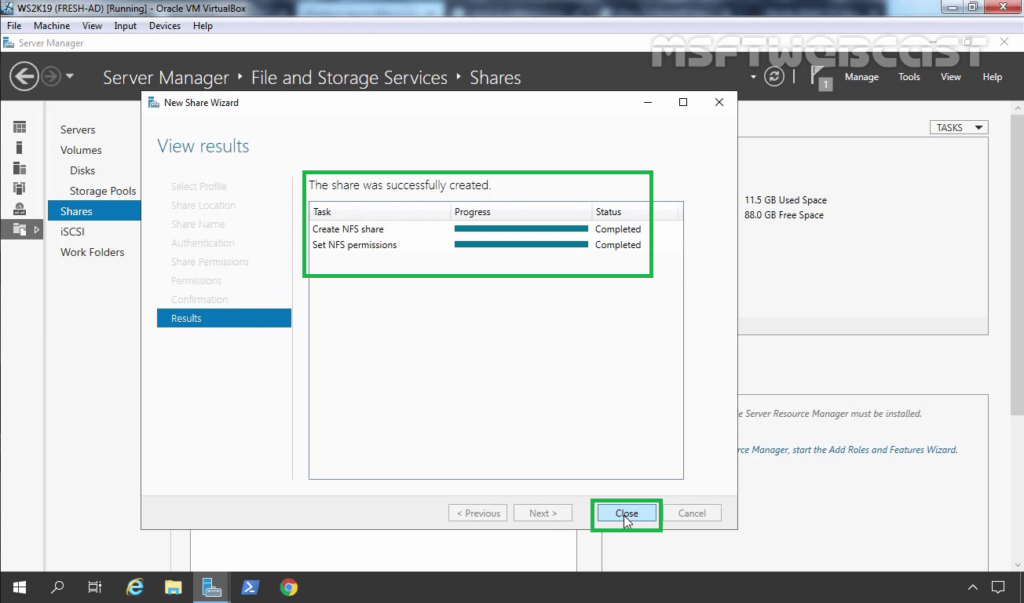
23. Click on the close button after verifying the successful creation of the NFS shared folder.
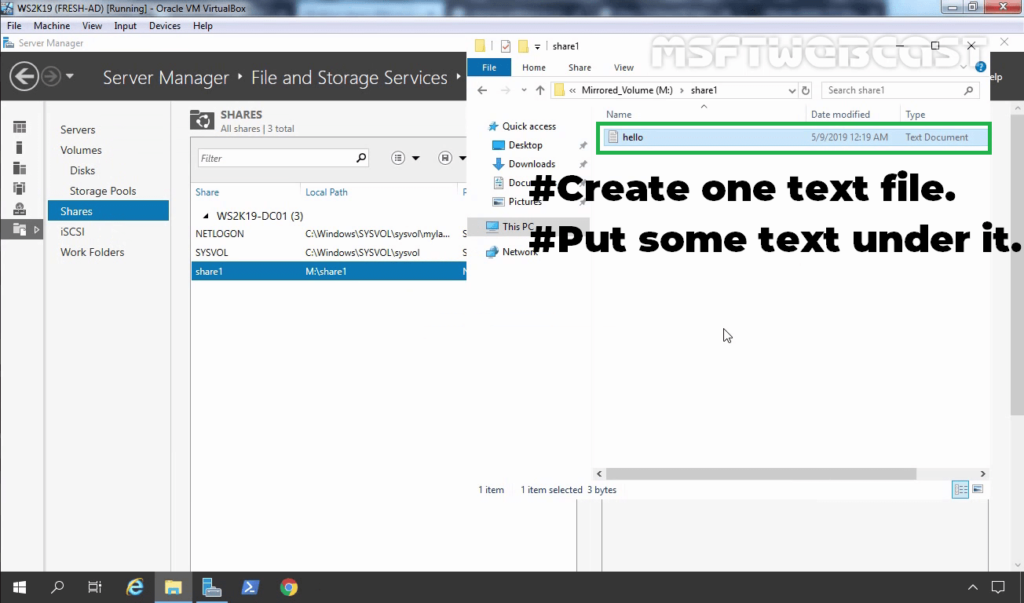
24. Verify the NFS shared folder under the shares list. Access the local path of the NFS shared folder. Create one text file and put some text under it.
Mount the NFS shared Folder on Linux Client (Ubuntu Machine):
25. On the Ubuntu machine, verify the local IP address and network connectivity with the NFS server.
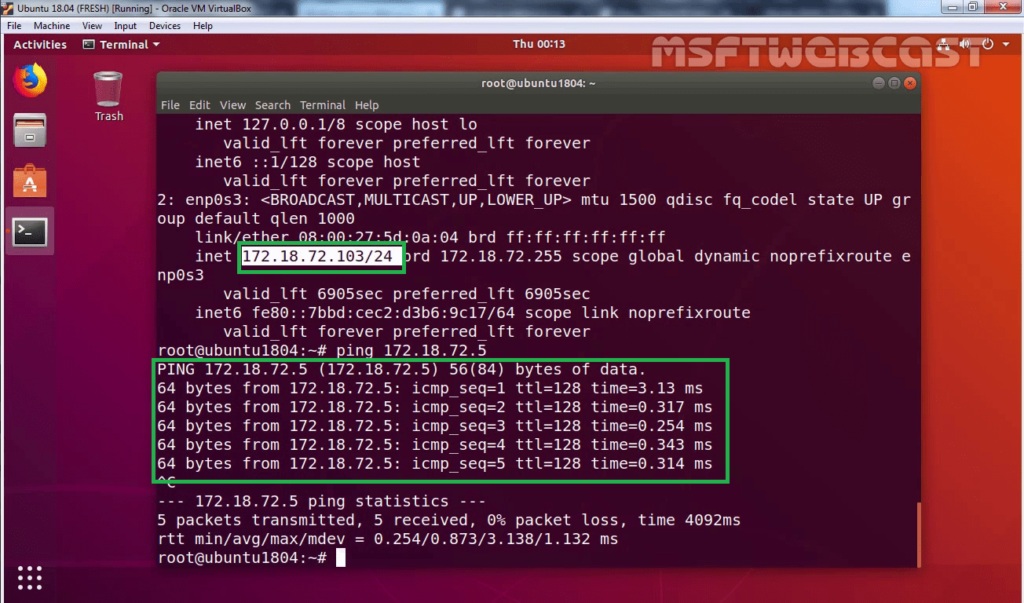
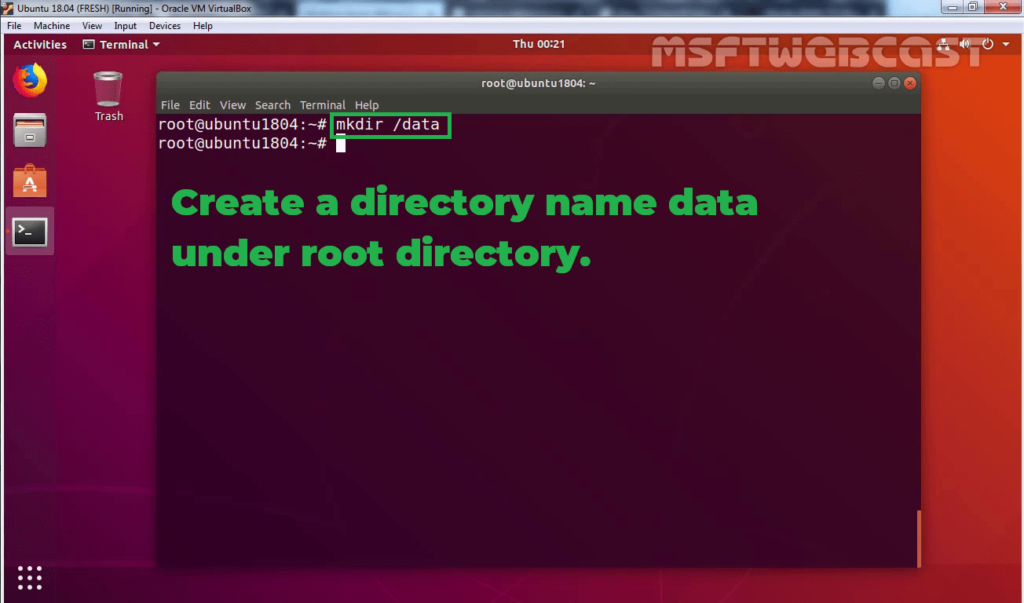
26. To mount an NFS shared folder on a Linux machine, open terminal. Type command: mkdir /data
This command will create one directory name data under the root directory.
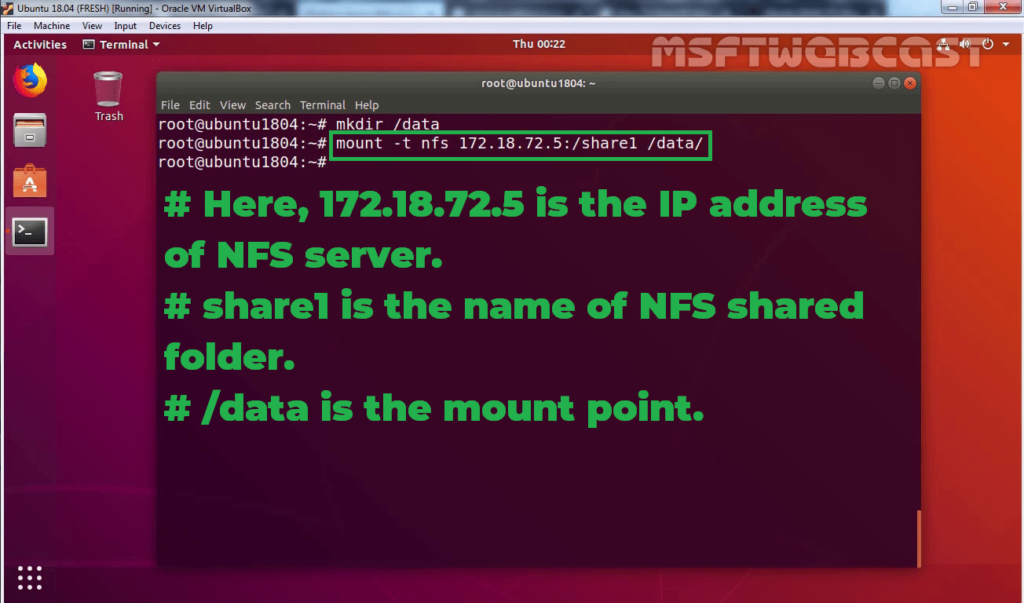
27. Type command:
Syntax: mount -t nfs <NFS-Server-IP>/<NFS-Shared-Folder-Name> /<Mount-Point>
For example, to mount an NFS shared folder named share1 of the NFS server that is configured with IP address 172.18.72.5, the folder should be mapped on the /data mount point.
In our case command will look like:
mount –t nfs 172.18.72.5:/share1 /data
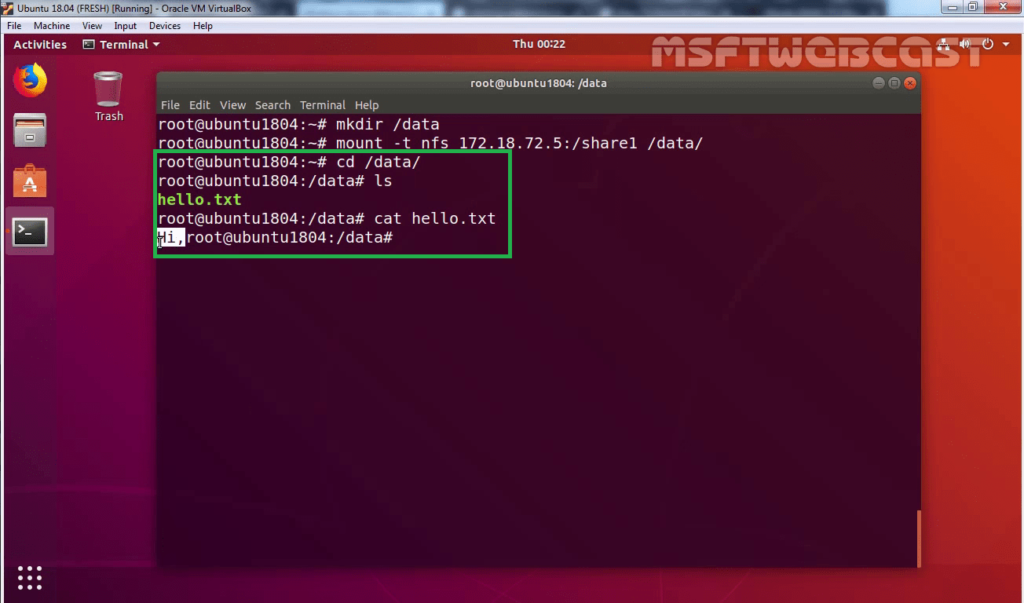
28. Verify the content of the text file which we have created earlier on the NFS server.
In this blog post, we have learned the steps on how to install and configure NFS in Windows Server 2019.
I hope, you enjoyed it. Thank you for reading.
Video Guide: Installing and Configuring NFS Server role in Windows Server 2019
Post Views: 5,141
In this guide we will show you how to install NFS Server on Windows Server 2019. NFS (Network File System) is one of the most commonly used file-based storage systems often used to access files over a network. It is a popular protocol for sharing files over the LAN on Linux, Unix, and Windows platforms. You can mount the remote directory on the local system as if they were locally mounted. It allows you to group resources onto centralized servers on a network for easy sharing. NFS server has a right on the shared directory and can give specific permission based on the client’s requirement.
Advantages of NFS (Pros)
- It provides centralized storage for all users that will decrease the workload for the administrator in terms of backups.
- Allows users to access their files from any remote PC.
- With NFS, you can keep all users’ accounts on the central NFS server. This way you can mount all user’s home directories from the NFS server to their local system.
- All data and user accounts could be kept and maintained in one place.
In this post, we will explain how to install NFS server on Windows server 2019. We will also explain to install the NFS client and mount the NFS share on the client machine.
Install NFS Server on Windows Server 2019
in order to install the NFS Server Role in Windows Server 2019. Follow the below steps to perform the installation:
Step 1 – Log in to the Windows server 2019 as an administrator user, press the Windows key, search for Server Manager and open it as shown on the following page:


Step 2 – Click on Add Roles and Features button. You should see the following screen:

Step 3 – Click on the Next button. You should see the Select Installation Type page:

Step 4 – Select Role-based or feature-based installation and click on the Next button. You will be asked to select the destination server as shown on the following screen:

Step 5 – Select the server you want to install NFS server and click on the Next button. You will be asked to select the Role in the following screen:

Step 6 – Expand File and Storage Services then again expand File and iSCSI Services then check the “Server for NFS” box and click on the Next button. You should see the Select Feature page:

Step 7 – Click on the Next button. You will be asked to confirm the installation as shown on the following screen:

Step 8 – Confirm all settings and click on the Install button to start the installation.
Once the installation has been finished, you will need to restart your system to apply the changes. Once your system is restarted, you can proceed to create an NFS share.
Create an NFS Share
After installing the NFS server, you will need to create an NFS share folder that your want to export to all clients. Follow the below steps to create an NFS share folder named nfsshare inside the C drive:
Step 1 – Open the Server Manager as shown in the following screen:

Step 2 – In the left pane, click on the File and Storage Services. You should see the following screen:

Step 3 – Select the Shares then click on the TASKS menu and click on New Share. You should see the following screen:

Step 4 – Select NFS Share-Quick and click on the Next button. You should see the following screen:

Step 5 – Select Type a custom path, define your nfsshare directory and click on the Next button. You should see the following screen:

Step 6 – Provide your NFS share name and click on the Next button. You will be asked to select the authentication method on the following screen:

Step 7 – Specify the authentication method and click on the Next button. You should see the following screen:

Step 8 – Click on the Add button to specify the share permission. You should see the following screen:

Step 9 – Provide the IP address of the client machine, provide read/write permission and click on the Add button. You should see the following screen:

Step 10 – Click on the Next button. You should see the following screen:

Step 11 – Confirm all settings and click on the Create button to create an NFS share. Once the NFS share has been created, you should see the following page:

Step 12 – Click on the Close button to exit from the wizard.
At this point, NFS share is created. You can now proceed to install the NFS client on the client machine and mount the NFS share.
Install NFS Client on Client Machine
In this section, we will show you how to install the NFS client on the client machine. Follow the below steps to install the NFS client on the client machine:
Step 1 – Open the Server Manager as shown in the following screen:

Step 2 – Click on Add Roles and Features. You should see the following screen:
Step 3 – Click on the Next button. You should see the Select Installation Type page:
Step 4 – Select Role-based or feature-based installation and click on the Next button. You should see the destination server selection screen:

Step 5 – Select the server you want to install NFS client and click on the Next button. You should see the Select Role screen:

Step 6 – Click on the Next button. You should see the following screen:

Step 7 – Check the box “Client for NFS” and click on the Next button. You should see the following screen:

Step 8 – Confirm the Installation selections and click on the Install button to install the NFS client.
Once the NFS client has been installed, you can proceed to the next step.
Mount the NFS Share on the Client Machine
Now, you will need to mount the NFS share from the NFS server machine to the client machine. You can mount it using the mount.exe command:
Open the PowerShell with Administrator privileges and run the following command:
mount.exe 104.245.35.28:/nfsshare E:\

Where: 104.245.35.28 is the IP address of the NFS server and nfsshare is the name of the NFS share.
Once the NFS share is mounted. Open the File Explorer and check if NFS share is mounted or not. You should see your mounted share on the following screen:

Install NFS Server on Windows Server 2019 Completed
In the above post, we explained how to install the NFS server and NFS client on Windows Server 2019. We also explained how to mount the NFS share from the server machine to the client machine.
How to Install and Configure NFS Server on Windows Server 2019. One of the services is NFS storage space sharing. NFS stands for Network File System and allows it to create a storage space that can be shared over other servers or clients over the network. This service operates as a server / client and through it can create a central storage. It can also be secured via acl in the new version.
In this article, we are going to install and configure NFS Server and create NFS Share. This is an efficient way to share a directory to other client machines in your organization.
Available VPS Servers in Eldernode
1) Open Server Manager
Hit Windows key and search for Server Manager.
Once open, click on Add Roles and Features.
On the first page of the Add Roles and Features Wizard, click Next.
In the Select Installation Type page, select Role-based or feature-based-installation and click Next.
Select the server you will install NFS on and click Next.
In the Select server roles part, expand File and Storage Services and further expand File and iSCSI Services.
Then check the box against Server for NFS.
A pop-up window will come forth.
In the pop-up window, just click on Add Features then hit Next.
Simply click on Next, in the Select features page.
Confirm your installation selections and hit Install.
Click Close to complete the installation process.
2) Configure NFS Share Folder
Now you must configure a folder that you export to clients.
Create a directory/folder in your desired disk partition. (We will create TestShare in C partition.)
Open Server Manager.
Click File and Storage Services and select Shares from the expanded menu.
After that, click on the TASKS drop-down menu and select “New Share…“.
A New Share Wizard will open.
*
On the first page of the wizard, select NFS Share-Quick and Click Next as shown below.
On the page below, choose Type a custom path, browse for your directory and click Next.
Type in a name for your share and hit Next.
Depending on the authentication methods that your organization uses, you have a choice to make at this stage.
Choose the one that befits your use case and hit Next.
Click on Add on the window below and you now have many options to choose the hosts to access the share.
You can place only one host, a Netgroup, Client group or all servers that can reach it.
Make your choice and click on Next.
**
You can tweakthe permissions to befit your scenario here.
Once done, click Next.
Confirm your selections and click Create.
Finally, click Close.
3) Confirm your share is created
Go back to Server Manager >> File and Storage Services >> Shares
Now install and setup NFS client on Windows Client.
Also, see:
1.How to Install and Configure DNS Server on Windows Server 2019
2.How to Install and Configure Windows Admin Center on Windows Server
3.How to Install and Configure Hyper-V on Windows Server 2019
4.How to install Active Directory on Windows Server 2019
5.How to install FTP Server on windows server 2019
6.How to Configure FTP Server on windows server 2019
Dear user, we hope you would enjoy this tutorial, you can ask questions about this training in the comments section, or to solve other problems in the field of Eldernode training, refer to the Ask page section and raise your problem in it as soon as possible. Make time for other users and experts to answer your questions.
Goodluck.
Network File System (NFS) клиент по умолчанию не установлен в Windows Server 2022/2019/2016 и десяточных версиях Windows 11/10. Для его установки запустите Server Manager, выберите Add Roles and Features -> Client for NFS.
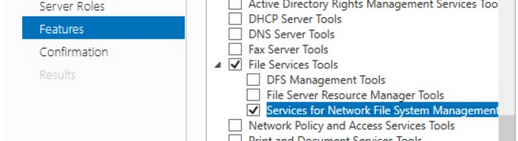
Если вы хотите установить графические консоли управления NFS (nfsmgmt.msc), выберите дополнительно Services for Network File System Management Tools в Remote Server Administration Tools -> Role Administration Tools -> File Services Tools.
Или вы можете установить клиент NFS и консоль управления с помощью PowerShell:
Install-WindowsFeature NFS-Client, RSAT-NFS-Admin
В Windows 10/11 для установки NFS клиента выполните:
Enable-WindowsOptionalFeature -FeatureName ServicesForNFS-ClientOnly, ClientForNFS-Infrastructure -Online -NoRestart
Клиент NFS в Windows поддерживает NFSv2 и NFSv3.
Теперь вы можете подключить NFS шару с помощью PowerShell:
New-PSdrive -PSProvider FileSystem -Name M -Root \\192.168.0.211\mnt\hyperv -Persist
Опция Persist включает автоматическое подключение NFS шары после перезагрузки.
Из CMD:
mount -o anon nolock \\192.168.0.211\mnt\hyperv M:
Также вы можете смонтировать NFS каталог из графического интерфейса File Explorer.
Для отключения NFS шары, выполните:
Umount M:
Или
Remove-PSdrive -Name M
При подключении NFS шары может появится ошибка:
The remote device or resource won’t accept the connection.
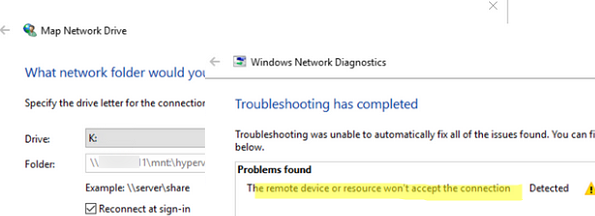
Чтобы исправить проблему, запустите консоль Services for Network File System (NFS) и проверьте права для подключения к удаленному ресурсу.
Если вы хотите подключиться к NFS ресурсу под anonymouse пользователем, нужно добавить два параметра реестра:
New-ItemProperty HKLM:\SOFTWARE\Microsoft\ClientForNFS\CurrentVersion\Default -Name AnonymousUID -Value 000001f4 -PropertyType "DWord"
New-ItemProperty HKLM:\SOFTWARE\Microsoft\ClientForNFS\CurrentVersion\Default -Name AnonymousGID -Value 00000064 -PropertyType "DWord"
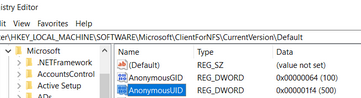
Если для подключения нужно всегда использовать учетную запись root, измените значения параметров AnonymousUID и AnonymousGID на 0.
Если вы используете NFS подключения в окружении Active Directory, нужно отменить важный нюанс.
Если в AD не добавлены UNIX атрибуты и User Name Mapping не настроен, то для подключения к NFS серверу из Windows будет использоваться анонимное подключение. Для использование учетных данных для подключения к NFS вам нужно внести изменения в схему AD (атрибуты uidNumber и gidNumber).
На контроллерах домена WS 2012R2 можно добавить вкладку UNIX атрибутов в свойствах пользователя AD:
Dism.exe /online /enable-feature /featurename:adminui /all
Однако эта опция является deprecated в Windows Server 2016 и атрибуты пользователя предлагается править вручную или с помощью PowerShell:
Set-ADUser -identity user1 -add @{uidNumber="<user_unix_uid>";gidNumber="<user_unix_gid>"}
При подключении NFS каталога также может появится ошибка:
You can't access this shared folder because your organization's security policies block unauthenticated guest access. These policies help protect your PC from unsafe or malicious devices on the network.
В этом случае нужно создать параметр реестра AllowInsecureGuestAuth:New-ItemProperty HKLM:\SYSTEM\CurrentControlSet\Services\LanmanWorkstation\Parameters -Name AllowInsecureGuestAuth -Value 00000001
New-ItemProperty HKLM:\ oftware\Policies\Microsoft\Windows\LanmanWorkstation -Name AllowInsecureGuestAuth -Value 00000001
Затем перепустите службу NFS.
I have recently been testing and working through some scenarios where I require the NFS client on a Windows machine to access some NAS shares over the NFS protocol, not much has changed I believe between Windows Server 2016 and Windows Server 2019 but thought it might help some to see how easy it is to get going.
I am picking up at this stage with my fully patched and ready to go Windows Server running 2019. As mentioned previously I want to use this machine to access my NFS share which doesn’t matter what it is or what it is for but this Windows machine is running in Microsoft Azure and I am access Azure NetApp Files over the NFS protocols, Azure NetApp Files can be presented over both NFS and SMB and I will have additional posts about this later.
Installing the Client for NFS
I am pretty sure this could also be achieved through the system manager and selecting the Add Features dialog and working through the wizard approach, I have been purposely doing a lot more of my tasks through PowerShell so that I can re-use and make my tasks quicker, this is something I have picked up from my learnings around Infrastructure as Code. For that reason, I am using PowerShell. I am sure someone else had documented the process through the system manager and UI.
First of all, let’s see what NFS based features we have available to us by running the below command.
Get-WindowsFeature -Name NFS*

As you can see from the image above, we have one feature available to us, “Client for NFS” by installing this it will allow us to mount NFS exports to our Windows machine so we can access the data within.
To install this feature run the following command.
Install-WindowsFeature -Name NFS-Client

That’s it, it’s that simple, hardly not worth mentioning. That’s the NFS Client installed on our machine, next we need to make sure from the NAS server point of view that the IP address of this windows machine can access that data.
As I said before I am using Azure NetApp Files, this export is configured in the following screen when configuring Azure NetApp Files. I will provide a step by step walkthrough of this process after this initial post.

As you can see from the above, I have allowed all clients from all subnets using the export policy (This is the default setting for ANF), my advice is that if this was production you should to create more secure export policies.
Mounting the share
Now we have our NFS Client and we have our export policy from whichever NAS device you are looking to mount onto your Windows, next we actually need to mount the share for use.
Some people will ask now, why you are using NFS when you can use SMB, certain applications, certain environments may require this method and protocol. If this was a traditional Windows environment and this share was going to house predominately user shares and home drives, then absolutely the way to do this would most likely be with the SMB protocol.
Next up is open up a command prompt with Administrator privileges, the mount command is going to be the command you use and then you will be using the NAS IP Address followed by the share name and then which letter you would like to mount this to on your Windows system.
Mount 10.1.1.4:/vZillaANFShare n:

Providing you have the correct configuration, mostly down to the export policy on your NAS device then this process should take seconds. And then by seeing the success message as per above but then checking this now as a mapped network drive as per below.

Quick post hope that it is useful for somebody. This was something I was working on so that I could test Azure NetApp Files without access to Azure Active Directory services (due to corporate policy) this stopped me from being able to use SMB but allowed me to test the functionality via NFS on Windows and Ubuntu.
Justin Parisi did a great blog on this at the start of the year – Windows NFS? WHO DOES THAT???
2019-11-12