In this post I will explain how you can configure an NFS Server on a Windows 2016 Server and connect/mount the NFS exports on Linux clients, in my case I wanted to run a Linux virtual machine whist ensuring that the actual data resides on physical disks on my host machine ensuring that the data is automatically part of my nightly backup routine and did not need to run separate backup scripts on the VM(s).
A bit of background first…
In my home network I have a single (in an attempt to be eco-friendly) Intel i7 server running Windows Server 2016 Standard edition, I use this server for hosting my family media, files and various database engines and ActiveDirectory for local development (I’m a software engineer by trade!) in addition to several Hyper-V virtual machines that do various tasks, all of the virtual machines are running a derivative of Linux.
I currently have the following virtual machines setup and running on it (under Hyper-V):
- A Web Server and reverse proxy running Ubuntu Server 16.04 LTS – Hosting Gogs, Minio and various Nginx reverse proxy configurations for sites, services and API’s that sit on other VM’s in my network.
- An OpenVPN server running CentOS 7 – Providing secure VPN tunnel access for me when away from home.
- A Jenkins server running Ubuntu Server 16.04 LTS– Used for automated code testing and continuous integration.
- A MineCraft server running Ubuntu Server 16.04 LTS – Used by my daughter and friend to play online together.
In the past I used to run VMWare ESXi and hosted everything in their own virtual machine for better isolation and performance although since then, I had tested and was extremely happy with the performance of running virtual machines on top of Hyper-V and Windows Server so when I re-built my home server several months ago I decided to go down that route instead.
Anyway, enough of all that, let me explain why I have such a need for this kind of set-up…
My home server has 1x SDD (500GB for the host operating system and local applications) in addition to 2x WD Red 4TB hard drives in a hardware RAID1 configuration, I periodically backup this array over my LAN to a Buffalo NAS device.
My plan is to install a new VM running Ubuntu Server 16.04 that will host an instance of NextCloud, this will provide me, my family and friends with a free alternative to DropBox with masses of space in addition to all the other cool things that NextCloud offer such as encrypted video calls and the like.
By setting up an NFS server on the host operating system, instead of provisioning this Linux VM with a massive virtual hard disk (and taking drive space away from the host OS) I have instead provisioned it with a single 20GB virtual hard drive and will then use NFS shares on my Windows Server to host the files on the physical disk and thus be automatically part of my backup routine and alleviate the need for using rsync or rsnapshot etc. on the VM and transferring it at regular intervals.
Installing NFS Server on Windows Server 2016
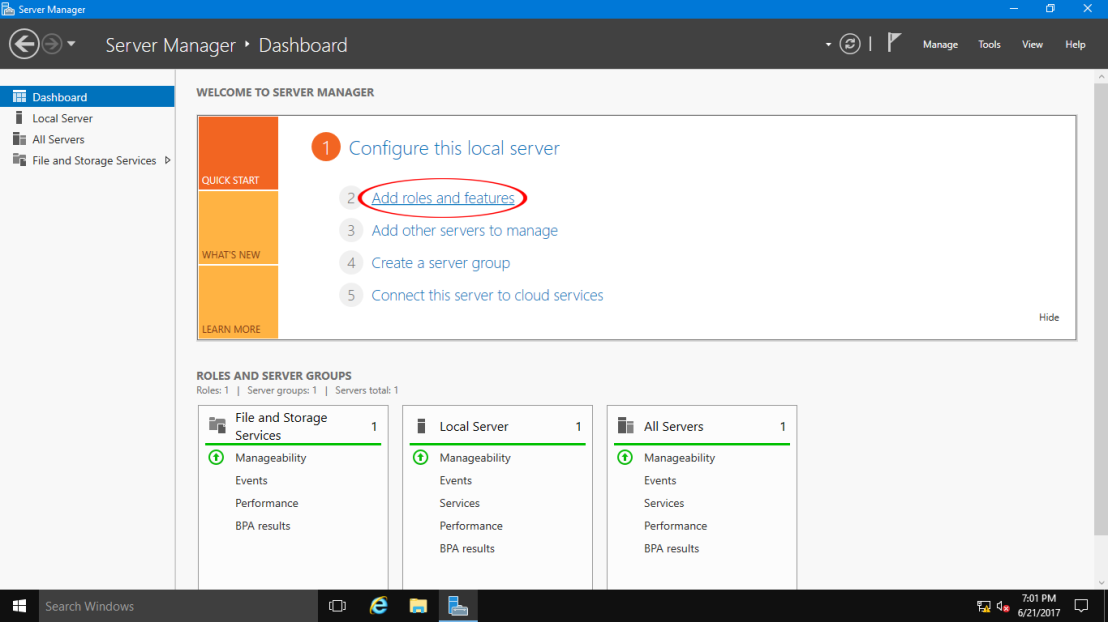
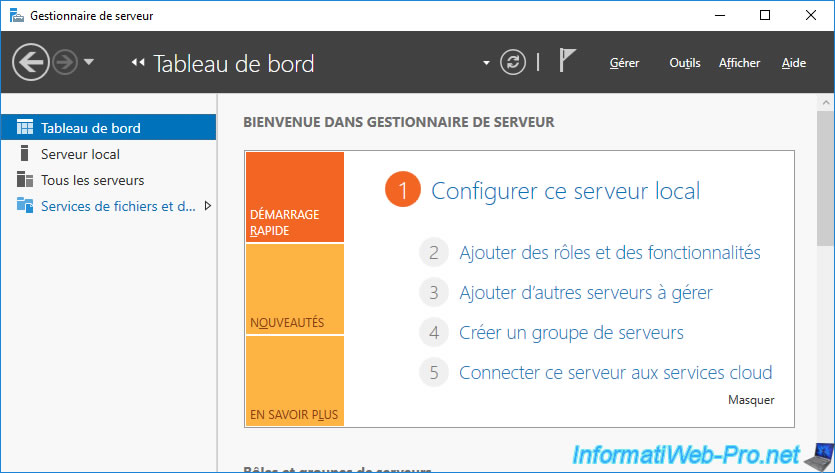
First up, we need to login to our Windows Server and open up the Server Management tool, once open, click on the large text link labelled “Add Roles and Features” as shown here:
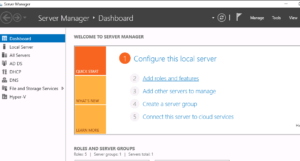
Once you have clicked on the “Add Roles and Features” link you should then be presented with this wizard:
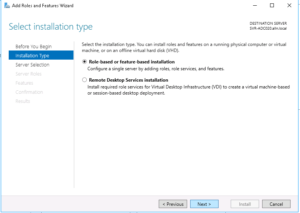
Accept the default “Role-based or feature based installation” and then click Next…
On the next screen you’ll be asked to choose the server that you want to add the role or feature to, select your server from the list that appears (you’ll probably only have one in the list anyway!) and then click Next…
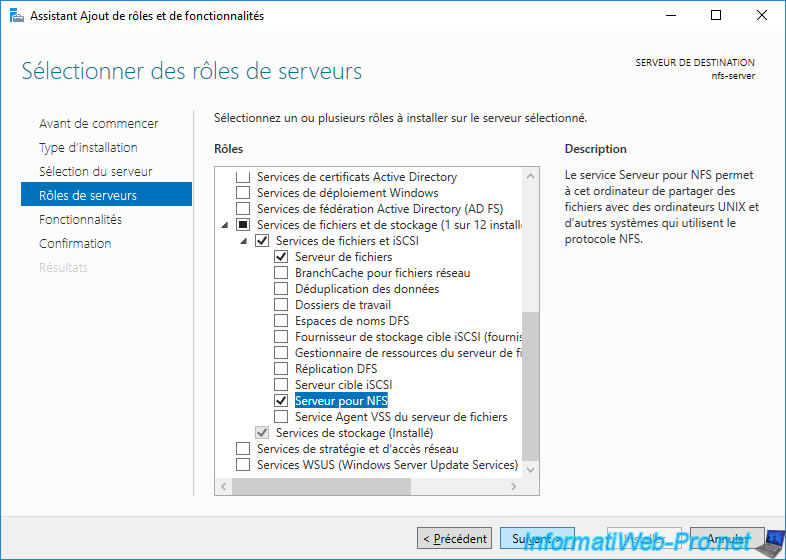
You will now be presented with a screen titled “Select server roles“, expand the following sections, then check the “Server for NFS” option as shown in the screenshot below:
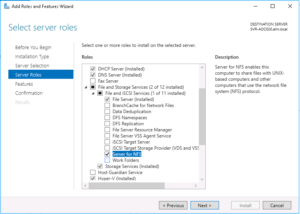
Once checked, click on the “Next” button…
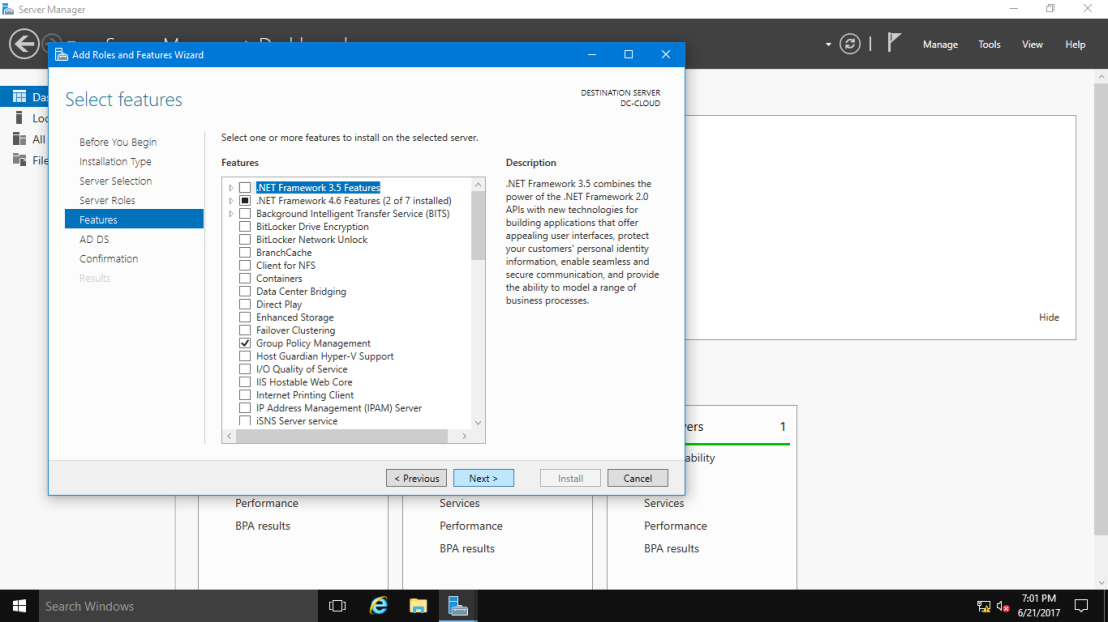
The next screen will just ask you to “Select features“, you can simply click “Next“!
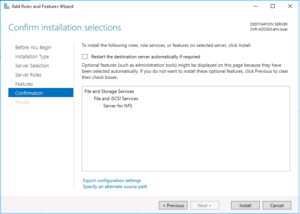
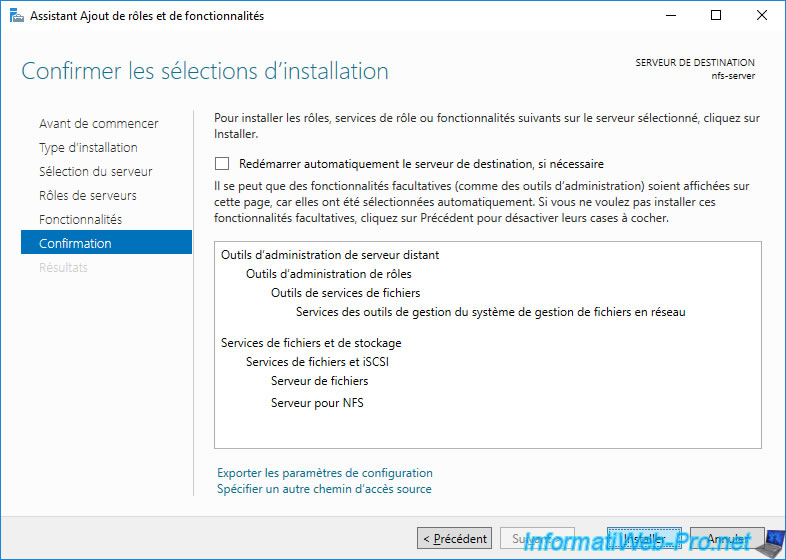
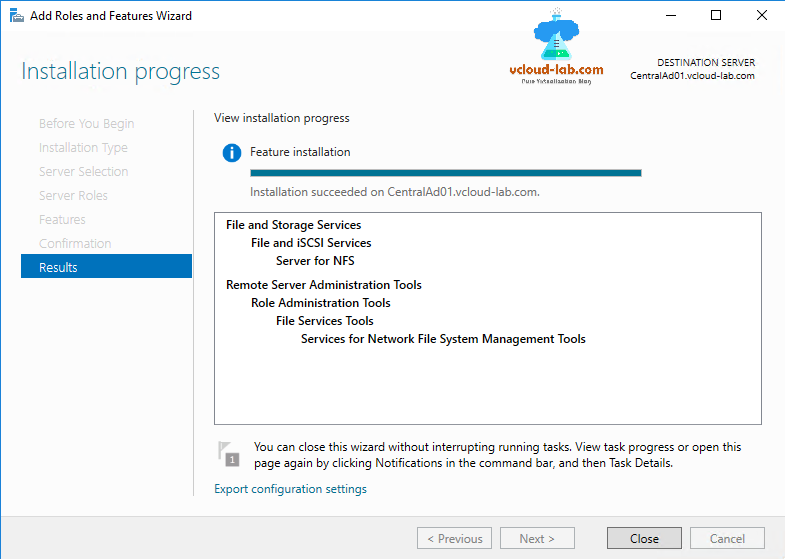
Finally, you’ll be shown a screen asking you to confirm the installation items, we now choose “Install“, this screen and the selection of features and roles to add should look as follows:
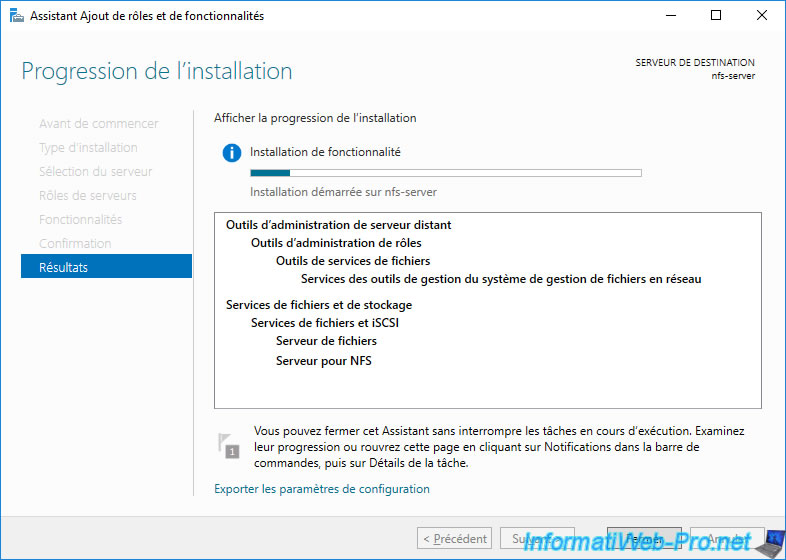
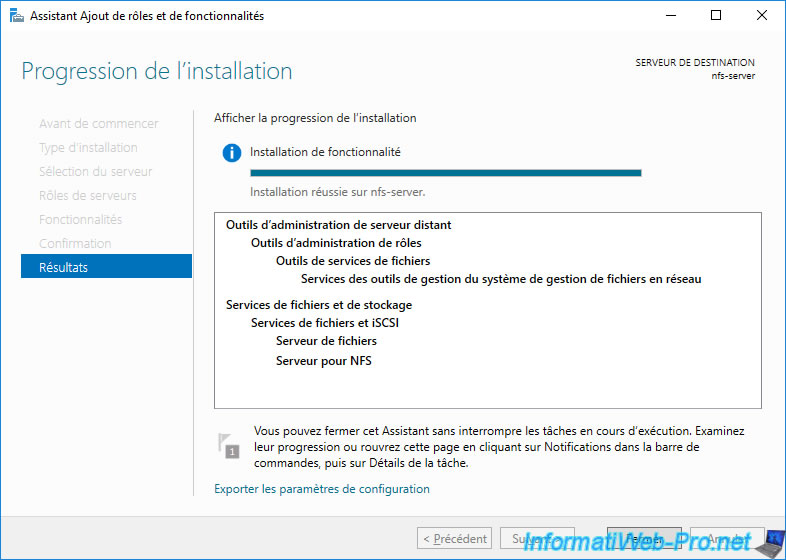
Great! We now have an NFS server running on our Windows 2016 Server!
Creating an NFS share (export)
Now that we have the NFS server installed we can now go and share (or “export” as NFS likes to call it) a directory, as per my intro notes to this blog post, I plan to add this to my data RAID array.
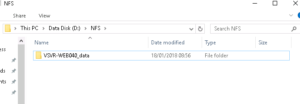
So first up, lets go and create a new directory on our data disk (in my case this is my D: drive), I’ve decided to call the directory “NFS” and then, inside that folder we’ll create another directory called “VSVR-WEB040_data” – This folder will be explicitly shared with my VM (that is named ‘VSVR-WEB040‘, the “_data” portion I’ve just named as that is what I will mount the share locally on the VM as eg. /data).
Now that you have an NFS server installed you can share/export numerous directories to individual or multiple VM’s or even other physical servers in your network.
The result of setting up this directory structure is as follows:-
Next up, we’ll right-click on the newly created folder and choose “Properties” – This will enable us to “Share” it as well as lock down the access to only a specific IP address (that being my NextCloud VM)…
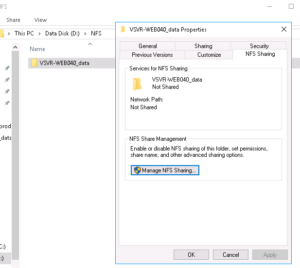
From the Properties window, select the “NFS Sharing” tab and then click on the button named “Manage NFS Sharing” this should then display the following window:
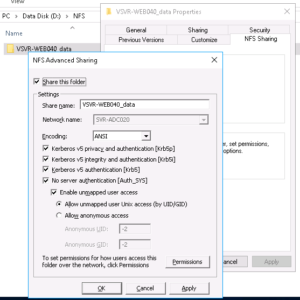
Ensure that the above screenshot matches your folder (eg. select all the checkboxes as per the above)
Next we’ll configure the permissions for the share, clicking on the “Permissions” button in the above screenshot will then display the following window:
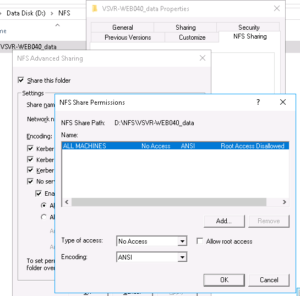
As you can see from the above screenshot, the permissions for this share are very restrictive by default, this is basically saying that for ALL MACHINES trying to access this share they WILL NOT be granted any access.
We should leave the defaults as is as we will instead create another permission only granting our specific VM access, to do this click on the “Add” button, the following screen should then appear:
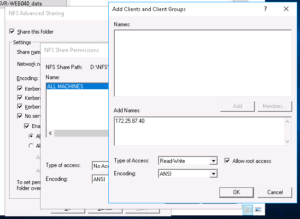
I’ve entered my virtual server IP address in to the “Add names” field already (172.25.87.40), you’ll then need to change the “Type of access” drop-down box to “Read/Write” and check the “Allow root access” checkbox.
Once completed, click the “OK” button!
That’s great, our Permissions form should now look as follows:-

Perfect! – We’re all done on the NFS server side configuration now!
Mounting the NFS share on the client-side
We can now mount the NFS share on our Ubuntu Server (the virtual machine), first we need to install the NFS tools, so we’ll login to our server (I’m using root but you should really use a user with sudo rights!)…
sudo apt-get install -y nfs-common
So before we configure fstab to automatically mount our NFS share at system boot, we’ll first test using the command line to make sure everything works as expected…
Before we can mount the NFS share we must first create a mount point, we will do this like so:
sudo mkdir /data
Now that we have created the mount point, we can mount the remote file-system as follows:
sudo mount -t nfs 172.25.87.20:/VSVR-WEB040_data /data
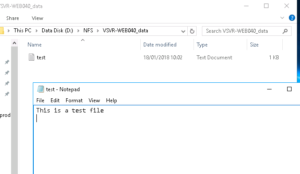
Once mounted you should be able to run the following commands, these commands will essentially create a file on our server and a text file with some content…
echo "This is a test file" > /data/test.txt
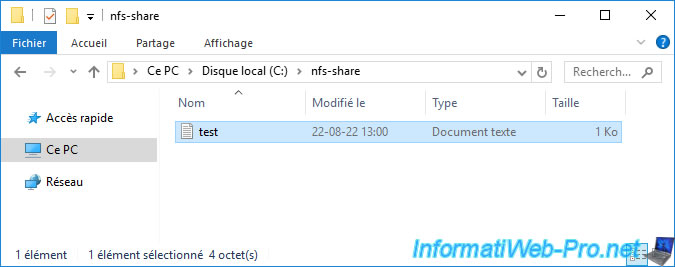
We can now jump back over to our Windows server and check our NFS server directory, we should see a file named test.txt and when we open it in Notepad, the contents should appear as follows:-
All going well, that has hopefully worked a charm for you and we can now move on to ensuring that our VM automatically mounts the NFS share at boot.
If for whatever reason wish to un-mount the share you can do it like so:
umount /data
Configuring fstab to mount our NFS share on system boot
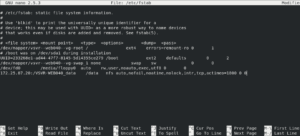
Using a text editor on the Linux VM we will open up the /etc/fstab file and add the following line to the bottom of the file:
172.25.87.20:/VSVR-WEB040_data /data nfs auto,nofail,noatime,nolock,intr,tcp,actimeo=1800 0 0
You’ll obviously need to replace your server’s IP address with your own 😉
The result should look something like the below:
Once completed, save the file and you can now either attempt to automatically mount the share using this command:
sudo mount -a
…or you can reboot your server!
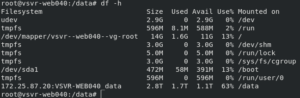
Once rebooted, login and you can then check and confirm that you have re-mounted your /data directory to the remote server by checking the output of:
df -h
You should be able to see and confirm the remote disk usage as demonstrated here:
OK, well that’s it, I hope this has been useful for you 🙂
What is NFS Server?
Using the NFS protocol, you can transfer files between computers running Windows and other non-Windows operating systems, such as Linux or UNIX.
In Windows Server 2016, NFS includes the components, Server for NFS and Client for NFS. Server for NFS enables a computer running Windows Server 2016 to act as a NFS file server for other non-Windows client computers. Client for NFS enables a Windows-based computer that is running Windows Server 2016 to access files that are stored on a non-Windows NFS server.
For this demo, Infrastructure Requirement:
- 1 DC SERVER (DC-CLOUD.Sifad.ae)
- 1 Client PC running Windows 10 (CLIENT-10)
Installing NFS Server.
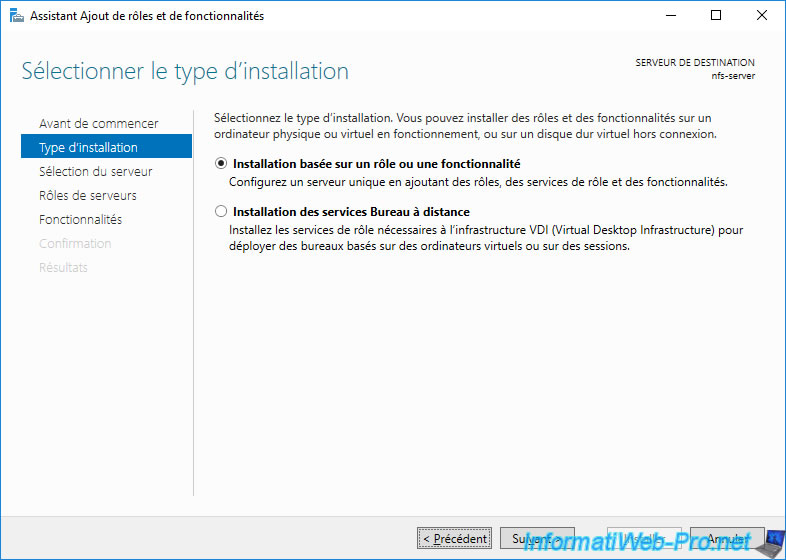
01 – Open Server Manager and Click Add roles and features.
02 – Click Next button.

03 – Select Role-based or feature-based installation.

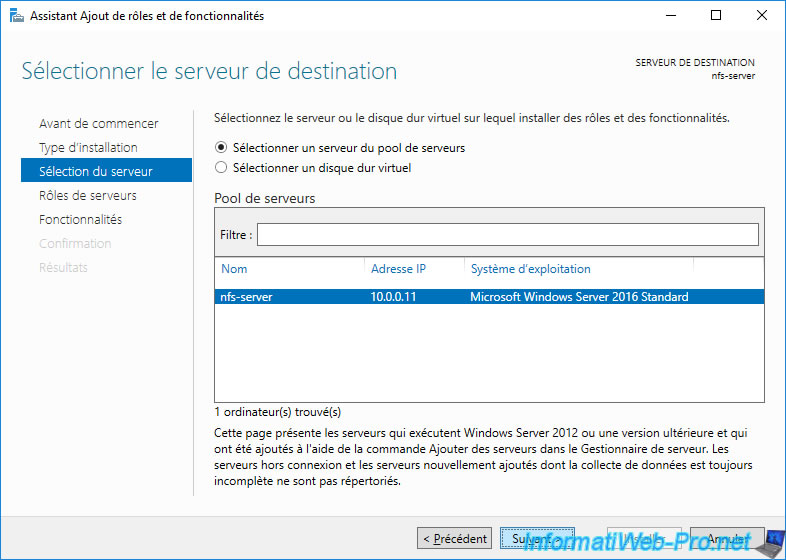
04 – Select a Host which you’d like to add services.

05 – Check a box Server for NFS.

06 – Addtional features are required to add NFS Server. Click Add Features button.
07 – Click Next button.

08 – Click Next button.
09 – Click Install button.

10 – After finishing Installation, click Close button.

Configure NFS Shared Folder.
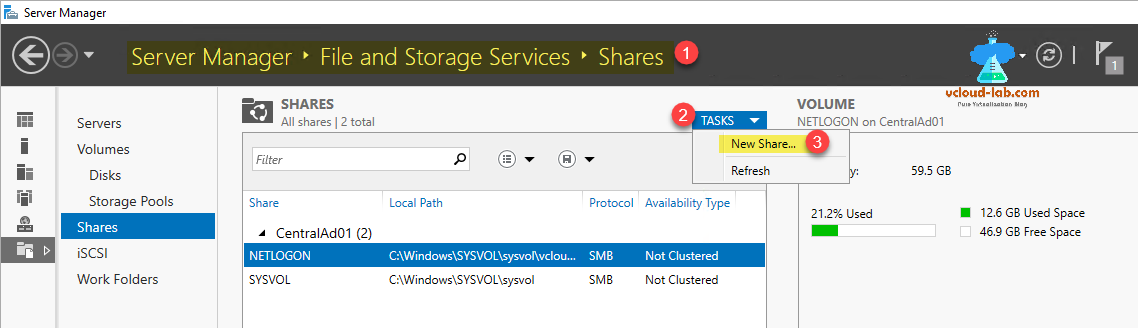
01 – Open Server Manager and Click File and Storage Services.

02 – Select Shares on the left pane and click TASKS – New Share.

03 – For example, select NFS Share – Quick on here.

04 – For example, configure a specific folder as shared one, so check a box Type a custom path and input the path for specific folder you’d like to set as shared folder. (set as “Share” on this example).

05 – Input local and remote share path.

06 – Specify authentication methods.
07 – Set the share permissions. Click Add button.
08 – Specify the Hosts you’d like to grant access permissions like the example below.

09 – Click Next button.

10 – Specify permissions to control access on here.

11 – Confirm selections and it’s no problem, Click Create button.

12 – After finishing creating, Click Close button.
13 – NFS shared folder has been just configured.

Configure NFS Server (Linux OS).
01 – Run Terminal and input commands like follows. (Please Refer to the Pictures)
mount [NFS server’s Hostname or IP address]:/[share name] [Local Folder Name to mount]

Configure NFS Client (Windows Client OS).
01 – Open Control Panel – Programs and Features then Check a box Client for NFS and click OK button.

02 – Run Command Prompt and input commands like follows.
mount [NFS server’s Hostname or IP address]:/[share name] [Local Drive to mount]:\

03 – Run Explorer, then NFS share folder is displayed.

that’s all for now.., any Doubts type a commend.. 🙂
In business, the NFS (Network Filesystem Storage) protocol is mainly used to access the storage available on a NAS.
Moreover, this protocol is mainly used on Linux systems. However, you can also create an NFS server on Windows Server and easily create NFS shares.
For the NFS client, you’ll see this is available as a feature on client versions of Windows.
- Install NFS Server
- Create an NFS share
- Install NFS Client on Windows 10
- Access an NFS share from a client PC on Windows 10
To install an NFS server, simply run the «Add Roles and Features» wizard and select «Role-based or feature-based installation».
Select the server where you want to install it.
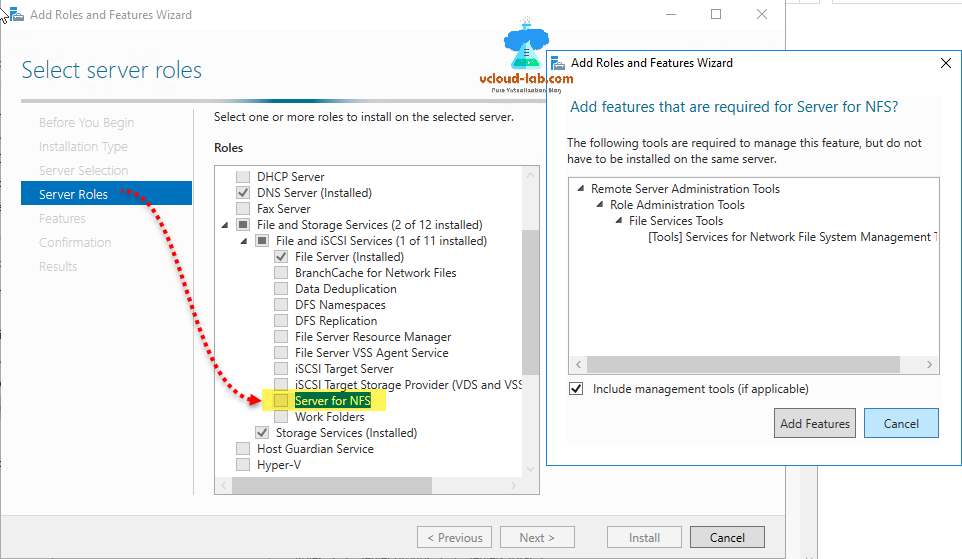
In the list of available roles, expand the «File and Storage Services» node and check the «Server for NFS» box found in : File and Storage Services -> File and iSCSI Services.
Click Install.
Wait while installing the NFS server.
The NFS server is installed.
2. Create an NFS share
To get started, create a folder wherever you want on your server.
For example, at the root of the «C» partition to avoid rights issues.

Create a test file inside this folder.
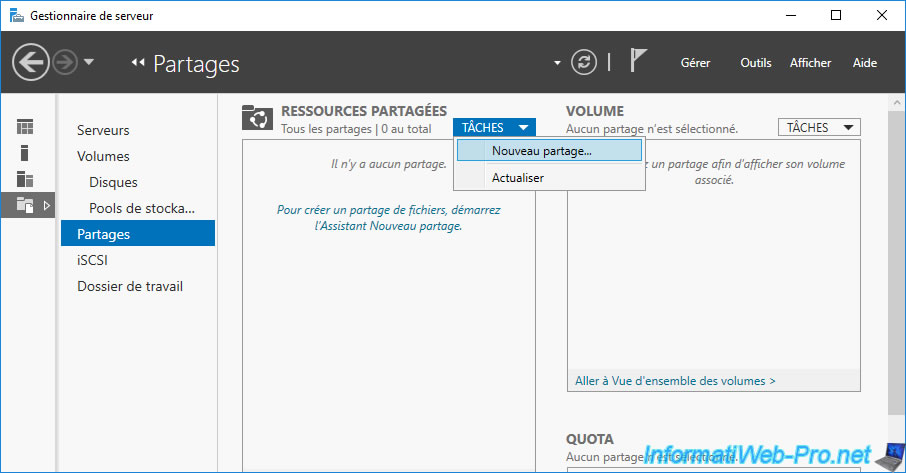
Open the Server Manager and go to the «File and Storage Services» section.
In the «Shares» tab, click on the «Tasks» button in the «Shares» section.
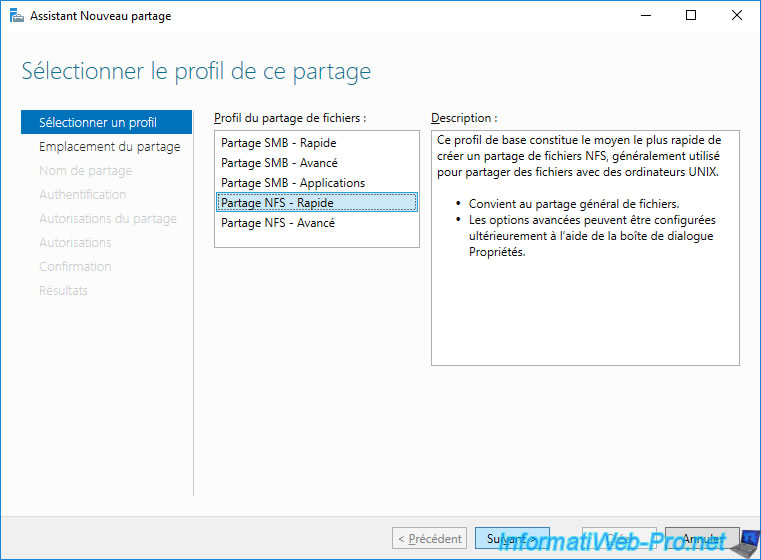
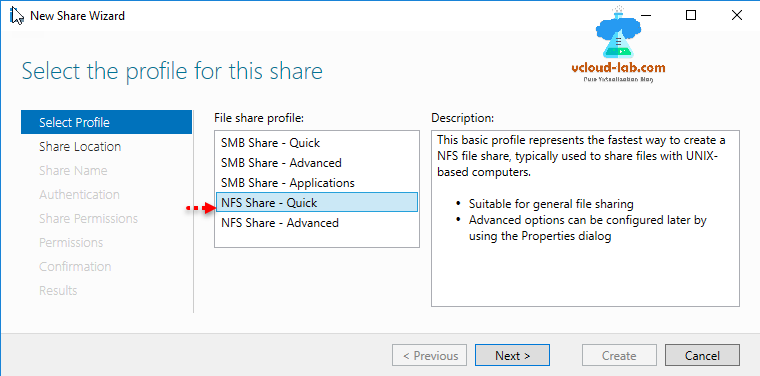
In the «New Share Wizard» window that appears, select «NFS Share — Quick» and click Next.
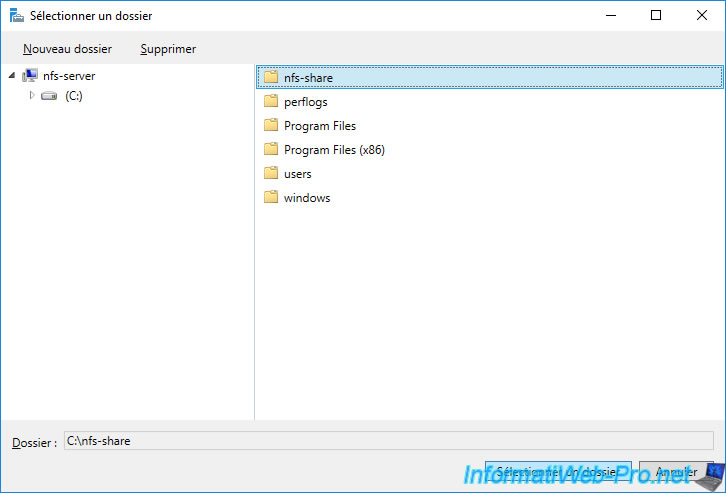
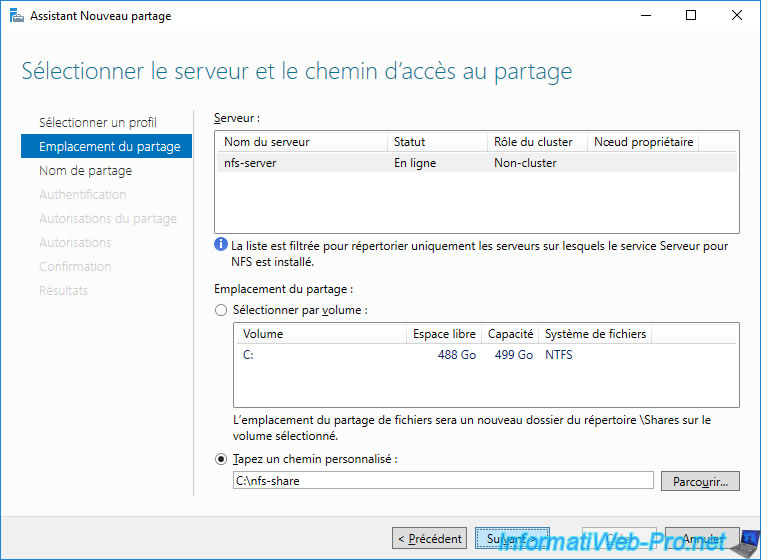
Select your NFS server (if needed), then select «Type a custom path» and click on : Browse.
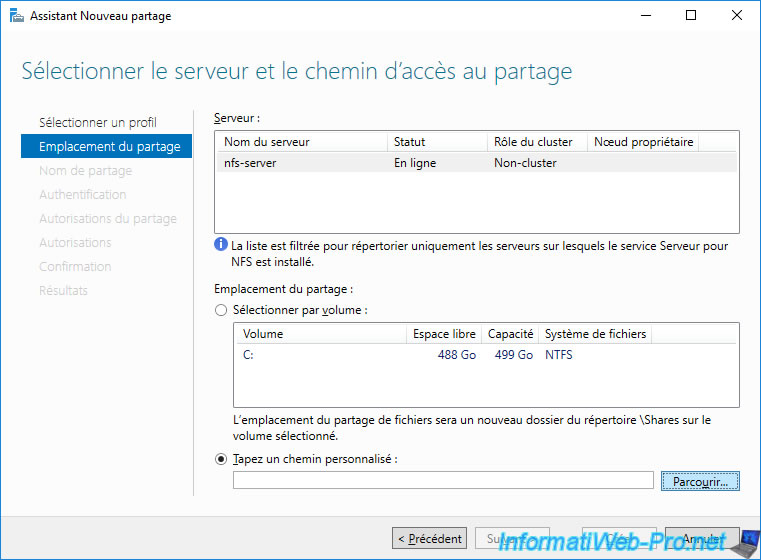
Select the folder created previously, then click on : Select a folder.
In our case, it is the «C:\nfs-share» folder.
Once the path of the folder to be shared via NFS has been selected, click Next.
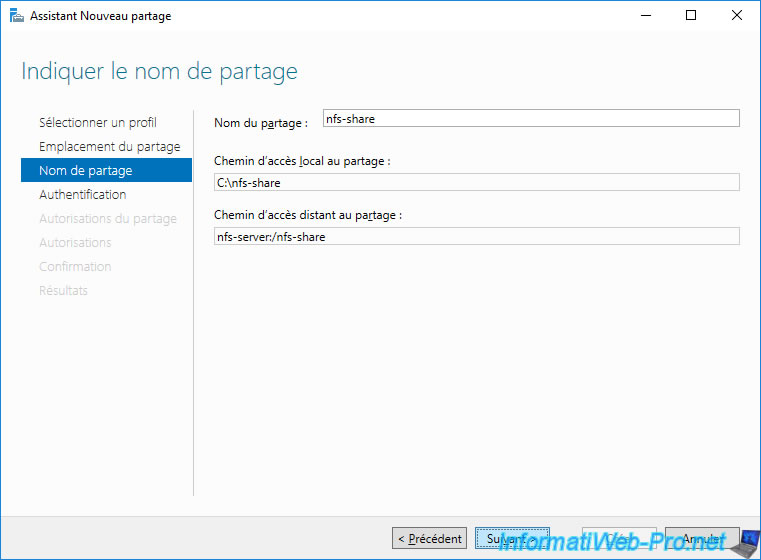
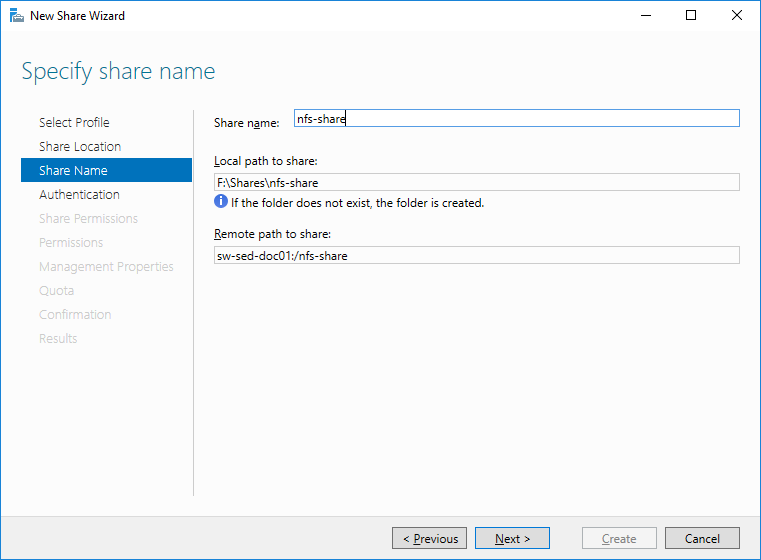
By default, the name of the share will correspond to the name of the folder selected previously.
Change this name if desired, then click Next.
- Local path to share : local path to access this folder on your NFS server.
- Remote path to share : network path to specify on the NFS client of a computer or server on your local network.
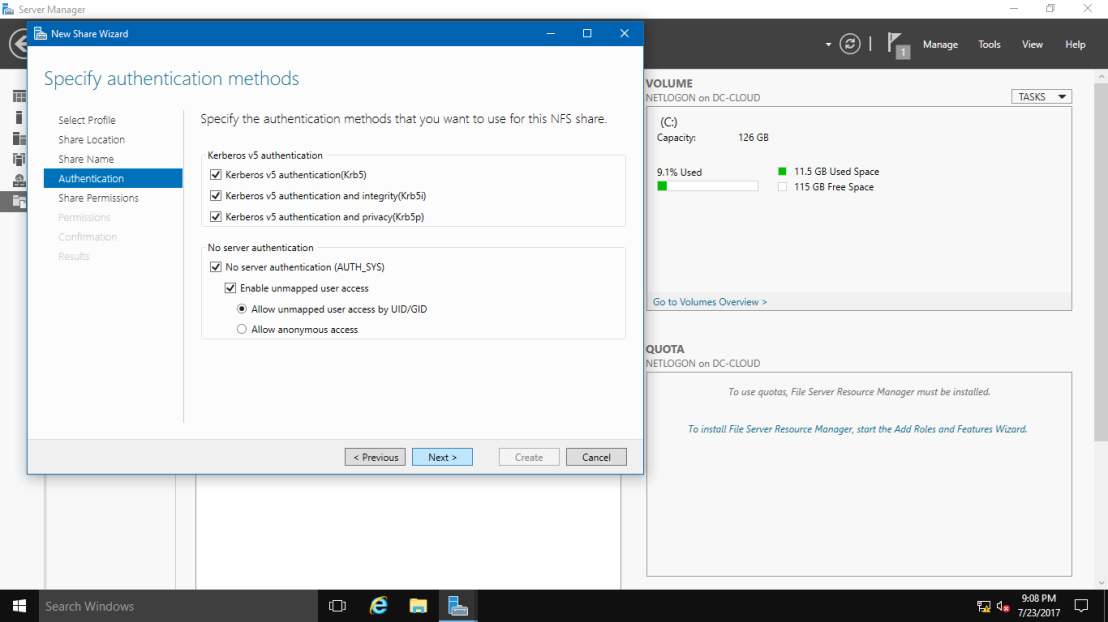
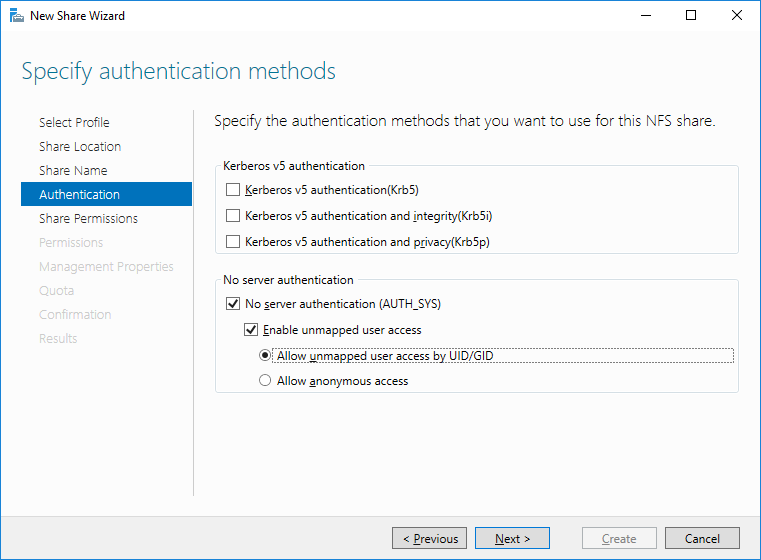
Since version 4.1 of NFS, you have the option of enabling Kerberos v5 authentication.
However, in this case, we will not use authentication to simplify this tutorial.
To do this, select the options :
- No server authentication (AUTH_SYS)
- Enable unmapped user access
- Allow unmapped user access by UID/GID

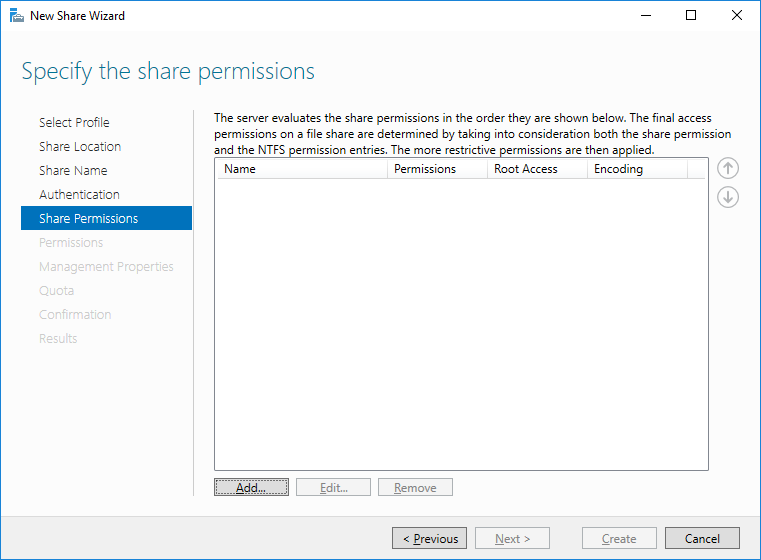
By default, no one can access an NFS share from the network.
To authorize specific computers, servers or users to access your share, you must click on : Add.
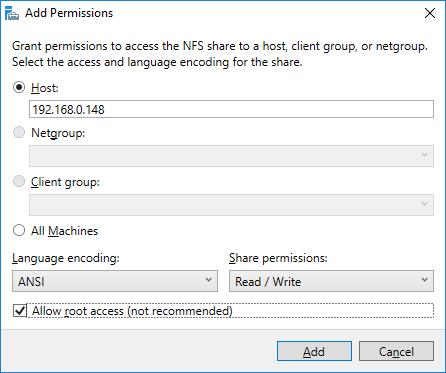
In our case, we authorize our client PC to read and write to this NFS share by specifying :
- Host: 10.0.0.12 (client PC IP address).
- Share permissions : Read / Write.
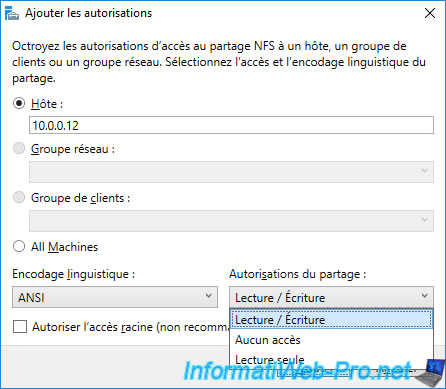
Once the desired permission has been added, click Next.
If desired, you can configure additional permissions on this NFS share.
However, in our case, we didn’t change anything.
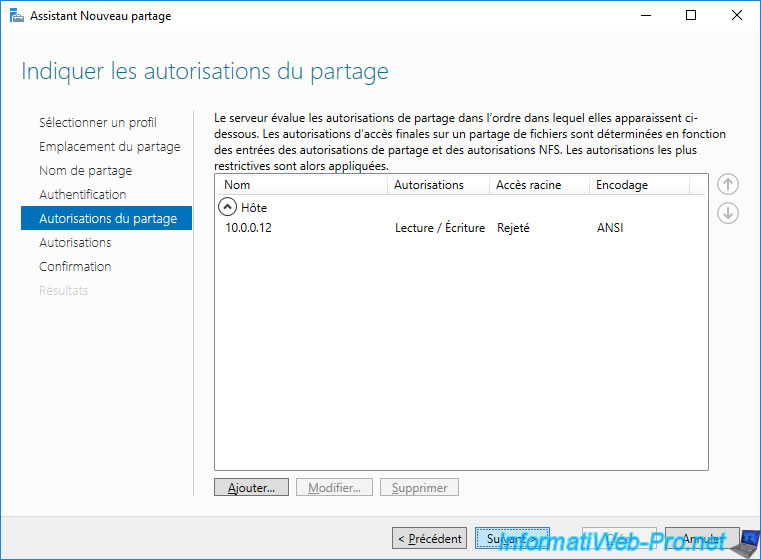
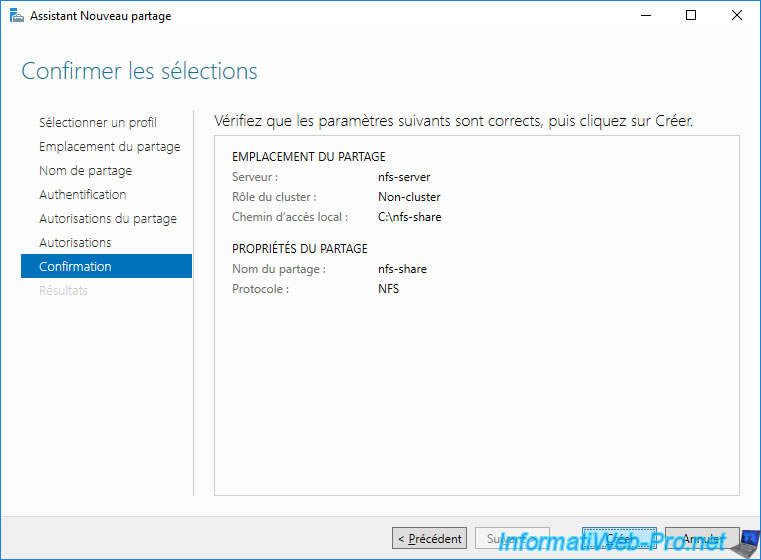
A summary of your NFS share configuration appears.
Click Create.
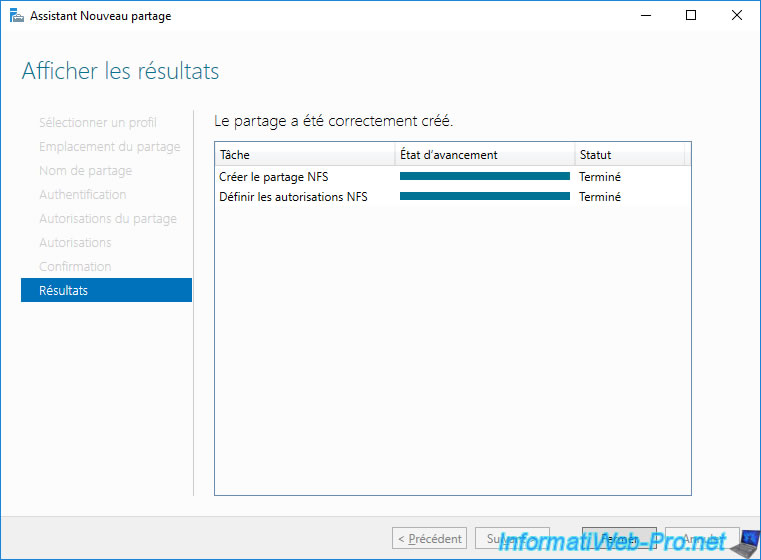
Once the NFS share has been created and the permissions set on it, click Close.
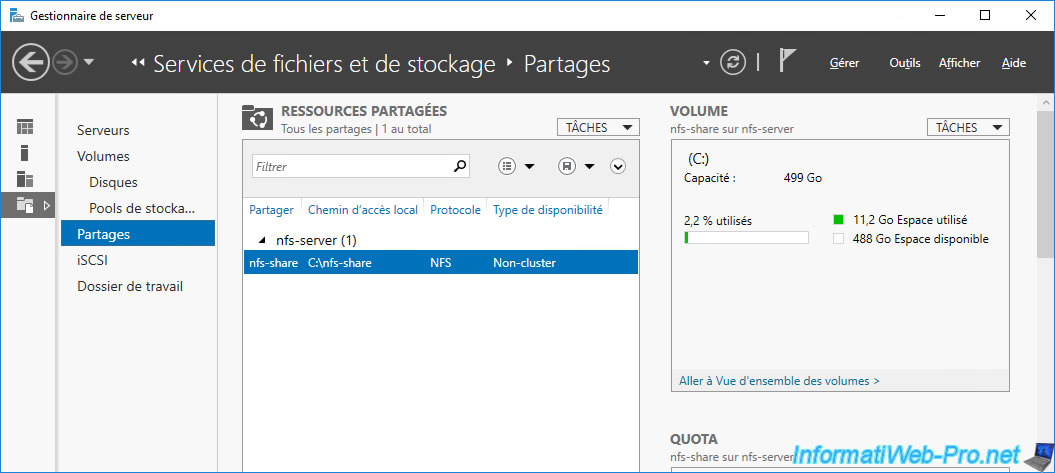
The created NFS share appears in the «Shares» list.
NFS (Network File System) is a client-server filesystem that allows users to access files across a network and handle them as if they are located in a local file directory. It is developed by Sun Microsystems, Inc, and it is common for Linux/ Unix systems.
Since Windows Server 2012 R2, it is possible to configure it on Windows Server as a role and use it with Windows or Linux machines as clients. Read to know about How to Configure NFS in Windows Server 2016 here.
How to install NFS to Windows Server 2016
Installation of NFS (Network File System) role is no different than an installation of any other role. It goes from “Add roles and features Wizard”.
With few clicks on “Select server roles” page, under File and Storage Services, and expansion of File and iSCSI Services, the system will show checkbox “Server for NFS”. Installation of that role will enable NFS server.
The configuration of NFS on Windows Server 2016
After installation, it is needed to configure role properly. The first stage is choosing or creating a folder for NFS (Network File System) share.
With right click and properties option, the system will bring the NFS Sharing tab, and Manage NFS sharing button, as part of the tab.
It will provide NFS Advanced Sharing dialogue box, with authentication and mapping options, as well as with “Permissions” button.
Clicking on “Permissions” button will open Type of access drop-down list, with the possibility of root user access, and permission level.
By default, any client can access the NFS shared folder, but it is possible to control or limit the specific clients, with a clicking of Add button and type the client’s IP address or hostname.
Mount NFS Shared Folder on Windows Client
The steps above make NFS (Network File System) server ready for work.
To successfully test it, it is needed to mount chosen NFS folder on a Linux or Windows client with following steps:
- It is needed to activate a feature on the client, by clicking Control Panel / Programs and Features / Services for NFS / Client for NFS
- After installing the service, it is needed to mount the folder with the following command :
mount –o \\<NFS-Server-IP>\<NFS-Shared-Folder> <Drive Letter>:
The command maps folder as drive and assigns chosen letter to it.
Mount NFS Shared Folder on Linux Client
No matter NFS is common to Linux / Unix systems, it is still needed to mount folder to a system via command, similar to windows systems.
mount –t NFS <NFS-Server-IP>/<NFS-Shared-Folder> /<Mount-Point>
Protect yourself and your clients against security leaks and get your free trial of the easiest and fastest NTFS Permission Reporter now!
In this post I will explain how you can configure an NFS Server on a Windows 2016 Server and connect/mount the NFS exports on Linux clients, in my case I wanted to run a Linux virtual machine whist ensuring that the actual data resides on physical disks on my host machine ensuring that the data is automatically part of my nightly backup routine and did not need to run separate backup scripts on the VM(s).
A bit of background first…
In my home network I have a single (in an attempt to be eco-friendly) Intel i7 server running Windows Server 2016 Standard edition, I use this server for hosting my family media, files and various database engines and ActiveDirectory for local development (I’m a software engineer by trade!) in addition to several Hyper-V virtual machines that do various tasks, all of the virtual machines are running a derivative of Linux.
I currently have the following virtual machines setup and running on it (under Hyper-V):
- A Web Server and reverse proxy running Ubuntu Server 16.04 LTS – Hosting Gogs, Minio and various Nginx reverse proxy configurations for sites, services and API’s that sit on other VM’s in my network.
- An OpenVPN server running CentOS 7 – Providing secure VPN tunnel access for me when away from home.
- A Jenkins server running Ubuntu Server 16.04 LTS– Used for automated code testing and continuous integration.
- A MineCraft server running Ubuntu Server 16.04 LTS – Used by my daughter and friend to play online together.
In the past I used to run VMWare ESXi and hosted everything in their own virtual machine for better isolation and performance although since then, I had tested and was extremely happy with the performance of running virtual machines on top of Hyper-V and Windows Server so when I re-built my home server several months ago I decided to go down that route instead.
Anyway, enough of all that, let me explain why I have such a need for this kind of set-up…
My home server has 1x SDD (500GB for the host operating system and local applications) in addition to 2x WD Red 4TB hard drives in a hardware RAID1 configuration, I periodically backup this array over my LAN to a Buffalo NAS device.
My plan is to install a new VM running Ubuntu Server 16.04 that will host an instance of NextCloud, this will provide me, my family and friends with a free alternative to DropBox with masses of space in addition to all the other cool things that NextCloud offer such as encrypted video calls and the like.
By setting up an NFS server on the host operating system, instead of provisioning this Linux VM with a massive virtual hard disk (and taking drive space away from the host OS) I have instead provisioned it with a single 20GB virtual hard drive and will then use NFS shares on my Windows Server to host the files on the physical disk and thus be automatically part of my backup routine and alleviate the need for using rsync or rsnapshot etc. on the VM and transferring it at regular intervals.
Installing NFS Server on Windows Server 2016
First up, we need to login to our Windows Server and open up the Server Management tool, once open, click on the large text link labelled “Add Roles and Features” as shown here:
Once you have clicked on the “Add Roles and Features” link you should then be presented with this wizard:
Accept the default “Role-based or feature based installation” and then click Next…
On the next screen you’ll be asked to choose the server that you want to add the role or feature to, select your server from the list that appears (you’ll probably only have one in the list anyway!) and then click Next…
You will now be presented with a screen titled “Select server roles“, expand the following sections, then check the “Server for NFS” option as shown in the screenshot below:
Once checked, click on the “Next” button…
The next screen will just ask you to “Select features“, you can simply click “Next“!
Finally, you’ll be shown a screen asking you to confirm the installation items, we now choose “Install“, this screen and the selection of features and roles to add should look as follows:
Great! We now have an NFS server running on our Windows 2016 Server!
Creating an NFS share (export)
Now that we have the NFS server installed we can now go and share (or “export” as NFS likes to call it) a directory, as per my intro notes to this blog post, I plan to add this to my data RAID array.
So first up, lets go and create a new directory on our data disk (in my case this is my D: drive), I’ve decided to call the directory “NFS” and then, inside that folder we’ll create another directory called “VSVR-WEB040_data” – This folder will be explicitly shared with my VM (that is named ‘VSVR-WEB040‘, the “_data” portion I’ve just named as that is what I will mount the share locally on the VM as eg. /data).
Now that you have an NFS server installed you can share/export numerous directories to individual or multiple VM’s or even other physical servers in your network.
The result of setting up this directory structure is as follows:-
Next up, we’ll right-click on the newly created folder and choose “Properties” – This will enable us to “Share” it as well as lock down the access to only a specific IP address (that being my NextCloud VM)…
From the Properties window, select the “NFS Sharing” tab and then click on the button named “Manage NFS Sharing” this should then display the following window:
Ensure that the above screenshot matches your folder (eg. select all the checkboxes as per the above)
Next we’ll configure the permissions for the share, clicking on the “Permissions” button in the above screenshot will then display the following window:
As you can see from the above screenshot, the permissions for this share are very restrictive by default, this is basically saying that for ALL MACHINES trying to access this share they WILL NOT be granted any access.
We should leave the defaults as is as we will instead create another permission only granting our specific VM access, to do this click on the “Add” button, the following screen should then appear:
I’ve entered my virtual server IP address in to the “Add names” field already (172.25.87.40), you’ll then need to change the “Type of access” drop-down box to “Read/Write” and check the “Allow root access” checkbox.
Once completed, click the “OK” button!
That’s great, our Permissions form should now look as follows:-
Perfect! – We’re all done on the NFS server side configuration now!
Mounting the NFS share on the client-side
We can now mount the NFS share on our Ubuntu Server (the virtual machine), first we need to install the NFS tools, so we’ll login to our server (I’m using root but you should really use a user with sudo rights!)…
sudo apt-get install -y nfs-common
So before we configure fstab to automatically mount our NFS share at system boot, we’ll first test using the command line to make sure everything works as expected…
Before we can mount the NFS share we must first create a mount point, we will do this like so:
sudo mkdir /data
Now that we have created the mount point, we can mount the remote file-system as follows:
sudo mount -t nfs 172.25.87.20:/VSVR-WEB040_data /data
Once mounted you should be able to run the following commands, these commands will essentially create a file on our server and a text file with some content…
echo "This is a test file" > /data/test.txt
We can now jump back over to our Windows server and check our NFS server directory, we should see a file named test.txt and when we open it in Notepad, the contents should appear as follows:-
All going well, that has hopefully worked a charm for you and we can now move on to ensuring that our VM automatically mounts the NFS share at boot.
If for whatever reason wish to un-mount the share you can do it like so:
umount /data
Configuring fstab to mount our NFS share on system boot
Using a text editor on the Linux VM we will open up the /etc/fstab file and add the following line to the bottom of the file:
172.25.87.20:/VSVR-WEB040_data /data nfs auto,nofail,noatime,nolock,intr,tcp,actimeo=1800 0 0
You’ll obviously need to replace your server’s IP address with your own 😉
The result should look something like the below:
Once completed, save the file and you can now either attempt to automatically mount the share using this command:
sudo mount -a
…or you can reboot your server!
Once rebooted, login and you can then check and confirm that you have re-mounted your /data directory to the remote server by checking the output of:
df -h
You should be able to see and confirm the remote disk usage as demonstrated here:
OK, well that’s it, I hope this has been useful for you 🙂
What is NFS Server?
Using the NFS protocol, you can transfer files between computers running Windows and other non-Windows operating systems, such as Linux or UNIX.
In Windows Server 2016, NFS includes the components, Server for NFS and Client for NFS. Server for NFS enables a computer running Windows Server 2016 to act as a NFS file server for other non-Windows client computers. Client for NFS enables a Windows-based computer that is running Windows Server 2016 to access files that are stored on a non-Windows NFS server.
For this demo, Infrastructure Requirement:
- 1 DC SERVER (DC-CLOUD.Sifad.ae)
- 1 Client PC running Windows 10 (CLIENT-10)
Installing NFS Server.
01 – Open Server Manager and Click Add roles and features.
02 – Click Next button.
03 – Select Role-based or feature-based installation.
04 – Select a Host which you’d like to add services.
05 – Check a box Server for NFS.
06 – Addtional features are required to add NFS Server. Click Add Features button.
07 – Click Next button.
08 – Click Next button.
09 – Click Install button.
10 – After finishing Installation, click Close button.
Configure NFS Shared Folder.
01 – Open Server Manager and Click File and Storage Services.
02 – Select Shares on the left pane and click TASKS – New Share.
03 – For example, select NFS Share – Quick on here.
04 – For example, configure a specific folder as shared one, so check a box Type a custom path and input the path for specific folder you’d like to set as shared folder. (set as “Share” on this example).
05 – Input local and remote share path.
06 – Specify authentication methods.
07 – Set the share permissions. Click Add button.
08 – Specify the Hosts you’d like to grant access permissions like the example below.
09 – Click Next button.
10 – Specify permissions to control access on here.
11 – Confirm selections and it’s no problem, Click Create button.
12 – After finishing creating, Click Close button.
13 – NFS shared folder has been just configured.
Configure NFS Server (Linux OS).
01 – Run Terminal and input commands like follows. (Please Refer to the Pictures)
mount [NFS server’s Hostname or IP address]:/[share name] [Local Folder Name to mount]
Configure NFS Client (Windows Client OS).
01 – Open Control Panel – Programs and Features then Check a box Client for NFS and click OK button.
02 – Run Command Prompt and input commands like follows.
mount [NFS server’s Hostname or IP address]:/[share name] [Local Drive to mount]:
03 – Run Explorer, then NFS share folder is displayed.
that’s all for now.., any Doubts type a commend.. 🙂
| title | description | ms.topic | author | ms.author | ms.date |
|---|---|---|---|---|---|
|
Deploy Network File System |
Describes how to deploy Network File System. |
article |
JasonGerend |
jgerend |
05/12/2021 |
Deploy Network File System
Applies to: Windows Server 2022, Windows Server 2019, Windows Server 2016, Windows Server 2012 R2, Windows Server 2012
Network File System (NFS) provides a file sharing solution that lets you transfer files between computers running Windows Server and UNIX operating systems using the NFS protocol. This topic describe the steps you should follow to deploy NFS.
What’s new in Network File System
Here’s what’s changed for NFS in Windows Server 2012:
-
Support for NFS version 4.1. This protocol version includes the following enhancements.
- Navigating firewalls is easier, improving accessibility.
- Supports the RPCSEC_GSS protocol, providing stronger security and allowing clients and servers to negotiate security.
- Supports UNIX and Windows file semantics.
- Takes advantage of clustered file server deployments.
- Supports WAN-friendly compound procedures.
-
NFS module for Windows PowerShell. The availability of built-in NFS cmdlets makes it easier to automate various operations. The cmdlet names are consistent with other Windows PowerShell cmdlets (using verbs such as «Get» and «Set»), making it easier for users familiar with Windows PowerShell to learn to use new cmdlets.
-
NFS management improvements. A new centralized UI-based management console simplifies configuration and management of SMB and NFS shares, quotas, file screens and classification, in addition to managing clustered file servers.
-
Identity Mapping improvements. New UI support and task-based Windows PowerShell cmdlets for configuring identity mapping, which allows administrators to quickly configure an identity mapping source, and then create individual mapped identities for users. Improvements make it easy for administrators to set up a share for multi-protocol access over both NFS and SMB.
-
Cluster resource model restructure. This improvement brings consistency between the cluster resource model for the Windows NFS and SMB protocol servers and simplifies administration. For NFS servers that have many shares, the resource network and the number of WMI calls required fail over a volume containing a large number of NFS shares are reduced.
-
Integration with Resume Key Manager. The Resume Key Manager is a component that tracks file server and file system state and enables the Windows SMB and NFS protocol servers to fail over without disrupting clients or server applications that store their data on the file server. This improvement is a key component of the continuous availability capability of the file server running Windows Server 2012.
Scenarios for using Network File System
NFS supports a mixed environment of Windows-based and UNIX-based operating systems. The following deployment scenarios are examples of how you can deploy a continuously available Windows Server 2012 file server using NFS.
Provision file shares in heterogeneous environments
This scenario applies to organizations with heterogeneous environments that consist of both Windows and other operating systems, such as UNIX or Linux-based client computers. With this scenario, you can provide multi-protocol access to the same file share over both the SMB and NFS protocols. Typically, when you deploy a Windows file server in this scenario, you want to facilitate collaboration between users on Windows and UNIX-based computers. When a file share is configured, it is shared with both the SMB and NFS protocols, with Windows users accessing their files over the SMB protocol, and users on UNIX-based computers typically access their files over the NFS protocol.
For this scenario, you must have a valid identity mapping source configuration. Windows Server 2012 supports the following identity mapping stores:
- Mapping File
- Active Directory Domain Services (AD DS)
- RFC 2307-compliant LDAP stores such as Active Directory Lightweight Directory Services (AD LDS)
- User Name Mapping (UNM) server
Provision file shares in UNIX-based environments
In this scenario, Windows file servers are deployed in a predominantly UNIX-based environment to provide access to NFS file shares for UNIX-based client computers. An Unmapped UNIX User Access (UUUA) option was initially implemented for NFS shares in Windows Server 2008 R2 so that Windows servers can be used for storing NFS data without creating UNIX-to-Windows account mapping. UUUA allows administrators to quickly provision and deploy NFS without having to configure account mapping. When enabled for NFS, UUUA creates custom security identifiers (SIDs) to represent unmapped users. Mapped user accounts use standard Windows security identifiers (SIDs), and unmapped users use custom NFS SIDs.
System requirements
Server for NFS can be installed on any version of Windows Server 2012. You can use NFS with UNIX-based computers that are running an NFS server or NFS client if these NFS server and client implementations comply with one of the following protocol specifications:
- NFS Version 4.1 Protocol Specification (as defined in RFC 5661)
- NFS Version 3 Protocol Specification (as defined in RFC 1813)
- NFS Version 2 Protocol Specification (as defined in RFC 1094)
Deploy NFS infrastructure
You need to deploy the following computers and connect them on a local area network (LAN):
- One or more computers running Windows Server 2012 on which you will install the two main Services for NFS components: Server for NFS and Client for NFS. You can install these components on the same computer or on different computers.
- One or more UNIX-based computers that are running NFS server and NFS client software. The UNIX-based computer that is running NFS server hosts an NFS file share or export, which is accessed by a computer that is running Windows Server 2012 as a client using Client for NFS. You can install NFS server and client software either in the same UNIX-based computer or on different UNIX-based computers, as desired.
- A domain controller running at the Windows Server 2008 R2 functional level. The domain controller provides user authentication information and mapping for the Windows environment.
- When a domain controller is not deployed, you can use a Network Information Service (NIS) server to provide user authentication information for the UNIX environment. Or, if you prefer, you can use Password and Group files that are stored on the computer that is running the User Name Mapping service.
Install Network File System on the server with Server Manager
- From the Add Roles and Features Wizard, under Server Roles, select File and Storage Services if it has not already been installed.
- Under File and iSCSI Services, select File Server and Server for NFS. Select Add Features to include selected NFS features.
- Select Install to install the NFS components on the server.
Install Network File System on the server with Windows PowerShell
- Start Windows PowerShell. Right-click the PowerShell icon on the taskbar, and select Run as Administrator.
- Run the following Windows PowerShell commands:
Import-Module ServerManager
Add-WindowsFeature FS-NFS-Service
Import-Module NFS
Configure NFS authentication
When using the NFS version 4.1 and NFS version 3.0 protocols, we recommend using Kerberos (RPCSEC_GSS). There are three options with increasing levels of security protection:
- Krb5. Uses the Kerberos version 5 protocol to authenticate users before granting access to the file share.
- Krb5i. Uses Kerberos version 5 protocol to authenticate with integrity checking (checksums), which verifies that the data has not been altered.
- Krb5p Uses Kerberos version 5 protocol, which authenticates NFS traffic with encryption for privacy. This is the most secure Kerberos option.
[!NOTE]
You can also choose not to use the Kerberos authentication methods above by enabling unmapped user access through AUTH_SYS. We strongly discourage using
this option as it removes all authentication protections and allows any user with access to the NFS server to access data.
When using unmapped user access, you can specify to allow unmapped user access by UID / GID, which is the default, or allow anonymous access.
Instructions for configuring NFS authentication on discussed in the following section.
Create an NFS file share
You can create an NFS file share using either Server Manager or Windows PowerShell NFS cmdlets.
Create an NFS file share with Server Manager
- Log on to the server as a member of the local Administrators group.
- Server Manager will start automatically. If it does not automatically start, select Start, type servermanager.exe, and then select Server Manager.
- On the left, select File and Storage Services, and then select Shares.
- Select To create a file share, start the New Share Wizard.
- On the Select Profile page, select either NFS Share � Quick or NFS Share — Advanced, then select Next.
- On the Share Location page, select a server and a volume, and select Next.
- On the Share Name page, specify a name for the new share, and select Next.
- On the Authentication page, specify the authentication method you want to use for this share.
- On the Share Permissions page, select Add, and then specify the host, client group or netgroup you want to grant permission to the share.
- In Permissions, configure the type of access control you want the users to have, and select OK.
- On the Confirmation page, review your configuration, and select Create to create the NFS file share.
Windows PowerShell equivalent commands
The following Windows PowerShell cmdlet can also create an NFS file share (where nfs1 is the name of the share and C:\shares\nfsfolder is the file path):
New-NfsShare -name nfs1 -Path C:sharesnfsfolder
Known issue
NFS version 4.1 allows the file names to be created or copied using illegal characters. If you attempt to open the files with vi editor, it shows as being corrupt. You cannot save the file from vi, rename, move it or change permissions. Avoid using illegal characters.
NFS (Network file system) is a distributed file sharing solution for diversified cross platform environments. It was originally designed to run on Sun solaris, This also supports and works well on windows and non-windows computers. NFS uses RPC and usually use Port (TCP and UDP) 111 and 2049. There are also ports for Cluster and client status (Port 1110 TCP for the former, and 1110 UDP for the latter) as well as a port for the NFS lock manager (Port 4045 TCP and UDP). In most of the environments NFS is configured in Linux as file share.
Warning: Windows NFS server is not listed on VMWare HCL as Esxi NFS datastore. I am using it as a demo purpose.
MICROSFOT WINDOWS 2012 R2 ISCSI TARGET STORAGE SERVER FOR ESXI AND HYPERV
Microsoft Powershell: Windows 2016 Install and configure NFS server
Add NFS datastores to VMware ESXi hosts using PowerCLI
Here in this article I will setup one NFS server on Microsoft Windows server 2016. To install this role Open server manager, Click on Add roles and features (Manage). After clicking next on Add roles and features wizard with all default options, once you land on the Server Roles page, expand roles File and Storage services >> File and iSCSI Services and locate Server for NFS. Once you check the box it ask for for add features that are required for server for NFS, click Add features.
After clicks on next with keeping default options, finish the feature installation and configuration. It takes few minutes to complete setup.
In next article I have mounted this NFS drive on Esxi — Microsoft Windows 2016 Install and configure NFS server for ESXi and Linux and Mount NFS share to multiple ESXi hosts.
After installing NFS server role successfully, Its time to configure new NFS Share, for configuration go to Server Manager, then File and Storage Services, on the Shares box, Click Tasks from drop down box click New Share. This launches New share wizard. On the right side It gives me insight about volumes with drive space and I can plan for creating shares.
On the New share Wizard, Select the NFS Share — Quick Profile for this share. This describes as The basic profile represents the fastest way to create a NFS file share, typically used to share files with UNIX-based computers.
- Suitable for general file sharing
- Advanced options can be configured later by using properties dialog
Click next.
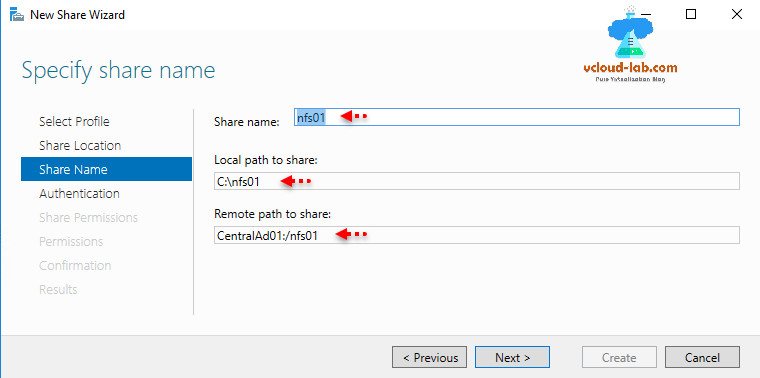
I have already created a folder on c:nfs01. On the same path I will be creating NFS share. either browse and select the path or Type it under custom path.
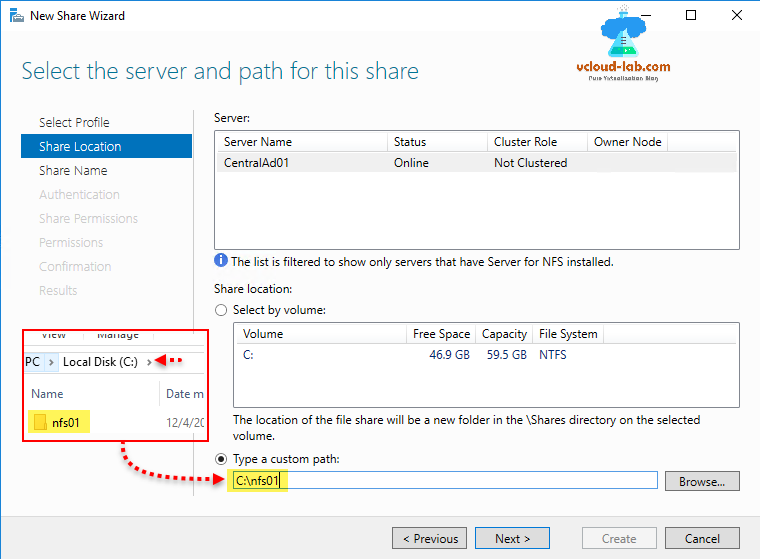
This is important stage of configuration, Provide the share name (I am keeping same as folder to avoid any confusion). Local path is c:nfs01. Next note down Remote path to share. This will require in next articles. Generally this is a fqdn_Or_ip:/nfs01.
On the No server authentication box specify the authentication methods that you want to use for this NFS share, check the boxes for No server authentication (AUTH_SYS), then Enable unmapped user access and select Allow unmapped user access by UID/GID. this will add require authentication while accessing servers.

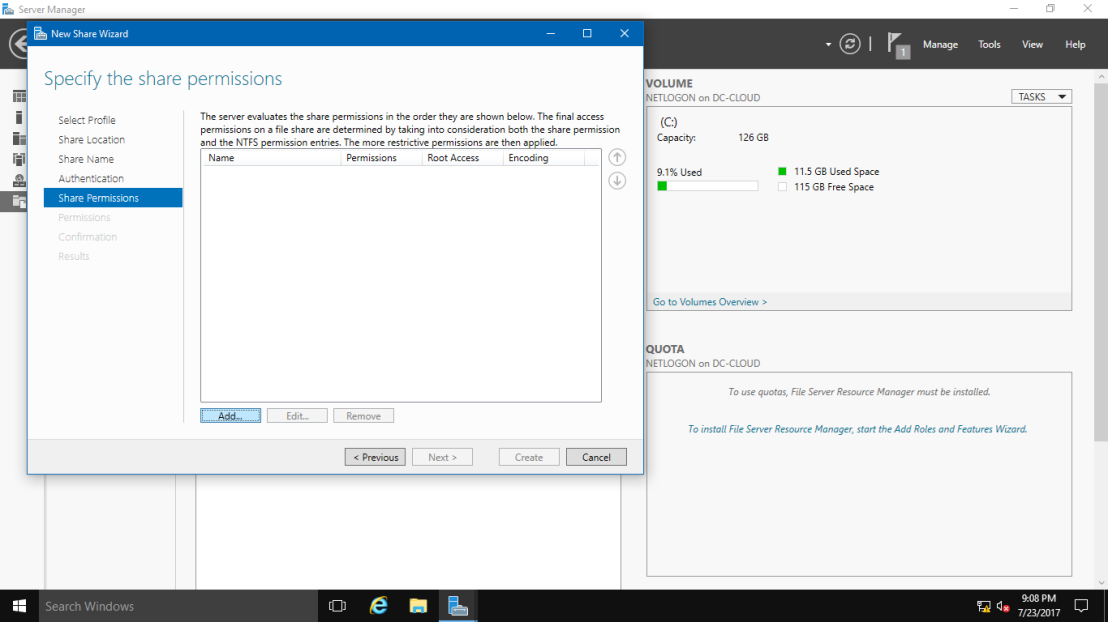
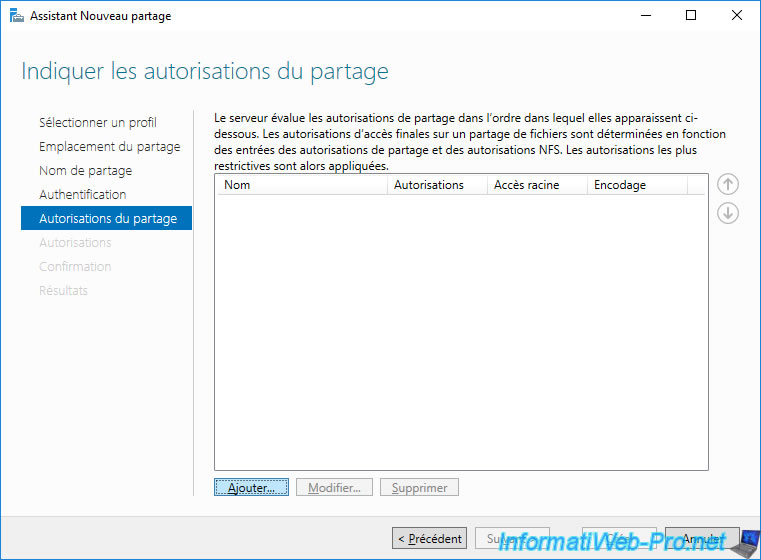
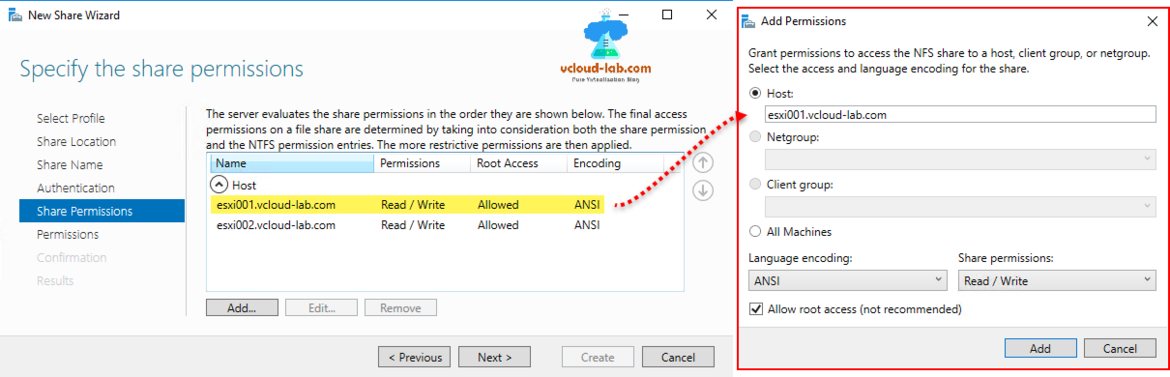
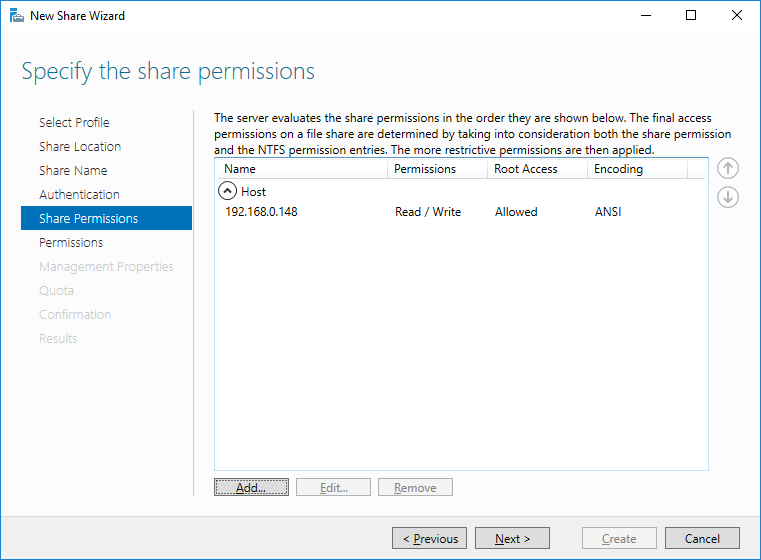
The server evaluates the share permissions in the order they are shows below. the final access permissions on a file share are determined by taking into consideration both the share permission and the NTFS permission entries. the more restrictive permissions are then applied.
Click Add button to add permissions. In next articles I am using this blog to show how to add and mount same NFS share on esxi server as datastore. Next I will be adding esxi host fqdn or ip in Host, Share permissions should be selected to Read/Write, and check the box of Allow root access.
In next
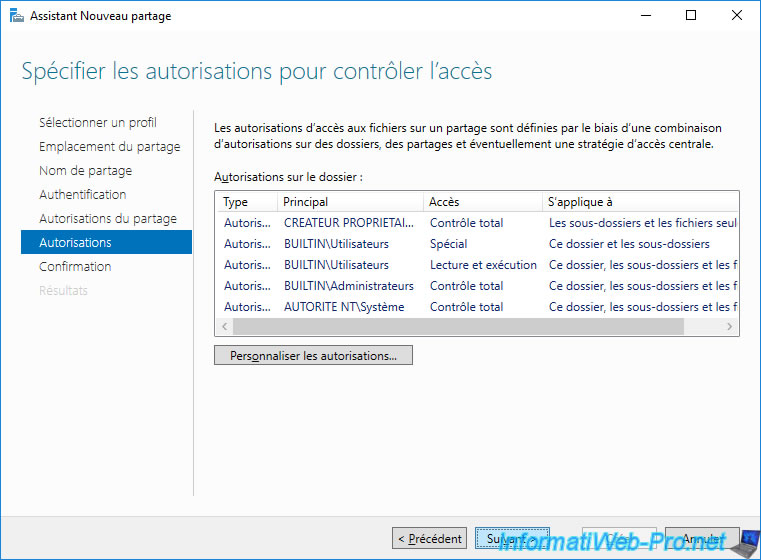
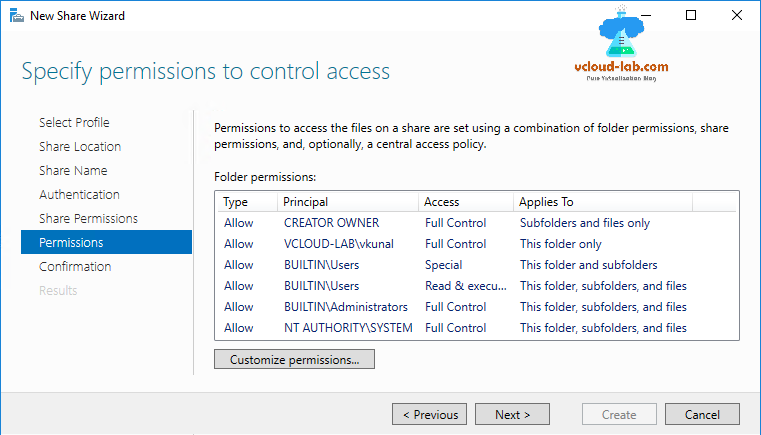
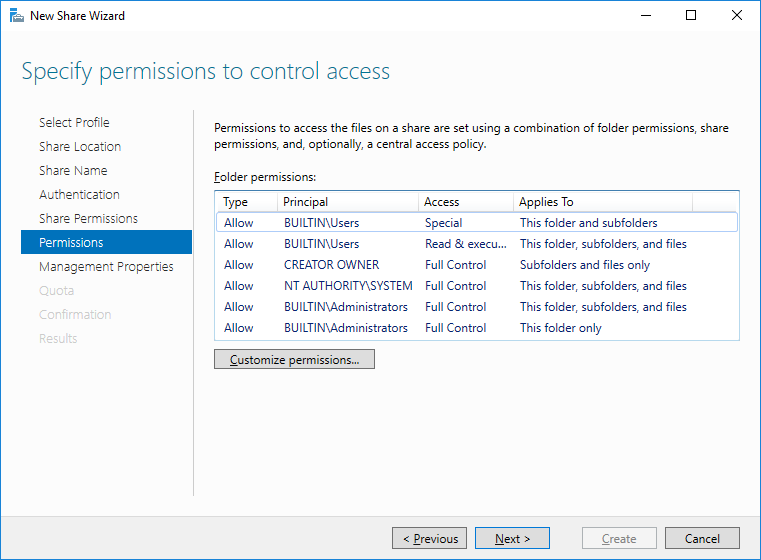
Permissions to access the files on a share are set using a combination of folder permissions, share permissions, and, optionally, a central access policy. Next in the wizard, don’t need to add or modify permissions, keep it default and press next.
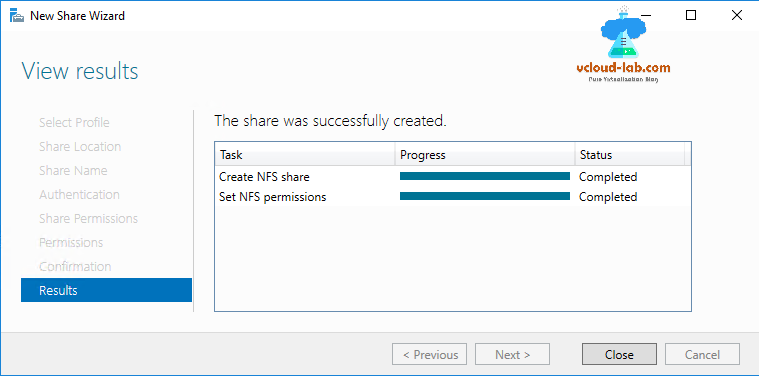
On the Confirm Selections page verify all the settings are correct and click to create share.
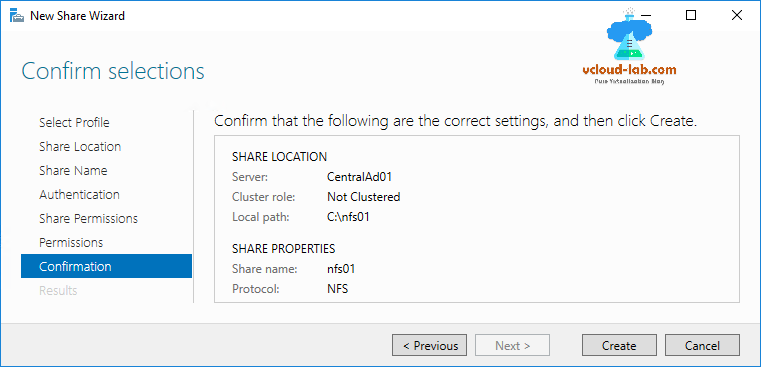
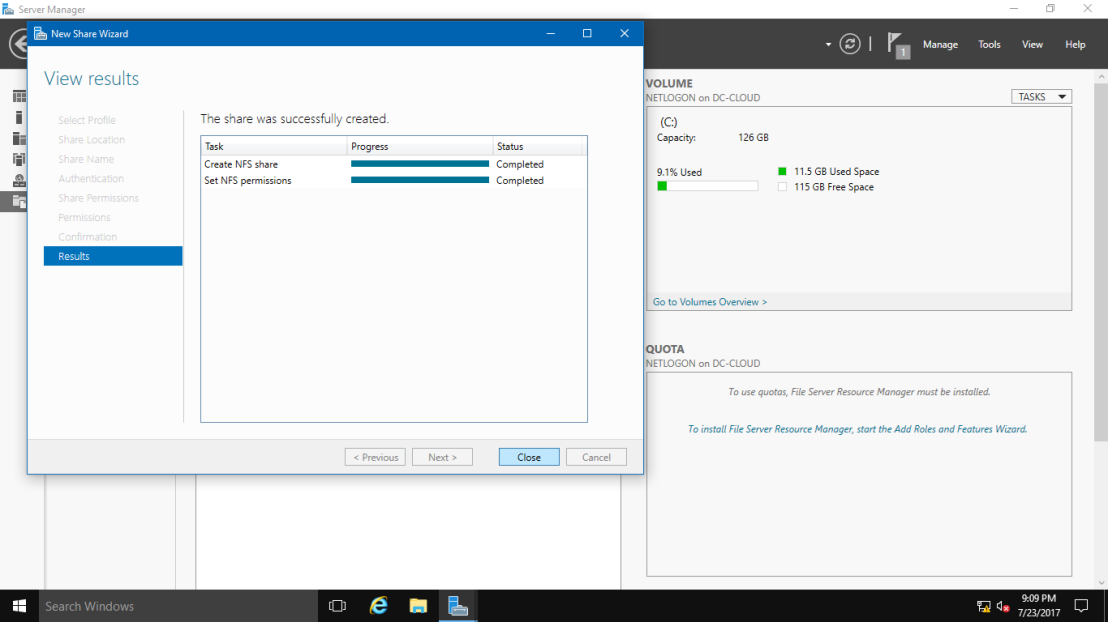
This takes few minutes (depending on the files in the folder) and check the progress and status of Create NFS share and set NFS permissions.
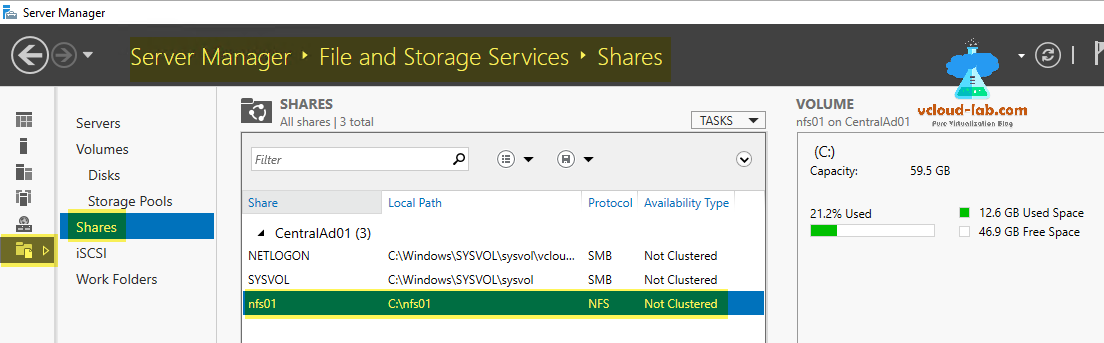
Finally NFS share will be listed with protocol NFS and in the next if you need to add hosts in permissions list. Right click nfs share, go to properties and make the necessary changes for later use.
Useful articles
VMWARE ESXI INSTALL AND CONFIGURE SOFTWARE ISCSI STORAGE ADAPTER FOR VMFS VERSION 6 DATASTORE
POWERCLI VMWARE: CONFIGURE SOFTWARE ISCSI STORAGE ADAPTER AND ADD VMFS DATASTORE
POWERCLI: VIRTUAL MACHINE STORAGE MIGRATE/SVMOTION AND DATASTORE PORT BINDING MULTIPATHING
PART 1 : INSTALLING ESXI ON VMWARE WORKSTATION HOME LAB
Unmount NFS datastores from VMware ESXi and NFS is in use
In this post, we are going to look on how to setup NFS Server by using Windows Server 2016 & use by Vmware ESX (i) as NFS datastore.
NFS stand for «Network File System». It is tradisional and most popular file shared method for the Linux, UNIX system and Vmware. NFS shared folder can then used to share files and data between NFS Server & NFS Client.
[ Install NFS Server ]
In Server Manager, click Manage , Click Add Roles & Features

Install «Server for NFS» on File and Storage Services

[Configure NFS Server ]
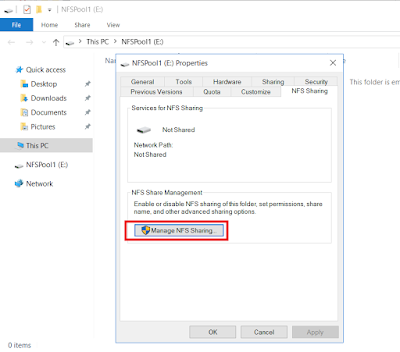
On new empty drive, right click and select Properties
Click NFS Sharing Tab, select Manage NFS Sharing
Tick Share this folder
Enter Share Name
Click Permission

Set type of access «Read Write»
Tick «Allow root access»

Now our NFS server is ready! Last step, configure on Vmware side.
[Configure NFS Client]
On ESX(i), click on Configuration, Add Networking

Select VMKernel
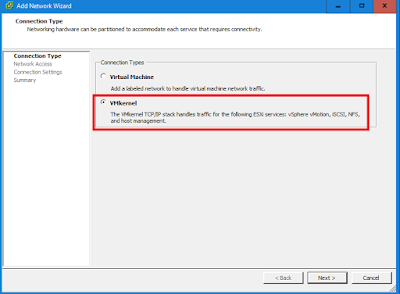
Create a new standard switch and bind to a physical NIC
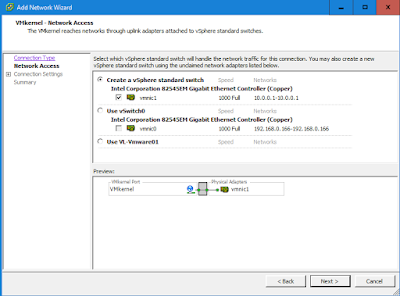
Enter network port name

Enter IP Address (same network as your storage -NFS Server)
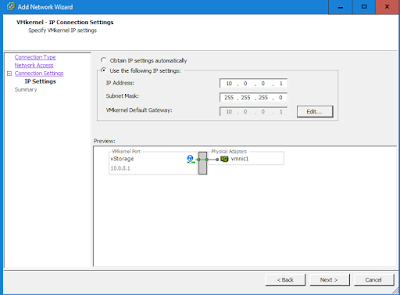

Now vkernel port is ready.
Lastly, start to mount the NFS share to vmware as new datastore.
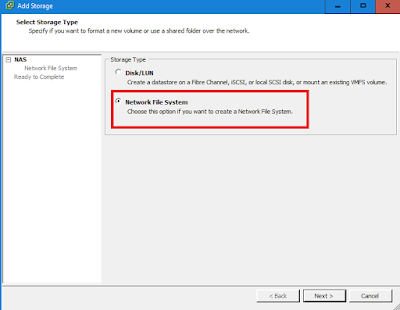
Click on Storage | Add Storage
Select Network File System
Enter NFS Server IP
Enter NFS Share Name
Enter NFS datastore
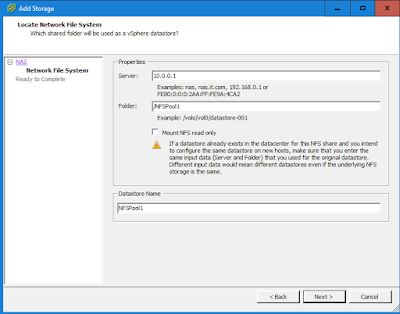
Complete the wizard. Your new NFS datastore is added into Vmware ESX (i) host.

NFS (Network File System) is a client-server filesystem that allows users to access files across a network and handle them as if they are located in a local file directory. It is developed by Sun Microsystems, Inc, and it is common for Linux/ Unix systems.
Since Windows Server 2012 R2, it is possible to configure it on Windows Server as a role and use it with Windows or Linux machines as clients. Read to know about How to Configure NFS in Windows Server 2016 here.
How to install NFS to Windows Server 2016
Installation of NFS (Network File System) role is no different than an installation of any other role. It goes from “Add roles and features Wizard”.
With few clicks on “Select server roles” page, under File and Storage Services, and expansion of File and iSCSI Services, the system will show checkbox “Server for NFS”. Installation of that role will enable NFS server.
The configuration of NFS on Windows Server 2016
After installation, it is needed to configure role properly. The first stage is choosing or creating a folder for NFS (Network File System) share.
With right click and properties option, the system will bring the NFS Sharing tab, and Manage NFS sharing button, as part of the tab.
It will provide NFS Advanced Sharing dialogue box, with authentication and mapping options, as well as with “Permissions” button.
Clicking on “Permissions” button will open Type of access drop-down list, with the possibility of root user access, and permission level.
By default, any client can access the NFS shared folder, but it is possible to control or limit the specific clients, with a clicking of Add button and type the client’s IP address or hostname.
Mount NFS Shared Folder on Windows Client
The steps above make NFS (Network File System) server ready for work.
To successfully test it, it is needed to mount chosen NFS folder on a Linux or Windows client with following steps:
- It is needed to activate a feature on the client, by clicking Control Panel / Programs and Features / Services for NFS / Client for NFS
- After installing the service, it is needed to mount the folder with the following command :
mount –o \<NFS-Server-IP><NFS-Shared-Folder> <Drive Letter>:
The command maps folder as drive and assigns chosen letter to it.
Mount NFS Shared Folder on Linux Client
No matter NFS is common to Linux / Unix systems, it is still needed to mount folder to a system via command, similar to windows systems.
mount –t NFS <NFS-Server-IP>/<NFS-Shared-Folder> /<Mount-Point>
Protect yourself and your clients against security leaks and get your free trial of the easiest and fastest NTFS Permission Reporter now!
Here we’re going to show you how to mount an NFS file share in Windows Server 2016 both temporarily and persistently so that it will automatically mount after a reboot.
There are a couple of different ways this can be done, including mapping a network drive or adding a network location, which we’ll discuss here.
Our NFS Server: In this example we already have an NFS server setup on a CentOS 7 Linux system which is available at 192.168.1.14 and we have exported the /root/nfs directory with NFS. See our guide on creating an NFS server in Linux here if you need information on how to do this.
Install NFS Client
Before we can mount any NFS shares on our Windows server, we must first install the NFS client feature. This can be done through the graphical user interface (GUI) using server manager, however that takes a lot longer so we’ll use some PowerShell.
First we’ll use the Get-WindowsFeature cmdlet to search for available features that contain the string ‘NFS*’ in the Name field.
PS C:> Get-WindowsFeature -Name NFS*

As we can see NFS-Client is available for install but not currently installed.
Next we use the Install-WindowsFeature cmdlet to install the NFS-Client feature, as shown below.
PS C:> Install-WindowsFeature -Name NFS-Client

Once complete we should see that the installation has completed successfully, no reboot is required for this feature, we can begin using it straight away.
Mount NFS Temporarily
We can use the mount command in command prompt to quickly mount our NFS share and confirm that it’s working. Note that the mount command used here is in command prompt rather than PowerShell, using it in PowerShell will fail as it is a different command.
C:UsersAdministrators> mount 2.168.1.14rootnfs X:
X: is now successfully connected to 2.168.1.14rootnfs

The command completed successfully.

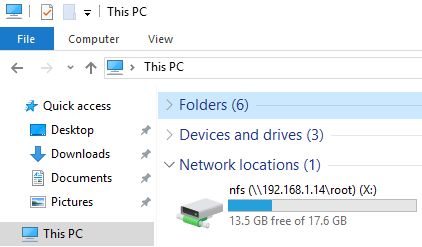
At this point we can browse to “This PC” and we should see the NFS share mounted under Network Locations.
There is an issue with this however, this mount is not persistent meaning that if we perform a restart of the Windows server it will not be there afterwards. Luckily there are a few ways we can permanently map to the NFS file share.
Mount NFS Persistently
Most of the time we will want our NFS mount to survive a system reboot and mount automatically after boot so that we don’t have to manually mount it every time.
There are a couple of different ways that we can achieve this task:
- Map Network Drive
- Add A Network Location
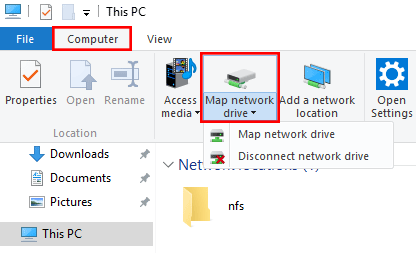
Map Network Drive
I personally prefer this method, as we can see the space remaining much more easily.
-
First open up “This PC” and select Computer from the menu at the top. From here click on Map network drive, as shown below.

-
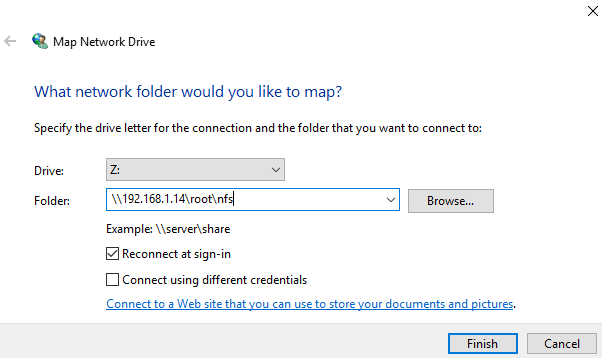
The Map Network Drive window will open, select the drive letter that you want to assign to the NFS share, followed by the IP address or hostname of the NFS server as well as the path to the exported NFS directory. Click the Finish button when complete.

You may see a pop up window showing that the connection is being attempted. Once complete the shared NFS folder will open up.
-
When you view “This PC” you will see the mapped network drive under Network location. This method is better than adding the network location as we’ll discuss next as it clearly shows how much disk space on the NFS share is in use and how much is still available.

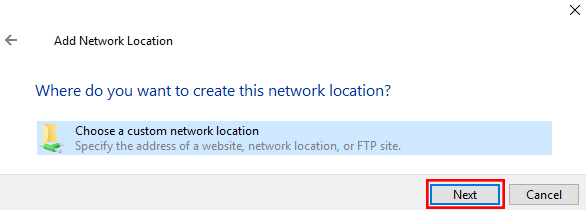
Add A Network Location
This will basically create a shortcut to the mounted NFS directory for you to access at any time, it will also be available after restart just like the map network drive method above.
-
First open up “This PC” and right click in the white space area and select “Add a network location”.

-
On the welcome screen click Next to proceed.

-
Select that you want to choose a custom network location, followed by the Next button.

-
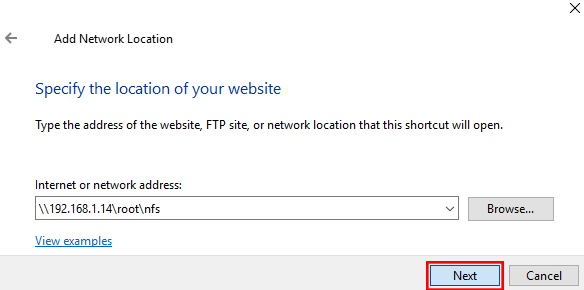
Enter in two back slashes, followed by the IP address or hostname of your NFS server, followed by the path that is being exported by the NFS server. Click Next once you’ve filled this in.

-
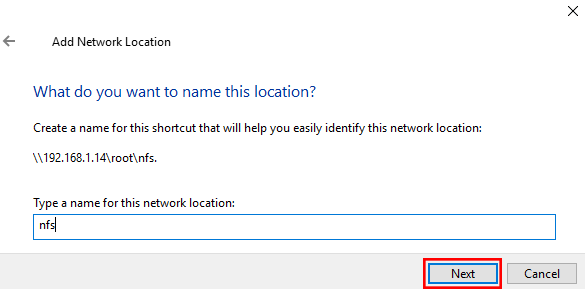
You can now select a custom name for the network location, click Next once you’ve set one.

-
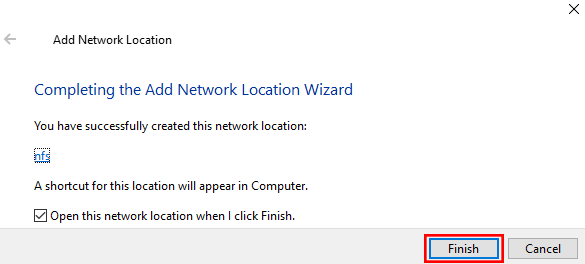
To complete the process, simply click the Finish button on the completion screen.

-
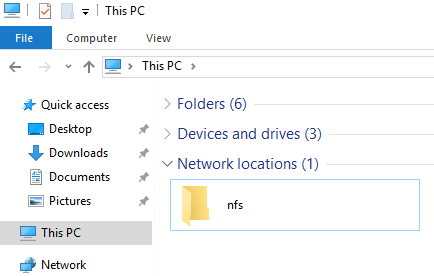
We can optionally open the NFS mount now, or we can browse to “This PC” and see the folder shortcut listed under the “Network locations” setting as shown below.

As mentioned note that this does not show the disk space in use like the network drive mapping option.


Summary
We have shown you how to install the NFS client feature in Windows Server 2016, and then mount an NFS share from a Linux server both temporarily through command prompt with the mount command, and persistently so that the NFS share is mounted automatically after the server has been restarted.
By doing this we can easily access files from a Unix or Linux based operating system over NFS from Windows.
Introduction
Many words were said about NFS (Network File System), but what exactly NFS can give us? In general, NFS used as the ISO library or just simple network file share with easy access from any Windows or Linux based machine. However, starts from NFS 3.0 protocol can give us the good performance and can be as the shared storage for ESXi or any Linux based Hypervisors. In this article I will create the NFS share on the Windows Server 2016 and then mount NFS share on the ESXi 6.5 and will create the VM on it.
Creating NFS File Share on Windows 2016
First of all, we need to install the Server Roles on the Windows-based server, such as File Server, Fileserver Resource Monitor and NFS server.

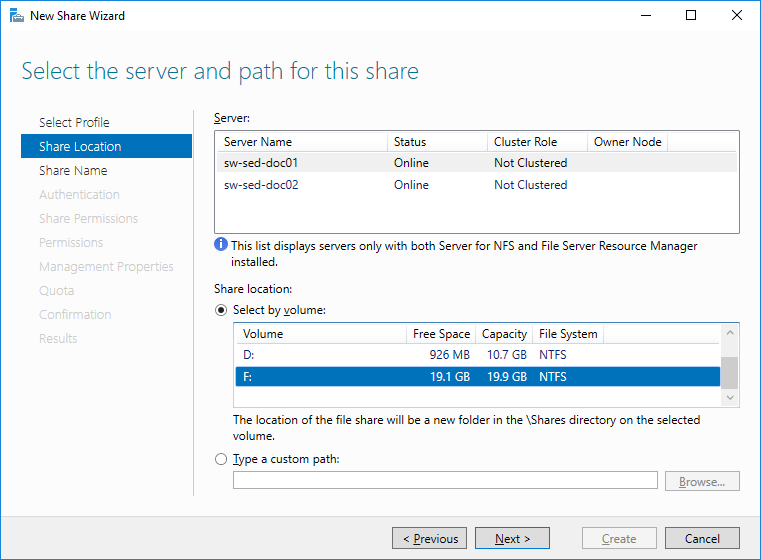
Then we can create the NFS share in Server Manager’s Shares tab. I decided to create “Advanced NFS Share” to specify more properties for share.
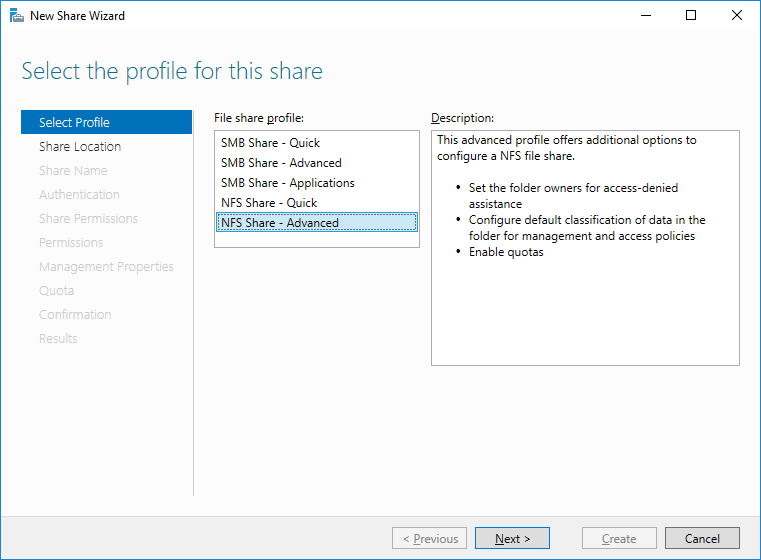
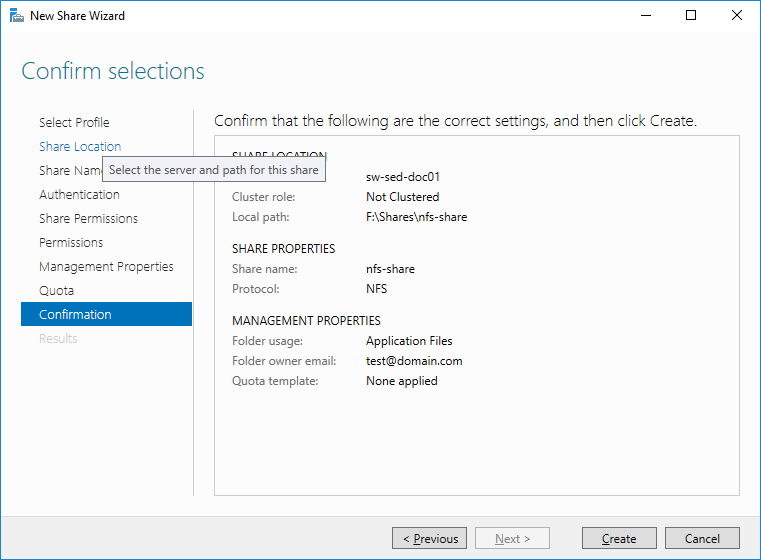
Select Server and specify the disk for NFS share
In this window, we should specify the share name.
In this step, we need to specify the Authentication method for our share. You are free to use any of them. In my case, I have created simple NFS share with no server authentication and unmapped user access (Note: to mount the NFS share on the Linux-based machine you must use “Unmapped user access by UID/GID”).
Click “Add” to specify the Share Permissions. You can either specify the Host IP with Language encoding and read/write permissions or allow the access for each machine in network.
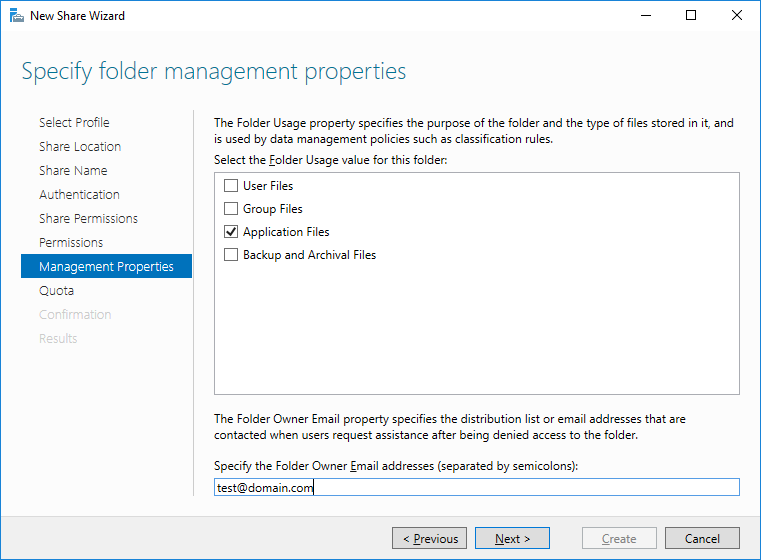
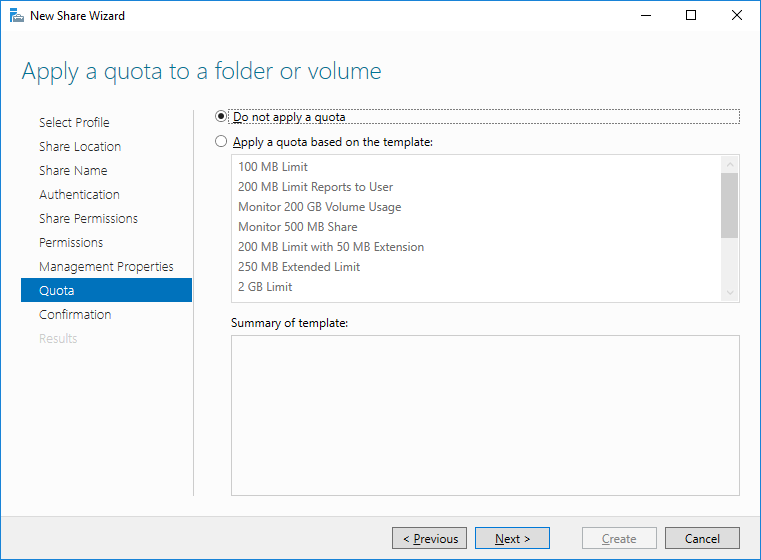
In next 3 steps you can specify the local Windows Permissions, Management Properties and Quota for NFS share by your requirements and needs.
Click “Create” to complete the Wizard and let’s mount this NFS Share in our ESXi 6.5 Hypervisor
Mounting NFS to ESXi and creating the VM
VSAN from StarWind is software-defined storage (SDS) solution created with restricted budgets and maximum output in mind. It pulls close to 100% of IOPS from existing hardware, ensures high uptime and fault tolerance starting with just two nodes. StarWind VSAN is hypervisor and hardware agnostic, allowing you to forget about hardware restrictions and crazy expensive physical shared storage.
Build your infrastructure with off-the-shelf hardware, scale however you like, increase return on investment (ROI) and enjoy Enterprise-grade virtualization features and benefits at SMB price today!
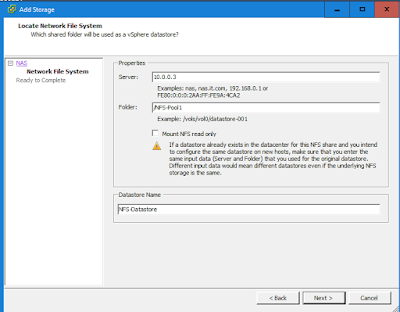
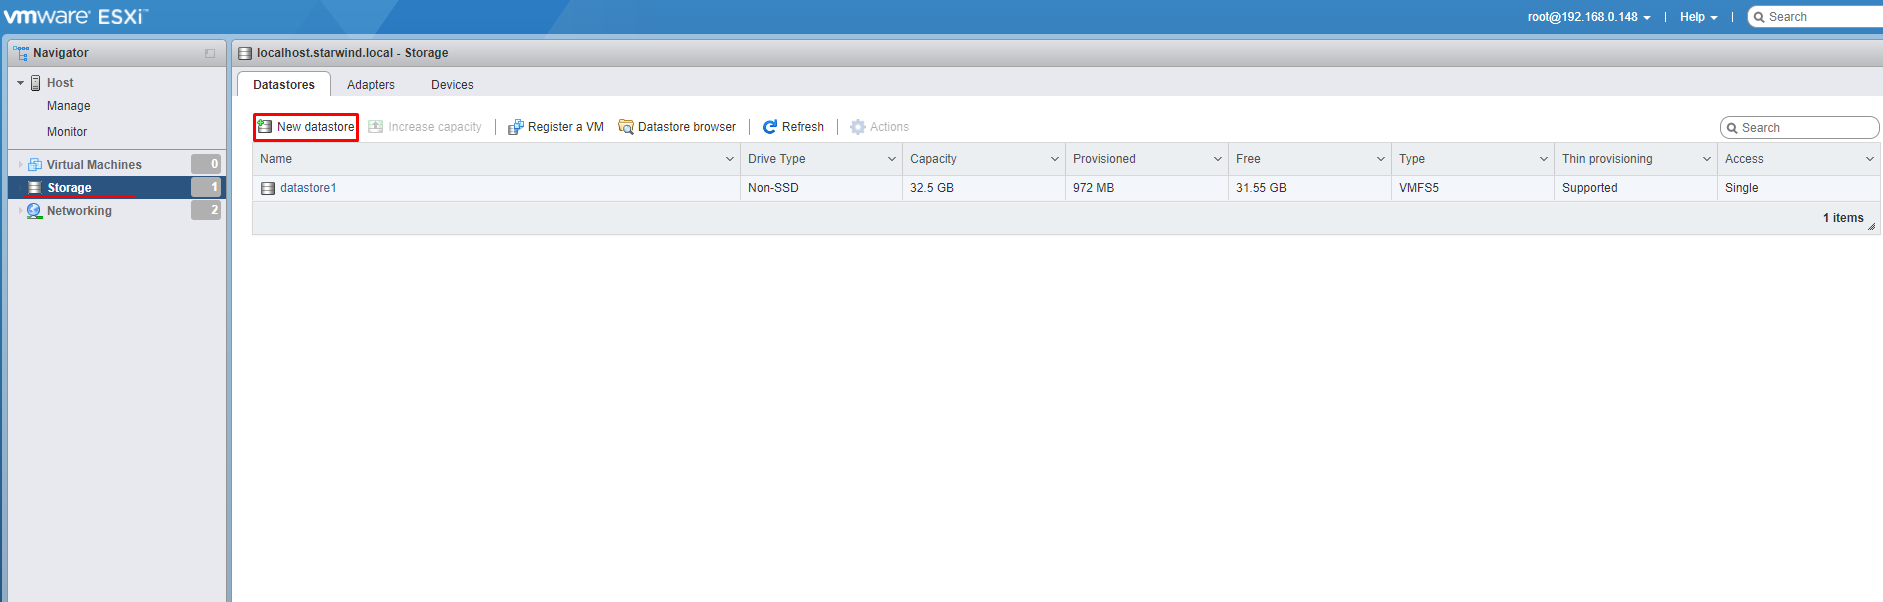
In ESXi console, navigate to Storage tab and click “Add datastore”
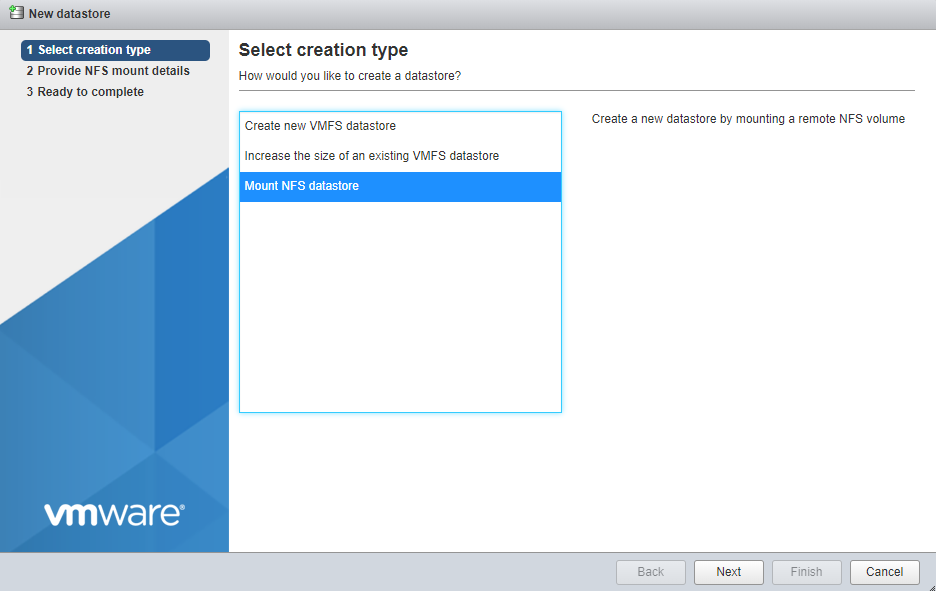
Then select “Mount NFS datastore”
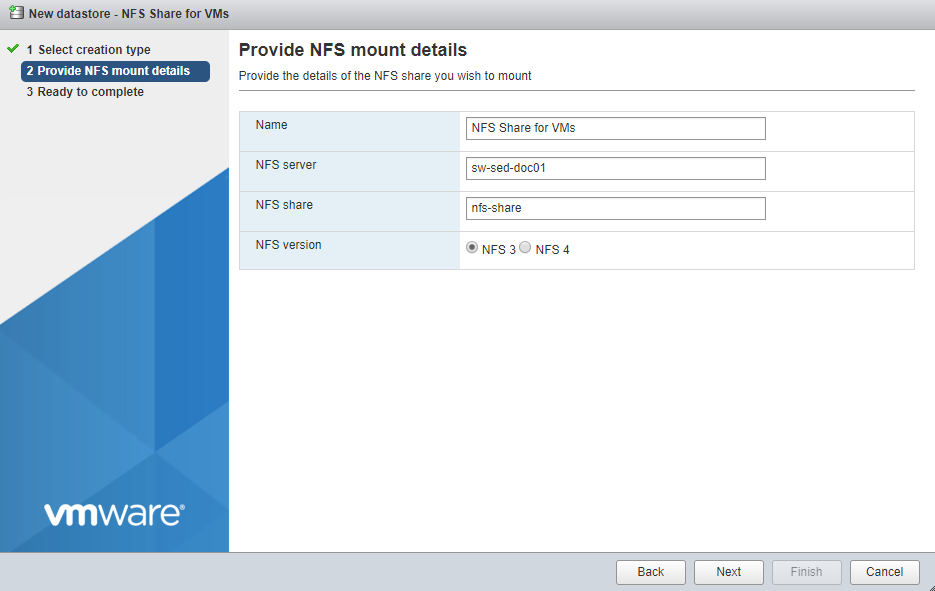
Specify the Name for Datastore, IP/FQDN/Server Name of NFS server and actual name of the share.
Disclaimer:
Windows Server 2016 supports all NFS protocols including NFS 4.1. I have tried to add my share as NFS 4.1 share and it was successfully mounted, but while creating the VM I have received an error that ESXi can’t create vmx files on it.
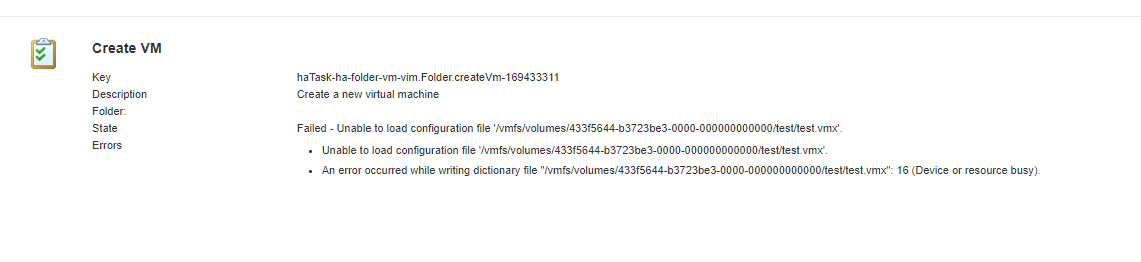
The quick research showed that some people encountered the same issue while mounting NFS share from Linux-based machine as well – https://communities.vmware.com/thread/553432
First thought I had that it could be an issue with web-based GUI on Standalone ESXi 6.5, so I deployed vCenter and tried one more time. No luck.
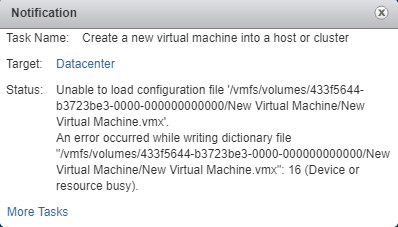
Then I have tried to create the VM on the local datastore and migrate it over to the NFS share. Once again, the same issue.
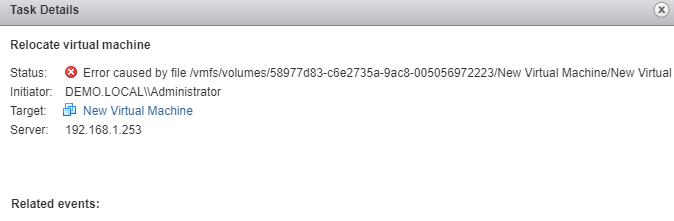
I’ve thought that the issue can be on Microsoft level. So, I deployed Ubuntu 16.04 LTS and install the nfs-kernel-server, created share folder called nfs at /var/ directory and started the sharing.
I mounted Linux-based NFS share on ESXi 6.5 and finally I was able to mount NFS share via protocol NFS4.1 and create the VM on top of the NFSv4 share.
So, it is looks like the ESXi can work with Microsoft NFS shared folder only via NFSv3 protocol.
Now in Datastores tab we can see our NFS share. In the next steps, we will create the Test VM on this NFS share.

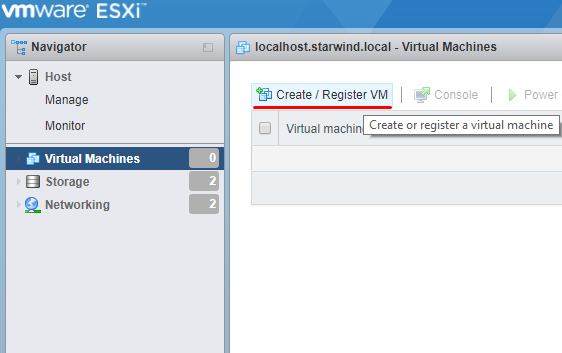
Click “Create/Register VM” in Virtual Machine tab and choose “Create a new Virtual Machine” option.
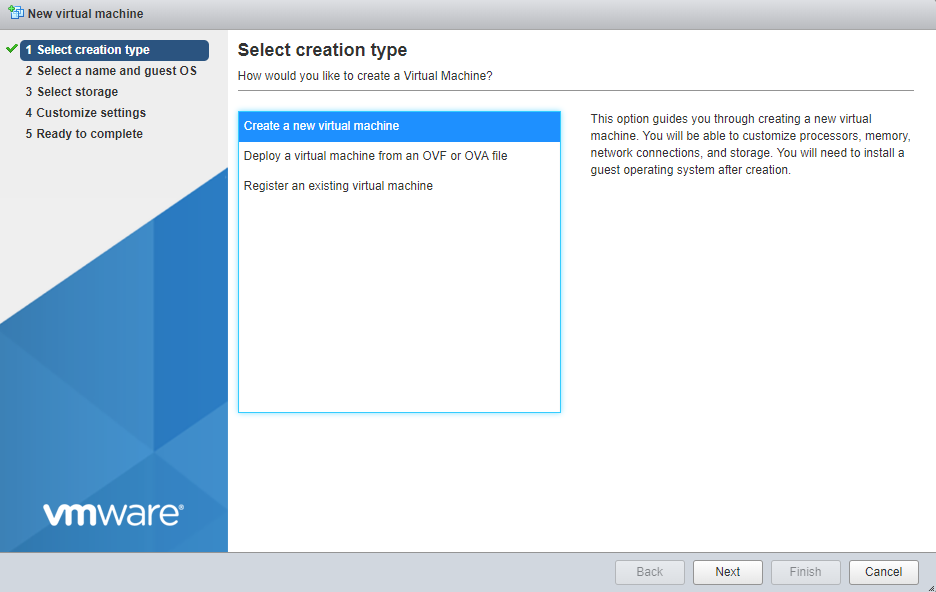
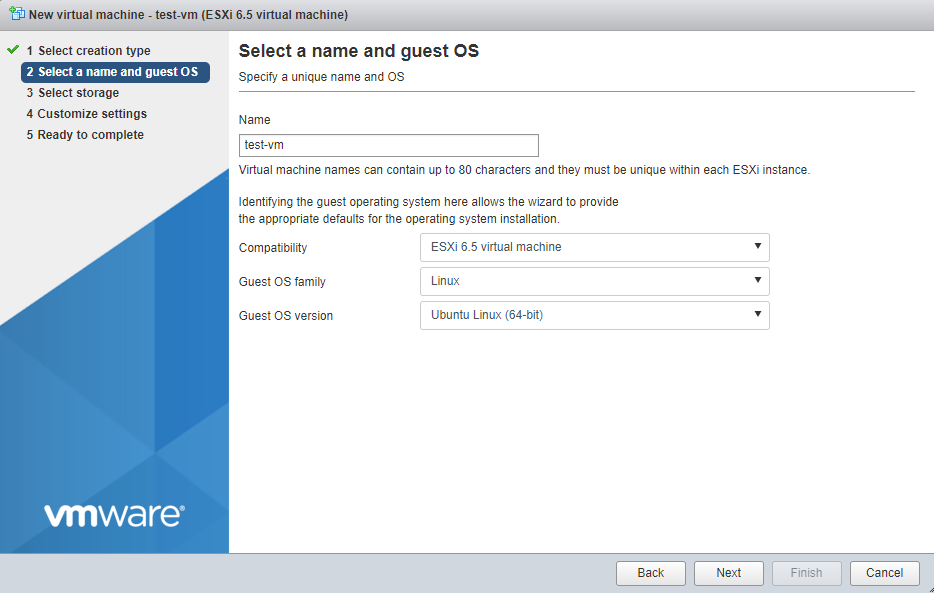
Specify the name for VM and Guest OS.
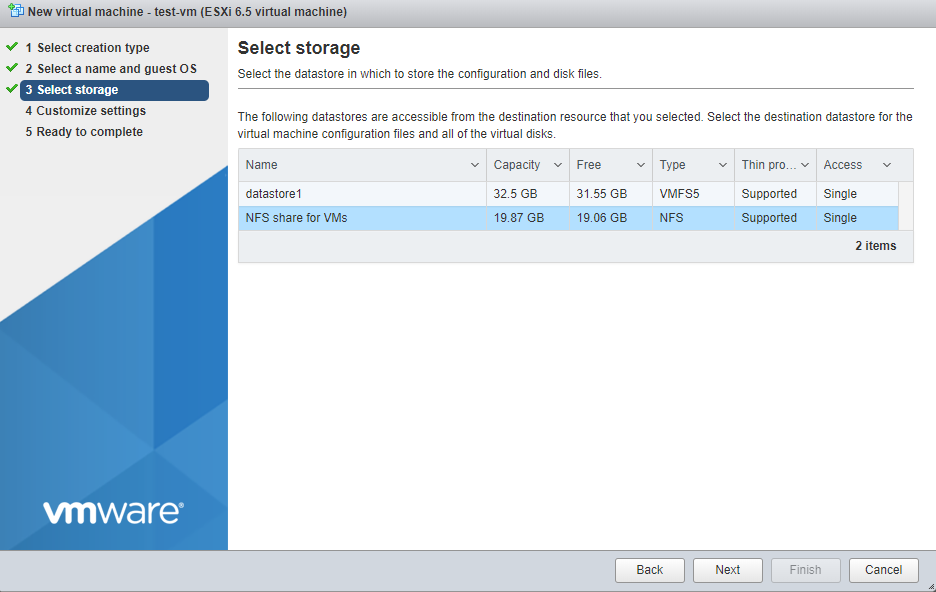
Select our newly mounted NFS datastore and click “Next”.
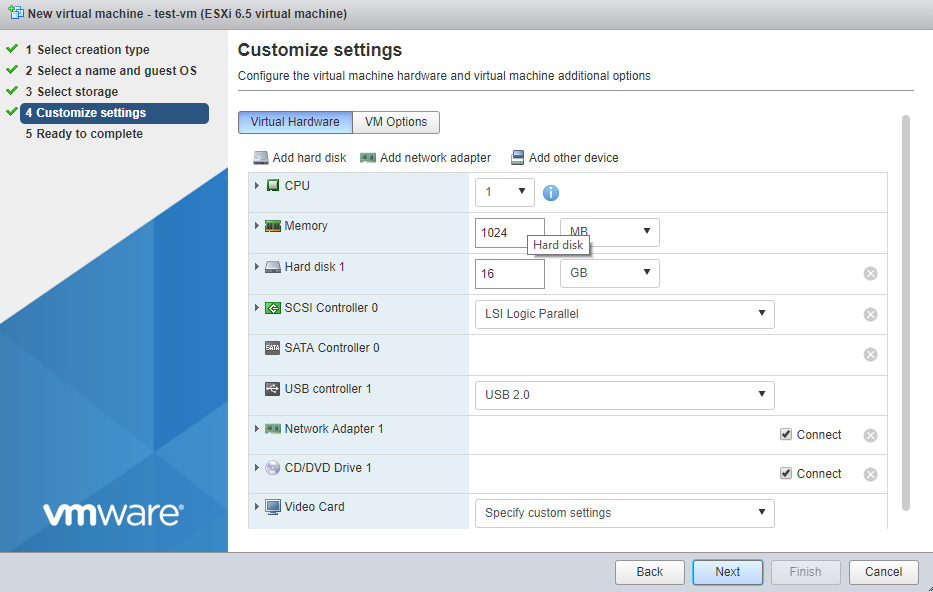
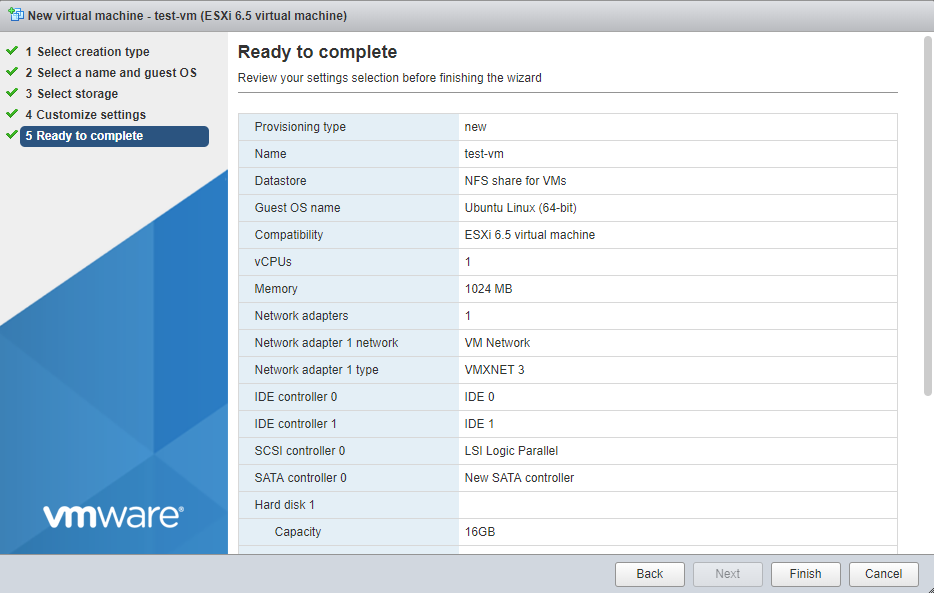
Specify the settings for your VM.
We have the VM which is located on NFS datastore. We can mount the same NFS datastore on other ESXi Server and register the same VM. Moreover, the NFS datastore can be used as the shared storage on multiple ESXi hosts.

Conclusion
As a result, you have the NFS shared storage-based on Microsoft Windows Server 2016 for your VMs in ESXi. Speaking of availability, you can achieve the High Availability with StarWind VSAN and Microsoft Failover Cluster for your NFS server and improve the availability for your data inside the NFS share.
- Network File System: access your files remotely as easily as if they were local
- Hyper-V VMs on an NFS share on Windows Server 2016 – is that real?