In this post I will explain how you can configure an NFS Server on a Windows 2016 Server and connect/mount the NFS exports on Linux clients, in my case I wanted to run a Linux virtual machine whist ensuring that the actual data resides on physical disks on my host machine ensuring that the data is automatically part of my nightly backup routine and did not need to run separate backup scripts on the VM(s).
A bit of background first…
In my home network I have a single (in an attempt to be eco-friendly) Intel i7 server running Windows Server 2016 Standard edition, I use this server for hosting my family media, files and various database engines and ActiveDirectory for local development (I’m a software engineer by trade!) in addition to several Hyper-V virtual machines that do various tasks, all of the virtual machines are running a derivative of Linux.
I currently have the following virtual machines setup and running on it (under Hyper-V):
- A Web Server and reverse proxy running Ubuntu Server 16.04 LTS – Hosting Gogs, Minio and various Nginx reverse proxy configurations for sites, services and API’s that sit on other VM’s in my network.
- An OpenVPN server running CentOS 7 – Providing secure VPN tunnel access for me when away from home.
- A Jenkins server running Ubuntu Server 16.04 LTS– Used for automated code testing and continuous integration.
- A MineCraft server running Ubuntu Server 16.04 LTS – Used by my daughter and friend to play online together.
In the past I used to run VMWare ESXi and hosted everything in their own virtual machine for better isolation and performance although since then, I had tested and was extremely happy with the performance of running virtual machines on top of Hyper-V and Windows Server so when I re-built my home server several months ago I decided to go down that route instead.
Anyway, enough of all that, let me explain why I have such a need for this kind of set-up…
My home server has 1x SDD (500GB for the host operating system and local applications) in addition to 2x WD Red 4TB hard drives in a hardware RAID1 configuration, I periodically backup this array over my LAN to a Buffalo NAS device.
My plan is to install a new VM running Ubuntu Server 16.04 that will host an instance of NextCloud, this will provide me, my family and friends with a free alternative to DropBox with masses of space in addition to all the other cool things that NextCloud offer such as encrypted video calls and the like.
By setting up an NFS server on the host operating system, instead of provisioning this Linux VM with a massive virtual hard disk (and taking drive space away from the host OS) I have instead provisioned it with a single 20GB virtual hard drive and will then use NFS shares on my Windows Server to host the files on the physical disk and thus be automatically part of my backup routine and alleviate the need for using rsync or rsnapshot etc. on the VM and transferring it at regular intervals.
Installing NFS Server on Windows Server 2016
First up, we need to login to our Windows Server and open up the Server Management tool, once open, click on the large text link labelled “Add Roles and Features” as shown here:
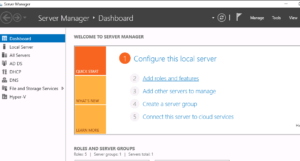
Once you have clicked on the “Add Roles and Features” link you should then be presented with this wizard:
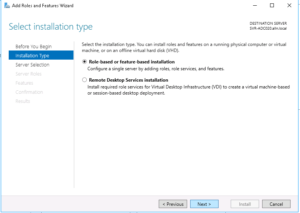
Accept the default “Role-based or feature based installation” and then click Next…
On the next screen you’ll be asked to choose the server that you want to add the role or feature to, select your server from the list that appears (you’ll probably only have one in the list anyway!) and then click Next…
You will now be presented with a screen titled “Select server roles“, expand the following sections, then check the “Server for NFS” option as shown in the screenshot below:
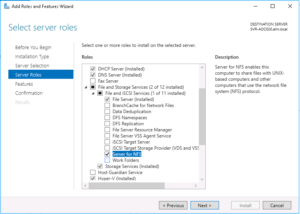
Once checked, click on the “Next” button…
The next screen will just ask you to “Select features“, you can simply click “Next“!
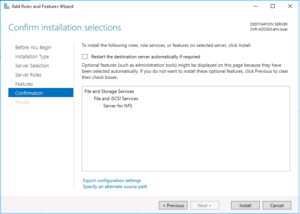
Finally, you’ll be shown a screen asking you to confirm the installation items, we now choose “Install“, this screen and the selection of features and roles to add should look as follows:
Great! We now have an NFS server running on our Windows 2016 Server!
Creating an NFS share (export)
Now that we have the NFS server installed we can now go and share (or “export” as NFS likes to call it) a directory, as per my intro notes to this blog post, I plan to add this to my data RAID array.
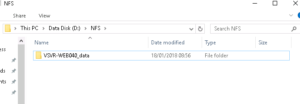
So first up, lets go and create a new directory on our data disk (in my case this is my D: drive), I’ve decided to call the directory “NFS” and then, inside that folder we’ll create another directory called “VSVR-WEB040_data” – This folder will be explicitly shared with my VM (that is named ‘VSVR-WEB040‘, the “_data” portion I’ve just named as that is what I will mount the share locally on the VM as eg. /data).
Now that you have an NFS server installed you can share/export numerous directories to individual or multiple VM’s or even other physical servers in your network.
The result of setting up this directory structure is as follows:-
Next up, we’ll right-click on the newly created folder and choose “Properties” – This will enable us to “Share” it as well as lock down the access to only a specific IP address (that being my NextCloud VM)…
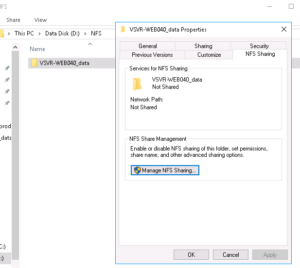
From the Properties window, select the “NFS Sharing” tab and then click on the button named “Manage NFS Sharing” this should then display the following window:
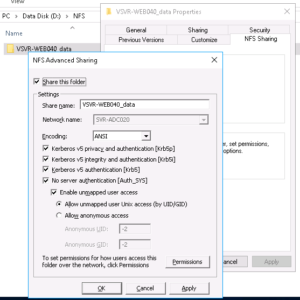
Ensure that the above screenshot matches your folder (eg. select all the checkboxes as per the above)
Next we’ll configure the permissions for the share, clicking on the “Permissions” button in the above screenshot will then display the following window:
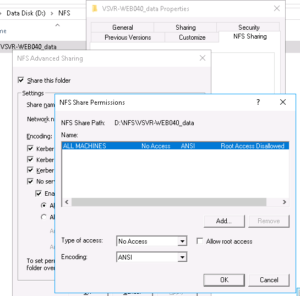
As you can see from the above screenshot, the permissions for this share are very restrictive by default, this is basically saying that for ALL MACHINES trying to access this share they WILL NOT be granted any access.
We should leave the defaults as is as we will instead create another permission only granting our specific VM access, to do this click on the “Add” button, the following screen should then appear:
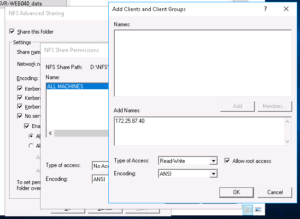
I’ve entered my virtual server IP address in to the “Add names” field already (172.25.87.40), you’ll then need to change the “Type of access” drop-down box to “Read/Write” and check the “Allow root access” checkbox.
Once completed, click the “OK” button!
That’s great, our Permissions form should now look as follows:-

Perfect! – We’re all done on the NFS server side configuration now!
Mounting the NFS share on the client-side
We can now mount the NFS share on our Ubuntu Server (the virtual machine), first we need to install the NFS tools, so we’ll login to our server (I’m using root but you should really use a user with sudo rights!)…
sudo apt-get install -y nfs-common
So before we configure fstab to automatically mount our NFS share at system boot, we’ll first test using the command line to make sure everything works as expected…
Before we can mount the NFS share we must first create a mount point, we will do this like so:
sudo mkdir /data
Now that we have created the mount point, we can mount the remote file-system as follows:
sudo mount -t nfs 172.25.87.20:/VSVR-WEB040_data /data
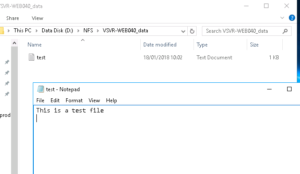
Once mounted you should be able to run the following commands, these commands will essentially create a file on our server and a text file with some content…
echo "This is a test file" > /data/test.txt
We can now jump back over to our Windows server and check our NFS server directory, we should see a file named test.txt and when we open it in Notepad, the contents should appear as follows:-
All going well, that has hopefully worked a charm for you and we can now move on to ensuring that our VM automatically mounts the NFS share at boot.
If for whatever reason wish to un-mount the share you can do it like so:
umount /data
Configuring fstab to mount our NFS share on system boot
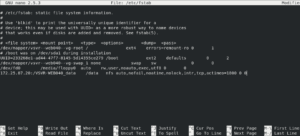
Using a text editor on the Linux VM we will open up the /etc/fstab file and add the following line to the bottom of the file:
172.25.87.20:/VSVR-WEB040_data /data nfs auto,nofail,noatime,nolock,intr,tcp,actimeo=1800 0 0
You’ll obviously need to replace your server’s IP address with your own 😉
The result should look something like the below:
Once completed, save the file and you can now either attempt to automatically mount the share using this command:
sudo mount -a
…or you can reboot your server!
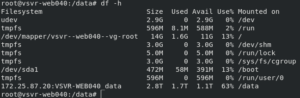
Once rebooted, login and you can then check and confirm that you have re-mounted your /data directory to the remote server by checking the output of:
df -h
You should be able to see and confirm the remote disk usage as demonstrated here:
OK, well that’s it, I hope this has been useful for you 🙂
This blog post will be about mounting Windows shares on Linux Operating Systems.
Actually, I have used this method explained in this post, recently for mounting a Windows Share to a virtualized ODA machine (mounting directly to the Linux ODA Base nodes).
Those who follow me know that I m trying to share unique articles and try to give you the info that can’t be easily found on the internet or Oracle Support…
This is also true for this article, although its name sounds quite familiar. I mean, Windows Admins may use it frequently but when it comes to Linux, we are more concantrate on the success of mouting the Windows shares, rather the method that we are using to mount them.
Actually, the main reason that made me writing this post is the hang situation that we have faced when using Windows shares.. (I m talking mounting Windows shares using CIFS , as we have faced sudden and unexpected hang situations using it.)
Another reason is, for mounting the Windows shares on Linux environments, we are using CIFS mostly, so that’s why I m writing this post to give you another method for mounting Windows Shares on Linux.
Before going forward, I want to give you the quick definitions of CIFS and NFS.
CIFS (Common Internet File System) is a form of SMB, developed by Microsoft.
Note that: Samba is an implementation of SMB written for UNIX. So Samba allows Unix clients to access CIFS shares. Samba and Smb are two different thing in this manner.
CIFS is used by Windows operating systems for file sharing.
It is based on a Client Server model and it is using TCP/IP.
With CIFS, servers share the storage and clients use or map the storage share.
The most common SMB/CIFS server for Linux is Samba.
NFS is the «Network File System» . NFS was originally developed by Sun and it is often used with Unix operating systems.
NFS has various versions like Nfsv2, v3 and v4. All these versions can use TCP/IP.
Note that, v2 and v3 can use UDP as well.(less protocol overhead than TCP)
With NFS, servers export the storage and clients mount the storage.
The most common
Linux NFS server is «nfsd».
Windows Shares supports both CIFS and NFS.
Wel… After this quick info, let’s take a look at what we need to do for sharing our Windows directories using NFS and mounting them on Linux Operating systems.
Fist, we install services for NFS components in our Windows Server.
Click Start, point to Administrative Tools, and then click Server Manager.
In the left pane, click Manage Roles.
Click Add Roles. The Add Roles Wizard appears.
Click Next. The Select Server Roles options appear.
Select the File Server check box and click Next.
The File Server screen appears. Click Next to view the Role Services options.
Select the Services for Network File System (NFS) check box and click Next.
Confirm your selection and click Install.
When the installation completes, the installation results will appear. Click Close.
After we install the services, we share our folder as NFS Service.
Note that, if we just mount the folder (without completing the NFS enablement of our share), we get the error represented in example below:
mount.nfs: mounting 10.34.10.184:/backupca failed, reason given by server: No such file or directory
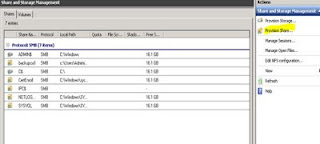
We open the Share and Storage Management and click on the Provision Share;
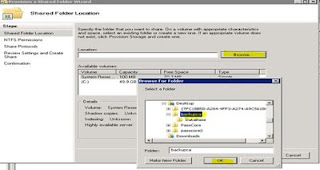
Then we select the folder that we want to share;
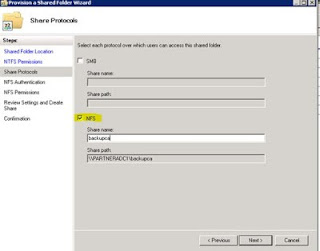
We choose NFS for the share protocol, type the name of our share and click Next;
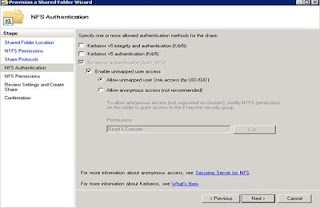
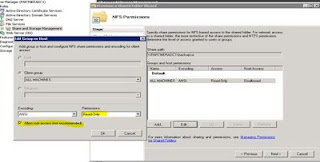
In the NFS authentication window, we just accept the default selections and click Next.
In the NFS Permissions window, we click edit and change permissions to Read-Write. We also check the Allow root access ( not recommended ) checkbox and click Next. (note that, these configuration is just for our specific example, you may do other configurations according to your needs)
As our last work in Windows side, we click Create button in the Review Settings and Create Shared window.

Well.. At this point, our work in Windows side is finished. So, we go to our Linux client and mount the NFS share from Linux using the standard mount commands as shown in the example below;
Mounting NFS share on Linux
We just run command below and mount our Windows Nfs share.
mount -v -t nfs servername:/nfssharename /mountpoint
Example:
mount -v -t nfs 10.34.10.184:/backupca /mnt/
Easy isn’t it?
What about the difference between NFS and CIFS? Which one is better? Which one to use? Which one to use when?
It is important to mention that, these comparisons should not only be done from the performance perspective but also from the Fault tolerancy and consistency perspectives.
While the main difference seems to be -> «NFS is stateless (except NFSv4) and CIFS is stateful (not stateless)», these questions are all for another topic..
But I hope, I have explained what I wanted to explain to you with this post.
If you are interested with the answers of the question above; I suggest you to read the following article;
NFS is a great way to share files across a computer network. If you have a Ubuntu 18.04 server and want to share files to Windows 10 Pro or Enterprise clients (or Linux based clients), you’ve come to the right place.
Some time ago, I bought a Synology NAS because Synology has a nice app that can automate backups of local directories on my Windows computers to my Synology NAS. It gave me peace of mind with regard to backups, but it didn’t solve another need that soon emerged: sharing some of these folders with other members of the household. I tried to use the built-in Synology NFS. It worked, but was painfully slow on my low-end, underpowered Synology with spindle drives. So I decided to set up my household i7 server with M2 disks instead. This is the short and sweet story of how I replaced my Synology and created shared folders for my household.
Set up the server (Ubuntu 18.04)
First, install the NFS server:
sudo apt-get install nfs-kernel-serverNow, prepare an NFS-share. I bind-mounted an existing directory on my Linux server to a short and sweet directory under /mnt, just to make the share-name shorter on the Windows client.
Create the mount point:
mkdir /mnt/myshareThen edit fstab and bind-mounted the directory with the actual files to my easy to remember and recognize share:
sudo vi /etc/fstab
/deep/down/directory/with/files/to/share /mnt/myshare none defaults,bind 0 0

mount /mnt/myshare
ls -la /mnt/myshare
Now, /mnt/myshare should have the contents of the deep down directory with files to share, and you are ready to share this directory from your NFS server.
To enable sharing, just edit the exports file and restart the service, like this:
sudo vi /etc/exports
/mnt/myshare 192.168.100.0/24(rw,no_subtree_check) 192.168.1.25(rw,no_subtree_check)

sudo service nfs-kernel-server restart
This will allow any client on the 192.168.100.0/24 network plus the single IP 192.168.1.25 to connect. You must make sure you trust the range and the IPs you allow to access your share. By defult, if the client says he’s root, he’s re-mapped to «nobody». If the client says he’s a valid user, NFS will accept that in the current configuration. You can ovverride that and force a uid + gid if you want to.
My server lives in a secured VLAN with a dedicated external firewall granting client access. If you want to secure the server and tighten your firewall, take a look at this page.
In short, I allow traffic to my NFS server from trusted networks on TCP and UDP on the following ports:
- 111
- 2049
- From 32764 to 32769 (or the more common notation: 32764:32769)
Port 111 and 2049 are fixed. In order to fix the higher ports I changed / appended to the following files on my NFS host server:
# /etc/default/nfs-common (change)
STATDOPTS="--port 32765 --outgoing-port 32766"

# /etc/default/nfs-kernel-server (change)
RPCMOUNTDOPTS="-p 32767"

# /etc/default/quota (change)
RPCRQUOTADOPTS="-p 32769"

# /etc/services (append - optional)
# NFS ports as per the NFS-HOWTO
# http://www.tldp.org/HOWTO/NFS-HOWTO/security.html#FIREWALLS
# Listing here does not mean they will bind to these ports.
rpc.nfsd        2049/tcp                        # RPC nfsd
rpc.nfsd        2049/udp                        # RPC nfsd
rpc.nfs-cb      32764/tcp                       # RPC nfs callback
rpc.nfs-cb      32764/udp                       # RPC nfs callback
rpc.statd-bc    32765/tcp                       # RPC statd broadcast
rpc.statd-bc    32765/udp                       # RPC statd broadcast
rpc.statd       32766/tcp                       # RPC statd listen
rpc.statd       32766/udp                       # RPC statd listen
rpc.mountd      32767/tcp                       # RPC mountd
rpc.mountd      32767/udp                       # RPC mountd
rpc.lockd       32768/tcp                       # RPC lockd/nlockmgr
rpc.lockd       32768/udp                       # RPC lockd/nlockmgr
rpc.quotad      32769/tcp                       # RPC quotad
rpc.quotad      32769/udp                       # RPC quotad
Then create the follwoing file with content:
sudo vi /etc/modprobe.d/local.conf

# /etc/modprobe.d/local.conf
options lockd nlm_udpport=32768 nlm_tcpport=32768
options nfs callback_tcpport=32764
Reload the system with new ports:
sysctl --system
sudo service nfs-kernel-server restart
Set up the client (Windows 10 Pro/Enterprise)
Setting up the client is key to make this work. Remember, you can set up several clients towards the same share! If you have Windows 10 Home Edition, you’re out of luck, though. It doesn’t ship with the NFS client.
To set up the client:
- Search for and go to «Control Panel»
- Go to «Programs»
- Click to the sub-title «Turn Windows features on or off»
- Open «Services for NFS», select «Client for NFS»
- Click OK.
Now, you need to tweak the client a bit for it to work correctly.
The first thing is to alter the UID and GID you connect to the share with. If you are allowed to connect to an NFS share, NFS also believes you are who you say you are(!). I chose to use the UID and GID of the owner of the files in the /mnt/myshare folder.
- Search for and go to «regedit»
- Create two New DWORD (32-bit) values inside the HKEY_LOCAL_MACHINE\SOFTWARE\Microsoft\ClientForNFS\CurrentVersion\Default
- AnonymousUid
- AnonymousGid
- Assign the UID and GID of your choosing, but preferably the owners of the files in the /mnt/myshare folder.
The second thing is to change the default permissions set on files created by the Windows client.
- Search for «cmd» and run it as a privileged user
- Type the following command and press enter: nfsadmin client config fileaccess=660
This will change the default file permissions from 755 to 660.
To see the client defaults and what other options you can configure, type the following command:
- nfsadmin client config
You can also stop and start the NFS client (but your mileage may vary):
- nfsadmin client stop
- nfsadmin client start
To be completely safe, restart your computer for the changes to take effect.
Now, its’ time to connect to your share:
- Open File Explorer
- Right click on «This PC» and choose «Map Network Drive»
- Choose a drive letter
- For location, type in: \serverip\mnt\myshare
- Reconnect at startup
And you’re set!
Network File System or NFS is a network-based filesystem protocol which is mainly used to share files and folders over the network. NFS is a UNIX based technology but can be used by most of the operating systems like Linux, Ubuntu, Debian, Kali, Mint, Fedora, CentOS, RedHat and Windows operating systems Windows 7, Windows 8, Windows 10, Windows Server 2008, Windows Server 2012, Windows Server 2016.
Install NFS Server
NFS packages mainly divided into two parts. First is the server side packages which will install related kernel modules and server tools.
Ubuntu, Debian, Mint, Kali Client Packages
$ sudo apt-get install nfs-common
Fedora, CentOS, Fedora Client Packages
$ sudo yum install nfs-utils
Ubuntu, Debian, Mint, Kali Server Packages
$ sudo apt-get install nfs-kernel-server

After the installation is complete the nfs-server service will be also created automatically.
Fedora, CentOS, Fedora Server Packages
$ sudo yum install nfs-utils
Check NFS Service Status
As the NFS shares will be served over nfs-server we need to the if it is working. We will use systemctl status command with the nfs-server service name.
$ sudo systemctl status nfs-server

We can see that the service is active and working properly.
Start NFS Service
If the service is not started or stopped in any way we need to start the nfs-server service. We will use systemctl start command with the nfs-server service name like below.
$ sudo systemctl start nfs-server
Create NFS Share
NFS main configuration is stored in the /etc/exports file. Each share is created line by line. For example, if we want to share /mnt with the IP address 192.168.10.10 we will use the following configuration.
/mnt 192.168.10.10
But generally, we share the files and folders with everyone who has access to the NFS server. We can use the following configuration to share everyone.
/mnt *
Enable Exports
After creating the share configuration we need to refresh the NFS table where the shares are stored. We can simply use exportfs command with the -a option which will add current configuration to the NFS table.
$ sudo exportfs -a
We can use mount command in order to mount NFS share. We will specify the filesystem type as nfs to the mount command with the -t option like below. The server IP address is 192.168.142.144 and share is /mnt . We will mount to the /home/ismail/poftut1.
$ sudo mount -t nfs 192.168.142.144:/mnt /home/ismail/poftut1/
List NFS Mounts
After mounting the NFS share we can check it by listing the NFS mount. We will use mount command and filter NFS shares with the grep command like below.
$ mount | grep nfs

Unmount NFS Share For Linux
We can unmount already mounted NFS shares with the umount command. We will just specify the mount path to the umount command with the sudo command like below.
$ sudo umount /home/ismail/poftut1
Mount NFS Share For Windows
First, we will enable NFS modules or features on Windows operating systems. Open Start > Control Panel > Programs. Select Turn Windows Features on or off. Select Services for NFS. Click OK.
We can mount NFS shares in Windows operating systems too. We will use mount command. We will also provide nolock option and other parameters like remote NFS server IP address and local drive which is Z in this case.
> mount -o nolock 192.168.142.144:/mnt z:
Alternatively, we can use net use command which can also mount NFS shares. We will provide the partition name which is z and remote NFS server.
> net use z: \\192.168.142.144\mnt
In this short guide I will talk about how to mount a shared drive that is in an Ubuntu or Debian installation that will be the server with the NFS (Network File System) drive, on a network drive accessible from Windows 10 who will play the role of client.

Table of Contents
-
Installation and configuration in Ubuntu or Debian as a server
- Drive options
-
Client installation and configuration in Windows 10
- Mounting the network drive
- Write permissions for the anonymous user
⇧
1. Installation and configuration in Ubuntu or Debian as a server
In the case of Debian, remove sudo from each command (it can even be executed the same).
Install the package «nfs-kernel-server»:
sudo apt install nfs-kernel-server1. Drive options
Then we edit the file /etc/exports with nano or with the editor of our preference:
sudo nano /etc/exportsThe file contains comments such as the following:
# /etc/exports: the access control list for filesystems which may be exported
#               to NFS clients.  See exports(5).
We add a line at the end with the following:
/home/user/folder 192.168.0.10(rw,sync,all_squash,anonuid=1000,anongid=1000)In the example above:
/home/user/folder it is the folder that will be shared by the network.
192.168.0.10 it is the IP of the client or clients that access the network resource. Only a static IP is shown, but we can use 192.168.0.1/24 to match between 192.168.0.1 and 192.168.0.254.
Mount options are in parentheses.
- rw: allow reading and writing.
- sync: is optional in case we want a little more file integrity and avoid data loss, sacrificing a bit of performance.
- all_squash: downgrades the permissions of the files created from the client to the nobody user. For example, if in Windows 10 I am logged in as Administrator and created a new file, it will belong to user nobody.
- anonuid: is the ID of the nobody user, or whatever user we want.
- anongid: is The group ID of the user nobody.
In this case, I set anonuid and anongid to 1000, which is the user who owns the folder, /home/user/folder to preserve execute and write permissions.
With the changes made, we save the file CTRL + O, then Enter, and then we close with CTRL + X, this only if we use the nano editor from the terminal.
We restart the NFS server:
sudo service nfs-kernel-server restartWith this, the configuration on the server will be ready, any error that appears when restarting is necessary to check the configuration and obviously the description of the error.
⇧
2. Client installation and configuration in Windows 10
Windows comes with a default client, but it needs to be installed. The only detail is that I don’t remember if it is available in the Windows 10 Home version.
The easiest way to install it is to use the search bar and type Control Panel, because Windows 10 has several modern panels that hide the older options. Open Programs › Programs and Features and in the left panel we open Turn Windows features on or off.

Mark the box Service for NFS with his two descendants Client for NFS and Administrative Tools. We click on OK and after some time the client will be installed.
1. Mounting the network drive
To mount the unit, we open the cmd (do not use PowerShell). We use the command:
mount -o anon \\192.168.0.20\home\user\folder k:The IP 192.168.0.20 is the server, followed by the shared folder and one drive letter that will be used. It is important to use the real full path of the resource as if we were personally on the server with the folder /home/user/folder, otherwise it won’t work. I have tried hiding the part of the path when mounting the drive, but it is a complicated process and not worth the extra effort.
The message, The command completed successfully. will indicate that everything is working properly.
2. Write permissions for the anonymous user
Normally and by default, Windows does not allow writing on this type of drive with the anonymous user. To enable writing, we have to open the Windows registry Regedit, and we headed towards: HKEY_LOCAL_MACHINE\SOFTWARE\Microsoft\ClientForNFS\CurrentVersion\Default.
There we will create a DWORD (32-bit) Value with the name AnonymousUid with the value of 0 with Base Decimal. Then create a DWORD (32-bit) Value with the name AnonymousGid with the value 0 with Base Decimal.
We have to restart the computer or the service Client for NFS, we can find it in the task manager in the Services tab.

If we follow all the previous steps, and we already have the unit mounted, we open the CMD and execute the command mount, the mount will appear and in properties it will show UID=0 y GID=0. If any other number appears, check the entire procedure above.

Note: The procedure is practically the same in both Ubuntu and Debian, or any other variation like Kubuntu. No need to use Ubuntu Server. The NFS version to be used is 3 with Ubuntu 18.04 — 64-bits and Windows 10.
⇧