 В первых версиях Windows 10 для входа в Центр управления сетями и общим доступом требовалось выполнить те же действия, что и в предыдущих версиях ОС — нажать правой кнопкой мыши по значку подключения в области уведомлений и выбрать нужный пункт контекстного меню. Однако, в последних версиях системы этот пункт исчез.
В этой инструкции подробно о способах открыть центр управления сетями и общим доступом в Windows 10, а также некоторая дополнительная информация, которая может оказаться полезной в контексте рассматриваемой темы.
Запуск Центра управления сетями и общим доступом в параметрах Windows 10

Первый способ попасть в нужный элемент управления сходен с тем, что присутствовал в предыдущих версиях Windows, однако теперь выполняется за большее количество действий.
Шаги для того, чтобы открыть Центр управления сетями и общим доступом через параметры будут следующими
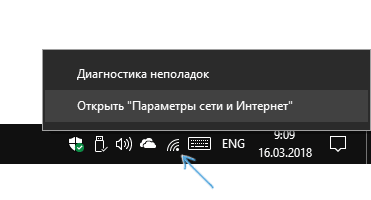
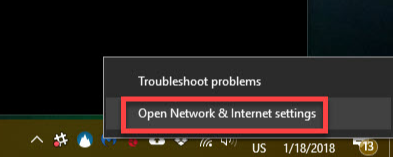
- Нажмите правой кнопкой мыши по значку соединения в области уведомлений и выберите пункт «Открыть параметры сети и Интернет» (или же можно открыть Параметры в меню Пуск, а затем выбрать нужный пункт).

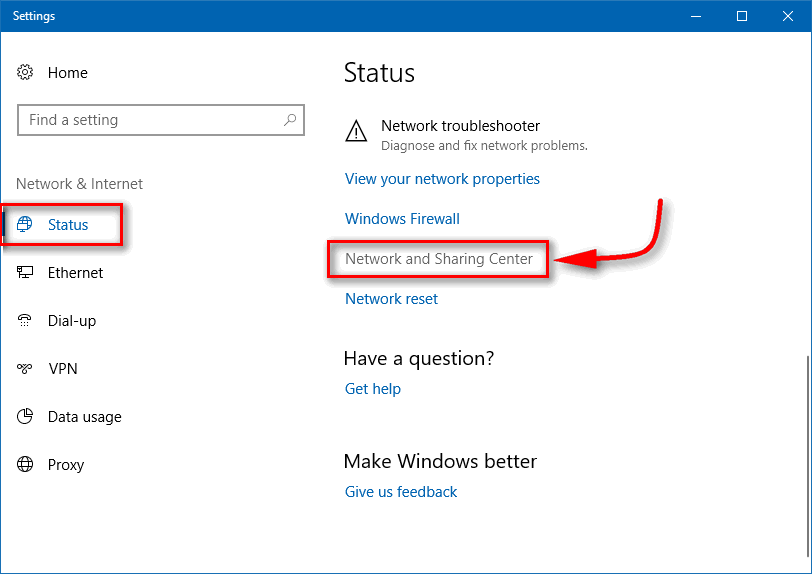
- Убедитесь, что в параметрах выбран пункт «Состояние» и внизу страницы нажмите по пункту «Центр управления сетями и общим доступом».


Готово — то, что требуется, было запущено. Но это не единственный способ.
В Панели управления
Несмотря на то, что некоторые пункты панели управления Windows 10 стали перенаправлять на интерфейс «Параметров», находящийся там пункт для открытия Центра управления сетями и общим доступом остался доступным в прежнем виде.
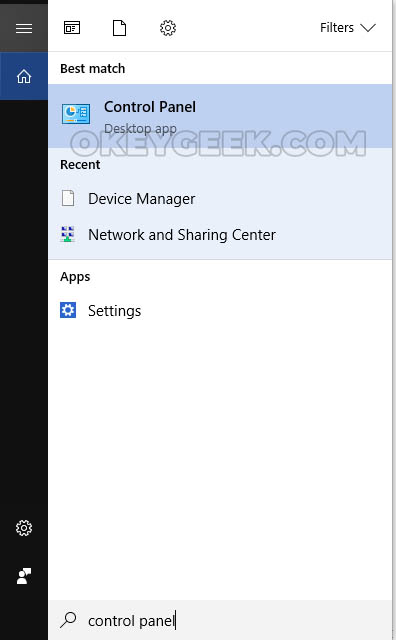
- Откройте панель управления, на сегодняшний день проще всего это сделать, используя поиск в панели задач: просто начните набирать «Панель управления» в нем для открытия нужного пункта.

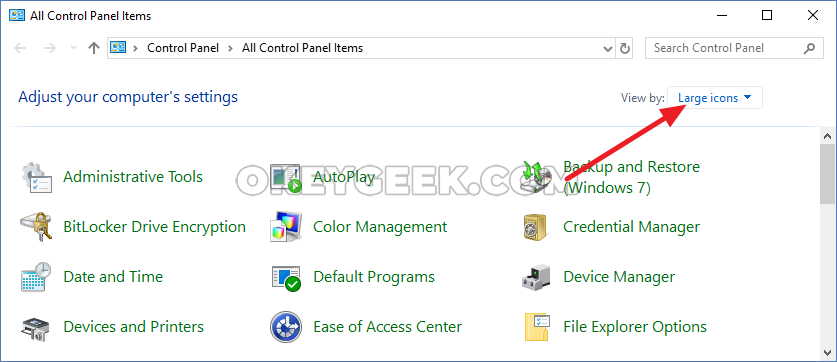
- Если у вас панель управления отображается в виде «Категории», выберите пункт «Просмотр состояния сети и задач» в разделе «Сеть и Интернет», если в виде значков, то среди них вы найдете «Центр управления сетями и общим доступом».


Оба пункта откроют нужный элемент для просмотра состояния сети и другими действиями над сетевыми подключениями.
С помощью диалогового окна «Выполнить»
Большинство элементов панели управления можно открыть с помощью диалогового окна «Выполнить» (или даже командной строки), достаточно знать необходимую команду. Такая команда есть и для Центра управления сетями.
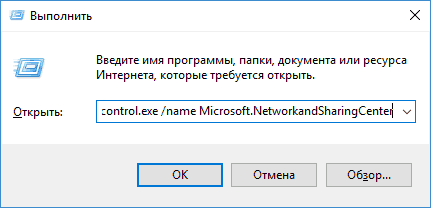
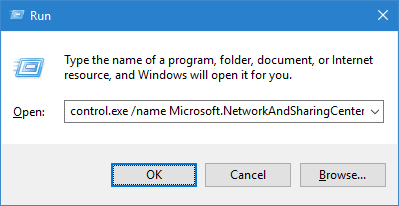
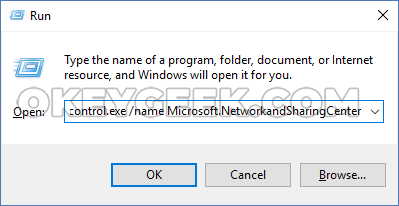
- Нажмите клавиши Win+R на клавиатуре, откроется окно «Выполнить». Введите в него следующую команду и нажмите Enter.
control.exe /name Microsoft.NetworkandSharingCenter

- Откроется центр управления сетями и общим доступом.
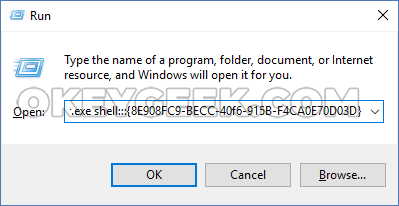
Есть и еще один вариант команды с тем же действием: explorer.exe shell:::{8E908FC9-BECC-40f6-915B-F4CA0E70D03D}
Дополнительная информация
Как упоминалось в начале руководства, далее — некоторая дополнительная информация, которая может быть полезна на тему:
- Используя команды из предыдущего способа, вы можете создать ярлык для запуска Центра управления сетями и общим доступом.
- Для открытия списка сетевых подключений (Изменение параметров адаптера) можно нажать Win+R и ввести ncpa.cpl
Кстати, если вам потребовалось попасть в рассматриваемый элемент управления из-за каких-либо проблем с Интернетом, возможно, пригодится встроенная функция — Сброс сетевых настроек Windows 10.
Where is Network and Sharing Center in Windows 10? Has it disappeared? Actually, not yet. The thing is Microsoft gradually moves the applets from the Control Panel to a new Settings app.
If you have Windows 10 Fall Creators Update (version 1709) or later version installed on your PC, you won’t see familiar “Open Network and sharing center” any more when you right-click the Ethernet or Wi-Fi icon the Taskbar. You see “Open Network and Internet settings” instead.
Windows 10 is like a living organism that is constantly changing and evolving. That’s why we have to modify our tutorials related to this OS because after each update there are many things that won’t work any more.
In this post we will explain how to find and open Network and Sharing Center in Windows 10 of the latest version and create a shortcut on the desktop. By the way, there is a high probability that this guide won’t help after the next Windows 10 update.
Contents:
- How to open Windows 10 Network and Sharing Center using the Settings App.
- Use the command line, PowerShell or Run dialogue
- How to create a shortcut to Control Panel
How It Was Earlier And How It Is Now
Here is how it was before the Fall Creators Update:
How it is now:

Where is Network and Sharing Center in Windows 10 Version 1709 And Higher
To find your familiar applet you need to perform the following steps.
Method 1 to open the applet
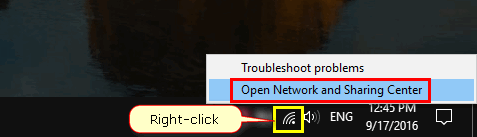
- Right-click the network icon in the Taskbar.
- Select “Open Network and Internet settings”:

- Now scroll down and click on the link named “Network and Sharing Center”:

Done!
Method 2 to open Network and Sharing Center
If you are unable to use method 2 for some reason, you can open the applet using the command line or a bat-file.
- Press Win+R.
- Copy and paste:
control.exe /name Microsoft.NetworkAndSharingCenter
- Hit Enter:

Create A Shortcut To Network And Sharing Center In Windows 10
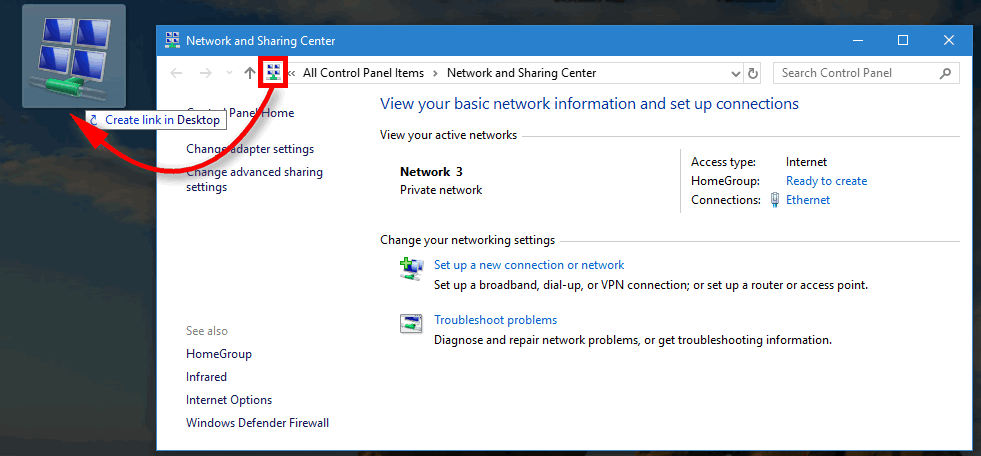
I think, you won’t feel happy to perform all those steps every time you need to open the deprecated applet. So, create a shortcut. All you need to do is drag and drop the icon from the address bar to the desktop:
It’s that easy!
The Network and Sharing Center in Windows 10 lets you change network settings
by Milan Stanojevic
Milan has been enthusiastic about technology ever since his childhood days, and this led him to take interest in all PC-related technologies. He’s a PC enthusiast and he… read more
Updated on
- Network and Sharing Center is a feature in all Windows versions that allows users to change network settings.
- Users can access Network and Sharing Center by right-clicking the network icon, using Control Panel, or searching for it in the search bar.
XINSTALL BY CLICKING THE DOWNLOAD
FILE
Today, most of us access the internet on daily basis, and although our internet connections are created automatically by Windows 10, sometimes you need to change your network settings and make certain adjustments.
The simplest way to do that is to use Network and Sharing Center, so today we’re going to explain to you what is Network and Sharing Center and how to use it.
- What is Network and Sharing Center and how does it work?
- How to open the Network and Sharing Center in Windows 10?
- 1. From the taskbar
- 2. Using the Control Panel
- 3. By searching with the search bar
- What are the things that you can do in the network and sharing center?
What is Network and Sharing Center and how does it work?
Network and Sharing Center was first introduced in Windows 7, as a part of the Control Panel, and it has remained a part of Windows through Windows 8 and Windows 10.
If you ever used Network and Sharing Center in Windows 7, you should know that it looks almost the same in Windows 10.
The only option that you might miss is the Manage wireless networks option which is now moved to a different place in order to allow users to connect quickly to a certain wireless network or change the wireless settings.
If you never used Network and Sharing Center before, you should know that you can access it with just a few clicks.
How to open the Network and Sharing Center in Windows 10?
1. From the taskbar
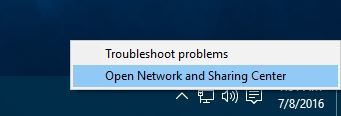
The simplest way to open Network and Sharing Center is to right-click your network icon in the bottom right corner and select Open Network and Sharing Center.
2. Using the Control Panel
Another way to open Network and Sharing Center is to use Control Panel. To access Control Panel and Network and Sharing Center do the following:
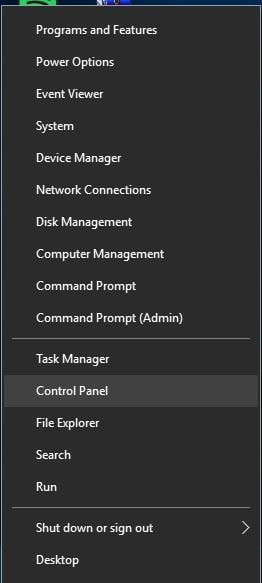
- Press Windows Key + X to open Power User Menu. Select Control Panel from the list.

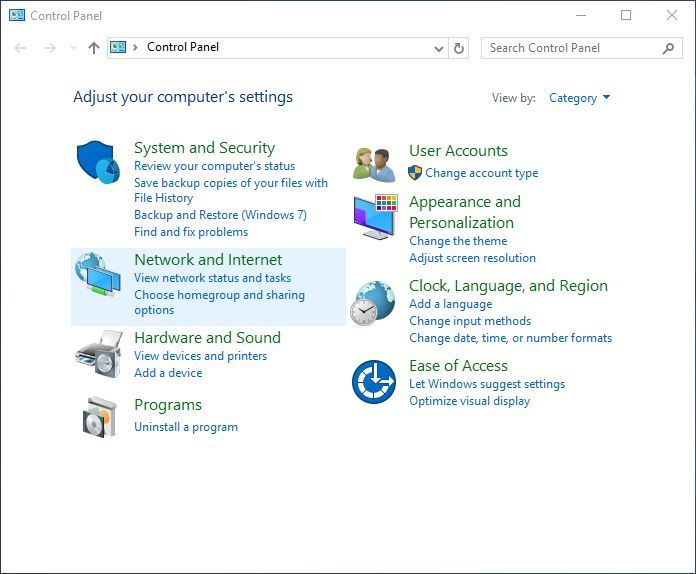
- When Control Panel opens, click on Network and Internet section.

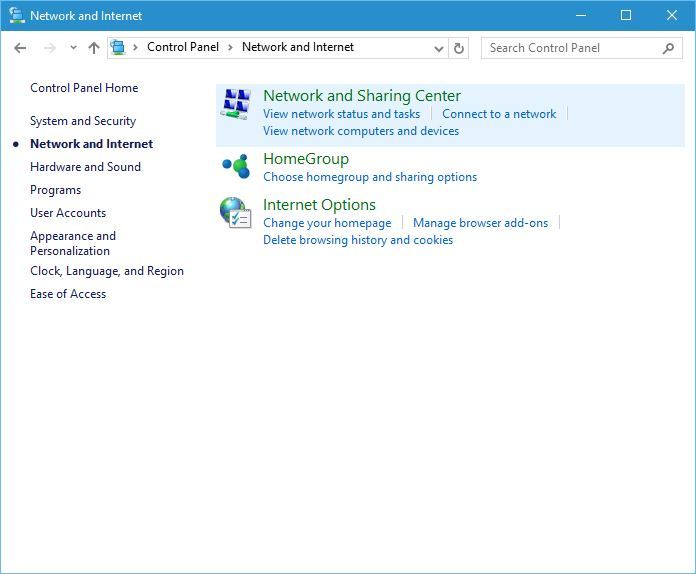
- Now select Network and Sharing Center.
3. By searching with the search bar
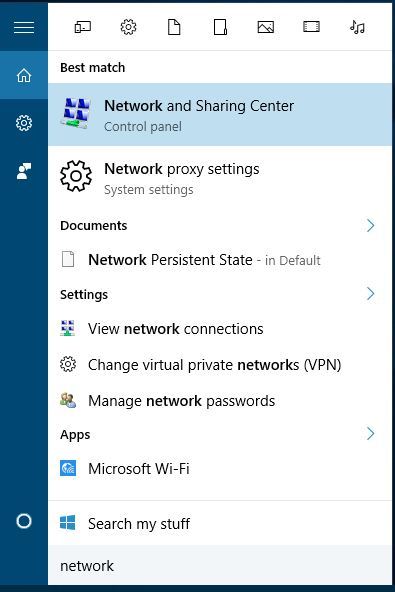
You can also access Network and Sharing Center by using the Search bar. To do that just press Windows Key + S, enter Network, and select Network and Sharing Center from the list of results.
Most users don’t know what to do when the Windows search box goes missing. Read this article to learn how you can get it back in just a couple of steps.
How we test, review and rate?
We have worked for the past 6 months on building a new review system on how we produce content. Using it, we have subsequently redone most of our articles to provide actual hands-on expertise on the guides we made.
For more details you can read how we test, review, and rate at WindowsReport.
What are the things that you can do in the network and sharing center?
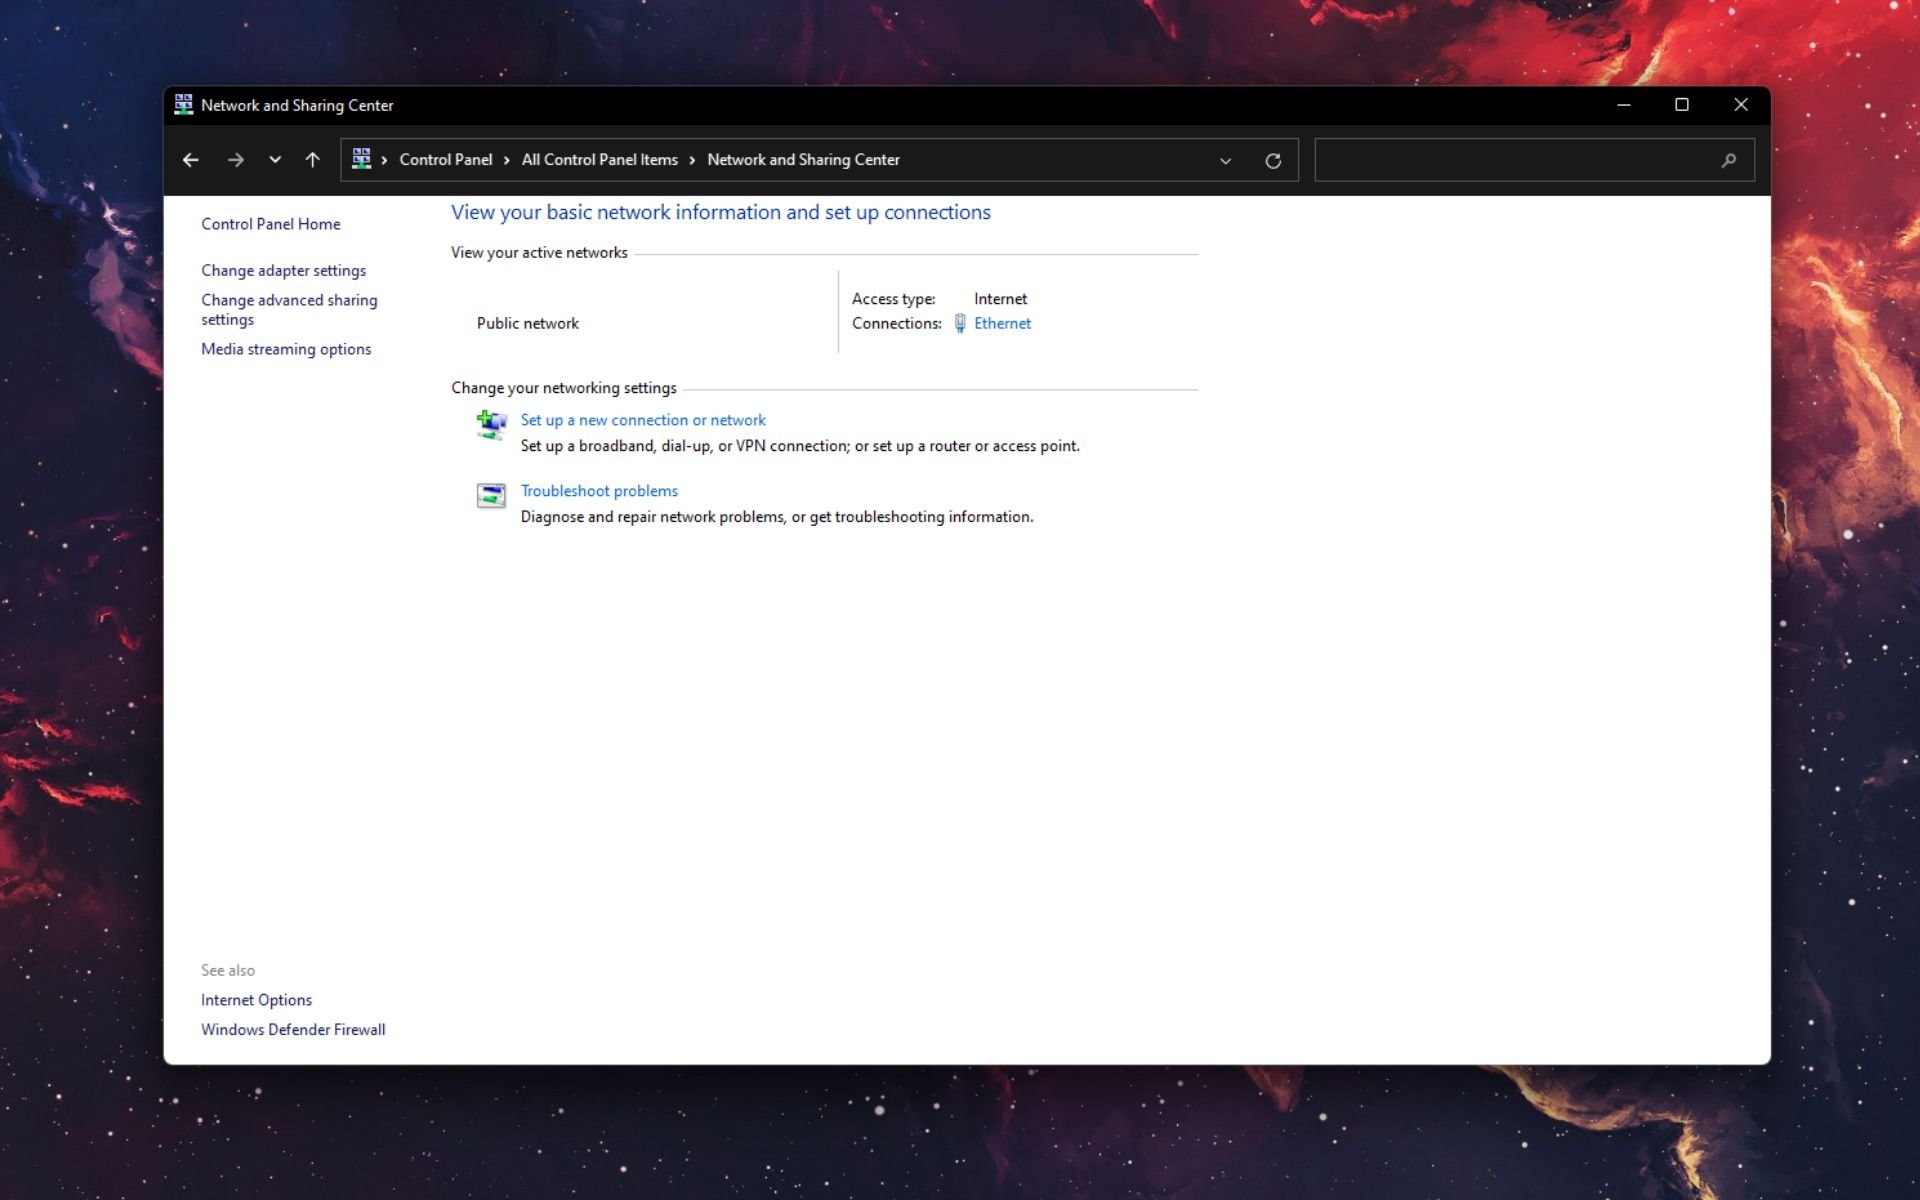
The first thing that you’ll notice when you open Network and Sharing Center is the View your active networks section.
This section gives you all the important information such as the name of your currently connected network as well as the type of network you’re connected to.
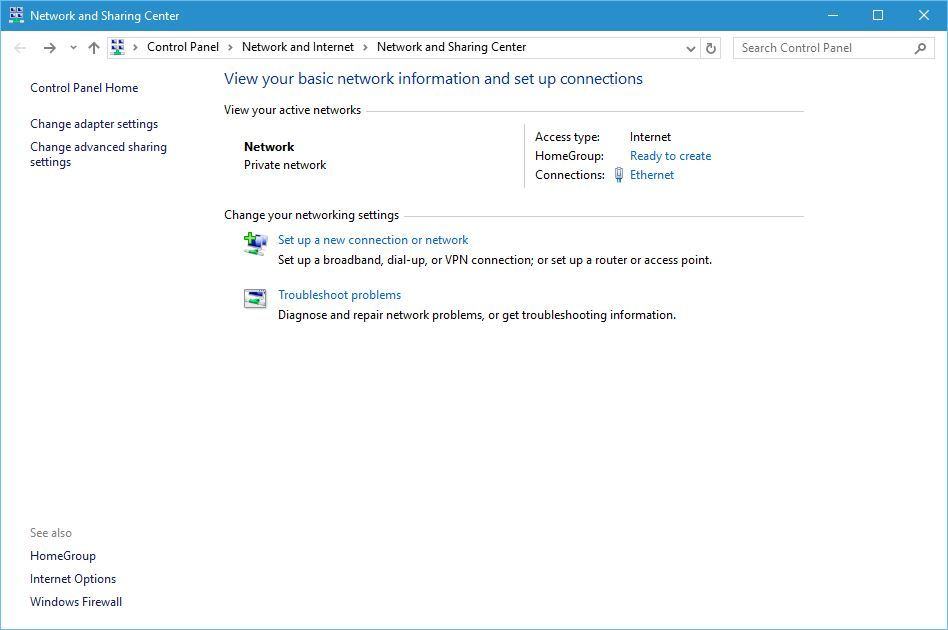
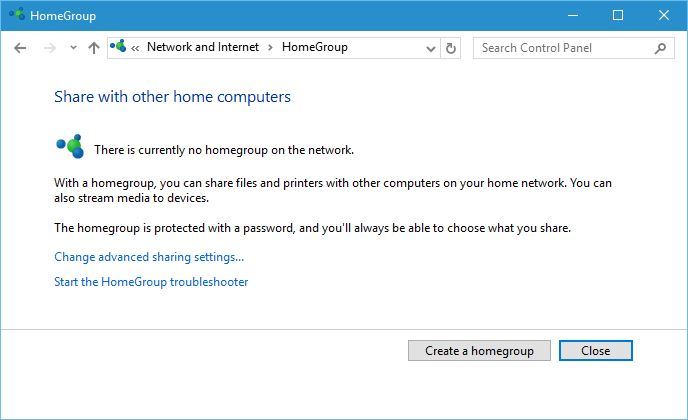
From this section, you can also use create your Homegroup by clicking Ready to create a link.
Homegroups allow computers on the same network to quickly and easily share files and printers, so if you have several computers connected to a network, you might want to create a Homegroup.
Next, there’s a Connections section, and you can click the connection that is listed there to see its details. For example, you can see the speed of your network connection and the number of received or sent bytes.
If you want to know more about your connection, there’s a Details section that shows you the name of the network adapter, your current IP address, as well as your MAC address.
If you want to know more about IP addresses, we already answered what is an IP address in one of our previous articles.
Due to privacy and security concerns, we strongly recommend to secure your network with a reliable VPN (Virtual Private Network). Get now Cyberghost VPN, a leader in the VPN market. It protects your PC from attacks while browsing, masks your IP address, and blocks all unwanted access.
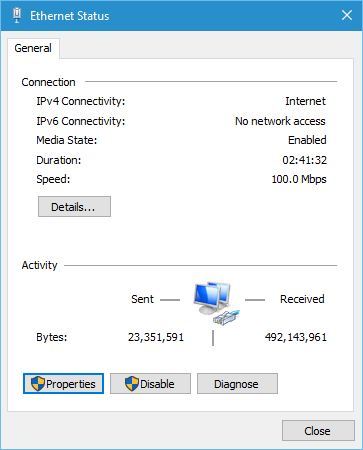
We should also mention that you can disable your network connection from this window by clicking the Disable button.
Sometimes your network connection might have certain problems, and one of the simplest solutions is to disable your network connection and enable it again.
If disabling the connection doesn’t work, you can always use the Diagnose button that will scan for problems and automatically repair them.
Lastly, there’s a Properties button that allows you to update or remove your network driver and configure your network adapter. In addition, by using this window you can also set your IP address to be dynamic or static in your network.

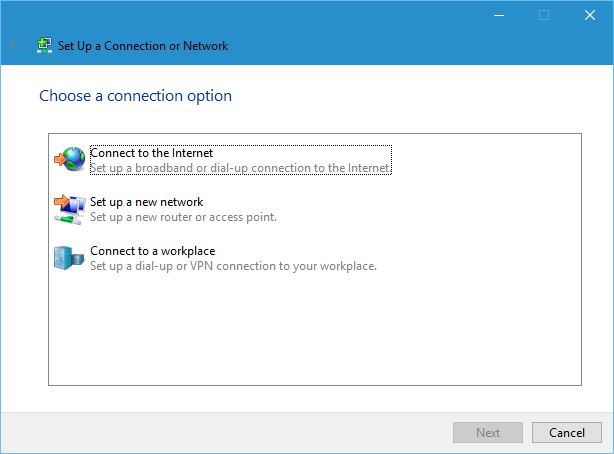
Next, we have changed your networking settings section. In this section, you can create a new connection by using the Set up a new connection or network link.
When creating a new connection you’ll have three options: Connect to the Internet, Set up a new network, and Connect to a workplace.
Depending on what you need, you just need to click one of the options and follow the instructions in order to create a new connection.
If you have issues with your network adapter, there’s a Troubleshoot problems section that allows you to automatically fix various problems.
When you open Troubleshoot problems section you’ll see Internet Connections, Shared Folders, HomeGroup, Network Adapter, Incoming Connections, and Printer options.
By choosing one of these options you’ll run a troubleshooter for a specific option that will automatically scan and fix problems for you.

Does the troubleshooter fail to load with an error? Follow this useful guide and fix it in just a couple of simple steps.
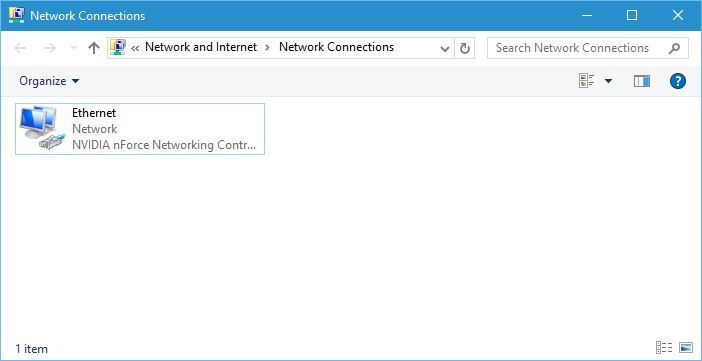
There are also several options available in the sidebar. The change adapter settings option will list all network adapters that you have and allow you to quickly disable them, rename them or change any of their settings.
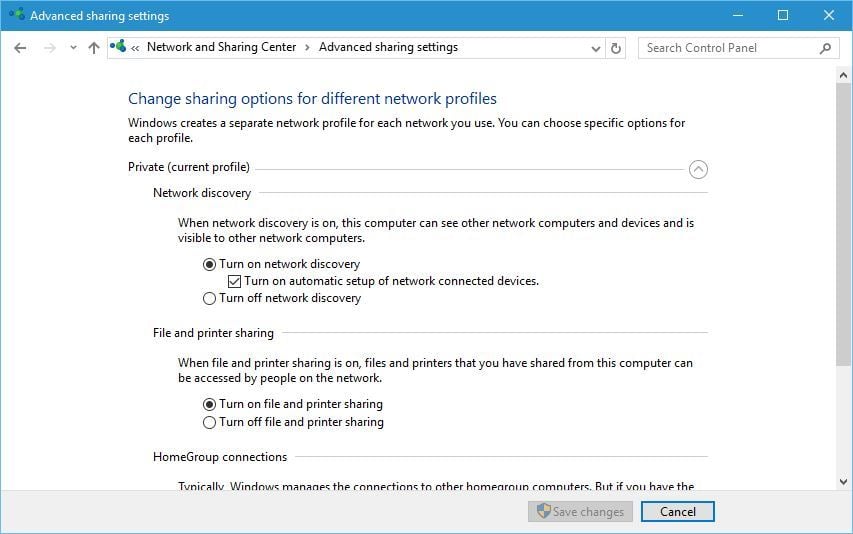
The next option is Change advanced sharing settings, and this option allows you to change how certain network profile works.
For example, you can turn network discovery on or off, thus allowing your computer to see other network devices that are connected to this network.
You can also turn on or off file and printer sharing, and change the way how homegroups work.
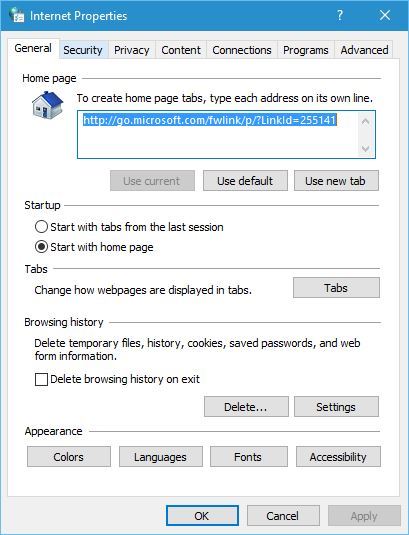
The next option is Internet Options, and from here you can change various settings related to your internet connection and Microsoft Edge or Internet Explorer.
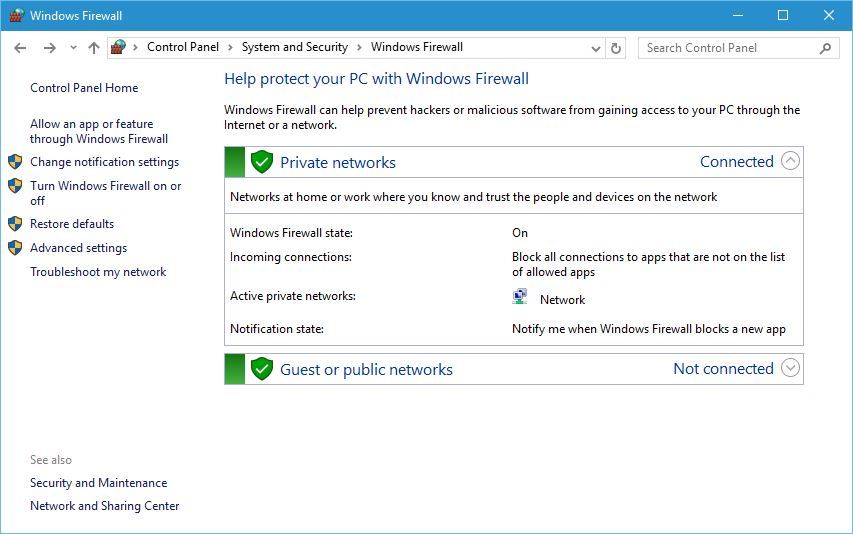
The last option is Windows Firewall, and by using this option you can turn Windows Firewall on or off, change firewall rules or block a certain application from accessing the Internet.
Network and Sharing Center on Windows 10 allows you to quickly access both basic and advanced options, and we hope that you now better understand how Network and Sharing Center works on Windows 10 after reading this article.
If you have any other questions, feel free to leave them in the comments section below.
READ ALSO:
- Fix: Windows 10 Can’t Connect To This Network
- How to Fix Windows 10 Network Adapter Problems
- How to Rename a Network in Windows 10
![]()

Людмила Бурым
Более 20 лет опыта в IT (программирование баз данных, постановка задач по разработке ПО, сопровождение пользователей, написание технической документации и отчетов) в сфере управления финансами.
Задать вопрос
С самого появления Windows 7 одной из его составляющих является Центр управления сетями и общим доступом, который и по сей день является незаменимой частью операционных систем Виндовс.
Это одна из наиболее важных и полезных составляющих панели управления. Он представляет собой единую точку входа, которая позволяет просматривать информацию о вашей сети и вносить изменения, которые могут повлиять на доступ к ее ресурсам.
В статье рассмотрим назначение приложения и способы быстрого перехода в него.
Содержание
- Для чего нужен доступ к Центру управления сетями Windows
- Как открыть Центр управления сетями и общим доступом
- Через системный трей
- С помощью функции Выполнить
- Через Панель управления
- Через параметры
- Особенности различных версий Windows
- Как создать ярлык Центра управления сетями и общим доступом на рабочем столе
Для чего нужен доступ к Центру управления сетями Windows
Служба предоставляет возможность организации централизованного контроля за всеми элементами сети, включая серверы, маршрутизаторы, коммутаторы, брандмауэры и другие устройства. Пользователи могут настраивать локальную сеть, Wi-Fi и VPN, а также добавлять или удалять адаптеры и настраивать общий доступ к файлам, каталогам или принтерам.
Доступ к инструментарию требуется, когда необходимо:
- проверить или изменить параметры сети;
- создать к сети новое подключение;
- поменять пароль Wi-Fi;
- исправить проблемы с низкой скоростью интернета или плохим подключением;
- внести изменения в настройки адаптера;
- настроить параметры доступа к расшареной папке или принтеру.
После открытия, приложение предоставляет доступ к ссылкам, которые позволяют перейти к выполнению указанных функций.

Нужно щелкнуть на одну из ссылок, выделенную синим цветом, чтобы выполнить что-нибудь из перечисленного.
Как открыть Центр управления сетями и общим доступом
Если возникли сложности со стабильной работой Интернета или необходимо внести поправки в сетевые настройки, то может потребоваться найти в компьютере Центр управления сетями. Существует несколько вариантов перейти в Центр всего за несколько кликов, которые практически не отличаются для Windows 7,10/11.
Рассмотрим, как это можно осуществить на примере Windows 10.
Через системный трей
Простейший способ для Windows 10 – нужно нажать правой кнопкой мышки на значок сети, который расположен в правой нижней части экрана, после этого выбрать опцию «Открыть параметры сети и интернет», в появившемся окне щелкнуть пункт «Состояние» — в правой части станет активен Центр управления сетями и общим доступом.

Для владельцев Виндовс 7 приложение открывается сразу же во всплывающем меню после нажатия левой кнопкой мыши на ту же иконку сети.
С помощью функции Выполнить
Чтобы воспользоваться этим инструментом, нажмите Win + R. Скопируйте в диалоговое окно control.exe /name Microsoft.NetworkAndSharingCenter и подтвердите действие, нажав на «ОК». Искомое приложение будет открыто сразу после выполнения команды.

Через Панель управления
Если приложение не открывается, переходим к следующему способу. Для всех версий Виндовс порядок действий будет одинаковый:
- Найдите значок поиска в левом нижнем углу экрана.
- Начните вводить словосочетание «Панель…».
- Когда появится «Панель управления» выберите ее или нажмите на «Открыть».

- В следующем окне нажмите «Сеть и Интернет», после чего «Состояние», чтобы найти приложение.

Через параметры
Перейдите на «Пуск», затем «Параметры». После перехода в раздел «Сеть и интернет» в правом окне появится Центр управления:

Особенности различных версий Windows
Различные версии Виндовс имеют свои особенности, но в каждой из них приложение находится в Панели управления.
В Windows 7 сразу же, как только нажмете на кнопку «Пуск», увидите Панель управления, в то время как в Windows 10 и Windows 11 вместо нее будет доступна опция «Параметры». Тем не менее, панель управления никуда не исчезла и находится в «Служебные Windows». Независимо от того, какой метод вы используете, процесс дальнейших действий будет одинаковым.

Как создать ярлык Центра управления сетями и общим доступом на рабочем столе
Для удобного управления параметрами сети может быть полезным создание ярлыка. Для этого требуется выполнить последовательно:
- Щелкнуть правой кнопкой мыши по свободному пространству рабочего стола.
- Выберите опцию «Создать» -> «Ярлык» в выпадающем меню.
- В режиме диалога вставьте строку control.exe /name Microsoft.NetworkAndSharingCenter и нажмите «Далее».
- На следующем шаге задайте наименование ярлыка, например, «Сетевой Центр».
- Нажмите на кнопку «Готово», чтобы завершить действие.
С этого момента вы сможете быстро открыть службу, обратившись к ярлыку.

Вы узнали, что существует несколько вариантов открыть Центр управления сетями и общим доступом: через системный трей, Параметры, Панель управления, функцию «Выполнить», а также ярлык, созданный для оперативного доступа к этому инструменту.
Приложение обеспечит полный контроль над сетевыми подключениями, совместным использованием ресурсов, безопасность вашей локальной сети и повысит эффективность использования устройства.
 Microsoft recommends that all Windows users upgrade to Windows 10 – the new version of the operating system. Structurally, it was virtually the same as Windows 7 or Windows 8 in the early stages, but the more updates come out, the harder it becomes for users to find the necessary settings in this operating system. With one of the latest updates, you can no longer access the “Network and Sharing Center” from the connection icon in the notification area. In the framework of this article we are going to tell you how it should be done now.
Table of contents:
1. How to open "Network and Sharing Center" through the settings
2. How to open "Network and Sharing Center" using control panel
3. How to open "Network and Sharing Center" through the "Run" window
How to open “network and sharing center” through the settings
Microsoft is trying to place all the settings in Windows 10 updated parameters. And from there any user can already get to the familiar utilities. Network and Sharing Center can also be opened through the settings. This is what you will have to do:
- In the notification area you will need to open the connection context menu by right-clicking on the Wi-Fi icon. Then select “Open Network and Internet settings”;

- At the Network Information tab you will see Windows 10 standard settings. The “Status” tab selected in the left menu will be immediately accessible. Slightly scroll down the opened window and here you will see the “Network and Sharing Center” button. Click it.


After that immediately there will open a standard utility for setting up the network. As you can see, Microsoft did not change it for the new interface of Windows 10, leaving it in its usual form.
How to open “network and sharing center” using control panel
Just like before, you can open the “Network and Sharing Center” settings through the “Control Panel”. However, difficulties in the updated versions of Windows 10 arise when you are trying to find the control panel itself. We recommend that you act as follows:
- Launch “Control Panel” through the search. To do this, in the lower left corner of the screen, click on the magnifying glass, then enter “Control Panel” and click on the result;

- Now you have opened the control panel. If information in the utility is displayed through the categories, switch to “Large icons” – this can be done in the upper right corner;

- Next, select “Network and Sharing Center”.


As you can see, there are no special changes here, and the main difficulty is to launch the control panel itself.
How to open the “network and sharing center” through the “run” window
“Run” utility is executing commands entered by the user, performing certain tasks in the operating system. In particular, through “Run” you can easily open the “Network and Sharing Center”. To do this, launch the “Run” window by pressing Win + R on the keyboard and run the following command:
control.exe /name Microsoft.NetworkandSharingCenter
After this command is executed, you will see that the “Network and Sharing Center” utility has been opened.
It is worth noting that you can open the network utility via the “Run” line with another command:
explorer.exe shell ::: {8E908FC9-BECC-40f6-915B-F4CA0E70D03D}
![]() Loading…
Loading…