Download Windows Speedup Tool to fix errors and make PC run faster
Windows 10 brings the entire Settings options under one hood. We have already taken a look at the Windows 10 Personalization Settings, Privacy Settings, Devices Settings, and the Update and Security settings. In this post, we will learn about the Network and Internet Settings in Windows 10.
The new and the latest version of the Network and Internet Settings in Windows 10 include quite a lot of features such as mobile hotspot, automatic proxy setup, manual proxy setup, airplane mode, and so on. You will also be able to access the Network Reset feature that can help you reinstall Network adapters and reset Networking Components to original settings.
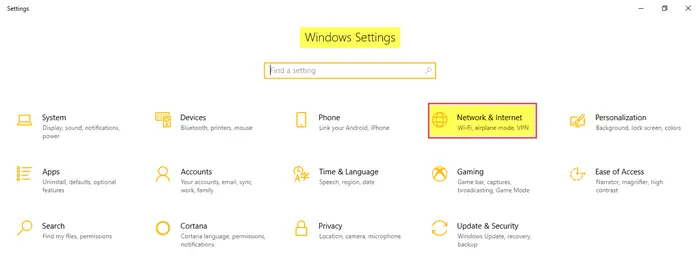
To open these settings, click on Start menu > Settings > Network and Internet.
In the Network and Internet Settings in Windows 10, you will see the following tabs –
- Status
- WiFi
- Ethernet
- Dial-up
- VPN
- Airplane mode
- Mobile hotspot
- Data usage
- Proxy
Let us go through them in detail.
1. Status
This tab shows you the status of the network – whether you are connected to a network or not. You can change the connection properties where you can choose to connect to a network automatically when in range. You can choose your Network Profile as public or private.
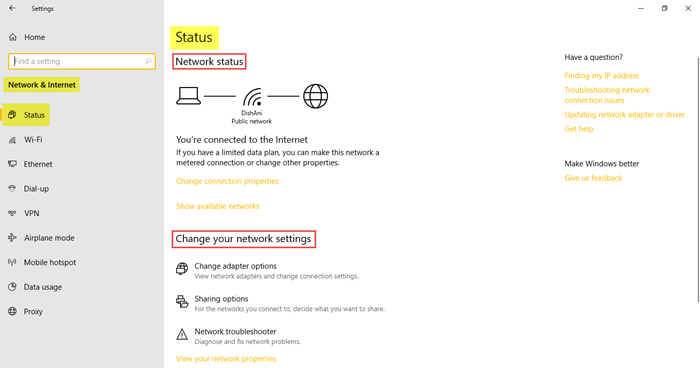
Moreover, this tab allows you to view the available network adapters, change connection settings, change sharing options for different network profiles, and diagnose and fix network problems. You will be able to access the Network Reset feature that can help you re-install network adapters and reset networking components to original settings.
2. WiFi
Check for available networks and connect to the wireless network you want. You can also manage and add a new network.

Random Hardware Addresses when turned on, makes it difficult for people to track your location when you connect to different WiFi networks. You can turn on the Hotspot 2.0 Network feature to make yourself more secure and safe when connected to public WiFi hotspots.
You can also select the option of setting a Metered Connection which gives you more control over the data usage. Turning it ON makes your apps work differently so that they use less data. This is especially helpful for users having a limited data plan. You will also see the properties of your device.
This tab allows you to adjust the Wi-Fi Sense settings in Windows 10. Wi-Fi Sense is a feature in Windows 10 that allows you to connect to your friend’s shared Wi-Fi connections. That is, you and your friends may opt to share your or their Wi-Fi connections.
3. Ethernet
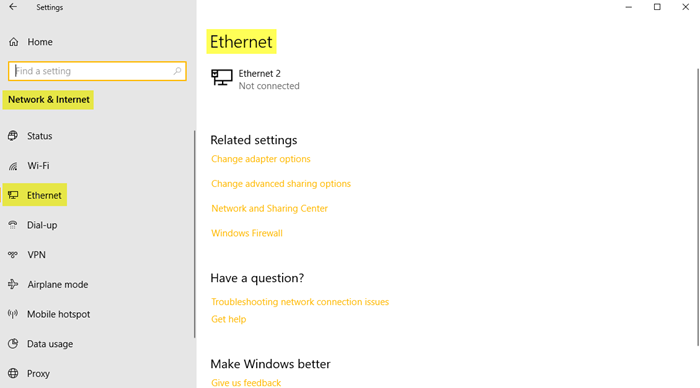
You can set and view Ethernet settings here. It also allows you to set it as a metered connection if you have a limited data plan.
4. Dial-Up
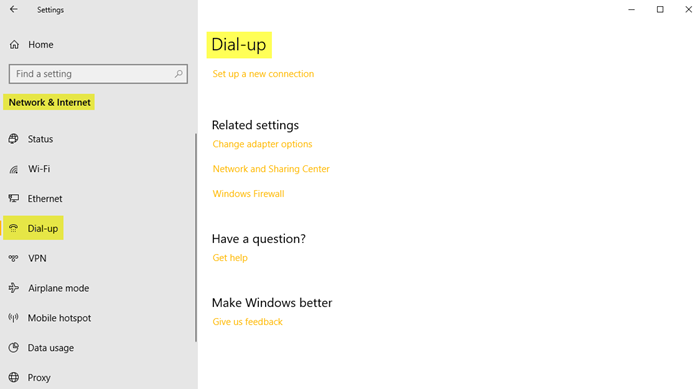
This tab allows you to choose and set up a new Dial-up connection or network with the following options –
- Set up broadband or dial-up connections to the Internet.
- Set up a new router or access point.
- Connect to a hidden network or create a new wireless profile.
- Set up a dial-up or VPN connection to your workplace.
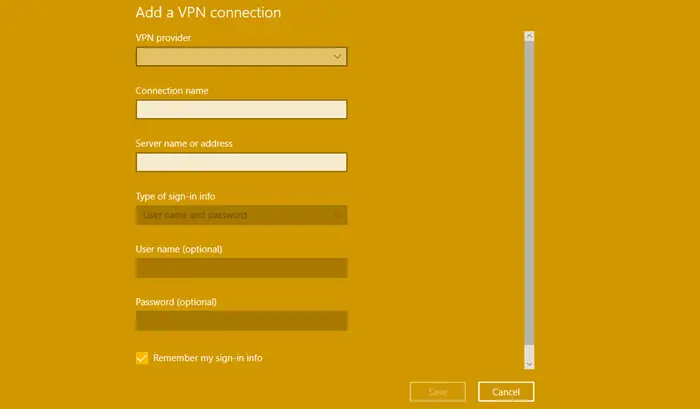
5. VPN
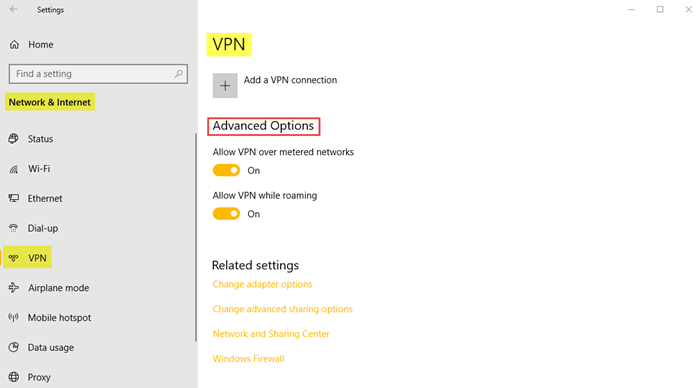
To add a VPN connection, keep your VPN provider, connection name and server name or address details ready. Fill in the type of sign-in info, username, and password and click Save.
Under Advanced Options, turn on the following settings if desired –
- Allow VPN over metered networks
- Allow VPN while roaming
6. Airplane Mode
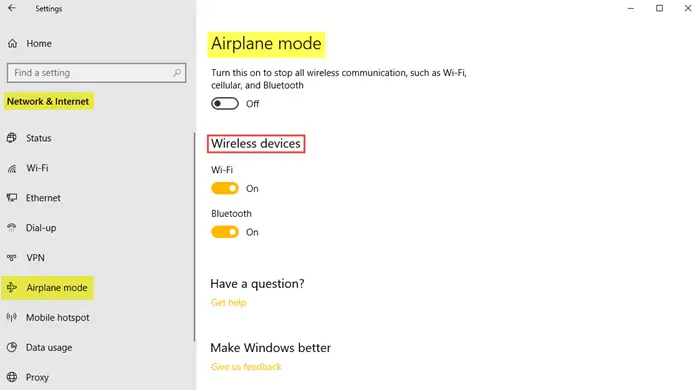
Airplane mode when turned on, stops all wireless communication, Bluetooth, WiFi networks, and cellular networks.
7. Mobile Hotspot
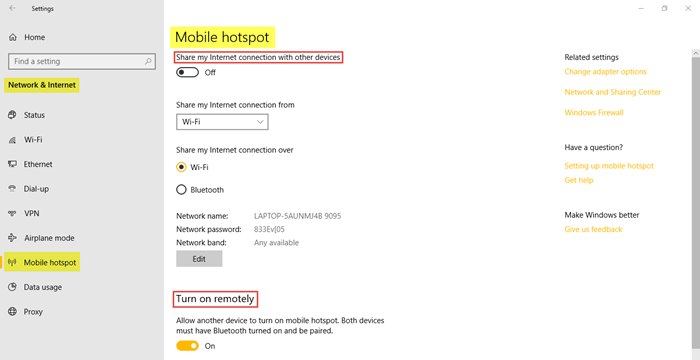
The Mobile Hotspot feature is a new one in the latest version of Windows 10 Settings which enables you to share your Internet connection with other devices. The users can choose to share their Internet connection over Wifi or Bluetooth. User can also set the Turn On Remotely feature to allow another device to turn on mobile hotspot.
8. Data Usage
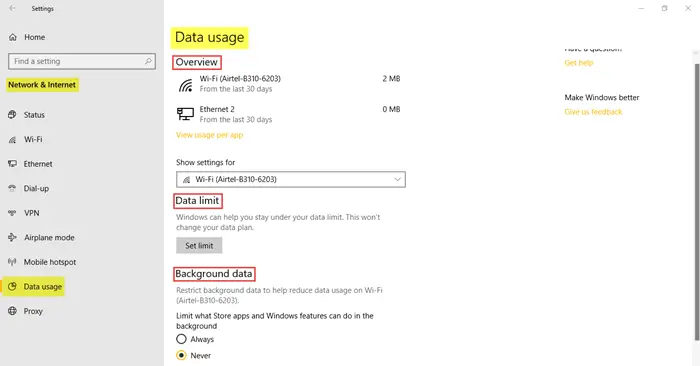
This section allows you to check the data used in the last 30 days for both WiFi as well as Ethernet. You can also view usage per app which will give you detailed information on data used by various apps on your PC. Additional features include setting data limits and restricting background data to reduce data usage on WiFi.
9. Proxy
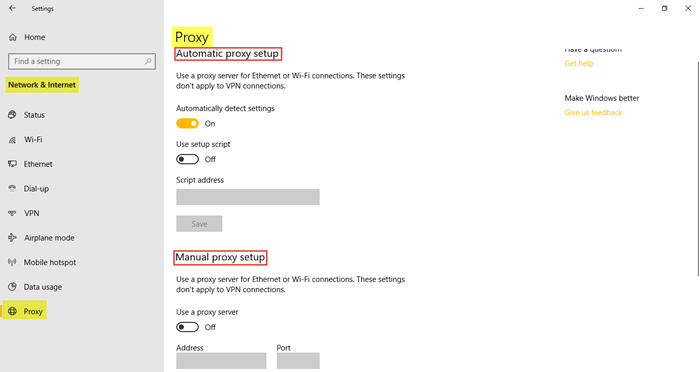
In this section, you can set your PC to detect the Proxy settings automatically. However, you can also adjust the settings manually by entering the IP address and the proxy port.
In this post, all the features and the importance of the Network and Internet Settings in Windows 10 have been covered. Hope this post was a helpful read!
Anand Khanse is the Admin of TheWindowsClub.com, a 10-year Microsoft MVP (2006-16) & a Windows Insider MVP (2016-2022). Please read the entire post & the comments first, create a System Restore Point before making any changes to your system & be careful about any 3rd-party offers while installing freeware.
Windows 10 is liked by the world compared to its predecessor 8.1. Lot has changed from Metro Interface. Start Menu is back with lot of modifications. Access to System, Devices, Network, Personalization and other settings is still possible through Control Panel. Redmond has introduced a new feature in Windows 10 known as “Settings” which is visible in the Start Menu as “Gears” icon.
Navigate through each setting, to find different options to customize your Windows 10. Before you dive in through, it’s important what is in store for us. So here is a brief overview of “Network & Internet” Settings in Windows 10.


- Subset of Settings available under Network & Internet
- Status
-
Wi-Fi
- Ethernet, Dial-Up
- VPN
- Airplane Mode
- Mobile hotspot
- Data usage
- Proxy
Subset of Settings available under Network & Internet
The following are the left-pane options available under the main item.
-
Status
-
Wi-Fi
-
Ethernet
-
Dial-up
-
VPN
-
Airplane mode
-
Mobile hotspot
-
Data Usage
-
Proxy
Each item has its own importance. So if you are using a modem with a router, then you need to make a few changes with the Wi-Fi settings. On the other side, if you are a legacy user living in the country side, with limited connectivity, then you STILL have the Dial-up option. These settings are not limited to desktop and can also be used with a laptop.
Status

Here you will find the network status. Here I’m connected to my TP-LINK router through Wi-Fi, to get my Internet. The same is shown as a diagram, with laptop, Wi-Fi, globe symbols to indicate your system connected through router to the web. If you have multiple networks, like 2 to 3 Wi-Fi and also a LAN connection which are available for connection, the same can be seen using the option below.
Show available networks
You can also see the network properties to which you are connected.
View your network properties
These are useful, if you want to diagnose any problem in your connection or copy these properties to any other system. It will also show the other available adapters that are present. You can see their status also. Since Wi-Fi adapter only is operational for my system, that is indicated in the list. You can see other properties like –

- Adapter name
- Physical address
- Status
- Maximum transmission limit
- Link speed (Receive/Transmit)
- IPv4 address
- IPv6 address
- IPv6 DNS servers
- IPv4 connectivity
- IPv6 connectivity Etc.
Generally for Ethernet (Wired) adapters, you will get the above. Also the link speed is mentioned in Pbbs. The status field will show “Operational” if that particular adapter is working or “Not Operational” if it’s not working. If you are using an Wi-Fi network, you will also get details like DHCP lease etc.
Under this category, you can find other settings like –
- HomeGroup
- Network troubleshooter
- Change adapter options
- Change advanced sharing options
- Windows Firewall
- Network reset
The troubleshooter option is useful, if you are not able to connect to the Internet. This will try to reset the adapter or provide some fix to your network problems etc. These options are also available through Control Panel.
Windows Firewall is the same old default security option available in other old OS like 7, 8 and 8.1. You can set Inbound and Outbound rules, so as to stop any applications or apps from accessing the internet. Also if you have any other third-party Firewall, you also turn it off.
Network reset is another problem-fixer for your Internet connectivity problems. If there are many network adapters installed on your computer or if you have changed their settings or if you have uninstalled them, then there are some junk left over in your system cache or somewhere else. This option will reinstall all your network adapters and set their components to the default settings. If you have VPN etc installed, you need to reinstall again.
Wi-Fi

This option will only be available if you are connected wirelessly like through a router. This will be set to “On” if you are using its adapter. The “network name” and its connection status are available here. There are other options like –
- Show available networks
- Hardware properties
- Manage known networks
There are some important changes to Network Settings in Windows 10. The following options are also available.
Wi-Fi Sense
This feature is useful in sharing your Wi-Fi with your Facebook or Skype or Outlook friends. If you share your password protected Wi-Fi network access with any of the above, they will automatically be connected to Internet (through your network) when they come in range. Though there was hip-hop of security concerns, the following message speaks the status of its usage.
According to Microsoft, few people actually used the feature and some were actively turning it off. “The cost of updating the code to keep this feature working combined with low usage and low demand made this not worth further investment,” said Gabe Aul, Microsoft’s Windows Insider czar.
(Source: http://www.extremetech.com/computing/228259-new-windows-10-build-kills-controversial-password-sharing-wi-fi-sense)
Hotspot 2.0 networks
This feature has been introduced with Windows 10 Build 14328. This is the new standard, also known as HS2 and Wi-Fi Certified Passpoint, for connecting to Wi-Fi networks in certain public places like airports, restaurants, hotels, railway stations etc. This offers secure and encrypted connection between the client and the access point.
Almost a year ago, Microsoft announced that the company will be bringing Hotspot 2.0 support to Windows 10 Mobile. Today, we can confirm that Microsoft will be adding Hotspot 2.0 support to Windows 10 Mobile with the Redstone release, and this feature should be coming to Insiders in the coming weeks.
(Source: http://mspoweruser.com/windows-10-mobile-redstone-will-get-hotspot-2-0-support-soon/)
Paid Wi-Fi services
These are services that are less secure. If you either don’t have a free Wi-Fi access and no Hotspot nearby, your best alternative is to buy a premium Wi-Fi. Such networks will be listed, if you make this option “On” and you can pay them to get Wi-Fi. These are generally available in rich countries like USA, UK, Germany, Japan, Australia, Canada etc.
There are related settings like –
- Change adapter options
- Change advanced sharing options
- Network and Sharing Center
- HomeGroup
- Windows Firewall
Ethernet, Dial-Up


These two options are for little outdated users. If you are still connecting your computer through LAN wire or using your landline phone to connect to Internet, you can play with these options. Most of the times, you can use the following option.
Set up a new connection.
In this way, you can provide the login user credential and other IP settings to access the web. Most of the times, this will open up pop-up window, with old legacy “Control Panel” type of options.
VPN

This feature is useful if you would like to connect your computer to your office network. Most of the times, corporate offices would like to have additional security to protect their sensitive data. In such cases, VPN (Virtual Private Network) is one method to added another layer of protection. Even individual or home users, who are concerned about their privacy can buy premium VPN services and get connected.
The following two options are generally available.
Allow VPN over metered networks
Allow VPN while roaming
The other related settings are similar like the above.
Airplane Mode

This feature made into the Windows OS in 8 and 8.1. This is especially useful, if you are travelling through air or planes. There are places or travel locations or passages where you are not supposed to use any electronic signals. Also for privacy purposes, you would like to restrict any connections from reaching you.
Enable this option, to stop all wireless communication, such as Wi-Fi, cellular, and Bluetooth.
Mobile hotspot

In this 2016 days, it’s common to share your Wi-Fi with your mobile devices. So if you are connected to Internet through LAN and would like to share with other devices, this option is good enough. The following options are available.
Share your Internet connection with other devices
Turn on remotely
Allow another device to turn on mobile hotspot. Both devices must have Bluetooth turned on and be paired.
Data usage

This feature is worth-mentioning. If you have limited bandwidth and want to make sure that you are within budget of MBs, you will know how much data you consumed. Generally, for the last 30 days the amount of Wi-Fi data utilized, will be listed with other adapter connections. If you want detail stats of how much each app or program used your bandwidth, that can also be got using the option “Usage details”.

Proxy

Generally, if you are roaming and would like to connect with your country’s IP, this feature is very much useful. Also, if you want to check any other restricted website, you can get premium proxies of countries like US, UK and Australia. Also if you are behind a firewall, you will be connected through this proxy.
For this you need to enter the address and port number.
Conclusion
Most of the above options are commonly available in Windows 8 and 8.1. But the interface through which you access these network settings, have changed in Windows 10. This is easier and intuitive compared to older ones.
Just by using the toggle button of “On” or “Off”, you can change any of the settings here. But instead of playing with them on a main system, you should try to implement them in your home on a dumb system, to make sure all of them are working. Also it is necessary to take backup of your network connection properties, in-case you mess them up.
Hope you like my article. If you want more people to know about the way, one can utilize network settings in Windows 10, please share this article with your friends.

Palla Sridhar is the writer and admin for WindowsTechIt.com. His primary focus is to write comprehensive how-tos and solutions guides for Windows 11, 10, Skype, Outlook, HDMI, Redmi, Facebook, Google, Tech Apps and LinkedIn.
On Windows 10, the Settings app includes the Network & Internet section, which is the place designed specifically to configure and change networking features on your computer.
When you open the Settings app (Windows key + I), Network & Internet is located between Devices and Personalization. Inside you can manage your computer’s Wi-Fi and Ethernet network adapters, turn on or off airplane mode, set up a VPN connection, and much more.
In this guide, you’ll get an overview of the Network & Internet settings on Windows 10.
Network & Internet is the place in the Settings that handles the networking features of Windows 10. However, you’ll quickly find out that this section is currently mostly a place to check status and turn some features on and off, as you still need to use Control Panel to change your Wi-Fi and Ethernet adapter settings, configure advanced options, and more.
Microsoft will eventually move all the network features to the Settings app from Control Panel, but it’ll take time.

Status
On the Status page, you can quickly see whether your device is currently connected to the internet. In addition, there is an easy way to understand diagram that shows exactly how your computer is connected to the internet and which adapter is using.
In the screenshot, you can see that the computer is connected using an Ethernet network adapter, which is named Ethernet0.

The Show available network link will simply open the network flyout in the Taskbar to show which network you’re connected.
Under Change your network settings, you’ll find a number of options, such as Change adapter options, Sharing options, Homegroup, Network troubleshooter, and others. However, these are just links to change those settings using Control Panel.
Perhaps the most interesting option is the Network reset link that allows you to virtually fix any networking problems on Windows 10 with a single-click.
Ethernet
If your computer has only an Ethernet adapter, then you’ll only see the Ethernet page.
On the Ethernet page, you can see your Ethernet (wired) connections. You can always click the network adapter to view current properties, including IP and MAC address, manufacturer and driver version.

There is also an option to make your device discoverable by other computers in the local network. The option is disable by default, but you can always turn on the Make this PC discoverable toggle switch.

Wi-Fi
If your computer has only a wireless adapter, then you’ll see the Wi-Fi and Mobile hotspot pages.
On the Wi-Fi page, you can manage most of the wireless features available on Windows 10. The page is divided into four sections, including Wi-Fi, Wi-Fi Sense, Hotspot 2.0 networks, and Paid Wi-Fi Services.
Wi-Fi allows you to enable or disable wireless access, and view the network you’re currently connected.

Clicking the current network connection will open another page, where you can control additional options, including:
- Connect automatically when in range: Connects your computer to the current network as soon it’s in range.
- Make this PC discoverable: Allows your computer to be discoverable in the local network.
- Metered connection: Restricts network data usage on limited data plans. Enabling this feature some apps will work differently, and Windows and driver updates won’t download.
You can also view your wireless current properties, including IP and MAC addresses, SSID, protocol, security type, network band and channel, manufacturer and driver version.

On Wi-Fi there is also a Show available networks link that opens the network flyout in Taskbar to see all the Wi-Fi networks in range.
Clicking the Manage known networks opens a page with a list of all the wireless networks you have previously connected. If you’re looking to remove a saved wireless network, you can select a network from the list, and click the Forget button.

Wi-Fi Sense is a feature on Windows 10 that allows devices to automatically connect to suggested wireless hotspots. In the page, you can turn Wi-Fi Sense on or off and show notifications when action is required to connect to a network.
Hotspot 2.0 networks is a new way to access public Wi-Fi (e.g., cafes, airports, and hotels). It’s a IEEE standard (802.11u) that allows you to securely automatically connect to trusted hotspots (avoid malicious wireless connections), and it offers an encrypted connection between your device and the access point. You can enable this feature by turning on the Let me use Online Sign-Up to get connected toggle switch.
Paid Wi-Fi services is a feature that allows to get online by purchasing internet time. You can enable this to let Windows 10 temporarily connect to open and unsecure wireless networks to see if there is paid Wi-Fi available.
Dial-up
On the Dial-up page, you won’t see any settings to configure a dial-up connection, but you can click the Set up a new connection link to use Control Panel to get connected using a slow dial-up connection.

VPN
On the VPN page, it’s possible to set up a new VPN (Virtual Private Network) connection to securely connect to a remote network over the internet.
If you need to set up a new VPN connection on Windows 10, you can use this step-by-step guide.

Then there is the Advanced Options section, which includes the ability to allow to use a VPN connection over metered networks and while roaming.
Airplane mode
On the Airplane mode, you can turn on airplane mode on Windows 10 to stop all wireless communications, including Wi-Fi, cellular, and Bluetooth connectivity.

This page also includes a toggle switch to individually disable Bluetooth on your computer. However, the same option is also available on the Devices section.
Mobile hotspot
On the Mobile hotspot page, you can share your internet connection with other devices by turning your PC into a wireless hotspot. In this page, you can turn on the feature and select a network adapter (must be wireless) to share an internet connection.

There is also an option to allow remote devices to turn on mobile hotspot automatically, but it only works when both devices are connected using Bluetooth.
If you need to set up a mobile hotspot on your Windows 10 PC, you can use this step-by-step guide.
Data usage
On the Data usage page, you’ll see an overview of your computer’s data usage in the last 30 days, which can come in handy when using a limited internet connection and to make sure you don’t go over the data limit.

You can click the Usage details to see which apps are using the most data.

Proxy
On the Proxy page, you can quickly configure proxy settings for your Windows 10 computer.
Proxy is basically a computer, typically a server, that acts as an intermediary between two devices. Many people use proxy servers to access websites that are geographically restricted.

On Windows 10, you can let your computer automatically detect these settings, use a script, or you can manually set up a proxy connection.
Windows 10 Settings
- System
- Devices
Wrapping things up
Microsoft is adding new changes to the Settings app with the Windows 10 Creators Update. This means that these settings are compatible until the Windows 10 Anniversary Update (version 1607).
Some of these changes will be happening to the Network & Internet section where you’ll be able to set an Ethernet connection as metered, Data usage with some visual changes, Wi-Fi Sense and Paid Wi-Fi services will be combined into one group called “Wi-Fi services”, and other small changes.
Editor’s Note: In this guide, we looked at the Network & Internet settings on Windows 10. In future guides, I’ll be also writing about the other remaining sections to uncover all the features in the Settings app. These articles will also be updated as Microsoft releases new versions of Windows 10.
In this post, you will read the details of all options in Network & Internet Tab in Windows 10 Settings Menu like WiFi, Airplane Mode, Cellular, Dial-up, Ethernet, and Proxy.
We are in an era where the Operating System holds the efficiency to execute a wide range of assignments from a single place and also at a time. One such place we are experiencing in the new build of Windows 10 is the Settings. This area allows its users to carry out all the required modifications they wished to do. Starting from the System, users will be able to do configurations of almost all the items. One such awesome tab is there in Windows 10 Settings that lets its users explore settings related to Network & Internet.
We are really thankful to Windows 10 Network & Internet of Settings which represents some configuration settings that were absent in the older versions or were not easily available to work with. The Network & Internet tab really did a great work by bringing the Network and Sharing Center together with the old settings of the Windows 8. All types of settings related to the network and internet are found in this single place. Thus, today we will drop down the details of the Network & Internet tab of Settings in Windows 10. Let us start it by telling you how to get access to it.
How to Access of Network & Internet Settings in Windows 10
Step 1
Click on the Start Menu and under Places you will see Settings. Open it.

Step 2
When the Settings window opens, click on the Network & Internet tab. You will be taken to the Network & Internet settings area.

The above mentioned is the one way to get into the Network & Internet settings. You can also navigate to it by clicking on the network icon that you will see on the system tray of the Notification Area.
![]()
When you are into Network & Internet you will see the following: Wi-Fi, Airplane mode, Cellular, VPN, DirectAccess, Dial-up, Ethernet, and Proxy. Now, we will see what all these have in store for you to work with.
Wi-Fi
The Wi-Fi part holds only two links – Show available connections and Advanced settings.
A click on the Show available connections prompts the Networks sidebar. There you can see the connections that are available. From here you can connect to any of the available networks on your computer.
Advanced settings link exhibits the settings of the Control Panel like Network & Sharing Center, HomeGroup, Change advanced sharing settings, Internet options, and Windows Firewall where you could navigate from the traditional Control Panel.

Airplane mode
When boarded on a flight, it is recommended to turn Airplane mode on as it detaches all the connections and restricts system from transferring waves. When you turn on it also deactivates all the connections facilities and switches off all the wireless communications.
When you turn on Airplane mode on your Windows 10 PC via settings all the Wireless connections automatically get disabled.

Cellular
A detailed article on Cellular has been recently covered by us. As my Windows 10 system is not connected to any cellular service, so we don’t have anything here to display. The link that asks to Show available connections when clicked will bring up the Network sidebar where you can see the available cellular services.
You find two links in Cellular too.
Show available connection leads to prompt the flap containing all the active Cellular Networks on you PC and you can connect to any network if your choice.
Advanced Settings is the medium to go away to the settings of the Control Panel.

VPN
A VPN connection is across the Internet and treated same as WAN. When you create a VPN connection, you enable your system to send or receive information across public or shared networks. It works as it is connected to the private network directly. Click on + Add a VPN connection and create your VPN connection by providing the necessary details of the VPN provider, connection name, login data and things like that.

DirectAccess
DirectAccess looks more like the Cellular part that we mentioned above. You will be able to connect to your Network without any Key in easy way using DirectAccess.
You can read more about DirectAccess here.
Again the link Show Available Connections will take you to the networks working on your PC to connect.

Dial-up
To pen down brief about this feature it comes to use when your system is not connected to a Local Area Network (LAN). And then when you wish to get connected to the Internet, you need to configure a Dial-up networking and get connected to the Internet by providing the required information.

Ethernet
Just like Cellular service and Dial-up connection, handling Ethernet is also that simple. You know Ethernet is a wire connection. When you are plugged to an Ethernet connection, you will view the IPv4 address, the DNS servers, driver version and things like that. It even provides you a way to copy the information and use it somewhere else (wherever you need it).

Proxy
To receive any data from the server, the Proxy server acts as an intermediary by connecting the client to the server. Here, you are the client and put a request to the proxy server to open up a web page, for instance, now the proxy server collects information and supplies it to you. In this section, you can get connected to the automatic proxy or can also use the manual setup by providing the IP address and other related information.
In the End
All the details of the Network & Internet is mentioned above in a brief way. If you see it carefully, you will see that every category that we discussed above has a common thing in between. All the categories have the option to see their Advanced settings.
Привет друзья! Продолжаем разбираться в настройке интернета и решению разных проблем в Windows 10. Я уже подготовил несколько полезных статей на эту тему, ссылки дам ниже. Ну а в этой статье мы будем настраивать интернет в Windows 10. Поговорим о настройке обычного сетевого соединения, высокоскоростного соединения (PPPoE), Wi-Fi сетей, и 3G/4G модемов. Думаю, статья будет многим полезна. Ведь, после обновления до Windows 10 не все сразу могут разобраться, где и что настраивать и как это сделать. Да и бывают случаи, когда после обновления до Windows 10 интернет просто не работает. Скорее всего, нужно просто заново настроить соединение.
Мы знаем, что есть разные способы подключить наш компьютер к интернету. В этой статье я постараюсь рассказать о настройке основных соединений:
- Настройка обычного соединения Ethernet. Подключение кабеля напрямую от провайдера к компьютеру, через роутер, или ADSL модем.
- Настройка высокоскоростного соединения (PPPoE) в Windows 10.
- Подключение к интернету по Wi-Fi.
- Настройка интернета через USB 3G/4G модем.
Сейчас мы подробно рассмотрим настройку подключения к интернету, через перечисленные выше соединения. Вы должны узнать, какой интернет у вас, и сразу можете переходить к нужному подзаголовку в этой статье. Начнем наверное с Ethernet — очень популярный способ подключения к интернету.
Ethernet: подключение к интернету в Windows 10 по сетевому кабелю (роутер, модем)
Рассмотрим сначала самое простое соединение. Если у вас интернет-провайдер просто проложил сетевой кабель в дом, и провайдер не предоставил логин и пароль для подключения к интернету, то у вас обычное соединение по технологии Ethernet.
Точно так же настраивается подключение к интернету в Windows 10 через роутер, или ADSL модем.
Для настройки такого соединения достаточно подключить сетевой кабель от провайдера (роутера, или ADSL модема) к вашему компьютеру (ноутбуку), в разъем сетевой карты:

Если с настройками Ethernet на компьютере все хорошо (их никто не менял), то интернет сразу должен заработать (вы это поймете по статусу соединения на панели уведомлений). Если интернет по сетевому кабелю не работает, компьютер просто не реагирует на подключение кабеля, то смотрите эту статью. Я сам столкнулся с такой проблемой.
Если же соединение появилось, но статус Ограниченно, или неопознанная сеть, и интернет не работает, то нужно проверить параметры Ethernet адаптера.
![]()
В Windows 10 это делается так:
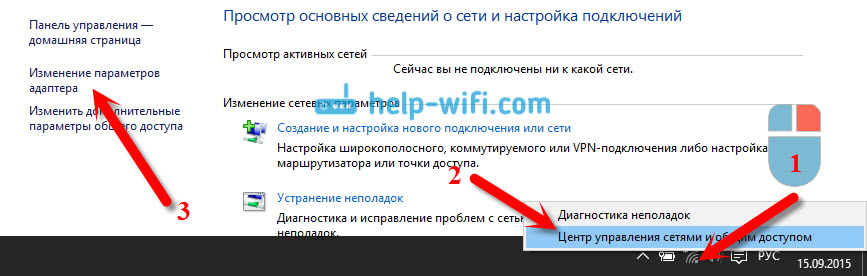
Нажимаем правой кнопкой мыши на статус соединения с интернетом, на панели уведомлений и выбираем пункт Центр управления сетями и общим доступом. Дальше, нажмите в новом окне на пункт Изменение параметров адаптера.
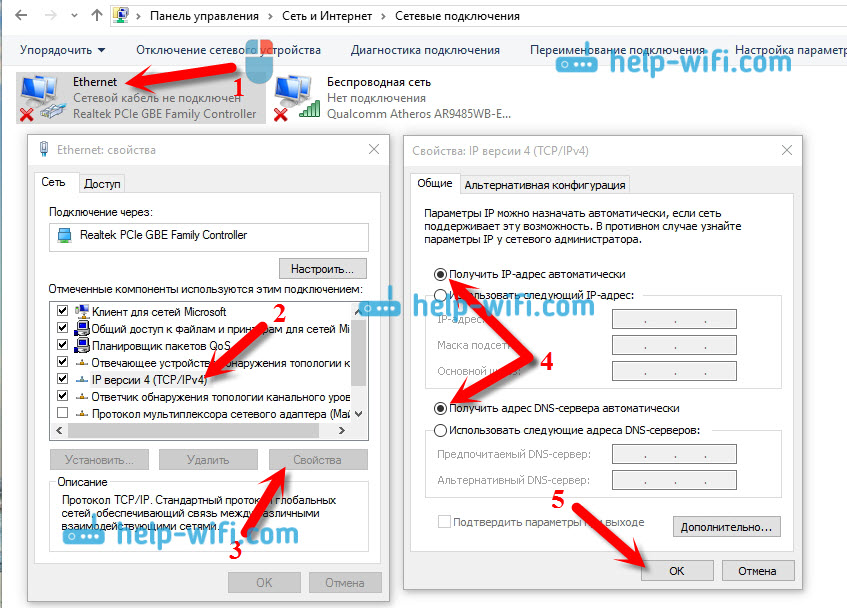
Нажимаем правой кнопкой мыши на адаптер Ethernet и выбираем Свойства. Выберите в списке пункт IP версии 4 (TCP/IPv4). Если галочка возле этого пункта не установлена, то обязательно установите ее, иначе интернет работать не будет. Значит выделили «IP версии 4 (TCP/IPv4)» и нажимаем кнопку Свойства.
В новом окне проверяем, что бы были выставлены автоматические настройки получения IP и DNS-адресов, и нажимаем Ok.
Интернет уже должен работать. Если нет, то перезагрузите компьютер. Если так и не получилось установить соединение, то проверьте подключение кабелей, нет ли проблем на стороне провайдера, нормально ли работает роутер, или ADSL модем, через который вы подключаетесь (если у вас не прямое соединение с провайдером).
Если вы пытаетесь настроить Ethernet соединение напрямую от провайдера, и у вас интернет не хочет работать, то узнайте у своего провайдера, не делает ли он привязку по MAC-адресу. Если делает, то вам нужно сообщить провайдеру MAC-адрес компьютера. Он его пропишет у себя в настройках, и интернет заработает. Мало провайдеров используют такую привязку, но она бывает. Как узнать MAC-адрес в Windows 10 читайте здесь.
Все, с этим типом соединения разобрались, дальше у нас высокоскоростное соединение.
Настройка высокоскоростного соединения (PPPoE) в Windows 10
Если у вас интернет провайдер проложил в дом кабель, и предоставил вам логин, пароль, и возможно какие-то другие данные для подключения к интернету, которые нужно задать в настройках компьютера, или Wi-Fi роутера, то вам на Windows 10 нужно настроить Высокоскоростное соединение (PPPoE). Чем мы сейчас и займемся. По сути, это то же самое, что и Ethernet, просто здесь интернет не будет работать до той поры, пока мы не создадим подключения.
Если у вас подключение к интернету идет через роутер, на нем настроено соединение (PPPoE, L2TP, PPTP), то вам на компьютере ничего настраивать не нужно. Достаточно подключить сетевой кабель от маршрутизатора к компьютеру. О настройке такого соединения я рассказывал выше.
Если же вы кабель подключаете напрямую к компьютеру, и у вас есть логин и пароль для подключения к интернету, то нужно создавать соединение.
Открываем Центр управления сетями и общим доступом:

Нажимаем на пункт Создание и настройка нового соединения или сети. Затем, выделяем пункт Подключение к интернету, и нажимаем на кнопку Далее.

В следующем окне выбираем пункт: Высокоскоростное (с PPPoE).

Дальше, задаем имя пользователя и пароль, которые вам должен предоставить интернет-провайдер. Так же, вы можете задать имя для подключения, например: «Высокоскоростное подключение Билайн». И можно еще установить галочки возле пунктов сохранения пароля, отображения пароля и разрешения на использование этого подключения другим пользователям. Я советую установить галочку возле пункта Запомнить этот пароль.

Нажимаем на кнопку Подключить, и если все правильно подключено, и правильно заданы параметры, то будет создано подключение и установлено соединение с интернетом.
Увидеть это соединение и управлять им, вы можете нажав на значок интернета на панели уведомлений.

Нажав на соединение, откроется меню Набор номера, где вы сможете подключится, удалить, или редактировать настройки соединения.
Подключение к интернету по Wi-Fi
Если у вас дома установлен Wi-Fi роутер, или вы хотите подключить свой ноутбук к интернету у друзей, в кафе и т. д., то можно использовать для этого дела Wi-Fi. Если у вас уже установлен драйвер на Wi-Fi адаптер, а Windows 10 практически всегда устанавливает его автоматически, то остается только открыть список доступных для подключения сетей, выбрать нужную, указать пароль (если сеть защищена), и вы уже подключены к интернету.
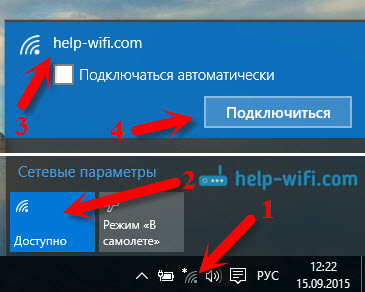
По этой теме, я уже писал подробную статью: как подключится к Wi-Fi на Windows 10. Думаю, с подключением к беспроводной сети проблем возникнуть не должно.
Настраиваем интернет через 3G/4G модем в Windows 10
Осталось только рассмотреть настройку подключения через USB 3G, или 4G модем. На компьютере с Windows 10, настройка такого подключения практически не будет отличаться от настройки 3G интернета на Windows 7 (статья на примере провайдера Интертелеком).
Первым делом, нам нужно подключить модем к компьютеру и установить драйвер на наш модем. Драйвер можно скачать с сайта производителя модема, с сайта интернет провайдера, или просто найти его в интернете. Ищите по имени и модели модема. Так же, драйвер может быть на диске в комплекте с модемом, или на самом модеме. Если драйвера для вашего модема нет под операционную систему Windows 10, то попробуйте найти для Windows 8, или даже Windows 7. Возможно, он подойдет.
После того, как драйвер вы установили, подключите модем к компьютеру, и можно приступать к настройке 3G соединения на Windows 10. Кстати, все практически так же, как при настройке высокоскоростного соединения.
Открываем Центр управления сетями и общим доступом.
Нажимаем на Создание и настройка нового соединения или сети и выбираем Подключение к интернету.
Дальше, выберите тип Коммутируемое.

И задаем параметры, которые предоставляет провайдер: номер, имя пользователя и пароль. Я показал на примере провайдера Интертелеком. Рекомендую поставить галочку возле пункта Запомнить этот пароль. Имя подключения задаете произвольное. Как заполните все поля, нажимайте на кнопку Создать.

Если все ok, то будет создано подключение, и установлено соединение с интернетом.
Если подключится не удалось, то проверьте все параметры и подключение USB модема. Может быть еще, что у вас очень плохое покрытие вашего провайдера. В таких случаях, интернет может не подключатся вообще, или работать очень медленно. Как посмотреть, какой у вас уровень сигнала, и как его увеличить, я писал здесь. В отдельных случаях, если сеть очень плохая, нужно устанавливать антенну для вашего модема.
Запускать созданное подключение, останавливать, удалить, или отредактировать вы можете нажав на значок подключения к интернету и выбрав созданное соединение.
 Статус соединения с интернетом, всегда отображается на панели уведомлений. Нажав на него, можно отключится от интернета, или запустить нужное соединение.
И еще несколько слов
Даю еще ссылку на инструкцию по настройке раздачи интернета с ноутбука на Windows 10. Если у вас кроме компьютера есть другие устройства, которые могут подключится к интернету по Wi-Fi, то вы можете раздать интернет даже без роутера.
Каким способом вы бы не настраивали интернет, вы можете столкнутся с популярной ошибкой «Ограничено». Когда интернет не работает, а возле статуса соединения желтый восклицательный знак. С этой проблемой мы разбирались в отдельной статье.
Статья получилась большой, но вроде бы не запутанной. Хотелось полностью ответить на поставленный в заголовке вопрос. Надеюсь, вы нашли в этой статье полезную для себя информацию, и подключили свой компьютер с Windows 10 к интернету.
Вопросы вы можете задавать в комментариях. Перед тем, как описывать свою проблему, внимательно прочитайте эту статью. Возможно, решение уже написано. Так же, смотрите ссылки на другие статьи, там много полезной информации по теме.