![]()
Download Article
Simple steps to connect and set up your Netgear router
![]()
Download Article
- Cable (Genie Interface)
- Cable (Smart Wizard Interface)
- DSL (Genie Interface)
- DSL (Smart Wizard Interface)
- Troubleshooting
- Expert Interview
- Q&A
|
|
|
|
|
|
If you got your Netgear router from your ISP, you usually won’t need to do much configuration to connect it to your cable or DSL provider and get online. But even if you’ve reset your wireless router or bought a brand new Netgear router that you need to connect to your modem, the setup wizard and other tools make it easy—we’ll show you how!
-

1
Power off your modem and Netgear router.
-
2
Connect the router to the modem. Use an ethernet cable to connect your modem to the port labeled “Internet” on your Netgear router.
Advertisement
-
3
Connect the router to your computer. Use a second ethernet cable to connect your computer to any port labeled “LAN” on your Netgear router.
-
4
Turn on your modem. Power on your modem and wait for all the lights to remain stable.
-
5
Turn on your router. Power on your Netgear router and wait for the “Power” light to remain solid green.
-
6
Go to the router’s admin interface. Launch an Internet browser on your computer and type one of the following URLs into the address bar: www.routerlogin.com, www.routerlogin.net, or http://192.168.1.1. The correct URL will bring up the router login dialog box.
- Examine the label on your Netgear router to determine the correct URL if none of these URLs bring up the router login dialog box.
-
7
Log in to your router interface using “admin” for the username and “password” for the password. These are the default login credentials for Netgear routers. The Netgear Genie setup wizard will display on-screen.
- If “Netgear Smart Wizard” displays on-screen in place of “Netgear Genie,” skip to Method Two in this article to finish setting up your router using the Smart Wizard interface. The Smart Wizard interface is only available on older models of Netgear routers.
-
8
Click on the {{MacButton|Advanced tab and select Setup Wizard.
-
9
Select Yes and click Next. The setup wizard will take a few minutes to detect your Internet connection and display the “Congratulations” page when complete.
-
10
Click on Take me to the Internet to verify your Internet connection is working. Your Netgear router will now be configured for use with your ISP.[1]


Advertisement
-
1
Connect the router to the modem. Use an ethernet cable to connect your modem to the port labeled “Internet” on your Netgear router.
-
2
Connect the router to your computer. Use a second ethernet cable to connect your computer to any port labeled “LAN” on your Netgear router.
-
3
Turn off all of your equipment. Power off your computer, modem, and Netgear router, then power all three devices back on.
-
4
Open a web browser. Allow a few minutes for all devices to power fully back on, then launch any Internet browser on your computer.
-
5
Go to your router’s admin panel. Type one of the following URLs into the address bar of your browser, then press “Enter:”http://192.168.0.1 or http://192.168.1.1. The correct URL will bring up the router login dialog box.
-
6
Sign in. Log in to the router interface using “admin” for the username and “password” for the password. These are the default login credentials for Netgear routers. You will now be logged into your Netgear router.
-
7
Click Setup Wizard and then click Yes. Select “Yes” when asked if you want Netgear to detect your Internet connection.
-
8
Click on Next.” Netgear will take a few minutes to detect your Internet connection.
-
9
Click on Next again when your Internet type is detected. Your Netgear router will save your settings and be configured for use with your ISP.[2]


Advertisement
-
1
Connect the Netgear router to your telephone jack using your DSL microfilter. The DSL microfilter is a small box that connects both your router and telephone to the telephone jack.
-
2
Connect your telephone to the DSL microfilter using a small telephone wire.
-
3
Connect the router to your computer. Use an ethernet cable to connect your computer to any port labeled “LAN” on your Netgear router.
-
4
Power on the router. Connect the Netgear router to its power supply unit, then power on the router. The router will take approximately one minute to fully boot up.
-
5
Launch any Internet browser on your computer. The Netgear Genie setup wizard will automatically display on-screen.
- Type one of the following URLs into the address bar of your browser if the setup wizard fails to automatically display on-screen: http://192.168.0.1 or http://www.routerlogin.net. These URLs will take you to the Netgear Genie setup wizard.
-
6
Select Yes and then Next. ‘
-
7
Select your country from the dropdown menu, then click on “Next.” Netgear will take a moment to detect your Internet connection. When complete, the router login screen will appear.
-
8
Type the username and password supplied by your ISP into the fields provided, then click on “Next.” This allows you to access your ISP’s network.
- Contact your ISP directly if you need help obtaining the username and password for your network.
-
9
Click on Take me to the Internet to verify your Internet connection is working. Your Netgear router will now be configured for use with your ISP.[3]


Advertisement
-
1
Connect the Netgear router to your telephone jack using your DSL microfilter. The DSL microfilter is a small box that connects both your router and telephone to the telephone jack.
-
2
Connect your phone to the DSL filter. Connect your telephone to the DSL microfilter using a small telephone wire.
-
3
Connect the router to your computer. Use an ethernet cable to connect your computer to any port labeled “LAN” on your Netgear router.
-
4
Turn on the router. Connect the Netgear router to its power supply unit then power on the router. The router will take approximately one minute to fully boot up.
-
5
Go to the router’s admin interface. Launch any Internet browser on your computer and type one of the following URLs into the address bar: http://192.168.0.1 or http://192.168.1.1. These URLs will take you to the router login screen.
-
6
Type “admin” into the username field, and “password” into the password field. These are the default login credentials for your Netgear router.
-
7
Click on Setup Wizard. Then, select Yes when asked if you want Netgear to detect your Internet connection.
-
8
Click on Next. Netgear will take a few minutes to detect your Internet connection, and display the appropriate configuration page based on your network type.
-
9
Apply the detected network settings so Netgear can complete the configuration process. The steps will vary depending on your type of Internet connection.
- Enter the login and password supplied by your ISP if using a PPPoE or PPPoA connection type.
- Click on “Apply” if using a dynamic IP address for connection type.
- Enter your IP address, IP subnet mask, primary DNS, and secondary DNS if using an IP over ATM or fixed IP connection type. This information must be supplied to you by your ISP.
-
10
Click on Apply after entering the necessary credentials based on your Internet connection type. Your Netgear router will now be configured for use with your ISP.[4]


Advertisement
-
1
Download the latest firmware from http://support.netgear.com. In some cases, outdated firmware can prevent you from being able to establish an Internet connection.[5]
-
2
Reset your Netgear router if you can’t connect to the internet. A reset will restore your router’s default factory settings and can help resolve software problems associated with your router.
-
3
Try different ethernet cables or phone wires. Faulty cables and hardware can prevent you from being able to effectively set up your router.
-
4
Contact your ISP for further assistance. If you can’t sign in to your Netgear router, your ISP can help you log in.[6]


Advertisement
Add New Question
-
Question
What can I do when my router will not allow my computer to connect?

Try to restart both the router and computer. If that does not work, then call the router manufacturer for assistance.
-
Question
When I connect an antenna the signal is weaker. What should I do?
I would recommend not connecting the antenna, since it is clearly making things worse.

Ask a Question
200 characters left
Include your email address to get a message when this question is answered.
Submit
Advertisement
About This Article
Thanks to all authors for creating a page that has been read 90,367 times.
Is this article up to date?

Hey there! If you’re looking to set up your Netgear router, you’ve come to the right place. With the Netgear Router Login Smart Wizard, you’ll be able to configure your router settings in no time.
Hello there! Are you having trouble accessing your Netgear router’s settings? Don’t worry, you’ve come to the right place! In this article, we’re going to talk about the Netgear Router Login Smart Wizard, a user-friendly interface that allows you to manage your router’s settings with ease. Whether you need to change your network name and password, set up a guest network, or configure parental controls, the Smart Wizard has got you covered.
First things first, let’s talk about why you might need to access your router’s settings in the first place. Your Netgear router is the central hub of your home network, and it’s important to keep it up-to-date and secure. By logging in to the Smart Wizard, you can make sure that your router is running the latest firmware and that your network is protected from potential security threats. You can also customize your network to meet your specific needs, such as setting up a VPN or blocking certain websites.
The good news is that accessing the Smart Wizard is quick and easy. All you need is a computer or mobile device that is connected to your Netgear router’s network. Once you’re connected, simply open a web browser and navigate to the router’s login page. Depending on your router model, the login page may be located at a specific IP address or domain name.
Once you’ve reached the login page, you’ll be prompted to enter your router’s username and password. If you haven’t changed these from the default settings, you can find them in your router’s manual or on the Netgear website. Once you’ve entered your login credentials, you’ll be taken to the Smart Wizard interface where you can begin managing your router’s settings.
In conclusion, the Netgear Router Login Smart Wizard is a powerful tool that can help you take control of your home network. By accessing the Smart Wizard, you can customize your network and ensure that it’s running smoothly and securely. So why wait? Log in to your Netgear router today and start exploring the Smart Wizard!
Router Setup Guide: How to Set Up Your Router
So, you just bought a new router and you’re ready to set it up. Great! Setting up a router may seem daunting, but it’s actually pretty easy. In this guide, we’ll walk you through the process step-by-step.
Step 1: Unbox Your Router
The first step is to unbox your router and make sure you have all the necessary components. This will typically include the router, an Ethernet cable, and a power adapter. Make sure everything is there before moving on to the next step.
Step 2: Connect Your Router to Your Modem
Next, you’ll want to connect your router to your modem. To do this, plug one end of the Ethernet cable into the modem and the other end into the router’s WAN port. This will ensure that your router is connected to the internet.
Step 3: Connect Your Devices to Your Router
Once your router is connected to the modem, it’s time to connect your devices. You can do this either wirelessly or by using an Ethernet cable. If you’re connecting wirelessly, make sure to find your router’s Wi-Fi network and enter the password when prompted. If you’re using an Ethernet cable, simply plug one end into your device and the other end into one of the router’s Ethernet ports.
Step 4: Configure Your Router
Now that your router is connected to the internet and your devices, it’s time to configure it. To do this, open a web browser on one of your connected devices and type in your router’s IP address (this can usually be found on the bottom of your router). Once you’ve entered the IP address, you’ll be prompted to log in to your router’s settings. From here, you can configure your router’s settings to your liking.
Step 5: Secure Your Network
Finally, it’s important to secure your network to prevent unauthorized access. To do this, make sure to change your router’s default password and enable WPA2 encryption. This will ensure that your network is protected from hackers and other potential threats.
And that’s it! Setting up a router may seem daunting, but by following these simple steps, you’ll have your router up and running in no time.
Login Instructions
Read more:
- Netgear Router Login Nighthawk: Tips and Tricks
- Get Access to Your Netgear Router Login and Wifi Password
- Get Started with Netgear Router Login Setup
Hey there! Ready to log in?
Logging in is easy peasy! Just follow these simple steps:
Step 1: Go to the login page by clicking on the “Login” button at the top right corner of the homepage.
Step 2: Enter your username and password in the designated fields. Make sure to double-check your username and password before clicking the “Login” button.
Step 3: Once you’ve clicked the “Login” button, you’ll be redirected to your account dashboard. Voila! You’re logged in!
Forgot Your Password?
No worries! If you’ve forgotten your password, simply click on the “Forgot Password?” link on the login page.
You’ll be asked to enter your email address associated with your account. After submitting your email address, you’ll receive an email with instructions on how to reset your password.
Need Help?
If you’re having trouble logging in, don’t hesitate to contact our support team by clicking on the “Contact Us” link at the bottom of the page. We’re always happy to help!
We hope this guide has been helpful. Happy logging in!
Get Smart with Smart Wizard Tool!
What’s the Smart Wizard Tool?
Hey there! Have you ever felt overwhelmed when it comes to paper works? Worry not, because Smart Wizard Tool is here to save your day! Smart Wizard Tool is an online platform designed to help you with all your paperwork needs. From creating contracts to filling out application forms, Smart Wizard Tool has got your back!
How does it work?
Using Smart Wizard Tool is super easy! All you have to do is log in to the website and choose from a variety of templates available. Once you’ve selected the template, Smart Wizard Tool will guide you through the process and help you fill out the necessary details. You can edit and customize the template to your liking and even preview how it looks like before saving it.
Why use Smart Wizard Tool?
Smart Wizard Tool makes paperwork hassle-free and saves you time! No more stressing over legal documents or worrying about missing deadlines. You can access the platform anytime, anywhere, and from any device. Plus, Smart Wizard Tool ensures the security of your data, and your information is kept confidential at all times.
So what are you waiting for? Say goodbye to paperwork woes and hello to Smart Wizard Tool! Try it out today and see how it can make your life easier.
4 Network Configuration Tips You Need to Know
Hey, it’s your patient assistant here! Want to learn more about network configuration? Check out these tips:
1. Keep your network secure: Setting up a strong password is important, but don’t forget about other security measures such as encryption and firewalls. Make sure your devices are updated with the latest security patches to prevent vulnerabilities.
2. Use DHCP: Dynamic Host Configuration Protocol (DHCP) makes it easier to manage IP addresses on a network. It automatically assigns IP addresses to devices, so you don’t have to manually configure them.
3. Configure Quality of Service (QoS): QoS is a feature that prioritizes certain types of traffic on your network. This is useful for things like video conferencing or online gaming, where you need a stable connection. By setting up QoS, you can ensure that these applications get the bandwidth they need.
4. Use VLANs: VLANs (Virtual LANs) allow you to segment your network into smaller subnetworks. This can be useful for separating traffic from different departments in a business or for creating a guest network. It’s a great way to manage traffic and keep your network organized.
So there you have it, four network configuration tips to help keep your network running smoothly. Remember to keep your network secure, use DHCP, configure QoS, and consider using VLANs to manage traffic. Happy networking!
Troubleshooting Help
Hey there! Are you facing any issues with your device or software? Don’t worry, I’m here to help you troubleshoot the problem. In this article, you’ll find some tips and tricks to identify and solve common issues.
Identify the Problem
First things first, you need to identify the problem. Is your device not turning on? Is the software crashing? Is the internet connection slow? Once you know the problem, it becomes easier to find a solution.
Restart your Device
One of the easiest solutions to most issues is to restart your device. Turn off your device and wait for a few seconds before turning it back on. This will refresh the device and may resolve the issue.
Check for Updates
Software updates can solve many issues. Check if there are any updates available for your device or software. Sometimes, outdated software can cause problems.
Clear Cache and Cookies
If you’re experiencing issues while browsing the internet, try clearing your browser’s cache and cookies. This will remove any temporary files and browsing history that may be causing the issue.
Contact Support
If none of the above solutions work, it’s best to contact support. Whether it’s the device manufacturer or the software developer, they will have a dedicated support team to help you resolve the issue.
That’s it for now! Remember, troubleshooting can be frustrating, but with the right approach, it can be a breeze. Good luck!
Firmware Updates: Why You Need Them and How to Get Them
Hey there! So, you might have heard the term firmware updates before, but what exactly are they and why do you need them?
What are Firmware Updates?
Put simply, firmware is the software that controls the hardware of your device. Firmware updates are essentially updates to that software that make your device run more smoothly, fix bugs, and sometimes even add new features.
Why Do You Need Them?
Firmware updates are important because they can help improve the performance and security of your device. Sometimes, a firmware update can fix a bug that was causing your device to crash or freeze. Other times, a firmware update can address a security vulnerability that could have put your personal information at risk.
How to Get Them
Getting a firmware update is usually pretty simple. Most devices will automatically check for updates and notify you when one is available. However, you can also manually check for updates by going to your device’s settings and looking for a “software update” or “firmware update” option.
When you do install a firmware update, it’s important to follow the instructions carefully and make sure your device has enough battery life to complete the update. You don’t want to accidentally interrupt the update process, as this could cause problems with your device.
So, there you have it! Firmware updates might not be the most exciting thing in the world, but they’re definitely important if you want your device to run smoothly and securely. Keep an eye out for firmware update notifications, and don’t forget to manually check for updates every once in a while!
Get the Best Out of Your Router with These Tips!
If you’re looking for ways to optimize your router’s performance, you’ve come to the right place. Here are some essential tips to help you get the most out of your router:
Router Setup Guide
Before you start using your router, it’s important to set it up correctly. Our easy-to-follow router setup guide will take you through the process step by step.
Login Instructions
Once your router is set up, you’ll need to log in to make any changes to its settings. Our login instructions will guide you through this process.
Smart Wizard Tool
If you’re not comfortable making changes to your router’s settings manually, our Smart Wizard Tool can simplify the process for you.
Network Configuration Tips
Optimizing your network configuration can help improve your router’s performance. Our tips will show you how to set up your network correctly.
Troubleshooting Help
If you’re experiencing problems with your router, our troubleshooting guide can help you identify and resolve the issue.
Firmware Updates
Regular firmware updates can help keep your router secure and improve its performance. Our guide will show you how to update your firmware.
That’s it! We hope these tips have helped you get the most out of your router. If you have any questions or need further assistance, don’t hesitate to contact us. Thanks for reading, and we’ll see you next time!
Всем привет! Сегодня мы поговорим про то, как подключить и настроить роутер NetGear. В первую очередь нам нужно его правильно установить – он будет стоять рядом с тем местом, куда может дотянуться кабель от провайдера. Также желательно поставить его в центральной части квартиры или дома, чтобы радиоволны доходили до всех уголков жилища. Теперь давайте подключим к нему нужные провода.

Сзади должны быть локальные порты (LAN) – для подключения всех домашних устройств: компьютеров, принтеров, телевизоров, камер-видеонаблюдения. Их обычно несколько, они могут иметь подписку LAN. Также они могут быть пронумерованы. И один, выделяющийся среди других WAN (Internet) порт – вот в него мы должны подключить кабель от провайдера.
ПРИМЕЧАНИЕ! На небольших моделях интернет порт может иметь синий цвет, а вот локальные порты будут жёлтыми. Если у вас модем Нетгеар, то нужно будет подключить телефонный кабель в подходящий вход.

Не забудьте подключить блок питания к розетке. Если у вас есть IP-TV приставка, то подключите её к свободному LAN порту (лучше всего использовать последний по номеру) – запомните номер порта, он нам понадобится для настройки роутера NetGear.
ПОМОЩЬ СПЕЦИАЛИСТА! Если у вас возникнут какие-то сложности, или будет что-то не получаться, то пишите свои вопросы в комментариях, и я вам обязательно помогу.
Содержание
- Как зайти в настройки роутера NetGear
- Интернет
- Wi-Fi
- IPTV
- Прошивка
- Задать вопрос автору статьи
Для входа в настройки нам не нужно ничего устанавливать, и для этого в первую очередь нужно подключиться к локальной сети аппарата – это можно сделать двумя способами:
- Подключить компьютер или ноутбук с помощью сетевого провода к свободному локальному порту.
- Подключиться по Wi-Fi – имя беспроводной сети (WiFi Network Name (SSID)) и пароль от неё (Network Key (Password)) находится на этикетке под корпусом.
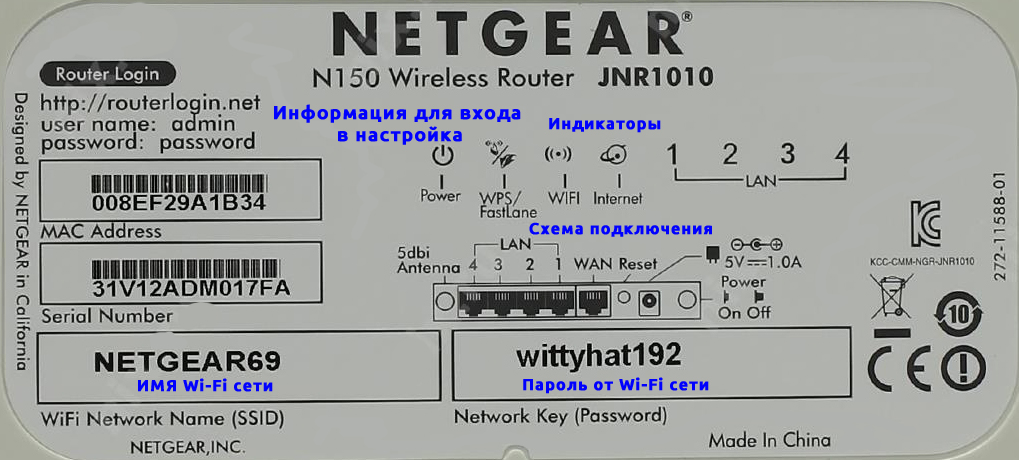
Кстати, там же находятся и данные для входа. После подключения к сети маршрутизатора откройте любой браузер и введите в адресную строку тот адрес, который написан на той же самой бумажке. Обычно используются следующие адреса:
- 192.168.0.1
routerlogin.net - routerlogin.com
- routerlogin.net
- orbilogin.net
Также вас попросят ввести:
- Логин: admin
- Пароль: password или admin
ВНИМАНИЕ! Для настройки интернета вам понадобится договор от провайдера – там прописаны данные для подключения, без которых вы не сможете настроить интернет.
Пароль не подходит
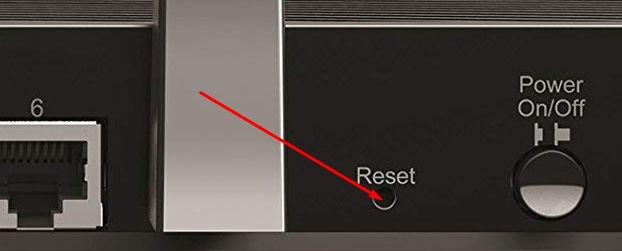
Если пароль не подходит, а вы взяли NETGEAR роутер у друга и знакомого, то скорее всего он уже кем-то настраивался. Проще всего скинуть его на заводские настройки – для этого при включенном аппарате зажмите кнопку Reset на 10 секунд. Для этого используйте что-то тонкое: булавку, скрепку или зубочистку.
Интернет
Новая прошивка
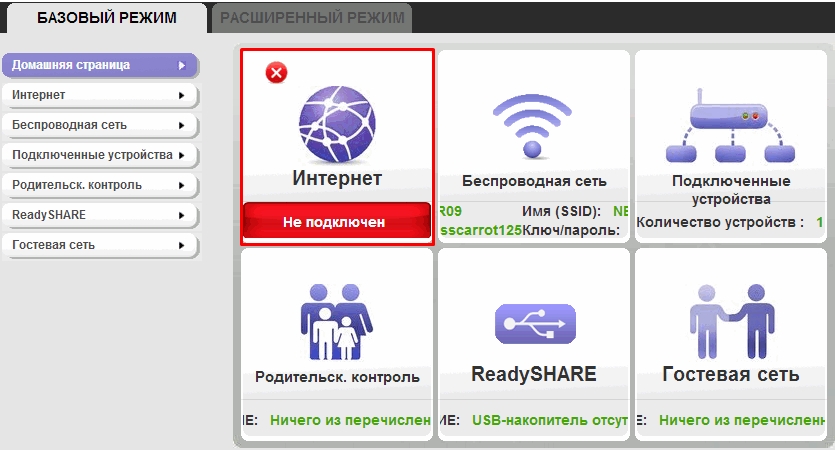
На главной вы увидите вот такое окошко, если в первом разделе «Интернет» стоит статус «Подключен», то значит ваш провайдер использует «Динамическое подключение», и вы можете его не настраивать и перейти к настройке вай-фай (Следующая глава). Если вы видите статус как у меня: «Не подключен», – то нажимаем по нему.
Старая прошивка
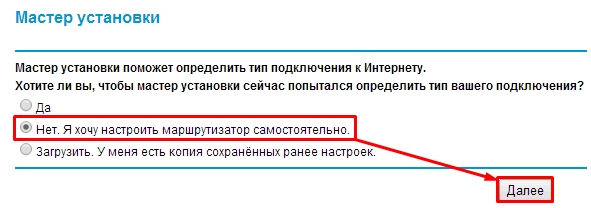
Вы должны при первом входе увидеть окно «Мастера установки» – выбираем вариант «Нет» и кликаем по кнопке «Далее».
- Вы увидите подобие теста, где нужно будет ответить на подобие вопросов:
- Если в договоре есть логин и пароль, то вводим, да и далее ниже вводим эти данные.
- Если в договоре есть IP, маска и шлюз, то также вводим их ниже, или ставим «Получать автоматически от провайдера».
- Аналогично поступаем и с DNS адресами.
- Если в договоре ничего не сказано про MAC-адрес, то ставим значение «По умолчанию» или вводим значение с листа.
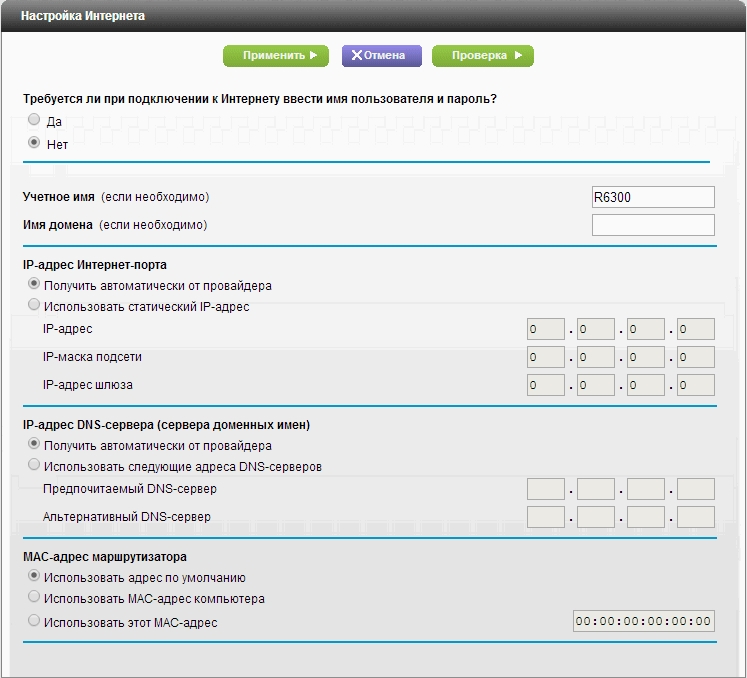
- В конце нажимаем «Применить».
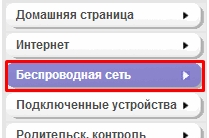
Wi-Fi
Новая прошивка
Слева выбираем «Беспроводная сеть».
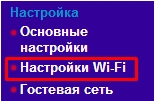
Старая прошивка
«Настройки Wi-Fi»
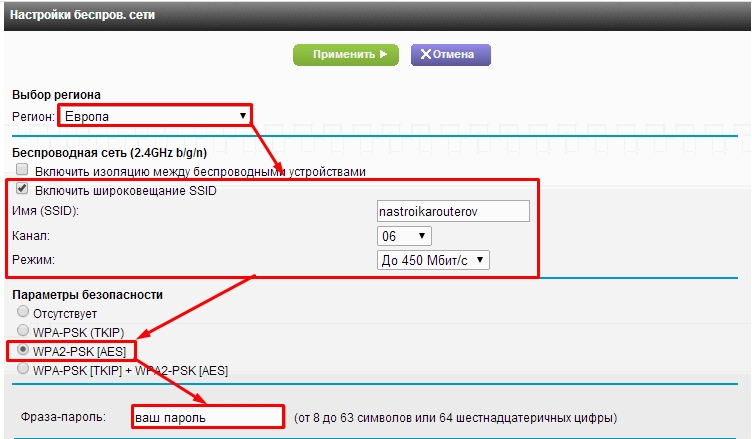
- А теперь поподробнее про настройки:
- «Регион» – ставим или Россию, или Европу.
- «Включить изоляцию между беспроводными устройствами» – если включить эту галочку, то устройства, подключённые по вай-фай, не будут видеть друг-друга, и иметь доступ к локальной сети, но смогут иметь доступ к интернету. Полезная функция в общественных местах: кафе, ресторанах, кино и т.д.
- Ставим галочку «Включить широковещание SSID», ниже пишем имя сети в строку «Имя (SSID)». Тут также устанавливаем «Канал» – если есть режим «Авто», то лучше ставить его. «Режим» – ставим на максимум.
- «Параметры безопасности» – можно конечно отключить пароль, но лучше установить тип защиты как «WPA2-PSK [AES]».
- В строку «Фраза-пароль» вводим ключ.
- Тоже самое проделываем для сети 5ГГц и нажимаем «Применить».
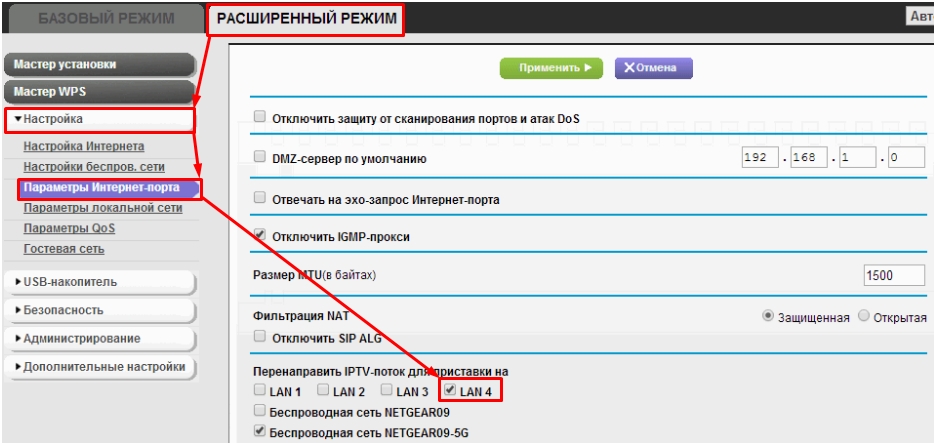
IPTV
Новая прошивка
Переходим по пути: «Расширенный режим» – «Настройки» – «Параметры Интернет-порта».
Старая прошивка
«Дополнительно» – «Параметры Интернет-порта».
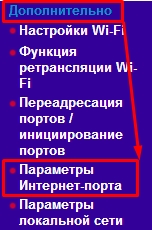
В строке перенаправления IPTV потока ставим галочку напротив того порта, к которому вы подключили приставку. Нажимаем по кнопке для применения настроек.
Прошивка
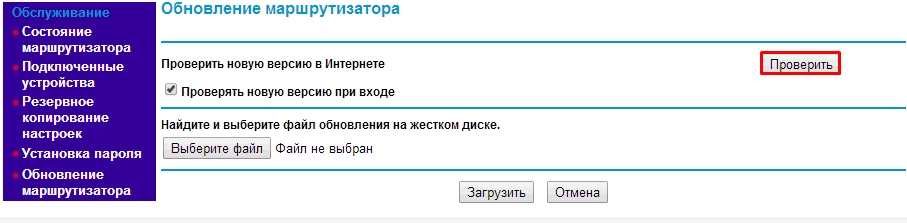
Старая прошивка
На старой прошивке есть кнопка «Проверить» в разделе «Обслуживание» – «Обновление маршрутизатора». Если таким образом не удается перепрошить router, то можно скачать его с официального сайта.
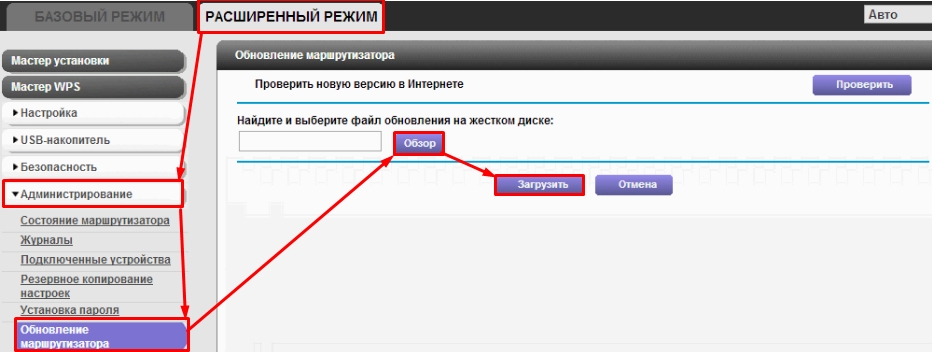
Новая прошивка
В расширенном режиме Нетгайр найдите раздел «Администрирования» и там в нужном пункте нужно будет нажать по кнопке «Проверить». Но можно скачать прошивку вручную с официального сайта.
- Заходим на официальную страницу поддержки.
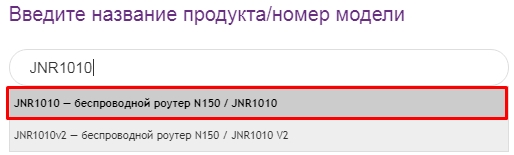
- Вводим название модели (также смотрите на версию) и выбираем наш аппарат из выпадающего списка. Название можно посмотреть в том же самом Web-интерфейсе в правом верхнем углу или на этикетке. Вводить следует только номер модели с буквами и цифрами.
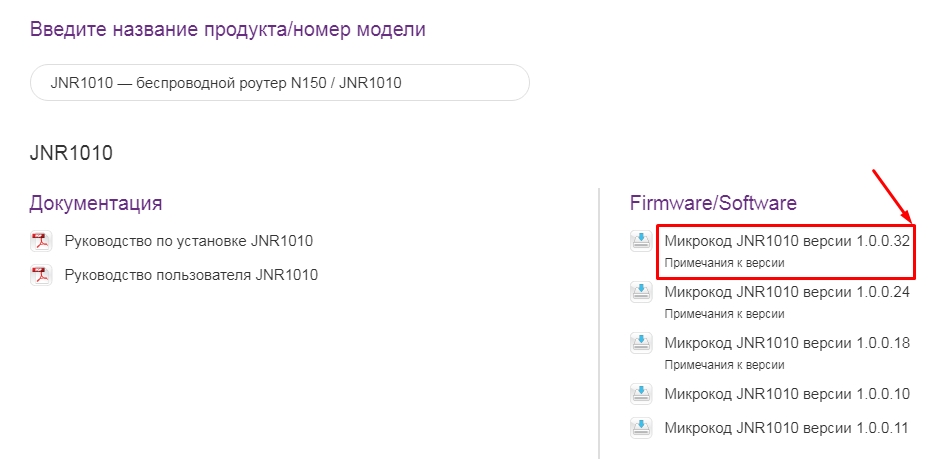
- В разделе «Firmware/Software» выбираем последнюю версию и нажимаем на неё.
- Скачиваем архив и разархивируем его.
- Кликаем по кнопке «Обзор» или «Выберите файл». Далее выбираем файл прошивки, он может иметь расширение «BIN» или «IMG» – если запутаетесь, то просто выбираем самый большой файл. Далее нажимаем «Загрузить».
- Во время прошивки не отключайте аппарат, и лучше пока им не пользоваться.
Нетгир Смарт Визард — это программное обеспечение, разработанное компанией Нетгир, которое позволяет упростить и ускорить процесс настройки роутера. С его помощью даже новички смогут без труда настроить свою домашнюю сеть и наслаждаться стабильным и безопасным интернет-соединением.
В данной статье мы расскажем о том, как правильно настроить роутер с использованием Нетгир Смарт Визард. Во-первых, у вас должно быть устройство с операционной системой Windows, Mac OS или Linux, а также доступ к интернету. Перед началом настройки убедитесь, что включен ваш роутер и вы подключены к его Wi-Fi сети с помощью устройства, с которого будете осуществлять настройку.
Шаг 1. Загрузите и установите Нетгир Смарт Визард на своё устройство. Для этого откройте ваш веб-браузер и перейдите по адресу «www.netgear.com/support/» в раздел «Поддержка». Найдите соответствующую модель своего роутера и скачайте программу Смарт Визард.
Шаг 2. После установки запустите программу. Она должна автоматически обнаружить ваш роутер и предложить начать процесс настройки. Если обнаружение не произошло автоматически, введите IP-адрес своего роутера вручную.
Шаг 3. Следуйте инструкциям, которые предлагает Смарт Визард. Вам будет необходимо выбрать желаемое имя и пароль для своей Wi-Fi сети, проверить настройки безопасности, а также настроить подключение интернет-провайдера (если требуется). Весь процесс настройки осуществляется с помощью удобного и интуитивно понятного интерфейса программы.
Шаг 4. После завершения настройки, Смарт Визард автоматически сохранит все изменения и перезагрузит роутер. Теперь ваш роутер готов к использованию, и вы можете подключить к нему все свои устройства и наслаждаться быстрым и стабильным интернет-соединением!
Используя Нетгир Смарт Визард, вы сможете настроить свой роутер всего в несколько простых шагов, даже если у вас нет технических навыков. Надеемся, что данная инструкция поможет вам успешно настроить ваш роутер и создать надежную домашнюю сеть.
Содержание
- Как настроить роутер Нетгир Смарт Визард: пошаговая инструкция
- Шаг 1: Подключение роутера к сети
- Шаг 2: Ввод начальных настроек для роутера
Как настроить роутер Нетгир Смарт Визард: пошаговая инструкция
- Подключите роутер к источнику питания и дождитесь, пока индикаторы питания и интернета не загорятся стабильно.
- Подключите компьютер к роутеру с помощью Ethernet-кабеля или подключитесь к Wi-Fi сети роутера.
- Откройте веб-браузер и введите адрес IP роутера в адресную строку (адрес IP можно найти на наклейке на самом роутере или в документации).
- В появившемся окне авторизации введите логин и пароль администратора (данный логин и пароль также могут быть указаны на наклейке или в документации). Часто используется комбинация «admin» в качестве логина и пароля.
- После успешной авторизации вы попадете в панель управления роутера. Здесь вы можете настроить различные параметры сети, такие как имя Wi-Fi сети (SSID) и пароль.
- Перейдите в раздел «Настройки Wi-Fi» и установите желаемое имя Wi-Fi сети (SSID). Затем задайте пароль для сети.
- Сохраните изменения и выйдите из панели управления роутера.
Поздравляем! Вы успешно настроили роутер Нетгир Смарт Визард. Теперь вы можете подключаться к новой Wi-Fi сети с использованием нового имени сети и пароля.
Шаг 1: Подключение роутера к сети
Перед началом настройки роутера Нетгир Смарт Визард необходимо его подключить к сети. Для этого следуйте инструкциям ниже:
- Найдите свободный порт на модеме или сетевом коммутаторе, к которому вы хотите подключить роутер.
- Возьмите один конец кабеля Ethernet и подключите его к выбранному порту на модеме или сетевом коммутаторе.
- Возьмите другой конец кабеля Ethernet и подключите его к порту WAN на задней панели роутера.
- Подключите роутер к источнику питания, используя прилагаемый адаптер переменного тока.
- Включите источник питания роутера.
Теперь роутер успешно подключен к сети и готов к дальнейшей настройке.
Шаг 2: Ввод начальных настроек для роутера
После подключения роутера к питанию и подключения к компьютеру при помощи Ethernet-кабеля, необходимо ввести начальные настройки для роутера.
Начните с открытия браузера на вашем компьютере и ввода адреса в строке адреса. В большинстве случаев адрес состоит из последовательности чисел, например, 192.168.0.1 или 192.168.1.1. Узнайте адрес для доступа к панели управления роутера в инструкции к вашему устройству или обратитесь к поставщику интернет-услуг.
После ввода адреса нажмите клавишу «Enter» на клавиатуре или щелкните по кнопке «Go». Это откроет страницу настройки роутера.
На открывшейся странице вам будет предложено ввести учетные данные для доступа к панели управления. Обычно, имя пользователя и пароль по умолчанию указываются в инструкции к роутеру или на самом устройстве. Введите эти данные в соответствующие поля и нажмите кнопку «Войти» или «Login».
После успешной авторизации вы будете перенаправлены на главную страницу панели управления роутера. Здесь вы можете изменить различные настройки роутера, такие как имя и пароль Wi-Fi сети, типы шифрования, настройки безопасности и другие.
Обязательно сохраните изменения после завершения настройки роутера.
If you want to configure your Netgear router, then this article will help you do this step by step. Basically, it configures your router for cable or broadband internet connection.
Steps to configure a router connection with Smart Wizard for cable internet:
Step 1: Connect the modem to the Internet Port of the router and the computer to the four LAN ports like in a given image.

Step 2: Switch off the router, broadband/cable modem and computer, and the on again. Now, wait till finish booting up.

Step 3: In the address bar of your web browser, enter the router’s IP address like http://192.168.1.1 or http://192.168.0.1 (use one of them) and press Enter to prompt to log into the router.

Step 4: Enter the username and password by default both are the admin in small letters (case-sensitive).

Step 5: Click Setup Wizard option and then select Yes and click Next.
Step 6: Click on the Next button. The router saves the settings.
Step 7: You can check Router Status under Maintenance if you are connected to the internet.
On the IP Address field, you can see, you’re a valid IP address. For additional troubleshooting, like see how do I get my connection back? Or lost connection to the internet, how to reset the password and much more you can call Netgear service number, that is listed on mycustomerservice directory.