In this tutorial, you will learn how to download and install Netcat on Windows 11/10 /Server.
Netcat is a network security tool that administrators can use for a variety of network operations, such as checking open ports, transferring data over a network connection, and security assessments.
Downloading Netcat for Windows
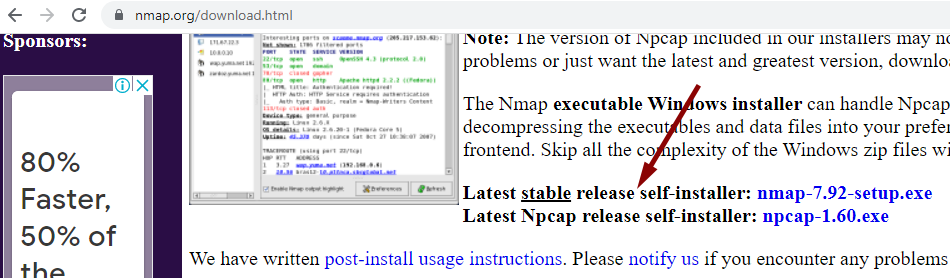
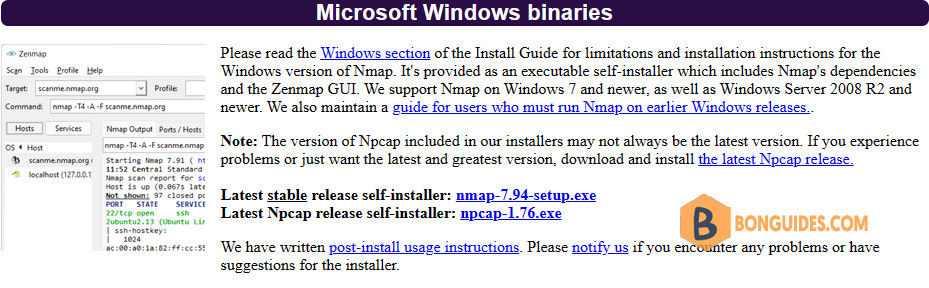
For Windows, you should install the Netcat (Ncat) package that comes with Nmap, which you can download from This link.
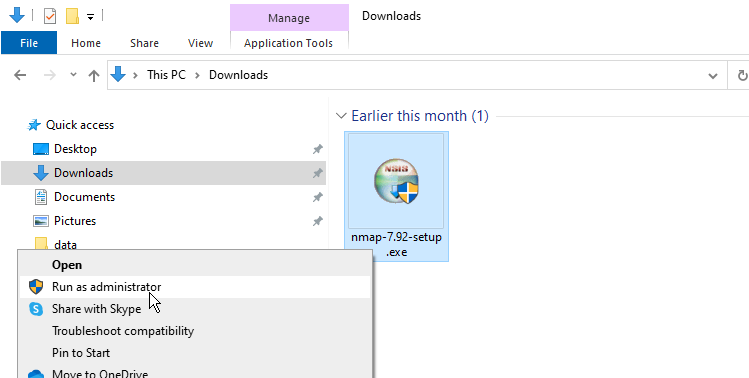
After the download is finished, right-click the setup and select Run as administrator to begin the installation.
When selecting components to install, choose all packages that come with the Nmap installer.
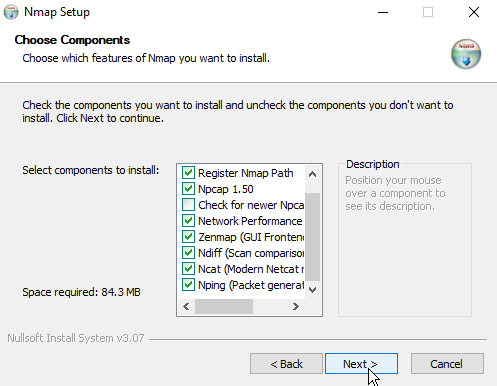
Before continuing, ensure that the Ncat and the Register Nmap Path options are selected, as shown in the above screenshot.
Ncat Command
The name of the Netcat command-line tool is called ncat, which you can run from either Windows Terminal, CMD, or PowerShell.
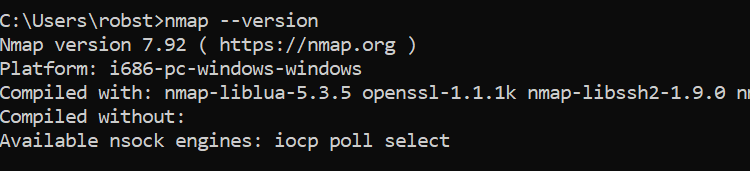
To check the Netcat version installed on your Windows PC, open a command prompt and execute the following command:
ncat --version
To display the help page, run the following command:
ncat -h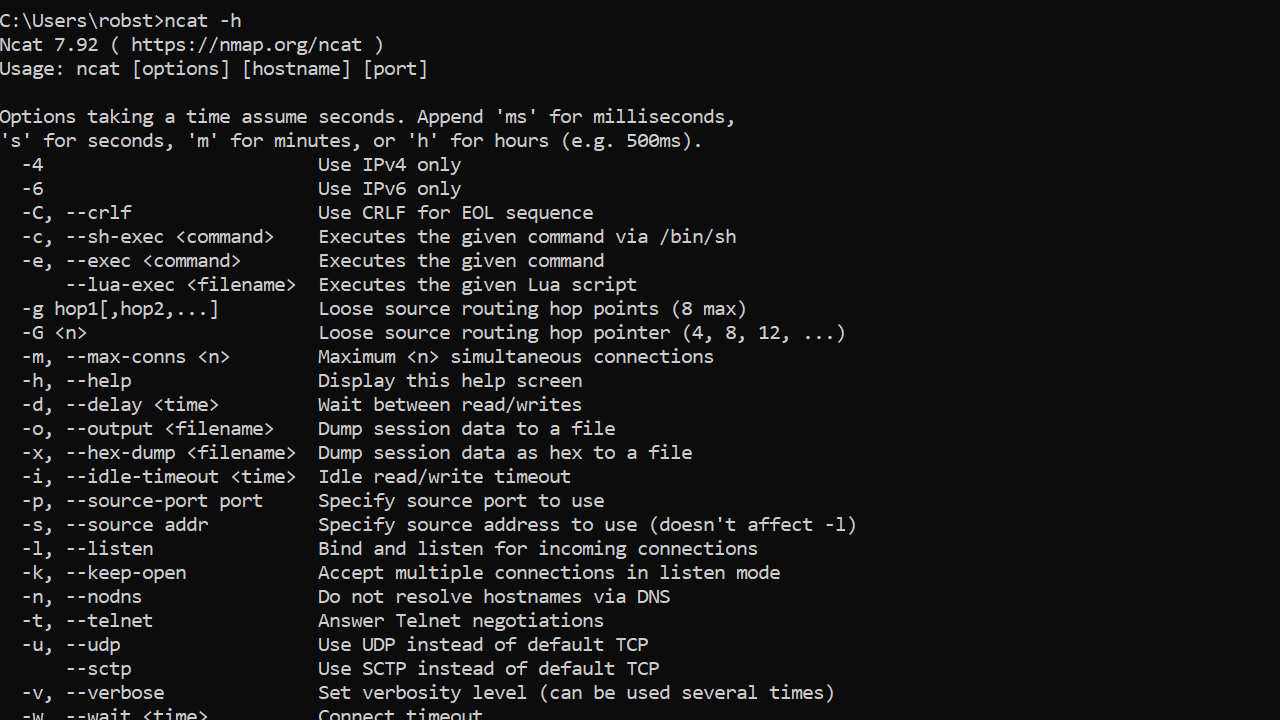
Apart from ncat, the nmap command also will be available from the command prompt.
And that’s it. Now you have a working installation of Netcat on your Windows computer. You can use this guide to install Netcat on Windows 10, 11, or Server.

Netcat is a utility used to write and read data across TCP and UDP network connections. You need to understand the capabilities of Netcat if you are responsible for network systems or system security. You can use Netcat Free Download as a:
- Port scanner
- A backdoor
- A port redirector
- A port listener
Though it is not the best tool in a town but of if I get stuck somewhere I would prefer to have Netcat with me on Windows 10, Windows 7 and Windows 8.
The Netcat is designed to be a reliable tool that can be used directly and also be driven easily by other programs and scripts. The device is a feature-rich network debugging and exploring tool as it can relate almost any connection that you would require including port binding to accept incoming connections
Netcat was released originally by Hobbit in 1995 but was not maintained despite being popular. Sometimes it even becomes hard to find a copy of the vl.10 source code. Moreover, the usefulness and flexibility of the Netcat tool triggered the Nmap project to produce Ncat that is a modern reimplementation that supports SSL, IPv6, socks and HTTP proxies, connection brokering and much more, others include the fantastic and versatile Socat, open BSD’s nc, Crypcat, netcat6, pnetcat, SBD and the GNU Netcat.
SEE ALSO: Snort Free Download – Top Network IDS/IPS Tool.
Netcat Features
Netcat comes with the following features:
- It is used for port scanning
- It is used for transferring files
- It has outbound or inbound connections that are used for TCP or UDP to or from any ports
- It comes with full DNS forward or reverses checking along with appropriate warnings
- It can use any local source port
- It can handle any locally configured network source address
- It comes with an in-built port scanning capability along with randomization
- It comes with an in-built loose course routing capability
- It can read the command line arguments from standard inputs
- It has a slow send mode that is one line every N seconds
- It has Hex dump of transmitted and received data
- It comes with an option in which you can let another program service to establish connections
- It comes with an optional telnet options responder
- It has a tunneling mode that permits the user with defined tunneling, for example, TCP or UDP with the possibility to specify all the network parameters (source interface or port, listening interface or port and also the remote host to allow to get connected to the tunnel).
SEE ALSO: Nmap Free Download.
Testing TCP and UDP Connections using Netcat
We all know today what Linux can do. Today Linux is known for its number of useful and mature command-line utilities. These utilities are available out of the way in most distributions. By using the built-in tools, skilled system administration can do much of the work without installing the additional software.
Now we shall discuss how the user can use the Netcat utility. As the Netcat tool offers excellent versatility, it is referred to as the army knife of networking tools. With the back assistance of this tool, the user can:
- Monitor
- Test
- Send data across the network connections
We shall be observing this on an Ubuntu 12.04 VPS, but Netcat must be there on any modern Linux distribution.
Netcat Syntax
The Netcat tool by default operates by initiating a TCP connection towards a remote host
The basic syntax is:
Netcat [options] host port
This command shall attempt to initiate a TCP to the particular host on the port number that is specified. These functions are similar to the old Linux “telnet” command. Do keep in your mind that your connection is encrypted entirely.
If you want to send instead of a TCP connection a UDP connection, then you can use the –u option. It is as followed:
Netcat –u host port
If you want to specify the range of ports you can do that by placing a dash between the first and the last:
Netcat host starport-endpoint
This is used with some particular flags
On many systems, you can use either Netcat or nc. These relay the same command.
SEE ALSO: Wireshark Free Download.
How to use Netcat to Scan for Open Ports
The best and most feature of Netcat is that it is used as a port scanner. Netcat can be used to perform simple port scans that can be used to identify open ports. Now, this can be done by specifying the range of ports that need to be scanned, as we did above along with the z option to perform a scan instead of attempting to initiate a connection. To scan ports up to 100, we need to issue the following command:
Netcat –z –v domain.com 1-1000
Here along with the –z option, we have specified the –v option as well so that the Netcat can provide us with more verbose information.
The output shall look like:
nc: connect to domain.com port 1 (tcp) failed: Connection refused
nc: connect to domain.com port 2 (tcp) failed: Connection refused
nc: connect to domain.com port 3 (tcp) failed: Connection refused
nc: connect to domain.com port 4 (tcp) failed: Connection refused
nc: connect to domain.com port 5 (tcp) failed: Connection refused
nc: connect to domain.com port 6 (tcp) failed: Connection refused
nc: connect to domain.com port 7 (tcp) failed: Connection refused
. . .
Connection to domain.com 22 port [tcp/ssh] succeeded!
. . .
Now, this shall provide you with a lot of information and will let me know whether the scan was successful or not. If you are using a domain name, then this is the type of form that you shall have to use.
If you know the IP address that is required, then the scan shall run faster. You can also use the –n flag to specify that you require resolving the IP address using DNS:
Netcat –z –n –v 198.52.100.0 1-1000.
The messages that are returned are sent actually to towards the standard error. To standard out, we can send the usual error messages that shall allow us to filter the results much more accessible. We can use 2>&1 bash syntax to redirect standard error to standard output.
The results shall be filtered, “grep.”
Netcat –z –n –v 198.51.100.0 1-1000 2>&1 grep succeeded
It shall have the following output:
Connection to 198.52.100.0 22 port [tcp/*] succeeded!
Over here we can see that the only port that is open in the range 1-1000 on the remote computer is the port 22 that is the traditional SSH port.
SEE ALSO: Download Cisco Packet Tracer 64-Bit Free.
We highlighted for you about Netcat Download for Windows tool that how it can be used to write and read database along with the TCP or UDP network connections. This is an excellent tool for whoever loves working with network switches and routers.
Netcat Download
Table of Contents
Netcat is a network security tool that administrators can use for a variety of network operations, such as checking open ports, transferring data over a network connection, and security assessments.
In this tutorial, we will show how to download and install Netcat on Windows 11/10 /Server.
Method 1: Install Netcat for Windows with Nmap
2️⃣ After the download is finished, right-click the setup and select Run as administrator then follow the installation wizard with default options.
3️⃣ Once done, open your Windows Terminal or CMD or PowerShell and run the ncat –version command to check the installed Netcat version:
PS C:\> ncat --version
Ncat: Version 7.80 ( https://nmap.org/ncat )
Method 2: Install Netcat using Package Manager
#Install using Windows Package Manager
winget install Insecure.Nmap

#Install using Chocolatey Package Manage
choco install nmap -y
Note
Note: Windows Package Manager is a native tool from Microsoft. But it works on new versions of Windows. If you stay on the old versions of Windows, the Chocolatey is the best option.
More information of the Nmap can be found using the below command.
PS C:\> winget show Insecure.Nmap

Found Nmap [Insecure.Nmap]
Version: 7.80
Publisher: Nmap Project
Publisher Url: https://nmap.org
Author: Nmap Project
Moniker: nmap
Homepage: https://nmap.org
License: Modified GNU GPLv2
License Url: https://nmap.org/book/man-legal.html
Privacy Url: https://insecure.org/privacy.html
Tags:
  network
  scan
  security
Installer:
  Installer Type: nullsoft
  Installer Url: https://nmap.org/dist/nmap-7.80-setup.exe
  Installer SHA256: 3b4d726bd366e7439367fa78a186dfa9b641d3b2ad354fd915581b6567480f94
For example, below is output when installing Nmap with Windows Package Manager:
PS C:\> winget install Insecure.Nmap

Found Nmap [Insecure.Nmap] Version 7.80
This application is licensed to you by its owner.
Microsoft is not responsible for, nor does it grant any licenses to, third-party packages.
Downloading https://nmap.org/dist/nmap-7.80-setup.exe
  ██████████████████████████████  25.6 MB / 25.6 MB
Successfully verified installer hash
Starting package install...
Successfully installed
How To Use Netcat Command
If you want to check the Netcat is really working or not. You can check if a port is opening on a remote or local machine. For example, we check the port 80 and 443 on a web server.
PS C:\> ncat -v -n 10.10.5.88 80
Ncat: Version 7.80 ( https://nmap.org/ncat )
Ncat: Connected to 10.10.5.88:80.

PS C:\> ncat -v -n 10.10.5.88 443
Ncat: Version 7.80 ( https://nmap.org/ncat )
Ncat: No connection could be made because the target machine actively refused it. .
Another example of Netcat. We’ll check if an UDP port is opened on a remote host. By default, Netcat checks the TCP only, show we need to -u to use UDP instead of TCP.
PS C:\> ncat -v -n -u 103.1xx0.2xx.2xx 5060

Ncat: Version 7.80 ( https://nmap.org/ncat )
Ncat: Connected to 103.1xx0.2xx.2xx:5060.
Netcat is a supper powerful tool for network admins. You can get more useful Netcat commands can be found in the help page using the command below:
PS C:\> ncat --help

Ncat 7.80 ( https://nmap.org/ncat )
Usage: ncat [options] [hostname] [port]

Options taking a time assume seconds. Append 'ms' for milliseconds,
's' for seconds, 'm' for minutes, or 'h' for hours (e.g. 500ms).
  -4                         Use IPv4 only
  -6                         Use IPv6 only
  -C, --crlf                 Use CRLF for EOL sequence
  -c, --sh-exec <command>    Executes the given command via /bin/sh
  -e, --exec <command>       Executes the given command
      --lua-exec <filename>  Executes the given Lua script
  -g hop1[,hop2,...]         Loose source routing hop points (8 max)
  -G <n>                     Loose source routing hop pointer (4, 8, 12, ...)
  -m, --max-conns <n>        Maximum <n> simultaneous connections
  -h, --help                 Display this help screen
  -d, --delay <time>         Wait between read/writes
  -o, --output <filename>    Dump session data to a file
  -x, --hex-dump <filename>  Dump session data as hex to a file
  -i, --idle-timeout <time>  Idle read/write timeout
  -p, --source-port port     Specify source port to use
  -s, --source addr          Specify source address to use (doesn't affect -l)
  -l, --listen               Bind and listen for incoming connections
  -k, --keep-open            Accept multiple connections in listen mode
  -n, --nodns                Do not resolve hostnames via DNS
  -t, --telnet               Answer Telnet negotiations
  -u, --udp                  Use UDP instead of default TCP
      --sctp                 Use SCTP instead of default TCP
  -v, --verbose              Set verbosity level (can be used several times)
  -w, --wait <time>          Connect timeout
  -z                         Zero-I/O mode, report connection status only
      --append-output        Append rather than clobber specified output files
      --send-only            Only send data, ignoring received; quit on EOF
      --recv-only            Only receive data, never send anything
      --no-shutdown          Continue half-duplex when receiving EOF on stdin
      --allow                Allow only given hosts to connect to Ncat
      --allowfile            A file of hosts allowed to connect to Ncat
      --deny                 Deny given hosts from connecting to Ncat
      --denyfile             A file of hosts denied from connecting to Ncat
      --broker               Enable Ncat's connection brokering mode
      --chat                 Start a simple Ncat chat server
      --proxy <addr[:port]>  Specify address of host to proxy through
      --proxy-type <type>    Specify proxy type ("http", "socks4", "socks5")
      --proxy-auth <auth>    Authenticate with HTTP or SOCKS proxy server
      --proxy-dns <type>     Specify where to resolve proxy destination
      --ssl                  Connect or listen with SSL
      --ssl-cert             Specify SSL certificate file (PEM) for listening
      --ssl-key              Specify SSL private key (PEM) for listening
      --ssl-verify           Verify trust and domain name of certificates
      --ssl-trustfile        PEM file containing trusted SSL certificates
      --ssl-ciphers          Cipherlist containing SSL ciphers to use
      --ssl-alpn             ALPN protocol list to use.
      --version              Display Ncat's version information and exit

See the ncat(1) manpage for full options, descriptions and usage examples
Not a reader? Watch this related video tutorial:
Что такое Netcat
Ncat — популярный инструмент для диагностики сети. С некоторых пор он стал частью более крупного пакета утилит под названием Nmap, доступного для всех основных операционных систем. В данной статье будет рассмотрена установка на примере Windows и Linux.
Установка netcat в Windows
Чтобы установить nmap (и ncat как часть nmap), выполните следующие действия:
- Войдите на свой сервер с правами администратора;
- Загрузите файл-установщик и запустите его. Примите лицензионное соглашение;

- Отметьте «галочкой» инструмент Ncat. Вы также можете запланировать установку и других утилит, если они вам нужны. Затем выберите место установки, нажмите «Установить» и немного подождите;


- Запустите терминал cmd и проверьте версию ncat;
ncat -v

Пример работы утилиты
Чтобы убедиться, что ncat действительно работает, откройте два окна терминала.
- В первом окне запустите:
ncat -l <любой_порт>
Во втором окне одновременно запустите:
ncat -C localhost <выбранный_порт>
- Теперь можно сымитировать работу чата между двумя окнами:

Установка nmap в ОС Linux
Процесс установки в Linux (например, Ubuntu 20.04) очень прост, достаточно выполнить следующую инструкцию:
- Авторизуйтесь как привилегированный пользователь и дайте команду на установку пакета из публично доступного репозитория;
apt-get update; apt install -y netcat

Для проверки работы можно воспользоваться примером, описанным в варианте установки для Windows — откройте два окна терминала и выполните следующие команды:
 nc -l # в одном окне, проверяем "режим сервера"

nc -C # в другой сессии, чтобы проверить "режим клиента"

Вывод
В этой статье я объяснил, как установить утилиту netcat в Windows 2022 Server и Ubuntu 20.04 LTS.
Аverage rating : 5
Оценок: 1
191028
Санкт-Петербург
Литейный пр., д. 26, Лит. А
+7 (812) 403-06-99
![]()
700
300
ООО «ИТГЛОБАЛКОМ ЛАБС»
191028
Санкт-Петербург
Литейный пр., д. 26, Лит. А
+7 (812) 403-06-99
![]()
700
300
ООО «ИТГЛОБАЛКОМ ЛАБС»
![]()
700
300
Netcat command is often referred to as the Swiss Army Knife of network tools and can help you monitor, test, and send information over network connections. This article will teach you How to Download and Install Netcat on Windows PCs. If you intend to Windows VPS servers, you can check the packages offered on our website.
Table of Contents
Introduction to Netcat
Netcat is a command-line utility that reads and writes data over network connections using the TCP or UDP protocols. It is built as a secure back-end tool and is available for Linux, macOS, Windows, and BSD. You can use Netcat to debug and monitor network connections, scan open ports, transfer data over the network connections, and security assessments. This utility allows you to send files from a client to a server and back directly with other programs and scripts.
Downloading Netcat on Windows
In this step, you will learn how to download Netcat on your Windows. To do this, follow the steps below.
You need to download the Netcat package that comes with Nmap. So first, navigate to the Nmap official website and go to the Downloads >> Windows path:
Now choose the latest stable release self-installer and click on nmap-7.93-setup.exe to start the download:
Wait for the download to complete.
Now go to the Downloads folder and right-click on the downloaded file. Then click on Run as administrator.
The following screen will appear which allows you to choose components to install. You should choose all the components that come with the Nmap installer and especially choose the Ncat and Register Nmap Path. After making your selection, click Next:
Now click on Browse and choose your install location. Once you make your selection, click on Install:
In this step, open your Windows Terminal or CMD or PowerShell and run the following command to check the installed Netcat version:
ncat -vDisplay the help page using the command below:
ncat -hIf you want to check the Netcat is really working or not, open two terminal windows and run the command below on the first window:
ncat -l <any-port>And run the following command on the second window:
ncat -C localhost <choosen-port>Lastly, you will see you can chat between the windows.
That’s it!
Conclusion
In this article, we introduced you to Netcat and taught you how to download and install it on Windows PCs. I hope this tutorial was useful for you and helps you to install Netcat on Windows PCs. If you encounter any problem while downloading or installing Netcat, you can contact us in the comments section.