В данной статье показаны действия, с помощью которых можно отключить или включить индексирование поиска (службу поиска Windows Search) в операционной системе Windows.
По умолчанию Windows использует индекс при поиске, чтобы ускорить результаты поиска. Индекс поиска выполняет индексирование контента, кэширование свойств и результатов поиска для файлов, электронной почты и другого контента.
Индекс использует службу поиска Windows Search и выполняется в фоновом режиме как процесс SearchIndexer.exe. Индекс автоматически перестраивается и обновляется при изменении, внесенных с момента последнего перестроения индекса, чтобы повысить точность результатов поиска.
Если вы предпочитаете выполнять поиск без использования индекса, можно полностью отключить индексирование поиска (службу поиска Windows Search). Если отключить индексацию поиска, то поиск займет немного больше времени, но результаты поиска всегда будут актуальными и точными.
- Чтобы отключить или включить индексирование поиска (службу поиска Windows Search), необходимо войти в систему с правами администратора
- Если отключить индексирование поиска, пользователи больше не смогут выполнять поиск в библиотеках.
- Функция Временная шкала (Timeline) требует, чтобы служба поиска Windows была включена, запущена и настроена на автоматический (отложенный запуск).
Содержание
- Как отключить индексирование
- Включение индексирования поиска
- Управление через командную строку
Как отключить индексирование
Чтобы отключить индексирование поиска (службу поиска Windows Search), откройте консоль «Службы», для этого нажмите сочетание клавиш ![]() + R, в открывшемся окне Выполнить введите services.msc и нажмите клавишу Enter↵.
+ R, в открывшемся окне Выполнить введите services.msc и нажмите клавишу Enter↵.

В окне Службы дважды щёлкните левой кнопкой мыши службу Windows Search.

В открывшемся окне Свойства: Windows Search (локальный компьютер) остановите службу нажав кнопку Остановить.

Затем в выпадающем списке Тип запуска: выберите пункт Отключена и нажмите кнопку OK.

Включение индексирования поиска
Чтобы включить индексирование поиска (службу поиска Windows Search), откройте консоль «Службы», для этого нажмите сочетание клавиш ![]() + R, в открывшемся окне Выполнить введите services.msc и нажмите клавишу Enter↵.
+ R, в открывшемся окне Выполнить введите services.msc и нажмите клавишу Enter↵.

В окне Службы дважды щёлкните левой кнопкой мыши службу Windows Search.

В открывшемся окне Свойства: Windows Search (локальный компьютер) в выпадающем списке Тип запуска: выберите пункт Автоматически (отложенный запуск) и нажмите кнопку Применить.

Затем запустите службу нажав кнопку Запустить.

Управление через командную строку
Также отключить или включить индексирование поиска (службу поиска Windows Search) можно используя командную строку.
Чтобы отключить индексирование поиска (службу поиска Windows Search), запустите командную строку от имени администратора и выполните следующую команду:
sc stop «wsearch» && sc config «wsearch» start=disabled

Чтобы включить индексирование поиска (службу поиска Windows Search), запустите командную строку от имени администратора и выполните следующую команду:
sc config «wsearch» start=delayed-auto && sc start «wsearch»

Команда «net stop windows search» – это встроенная команда операционной системы Windows, которая используется для остановки службы индексации Windows. С помощью этой команды вы можете временно отключить поиск файлов и папок на вашем компьютере, чтобы освободить системные ресурсы или выполнить определенные операции без вмешательства поискового сервиса.
Служба индексации Windows отвечает за создание и поддержание индексов файлов и папок на вашем компьютере, чтобы ускорить процесс поиска и обращения к ним. Однако, иногда может возникнуть необходимость временно отключить эту службу, например, при выполнении сложных задач, требующих большого объема системных ресурсов.
Чтобы использовать команду «net stop windows search», вам нужно открыть командную строку с правами администратора. Для этого нажмите правой кнопкой мыши на кнопку «Пуск» и выберите «Командная строка (администратор)». После открытия командной строки введите команду «net stop windows search» и нажмите клавишу Enter. Система выполнит команду и остановит службу индексации Windows. При необходимости включить службу снова, используйте команду «net start windows search».
Важно отметить, что при остановке службы индексации Windows поиск файлов и папок на вашем компьютере станет недоступен. Будьте осторожны и убедитесь, что вы выполняете данную команду только в случаях, когда это действительно необходимо, и вы осознаете последствия.
Команда «net stop windows search» полезна во многих ситуациях, например, при выполнении сложных вычислений или обработки больших объемов данных, когда каждый процент системных ресурсов важен. Она также может быть использована для временного отключения поиска, если вы не пользуетесь им или хотите избежать дополнительной нагрузки на процессор и диск.
Содержание
- Назначение команды «net stop windows search»
- Практические применения
- Подготовка к использованию
- Особенности работы команды
- Как отменить работу команды
Назначение команды «net stop windows search»
Несмотря на то, что Windows Search является полезным инструментом, иногда возникают ситуации, когда вы хотите временно выключить его работу. Это может быть полезно, например, при выполнении определенных операций с файловой системой или чтобы снизить нагрузку на систему, если процесс индексации требует больших ресурсов компьютера.
Команда «net stop windows search» выполняет остановку службы индексации, что приводит к приостановке процесса индексации файлов. После этого вы можете выполнить необходимые операции и затем, при желании, снова запустить службу индексации с помощью команды «net start windows search».
Однако стоит учитывать, что приостановка работы службы индексации может замедлить поиск файлов на вашем компьютере до тех пор, пока служба не будет включена заново. Поэтому рекомендуется использовать эту команду только в случаях, когда она действительно необходима и вы осознаете возможные последствия.
Практические применения
Команда «net stop windows search» имеет несколько практических применений:
- Отключение службы поиска Windows: выполнение этой команды приведет к остановке службы поиска, что может быть полезно в определенных ситуациях, например, при необходимости сэкономить системные ресурсы или при решении проблем, связанных с поиском.
- Ускорение работы компьютера: отключение службы поиска может уменьшить нагрузку на систему и повысить производительность компьютера, особенно если поиск не используется часто или вообще не требуется.
- Решение проблем с поиском: если поиск в операционной системе работает некорректно или вызывает проблемы, попытка временно отключить службу поиска с помощью команды «net stop windows search» может помочь найти и исправить ошибки.
Важно помнить, что после выполнения команды «net stop windows search» служба поиска остановится, и чтобы включить ее снова, необходимо использовать команду «net start windows search».
Подготовка к использованию
Перед использованием команды «net stop windows search» следует убедиться, что у вас есть права администратора на компьютере. Это особенно важно, поскольку выполнение данной команды требует повышенных привилегий.
Прежде чем приступить к использованию команды, вам необходимо открыть командную строку Windows. Для этого можно воспользоваться одним из следующих способов:
| 1. | Нажмите клавиши Windows + R одновременно. В появившемся окне «Выполнить» введите команду cmd и нажмите клавишу Enter. |
| 2. | Нажмите правой кнопкой мыши на кнопке «Пуск» в левом нижнем углу экрана. В контекстном меню выберите пункт «Командная строка (администратор)». |
После того как командная строка будет открыта, вы можете вводить команду «net stop windows search» для остановки службы Windows Search. После нажатия клавиши Enter, система выполнит указанную команду и служба будет остановлена.
Особенности работы команды
Команда «net stop windows search» используется для остановки службы индексации Windows Search. Она позволяет временно приостановить работу поиска файлов и папок на компьютере.
Важно учитывать, что данная команда требует прав администратора для выполнения. Поэтому перед использованием команды необходимо убедиться, что у вас есть соответствующие привилегии.
После выполнения команды «net stop windows search» служба индексации будет остановлена. Это может быть полезным, если вы заметили, что процесс индексации слишком нагружает систему или вызывает другие проблемы. Остановка службы позволит вам временно освободить ресурсы компьютера и устранить возможные проблемы.
Однако стоит учесть, что при остановке службы индексации Windows Search вы не сможете выполнять поиск файлов и папок на компьютере. Вместо этого вам придется использовать альтернативные методы поиска, такие как поиск вручную или использование специализированных программ.
После выполнения необходимых действий, связанных с устранением проблем или оптимизацией системы, вы можете снова запустить службу индексации с помощью команды «net start windows search». Это позволит вам использовать поиск файлов и папок, как обычно.
Важно: При использовании команды «net stop windows search» будьте внимательны и убедитесь, что понимаете последствия ее выполнения. Неправильное использование данной команды может привести к нежелательным результатам и проблемам с функциональностью операционной системы.
Как отменить работу команды
Для отмены работы команды «net stop windows search» необходимо выполнить команду «net start windows search». Эта команда запускает службу Windows Search, если она была приостановлена с помощью предыдущей команды.
Чтобы выполнить команду «net start windows search», откройте командную строку, нажав Win + R на клавиатуре, введите «cmd» в поле «Выполнить» и нажмите Enter. В командной строке введите «net start windows search» и нажмите Enter. Служба Windows Search будет запущена.
После выполнения команды «net start windows search» поиск на вашем компьютере снова будет доступен.
Windows Search is a great feature that helps you avoid having to go through all the path directories to access a file or a folder.
However, you may have to disable this feature in some scenarios. For instance, you may want to restrict user access to search if you want to create a limited environment domain.
Many search features are also redundant and you may want to disable those instead of the search application altogether.
So, we have created this article to help you enable/disable Windows Search or its specific features.
Table of Contents
There are mainly two ways to enable or disable Windows Search. They actually have different outcomes, so read carefully and pick one according to your need.
Change Search Service Behavior
The most convenient method to enable or disable Windows Search is by changing its service configuration. The Windows Search service handles indexing, caching, and search results for files, e-mail, etc.
So, disabling this service turns off indexing altogether. However, keep in mind that you can still use the search app. It can’t find your files and folders unless you enter the exact name or the initial part of the name. But you can still use the Start menu to search for apps and web results.
Regardless, here are some of the ways to disable your search service:
Through Services App
The Services app is the default program you can use to change the configuration of your system services, including the Windows Search service.
Here’s how you can enable/disable Windows Search Service:
- Open Run by pressing Win + R.
- Type
services.mscand press Enter to open the Services app. - Look for Windows Search and double-click on it.
- To Disable Search, set the Startup type to Disabled and click Stop.

- To Enable Search, set the Startup type to Automatic (Delayed Start) and click Start.
- Click on Apply and OK.

Using Command Prompt
Another easy way to enable or disable the Windows Search service is by using the Command Prompt. You only need a single command in both cases, so copying and pasting the command is more convenient.
Here’s what you need to do:
- Open Run.
- Type
cmdand press Ctrl + Shift + Enter to open the Elevated Command Prompt. - Enter the following commands depending on whether you want to disable or enable Search:
- Disable:
sc config "wsearch" start=disabled && sc stop "wsearch" - Enable:
sc config "wsearch" start=delayed-auto && sc start "wsearch"
- Disable:

With Registry Editor
You can also modify the service’s settings by changing its configuration in your registry settings. In fact, all the above methods change the values in the relevant registry entries and your system directly looks at these entries to check the service configuration.
To use the Registry Editor to change such entries,
- Open Run and enter
regeditto open the Registry Editor. - Navigate to
Computer\HKEY_LOCAL_MACHINE\SYSTEM\CurrentControlSet\Services\WSearch\ - To disable Windows Search, change the value of Start to 4. And, to enable Windows Search, change the value of Start to 2 and DelayedAutoStart to 1.
- You need to double-click on the entry, change the Value data and click OK to change its value.


Restart your PC after changing the values for your system to apply the changes.
Rename Search Folder
Renaming the system folders and files used in the search feature is a great way to disable the feature from your File Explorer as well as the Start menu. Here, renaming is the same as deleting the files while creating backups. It effectively stops your system from using such files altogether, making search impossible unless you change the folder back to their default names.
However, this method requires you to change the permission settings for the folders and files. So we recommend you create a restore point beforehand to account for any issues due to improper permissions.
The complete method is as follows:
- Open Run and enter
%WinDir%\SystemApps - Click on Microsoft.Windows.Search_cw5n1h2txyewy and press F2 to rename it. You can set its name to anything you want, but we recommend just appending
.bakor.oldto make renaming it again easier. - Open this folder, select
SearchApp.exe, and press Alt + Enter to open its Properties. - Go to its Security tab and check whether any users other than TrustedInstaller allow Full Control.
- If Users, Administrators (if your account is an admin) or your current user has such permission, you can directly rename the file.
- Otherwise, click on Advanced.
- Select Change under Owner.

- Click on Advanced and on the next page, Find Now.
- Select your current user from the list and click OK. Selecting any other users is not recommended. Click OK again to change the owner.
- Keep on clicking OK until you close the Properties.
- Open the
SearchApp.exeProperties and go to Security > Advanced. - Click on Add and then, Select a principal.

- Perform steps 7-9 to select your current user as a principal.
- Set Type to Allow and tick Full Control.
- Keep on Pressing OK till you close Properties while applying the changes.
- Rename
SearchApp.exein a similar manner to its parent folder. For example,SearchApp.exe.old. - Now, go inside the
%WinDir%\SystemApps\MicrosoftWindows.Client.CBS_cw5n1h2txyewyfolder. - Look for
SearchHost.exeand perform steps 3-16 for this file too. - If the SystemApps folder contains Microsoft.Windows.Cortana_cw5n1h2txyewy folder, you also need to change the name of the folder and the executable file inside this folder as well.


You need to restart your Windows Explorer to apply the changes. To do so,
- Press Ctrl + Shift + Esc to open the Task Manager.
- Go to the Details tab.
- Select
explorer.exeand click End Task. Confirm with End process.
- Click on File > Run new task from the menu and enter explorer.

If a window with the name, Search, keeps popping up and closing continuously, you need to restart Windows Explorer again.
Through Group Policy Management Editor
This method is a safer alternative to renaming the search files and folders. However, you can only use it by creating a Software Restriction Group Policy Object for a domain. Here’s how you can do so:
- Open the Group Policy Management Editor.
- Go to Computer Configuration > Policies > Windows Settings > Security Settings > Software Restriction Policies > Additional Rules.
- If Software Restriction Policies does not expand to Additional Rules, right-click on it and select New Software Restriction Policy.
- Right-click on Additional Rules and select New Path Rule.

- Enter the following paths on the Path text box, set the Security level to Disallowed, and click OK:
%WinDir%\SystemApps\Microsoft.Windows.Search_cw5n1h2txyewy%WinDir%\SystemApps\Microsoft.Windows.Cortana_cw5n1h2txyewy(if the folder exists)%WinDir%\SystemApps\MicrosoftWindows.Client.CBS_cw5n1h2txyewy\SearchHost.exe

How to Enable/Disable Windows Search Web Results
Showing web results in Windows Search does not have many advantages. In fact, many users unknowingly open the web result when they actually want to run an app or any file in their local drive.
So, if you want to disable this feature, you can do so easily using the steps below:
- Open Run and enter
regedit. - Navigate to
Computer\HKEY_CURRENT_USER\SOFTWARE\Policies\Microsoft\Windows - Right-click on Windows and select New > Key.

- Name it as
Explorer. - Right-click on Explorer and select New > DWORD (32-bit) Value.
- Set its name to DisableSearchBoxSuggestions and double-click on it to change its value.
- Change the Value data to 1 to disable web results and click OK.
- If you want to enable it, you can change its value to 0.


Restart Windows Explorer (see above) to apply the changes.
How to Enable/Disable Search Highlights
Another possible search feature you might want to delete is the search highlights. It distracts you from your work and many users prefer customizing the start or search menu to their liking instead of automatically getting highlights based on Bing searches.
You can use the methods we have mentioned below to enable or disable this feature. Some of the methods overwrite other methods, so we recommend performing all of them.
Change Search Settings
The usual way to enable or disable search highlights is through the search permission Settings. The methods differ between Windows 10 and 11, so we have included both of them
On Windows 11
- Open Run and Enter
ms-settings:search-permissions. - Scroll down to Show search highlights and set its switch to On/Off per your need.


On Windows 10
- Right-click on the taskbar or the search bar.
- Click on Search and select Show search highlights to toggle this option.
Using Group Policy Editor
You can also change the group policy settings to enable or disable search highlights. This option overrides the settings so make sure to check it as well.
- Open Run and enter
gpedit.msc. - Go to Computer Configuration > Administrative Templates > Windows Components > Search.
- Double-click on Allow search highlights.

- Check Disabled or Enabled according to your preference and click OK.

Through Registry Editor
Another way you can change this setting is by modifying the relevant registry entry. Here’s how you can do so:
- Open Run and enter
regedit. - Navigate to
Computer\HKEY_CURRENT_USER\Software\Microsoft\Windows\CurrentVersion\SearchSettings - If IsDynamicSearchBoxEnabled exists, double-click on it to edit its value.

- If not, right-click on SearchSettings and select New > DWORD (32-bit) Value. Set its name to
IsDynamicSearchBoxEnabledand double-click on it. - Set the Value data to 0 to disable and 1 to enable the feature and click OK.

Related Questions
How to Hide and Unhide Search Icon on Windows
If you have disabled Windows Search, you might as well hide its icon to save space on the Taskbar. Here’s how you can do so:
On Windows 11
- Open Run and Enter
ms-settings:taskbar. - Click on the switch next to Search to hide or show its icon.

On Windows 10
- Right-click on the taskbar or the search bar.
- Click on Search and select Show search box to toggle the option.
How to Enable/Disable Win + S Search Shortcut?
Here’s how you can enable or disable the Win + S shortcut for Search. However, keep in mind that it also disables other hotkeys that include Win + S, such as Win + Shift + S for the snipping tool.
To enable or disable this shortcut:
- Open Run and enter
regedit. Computer\HKEY_CURRENT_USER\Software\Microsoft\Windows\CurrentVersion\Explorer\Advanced- Right-click on Advanced and select New > String Value.
- Set its name to
DisabledHotkeysand double-click on it. - Change the value data to
Sand click OK.
You don’t need to create this value if it already exists. You can also add S to any other keys already present in the value by separating them with a comma.
This post shows students and new users steps to turn On or Off Windows Search Indexing in Windows 11. Windows has a built-in search feature that allows you to search for documents from a particular folder or the entire PC.
Windows indexes those content on the local computer to return faster results when users search for files, emails, or other local content. There are two indexing options in Windows 11: Classic and Enhanced indexing options.
The Classic indexing option will index content in the user profile folders, including Documents, Pictures, Music, and the Desktop.
Users can add additional locations using the Classic indexing option to include additional content.
By default, the Enhanced indexing option indexes the user computer’s entire contents, all hard drives, and partitions, including your libraries and desktop. The indexer uses the Windows Search service and runs the Searchindexer.exe process in the background.
How to turn off Windows Search indexing in Windows 11
As mentioned above, Windows Search indexes content on the user’s computer to provide faster and improved results. A search indexer is a service that runs in the background.
You can search Windows without using its indexer. However, you may not get faster or enhanced results if the Windows indexer is turned off.
Below is how to turn off or disable Windows Search indexer in Windows 11.
First, open the Services console, then locate the Windows Search service. On the Windows Search service name, double–click it to open.

Click the Stop button on the Windows Search Properties window to stop the service.

Select Disabled in the Startup type drop menu, and click on Apply.

You can close out the Services console.
When you stop the Windows Search service, it will also stop Windows Search indexing. As you can see in the image below, the Indexing status should indicate the service is Not running.

How to enable Windows Search indexing in Windows 11
If Windows Search indexing is disabled, reverse the steps above to re-enable it. Open the Services console, then locate the Windows Search service, and double-click to open.
Select Automatic (Delayed Start) for the Startup type drop-down menu on the Windows Search Properties window, then click the Apply button.

Also, click the Start button to start the Windows Search service immediately.

Windows Search Indexing should be re-enabled.
How to enable or disable Windows Search from the command prompt
The same steps above can be done using the Command Prompt.
To do that, open the Command Prompt as administrator.
Run the commands below to enable Windows Search Indexing.
sc config "wsearch" start=delayed-auto && sc start "wsearch"
To turn it off, run the commands below.
sc stop "wsearch" && sc config "wsearch" start=disabled
That should do it!
Conclusion:
This post showed you how to turn Windows Search Indexing on or off in Windows 11. Please use the comment form below if you find any errors above or have something to add.

If your Windows 10 PC is running slow and you find that the hard drive is working at or near 100 percent, here are some steps you can take to fix the issue.
Sometimes your Windows 10 system will slow to a crawl even though you have a powerful CPU, plenty of RAM, and just a couple of apps running. While many factors can cause this, one is that the hard drive is working at or near 100 percent. It doesn’t have the spare cycles to perform routine OS tasks. This results in everything slowing down. A simple reboot, which often solves many OS issues, won’t fix an over-worked drive. Here are some of the things you can do to fix the disk usage problem in Windows 10.
When you’re trying to figure out what’s causing the slowdown, you might have noticed that the Disk usage is 100% in Task Manager.
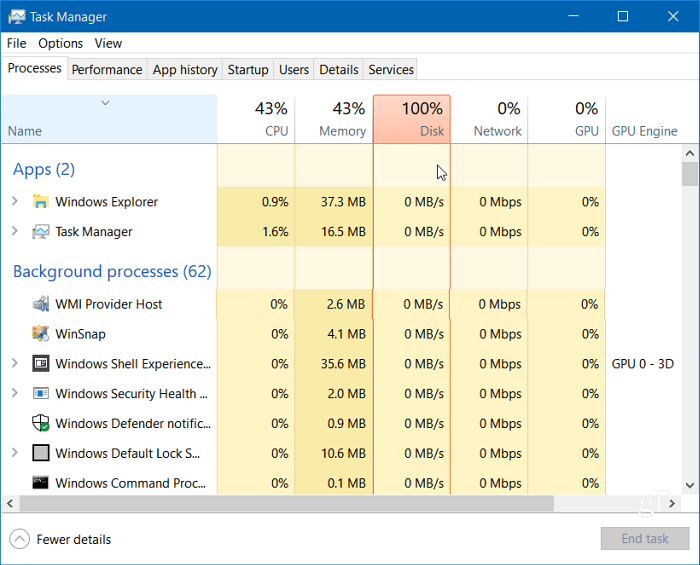
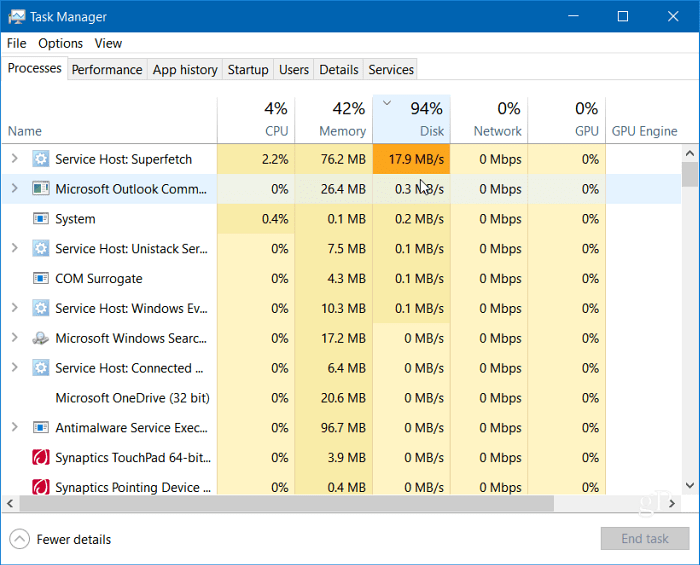
One of the easiest ways to find the culprit is to click the Disk column in Task Manager, so the items taking up more resources display in descending order. Like in this example shown below, you can see SuperFetch is likely the culprit.
Disable Windows Search
The Windows Search feature always indexes all files on your drive and is meant to make finding files on your PC faster. However, it can cause an issue where the disk is being overworked.
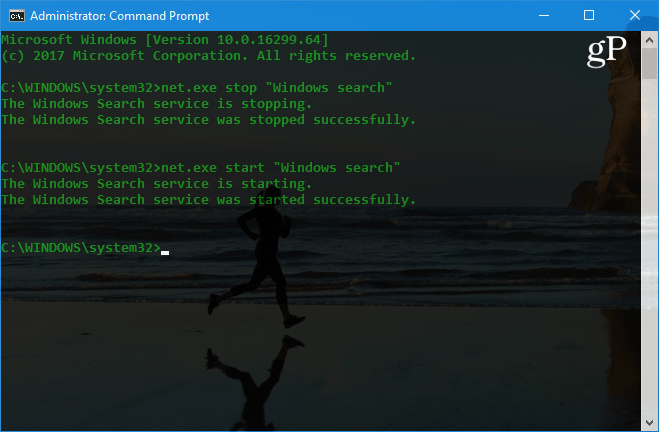
Hit the Windows Key and type: cmd and right-click Command Prompt from the result at the top and click Run as Administrator.

Then in the Command Prompt type: net.exe stop “Windows search” and hit Enter. After that, check Task Manager to see where the disk usage is at. If there is no change, you can restart it from the command line, type: net.exe start “Windows search” and hit Enter.
The good is turning off Windows Search is just temporary, and you can see if performance improves. If this fixes the issue, you can turn it off permanently. Hit the keyboard shortcut Windows key + R and type: services.msc and click OK or hit Enter.
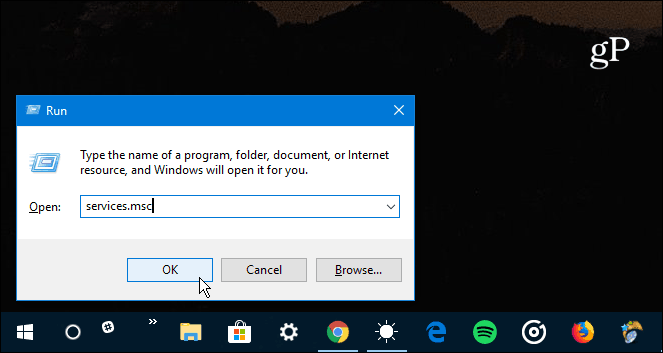
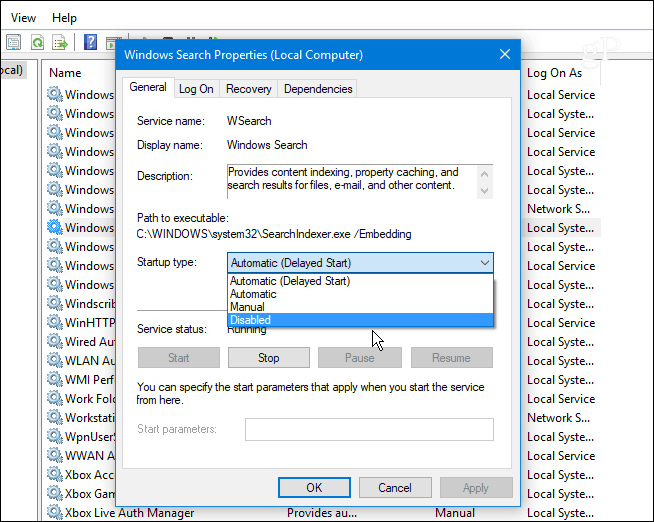
Scroll down the list of services and double-click Windows Search, and under the General tab, set the “Startup type” to Disabled and click OK and close out of services.
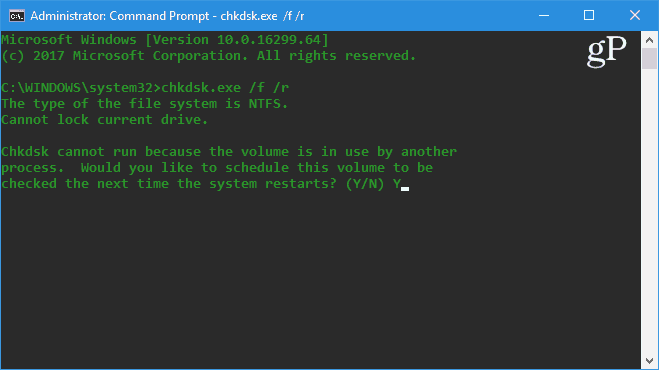
Run a Disk Check
Windows has a built-in tool that will scan your drive for errors and attempt to correct them. Open the Command Prompt as Admin and type: chkdsk.exe /f /r and hit Enter. Then on the next prompt type: Y and hit Enter.
For more detailed information on the many ways to run and use this utility, check out our article on how to prevent issues and fix errors with Disk Check in Windows 10.
Disable the SuperFetch Feature
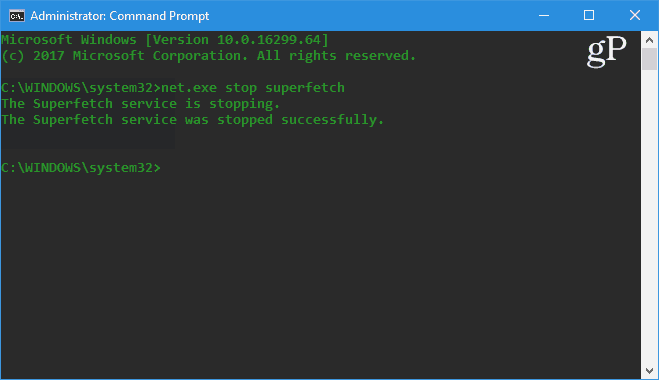
SuperFetch is a feature that helps decrease boot time by making apps load more efficiently. However, it can cause problems with your drive. To disable it, launch the Command Prompt as Admin and type: net.exe stop superfetch and hit Enter. Give it a few minutes and see if that improves the disk usage percentage in Task Manager.
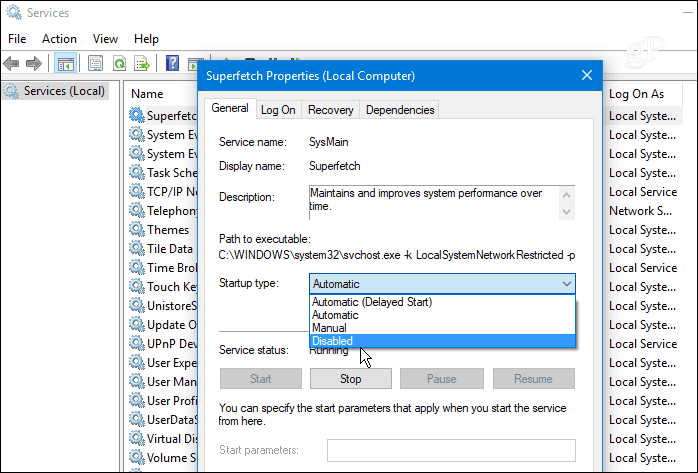
If this fixes it, you can permanently disable it, just like you can with Window Search (shown above), by heading to services.msc and disable the Windows SuperFetch feature.
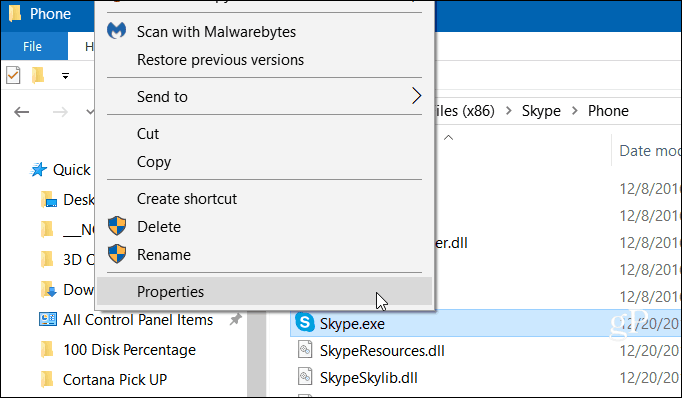
Fix Chrome or Skype
A couple of other programs that have often been reported as causing the 100 percent disk issue are Skype and Chrome. If you find that Skype is causing a problem, close out of it completely. Then head to C:\Program Files (x86)\Skype\Phone and right-click on Skype.exe and select Properties.
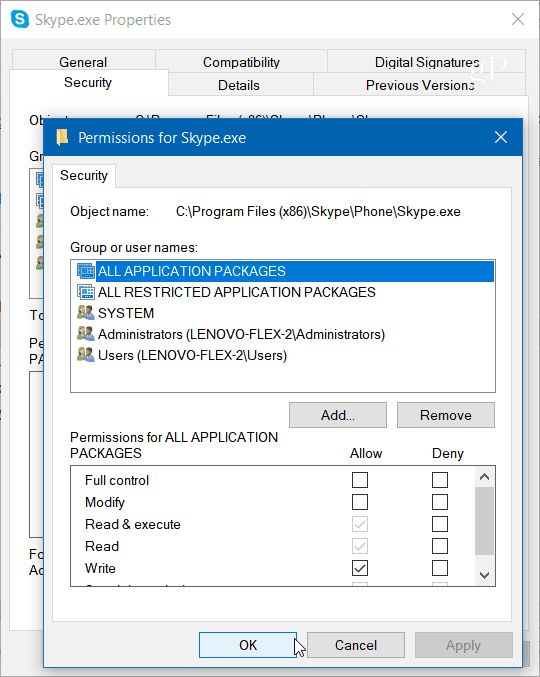
Head to the Security tab and click the Edit button. Make sure All Application Packages are highlighted and check Allow for Write Permissions and click OK.
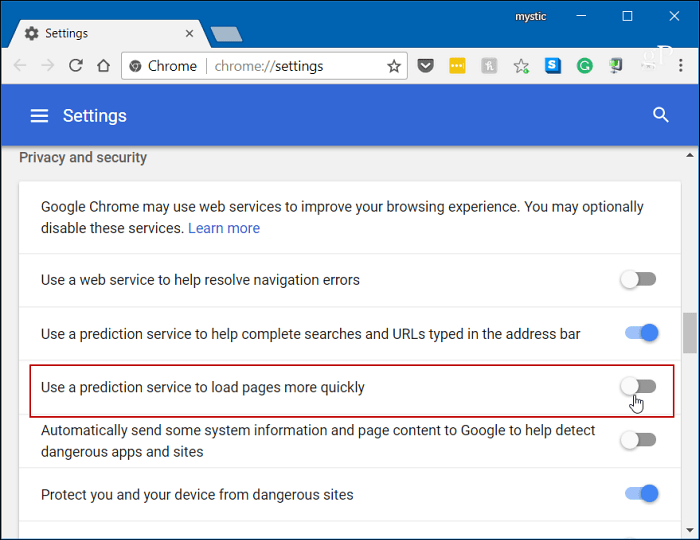
For Chrome, the most common issue is it uses too many resources with its prediction service to load pages faster. To disable it, head to Advanced Settings, and under the Privacy and Security section, turn off “Use a prediction service to load pages more quickly” and restart the browser.
Wrapping Up
Usually, one of the options above will fix an over-worked hard drive, but not always. If you’re running an antivirus suite like Norton or Kaspersky. Ensure your computer is offline, and then temporarily disable the antivirus software to see if things improve. If so, contact the company’s customer service. Also, make sure all device drivers are up-to-date, and another place to look is Virtual Memory. If you have made changes to it in the past, go back and reset it to default settings.
Have you experienced this problem on your Windows PC? Let us know the steps you took to fix it. And for more tips, tricks, and troubleshooting advice, check out our Windows 10 Forums.
![]()