На чтение 4 мин. Просмотров 3.4k. Опубликовано
Вы обновились до Windows 8.1 или Windows 10, и ваша кнопка выключения пропала? Что ж, в Windows 8.1, Windows 10 есть функция, которую вы можете попробовать, чтобы вернуть кнопку выключения, и это займет всего 5 минут вашего времени. Хотя вернуть кнопку выключения в Windows 8.1 и Windows 10 легко, вы должны быть очень осторожны, чтобы не повредить другие системные файлы, выполняя действия, перечисленные ниже . < br />

Если у вас планшет, телефон, ПК или ноутбук под управлением Windows 8.1, Windows 10, в большинстве случаев может быть включена функция кнопки выключения. Это означает, что вы можете видеть это или вы можете отключить его для определенной цели. Выполните шаги, перечисленные ниже, чтобы узнать, как добавить кнопку выключения, если она отсутствует, или удалить ее – если вы когда-нибудь захотите в будущем.
Содержание
- Решено: в меню «Пуск» отсутствует кнопка выключения Windows 10
- 1. Настройте свой реестр
- 2. Используйте файл .bat
- 3. Проверьте параметры групповой политики.
Решено: в меню «Пуск» отсутствует кнопка выключения Windows 10
- Настройте свой реестр
- Используйте файл .bat
- Проверьте настройки групповой политики
1. Настройте свой реестр
- Нажмите и удерживайте кнопку «Windows» и кнопку «R», чтобы открыть окно «Выполнить».
- В появившемся окне вам нужно будет написать «regedit».
- Нажмите кнопку «Ввод» на клавиатуре.
- Должно появиться окно редактора реестра.
- В правой части окна дважды щелкните левой кнопкой мыши на «HKEY_CURRENT_USER».
- В папке «HKEY_CURRENT_USER» дважды щелкните левой кнопкой мыши на папке «Программное обеспечение».
- В папке «Программное обеспечение» дважды щелкните левой кнопкой мыши на папке «Microsoft».
- В папке «Microsoft» дважды щелкните левой кнопкой мыши на папке «Windows».
-
В папке «Windows» дважды щелкните левой кнопкой мыши папку «CurrentVersion».
- В папке «CurrentVersion» дважды щелкните левой кнопкой мыши на папке «ImmersiveShell».
- Теперь щелкните правой кнопкой мыши на папке «ImmersiveShell» и щелкните левой кнопкой мыши на «Новая» функция.
- В подменю «Новый» щелкните левой кнопкой мыши на «Ключ».
- Это создаст новую подпапку, которую вам нужно будет назвать «Launcher».
- Теперь щелкните левой кнопкой мыши на папке «Launcher», чтобы выбрать ее.
- На правой панели вам нужно будет щелкнуть правой кнопкой мыши на открытом пространстве и выбрать «DWORD (32-битное) значение».
- Назовите значение «Launcher_ShowPowerButtonOnStartScreen»
-
Теперь, чтобы кнопка «Выключение» была активирована, вам необходимо установить значение «Launcher_ShowPowerButtonOnStartScreen» на «1».
Примечание: Если значение остается «0», кнопка выключения не будет появляются. - Перезагрузите устройство Windows 8.1 или Windows 10, чтобы изменения вступили в силу, и кнопка выключения снова появится в соответствии с вашими потребностями.
- СВЯЗАННЫЕ: исправлено: кнопка выключения Windows 10 не работает
2. Используйте файл .bat
Это более быстрый способ выполнить описанные выше шаги, загрузив файл «.bat», чтобы сделать все это за вас, но для более подробного понимания того, что именно вы изменяете в реестрах, рекомендуется выполнить первое руководство.
-
Теперь вам нужно скачать файл «.bat», щелкнув левой кнопкой мыши по ссылке ниже.
Загрузите здесь программу для добавления кнопки выключения . -
Вам нужно будет щелкнуть левой кнопкой мыши по кнопке «Сохранить» и выбрать каталог, в котором вы хотите его разместить.
Примечание. рекомендуется сохранить его на рабочем столе для более быстрого доступа. - Дважды щелкните (щелкните левой кнопкой мыши) на файле, который вы загрузили.
- Щелкните левой кнопкой мыши по кнопке «Выполнить», когда UAC появится.
- Пусть пакетный файл запустится на пару секунд.
- Перезагрузите компьютер с Windows 8.1 или Windows 10.
- Теперь у вас есть кнопка выключения в операционной системе Windows.
- СВЯЗАННЫЕ: исправлено: ноутбук не выключается в Windows 10
3. Проверьте параметры групповой политики.
Теперь, если кнопка «Завершение работы» недоступна в меню «Пуск» или она неактивна, это может быть связано с неправильными настройками групповой политики. В результате вы можете быстро решить эту проблему, применив правильные настройки.
- Зайдите в Пуск> откройте новое окно запуска
- Введите gpedit.msc > нажмите Enter
-
Перейдите по следующему пути:
Конфигурация пользователя. Меню и шаблоны запуска административных шаблонов .
-
Дважды нажмите ‘ Удалить и запретить доступ к команде Завершение работы ‘.
-
Выберите «Не настроен» или «Отключен», чтобы разрешить всем пользователям доступ к кнопке выключения
- Закройте групповую политику> перезагрузите компьютер.
Итак, у вас есть три метода, которые вы можете использовать, если хотите добавить кнопку выключения на ваше устройство Windows 8.1 или Windows 10. Хотя в некоторых случаях вам действительно не нужна кнопка выключения, все равно неплохо узнать, как ее можно добавить, на случай, если вы захотите использовать ее в будущем.
Use the easy fixes to get the shutdown working effectively again!
by Ivan Jenic
Passionate about all elements related to Windows and combined with his innate curiosity, Ivan has delved deep into understanding this operating system, with a specialization in drivers and… read more
Updated on
- Problems with the Fast Startup feature can cause the shutdown button not working issue.
- You can fix this issue quickly by replacing the Intel Management Engine Interface driver.
- Another quick and effective way to get past this issue is to update your PC to the latest version.
Windows 10 boasts many excellent features that rank it as one of the best releases from Microsoft. However, it is not without its flaws and issues.
One prominent issue is problems with turning off your PC, with some users complaining that their Laptop is not shutting down. Now, it is the Windows 10 shutdown button not working issue that is troubling users.
Fortunately, this issue is not the most difficult to fix, as shown in this guide. You only need to follow the instructions carefully, and things should be back to normal.
Why is the shutdown button not working?
There are several ways to shut down a PC, but many users prefer the shutdown button. Speaking of the shutdown button, users reported the following issues with it:
- Start Menu shutdown not working: This problem can occur due to a corrupted installation. If you have this issue, you might want to create a new user profile and check if that helps.
- Shutdown button not working on laptop: Sometimes, the shutdown button on your computer might not work. Your power settings cause this, and it can be easily fixed.
- When I click shutdown nothing happens Windows 10: If the shutdown button doesn’t work, you might want to try shutting down your PC by using a different method.
- Shutdown button not showing, disappeared, missing Windows 10: These are several common problems that users reported. In most cases, they are caused by corrupted Windows 10 installation.
- Shutdown button doesn’t work: This can be an annoying problem, but you should be able to fix it using one of our solutions.
How do I fix the Shutdown button if it’s not working?
1. Replace the Intel Management Interface driver
- Press Windows key + X and choose Device Manager from the list.
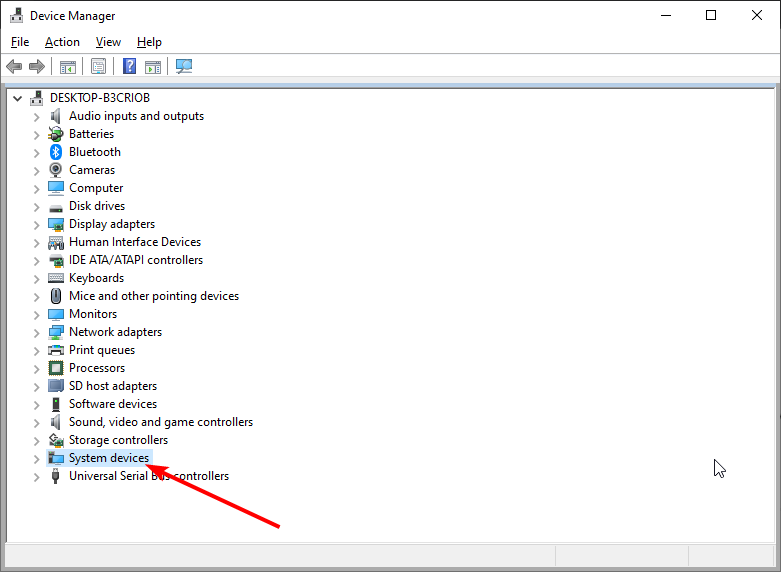
- Double-click the System Devices option to expand it.
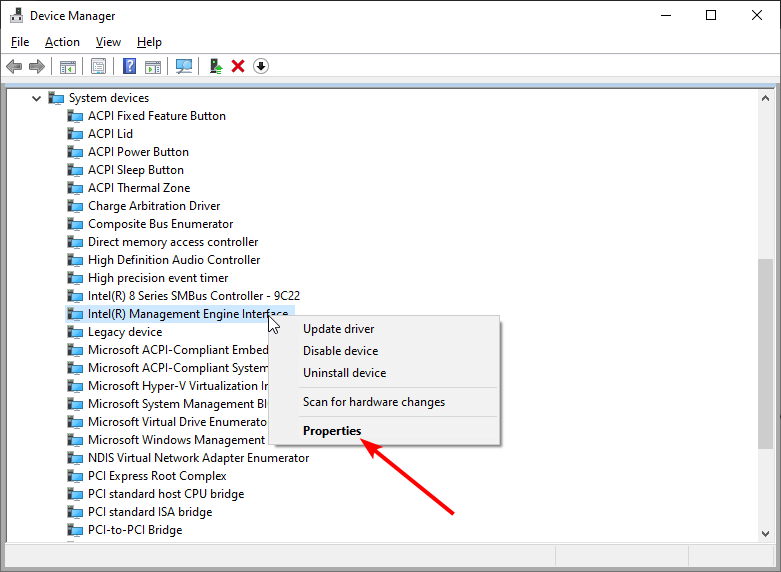
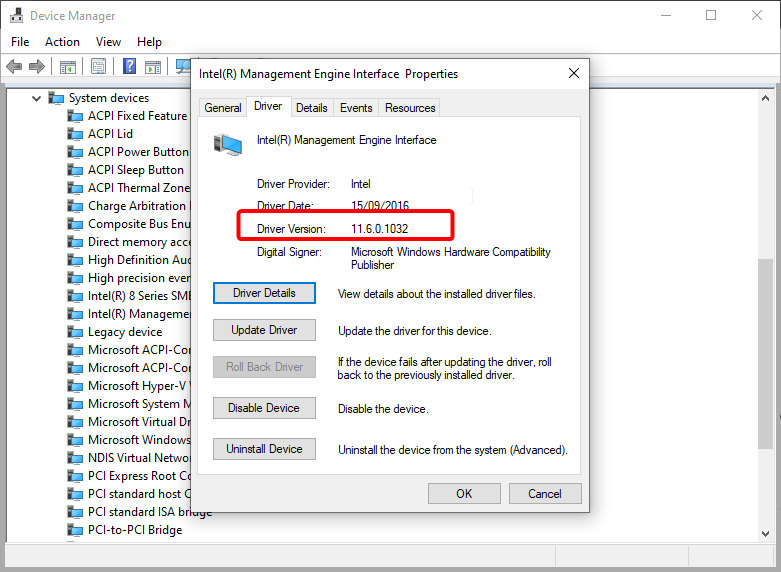
- Right-click Intel(R) Management Engine Interface.
- Choose the Properties options.
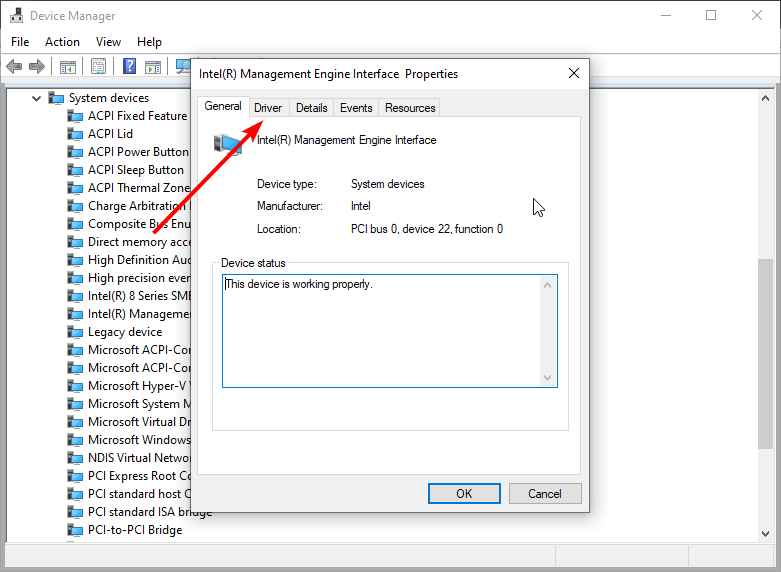
- Now, click the Driver tab in the top menu.
- Check the version of the driver to see if it is 11.
- If it is version 11, go to Intel’s website and download an older or later version.
- When you try to install an older version, you’ll be notified that you already have a newer version.
- Click Yes to overwrite it.
According to the reports, the Intel Management Interface driver can cause the shutdown button not working issue on Windows 10 and 11, so to fix it, you need to install the older version.
Currently, version 11 is the leading cause of some laptop shutdown issues, so let’s check first what version of the driver you’re using.
Otherwise, you can use specialized software like the one below and get the correct driver versions for your PC.
Often, your computer system might not be able to update the generic drivers for your hardware and peripherals correctly. There are vital differences between a generic driver and a manufacturer’s driver. Finding the correct driver versions for every hardware component can become tiresome.That’s why a dependable updater can help you find and update your drivers automatically. We strongly suggest the Outbyte Driver Updater, and here’s how to do it:
- Download and install the Outbyte Driver Updater app.
- Launch the software and wait for the app to detect all incompatible drivers.
- Now, it will show you a list of all outdated drivers to select the ones to Update or Ignore.
- Click on Update & Apply Selected to download and install the latest versions.
- Restart your PC to ensure the applied changes.

Outbyte Driver Updater
Maintain your device healthy by letting OutByte Driver Updater find the latest driver options.
Disclaimer: You may need to upgrade the app from the free version to perform specific actions.
2. Put your computer into sleep mode and then shut it down
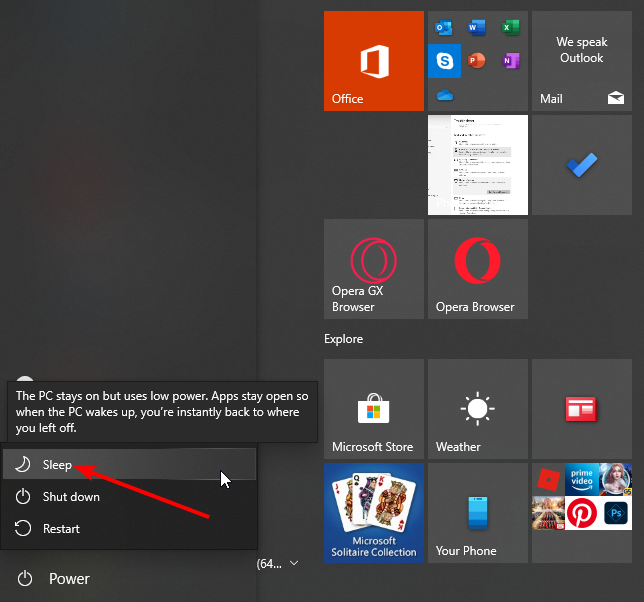
- Press the Windows key and click the Power icon.
- Click the Sleep option.
- Wake the computer from sleep and sign in.
- Now, shut down your PC.
This is more of a workaround that will temporarily fix the shutdown button not working problem. But it’s not a permanent solution, so keep that in mind.
3. Use a shutdown command to shut down your PC
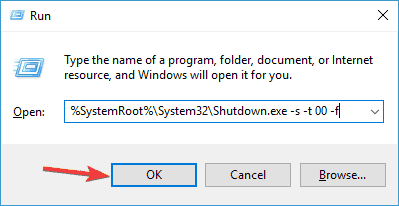
- Press the Windows key + R to open the Run dialog.
- When the Run dialog opens, enter the string below and click OK:
%SystemRoot%System32Shutdown.exe -s -t 00 -f
After running this command, your PC should shut down. This is easy to get past the shutdown button not working issue. If this command works, you might want to create a shortcut to run it faster.
How we test, review and rate?
We have worked for the past 6 months on building a new review system on how we produce content. Using it, we have subsequently redone most of our articles to provide actual hands-on expertise on the guides we made.
For more details you can read how we test, review, and rate at WindowsReport.
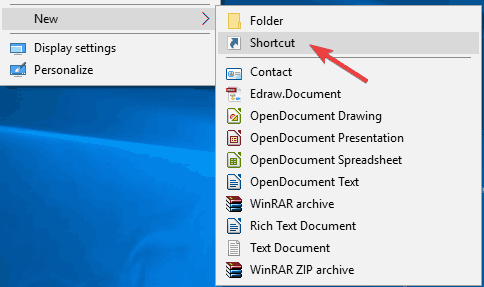
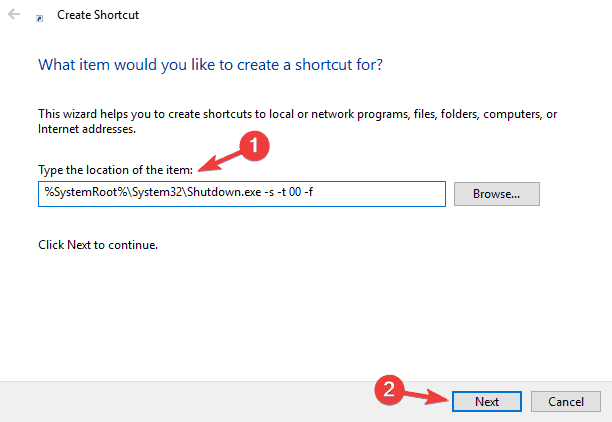
This is relatively simple, and you can do it by following these steps:
- First, right-click your Desktop and choose New > Shortcut from the menu.
- In the Type the location of the item field, enter the string below, and click Next to continue: %SystemRoot%System32Shutdown.exe -s -t 00 -f
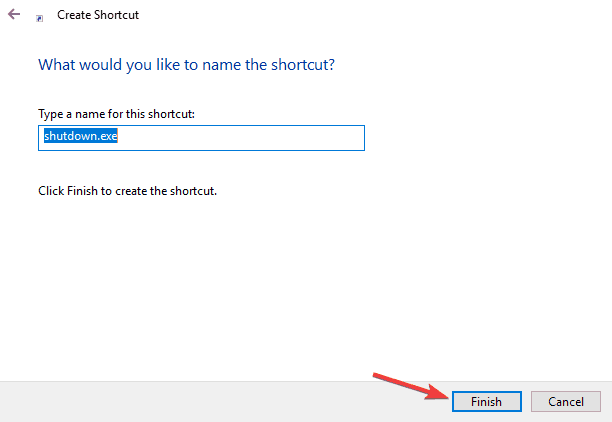
- Change the shortcut’s name if you want, and click on Finish.
You can permanently shut down your PC using the shutdown command. Remember that this is a workaround and won’t fix the core problem. But it will allow you to shut down your PC with just a few clicks.
4. Install the latest updates
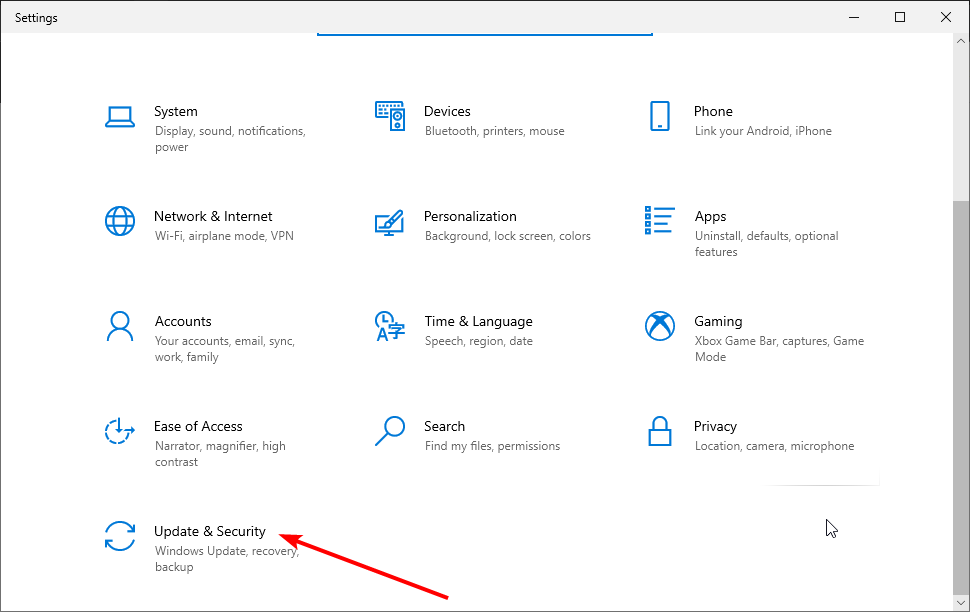
- Press the Windows key + I to open the Settings app.
- Choose the Update & Security option.
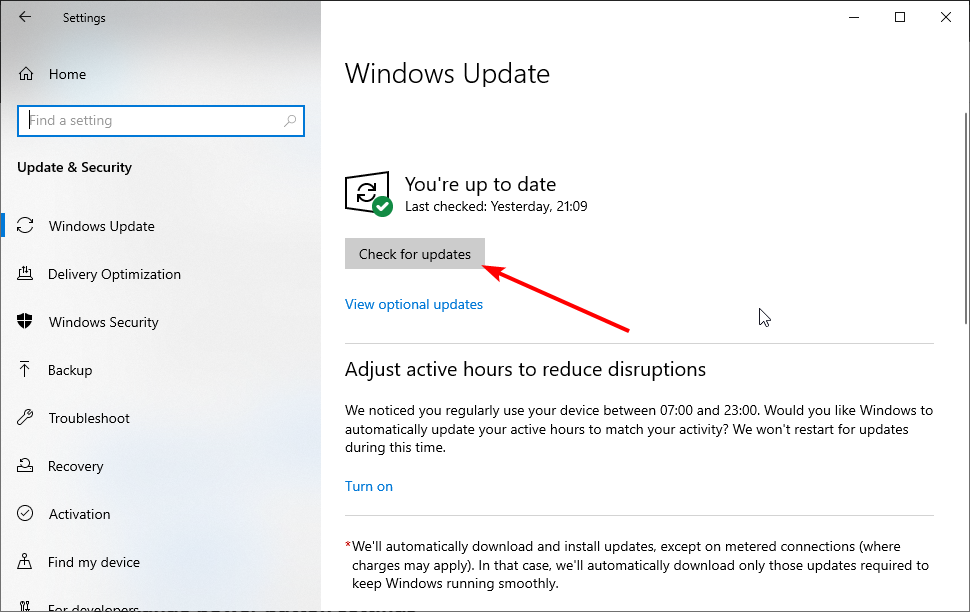
- Now in the right pane, click on Check for updates button.
Windows 10 is a solid operating system, but inevitable glitches and bugs can sometimes appear. For example, if the shutdown button is not working on your PC, the problem might be a bug in your system.
The best way to permanently fix this problem is to install the latest updates. If you can’t open the Setting app in Windows 10, look at this article to solve the issue.
5. Change power button settings
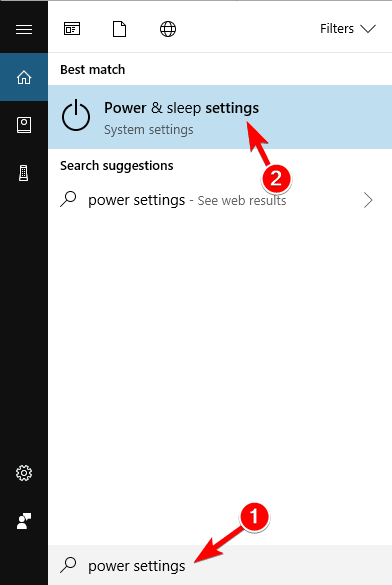
- Press the Windows key + S and enter power settings.
- Select Power & sleep settings from the menu.
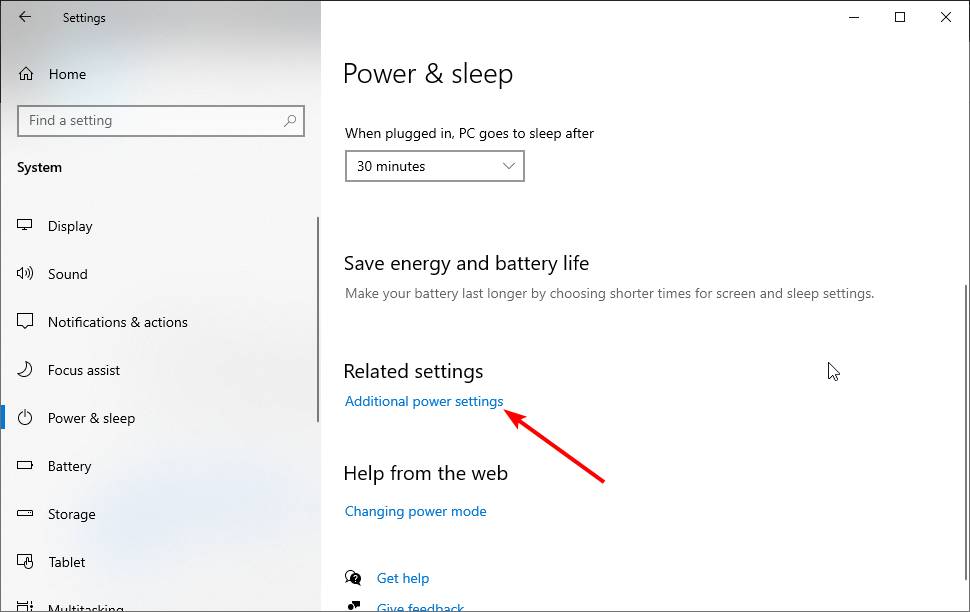
- Click Additional power settings in the right panel.
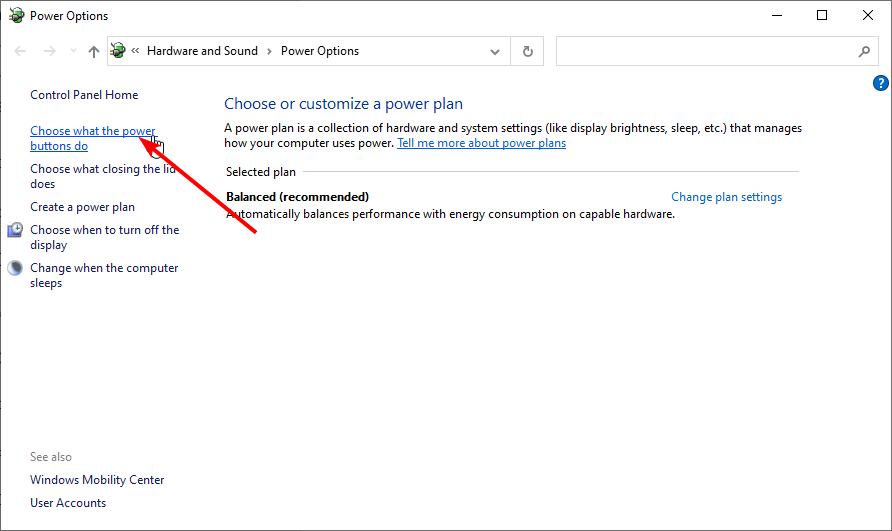
- Now click Choose what the power buttons do from the menu on the left.
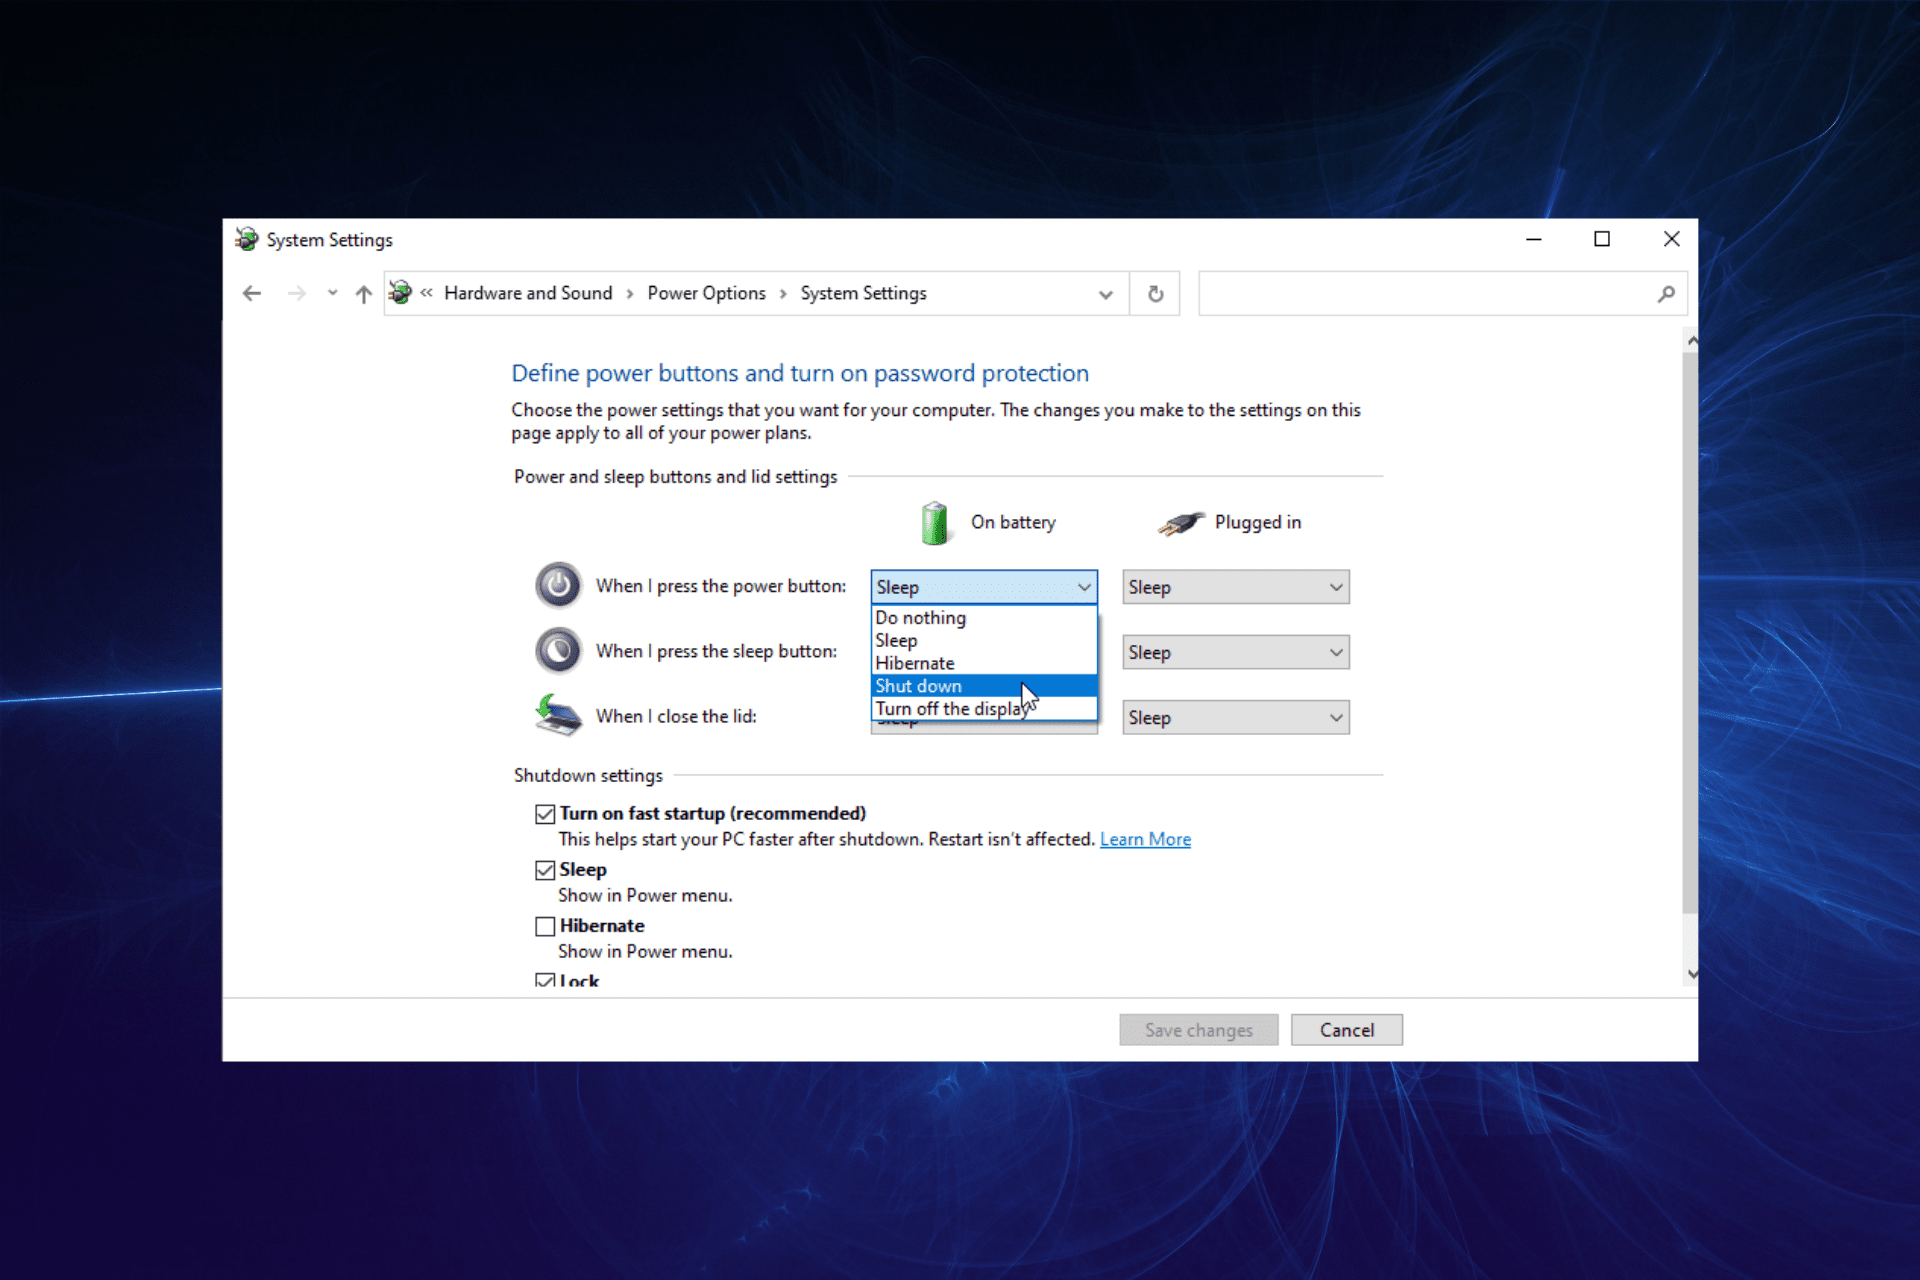
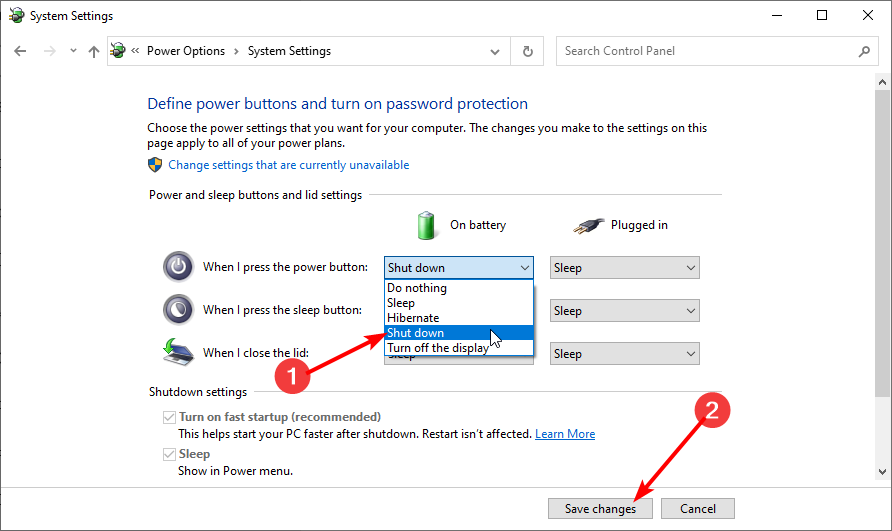
- Set When I press the power button to Shut down.
- Now, click on Save changes.
If the shutdown button is not working on your PC, the problem might be your settings. The power button can be configured to do several things, and sometimes it might not turn off your PC.
After that, your power button will be configured to shut down your PC whenever you press it.
6. Use the Win + X shortcut
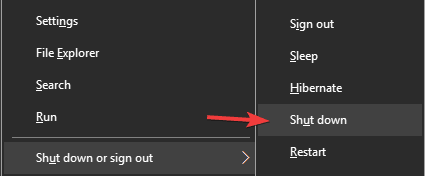
- Press the Windows + X keys.
- Select Shut down or sign out.
- Now, choose Shut down from the menu.
If the shutdown button is not working, you might be able to turn off your PC using this workaround. In addition, Windows 10 comes with a helpful menu called Win + X, which holds several valuable shortcuts.
You can easily access specific applications using this menu, but you can also turn off your PC.
After doing that, your PC should shut down without any problems. Remember that this is just a workaround, so you’ll have to use this method whenever you want to shut down your PC.
7. Turn off Fast Startup
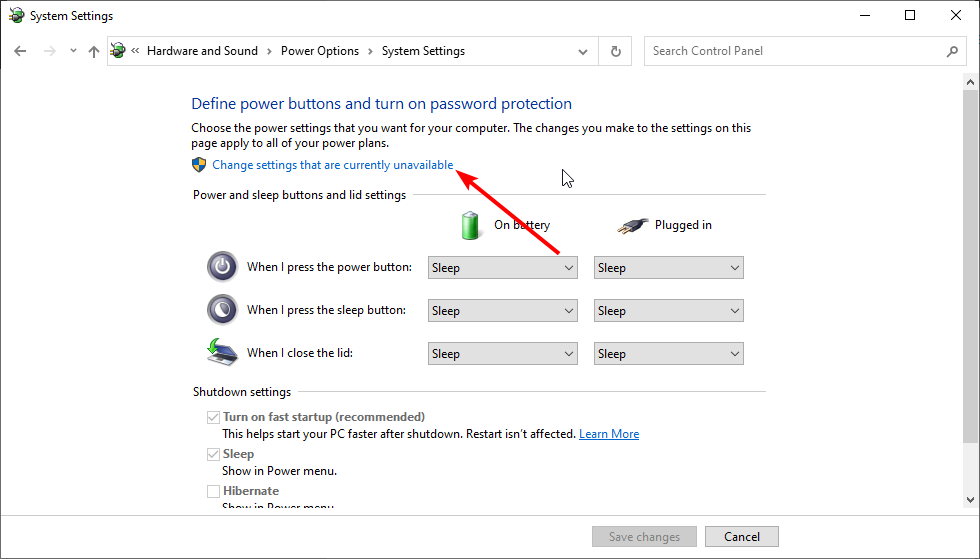
- Press the Windows key, type power settings, and select Power & sleep settings.
- Click the Additional power settings option.
- Select Choose what the power buttons do in the left pane.
- Now, click on Change settings that are currently unavailable.
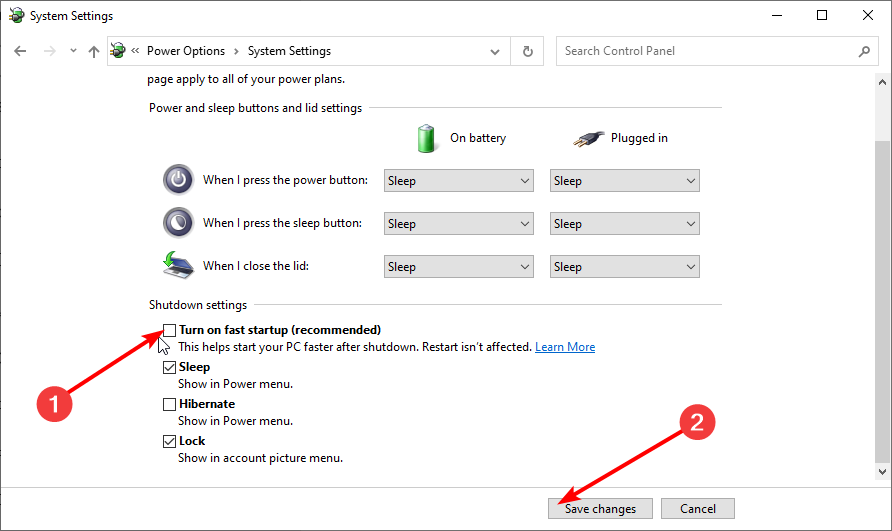
- Uncheck the box for Turn on fast startup (recommended).
- Click the Save changes button.
Windows 10 has an exciting Fast Startup feature that allows your PC to start faster. The feature combines shutdown and hibernation into one, allowing your PC to start faster.
However, specific issues like the shutdown button, not working problem can occur due to this feature. And many users are suggesting turning it off.
After doing that, this feature should be disabled completely. Remember that your PC might boot slower than before after turning off this feature, but the shutdown problem should be resolved entirely.
- Surface Go 3 Black Screen: How to Fix it
- Is Windows 11 Faster Than Windows 10?
- How to Change the Icon Size on Windows 10
- Are Windows 11 Product Keys Backward Compatible?
8. Turn off hibernation
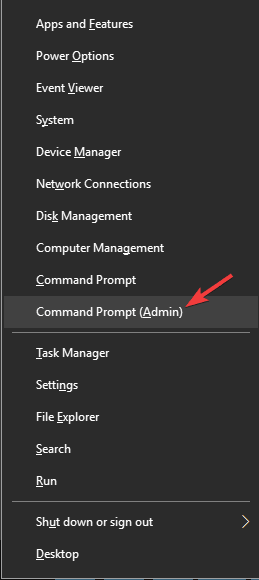
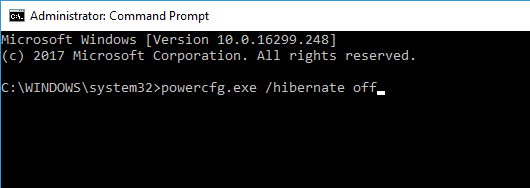
- Press Windows key + X and choose Command Prompt (Admin) or PowerShell (Admin) if Command Prompt is unavailable.
- When Command Prompt starts, enter the command below and press Enter: powercfg.exe /hibernate off
Hibernation is a helpful feature that will shut down your PC and save all your open files allowing you to continue where you left off.
However, sometimes this feature can cause the shutdown button not working issue. After that, the hibernation feature will be turned off, and the shutdown problem will be resolved.
9. Reset your BIOS

If the shutdown button is not working, the problem might be your BIOS configuration. BIOS works as a configuration utility for your PC, and sometimes specific BIOS settings can interfere with your PC and prevent it from shutting down properly.
Many versions of BIOS allow you to choose between several different shutdown modes, and sometimes choosing the wrong one can cause this issue to appear. However, you can fix that problem simply by resetting BIOS to default.
To do that, you need to enter BIOS and select the reset option. To see how to enter BIOS and reset it, we advise you to check your motherboard manual for detailed instructions.
If Windows skips BIOS, solve the issue quickly by following this fantastic guide.
In addition, users have reported that removing Intel Rapid Storage and Intel Security Assist helps fix this problem. So you might want to check out similar fixes just in case your Windows 10 laptop won’t shut down.
Why can’t I shut down my PC?
If your computer is not shutting down, it might be because of broken or corrupt system files. You can fix this quickly by running the Windows built-in repair tools or dedicated software like Fortect.
Also, the issue might be down to the Fast Startup feature. We have shown how to disable this feature in this guide.
That would be all. We hope these solutions helped you to fix the shutdown button not working in Windows 10 issue.
While still on shutdown issues, you can check our detailed guide to schedule automatic shutdown on Windows 10.
For any more questions or suggestions, reach for the comments section below.
Пропала кнопка «выключения компьютера» в меню пуск.(ждущий режим,выключение,перезагрузка)
как её вернуть?
Попробуйте сделать откат системы:
пуск-программы-стандартные-служебные-восстановление системы
Зайдите в Start -> Run там напишите regedit и нажми Enter, находим строчку:
HKEY_CURRENT_USER\Software\Microsoft\Windows\CurrentVersion\Policies\Explorer
Посмотрите если есть такой параметр:
«NoClose»=dword:00000001 (1)
Если есть, то удаляйте или меняйте значение на «0». Больше ничего не меняйте.
Если же такого параметра, то попробуйте создать параметр типа DWORD:
параметр:
HKEY_CURRENT_USER\Software\Microsoft\Windows\CurrentVersion\Policies\Explorer
Cоздаём параметр NoClose, значение 0 и перезагружаем компьютер.
Изменено пользователем -=Kirill Strelets=-
Более чем уверен, что многие из вас не задумывались над тем, какие существуют способы быстрого отключения компьютера. Что там, щелкнул «Завершить работу» и готово. Но бывают ситуации, когда ПК подвис, заглючило меню Пуск и прочее.
Вот для таких случаев мы и расскажем, как можно выключить компьютер под управлением Windows 10 (какие-то способы актуальны и для прошлых версий операционной системы).
Способ 1. С помощью дополнительного меню Пуск
Немногие знают, что в последних редакциях Windows вернулось вспомогательное меню Пуск. Чтобы его открыть, щелкните по иконке правой кнопкой мыши.
Дальше ничего сложного, выбираем привычный пункт «Завершение работы или выход из системы». Там будет кнопка выключения.
Способ 2. С помощью ярлыка на рабочем столе
Чтобы не лезть в меню Пуск, можно создать специальный ярлык для выключения ПК на рабочем столе.
Для этого необходимо щелкнуть по свободному месту на рабочем столе правой кнопкой мыши, Создать —> Ярлык. Вводим в поле этот текст %windir%\System32\shutdown.exe /s /t 0. Завершаем создание ярлыка. После этого вы сможете двойным нажатием выключить ПК.
Способ 3. С помощью горячих клавиш
Есть ещё один вариант быстрого выключения ПК. Для этого достаточно нажать сочетание клавиш Alt+F4. В контекстном меню можно выбрать как переход в режим сна, так и выключение компьютера. В следующий раз достаточно будет нажать Enter, и ваш ПК выключится.
Способ 4. Перенастройка кнопки питания
Самый быстрый способ — нажать на кнопку питания. Есть 2 режима, программируемый и аварийный. Последний использовать только при условии, что у вас завис ПК — зажимаем кнопку питания примерно на 5 секунд, компьютер резко выключается.
Программируемый способ:
Шаг 1. Переходим в Панель управления —> Все элементы панели управления —> Электропитание.
Шаг 2. Открываем вкладку Действия кнопок питания.
Шаг 3. Переходим в Изменение параметров, которые сейчас недоступны.
Шаг 4. Ставим «Завершение работы», нажимаем сохранить.
…
PROFIT!
Все, эти 4 способа помогут вам быстрее выключать компьютер.

🤓 Хочешь больше? Подпишись на наш Telegram.

iPhones.ru
Всего один-два клика.
- windows,
- инструкции,
- это полезно
Артём Баусов
@Dralker
Главный по новостям, кликбейту и опечаткам. Люблю электротехнику и занимаюсь огненной магией.
Telegram: @TemaBausov
$config[ads_netboard] not found
Оглавление:
- Решено: в меню «Пуск» отсутствует кнопка выключения Windows 10
- 1. Настройте свой реестр
Видео: Emacs — the C-q prefix, ASCII Control Characters and Caret Notation 2023
$config[ads_netboard] not found
Вы обновились до Windows 8.1 или Windows 10, и ваша кнопка выключения пропала? Что ж, в Windows 8.1, Windows 10 есть функция, которую вы можете попробовать, чтобы вернуть кнопку выключения, и это займет всего 5 минут вашего времени. Хотя вернуть кнопку выключения в Windows 8.1 и Windows 10 легко, вы должны быть очень осторожны, чтобы не повредить другие системные файлы, выполняя действия, перечисленные ниже .
Если у вас есть планшет с Windows 8.1, Windows 10, телефон, компьютер или ноутбук, в большинстве случаев может быть включена функция кнопки выключения. Это означает, что вы можете видеть это или вы можете отключить его для определенной цели. Выполните шаги, перечисленные ниже, чтобы узнать, как добавить кнопку выключения, если она отсутствует, или удалить ее — если вы когда-нибудь захотите в будущем.
- Настройте свой реестр
- Используйте файл.bat
- Проверьте параметры групповой политики
1. Настройте свой реестр
- Нажмите и удерживайте кнопку «Windows» и кнопку «R», чтобы открыть окно «Выполнить».
- В появившемся окне вам нужно будет написать «regedit».
- Нажмите кнопку «Ввод» на клавиатуре.
- Должно появиться окно редактора реестра.
- В правой части окна дважды щелкните левой кнопкой мыши на «HKEY_CURRENT_USER».
- В папке «HKEY_CURRENT_USER» дважды щелкните левой кнопкой мыши на папке «Программное обеспечение».
- В папке «Программное обеспечение» дважды щелкните левой кнопкой мыши на папке «Microsoft».
- В папке «Microsoft» дважды щелкните левой кнопкой мыши на папке «Windows».
- В папке «Windows» дважды щелкните левой кнопкой мыши папку «CurrentVersion».
- В папке «CurrentVersion» дважды щелкните левой кнопкой мыши на папке «ImmersiveShell».
- Теперь щелкните правой кнопкой мыши на папке «ImmersiveShell» и щелкните левой кнопкой мыши на «Новая» функция.
- В подменю «Новый» щелкните левой кнопкой мыши на «Ключ».
- Это создаст новую подпапку, которую вам нужно будет назвать «Launcher».
- Теперь щелкните левой кнопкой мыши на папке «Launcher», чтобы выбрать ее.
- На правой панели вам нужно будет щелкнуть правой кнопкой мыши на открытом пространстве и выбрать «DWORD (32-битное) значение».
- Назовите значение «Launcher_ShowPowerButtonOnStartScreen»
- Теперь, чтобы кнопка «Выключение» была включена, вам нужно установить значение от «Launcher_ShowPowerButtonOnStartScreen» до «1».
Примечание. Если значение остается «0», кнопка выключения не появится.
- Перезагрузите устройство Windows 8.1 или Windows 10, чтобы изменения вступили в силу, и кнопка выключения снова появится в соответствии с вашими потребностями.
Как починить клавиатуру на клавиатуре, если она не работает?
Если у вас есть проблемы с клавишей @ на клавиатуре вашего ноутбука, вполне вероятно, что проблема связана с драйвером, поэтому обязательно обновите все драйверы.
Как запланировать выключения в Windows 8, 8.1, 10
В этом руководстве мы покажем вам, как запланировать автоматическое отключение в Windows 10, 8, используя три различных решения. Прочтите этот пост, чтобы узнать больше.
Новое всплывающее окно обновления Windows 10 обновляет ОС, даже если вы нажмете кнопку x
Все ваши ПК с Windows принадлежат нам. Недавно мы сообщили, что Microsoft будет автоматически планировать ПК для установки Windows 10 без разрешения пользователя. Новое всплывающее окно обновления Windows 10 теперь предлагает только две официальные опции: «Обновить сейчас» и «Начать загрузку, обновить позже» и третий, неофициальный вариант. В начале кампании по обновлению Windows 10 пользователи просто нажимали на…
$config[ads_netboard] not found


