Windows 10 Enterprise version 1607 Windows 10 Enterprise version 1703 Windows Server 2016, all editions .NET Framework 4.8 Еще…Меньше
Введение
В этой статье описывается обновление для Microsoft .NET Framework 4.8 на Windows 10, версия 1607; Windows 10, версия 1703 (только загружайте каталог) и Windows Server 2016 (только загружайте каталог).
Пожалуйста, обратите внимание: .NET Framework 4.8
был обновлен с последние обновления обслуживания по состоянию на 14 январяЙ, 2020. Помимо
обслуживание исправлений, нет никаких изменений в продукте .NET Framework 4.8 от
13 августаЙ, 2019 Обновление Windows. Если вы уже скачали и
установлено обновление с августа, вам не нужно устанавливать это обновление
в противном случае, пожалуйста, установите это обновление, чтобы получить последние биты продукта.
О Microsoft .NET Framework 4.8
Microsoft .NET Framework 4.8 является высокосовместимым и на месте обновление мн.NET Framework 4.6.2, 4.7, 4.7.1 и 4.7.2. Тем не менее, он может работать бок о бок с .NET Framework 3.5 Service Pack 1 (SP1) и более ранними версиями .NET Framework.
При установке этого пакета он указан как обновление для Microsoft Windows (KB4486129) под элементом установленных обновлений в панели управления.
Microsoft .NET Framework 4.8 доступна на Windows Update (WU) и на службе обновления серверов Windows (WSUS). Он будет предлагаться в качестве рекомендуемого обновления на Windows Update.
Рекомендуемое обновление может быть автоматически установлено на всех поддерживаемых платформах на основе настроек вашего компьютера в Обновлении Windows.
Сведения о загрузке
Следующие файлы доступны для скачивания с сайта .NET Скачать:
Скачать .NET Framework 4.8 автономный пакет установщика сейчас
Для получения информации о .NET Framework 4.8 оффлайн установщик, см.
Для получения информации о том, как загрузить файлы поддержки Майкрософт, см.
Вирус-сканирование претензии: Корпорация Майкрософт сканировала этот файл на наличие вирусов, используя самое современное программное обеспечение для обнаружения вирусов, которое было доступно на дату публикации файла. Файл хранится на серверах, усовершенствованных системой безопасности, что помогает предотвратить несанкционированные изменения в нем.
Дополнительная информация
Известные проблемы
Для известных проблем в .NET Framework 4.8 см.
Параметры командной строки для этого обновления
Для получения дополнительной информации о различных вариантах командной строки, которые поддерживаются этим обновлением, см.
Требование к перезапуску
Возможно, вам придется перезапустить компьютер после установки этого обновления. Мы рекомендуем вам выйти из всех приложений, которые используют .NET Framework, прежде чем установить это обновление.
Поддерживаемые операционные системы
Microsoft .NET Framework 4.8 (Offline Installer) поддерживает следующие операционные системы:
-
Windows 10 версия 1607
-
Windows 10 версия 1703
-
Windows Server 2016
Нужна дополнительная помощь?
Нужны дополнительные параметры?
Изучите преимущества подписки, просмотрите учебные курсы, узнайте, как защитить свое устройство и т. д.
В сообществах можно задавать вопросы и отвечать на них, отправлять отзывы и консультироваться с экспертами разных профилей.
Windows 10 Enterprise version 1607 Windows 10 Enterprise version 1703 Windows Server 2016, all editions .NET Framework 4.8 More…Less
Introduction
This article describes an update for Microsoft .NET Framework 4.8 on Windows 10, version 1607; Windows 10, version 1703 (Catalog download only), and Windows Server 2016 (Catalog download only).
Please note: .NET Framework 4.8
has been refreshed with the latest servicing updates as of January 14th, 2020. Apart from the
servicing fixes, there is no change in the .NET Framework 4.8 product from the
August 13th, 2019 Windows update. If you have already downloaded and
installed the update from August, you do not need to install this update
otherwise please install this update to receive the latest product bits.
About Microsoft .NET Framework 4.8
Microsoft .NET Framework 4.8 is a highly compatible and in-place update to .NET Framework 4.6.2, 4.7, 4.7.1, and 4.7.2. However, it can run side-by-side with .NET Framework 3.5 Service Pack 1 (SP1) and earlier versions of .NET Framework.
When you install this package, it is listed as Update for Microsoft Windows (KB4486129) under the Installed Updates item in Control Panel.
Microsoft .NET Framework 4.8 is available on Windows Update (WU) and on Windows Server Update Service (WSUS). It will be offered as a recommended update on Windows Update.
A recommended update may be installed automatically on all supported platforms based on your computer settings on Windows Update.
Download information
The following files are available for download from the .NET Download Site:
Download .NET Framework 4.8 offline installer package now
For information about .NET Framework 4.8 offline installer, see Microsoft .NET Framework 4.8 offline installer for Windows.
For information about how to download Microsoft support files, see How to obtain Microsoft support files from online services.
Virus-scan claim: Microsoft scanned this file for viruses, using the most current virus-detection software that was available on the date that the file was posted. The file is stored on security-enhanced servers that help prevent any unauthorized changes to it.
More information
Known issues
For the known issues in .NET Framework 4.8 see .NET Framework 4.8 Known Issues.
Command-line switches for this update
For more information about the various command-line options that are supported by this update, see the “Command-Line options” section in .NET Framework Deployment Guide for Developers.
Restart requirement
You may have to restart the computer after you install this update. We recommend that you exit all applications that are using .NET Framework before you install this update.
Supported operating systems
Microsoft .NET Framework 4.8 (Offline Installer) supports the following operating systems:
-
Windows 10 version 1607
-
Windows 10 version 1703
-
Windows Server 2016
Need more help?
Want more options?
Explore subscription benefits, browse training courses, learn how to secure your device, and more.
Communities help you ask and answer questions, give feedback, and hear from experts with rich knowledge.
Wondering how to install .NET framework 4.8 on windows server 2016? We can help you.
Installing the latest .Net framework on the server improves the performance and speed of the web apps.
At Bobcares, we often receive requests to install the .Net framework on the windows server as part of our Server Management Services.
Today, let’s discuss how our Support Engineers do it easily for our customers.
What is the .NET Framework?
.NET Framework by Microsoft is used to run and create applications and services which are based on the XML web.
The .NET software on Windows cannot run if the .NET Framework is not installed on the system.
The main advantages it provides include, Integration, Reliability, Performance, Productivity, and security.
How to install .NET Framework 4.8 on Windows 2016?
Recently, one of our customers approached us to install the latest .Net framework on his dedicated server. Let’s see how our Support Engineers install the .Net framework for them.
- Initially, we RDP to the server.
- Then open the web browser from the server and download the required .NET Framework from the below link.
https://dotnet.microsoft.com/download/dotnet-frameworkClick on the .NET Framework 4.8 link and the Download .NET Framework 4.8 option.
- Then right-click on the downloaded file. We click on the Properties and unblock it.
- Then double click on the file and complete the installation.
- After the .Net installation, the server will ask for a reboot. So we reboot the server.
- Then we open the corresponding Plesk panel of the server.
- Select the Tools and Settings from the Plesk.
- Then under the Applications & Databases, we choose ASP.NET Settings.

- Then we check whether the new version updates under Framework Version.

How to change the ASP.NET version on an account?
We follow the below steps to change the .Net version of an account.
- Firstly we log in to Plesk.
- Then from the left sidebar, we click Websites & Domains.
- After that select the account and click Hosting Settings.
- Then under the Web Scripting and Statistics, in the Microsoft ASP.NET support (Version) list box, we select the ASP.NET version.
- Finally, we click the Ok button.
Few Installation errors
We have also found that the installation may end up with errors. Here are some such instances and their solution by our Support Techs.
-
Installation failed with error code: (0x8000FFFF), “Catastrophic failure”
While installing .NET Framework v4.8, we may come across a “0x8000ffff catastrophic failure” error.
In order to solve this error we follow the below steps:
- Temporarily turn off the security software.
- Then open the command prompt and run as administrator:
DISM /Online /Cleanup-Image /RestoreHealth
- Check the permission of the C:\Windows\ System32 \CatRoot2\ folder and give full control to the NETWORK SERVICE and SYSTEM and CryptSvc accounts.
-
This application could not be started
Applications for the .NET Framework typically require a specific version of the .NET Framework to install on the system. In some cases, we attempt to run an application without either an installed version or the expected version.
This often produces an error dialog box stating, ‘This application could not be started’
This typically indicates one of the following conditions:
- Corruption of a .NET Framework installation on the system.
- The version of the .NET Framework needed by the application cannot be detected.
Our Support Techs resolve this by following the below procedure:
Initially, we download the .NET Framework Repair Tool (NetFxRepairTool.exe) from the URL: https://www.microsoft.com/en-us/download/details.aspx?id=30135‘
Once the download completes the tool runs automatically.
However, if the .NET Framework Repair Tool recommends any additional action, we select Next.
It displays a dialog box to indicate that changes are complete. We leave this dialog box open while we to try rerun the application.
This should succeed if the .NET Framework Repair Tool has identified and corrected a corrupted .NET Framework installation.
If the application runs successfully, select the Finish button. Otherwise, select the Next button.
If we select the Next button, the .NET Framework Repair Tool displays a dialog box regarding the logs to be sent to Microsoft. Select the Finish button to send diagnostic information to Microsoft.
If we still fail to run the application, we install the latest version of the .NET Framework supported by the version of Windows. Then attempt to launch the application.
In some cases, we may see a dialog box that asks to install the .NET Framework 3.5. Select Download and install this feature, then launch the application again.
[Need more assistance in installing .NET framework 4.8? We’ll help you.]
Conclusion
To conclude, we discussed how to install the .NET framework 4.8 on windows server 2016. Also, we saw how our Support Engineers help our customers install it.
PREVENT YOUR SERVER FROM CRASHING!
Never again lose customers to poor server speed! Let us help you.
Our server experts will monitor & maintain your server 24/7 so that it remains lightning fast and secure.
GET STARTED
var google_conversion_label = «owonCMyG5nEQ0aD71QM»;
Lots of applications require the .NET Framework 3.5 installed on your Windows Server 2016 and later. By default, the .NET Framework 3.5 is not installed on these Operating Systems and must be installed manually by an administrator. You can install the .NET Framework 3.5 also on Windows Server 2022 by following the steps described in this blog post.
There are multiple ways to install the .NET Framework 3.5 feature on Windows Server 2016 and later:
- By using the “Add Roles and Features” Wizard of the Windows Server Manager
- By using PowerShell
- By using the DISM tool
- By using the Group Policy Feature on Demand setting
In this blog post I will focus on just two of them: The installation using the Windows Server Manager and the installation via the Windows PowerShell.
If you are using Windows 10, Windows Server 2016, or Windows Server 2019, Microsoft recommends installing .NET Framework 3.5 through the control panel or the methods listed above.
You can find more information about this installation within the official documentation published by Microsoft: Microsoft .NET Framework 3.5 Deployment Considerations.
Prerequisites
To install the .NET Framework on your system running Windows Server 2016 and later you need the Windows Server installation media that was used to setup the server. Within this blog post, we will need the contents from the subfolder [ISO]:\Sources\SxS on the installation media.
If you are using a Windows Server installation ISO, you can simply mount the ISO file on your server or extract the contents of the [ISO]:\Sources\SxS to a local directory, for example D:\Sources\SxS. To mount the ISO file using the Windows Explorer, simply select Mount from the context menu of the ISO file:

Mount a ISO file using the Windows Explorer
Additionally, the user account used to run the steps described in this blog required administrative privileges on the system. This means the user must be a member of the local Administrators group.
Install the .NET Framework 3.5 Feature using the Server Manager
First you must open the Server Manager on the system where you want to install the .NET Framework 3.5.
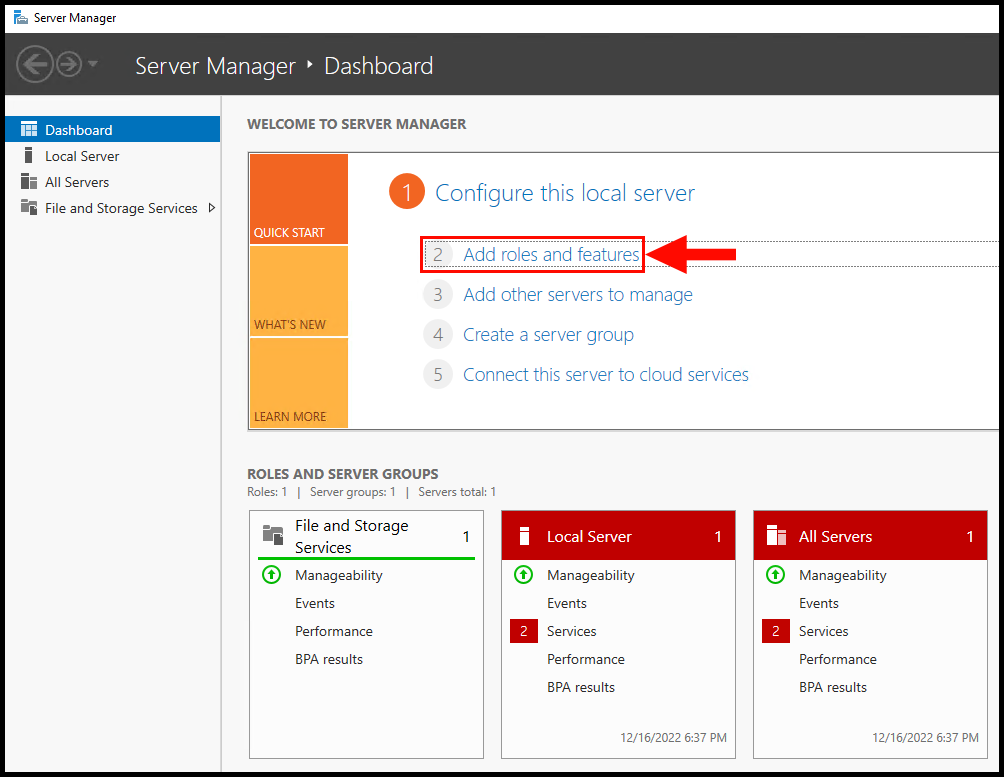
- In the Server Manager, open the Add Roles and Features Wizard by clicking Manage –> Add Roles and Features.
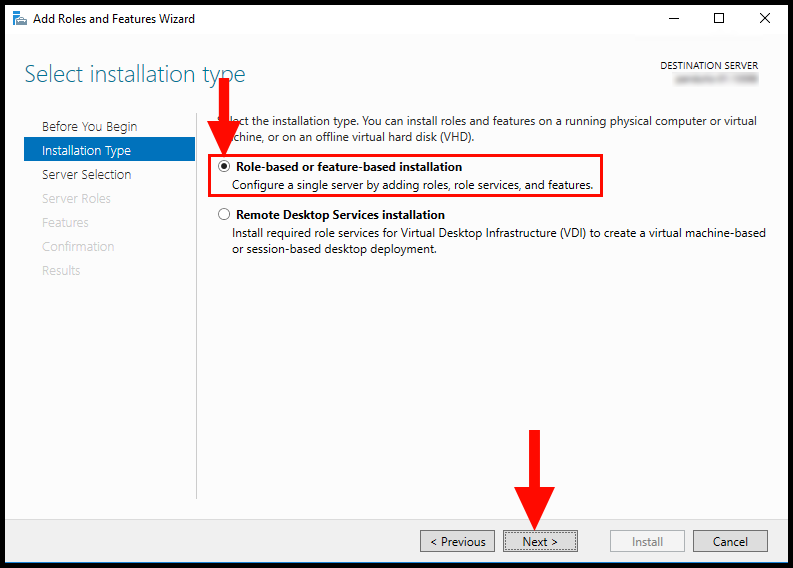
- Step forward to Installation Type and select Role-based or feature-based installation.
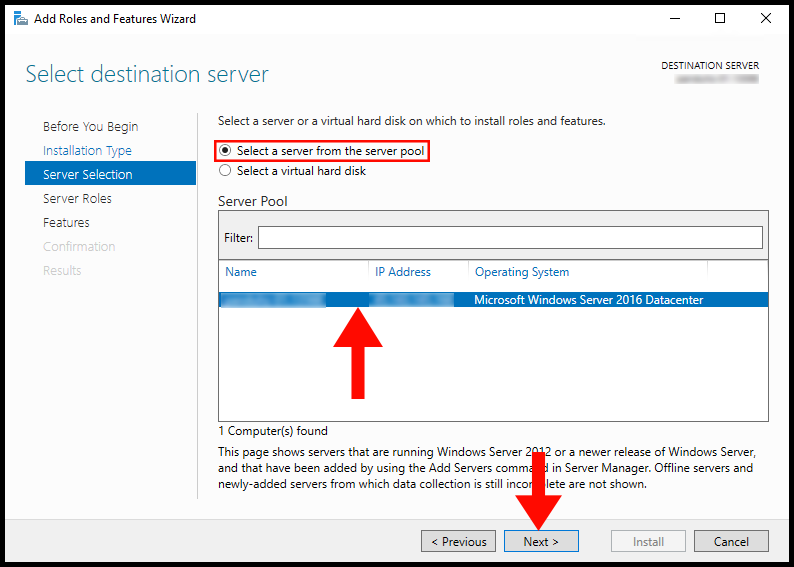
- Ensure that you have selected the correct server in the step Server Selection.
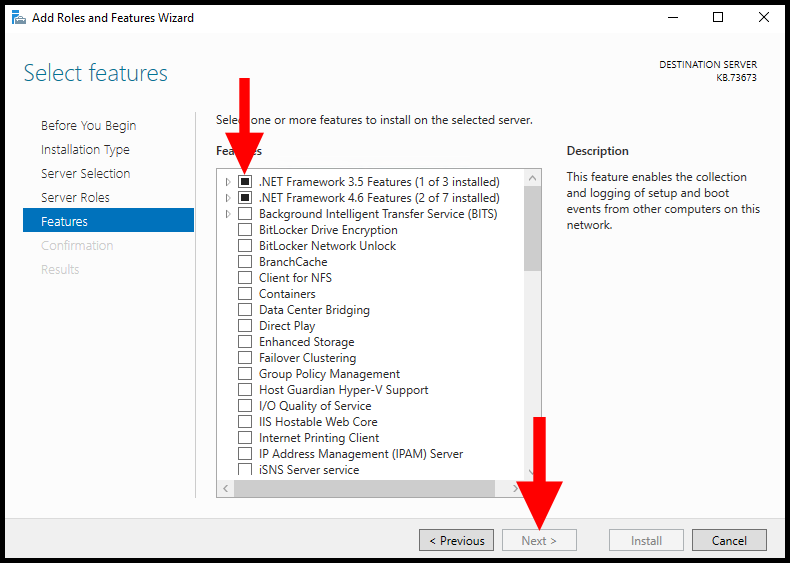
- Continue to the step Select features and select the (Sub-)feature .NET Framework 3.5 (includes .NET 2.0 and 3.0).
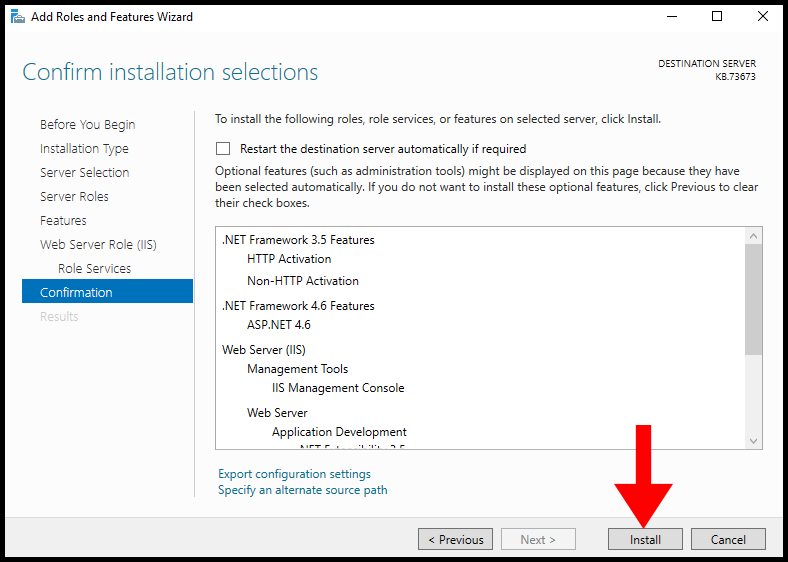
- Within the step Confirmation you must specify an alternate source path. On the bottom of the Confirm installation selections screen, click Specify an alternate source path. In the new dialog window Specify Alternate Source Path type the path to the [ISO]:\Sources\SxS on the installation media or the local directory where you have copied the files to. In this example the files were copied to D:\Sources\SxS. Close the dialog window with Ok and start the feature installation by clicking Install on the Confirm installation selections screen.

Select the Installation Type

Select the destination server

Select the feature “.NET Framework 3.5 (includes .NET 2.0 and 3.0)”

Specify an alternate source path

Specify an alternate source path
Install the .NET Framework 3.5 Feature using PowerShell
The following commands must be executed within a PowerShell that was started as an administrator.
You can verify if the .NET Framework 3.5 is already installed by running the following PowerShell command:
PS> Get-WindowsFeature -Name "NET-Framework-Core"
If the .NET Framework 3.5 is not installed, you will receive an output like the following:
Display Name                                            Name                       Install State

------------                                            ----                       -------------

    [ ] .NET Framework 3.5 (includes .NET 2.0 and 3.0)  NET-Framework-Core               Removed
To install the .NET Framework 3.5 Windows feature, you must run the following command:
PS> Install-WindowsFeature -Name "NET-Framework-Core" -Source "D:\Sources\SxS"
After the command has finished, you will receive an output like this:
Success Restart Needed Exit Code      Feature Result

------- -------------- ---------      --------------

True    No             Success        {.NET Framework 3.5 (includes .NET 2.0 and...
If you run the following command again, the column Install State should show Installed for the .NET Framework 3.5 (includes .NET 2.0 and 3.0) feature:
PS> Get-WindowsFeature -Name "NET-Framework-Core"

Display Name                                            Name                       Install State

------------                                            ----                       -------------

    [X] .NET Framework 3.5 (includes .NET 2.0 and 3.0)  NET-Framework-Core             Installed
Known Issues
There are some system configurations that are incompatible with the described installation options in this blog post and result in weird errors.
For example, we observed such issues on systems that have been upgraded from Windows Server 2008 (R2) to Windows Server 2012 (R2) to Windows Server 2016 and Windows Server 2019 by using the Windows In place Upgrade.
To get the installation of the .NET Framework 3.5 feature working on such systems, we recommend additional research in the internet or to contact the Microsoft Support.
Nevertheless, in this case you can try to install the .NET Framework 3.5 using the Offline Installer provided by Microsoft.
Conclusion
This blog post describes two ways how to install the .NET Framework 3.5 feature on Windows Server 2016 and later. These two ways should work for most of your servers.
However, there are some system configurations that break the described installation options and require manual work to get the installation working. Solutions for these systems are not provided by this blog post!
Many applications require the .NET Framework to be installed on the Windows Server. The .NET Framework doesn’t come pre-installed, you will need to manually install the .NET Framework on your Windows Server 2012, 2016, or later. In this article, we will go over how to install the .NET framework 3.x or 4.x on Windows Server 2012, 2016, or later.
How to install .NET Framework using Server Manager
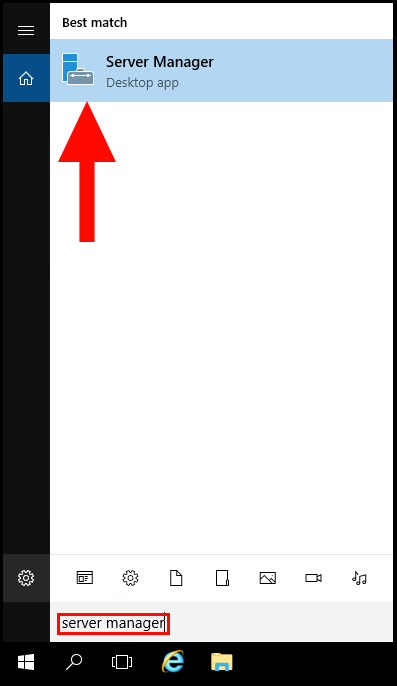
1. To start off, log in to your Windows Server 2012, 2016, or later and then open Server Manager.
2. In the Server Manager window, click on Add Roles and Features.
3. Then in the Installation Type section, select Role-based or feature-based installation, and then click Next.
4. Next, the Server Selection page will appear. Select the option Select a server from the server pool and select your server in the Server Pool window. Then, click Next to proceed.
5. Do not select or Deselect anything in Server Roles Section, then click Next to proceed.
6. In the Features section, select the .NET Framework 3.x or 4.x or both, then click Next to proceed.
7. Lastly on the Confirmation screen, select Install to finish.
Once the installation is complete, do not forget to reboot your server in order to complete the installation.
How to install .NET Framework using Offline Installer
If you want to install the .NET framework conveniently, then an offline installer will do the job for you. You just need to download the offline installer from the Microsoft website and process the installation. In this method, you will only need an internet connection while downloading the installer file. Afterward, you will not require an internet connection for the installation.
You can download any desired .NET Framework version by using the following URL,
https://dotnet.microsoft.com/download/dotnet-framework/
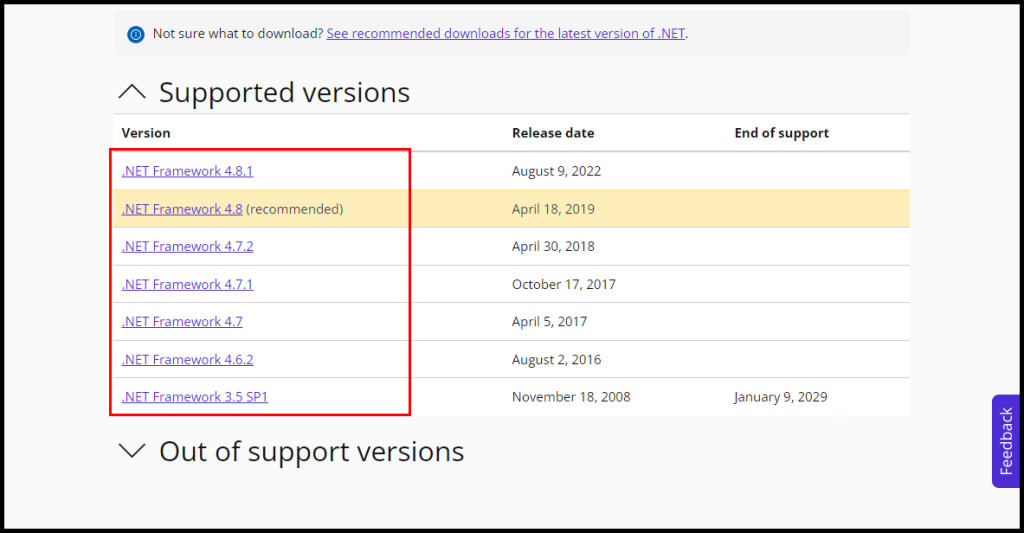
For this article, we will be installing the .NET Framework 4.8. You can install any version of the .NET Framework as per your requirement.
1. Visit the above URL: https://dotnet.microsoft.com/download/dotnet-framework/ and select the .NET Framework Version.
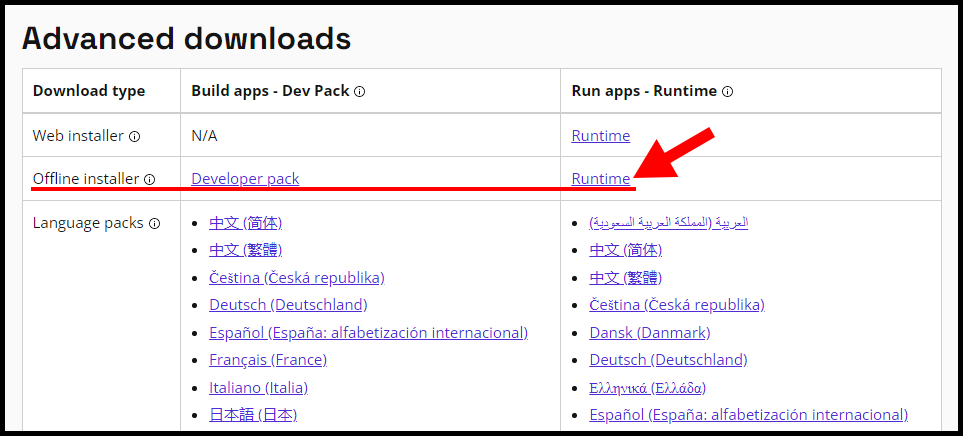
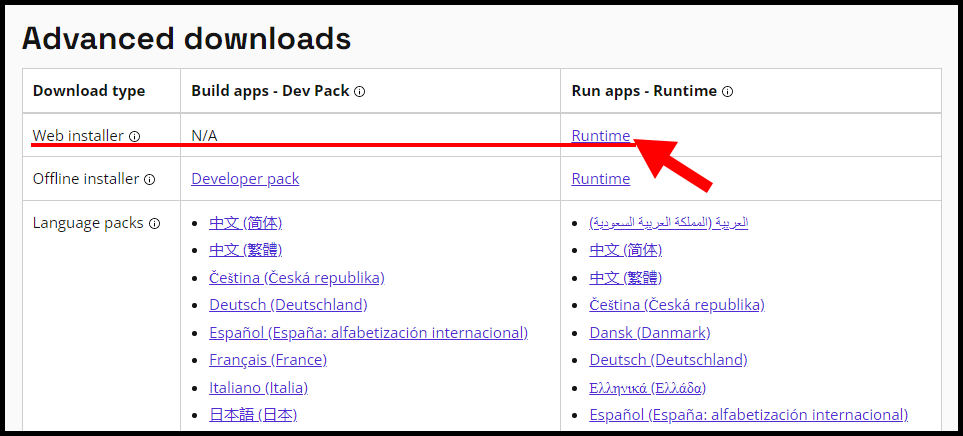
2. Scroll down a little bit and download the Offline Installer from the Advanced downloads section under Run apps – Runtime.
Run apps – Runtime: The runtime includes everything you need to run existing apps/programs built with .NET Framework.
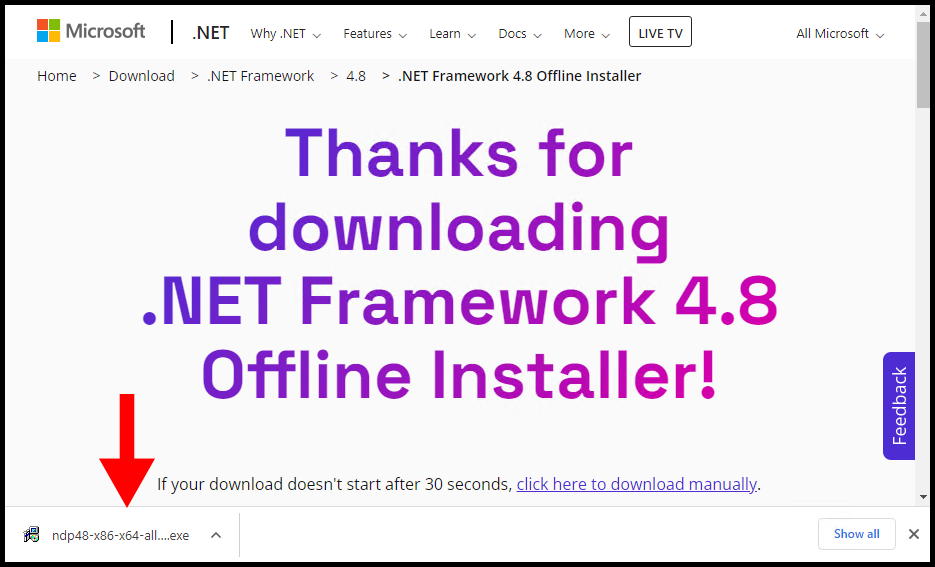
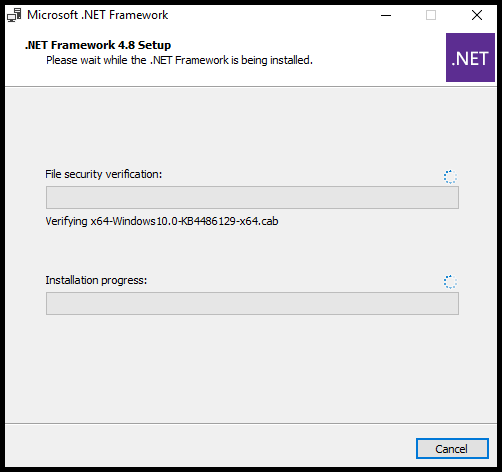
3. Once the download has been completed, click and run the executable file.
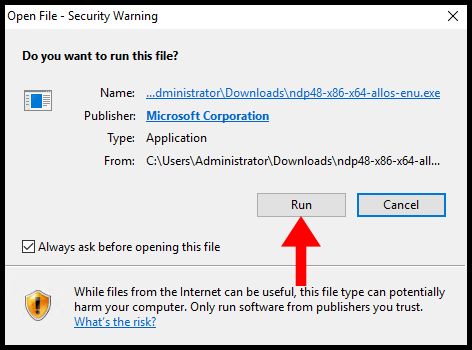
4. You will see the below pop-up warning Do you want to run this file? then click on Run.
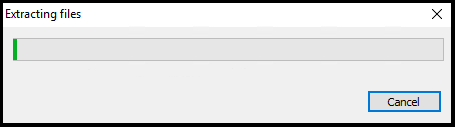
5. Now, windows will extract the files to start the installation.
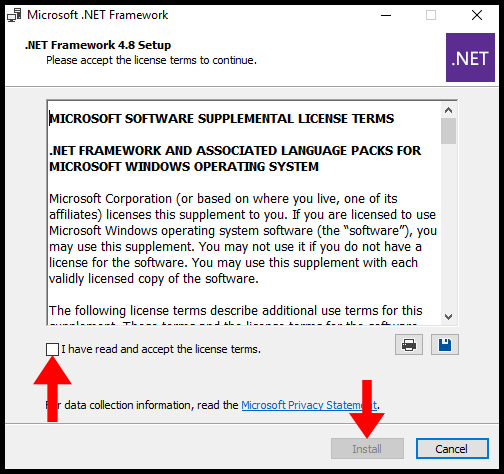
6. Once you have read the license terms, check the box I have read and accept the license terms and then proceed to press Install.
7. Next, the installation will begin.
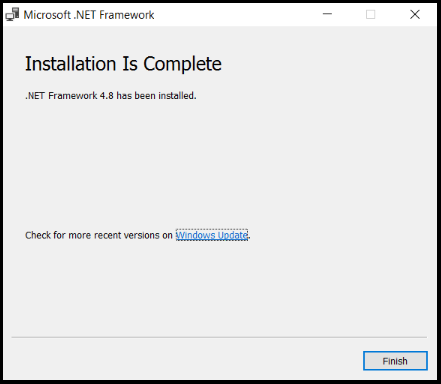
8. Once the installation is done, your server will now have .NET Framework.
How to install .NET Framework using Online Installer
If you want to process the .NET Framework with Online Installer i.e. Web Installer you must have an internet connection while processing the installation.
You can download any desired .NET Framework version by using the following URL,
https://dotnet.microsoft.com/download/dotnet-framework/
For this article, we will be installing .NET Framework 4.6. You can install any version of the .NET Framework as per your requirement.
1. Visit the above URL: https://dotnet.microsoft.com/download/dotnet-framework/ and select the .NET Framework Version.
2. Scroll down a little bit and download the Web Installer from the Advanced downloads section under Run apps – Runtime.
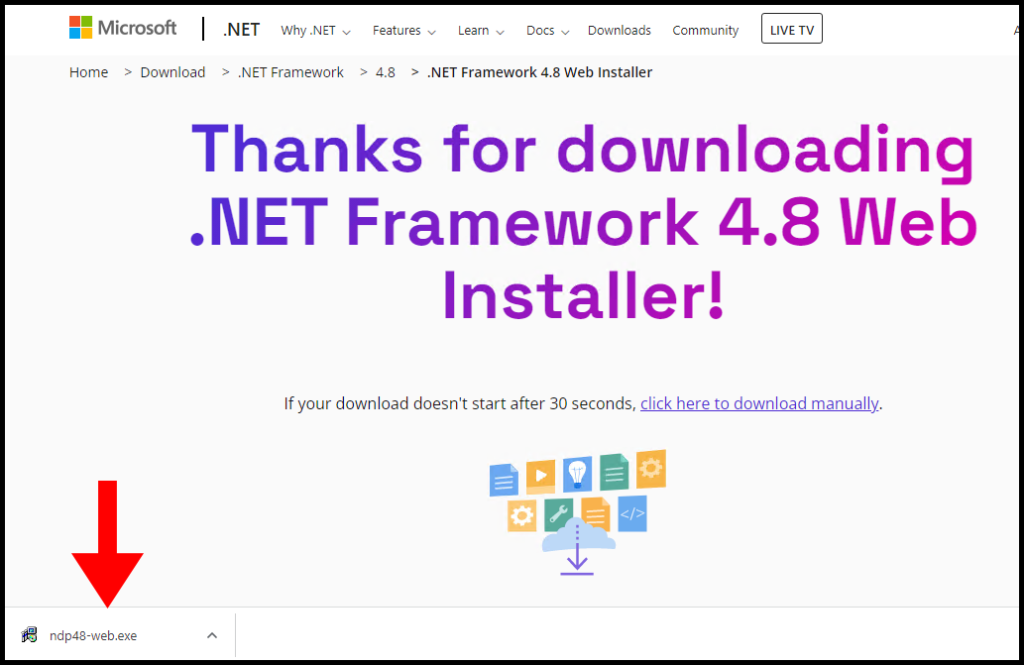
3. Once the download has been completed, click and run the executable file.
3. You will see one warning Do you want to run this file? then click on Run.
4. Now, windows will extract the files to start the installation.
5. Once you have read the license terms, check the box I have read and accept the license terms and then proceed to press Install.
6. Next, the installation will begin.
7. Congratulations, the .NET framework has been installed on your server.
Errors & Fix
Problem 1) .NET Framework 4 has not been installed because HRESULT 0xc8000222
Resolution:
1. First, open Command Prompt.
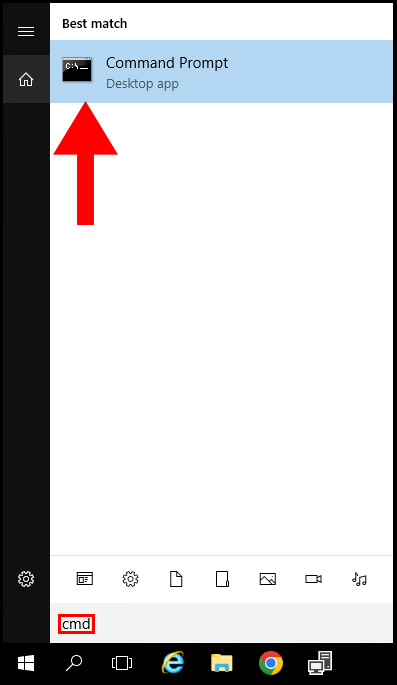
2. Type “net stop wuauserv” and hit Enter.
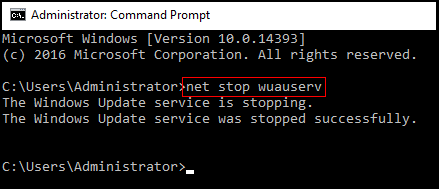
3. Now, open RUN (Windows Key + R) and type %windir%, then hit the OK button.
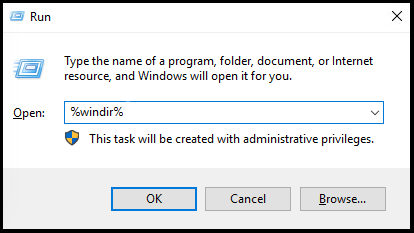
4. Then scroll down and find SoftwareDistribution and rename it to SD-kbp.
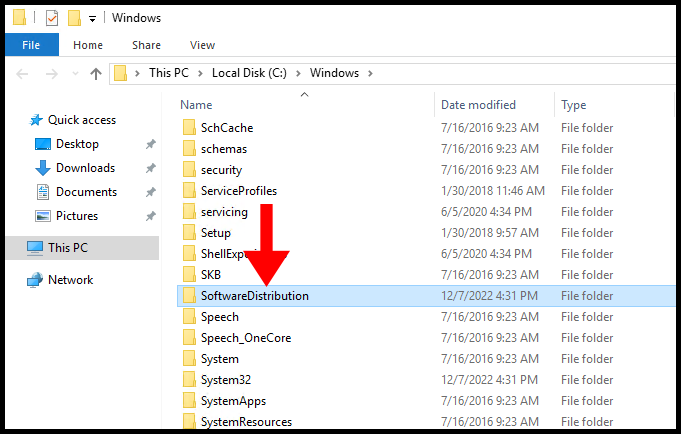
5. Finally, reopen Command Prompt and type “net start wuauserv” and hit Enter.
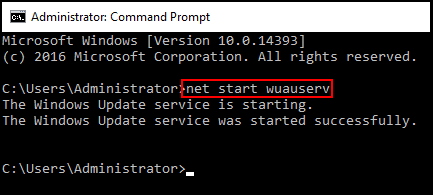
6. Now, try to install the .NET Framework.
Problem 2) The installation fails with the error 0x800f081f.
Resolution: This type of error encounters when supported files for the installation are not found. To install, NET-Framework-Core; you must have ISO of Windows Server 2016 or 2019. Now, mount the ISO file as a virtual drive. (Example E:)
Now specify an alternative source in the “Confirmation” option. There you need to put “E:sourcessxs” and hit OK.
Finally, process with the last steps of the installation.
All the Hyonix Windows VPS comes with Netframework by default