By Luke Latham and Rick Anderson
Sections:
- Supported operating systems
- IIS configuration
- Install the .NET Core Windows Server Hosting bundle
- Application configuration
- Deploy the application
- Configure the website in IIS
- Create a Data Protection Registry Hive
- Configuration of sub-applications
- Common errors
- Additional resources
Supported operating systems
The following operating systems are supported:
- Windows 7 and newer
- Windows Server 2008 R2 and newer*
*Conceptually, the IIS configuration described in this document also applies to hosting ASP.NET Core applications on Nano Server IIS, but refer to ASP.NET Core on Nano Server for specific instructions.
IIS configuration
Enable the Web Server (IIS) server role and establish role services.
Windows desktop operating systems
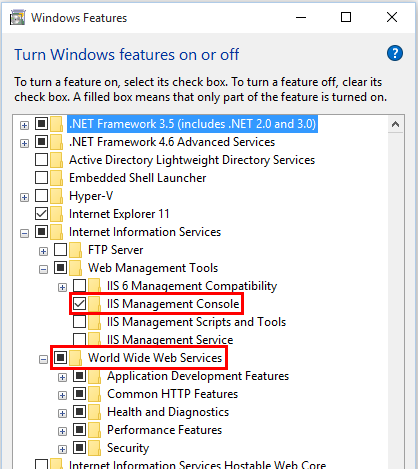
Navigate to Control Panel > Programs > Programs and Features > Turn Windows features on or off (left side of the screen). Open the group for Internet Information Services and Web Management Tools. Check the box for IIS Management Console. Check the box for World Wide Web Services. Accept the default features for World Wide Web Services or customize the IIS features to suit your needs.
Windows Server operating systems
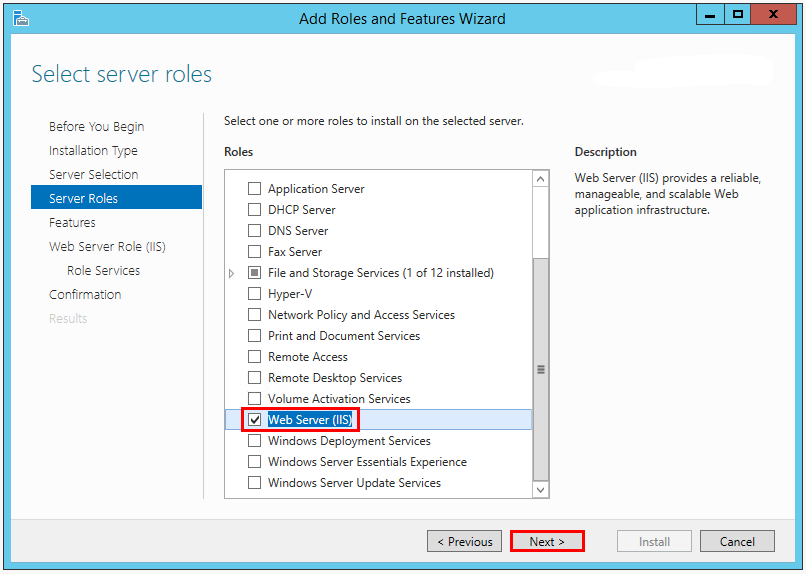
For server operating systems, use the Add Roles and Features Wizard via the Manage menu or the link in Server Manager. On the Server Roles step, check the box for Web Server (IIS).
On the Role services step, select the IIS role services you desire or accept the default role services provided.
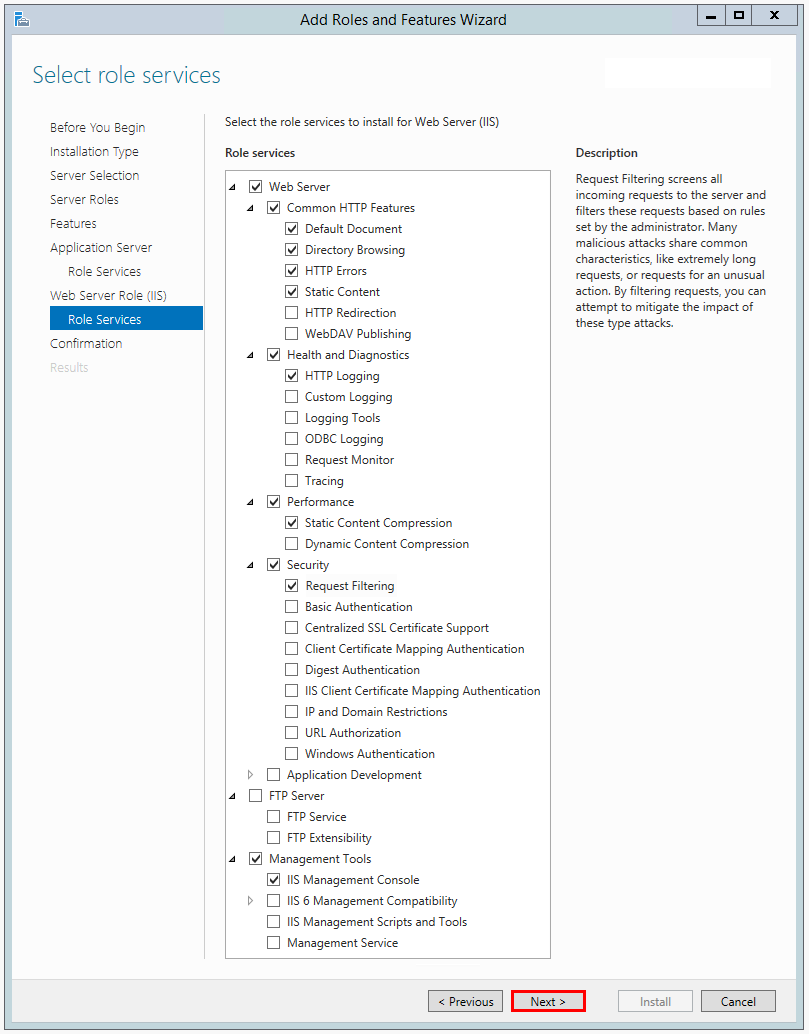
Proceed through the Confirmation step to enable the web server role and services.
Install the .NET Core Windows Server Hosting bundle
- Install the .NET Core Windows Server Hosting bundle on the server. The bundle will install the .NET Core Runtime, .NET Core Library, and the ASP.NET Core Module. The module creates the reverse-proxy between IIS and the Kestrel server.
- Restart the server or execute net stop was /y followed by net start w3svc from the command-line to pickup changes to the system PATH.
For more information on the ASP.NET Core Module, including configuration of the module and setting environment variables with web.config, the use of app_offline.htm to suspend request processing, and activation of module logging, see ASP.NET Core Module Configuration Reference.
Application configuration
Enabling the IISIntegration components
Include a dependency on the Microsoft.AspNetCore.Server.IISIntegration package in the application dependencies. Incorporate IIS Integration middleware into the application by adding the .UseIISIntegration() extension method to WebHostBuilder().
var host = new WebHostBuilder()
  .UseKestrel()
  .UseContentRoot(Directory.GetCurrentDirectory())
  .UseIISIntegration()
  .UseStartup<Startup>()
  .Build();
Note that code calling .UseIISIntegration() does not affect code portability.
Setting IISOptions for the IISIntegration service
To configure IISIntegration service options, include a service configuration for IISOptions in ConfigureServices.
services.Configure<IISOptions>(options => {
  ...
});
| Option | Setting |
|---|---|
| AutomaticAuthentication |
If true, the authentication middleware will alter the request user arriving and respond to generic challenges. If false, the authentication middleware will only provide identity and respond to challenges when explicitly indicated by the AuthenticationScheme. |
| ForwardClientCertificate |
If true and the MS-ASPNETCORE-CLIENTCERT request header is present, the ITLSConnectionFeature will be populated. |
| ForwardWindowsAuthentication |
If true, authentication middleware will attempt to authenticate using platform handler windows authentication. If false, authentication middleware won’t be added. |
Deploy the application
- On the target IIS server, create a folder to contain the application’s published folders and files, which are described in Directory Structure.
- Within the folder you created, create a logs folder to hold application logs (if you plan to enable logging). If you plan to deploy your application with a logs folder in the payload, you may skip this step.
- Deploy the application to the folder you created on the target IIS server. MSDeploy (Web Deploy) is the recommended mechanism for deployment, but you may use any of several methods to move the application to the server (for example, Xcopy, Robocopy, or PowerShell). Visual Studio users may use the default Visual Studio web publish script. For information on using Web Deploy, see Publishing to IIS with Web Deploy using Visual Studio.
Warning
.NET Core applications are hosted via a reverse-proxy between IIS and the Kestrel server. In order to create the reverse-proxy, the web.config file must be present at the content root path (typically the app base path) of the deployed application, which is the website physical path provided to IIS.
Sensitive files exist on the app’s physical path, including subfolders, such as my_application.runtimeconfig.json, my_application.xml (XML Documentation comments), and my_application.deps.json. The web.config file is required to create the reverse proxy to Kestrel, which prevents IIS from serving these and other sensitive files. Therefore, it is important that the web.config file is never accidently renamed or removed from the deployment.
Configure the website in IIS
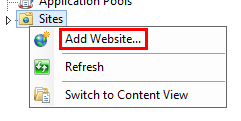
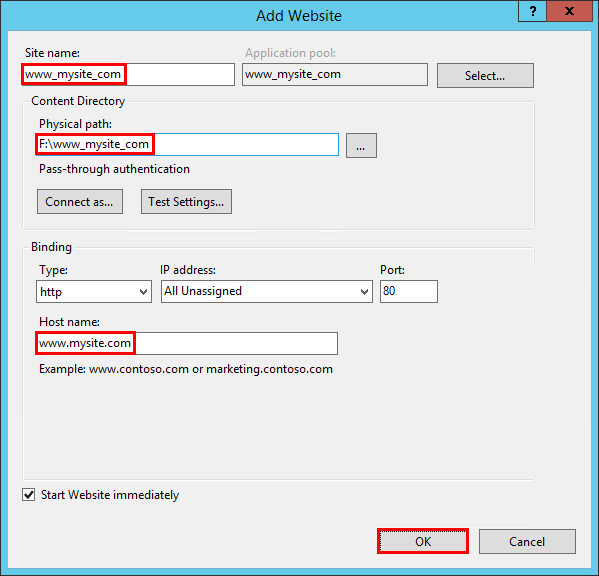
- In IIS Manager, create a new website. Provide a Site name and set the Physical path to the application’s assets folder that you created. Provide the Binding configuration and create the website.
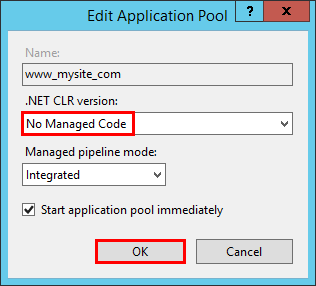
- Set the application pool to No Managed Code. ASP.NET Core runs in a separate process and manages the runtime.
Note
If you change the default identity of the application pool from ApplicationPoolIdentity, verify the new identity has the required permissions to access the application’s assets and database.
Open the Add Website window.
Configure the website.
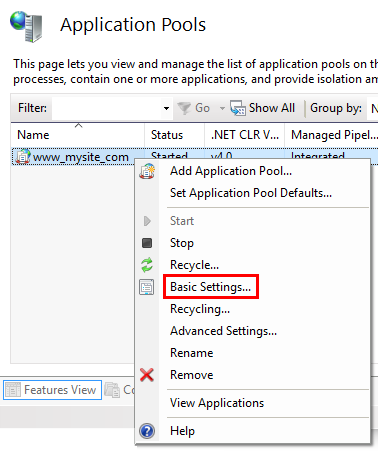
In the Application Pools panel, open the Edit Application Pool window by right-clicking on the website’s application pool and selecting Basic Settings… from the popup menu.
Set the .NET CLR version to No Managed Code.
Browse the website.

Create a Data Protection Registry Hive
Data Protection keys used by ASP.NET applications are stored in registry hives external to the applications. To persist the keys for a given application, you must create a registry hive for the application’s application pool.
For standalone IIS installations, you may use the Data Protection Provision-AutoGenKeys.ps1 PowerShell script for each application pool used with an ASP.NET Core application. The keys will be persisted in the registry.
In web farm scenarios, an application can be configured to use a UNC path to store its data protection key ring. By default, the data protection keys are not encrypted. You can deploy an x509 certificate to each machine to encrypt the key ring. See Configuring Data Protection for details.
Warning
Data Protection is used by various ASP.NET middlewares, including those used in authentication. Even if you do not specifically call any Data Protection APIs from your own code you should configure Data Protection with the deployment script or in your own code. If you do not configure data protection when using IIS by default the keys will be held in memory and discarded when your application closes or restarts. This will then, for example, invalidate any cookies written by the cookie authentication and users will have to login again.
Configuration of sub-applications
When adding applications to an IIS Site’s root application, the root application web.config file should include the <handlers> section, which adds the ASP.NET Core Module as a handler for the app. Applications added to the root application shouldn’t include the <handlers> section. If you repeat the <handlers> section in a sub-application’s web.config file, you will receive a 500.19 (Internal Server Error) referencing the faulty config file when you attempt to browse the sub-application.
Common errors
The following is not a complete list of errors. Should you encounter an error not listed here, please leave a detailed error message in the DISQUS section below (click Show comments to open the DISQUS panel).
To diagnose problems with IIS deployments, study browser output, examine the server’s Application log through Event Viewer, and enable module logging. The ASP.NET Core Module log will be found on the path provided in the stdoutLogFile attribute of the <aspNetCore> element in web.config. Any folders on the path provided in the attribute value must exist in the deployment. You must also set stdoutLogEnabled=”true” to enable module logging. Applications that use the publish-iis tooling to create the web.config file will default the stdoutLogEnabled setting to false, so you must manually provide the file or modify the file in order to enable module logging.
Several of the common errors do not appear in the browser, Application Log, and ASP.NET Core Module Log until the module startupTimeLimit (default: 120 seconds) and startupRetryCount (default: 2) have passed. Therefore, wait a full six minutes before deducing that the module has failed to start a process for the application.
A quick way to determine if the application is working properly is to run the application directly on Kestrel. If the application was published as a portable app, execute dotnet <my_app>.dll in the deployment folder. If the application was published as a self-contained app, run the application’s executable directly on the command line, <my_app>.exe, in the deployment folder. If Kestrel is listening on default port 5000, you should be able to browse the application at http://localhost:5000/. If the application responds normally at the Kestrel endpoint address, the problem is more likely related to the IIS-ASP.NET Core Module-Kestrel configuration and less likely within the application itself.
A way to determine if the IIS reverse proxy to the Kestrel server is working properly is to perform a simple static file request for a stylesheet, script, or image from the application’s static assets in wwwroot using Static File middleware. If the application can serve static files but MVC Views and other endpoints are failing, the problem is less likely related to the IIS-ASP.NET Core Module-Kestrel configuration and more likely within the application itself (for example, MVC routing or 500 Internal Server Error).
In most cases, enabling application logging will assist in troubleshooting problems with application or the reverse proxy. See Logging for more information.
Common errors and general troubleshooting instructions:
Installer unable to obtain VC++ Redistributable
- Installer Exception: Installation of the .NET Core Windows Server Hosting Bundle fails with 0x80070002 — The system cannot find the file specified.
Troubleshooting:
- If the server does not have Internet access while installing the server hosting bundle, this exception will ensue when the installer is prevented from obtaining the Microsoft Visual C++ 2015 Redistributable (x64) packages online. You may obtain an installer for the packages from the Microsoft Download Center.
Platform conflicts with RID
- Browser: HTTP Error 502.5 — Process Failure
- Application Log:
— Application Error: Faulting module: KERNELBASE.dll Exception code: 0xe0434352 Faulting module path: C:\WINDOWS\system32\KERNELBASE.dll
— IIS AspNetCore Module: Failed to start process with commandline ‘“dotnet” .\my_application.dll’ (portable app) or ‘“PATH\my_application.exe”’ (self-contained app), ErrorCode = ‘0x80004005’. - ASP.NET Core Module Log: Unhandled Exception: System.BadImageFormatException: Could not load file or assembly ‘teststandalone.dll’ or one of its dependencies. An attempt was made to load a program with an incorrect format.
Troubleshooting:
- If you published a self-contained application, confirm that you didn’t set a platform in buildOptions of project.json that conflicts with the publishing RID. For example, do not specify a platform of x86 and publish with an RID of win81-x64 (dotnet publish -c Release -r win81-x64). The project will publish without warning or error but fail with the above logged exceptions on the server.
URI endpoint wrong or stopped website
- Browser: ERR_CONNECTION_REFUSED
- Application Log: No entry
- ASP.NET Core Module Log: Log file not created
Troubleshooting:
- Confirm you are using the correct URI endpoint for the application. Check your bindings.
- Confirm that the IIS website is not in the Stopped state.
CoreWebEngine or W3SVC server features disabled
- OS Exception: The IIS 7.0 CoreWebEngine and W3SVC features must be installed to use the Microsoft HTTP Platform Handler 1.x.
Troubleshooting:
- Confirm that you have enabled the proper server role and features. See IIS Configuration.
Incorrect website physical path or application missing
- Browser: 403 Forbidden: Access is denied –OR– 403.14 Forbidden: The Web server is configured to not list the contents of this directory.
- Application Log: No entry
- ASP.NET Core Module Log: Log file not created
Troubleshooting:
- Check the IIS website Basic Settings and the physical application assets folder. Confirm that the application is in the folder at the IIS website Physical path.
Incorrect server role, module not installed, or incorrect permissions
- Browser: 500.19 Internal Server Error: The requested page cannot be accessed because the related configuration data for the page is invalid.
- Application Log: No entry
- ASP.NET Core Module Log: Log file not created
Troubleshooting:
- Confirm that you have enabled the proper server role. See IIS Configuration.
- Check Programs & Features and confirm that the Microsoft ASP.NET Core Module has been installed. If the Microsoft ASP.NET Core Module is not present in the list of installed programs, install the module. See IIS Configuration.
- Make sure that the Application Pool Process Model Identity is either set to ApplicationPoolIdentity; or if a custom identity is in use, confirm the identity has the correct permissions to access the application’s assets folder.
Hosting bundle not installed or server not restarted
- Browser: 502.3 Bad Gateway: There was a connection error while trying to route the request.
- Application Log: Process ‘0’ failed to start. Port = PORT, Error Code = ‘-2147024894’.
- ASP.NET Core Module Log: Log file created but empty
Troubleshooting:
- You may have deployed a portable application without installing .NET Core on the server. If you are attempting to deploy a portable application and have not installed .NET Core, run the .NET Core Windows Server Hosting Bundle Installer on the server. See Install the .NET Core Windows Server Hosting Bundle.
- You may have deployed a portable application and installed .NET Core without restarting IIS. Either restart the server or restart IIS by executing net stop was /y followed by net start w3svc from the command-line.
Incorrect processPath, missing PATH variable, or dotnet.exe access violation
- Browser: HTTP Error 502.5 — Process Failure
- Application Log: Failed to start process with commandline ‘“dotnet” .\my_application.dll’ (portable app) or ‘”.\my_application_Foo.exe”’ (self-contained app), ErrorCode = ‘0x80070002’.
- ASP.NET Core Module Log: Log file created but empty
Troubleshooting:
- Check the processPath attribute on the <aspNetCore> element in web.config to confirm that it is dotnet for a portable application or .\my_application.exe for a self-contained application.
- For a portable application, dotnet.exe might not be accessible via the PATH settings. Confirm that C:\Program Files\dotnet\ exists in the System PATH settings.
- For a portable application, dotnet.exe might not be accessible for the user identity of the Application Pool. Confirm that the AppPool user identity has access to the C:\Program Files\dotnet directory.
- You may have deployed a portable application and installed .NET Core without restarting IIS. Either restart the server or restart IIS by executing net stop was /y followed by net start w3svc from the command-line.
Incorrect arguments of <aspNetCore> element
- Browser: HTTP Error 502.5 — Process Failure
- Application Log: Failed to start process with commandline ‘“dotnet” .\my_application_Foo.dll’, ErrorCode = ‘0x80004005’.
- ASP.NET Core Module Log: The application to execute does not exist: ‘PATH\my_application_Foo.dll’
Troubleshooting:
- Examine the arguments attribute on the <aspNetCore> element in web.config to confirm that it is either (a) .\my_applciation.dll for a portable application; or (b) not present, an empty string (arguments=”“), or a list of your application’s arguments (arguments=”arg1, arg2, …”) for a self-contained application.
Missing .NET Framework version
- Browser: 502.3 Bad Gateway: There was a connection error while trying to route the request.
- Application Log: Failed to start process with commandline ‘[IIS_WEBSITE_PHYSICAL_PATH] ‘, Error Code = ‘0x80004005’.
- ASP.NET Core Module Log: Missing method, file, or assembly exception. The method, file, or assembly specified in the exception is a .NET Framework method, file, or assembly.
Troubleshooting:
- Install the .NET Framework version missing from the server.
Stopped Application Pool
- Browser: 503 Service Unavailable
- Application Log: No entry
- ASP.NET Core Module Log: Log file not created
Troubleshooting
- Confirm that the Application Pool is not in the Stopped state.
IIS Integration middleware not implemented or .UseUrls() after .UseIISIntegration()
- Browser: HTTP Error 502.5 — Process Failure
- Application Log: Process was created with commandline ‘“dotnet” .\my_application.dll’ (portable app) or ‘”.\my_application.exe”’ (self-contained app) but either crashed or did not reponse within given time or did not listen on the given port ‘PORT’, ErrorCode = ‘0x800705b4’
- ASP.NET Core Module Log: Log file created and shows normal operation.
Troubleshooting
- Confirm that you have correctly referenced the IIS Integration middleware by calling the .UseIISIntegration() method of the application’s WebHostBuilder().
- If you are using the .UseUrls() extension method when self-hosting with Kestrel, confirm that it is positioned before the .UseIISIntegration() extension method on WebHostBuilder(). .UseIISIntegration() must set the Url for the reverse-proxy when running Kestrel behind IIS and not have its value overridden by .UseUrls().
Sub-application includes a <handlers> section
- Browser: HTTP Error 500.19 — Internal Server Error
- Application Log: No entry
- ASP.NET Core Module Log: Log file created and shows normal operation for the root application. Log file not created for the sub-application.
Troubleshooting
- Confirm that the sub-application’s web.config file doesn’t include a
<handlers>section.
Hello Dev, welcome to our guide on installing the .NET Core Windows Server Hosting Bundle. This bundle is essential for hosting .NET Core web applications on a Windows server. By following the steps in this article, you will be able to install the hosting bundle and have your website up and running in no time.
Step 1: Check Prerequisites
Before installing the .NET Core Windows Server Hosting Bundle, there are a few prerequisites that need to be in place:
.NET Core Runtime
The first prerequisite is the .NET Core runtime. You can download it from the official .NET Core website using this link: https://dotnet.microsoft.com/download Make sure to install the correct version of the runtime for your operating system.
Windows Server
The second prerequisite is a Windows server. The .NET Core Windows Server Hosting Bundle is only compatible with Windows servers, so make sure you have access to one before proceeding.
Step 2: Download the Bundle
Once you have the prerequisites in place, you can download the .NET Core Windows Server Hosting Bundle from the official Microsoft website using this link: https://dotnet.microsoft.com/download/dotnet-core/thank-you/runtime-aspnetcore-5.0.0-windows-hosting-bundle-installer Make sure to download the correct version of the bundle for your operating system.
Step 3: Install the Bundle
Now that you have downloaded the bundle, it’s time to install it. Follow these steps:
1. Run the Installer
Double-click on the downloaded file to start the installation process.
2. Accept License Terms
Read and accept the license terms to continue with the installation.
3. Choose Installation Path
Select the installation path for the hosting bundle. The default path is recommended unless you have a specific reason to choose a different path.
4. Install the Bundle
Click the Install button to start the installation process. This may take a few minutes to complete.
5. Verify Installation
Once the installation is complete, verify that it was successful by running the following command in a command prompt: dotnet --list-runtimes The .NET Core Windows Server Hosting Bundle should be listed as one of the installed runtimes.
Step 4: Configure Your Application
Now that you have installed the .NET Core Windows Server Hosting Bundle, you can configure your application to use it. Follow these steps:
1. Publish Your Application
Publish your .NET Core web application using Visual Studio or the dotnet CLI. Make sure to choose the appropriate target runtime and configuration.
2. Copy Files to Server
Copy the published files to the server where you installed the .NET Core Windows Server Hosting Bundle. You can use FTP or any other file transfer method to do this.
3. Configure IIS
Configure IIS to host your application by following these steps:
Create a New Application Pool
Open IIS Manager and navigate to the Application Pools section. Click Add Application Pool and enter a name for your new application pool. Choose the appropriate .NET CLR version and pipeline mode.
Create a New Website
Click Add Website and enter a name for your new website. Choose the appropriate binding information and select the application pool you just created. Set the physical path to the location where you copied your published files.
Configure Application Settings
Click on your new website in the IIS Manager and navigate to the .NET Core Settings section. Enter the path to your application’s startup assembly and any other required settings.
Start Your Website
Click Start in the IIS Manager to start your website. Your .NET Core web application should now be hosted and accessible via the internet.
FAQ
|
Question |
Answer |
|---|---|
|
Can I install the .NET Core Windows Server Hosting Bundle on a non-Windows server? |
No, the hosting bundle is only compatible with Windows servers. |
|
Do I need to install the .NET Core runtime before installing the hosting bundle? |
Yes, the .NET Core runtime is a prerequisite for the hosting bundle. |
|
What version of the hosting bundle should I download? |
You should download the version that corresponds to the version of .NET Core that your web application targets. |
|
Can I use the hosting bundle with other web servers besides IIS? |
No, the hosting bundle is designed to work specifically with IIS. |
|
Do I need to configure anything on the client side to use my .NET Core web application? |
No, as long as the server is configured correctly, clients can access your web application using a web browser. |
Search code, repositories, users, issues, pull requests…
Provide feedback
Saved searches
Use saved searches to filter your results more quickly
Sign up

In my previous post, I have mentioned how to create Serverless .Net Core application which you can find here and you can find my all .Net Core posts here.
In this post, I will explain how to host\deploy your .Net Core 2.0 application to IIS.
prerequisite:
- Visual studio 2017 community edition, download here
- .Net Core 2.0 SDK from here (I have written a post to install SDK here)
- Make sure you have enabled the Web Server (IIS) role and established the role services
Install .NET Core Windows Server Hosting Bundle
Since .Net Core is a new framework, at this moment IIS is not aware of how to run .Net Core applications. So we need to inform IIS to set up an environment for the .Net Core applications.
For this, we need to install .Net Core Windows Server Hosting bundle which will install the .NET Core runtime, libraries, and the ASP.NET Core module for IIS.
Please note that this is a very important step and you must install the bundle before you publish the application on IIS.
You can download it from here(download will start once you click the link):
.NET Core Windows Server Hosting bundle
Wait till the installation is over:

Once the installation is completed, either restart your system or run below commands in sequence in command prompt:
- net stop was /y
- net start w3svc
The first command will stop the World Wide Web publishing service and the second command will start the service again.
Create the Web application using .Net Core 2.0 template in VS 2017
Once you have all these installed, open your Visual Studio 2017 -> Create New Project -> Select Core Web application:

Click on Web Application in next window and then click on Ok:

Visual Studio will create a well-structured application for you.
Right click on the solution and click on Publish:

In next window, click on Folders and give the folder path. I created Publish folder under wwwroot folder:

It will publish the application on the above-mentioned path:

Create Website on IIS
Open your IIS Manager and add new website:

Now go to Application Pools panel, open the Edit Application Pool window by right-clicking on the website’s app pool and selecting Basic Settings and set .NET CLR version to No Managed Code:

Check if .Net Core Windows Server Hosting bundle is installed properly
Next step is to check whether the hosting bundle which we installed earlier is installed properly or not.
For this click on Modules(in IIS Manager) of your newly created website and search for AspNetCoreModule. If it is available, it indicates that IIS is now aware of how to run a .Net Core application.

You might be wondering what is Asp .Net Core Module?
- ASP.NET Core Module lets you run ASP.NET Core applications on IIS for what it’s good for i.e. security, manageability, and lots more
- On the other hand, ASP.NET Core Module lets you run ASP.NET Core applications using Kestrel for what it’s good at for example being really fast
- Thus it is getting the benefits of both technologies at once
- Asp .Net Core Module handles all incoming traffic to IIS and acts as the reverse proxy that knows how to hand the traffic off to your ASP.NET Core application
You may have noticed that when we published the code to a particular folder, a web.config was created in which you can see aspNetCore under Handler section as below. This is only used when deploying your application to IIS and It registers the AspNetCoreModule as an HTTP handler.
<?xml version="1.0" encoding="utf-8"?>
<configuration>
<system.webServer>
<handlers>
<strong><add name="aspNetCore" path="*" verb="*" modules="AspNetCoreModule" resourceType="Unspecified" /></strong>
</handlers>
<aspNetCore processPath="dotnet" arguments=".\NeelCorePublishIIIS.dll" stdoutLogEnabled="false" stdoutLogFile=".\logs\stdout" />
</system.webServer>
</configuration>
That is it.
Just load your IIS site and it should load just fine:

Now the application is hosted on IIS.
Hope it helps.

Published by Neel
Senior Software Engineer at Coolblue | Tech Blogger | Top 4% Overall on StackOverflow
View all posts by Neel
Published
- Remove From My Forums
-
Question
-
User-1228944606 posted
Hello:
I need to use IIS for hosting my ASP .NET Core 2.x application.
According to the link,
https://docs.microsoft.com/en-us/aspnet/core/host-and-deploy/iis/index?tabs=aspnetcore2xIt says the following.. but I cannot find the NET Core Windows Server Hosting bundle. Can someone help? Thanks!
Install the .NET Core Windows Server Hosting bundle
-
Install the .NET Core Windows Server Hosting bundle on the hosting system. The bundle installs the .NET Core Runtime, .NET Core Library, and the ASP.NET
Core Module. The module creates the reverse proxy between IIS and the Kestrel server. If the system doesn’t have an Internet connection, obtain and install the Microsoft
Visual C++ 2015 Redistributable before installing the .NET Core Windows Server Hosting bundle.- Navigate to the .NET All Downloads page.
- Select the latest non-preview .NET Core runtime from the list (.NET Core > Runtime > .NET Core Runtime x.y.z). Unless you intend
to work with preview software, avoid runtimes that have the word «preview» in their link text. - On the .NET Core runtime download page under Windows, select the Server Hosting Installer link to download the .NET Core Windows Server Hosting
bundle.
-