Что представляет собой графовая система управления базой данных Neo4j и как подключить ее к виртуальному серверу, использующему ОС Виндовс.
Описание Neo4j
Данная СУБД является графовой, то есть в своей работе с информацией она применяет модель графов. На сайта разработчика можно более подробно разузнать обо всех возможностях программы.
Что потребуется для работы
Чтобы запустить Neo4j на компьютере, устройство должно обладать следующими минимальными характеристиками:
- Оперативная память – от 2 Гб. Для оптимального функционирования необходимо 16 Гб.
- Жесткий диск – SSD типа.
- Язык программирования виртуального сервера – Java. Поэтому понадобится установка Oracle Java на веб-сервер.
Как загрузить СУБД
Чтобы начать загрузку Neo4j, необходимо на официальном портале ПО подобрать оптимальную версию, которая подойдет для работы с Виндовс системами, а после загрузить zip-архив.

Разархивировать файлы можно в любую удобную директорию, но желательно поместить их прямо на системный диск:
C:neo4j
После чего система управления базами данных запускается через консольное приложение либо службу Виндовс,
Открыть как консольное приложение
Для запуска Neo4j нужно открыть PowerShell, также подойдет и классическая командная строка. Дальше надо зайти в директорию с файлами:
cd neo4jbin
Сделать запуск исполняемого файла:
.neo4j.bat console
Итог: консоль покажет несколько строк с технической информацией.
2018-12-14 14:07:42.177+0000 INFO ======== Neo4j 3.5.0 ======== 2018-12-14 14:07:42.192+0000 INFO Starting... 2018-12-14 14:07:45.130+0000 INFO Bolt enabled on 127.0.0.1:7687. 2018-12-14 14:07:46.661+0000 INFO Started. 2018-12-14 14:07:47.630+0000 INFO Remote interface available at http://localhost:7474/
После этого открывается виртуальный интерфейс и работа продолжается в нем.
Открыть как службу Windows
Для запуска Neo4j, как и в прошлом случае, потребуется командная строка либо PowerShell. Затем необходимо зайти в директорию с файлом:
cd neo4jbin
Инсталлировать сервис через такую команду:
.neo4j.bat install-service
В итоге на экран выведется строчка:
Neo4j service installed
Запустить саму систему управления базами данных можно через:
.neo4j.bat start
А если понадобится завершить работу, есть команда:
.neo4j.bat stop
Как подключиться к веб-интерфейсу
Когда СУБД успешно запустилась, открывается браузер по умолчанию, в нем в строчке поиска пишется:
localhost:7474
Первое подключение запросит пароль, можно указать:
neo4j
Далее можно поменять стандартный пароль на более сложный.
А после этого откроется окошко с начало работы Neo4j.
Аverage rating : 5
Оценок: 1
220140
Минск
ул. Домбровская, д. 9
+375 (173) 88-72-49
![]()
700
300
ООО «ИТГЛОБАЛКОМ БЕЛ»
220140
Минск
ул. Домбровская, д. 9
+375 (173) 88-72-49
![]()
700
300
ООО «ИТГЛОБАЛКОМ БЕЛ»
![]()
700
300
A detailed guide to installing Neo4j server community edition on Windows 10.
This is a guide to installing Neo4j server on windows 10, how to launch and connect to your own Neo4j server, and how to install and use plugins with them. Throughout this guide, we will be downloading many programs and tools too:
— Node.js
— Yarn
— Git for Windows 10
— Java SE developer kit 17
— NeoDash (complicated, will be instructed below)
This guide is also made into a video instruction playlist available on YouTube here
Step 1: Installing prerequisites for Neo4j server and NeoDash:
Our order of installation will be:
- Java developer kit 17 (JDK)
- Node.js
- Yarn
- Git
1.1 Installing Java developer kit 17 (JDK)
To start with, begin downloading JDK from the link given. The one you want to download is the x64 Installer, where its file extension ends with .exe.

Once downloaded, the installer will look like below. Simply launched the installer and follow the instruction.

1.2 Installing Node.js
For this installation, select the Windows Installer (.msi) and the respective window operating system. In this video, we will be going with 64-bit installer.

Now that you have downloaded it, launch the installer, and follow the instruction.

1.3 Installing Yarn
Yarn itself is not a program. Yarn is a programming package manager, that is already included in Node.js but is not active by default. With our current version of Node.js, simply launch a Command Prompt window as an admin. Then proceed to type/copy the code line below:
This will enable Yarn for us to install NeoDash.

1.4 Installing Git
For windows, you will have to navigate to Git download page linked above. Once there, from the section Standalone Installer, select the appropriate version for your computer. In this case, we will be going with the 64-bit Git for Windows Setup.

After launching the installer, follow the instruction.

Step 2: Installing Neo4j server community edition and APOC core
2.1 Installing Neo4j server community edition
Go to the following link to download the appropriate neo4j server community edition

After downloading the file, locate the location you want to deploy the server, and extract the zip file there. In this case, we are choosing the D: drive. We will be calling this the NEO4J_HOME folder. The result will look like this:

2.2 Installing APOC core
Since our work will also be using APOC for functions and queries that would be more convenient, we will be installing APOC core. This file is already available in the labs folder in NEO4J_HOME.


Simply copy it over to plugins folder, and it will be available the next time you launch Neo4j.

2.3 Configurating Neo4j and Windows for remote connection
2.3.1 Configuring Neo4j for remote connect
In order to connect to Neo4j from outside, we must configure the program to listen to inbound connection request. First, you must access the conf folder in NEO4J_HOME:

Then, open the neo4j conf with any program that can be used to edit it. In this example, we will be using Visual Studio Code:

Now locate these lines and delete the # before the line. Becareful not to accidentally pull the code into a different line.

2.3.2 Configuring Windows Defender Firewall
As of now, you have enable Neo4j to respond to call for it from outside, but you still need to configure window’s own firewall: Windows Defender Firewall.
- Open
Windows Defender Firewall

- Access
Advance settings

- Go to
Inbound Rules, then selectNew ruleson the right side

- Here, you have to choose connecting through port

- Choose connection type
TCPand type in port number7474. This is the default http port for neo4j. It is also the port noted in the section above when you delete the#above.

- Now choose
Allow the connection

- Select all options here

- Lastly, name the port opening, so we can find it again in the future. For
Neo4j, we name itneo4j http.

- Now we have to repeat step 3-8 again, but for another rule to enable
neo4j bolt, andNeoDashto connect. Below are the two steps 5 and 8, where there is a difference in the process. In each respective rules, their names and ports are:neo4j bolt:7687neodash:3000


Step 3: Installing NeoDash
Before we continue to launch Neo4j, we will also be downloading a dashboard builder that’s built for Neo4j. NeoDash, however, is a bit more complicated to install, as it is not just a folder, but a GitHub repository. To install, follow the steps below:
- Launch
Git CMD

- Navigate to where you want to install
NeoDash. In this guide, we will be using the parent folder ofNEO4J_HOME.

- Type/copy the code below:
git clone https://github.com/neo4j-labs/neodash

- Once the progress is done, type/copy the following code:

You have now installed NeoDash, but you have not finished setting it up yet.
Now navigate into the folder with this command
And run the command again to set up NeoDash dependencies.

Now NeoDash is fully installed and ready to be used.
Step 4: Launching and navigating
At this step, you should have everything ready to launch and use.
For any one to access neo4j from outside but on the same network, you will need to access through the computer’s IP address. In order to do so, open a Command Prompt window, and copy the following code:
Now, locate this line, and the entire corresponding number on the right hand side is you IP address

4.1: Launching neo4j:
To launch Neo4j, navigate to the bin folder inside the NEO4J_HOME folder in Command Prompt, then copy this code below:

Neo4j can then be accessed in a browser at the following address: IP address:7474.

You can then choose how to access Neo4j browser, here we chose the method username/password. For the first time, we will be using the default username: neo4j and password: neo4j to access the first time.

You will be prompted to change your password. This username and password is what you will use everytime you access neo4j again.

4.2: Importing data files:
Usually, you need to use data outside of what Neo4j can offer. In order to do so, you will need to navigate to your NEO4J_HOME folder. Once there, navigate to import folder, and put the data file there.

The data is now ready to be used.
4.3: Launching NeoDash:
Similar to launching Neo4j, you need to use Command Prompt to navigate to the folder where you have NeoDash cloned.

Once there, copy the following code:

This will run NeoDash, and you can access it by going to IP address:3000 on your browser. Once there, you will be shown this screen:

Simply click NEW DASHBOARD, and you will be taken to this screen:

You need to change the following:
- Connection: bolt
- Port: 7687
- Username: neo4j
- Password: the password you created above
Then, clickCONNECT, and you will be connected and your dashboard is ready to use.
4.4 Load a pre-designed dashboard:
In order to load a pre-designed dashboard, go to Load Dashboard on the left.

Copy and paste a dashboard content here, as such:

Click LOAD DASHBOARD, and the dashboard is now available.

Step 5: Closing Neo4j and NeoDash after done.
5.1: Closing Neo4j:
In the Command Prompt that is running Neo4j, simply press CTRL, hold, and C, to close Neo4j.
You might be prompted with this message:

Type y or Y to close, and n or N to cancel closing. Afterward, you should see this message:

That means Neo4j has successfully closed, and you can close the browser tab and the Command Prompt now.
5.2: Closing NeoDash:
Similar to above, in the Command Prompt that is running NeoDash, simply press CTRL, hold, and C, to close NeoDash.
You might be prompted with this message:

Type y or Y to close, and n or N to cancel closing. Afterward, you should see this message:

That means NeoDash has successfully closed, and you can close the browser tab and the Command Prompt now.That means Neo4j has successfully closed, and you can close the browser tab and the Command Prompt now.
Time for me to play with Neo4j. I have a project, where a graph DB makes most sense. In this blog I’ll install Neo4j on Windows.
First I’ll install a docker version. It might come handy in deployment case.
Next I’ll install a Desktop version to get a GUI both for management, but mostly for a data editing interface.
Neo4j — editions
So what is out there to install?
On the Neo4j Download page you have options to download
- two server versions,
- Enterprise or
- Community. You also have option of downloading
- a Desktop version with a GUI included.
- A Cypher CLI is a separate install.
Neo4j KB article talks about CLIs. There you find a handy script for a Neo4j docker container.
From the the download page I’ll grap
- Neo4j Desktop
- SDK for JavaScript and possibly some plugins
From the KB article I’ll grap the Neo4j Docker script and modify it a bit.
Install Docker Container edition
From Neo4j KB article you’ll find this script:
# Script from https://neo4j.com/developer/kb/using-neo4j-shell-neo4j-ce-3x/
docker pull neo4j
CONTAINER=$(docker run -d --name neo4j -p 7474:7474 -v /path/to/data:/data -v /path/to/csv-files:/var/lib/neo4j/import neo4j)
echo "Running Neo4j as $CONTAINER, waiting for startup"
sleep 10
# to import a file from `/path/to/csv-files/import.cypher`
docker exec $CONTAINER /var/lib/neo4j/bin/neo4j-shell -f /var/lib/neo4j/import/import.cypher
# or for interactive mode
docker exec -ti $CONTAINER /var/lib/neo4j/bin/neo4j-shell
Here is what I modified it to on Windows:
From CMD: (Run as admin)
# Set envir for Neo4j database files - notice folder format is not Linux, though it will be used from GIT BASH
setx NEO_DATA "C:\Users\user\ItData\neodata\neo4jDatabases" /M
# SUCCESS: Specified value was saved.
From Git Bash:
# Optionally do some cleanup:
docker system prune
# WARNING! This will remove:
#         - all stopped containers
#         - all networks not used by at least one container
#         - all dangling images
#         - all dangling build cache
# Are you sure you want to continue? [y/N] y

# Download image from docker hub
# 3.5.5 is currently latest neo4j image
docker pull neo4j:3.5.5
# ...
# Status: Downloaded newer image for neo4j:3.5.5

# Verify envir
printenv | grep NEO
# NEO_DATA_BASH=C:\Users\user\ItData\neodata

# Create folder for the container and for CYPHER CSV imports
cd $NEO_DATA
mkdir docker-container1 && cd docker-container1 && mkdir import && mkdir data

# Start Docker

# Map a DB data folder and an CSV import folder on your PC for a Neo4j container and start it
# https://neo4j.com/docs/operations-manual/current/docker/introduction/#docker-volumes
CONTAINER=$(docker run -d --name neo4j -p 7474:7474 -v $NEO_DATA/docker-container1/data:/data -v $NEO_DATA/docker-container1/import:/var/lib/neo4j/import neo4j)
echo "Running Neo4j as $CONTAINER, waiting for startup"
sleep 10

# iIs it running?
docker ps
# CONTAINER ID        IMAGE                         COMMAND                  CREATED              STATUS              PORTS                                        NAMES
# 95f89a2b0956        neo4j                         "/sbin/tini -g -- /d…"   About a minute ago   Up About a minute   7473/tcp, 7687/tcp, 0.0.0.0:7474->7474/tcp   neo4j

# Whats in its log?
docker logs neo4j
# Active database: graph.db
# Directories in use:
#   home:         /var/lib/neo4j
#   config:       /var/lib/neo4j/conf
#   logs:         /logs
#   plugins:      /var/lib/neo4j/plugins
#   import:       /var/lib/neo4j/import
#   data:         /var/lib/neo4j/data
#   certificates: /var/lib/neo4j/certificates
#   run:          /var/lib/neo4j/run
# Starting Neo4j.

# So when container was started it created a DB with

# to import a file from `$NEO_DATA_BASH/import/import.cypher`
# docker exec $CONTAINER /var/lib/neo4j/bin/neo4j-shell -f /var/lib/neo4j/import/import.cypher

# or for interactive mode
docker exec -ti $CONTAINER /var/lib/neo4j/bin/neo4j-shell
# the input device is not a TTY.  If you are using mintty, try prefixing the command with 'winpty'

# Annoying could not connect - the one fix I know is to repeat the command from the PS1 Docker CLI, which you can start from Kitematic or directly from Kitematic
From Kitematic:
- Select the neo4j container
- Press EXEC icon
- This will open a PS1 prompt
# where are we?
pwd
# /var/lib/neo4j

# What is the version?
./bin/neo4j --version
# neo4j 3.5.5

# now run the shell from here - neo4j-shell is now cypher-shell
./bin/cypher-shell
# username: neo4j
# password: neo4j
# Connected to Neo4j 3.5.5 at bolt://localhost:7687 as user neo4j.
# Type :help for a list of available commands or :exit to exit the shell.
# Note that Cypher queries must end with a semicolon.
# neo4j>
:help
# Available commands:
#   :begin    Open a transaction
#   :commit   Commit the currently open transaction
#   :exit     Exit the logger
#   :help     Show this help message
#   :history  Print a list of the last commands executed
#   :param    Set the value of a query parameter
#   :params   Prints all currently set query parameters and their values
#   :rollback Rollback the currently open transaction
# For help on a specific command type:
#     :help command
# For help on cypher please visit:
#     https://neo4j.com/docs/developer-manual/current/cypher/
:exit
When you are done using the shell you can just close it with Alt+F5.
When you are done with using the DB, you can stop it from GIT BASH
- More info on Docker Hub
- Even more on Docker — The Neo4j Operations Manual v3.5
- Tutorial: Neo4j Data Import: Moving Data from RDBMS to Graph
Windows Desktop edition
It is still nice to have the Desktop edition. You get the browser and you can connect to the docker DB.
Install Neo4j Desktop
You can install Neo4j for personal use into
C:\Users\user\AppData\Local\Programs\Neo4j Desktop
or for all users into
C:\Program Files\Neo4j Desktop
The default place it wants to place your data is
C:\Users\user\.Neo4jDesktop
I want it shared with my docker install into
C:\Users\user\ItData\neodata
Warnings:
- When you uninstall neo4j it will delete the whole folder, but you can choose option to backup, so you still have the data for e.g. your docker container
- In some countries you will get message
You are not online so you can not 'Register via Social Login', when starting Neo4j.- Solution A: Use VPN to get access from another country.
- Solution B: Work offline (if that is enough). For development it probably is. You can also get an activation key via email. You’ll get this supportive message:
Your friendly neighborhood Neo4j representative can get an activation key for you. If you're not sure who to call send an inquiry to info@neo4j.com
Create a local graph DB
You can connect towards an exiting local or remote graph DB — or you can create a new local one.
Since the docker uses same port you should stop it first
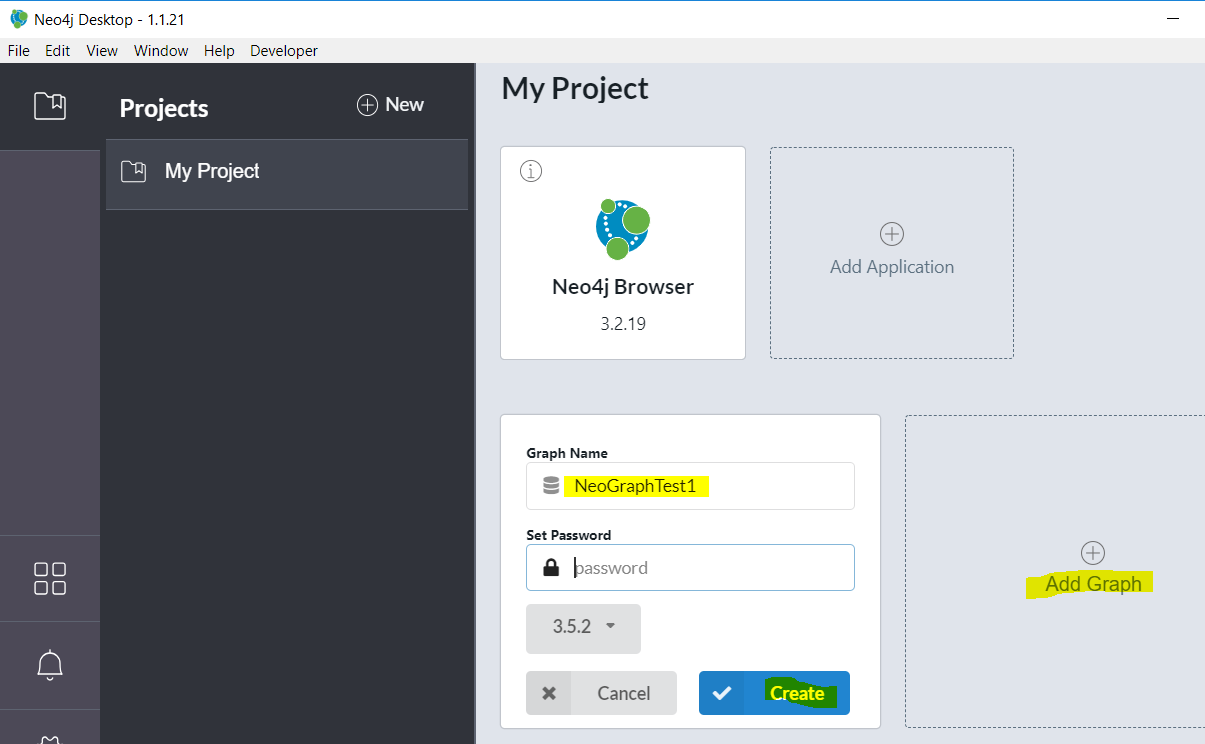
To create a new local graph DB
- Click on
Add Graph- You can now create a local graph or connect to a remote one. You could have started the container and have connected towards that one
- Instead — Create the local one (I am just exploring anyway)
-
Give it a name, a password and click
Create- I called this one
NeoGraphTest1

- I called this one
-
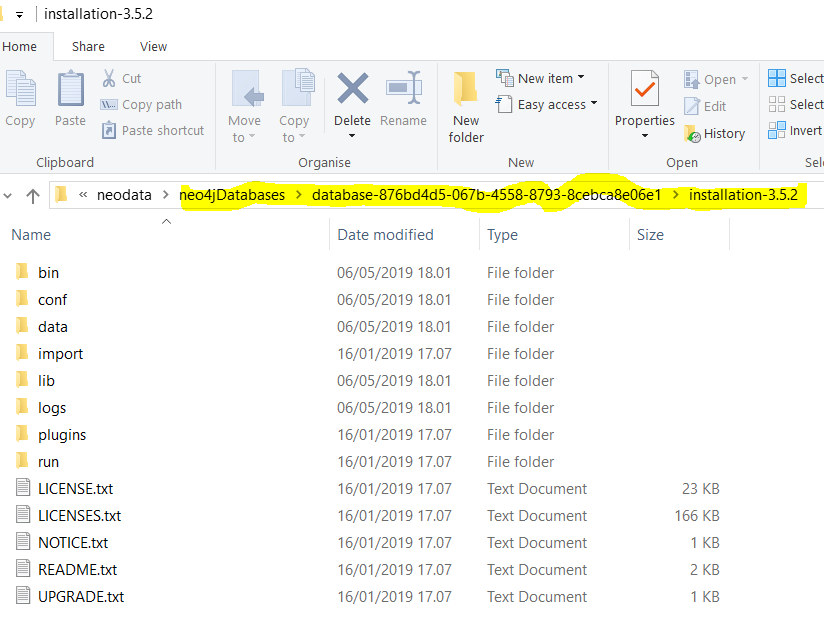
This will create the DB in a folder below what you chose during installation
- In my case the DB is in
\neodata\neo4jDatabases\database-876bd4d5-067b-4558-8793-8cebca8e06e1\installation-3.5.2\data\databases\graph.db - So that is why I put the container data folder into
\neodata\neo4jDatabases\container1\data. This keeps it separated in the same level except that I have left out the installation version. If I needed that I would instead have called the folder\container1-3.5.5\. - The level
\database-876bd4d5-067b-4558-8793-8cebca8e06e1\installation-3.5.2gives you the content ofNeoGraphTest1- It has all the files as the container has including
\bin\folder — but these are the Windows files opposed to the Linux files in the container
- It has all the files as the container has including
- In my case the DB is in
-
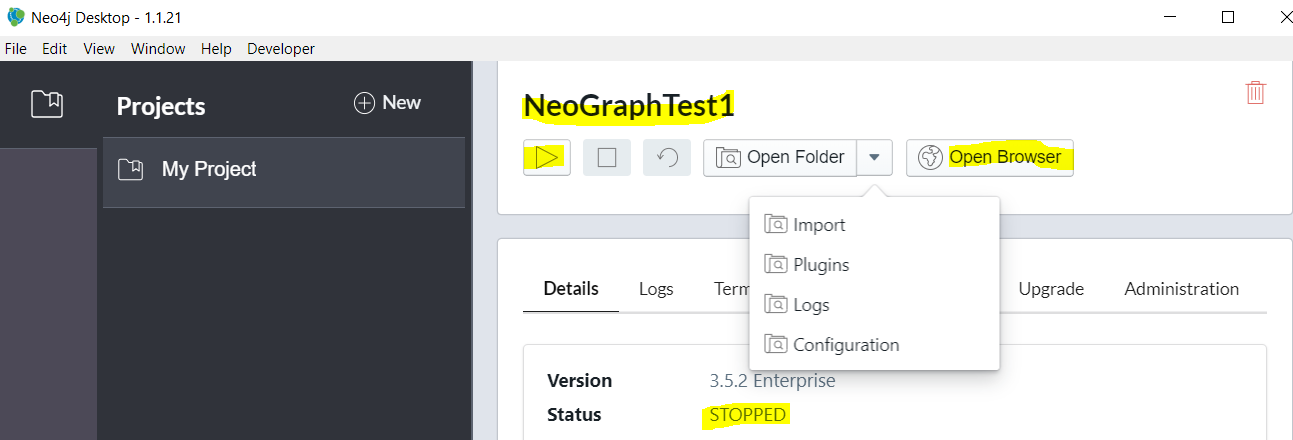
The new DB is stopped. You can start it from the project page or you can press
Manageto enter the DB page forNeoGraphTest1- On DB page you have a dashboard to a lot — most importantly to start the DB and to connect to it with the Cypher Browser
- Press
Start
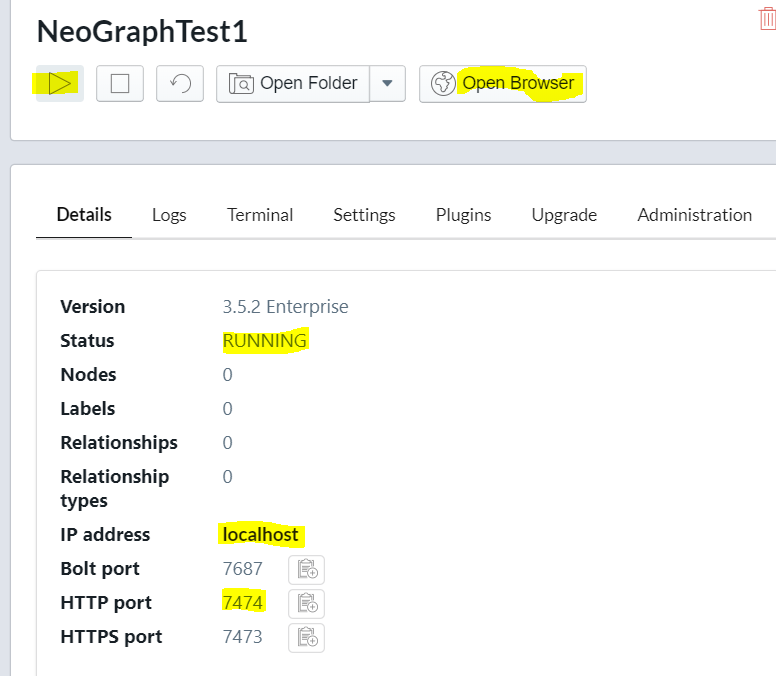
-
With the DB started you get to know the ports it
Connect to your docker container graph DB
The docker neo4j DB is easy to intall into cloud, so lets get aquainted with connecting to that as well.
Since the docker uses same port as NeoGraphTest1 you should stop NeoGraphTest1 first and start docker.
Just browse docker
To browse the docker Graph with Cypher
-
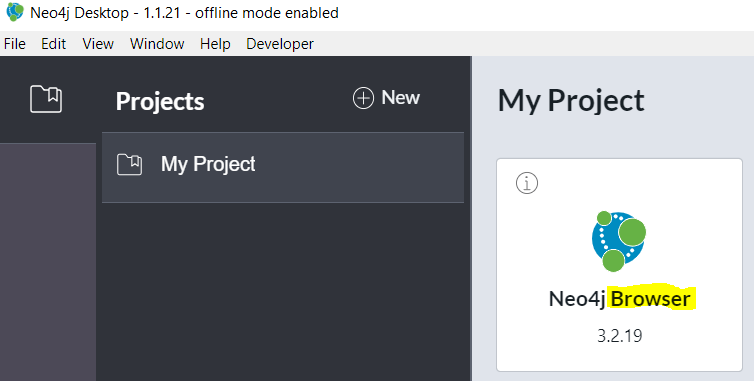
From Neo4j Desktop Click on
Neo4j Browser
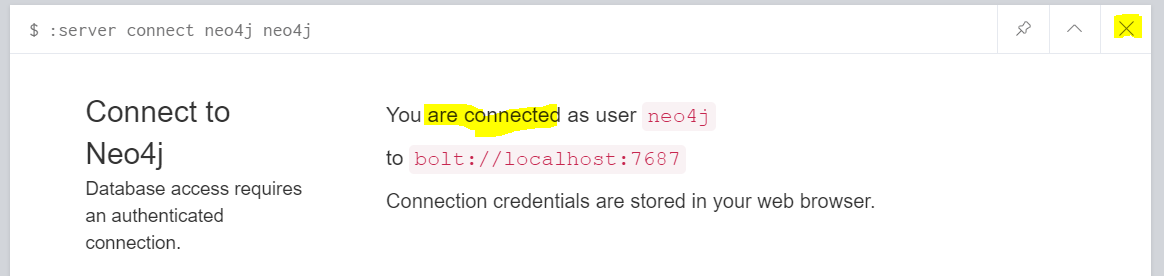
A new window opens and complains that it can’t connect tobolt://localhost:7687. -
You need to help it with username/password.
- In the cypher prompt enter command
:server connect neo4j neo4j

The response is displayed in a box below. If you are connected, then just press X to cleanup.
- When you are done you can
:server disconnect
Save the docker browser
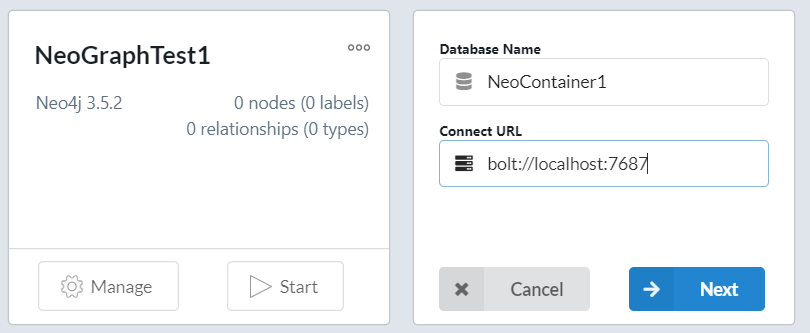
You could also save the link to the docker Graph just as NeoGraphTest1
- From Neo4j Desktop Click on
Add Graph - Click on
Connect to Remote - Name:
NeoContainer1 -
Url:
bolt://localhost:7687
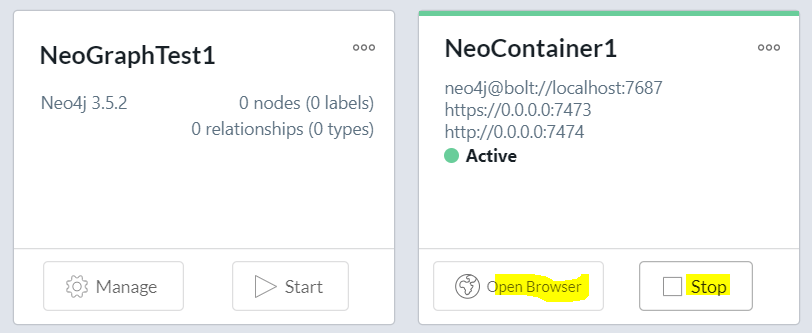
-
Press
Username/Password - User:
neo4j - Password:
neo4j - Press
Connect -
Press
Start
-
Press
Open Browser
Notes:
- After restarting the container at one point I hade to add the port 7687 in Kitematic to be able to connect
- When you connect to the container remotely you also have to change the default password from
neo4jafter opening it in the browser
Installation Guides
- 2.5. Windows installation
- Neo4j Desktop
What’s next?
- Play with Cypher to add and read some data
- Create some code to interact with the data
- Change ports on local DB, so it doesn’t collide with the docker DB.
Learn and Communities
- Neo4j Community
- Cypher:
- Neo4j’s Graph Query Language: An Introduction to Cypher
- Neo4j — Create a Node using Cypher
- eBooks:
- Neo4j Books: Free Graph Database Ebooks
- Graph Databases for Beginners — Neo4j Graph Database Platform
- O’Reilly Graph Algorithms Book — Neo4j Graph Database Platform
- Neo4j Books: Free Graph Database Ebooks
The End
Graph Database Overview
First, a brief introduction to graph databases. Graph databases are a convenient, natural way to represent almost any kind of data. As a result, they have experienced a rapid growth in popularity over the last several years.
Data is stored using a graph structure; in other words, nodes, edges, and properties are used represent information and relationships.
Neo4j is the most popular graph database available today. It is open-source, fully ACID compliant, and capable of scaling to billions of nodes and relationships.
Official Neo4j Documentation
The official documentation for installing Neo4j on Windows can be found here: http://neo4j.com/docs/2.1.6/server-installation.html#windows-install.
Why Neo4j?
I am currently working on a project that involves data where the relationships in the data are every bit as important as the actual data itself.
A graph database seemed like a natural fit, so I set out to learn how to get started with Neo4j.
Using the Installer
Initially, I installed Neo4j Community Edition locally using the Windows 64-bit installer. To download an installer (or other release), head over to http://neo4j.com/download/.
The installer worked flawlessly, and I had it up and running in minutes. The installer adds a start menu option that opens a small program window to start/stop/configure your local Neo4j instance.
This is a great way to quickly experiment with Neo4j and find out if it meets your needs.
Loading Data
My next objective was loading data into the database. I wrote a small C# program to read in data from a CSV file and create nodes and relationships.
I used the Readify/Neo4jClient (also available via NuGet) to greatly simplify the process. It provides a fluent interface for writing Cypher queries (Neo4j’s query language) and executing them against a database, and the wiki documentation had everything I needed to get started.
A Word of Caution When Loading Data
A brief digression and warning: even when using Readify/Neo4jClient, some string concatenation is still necessary to build Cypher statements. It is very easy to change something (e.g. a property name on an object) and then forget to make the corresponding change in a string in a Cypher query.
I found this out when I started loading data and my create operations quickly slowed to a crawl. I thought I was testing for uniqueness before creating, but what I was actually doing was always creating new nodes and then pointlessly searching through all the existing ones to check non-existent properties (oops!).
Once I caught the mistake, my data ingestion speed massively increased. Ultimately, it took me approximately five hours to create about 155,000 nodes and 210,000 relationships with no other optimizations besides fixing the previously described mistake.
I should also add that I was checking for uniqueness as I created nodes and relationships, so my ingestion speed gradually slowed as more and more nodes and edges were added.
To the Server!
With Neo4j working and a database full of nodes and relationships, I wanted to make it available for other members of my to check out and experiment with. I logged into one of our development servers and ran the installer.
It still worked great, but it occurred to me that having an application to start/stop the database was not the ideal solution for a server install. As soon as I logged off, the application would close, and the database would stop.
Fortunately, Neo4j has an option to install it as Windows service. This option requires a Java Virtual Machine (JVM) to be installed on the computer, whereas the installer does not have this prerequisite.
Installing the JVM
This particular server did not have a JVM installed, so off I went to the Oracle site to download it.
Neo4j “recommends” that you install Java 7; however, I can tell you from experience that, as of v2.1.6, you must use Java 7, as Java 8 will not work and you will receive an error message when running the install script, something like:
“ERROR! You are using an unsupported version of Java, please use Oracle HotSpot 1.7”.
When you go to the Oracle site to download Java, be sure to pick the right version (I had to scroll down), as Java 8 will typically be listed first. I downloaded the Server JRE version for Windows x64 and followed the Server JRE installation instructions.
Another note: the download site makes it appear that you will download a .tar.gz file, but my download was actually just a .gz file. I was still able to unzip and extract it successfully by manually changing the extension to .tar.gz.
Once the JVM installed, make sure you set the JAVA_HOME environment variable to the location where you installed the JRE.
Install Neo4j as a Windows Service
With the JVM successfully installed, I followed the “As a Windows service” instructions in the Neo4j Manual. I downloaded the 64-bit Zip file from http://neo4j.com/download, extracted it to a directory on the server, and ran the install script. It worked perfectly, and Neo4j was running as a service!
Configuring Neo4j
In the directory structure created by extracting the Neo4j Zip file, there should be a “conf” folder. This folder contains several .properties files that can be used to configure your Neo4j install.
By default, Neo4j is configured to use http://localhost:7474/.
Since I wanted to make Neo4j available for the rest of my team to use, in the neo4j-server.properties file, I uncommented the “org.neo4j.server.webserver.address” property and set it to the server’s IP address.
There is also an “org.neo4j.server.database.location” property that allows you to specify the location of your Neo4j database.
If you change any of the properties in this file or any of the other configuration files, be sure to restart the Neo4j service!
Conclusion
Other than a couple minor JVM-related hiccups, installing Neo4j could not have been much smoother.
I should also add that on top of the graph database itself, Neo4j also comes with a very slick browser-based UI that allows you to interact with your data and run Cypher queries interactively. So not only is it very easy to set up, it’s just as easy to start visualizing the data you put in it!
For an even lighter-weight, no-install test drive, check out the UI using Neo4j’s interactive “Getting started with Cypher” tutorials at http://neo4j.com/docs/2.1.6/tutorials-cypher.html.

If your project uses a graph database and you’ve opted to go with the open-source Neo4j, you’ll be happy to know there’s a desktop app available that makes connecting to remote servers and managing databases very easy.
The app in question is called the Neo4j Desktop and is freely available and installable on Linux, macOS and Windows. The only caveat to the Linux installation is that it’s available as an AppImage.
SEE: 40+ open source and Linux terms you need to know (TechRepublic Premium)
The Neo4j Desktop app is designed to help new users learn the ins and outs of the Neo4j database. This app can create and connect to a local database for experimental purposes or to a remote server for the management of production databases.
In this tutorial, I’m going to show you how to install the Neo4j Desktop app on Pop!_OS Linux. The installation of the app on both macOS and Windows is as straightforward as any app; you just download and run the installer file. For Linux, it’s a bit less obvious.
Jump to:
- What you’ll need to install and use the Neo4j Desktop app
- How to install the Neo4j Desktop app
- How to use the Neo4j Desktop app
- How to create your first Neo4j node
- Benefits of using the Neo4j Desktop app
What you’ll need to install and use the Neo4j Desktop app
To install the Neo4j Desktop app, you’ll need a running instance of any Linux distribution that supports AppImage. To connect the Neo4j Desktop app to a remote server, you’ll need an instance of the Neo4j graph database up and running on a remote server that is accessible from the desktop where you’ll be installing the app.
That’s all you need. Let’s get to work.
How to install the Neo4j Desktop app
To download the Neo4j AppImage, point your browser to the Neo4j Download page, and click Download. You’ll be prompted to fill out a form, and the site will auto-detect your OS, so you don’t have to select which download to save.
Once you’ve filled out the required form, save the AppImage to your local drive. You will also be presented with a Neo4j Desktop Activation Key. Make sure to copy that key and save it.
As to where you should save the downloaded file, I recommend creating a directory to house your AppImages with the command:
mkdir ~/AppImages
Save all of your AppImage files in that directory, so you always know where they are.
Once the download completes, give the file executable permission with this command:
chmod u+x ~/AppImages/neo4j-desktop*.AppImage
If you saved the download file to another directory, make sure to alter the above command to reflect that.
You can now start the desktop app with the command:
~/AppImages/neo4j-desktop*.AppImage
When you first run the app, you will be asked if you want to Run or Run And Integrate. Make sure to select Run And Integrate, so an entry for Neo4j Desktop will be added to your desktop menu. This way, you don’t have to run the app from the command line.
How to use the Neo4j Desktop app
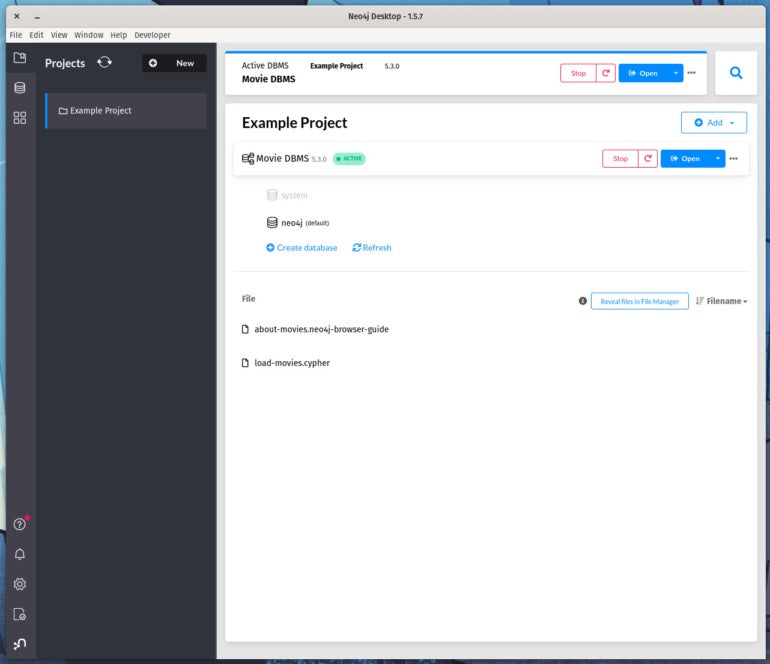
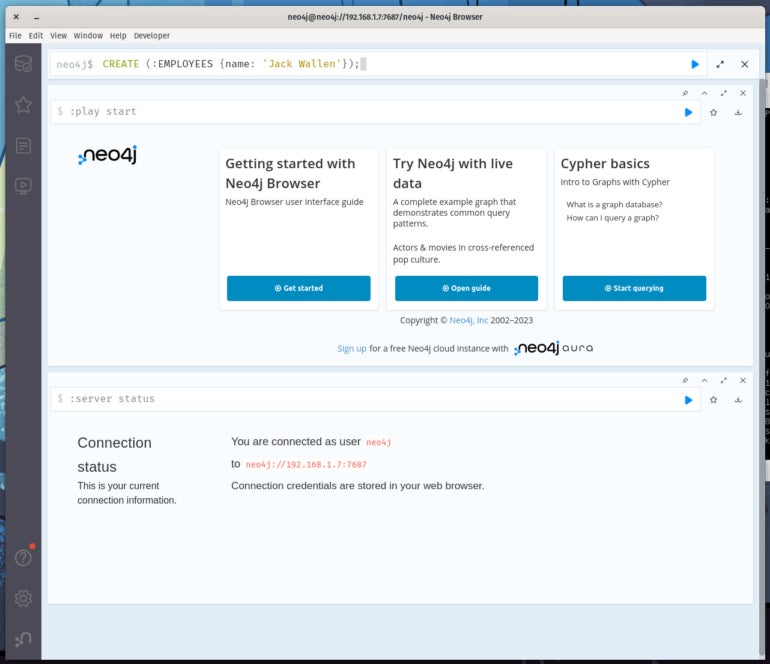
To start using Neo4j Desktop, open the Neo4j application. You’ll be prompted to paste the Software Key from the download page; make sure you do that, or you won’t be able to use the application. When Neo4j opens (Figure A), you’ll be greeted by an example project you can use to test-drive the Neo4j database. If you’ve already deployed Neo4j on a remote server, you can go ahead and connect to it from the app.
Figure A
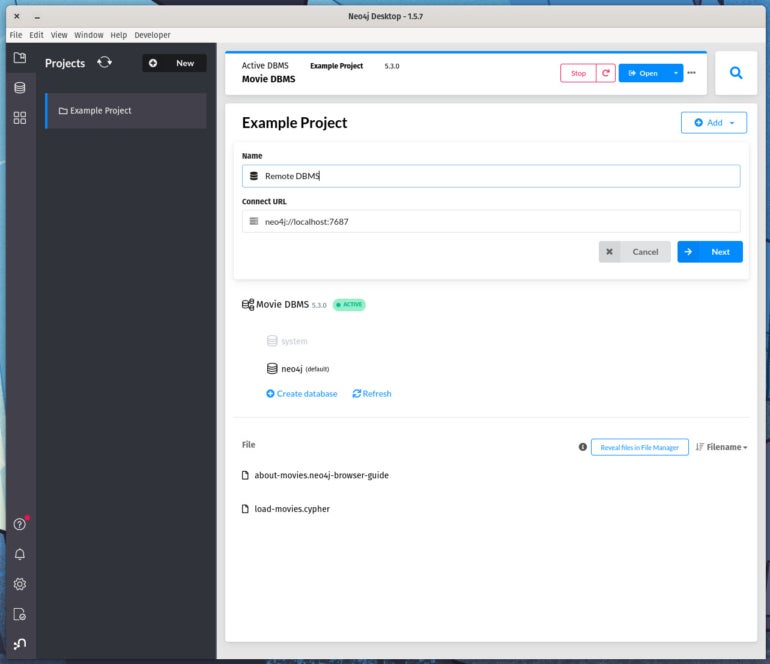
To connect Neo4j Desktop to the remote server, click the Add dropdown, and select Remote Connection (Figure B).
Figure B

In the resulting window (Figure C), give the new connection a name, and then, type the URL for the remote server.
Figure C
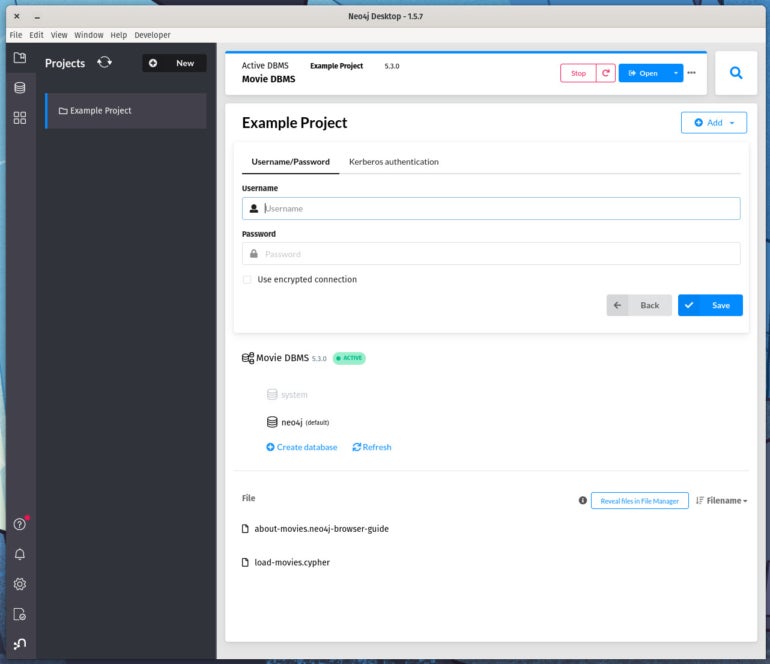
The structure of the Connect URL is similar to what was used when installing Neo4j and testing the connection, so it’ll look something like this:
neo4j://192.168.1.7:7687
192.168.1.7 is the IP address of the server hosting your Neo4j database.
Click Next, and when prompted (Figure D), type the username and password for the Neo4j database. The default username is neo4j, and the password is what you used when you first tested the Neo4j connection while installing Neo4j.
Figure D
Click Save, and you’ll find yourself on the Projects page with your new connection listed (Figure E).
Figure E
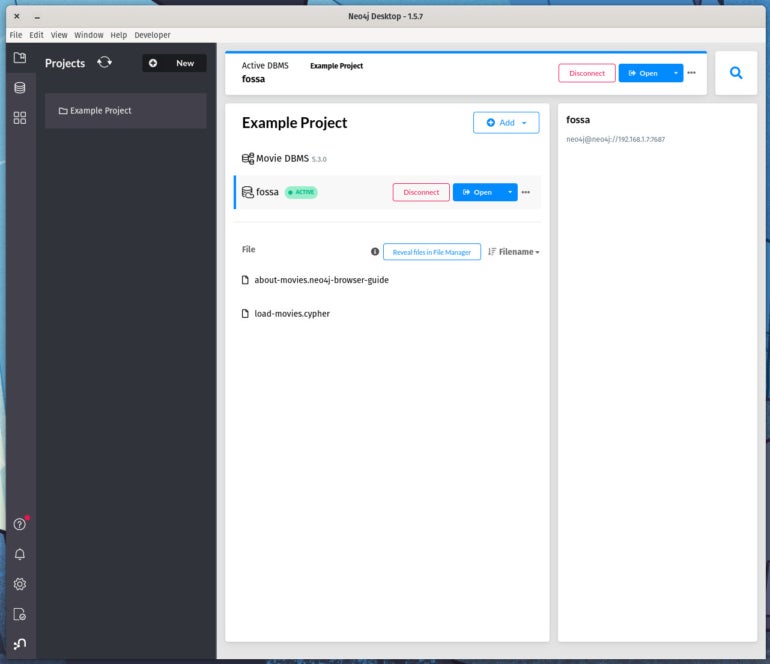
Now, click Open, and a new window will appear displaying the Neo4j console, as seen through the Desktop app GUI (Figure F).
Figure F
How to create your first Neo4j node
At the neo4j$ prompt in the GUI, let’s create a node called EMPLOYEES and add the name Jack Wallen to it. For that, the command would be:
CREATE ( :EMPLOYEES {name: 'Jack Wallen'});
Click the Run button to the right of the command prompt, and the node will be created. You can then create a second node with this command:
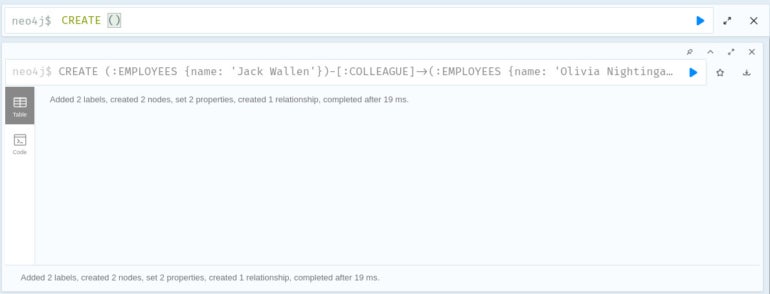
CREATE ( :EMPLOYEES {name: 'Olivia Nightingale'});
Let’s now create a relationship between the two. Let’s say Jack and Olivia are colleagues, and we want to add that relationship. For that, the command would be:
CREATE (:EMPLOYEES {name: 'Jack Wallen'})-[:COLLEAGUE]->(:EMPLOYEES {name: 'Olivia Nightingale'});
Benefits of using the Neo4j Desktop app
You might be asking yourself why you should bother with a GUI when all you’re doing is typing commands. One handy feature of the Node4j Desktop app that makes it worth the effort is it does autocompletion.
SEE: Hiring kit: Database administrator (TechRepublic Premium)
For example, if you type CREATE (, the Neo4j Desktop app will auto-complete the ) to ensure your queries are created correctly. You can also save a query as a favorite, so if you have long queries that you find yourself typing over and over, just click the star in the history (Figure G), and the query will be available to you at any time.
Figure G
Once you start using the Neo4j Desktop app, you’ll soon understand why it’s a helpful addition to your tech stack. The app makes learning and interacting with the Neo4j Graph Database considerably easier than just approaching it from the command line. Give this desktop GUI a try, and see if it doesn’t become your go-to for working with Neo4j databases.
Subscribe to TechRepublic’s How To Make Tech Work on YouTube for all the latest tech advice for business pros from Jack Wallen. Learn more about Linux with The Mastering Linux Development Bundle from TechRepublic Academy.