PREVIOUS POST
Hi Just scrolled thru the responses…. I have an MF216n, (My rig is 64-bit Home) and had the same problems that everyone here has stated. My fix was to follow previous suggestions — go to and uninstall the MF Toolbox and re-install it individually from the disk. Go to services.msc and check settings for windows image acqusition service. Made those suggested changes too.
That part of the fix did not work, so I re-started my computer, and then went to the installation disk>Drivers>us_eng>x64 setup…there is a 32-bit choice as well. That brings up the Setup Wizard for the MF Drivers. Choose Next>Yes>Choose your connection (Mine is Network)>Next>Select drivers. At this point I only selected the Scanner Driver, and unchecked the Printer and Fax drivers. Next>Confirm Settings>Start, which then installed the driver. That worked. I haven’t restarted my computer yet, but I will after I finish this post.
I’ll come back to this post if it is not working after a restart. Otherwise, presume it’s working so far…
POSTSCRIPT TO PREVIOUS POST
Still working after restart…
This time I went to one of my other machines running Win 10 X64 Pro. At first, I opened the MF Toolbox from the dektop icon, and got the error message again. I decided not to uninstall everything this time to see if the earlier procedure would work without a restart. Behold and Lo… it did work on the Pro machine too.
It suggests that going to the disc and then reloading the driver directly from the driver file on the disk, then using the Driver Setup wizard and not just the entire setup routine might be an alternative approach. I did not make any other changes to the WAI files via Services either, so I guess I’m satisfied that the appropriate driver is not getting installed on first install.
For MF216n users, I did go their support website where I found drivers dated 11-11-15: http://bit.ly/1UG4w11 ( the entire URL is way to long to post) which may be later than the ones you have. I’m sticking to the disk though, since it has now worked twice for me on 2 flavors of the Win10 OS. Good Luck!
POST POSTSCRIPT
When I restarted the Pro machine, it went to a Windows Update (not major)…. still working so far….
Разберём ошибку, когда Canon MF Toolbox зависает при попытке начать сканирование, а при перезапуске – выдаёт ошибку «Не удаётся связаться со сканером. Возможно, отключен кабель, либо сканер выключен или используется другим приложением».
Перед тем, как пытаться устранить проблему, убедитесь в том, что:
- МФУ подключено к розетке и включено
- USB-кабель не повреждён и вставлен и в МФУ, и в компьютер
- МФУ переведено в режим сканирования (например для моделей M4xxx – кнопка SCAN на лицевой панели нажата и подсвечена зелёным индикатором)
- После перехода в режим сканирования, был выбран пункт «Удалённое сканирование» и на экране МФУ отображается надпись «Ожидание (Online)»
- МФУ не сканирует, но при этом успешно печатает
Данная ошибка возникает, по большей части, на относительно старых МФУ Canon. По крайней мере на нашем опыте, чаще всего этим грешат МФУ серии i-SENSYS M4xxx.
Ошибка возникает по причине того, что MF Toolbox по неизвестной причине конфликтует с Службой загрузки изображений (WIA), и в результате либо перестаёт работать с этой службой (однако другие приложения сохраняют возможность работы с WIA), либо напрочь вешает службу WIA, из-за чего сканирование через WIA становится недоступно.
Варианта постоянного решения этой проблемы нами пока что не найдено, однако существуют варианты временного решения проблемы – их необходимо выполнять при появлении этой проблемы.
UPD: Для постоянного решения проблемы можно попробовать установить патч от Canon. Иногда этот способ помогает и проблема не проявляет себя в будущем, однако иногда этот способ не срабатывает. В любом случае, можно попробовать.
Скачать патч можно с официального сайта Canon: https://asia.canon/en/support/0100765702 или с нашего сайта (прямая ссылка, файл *.exe, 7.7Мб)
Вариант 1
Первый вариант решения проблемы банален до невозможности – перезагрузка компьютера.
При перезагрузке компьютера, служба WIA перезапустится, и сканирование станет возможным.
Вариант 2
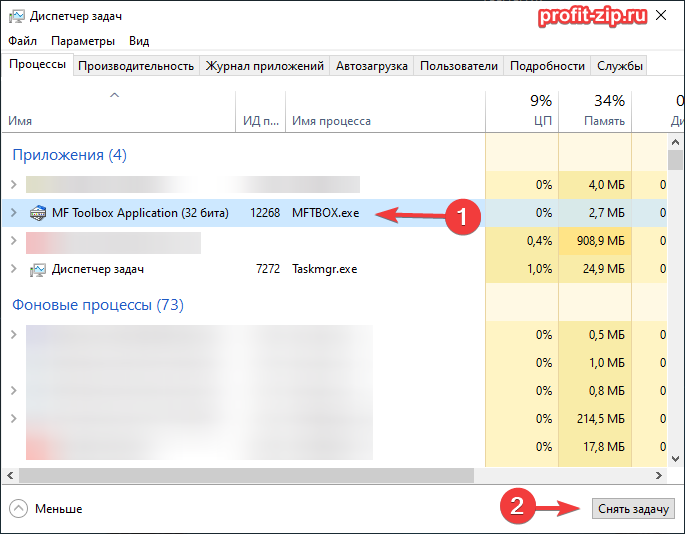
Если MF Toolbox завис и не закрывается – запустите Диспетчер задач и завершите процесс MF Toolbox:
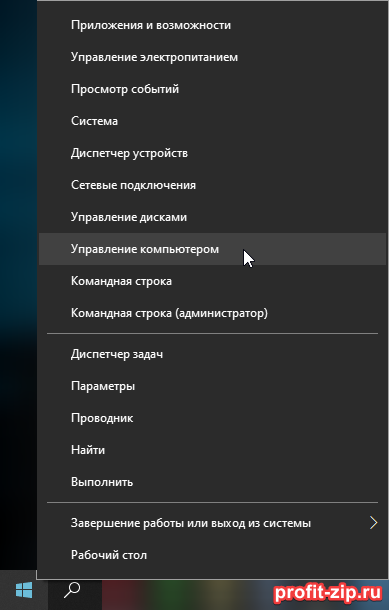
После этого нажмите правой кнопкой мыши (ПКМ) по кнопке «Пуск» и нажмите ЛКМ по «Управление компьютером»
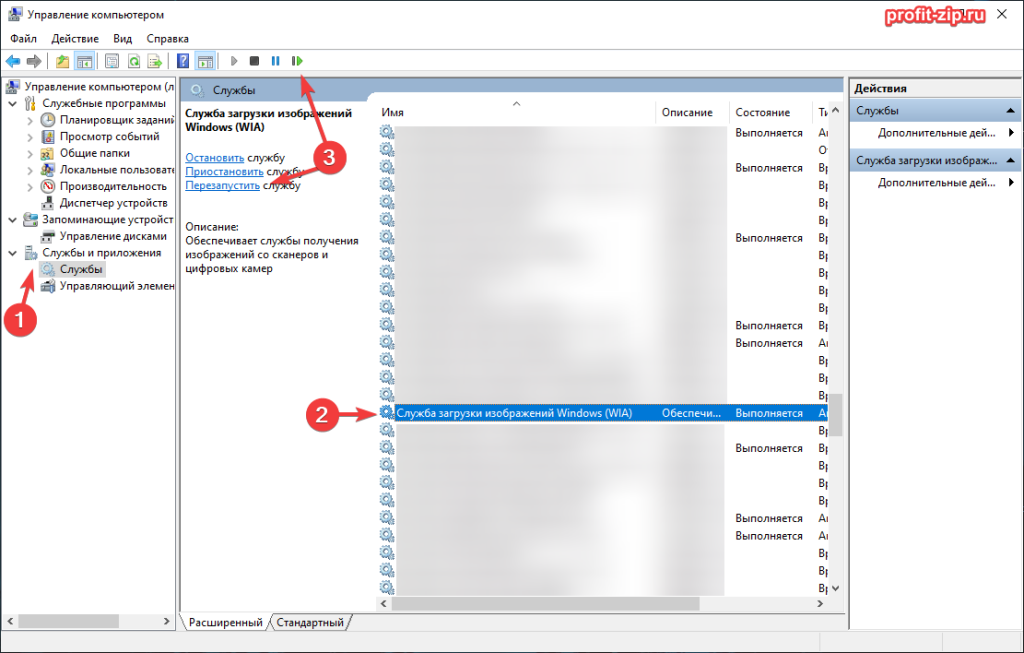
Далее перейдите в левой панели в Службы и приложения – Службы. В открывшемся списке служб найдите «Служба загрузки изображений Windows (WIA)» и в панели слева от службы или в верхней панели выберите «Перезапустить» (или, если служба не выполняется – «Запустить«).
Вновь запустите MF Toolbox и попробуйте выполнить сканирование.
Вариант 3
Этот вариант будет полезен, если при попытке завершить службу выяснилось, что служба зависла и появилась ошибка: «Не удалось остановить службу Служба загрузки изображений Windows (WIA) на локальном компьютере. Ошибка 1053. Служба не ответила на запрос своевременно.«.
Запустите командную строку от имени администратора: ПКМ по «Пуск» – Командная строка (администратор) или Powershell (администратор).
В командной строке выполните следующие команды (MF Toolbox должен быть закрыт):
taskkill /f /fi "serivces eq stisvc"
net start stisvc
Первая команда принудительно завершит процесс, который выполняется службой, а вторая – заново запустит службу.
После этого попробуйте выполнить сканирование через Toolbox.
Если такая ошибка появляется время от времени – чтобы не записывать и не искать эти команды, вы можете создать BAT-файл (или скачать готовый) со следующим содержимым:
@echo off
taskkill /f /im "mftbox.exe"
taskkill /f /fi "services eq stisvc"
net start stisvc
cd "C:\Program Files\Canon\MF Toolbox*" || cd "C:\Program Files (x86)\Canon\MF Toolbox*"
start mftbox.exe
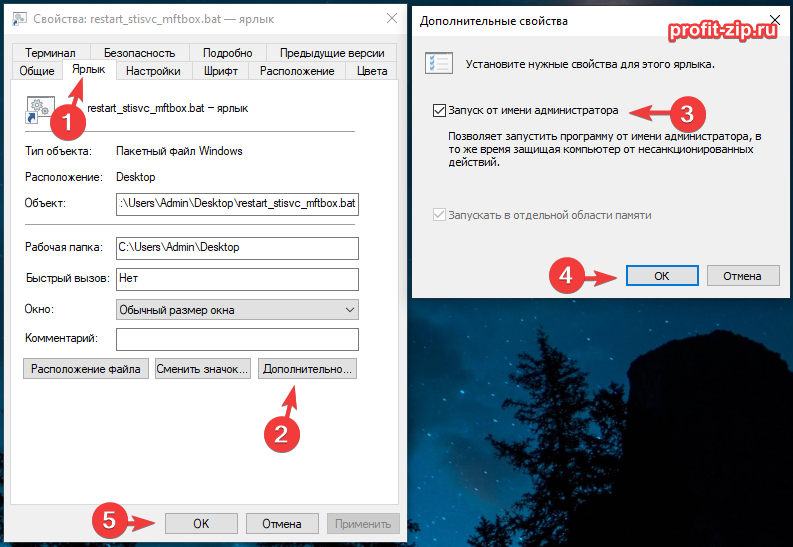
Данный файл необходимо запускать от имени администратора (ПКМ – Запуск от имени администратора). Этот BAT-файл завершает процесс MF Toolbox, перезапускает службу WIA, и снова открывает Toolbox.
Для того, чтобы не забывать открывать файл от имени администратора, вы можете создать ярлык BAT-файла (ПКМ — Отправить — Рабочий стол (создать ярлык)), и в свойствах ярлыка указать необходимость запуска от имени администратора:
Canon MF Toolbox — это программное обеспечение, предназначенное для работы с МФУ Canon и предлагающее широкий спектр инструментов для сканирования и печати документов. Однако пользователи, обновившие свою операционную систему до Windows 10, могут столкнуться с проблемой запуска данной программы. В этой статье мы расскажем вам, как запустить Canon MF Toolbox на Windows 10.
Шаг 1. Подготовка.
Перед тем, как приступить к установке Canon MF Toolbox, необходимо убедиться, что на вашем компьютере установлены последние драйверы для МФУ Canon. Вы можете найти их на официальном сайте компании Canon. Загрузите и установите соответствующие драйверы для вашей модели МФУ.
Шаг 2. Установка драйверов.
После того, как драйверы успешно установлены, перейдите к установке Canon MF Toolbox. Скачайте установочный файл с официального сайта компании Canon, сохраните его на вашем компьютере и запустите установку. Следуйте инструкциям мастера установки, чтобы завершить процесс.
Шаг 3. Запуск Canon MF Toolbox.
По завершению установки Canon MF Toolbox должен появиться на рабочем столе или быть доступен в меню «Пуск». Запустите программу, щелкнув по соответствующему значку. Canon MF Toolbox готов к использованию на Windows 10 и вы можете начать пользоваться всеми его функциями.
Примечание: Если после выполнения всех вышеуказанных шагов Canon MF Toolbox не запускается, попробуйте переустановить программу. Для этого удалите ее с помощью «Диспетчера приложений» в настройках Windows 10 и повторите установку сначала.
Теперь вы знаете, как запустить Canon MF Toolbox на Windows 10. Следуйте этому руководству и наслаждайтесь всеми возможностями, которые предлагает эта программа для работы со сканером и принтером МФУ Canon.
Содержание
- Установка Canon MF Toolbox на Windows 10
- Скачать драйвер Canon MF Toolbox
- Запустить установочный файл
- Пройти процесс установки
- Открыть Canon MF Toolbox
- Настроить Canon MF Toolbox на Windows 10
- Перейдите на официальный веб-сайт Canon и найдите раздел поддержки или загрузок.
- В разделе загрузок найдите свою модель многофункционального принтера Canon. Обратите внимание на модель и версию операционной системы, чтобы скачать соответствующую версию Canon MF Toolbox.
- Скачайте установочный файл Canon MF Toolbox на ваш компьютер. Он должен иметь расширение .exe.
- После завершения загрузки откройте скачанный файл. Вам может потребоваться подтвердить свое намерение установить программу.
- Запустите установщик Canon MF Toolbox и следуйте инструкциям на экране. Обычно вам предложат выбрать язык установки и принять условия лицензионного соглашения.
- Выберите путь установки программы. По умолчанию установщик предлагает вам стандартную директорию. Если вам нужно изменить местоположение, выберите другую папку.
- Дождитесь завершения установки. Это может занять несколько минут в зависимости от скорости вашего компьютера.
- После завершения установки запустите Canon MF Toolbox. Она должна быть добавлена в список ваших программ и ярлык может быть размещен на рабочем столе или в панели задач.
- Когда Canon MF Toolbox запустится, подключите свой многофункциональный принтер Canon к компьютеру с помощью USB-кабеля или через локальную сеть. Программа обнаружит подключенное устройство и предоставит доступ к его функциям.
Теперь вы можете использовать Canon MF Toolbox на своем компьютере с операционной системой Windows 10. Убедитесь, что у вас установлены все необходимые драйверы для вашего принтера Canon, чтобы программа работала корректно.
Для того чтобы запустить Canon MF Toolbox на Windows 10, необходимо установить соответствующий драйвер на компьютер. Вот пошаговая инструкция, как именно это сделать:
- Перейдите на официальный сайт Canon (https://www.canon.com).
- Нажмите на раздел «Поддержка» или «Поддержка и драйверы», в зависимости от версии сайта.
- Выберите свою модель принтера из выпадающего списка или введите ее название в поле поиска.
- Найдите раздел с драйверами и загрузите драйвер Canon MF Toolbox для вашей операционной системы (Windows 10).
- После завершения загрузки, откройте установочный файл и следуйте инструкциям мастера установки.
- После установки драйвера, перезагрузите компьютер.
После перезагрузки компьютера вы сможете запустить Canon MF Toolbox и использовать его для управления функциями вашего принтера Canon.
Запустить установочный файл
Перед тем, как запустить Canon MF Toolbox на Windows 10, необходимо скачать и установить программу.
Для этого пройдите по следующему адресу на официальном сайте Canon: https://www.canon.ru/support/consumer_products/products/fax__multifunctionals/laser/laserbase_mf_series/i-sensys_mf3220.aspx?type=drivers&language=&os=WINDOWS%2010%20(64-bit).
На странице выберите раздел «Драйверы и програмное обеспечение», а затем выберите свою операционную систему — Windows 10 (64-разрядная версия). Нажмите на ссылку для скачивания файла-установщика.
После того, как загрузка завершится, найдите скачанный файл в папке Загрузки или другой выбранной вами папке. Дважды кликните по файлу для запуска установки Canon MF Toolbox.
Пройти процесс установки
Чтобы запустить Canon MF Toolbox на Windows 10, сначала необходимо пройти процесс установки программного обеспечения. Вот пошаговое руководство:
Шаг 1: Загрузка установочного файла
Перейдите на официальный сайт Canon и найдите раздел поддержки. Найдите страницу загрузки для вашей модели принтера Canon и скачайте файл установки Canon MF Toolbox.
Шаг 2: Запуск установки
По завершении загрузки дважды щелкните на файле установки Canon MF Toolbox, чтобы запустить процесс установки. При необходимости подтвердите свои административные права.
Шаг 3: Принятие лицензионного соглашения
Прочитайте и примите условия лицензионного соглашения. Если вы не согласны с условиями, вы не сможете продолжить установку программного обеспечения.
Шаг 4: Выбор места установки
Выберите диск и папку, в которые вы хотите установить Canon MF Toolbox. По умолчанию программа будет установлена в папку «Program Files» на системном диске.
Шаг 5: Ожидание завершения установки
Дождитесь завершения процесса установки Canon MF Toolbox. В это время система может запросить дополнительные файлы или драйверы для полноценной работы программы.
Шаг 6: Перезагрузка системы
После успешной установки необходимо перезагрузить компьютер, чтобы изменения вступили в силу.
Шаг 7: Запуск Canon MF Toolbox
После перезагрузки компьютера найдите ярлык Canon MF Toolbox на рабочем столе или в меню Пуск. Дважды щелкните на ярлыке, чтобы запустить программу.
Теперь у вас должна быть установлена и готова к использованию программа Canon MF Toolbox на Windows 10.
Обратите внимание, что процесс установки может немного отличаться в зависимости от версии Canon MF Toolbox и операционной системы Windows 10.
Чтобы открыть Canon MF Toolbox на Windows 10, следуйте этим шагам:
- Убедитесь, что ваш принтер Canon подключен к компьютеру и включен.
- Откройте меню «Пуск», нажав на кнопку «Пуск» в левом нижнем углу экрана.
- Введите «MF Toolbox» в поисковой строке меню «Пуск» и нажмите клавишу «Enter».
- В результате поиска должна появиться программа «Canon MF Toolbox». Щелкните по ней, чтобы открыть ее.
Теперь Canon MF Toolbox будет открыта и вы сможете использовать ее для сканирования, печати и управления функциями принтера Canon.
Настройка Canon MF Toolbox на Windows 10 включает в себя несколько простых шагов:
- Первым шагом является скачивание драйверов для вашего принтера с официального веб-сайта Canon. Проверьте, совместимость драйверов с операционной системой Windows 10.
- После завершения загрузки и установки драйвера, подключите ваш принтер к компьютеру при помощи USB-кабеля. Убедитесь, что принтер включен и готов к работе.
- Теперь откройте окно «Пуск» и найдите раздел «Параметры». В этом разделе выберите «Приложения» и найдите в списке «Canon MF Toolbox».
- После открытия Canon MF Toolbox настройте язык и прочие настройки по вашему усмотрению.
- Программа Canon MF Toolbox теперь готова к использованию на Windows 10. Вы можете отсканировать документы, отправить факс или выполнить другие доступные функции с помощью данного инструмента.
Процесс настройки Canon MF Toolbox на Windows 10 довольно прост и не требует специальных навыков. Следуя этому пошаговому руководству, вы сможете легко настроить программу и начать использовать ее для управления принтером Canon.
Canon Mf Toolbox Doesn’t Work With Windows 10 Canon MF Toolbox As stated previously, this software program is a software program produced to assist customers handle different documents that are checked or published on a Canon MF tool kit 4.9. This software program itself has actually currently got in the variation 4.9 design. The variation of the canon tool kit 4.9 for home windows 10 itself is currently on the authorities Canon site and also you could download and install it straight.
You just have to go into keyword phrases in the look area, after that later on you’ll discover the outcomes of your look through a software application from Canon Tool kit MF you could download and install.
Exists a Canon MF toolbox for Mac or Home windows?
Certainly. You could locate this software program to be made use of on a Mac various other compared to just being made use of on Home windows. So, you’ll not just locate canon mf toolbox 4.9 home windows 10, yet likewise Mac. Nevertheless, however the variation for Mac itself isn’t extremely regular many updates for Home windows are offered right below.
Certainly, the variation for Home windows itself is various from the variation for Mac. So, you need to take care in selecting it in the past making a decision when to download and install it. You could likewise see the distinction in the submit style you download and install. Specifically for Home windows OS itself, the submit style made use of is typically.exe.
Exactly just how do I obtain a download and install from the submit?
Canon Mf Toolbox Doesn’t Work With Windows 10.In fact it’s really simple to obtain documents from the canon mf toolbox 4.9 download and install it. You could go straight to the Canon authorities internet site. From there you’ll discover different records and documents that you’ll require later on. This is likewise really efficient if you’re trying to find back-ups for software application documents if the printer installer CD is shed or simply upgrading to a more recent variation.
Canon Mf Toolbox Doesn’t Work With Windows 10.If you do not such as mosting likely to the authorities Canon website, after that you could take benefit of a number of third-party websites that additionally give download and install documents for the software application. Undoubtedly, there are numerous third-party websites that use their websites as an area to download and install these documents, yet frequently we’ll really feel much a lot extra annoyed since they are plagued by deceptive promotions.
Canon Mf Toolbox Doesn’t Work With Windows 10.For that reason, attempt to check out websites from 3rd parties that have the most effective online reputation or that are relied on. You could see it from several of the examines sent on the site itself. Typically examines are accomplished by unique celebrations that have the online reputation and trust fund of various other celebrations, obviously.
What barriers are typically discovered when utilizing this software application?
Canon Mf Toolbox Doesn’t Work With Windows 10.Without a doubt, there are times when we’ll come across issues when utilizing Canon MF toolbox 4.9 on our tools. Normally this is suggested by a notice through a canon mf toolbox 4.9 not functioning. If so, the issue is still basic. Maybe as a result of an issue by yourself tool, or on a printer tool that you likewise utilize.
Canon Mf Toolbox Doesn’t Work With Windows 10.It is various if you locate a notice such as the canon mf toolbox 4.9 cannot interact with scanner, or the canon mf toolbox 4.9 sustained scanner not mounted, after that it’s extremely remove, this issue is with your printer gadget, specifically the issue with the scanner engine component in it.
Canon Mf Toolbox Doesn’t Work With Windows 10.Typically, this issue happens since the wire you’re utilizing is harmed or otherwise attached for a tool. Nonetheless, it might additionally result from pests or specific troubles with the software program itself. If this issue resembles that, after that among the very best options you could do is to download and install the more recent variation of the canon mf toolbox 4.9 scanner. The brand-new variation definitely supplies functions, security, safety and safety, and also insect solutions that happened in the previous variation, certainly.
Canon Mf Toolbox Doesn’t Work With Windows 10.Additionally, you could additionally locate canon mf3010 toolbox 4.9 right below later on. Canon MF3010 itself is a various design and also kind variation from the common Canon printer versions. On Canon’s very own authorities website, you could locate much a lot extra total info concerning the printer later on. Varying from chauffeurs to software application especially sustained for these Canon printer versions.
Scanning with the MF Toolbox 4.9
1. Established paperwork.
2. To the Windows desktop, double-click [Canon MF Toolbox four.9].
You may as well open the MF Toolbox by clicking [Start] about the Windows task bar, [(All) Programs], [Canon], [MF Toolbox four.9], [Toolbox four.9].
3. Click on a person on the scanning buttons underneath. The textual content are going to be scanned and seem from the registered software. You can improve the button title by directly moving into a whole new title (up to eight figures prolonged) about the button title.
4. Specify the needed options.
Choose the [Display the Scanner Driver] check out box, to exhibit the [ScanGear MF] dialog box on phase five. This check out box is just not readily available when scanning with the [OCR] button. Should you choose to hold the same options for long term scans, click [Apply] ahead of clicking [Start].
5. Specify the essential settings.Click [Scan].
In case you clicked [Mail], [Save] or [PDF] in move three, a folder together with the scanning day might be produced from the [My Pictures] folder from the [My Documents] folder, as well as your document might be saved in this folder.In case you have programs registered for the [Mail], [OCR], [PDF], [Scan-1], or [Scan-2] buttons, the scanned image might be displayed from the software or hooked up to an electronic mail information following scanning
6. The CD-ROM offered using the device has some apps that may be applied using the MF Toolbox. If the apps from the CD-ROM are installed, they will be registered from the MF Toolbox buttons.
Canon Mf Toolbox Doesn’t Work With Windows 10 Canon MF Toolbox on 32-bit and 64-bit PCs Compatibility
Compatibility using this document scanner program may well vary, but will typically operate fine less than Microsoft Windows 10, Windows 8, Windows 8.one, Windows seven, Windows Vista and Windows XP on either a 32-bit or 64-bit setup. A individual x64 variation may well be offered from Canon. sharing Canon Mf Toolbox Doesn’t Work With Windows 10 download backlinks, which can enable you to download immediately from official Canon website
Windows 10 (32bit / 64bit), Windows 8.1(32bit / 64bit), Windows 8(32bit / 64bit), Windows 7(32bit / 64bit), Windows Vista(32bit / 64bit), Windows XP SP2 or later, Windows XP x64 Edition, MacOS High Sierra v10.13 /MacOS Sierra v10.12 / Mac OS X v10.11 / Mac OS X v10.10 /Mac OS X v10.9 / Mac OS X v10.8 / Mac OS X v10.7 / Mac OS X v10.6 / Mac OS X v10.5 / Linux Operating System
Canon Mf Toolbox Doesn’t Work With Windows 10
Dropping or damaging your Canon Mf Toolbox Doesn’t Work With Windows 10 CD is often a key trouble, however the resolution would be to set up the Canon Mf Toolbox Doesn’t Work With Windows 10 bundle. As a result, we are giving within this submit Canon Mf Toolbox Doesn’t Work With Windows 10 download back links of Windows Vista, XP, 7, 8, 8.1, 10, Server 2000, 2003, Server 2008, Server 2012, Server 2016 for 32 & 64-bit versions, Mac OS X operating systems. We are also providing info for properly installing these drivers
How To Download Canon Mf Toolbox Doesn’t Work With Windows 10
We have extra all the Canon Mf Toolbox Doesn’t Work With Windows 10 download links during the listing, click on the download link according to your operating method
1. Get started by identifying your favored OS in our checklist
2. 2nd, click on download website link download the Canon Mf Toolbox Doesn’t Work With Windows 10 connected with it.
Canon Mf Toolbox Doesn’t Work With Windows 10 Download Link
Pick your OS from your record of OS pointed out this post and download Canon Mf Toolbox Doesn’t Work With Windows 10 associated with it. We are generally available that can assist you in case you encounter any trouble even though downloading the driver. Please, feel free of charge to get hold of us.
Canon Mf Toolbox Doesn’t Work With Windows 10
Setup instruction Drivers and applications are compressed.
- Download the file (A Supported Scanner Is Not Installed Canon Mf Toolbox Windows 7).
- When clicking (Run) on the submit download and install display (submit isn‘t conserved to disk)
- If the Individual Account Manage trigger is showed, click (Yes), and after that click (Run) on the succeeding Safety and safety Sharp display.
- When clicking (Save) on the submit download and install display (submit is conserved to disk at defined place)
- To download and install data, click the submit web link, choose (Save), and define the directory site where you wish to conserve the submit. The download and install will begin immediately.
- Downloaded and install data are conserved in the defined folder in a self-extracting style (. exe style).
- Double-click the data to unwind them. A brand-new folder will be produced in the exact very same folder. The brand-new folder will have the exact very same call as the pressed submit.
- Double-click the decompressed Configuration. exe submit to begin setup.
Download Canon Mf Toolbox Doesn’t Work With Windows 10
Download for Windows OS
Download for Mac OS
На чтение 3 мин Просмотров 7.4к. Опубликовано 25.11.2021
Содержание
- Почему не работает?
- Как исправить?
- Сторонние проблемы
МФУ Canon i-SENSYS MF4410 сочетает в себе принтер и сканер. Это очень удобно для использования как в офисах, так и дома. Однако часто пользователи Windows 10 сталкиваются с тем, что принтер не сканирует документы по непонятным причинам. Это, как правило, решается несколькими простыми действиями.
Пользователь запускает программу Toolbox (стандартное приложение Canon), жмёт кнопку «Пуск», но после этого машина не начинает сканировать, а выдаёт сообщение системы об ошибке. Иногда помогает нажатие клавиши COPY/SCAN на самом принтере и последующий выбор «удалённого сканера» на мониторе.
На Windows 10 — отключение определённой службы через Диспетчер задач (служба с названием WIA (Windows Image Acquisition)). Но многим такие решения не придутся по душе, так как они сильно затрудняют сканирование документов, содержащих, к примеру, сотни страниц.
Почему не работает?
Почему Canon MF4410 не сканирует бумаги? Виной тому не само устройство, а программное обеспечение, установленное на компьютере. Сталкиваются с таким восстанием МФУ в основном пользователи, использующие принтер совместно с Windows 10. На более старых системах всё работает исправно.
Всему виной стандартная утилита от Microsoft, предназначенная как раз для сканирования.
Вот только Кэноны, i-SENSYS MF4410 в том числе, используют своё ПО — Toolbox. Как это обычно бывает с приложениями, выполняющими одну и ту же функцию, Тулбокс и утилита сканирования конфликтуют, что приводит к неработоспособности принтера.
Как исправить?
Всё решается, как правило, простым отключением ненужной утилиты.
- Открываем Панель управления («Параметры» в Win 10).
- Находим пункт «Программы и компоненты», далее «Включение или отключение компонентов Windows».

- Доходим до графы «Факсы и сканирование» и убираем галочку с этого пункта.
- Перезагружаем компьютер.
Эти действия обычно решают проблему с i-SENSYS MF4410 и другими принтерами (МФУ) Canon, использующими Toolbox. А также помогает программа Vuescan, которая проверит, как работает сканер и предложит собственные пути решения.
Сторонние проблемы
Иногда МФУ не работает на ПК с Windows 10 по другим причинам. В их числе — драйверы. Пользователь, приобретая МФУ, в нашем случае Canon MF4410, не устанавливает нужное программное обеспечение.
По идее, на современных системах оно загружается самостоятельно, но на деле это происходит далеко не всегда.
Если это как раз ваш случай, загрузите необходимые драйверы и патчи самостоятельно. Сделать это можно через официальный сайт Canon.
- Заходим на веб-сайт canon.ru, находим там раздел загрузок.
- Выбираем свою операционную систему (Windows 10) и её разрядность.
- Скачиваем нужные файлы.
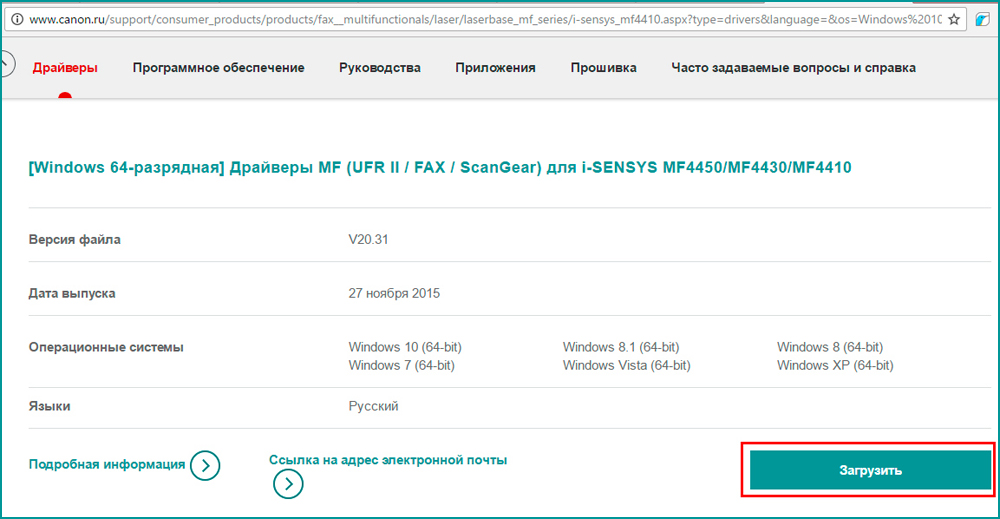
Выберите свою версию ОС и нажмите Загрузить
Без драйвера принтер, а тем более устройство, сочетающее в себе также сканер, вообще не будут функционировать. Поэтому если драйверы почему-то не были установлены автоматически, это обязательно нужно сделать. Патчи для Виндовс 10 исправляют различные неполадки, связанные с конфликтами «родного» ПО для аппаратов фирмы Кэнон.
В конце концов, USB-кабель или дефекты в самом принтере могут мешать нормально сканировать документы. Попробуйте поменять провод или USB-порт на ПК. Возможно, это исправит неполадки.
Теперь вы знаете, какие системные программы Windows 10 могут помешать МФУ Canon i-SENSYS MF4410 сканировать документы. Решить эту проблему, как и другие, не составит труда, если знать, в чём её причина.
PREVIOUS POST
Hi Just scrolled thru the responses…. I have an MF216n, (My rig is 64-bit Home) and had the same problems that everyone here has stated. My fix was to follow previous suggestions — go to and uninstall the MF Toolbox and re-install it individually from the disk. Go to services.msc and check settings for windows image acqusition service. Made those suggested changes too.
That part of the fix did not work, so I re-started my computer, and then went to the installation disk>Drivers>us_eng>x64 setup…there is a 32-bit choice as well. That brings up the Setup Wizard for the MF Drivers. Choose Next>Yes>Choose your connection (Mine is Network)>Next>Select drivers. At this point I only selected the Scanner Driver, and unchecked the Printer and Fax drivers. Next>Confirm Settings>Start, which then installed the driver. That worked. I haven’t restarted my computer yet, but I will after I finish this post.
I’ll come back to this post if it is not working after a restart. Otherwise, presume it’s working so far…
POSTSCRIPT TO PREVIOUS POST
Still working after restart…
This time I went to one of my other machines running Win 10 X64 Pro. At first, I opened the MF Toolbox from the dektop icon, and got the error message again. I decided not to uninstall everything this time to see if the earlier procedure would work without a restart. Behold and Lo… it did work on the Pro machine too.
It suggests that going to the disc and then reloading the driver directly from the driver file on the disk, then using the Driver Setup wizard and not just the entire setup routine might be an alternative approach. I did not make any other changes to the WAI files via Services either, so I guess I’m satisfied that the appropriate driver is not getting installed on first install.
For MF216n users, I did go their support website where I found drivers dated 11-11-15: http://bit.ly/1UG4w11 ( the entire URL is way to long to post) which may be later than the ones you have. I’m sticking to the disk though, since it has now worked twice for me on 2 flavors of the Win10 OS. Good Luck!
POST POSTSCRIPT
When I restarted the Pro machine, it went to a Windows Update (not major)…. still working so far….

Ситуация такая, жила себе программка нормально Canon MF Toolbox 4.9, но в какой-то момент перестала включаться.
Принтер: Canon i-sensys MF211
Порядок работы: нажимаю кнопку copy/scan, переключаюсь на скан — на экране написано «компьютер» — нажимаю «Ок» — «Цветное сканирование» — «Ок». После этого на пк автоматически запускается Toolbox — сканирует — завершает и жизнь удалась.
Сегодня после нажатия «Цветное сканирование» программа Toolbox запустила начальную менюшку:

И дальше процесс не пошёл(((
Перезагрузка принтера и пк не дала результатов.
Переустановил программу и драйвер — ничего
Увидел закономерность:
1) Если в свойствах программы не стоит галочка на «Выполнять эту программу от имени администратора» — выдаёт ошибку:
Но после нажатия на принтере «Цветное сканирование» программа Toolbox запустила начальную менюшку, но продолжения не последовало, т.к. без прав админа она не будет работать.
2) Если в свойствах программы стоит галочка на «Выполнять эту программу от имени администратора», то после нажатия «Цветное сканирование» программа Toolbox даже не запускает первую менюшку.
Как мне восстановить автоматический запуск программы, когда управляют сканом на самом принтере?
__________________
Помощь в написании контрольных, курсовых и дипломных работ, диссертаций здесь

Обновление Windows 10 приводит очередные сюрпризы. При запуске программы для сканирования всплывает сообщение: «Не установлен поддерживаемый сканер. Установите поддерживаемый сканер, а затем перезапустите программу Toolbox».

Если ранее все работало, то не тратьте время на переустановку драйверов принтера/сканера или приложение MF Toolbox, это не поможет.
Ниже вы ознакомитесь с инструкцией, как установить поддерживаемый сканер MF Toolbox. Статья актуальна для многофункциональных устройств Canon:
- imageRunner 2202/2202N;
- i-SENSYS моделей серии MF3000, MF4000, MF5000, MF6000, MF8000;
- LaserBase MF3110, MF3240, MF5630, MF5650, MF5730, MF5750, MF5770;
- PC-D440, PC-D450.
Для начала проверим, доступен ли сканер в Windows, для этого откройте Панель управления — Устройства и принтеры. Кликните правой кнопкой мыши по вашему МФУ Canon, выберите «Начать сканировать», если нужно, включите на принтере функцию «Удаленный сканер». Все работает как надо? — Значит с устройством и драйверами все в порядке.
Если в «Устройства и принтеры» отсутствует Canon или функция «Начать сканирование», то установите драйвера для вашей модели МФУ.
Теперь решаем проблему с MF Toolbox 4.9. Для этого кликните правой кнопкой мыши по ярлыку «Canon MF Toolbox», выберите «Свойства«. В появившемся окне откройте вкладку «Совместимость«, отметьте галочкой перед «Запускать эту программу от имени администратора«. Нажмите кнопку Применить, затем ОК.
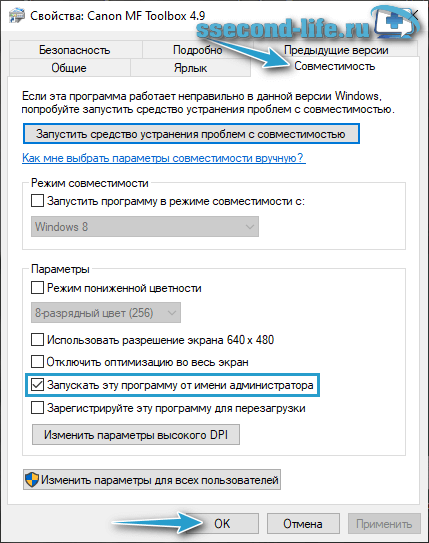
Запустите программу Canon MF Toolbox, ошибка «Не установлен поддерживаемый сканер…» больше не должна появляться.
by Milan Stanojevic
Milan has been enthusiastic about technology ever since his childhood days, and this led him to take interest in all PC-related technologies. He’s a PC enthusiast and he… read more
Updated on March 1, 2022
- Some Windows 10 users encountered an error message when trying to use their Canon scanners.
- In order to quickly solve this annoying problem, you need to follow the steps in this article.
- Take a look at our Windows 10 section for complete guides from trustworthy tech experts.
- For accurate solutions to similar problems, you may also visit our Fix Hub.
XINSTALL BY CLICKING THE DOWNLOAD FILE
This software will keep your drivers up and running, thus keeping you safe from common computer errors and hardware failure. Check all your drivers now in 3 easy steps:
- Download DriverFix (verified download file).
- Click Start Scan to find all problematic drivers.
- Click Update Drivers to get new versions and avoid system malfunctionings.
- DriverFix has been downloaded by 0 readers this month.
A scanner is an indispensable device in any office. There’s always a need to do some paperwork. Therefore, the scanner needs to be up and running smoothly.
Unfortunately, many of them are affected by various issues. Cannot communicate with scanner is a common error message that can appear with Canon scanners on Windows 10.
This can be a big problem, and in today’s article we’ll show you how to fix it.
How can I fix the Canon scanner error message in Windows 10?
1. Run the troubleshooter
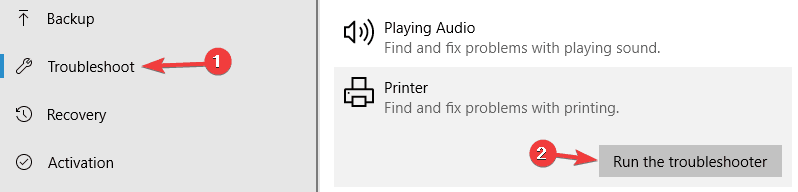
- Press Windows Key + I to open the Settings app.
- Go to the Update & Security section.
- Choose Troubleshoot.
- Select Printer and click Run the troubleshooter.
- Follow the on-screen instructions to complete it.
2. Update your drivers
According to users, if you keep getting Cannot communicate with scanner message on your Canon scanner, the issue might be outdated drivers.
To fix the problem, it’s advised to visit Canon’s website and download the latest drivers for your scanner. After updating the drivers to the latest version, the issue should be completely resolved.
We strongly recommend the DriverFix tool to update your drivers in order to avoid damage to your PC by manually downloading the wrong driver versions.
It scans your system and lists all existing and possibly missing drivers. The tool also detects if there is already a new version for current records. If necessary, these can be updated directly via DriverFix.

DriverFix
This great software will update all your drivers with just a couple of clicks, so be sure to try it out.
3. Reinstall the drivers
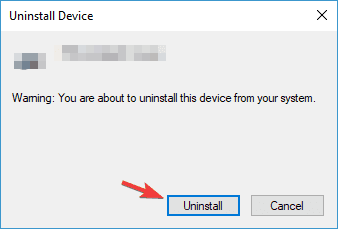
- Press Windows Key + I and select Device Manager.
- Locate your Canon driver, right-click it and choose Uninstall device.
- Check Remove driver software for this device and click the Uninstall button.
- Click the Scan for hardware changes button, and Windows will install the missing drivers.
4. Perform a Clean boot
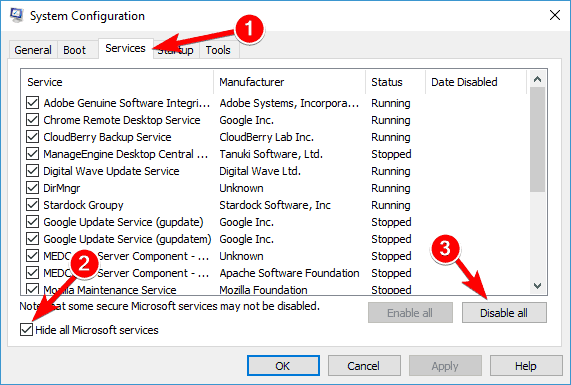
- Press Windows Key + R, type msconfig. and click OK.
- Go to the Services tab.
- Check Hide all Microsoft services and click Disable all button.
- Go to the Startup tab and click Open Task Manager.
- Right-click the first entry on the list and choose Disable.
- Do the same for all entries on the list.
- Close Task Manager and go back to the System Configuration window.
- Click Apply and OK, and restart your PC.
In some instances, third-party applications can interfere with your hardware and cause Cannot communicate with scanner message.
To fix this problem, users are suggesting to disable all startup applications and services. After your PC restarts, check if the problem is still there.
If the issue doesn’t reappear, the cause is one of the disabled applications or services. To find the exact cause, you need to enable disabled applications one by one or in groups until the problem reappears.
5. Enable bidirectional support

- Press Windows Key + S, type control panel and select it.
- Go to Devices and Printers.
- Locate your printer and right-click it.
- Choose Printer properties from the menu.
- Go to the Ports tab and check Enable bidirectional support.
- Click OK to save changes.
6. Move the problematic directories
- Go to the C:twain_32 directory.
- In there you should see two PIXMA directories and a wiatwain.ds file.
- Leave PIXMA and wiatwain.ds alone, and move other files and directories to a new folder on your desktop.
- After moving the files and directories, restart your PC.
Once your PC restarts, your printer/scanner will recreate the missing files and the problem with scanning should be completely resolved.
Users claim that they fixed this error on Canon PIXMA MG5420, simply by moving a couple of directories. Although this solution works for the aforementioned model, it might also work for other Canon devices.
7. Switch to the Power-saving mode
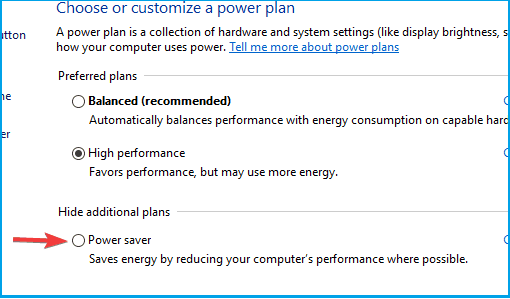
- Press Windows Key + S and type power settings.
- Select Power & sleep settings.
- Click on Additional power settings in the Related settings section.
- Select Power saver mode from the list.
After doing that, your scanner should start working again. We have to admit that this is an unusual solution, but several users claim that it works, so feel free to try it out.
We hope at least one of these solutions was helpful. In case you have any subject-related questions or suggestions, just reach for the comments section below.
Still having issues? Fix them with this tool:
SPONSORED
If the advices above haven’t solved your issue, your PC may experience deeper Windows problems. We recommend downloading this PC Repair tool (rated Great on TrustPilot.com) to easily address them. After installation, simply click the Start Scan button and then press on Repair All.
![]()
Newsletter
by Milan Stanojevic
Milan has been enthusiastic about technology ever since his childhood days, and this led him to take interest in all PC-related technologies. He’s a PC enthusiast and he… read more
Updated on March 1, 2022
- Some Windows 10 users encountered an error message when trying to use their Canon scanners.
- In order to quickly solve this annoying problem, you need to follow the steps in this article.
- Take a look at our Windows 10 section for complete guides from trustworthy tech experts.
- For accurate solutions to similar problems, you may also visit our Fix Hub.
XINSTALL BY CLICKING THE DOWNLOAD FILE
This software will keep your drivers up and running, thus keeping you safe from common computer errors and hardware failure. Check all your drivers now in 3 easy steps:
- Download DriverFix (verified download file).
- Click Start Scan to find all problematic drivers.
- Click Update Drivers to get new versions and avoid system malfunctionings.
- DriverFix has been downloaded by 0 readers this month.
A scanner is an indispensable device in any office. There’s always a need to do some paperwork. Therefore, the scanner needs to be up and running smoothly.
Unfortunately, many of them are affected by various issues. Cannot communicate with scanner is a common error message that can appear with Canon scanners on Windows 10.
This can be a big problem, and in today’s article we’ll show you how to fix it.
How can I fix the Canon scanner error message in Windows 10?
1. Run the troubleshooter
- Press Windows Key + I to open the Settings app.
- Go to the Update & Security section.
- Choose Troubleshoot.
- Select Printer and click Run the troubleshooter.
- Follow the on-screen instructions to complete it.
2. Update your drivers
According to users, if you keep getting Cannot communicate with scanner message on your Canon scanner, the issue might be outdated drivers.
To fix the problem, it’s advised to visit Canon’s website and download the latest drivers for your scanner. After updating the drivers to the latest version, the issue should be completely resolved.
We strongly recommend the DriverFix tool to update your drivers in order to avoid damage to your PC by manually downloading the wrong driver versions.
It scans your system and lists all existing and possibly missing drivers. The tool also detects if there is already a new version for current records. If necessary, these can be updated directly via DriverFix.
DriverFix
This great software will update all your drivers with just a couple of clicks, so be sure to try it out.
3. Reinstall the drivers
- Press Windows Key + I and select Device Manager.
- Locate your Canon driver, right-click it and choose Uninstall device.
- Check Remove driver software for this device and click the Uninstall button.
- Click the Scan for hardware changes button, and Windows will install the missing drivers.
4. Perform a Clean boot
- Press Windows Key + R, type msconfig. and click OK.
- Go to the Services tab.
- Check Hide all Microsoft services and click Disable all button.
- Go to the Startup tab and click Open Task Manager.
- Right-click the first entry on the list and choose Disable.
- Do the same for all entries on the list.
- Close Task Manager and go back to the System Configuration window.
- Click Apply and OK, and restart your PC.
In some instances, third-party applications can interfere with your hardware and cause Cannot communicate with scanner message.
To fix this problem, users are suggesting to disable all startup applications and services. After your PC restarts, check if the problem is still there.
If the issue doesn’t reappear, the cause is one of the disabled applications or services. To find the exact cause, you need to enable disabled applications one by one or in groups until the problem reappears.
5. Enable bidirectional support
- Press Windows Key + S, type control panel and select it.
- Go to Devices and Printers.
- Locate your printer and right-click it.
- Choose Printer properties from the menu.
- Go to the Ports tab and check Enable bidirectional support.
- Click OK to save changes.
6. Move the problematic directories
- Go to the C:twain_32 directory.
- In there you should see two PIXMA directories and a wiatwain.ds file.
- Leave PIXMA and wiatwain.ds alone, and move other files and directories to a new folder on your desktop.
- After moving the files and directories, restart your PC.
Once your PC restarts, your printer/scanner will recreate the missing files and the problem with scanning should be completely resolved.
Users claim that they fixed this error on Canon PIXMA MG5420, simply by moving a couple of directories. Although this solution works for the aforementioned model, it might also work for other Canon devices.
7. Switch to the Power-saving mode
- Press Windows Key + S and type power settings.
- Select Power & sleep settings.
- Click on Additional power settings in the Related settings section.
- Select Power saver mode from the list.
After doing that, your scanner should start working again. We have to admit that this is an unusual solution, but several users claim that it works, so feel free to try it out.
We hope at least one of these solutions was helpful. In case you have any subject-related questions or suggestions, just reach for the comments section below.
Still having issues? Fix them with this tool:
SPONSORED
If the advices above haven’t solved your issue, your PC may experience deeper Windows problems. We recommend downloading this PC Repair tool (rated Great on TrustPilot.com) to easily address them. After installation, simply click the Start Scan button and then press on Repair All.
![]()